

Page 1
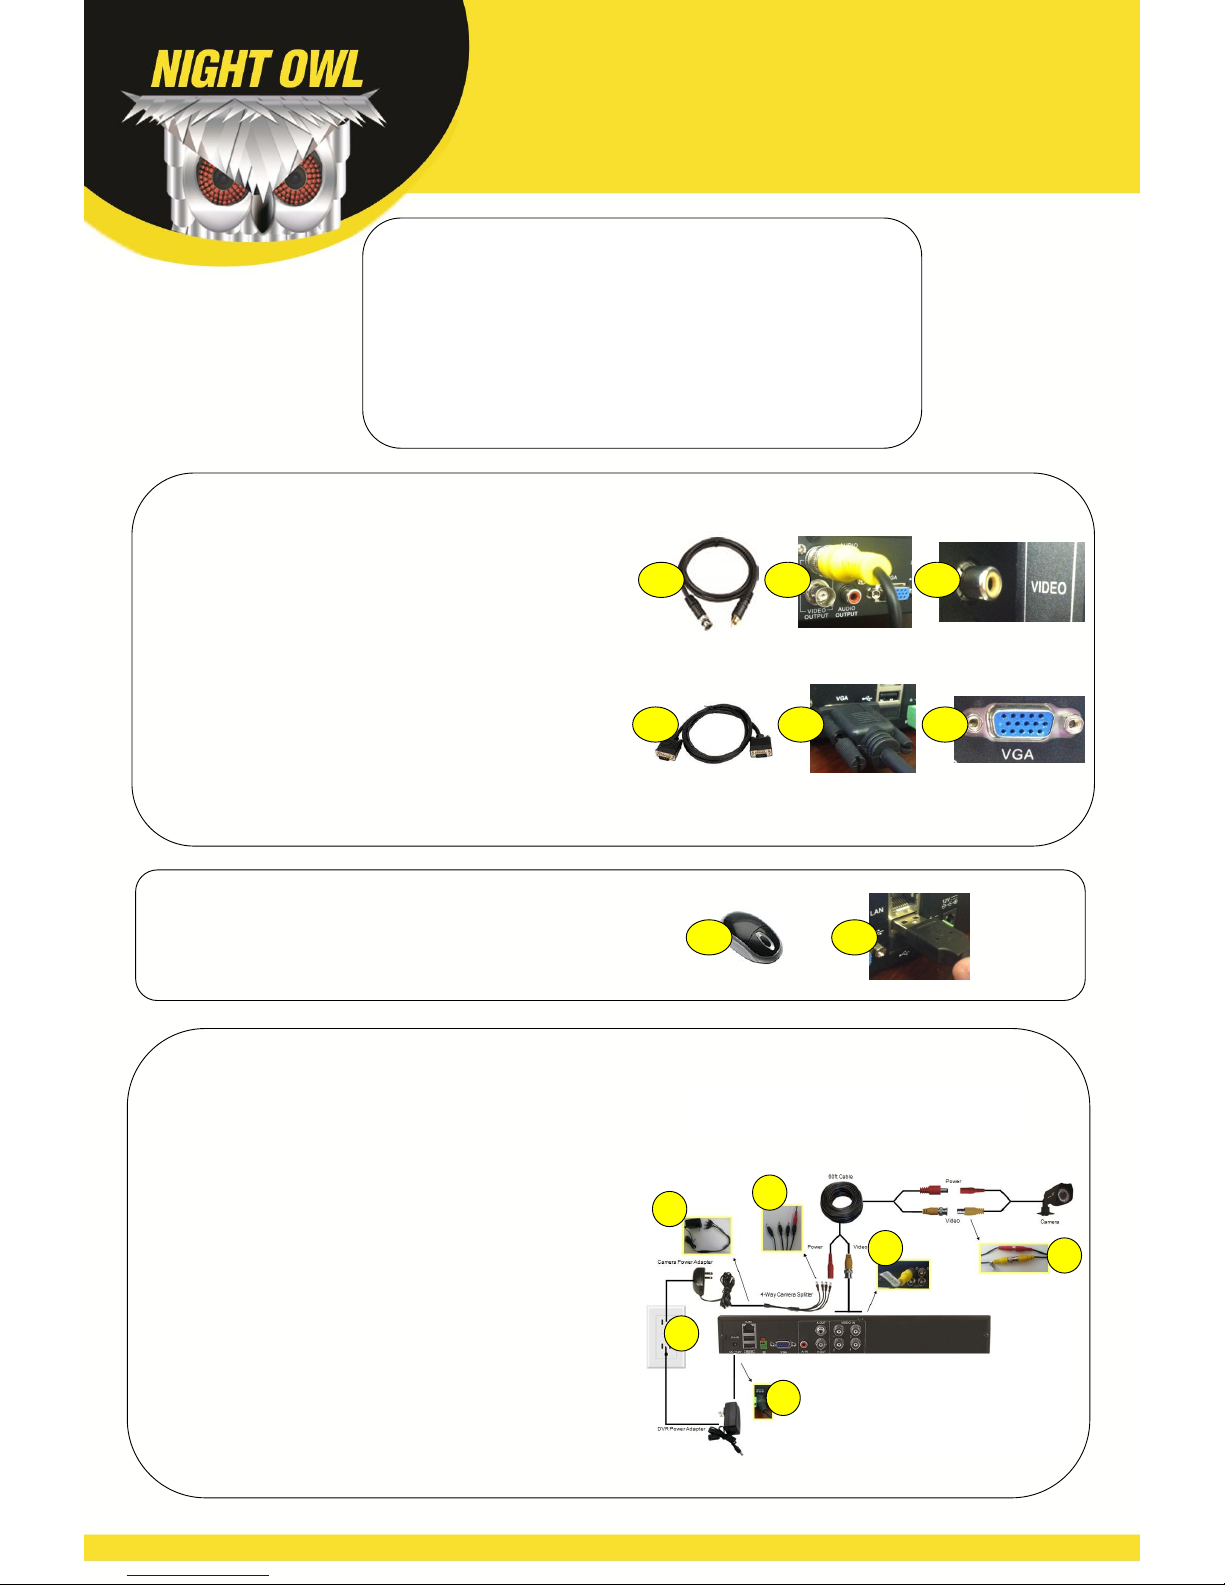
STEP 3: Connecting the cameras to the DVR
STEP 2: Connecting the USB mouse to the DVR
STEP 1: Connecting the DVR to a TV or monitor
A
A. Locate the VGA video cable.
B. Connect one end of the VGA cable to the VGA port on the DVR.
C. Connect the other end of the cable to the VGA input on your TV or monitor.
D. Turn your TV or monitor on and select the correct input (e.g., LINE or VIDEO).
If your TV or monitor has RCA inputs (and no VGA input), follow these steps:
A. Locate the BNC-to-RCA video output cable (not included).
B. Connect the BNC end of the cable to a yellow Video Output port on the DVR.
C. Connect the RCA end of the cable to the yellow Video In port on your TV or
monitor.
D. Turn your TV or monitor on and select the correct input (e.g., LINE or VIDEO).
If your TV or monitor has a VGA input, follow these steps:
A. Locate the USB mouse.
B. Connect the USB cable of the mouse to the USB port on the DVR.
A. Locate the 60-ft. BNC cable, four-way camera splitter, power adapters,
DVR, and camera.
B. Locate the end of the 60-ft. BNC cable labeled “TO CAMERA.” Connect the
yellow BNC adapter on the 60-ft. BNC cable to the yellow BNC adapter on
the camera. Connect the red RCA power adapter on the cable to the red
RCA power adapter on the camera.
C. Locate the end of the 60-ft. BNC cable labeled “TO DVR”. Connect the
yellow BNC adapter on the 60-ft. BNC cable to a yellow Video In channel
input on the back of the DVR. The channel inputs are labeled by number.
D. Connect the red RCA power adapter on the 60-ft. BNC cable to the male
side of the four-way camera splitter.
E. Repeat steps A-D for all cameras.
F. Connect the power adapter to the female side of the four-way camera
splitter.
G. Connect the DVR power adapter into the 12V port on the back of the DVR.
H. Plug the camera and DVR power adapters into a wall socket, power strip,
or surge protector.
B
C
A B C
A B F
D
C
B
G
H
Quick Setup Guide
4 CH ADV Series Security Kits
Before you get started you will need:
Included:
DVR with power adapter
Cameras with 60-ft. BNC cables, 4-way splitter, and power adapter (kits only)
VGA cable
Ethernet cable
USB mouse
Not included:
TV or monitor with VGA or RCA input
BNC-to-RCA cable (if TV or monitor does not have VGA input)
Computer running Windows Vista, XP, 7, or 8
Router/modem with two empty ports
NOTE: Connect the cameras and cables to the DVR
before mounting to ensure that they work properly.
Page 2
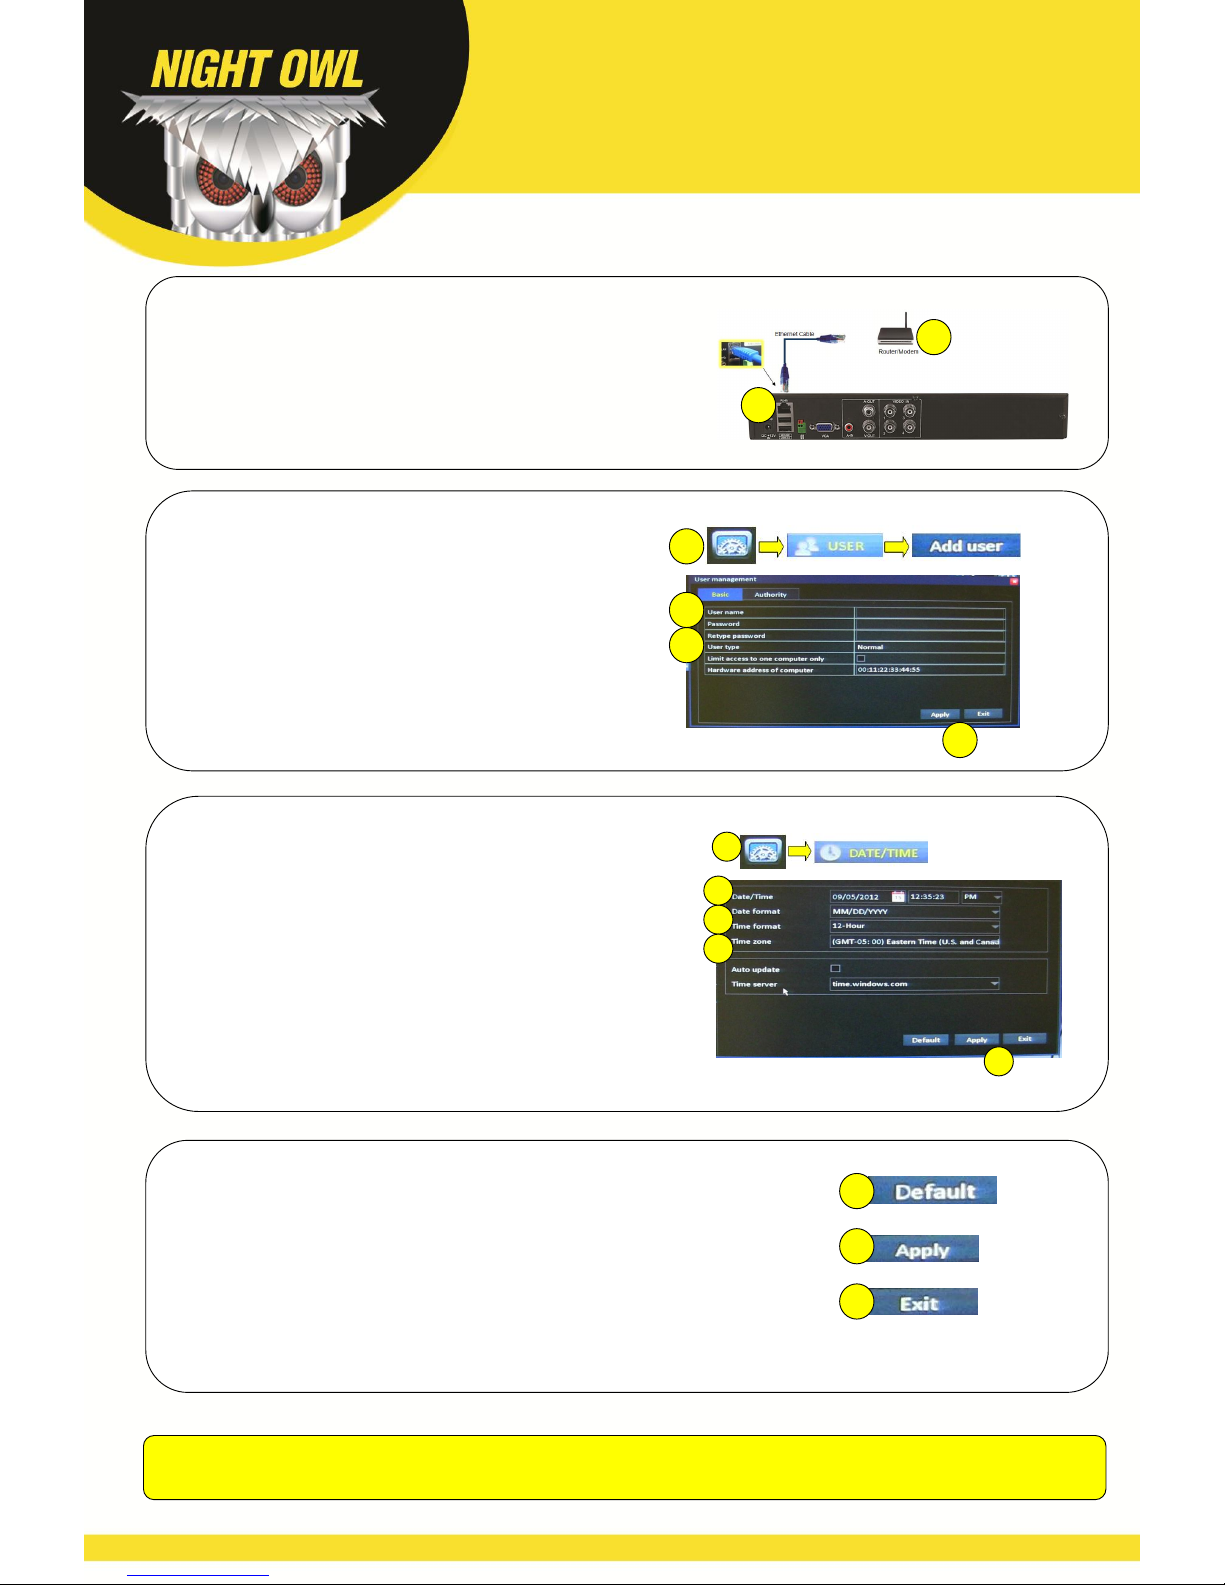
STEP 5: Entering a user name and password
STEP 4: Connecting the DVR to a router or modem
A. Locate the blue Ethernet (RJ-45) cable.
B. Connect one end of the Ethernet cable to the DVR’s LAN (RJ45) port.
C. Connect the other end of the Ethernet cable to an open port on the
router/modem.
To configure remote viewing, please refer to the Remote Viewing chapter of
the DVR manual.
A. Turn on your TV or monitor. Right-click the mouse to display the menu
options. Select Main Menu, select the Basic button, select the User tab,
and then select Add User.
B. Use the onscreen keyboard to enter a name in the User Name field.
C. Enter a password in the Password field and the same password in the
Retype Password field.
D. Once you have entered your user name and password, select the Apply
button and then the Exit button.
STEP 6: Changing the time and date
STEP 7: Choosing basic functions on all menus
A. Right-click the mouse to display the menu options. Select Main Menu,
select the Basic button, and then select Date/Time.
B. Enter the current date and time in the Date/Time field. If you have the 12-
hour time format selected, you will have to differentiate between AM and
PM.
C. Choose the format in which you would like the date displayed in the Date
Format field. Choose the format in which you would like the time displayed
in the Time Format field.
D. Select your time zone in the Time Zone field.
E. Once you have made all of the necessary changes, select the Apply
button and then the Exit button.
Every menu has three buttons:
A. Default button: This button changes all of the settings back to
the factory settings.
B. Apply button: This button saves all of the settings you have
changed.
C. Exit button: This button exits the current menu without saving
any changes.
Please visit our website at www.NightOwlSP.com for all manuals, software, and firmware updates. There are also
free How-To videos with step-by-step instructions for configuring the settings on your DVR.
Refer to your User Manual on the CD to learn how to configure
all of the features of your Night Owl Security Kit.
B
C
A
Quick Setup Guide
4 CH ADV Series Security Kits
Be sure to write down all user names and passwords and keep them in a secure place.
C
B
D
C D E
B
A B C
 Loading...