


ND 0108
Parts Packed in this Box.
Page 1 of 8
1A
1B
Hardware in this Box.
60mm Bolts x 8
For the Side Rails.
Wood Buttons
x 4
Long Allen Key
x 1
Wooden Dowels
x 16
Barrel Nuts
x 8
30mm Bolts x 24
For the Slat Supports.
Seat Side Rails x 2
Stretchers x 2
Back Side Rail (Right Hand) x 1
Seat Long Rails (Shorter) x 2
Back Long Rails (Longer) x 2
Slat Supports
(Back Deck) x 2
Slat Supports
(Seat Deck) x 2
Curved Slats x 4
featuring the Rubber
TM
US Patent #6,715,166. Other Patents Pending.
TM
Assembly Instructions
Full Size • Queen Size
Bronze
S H O E F I T T I N G S
TM
Back Side Rail (Left Hand) x 1
Quick Instructions
Card x 1
Plastic Caps
Full Size x 48
Queen Size x 56
Spring Slats
Full Size x 24
Queen Size x 28
Page 2 of 8
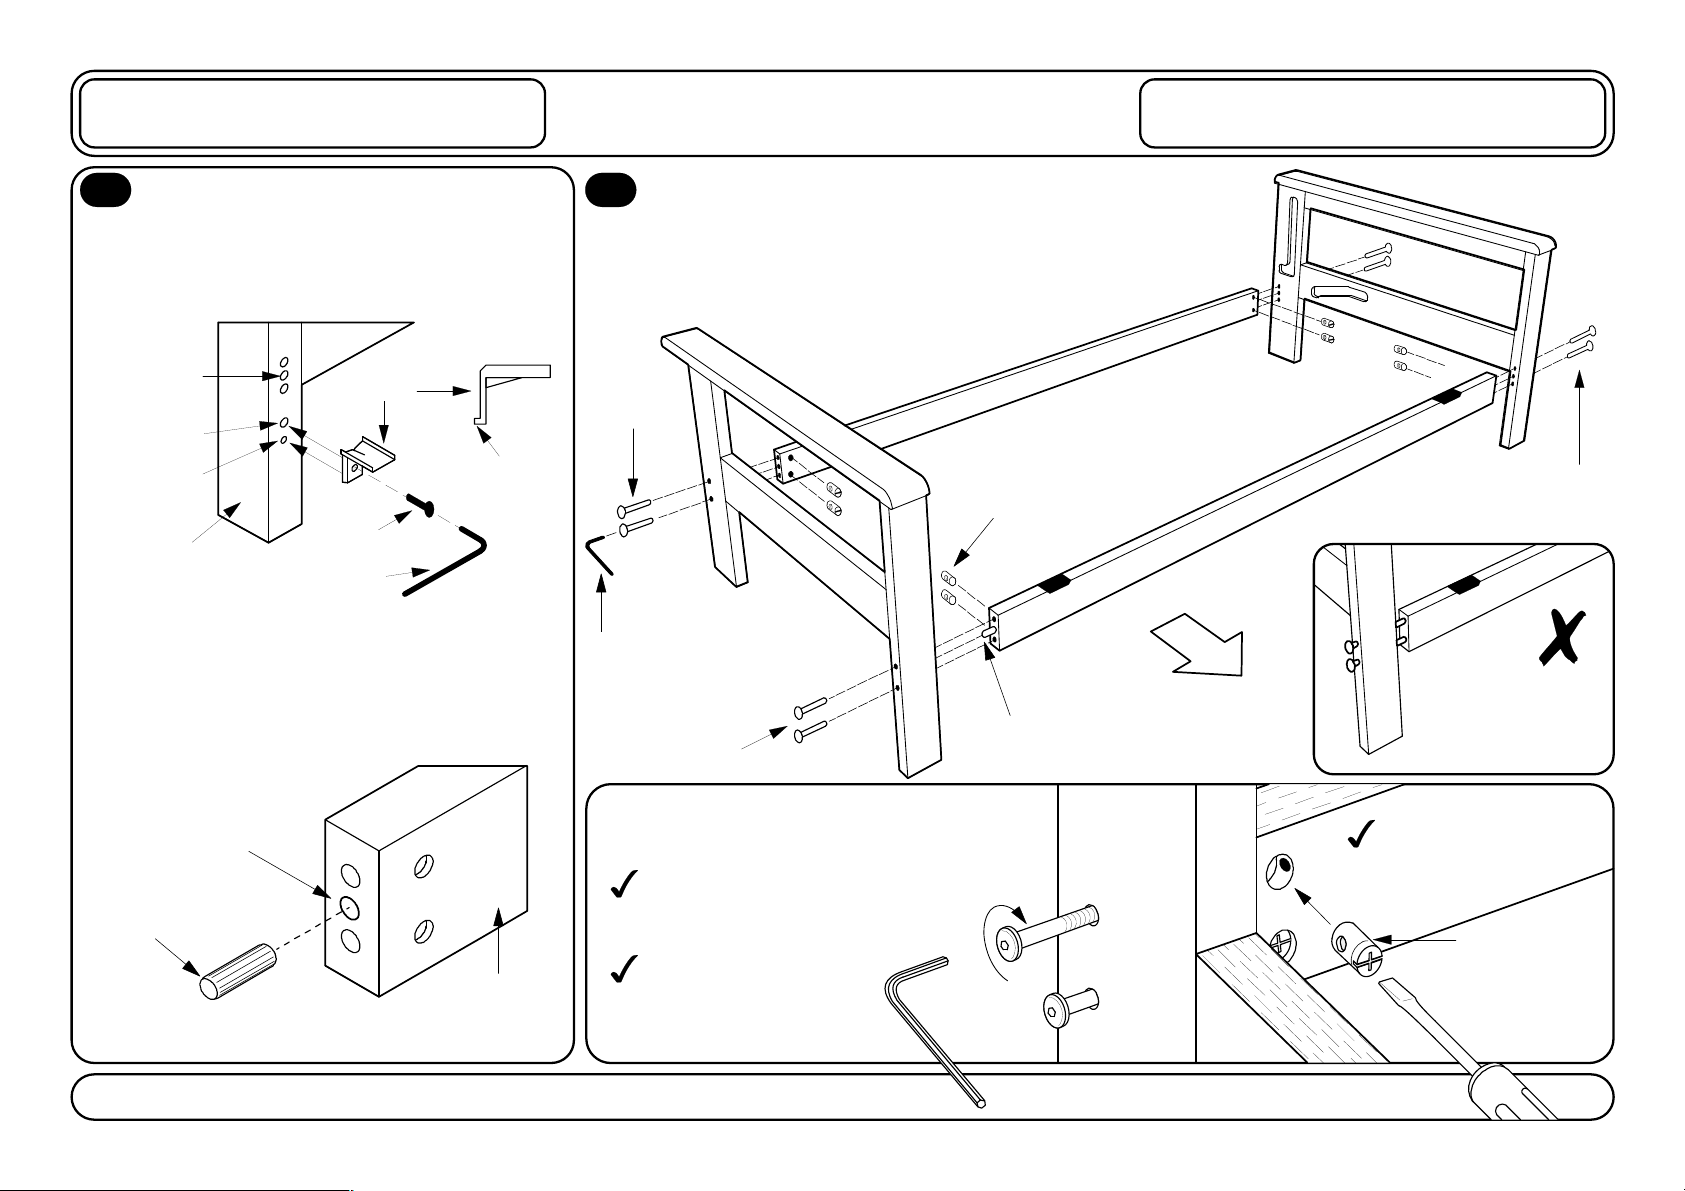
Attach Stretchers to Arms
Prepare Arms for Assembly.
2A 2B
Attach Arms to Stretchers.
Using Bolts and Barrel Nuts provided with the Arms,
attach the Arms LOOSELY to the Stretchers as shown..
It is important that these bolts are left LOOSE!
Rear
stretcher
(
no
plates
)
The
Front
Stretcher
has
metal
plates
which
should
face
upwards.
Fasten Stretcher Brackets to the Arms:
Fit Wooden Dowels to
Stretchers:
NOTE:
The hardware for these steps is
included .in the ARM box.
THIS END
FRONT
Wooden
Dowel
Barrel Nuts
Allen Key Leave bolts LOOSE!
Bolts
Bolts
Bolts
Be sure the holes are
free of wood chips
and saw dust.
Do not force the Bolt
as you may strip the
thread. Be sure the
thread is properly started.
Barrel Nut
Bolt
Allen Key
Screwdriver
BOLT AND BARREL NUT
ASSEMBLY SYSTEM
Insert Barrel Nuts as shownusing a
screwdriver. This will help you position
the Nut in line with the Bolt.
Bolt
Tap dowels all the way into the middle hole at
each end of the Stretchers.
Wooden Dowel
Stretcher
Middle
hole
Cleat
Stretcher
Bracket
Hole for Cleat
Leg
Dowel Hole
16mm Bolt
Allen Key
Hole for Bolt
A. Insert the Stretcher Bracket Cleat into
the hole provided.
B. IMPORTANT: Don't fully tighten Bracket
until Stretchers are all in place for easy
alignment.
Do not tighten
the Bolts at
this stage!
Springwood Frame
Assembly Instructions
Full Size • Queen Size
Bronze
S H O E F I T T I N G S
TM
ND 0108
Page 3 of 8
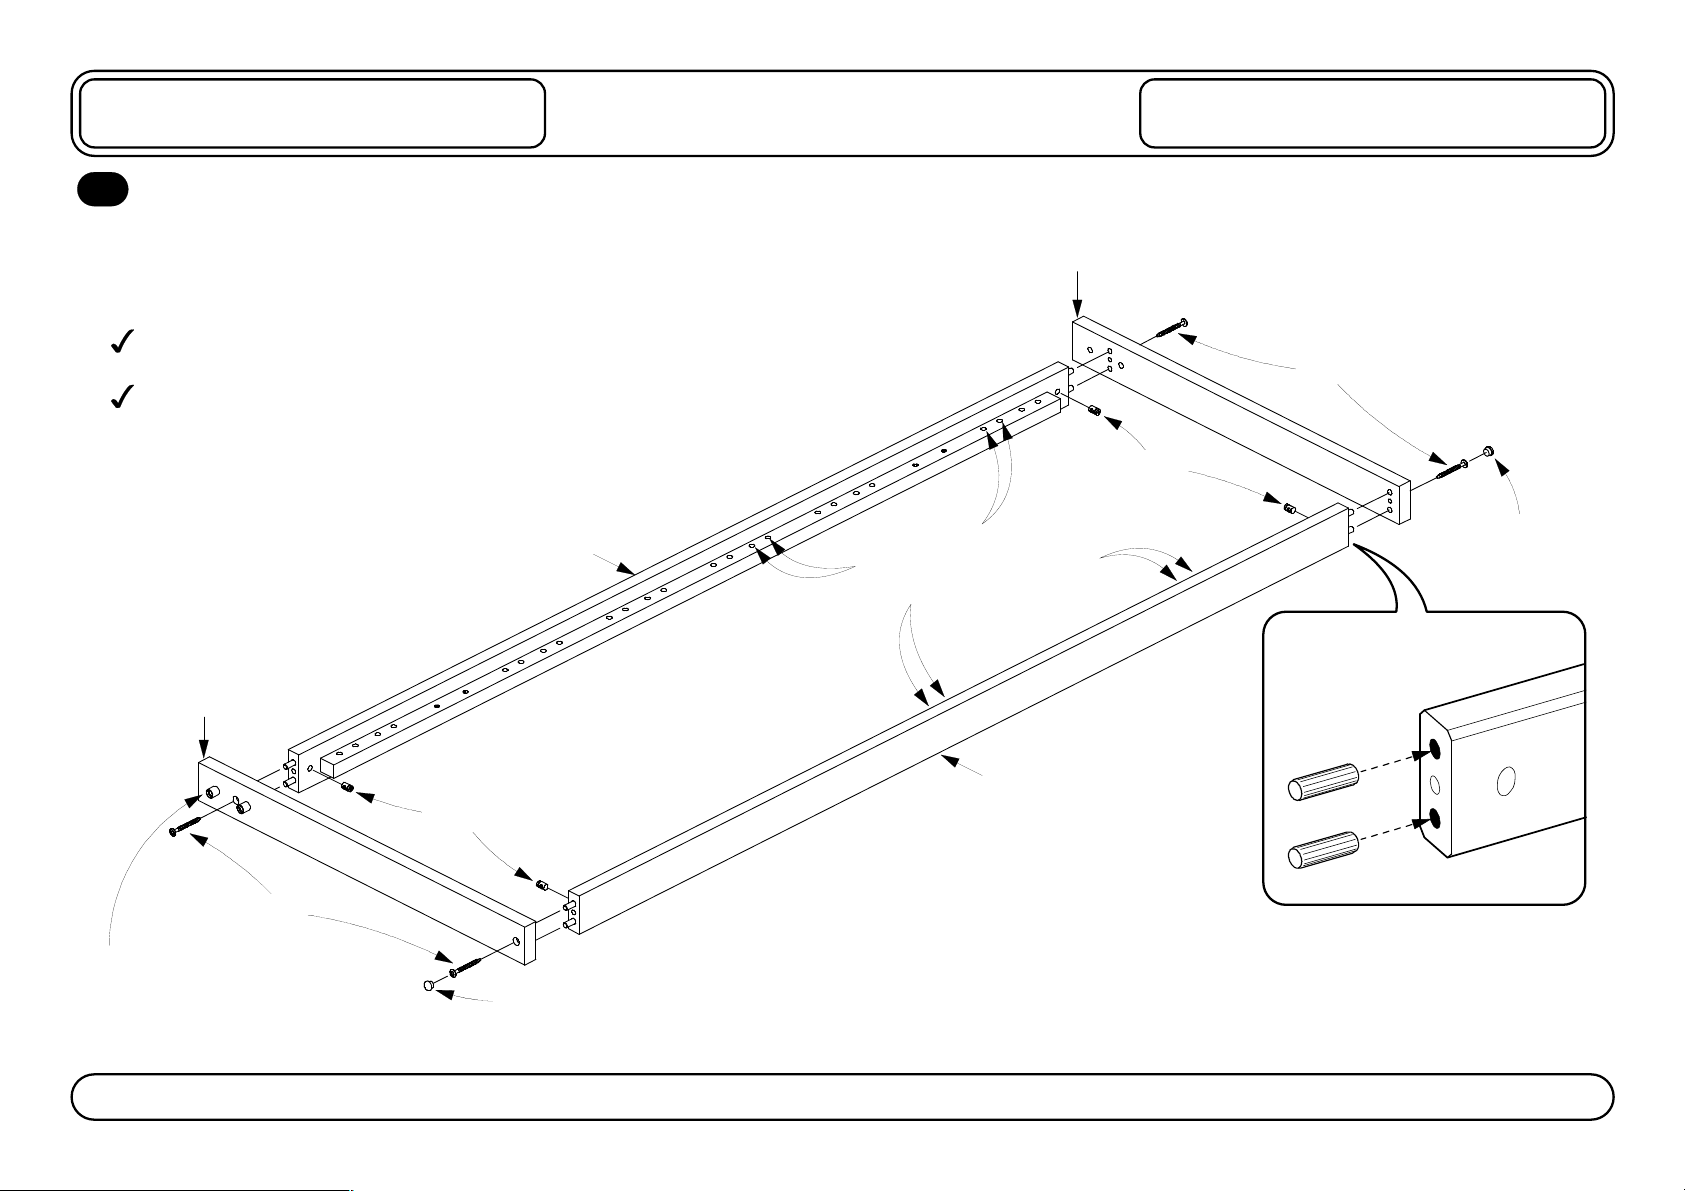
Seat Deck:
Seat Side Rail
Seat Side Rail
Wood Button
Wood Button
Seat Long Rail
(Shorter)
Seat Long Rail
(Shorter)
Barrel Nuts
Barrel Nuts
60mm Bolts
60mm Bolts
Make sure the holes in the
Seat Long Rails face
upward.
The Seat Long Rails are the shorter rails.
Wooden
Dowels
Long Rails
3A
Use the Bolts and Barrel Nuts to attach the Seat Side Rails
to the Seat Long Rails. Fit Wood Buttons into Bolt holes as
shown below.
Attach the Seat Side Rails to the Seat Long Rails.
For Seat and Back Long Rails.
Make sure the holes in the Seat Long Rails face upward.
Plastic Rollers need to face
towards the back.
Assemble the Seat Deck
Springwood Frame
Assembly Instructions
Full Size • Queen Size
Bronze
S H O E F I T T I N G S
TM
ND 0108

Page 4 of 8
Back Side Rail
Back Side Rail
Wood Button
Wood Button
Back Long Rail
(Longer)
Back Long Rail
(Longer)
Barrel Nuts
Barrel Nuts
60mm Bolts
60mm Bolts
Make sure the holes in
the Back Long Rails face
upward.
4A
Attach the Back Side Rails to the Back Long Rails.
Back Deck:
Right Rubber
Snapper "S1R"
This Way Up
Left Rubber
Snapper "S1L"
This Way Up
Use the Bolts and Barrel Nuts to attach the Back Side Rails
to the Back Long Rails. Fit Wood Buttons into Bolt holes as
shown below.
The Back Long Rails are the longer rails.
Make sure the holes in the Back Long Rails face upward.
Assemble the Back Deck
Springwood Frame
Assembly Instructions
Full Size • Queen Size
Bronze
S H O E F I T T I N G S
TM
ND 0409

Page 5 of 8
5A
Attach the Curved Slats to the Seat and
Back Deck with 30mm Bolts.
Attach the Curved Slats and Slat Supports
to the Seat and Back Deck.
Plastic Cap
Spring Slat
30mm
Bolts
Back Deck Slat
Supports
30mm
Bolts
Curved
Slats
30mm
Bolts
30mm
Bolts
Seat Deck Slat Supports
Note: Need to face towards the front.
Curved
Slats
Back Deck:
Seat Deck:
5B
Slot the Plastic Cap into the
ends of all the Spring Slats.
Tap the Spring Slats to
the Back Deck and Seat
Deck.
Plastic Rollers need to
face towards the back.
Assemble the Slats
Springwood Frame
Assembly Instructions
Full Size • Queen Size
Bronze
S H O E F I T T I N G S
TM
ND 0108

Page 6 of 8
Use 2 People!
Please Note:
Fit the Back Deck into Position:
6A
Tighten all the Bolts.
Remember that the Bolts on the Arm should be LOOSE.
Be careful not to scratch the Arms with the Plastic
Runners when you lower the ends of the Back Deck.
Insert the Back Deck lying
flat. Insert one end first, then
gently lower the other end into position.
Tighten all the Bolts.
When you have the Back Deck fitted
lying flat, tighten all the Bolts.
6B
All four joints
must be left
LOOSE.
CAREFUL ! These can
Scratch the Arms
Your arm style may vary
ND 0108
Fit the Back Deck
Springwood Frame
Assembly Instructions
Full Size • Queen Size
Bronze
S H O E F I T T I N G S
TM
Fit the "Quick Instructions" card on to
the last slat on the Back Deck.
6C
The Quick Instructions card
has double sided tape on
the reverse.
Stick it onto the last slat on
the left hand side of
the Back Deck.

Page 7 of 8
Hook the Seat Deck onto the Snapper.
7A
Pull the Seat over the "Snap Point."
7B
Push down on the Seat, and the
Back will Lift.
7C
This is the Lounge Position.
7D
This is the Sofa Position.
7E
Lift the Seat Deck in vertically, so the Pins
meet with the Rubber Snapper. The head of
the Snapper should fit between both Pins.
With the Top Pin
inside the notch on
the Rubber Snapper, put
your foot on the Back Deck
and pull the Seat over the "Snap Point"
Put your
foot here
You will need to Pull Hard.
Push the Seat
down further and the
Back will rise until it is
in the "Lounge Position"
Push the Seat
with your knee, to
convert to the Sofa Position
Push
Add Mattress and
Enjoy! See separate page
for Operating Instructions.
•The Top Pin - fits over the top,
•The Lower Pin - goes underneath.
Just remember:
Use 2 People!
Please Note:
- over the top
Bottom Pin
Notch
Top Pin
Rubber
Snapper
- underneath
Fit the Seat Deck
Springwood Frame
Assembly Instructions
Full Size • Queen Size
Bronze
S H O E F I T T I N G S
TM
ND 0108

Page 8 of 8
Use 2 People!
Please Note:
From the Back, lift out the Top Pin and ease the Seat Deck forward.
Push the Seat over the "Snap Point."From the Bed position, lift the Seat.
8A
Lift the Seat all the way.
8B 8C
8D
Lift the Seat clear of the frame.
8E
You will need to Push Hard.
Lift from the front,
using both hands.
Lift all the way until the
Top Pin drops into the
notch on the Rubber Snapper.
Lift and ease the Deck forward
Lift up so the Top Pin is out of
its notch in the Rubber Snapper.
Ease the Back Deck forward,
keeping it orientated vertically.
Be careful when lifting the
Seat Deck out, not to scratch
the Arms with the Rollers.
Top Pin
Notch
Rubber
Snapper
Rubber
Snapper
Disassembly: Removing the Seat
Springwood Frame
Assembly Instructions
Full Size • Queen Size
Bronze
S H O E F I T T I N G S
TM
ND 0108
 Loading...