

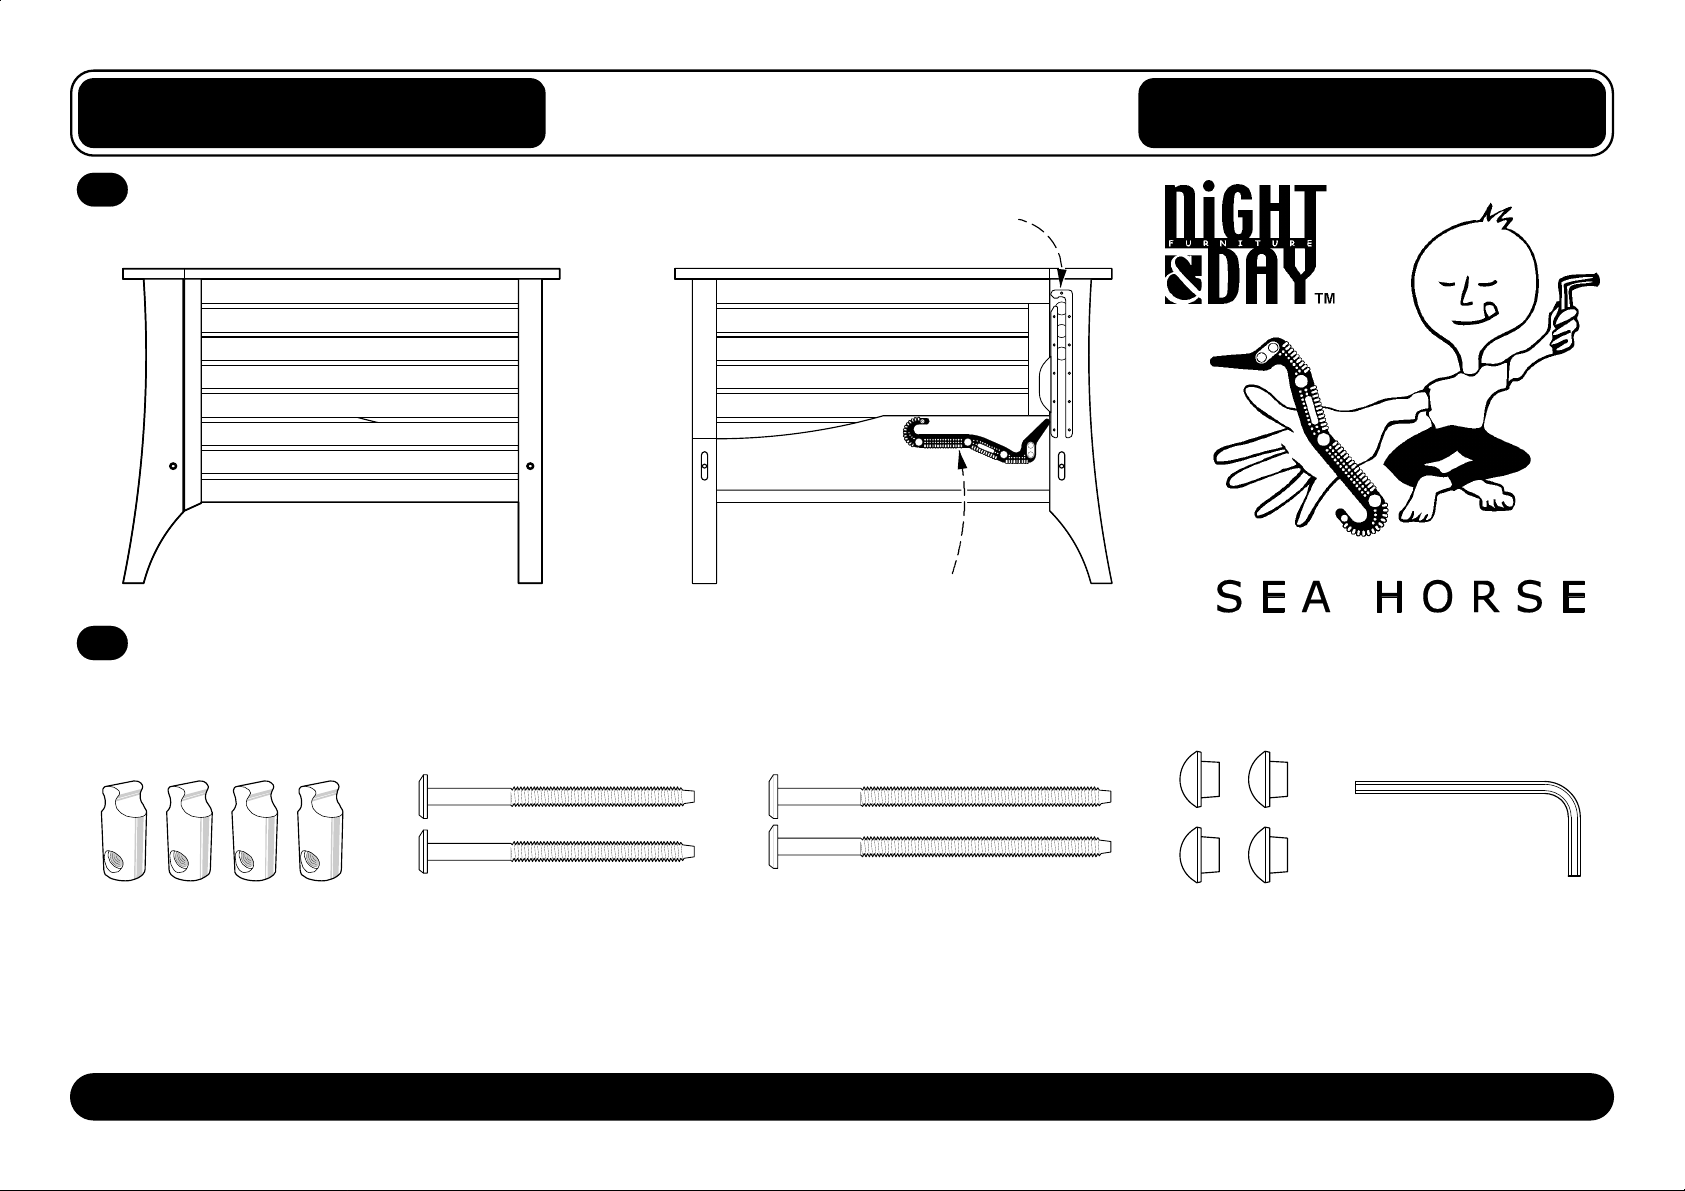
One Pair of Shoe Fittings Arms:
1A
Siesta Arms
Roller Guide
S H O E F I T T I N G S
TM
GoldAssembly Instructions
SF 0307
Outside View Inside View
Hardware in this Box:
1B
ThumNut™ x 4 pieces
Patent No.: US 6,457,923
Page 1 of 6
80mm Bolts x 2 pieces
(for Back Leg)
S H O E F I T T I N G S
Sea Horse
100mm Bolts x 2 pieces
(for Front Leg)
TM
Protected by US Patent #6,715,166. Other Patents Pending.
featur ing the Rubber
Wood Buttons
x 4 pieces
TM
Allen Key
x 1 piece
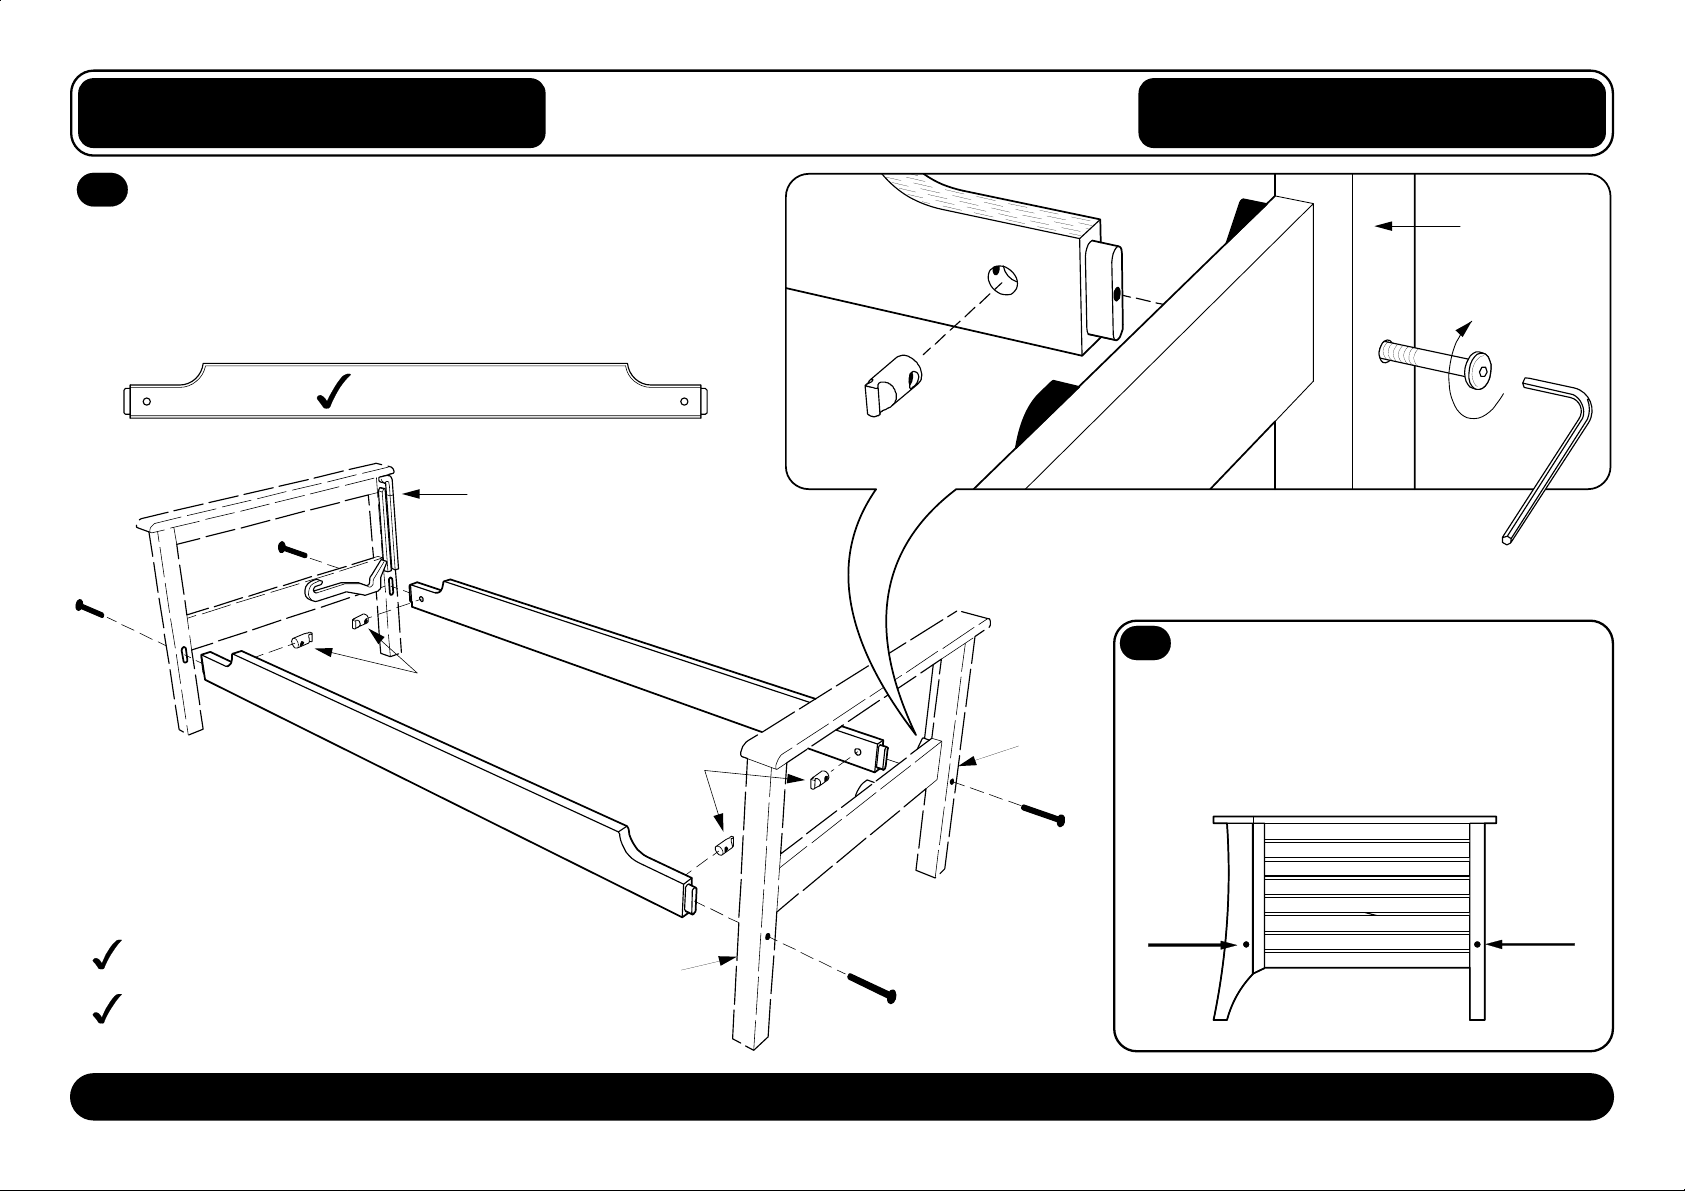
Attach Stre tch er s to Ar m s
2A
Siesta Arms
S
H O E F I T T I N G S
TM
GoldAssembly Instructions
SF 0307
100mm Bol t
Using Bolts and ThumNuts™ provided with
the Arms, at ta c h th e A rms to the
Stretc hers as show n .
The raised side of the stretcher should face upwards.
This way up.
Arm
-Your style may be
different to t hat sh ow n her e
80mm
Bolt
ThumNuts™
ThumNuts™
Stretcher
ThumNut™
Back
Leg
Allen Key
Fit Wood Buttons into Bolt Holes .
2B
Tighten all Bolts. Push fit or lightly
tap the Wo od Buttons i n to the
Bolt holes on the Arms.
Arm
Bolt
Bolt and Th umNut™ as sembly.
Do not force the Bolt as you may strip the
thread. Be sure the thread is properly started.
Be sure the holes are free of wood chips
and saw dust.
Page 2 of 6
Front
Leg
100mm Bol t
80mm Bolt
Wood
Button
Wood
Button

Assembly 1: Fit the Back Deck
Chair • Love seat • Full • Queen
Carefully lift the Back Deck into position. Place the Bottom Rollers onto the
3A
back of the Rubber Sea Horse.
Please Note:
The Bottom Roller
should be sittin g o n
Use 2 People!
the Rubber Sea Horse.
S H O E F I T T I N G S
Rest the Top Rollers againt the Leg.
3B
TM
GoldAssembly Instructions
SF 0404
Gently lift the Back Deck so the Top Roller goes inside the Roller Guide.
3C
Very Important: Make sure the Top
Rollers are fully inside on both sides!
Roller Guide
Back Leg
of Arm
Final Position
of Top Roller
From the Back: Gently ease
the Top Rol l er s into p osi ti o n .
Page 3 of 6
Gently Lower the Back down until it
3D
is lying flat.
From the Bac k :
Lower the Back Deck.
It will help to
pull on the Bottom
of the Bac k Deck.

Hook the Seat Deck onto the Snapper.
4A
Assembly 2: Fit the Seat Deck
Chair • Love seat • Full • Queen
Lift the Seat Deck in vertically, so the Pins
meet with the Rubber Snapper. The head of
the Snapper should fit between both Pins.
Just remember:
•The Top Pin - fits over the top,
•The Lower Pin - goes underneath.
Top Pin
- over the top
S
H O E F I T T I N G S
Pull the Seat over the "Snap Point."
4B
You will need to Pull Hard.
TM
GoldAssembly Instructions
SF 0404
Put your
foot here
Please Note:
Use 2 People!
Push down on the Seat, and the
4C
Back will Lift.
Push the Seat
down further and the
Back will rise until it is
in the "Lounge Po si ti o n"
Rubber
Snapper
Bottom Pin
- underneath
This is the Lounge Po sition.
4D
Push
Push the Sea t
with your kne e, to
conve r t to the Sofa Po sit io n
Notch
With the Top Pin
inside the notch on
the Rubber Snapper, put
your foot on the Back Deck
and pull the Seat over the "Snap Point"
This is the Sofa Pos ition.
4E
Add Mattress and
Enjoy! S ee se parate page
for Operati ng I nstruc tions.
Page 4 of 6

5A
Lift from the front,
using both Handles.
Please Note:
Use 2 People!
Disassembly 1: Removing the Seat
Chair • Love seat • Full • Queen
Lift the Seat all the way.
5B 5C
Lift all the way until the
Top Pin dr ops into the
notch on th e Ru b b er Sn a pp er .
S
Rubber
Snapper
H O E F I T T I N G S
Push the Seat ov er the "S n ap Poi n t."From the Bed position, lift the Sea t.
You will need to Push Hard.
Top Pin
Notch
TM
GoldAssembly Instructions
SF 0404
From the Back, lift out the To p Pin and eas e the Sea t Deck f or ward.
5D
Lift and ease the Deck forward
Lift up so the Top Pin is out of
its notch in the Rubber Snapper.
Ease the Back Deck forward,
keeping it orientated vertically.
Rubber
Snapper
Page 5 of 6
Lift the Seat clear of the frame.
5E
Be careful when lifting the
Seat Deck out, not to scratch
the Arms with the Rollers .

Disassembly 2: Removing the Back
Chair • Love seat • Full • Queen
Lift the Back Deck up.
6A 6B
S
H O E F I T T I N G S
Lift Back Deck so the Top Roller is clear of the Back Leg.
TM
GoldAssembly Instructions
SF 0404
Lift from the Back Lift from the Back
Please Note:
Use 2 People!
Push t he Deck f o rward at t he top.
6C
Lift the Back aw ay from the Arms.
6D
Very Important: Make sure the Top
Rollers are fully outside on both sides!
Final Position
of Top Roller
Back Leg
of Arm
Undo the Stretcher Bolts.
6E
Roller Guide
Use the Alle n K ey
to undo the Bolts
on the Arms.
Page 6 of 6
Be careful when lifting the
Back De c k out, not to scr a tc h
the Arms with the Rollers .
 Loading...