

Nicotra RER 0250-2G, RER 0200-2G, RER 0280-2G, RER 0315-2G, RER 0355-2G Operating Instructions Manual
...
II 2G c IIB T3 (II 3G c IIB T3)
BA-CFB-RZR-RER-ATEX 6.6 - 04/2016
Betriebsanleitung, ATEX
DE
Radialventilatoren für Riemenantrieb
(Original)
Operating Instructions, ATEX
EN
Centrifugal fans belt driven
(Translation of the original)
RZR
RER

Deutsch
DE-2/32
Inhaltsverzeichnis
1. Revisionsindex ...................................................................................................................................... DE-2
2. Zu dieser Betriebsanleitung .................................................................................................................. DE-3
3. Bestimmungsgemäße Verwendung ...................................................................................................... DE-5
4. Sicherheit .............................................................................................................................................. DE-7
5. Produktbeschreibung .......................................................................................................................... DE-11
6. Transport und Lagerung ...................................................................................................................... DE-14
7. Montage............................................................................................................................................... DE-15
8. Elektrischer Anschluss ........................................................................................................................ DE-18
9. Inbetriebnahme / Bedienung ............................................................................................................... DE-20
10. Instandhaltung ..................................................................................................................................... DE-21
11. Störungen ............................................................................................................................................ DE-25
12. Service, Ersatzteile und Zubehör ........................................................................................................ DE-26
13. Anhang ................................................................................................................................................ DE-26
EU-Konformitätserklärung 2014/34/EU (ATEX) ....................................................................................... DE-300
EG-Einbauerklärung………………………………………………………………………………………….. …. DE-31
English EN-2…EN-31
weitere Sprachen auf Anfrage / further languages on request.
1. Revisionsindex
Tabelle 1-1: Revisionsindex
Revision Datum
BA-RV 6.1 – 08/2011 08/2011
BA-CFB-RZR-RER-ATEX 6.2 - 01/2014 01/2014
BA-CFB-RZR-RER-ATEX 6.3 - 01/2014 07/2014
BA-CFB-RZR-RER-ATEX 6.4 - 03/2015 03/2015
BA-CFB-RZR-RER-ATEX 6.5 - 10/2015 10/2015
BA-CFB-RZR-RER-ATEX 6.6 - 04/2016 04/2016

Deutsch
DE-3/32
2. Zu dieser Betriebsanleitung
Diese Betriebsanleitung ist Teil des Radialventilators.
Für Schäden und Folgeschäden, die durch Nichtbeachtung der
Betriebsanleitung entstehen, übernimmt Nicotra Gebhardt keinerlei
Haftung oder Gewährleistung.
Betriebsanleitung vor Gebrauch aufmerksam lesen.
Betriebsanleitung während der Lebensdauer des Ventilators
aufbewahren.
Betriebsanleitung dem Personal jederzeit zugänglich machen.
Betriebsanleitung an jeden nachfolgenden Besitzer oder Benutzer des
Ventilators weitergeben.
Jede vom Hersteller erhaltene Ergänzung in die Betriebsanleitung
einfügen.
2.1. Gültigkeit
Diese Betriebsanleitung ist nur gültig für die auf der Titelseite
angegebenen Radialventilatoren.
2.2. Zielgruppe
Zielgruppe dieser Betriebsanleitung sind Betreiber und ausgebildetes
Fachpersonal, das mit Montage, Inbetriebnahme, Bedienung,
Instandhaltung und Außerbetriebnahme vertraut ist.
2.3. Mitgeltende Dokumente
Zusätzlich zu der dem Ventilator beiliegenden Betriebsanleitung,
den am Ventilator angebrachten Typen-, Warn- und
Hinweisschildern, sind folgende Dokumente beachten:
- DIN VDE 0100-100
- DIN EN 60204-1
- DIN EN ISO 13857
- DIN EN ISO 12100
- DIN EN ISO 13732-1
- DIN EN 13463-1; -5
- DIN EN 1127-1
- DIN EN 60079-0
- DIN EN 14986
- Technischer Katalog
- EU-Richtlinie 2014/34/EU
2.4. Symbole und Kennzeichnungen
2.4.1. Aufbau von Warnhinweisen
Signalwort
Art, Quelle und Folgen der Gefahr!
Maßnahme zur Vermeidung der Gefahr

Deutsch
DE-4/32
2.4.2. Gefahrenstufen in Warnhinweisen
Tabelle 2-1: Gefahrenstufen in Warnhinweisen
Symbol / Gefahrenstufe Eintretens-
Wahrscheinlichkeit
Folgen bei
Nichtbeachtung
Danger
Unmittelbar drohende
Gefahr
Tod, schwere
Körperverletzung
Warning
Mögliche drohende
Gefahr
Tod, schwere
Körperverletzung
Caution
Mögliche drohende
Gefahr
Leichte
Körperverletzung
Vorsicht
Mögliche drohende
Gefahr
Sachschaden
2.4.3.
Hinweise
Hinweis Hinweis zum leichteren bzw. sicheren Arbeiten.
Maßnahme zum leichteren bzw. sicheren Arbeiten.
2.4.4. Sonstige Symbole und Kennzeichnungen
Tabelle 2-2: Sonstige Symbole und Kennzeichnungen
Symbol Bedeutung
Voraussetzung zu einer Handlung
Handlung mit einem Schritt
1. ….
2. ….
3. ….
Handlung mit mehreren Schritten
앫
Aufzählung (erste Ebene)
- Aufzählung (zweite Ebene)
Hervorhebung (fett) Hervorhebung

Deutsch
DE-5/32
3. Bestimmungsgemäße Verwendung
3.1. Betriebsdaten / Grenzdaten
Vorsicht
Verletzungsgefahr!
Technische Daten und zulässige Grenzwerte einhalten.
Die Technischen Daten sind dem Typenschild, dem technischen
Datenblatt und dem technischen Katalog zu entnehmen!
Besonders beachten!
zulässige Motorleistung
kleinster zulässiger
Riemenscheibendurchmesser
maximale Ventilatordrehzahl
zulässige Mediumsart
zulässige Mediumstemperatur
Hinweis ATEX Kategorie II 2G IIB T3 oder II 3G IIB T3
Ventilatoren dieser Kategorie sind zur Verwendung in Bereichen bestimmt, in
denen damit zu rechnen ist, dass eine explosionsfähige Atmosphäre aus
einem Gemisch von Luft und Gasen, Dämpfen oder Nebeln
gelegentlich (2G) oder selten (3G) auftritt.
Die gerätebezogenen Explosionsschutzmaßnahmen dieser Kategorie
müssen selbst bei häufigen Gerätestörungen oder Fehlerzuständen, die
üblicherweise zu berücksichtigen sind (vorhersehbare Störungen), das
erforderliche Maß an Sicherheit bieten.
Für den Betrieb der Ventilatoren in explosionsgefährdeten Bereichen sind die
einschlägigen Bestimmungen und örtlichen Vorschriften und entsprechenden
Richtlinien (ATEX 2014/34/EU) für den Hersteller und Betreiber zu beachten.
Zulässige Fördermediumstemperaturen
Tabelle 3-1: Grenzdaten
Baureihe ATEX
zul. Temperatur des
Fördermediums
max.
Umgebungstemp. am
Antriebsmotor
RZR -20°C bis +40°C (+60°C)
+ 40°C (60°C)
RER -20°C bis +60°C
Bei Motoreignung für eine Kühlmitteltemperatur von +60°C kann der
Temperaturbereich in Sonderfällen auf diesen Wert ausgeweitet werden!
(Eventuell unter Berücksichtigung einer Leistungsreduzierung nach
Herstellerangaben)
Als nicht bestimmungsgemäße Verwendung gilt z.B. die Förderung:
von Medien mit unerlaubten hohen oder niedrigen Temperaturen
aggressiven Medien
stark staubhaltigen Medien

Deutsch
DE-6/32
Die Folgen von nicht bestimmungsgemäßem Einsatz sind:
Lagerschäden
Korrosionsschäden
Unwucht
Vibration
Deformation
Abrasion
Vorsicht Unerlaubte Betriebszustände:
Kein Betrieb über der angegebenen Drehzahl (Typenschild, techn. Daten)
Kein Betrieb in Drehzahlbereichen erhöhter Schwingungen (Resonanz)
Kein Betrieb in Drehzahlbereichen außerhalb des zulässigen
Kennfeldbereiches (Strömungsstabilität)
Kein Betrieb bei Verschmutzung des Ventilators
Vorsicht Dynamische Beanspruchung des Laufrades Vermeiden.
Keine häufigen Lastwechsel!
Gefahr
Als Gefahr drohen:
Personenschäden- und Sachschäden durch Wellenbrüche,
Laufradbrüche, Dauerbrüche,
oder Explosionen durch Funkenbildung
3.2. Explosionsschutz-Kennzeichnung
Die Kennzeichnung von Ventilatoren in explosionsgeschützter Ausführung
erfolgt durch Angabe der Gerätegruppe, Kategorie, Zündschutzart und
Temperaturklasse auf dem Typenschild sowie durch ein CE-Ex-Zeichen, durch
das die Konformität des Geräts mit der europäischen Richtlinie 2014/34/EU
bestätigt wird.
Die Einbauerklärung und Konformitätserklärung zur EU-Richtlinie 2014/34/EU
(ATEX) befinden sich im Anhang dieser Betriebsanleitung.
Bild 3-1: Explosionsschutz-Kennzeichnung (Beispiel)
A CE-Kennzeichnung
B Ex-Geräte Kennzeichnung
1 Gerätegruppe II
Nichtelektrische Geräte außerhalb von Bergbau- und UntertagebauEinsatz
2 Gerätekategorie 2 (innen und außen) einsetzbar in Zone 1+2;
In der Umgebung tritt nur gelegentlich Ex -Atmosphäre auf
3 Fördermedium G = Gasförmige Fördermedien
4 Zündschutzart c = Explosionsschutz durch konstruktive Sicherheit
5 Explosionsgruppe IIB Art der Gasatmosphäre
6 Temperaturklasse T3 max. Oberflächentemperatur am Gerät +200°C

Deutsch
DE-7/32
4. Sicherheit
4.1. Produktsicherheit
Die Ventilatoren bieten ein hohes Maß an Betriebssicherheit und einen
hohen Qualitätsstandard, der durch ein zertifiziertes QualitätsmanagementSystem (EN ISO 9001) gewährleistet wird.
Alle Ventilatoren werden vor Verlassen des Werkes einer Kontrolle
unterzogen und mit einem Prüfsiegel versehen.
Dennoch können beim Betrieb der Radialventilatoren Gefahren für Leib und
Leben des Benutzers oder Dritter bzw. Beeinträchtigungen des Ventilators
und anderer Sachwerte entstehen.
Ventilator nur in technisch einwandfreiem Zustand sowie
bestimmungsgemäß, sicherheits- und gefahrenbewusst unter Beachtung
der Betriebsanleitung benutzen.
Störungen, die die Sicherheit beeinträchtigen können, umgehend
beseitigen.
Gefahr
Explosionsfähige Gasgemische können in Verbindung mit heißen und
bewegten Teilen schwere oder tödliche Verletzungen verursachen.
Explosionsgefahr durch erhöhte Umgebungstemperatur!
Umgebungstemperatur beobachten.
Für ausreichende Kühlluftzufuhr sorgen
4.2. Sicherheitsvorschriften
Ventilator nur in Übereinstimmung mit folgenden Vorschriften in Betrieb
nehmen, betreiben und instand halten:
Betriebsanleitung
Warn- und Hinweisschilder am Radialventilator
Alle anderen zur Anlage gehörenden Betriebs- und Montageanleitungen
Anlagenspezifische Bestimmungen und Erfordernisse
Gültige nationale und regionale Vorschriften, insbesondere zu Sicherheit
und Unfallverhütung

Deutsch
DE-8/32
4.3. Schutzeinrichtungen
1. Rotierende Teile (Wellen, Laufrad usw.) durch geeignete
Schutzeinrichtungen gegen Berührung sichern.
2. Schutzvorrichtungen so auslegen, dass das Ansaugen oder Hineinfallen
von Gegenständen verhindert wird.
3. Schutzvorrichtungen, die bei der Montage demontiert wurden,
unmittelbar nach der Montage (und vor dem elektrischen Anschluss)
wieder anbringen.
Gefahr
Die Ventilatoren werden ohne saug- und druckseitigen
Berührungsschutz geliefert. Besteht durch die Art des Einbaus die
Gefahr einer Berührung des Laufrades, so sind bauseitig Schutzgitter
entsprechend DIN EN ISO 13857 anzubringen.
Erst dann darf der Ventilator in Betrieb gesetzt werden!
(Schutzgitter sind als Zubehör lieferbar.)
Gefahr
ATEX Ventilatoren der Kategorie 2G und 3G müssen gegen das Eindringen von Gegenständen geschützt werden (min. IP20 nach DIN EN 60529).
Vom Anlagenbetreiber müssen geeignete Maßnahmen ergriffen
werden!
Vorsicht! Die Eignung der Schutzeinrichtungen und deren Befestigungen am
Ventilator sind im Zusammenhang mit dem gesamten
Sicherheitskonzept der Anlage zu bewerten.
4.4. Qualifikation des Personals
1. Sicherstellen, dass die Montage und alle Arbeiten am Radialventilator nur
von Fachmonteuren unter Beachtung dieser Betriebsanleitung sowie den
gültigen Vorschriften ausgeführt werden.
2. Elektroanschluss nur durch ausgebildete Elektro-Fachkraft ausführen
lassen.
4.5. Schutzausrüstung
Vorsicht!
Sicherstellen, dass das Personal je nach Einsatz und
Umgebungsbedingung geeignete Schutzausrüstung trägt.
Die Schutzkleidung ist in den folgenden Abschnitten beschrieben!
4.6. Besondere Gefahren
4.6.1. Geräuschemission
Die zu erwartende Schallemission für den bestimmungsgemäßem Betrieb
des Ventilators ist in den technischen Katalogen dokumentiert und
entsprechend zu berücksichtigen.
Gehörschutz tragen bei Arbeiten in der Nähe - oder am laufenden
Ventilator!

Deutsch
DE-9/32
4.6.2. Schwere Lasten
Aufgrund des hohen Gewichts des Ventilators und seiner Komponenten
ergeben sich bei Transport und Montage folgende Gefahren:
Klemm-, Quetsch- und Schneidgefahren durch Bewegen oder Kippen
Gefahren durch Herabfallen von Komponenten
Nicht unter schwebenden Lasten aufhalten oder arbeiten.
Schutzhelm, Sicherheitsschuhe und Handschuhe tragen.
4.6.3. Rotierende Wellen und Laufräder
Auf rotierende Wellen und Laufräder fallende Gegenstände können
wegfliegen und schwere Verletzungen verursachen.
Kleidungsstücke oder Haare können sich an rotierenden Wellen und in
Laufrädern verfangen.
Schutzvorrichtungen während des Betriebs nicht entfernen.
eng anliegende Kleidung tragen, bei Arbeiten in der Nähe
rotierender Wellen und Laufräder
Schutzbrille tragen
4.6.4. Heiße Oberflächen
Im Betrieb besteht Verbrennungs- und Verbrühungsgefahr aufgrund heißer
Oberflächen.
Motor während des Betriebs nicht berühren.
Bei Stillstand des Radialventilators warten, bis sich der Motor
abgekühlt hat.
Schutzhandschuhe tragen
4.7. Bauliche Veränderungen, Ersatzteile
Hinweis Eigenmächtige bauliche Veränderungen am Ventilator sind ohne
Zustimmung der Nicotra Gebhardt GmbH nicht zulässig.
Für daraus entstandene Schäden übernimmt die Nicotra Gebhardt
GmbH keine Haftung.
Es dürfen nur Original-Ersatzteile der Nicotra Gebhardt GmbH
verwendet werden.
Vorsicht Im Ex-Bereich dürfen nur die Nicotra Gebhardt GmbH selbst, eine
durch sie autorisierte Servicestelle oder durch sie ermächtigtes und
ausgebildetes Personal den Ventilator ändern oder umrüsten.
4.8. Installation und Instandhaltung
Vor Arbeiten am Ventilator folgende Maßnahmen durchführen:
1. Sicherstellen, dass keine explosionsfähige Atmosphäre vorhanden ist.
2. Anlage abschalten und gegen unbeabsichtigtes Wiedereinschalten
sichern.
3. Schild mit folgendem Text anbringen:
Nicht einschalten! An der Anlage wird gearbeitet.

Deutsch
DE-10/32
4.9. Schilder am Ventilator
Typenschild und Drehrichtungspfeil sind je nach Baureihe gut sichtbar am
Gehäuse angebracht.
4.9.1. Typenschild
Bild 4-1:
Typenschild-Muster
4.9.2 Riementrieb-Schild
Bild 4-2:
Riementriebschild-Muster
4.9.3 Drehrichtungspfeil
Bild 4-3:
Drehrichtungspfeil
Nur Muster
Nur Muster

Deutsch
DE-11/32
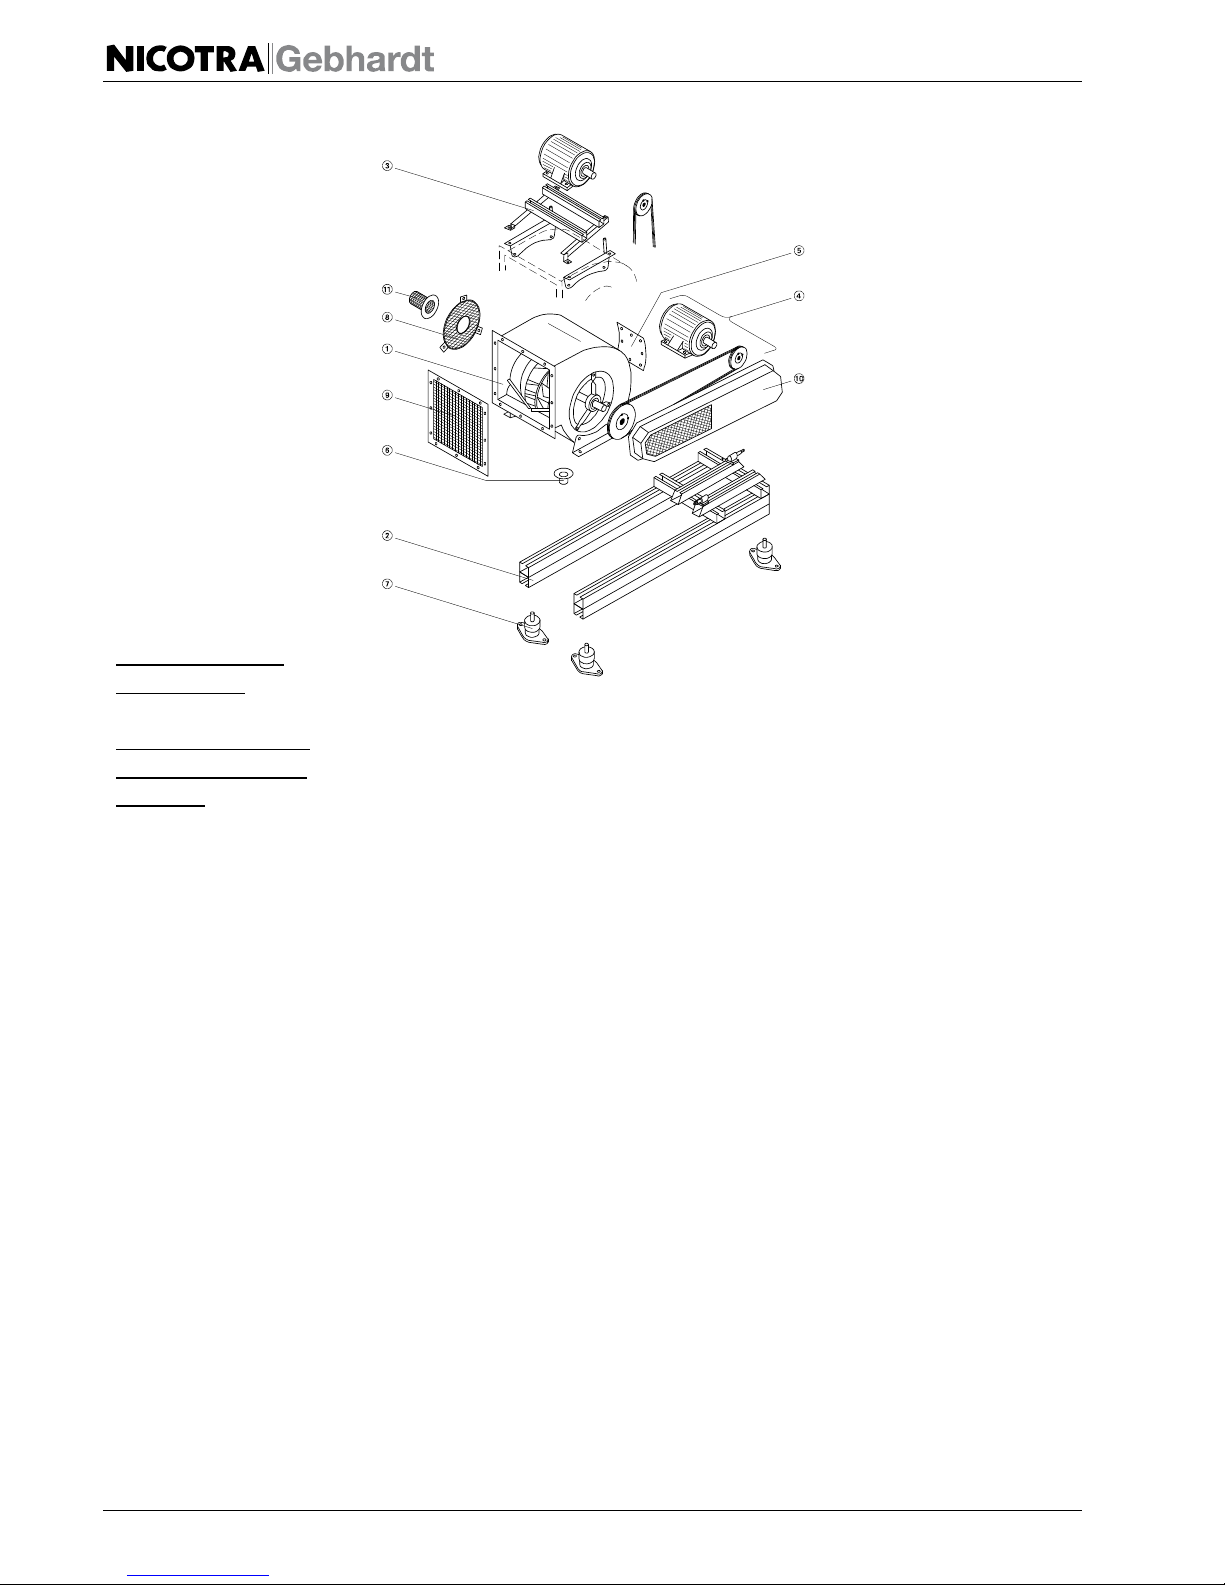
5. Produktbeschreibung
5.1. Radialventilatoren allgemein
Die Radialventilatoren können mit Grundrahmen und Riementrieb oder je
nach Baureihe mit Motorwippe und Riemenantrieb komplettiert werden.
Weitere Ausstattungsvarianten und weiteres Zubehör siehe proSELECTA II,
Technische Dokumentationen und Preislisten.
Exemplarische Beispiele siehe nachfolgende Explosionszeichnungen.
5.2. Radialventilatoren
Die Radialventilatoren der Baureihe RZR und RER erfüllen die Anforderungen
der ATEX-Richtlinie 2014/34/EU durch konstruktive Sicherheit und sichere
Bauweise entsprechend EN 14986 und DIN EN 13463-1/-5.
Die Einordnung erfolg je nach Typenschild in die Gerätegruppe II, Kategorie
2G oder 3G, Explosionsgruppe IIB und Temperaturklasse T3.
Diese Radialventilatoren können mit Grundrahmen oder Motorwippe,
Riementrieb und Antriebsmotor komplettiert werden.
Bei einer nicht von Nicotra Gebhardt durchgeführten Komplettierung der
Komponenten gilt die ATEX Konformität jedoch nur für den Ventilator selbst.
Der ATEX Ventilator, bzw. die von Nicotra Gebhardt komplettierte Einheit darf
vom Kunden nicht verändert werden. Bei Veränderungen erlischt die ATEX –
Konformität.
Materialpaarung:
- Laufrad aus Stahlblech mit ATEX-Spezialbeschichtung
- Einströmdüse aus Kupfer
Vorsicht
Bei Aufstellung im Freien oder bei Förderung sehr feuchter Luft ist ein
Kondenswasserablaufstutzen, als Zubehör erhältlich, an der tiefsten
Stelle des Gehäuses vorzusehen.
Hinweis ATEX Ventilatoren dürfen nicht verändert werden!
Bei Veränderungen erlischt die ATEX – Konformität!

Deutsch
DE-12/32
5.2.1 z.B. RZR 11–
1 Ventilator
2 Grundrahmen mit
Spannschienen oder
Spannschlitten
3 Motorwippe
4 Antrieb
7 Schwingungsdämpfer
Wichtiges Zubehör:
5 Inspektionsdeckel
(wenn Laufrad
unzugänglich ist)
6 Kondensatablauf
8 Ansaugschutzgitter
9 Ausblasschutzgitter
10 Riemenschutz
11 Wellenschutz
Berührungsschutz
DIN EN ISO 13857
Schutz gegen das
Eindringen von
Gegenständen
DIN EN 60529
Bild 5-1: Komplettierung RZR 11

Deutsch
DE-13/32
5.2.2 z.B. RER 11-
1 Ventilator
2 Grundrahmen mit
Spannschienen oder
Spannschlitten
3 Motorwippe
4 Antrieb
7 Schwingungsdämpfer
Wichtiges Zubehör:
5 Inspektionsdeckel
ATEX-Lieferumfang
6 Kondensatablauf
8 Ansaugschutzgitter
9 Ausblasschutzgitter
10 Riemenschutz
Berührungsschutz
DIN EN ISO 13857
Schutz gegen das Eindringen von Gegenständen
DIN EN 60529
Bild 5-2: Komplettierung RER 11
5.3.3 z.B. RER 13 -
1 Ventilator mit
Grundrahmen
2 Motorspannschienen
3 Motor
4 Riementrieb
7 Schwingungsdämpfer
Wichtiges Zubehör:
5 Inspektionsdeckel
ATEX-Lieferumfang
6 Kondensatablauf
8 Ansaugschutzgitter
9 Ausblasschutzgitter
10 Riemenschutz
Berührungsschutz
DIN EN ISO 13857
Schutz gegen das Eindringen von Gegenständen
DIN EN 60529
Bild 5-3: Komplettierung RER 13 / 17
Deutsch
DE-14/32
6. Transport und Lagerung
6.1. Verpackung
Radialventilatoren werden abhängig von Baugröße und Gewicht in stabilen
Kartonagen oder Holzverschlägen verpackt bzw. auf stabile Paletten
geschraubt. Hinweise auf das Entfernen von Transportsicherungen sind ggf.
beigefügt.
6.2. Symbole auf der Verpackung
Auf den Kartonagen sind folgende Symbole angebracht:
Tabelle 7-1: Symbole auf der Verpackung
Symbol Bedeutung
Zerbrechliches Gut
Vor Nässe schützen
Oben
6.3. Radialventilator transportieren
Warnung
Verletzungsgefahr durch herab fallende Komponenten!
Nur geprüfte und für den jeweiligen Ventilator geeignete
Lastaufnahmemittel verwenden!
Das Transportmittel nach Gewicht und Bauform des Ventilators wählen!
Ventilator so lange wie möglich mit der Originalverpackung
transportieren!
Ladung sichern!
Nicht unter schwebenden Lasten aufhalten!
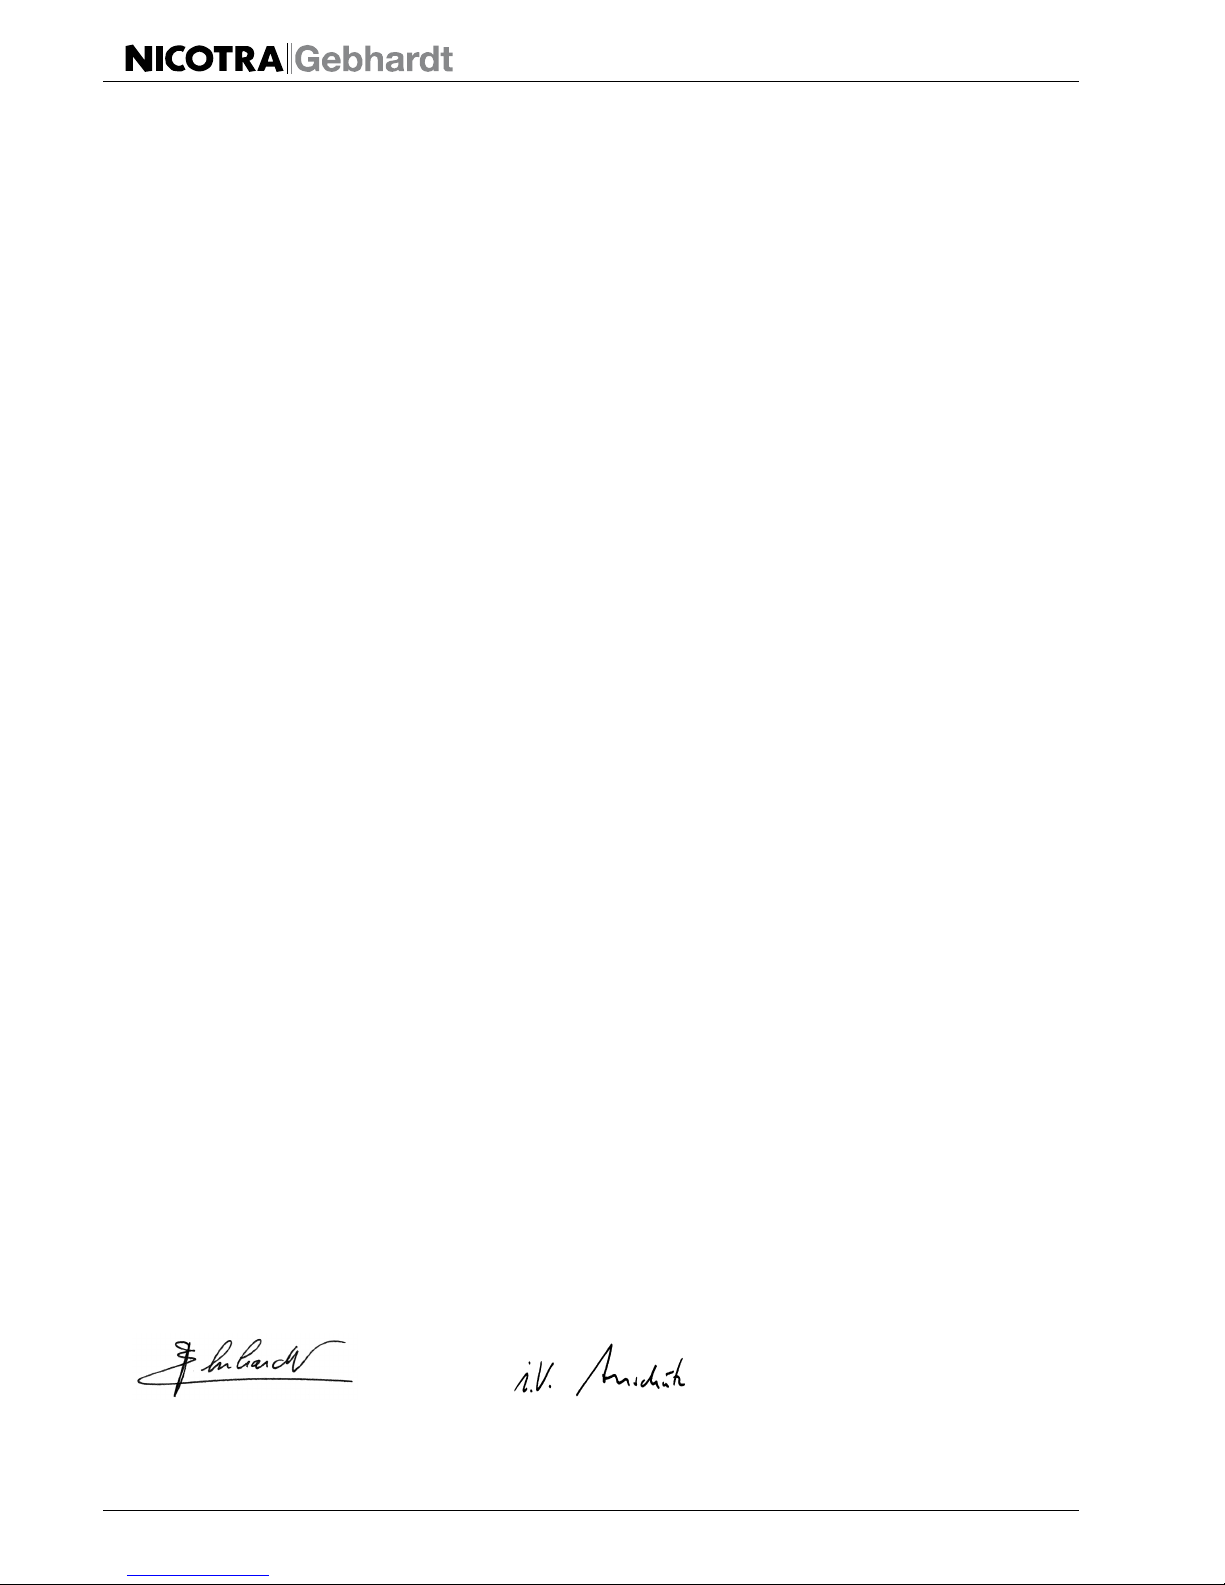
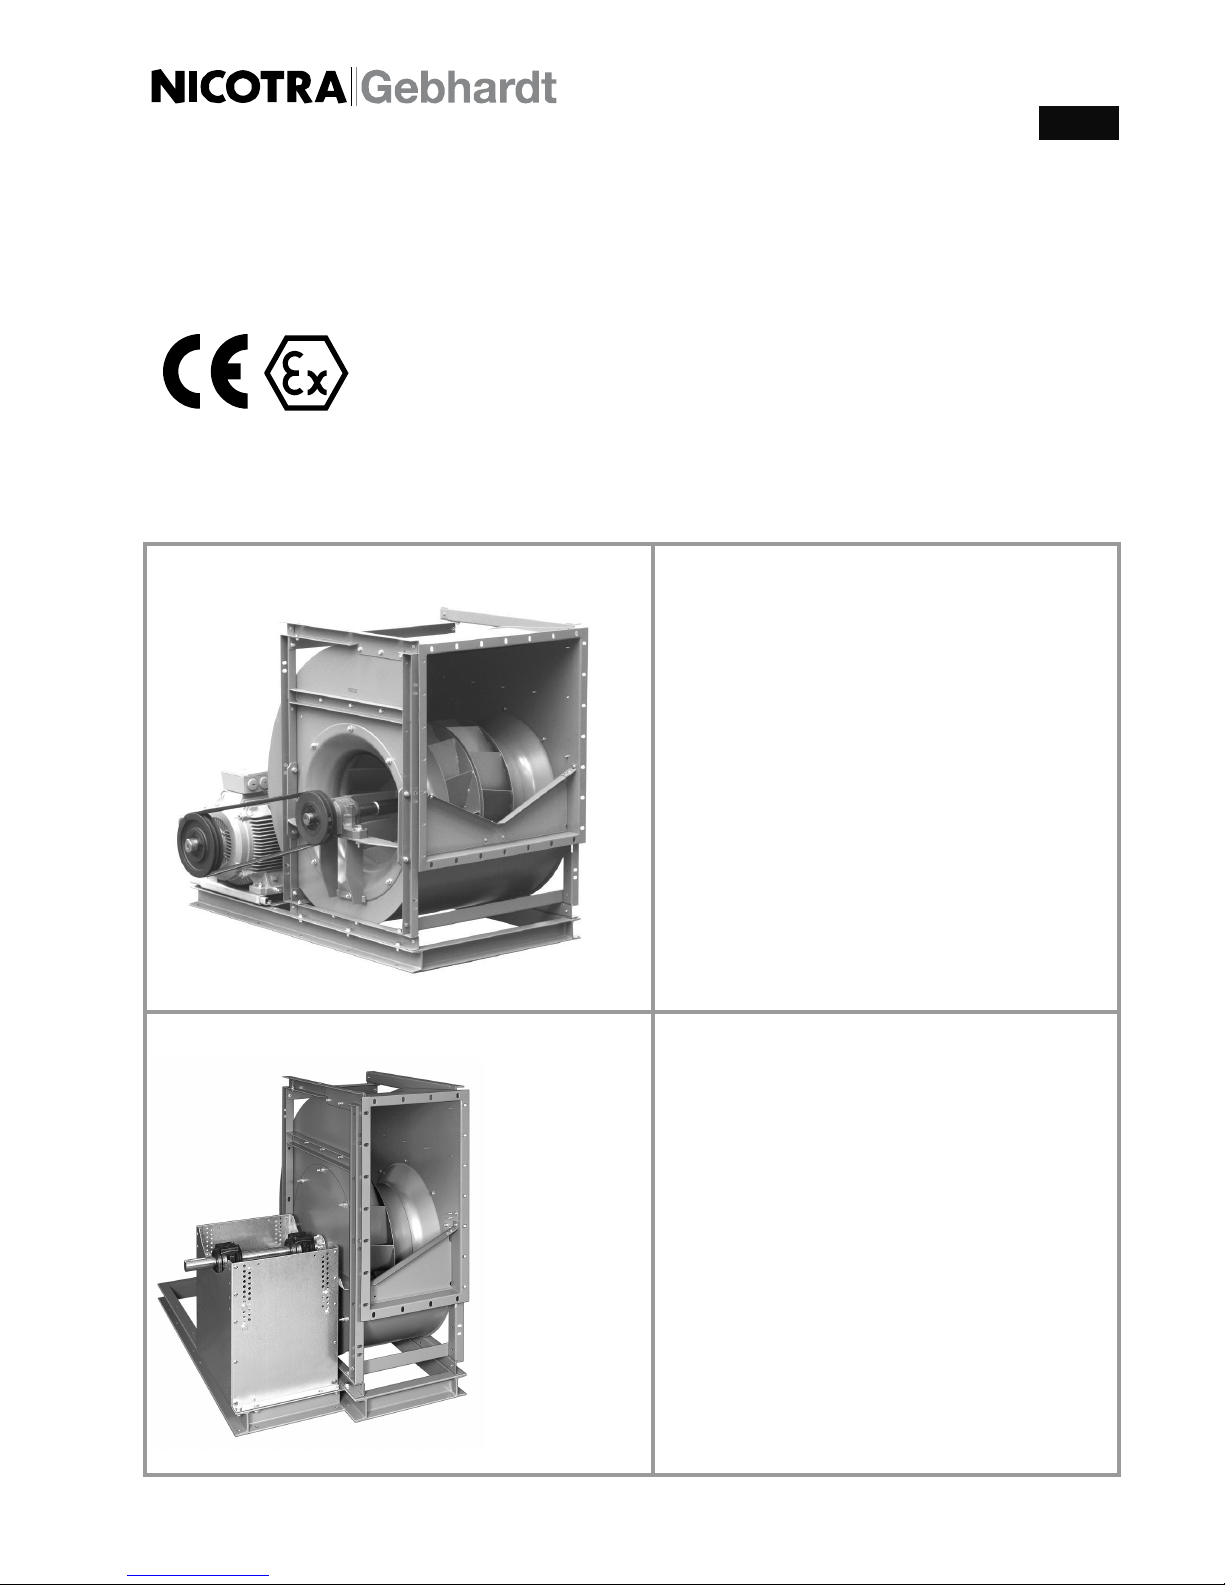
Bild 5-4: Transportösen
Bild 5-5: Transportgeschirr
1. Transportmittel entsprechend dem Ventilatorgewicht, der Bauform oder
der Aufhängemöglichkeit auswählen
(Gewichte siehe technischer Katalog).
2. Radialventilator an den dafür vorgesehenen Transportösen anhängen,
oder an Grundrahmen, Grund- oder Tragplatte aufnehmen.
3. Falls notwendig/möglich Transportschäkel einschrauben
4. Rahmenlose Ventilatoren mit Spezialtransportgeschirr an beiden
Wellenenden aufnehmen und nur mit waagerechter Achse transportieren!
(Verformungsgefahr)!
5. Bei Transportgurten immer Vierpunktaufhängung vorsehen
(2 Gurtschlaufen).Die Gurtschlaufen dürfen keine verformende Kraft auf
Ventilator oder Verpackung ausüben, gegebenenfalls Distanzstücke
verwenden!
6. Ladung z. B. durch Transportgurte oder Rutschsicherungen sichern.
7. Radialventilator sorgfältig transportieren und Schäden z. B. durch Stöße
und hartes, verkantetes Aufsetzen vermeiden.

Deutsch
DE-15/32
Vorsicht! Keine Befestigungspunkte am Ventilator sind!
Lagerstreben
Gehäuseflansche / Gehäuserahmen
einseitig an der Ventilatorwelle
Motortransportösen
6.4. Radialventilator lagern
Vorsicht Korrosionsgefahr!
Ventilator in Verpackung einlagern bzw. diese in Abhängigkeit von den
äußeren Einflüssen ergänzen.
Ventilator nur in einem gut durchlüfteten Raum unter normalen
Temperaturverhältnissen und in einer nicht korrosiven Atmosphäre
lagern.
Ventilator bei Luftfeuchtigkeit unter 70 % lagern.
Max. zulässige Temperatur von –20 °C bis +40 °C einhalten.
7. Montage
7.1. Sicherheitshinweise zur Montage
Sicherheitshinweise und Schutzmaßnahmen in Kapitel 4 sowie die
gültigen gesetzlichen Vorschriften beachten.
Vorsicht Das von Nicotra Gebhardt gelieferte ATEX-Ventilatorsystem darf in
keiner Weise bauseitig verändert werden.
Der Betrieb ist nur im Originalzustand innerhalb der technisch
festgelegten Grenzen zulässig!
(Katalog- und Typenschilddaten beachten).
7.2. Montage vorbereiten
Der Aufstellungsort ist in Art, Beschaffenheit, Umgebungstemperatur
und Umgebungsmedium für den jeweiligen Radialventilator geeignet.
Die Unterkonstruktion ist eben und ausreichend tragfähig.
1. Radialventilator vorsichtig auspacken.
2. Transportsicherungen ggf. demontieren
3. Verpackungsmaterial vollständig entfernen und fachgerecht entsorgen.

Deutsch
DE-16/32
7.3. Montage durchführen
1. Ventilator bzw. Grundrahmen spannungsfrei auf der Unterkonstruktion
befestigen bzw.-
2. Schwingungsdämpfer gleichmäßig um den Ventilatorschwerpunkt verteilt
ausrichten und befestigen, dabei auf gleichmäßige Einfederung achten.
Von Anlagenteilen werden keine Kräfte oder Schwingungen auf den
Radialventilator übertragen (flexible Anschlussstutzen)!
Die flexiblen saug- und /oder druckseitigen Anschlussstutzen sind
schwingfähig und ohne Versatz montiert
Die Schwingungsdämpfer schwingen frei und sind gleichmäßig
eingefedert!
Das Laufrad dreht frei und streift nicht an der Einströmdüse!
Ventilator auf Standsicherheit geprüft (kein Kippen möglich)
Bei Förderung feuchter Luft oder bei Aufstellung im Freien:
Ein Kondenswasserstutzen ist an der tiefsten Stelle des Gehäuses
vorhanden.
7.4. Spaltmaß am Ventilator prüfen
Bild 7-1: Spaltmaß-RER
Bild 7-2: Spaltmaß-RZR
Spaltweite zwischen Laufrad und Einströmdüse und zwischen Welle
und Deckscheibe (RER) prüfen und mit den Tabellenwerten
abgleichen!
Für ATEX Ventilatoren gilt die Forderung, an kritischen Stellen, an denen
Zündfunken durch Reibung entstehen können, bestimmte Spaltmaße
einzuhalten.
Bei den Ventilatoren RER und RZR befindet sich diese kritische Stelle,
zwischen Einströmdüse und Laufrad und Wellendurchgängen durch das
Gehäuse.

Deutsch
DE-17/32
RER r1 a r2
mm mm mm
RER 0200-2G / -3G 2,0 2,0 2,0
RER 0225-2G / -3G 2,0 2,0 2,0
RER 0250-2G / -3G 2,0 2,0 2,0
RER 0280-2G / -3G 2,2 2,2 2,0
RER 0315-2G / -3G 2,4 2,4 2,0
RER 0355-2G / -3G 2,7 2,7 2,0
RER 0400-2G / -3G 3,0 3,0 2,0
RER 0450-2G / -3G 3,4 3,4 2,0
RER 0500-2G / -3G 3,8 3,8 2,0
RER 0560-2G / -3G 4,3 4,3 2,0
RER 0630-2G / -3G 4,8 4,8 2,0
RER 0710-2G / -3G 5,4 5,4 2,0
RER 0800-2G / -3G 6,0 6,0 2,0
RER 0900-2G / -3G 6,7 6,7 2,0
RER 1000-2G / -3G 7,6 7,6 2,0
RZR r1 a
mm mm
RZR 0200-2G / -3G 2,0 2,0
RZR 0225-2G / -3G 2,0 2,0
RZR 0250-2G / -3G 2,0 2,0
RZR 0280-2G / -3G 2,2 2,2
RZR 0315-2G / -3G 2,4 2,4
RZR 0355-2G / -3G 2,7 2,7
RZR 0400-2G / -3G 3,0 3,0
RZR 0450-2G / -3G 3,4 3,4
RZR 0500-2G / -3G 3,8 3,8
RZR 0560-2G / -3G 4,3 4,3
RZR 0630-2G / -3G 4,8 4,8
RZR 0710-2G / -3G 5,4 5,4
RZR 0800-2G / -3G 6,0 6,0
RZR 0900-2G / -3G 6,7 6,7
RZR 1000-2G / -3G 7,6 7,6
RZR 1120-2G / -3G 8,5 8,5
RZR 1250-2G / -3G 9,5 9,5
RZR 1400-2G / -3G 10,6 10,6
RZR 1600-2G / -3G 12,1 12,1
1. Spalt messen, Sicherstellen, dass das Spaltmaß in keiner Phase der
Drehbewegung (von Hand drehen) unterschritten wird.
2. Messung an vier um 90° versetzten Punkten am Umfang
durchführen.

Deutsch
DE-18/32
7.5. Schutzvorrichtungen montieren
1. Frei zugängliche Eintrittsöffnungen mit Schutzvorrichtungen
(DIN EN ISO 13857) sichern.
2. Schutzvorrichtungen so auslegen, dass das Ansaugen oder Hineinfallen
von Gegenständen verhindert wird (DIN EN 60529).
8. Elektrischer Anschluss
8.1. Sicherheitshinweise zum elektrischen Anschluss
Gefahr
Achtung, Gefahr durch Stromschlag!
Sicherheitshinweise und Schutzmaßnahmen in Kapitel 4 sowie die
gültigen gesetzlichen Vorschriften beachten. EN 60204-1, DIN VDE
0100-100; DIN EN 60079-0, VDE 0170-1 DIN EN 60079-14, VDE 0165-1
Alle Ventilatoren mit Komplettierung werden anschlussfertig geliefert. Der
Motor-Klemmenkasten ist leicht zugänglich. Das Anschlussschaltbild befindet
sich im Klemmkasten-Deckel.
Vorsicht Sachschaden durch Revisionsschalter, elektronisches Steuergerät und
Frequenzumrichter!
Kein elektronisches Steuergerät und keinen Frequenzumrichter im Ex-
Bereich verwenden.
Revisionsschalter – ausgenommen Ex-Revisionsschalter –außerhalb
des Ex-Bereichs montieren.
Vorsicht Sachschaden durch zu hohe te-Zeit!
Bei Verwendung von Überlast-Schutzeinrichtung die auf dem
Motortypenschild angegebene te-Zeit nicht überschreiten.
Hinweis
Die Normmotoren sind in Schutzart “erhöhte Sicherheit Ex e II”, Temperaturklasse T3, Wärmeklasse B nach Richtlinie 2014/34/EU (ATEX) bzw. IEC/EN
60079-0, IEC/EN 60079-7 ausgeführt.
Stromart, Spannung und Frequenz des Netzanschlusses auf
Übereinstimmung zum Ventilator- bzw. Motortypenschild geprüft
Bei Motoren mit Nennleistung >4 kW Stern-Dreieck-Anlauf oder
Sanftanlauf gegeben.
Die Leistungsbegrenzung des Energieversorgungsunternehmens sind
beachtet!
Ggf. Revisionsschalter vorhanden (außerhalb des Ex-Bereiches)
Die Bauteile des Ventilators sind untereinander leitend verbunden, die
Erdung ist sichergestellt!
Der Ventilator ist gegen unerwarteten Anlauf geschützt!
Kapitel 4. „Sicherheit“ wird beachtet!
8.2. Motor anschließen

Deutsch
DE-19/32
Bild 8-2: Komplettierung
(ohne Schutzgitter)
1. Ggf. Revisionsschalter anbringen.
2. Anschlusskabel zum Ventilator bzw. Revisionsschalter führen.
3. Ventilator nach beigefügtem Anschlussschema anschließen.
4. Sicherstellen, dass alle elektrischen Schutzeinrichtungen
angebracht und angeschlossen sind.
1 = Klemmenkasten
8.3. Motorschutz
Motoren entsprechend EN 60204-1 gegen Überlast schützen.
Es sind nur Motoren zulässig, die der jeweiligen ATEX – Kategorie des
Ventilators entsprechen
Motorschutzschalter auf den Motornennstrom (siehe Typenschild)
einstellen. Ein höherer Einstellwert ist nicht zulässig!
die auf dem Motortypenschild angegebene te-Zeit für Überlast-
Schutzeinrichtungen beachten
Vorsicht Schmelzsicherungen und Sicherungsautomaten aber auch einfache
Bimetallschutzschalter bieten keinen ausreichenden Motorvollschutz.
Bei Schäden durch unzureichenden Motorvollschutz entfällt die
Herstellergarantie!
Hinweis Beachten Sie in allen Fällen die vorgegebenen Leistungsbegrenzungen
vom zuständigen Energieversorgungsunternehmen.
Sollte anlagenbedingt ein Direktanlauf erforderlich sein, so ist auch die
konstruktive Eignung des Ventilators von Nicotra Gebhardt zu bestätigen.
Bei Ventilatoren mit einem hohen Massenträgheitsmoment des Laufrades
kann es zu Hochlaufzeiten von über 6 Sekunden kommen. In diesem Fall
Motorschutzschalter oder Bimetall-Relais für Schweranlauf vorsehen.

Deutsch
DE-20/32
8.4. Probelauf durchführen
Gefahr
Verletzungsgefahr durch rotierendes Laufrad!
Bei frei zugänglichem Ventilator nie in das Laufrad greifen.
1. Radialventilator gegen unbeabsichtigtes Einschalten sichern.
2. Alle Fremdkörper (Werkzeuge, Kleinteile, Bauschutt etc.) aus dem
Kanalsystem und dem Ventilator entfernen.
3. Alle Revisionsöffnungen schließen.
4. Ventilator einschalten und die Drehrichtung des Laufrades durch
Vergleich mit dem Drehrichtungspfeil am Ventilator prüfen.
5. Bei falscher Drehrichtung den Motor unter Beachtung der
Sicherheitsvorschriften elektrisch umpolen.
6. Nach Erreichen der Betriebsdrehzahl die Stromaufnahme messen und
mit dem Motornennstrom auf dem Radialventilator- bzw.
Motortypenschild vergleichen.
7. Bei anhaltendem Überstrom Radialventilator sofort abschalten.
8. Radialventilator auf ruhigen Lauf prüfen. Sicherstellen, dass keine
außergewöhnlichen Schwingungen und Vibrationen auftreten.
9. Motor auf untypische Geräusche prüfen.
9. Inbetriebnahme
Die Motoren sind für Dauerbetrieb S1 ausgelegt. Bei mehr als drei Anläufen
pro Stunde ist die Eignung des Motors von der Nicotra Gebhardt GmbH zu
bestätigen.
Gefahr
Explosionsfähige Gasgemische können in Verbindung mit heißen und
bewegten Teilen schwere oder tödliche Verletzungen verursachen.
Explosionsgefahr durch erhöhte Umgebungstemperatur!
1. Umgebungstemperatur beobachten.
2. Für ausreichende Kühlluftzufuhr sorgen.
9.1. Voraussetzungen für den Betrieb im Ex-Bereich
Ventilator im Ex-Bereich nur in Betrieb nehmen, wenn folgende Bedingungen
erfüllt sind:
Die Angaben auf dem Typenschild stimmen mit den Anforderungen
des Ex-Einsatzbereichs vor Ort überein
(Gerätegruppe, Ex-Kategorie, Ex-Zone, Temperaturklasse).
Alle an den Ventilator gekoppelten Komponenten, von denen eine
Zündgefahr ausgehen kann, haben die erforderliche Ex-Zulassung.
Die Umgebungstemperatur beim späteren Einsatz liegt im erlaubten
Bereich!
Alle erforderlichen Schutzeinrichtungen sind installiert.

Deutsch
DE-21/32
Das Laufrad ist gegen Berührung und vor dem Auftreffen fallender
oder angesaugter Gegenstände geschützt.
Der Ventilator wird nicht in staubiger Umgebung betrieben.
Es ist sichergestellt, dass sich auf dem Ventilator keine unzulässigen
Staubansammlungen bilden.
9.2. Ventilator in Betrieb nehmen
Gefahr
Verletzungsgefahr durch rotierende Teile und heiße Oberflächen!
Sicherstellen, dass alle Schutzvorrichtungen angebracht sind.
Sicherstellen, dass das Laufrad entsprechend DIN EN ISO 13857
abgesichert ist.
Aktion
1. Funktion aller angeschlossenen Regelorgane prüfen.
2. Ventilator einschalten
9.3. Überprüfung nach Einlaufphase
Nach einer Einlaufphase von 1 bis 2 Stunden folgend Überprüfungen
durchführen:
Radialventilator gegen unbeabsichtigtes Einschalten gesichert!
1. Riemenspannung prüfen und gegebenenfalls nachspannen.
(siehe Kapitel 10.5.1 / 10.5.2 / 10.5.3)
2. Lagertemperatur prüfen (siehe Wartungsanhang)
10. Instandhaltung
10.1. Sicherheitshinweise zur Instandhaltung
Sicherheitshinweise und Schutzmaßnahmen in Kapitel 4 sowie die
gültigen gesetzlichen Vorschriften beachten.
Die Vorschriften des Motorherstellers sowie Angaben der Hersteller
der Schalt- und Steuergeräte beachten
Warnung
Nur bei gesicherter Netztrennung am Ventilator arbeiten!
Vorsicht Sachschaden durch Hochdruckreiniger!
Keine Hochdruckreiniger (Dampfstrahlreiniger) zum Reinigen verwenden.
Vorsicht Undichte Stutzen führen zu Störungen und Gefährdungen durch
austretendes Fördermedium und müssen ausgetauscht werden.

Deutsch
DE-22/32
10.2. Regelmäßige Kontrollintervalle durchführen
Zur Aufrechterhaltung des Betriebes und der Sicherheit, empfehlen wir die
Ventilatoren in regelmäßigen Abständen auf ihre Funktion und
Beschaffenheit von fachlich qualifiziertem Wartungspersonal oder einer
Fachfirma prüfen zu lassen und dies zu dokumentieren.
Art, Umfang und Wartungsintervalle, sowie darüber hinaus erforderliche
Tätigkeiten sind in Abhängigkeit des Einsatzes der Ventilatoren sowie der
vor Ort vorherrschenden Bedingungen festzulegen,
Die Wartungs- und Prüfungsempfehlung in Anlehnung an die VDMA 24186-1
finden Sie auch auf unserer Internetseite.
10.3. Instandhaltung vorbereiten
1. Motor vom Netz trennen.
2. Bei Radialventilator mit Revisionsschalter, Motor mit Revisionsschalter
abschalten.
3. Ventilator gegen unbeabsichtigtes Einschalten sichern.
4. Warten, bis das Laufrad steht.
5. Warten, bis alle heißen Oberflächen kalt sind.
6. Alle Reststoffe im Ventilator entfernen.
7. Je nach Einbausituation Anlagenteile demontieren.
Instandhaltung vorbereitet
10.4 Wartungsempfehlung für Radialventilatoren
Tabelle 10-1:
Wartungsempfehlung
Ggf. Probelauf durchführen (siehe Kapitel 8.4.).
Durchgeführte Kontrollintervalle dokumentieren.
Pos. Beschreibung
1.0 Ventilator 1/4 jährl. periodisch bei Bedarf
1.1 Auf Verschmutzung, Beschädigung, Korrosion und Befestigung prüfen ×
1.2 Laufrad auf Beschädigung und Unwucht prüfen ,Schwingungsmessung ×
1.3 Lager auf Geräusch prüfen ×
1.4 Lager nachschmieren (gem. Schmierfristen) ×
1.5 Flexible Verbindungen auf Dichtheit prüfen ×
1.6 Schwingungsdämpfer auf Funktion prüfen ×
1.7 Schutzeinrichtungen auf Funktion prüfen ×
1.8 Entwässerung auf Funktion prüfen ×
1.9 Funktionserhaltendes Reinigen × ×
1.10 Laufraddrehrichtung prüfen (in allen Drehzahlstufen) ×
1.11 Ventilator auf Funktion und Betriebsbereitschaft prüfen ×
2.0 Motor 1/4 jährl. periodisch bei Bedarf
2.1 Äußerlich auf Verschmutzung, Beschädigung, Korrosion und Befestigung prüfen × ×
2.2 Drehrichtung prüfen ×
2.3 Lager auf Geräusch prüfen ×
2.4 Lager schmieren (bei nachschmierbarer Ausführung) ×
2.5 Schutzeinrichtung auf Funktion prüfen ×
2.6 Anschlussklemmen auf festen Sitz prüfen ×
2.7 Funktionserhaltendes Reinigen × ×
3.0 Riementrieb 1/4 jährl. periodisch bei Bedarf
3.1 Auf Verschmutzung, Beschädigung und Verschleiß prüfen ×
3.2 Riemen auswechseln ×
3.3 Spannung und Flucht prüfen ×
3.4 Gegebenenfalls nachspannen / einstellen ×
3.5 Schutzeinrichtung auf Funktion prüfen ×

Deutsch
DE-23/32
10.4.1 Schwingungsüberprüfung
Der Ventilator ist regelmäßig auf mechanische Schwingungen zu überprüfen.
Die maximal zulässigen Schwinggeschwindigkeiten sind der ISO 14694
angelehnt.
Tabelle 10-2:
Baugröße Schwinggeschwindigkeit mm/s
Schwinggeschwindigkeit
≤ 0315 7,1
≥ 0355 4,5
Die Schwinggeschwindigkeiten werden in radialer Richtung an den Lagern bzw.
am Lagerschild des Motors gemessen.
Eine Laufradverschmutzung kann Unwucht und Beschädigung hervorrufen. Um
diesen Gefahren vorzubeugen, sind je nach Einsatz geeignete Inspektions- und
Reinigungsintervalle einzuhalten.
10.4.2 Motorlager
Die Lager des Motors sind werksseitig mit einer Dauerschmierung versehen;
erfahrungsgemäß muss das Fett bei normalen Betriebsbedingungen erst
nach mehreren Jahren erneuert werden.
Bei nachschmierbaren Motorlagerungen sind die Herstellerangaben zu
beachten!
Bei Lagergeräuschen ist die Service-Abteilung von Nicotra Gebhardt zur
Überprüfung oder zum Austausch der defekten Lager zu beauftragen.
10.4.3 Stillstandzeiten
Bei längeren Stillstandszeiten ist der Ventilator regelmäßig kurzzeitig in
Betrieb zu nehmen um Lagerschäden durch mechanische Belastung oder
Eindringen von Feuchtigkeit zu vermeiden.
Nach längerer Lagerung sind vor dem Einbau die Lager zu überprüfen.
10.5. Riementrieb
Der Riementrieb muss den Anforderungen der ATEX-Richtlinie entsprechen.
Er ist nach der Einlaufphase weitgehend wartungsfrei.
Es wird jedoch empfohlen, je nach Aufstellungsort und Betriebsart, die
Riemenspannung regelmäßig zu überprüfen. Die Prüfkraft F
p
ist auf dem
Typenschild und dem Auslegungsblatt angegeben.

Deutsch
DE-24/32
10.5.1
Spannvorschrift für Keilriementrieb
Bild 10-3:Keilriementrieb
L = Trumlänge
b = Riemendurchbiegung unter der Prüfkraft F
p
F
p
= Prüfkraft in N aus Gebhardt Dokument
Die richtige Riemenspannung ist erreicht, wenn mit der individuellen
Prüfkraft F
p
eine Riemendurchbiegung b von 16 mm pro 1000 mm
Trumlänge möglich ist.
10.5.2
Spannvorschrift für Flachriementrieb
Bild 10-4: Flachriementrieb
L
Mu
= Messmarkenabstand ungespannten Flachriemen
L
Mg
= Messmarkenabstand am korrekt gespannten Flachriemen
* = Auflegedehnung in mm aus Gebhardt Dokument
Die richtige Riemenspannung ist erreicht, wenn sich der
Messmarkenabstand L
Mu
um die Auflegedehnung * vergrößert hat. Die
Einstellung sollte in zwei Stufen mit einem zeitlichen Abstand von einigen
Stunden erfolgen, um die Lager nicht zu überlasten.
10.5.3 Spannvorschrift für Keil- und Flachriementrieb
Bild 10-5: Riementrieb
Die Prüfung der Riemenspannung erfolgt über die statische Frequenz des
Antriebsriemens. Hierbei wird der Flach- bzw. Keilriemen im Stillstand durch
Anschlagen in Eigenschwingung versetzt. Diese Schwingung wird mit einem
elektronischen Messgerät (z.B.) Trummeter gemessen. Die Schwingung in Hz
ist auf den angegebenen Wert (Dokumentation / Typenschild) einzustellen.
Die Messpunkt erfolgt in der Mitte (1) des Antriebsriemens.
10.5.4 Riemenwechsel
Achsabstand soweit verringern, bis der/die neuen Riemen leicht von Hand
aufgelegt werden können.
Das Spannen der Riemen erfolgt nach der jeweiligen Spannvorschrift.
Einlaufphase beachten!
10.5.5
Riemenscheibenwechsel
Bild 10-5: lösen
Riemenscheiben lösen:
1. Schrauben (3) herausdrehen.
2. Innensechskantschraube in Gewindeloch (4) eindrehen.
3. Spannbuchse aus der konischen Bohrung drücken.
4. Riemenscheibe kann nun leicht auf der Welle verschoben werden.
Bild 10-6: befestigen
Riemenscheibe befestigen:
1. Riemenscheibe und Spannbuchse mittels Innensechskantschrauben (3)
zusammenziehen.
2. Motorscheibe und Ventilatorscheibe genau fluchtend ausrichten
3. Riemenspannung nach Vorschrift einstellen

Deutsch
DE-25/32
Hinweis Darauf achten, dass Motorscheibe und Ventilatorantriebscheibe genau
fluchten!
Montieren und Spannen der Riemen nach Vorschrift.
10.5.6
Riementriebauslegung
Wird der Riementrieb ohne unser EDV-gestütztes Auswahlprogramm
ausgelegt oder verändert, sind die Grenzdrehzahlen des Ventilators sowie die
Genzwertdiagramme für die Riemenzugkräfte im jeweiligen technischen
Katalog zu beachten.
Es dürfen nur elektrostatisch leitfähige Riemen gemäß der ATEX-Richtlinie
verwendet werden.
10.5.7
Riemenschutz
Der Riemenschutz muss nach DIN EN 14986 ausgeführt sein!
10.6. Ventilatorlager
Die Ventilatorlager sind standardmäßig auf „Lebensdauer“ gefettet. Bei
erschwerten Betriebsbedingungen sind jedoch Wartungsintervalle vom
Betreiber festzulegen. Dabei sind unsere Wartungsrichtlinien für Ventilatoren
mit Nachschmiereinrichtung zu beachten.
10.7. Elastische Anschlussstutzen
Elastische Stutzen (Kompensatoren) zwischen Ventilator und Anlageteilen
müssen den ATEX-Anforderungen entsprechen. Diese sind in regelmäßigen
Intervallen zu überprüfen.
Vorsicht Lässt der Zustand des Ventilators eine Instandsetzung durch geeignete
Maßnahmen nicht mehr zu, ist der Ventilator unverzüglich außer
Betrieb zu setzen und ggf. zu erneuern.
11. Störungen
Treten während des Betriebs Störungen auf, die nicht vom
Wartungspersonal behoben werden können, bitte Kontakt mit der ServiceAbteilung der Nicotra Gebhardt GmbH aufnehmen.
Warnung
Explosionsgefahr durch unzulässige Betriebszustände!
Bei Überschreitung der zulässigen Werte, Unregelmäßigkeiten oder
Störungen Dachventilator sofort abschalten.
Deutsch
DE-26/32
12. Service, Ersatzteile und Zubehör
Nicotra Gebhardt GmbH
Gebhardtstraße 19–25
74638 Waldenburg
Germany
Telefon: +49 (0) 7942 101 384
Telefax: +49 (0) 7942 101 385
E-Mail: info@nicotra-gebhardt.com
www.nicotra-gebhardt.com
12.1. Ersatzteile bestellen
Nur Original-Ersatzteile der Nicotra Gebhardt GmbH entsprechend der
Ersatzteilliste verwenden.
Der Einbau von Ersatzteilen anderer Fabrikate kann die Sicherheit
beinträchtigen.
Für Schäden und Folgeschäden, die durch Verwendung von Ersatzteilen
anderer Fabrikate entstehen, übernimmt die Nicotra Gebhardt GmbH
keinerlei Haftung oder Gewährleistung.
Ersatzteile online bestellen - www.nicotra-gebhardt.com/Partshop
12.2. Zubehör
Die Nicotra Gebhardt GmbH bietet ein breites Zubehörprogramm zum
wirtschaftlichen Einsatz der Ventilatoren.
Das Zubehör ist optional und immer separat zu bestellen.
Die Auswahl erfolgt über die technische Dokumentation oder unser
elektronisches Auswahlprogramm.
Für die Montage bzw. Anwendung ist das Zubehör, soweit nicht
selbsterklärend, mit separaten Bedien- oder Montagehinweisen versehen.
13. Anhang
13.1 Weitere Dokumentation der Nicotra Gebhardt GmbH
Tabelle 13 1: Weitere Dokumentation
Art der Dokumentation Wo abgelegt
Wartungs- und Prüfempfehlungen Internet, siehe Link Kapitel 10.4.
Lagerwartung Anhang
EG-Einbauerklärung Anhang
EU-Konformitätserklärung Anhang
13.2 Anhang Lagerwartung
Hinweis Zu beachten bei Service- und Wartungsarbeiten
Sicherheitshinweise Kapitel 4
Instandhaltung / Wartung Kapitel 10
Sicherheitshinweise Kapitel 10.1

Deutsch
DE-27/32
Hinweis Es werden geräuschgeprüfte Präzisionswälzlager verwendet, die für eine
nominelle Lebensdauer (L10h nach DIN ISO 281-1) von 40 000
Betriebsstunden ausgelegt sind.
Damit die zulässigen Lagerbelastungen nicht überschritten werden, sind für
jeden Ventilator Mindest-Keilriemenscheiben Durchmesser festgelegt, die
nicht unterschritten werden dürfen. Die angegebenen MindestScheibendurchmesser gelten nur für Riementriebe, welche nach dem Stand
der Technik richtig dimensioniert und nach Spannvorschrift gespannt sind
(siehe technischer Katalog).
Bei Flachriementrieben sind die vorgegebenen Mindestscheiben-Durchmesse
r
um ca. 40% zu vergrößern!
13.2.1 Lager ohne Nachschmiereinrichtung
Die Lager sind standardmäßig mit einem alterungsbeständigem
Hochleistungsfett auf Lebensdauer gefettet und unter normalen
Betriebsbedingungen wartungsfrei.
Sollte aufgrund normaler Abnützung und Verschleiß ein Lagerwechsel
erforderlich sein, fordern Sie bitte unseren Kundendienst an.
13.2.2 Lager mit Nachschmiereinrichtung
IWN 01 - Standardfett
IWN 11 -Feuchtigkeitsfett
IWN 21 –Hochtemperaturfett (RER)
Vorsicht Um die maximal zulässige Lebensdauer der Lager auch bei erschwerten
Betriebsbedingungen zu erreichen, müssen die Lager in regelmäßigen
Intervallen nachgeschmiert werden.
Die Intervalle hängen von den jeweiligen Betriebsbedingungen ab und
sind vom Betreiber festzulegen. Dabei sind unsere Wartungsrichtlinien
für Ventilatoren mit Nachschmiereinrichtung zu beachten.
13.2.3 Schmierfristen
Unter normalen Betriebsbedingungen muss mindestens einmal jährlich
nachgeschmiert werden!
Diese Angaben gelten für Lager auf waagrechter Welle, wenn die Temperatur
am Lageraußenring +70°C nicht überschreitet.
Bei Temperaturen über +70°C muss für je 15°C
Temperaturüberschreitung die Schmierfrist auf die Hälfte
reduziert werden.
13.2.4 Nachschmierung mit Nachschmiereinrichtung
Bei der Nachschmierung während des Betriebes wird über den (nach Außen
gelegten) Kegelschmiernippel von der entsprechenden Fettsorte die
vorgeschriebene Menge in das Lager gepresst.
Das ausgetretene Altfett ist während kurzem Stopp zu entfernen.
Bei zweiteiligen Steh-Gussgehäusen mit eingebauten Pendellagern ist
nach dreimaligem Nachschmieren eine Reinigung und Neufettung der
Lager vorzunehmen!

Deutsch
DE-28/32
RZR 11- 0200·/.0710
RZR 12- 0200·/.0710
RZR 19- 0200·/.0355
Streben-Gussgehäuse mit eingebautem Rillenkugellager mit balligem
Außenring zur Selbsteinstellung
mit Nachschmiereinrichtung IWN.
Bild 13-5: Rillenkugellager
mit Streben-Gussgehäuse
Nachschmierung mindestens einmal jährlich.
Je nach Betriebsbedingungen öfters nachschmieren
Fettmenge:
Nachschmieren bis frisches Fett aus dem Lager austritt.
RZR 15-0400·/.1000
RZR 19-0400·/.1000
Zweiteiliges Streben-Gussgehäuse mit eingebautem Pendelkugellager
mit Nachschmiereinrichtung IWN
Bild 13-6: Pendelkugellager
mit Streben-Gussgehäuse
Nachschmierung mindestens einmal jährlich.
Je nach Betriebsbedingungen öfters nachschmieren.
Tabelle 13-4: Fettmengen
Baugröße 0400-0500 0560-0630 0710-0800 0900-1000
Fettmenge 15 g 20 g 30 g 35 g

Deutsch
DE-29/32
RZR 13-0400·/.1000
RZR 18-0400·/.1000
RZR 13-1120./.1600
Zweiteiliges Steh-Gussgehäuse mit eingebautem Pendellager
mit Nachschmiereinrichtung IWN
Bild 13-4: StehGussgehäuse mit
Pendelkugellager
Nachschmierung mindestens einmal jährlich.
Je nach Betriebsbedingungen öfters nachschmieren.
RZR 13 / 18- 0400-0500 0560-0630 0710-0800 0900-1000
Fettmenge 15 g 20 g 30 g 35 g
RZR 13- 1120 1250 1400 1600
Fettmenge 35 g 40 g 50g 50g
Tabelle 13-5: Fettmengen
RER 13-0200·/.1000;
RER 17-0200·/.1000;
Zweiteiliges Steh-Gussgehäuse mit eingebautem Pendellager
mit Nachschmiereinrichtung IWN
Bild 13-5: Pendelkugellager
mit Steh-Gussgehäuse
0200 /-1000
Nachschmierung mindestens einmal jährlich.
Je nach Betriebsbedingungen öfters nachschmieren.
RER 13-/17- 0200-0250 0280-0355 0400-0500 0560-0710 0800-1000
Fettmenge 15 g
15 g 25 g 30 g 35 g
Tabelle 13-6: Fettmengen
Deutsch
DE-30/32
EU-Konformitätserklärung
zur EU-Richtlinie 2014/34/EU (ATEX 95)
Der Hersteller:
Nicotra Gebhardt GmbH, Gebhardtstraße 19-25, 74638 Waldenburg, Germany
erklärt hiermit, dass die nachfolgend bezeichnete Maschine aufgrund ihrer Konzipierung und Bauart sowie
in der von uns in Verkehr gebrachten Ausführung den einschlägigen grundlegenden Sicherheits- und
Gesundheitsanforderungen der unten angeführten EG-Richtlinien entspricht.
Bei einer nicht mit uns abgestimmten Änderung der Maschine verliert diese Erklärung ihre Gültigkeit.
Bezeichnung:
Radialventilator mit Gehäuse, der Kategorie 2G bzw. 3G, zur Förderung explosionsfähiger
Atmosphäre
Maschinentyp:
RZR / RER .. -2G; RZR / RER .. -3G
Kategorie:
II 2G c IIB T3; II 3G c IIB T3
Baujahr/Typenbezeichnung:
siehe Typenschild
Einschlägige EG-Richtlinien:
EU-Richtlinie 2014/34/EU (ATEX)
EG-Bescheinigungsnummer:
EX9 11 09 78300 005
Name der genannten Stelle:
TÜV SÜD Produkt Service; Zertifizierstelle; Riedelstraße 65; 80339 München; Germany
Angewandte, harmonisierte Normen
1
), insbesondere:
DIN EN 13463-1, DIN EN 13463-5, DIN EN 1127-1, DIN EN 14986
Für die Einhaltung dieser Normen beim Einbau des Ventilators in eine Maschine oder Anlage ist der
Hersteller bzw. Anlagenbauer verantwortlich.
Der Hersteller trägt die alleinige Verantwortung für die Ausstellung der Konformitätserklärung.
Waldenburg, den 21.04.2016
Produktionsleiter Leiter Forschung & Entwicklung
i.V. T. Ehrhardt i.V. Dr. J. Anschütz
1) Die vollständige Liste der angewandten Normen und technischen Spezifikationen siehe Herstellerdokumentationen.

Deutsch
DE-31/32
EG-Einbauerklärung
Der Hersteller: Nicotra Gebhardt GmbH
Gebhardtstraße 19-25, 74638 Waldenburg, Germany
erklärt hiermit, dass folgendes Produkt:
Produktbezeichnung: Radialventilator mit Gehäuse
Typenbezeichnung: RZR / RER .. -2G; RZR / RER .. -3G
Seriennummer: siehe Typenschild
Baujahr: siehe Typenschild
als unvollständige Maschine gilt im Sinne von Artikel 2, Absatz „g“ und den folgenden grundlegenden
Anforderungen der Richtlinie Maschinen (2006/42/EG) entspricht: Anhang I, Artikel 1.1.2, 1.3.7
Die unvollständige Maschine darf erst dann in Betrieb genommen werden, wenn festgestellt wurde, dass die
Maschine, in die die unvollständige Maschine eingebaut werden soll, den Bestimmungen der Richtlinie
Maschinen (2006/42/EG) entspricht.
Folgende harmonisierte Normen
1)
wurden angewandt:
DIN EN ISO 12100 Sicherheit von Maschinen - Grundbegriffe, allgemeine Gestaltungsleitsätze,
DIN EN ISO 13857 Sicherheit von Maschinen – Sicherheitsabstände gegen das erreichen von
Gefährdungsbereichen
Der Hersteller verpflichtet sich, die speziellen Unterlagen zur unvollständigen Maschine nach Anhang VII,
Teil B, einzelstaatlichen Stellen auf Verlangen per Post/Email zu übermitteln.
Waldenburg, den 21.04.2016
Bevollmächtigter für die technische Dokumentation: Michael Hampel
Produktionsleiter Leiter Forschung & Entwicklung
i.V. T. Ehrhardt i.V. Dr. J. Anschütz
1) Die Vollständige Liste der angewandten Normen und technischen Spezifikationen siehe Herstellerdokumentation
2) Sofern noch keine entsprechende harmonisierten Normen vorliegen

Deutsch
DE-32/32
Nicotra Gebhardt GmbH
Gebhardtstraße 19-25
74638 Waldenburg
Germany
Telefon +49 (0)7942 1010
Telefax +49 (0)7942 101170
E-Mail info@nicotra-gebhardt.com
www.nicotra-gebhardt.com
II 2G c IIB T3 (II 3G c IIB T3)
BA-CFB-RZR-RER-ATEX 6.6 - 04/2016
Operating Instructions, ATEX EN
Centrifugal fans belt driven
(Translation of the original)
RZR
RER

English
EN-2/32
Contents
1. Revision Index ....................................................................................................................................... EN-2
2. About This Operating Manual ............................................................................................................... EN-3
3. Designated Use ..................................................................................................................................... EN-5
4. Safety .................................................................................................................................................... EN-7
5. Product Description ............................................................................................................................. EN-11
6. Handling and Storage .......................................................................................................................... EN-14
7. Installation ........................................................................................................................................... EN-15
8. Electrical Connection ........................................................................................................................... EN-18
9. Commissioning .................................................................................................................................... EN-20
10. Maintenance ........................................................................................................................................ EN-21
11. Disturbances ....................................................................................................................................... EN-25
12. Service, Spare Parts and Accessories ................................................................................................ EN-26
13. Annex .................................................................................................................................................. EN-26
EU Declaration of Conformity to EU Council Directive 2014/34/EU (ATEX) ............................................. EN-30
EC-Declaration of Incorporation ................................................................................................................. EN-31
English EN-2…EN-31
Further languages on request.
1. Revision Index
Tabelle 1-1: Revision Index
Revision Date
BA-RV 6.1 – 08/2011 08/2011
BA-CFB-RZR-RER-ATEX 6.2 01/2014
BA-CFB-RZR-RER-ATEX 6.3 07/2014
BA-CFB-RZR-RER-ATEX 6.4 03/2015
BA-CFB-RZR-RER-ATEX 6.5 05/2015
BA-CFB-RZR-RER-ATEX 6.6 04/2016

English
EN-3/32
2. About This Operating Manual
These operating instructions are an integral part of the centrifugal fan.
Nicotra Gebhardt GmbH shall not accept any liability or provide any
warranty cover for primary damage or secondary damage arising as a
consequence of disregarding these operating instructions.
Read operating manual carefully before use.
Retain operating manual for entire service life of centrifugal fan.
Keep operating manual accessible to personnel at all times.
Pass operating manual on to any subsequent owner or user of
centrifugal fan.
Insert any supplementary instructions received from the manufacturer
in the operating manual.
2.1. Validity
This operating manual only applies to the centrifugal fans stated on the
front page.
2.2. Target Group
This operating manual is intended for operators and qualified
professionals trained in installation, commissioning, operation,
maintenance and decommissioning.
2.3. Other Applicable Documents
In addition to the operating instructions, to the type plate,
warning and indication signs – fixed to the fan – the following
documents have to be observed:
- DIN VDE 0100-100
- EN 60204-1
- EN ISO 13857
- EN ISO 12100
- EN ISO 13732-1
- EN 13463-1; -5
- EN 1127-1
- EN 60079-0
- EN 14986
- Technical Catalogue
- EU-Directive 2014/34/EU
2.4. Symbols and Markings
2.4.1. Use of Warning Signs
Signal Word
Nature, source and consequences of hazard!
Steps required to avert danger

English
EN-4/32
2.4.2. Levels of Danger in Warning Signs
Table 2-1: Levels of danger in warning signs
Symbol / Danger Level Likelihood of
Occurrence
Consequences of
Neglect
Danger
Imminent danger
Death, serious
physical injury
Warning
Potential danger
Death, serious
physical injury
Caution
Potential danger Minor physical injury
Caution
Potential danger Damage to property
2.4.3.
Notes
Note Note giving pointers for easier or safe work.
Steps required for easier or safe work.
2.4.4. Other Symbols and Markings
Table 2-2: Other symbols and markings
Symbol
Meaning
Requirement for an operation
Operation with one step
1. ….
2. ….
3. ….
Operation with several steps
앫
Bullet point (primary list)
-
Bullet point (secondary list)
Accentuation (bold)
For emphasis

English
EN-5/32
3. Designated Use
3.1. Operating Data / Maximum Ratings
Caution
Risk of injury!
Adhere to technical specifications and permissible limits.
For technical specifications reference should be made to the type plate,
technical data sheet and technical catalogue!
To be observed specially!
specified motor rating
smallest permitted pulley
diameter
maximum fan speed [rpm]
permissible kind of the medium
permissible medium temperature
Note ATEX category II 2G IIB T3 or II 3G IIB T3
Fans of this category are designed for areas where an explosive atmosphere
– as a mix of air, gases, vapours or mist - is likely to occur occasionally (2G)
or rarely (3G).
The unit related measures for explosion protection of this category have to
offer the necessary amount of safety, even in the case of frequent unit
troubles or failure modes, to be usually anticipated (predictable troubles).
For the operation of the fans in explosion hazardous areas the relevant
prescriptions, local regulations and directives (ATEX 2014/34/EU) for
manufacturers and user have to be respected.
Permissible conveyed medium temperatures:
Table 3-1: Maximum ratings
Range ATEX
perm. temperature of
conveyed medium
max. ambient temp.
on drive motor
RZR -20°C to +40°C (+60°C)
+ 40°C (60°C)
RER -20°C to +60°C
The temperature range in special cases can be extended to this value if the
coolant temperature is + 60 ° C! (Possibly taking into account a power
reduction according to the manufacturer)
Examples of incorrect use include the following:
Extraction of media with impermissibly high or low temperatures
Extraction of corrosive media
Extraction of very dusty media

English
EN-6/32
The results are:
Bearings damage
Corrosion damage
Unbalancing
Vibration
Deformation
Abrasion damage
Caution Unauthorised operation
No operation above the indicated rpm (see type plate, data sheet)
No operation at rpm ranges with increased vibration (resonance)
No operation at rpm ranges out of permitted fan curve area (stability of
flow pattern)
No operation if fan becomes polluted
Caution
Danger points:
There can be injury to personnel and material damage through impeller
breakage, shaft breakage, fatigue failure, fire from spark creation.
3.2. Explosion Protection Markings
The marking on the type label of the explosion proof fans includes the group,
category, ignition class and temperature class as well as a CE-Ex-sign thus
confirming the conformity to the European directive 2014/34/EU.
The manufacturer’s declaration and the declaration of conformity 2014/34/EU
(ATEX) are attached to this maintenance instructions.
Fig 3-1: Explosion protection markings (example)
A CE-Mark
B Hazardous duty marking
1 Machine group II
Non-electric machines for use outside of the mining industry and
underground mining
2 Machine category 2 (internal and external) for use in Zones 1+2;
An explosive atmosphere is only present in the area occasionally
3 Conveyed medium G = Gaseous conveying medium
4 Ignition protection c = Explosion protection through design safety
5 Explosion group IIB = Type of gaseous atmosphere
6 Temperature class T3 = max. temperature on machine surface +200°C

English
EN-7/32
4. Safety
4.1. Product safety
The fans offer a high degree of operational safety and high quality standards
guaranteed by a certified Quality Management System (EN ISO 9001).
Before leaving the factory all the fans are inspected and sealed with a mark
of conformity.
Nevertheless, when operating fans supplied by Nicotra Gebhardt GmbH
there can be a risk of death or injury for the user or third parties, and a risk of
damage to the fan or other material assets.
Only use the fans in perfect working order and for its designated use as
intended, having due regard for safety, an awareness of hazards and in
due compliance with the operating instructions.
Arrange immediate repair of any faults which could compromise safety.
Danger
Potentially explosive gas mixtures in conjunction with hot and moving
parts may cause serious or fatal injury.
Risk of explosion due to increased ambient temperature!
Observe ambient temperature
Ensure adequate supply of cooling air
4.2. Safety Instructions
The fan may only be commissioned, operated and serviced in compliance
with the following instructions:
Operating instructions
Warning and information signs on the fan
Any other operating and installation instructions pertaining to the machine
Terms and requirements relevant to the machine
Applicable national and regional regulations, especially regarding
explosion protection, health & safety and accident prevention.
English
EN-8/32
4.3. Safety Instructions
1. Use appropriate safeguards to prevent contact with rotating parts (shafts,
impeller, etc.).
2. Protection devices are so selected so that sucking or falling-in of objects
will be prevented.
3. After installation (and before electrical connection) immediately refit any
guards which have been removed during installation.
Danger
The fans are delivered without inlet- and discharge guards. If there is a
danger of contact with the impeller owing to the way the fan is installed,
then it is necessary to fit guards conforming to EN ISO 13857 (available
as an accessory).
Only then can the fan be set in operation!
Danger
ATEX fans of categories 2G or 3G are made for integration into
installations. Care must be taken to avoid any ingress of object into the
fan. (min. IP20 to EN 60529).
The user has to find corresponding protection in order to ensure a safe
operation!
Caution!
The suitability of protection devices and their fixtures to the fan have to
be evaluated within the overall security concept of the installation.
4.4. Professional Staff
1. Ensure that the Installation of the fan and any work on it is carried out by
skilled professionals only with due regard to these operating instructions
and any applicable regulations.
2. Electrical connection to be carried out by qualified electricians only.
4.5. Protective Gear
Caution!
Ensure that members of staff are wearing protective gear appropriate to
their deployment and environment.
The protective clothing is specified below!
4.6. Specific Hazards
4.6.1. Noise Emission
The sound emission expected during normal use of the fan is documented in
the technical lists and should be duly taken into account.
Wear ear defenders when working near to or on the running fan!

English
EN-9/32
4.6.2. Heavy Loads
The heavy weight of the fan and its components entail the following risks in
transit and during installation:
Risk of being trapped, crushed or cut by moving or toppling machinery
Danger of falling components
Do not stand or work under suspended loads.
Wear a hard hat, safety shoes and gloves.
4.6.3. Rotating Shafts and Impellers
Objects falling onto rotating shafts and impellers can fly off at an angle and
cause serious injury.
Articles of clothing and hair can get caught in rotating shafts and impellers.
Do not remove guards during operation.
Do not wear loose-fitting clothing when working near rotating
shafts and impellers
Wear goggles
4.6.4. Hot Surfaces
There is a risk of sustaining burns or scalds on hot surfaces during operation.
Do not touch the motor during operation.
When the fan has stopped wait until the motor has cooled down.
Wear protective gloves
4.7. Structural Modifications, Spare Parts
Notes Unauthorised structural modifications may not be made to the
centrifugal fan without the consent of Nicotra Gebhardt GmbH.
Nicotra Gebhardt GmbH shall not accept liability for any damage
arising as a result of said modifications.
Use only genuine spare parts supplied by Nicotra Gebhardt GmbH.
Caution In areas subject to explosion hazards the fan may only be modified or
converted by Nicotra Gebhardt GmbH itself, by a service location
approved by the company, or by personnel authorised and trained by
the company.
4.8. Installation and Maintenance
The following steps should be taken before working on the fan:
1. Ensure that the atmosphere is not potentially explosive.
2. Switch off the machine and take measures to prevent it from being
switched back on accidentally.
3. Display the following message on a sign:
Do not switch on! Work currently in progress on the machine

English
EN-10/32
4.9. Signs on the Fan
Depending on the model, the type plate and the arrow indicating the direction
of rotation are fitted to the housing or handle for high visibility.
4.9.1. Type Plate
Fig. 4-1:
Example type plate
4.9.2 Belt drive plate
Fig. 4-2:
Belt drive - Sample
4.9.3 Arrow Indicating Direction of Rotation
Fig. 4-3:
Arrow indicating direction
of rotation
Only Example
Only Example

English
EN-11/32
5. Product Description
5.1. Centrifugal Fans in General
The centrifugal fans can be completed to a fan set by equipping them with
base frame and belt drive or acc. to the type & size with pick-a-back and belt
drive.
Further options and accessories see proSELECTA II, Technical
documentation and price lists.
Examples see subsequent drawings.
5.2. Centrifugal Fans
The centrifugal fan RZR and RER do meet the requirements of ATEX regulation
2014/34/EU by its safe design and controlled production procedures
corresponding to EN 14986 and EN 13463-1/-5.
Classification is made – according to the corresponding type plate – to group II,
category 2G, explosion group IIB and temperature class T3.
The centrifugal fans can be supplied completed as a fan set with base frame
or pick-a-back, belt drive, and motor.
If the fan is supplied by Nicotra Gebhardt as a bare fan i.e. without the
necessary accessories, the ATEX conformity is limited to the fan itself as
supplied.
The ATEX fan or the fan set supplied by Nicotra Gebhardt must not be
modified by the customer. Any modification will make the ATEX conformity
invalid.
Materials:
- Impeller made of sheet steel, with ATEX special coating
- Inlet cone made of copper
Caution
If the fan installed outside a building or when conveying humid air a
condense water drain – available as an accessory – has to be fitted at th
e
lowest point of the casing.
Note The ATEX fan must not be modified by the user. Any modification will
render ATEX conformity invalid.
English
EN-12/32
5.2.1 e.g. RZR 11–
1 Centrifugal fan
2 Base frame with
- Motor rails -or
- Motor slide bases
3 Pick-a-Back
4 Drive
7 Anti-vibration mounts
Important Accessories:
5 Access door
(if the impeller isn’t
accessible)
6 Drain plug
8 Inlet guard
9 Discharge guard
10 Drive guard
11 Shaft guard
Contact protection.
EN ISO 13857
Protection against the
penetration of articles
EN 60529
Fig. 5-1: Fan Set RZR 11

English
EN-13/32
5.2.2 e.g. RER 11-
1 Centrifugal fan
2 Base frame with
- Motor rails -or
- Motor slide bases
3 Pick-a-Back
4 Belt drive
7 Anti-vibration mounts
Important Accessories:
5 Access door
ATEX- Scope of supply
6 Drain plug
8 Inlet guard
9 Discharge guard
10 Drive guard
Contact protection.
EN ISO 13857
Protection against the
penetration of articles
EN 60529
Fig. 5-2: Fan Set RER 11
5.3.3 e.g. RER 13 -
1 Centrifugal fan with
base frame
2 Motor rails –or
- Motor slide bases
3 Motor
4 Belt drive
7 Anti-vibration mounts
Important Accessories:
5 Access door
ATEX- Scope of supply
6 Drain plug
8 Inlet guard
9 Discharge guard
10 Drive guard
Contact protection.
EN ISO 13857
Protection against the
penetration of articles
EN 60529
Fig. 5-3: Fan Set RER 13 / 17

English
EN-14/32
6. Handling and Storage
6.1. Packing
Centrifugal fans are packaged in sturdy cardboard boxes or on wooden
crates depending on their size and weight. Instructions on removing
transportation locks are enclosed.
6.2. Symbols on Packing
The following symbols are printed on the cardboard boxes:
Table 7-1: Symbols on packaging
Symbol Meaning
Handle with care
Keep dry
Top
6.3. Handling of Centrifugal Fans
Warning
Danger of injury from falling components!
Do use only certified lifting devices suitable for the fans to handle!
Select the transportation mode according to the weight and execution of
the fan!
Handle the fan as long time as possible with its original packing!
Secure load!
Do not stand under suspended loads!
Fig. 5-4: Lifting lugs
Fig. 5-5: Lifting beam
1. Select the transportation mode according to the weight, execution, or
suspension possibilities of the fan
(Weight data see technical catalogue).
2. Centrifugal fans to be attached at the lifting lugs provided or at the base
frame, base plate, or supporting plate.
3. If necessary and possible screw in a shackle.
4. Fans without a frame to be handled by using special lifting device taking
the fan at both shaft ends and to be transported in a horizontal shaft
position only!
5. When using transport belts always provide 4 points of suspension (2
belts).
The belt may not exert a deforming force to the fan or its packing. If
necessary use a spacer!
6. Secure load with belts or fix it against sliding!
7. Handle centrifugal fan with care to prevent damages, avoid e.g. shock or
rough placement.

English
EN-15/32
Caution These are NO fixing points at the fan!
Bearing struts
Casing flange / Casing frame
One-sided fixing at fan shaft
Motor lifting lug
6.4. Storage of Centrifugal Fan
Caution Risk of corrosion!
Store the fan in its packaging, adding any other protection dictated by its
storage environment.
Store centrifugal fan in a well-ventilated room only at normal
temperatures and in a non-corrosive atmosphere.
Store centrifugal fan in conditions registering less than 70 % atmospheric
humidity.
Adhere to max. permissible temperature of –20 °C to +40 °C.
7. Installation
7.1. Safety Instructions for Installation
Observe the safety instructions and preventive measures in Chapter 4
and the relevant legal requirements.
Caution
The fan system supplied by Nicotra Gebhardt must not be modified in
any way!
It’s operation is exclusively permitted in it’s state as originally supplied
and within the LIMITS SPECIFIED.
(Respect catalogue- and type plate data).
7.2. Preparation to Installation
Place of installation suitable for the centrifugal fan in terms of its
category, condition, ambient temperature and environmental media.
The installation surface is plane and able to support the weight.
1. Unpack centrifugal fan carefully.
2. Unfasten or dismantle transport locks
3. Packing material to be fully removed and disposed.

English
EN-16/32
7.3. Carrying out Installation
1. The fan or base frame must be fixed without stressing to the supporting
structure.
2. AVM to be regularly placed around centre of gravity and definitely fixed. Check
whether the AVM is evenly under load.
No forces or vibrations may be transferred from other plant parts to
the fan (flexible connection).
The flexible connections (ATEX) at intake and/or discharge are
installed well aligned and freely moving.
The AVM are freely moving and under even load!
The impeller is turning idly and does not touch at intake cone!
The stability against collapse of the fan has been checked.
Conveying humid air outside installation:
Is a condense water drain fitted to the lowest point of the casing
7.4. Checking the Gap Dimension on the Fan
Table 7-1: Gap width RER
Table 7-2: Gap width RZR
Check gap between impeller and inlet cone and between shaft and drilling
in the cover disk (RER) against chart values below!
For ATEX fans the rule is applied that at critical spots where sparks can be
ignited by friction, certain gaps have to be respected.
With the RZR and RER fans this critical spots are between intake cone and
rotating impeller and if existing at the shaft passage at the casing.

English
EN-17/32
RER r1 a r2
mm mm
RER 0200-2G / -3G 2,0 2,0 2,0
RER 0225-2G / -3G 2,0 2,0 2,0
RER 0250-2G / -3G 2,0 2,0 2,0
RER 0280-2G / -3G 2,2 2,2 2,0
RER 0315-2G / -3G 2,4 2,4 2,0
RER 0355-2G / -3G 2,7 2,7 2,0
RER 0400-2G / -3G 3,0 3,0 2,0
RER 0450-2G / -3G 3,4 3,4 2,0
RER 0500-2G / -3G 3,8 3,8 2,0
RER 0560-2G / -3G 4,3 4,3 2,0
RER 0630-2G / -3G 4,8 4,8 2,0
RER 0710-2G / -3G 5,4 5,4 2,0
RER 0800-2G / -3G 6,0 6,0 2,0
RER 0900-2G / -3G 6,7 6,7 2,0
RER 1000-2G / -3G 7,6 7,6 2,0
RZR r1 a
RZR 0200-2G / -3G 2,0 2,0
RZR 0225-2G / -3G 2,0 2,0
RZR 0250-2G / -3G 2,0 2,0
RZR 0280-2G / -3G 2,2 2,2
RZR 0315-2G / -3G 2,4 2,4
RZR 0355-2G / -3G 2,7 2,7
RZR 0400-2G / -3G 3,0 3,0
RZR 0450-2G / -3G 3,4 3,4
RZR 0500-2G / -3G 3,8 3,8
RZR 0560-2G / -3G 4,3 4,3
RZR 0630-2G / -3G 4,8 4,8
RZR 0710-2G / -3G 5,4 5,4
RZR 0800-2G / -3G 6,0 6,0
RZR 0900-2G / -3G 6,7 6,7
RZR 1000-2G / -3G 7,6 7,6
RZR 1120-2G / -3G 8,5 8,5
RZR 1250-2G / -3G 9,5 9,5
RZR 1400-2G / -3G 10,6 10,6
RZR 1600-2G / -3G 12,1 12,1
1. Measure the gap and ensure that the width of the gap does not fall
below the threshold in any phase of the rotation (manual rotation).
2. Carry out measurements on four 90° points on the circumference.

English
EN-18/32
7.5. Install Protection Devices
1. Fit guards to protect exposed inlet openings (EN ISO 13857).
2. Design safety devices in such a way that they prevent objects from being
sucked in or from falling in (see EN 60529).
8. Electrical Connection
8.1. Safety Instructions for Electrical Connection
Danger
Danger of electric shock!
Observe the safety instructions and preventive measures in Chapter 4 as
well as the relevant legal requirements.
EN 60204-1, DIN VDE 0100-100; EN 60079-0, VDE 0170-1 EN 60079-
14, VDE 0165-1
All the fans are delivered ready for connection.
The terminal box is easily accessible.
The wiring diagram is in the terminal box.
Caution Inspection switches, electronic control units and frequency converters
can cause material damage!
Do not use electronic control units or frequency converters in areas
subject to explosion hazards.
Install inspection switches - except inspection switches approved for
areas subject to explosion hazard – outside the area subject to explosion
hazards.
Caution Excessive te-time can cause material damage!
When using overload protective devices do not exceed the te-time stated
on the motor rating plate.
Note
The standard motors are classified as protection category “Increased Safety
Ex e II”, temperature class T1 to T3, and insulation class B in accordance
with Directive 2014/34/EU (ATEX) and IEC/EN 60079-0, IEC/EN 60079-7.
Current, voltage and frequency of mains supply checked for
conformity with fan type plate and motor rating plate.
Star-delta or soft start provided for motors with a nominal output
>4 kW.
Adhere to the output limits imposed by the power supply company.
If necessary, an Isolator must be provided(outside the area subject to
explosion hazards)
All components are provided with an earthing. The fan components
are electrically connected to each other.
The fan is protected against unexpected start!
Chapter 4. „Safety“must be respected!

English
EN-19/32
8.2. Electrical connection of the motor
Fig. 8-2: Fan set (without
p
rotection guard)
1. Fit inspection switch if applicable.
2. Connect feed line to fan or service switch.
3. Connect motor as shown on connection diagram supplied.
4. Ensure that all the electrical safety devices have been fitted and
connected.
1 = Connection box
8.3. Motor Protection
Protect motors against overload in accordance with EN 60204-1.
Only motors conforming to the corresponding ATEX – category of the fan
are permitted.
Motor protection switches must be set to the nominal motor current (see
type plate). A higher setting value is not admitted!
Respect the te–time for overload protection indicated on the motor type
plate.
Caution Fuses or circuit breakers do not provide sufficient motor protection.
Damage due to insufficient motor protection invalidates the
manufacturer’s guarantee.
Note In all cases the power limitations provided by the existing power supply
company must be taken into account.
If plant conditions necessitate a direct start the suitability of the fan design
must be confirmed with Nicotra Gebhardt. Fans with high inertia impellers can
take over 6 seconds to reach top running speed. In these cases heavy duty
motor protection relays or bimetal relays must be provided.

English
EN-20/32
8.4. Carrying out a Test Run
Danger
Risk of injury from rotating impeller!
Never reach into the impeller when the fan is open.
1. Take measures to prevent the centrifugal fan from being switched on
accidentally
2. Clear the ducting system and fan of all foreign bodies (tools, small parts,
construction waste, etc.
3. Close all the inspection openings.
4. Switch on the fan and check the direction of rotation of the impeller by
comparing it with the arrow on the fan indicating the direction of rotation.
5. If the direction of rotation is wrong, reverse the polarity of the motor
having due regard to the safety instructions.
6. Once operating speed has been reached measure the current
consumption and compare it with the nominal motor current on the fan
type plate or motor rating plate
7. If there is continuous overload switch the fan off immediately.
8. Check that the fan runs smoothly and quietly. Ensure that there are no
unusual oscillations or vibrations.
9. Check the motor for any abnormal noises.
9. Commissioning
The motors are designed for continuous operation S1. If operations involve
more than three starts per hour Nicotra Gebhardt GmbH shall be required to
confirm the suitability of the motor.
Danger
Potentially explosive gas mixtures in conjunction with hot and moving
parts may cause serious or fatal injury.
Risk of explosion due to increased ambient temperature!
Observe ambient temperature
Ensure adequate supply of cooling air
9.1. Conditions for Commissioning in Ex-Area
he following requirements must be met before operating the fan in areas
subject to explosion hazards:
Specifications on the type plate to meet the standards required in the
local operating conditions in respect of explosion hazards (machine
group, explosion hazard category, explosion hazard zone,
temperature class).
All the components connected to the fan carrying a risk of ignition or
explosion to have the required approval certificates.
The ambient temperature during subsequent use to be within in the
allowed limits!

English
EN-21/32
All the requisite safety devices to be installed.
Prevent impeller from contact and from being hit by falling or sucked-
in objects.
The fan is not operated in a dusty environment.
Ensure that unacceptable levels of dust are not allowed to gather on the fan.
9.2. Commissioning the Centrifugal Fan
Danger
Risk of injury from rotating parts and hot surfaces!
1. Ensure that all the safety devices are fitted.
2. Ensure that the impeller has been secured acc. to EN ISO 13857!
Action
1. Check the working order of all the connected control instruments.
2. Switch on the centrifugal fan.
9.3. Checks after Running-In phase
After a running-in phase of 1 to 2 hours the following checks have to be
made:
Centrifugal fan secured against involuntary switching on!
1. Check belt tension and retighten if necessary.
(see chapter 10.5.1 / 10.5.2 / 10.5.3)
2. Check bearing temperature (see attachment)
10. Maintenance
10.1. Safety Instructions for Maintenance
Observe the safety instructions and preventive measures in
Chapter 4 and the relevant legal requirements.
Follow the directions of the motor supplier and the instructions
specified by the manufacturers of the switches and control units.
Warning
Works on the fan are authorised only when fully cut off power supply!
Caution Pressure washers can cause damage to property!
Do not use pressure washers (steam jet cleaners) to clean the equipment.
Caution Unsealed sleeving leads to breakdowns and danger from escaping
transported medium and must be replaced.
English
EN-22/32
10.2. Observing Regular Inspection Intervals
In the interests of upkeep and safety we recommend having the operation
and condition of the fans inspected at regular intervals by duly qualified
service personnel or a professional maintenance firm and documenting these
inspections.
The nature and extent of the maintenance work, the service intervals and any
additional work required needs to be specified on a case-by-case basis
depending on the use of the fans and the general conditions on site.
Our servicing and inspection recommendations based on VDMA 24186-1
can be found on our website.
10.3. Preparing for Maintenance
1. Disconnect the motor from the mains.
2. Centrifugal fans fitted with an inspection switch should be switched off
using the inspection switch.
3. Take measures to prevent the centrifugal fan from being switched on
accidentally.
4. Wait until the impeller has stopped.
5. Wait until all hot surfaces have cooled down.
6. Remove any residues from the fan.
7. Depending on the situation installation components may be dismantled
for inspection and maintenance.
Preparation for maintenance is completed
10.4 Maintenance recommendations for centrifugal fans:
Table 10-1:
Maint. recommendation
Conduct test run if applicable (see Chapter 8.4).
Document inspection intervals observed.
Pos. Description
1.0 Fan quarterly cyclic on demand
1.1 Check deposit, damages, corrosion an fixing ×
1.2 Check impeller for damage and unbalancing, vibration check ×
1.3 Check bearing noise ×
1.4 Relubricate bearing (acc. to relubrication plan) ×
1.5 Check flexible connection for tightness ×
1.6 Check correct function of AVM ×
1.7 Check safety devices (guards) for effectivity ×
1.8 Check condense water drain ×
1.9 Clean whole unit in order to keep all elements in best working conditions × ×
1.10 Check rotational sense of impeller (for all speeds) ×
1.11 Check fan function and its readiness to immediate start up ×
2.0 Motor quarterly cyclic on demand
2.1 Visual control for dirt, damages, corrosion and correct fixing × ×
2.2 Check rotational sense ×
2.3 Check bearing noise ×
2.4 Relubricate bearing (in case of relubricatable bearings) ×
2.5 Check safety devices (guards) for effectivity ×
2.6 Check tight electrical connections on tight fixing ×
2.7 Clean whole unit in order to keep all elements in best working conditions × ×
3.0 Belt Drive quarterly cyclic on demand
3.1 Check for deposit, damages and wear ×
3.2 Change V-belts ×
3.3 Check tightening and alignment ×
3.4 If necessary retighten / align ×
3.5 Check safety devices (guards) for effectivity ×

English
EN-23/32
10.4.1 Vibration monitoring
The fan has to be frequently checked for vibrations. The max. vibration velocity
values admitted are those which relate to ISO 14694.
Table 10-2:
Size Vibration velocities mm/s
Vibration velocity
≤ 0315 7,1
≥ 0355 4,5
These vibration velocities are to be measured in a radial direction on the bearing
or bearing casing of the motor.
Deposits of dirt and dust on the impeller can cause unbalancing and subsequent
damages. In order to prevent this danger frequent inspections and cleaning
measures have to be carried out depending on the degree of possible deposit.
10.4.2 Motor bearings
The motor bearings are supplied permanently lubricated by the factory; ex-
perience has shown that the grease needs to be changed only after several
years only under normal operating conditions.
In the case of bearing noise please contact Nicotra Gebhardt-Service for a
check and a possible change of defective bearings.
10.4.3 Periods of stand still
During longer periods of standstill the fan must from time to time be put into
operation for a short while. This is to avoid bearing damages due to the
mechanical load and ingress of humidity.
After longer periods of storage, the fan and motor bearings have to be
checked prior to installation.
10.5.
Belt drive
The belt drive has to reply to the requirements of the ATEX guideline and will
maintenance free be after the start-up / running-in phase.
It is nevertheless recommended to check belt tension in regular intervals.
The test force F
p
is indicated at the type plate and the design sheet.

English
EN-24/32
10.5.1 Tensioning rules for V-belt drives
Fig. 10-3: V-belt drive
L = Span between shaft centres
b = Belt deflection under test force F
p
F
p
= Test force in N from the
The correct tensioning for a belt is achieved if the individual test force F
p
produces a belt deflection b of 16 mm per 1000 mm of span.
10.5.2 Tensioning rules for flat belts
Fig. 10-4: Flat belt drive
L
Mu
= Measurement mark spacing on un-tensioned flat belt
L
Mg
= Measurement mark spacing on correctly tensioned belt
* = Increase in mm from the manufacturer documentation
The correct belt tensioning has been achieved when the measurement
mark spacing L
Mu
has increased by *. The adjustment should take place
in two stages with a time period of some hours in between to avoid
overloading the bearings.
10.5.3 Tensioning rules for V-belt and flat belt drive
Fig. 10-5: Belt drive
The check of the belt tension is made through observation of the static belt
frequency. For this purpose the flat or V-belt is hit and vibrating at resonance
frequency. An electronically measuring device - the so-called Trummeter – will
relate this to the tension force. The oscillation in Hz has to correspond to the
value indicated in the documentation/type plate.
The measuring point is places in the centre (1) of the belt, i.e. between
both pulleys.
10.5.4 Belt changing
The centre distance should be reduced until the new belt/s can be easily
fitted by hand.
The tensioning of the belt follows in accordance to the respective
tensioning rules.
Observe the running-in phase!
10.5.5 Pulley changing
To release the pulley wheel:
1. Unscrew the bolts (3).
2. Tighten the socket head cap screw in the threaded hole (4).
3. Press the clamping bush out of the tapered hole.
4. The pulley wheel can now be easily slid of the shaft.
Fig. 10-6 to release:
To fix the pulley :
1. Pull the pulley wheel and the clamping bush together by means of the
socket head cap screw (3).
2. Motor pulley and fan pulley to be exactly in line
3. Belt tension to be set according to instructions
Fig. 10-7: Fixing

English
EN-25/32
Note Ensure that the motor pulley and the fan drive pulley are accurately
aligned.
Fit and tension the belt in accordance with instructions.
10.5.6 Belt drive design
If the belt drive is designed or modified without using the Nicotra Gebhardt
selection programme the speed limits of the fan as well as the limitations for
belt forces
- to be found in the corresponding catalogue - are to respected.
Only electro statically conductive belts acc. to ATEX guideline may be used.
10.5.7 Drive guard
Belt guard must be designed in accordance with EN 14986!
10.6. Fan bearings
The fan bearings are “Life span” lubricated as standard. However in heavy
duty operational conditions maintenance intervals are to be established by the
operator. Our maintenance guidelines on later lubrication are to be observed.
10.7. Flexible connections
Flexible connections (compensators) between fan and ducting have to reply to
ATEX requirements. They are to be checked in regular intervals.
Caution
If the state of the fan does not allow adapted action for repair it has to be
put out of order immediately and to be replaced if required.
11. Disturbances
If disturbances occur during operation which cannot be repaired by
maintenance personnel please contact the service department of
Nicotra Gebhardt GmbH.
Warning
Risk of explosion caused by improper operating states!
Switch the fan off immediately if permissible limits are exceeded and in
the event of irregularities or faults.

English
EN-26/32
12. Service, Spare Parts and Accessories
Nicotra Gebhardt GmbH
Gebhardtstraße 19–25
74638 Waldenburg
Germany
Telephone: +49 (0) 7942 101 384
Fax: +49 (0) 7942 101 385
E-mail: info@nicotra-gebhardt.com
www.nicotra-gebhardt.com
12.1. Ordering Spare Parts
Use only genuine spare parts supplied by Nicotra Gebhardt GmbH as
featured in the list of spare parts.
The use of spare parts supplied by other manufacturers may compromise the
safety of the equipment. Nicotra Gebhardt GmbH shall not accept any liability
or provide any warranty cover in respect of primary or secondary damage
arising as a consequence of using spare parts supplied by other
manufacturers.
Spare parts can be ordered online at -- www.nicotra-gebhardt.com/Partshop
12.2. Accessories
Nicotra Gebhardt GmbH has a wide range of accessories for the economical
and efficient use of its fans.
Accessories are optional and always need to be ordered separately.
Spare parts should be selected on the basis of the technical specifications or
via our electronic selection program. Accessories are supplied with separate
operating or installation instructions unless their installation or uses are selfexplanatory.
13. Annex
13.1 Further Documentation Supplied by
Nicotra Gebhardt GmbH
Table 13 1: Further documentation
Type of Documentation File Location
Maintenance and inspection
recommendations
Internet
Bearing maintenance Annex
EU-Declaration of Conformity Annex
EC-Declaration of Incorporation Annex
13.2 Annex - Bearing Maintenance
Note or service and maintenance observe the following instructions
Safety instructions Chapter 4
Service/ Maintenance Chapter 10
Safety Notes Chapter 10.1

English
EN-27/32
Note As a standard there are only noise tested precision bearings fitted, designed
for a nominal life time (L10h acc. to ISO 281-1) of 20 000 operation hours.
In order to not exceed the permitted bearing loads there are minimum pulley
diameters specified for each fan whose values must be fallen below. The
minimum pulley diameter indicated are applicable for belt drives which are
correctly dimensioned to the actual „state of the art“ and tighten to the
tightening specification.
For flat belt drives the minimum pulley diameter value has to be increased of
about 40%!
13.2.1 Bearings without Lubricating Device
The bearings are normally supplied greased for life with a high-performance
grease that is resistant to ageing and does not require maintenance under
normal operating conditions.
If in the case of normal wear and tear a bearing change is required ask for the
Nicotra Gebhardt-Service.
13.2.2 Bearings with Lubricating Device
IWN 01 – Stand grease
IWN 11 – Moisture resistant grease
IWN 21 – High temperature grease (RER)
Caution In order to reach the maximum permitted bearing lifetime under heavy
duty operating conditions, they have to reduplicate within regular
intervals.
The intervals depend on the specific operating conditions and are to be
determined by the operator. The maintenance instructions of the fans
containing republication guidelines have to be taken into account.
13.2.3 Relubrication intervals
Under normal operating conditions a relubrication has to be carried out at leas
t
once a year!
This is applicable for bearings of a shaft in a horizontal position and when the
temperature at outer bearing ring does not exceed +70°C.
For temperatures exceeding +70°C the relubrication interval has
to reduce to half for every 15°C above this value.
13.2.4 Relubrication with Lubricating Device
Relubrication during operation (only applicable for RZR fans) is carried out by
pressing the required quantity of grease through the (by tubes extended)
conical grease nipple into the bearing.
The escaped old grease has to be taken off during a short stop of the fan.
For self aligning bearings fitted in a split plummer block casing a
cleaning of the bearing and a fully new greasing has to be carried out!

English
EN-28/32
RZR 11- 0200·/.0710
RZR 12- 0200·/.0710
RZR 19- 0200·/.0355
Cast iron housing with struts and self aligning radial insert ball
bearings
with lubrication device IWN
Fig. 13-5: Ball bearings in
cast iron housing with
struts
Relubrication at least once a year.
Interval to be reduced for heavy duty operation
Grease Quantity:
Press grease into bearing until fresh grease is escaping.
RZR 15-0400·/.1000
RZR 19-0400·/.1000
Split type cast iron housing strut mounted with self-aligning double row
bearings,
with lubrication device IWN
Fig. 13-6: Self aligning
double row bearing in a
cast iron housing
Relubrication at least once a year.
Interval to be reduced for heavy duty operation
Table 13-4: Grease quantity
RZR 15 / 19- 0400-0500 0560-0630 0710-0800 0900-1000
Grease quantity 15 g 20 g 30 g 35 g
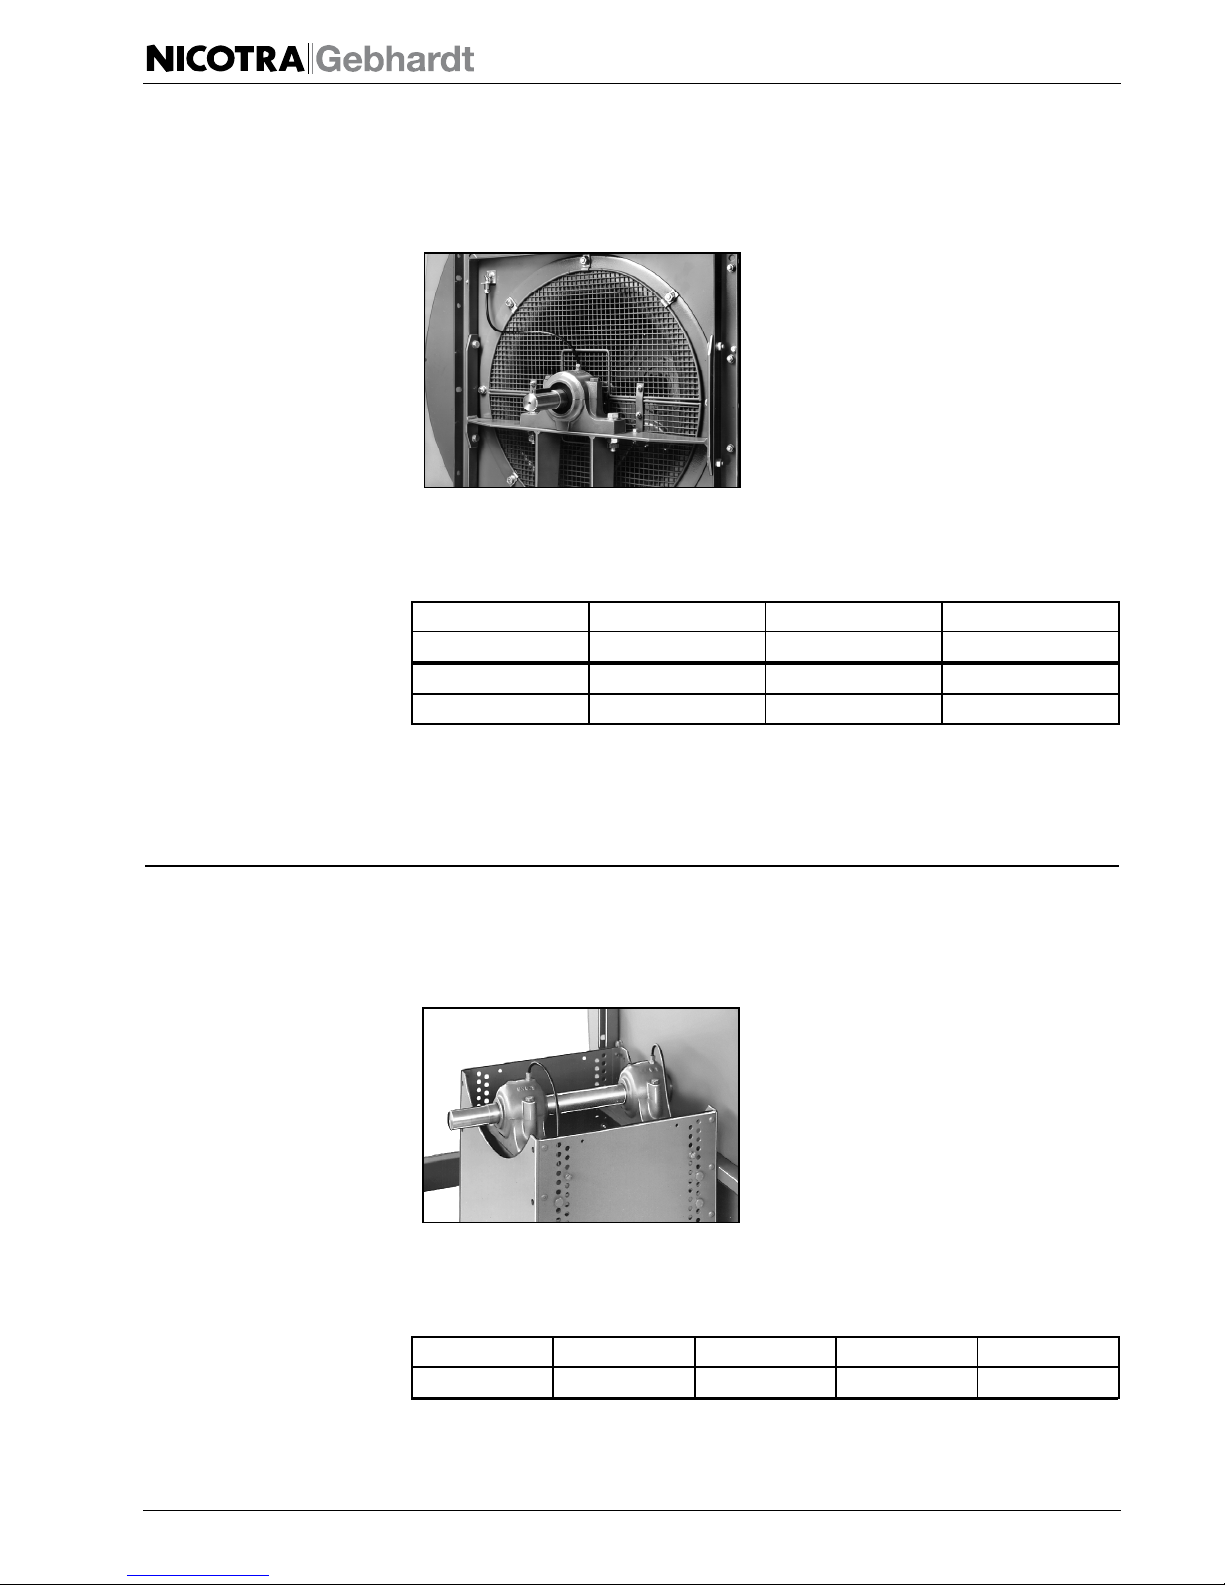
English
EN-29/32
RZR 13-0400·/.1000
RZR 18-0400·/.1000
RZR 13-1120./.1600
Split type plummer block housing with self-aligning double row
bearings
with lubrication device IWN
Fig. 13-4: Self aligning
double row bearing in a
Plummer block housing
Relubrication at least once a year.
Interval to be reduced for heavy duty operation
RZR 13 / 18- 0400-0500 0560-0630 0710-0800 0900-1000
Grease quantity 15 g 20 g 30 g 35 g
RZR 13- 1120 1250 1400 1600
Grease quantity 35 g 40 g 50g 50g
Table 13-5: Grease quantity
RER 13-0200·/.1000;
RER 17-0200·/.1000;
Split type Plummer block housing with self-aligning double row bearings
with lubrication device IWN
Fig. 13-5: Self aligning
double row bearing in a
Plummer block housing
0200 /-1000
Relubrication at least once a year.
Interval to be reduced for heavy duty operation
RER 13-/17- 0200-0250 0280-0355 0400-0500 0560-0710 0800-1000
Grease quantity 15 g
15 g 25 g 30 g 35 g
Table 13-6: Grease quantity

English
EN-30/32
EU Declaration of Conformity
to EU Council Directive 2014/34/EU (ATEX)
Der Hersteller:
Nicotra Gebhardt GmbH
Gebhardtstraße 19-25, 74638 Waldenburg, Germany
herewith declares, that the machinery designated below, on the basis of its design and construction in the form
brought onto the market by us is in accordance with the relevant safety and health requirements of the EU
Council Directive as mentioned below. If any alterations are made to the machinery without prior consultations
with us this shall render the declaration invalid.
Designation:
Centrifugal fan with housing, categories 2G or 3G for conveying explosive atmosphere
Machine type:
RZR / RER .. -2G; RZR / RER .. -3G
Category:
II 2G c IIB T3; II 3G c IIB T3
Year of Production/Type:
See type plate
Relevant EU Council Directive:
EU Directive 2014/34/EU (ATEX)
Applied harmonized standards
1)
, in particular:
EN 13463-1, EN 13463-5, EN 1127-1, EN 14986
Name of Notified Body:
TÜV SÜD Produkt Service; Zertifizierstelle; Riedelstraße 65; 80339 München; Germany
EC-certificate number:
EX9 11 09 78300 005
It is the responsibility of the manufacturer or contractor to ensure that conformity to these standards is
observed when installing the fan in a machine or system.
The manufacturer is solely responsible for issuing the declaration of conformity.
Waldenburg, 21.04.2016
Head of Production Research and Development Director
i.V. T. Ehrhardt i.V. Dr. J. Anschütz
1)
For the complete list of applied standards and technical specifications please see the manufacturer’s documentation.
English
EN-31/32
EC-Declaration of Incorporation
The manufacturer: Nicotra Gebhardt GmbH, Gebhardtstraße 19-25,
74638 Waldenburg, Germany
herewith declares, that the following product:
Product designation: Centrifugal fan
Type nomination: RZR / RER .. -2G; RZR / RER .. -3G
Serial n°: see type plate
Year of manufacture: see type plate
qualifies as a partly completed machine, according to Article 2, clause “g” and complies with the following
basic requirements of the Machine Directive (2006/42/EC): Annex I, Article 1.1.2; 1.3.7
The partly completed machine may be put into operation only if it has been stated that the machine into which
the uncompleted machine has to be incorporated complies with the requirements of the Machine Directive
(2006/42/EC).
The following harmonised standards
1)
have been applied:
EN ISO 12100 Safety of machines – Fundamental terms, general design principles
EN ISO 13857 Safety of machines – Safety distances to hazardous areas
The manufacturer is committed to providing the special documents to Annex VII, Part B, for partly completed
machines to any state authority per post/email on request.
Waldenburg, 21.04.2016
Representative for the documentation: Michael Hampel
Head of Production Research and Development Director
i.V. T. Ehrhardt i.V. Dr. J. Anschütz
1)
For the complete list of applied standards and technical specifications please see the manufacturer’s documentation.

English
EN-32/32
Nicotra Gebhardt GmbH
Gebhardtstraße 19-25
74638 Waldenburg
Germany
Telefon +49 (0)7942 1010
Telefax +49 (0)7942 101170
E-Mail info@nicotra-gebhardt.com
www.nicotra-gebhardt.com
 Loading...