


RC200
Récepteur radio
FR - Instructions et avertissements pour l’installation et l’utilisation
EN - Instructions and warnings for installation and use
IT - Istruzioni ed avvertenze per l’installazione e l’uso
PL - Instrukcje i ostrzeżenia do instalacji i użytkowania


AVERTISSEMENTS
— PHASE 1 —
• Avant de commencer l’installation vérifiez si le produit est adapté à l’emploi,
avec une attention particulière pour les données figurant dans le chapitre
« Caractéristiques techniques » ; NICE ne répond pas des dommages dérivant d’une utilisation du produit différente de celle qui est prévue dans le
présent manuel.
• Éviter que les parties internes du produit puissent entrer en contact avec
de l’eau ou d’autres substances polluantes, ne pas le conserver à proximité de sources de chaleur intense et ne pas l’exposer à des flammes vives
; si cela se produit, suspendre immédiatement l’utilisation et s’adresser au
service après-vente NICE.
• Pour les opérations d’installation, couper l’alimentation électrique.
• Les matériaux de l’emballage doivent être émis au rebut dans le plein respect des normes locales.
DESCRIPTION DU PRODUIT ET APPLICATION
— PHASE 2 —
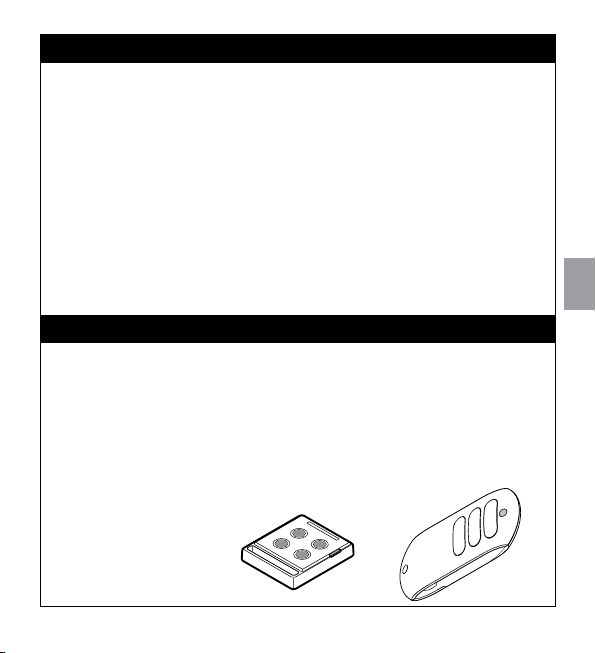
Le récepteur radio RC200 permet de commander à distance, à l’aide des
émetteurs ECCO5... et STX100, des appareils monophasés alimentés à la
tension de secteur avec des puissances allant jusqu’à 500 W. On peut avoir
des commandes type On/Off, « Homme mort », Temporisateur 1 et Temporisateur 2. Le récepteur radio opère à la fréquence de 433,92 MHz et peut
mémoriser jusqu’à 30 émetteurs de la série ECCO5... et STX100.
STX100
ECCO5
Français – 1
FR
Instructions traduites de l’italien
FR
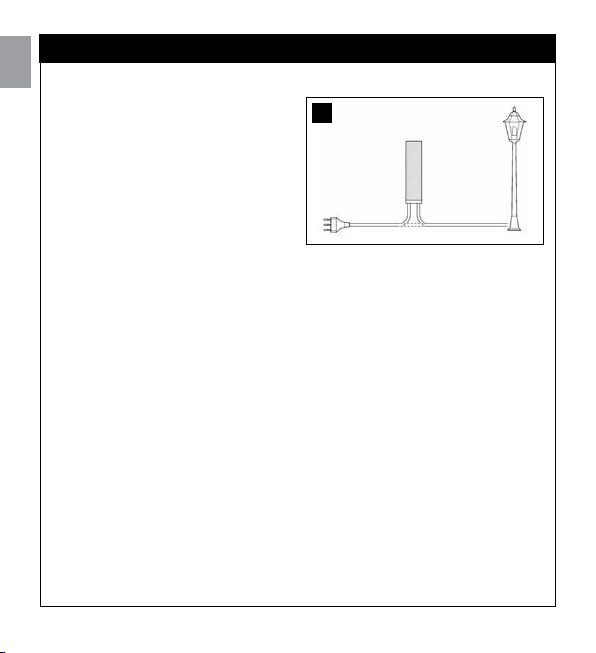
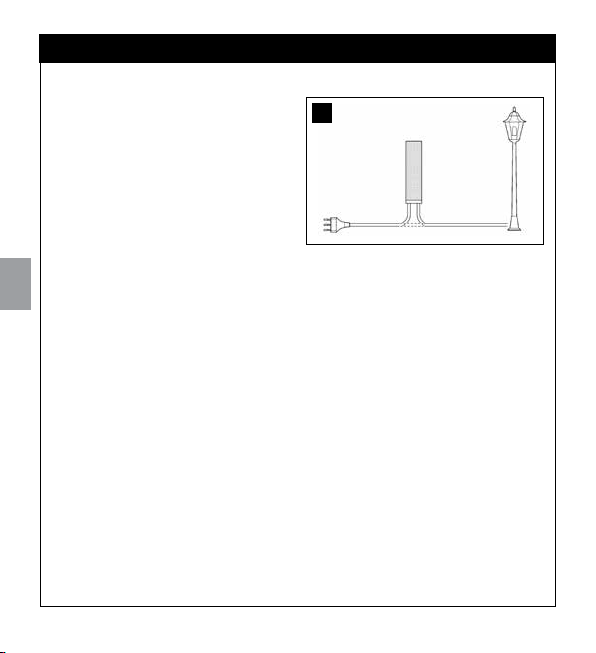
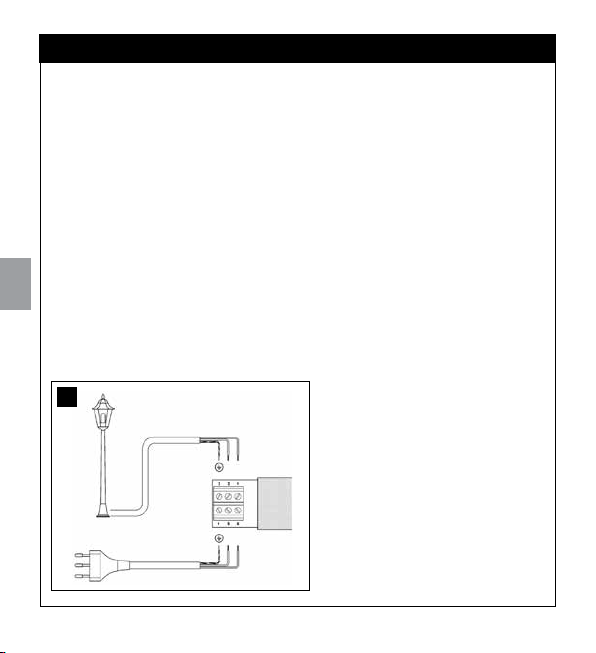
Le récepteur radio RC200 doit être
connecté en « interrompant » le câble
d’alimentation normal de l’appareil à
commander.
ATTENTION: Les installations
électriques doivent être effectuées
par du personnel qualifié et dans
le respect des nor mes. Le boîtier
de RC200 doit être positionné
dans un endroit non accessible
car les passe-câ bles ne protègent pas les câbles contre l’arrachement et le couvercle amovible est un élément qui se détache et qui ne
garantit pas la protection contre l’accès à des parties sous tension.
Si le récepteur radio est placé à l’extérieur, il faut tenir compte du
fait que les passe-câbles garantissent l’étanchéité à l’eau seulement
pour les câbles ronds d’un diamètre compris entre 6,5 et 8,5 mm.
S’assurer qu’aucune partie des circuits électriques n’est sous tension.
01.
02. Couper le câble d’alimentation de l’appareil à commander.
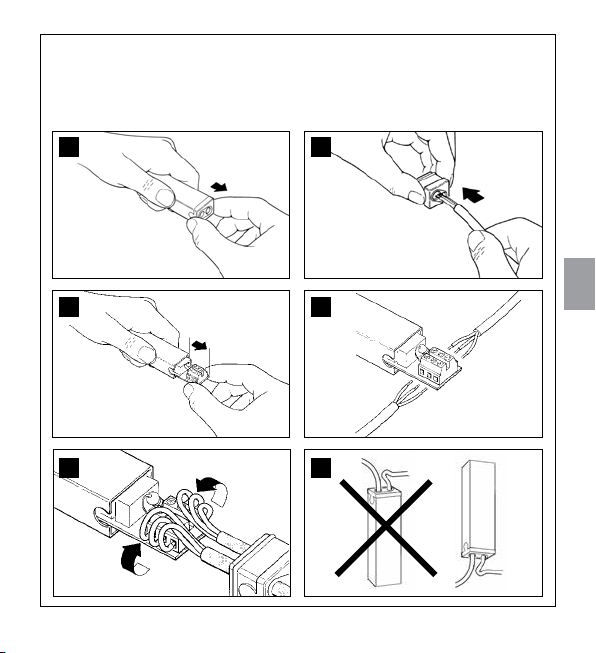
03. Ouvrir le boîtier de RC200 en enlevant le « bouchon passe-câbles ».
04. Dégainer les deux parties du câble sur environ 3 cm puis dénuder les
différents conducteurs sur environ 5 mm.
05. Passer les deux câbles dans les trous prévus à cet effet sur le « bou-
chon ».
06. Extraire la carte de quelques centimètres.
07. Connecter les conducteurs aux bornes en respectant le schéma.
08. Replier les conducteurs.
09. Pousser la carte à l’intérieur du boîtier, vérifier que la partie dégainée du
câble est complètement à l’intérieur, faire coulisser le « bouchon » sur les
câbles jusqu’à la fermeture complète du boîtier
10. Le récepteur radio RC200 n’a pas besoin de fixation et peut être posi-
2 – Français
— PHASE 3 —
1
INSTALLATION
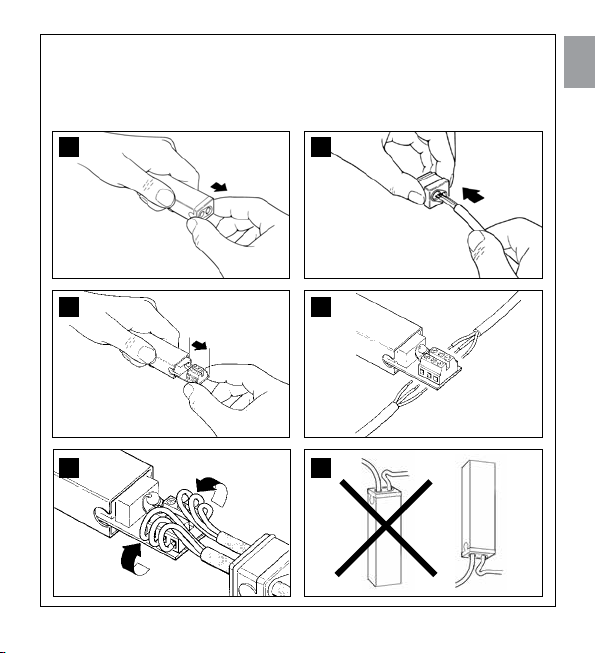
tionné directement dans le logement qui lui est destiné; pour éviter le
risque d’infiltrations d’eau, il est conseillé de le positionner avec les
câbles vers le bas.
ATTENTION: Le boîtier ne doit être percé sous aucun prétexte.
2 3
4 5
6 7
FR
Français – 3

FR
Alimentation
L’alimentation principale du récepteur radio (terre, phase, neutre) doit être
effectuée en utilisant les bornes 5-6-7 comme l’indique la figure ci-contre
« Connexions électriques ».
Connexion de l’appareil à commander
L’appareil à commander (max. 500 W) doit être raccordé entre les bornes
1-2, tandis que la n° 3 est la borne de terre.
ATTENTION
La borne 7 (Neutre) est connectée directement à la borne 1 de l’appareil à commander qui ne résulte donc pas complètement isolé de la
ligne électrique d’alimentation.
Respecter scrupuleusement les connexions prévues, en cas de doute NE
PAS TENTER en vain, mais consulter les fiches techniques d’approfondissement.
Une connexion erronée peut provoquer des pannes graves au récepteur radio.
8
4 – Français
— PHASE 4 —
CONNEXIONS ÉLECTRIQUES
MÉMORISATION DES ÉMETTEURS
— PHASE 5 —
Pour qu’un émetteur puisse commander le récepteur radio, il faut effectuer la
procédure de mémorisation.
ATTENTION:
• Toutes les phases de mémorisation décrites dans ce chapitre sont temporisées, c’est-à-dire qu’elles doivent être effectuées dans les limites de
temps prévues.
• La mémorisation par radio peut se vérifier dans tous les récepteurs qui se
trouvent dans le rayon de portée de l’émetteur ; il est donc préférable de ne
laisser alimenté que celui qui est concerné par l’opération.
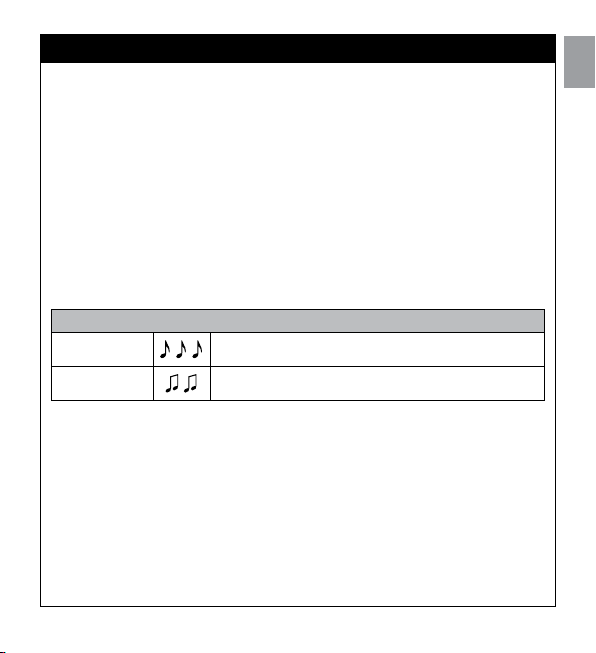
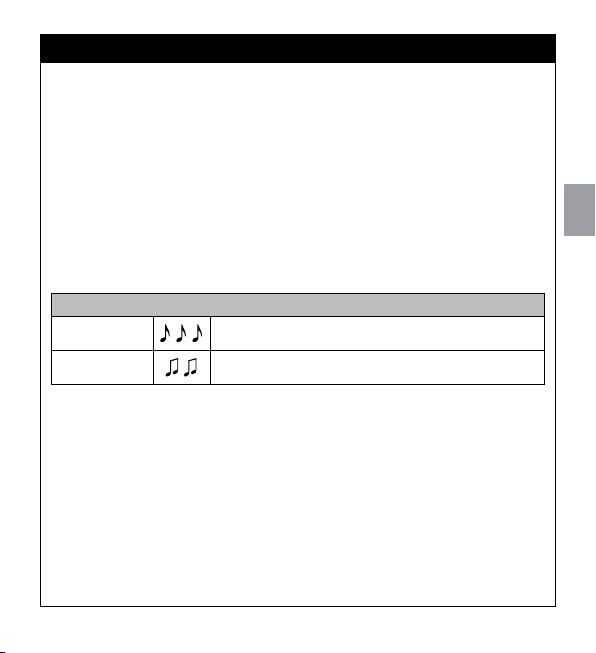
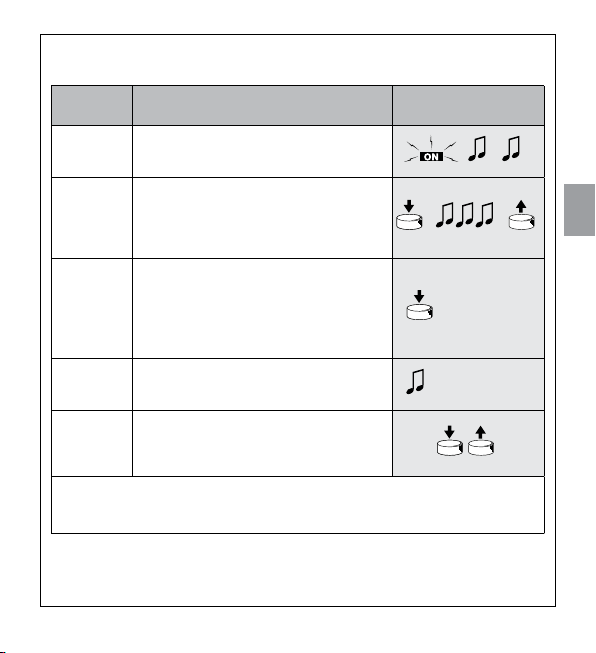
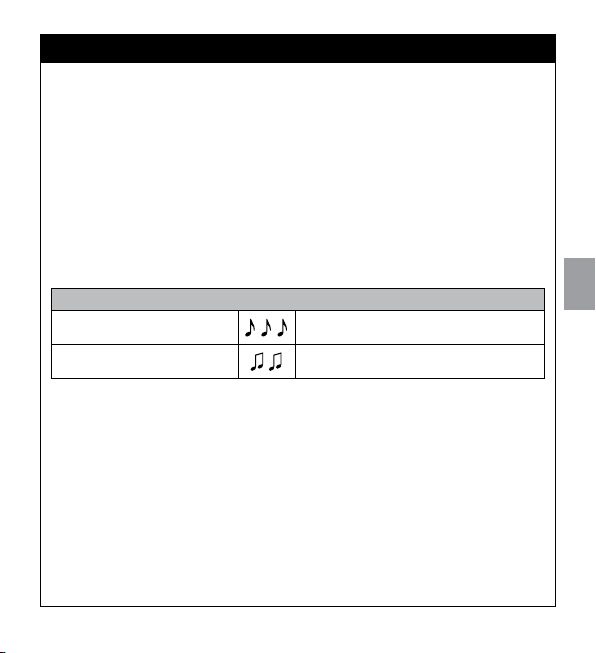
Il est possible de vérifier si des émetteurs sont déjà mémorisés dans le récepteur radio : pour cela, il suffit de vérifier le nombre de bips sonores émis au
moment de l’allumage du récepteur radio.
Vérification des émetteurs mémorisés
3 bips brefs
Il y a déjà des émetteurs mémorisés
FR
2 bips longs
Mémoire vide (aucun émetteur mémorisé)
Il y a deux manières possibles de mémoriser les émetteurs :
– Mode 1 : mémorisation simplifiée (les touches de l’émetteur sont automa-
tiquement configurées par le récepteur radio RC200).
– Mode 2 : mémorisation avancée (chaque touche de l’émetteur peut être
configurée pour une commande donnée).
Français – 5
Mode 1 (mémorisation simplifiée)
Dans ce mode, les fonctions des touches de l’émetteur sont préétablies.
FR
L’association des touches s’effectue par paires: les touches 1 et 2 peuvent
exécuter les commandes On-Off d’un récepteur radio RC200, tandis que les
touches 3 et 4 peuvent effectuer les commandes On-Off d’un autre récepteur
radio RC200 comme l’indique l’exemple suivant.
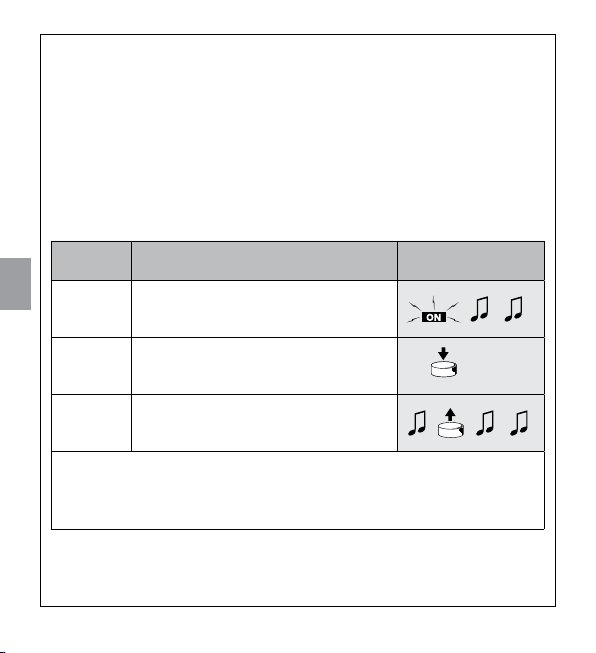
Quand la mémoire est vide (aucun émetteur mémorisé) on peut procéder à la
mémorisation du premier émetteur en Mode 1 comme l’indique le tableau [A].
ATTENTION : si l’on presse les touches 1 ou 2 c’est cette paire de touches
qui sera mémorisée, tandis que si l’on presse les touches 3 ou 4, c’est cette
deuxième paire de touches qui sera mémorisée.
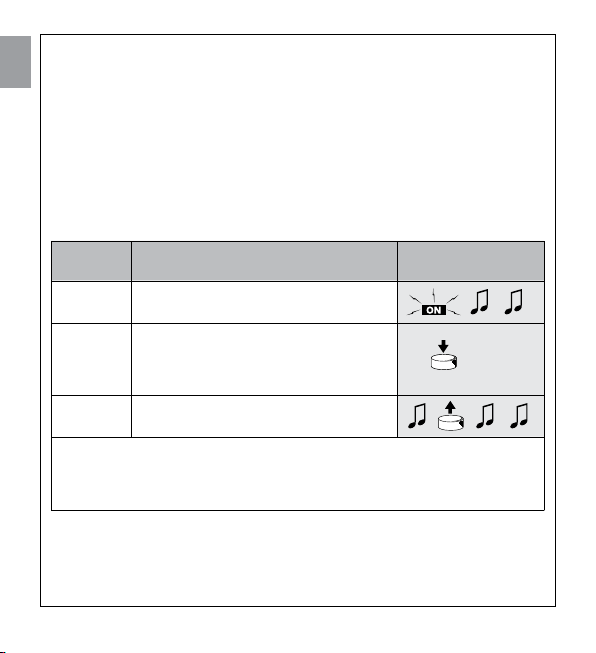
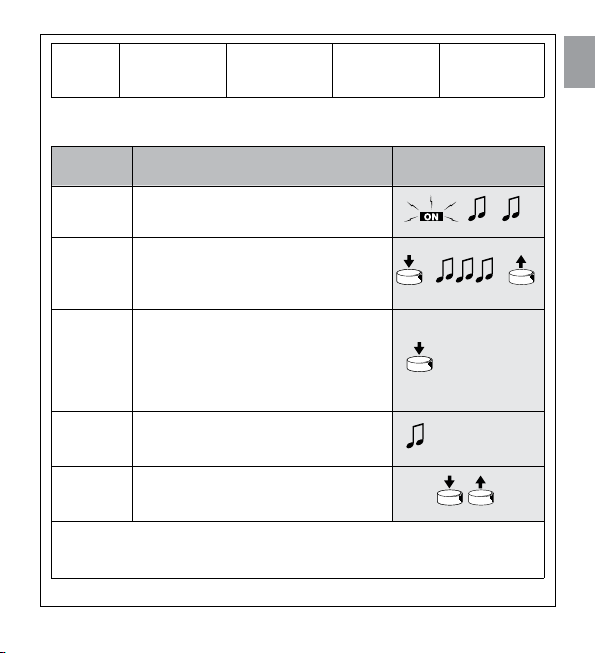
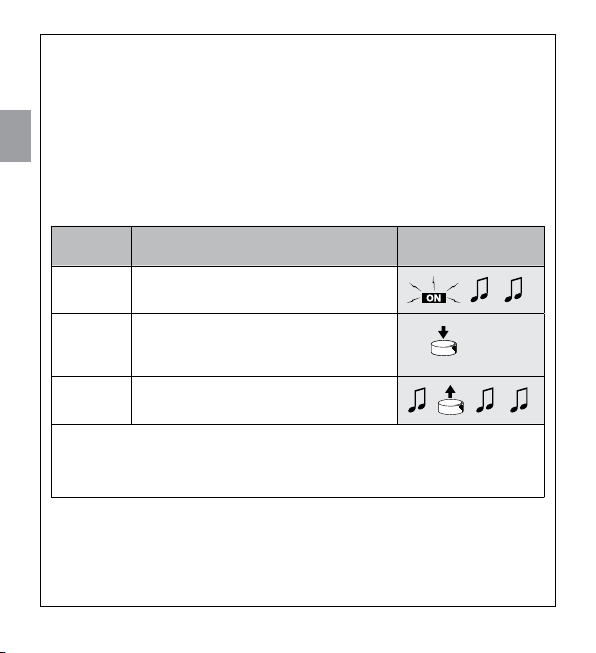
Tableau
[A]
1 Alimenter le récepteur radio : on entend 2
2 Dans les 5 secondes qui suivent presser
3 Relâcher la touche au premier des 3 bips
Si le récepteur radio contient déjà des émetteurs mémorisés, à l’allumage on
entend 3 bips brefs et il n’est pas possible d’effectuer la procédure ci-dessus.
Dans ce cas, il faudra passer au mode de mémorisation du Tableau [B]
6 – Français
Mémorisation du premier émetteur
en Mode 1
longs bips (biiip)
et maintenir enfoncée, sur l’émetteur,
une touche de la paire désirée (paire de
touches 1-2 ou 3-4)
qui confirment la mémorisation
Exemple
5s

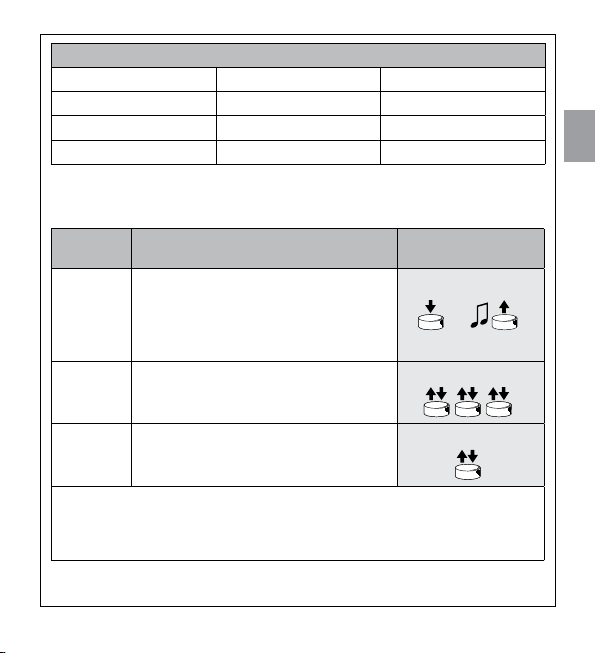
Exemple de mémorisation en Mode 1
Touche 1 On sur RC200 n° 1
Touche 2 Off sur RC200 n° 1
Touche 3 On sur RC200 n° 2
Touche 4 Off sur RC200 n° 2
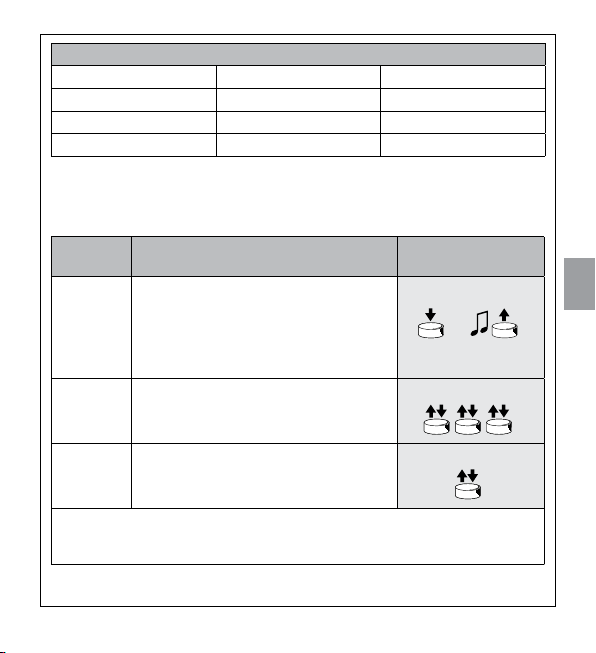
Quand un ou plusieurs émetteurs ont déjà été mémorisés en Mode 1, il est
possible d’en mémoriser d’autres toujours en Mode 1, comme l’indique le
tableau [B].
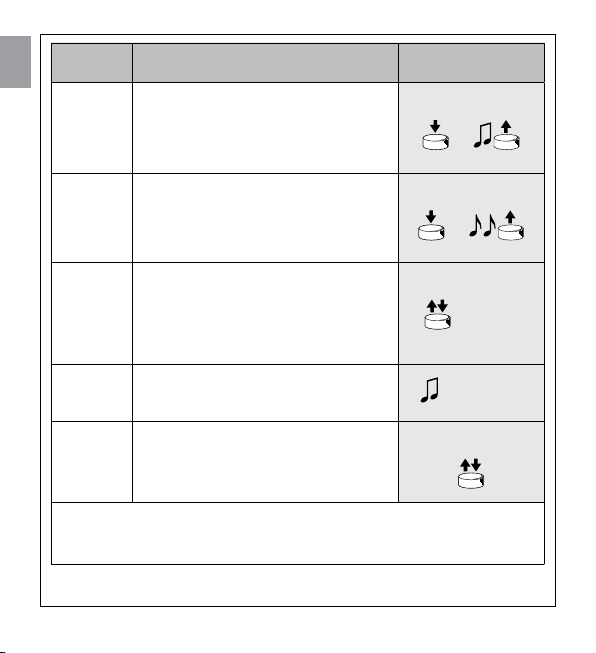
Tableau
[B]
1 Maintenir enfoncée une touche de la paire
2 Presser lentement 3 fois une touche de la
Mémorisation d’émetteurs
supplémentaires en Mode 1
désirée (1-2 ou 3-4) sur le nouvel émetteur à mémoriser (Nouveau TX) jusqu’à ce
que l’on entende un bip (au bout d’environ
5 secondes) puis relâcher la touche
paire désirée sur un émetteur déjà mémorisé (ancien TX)
Exemple
Nouveau
Ancien
TX
TX
5s
FR
3 Presser et relâcher encore une fois la
À la fin, 3 bips signalent que le nouvel émetteur a été mémorisé correctement.
Si la mémoire est pleine (30 émetteurs), 6 bips indiqueront que la mémoire n’est
pas en mesure d’accueillir d’autres émetteurs.
même touche enfoncée au point 1 sur le
nouvel émetteur
Nouveau
TX
Français – 7

Mode 2 (mémorisation avancée)
Dans ce mode, à chaque touche de l’émetteur on peut associer l’une des 4
FR
commandes possibles, comme l’indique le tableau [C].
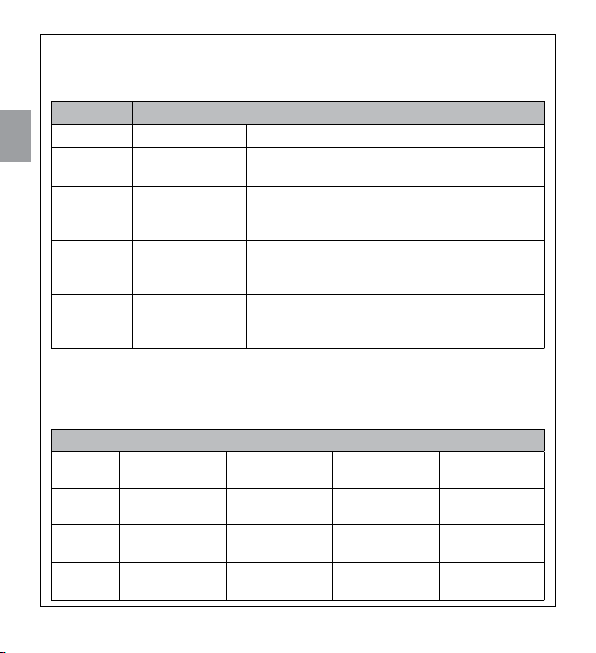
Tableau
[C]
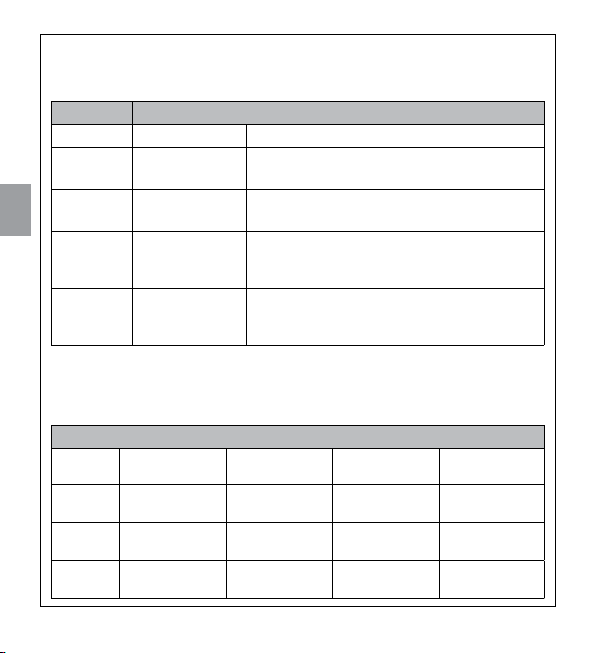
N° Commande Description
1 On-Off La première commande active l’allumage, la
2 « Homme mort » Quand la touche est pressée, le contact du
3 Temporisateur 1 Fermeture du contact pendant une période
4 Temporisateur 2 Fermeture du contact pendant une période
Commandes disponibles pour la mémorisation en Mode 2
commande successive active l’extinction et
ainsi de suite
relais est fermé. Quand la touche est relâchée, le
contact du relais est ouvert
de temps qui va d’1 seconde à 9 heures (programmable suivant les indications du tableau [G])
de temps qui va d’1 seconde à 9 heures (programmable suivant les indications du tableau [G])
Dans cette procédure, la mémorisation s’effectue séparément pour chaque
touche de l’émetteur ; cela signifie que 2 touches du même émetteur peuvent
être mémorisées pour deux commandes du même récepteur radio ou pour
commander des récepteurs différents comme l’indique l’exemple suivant :
Exemple de mémorisation en Mode 2
Touche 1 On-Off sur
Touche 2 Timer1 sur
Touche 3 Timer2 sur
8 – Français
RC200 n° 1
RC200 n° 2
RC200 n° 3
Touche 4 « Homme mort
» sur RC200
n° 3
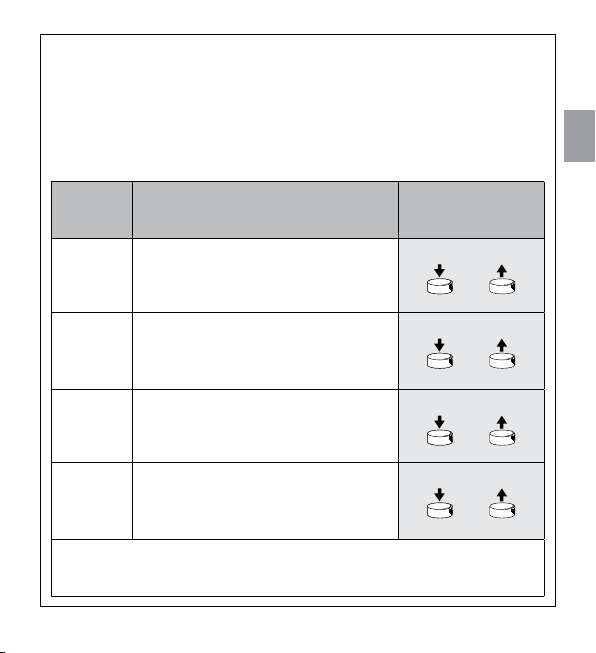
Pour mémoriser les émetteurs en Mode 2 se référer aux tableaux [D] et [E].
Tableau
[D]
1 Alimenter le récepteur radio : on entend
Mémorisation du premier émetteur
en Mode 2
2 longs bips (biiip)
Exemple
FR
2 Dans les 5 secondes qui suivent, presser
3 Dans les 3 secondes qui suivent, presser
4 Au bout d’environ 3 secondes on
5 Dans les 2 secondes qui suivent,
À la fin, 3 bips signalent que le nouvel émetteur a été mémorisé correctement.
Si au point 4 on n’entend pas un nombre de bips égal à la fonction désirée,
attendre 10 secondes pour sortir de la procédure puis refaire la procédure.
et maintenir enfoncée la touche désirée
de l’émetteur à mémoriser jusqu’à la fin
des 3 bips ; puis la relâcher
la même touche de l’émetteur un nombre
de fois égal à la commande désirée : 1 =
On-Off ; 2 = « Homme mort » ;
3 = Temporisateur 1 ;
4 = Temporisateur 2
entendra un nombre de bips égal à la
commande choisie
presser et relâcher la même touche pour
confirmer la programmation
X1...X4
X1...X4
Français – 9
Tableau
[E]
FR
1 Maintenir enfoncée la touche désirée du
2 Dans les 5 secondes qui suivent, presser et
3 Dans les 3 secondes qui suivent, presser
4 Au bout d’environ 3 secondes on
5 Dans les 2 secondes qui suivent, presser
À la fin, 3 bips signalent que le nouvel émetteur a été mémorisé correctement.
Si la mémoire est pleine (30 émetteurs), 6 bips indiqueront que la mémoire n’est
pas en mesure d’accueillir d’autres émetteurs.
10 – Français
Mémorisation d’émetteurs
supplémentaires en Mode 2
nouvel émetteur (nouveau TX) jusqu’à
ce que l’on entende un bip (au bout
d’environ 5 secondes) puis relâcher la
touche
maintenir enfoncée pendant environ 5
secondes une touche déjà mémorisée d’un
émetteur (ancien TX) jusqu’à ce qu’on
entende 2 bips brefs, puis relâcher la touche
de nouveau la même touche de l’émetteur
déjà mémorisé (ancien TX) un nombre
de fois égal à la commande désirée : 1
= On-Off ; 2 = « Homme mort » ; 3 =
Temporisateur 1 ; 4 = Temporisateur 2
entendra un nombre de bips identique à
la com mande choisie
et relâcher la touche désirée sur le nouvel
émetteur (nouveau TX) pour confirmer la
programmation
Exemple
Nouveau
Ancien TX
Ancien TX
Nouveau
TX
5s
5s
TX
X1...X4
X1...X4
Mémorisation d’un nouvel émetteur comme un émetteur déjà mémorisé
On peut aussi mémoriser un nouvel émetteur de manière qu’il fonctionne
exactement comme un émetteur déjà mémorisé. Si l’émetteur déjà mémorisé
est en Mode 1, le nouvel émetteur lui aussi fonctionnera en Mode 1 et une
seule phase de mémorisation suffit. Si la touche de l’émetteur déjà mémorisé
est en Mode 2, la touche du nouvel émetteur aussi sera mémorisée en Mode
2 et actionnera la même commande : si l’on souhaite mémoriser plusieurs
touches, il faudra faire une phase de mémorisation pour chaque touche.
Tableau
[F]
1 Maintenir enfoncée la touche du nouvel
2 Presser la touche de l’émetteur déjà
Mémorisation d’un nouvel émetteur
exactement comme un émetteur déjà
mémorisé
émetteur (nouveau TX) à mémoriser
pendant au moins 3 secondes, puis
relâcher la touche
mémorisé (ancien TX) pendant au moins
3 secondes, puis relâcher la touche
Exemple
Nouveau
Ancien TX
TX
3s
3s
FR
3 Presser de nouveau la touche du nouvel
4 Presser la touche de l’émetteur déjà
À la fin, 3 bips signalent que le nouvel émetteur a été mémorisé correctement.
Si la mémoire est pleine (30 émetteurs), 6 bips indiqueront que la mémoire n’est
pas en mesure d’accueillir d’autres émetteurs.
émetteur (nouveau TX) pendant au moins
3 secondes et relâcher
mémorisé (ancien TX) pendant au moins
3 secondes, puis relâcher la touche
Nouveau
Ancien TX
TX
3s
3s
Français – 11

Programmation du temps des temporisateurs
Le récepteur radio RC200 dispose de 2 temporisateurs indépendants (Tempo-
FR
risateur 1 et Temporisateur 2) pour l’extinction automatique des relais, au bout
d’un temps préétabli par la commande.
Il est possible d’anticiper l’extinction, par rapport à la durée prévue par le
temporisateur, en maintenant la commande « temporisateur » active pendant
plus de 3 secondes ou bien en envoyant une commande de « Off ». Les
valeurs programmées en usine, ou après l’effacement de la mémoire, pour
les deux temporisateurs sont respectivement d’1 minute (Temporisateur 1) et
de 10 minutes (Temporisateur 2).
Il est possible de programmer le temps de manière séparée pour chacun
des deux temporisateurs, d’un minimum d’1 seconde à un maximum de 9
heures. Une fois que le temps est programmé, chaque commande relative à
ce temporisateur activera le relais pendant la durée prévue. Pour procéder à
la programmation des temporisateurs, il faut disposer d’un émetteur mémorisé pour la commande du temporisateur, puis suivre les phases décrites dans
le tableau ci-dessous.
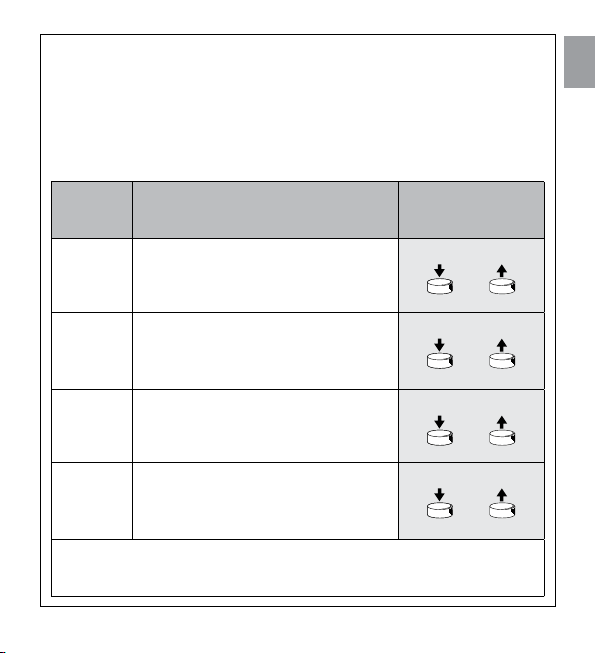
Tableau
[G]
1 Presser et maintenir enfoncée la touche
2 Maintenir toujours la pression sur la
3 Maintenir toujours la pression sur la même
12 – Français
Programmation du temps des
temporisateurs
de l’émetteur relative à la commande du
temporisateur que l’on désire
programmer. Le relais s’activera (On)
même touche, au bout d’environ 3
secondes le relais se désactivera (Off)
touche pendant environ 10 secondes
jusqu’à ce que le relais s’active de nouveau
(On). À partir de ce moment, la phase de
« mesure » du temps commence. Relâcher
maintenant la touche
Exemple
“Relais ON”
3s “Relais OFF”
10s “Relais ON”
4 Quand le temps que l’on souhaite pro-
3 longs bips signaleront que le temps a été programmé, suivis d’1 ou de 2 bips
brefs pour indiquer si la programmation est relative au temporisateur 1 ou au
temporisateur 2
grammer s’est écoulé, presser la touche
relative à la commande du temporisateur.
Le relais se désactive (Off) et le temps
mesuré est mémorisé.
“Relais OFF”
Effacement de la mémoire du récepteur radio
Dans certains cas, il peut être nécessaire d’effacer la mémoire du récepteur
radio RC200.
L’effacement de la mémoire est possible avec :
– un émetteur non mémorisé ou mémorisé pour des commandes « tempori-
sateur » en commençant à partir du point A.
– un émetteur déjà mémorisé en commençant à partir du point N°1
On peut effacer :
– seulement les émetteurs, en terminant la procédure au point 4
– toutes les données (émetteurs et temporisateurs) en complétant la procé-
dure jusqu’au point 5.
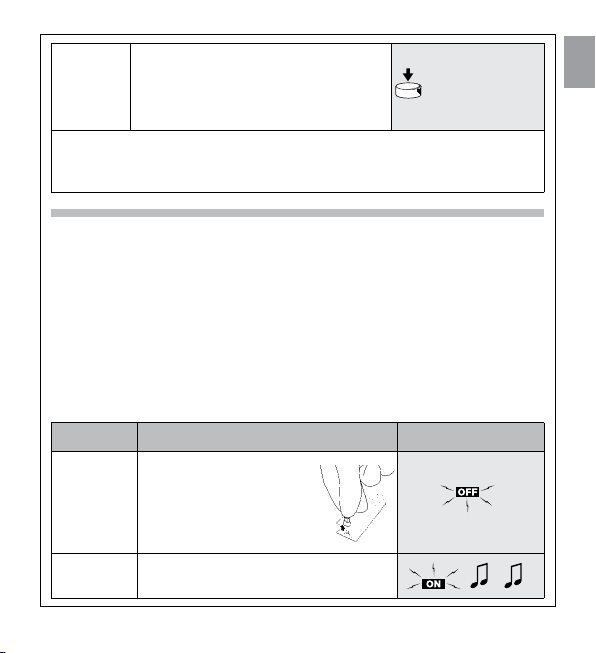
Tableau [H] Effacement de la mémoire Example
➨ A
B Alimenter le récepteur radio et attendre
Avec le récepteur radio
non alimenté, enlever le
ca valier présent sur la
carte (il faut le remettre en
place à la fin de la procédure d’effacement)
les bips initiaux
Français – 13
FR

➨ 1
FR
2 Au bout d’1 seconde, presser de nou-
3 Au bout d’une seconde presser de nou-
➨ 4
➨ 5
14 – Français
• Avec l’émetteur en mode I ou non
mémorisé : Maintenir enfoncée la touche
2 ou la touche 4 d’un émetteur déjà mémorisé en mode I jusqu’à ce que l’on entende
un bip (au bout d’environ 5 secondes) puis
relâcher la touche
• Avec l’émetteur en mode II (seulement On/Off ou temporisateur) :
Si « On/Off » est avec le relais ouvert (Off)
presser la touche pour l’activer (On), relâcher la touche et la presser de nouveau
en la maintenant enfoncée jusqu’à ce que
l’on entende un bip (au bout d’environ 5
secondes). Relâcher ensuite la touche. Si «
temporisateur » est avec le relais ouvert (Off)
presser la touche pour l’activer (On), maintenir la touche enfoncée jusqu’à ce que le
relais se désactive (Off) et qu’on entende un
bip (au bout d’environ 5 secondes). Relâcher ensuite la touche.
veau la même touche et la relâcher exactement durant le troisième bip
veau la même touche et la relâcher exactement durant le troisième bip
Au bout d’une seconde presser de nouveau la même touche et la relâcher exactement durant le troisième bip
Si l’on souhaite effacer complètement
toutes les données présentes dans
la mémoire, dans les 2 secondes qui
suivent, presser de nouveau la touche
puis la relâcher.
Au bout de quelques secondes 5 bips
signalent que la mémoire a été effacée.
5s
?... 5s

MAINTENANCE ET MISE AU REBUT
— PHASE 6 —
Le système n’a besoin d’aucune maintenance particulière.
Ce produit est constitué de différents types de matériaux dont certains
peuvent être recyclés et d’autres devront être mis au rebut. Informez-vous
sur les systèmes de recyclage ou de mise au rebut en respectant les normes
locales en vigueur.
Attention: certains composants électroniques pourraient con-
tenir des substances polluantes : ne pas les abandonner dans
la nature.
Français – 15
FR
FR
RC200 est produit par NICE S.p.A. (TV) Italy. Dans le but d’améliorer les produits, NICE S.p.A. se réserve le droit d’en modifier à tout moment et sans préavis les caractéristiques techniques, en garantissant dans tous les cas le bon
fonctionnement et le type d’utilisation prévus.
N.B. : toutes les caractéristiques techniques se réfèrent à la température de
20°C.
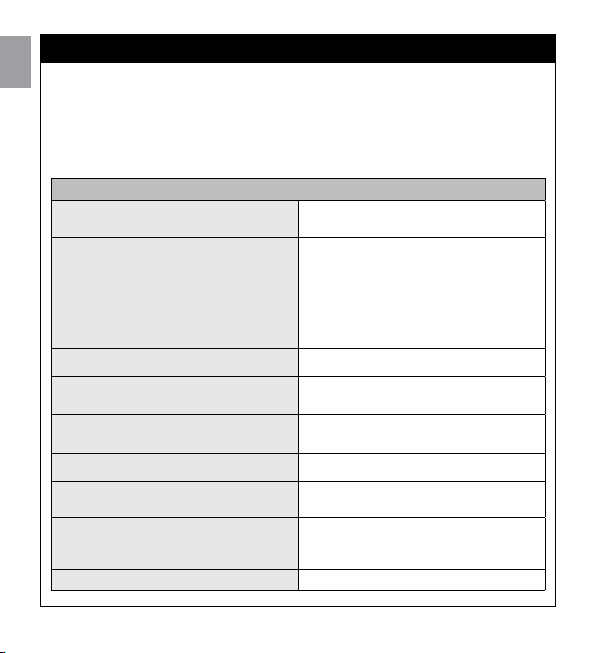
Récepteur radio RC200
CARACTÉRISTIQUES TECHNIQUES
Typologie Récepteur radio pour la commande
Technologie adoptée Réception et décodage des signaux
Possibilité de télécommande Avec émetteurs ECCO5... ou STX100
Codage Rolling code avec code à 64 Bits (18
Émetteurs ECCO5... et STX100
mémorisables
Fréquence de réception 433.92 MHz
Sensibilité du récepteur radio Supérieure à 0,6 µV (avec couplage
Portée des émetteurs ECCO5... et
STX100
Alimentation 230 Vca (+10-15%) 50 Hz
16 – Français
d’appareils électriques en général
audio émis par les émetteurs. Activation
des relais de sortie seulement en cas de
correspondance d’un code précédemment mémorisé et correctement
en synchronisme avec la séquence de
variabilité
milliards de milliards de combinaisons)
Jusqu’à 30 s’ils sont mémorisés en
Mode 1
direct)
Estimée à 50-100 m (la portée change
en présence d’obstacles et de parasites électromagnétiques)

Puissance maximum en sortie 500 W / 400 VA
Consommation au repos < 0,7 W (typiques à 230 Vca)
Temps d’activation environ 300 ms
Temps de désactivation environ 300 ms
Maintien de l’état de la sortie en
cas de manque d’alimentation
Résolution et précision des
temporisateurs
Température ambiante de
fonctionnement
Indice de protection IP55 (boîtier intact) et avec câbles
Dimensions / poids 98 x 26 x 20 / 45 g
Non
1s/±2%
-10°C ... +55°C
ronds diamètre compris entre 6,5 et
8,5 mm
Français – 17
FR

Déclaration DE conformité
FR
Déclaration en accord avec la directive 1999/5/CE
Note : Le contenu de cette déclaration de conformité correspond à ce qui est déclaré dans le document
officiel, déposé au siège de Nice S.p.A., et en particulier à sa dernière révision disponible avant l’impression de ce guide. Ce texte a été réadapté pour des raisons d’édition. Une copie de la déclaration originale
peut être demandée à Nice S.p.A. (TV) Italy.
Numéro de déclaration : 584/RC Revisione: 0 Langue : FR
Le soussigné Roberto Griffa en tant qu’Chief Executive Officer déclare sous sa
propre responsabilité que le produit :
Nom producteur : NICE S.p.A.
Adresse : Via Pezza Alta 13, 31046 Rustignè di Oderzo (TV) Italy
Modèle : Émetteur radio RC200
Accessoires :
Est conforme aux critères essentiels requis par l’article 3 de la directive communautaire suivante, pour l’usage auquel ces produits sont destinés :
• Directive 1999/5/CE DU PARLEMENT EUROPÉEN ET DU CONSEIL du 9 mars
1999 concernant les équipements hertziens et les terminaux de communication
et la reconnaissance mutuelle de leur conformité, selon les normes harmonisées
suivantes :
- Protection de la santé (art. 3(1)(a)) : EN 62479:2010
- Sécurité électrique (art. 3(1)(a)) : EN 60950-1:2006+A11:2009+A12:2011
- Compatibilité électromagnétique (art. 3(1)(b)) : EN 301 489-1 V1.9.2:2011, EN
301 489-3 V1.4.1:2002
- Spectre radio (art. 3(2)) : EN 300 220-2 V2.4.1:2012
Oderzo, 28 juillet 2016 Ing. Roberto Griffa
(Chief Executive Officer)
18 – Français

WARNINGS
— STEP 1 —
• Before proceeding with the installation, make sure the product is suit-
able for its intended use. Pay special attention to the data provided in the
“Technical Characteristics” chapter. NICE disclaims liability for any dam-
age resulting from uses of the product other than those described in this
manual.
• Protect the product’s internal components from contact with water and
other polluting substances. Keep it away from heat sources and do not
expose it to open flames. If any of these conditions occur, stop using it
immediately and call NICE customer service.
• Disconnect the power supply before proceeding with the installation opera-
tions.
• The packaging materials must be disposed of in compliance with the regu-
lations locally in force.
PRODUCT DESCRIPTION AND APPLICATIONS
— STEP 2 —
The RC200 radio receiver, used in combination with the ECCO5... and
STX100 transmitters, is suitable for the remote control of single-phase equip-
ment powered by the mains voltage, with up to 500W power.
The possible commands are On/Off, “Man Present”, Timer 1 and Timer 2.
The radio receiver operates at a frequency of 433.92 MHz and can memorize
up to 30 ECCO5... and STX100 transmitters.
STX100
ECCO5
English – 1
EN
Instructions translated from Italian

INSTALLATION
— STEP 3 —
To connect the RC200 radio receiver,
the normal power cable to the equipment to be controlled must be “inter-
EN
rupted” (Fig. 1).
WARNING: Electrical systems
must be set up by qualified and
experienced personnel in compliance with current legislation. As
the cable clamps do not provide
protection against pulling and the
removable cable cap can be separated, the RC200 container must be
positioned where it is inaccessible to the general public. Said container does not guarantee protection against access to those parts
of the system which are live. If the RC200 radio receiver is installed
outdoors, keep in mind that the cable holders are waterproof only for
round cables with a diameter of 6.5 to 8.5 mm.
01. Make sure there is no voltage anywhere in the electrical circuits.
02. Cut the power cable to the equipment to be controlled.
03. Open the RC200 enclosure and remove the “cable holding cap” (Fig. 2).
04. Strip the sheath off the two ends of the cable approx. 3 cm, then strip
the single conductors approx. 5 mm.
05. Thread the two cables through the holes in the cable holding “cap”
(Fig. 3).
06. Pull the board out a few centimetres (Fig. 4).
07. Connect the conductors to the terminals (Fig. 5).
08. Fold the conductors (Fig. 6).
09. Push the board back inside the enclosure, making sure that the
stripped sections of cable are not exposed, then slide the “cap” along
the cables until the enclosure is closed tight.
10. The RC200 radio receiver does not require mounting, it can be posi-
2 – English
1

tioned directly in the dedicated compartment. To avoid any risk of water
infiltrations, we recommend positioning it with the cables facing down
(Fig. 7).
WARNING: The enclosure must not be perforated for any reason.
2 3
4 5
6 7
EN
English – 3

ELECTRICAL CONNECTIONS
— STEP 4 —
Power Supply
Use terminals 5-6-7 for the main power supply to the radio receiver (ground,
phase, neutral), as shown in figure alongside “Electrical Connections”.
EN
Connection to the Equipment to Be Controlled
The equipment to be controlled (Max 500W) must be connected to terminals
1-2; No. 3 is the ground terminal.
WARNING
Terminal 7 (Neutral) is directly connected to terminal 1 of the equipment to be controlled, which is therefore not com pletely isolated from
the power supply line.
Carefully follow all the connection instructions. If you have any doubts do
NOT make experiments but refer to the relevant technical specifications.
Improper connection may cause serious damage to the radio receiver.
8
4 – English

MEMORIZATION OF RADIO TRANSMITTERS
— STEP 5 —
A memorization procedure must be executed in order to enable the transmitter to control the radio receiver.
WARNING:
• All the memorization sequences described in this chapter are timed, there-
fore they must be performed within the set time limits.
• All the receivers that are within the range of the transmitter can be memo-
rized via radio; it is therefore expedient to power only the radio receiver
involved in the operation.
You can check whether any transmitters have been previously memorized
in the radio receiver; this is done by counting the number of beeps emitted
when the radio receiver is switched on.
Checking the memorized transmitters
3 short beeps
Some transmitters are already memorised
EN
2 long beeps
Empty memory (no memorized transmitters)
Two different procedures can be followed to memorize the transmitters:
– Mode 1: simplified memorization (the transmitter keys are automatically
configured by the RC200 radio receiver).
– Mode 2: advanced memorization (each single transmitter key can be con-
figured for a specific command).
English – 5
Mode 1 (simplified memorization)
In this mode the functions of the transmitter keys are pre-set. The keys are
associated by pairs: keys 1 and 2 can perform the On-Off commands from
an RC200 radio receiver, whereas keys 3 and 4 can perform the On-Off com-
mands from a different RC200 radio receiver, as shown in the example below.
When the memory is empty (no memorized transmitters) you can proceed to
EN
program the first transmitter in Mode 1 as shown in table [A].
WARNING: if you press key 1 or 2, this pair of keys will be me morized,
whereas if you press key 3 or 4, this latter pair of keys will be memorized.
Table [A] Memorizing the first transmitter
1 Power the radio receiver: you will hear
2 Within 5 seconds, press one of the keys
3 Release the key when you hear the first of
If the radio receiver has already memorized one or more transmitters, when it
is switched on you will hear 3 short beeps. In this case you will not be able to
proceed as described above, but will have to switch to the memorization mode
described in Table [B]
6 – English
in Mode 1
two long beeps
in the desired pair (pair 1-2 or 3-4) on the
transmitter and hold it down
the 3 beeps confirming the memorization
Example
5s
Example of memorization in Mode 1
Key 1 On on RC200 no. 1
Key 2 Off on RC200 no. 1
Key 3 On on RC200 no. 2
Key 4 Off on RC200 no. 2
Even if one or more transmitters have already been memorized in Mode 1, ad-
ditional transmitters can be memorized in Mode 1, as described in Table [B].
Table [B] Memorizing additional transmitters
1 Press and hold down one of the keys in
2 Slowly press one of the keys in the
3 Once again, press and release the key
The 3 final beeps signal that the new transmitter has been correctly memorized.
If the memory is full (30 transmitters), 6 beeps will signal that the memory is not
capable of memorizing any additional transmitters.
in Mode 1
the desired pair (1-2 or 3-4) on the new
transmitter to be memorized (New TX) until
you hear a beep (after approx. 5 seconds),
then release the key
desired pair on a previously memorized
transmitter (old TX)
on the new transmitter you pressed
according to step 1
Example
New TX
5s
Old TX
New TX
English – 7
EN
Mode 2 (advanced memorization)
In this mode, each of the 4 available commands can be associated to a trans-
mitter key, as shown in Table [C].
Table [C] Commands available for memorization Mode 2
N° Command Description
EN
1 On-Off The first command switches on the unit, the
2 Man Present When the key is pressed the relay contact
3 Timer 1
4 Timer 2
next one switches it off, and so on
closes. When the key is released the relay
contact opens
The contact remains closed for a length of time
ranging from 1 sec to 9 hours (programmable
as shown in Table [G])
The contact remains closed for a length of time
ranging from 1 sec to 9 hours (programmable as
shown
in Table [G])
In this mode, the memorization procedure is performed separately for each
single transmitter key; this means that 2 keys on the same transmitter can be
memorized for two commands to the same radio receiver, or to command
different receivers as illustrated in the example below:
Example of memorization in Mode 2
Key 1 On-Off on
Key 2 Timer1 on
Key 3 Timer2 on
Key 4 Man Present on
8 – English
RC200 no. 1
RC200 no. 2
RC200 no. 3
RC200 no. 3

To memorize the transmitters in Mode 2, refer to Tables [D] and [E].
Table [D] Memorizing the first transmitter
1 As soon as the radio receiver is powered
2 Within 5 seconds, press the desired
in Mode 2
you will hear 2 long beeps
key on the transmitter to be memorized
and hold it down until al 3 beeps have
sounded, then release the key
Example
EN
3 Within 3 seconds, press the same key
4 After approx. 3 seconds you will hear a
5 Within 2 seconds, press and release the
The 3 final beeps signal that the new transmitter has been correctly memorized.
During step 4, if you do not hear the number of beeps corresponding to the
desired function, wait 10 seconds before abandoning the procedure, then try
again.
on the transmitter as many times as the
number corresponding to the desired
command: 1 = On-Off; 2 = Man Present;
3 = Timer1; 4 = Timer2
number of beeps corresponding to the
selected command
same key to confirm the programming
X1...X4
X1...X4
English – 9
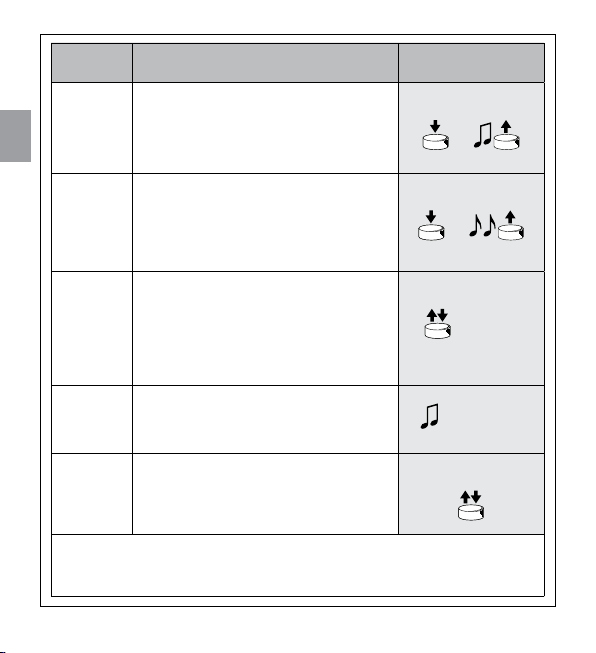
Table [E] Memorizing additional transmitters
1 Press and hold down the desired key on
EN
in Mode 2
the new transmitter (New TX) until you
hear a beep (after approx. 5 seconds),
then release the key
Example
New TX
5s
2 Within 5 seconds, press and hold down
3 Within 3 seconds, press again the same
4 After approx. 3 seconds you will hear a
5 Within 2 seconds, press and release the
The 3 final beeps signal that the new transmitter has been correctly memorized.
If the memory is full (30 transmitters), 6 beeps will signal that the transmitter
cannot be memorized.
10 – English
for approx. 5 seconds a previously
memorized key on a transmitter (old TX)
until you hear 2 short beeps, then release
the key
key on the previously memorized transmitter (old TX) as many times as the
number corresponding to the desired
command: 1 = On-Off; 2 = Man Present;
3 = Timer1; 4 = Timer2
number of beeps corresponding to the
selected command
desired key on the new transmitter (new
TX) to confirm the programming
Old TX
5s
Old TX
X1...X4
X1...X4
New TX
Memorizing a new transmitter like a previously memorized transmitter
It is possible to memorize a new transmitter so that it operates exactly like a
previously memorized one. If the old transmitter was memorized in Mode 1,
the new one will also operate in Mode 1 and a single memorization stage will
be required. If the key on the old transmitter was memorized in Mode 2, also
the key on the new transmitter will be memorized in Mode 2 and will perform
the same function. If you wish to memorize more than one key you will have
to perform a memorization procedure for each key.
Table [F] Memorizing a new transmitter
1 Press the key on the new transmitter
2 Press the key on the previously
3 Press the key on the new transmitter
4 Press the key on the previously
The 3 final beeps signal that the new transmitter has been correctly memorized.
If the memory is full (30 transmitters), 6 beeps will signal that the memory is not
capable of memorizing any additional transmitters.
exactly like a previously memorized
transmitter
(new TX) to be memorized and hold it
down for at least 3 seconds, then
release it
memorized transmitter (old TX) and hold it
down for at least 3 seconds, then
release it
(new TX) again and hold it down for at
least 3 seconds, then release it
memorized transmitter (old TX) and hold it
down for at least 3 seconds, then
release it
Example
New TX
3s
Old TX
3s
New TX
3s
Old TX
3s
English – 11
EN

Programming the Timers
The RC200 radio receiver features two independent timers (Timer1 and Tim-
er2) for automatic relay deactivation after a set time delay.
The deactivation time can be brought forward, compared to the timer setting,
by maintaining the “timer” command active for more than 3 seconds or by
giving an “Off” command.
EN
The factory or default settings for the two timers are 1 minute (Timer1) and 10
minutes (Timer2) respectively.
The time settings can be programmed separately for each of the two timers,
from a minimum of 1 second to a maximum of 9 hours. Once the timer has
been programmed, every command associated with it will activate the relay
for the set time interval.
In order to program the timers you need to have a transmitter memorized for
timer control, then follow the steps in the table [G].
Table [G] Programming the Timers Example
1 Press and hold down the transmitter
key associated with control of the timer
you wish to program. The relay will be
activated (On)
“Relay ON”
2 Hold the key down, after approx.
3 Hold down the same key for approx. 10
12 – English
3 seconds the relay will be deactivated
(Off)
seconds, until the relay is activated again
(On). The time measuring stage starts at
this point. Release the key
3s “Relay OFF”
10s “Relay ON”

4 When the time you wish to set has
3 long beeps will signal that the time has been programmed successfully;
the following 1 or 2 short beeps indicate whether timer1 or timer2 has been
programmed.
elapsed, press the key associated with
control of the timer. The relay will be
deactivated (Off) and the measured time
will be memorized
“Relay OFF”
Clearing the Receiver Memory
There may be cases when the RC200 radio receiver memory has to be cleared.
The memory can be cleared using:
– non-memorised transmitters or those which have been memorised for
“Timer” commands starting from point A.
– A previously memorized transmitter, starting from step N. 1
The following items may be erased:
– Transmitters only, proceeding up to step 4
– All the data (transmitters and timers), completing the procedure up to
step 5.
Table [H] Clearing the Memory Example
➨ A
B Power the radio receiver and wait for the
With the radio receiver
not powered, remove
the jumper from the
board (after clearing the
memory, the jumper must
be reinstalled).
initial beeps
English – 13
EN

➨ 1
EN
2 After 1 second, press the same key again
3 After 1 second, press the same key again
➨ 4
➨ 5
14 – English
• With the transmitter in
not memorized:
Press and hold down key 2 or key 4 on a
transmitter previously memorized in Mode
1 until you hear a beep (after approx. 5
seconds), then release it.
• With the transmitter in
Off or timer only):
For On/Off with open relay (Off), press the
key to activate it (On), release the key,
press it again and hold it down until you
hear a beep (after approx. 5 seconds),
then release the key.
For timer with open relay (Off), press the
key to activate the relay (On), hold down
the key until the relay is deactivated (Off)
and you hear a beep (after approx. 5
seconds), then release the key
and release it precisely during the third
beep
and release it precisely during the third
beep
After 1 second, press the same key again
and release it precisely during the third
beep
If you wish to completely erase all the data
stored in the memory, press the key again
within 2 seconds and then release it
After a few seconds, 5 beeps will signal
that the memory has been cleared
Mode 1 or
Mode 2 (On/
5s
?... 5s

MAINTENANCE AND DISPOSAL
— STEP 6 —
The system does not require special maintenance.
This product is made of various materials; some may be recycled and others
must be disposed of. Obtain information on product recycling or disposal, in
observance of current local standards.
Caution: come electronic components may contain pollutant
substances; never dispose of into the environment.
English – 15
EN

TECHNICAL CHARACTERISTICS
RC200 is produced by NICE S.p.A. (TV) Italy. Nice S.p.A., in order to improve
its products, reserves the right to modify their technical characteristics at
any time without prior notice. In any case, the manufacturer guarantees their
functionality and fitness for the intended purposes.
Note: all the technical characteristics refer to a temperature of 20°C.
EN
RC200 Radio receiver
Type radio receiver for control of general
Technology adopted reception and decoding of the radio
Possibility of remote control with ECCO5... or STX100 transmitters
Coding 64 bit rolling code (18 billion billion
ECCO5... and STX100 transmitters
memorization capacity
Reception frequency 433.92 MHz
Receiver sensitivity better than 0.6µV (with direct coupling)
Range of ECCO5... and STX100
transmitters
Power supply 230Vac (+10-15%) 50Hz
Maximum power output 500W / 400VA
Absorption when idle < 0.7W (typical at 230 Vac)
Activation time approx. 300ms
16 – English
electrical equipment
signals emitted by the transmitters
activation of the output relays only in
case of correspondence with a previ-
ously memorized code, correctly synchronized with the variability sequence
combinations)
up to 30, if memorized in Mode 1
estimated at 50-100m (this distance
may vary in the presence of obstacles
or electromagnetic disturbances)

Deactivation time approx. 300ms
Maintenance of output status in
case of power failure
Timer resolution and precision 1s/±2%
Operating ambient temperature -10°C ... +55°C
Protection class IP55 (enclosure undamaged) with
Dimensions / weight 98 x 26 x 20 / 45 g
No
round cables having a diameter of 6.5
to 8.5 mm
English – 17
EN

CE Declaration of conformity
Declaration in accordance with Directive 1999/5/EC
Note: The contents of this declaration correspond to declarations in the official document deposited
at the registered offices of Nice S.p.A. and in particular to the last revision available before printing this
manual. The text herein has been re-edited for editorial purposes.
A copy of the original declaration can be requested from Nice S.p.A. (TV) Italy.
EN
Declaration number: 584/RC Revision: 0 Language: EN
The undersigned, Roberto Griffa, in the role of Chief Executive Officer, declares
under his sole responsibility, that the product:
Manufacturer’s Name: NICE S.p.A.
Address: Via Pezza Alta 13, 31046 Rustignè di Oderzo (TV)
Italy
Model: RC200 radio receiver
Accessories:
Conforms to the essential requirements stated in article 3 of the following EC directive, for the intended use of products:
• DIRECTIVE 1999/5/EC OF THE EUROPEAN PARLIAMENT AND OF THE
COUNCIL of 9 March 1999 on radio equipment and telecommunications termi-
nal equipment and the mutual recognition of their conformity, in accordance with
the following harmonised standards:
- Health and safety (Art. 3(1)(a)): EN 62479:2010
- Electrical safety (Art. 3(1)(a)): EN 60950-1:2006+A11:2009+A12:2011+A1:20
10+A2:2013
- Electromagnetic compatibility (Art. 3(1)(b)): EN 301 489-1 V1.9.2:2011, EN
301 489-3 V1.6.1:2013
- Radio spectrum (Art. 3(2)): EN 300 220-2 V2.4.1:2012
Oderzo, 28 July 2016 Ing. Roberto Griffa
(Chief Executive Officer)
18 – English

AVVERTENZE
— PASSO 1 —
• Prima di iniziare l’installazione verificate se il prodotto è adatto all’uso, con
particolare attenzione ai dati riportati nel capitolo “Caratteristiche tecniche”;
NICE non risponde dei danni risultanti da un uso del prodotto diverso da
quanto previsto nel presente manuale.
• Le operazioni di installazione devono avvenire senza la presenza dell’alimentazione elettrica.
• Evitare che le parti interne del prodotto possano venire a contatto con
acqua o altre sostanze inquinanti, non tenerlo vicino a forti fonti di calore
né esporlo a fiamme; qualora accada, sospendere immediatamente l’uso e
rivolgersi al servizio assistenza NICE.
• Il materiale dell’imballaggio deve essere smaltito nel pieno rispetto della
normativa locale.
IT
DESCRIZIONE DEL PRODOTTO E DESTINAZIONE D’USO
— PASSO 2 —
Il ricevitore radio RC200 permette di comandare a distanza tramite gli appositi trasmettitori ECCO5... e STX100, apparecchi monofase alimentati a tensione di rete con potenze fino a 500W.
Sono possibili comandi On/Off, Uomo Presente, Timer 1 e Timer 2.
Il ricevitore radio opera alla frequenza di 433.92 MHz e può memorizzare fino
a 30 trasmettitori della serie e ECCO5... e STX100.
STX100
ECCO5
Italiano – 1
Istruzioni originali

INSTALLAZIONE
— PASSO 3 —
Il ricevitore radio RC200 si deve collegare “interrompendo” il normale cavo
di alimentazione dell’apparecchio da
comandare.
ATTENZIONE: Gli impianti elettrici devono essere eseguiti da
perso nale esperto e qualificato,
IT
nel ri spetto delle norme di legge.
Il con tenitore di RC200 deve
essere posto in luoghi non
accessibili in quanto i passacavo non proteggono dallo strappo dei
cavi ed il tappo remo vibile costituisce elemento separabile e non
garantisce la protezione contro l’accesso a parti in tensione. Se il
ricevitore radio RC200 viene po sto in ambienti esterni considerare che i passacavi garantiscono la tenuta all’acqua solo per cavi
rotondi e con diametro tra 6,5 e 8,5 mm.
01. Assicurarsi che non sia presente tensione in nessuna parte dei circuiti
elettrici.
02. Tagliare il cavo di alimentazione dell’apparecchio da co mandare.
03. Aprire il contenitore di RC200 togliendo il “tappo passacavi”.
04. Sguainare le due parti del cavo di circa 3 cm e poi i singoli conduttori di
circa 5 mm.
05. Passare i due cavi negli appositi fori passacavo del “tappo”.
06. Estrarre di qualche centimetro la scheda.
07. Collegare i conduttori ai morsetti rispettando lo schema.
08. Ripiegare i conduttori.
09. Spingere la scheda all’interno del contenitore, verificare che la parte
sguainata del cavo sia tutta all’interno, far scorrere il “tappo” sui cavi fino
alla completa chiusura del contenitore.
10. Il ricevitore radio RC200 non necessita di fissaggio e può essere posizio-
2 – Italiano
1

nato direttamente nel vano destinatogli; per evitare il rischio di infiltrazioni
d’acqua si consiglia di riporlo con i cavi verso il basso.
ATTENZIONE: Il contenitore non deve essere forato per nessun
mo tivo.
2 3
4 5
6 7
Italiano – 3
IT

COLLEGAMENTI ELETTRICI
— PASSO 4 —
Alimentazione
L’alimentazione principale del ricevitore radio (terra, fase, neutro) deve essere
eseguita utilizzando i morsetti 5-6-7 come indicato nella figura a lato “Collegamenti elettrici”.
Collegamento all’apparecchio da comandare
L’apparecchio da comandare (Max 500W) deve essere collegato tra i morsetti 1-2; mentre il n° 3 è il morsetto di terra.
IT
ATTENZIONE
Il morsetto 7 (Neutro) è collegato direttamente al morsetto 1 dell’apparecchio da comandare che quindi non risulta com pletamente isolato dalla linea elettrica di alimentazione.
Rispettare scrupolosamente i collegamenti previsti, in caso di dubbio NON
tentare invano, ma consultare le apposite schede tecniche di approfondimento.
Un collegamento errato può provocare guasti gravi al ricevitore radio.
8
4 – Italiano
MEMORIZZAZIONE DEI TRASMETTITORI
— PASSO 5 —
Affinché un trasmettitore possa comandare il ricevitore radio, è ne cessario
eseguire una fase di memorizzazione.
ATTENZIONE:
• Tutte le sequenze di memorizzazione descritte in questo capitolo sono a
tempo, cioè devono essere eseguite entro i limiti di tempo previsti.
• La memorizzazione via radio può avvenire in tutti I ricevitori che si trovano
nel raggio della portata del trasmettitore; è quindi opportuno tenere alimentato solo quello interessato all’operazione.
È possibile verificare se nel ricevitore radio vi sono già memorizzati dei trasmettitori; a questo scopo è sufficiente verificare il numero di bip acustici
emessi al momento dell’accensione del ricevitore radio.
Verifica dei trasmettitori memorizzati
3 bip brevi
Vi sono già dei trasmettitori memorizzati
IT
2 bip lunghi
Nessun trasmettitore memorizzato
Vi sono 2 possibili modalità per memorizzare i trasmettitori:
- Modo 1: memorizzazione semplificata (i tasti del trasmettitore sono automaticamente configurati dal ricevitore radio RC200)
- Modo 2: memorizzazione avanzata (ogni singolo tasto del trasmettitore
può essere configurato per un determinato co mando).
Italiano – 5

Modo 1 (memorizzazione semplificata)
In questa modalità le funzioni dei tasti del trasmettitore è prefissata. L’associazione dei tasti avviene a coppie: i tasti 1 e 2 possono svolgere i comandi
On-Off di un ricevitore radio RC200, mentre i tasti 3 e 4 possono svolgere i
comandi On-Off di un altro ricevitore radio RC200 come indicato nel seguente esempio.
Quando la memoria è vuota (nessun trasmettitore memorizzato) si può procedere all’inserimento del primo trasmettitore in Modo 1 come indicato in
tabella [A].
ATTENZIONE: premendo i tasti 1 o 2 verrà memorizzata questa coppia di
IT
tasti, mentre premendo i tasti 3 o 4 verrà memorizzata questa seconda coppia di tasti.
Tabella [A] Memorizzazione del primo
1 Alimentare il ricevitore radio: si sentiranno
2 Entro 5 secondi premere e tener premuto,
3 Rilasciare il tasto al primo dei 3 bip che
Se il ricevitore radio contiene già dei trasmettitori memorizzati, all’accensione
si udiranno dei 3 bip brevi e non si potrà procedere come descritto sopra. In
questo caso sarà necessario passare alla modalità di memorizzazione della
Tabella [B]
6 – Italiano
trasmettitore in Modo 1
2 bip lunghi (biiip)
nel trasmettitore, un tasto della coppia
desiderata (coppia di tasti 1-2 oppure 3-4)
confermano la memorizzazione
Esempio
5s

Esempio di memorizzazione in Modo 1
Tasto 1 On su RC200 n° 1
Tasto 2 Off su RC200 n° 1
Tasto 3 On su RC200 n° 2
Tasto 4 Off su RC200 n° 2
Quando uno o più trasmettitori sono già stati memorizzati in Modo 1, è possibile memorizzarne degli altri sempre in Modo 1, come indicato in tabella [B]
Tabella [B] Memorizzazione di trasmettitori
1 Tenere premuto un tasto della coppia
2 Lentamente premere per 3 volte un tasto
3 Premere e rilasciare ancora una volta
I 3 bip finali segnalano che il nuovo trasmettitore è stato memorizzato correttamente. Se la memoria è piena (30 trasmettitori), 6 Bip indicheranno che la
memoria non è in grado di memorizzare altri trasmettitori.
aggiuntivi in Modo 1
desiderata (1-2 oppure 3-4) del nuovo
trasmettitore da memorizzare (Nuovo
TX) fino a sentire un bip (dopo circa 5
secondi) poi rilasciare
della coppia desiderata di un trasmettitore
già memorizzato (vecchio TX)
lo stesso tasto premuto al punto 1 del
nuovo trasmettitore
Esempio
Nuovo TX
5s
Vecchio TX
Nuovo TX
Italiano – 7
IT
Modo 2 (memorizzazione avanzata)
In questa modalità ad ogni tasto del trasmettitore può essere associato uno
dei 4 possibili comandi come indicato in tabella [C].
Tabella [C] Comandi disponibili per memorizzazione in Modo 2
N° Comando Descrizione
1 On-Off Il primo comando attiva l’accensione, il suc-
2 Uomo Presente Con tasto premuto il contatto del relè è chiuso.
IT
3 Timer 1 Chiusura del contatto per un periodo di tempo
4 Timer 2 Chiusura del contatto per un periodo di tempo
cessivo attiva lo spegnimento e così via
A tasto rilasciato il contatto del relè è aperto
che va da 1 sec a 9 ore (programmabile come da
tabella [G])
che va da 1 sec a 9 ore (programmabile come da
ta bella [G])
In questa procedura la memorizzazione avviene separatamente per singolo
tasto del trasmettitore; questo significa che 2 tasti dello stesso trasmettitore
possono essere memorizzati per due comandi dello stesso ricevitore radio
oppure per comandare ricevitori diversi come indicato nel seguente esempio:
Esempio di memorizzazione in Modo 2
Tasto 1 On-Off su
Tasto 2 Timer1 su
Tasto 3 Timer2 su
Tasto 4 Uomo presente
8 – Italiano
RC200 n° 1
RC200 n° 2
RC200 n° 3
su RC200 n° 3
Per memorizzare i trasmettitori in Modo 2 fare riferimento alle tabelle [D] e
[E].
Tabella [D] Memorizzazione del primo
1 Appena data alimentazione al ricevitore
trasmettitore in Modo 2
radio, si sentiranno 2 bip lunghi (biiip)
Esempio
2 Entro 5 secondi premere e mantenere
3 Entro 3 secondi premere lo stesso tasto
4 Dopo circa 3 secondi si udirà un numero
5 Entro 2 secondi premere e rilasciare lo
I 3 bip finali segnalano che il nuovo trasmettitore è stato memorizzato correttamente. Se al punto 4 non si sente un numero di bip uguale alla funzione desiderata, aspettare 10 secondi per uscire dalla procedura e poi riprovare.
premuto il tasto desiderato del trasmettitore da memorizzare fino alla fine di tutti
e 3 i bip; quindi rilasciarlo
del trasmettitore per un numero di volte
uguale al comando desiderato: 1 = OnOff; 2 = Uomo Presente; 3 = Timer1;
4 = Timer2
di bip uguale al comando scelto
stesso tasto per confermare la programmazione
X1...X4
X1...X4
Italiano – 9
IT

Tabella [E] Memorizzazione di trasmettitori
1 Tenere premuto il tasto desiderato del
aggiuntivi in Modo 2
nuovo trasmettitore (nuovo TX) fino a
sentire un bip (dopo circa 5 secondi) e
rilasciare
Esempio
Nuovo TX
5s
2 Entro 5 secondi premere e tenere
IT
3 Entro 3 secondi premere nuovamente
4 Dopo circa 3 secondi si udirà un numero
5 Entro 2 secondi premere e rilasciare il
I 3 bip finali segnalano che il nuovo trasmettitore è stato memorizzato cor rettamente. Se la memoria è piena (30 trasmettitori), 6 Bip indicheranno il tra-
smettitore non può essere memorizzato.
10 – Italiano
premuto per circa 5 secondi un tasto già
memorizzato di un trasmettitore (vecchio
TX) fino a sentire 2 bip brevi, quindi
rilasciare
lo stesso tasto del trasmettitore già
me mo rizzato (vecchio TX) un numero di
volte uguale al comando desiderato: 1 =
On-Off; 2 = Uomo Presente; 3 = Timer1;
4 = Timer2
di bip uguale al comando scelto
tasto desiderato del nuovo trasmettitore
(nuovo TX) per confermare la
programmazione
Vecchio TX
5s
Vecchio TX
Nuovo TX
X1...X4
X1...X4

Memorizzazione di un nuovo trasmettitore come un trasmettitore già
memorizzato
È possibile anche memorizzare un nuovo trasmettitore in modo che funzioni
esattamente come un trasmettitore già memorizzato. Se il trasmettitore già
memorizzato è in Modo 1, anche il nuovo trasmettitore funzionerà in Modo
1 e basta una sola fase di memorizzazione. Se il tasto del trasmettitore già
memorizzato è in Modo 2 anche il tasto del nuovo trasmettitore lo sarà in
Modo 2 ed eseguirà per lo stesso comando; se si desiderano memorizzare
più tasti bisognerà fare una fase di memorizzazione per ogni tasto.
Tabella [F] Memorizzazione di un nuovo
1 Tenere premuto il tasto del nuovo
2 Premere il tasto del trasmettitore già
3 Premere nuovamente il tasto del nuovo
4 Premere il tasto del trasmettitore già
I 3 bip finali segnalano che il nuovo trasmettitore è stato memorizzato corret tamente. Se la memoria è piena (30 trasmettitori), 6 Bip indicheranno che la
memo ria non è in grado di memorizzare altri trasmettitori.
trasmettitore esattamente come
un trasmettitore già memorizzato
tra smettitore (nuovo TX) da memorizzare
per almeno 3 secondi, poi rilasciare
me morizzato (vecchio TX) per almeno 3
se condi, poi rilasciare
trasmettitore (nuovo TX) per almeno 3
secondi e rilasciare
memorizzato (vecchio TX) per almeno 3
secondi, poi rilasciare
Esempio
Nuovo TX
3s
Vecchio TX
3s
Nuovo TX
3s
Vecchio TX
3s
Italiano – 11
IT

Programmazione del tempo dei Timer
Il ricevitore radio RC200 dispone di 2 timer indipendenti (Timer1 e Timer2) per
lo spegnimento automatico dei relè, dopo un tempo prefissato dal comando.
È possibile anticipare lo spegnimento, rispetto alla durata prevista dal timer,
tenendo attivo il comando “timer” per più di 3 secondi oppure inviando un
comando di “Off”. I valori di fabbrica, o dopo una cancellazione della memoria, per i due timer sono rispettivamente di 1 minuto (Timer1) e 10 minuti
(Timer2).
È possibile programmare il tempo, separatamente per ognuno dei due timer,
da un minimo di 1 secondo ad un massimo di 9 ore. Una volta programmato il
tempo, ogni comando relativo a quel timer attiverà il relè per la durata prevista.
IT
Per procedere alla programmazione dei timer è necessario disporre di un
trasmettitore memorizzato per il comando del timer, poi seguire i passi della
seguente tabella.
Tabella [G] Programmazione tempo dei timer Esempio
1 Premere e tenere premuto il tasto del tra-
smettitore relativo al comando del timer
che si desidera programmare.
Il relè si attiverà (On)
“Relè ON”
2 Mantenere sempre premuto lo stesso
3 Mantenere sempre premuto lo stesso tasto
12 – Italiano
tasto, dopo circa 3 secondi il relè si
disattiverà (Off)
per circa 10 secondi fino a quando il relè si
attiverà nuovamente (On). Da questo istante inizia la fase di “misura” del tempo.
Rilasciare ora il tasto
3s “Relè OFF”
10s “Relè ON”

4 Quando è trascorso il tempo che si
3 bip lunghi segnaleranno l’avvenuta programmazione del tempo; seguiranno
1 o 2 bip brevi per indicare se la programmazione è relativa al timer1 o al
timer2.
desidera programmare premere il tasto
relativo al comando del timer. Il relè si
disattiverà (Off) e verrà memorizzato il
tempo misurato
“Relè OFF”
Cancellazione della memoria del ricevitore radio
In alcuni casi può essere necessario cancellare la memoria del ricevitore radio
RC200.
La cancellazione della memoria è possibile con:
– un trasmettitore non memorizzato, o memorizzato per co mandi “timer”, ini-
ziando dal punto A
– un trasmettitore già memorizzato iniziando dal punto N°1
Possono essere cancellati:
– solo i trasmettitori, terminando al punto 4
– tutti i dati (trasmettitori e timer) completando la procedura fino al punto 5.
Tabella [H] Cancellazione della memoria Esempio
➨ A
B Alimentare il ricevitore radio ed attendere
A ricevitore radio non
alimentato togliere il
ponticello presente nella
scheda (il ponticello va
ripristinato al termine della
cancellazione)
i bip iniziali
Italiano – 13
IT

➨ 1
IT
2 Dopo 1 secondo ripremere lo stesso
3 Dopo 1 secondo ripremere lo stesso
➨ 4
➨ 5
14 – Italiano
• Con trasmettitore in modo I o non
memorizzato:
tenere premuto il tasto 2 o il tasto 4 di un
trasmettitore già memorizzato in modo I
fino a sentire un bip (dopo circa 5 secondi) e rilasciare
• Con trasmettitore in modo II (solo
On/Off o timer):
Se On/Off con relè aperto (Off) premere
il tasto per attivarlo (On), rilasciare il tasto
e ripremerlo mantenendolo premuto fino
a sentire un bip (dopo circa 5 secondi) e
rilasciare il tasto.
Se timer con relè aperto (Off) premere il
tasto per attivare il relè (On), mantenere
il tasto premuto fino a quando il relè si
disattiva (Off) e si sente un bip (dopo circa
5 secondi) e rilasciare il tasto
tasto e rilasciare esattamente durante il
terzo bip
tasto e rilasciare esattamente durante il
terzo bip
Dopo 1 secondo ripremere lo stesso
tasto e rilasciare esattamente durante il
terzo bip
Se si vogliono cancellare completamente
tutti i dati presenti in memoria, entro 2
secondi, premere nuovamente il tasto e
poi rilasciarlo.
Dopo qualche secondo 5 bip segnalano
che la memoria è stata cancellata
5s
?... 5s

MANUTENZIONE E SMALTIMENTO
— PASSO 6 —
Il sistema non necessita di alcuna manutenzione particolare.
Questo prodotto è costituito da varie tipologie di materiali, alcuni possono
essere riciclati, altri dovranno essere smaltiti. Informatevi sui sistemi di riciclaggio o smaltimento del prodotto attenendosi alle nor me di legge vigenti a
livello locale.
Attenzione: alcuni componenti elettronici potrebbero contenere
so stanze inquinanti: non disperdeteli nell’ambiente.
Italiano – 15
IT

CARATTERISTICHE TECNICHE
RC200 è prodotto da NICE S.p.A. (TV) Italy. Allo scopo di migliorare i prodotti, NICE S.p.A. si riserva il diritto di modificare le caratteristiche tecniche in
qualsiasi momento e senza preavviso, garantendo comunque funzionalità e
Destinazione d’uso previste.
Nota: tutte le caratteristiche tecniche sono riferite alla temperatura di 20°C.
Ricevitore RC200
Tipologia Ricevitore radio per il comando di
IT
Tecnologia adottata Ricezione e decodifica dei segnali radio
Possibilità di telecomando Con trasmettitori ECCO5... oppure
Codifica Rolling code con codice a 64 Bit (18
Trasmettitori ECCO5... e STX100
memorizzabili
Frequenza di ricezione 433.92 MHz
Sensibilità del ricevitore radio Migliore di 0,6µV (con accoppiamento
Portata dei trasmettitori
ECCO5... e STX100
Alimentazione 230Vac (+10-15%) 50Hz
Potenza massima uscita 500W / 400VA
16 – Italiano
apparecchi elettrici in genere
emessi dai trasmettitori. Attivazione dei
relè di uscita solo in caso di corri spondenza di un codice pre ce dentemente
memorizzato e corretta mente in sincronismo con la sequenza di variabilità
STX100
miliardi di miliardi di combinazioni)
Fino a 30 se memorizzati in Modo 1
diretto)
Stimata in 50-100m (la portata cambia
in presenza di ostacoli e di disturbi
elettromagnetici)

Consumo a riposo < 0,7W (tipici a 230 Vac)
Tempo attivazione circa 300ms
Tempo disattivazione circa 300ms
Mantenimento dello stato
dell’uscita in caso di mancanza di
alimentazione
Risoluzione e precisione dei timer 1s/±2%
Temperatura ambientale
di funzionamento
Grado di protezione IP55 (contenitore integro) e con cavi
Dimensioni / peso 98 x 26 x 20 / 45 g
No
-10°C ... +55°C
rotondi diametro tra 6,5 e 8,5 mm
Italiano – 17
IT

Dichiarazione CE di conformità
Dichiarazione in accordo alla Direttiva 1999/5/CE
Nota: Il contenuto di questa dichiarazione corrisponde a quanto dichiarato nel documento ufficiale depositato presso la sede di Nice S.p.A., e in particolare, alla sua ultima revisione disponibile prima della
stampa di questo manuale. Il testo qui presente è stato riadattato per motivi editoriali.
Copia della dichiarazione originale può essere richiesta a Nice S.p.A. (TV) Italy.
Numero dichiarazione: 584/RC Revisione: 0 Lingua: IT
Il sottoscritto Roberto Griffa in qualità di Amministratore Delegato, dichiara sotto la
propria responsabilità che il prodotto:
Nome produttore: NICE S.p.A.
IT
Indirizzo: Via Pezza Alta 13, 31046 Rustignè di Oderzo (TV) Italy
Modello: Ricevitore radio RC200
Accessori:
Risulta conforme ai requisiti essenziali richiesti dall’articolo 3 della seguente direttiva comunitaria, per l’uso al quale i prodotti sono destinati:
• Direttiva 1999/5/CE DEL PARLAMENTO EUROPEO E DEL CONSIGLIO del 9
marzo 1999 riguardante le apparecchiature radio e le apparecchiature terminali
di comunicazione e il reciproco riconoscimento della loro conformità, secondo le
seguenti norme armonizzate:
- Protezione della salute (art. 3(1)(a)): EN 62479:2010
- Sicurezza elettrica (art. 3(1)(a)): EN 60950-1:2006+A11:2009+A12:2011+A1:
2010+A2:2013
- Compatibilità elettromagnetica (art. 3(1)(b)): EN 301 489-1 V1.9.2:2011, EN
301 489-3 V1.6.1:2013
- Spettro radio (art. 3(2)): EN 300 220-2 V2.4.1:2012
Oderzo, 28 luglio 2016 Ing. Roberto Griffa
(Amministratore Delegato)
18 – Italiano
ZALECENIA
— KROK 1 —
• Przed rozpoczęciem montażu sprawdź czy urządzenie nadaje się do użytku; zwróć szczególną uwagę na dane zamieszczone w rozdziale “Parametry
techniczne”; NICE nie odpowiada za szkody wynikające z niewłaściwego używania urządzenia, odmiennego od przewidzianego w tej instrukcji obsługi.
• Operacje montażu muszą być wykonywane po odłączeniu zasilania elektrycznego.
• Zadbaj o to, aby elementy znajdujące się wewnątrz urządzenia nie zetknęły
się z wodą lub innymi substancjami zanieczyszczającymi, nie umieszczaj
go w pobliżu silnych źródeł ciepła i płomieni; jeżeli tak się stanie natychmiast przerwij używanie urządzenia i skontaktuj się z serwisem technicznym NICE.
• Opakowanie urządzenia musi zostać zlikwidowane zgodnie z odpowiednimi przepisami lokalnymi.
OPIS URZĄDZENIA I JEGO PRZEZNACZENIE
— KROK 2 —
Odbiornik radiowy RC200 umożliwia zdalne sterowanie przy pomocy nadajników ECCO5... i STX100 urządzeniami jednofazowymi, zasilanymi napięciem
sieciowym, o mocy do 500W.
Dostępne są polecenia Włącz/Wyłącz, Sterowanie w trybie manualnym (z
przytrzymaniem przycisku), Timer 1 i Timer 2.
Odbiornik radiowy pracuje na częstotliwości 433.92 MHz i może zapamiętać
do 30 nadajników z serii ECCO5... i STX100.
STX100
ECCO5
Polski – 1
PL
Instrukcja przetłumaczona z języka włoskiego
MONTAŻ
— KROK 3 —
Przy podłączaniu odbiornika RC200
należy “przerwać” zwykły przewód
zasilania sterowanego urządzenia.
UWAGA: Instalacje elektryczne
muszą być wykonywane przez
personel doświadczony i wykwa-
lifikowany, zgodnie z przepisami.
Obudowa RC200 musi znajdować
się w miejscach niedostępnych,
ponieważ przelotki nie zabezpieczają przed zerwaniem przewodów a zdejmowana zatyczka stanowi oddzielny element i nie gwarantuje zabezpieczenia przed dostę-
PL
pem do elementów znajdujących się pod na pięciem. Jeżeli odbiornik RC200 zostanie umieszczony na zewnątrz budynków, należy
uwzględnić, że przelotki gwarantują szczelność na wodę tylko dla
przewodów okrągłych, o średnicy od 6,5 do 8,5 mm.
01. Upewnij się, że żadna część obwodów elektrycznych nie znajduje się
pod napięciem.
02. Odłącz przewód zasilający od sterowanego urządzenia.
03. Otwórz pokrywę RC200 zdejmując “zatyczkę przelotki”.
04. Zdejmij izolację wspólną z obu żył przewodu na długości około 3 cm,
zdejmij ją również z pojedynczych żył na około 5mm.
05. Włóż oba przewody przez specjalne otwory w przelotce “zatyczki”.
06. Wysuń płytkę na kilka centymetrów.
07. Połącz przewody z zaciskami zgodnie ze schematem.
08. Zwiń przewody.
09. Włóż płytkę do obudowy, sprawdź czy część przewodu ze zdjętą izola-
cją znajduje się w całości wewnątrz, wsuń “zatyczkę” na przewody, aż
do całkowitego zamknięcia obudowy.
10 Odbiornik radiowy RC200 nie wymaga przymocowania i może być
2 – Polski
1
umieszczany bezpośrednio w miejscu dla niego przeznaczonym; aby
zapobiec zagrożeniu wnikania wody należy dopilnować, aby podczas
wkładania odbiornika przewody były skierowane do dołu.
UWAGA: Obudowa nie może być przewiercana z żadnego powodu.
2 3
4 5
6 7
PL
Polski – 3
PODŁĄCZENIA ELEKTRYCZNE
— KROK 4 —
Zasilanie
Główne zasilanie odbiornika (uziemienie, faza, neutralny) musi być wykonane
z zastosowaniem zacisków 5-6-7, jak pokazano na rysunku obok “Podłączenia elektryczne”.
Podłączenie do sterowanego urządzenia
Sterowane urządzenie (Max 500W) musi być podłączone po między zaciskami
1-2; natomiast nr 3 jest zaciskiem uziemiającym.
UWAGA
Zacisk 7 (Neutralny) jest połączony bezpośrednio z zaciskiem 1 sterowanego urządzenia, które w związku z tym nie jest całkowicie odizolo-
wane od elektrycznej linii zasilania.
PL
Skrupulatnie przestrzegaj przewidzianych połączeń; w razie wątpliwości NIE
wykonuj niepotrzebnych prób, ale przejrzyj szczegółowo dokumentację techniczną.
Nieprawidłowe podłączenie może spowodować poważne uszkodzenia w odbiorniku.
8
4 – Polski
WCZYTYWANIE NADAJNIKÓW
— KROK 5 —
Aby nadajnik mógł sterować odbiornikiem należy wykonać fazę wczytywania.
UWAGA:
• Każda kolejność wczytywania opisana w tym rozdziale jest czasowa, co
oznacza, że musi być wykonywana w przewidzianym zakresie czasowym.
• Wczytywanie drogą radiową może następować we wszystkich odbiornikach, które znajdują się w zasięgu nadajnika; jest więc wskazane podłączenie zasilania tylko do tego odbiornika, w którym operacja jest wykony-
wana.
Istnieje możliwość sprawdzenia czy do odbiornika zostały już wczytane
nadajniki; w tym celu wystarczy sprawdzić ilość sygnałów dźwiękowych
wydawanych podczas jego włączania.
Weryfikacja wczytanych nadajników
3 krótkie sygnały dźwiękowe
Zostały już wczytane jakieś nadajniki
PL
2 długie sygnały dźwiękowe
Żaden nadajnik nie został wczytany
Istnieją 2 możliwe tryby wczytywania nadajników:
– Tryb 1: wczytywanie uproszczone (przyciski nadajnika są automatycznie
konfigurowane przez odbiornik RC200)
– Tryb 2: wczytywanie zaawansowane (każdy pojedynczy przycisk w nadaj-
niku może zostać skonfigurowany dla określonego polecenia)
Polski – 5
Tryb 1 (wczytywanie uproszczone)
W tym trybie funkcje przycisków nadajnika są ustalone wcześniej. Połączenie
przycisków następuje parami: przyciski 1 i 2 mogą wykonywać polecenia
On-Off odbiornika RC200, natomiast przyciski 3 i 4 mogą wykonywać polecenia On-Off innego odbiornika RC200, jak pokazano na poniższym przykładzie.
Kiedy pamięć jest pusta (brak wczytanych nadajników) można przystąpić do
wczytania pierwszego nadajnika w Trybie 1, jak pokazano w tabeli [A].
UWAGA: wciśnięcie przycisków 1 lub 2 powoduje wczytanie tej pary przycisków, natomiast wciśnięcie przycisków 3 lub 4 powoduje wczytanie tej drugiej pary.
Tabela [A] Wczytywanie pierwszego nadajnika w
PL
1 Podłącz zasilanie do odbiornika: zostaną
2 W ciągu 5 sekund wciśnij i przytrzymaj w
3 Zwolnij przycisk po pierwszym z 3 sygna-
Jeżeli w odbiorniku są już wczytane nadajniki, po włączeniu wykona on 3 krótkie
sygnały dźwiękowe i nie będzie możliwe wykonanie wyżej opisanych operacji. W
tym przypadku stanie się konieczne przejście do trybu wczytywania przedsta-
wionego w Tabeli [B].
6 – Polski
Trybie 1
wykonane 2 długie sygnały dźwiękowe
(biiip)
nadajniku przycisk pary wybranej (para
przycisków 1-2 lub 3-4)
łów dźwiękowych, które potwierdzają
wczytanie
Przykład
5s
Przykład wczytywania w Trybie 1
Przycisk 1 On w RC200 nr 1
Przycisk 2 Off w RC200 nr 1
Przycisk 3 On w RC200 nr 2
Przycisk 4 Off w RC200 nr 2
W przypadku, kiedy jeden lub kilka nadajników zostało już wczytanych w Trybie 1, jest możliwe wczytanie innych nadajników w tym samym w Trybie 1, jak
podano w tabeli [B].
Tabela [B] Wczytywanie dodatkowych
1 Przytrzymaj wciśnięty jeden przycisk
2 Powoli wciśnij 3 razy jeden przycisk z
3 Wciśnij i zwolnij jeszcze jeden raz ten sam
3 końcowe sygnały dźwiękowe sygnalizują, że nowy nadajnik został wczytany
prawidłowo. Jeżeli pamięć jest pełna (30 nadajników), 6 sygnałów dźwiękowych
wskazuje, że pamięć nie jest już w stanie wczytać nowych nadajników.
nadajników w Trybie 1
z wybranej pary (1-2 lub 3-4) nowego
nadajnika wczytywanego (Nowy TX),
dopóki nie zostanie usłyszany sygnał
dźwiękowy (po około 5 sekundach),
następnie zwolnij przycisk
wybranej pary nadajnika już wczytanego
(stary TX)
przycisk, wciśnięty w punkcie 1 w nowym
nadajniku
Przykład
Nowy TX
5s
Stary TX
Nowy TX
Polski – 7
PL

Tryb 2 (wczytywanie zaawansowane)
W tym trybie z każdym przyciskiem nadajnika może zostać połączone jedno
z 4 możliwych poleceń, jak przedstawiono w tabeli [C].
Tabela [C] Polecenia do dyspozycji podczas wczytywania w Trybie 2
Nr Polecenie Opis
1 Włączony-
2 W obecności
3 Timer 1 Zamknięcie styku przez okres czasu od 1 sek. do
PL
4 Timer 2 Zamknięcie styku przez okres czasu od 1 sek. do
Wyłączony
użytkownika
Pierwsze polecenie uaktywnia włączenie, następne polecenie uaktywnia wyłączenie i tak dalej
Przy wciśniętym przycisku styk przekaźnika jest
zamknięty. Przy zwolnionym przycisku ten styk
jest otwarty
9 godzin (programowalny, jak wynika z tabeli [G])
9 godzin (programowalny, jak wynika z tabeli [G])
W tej procedurze wczytywanie następuje oddzielnie dla każdego, pojedynczego
przycisku nadajnika; oznacza to, że 2 przyciski tego samego nadajnika mogą
być wczytywane dla dwóch różnych poleceń tego samego odbiornika lub aby
sterować różnymi odbiornikami, jak pokazano w poniższym przykładzie:
Przykład wczytywania w Trybie 2
Przycisk 1 On-Off w
Przycisk 2 Timer1 w
Przycisk 3 Timer2 w
8 – Polski
RC200 nr 1
RC200 nr 2
RC200 nr 3

Przycisk 4 W obecności użyt-
kownika w RC200
nr 3
Aby wczytać nadajniki w Trybie 2 odwołaj się do tabel [D] i [E].
Tabela [D] Wczytywanie pierwszego nadajnika
1 Zaraz po podłączeniu zasilania do
2 W ciągu 5 sekund wciśnij i przytrzymaj
3 W ciągu 3 sekund wciśnij ten sam
4 Po około 3 sekundach będzie słyszalna
5 W ciągu 2 sekund wciśnij i zwolnij ten
3 końcowe sygnały dźwiękowe sygnalizują, że nowy nadajnik został wczytany
prawidłowo. Jeżeli w punkcie 4 nie będzie słyszana ilość sygnałów dźwiękowych
równa wybranej funkcji, odczekaj 10 sekund, aby wyjść z procedury i następnie
spróbuj ponownie.
w Trybie 2
odbiornika będą słyszalne 2 długie
sygnały dźwiękowe (biiip)
wybrany przycisk w nadajniku wczytywanym, aż do momentu zakończenia
3 sygnałów dźwiękowych; następnie
zwolnij przycisk
przycisk w nadajniku ilość razy równą
wybranemu poleceniu: 1 = On-Off; 2 = W
obecności użytkownika; 3 = Timer1;
4 = Timer2
ilość sygnałów dźwiękowych równa
wybranemu poleceniu
sam przycisk, aby potwierdzić progra-
mowanie
Przykład
X1...X4
X1...X4
Polski – 9
PL

Tabela [E] Wczytywanie dodatkowych
1 Przytrzymaj wciśnięty wybrany przycisk w
nadajników w Trybie 2
nowym nadajniku (nowy TX), dopóki nie
zostanie usłyszany sygnał dźwiękowy (po
około 5 sekundach) i zwolnij przycisk
Przykład
Nowy TX
5s
2 W ciągu 5 sekund wciśnij i przytrzy-
3 W ciągu 3 sekund ponownie wciśnij ten
PL
4 Po około 3 sekundach będzie słyszalna
5 W ciągu 2 sekund wciśnij i zwolnij wybra-
3 końcowe sygnały dźwiękowe sygnalizują, że nowy nadajnik został wczytany
prawidłowo. Jeżeli pamięć jest pełna (30 nadajników), 6 sygnałów dźwiękowych
wskazuje, że nadajnik nie może zostać wczytany.
10 – Polski
maj przez około 5 sekund przycisk już
wczytany w nadajniku (stary TX), dopóki
nie zostaną usłyszane 2 krótkie sygnały
dźwiękowe, następnie zwolnij ten przycisk
sam przycisk w nadajniku już wczytanym
(stary TX), ilość razy równą wybranemu
poleceniu: 1 = On-Off; 2 = W obecności
użytkownika; 3 = Timer1; 4 = Timer2
ilość sygnałów dźwiękowych równa
wy bra nemu poleceniu
ny przycisk w nowym nadajniku (nowy
TX), aby zatwierdzić programowanie
Stary TX
5s
Stary TX
Nowy TX
X1...X4
X1...X4

Wczytywanie nowego nadajnika w ten sam sposób co wczytany
wcześniej nadajnik
Jest również możliwe wczytanie nowego nadajnika w sposób umożliwiający
jego funkcjonowanie dokładnie w ten sam sposób jak wczytany wcześniej
nadajnik. Jeżeli nadajnik został już wczytany w Trybie 1, nowy nadajnik będzie
również funkcjonować w Trybie 1, wystarczy tylko jedna faza wczytywania.
Jeżeli przycisk nadajnika został wczytany w Trybie 2, również przycisk nowego nadajnika zostanie wczytany w Trybie 2 i wykona to samo polecenie; jeżeli
zamierzasz wczytać kilka przycisków, musisz wykonać fazę wczytywania dla
każdego pojedynczego przycisku.
Tabela [F] Wczytywanie nowego nadajnika
1 Przytrzymaj wciśnięty przycisk w nowym
2 Wciśnij przycisk w nadajniku już wczyta-
3 Ponownie wciśnij przycisk w nowym
4 Wciśnij przycisk w nadajniku już wczyta-
3 końcowe sygnały dźwiękowe sygnalizują, że nowy nadajnik został wczytany
prawidłowo. Jeżeli pamięć jest pełna (30 nadajników), 6 sygnałów dźwiękowych
wskazuje, że pamięć nie jest już w stanie wczytać nowych kolejnych nadajników.
dokładnie w ten sam sposób co
wczytany wcześniej nadajnik
nadajniku (nowy TX), który zamierzasz
wczytać przez co najmniej 3 sekundy,
następnie zwolnij przycisk
nym (stary TX) przez co najmniej 3 sekundy, następnie zwolnij
nadajniku (nowy TX) przez co najmniej 3
sekundy i następnie zwolnij
nym (stary TX) przez co najmniej 3 sekundy, następnie zwolnij
Przykład
Nowy TX
3s
Stary TX
3s
Nowy TX
3s
Stary TX
3s
Polski – 11
PL

Programowanie czasu Timera
Odbiornik radiowy RC200 dysponuje 2 niezależnymi timerami (Timer1 i
Timer2) służącymi do automatycznego wyłączania przekaźników po upłynię-
ciu ustawionego czasu.
Jest możliwe wyprzedzenie wyłączenia w stosunku do czasu przewidzianego
przez timer utrzymując polecenie “timera” aktywne przez ponad 3 sekundy
lub wysyłając polecenie “Off”. Wartości fabryczne lub po skasowaniu pamięci
dla dwóch timerów są to odpowiednio 1 minuta (Timer1) i 10 minut (Timer2).
Jest możliwe zaprogramowanie czasu, oddzielnie dla każdego z dwóch timerów, od minimum 1 sekundy do maksimum 9 godzin. Po zaprogramowaniu
czasu każde polecenie dotyczące danego timera uaktywni przekaźnik na
przewidziany czas.
Aby przystąpić do programowania timerów należy dysponować wczytanym
nadajnikiem, umożliwiającym sterowanie timerem, następnie należy śledzić
kroki z zamieszczonej niżej tabeli.
PL
Tabela [G] Programowanie czasu timera Przykład
1 Wciśnij i przytrzymaj przycisk w nadaj-
2 Przytrzymaj nadal wciśnięty ten sam
3 Przytrzymaj nadal wciśnięty ten sam
12 – Polski
niku, dotyczący polecenia timera, które
zamierzasz zaprogramować. Przekaźnik
włączy się (On)
przycisk, po około 3 sekundach przekaźnik wyłączy się (Off)
przycisk przez około 10 sekund, dopóki
przekaźnik nie włączy się ponownie (On).
Od tego momentu rozpoczyna się faza
“odliczania” czasu. Teraz zwolnij przycisk
“Przekaźnik ON”
3s “Przekaźnik
OFF”
10s “Przekaźnik
ON”

4 Po upłynięciu czasu, który zamierza się
3 długie sygnały dźwiękowe sygnalizują zaprogramowanie czasu; po nich nastąpi 1 lub 2 krótkie sygnały dźwiękowe, które wskazują czy zaprogramowanie
dotyczy timera1 lub timera2
zaprogramować wciśnij przycisk odpowiadający poleceniu timera. Przekaźnik
wyłączy się (Off) i zostanie wczytany odliczony czas
“Przekaźnik OFF”
Kasowanie pamięci odbiornika
W niektórych przypadkach może stać się konieczne skasowanie pamięci
odbiornika RC200.
Skasowanie pamięci jest możliwe z zastosowaniem:
– nadajnika niewczytanego lub wczytanego dla poleceń “timera”, rozpoczy-
nając od punktu A
– nadajnika już wczytanego, rozpoczynając od punktu Nr1
Mogą zostać skasowane:
– tylko nadajniki, z zakończeniem procedury w punkcie 4
– wszystkie dane (nadajniki i timer) z zakończeniem procedury w punkcie 5.
Tabela [H] Kasowanie pamięci Przykład
➨ A
B Podłącz zasilanie do odbiornika i odczekaj
Po odłączeniu zasilania od
odbiornika wyjmij mostek
znajdujący się na płytce
odbiornika (mostek musi
zostać ponownie włożony
po zakończeniu kasowania)
na początkowe sygnały dźwiękowe
Polski – 13
PL

➨ 1
PL
2 Po upłynięciu 1 sekundy ponownie wciśnij
3 Po upłynięciu 1 sekundy ponownie wciśnij
➨ 4
➨ 5
14 – Polski
• W przypadku nadajnika wczytanego
w trybie I lub niewczytanego: przytrzy-
maj wciśnięty przycisk 2 lub 4 nadajnika już
wczytanego w trybie I, dopóki nie zostanie
usłyszany sygnał dźwiękowy (po około 5
sekundach) i zwolnij
• W przypadku nadajnika wczytanego
w trybie II (tylko On/Off lub timer):
Jeżeli On/Off z otwartym przekaźnikiem
(Off) wciśnij przycisk, aby uaktywnić przekaźnik (On), zwolnij przycisk ponownie
wciśnij i przytrzymaj, dopóki nie zostanie
usłyszany sygnał dźwiękowy (po około 5
sekundach) następnie zwolnij przycisk.
Jeżeli timer z otwartym przekaźnikiem (Off)
wciśnij przycisk, aby uaktywnić przekaźnik
(On), przytrzymaj przycisk wciśnięty dopóki
przekaźnik nie zostanie wyłączony (Off) i nie
zostanie usłyszany sygnał dźwiękowy (po
około 5 sekundach) i zwolnij przycisk
ten sam przycisk i zwolnij dokładnie podczas trzeciego sygnału dźwiękowegop
ten sam przycisk i zwolnij dokładnie podczas trzeciego sygnału dźwiękowego
Po upłynięciu 1 sekundy ponownie wciśnij
ten sam przycisk i zwolnij dokładnie podczas trzeciego sygnału dźwiękowego
Jeżeli zamierzasz całkowicie skasować
wszystkie dane znajdujące się w pamięci,
w ciągu 2 sekund ponownie wciśnij przycisk i następnie zwolnij. Po upłynięciu kilku
sekund 5 sygnałów dźwiękowych sygnalizuje, że pamięć została skasowana
5s
?... 5s

KONSERWACJA I UTYLIZACJA
— KROK 6 —
System nie wymaga wykonywania żadnej szczególnej konserwacji.
Urządzenie składa się z różnych materiałów, niektóre z nich mogą być
ponownie używane, inne nadają się do wyrzucenia. Zgromadź informacje
dotyczące placówek zajmujących się recyklingiem lub utylizacją materiałów, zgodnie z przepisami obowiązującymi dla danej kategorii urządzenia na
Waszym terytorium.
Uwaga: niektóre komponenty elektroniczne mogą zawierać
substancje zanieczyszczające: nie wyrzucaj ich do otoczenia.
Polski – 15
PL

PARAMETRY TECHNICZNE
Odbiornik radiowy RC200 został wyprodukowany przez NICE S.p.A. (TV) Italy.
W celu ulepszenia produkowanych urządzeń firma Nice S.p.A. zastrzega sobie
prawo do wprowadzania zmian do parametrów technicznych w każdej chwili i
bez uprzedzenia, gwarantując jednakże te same funkcje i przeznaczenie.
Uwaga: wszystkie podane parametry techniczne dotyczą temperatury 20°C.
Odbiornik radiowy RC200
Typ Odbiornik radiowy radiowy służący do
Zastosowana technologia Odbiór i dekodowanie sygnałów radio-
PL
Możliwość zastosowania pilota Z nadajnikami ECCO5... lub STX100
Kodowanie Rolling code z kodem 64-bitowym (18
Nadajniki ECCO5... and STX100 do
wczytywania
Częstotliwość odbioru 433.92 MHz
Czułość odbiornika Powyżej 0,6µV (z bezpośrednim
Zasięg nadajników ECCO5... and
STX100
Zasilanie 230Vac (+10-15%) 50Hz
Maksymalna moc na wyjściu 500W / 400VA
Pobór mocy w stanie spoczynku < 0,7W (typowe przy 230 Vpp)
16 – Polski
sterowania urządzeniami elektrycznymi
wych emitowanych przez nadajniki. Uaktywnianie przekaźników wyjściowych
tylko w przypadku zgodności uprzednio
wczytanego kodu i prawidłowo zsynchronizowanego z sekwencją zmian
trylionów kombinacji)
Do 30, jeżeli wczytane w Trybie 1
sprzęganiem)
Oszacowany na 50-100m (zasięg
zmie nia się w obecności przeszkód i
zakłóceń elektromagnetycznych)

Czas aktywacji około 300ms
Czas dezaktywacji około 300ms
Utrzymywanie stanu wyjścia w
przypadku braku zasilania
Parametry i dokładność timera 1s/±2%
Temperatura środowiskowa
funkcjonowania
Stopień zabezpieczenia IP55 (z nienaruszoną obudową) i okrą-
Wymiary / ciężar 98 x 26 x 20 / 45 g
Nie
-10°C ... +55°C
głymi przewodami o średnicy od 6,5 do
8,5 mm
Polski – 17
PL

Deklaracja zgodności CE
Deklaracja zgodna z Dyrektywą 1999/5/WE
Uwaga: Zawartość niniejszej deklaracji zgodności odpowiada oświadczeniom znajdującym się w dokumencie urzędowym, złożonym w siedzibie firmy Nice S.p.A., a w szczególności w ostatniej korekcie
dostępnej przed wydrukowaniem tej instrukcji. Tekst w niej zawarty został dostosowany w celach wydawniczych. Kopia oryginalnej deklaracji może być zamawiana w firmie Nice S.p.A. (TV) Italy.
Numer deklaracji: 584/RC Wydanie: 0 Język: PL
Niżej podpisany Roberto Griffa, w charakterze Członka Zarządu Spółki oświadcza
na własną odpowiedzialność, że urządzenie:
Nazwa producenta: NICE S.p.A.
Adres: Via Pezza Alta 13, 31046 Rustignè di Oderzo (TV) Italy
Model: Odbiornik radiowy RC200
Akcesoria:
Jest zgodne z podstawowymi wymogami artykułu 3 niżej zacytowanej dyrektywy
PL
europejskiej, podczas użytku, do którego te urządzenia są przeznaczone:
• Dyrektywa PARLAMENTU EUROPEJSKIEGO I RADY NR 1999/5/WE z dnia 9
marca 1999 r. w sprawie urządzeń radiowych i końcowych urządzeń telekomunikacyjnych oraz wzajemnego uznawania ich zgodności, zgodnie z następującymi normami zharmonizowanymi:
- Ochrona zdrowia (art. 3(1)(a)): EN 62479:2010
- Bezpieczeństwo elektryczne (art. 3(1)(a)): EN 60950-1:2006+A11:2009+A12:
2011+A1:2010+A2:2013
- Kompatybilność elektromagnetyczna (art. 3(1)(b)): EN 301 489-1
V1.9.2:2011, EN 301 489-3 V1.6.1:2013
- Widmo radiowe (art. 3(2)): EN 300 220-2 V2.4.1:2012
Oderzo, 28 lipiec 2016 Inż. Roberto Griffa
(Chief Executive Officer)
18 – Polski


Service Après Vente France
En cas de panne, merci de contacter obligatoirement notre Service Après Vente par téléphone
ou par email :
0 820 859 203
Service 0,15 €/min + prix appel
niceservice@niceforyou.com
Merci de ne pas retourner le produit en magasin
Worldwide Customer Service
customerservice@niceforyou.com
Nice S.p.A.
Via Pezza Alta, 13
31046 Oderzo TV Italy
info@niceforyou.com
IS0478A00MM_24-11-2016
www.niceforyou.com
 Loading...