

Page 1

User Manual
Smart Camera
Version: 1.0
Page 2

Important Note
Ple ase make sure the devi ce is conne cted to t he powe r
1.
and y our pho ne is con necte d with Wi- Fi.
Rou ters: I f the router i s a dual-band router the device
2.
doe s not support 5G Hz network, pleas e sel ect a 2. 4GHz
net work to add the device. You al so need to enabl e the
rou ter broadcast ing fun ction.
Differen t kind of camer a has diffe rent valid dista nce, NG-
3.
C40 0/NG- C500 w ithin 8~15 m; NG- C100/ NG-C200 withi n
5~1 0m; NG- C300 withi n 5~8m.
4.
Wireles s Router: Set the e ncry ption m ethod a s WPA2- PSK
and auth oriza tion type as AES or set both as Auto . Pleas e
name th e Wi- Fi router in English . To a chie ve b ette r
con nectivit y, please keep the device and ro uter w ithin a
cer tain distance.
5.
Che ck whet her the d evices con necte d to the ro uter have
ach ieved the maxim um nu mber. If so, p lease t ry to turn
off th e Wi-Fi connection o f some de vices .
6.
Make sure the rout er wire less MAC filteri ng functio n i s
ena bled.
Rem ove the devi ce from the filter and ma ke sure that the
7.
rou ter is not prohib iting t he device from the c onnec tion.
8.
Make sure the enter ed W i-Fi passwo rd is correct wh en
add ing a new d evice.
Du e t o r egu lar up gra des o f sy ste ms a nd p rod uct s,
NGTeco could not guarantee exact consisten cy b etwee n
the actual pro duct a nd the w ritte n informat ion in t his
man ual.
Page 3
Overview
Sma rt ca meras , facial rec ognit ion de vices and sirens, all
the se were seen at eithe r banks or so me h igh-p rofile of fice
or buil ding in the past. You can find one install ed i n homes
or store s. Home security camer a system have become one
of the best way to keep your home safe. You can tak e care of
you r home wi thout b eing ac tuall y there.
How to connect Smart Camera
to NGTeco Home?
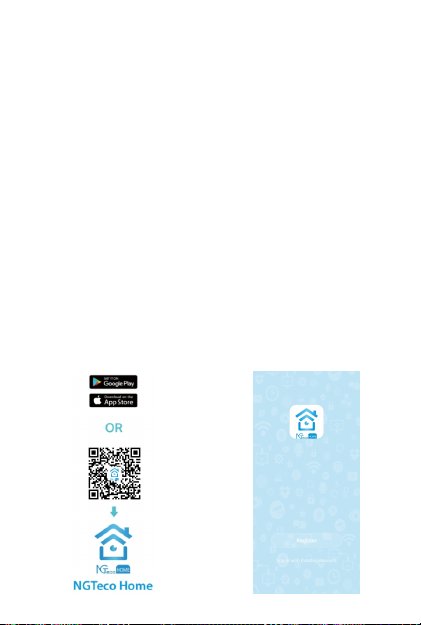
Step 1: Account Registration
Sea rch the NGTeco HOME
App in Appl e App Store or
G oo gl e P lay S to re a nd
dow nload the App to your
mob ile pho ne.
Ope n the N GTeco HOM E
App and log in w ith y our
acc ount. If yo u do not have
a n a cc o un t, c r eate a n
acc ount with y our p hone
num ber or Em ail ID.
1
Page 4
Step 2: Power on the Camera
Pl ug the c ame ra in to t he p owe r s ock et us ing t he
provided power ada pter an d USB cab le.
Wait fo r a few seco nds unti l you hear the promp t “Wait
for Wi-Fi con fig”.
Not e: If y ou did not hea r the p rompt, ple ase press a nd hol d
th e “Re set” b utton un til y ou h ear t he prom pt “R ese t,
Cam era reboot“.
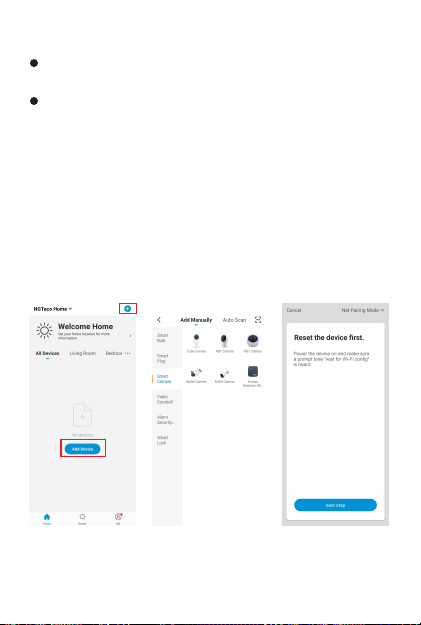
Step 3: Add the Camera to the App
Tap the “+” but ton on t he top r ight corner of the inter face,
and t hen sele ct t he “S mart C amer a” o ption an d th en
cho ose th e correspondi ng mod el purchased . Choo se “Nex t
Ste p” button on the next int erfa ce.
2
Page 5
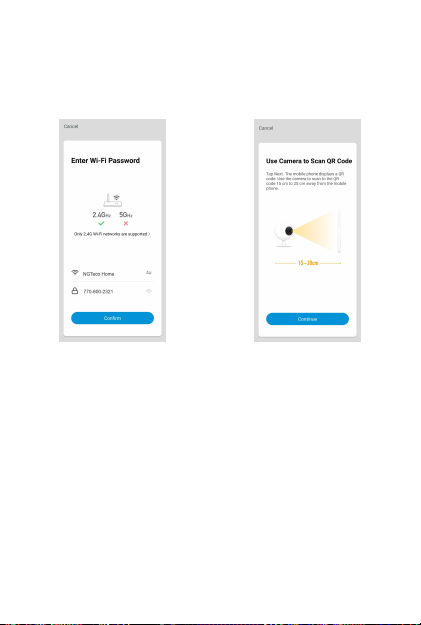
Step 4: Add the Wi-Fi Details
Ent er the Wi-Fi name and Passw ord. Then tap th e “Confir m”
but ton.
Not e: The ca mera only w orks on 2 .4GHz Wi-Fi netwo rks.
Step 5: Scan the QR Code
1.
The App screen dis play s a QR code. S how the QR code
tow ards the came ra lens , and the came ra will sca n the
QR co de.
2.
Onc e yo u he ar t he p rompt “Connect rout er”, tap the “I
hea rd a p rompt ” butt on on your mob ile, th e A pp will
con nect the cam era.
Not e: Please hold the phon e abo ut 1 5 to 20 c m away from
the c amera .
3
Page 6
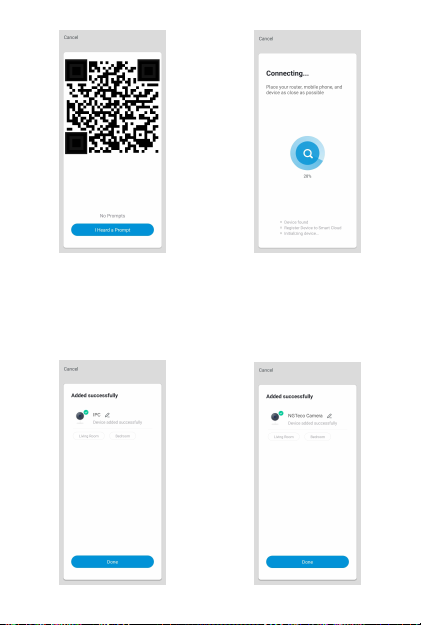
Step 6: Finish the Setup
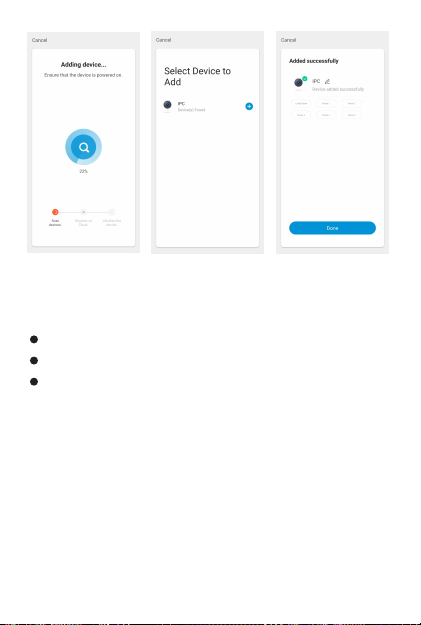
Onc e you see the mes sage “Add ed succ essfu lly” on the
mob ile ap p, you can e dit th e name of cam era manu ally, t ap
the “Do ne” button t o complet e the setup.
4
Page 7
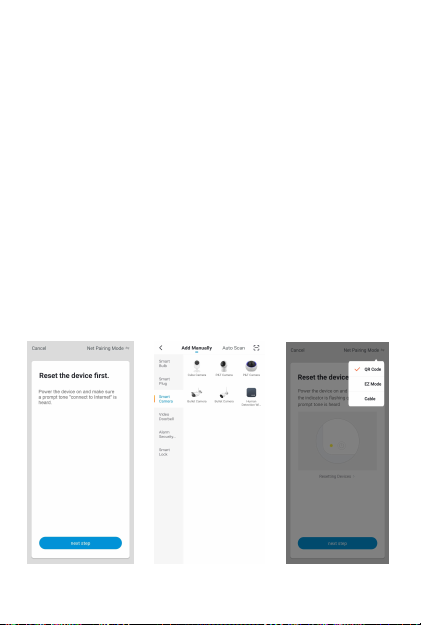
Conne c t t o c am era thro u g h
LAN cable
Con nect yo ur came ra to a rou ter wit h a LAN cable. Power on
unt il you hear a p romp t "Con nect to Interne t", connec t
you r smart phon e to the router Wi Fi.
1.
Tap “+” in the cente r or upper ri ght cor ner.
2.
Sel ect your cam era.
3.
Cli ck the up per r ight corner to ch ange "Net Pairi ng
Mod e" to "Ca ble".
4.
Tap "N ext", the software will search your came ra, w ait for
abo ut 2 minu tes.
5.
Sel ect device t o add.
6.
Nam e your ca mera, a nd clic k "Dnoe ".
5
Page 8
Wi-Fi Camera Functions
The Wi -Fi Came ra supp orts t he fol lowin g funct ions:
Two-way Audio.
Sav es video record ing to th e local file .
Cap tures the Playback Video imag e and save it to the
Micro SD Card.
In t he device list section, it shows all th e dev ices conne cted
suc cessf ully to t he A pp. Click t he corre spondin g de vice to
vie w the liv e video s direc tly.
6
Page 9
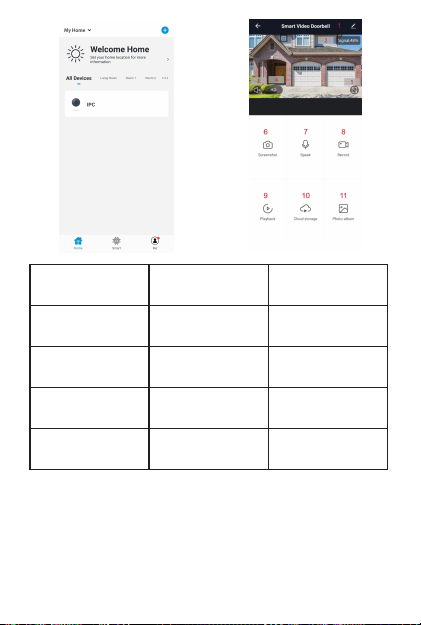
1. Se tting s and
Man ageme nt
2. Wi- Fi Signa l
Str ength
3. Au dio but ton
4. SD /HD
7. Voice Cha t
10. C loud St orage
13. Vi ew Phot o
5. Vie w Full Scr een
8. Re cord li ve view
11. P TZ Cont rols
6. Sc reens hot
9. Pl aybac k Video
12. M otion D etection
Ala rm
Not e:
PTZ control: The came ra c an be arbit rarily rota ted to give
you a different pers pective. You can move it up an d down,
or ca pture a ny cor ner you w ant to vi ew only a par t of(
cam erasup port .)
7
Page 10

Motion d etec tion a larm: Abno rma l repor t no tifi cat ion
thr ough inte llige nt detec tion of an anomaly in the home.
You can go out conf ident ly without any securit y co ncern s.
You can set the alarm level acco rding to the camera's fiel d
to ob tain ac curat e resu lts.
8
Page 11

Warning:
Thi s devi ce co mplie s with Par t 15 o f the FCC R ules. Ope ratio n is
sub ject t o the fol lowin g two co nditi ons: (1 ) This de vice m ay not c ause
har mful in terf erence , and (2 ) this d evice m ust ac cept an y inter feren ce
rec eived, i nclud ing int erfe rence th at may ca use und esire d opera tion.
Thi s equ ipment has been t ested and f ound to com ply w ith th e lim its
for a Class B digi tal de vice, pursu ant to P art 15 of the FCC Rul es. The se
lim its ar e des igned to pro vide reason able prote ction again st ha rmful
int erfer ence in a res ident ial inst allat ion. Thi s e quipm ent gen erate s,
use s, and can r adiat e radi o freq uenc y ener gy and , if n ot ins talle d and
us ed in a cco rda nce wi th th e i nst ruc tio ns, ma y c aus e h arm ful
in te rfe re nce t o r adi o co mm uni ca tio ns . H owe ve r, t he re is n o
gua rante e tha t inte rfer ence w ill n ot oc cur i n a p artic ular insta llati on.
If t his eq uip ment d oes ca use ha rmf ul int erf ere nce to ra dio o r
te levi sio n re cep tio n, w hic h ca n b e d eter min ed b y t urn ing th e
equ ipmen t o ff a nd o n, the user is en coura ged to try to corr ect the
int erfer ence by o ne or mor e of the fol lowin g measu res:
Reo rient o r reloc ate the r eceiv ing ante nna.
Inc rease t he sepa ratio n betwe en the eq uipme nt and re ceive r.
Con nect th e equip ment in to an out let on a ci rcuit d ifferen t from
tha t to whic h the rec eiver is c onnec ted.
Con sult th e deale r or an exp erien ced rad io/T V techn ician f or help.
IMP ORTANT! Any cha nges or modi ficati ons not expre ssly appr oved
by th e p art y re spo nsib le for co mpli anc e co uld vo id th e us er' s
aut horit y to oper ate the e quipm ent.
Page 12

160 0 Union H ill Roa d, Alpha retta , GA 3000 5
Tel: 77 0-800 -2321 (US)
ww w.ngteco.co m
Copyright©2020 NGTECO CO., LIMITED. All rights reserved.
 Loading...