

NGS WILDTRAP 3 User Manual
WILDTRAP 3
USER’S MANUAL
ENGLISH I FRANÇAIS I ESPAÑOL I DEUTSCH I ITALIANO
PORTUGUÊS I POLSKI I NEDERLANDS I ČESKY I
WWW.NGS.EU
ΕΛΛΗΝΙΚΑ

USER’S MANUAL
WILDTRAP 3
DJ PARTY SPEAKER
Welcome to use this DJ party speaker. Please read
this user’s manual carefully before using it.
2
ENGLISH
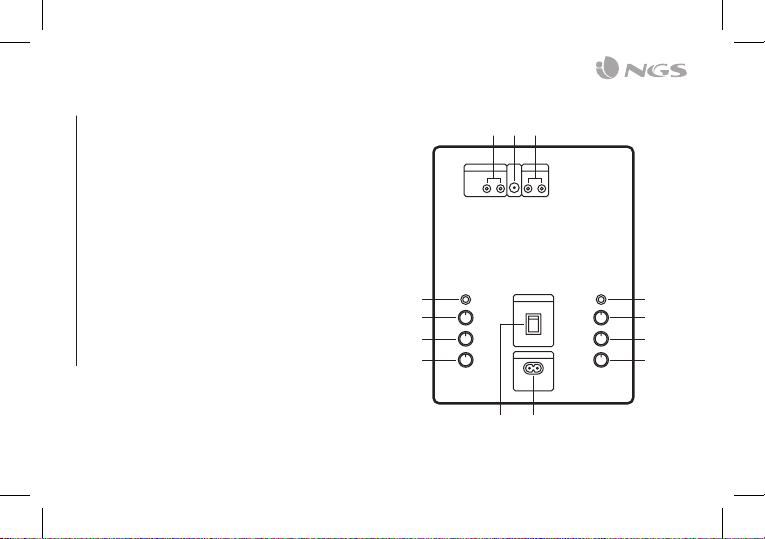
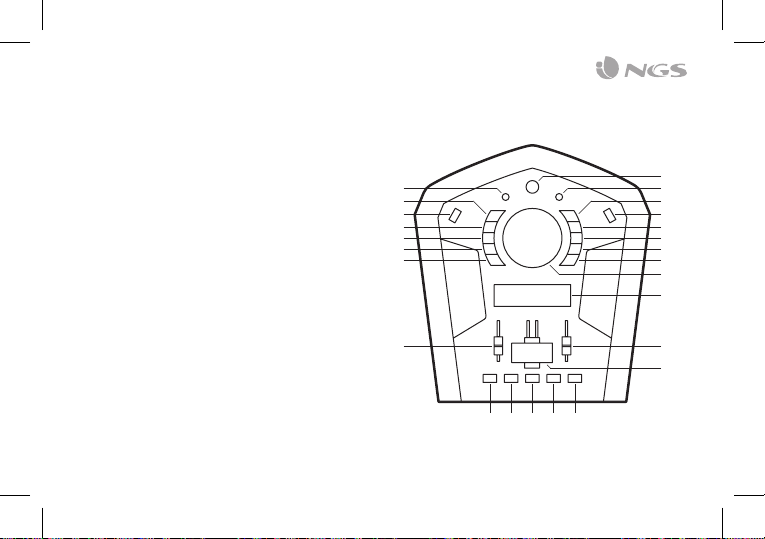
REAR PANEL
POWER: Press this switch to turn the unit ON or OFF.
1
AC INPUT: AC 230V~50Hz
2
USB B TEMPO: Move this knob to choose USB B playing
3
fast or slow.
DJ EFFECT VOL: Move this knob to change DJ effects
4
volume
GUITAR VOL: Adjust the volume of the guitar input
5
GUITAR jack
6
LINE OUT audio jack: To connect more speakers at the
7
same time
FM antenna
8
AUDIO INPUT: Aux audio input jack (belongs to input A)
9
MIC: Microphone jack
10
MIC VOL: Adjust the volume of mic input
11
ECHO: Adjust the echo depth of the mic input
12
USB A TEMPO: Move this knob to choose USB A playing
13
fast or slow
8
9 7
10
11
12
13
21
6
5
4
3
3

USER’S MANUAL
FRONT PANEL
PARTY EFFECTS
CLUB
1
MARVEL
2
PARTY EFFECT
3
Press this key to choose different party effect: Scratch,
Reverb, Beat box, Yeah, Bring it, Geyr, Come on.
After choose each one, move VOLUME/MULTI knob to
use them.
LASER
4
PRO
5
BOMB EFFECT
6
Slide the lever to create a bomb atmosphere
MAIN FUNCTIONS
INPUT B VOLUME
7
This is used to adjust the volume with input B
LED DISPLAY
8
Display system parameter information, a half of the left
side display the input A status, another half of left side
display the input B status.
4
VOLUME/MULTI
9
Rotate the knob to adjust the main volume, phones
volume, treble, bass and play DJ effects
PHONES MODE
10
Press this key to choose different earphones input
INPUT B PREV
11
Press this key to choose previous music with USB B
INPUT B NEXT
12
Press this key to choose next music with input B
INPUT B PLAY/PAUSE
13
Press this key to choose play/pause music with input B
USB B INPUT JACK
14
INPUT B MODE
15
Press this key to choose different input B mode: Line or
USB B
EARPHONES INPUT JACK
16
CHARGE/STANDBY
17
Press this key to turn ON or standby the unit
LINE IN AUDIO INPUT JACK (belongs to input B)
18
Connect to Line in signal input jack

ENGLISH
INPUT A MODE
19
Press this key to choose different input A mode: Audio
input, FM radio, BT, USB A
USB A INPUT JACK
20
INPUT A PLAY/PAUSE
21
Press this key to choose play/pause music with input A
INPUT A NEXT
22
Press this key to choose next music with input A
INPUT A PREV
23
Press this key to choose previous music with USB A
MENU
24
This switch selects the main volume, bass, treble,
x driver, light mode
INPUT A VOLUME
25
This is used to adjust the volume with input A
17
18
19
20
21
22
23
24
25
1 32 4 5
16
15
14
13
12
11
10
9
8
7
6
5
USER’S MANUAL
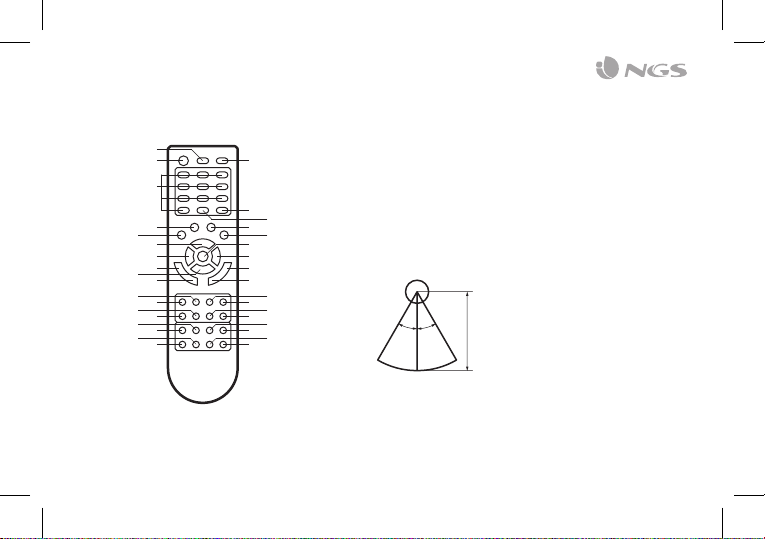
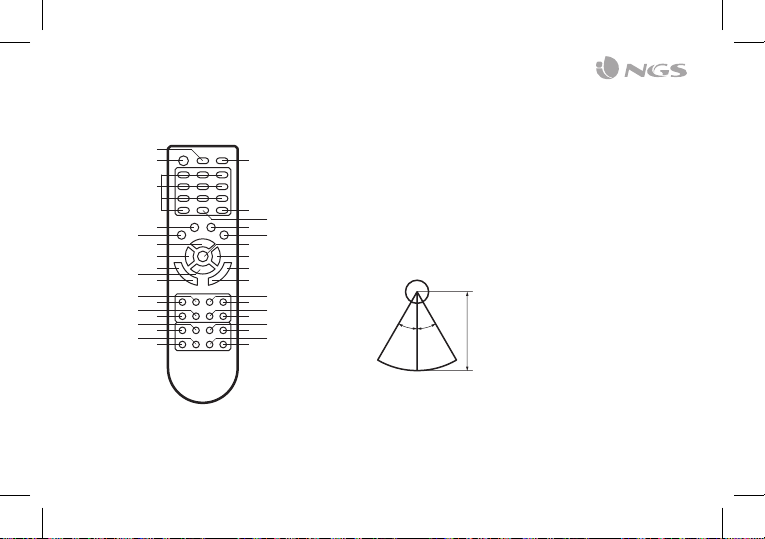
REMOTE CONTROL
LIGHT: Select light mode
1
STANDBY: Turn ON/OFF
2
NUMBER BUTTON
3
TUNING –: Move radio frequency –
4
CHANNEL –: Go to previous saved radio station
5
VOLUME +: Increase volume
6
X DRIVE: Activate/disactivate super bass
7
TREBLE +: Increase treble
8
VOLUME –: Decrease volume
9
TREBLE –: Decrease treble
10
AUX-A: Select Aux in A input
11
USB-A: Select USB input in A input
12
USB-A FORWARD
13
USB-A BACKWARD
14
LINE: Select line in, in input B
15
USB-B: Select USB in input B
16
USB-B FORWARD
17
USB-B BACKWARD
18
6
MUTE: No sound
19
FM: Select FM mode
20
AUTO: Auto search in FM mode
21
TUNING +: Move radio frequency +
22
CHANNEL +: Go to next saved radio station
23
BT: Select Bluetooth mode in input A
24
DISCONNECT: Go into Bluetooth search mode
25
BASS +: Incresase bass
26
BASS –: Decresase bass
27
INPUT-A REPEAT: Select single, all or ramdomize
28
INPUT-A PAUSE : Play/pause
29
INPUT-A PREVIOUS : Previous track
30
INPUT-A NEXT : Next track
31
INPUT-B REPEAT: Select single, all or ramdomize
32
INPUT-B PAUSE : Play/pause
33
INPUT-B PREVIOUS : Previous track
34
INPUT-B NEXT : Next track
35
ENGLISH
1
2
3
4
5
6
7
8
9
10
11
12
13
14
15
16
17
18
19
20
21
22
23
24
25
26
27
28
29
30
31
32
33
34
35
Infrared remote
control receiver
30° 30°
Infrared remote
control unit
5m
7

USER’S MANUAL
ON OFF
Connect one end of the power cable to the power supply
and the other end to the AC INPUT port on the back of the
speaker.
Turn the POWER switch to the ON position.
To put it in Standby, press the STANDBY button on the upper
panel. Press it again to turn it on.
OPERATION
Input channel and volume selection
The sound system has two input channels, INPUT A and
INPUT B.
INPUT A consists of the following sound inputs: Bluetooth,
USB, audio input and FM radio.
INPUT B consists of the following sound inputs: USB and
line in.
8
How to select each input
Press the INPUT A or INPUT B buttons on the upper panel to
select the desired audio input.
With the VOL A and VOL B volume levers, you can select the
volume of the channel you want to hear from the speaker.
In addition, you can control the main volume by turning the
VOLUME/MULTI wheel in the centre of the upper panel.
Note: You can select the tempo of the music (only in USB
mode) from the USB A TEMPO and USB B TEMPO wheels on
the rear panel.
Bluetooth Connection
Select the BT option at input A (INPUT A).
Turn on the Bluetooth option on your mobile device (phone,
tablet ...) and select the NGS WILDTRAP device to pair it.

ENGLISH
FM Radio
Select the Radio option at input A (INPUT A).
Press the play/pause button on the control or the AUTO
button on the remote control to perform an automatic
search and store the captured stations.
Press the CHANNEL+ / CHANNEL- buttons on the remote
control, or press and hold the FDD / REW buttons for 2
seconds to move between the stored stations.
Line In Input and Audio Input
Audio Input: This sound input located on the rear panel
corresponds with input A (INPUT A). Press the INPUT A
button until AUX A appears in the display. Connect one end of
an audio cable to the back and the other end to an external
audio source.
Line In: This sound input located on the upper panel
corresponds with input B (INPUT B). Press the INPUT B
button until LINE appears in the display. Connect a 3.5mm
audio jack cable, with the other end connected to an external
audio source.
Sound output
The speaker system has an audio output option to connect
another speaker in series. Just connect another sound
system to the “LINE OUT” output on the back of the speaker.
The output will be the same as that playing on the first
speaker, either input A, B or both at the same time.
DJ Effects
The equipment has different predetermined DJ sounds.
4 buttons on the upper panel have their respective recorded
sounds and will play when these buttons are pressed:
CLUB / MARVEL / LASER / PRO
In addition, the BOMB EFFECT central wheel generates a
bomb effect. If we gradually increase the lever we will hear a
progressive siren that will finish with an explosion when the
lever reaches the upper limit.
By pressing the PARTY EFFECT button, we can select other
DJ effects that we will see on the screen:
SCRATCH, REVERB, BEAT BOX, YEAH, BRING IT, GEYR & COME ON
Once the desired effect has been selected, we can hear it by
turning the VOLUME/MULTI wheel.
We can select the volume of the DJ effects from the DJ
EFFECT VOL wheel on the rear panel.
9

USER’S MANUAL
Menu button
By pressing the menu button on the upper panel, we can
select different parameters and modify them using the
VOLUME/MULTI wheel. By default, this wheel modifies the
general volume of the device between the values 0 and 60,
where 0 is the minimum and 60 is the maximum. If before
turning the wheel, however, we press the menu button
and select one of the following options, we can vary its
parameters:
BASS: Modifies the values of the low frequencies
TREB: Modifies the values of the high frequencies
DRI: Activates or deactivates the SUPER BASS option
(super bass)
Lights: We can select the following lighting options
R: Red / G: Green / B: Blue
RG: Red and blue / GB: Green and blue
RGB: Red, green and blue
AUTO: Varies the colours depending on the rhythm of the
music
DEMO: Change of colours in a predetermined cycle
OFF: Without lights
10
Headphones option
By pressing the PHONES MODE button we can select
the output of the music we are listening to through the
headphones connected to the PHONES output on the upper
panel. This option is very useful when we are playing music
and we want to mix two songs between the INPUT A and
INPUT B input ports. This way, we can listen to one channel
on the speakers and the other on the headphones in order to
make the transition from one song to another like a true DJ.
The options available to listen with headsets are:
INPUT A: We listen to the music from input A
INPUT B: We listen to the music from input B
INPUT AB: We listen to both inputs at the same time
Microphone and guitar inputs
On the rear panel of the speaker we have a microphone
input and another for guitar. Both inputs have their own
volume control, just under the connector, and in addition,
the microphone input has a wheel to control the microphone
echo level.
ENGLISH
TECHNICAL SPECIFICATIONS
Power input: AC 230V/50Hz
Output power: 600W
Super bass function
Bluetooth 2.1
FM 88MHz-108MHz
USB input x2
Line in x2
Audio output
DJ effects
LED lights
3 x 10” subwoofer units
1 x 2” medium range unit
1 x 1” tweeter unit
If at any time in the future you should need to
dispose of this product please note that:
Waste electrical products should not be
disposed of with household waste. Please
recycle where facilities exist.
Check with your Local Authority or retailer for
recycling advice.
(Waste Electrical and Electronic Equipment
Directive)
11

MANUEL DE L’UTILISATEUR
WILDTRAP 3
HAUT-PARLEUR DE SOIRÉE DJ
Bienvenue dans le manuel d’utilisation de ce hautparleur de soirée DJ. Lire attentivement le mode
d’emploi avant l’usage.
12

FRANÇAIS
VUE ARRIÈRE
POWER: Appuyez sur ce bouton pour allumer ou éteindre
1
l’appareil.
ENTRÉE AC: AC 230V~50Hz
2
USB B TEMPO: Déplacez ce bouton pour choisir la lecture
3
rapide ou lente de l’USB B.
EFFET DJ VOL: Déplacez ce bouton pour changer le
4
volume des effets DJ.
GUITARE VOL: Réglez le volume de l’entrée guitare.
5
Prise jack GUITARE
6
Prise jack audio LINE OUT: Pour connecter plus
7
d’enceintes en même temps
Antenne FM
8
ENTRÉE AUDIO: Prise d’entrée audio aux (appartient à
9
l’entrée A)
MIC: Prise jack du microphone
10
MIC VOL: Réglez le volume de l’entrée du micro
11
ÉCHO: Réglez la profondeur d’écho de l’entrée du micro
12
USB A TEMPO: Déplacez ce bouton pour choisir la lecture
13
rapide ou lente de l’USB A
8
9 7
10
11
12
13
21
6
5
4
3
13

MANUEL DE L’UTILISATEUR
VUE AVANT
EFFETS DE SOIRÉE
CLUB
1
MARVEL
2
EFFET DE SOIRÉE
3
Appuyez sur ce bouton pour sélectionner un effet de
soirée différent: Scratch, Reverb, Beat box, Yeah, Bring
it, Geyr, Come on.
Après avoir sélectionné chacun d’entre eux, déplacez le
bouton VOLUME / MULTI pour les utiliser.
LASER
4
PRO
5
EFFET BOMBE
6
Faites glisser le levier pour créer une atmosphère de
bombe
FONCTIONS PRINCIPALES
ENTRÉE B VOLUME
7
Sert à régler le volume de l’entrée B
AFFICHAGE LED
8
Sert à afficher les informations des paramètres du
système, une moitié du côté gauche affiche l’état de
l’entrée A, une autre moitié du côté gauche affiche l’état
de l’entrée B.
14
VOLUME/MULTI
9
Tournez le bouton pour régler le volume principal, le
volume des écouteurs, les aigus, les basses et les effets DJ
MODE ÉCOUTEURS
10
Appuyez sur ce bouton pour choisir différentes entrées
d’écouteurs
ENTRÉE B PRÉCÉDENT
11
Appuyez sur ce bouton pour choisir la musique
précédente de l’USB B
ENTRÉE B SUIVANT
12
Appuyez sur ce bouton pour choisir la musique suivante
de l’entrée B
ENTRÉE B LECTURE/PAUSE
13
Appuyez sur ce bouton pour lire / mettre en pause la
musique de l’entrée B
PRISE JACK DE L’ENTRÉE USB B
14
MODE ENTRÉE B
15
Appuyez sur ce bouton pour sélectionner un mode
d’entrée B différent: Ligne ou USB B
PRISE JACK ÉCOUTEURS
16
CHARGE/VEILLE
17
Appuyez sur ce bouton pour allumer ou mettre
l’appareil en veille

FRANÇAIS
JACK D’ENTRÉE AUDIO LIGNE (appartient à l’entrée B)
18
Connexion au jack d’entrée en Ligne
MODE ENTRÉE A
19
Appuyez sur ce bouton pour sélectionner un mode
d’entrée A différent: entrée audio, radio FM, BT, USB A
PRISE JACK DE L’ENTRÉE USB A
20
ENTRÉE A LECTURE/PAUSE
21
Appuyez sur ce bouton pour lire / mettre en pause la
musique de l’entrée A
ENTRÉE A SUIVANT
22
Appuyez sur ce bouton pour choisir la musique suivante
de l’entrée A
ENTRÉE A PRÉCÉDENT
23
Appuyez sur ce bouton pour choisir la musique
précédente de l’USB A
MENU
24
This switch selects the main volume, bass, treble,
x driver, light mode
ENTRÉE A VOLUME
25
Sert à régler le volume de l’entrée A
17
18
19
20
21
22
23
24
25
1 32 4 5
16
15
14
13
12
11
10
9
8
7
6
15
MANUEL DE L’UTILISATEUR
TÉLÉCOMMANDE
LUMIÈRE: Sélectionnez le mode d’éclairage
1
VEILLE: ON/OFF
2
NUMÉRO DU BOUTON
3
TUNING –: Déplace la fréquence radio –
4
CANAL –: Va à la précédente station de radio enregistrée
5
VOLUME +: Augmente le volume
6
X DRIVE: Active/désactive la super basse
7
TREBLE +: Augmente les aigus
8
VOLUME –: Diminue le volume
9
TREBLE –: Diminue les aigus
10
AUX-A: Sélectionne Aux dans l’entrée A
11
USB-A: Sélectionne l’entrée USB dans l’entrée A
12
USB-A AVANT
13
USB-A RETOUR
14
LIGNE: Sélectionne l’entrée en Ligne dans l’entrée B
15
USB-B: Sélectionne USB dans l’entrée B
16
USB-B AVANT
17
USB-B RETOUR
18
16
MUTE: Aucun son
19
FM: Sélectionne le mode FM
20
AUTO: Recherche automatique en mode FM
21
TUNING +: Déplace la fréquence radio +
22
CANAL +: Va à la prochaine station de radio enregistrée
23
BT: Sélectionne le mode Bluetooth dans l’entrée A
24
DÉCONNECTER: Passe en mode de recherche Bluetooth
25
BASS +: Augmente les basses
26
BASS –: Diminue les basses
27
ENTRÉE A REPET: Sélectionne unique, tout ou aléatoire
28
PAUSE ENTRÉE A : Lecture/Pause
29
ENTRÉE A PRÉCÉDENT : Piste précédente
30
ENTRÉE A SUIVANT : Piste suivante
31
ENTRÉE B REPEAT: Sélectionne unique, tout ou aléatoire
32
PAUSE ENTRÉE B : Lecture/Pause
33
ENTRÉE B PRÉCÉDENT : Piste précédente
34
ENTRÉE B SUIVANT : Piste suivante
35
FRANÇAIS
1
2
3
4
5
6
7
8
9
10
11
12
13
14
15
16
17
18
19
20
21
22
23
24
25
26
27
28
29
30
31
32
33
34
35
Télécommande infrarouge
Récepteur de commande
30° 30°
Télécommande infrarouge
unité de commande
5m
17

MANUEL DE L’UTILISATEUR
MARCHEARRÊT
Branchez le câble d’alimentation au courant électrique et
l’autre extrémité à l’ENTRÉE AC à l’arrière de l’enceinte.
Mettez l’interrupteur sur ON.
Pour la mettre en veille, appuyez sur le bouton STANDBY sur
le dessus. Appuyez à nouveau pour l’allumer.
FONCTIONNEMENT
Sélection du canal d’entrée et du volume
Le système audio comporte deux entrées, les entrées A et B.
L’ENTRÉE A comprend les entrées audio suivantes:
Bluetooth, USB, entrée audio et radio FM.
L’ENTRÉE B se compose des entrées audio suivantes: USB
et Ligne.
18
Comment sélectionner chaque entrée
Appuyez sur les boutons ENTRÉE A ou ENTRÉE B sur
le dessus de l’enceinte pour sélectionner l’entrée audio
souhaitée.
Avec les leviers VOL A et VOL B, vous pouvez sélectionner le
volume du canal à écouter sur l’enceinte.
De plus, vous pouvez contrôler le volume principal en
tournant la molette VOLUME / MULTI au milieu du panneau
supérieur.
Remarque: Vous pouvez sélectionner le tempo de la musique
(uniquement en mode USB) grâce aux molettes USB A
TEMPO et USB B TEMPO sur le panneau arrière.
Connexion Bluetooth
Sélectionnez l’option BT sur l’entrée A (INPUT A).
Activez le Bluetooth de votre appareil mobile (téléphone,
tablette ...) et sélectionnez le périphérique NGS WILDTRAP
pour l’appareillage.

FRANÇAIS
Radio FM
Sélectionnez l’option Radio sur l’entrée A (INPUT A).
Appuyez sur le bouton Lecture / Pause ou sur le
bouton AUTO de la télécommande pour rechercher
automatiquement et connecter les stations ainsi trouvées.
Appuyez sur les bouton CHANNEL + / CHANNEL - de la
télécommande ou maintenez les boutons FDD / REW
enfoncés pendant 2 secondes pour vous déplacer entre les
stations mémorisées.
Entrée Ligne et entrée audio
Audio Input: Cette prise d’entrée audio sur le panneau arrière
répond à l’entrée A (INPUT A). Appuyez sur le bouton INPUT A
jusqu’à ce que AUX A apparaisse à l’écran. Branchez un câble
audio à l’arrière et l’autre extrémité à une source audio externe.
Line In: Cette prise d’entrée audio sur le panneau supérieur
répond à l’entrée B (INPUT B). Appuyez sur le bouton INPUT
B jusqu’à ce que LINE apparaisse à l’écran. Branchez une
prise audio de 3,5 mm et l’autre extrémité à une source audio
externe.
Sortie audio
Le système d’enceintes possède une sortie audio pour
connecter une autre série de haut-parleurs. Il vous suffit de
connecter un autre système audio à la sortie «LINE OUT»
à l’arrière de l’enceinte. La sortie sera la même que dans la
première enceinte, c’est-à-dire entrée A ou B, ou les deux
à la fois.
Effets DJ
L’appareil dispose de sons de DJ par défaut.
4 boutons du panneau supérieur ont des sons enregistrés
respectifs et produisent des sons lorsque les boutons sont
pressés:
CLUB / MARVEL / LASER / PRO
De plus, la molette centrale, BOMB EFFECT, génère un effet
de bombe. Si nous levons le levier petit à petit, nous allons
entendre une sirène progressive qui finit par une explosion
lorsque le levier atteint la butée supérieure.
En appuyant sur le bouton PARTY EFFECT, vous pouvez
sélectionner d’autres effets DJ que nous allons voir à l’écran:
SCRATCH, REVERB, BEAT BOX, YEAH, BRING IT, GEYR & COME ON
Une fois l’effet désiré sélectionné, nous pouvons l’entendre
en tournant la molette VOLUME / MULTI.
Vous pouvez sélectionner le volume des effets DJ grâce à la
molette DJ EFFET VOL sur le panneau arrière.
19

MANUEL DE L’UTILISATEUR
Bouton de Menu
En appuyant sur le bouton de menu sur le panneau supérieur,
vous pouvez sélectionner les différents paramètres et les
modifier à l’aide de la molette VOLUME / MULTI. Par défaut,
cette molette modifie le volume global de l’appareil entre
0 et 60 où 0 est le minimum et 60 est le maximum. Si vous
appuyez sur le bouton de menu et sélectionnez l’une des
options suivantes avant de tourner la molette, vous pouvez
changer les paramètres:
BASS: modifie les valeurs des fréquences basses
TREB: modifie les valeurs des fréquences aiguës
DRI: Active l’option SUPER BASS (super basses)
Lumières: Nous pouvons sélectionner les options d’éclairage
suivantes
R: Rouge / G: Vert / B: Bleu
RG: Rouge et Bleu / GB: Vert et Bleu
RGB: Rouge, vert et bleu
AUTO: Fait varier les couleurs au rythme de la musique
DEMO: Modification des couleurs dans un cycle prédéterminé
OFF: Pas d’éclairage
20
Option Écouteurs
En appuyant sur le bouton MODE PHONES, vous pouvez
sélectionner la sortie par un casque connecté à la sortie
PHONES sur le panneau supérieur. Cette option est utile
lorsque vous écoutez de la musique et que vous voulez
mélanger deux chansons entre les ports d’entrée INPUT A et
INPUT B. De cette façon, les enceintes peuvent être un canal
de sortie et les écouteurs un autre canal, afin de mixer les
chansons comme un vrai DJ. Les options d’écoute avec des
écouteurs sont:
INPUT A: pour entendre la musique de l’entrée A
INPUT B: pour entendre la musique de l’entrée B
INPUT AB: pour entendre les deux entrées à la fois
Entrées micro et guitare
Sur le panneau arrière de l’enceinte, il y a une entrée micro et
une entrée guitare. Les deux entrées ont leur propre contrôle
de volume, juste en dessous du connecteur, et l’entrée du
microphone possède une molette pour le contrôle de l’écho
de celui-ci.
FRANÇAIS
CARACTÉRISTIQUES
Alimentation: AC 230V/50Hz
Puissance de sortie: 600W
Fonction Super Bass
Bluetooth 2.1
FM 88MHz-108MHz
Entrée USB x2
Entrée ligne x2
Sortie audio
Effets DJ
Lumières LED
3 x unités subwoofer 10”
1 x unité de moyenne fréquence 2”
1 x unité tweeter 1”
Si dans l’avenir vous deviez vous débarrasser de
ce produit veuillez remarquer que:
Les déchets électriques ne doivent pas être
jetés avec les déchets ménagers. Veuillez
recycler les produits dans une déchetterie.
Consulter votre responsable local ou votre
revendeur pour un conseil sur le recyclage.
(Directive sur les déchets des équipements
électriques et électroniques)
21

MANUAL DE USUARIO
WILDTRAP 3
ALTAVOZ DE FIESTA DJ
Bienvenido al uso de este altavoz de fiesta DJ.
Lea este manual del usuario detenidamente
antes de utilizarlo.
22

ESPAÑOL
PANEL TRASERO
POWER: Presione este interruptor para ENCENDER o
1
APAGAR la unidad.
ENTRADA CA: AC 230V~50Hz
2
TEMPO USB B: Gire este mando para seleccionar si el
3
USB B se reproduce rápido o lento.
VOL EFECTOS DJ: ire este mando para cambiar el
4
volumen de los efectos de DJ
VOL GUITARRA: Ajusta el volumen de la entrada de
5
guitarra
ENTRADA de guitarra
6
Conector de audio LINE OUT: Para conectar más
7
altavoces al mismo tiempo
Antena FM
8
ENTRADA DE AUDIO: Conector de entrada de audio
9
auxiliar (pertenece a la entrada A)
MIC: Conector de micrófono
10
VOL MIC: Ajuste del volumen de entrada de micrófono
11
ECO: Ajuste de la profundidad del eco de la entrada de
12
micrófono
TEMPO USB A: Gire este mando para seleccionar si el
13
USB A se reproduce rápido o lento
8
9 7
10
11
12
13
21
6
5
4
3
23

MANUAL DE USUARIO
PANEL FRONTAL
EFECTOS DE FIESTA
CLUB
1
MARVEL
2
EFECTO DE FIESTA
3
Presione esta tecla para elegir un efecto de fiesta
diferente: Scratch, Reverb, Beat box, Yeah, Bring it, Geyr,
Come on.
Después de elegir cada uno, gire el mando VOLUME/
MULTI para usarlo.
LASER
4
PRO
5
EFECTO BOMBA
6
Deslice la palanca para crear una atmósfera de bomba
FUNCIONES PRINCIPALES
VOLUMEN ENTRADA B
7
Se usa para ajustar el volumen de la entrada B
PANTALLA LED
8
Muestra información de parámetros del sistema: la
mitad del lado izquierdo muestra el estado de la entrada
A, la mitad del lado izquierdo muestra el estado de la
entrada B.
24
VOLUME/MULTI
9
Gire el mando para ajustar el volumen principal, el
volumen de los auriculares, los agudos, los graves y los
efectos de DJ.
MODO AURICULARES
10
Presione esta tecla para elegir diferentes entradas de
auriculares
ENTRADA B ANTERIOR
11
Presione esta tecla para elegir música anterior en USB B
ENTRADA B SIGUIENTE
12
Presione esta tecla para elegir la siguiente música en la
entrada B
ENTRADA B REPRODUCCIÓN/PAUSA
13
Presione esta tecla para elegir reproducir/pausar
música en la entrada B
CONECTOR DE ENTRADA USB B
14
MODO ENTRADA B
15
Presione esta tecla para elegir un modo de entrada B
diferente: Línea o USB B
CONECTOR DE ENTRADA DE AURICULARES
16
CARGA/ESPERA
17
Presione esta tecla para ENCENDER o poner en espera
la unidad
ESPAÑOL
CONECTOR DE ENTRADA DE AUDIO EN LÍNEA
18
(pertenece a la entrada B)
Conecta al conector de entrada de señal de línea.
MODO ENTRADA A
19
Presione esta tecla para seleccionar un modo de entrada
A diferente: entrada de audio, radio FM, BT, USB A
CONECTOR ENTRADA USB A
20
ENTRADA A REPRODUCCIÓN/PAUSA
21
Presione esta tecla para elegir reproducir/pausar
música en la entrada A
ENTRADA A SIGUIENTE
22
Presione esta tecla para elegir la siguiente música en la
entrada A
ENTRADA A ANTERIOR
23
Presione esta tecla para elegir música anterior en USB A
MENÚ
24
Este interruptor selecciona el volumen principal, graves,
agudos, X-driver, modo de luz
VOLUMEN DE ENTRADA A
25
Se usa para ajustar el volumen de la entrada A
17
18
19
20
21
22
23
24
25
1 32 4 5
16
15
14
13
12
11
10
9
8
7
6
25

MANUAL DE USUARIO
CONTROL REMOTO
LUZ: Selecciona el modo de luz
1
ESPERA: Encender/apagar
2
BOTÓN DE NÚMERO
3
SINTONIZADOR –: Desplaza la frecuencia de radio hacia
4
abajo
CANAL –: Va a la estación de radio guardada anterior
5
VOLUMEN +: Aumenta el volumen
6
X DRIVE: Activar/desactivar el Super Bass
7
AGUDOS +: Aumenta los agudos
8
VOLUMEN –: Reduce el volumen
9
AGUDOS –: Reduce los agudos
10
AUX-A: Selecciona la entrada AUX A
11
USB-A: Selecciona la entrada USB en la entrada A
12
USB-A ADELANTE
13
USB-A ATRÁS
14
LÍNEA: Selecciona entrada de línea, en la entrada B
15
USB-B: Selecciona USB en la entrada B
16
USB-B ADELANTE
17
USB-B ATRÁS
18
MUDO: Sin sonido
19
26
FM: Selecciona el modo FM
20
AUTO: Búsqueda automática en modo FM
21
SINTONIZADOR +: Desplaza la frecuencia de radio hacia
22
arriba
CANAL +: Va a la estación de radio guardada siguiente
23
BT: Selecciona el modo Bluetooth en la entrada A
24
DESCONECTAR: Va al modo de búsqueda Bluetooth
25
BAJOS +: Aumenta los bajos
26
BAJOS –: Reduce los bajos
27
REPETIR ENTRADA A: Selecciona reproducir una vez,
28
todo o reproducción aleatoria
PAUSA ENTRADA A : Reproducir/pausar
29
ANTERIOR ENTRADA A : Pista anterior
30
SIGUIENTE ENTRADA A : Siguiente pista
31
REPETIR ENTRADA B: Selecciona reproducir una vez,
32
todo o reproducción aleatoria
PAUSA ENTRADA B : Reproducir/pausar
33
ANTERIOR ENTRADA : Pista anterior
34
SIGUIENTE ENTRADA : Siguiente pista
35

ESPAÑOL
1
2
3
4
5
6
7
8
9
10
11
12
13
14
15
16
17
18
19
20
21
22
23
24
25
26
27
28
29
30
31
32
33
34
35
Mando a distancia por infrarrojos
receptor de control
30° 30°
Mando a distancia por infrarrojos
unidad de control
5m
27

MANUAL DE USUARIO
ENCENDIDOAPAGADO
Conecte el cable de alimentación a la corriente eléctrica y
el otro extremo al puerto AC INPUT en la parte trasera del
altavoz.
Ponga el interruptor POWER en posición ON.
Para ponerlo en Standby, pulse el botón STANDBY en el panel
superior. Púlselo de nuevo para encenderlo.
FUNCIONAMIENTO
Selección de canal de entrada y volumen
El sistema de sonido dispone de dos canales de entrada,
INPUT A e INPUT B.
INPUT A consta de las siguientes entradas de sonido:
Bluetooth, USB, audio input y radio FM.
INPUT B consta de las siguientes entradas de sonido: USB
y line in.
28
Cómo seleccionar cada entrada
Pulse en el panel superior los botones INPUT A o INPUT B
para seleccionar la entrada de audio deseada.
Con las palancas de volumen VOL A y VOL B, puede
seleccionar el volumen del canal que desea escuchar por el
altavoz.
Además, puede controlar el volumen principal girando la
rueda VOLUME/MULTI en el centro del panel superior.
Nota: Se puede seleccionar el tempo de la música (sólo en
modo USB) desde las ruedas USB A TEMPO y USB B TEMPO
en el panel trasero.
Conexión Bluetooth
Seleccione la opción BT en la entrada A (INPUT A).
Encienda la opción Bluetooth de su dispositivo móvil
(teléfono, tableta…) y seleccione el dispositivo NGS
WILDTRAP para emparejarlo.

ESPAÑOL
Radio FM
Seleccione la opción Radio en la entrada A (INPUT A).
Pulse el botón play/pause en el control o el botón AUTO en el
mando a distancia para realizar una búsqueda automática y
almacenar las emisoras captadas.
Pulse los botones CHANNEL+/ CHANNEL– en el mando
a distancia, o mantenga pulsados los botones FDD/REW
durante 2 segundos para moverse entre las emisoras
almacenadas.
Entradas Line In y Audio Input
Audio Input: Esta entrada de sonido situada en el panel
trasero responde a la entrada A (INPUT A). Pulste el botón
INPUT A hasta que en la pantalla aparezca AUX A. Conecte
un cable de audio en la parte trasera y el otro extremo a una
fuente de audio externa.
Line In: Esta entrada de sonido situada en el panel superior
responde a la entrada B (INPUT B). Pulse el botón INPUT B
hasta que en la pantalla aparezca LINE. Conecte un cable de
audio jack 3,5mm y el otro extremo a una fuente de audio
externa.
Salida de sonido
El sistema de altavoces dispone de salida de audio para poder
conectar otro altavoz en serie. Sólo debes conectar otro
sistema de sonido a la salida “LINE OUT” en la parte trasera
del altavoz. La salida será la misma que está sonando en el
primer altavoz, ya sea input A, B o ambas a la vez.
Efectos DJ
El equipo dispone de diferentes sonidos DJ predeterminados.
4 botones en el panel superior tienen sus respectivos sonidos
grabados y sonarán cuando se pulsen dichos botones:
CLUB / MARVEL / LASER / PRO
Además, la rueda central, BOMB EFFECT, genera un efecto
bomba. Si vamos subiendo la palanca poco a poco iremos
escuchando una sirena progresiva que culminará con una
explosión cuando la palanca llegue al tope superior.
Pulsando el botón PARTY EFFECT, podemos seleccionar
otros efectos DJ que iremos viendo en pantalla:
SCRATCH, REVERB, BEAT BOX, YEAH, BRING IT, GEYR & COME ON
Una vez seleccionado el efecto deseado, lo podremos
escuchar girando la rueda VOLUME/MULTI.
Podemos seleccionar el volumen de los efectos DJ desde la
rueda DJ EFFECT VOL en el panel trasero.
29

MANUAL DE USUARIO
Botón menú
Pulsando el botón menú en el panel superior, podemos
seleccionar diferentes parámetros y modificarlos utilizando
a su vez la rueda VOLUME/MULTI. Esta rueda, por defecto
modifica el volumen general del aparato entre los valores 0 y
60, donde 0 es el mínimo y 60 es el máximo. Pero si antes de
girar dicha rueda, pulsamos el botón menú y seleccionamos
una de las siguientes opciones, podemos variar sus
parámetros:
BASS: modifica los valores de las frecuencias graves
TREB: Modifica los valores de las frecuencias agudas
DRI: Activa o desactiva la opción SUPER BASS (super graves)
Luces: Podemos seleccionar las siguientes opciones de luces
R: Rojo / G: Verde / B: Azul
RG: Rojo y azul / GB: Verde y azul
RGB: Rojo, verde y azul
AUTO: Varía los colores en función del ritmo de la música
DEMO: Cambio de colores en un ciclo predeterminado
OFF: Sin luces
30
Opción headphones
Pulsando el botón PHONES MODE podemos seleccionar
la salida de la música que escuchamos por los auriculares
conectados a la salida PHONES en el panel superior. Esta
opción es muy útil cuando estamos pinchando música
y queremos mezclar dos canciones entre los puertos
de entrada INPUT A e INPUT B. De esta manera, por los
altavoces podemos estar escuchando un canal y por los
cascos el otro, para poder hacer el tránsito de una canción
a otra como un auténtico DJ. Las opciones que existen para
escuchar por los cascos son:
INPUT A: Escuchamos la música de la entrada A
INPUT B: Escuchamos la música de la entrada B
INPUT AB: Escuchamos ambas entradas a la vez
Entradas de micrófono y guitarra
En el panel trasero del altavoz tenemos una entrada de
micrófono y otra de guitarra. Ambas entradas tienen control
de volumen propio, justo bajo el conector, y además, la
entrada de micro tiene una rueda para el control del eco del
mismo.
 Loading...