

NGS Flea User Manual [fr]

RED FLEA
ADVANCED
2.4GHz WIRELESS
MOUSE
USER’S
MANUAL
ENGLISH · FRANÇAIS · ESPAÑOL · DEUTSCH
ITALIANO · PORTUGUÊS · POLSKI
USER’S MANUAL
WELCOME
NGS thanks you for your trust in purchasing this product.
This document provides all the necessary information for a correct setup and data needed to fully enjoy your device.
Visit our website for further details www.ngs.eu
PACKAGE CONTENTS
• RED FLEA ADVANCED
• User´s manual
• Warranty card
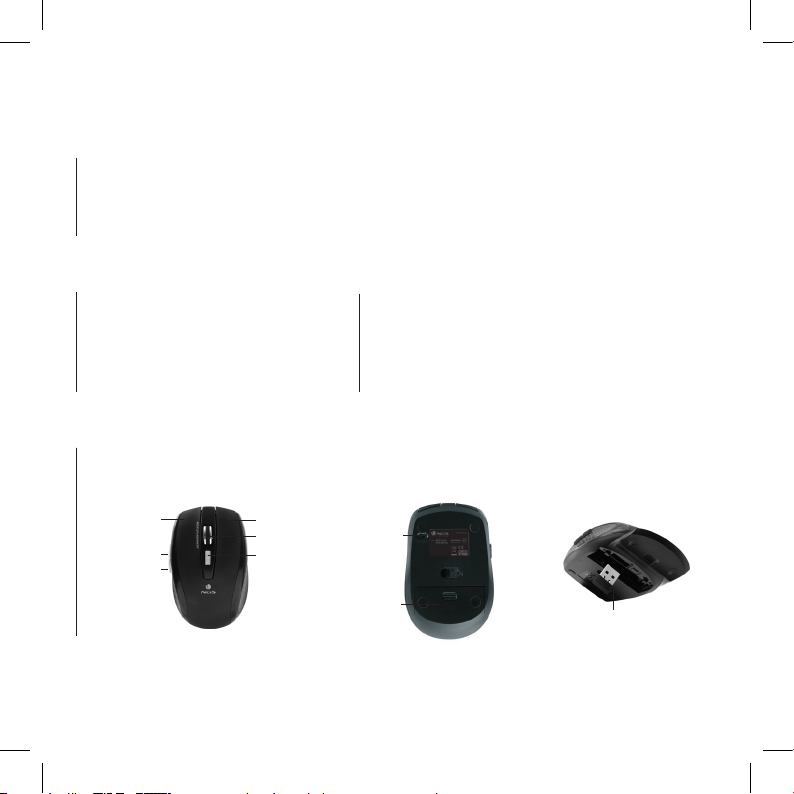
COMPONENTS
Left button
Forward
Backward
2
Right button
Scrollwheel
CPI Button
RED FLEA ADVANCED MOUSE
INTRODUCTION
RED FLEA ADVANCED mouse includes 6 push buttons, which
provide shortcut access to your PC applications: Internet
Explorer, Outlook, etc. You will get thus biggest performance of
your PC in a comfortable and easy way.
On/Off
Battery Cover Switch
Nano Receiver

ENGLISH
INSTALLATION
1. Plug the Nano receiver into a USB port of your computer.
2. Push the Battery Cover Switch aside, open the battery door
and install battery, then close the battery cover.
RECEIVER STORAGE AND
ON/OFF THE MOUSE
1. You can store or take out the Nano receiver from the Nano
receiver storage by push/pull the Nano receiver.
2. You can switch On or shut off the mouse by use the ON/OFF
switch on the bottom of the mouse.
SPEED CONTROL
Press the CPI button and you can toggle the CPI between 800
CPI and 1600 CPI.
TROUBLE SHOOTING
1. Check Nano receiver connection; try to insert Nano Receiver to
another USB port on your computer.
2. Check to see if the batteries in the mouse are installed
correctly. Make sure the polarity of the batteries corresponds
with the polarity signs in the battery compartment.
3. Replace the batteries to make sure the batteries are not low
on power.
CAUTION!!
The manufacturer is not responsible for any radio or TV
interference caused by unauthorized modifications to this
equipment. Such modifications could void the user authority
to operate the equipment.
3

MANUEL DE L’UTILISATEUR
BIENVENUE
NGS vous remercie de votre confiance pour l’achat de ce produit.
Vous trouverez dans ce document toute l’information nécessaire pour une correcte installation et les donées nécessaires
pour profiter pleinement de ce produit.
Veuillez consulter notre site web pour plus d’information www.ngs.eu
CONTENU DE L’EMBALLAGE
• RED FLEA ADVANCED
• Manuel de l’utilisateur
• Carte de Garantie
CONTENU
Bouton droit
Scrollwheel
CPI Bouton
4
Bouton gauche
Bouton latéral
frontal
Bouton latéral
postérieur
INTRODUCTION À L’UTILISATION DE
LA SOURIS RED FLEA ADVANCED
Grâce à ses 6 boutons, la souris RED FLEA ADVANCED vous
permettra d’accéder rapidement aux applications de votre PC :
Internet Explorer, Outlook, etc. Vous obtiendrez ainsi le plus
grand rendement de votre PC confortablement et en toute
simplicité.
Allumage
On/Off
Couvercle des Batteries
Récepteur Nano
FRANÇAIS
INSTALLATION
1. Branchez le récepteur Nano dans un port USB de votre
ordinateur.
2. Poussez le couvercle de la batterie vers le côté, ouvrez le
compartiment de la batterie et installez la batterie, puis
refermez le couvercle.
RANGEMENT DU RÉCEPTEUR
ET INTERRUPTEUR D’ALLUMAGE
DE LA SOURIS
1. Vous pouvez stocker ou extraire le récepteur Nano de son
rangement en poussant/tirant du récepteur Nano.
2. Vous pouvez allumer ou éteindre la souris à l’aide de
l’interrupteur d’allumage situé à la base de la souris.
RÉGLAGE DE LA VITESSE
Appuyez sur le bouton CPI pour changer le mode CPI de 800 CPI
à 1600 CPI.
DÉPANNAGE
1. Vérifiez le branchement du récepteur Nano; essayez de
brancher le récepteur Nano dans un autre port USB de votre
ordinateur.
2. Vérifiez que les batteries de la souris soient correctement
installées. Vérifiez que la polarité des batteries corresponde
aux signes du compartiment de la batterie.
3. Remplacez les batteries pour vérifier leur état de charge.
ATTENTION !
Le fabricant ne se rend pas responsable des interférences
de radio ou de TV provoquées par des modifications non
autorisées de cet équipement. De telles modifications
pourraient interdire l’utilisation de cet équipement.
5
 Loading...