

NGS CLUTCH User Manual
CLUTCH
USER’S MANUAL
www.ngs.eu
English i Français i Español i Deutsch i Italiano i Português i Polski

CLUTCH
PORTABLE FM RADIO +
SD/MMC & USB SPEAKER
NGS thanks you for your trust in purchasing this product.
This document provides all the necessary information for a
correct setup and data needed to fully enjoy your device.
Visit our website for further details www.ngs.eu.
ENGLISH
3
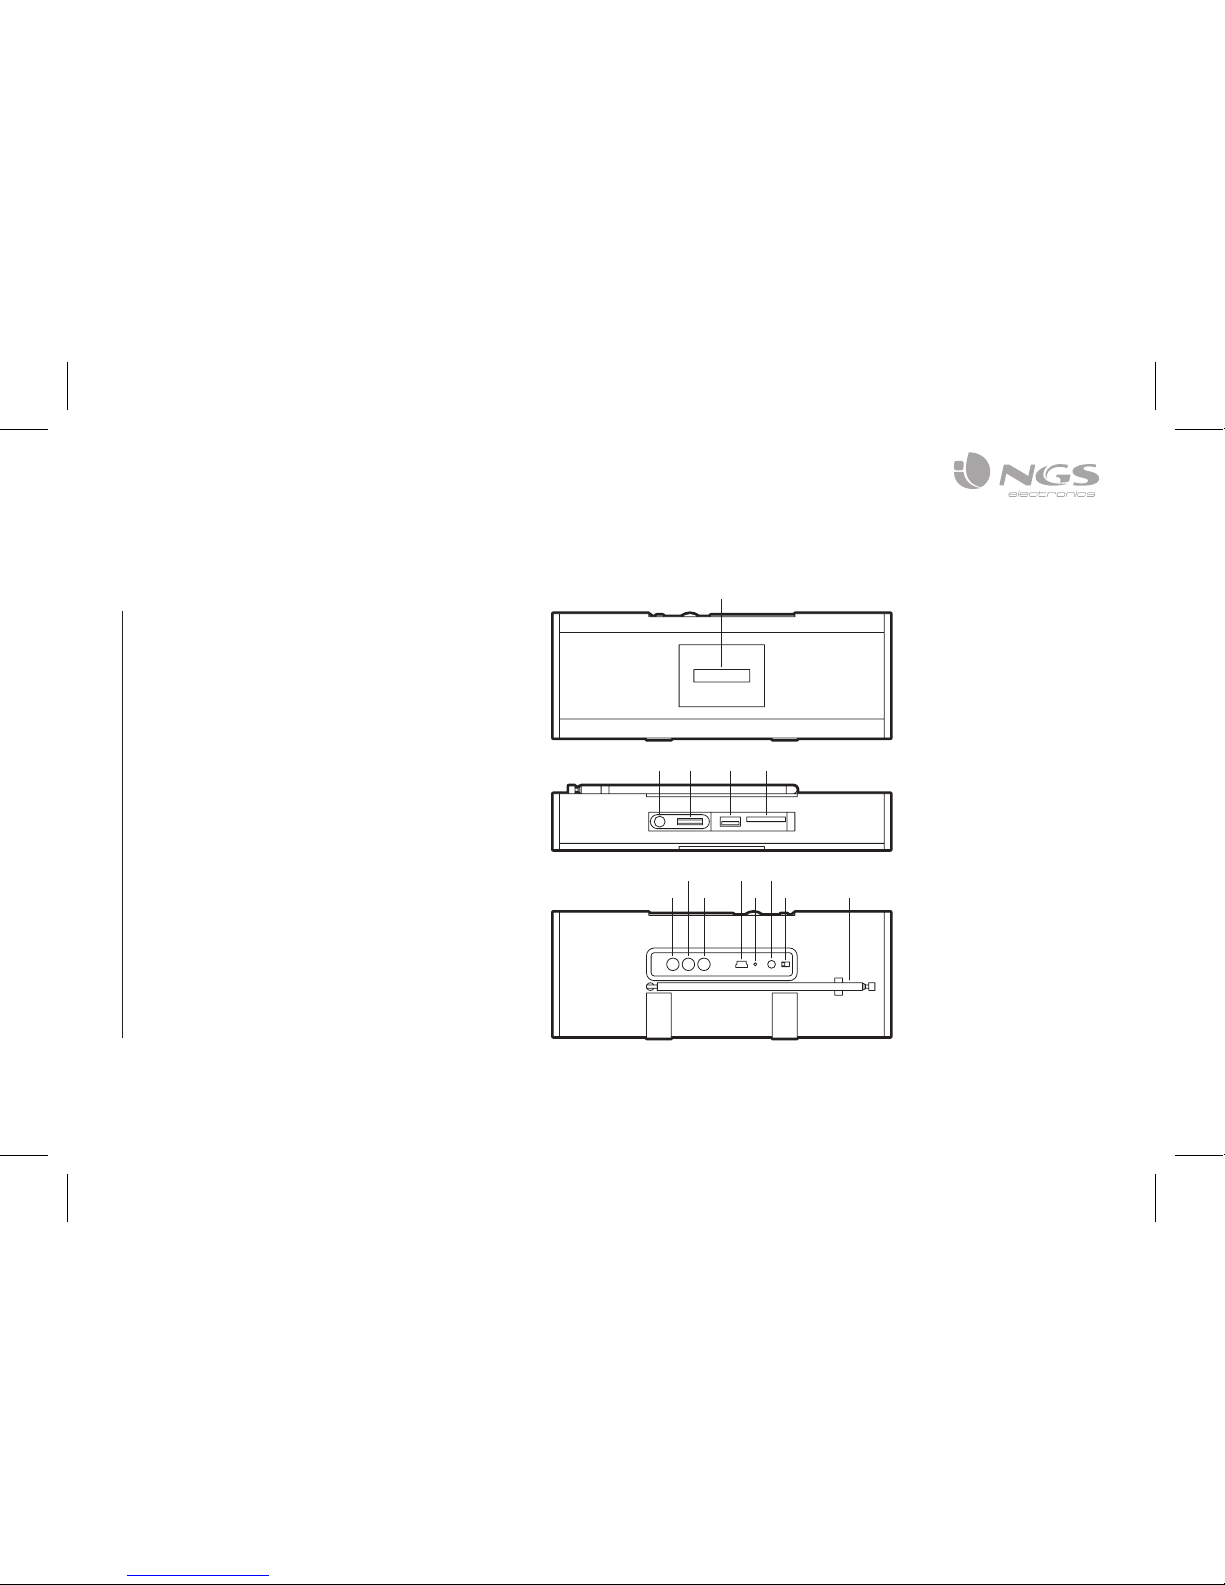
FEATURES
1. LED display
2. Play/pause
3. Volume control
4. USB input
5. SD/MMC card slot
6. M button (mode)
7. Back
8. Forward
9. USB power source
10. Power ON LED
11. AUX input
12. Power switch
13. FM antenna
12 13106 8
7
2 3 415
9 11

USER’S MANUAL
4
BATTERY CHARGE FUNCTION
1. Before you charge the battery for the first time, it should
be completely flat.
2. Make sure you complete a full recharge the first time you
charge the battery.
3. Connect one end of the charging cord to the mini USB
port on the back of the speaker and the other end to a
computer or a 5V/0,5A continuous power source, such a
mains plug.
Note: It is recommended to recharge the battery after it is
completely flat in order to enhance its lifespan.
USB & SD/MMC
1. Please connect a USB memory or a SD/MMC card in the
suitable slot and turn the device ON.
2. Music will start playing automatically.
3. Turn the wheel on the top to control the volume.
4. Press and buttons to browse the songs in the USB
or SD/MMC memories.
5. Press the M (mode) button to switch AUX or RADIO mode.
ENGLISH
5
RADIO MODE
Automatic search
1. Switch ON the device.
2. Switch the M button to RADIO mode.
3. Press and hold button during 3 seconds to start
automatic search. The device will scan and save every
available channel.
4. Press button to browse the saved tuning.
Manual search
1. Switch ON the device.
2. Switch the M button to radio mode.
3. Press and buttons to browse the available tunings
until you find the desired station.
4. Press and hold and buttons to browse the saved
stations.

USER’S MANUAL
6
AUX MODE
1. Switch ON the device.
2. Switch the M button to AUX mode.
3. Connect the audio cable on the rear aux plug.
4. Connect the other end of the aux cable to an external audio
source (MP3 player, smartphone, etc.).
5. Play the music from the external audio source.
6. Turn the wheel on the top to control the volume.
FUNCTION
ENGLISH
7
TECHNICAL SPECIFICATIONS
FM radio: 30 presets
SD/MMC card slot
USB slot
Jack 3,5mm audio input
LED display
Built in internal battery
Battery type: Li-Ion 530mAh
Battery life: 5 hours
Power supply: DC 5V
Output power: 4Wx2
Frequency response: 150Hz -18kHz
HEREBY, LURBE GRUP S.A, DECLARES THAT
THIS FM RADIO IS IN COMPLIANCE WITH THE
ESSENTIAL REQUIREMENTS AND OTHER
RELEVANT PROVISIONS OF DIRECTIVE
1999/5/EC.
If at any time in the future you should need to
dispose of this product please note that:
Waste electrical products should not be
disposed of with household waste. Please
recycle where facilities exist.
Check with your Local Authority or retailer for
recycling advice.
(Waste Electrical and Electronic Equipment
Directive)

CLUTCH
RADIO FM PORTABLE +
HAUT-PARLEUR SD/MMC ET USB
NGS vous remercie de votre confiance pour l’achat de ce
produit.
Vous trouverez dans ce document toute l’information
nécessaire pour une correcte installation et les données
nécessaires pour profiter pleinement de ce produit.
Veuillez consulter notre site web pour plus d’information
www.ngs.eu

FRANÇAIS
9
FONCTIONS
1. Affichage LED
2. Lecture/Pause
3. Contrôle du Volume
4. Entrée USB
5. Fente pour la carte SD/MMC
6. Bouton M (mode)
7. Précédent
8. Suivant
9. Port d’alimentation USB
10. Voyant LED d’allumage
11. Entrée AUX
12. Interrupteur d’allumage
13. Antenne FM
12 13106 8
7
2 3 415
9 11

MANUEL DE L’UTILISATEUR
10
CHARGE DE LA BATTERIE FONCTIONNEMENT
1. Déchargez la batterie complètement avant de la charger
pour la première fois.
2. La première recharge de la batterie doit être une recharge
complète.
3. Branchez le câble de recharge sur le port mini-USB à
l’arrière du haut-parleur et raccordez l’autre extrémité à
un ordinateur ou une source de courant continu à 5V/0,5A,
comme un chargeur pour une prise murale.
Note : Il est recommandé de décharger complètement la
batterie chaque fois avant de la recharger pour augmenter la
vie utile de la batterie.
USB & SD/MMC
1. Insérez une mémoire USB ou une carte SD/MMC dans
les fentes correspondantes et mettez l’interrupteur
d’allumage dans la position ON.
2. La musique commence à sonner automatiquement.
3. Tournez la roulette située dans la partie supérieure pour
monter et descendre le volume.
4. Appuyez sur les boutons et pour parcourir les
chansons dans les mémoires USB et SD/MMC.
5. Appuyez sur le bouton M (mode) pour changer au mode
AUXILIAIRE ou RADIO.
FRANÇAIS
11
MODE RADIO
Recherche automatique
1. Mettez l’interrupteur en position ON.
2. Appuyez sur le bouton M jusqu’à ce que vous accédiez au
mode radio.
3. Pour réaliser une recherche automatique, appuyez sur le
bouton pendant 3 secondes. Le dispositif effectuera
un balayage complet et gardera en mémoire toutes les
stations disponibles.
4. Appuyez sur le bouton pour parcourir les stations
mémorisées.
Recherche manuelle
1. Mettez l’interrupteur en position ON.
2. Appuyez sur le bouton M jusqu’à ce que vous accédiez au
mode radio.
3. Appuyez sur les boutons et pour parcourir les
fréquences disponibles à la recherche de la station
souhaitée.
4. Appuyez et maintenez appuyé les boutons et pour
rechercher la station suivante ou précédente.

MANUEL DE L’UTILISATEUR
12
MODE AUXILIAIRE
1. Mettez l’interrupteur en position ON.
2. Appuyez sur le bouton M jusqu’à ce que vous accédiez au
mode AUX.
3. Raccordez le câble audio à la prise auxiliaire (AUX) située à
l’arrière.
4. Reliez l’autre extrémité du câble auxiliaire à une source
audio externe (lecteur MP3, smartphone, etc.).
5. Effectuez la lecture de la musique depuis la source audio
externe.
6. Tournez la roulette située dans la partie supérieure pour
monter et descendre le volume.
FONCTIONNEMENT

FRANÇAIS
13
SPÉCIFICITÉS TECHNIQUES
Radio FM : 30 mémoires
Fente pour carte SD/MMC
Port USB
Prise d’entrée audio de 3,5mm
Affichage LED
Batterie interne incorporée
Batterie type : Li-Ion 530mAh
Autonomie de la batterie : 5 heures
Alimentation : CC 5V
Puissance de sortie : 4Wx2
Réponse de fréquence : 150Hz -18kHz
PAR LA PRÉSENTE LURBE GRUP S.A.
DÉCLARE QUE L’APPAREIL RADIO FM EST
CONFORME AUX EXIGENCES ESSENTIELLES
ET AUX AUTRES DISPOSITIONS PERTINENTES
DE LA DIRECTIVE 1999/5/CE.
Si dans l’avenir vous deviez vous débarrasser de
ce produit veuillez remarquer que:
Les déchets électriques ne doivent pas être
jetés avec les déchets ménagers. Veuillez
recycler les produits dans une déchetterie.
Consulter votre responsable local ou votre
revendeur pour un conseil sur le recyclage.
(Directive sur les déchets des équipements
électriques et électroniques)

CLUTCH
RADIO FM PORTÁTIL +
ALTAVOZ SD/MMC Y USB
NGS le agradece su confianza por la adquicisión de este
producto.
En este documento encontrará todo la información necesaria
para una correcta instalación y los datos necesarios para que
pueda disfrutar de este producto plenamente.
Para más detalles puede visitar nuestra website www.ngs.eu
 Loading...