

Page 1
Page 2

Page 3

Dansk - Koraet Instrukon ..................... 4
Deutsch - Kurzanleitung ........................... 21
English - Quick Guide ................................ 38
Español - Guía Rápida ............................... 55
Français - Guide Rapide ............................ 72
Italiano - Guida Rapida ............................. 89
Norsk - Hurgmeny ................................ 106
Suomi - Pikaopas .................................... 123
Svenska - Snabb Guide ........................... 140
Page 4
4
DANSK
Velkommen til en verden af AndroidTM NGM. Tak for at have købt NGM YouColor
M500. Med denne enhed kan du få adgang til de mange nye funktioner
Android
TM
5.0, Lollipop for at styre dine kontakter, e-mail, social netværk og
opdage mulighederne i internettet med et enkelt tryk! Udforsk det fulde
potentiale af din nye "intelligente" telefon. I forhold til mono-SIM smartphone på
markedet, NGM YouColor M500 tilbyder bekvemmeligheden ved dobbelt SIM,
der altid har præget hele spektret af NGM, eller evnen til dermed at håndtere to
SIM to telefonnumre på samme tid. Du vil opdage de nyttige funktioner såsom at
indstille det foretrukne SIM til opkald,beskeder og data-forbindelse. Ved at
besøge den officielle hjemmeside www.ngm.eu vil du lære om hele spektret af
NGM mobil, prøv vores praktiske funktionelle service e-handel til at købe
mobiltelefoner og tilbehør, modtag drifts assistance, gå til forummet af teknisk
hjælp og hent softwareopdateringer.
Forsigtig: forbindelsen data NGM YouColor M500 er aktiv på tidspunktet for
den første tur på telefonen (og også efter hver mulig af restaurering af
fabriksindstillinger). Hvis du ikke har en særlig sats, eller "flad" til
dataforbindelsen med dit SIM-kort, kan du ønske at slukke for datatrafik og
oprette en Wi-Fi for at undgå yderligere omkostninger.
Page 5
5
DANSK
Montage
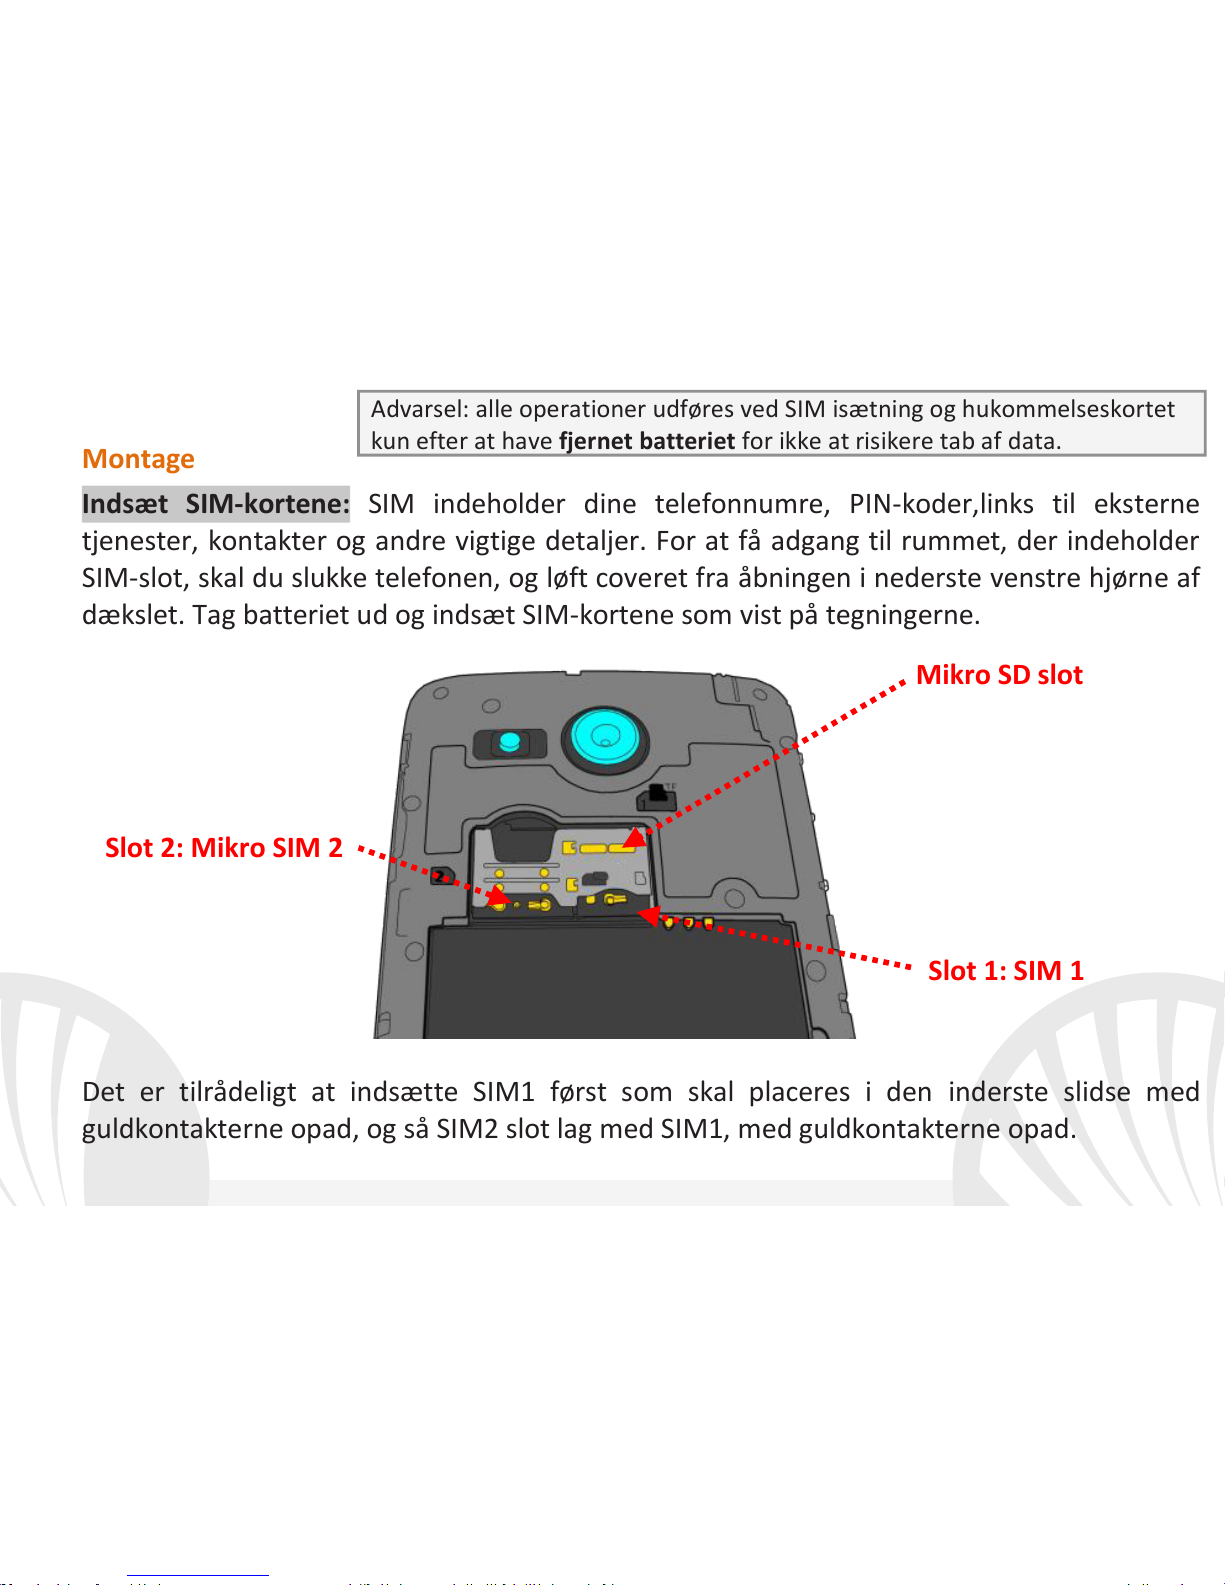
Indsæt SIM-kortene: SIM indeholder dine telefonnumre, PIN-koder,links til eksterne
tjenester, kontakter og andre vigtige detaljer. For at få adgang til rummet, der indeholder
SIM-slot, skal du slukke telefonen, og løft coveret fra åbningen i nederste venstre hjørne af
dækslet. Tag batteriet ud og indsæt SIM-kortene som vist på tegningerne.
Det er tilrådeligt at indsætte SIM1 først som skal placeres i den inderste slidse med
guldkontakterne opad, og så SIM2 slot lag med SIM1, med guldkontakterne opad.
Advarsel: alle operationer udføres ved SIM isætning og hukommelseskortet
kun efter at have fjernet batteriet for ikke at risikere tab af data.
Mikro SD slot
Slot 1: SIM 1
Slot 2: Mikro SIM 2
Page 6
6
DANSK
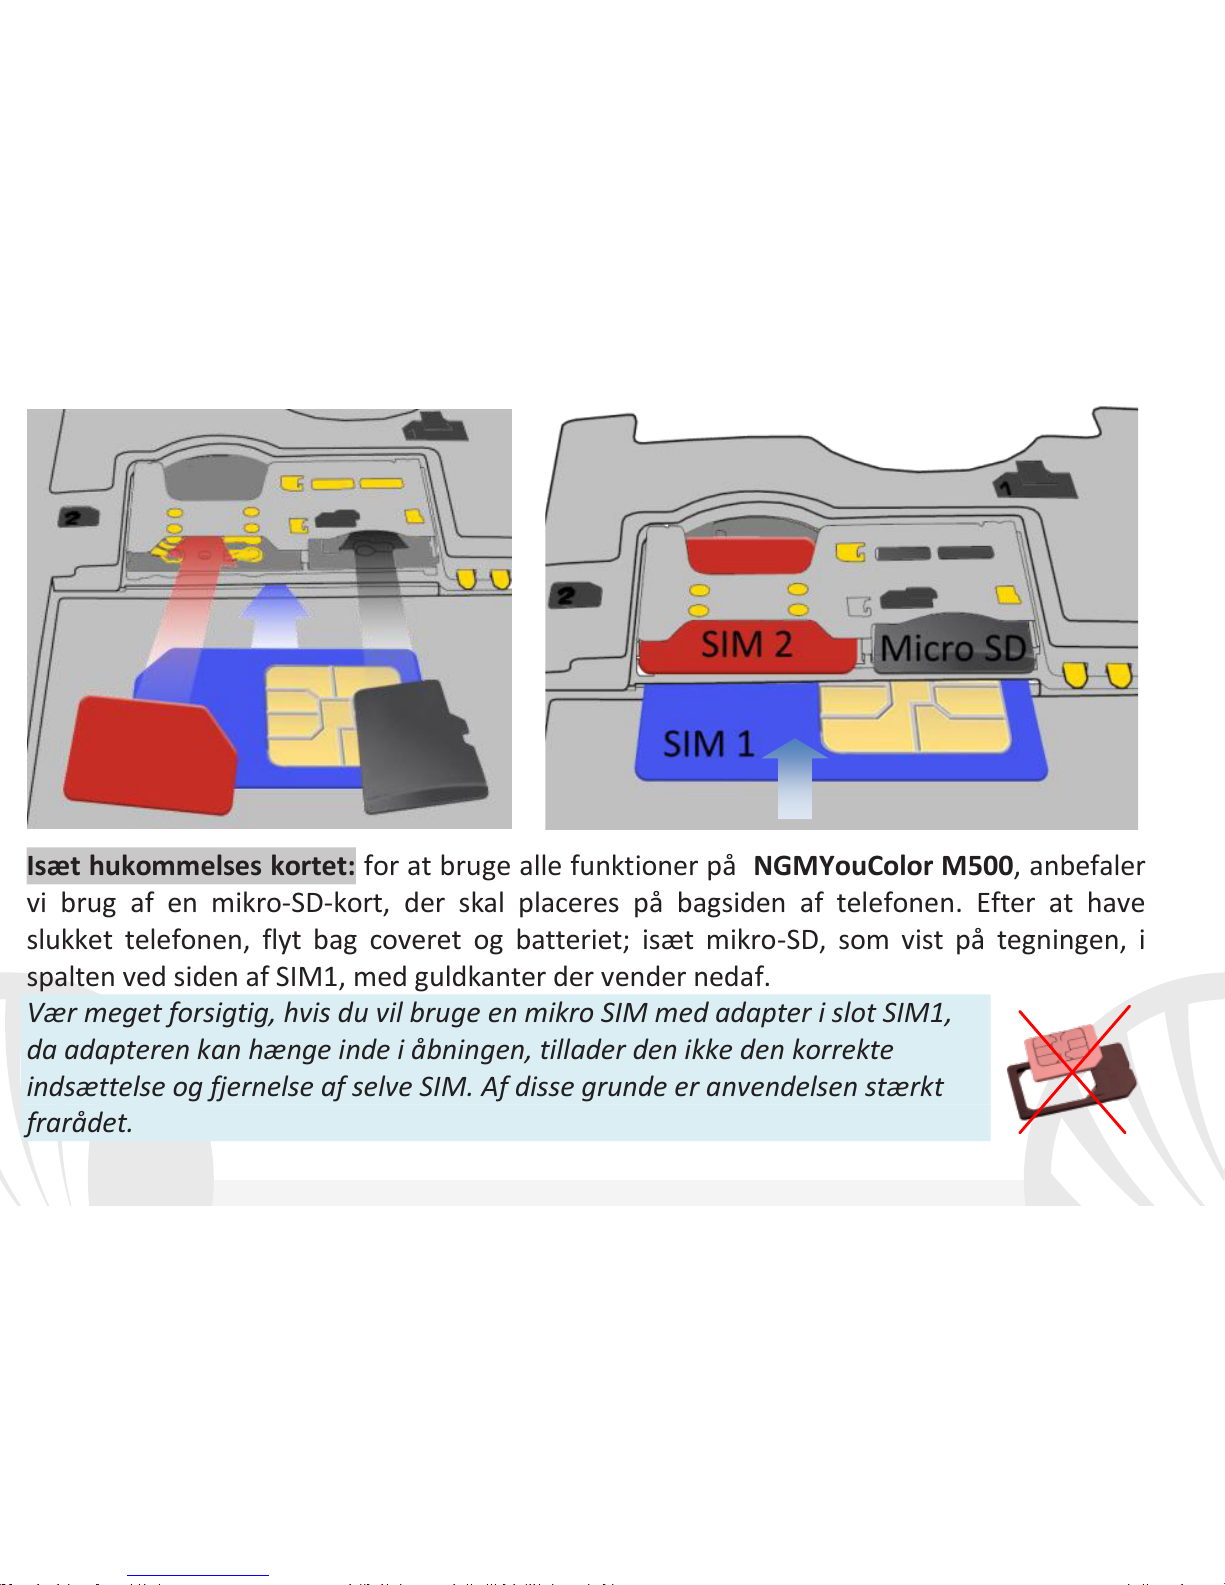
Isæt hukommelses kortet: for at bruge alle funktioner på NGMYouColor M500, anbefaler
vi brug af en mikro-SD-kort, der skal placeres på bagsiden af telefonen. Efter at have
slukket telefonen, flyt bag coveret og batteriet; isæt mikro-SD, som vist på tegningen, i
spalten ved siden af SIM1, med guldkanter der vender nedaf.
Vær meget forsigtig, hvis du vil bruge en mikro SIM med adapter i slot SIM1,
da adapteren kan hænge inde i åbningen, tillader den ikke den korrekte
indsættelse og fjernelse af selve SIM. Af disse grunde er anvendelsen stærkt
frarådet.
Page 7
7
DANSK
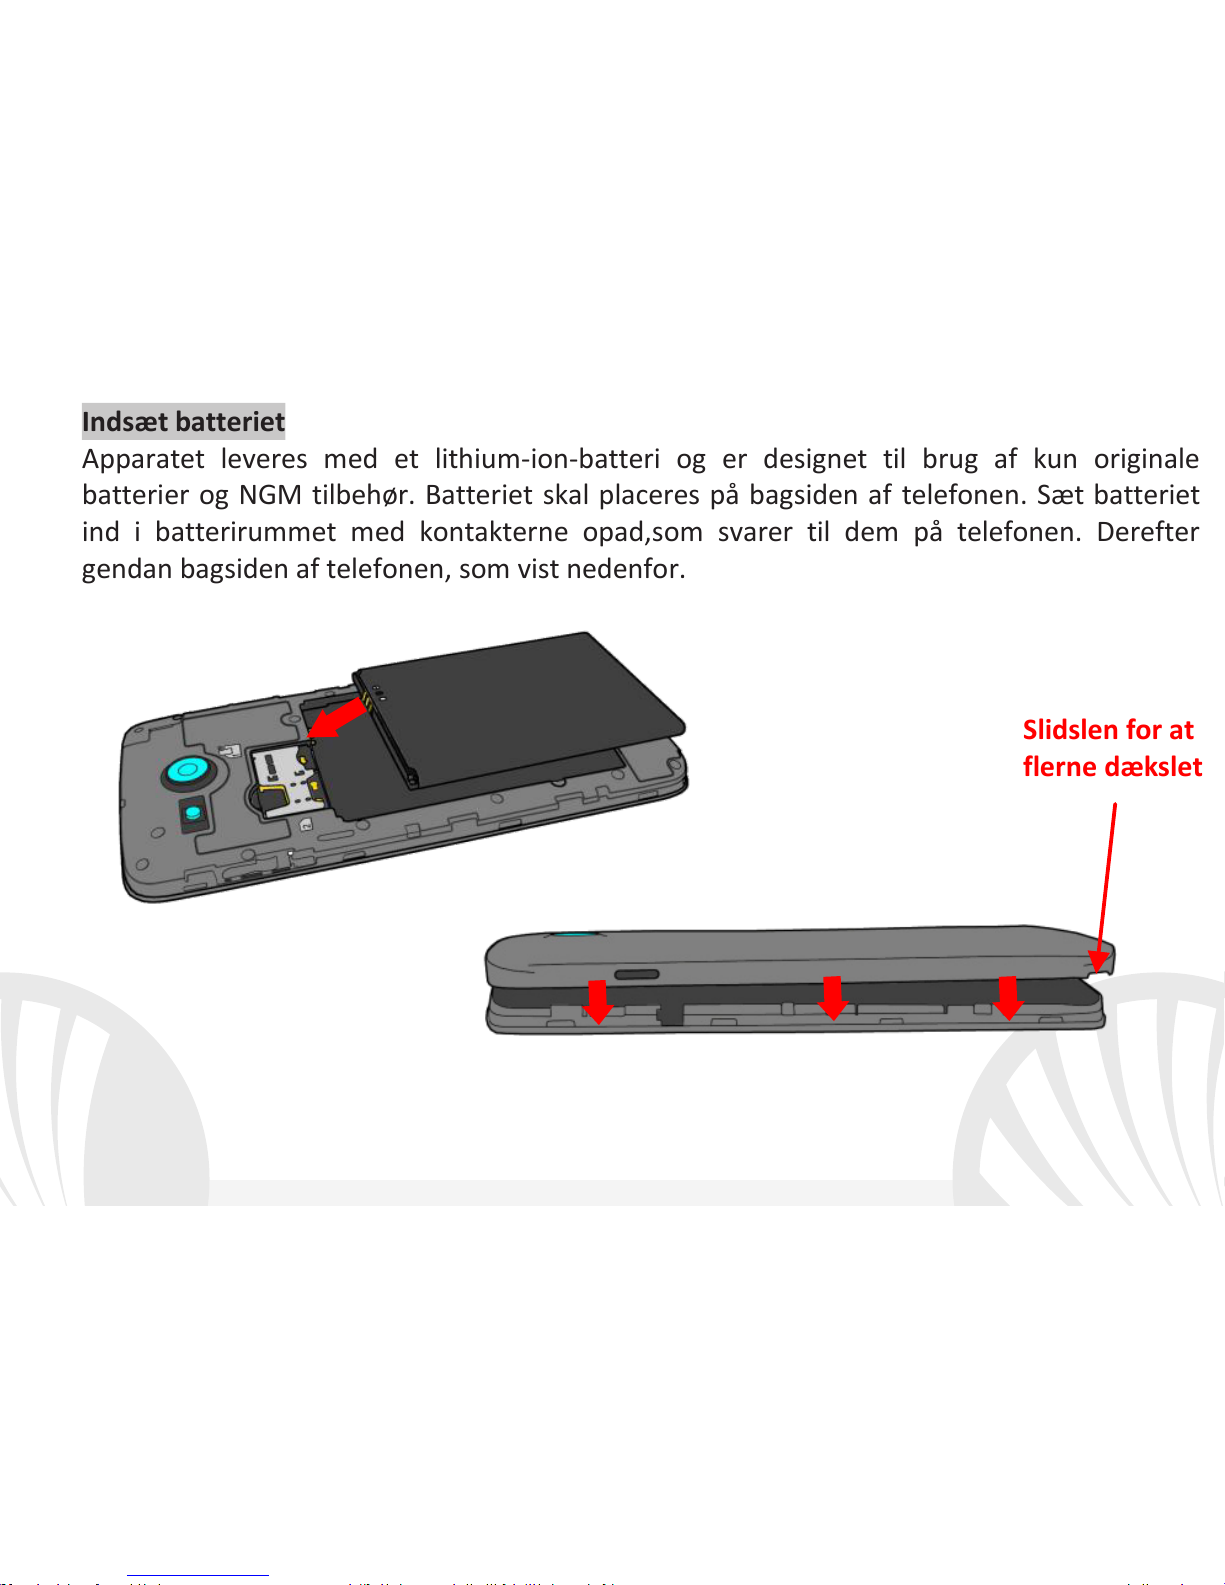
Indsæt batteriet
Apparatet leveres med et lithium-ion-batteri og er designet til brug af kun originale
batterier og NGM tilbehør. Batteriet skal placeres på bagsiden af telefonen. Sæt batteriet
ind i batterirummet med kontakterne opad,som svarer til dem på telefonen. Derefter
gendan bagsiden af telefonen, som vist nedenfor.
Slidslen for at
flerne dækslet
Page 8

8
DANSK
Oplad batteriet
Oplad batteriet, før du begynder at bruge enheden. Brug det medfølgende USB-kabel og
USB-stikket på oversiden af telefonen. Slut opladeren til et stikkontakt, og derefter
enheden til USB-kablet. Du kan også oplade din telefon ved at tilslutte den til pc'en, men i
dette tilfælde vil opladningen være langsommere. Når batteriet oplades, vises et animeret
ikon status på skærmen for processen, hvis telefonen er tændt. Når batteriet ikonet er
fuldt opladet, kan telefonen afbrydes fra lysnettet.
Bemærk venligst: Man må ikke tilslutte telefonen til en computer,som tænder eller slukker
for at undgå overspænding. For at bevare den korrekte funktionalitet af produktet og
integriteten af garantien anbefales at bruge originale opladere NGM. Fortsæt med at
genoplade udelukkende indendørs og i tørre steder. En let opvarmning af telefonen,mens
du oplader er normal. Batteriet opnår sin funktionelle effektivitet først efter et par
fuldstændige opladninger.
Tænd, sluk og pause
For at tænde enheden, skal du trykke på og holde tænd/sluk-knappen. For at slukke for
enheden, skal du trykke og holde på den samme knap og bekræft nedlukning ved at vælge
"Sluk". Et kort tryk giver i stedet mulighed for hurtigt at skifte til pause-tilstand (slukket
skærm) eller vende tilbage til skærmen fra denne udgivelse (se nedenfor).
Page 9
9
DANSK
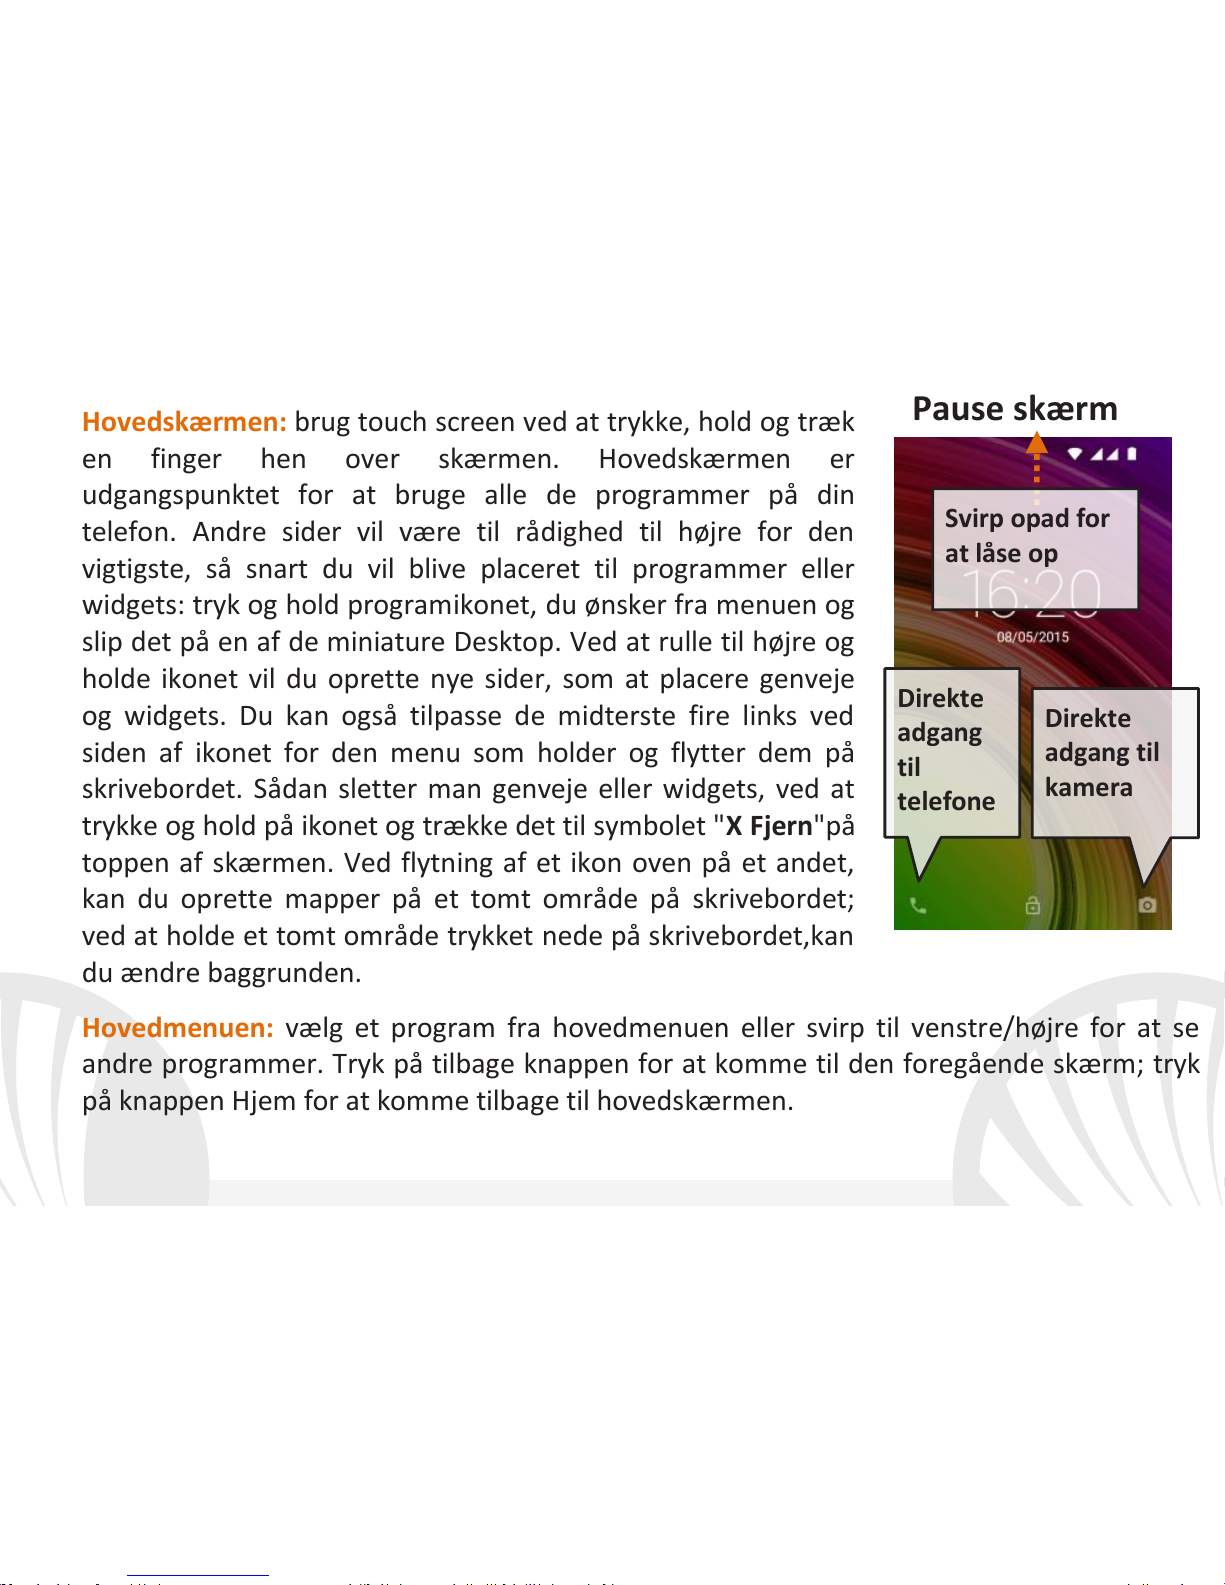
Hovedskærmen: brug touch screen ved at trykke, hold og træk
en finger hen over skærmen. Hovedskærmen er
udgangspunktet for at bruge alle de programmer på din
telefon. Andre sider vil være til rådighed til højre for den
vigtigste, så snart du vil blive placeret til programmer eller
widgets: tryk og hold programikonet, du ønsker fra menuen og
slip det på en af de miniature Desktop. Ved at rulle til højre og
holde ikonet vil du oprette nye sider, som at placere genveje
og widgets. Du kan også tilpasse de midterste fire links ved
siden af ikonet for den menu som holder og flytter dem på
skrivebordet. Sådan sletter man genveje eller widgets, ved at
trykke og hold på ikonet og trække det til symbolet "X Fjern"på
toppen af skærmen. Ved flytning af et ikon oven på et andet,
kan du oprette mapper på et tomt område på skrivebordet;
ved at holde et tomt område trykket nede på skrivebordet,kan
du ændre baggrunden.
Hovedmenuen: vælg et program fra hovedmenuen eller svirp til venstre/højre for at se
andre programmer. Tryk på tilbage knappen for at komme til den foregående skærm; tryk
på knappen Hjem for at komme tilbage til hovedskærmen.
Pause skærm
Direkte
adgang
til
telefone
Direkte
adgang til
kamera
Svirp opad for
at låse op
Page 10
10
DANSK
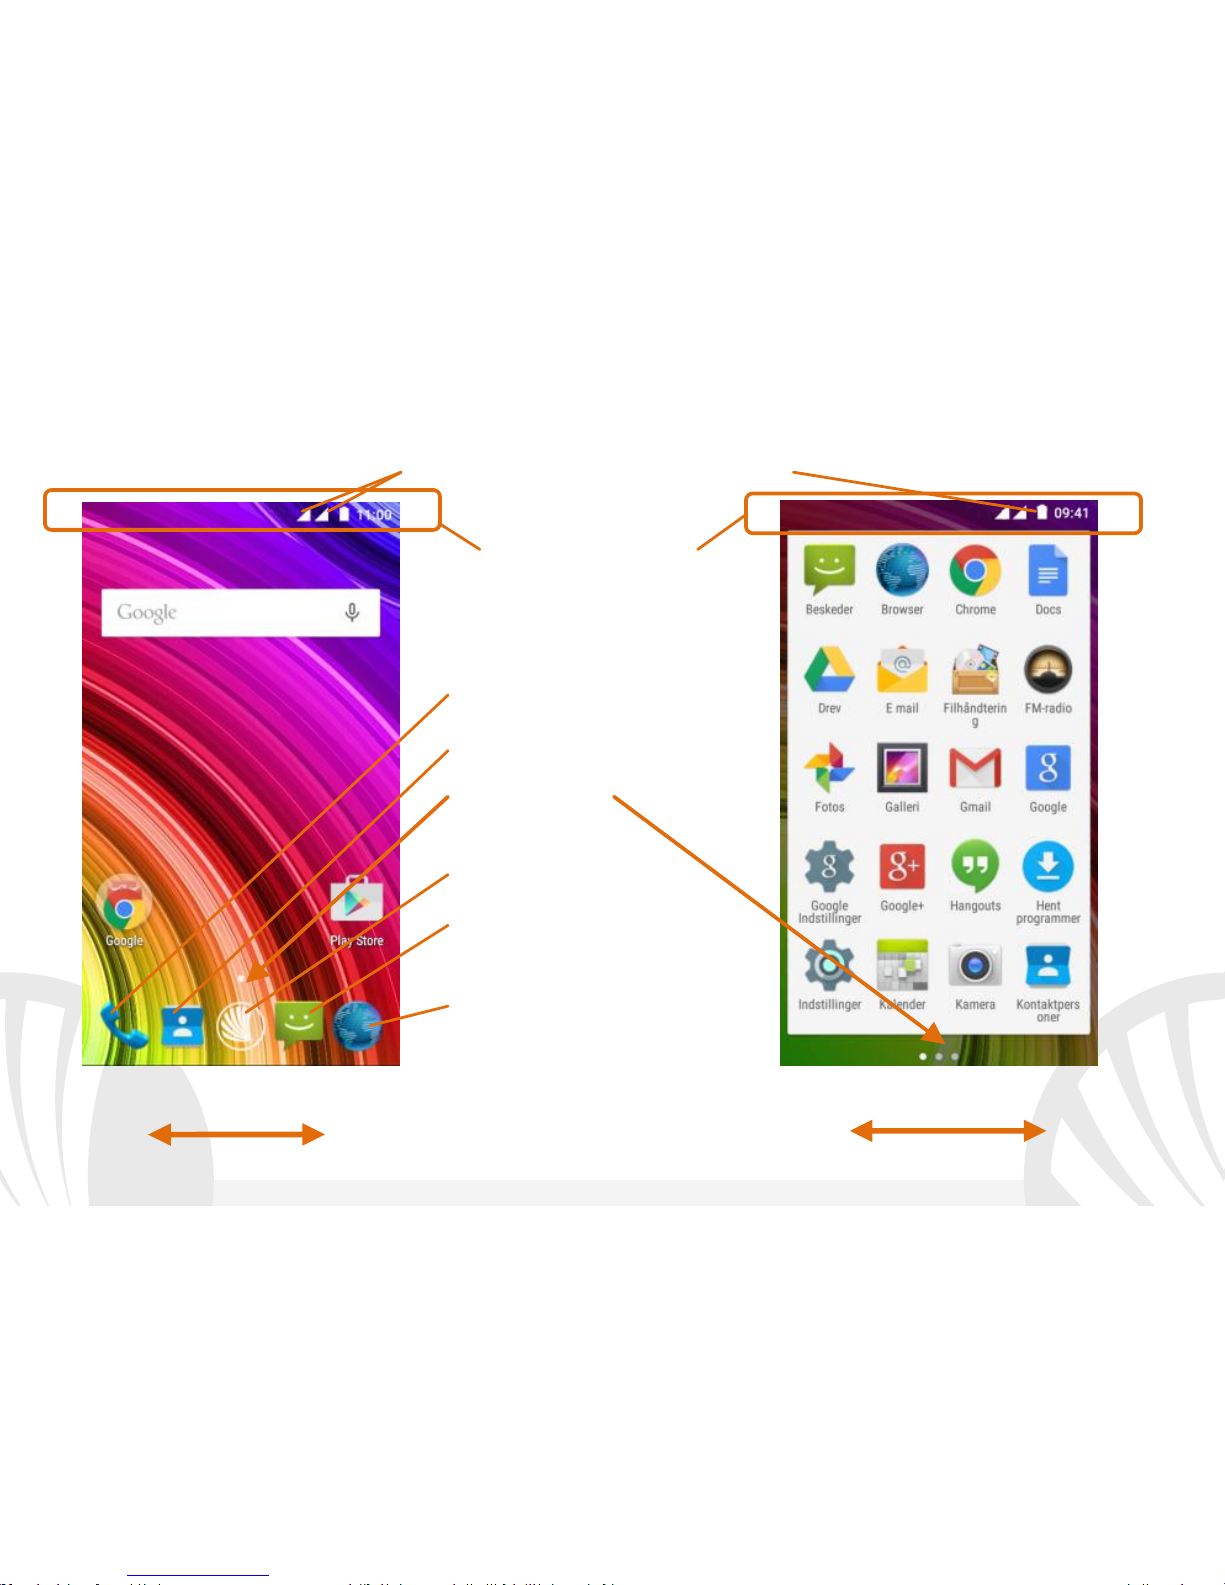
Hovedskærmen
Hovedmenuen
Panelmeddelelses linje
Signalstyrke og batteriniveau SIM
Side indikator
Telefon
Adressebog
Hovedmenuen
Internettet
Beskeder
Rulle skærmen HJEMME
Rullemenu
Page 11
11
DANSK
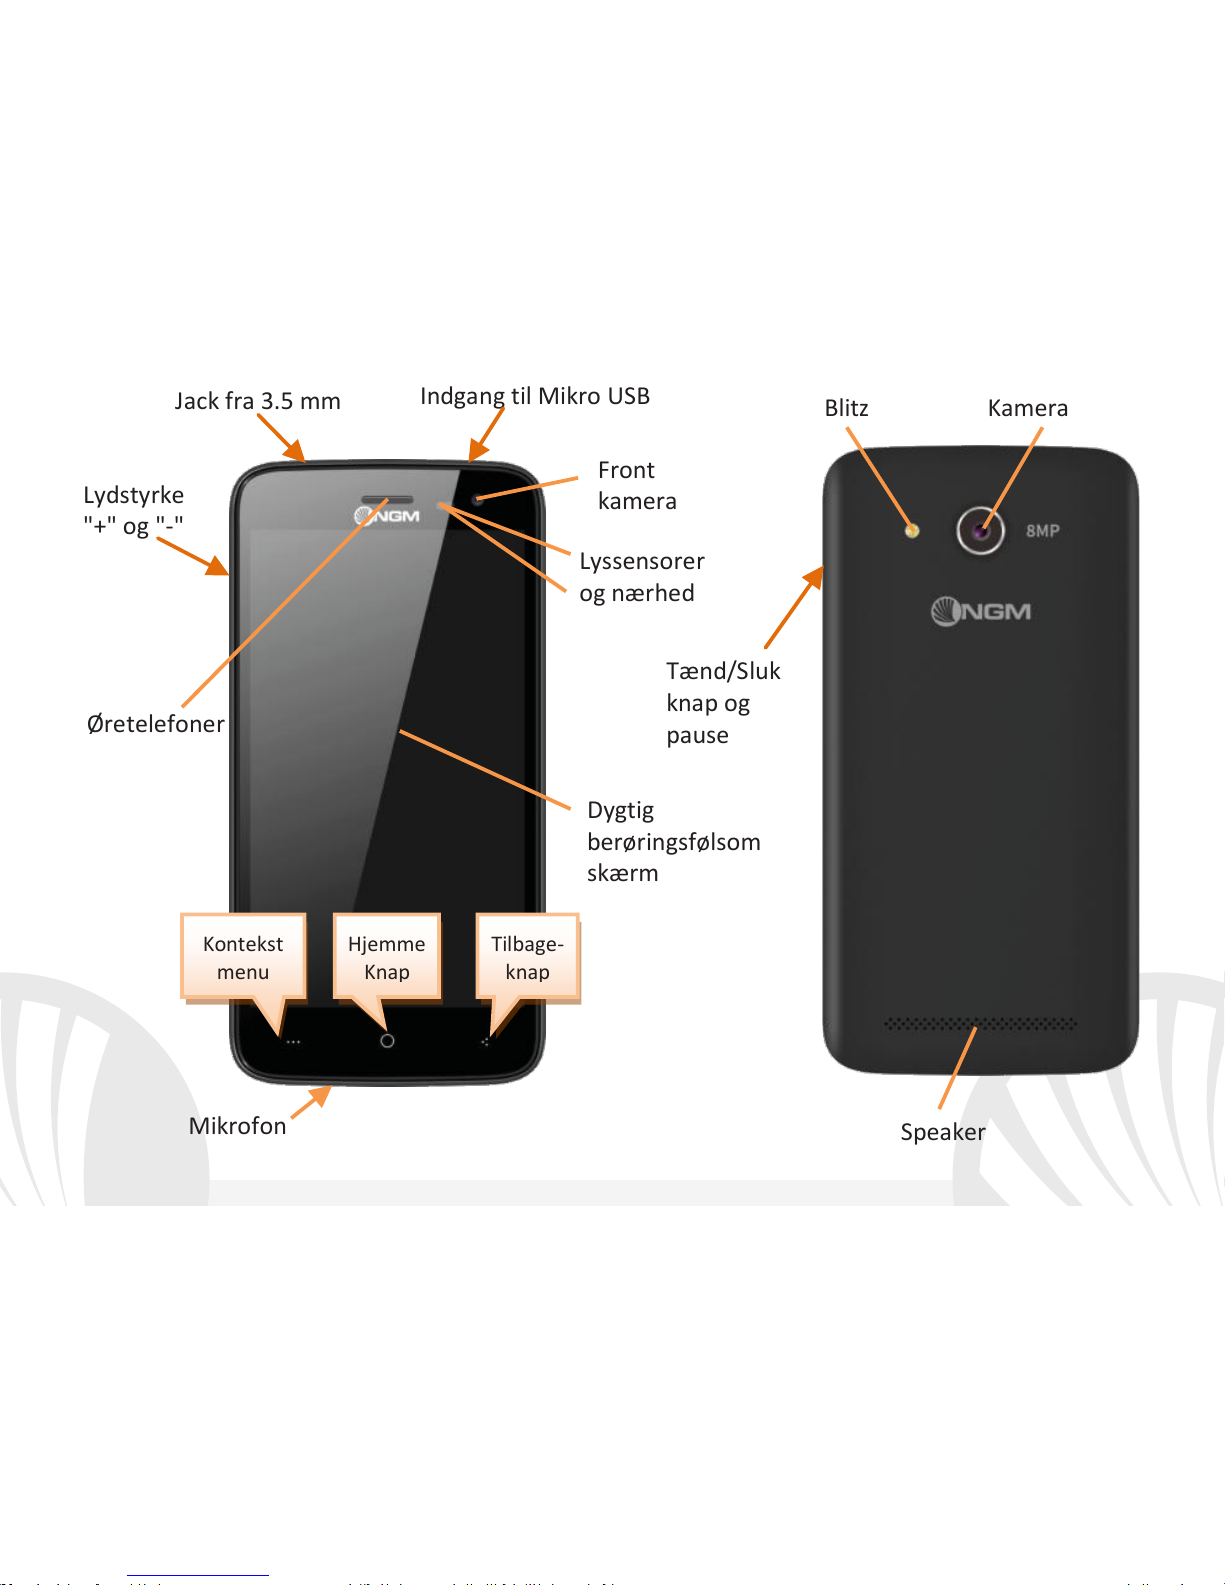
Tænd/Sluk
knap og
pause
Dygtig
berøringsfølsom
skærm
Blitz
Kamera
Indgang til Mikro USB
Jack fra 3.5 mm
Front
kamera
Øretelefoner
Lyssensorer
og nærhed
Speaker
Lydstyrke
"+" og "-"
Mikrofon
Kontekst
menu
Tilbage-
knap
Hjemme
Knap
Page 12
12
DANSK
GENVEJE
Besked panel: for at åbne anmeldelsespanelet, tryk på ikonet øverst på skærmen. Ved at
rulle ned vises underretninger først, hvis du forsætter med at rulle ned, kan du også vise
knapperne Quick Setup. Med slet meddelelser på panel. For at skjule panelet, skal du
trække op fra bunden af panelet, eller røre ved tilbage-knappen. Meddelelser vil være
synlige i unlock skærmen.
Seneste applikationer: når du er inden i enhver applikation, skal du trykke på og holde
knappen : derved viser den listen over programmer, som du er logget ind for fornylig;
som kan direkte vælges.
Skærm lås og vibration: fra hovedmenuen, skal du vælge Indstillinger > Sikkerhed >
Skærmlås. Vælg den ønskede tilstand (Ingen, Glide, Vokal op låsning, Sekvens, PIN eller
Adgangskode) og bekræft. For at låse skærmen hurtigt skal du trykke kortvarigt på
knappen til/fra på telefonen. Sådan låser du skærmen, skal du følge instruktionerne på
skærmen.
Kontekst menu: mange applikationer forudser brugen af Kontekst Menuen Ved at
trykke på denne knap, vises der en kontekst menu beregnet til selve applikationen med de
relative funktioner.
Page 13

13
DANSK
Administrer to SIM
Fra hovedmenuen, skal du vælge Indstillinger > SIM administrator. Marker eller fjern
Tænd/Sluk ved siden af teleoperatører, der svarer til "SIM1" og "SIM2" til selektivt at
aktivere eller deaktivere SIM til enhver tid. Fra denne menu kan du også tilpasse farven og
navn for hver ikon SIM SIM og beslutte, hvilket at bruge som standard til
opkald,videoopkald, beskeder og data-forbindelse, eller vælg "altid spørge", hvis du ikke
ønsker at indstille en standard SIM.
Vælg en SIM hvorpå du kan aktivere data, på samme SIM aktiveres automatisk 3Gtjenester. Dette giver dig mulighed for at bevæge sig let fra den ene til den anden SIM 3G,
normalt begrænset udelukkende til slot 1, uden fysisk at skulle vende den.
Smart Gestus
Fra Indstillingsmenuen, vælg Smart gestus, kan man aktivere de NGM innovative funktioner
i telefonen med den største bekvemmelighed og hastighed.
Gæstetilstand
Beskeder, opkaldslog og fotoalbum vil midlertidigt blive skjult, og eventuelle ændringer vil
hæmme desktop. Når denne tilstand er aktiv, vises et ikon i meddelelses proceslinjen. I
Indstillinger > Sikkerhed, kan du angive en adgangskode til at køre denne funktion.
Page 14
14
DANSK
ADMINISTRATION AF ET OPKALD
Tryk på ikonet Telefon fra hovedskærmen;indtast telefonnummeret ved hjælp af det
virtuelle tastatur (for at vise det vælg ikonet )
Tryk på modtager ikonet og vælg derefter det ønskede SIM.
Til slut, skal du trykke på den røde ikon for at afbryde opkaldet.
Vælg Besvar på pop-up for at besvare et opkald, der vises øverst på skærmen, eller tryk
på pop-up for at vise opkaldet. På dette punkt, skal du trække telenonen til højre på den
centrale blå håndsæt for at svare; for at afvise opkaldet i stedet træk den til venstre på
den røde håndsæt, for at afvise beskeden før røret opad. Til tavshed et indgående
opkald, skal du trykke Lydstyrke "+" eller "-" (på den venstre side af telefonen).
Hent et nummer fra opkaldsloggen
Fra hovedmenuen, gå ind i menuen Telefon og vælg Telefonopkald Historie fra
genvejsmenuen (skjul først virtuel tastatur), viser opkaldsloggen med ubesvarede opkald,
indgående og udgående.
Vælg det ønskede nummer og derefter Ring tilbage, derved vælg med hvilken SIM
opstarte opkaldet i tilfælde af at du ikke har indstillet nogen standard SIM.
Page 15
15
DANSK
Håndtering af kontakter
Tilføj ny kontakt
Fra hovedmenuen skal du vælge ikonet Kontakter.
Tryk ikonet forneden.
Vælg hvor du vil gemme den nye kontakt (konto, telefon eller SIM1 eller SIM2).
Indsæt Navn, Nummer og eventuelt andre detaljer af kontakten(andre detaljer kan
man kun tilslutte hvis de bliver gemt på telefonen) og bekræft for at gemme.
Tilføjelse af en ny kontaktperson fra opkaldsloggen
Fra menu Telefon, få adgang til Opkaldslisten (genvejsmenu).
Tryk på billede tom kontakt derefter vælg ikonet øverst til højre.
Vælg Opret Ny kontakt foroven eller tilføje nummeret til en Eksisterende kontaktperson
ved at vælge den fra listen. Efter at have tilføjet navn og eventuelt andre informationer
(hvis gemt på Telefonen), bekræft med Gem.
Indstilling af ringetoner
Fra hovedmenuen skal du vælge Indstillinger > Lyd og meddelelser > Generelt.
Vælg Telefon Ringtone > SIM1 eller SIM2 og vælg den ønskede ringtone for hver SIM. For
at indstille en brugerdefineret ringetone: i Musik vælge det ønskede lydspor med et
langt tryk og vælg Anvendelse som Ringetone i kontekst menuen. Således vil dette lydfil
blive føjet til listen over tilgængelige ringetoner.
Bemærk: Du kan bruge ringetoner i filer i som* mid, * wav, ogg * eller * mp3.
Anmærkninger: I genvejsmenu fra telefonbogen har du adgang til de
funktioner, import/eksport kontakter og forskellige nyttige indstillinger.
Page 16

16
DANSK
Aktivere eller deaktivere vibration hurtigt: for at slukke hurtigt for ringtonen for opkald og
meddelelser, skal du trykke på knappen lydstyrke"-". indtil du opnår den mindste lydstyrke,
og telefonen vil indgå i vibrere tilstand. Det er derved muligt, på samme måde, at
administrere afbrydelserne for meddelelser (se par. efter)
afbrydelser af meddelelser og app meddelelser: Android
TM
5.0, Lollipop har indført nye
funktioner. I Indstillinger > Lyd og meddelelser > Afbrydelser er det muligt at beslutte sig til
ikke at modtage meddelelser på særlige dage og tidspunkter. Især, kan du indstille tre
tilstande:
Afbryd ikke: vil modtage alle meddelelser
Tillad kun prioritets afbrydelser: vil kun modtage prioritets meddelelser, valgbar i den
næste menu ( begivenheder og påmindelser, opkald og beskeder. Advarsler er altid
betragtet som afbrydelser prioritet)
Afbryd altid: du modtager ingen prioriteret meddelelse, selv i de dage og tidspunkter,
der er etableret
Når prioriterede meddelelser er etableret, hvorfra du vil modtage meddelelser, kan du
indstille en tidsramme til at afbryde modtagelsen af alle andre meddelelser som ikke
betragtes som en prioritet. Ved aktiveringen af afbrydelser vises en stjerne på
meddelelseslinjen.
I Indstillinger > Lyd og meddelelser > Meddelelser i stedet, kan du stoppe med at modtage
meddelelser fra specifikke anvendelser valgbar menu Meddelelser app.
Page 17
17
DANSK
Sende og læse SMS og MMS-beskeder
Læs SMS og MMS: når du modtager en SMS eller MMS, vises ikonet i
meddelelsesområdets panel. Ved at klikke på ikonet, kan du gå direkte til samtalen og læse
den indgående besked. Det er muligt at vise de indkommende meddelelser også fra
hovedskærmen eller fra menu, ved at vælge Meddelelser.
Send SMS og MMS: fra siden eller hovedmenuen, vælg Besked og derefter på ikonet for
neden. Indtast de første par bogstaver i et navn i modtagerfeltet for at søge efter en
kontakt, og vælg det fra listen eller direkte indtast nummeret eller vælg ved siden af
feltet og find modtageren. Indtast tekst med det virtuelle tastatur i feltet. Vælg"+" for at
inkludere vedhæftede multimediefiler (beskeden vil blive konverteret til MMS), og tryk
ved at vælge den ønskede SIM.
FORBINDELSE: for en bedre udnyttelse af potentialet tilbud i terminalen og dens
styresystem,skal du have en aktiv dataforbindelse; forbindelsen data NGM YouColor M500
er aktiv på tidspunktet for den første tur på telefonen. Hvis det ikke er fastsat i
abonnement, at trafikdata indebærer omkostningerne,så anbefales det at indstille adgang
til internettet igennem WiFi. For at aktivere datatrafik på en af SIM-kortene, skal du vælge
Indstillinger > SIM administrator > Dataforbindelse, eller aktivere det med hurtig
indstillings knappen i meddelelsespanelet.
Page 18
18
DANSK
Forbindelse på Internet med Wi-Fi® funktion: i kan tilslutte jer til nettet WLAN ved at
bruge Wi-Fi. For at aktivere den skal du vælge fra hoved menu Indstillinger > WiFi I/O.
Overhold alle advarslerne og anvisninger fra officielle personale,når du er i områder, hvor
brugen af trådløse enheder er begrænset (fly, hospitaler, mv.). Skift til offline-tilstand, når
du har brug for kun at bruge de tjenester, der ikke kræver adgang til netværket.
Forbind til en Bluetooth® enhed: tænd enheden Blootooth som du ønsker at tilslutte dig
til. Der henvises til enhedens dokumentation.
Vælg fra hovedmenuen Indstillinger > Bluetooth til/fra og tænd for Bluetooth. I
kontekst-menuen finder du yderligere funktioner og indstillinger.
Vælg Søg efter enheder for automatisk at begynde at søge efter Bluetooth-enheder
Blandt de registrerede enheder, skal du vælge enhedens navn til at associere med.
Telefonen vil forsøge at forene med enheden, hvilket kan blive bedt om en parrings
kode.
Opret forbindelse til internettet: fra hovedmenuen, skal du vælge Browser. Indtast URL'en
i adressefeltet for at starte navigation. Hvis du vælger at sejle med dataforbindelsen af
telefonnettet, forhør dig om prisen, eller vælg en data kontrakt "flad" med din operatør.
Alternativt kan du bruge WiFi-forbindelse (se "Forbindelse").
Konto opsætning Gmail: for at udnytte funktionerne af systemet Android
TM
, er det
nødvendigt at konfigurere en ny Gmail konto eller indsætte en som allerede eksistere. Det
vil tillade dig adgang til alle applikationerne i systemet Android
TM
.
Page 19

19
DANSK
E-mail: ved at konfigurere en standard-konto, kan du nemt administrere e-mail og vise
detautomatisk på din telefon. Hvis du ønsker at bruge også en anden udbyder af mailtjenester er forskellige fra dem, der foreslås af telefonen, du kan oprette en ekstra konto
med en anden udbyder i ansøgningen Email i hovedmenuen.
Synkronisering: synkronisering er den mest effektive måde at styre deres data nyttigt,fordi
det giver dig mulighed for at lave en sikkerhedskopi af data på enheden med internetkonto. I tilfælde af ændringer, tab eller beskadigelse af telefonen, vil der ikke være nogen
tab af disse data. Synkronisering kan være aktiv på et hvert program installeret
synkroniseret; Listen over disse programmer er i Indstillinger > Konto [liste App indstil].
For at tilføje en ny konto, skal du vælge Tilføj konto. Synkroniseringen anvender en aktiv
dataforbindelse, der kan have omkostninger i datatrafik. Vi anbefaler, at du bruger en WiFiforbindelse, hvis tilgængelig.
GPS-placering: det Global placering System (GPS) er et satellit-baseret system til
positionsbestemmelse, global dækning og kontinuerlig. For at indtaste GPS, vælg
Indstillinger > Adgang til position I/O. Når GPS-funktionen er aktiveret, vil telefonen
indsamle data fra satellitter og bestemme dets nuværende placering. Tiden i Fix (position
detektion) er variable og kan være påvirket af flere eksterne faktorer (uklarhed,
afskærmning fra bygninger osv.). For at reducere batteriforbruget og hukommelse,
anbefales det at slukke GPS, når den ikke er i brug.
Page 20
20
DANSK
Advarsel: Formatet og leveringen af denne håndbog er baseret på AndroidTM-
operativsystemer; Producenten påtager sig intet ansvar for enhver overtrædelse af
retningslinjerne ovenfor eller for ethvert misbrug af telefonen. Producenten forbeholder sig
ret til at ændre, uden varsel til oplysningerne i denne vejledning. Indholdet i denne
vejledning kan variere fra det faktiske indhold, der vises på telefonen. I dette tilfælde
gælder den anden.
Copyright © 2015 NGM Italia
Ingen del af denne manual må reproduceres, distribueres, oversættes, transmitteres i nogen form
eller på nogen måde, elektronisk eller mekanisk, herunder fotokopiering, optagelse eller lagring i
informationen opbevaring eller søgesystem uden forudgående skriftlig tilladelse fra NGM Italia.
Bluetooth® er et registreret varemærke i verden af Bluetooth SIG, Inc.
Wi-Fi® og Wi-Fi-logoet er registrerede varemærker tilhørende Wi-Fi Alliance.
Page 21
21
DEUTSCH
Herzlich willkommen in der Welt von NGM AndroidTM. Danke dass Sie NGM YouColor
M500 gekauft haben. Mit diesem Gerät können Sie mit dem vielfältigen Android
TM
5.0, Lollipop OS Ihre Kontakte, E-Mails, Sozialnetzwerke und Internetzugang
verwalten. Entdecken Sie das volle Potenzial Ihres neuen "intelligenten" Telefons. Im
Vergleich zu den gewöhnlichen mono-SIM Smartphones, bietet NGM YouColor M500
die Bequemlichkeit des Dual-SIM an; diese Funktion charakterisiert seit immer die
gesamte Palette von NGM Telefonen und bietet die Fähigkeit, zwei SIM Karten und
damit zwei Telefonnummern gleichzeitig zu verwalten. Sie werden viele nützlichen
Funktionen wie die Einstellung der bevorzugten SIM für Anrufe, Nachrichten und
Datenverbindung entdecken. Besuchen Sie unsere Webseite www.ngm.eu um unsere
gesamte NGM Telefonkollektion und Zubehöre zu sehen, zum After-Sales Service
Zugang zu haben, Software Aktualisierungen herunterzuladen und um in das
technische Assistenz-Forum einzutreten.
Warnung: die Datenverbindung von NGM YouColor M500 ist bei der ersten
Einschaltung des Handys aktiv (und nach jeder Wiederherstellung der
Werkseinstellungen). Wenn Sie nicht über einen speziellen oder "flat" Tarif für die
Datenverbindung mit der SIM-Karte verfügen, können Sie den Datenverkehr
ausschalten und eine WiFi Verbindung einrichten um zusätzliche Kosten zu
vermeiden.
Page 22
22
DEUTSCH
Inbetriebnahme
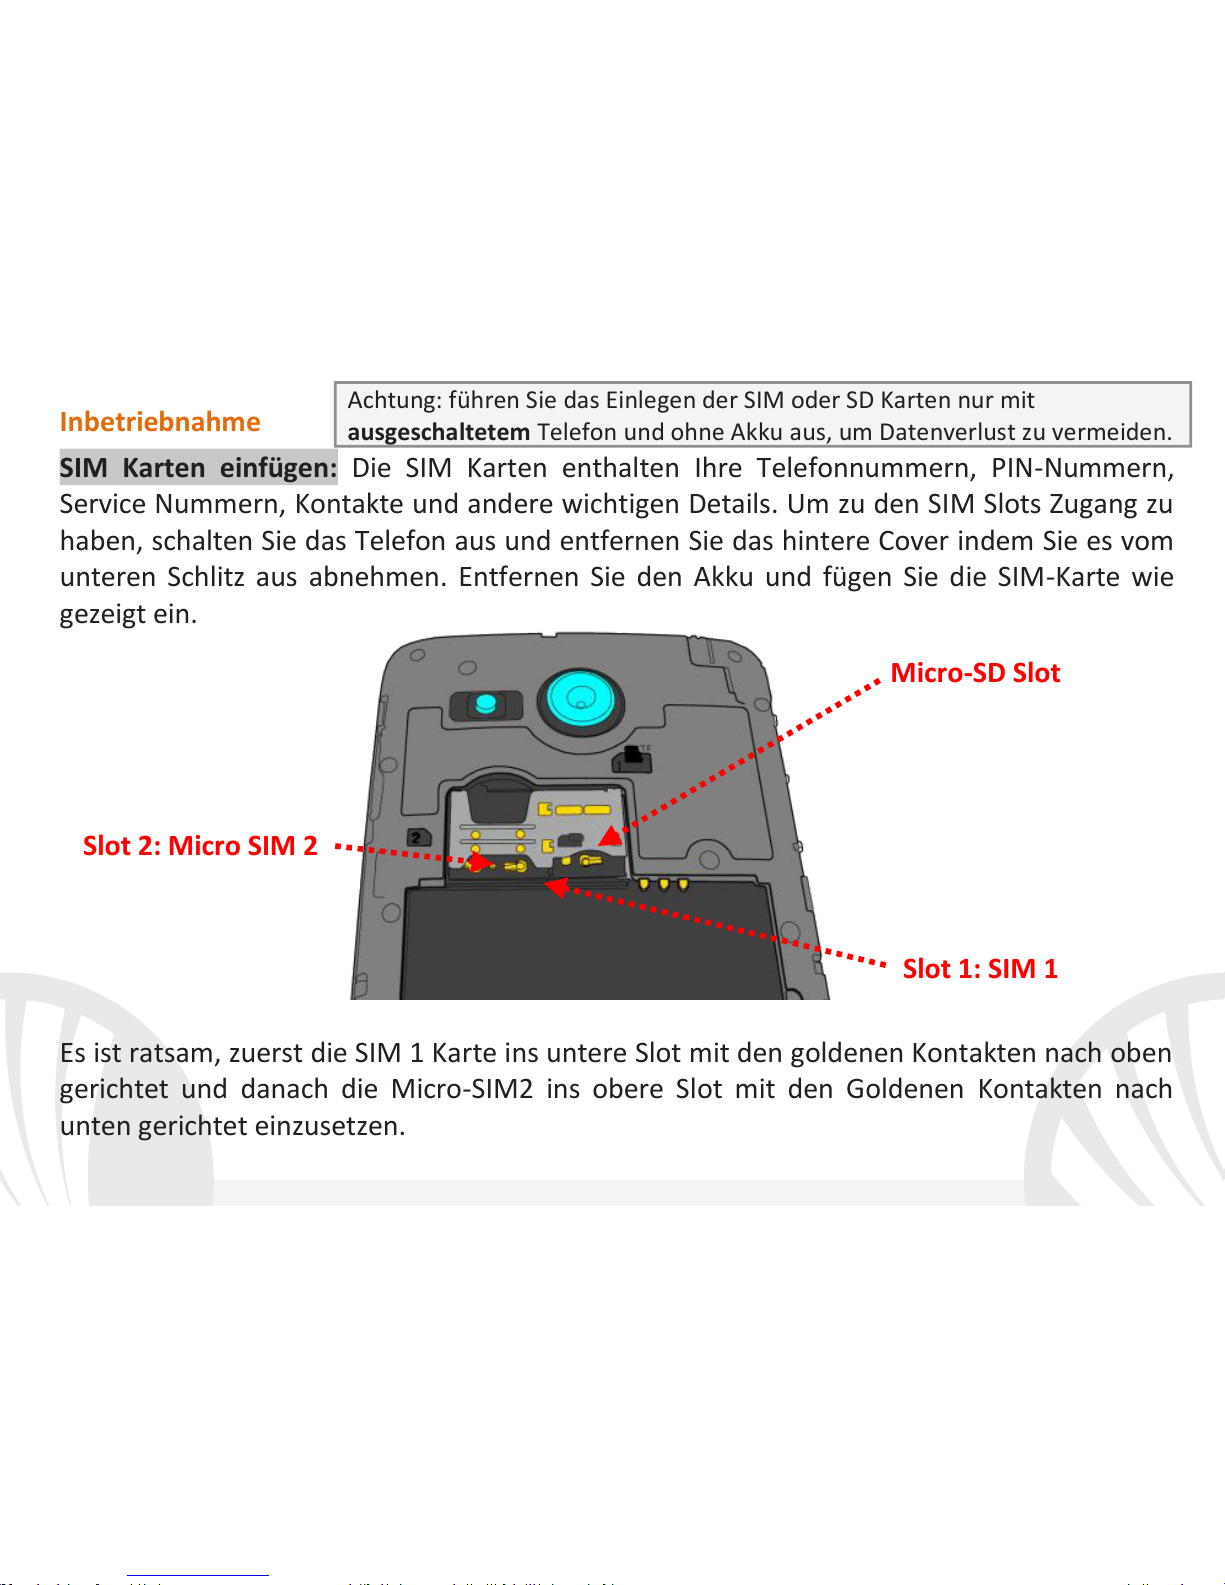
SIM Karten einfügen: Die SIM Karten enthalten Ihre Telefonnummern, PIN-Nummern,
Service Nummern, Kontakte und andere wichtigen Details. Um zu den SIM Slots Zugang zu
haben, schalten Sie das Telefon aus und entfernen Sie das hintere Cover indem Sie es vom
unteren Schlitz aus abnehmen. Entfernen Sie den Akku und fügen Sie die SIM-Karte wie
gezeigt ein.
Es ist ratsam, zuerst die SIM 1 Karte ins untere Slot mit den goldenen Kontakten nach oben
gerichtet und danach die Micro-SIM2 ins obere Slot mit den Goldenen Kontakten nach
unten gerichtet einzusetzen.
Achtung: führen Sie das Einlegen der SIM oder SD Karten nur mit
ausgeschaltetem Telefon und ohne Akku aus, um Datenverlust zu vermeiden.
Micro-SD Slot
Slot 1: SIM 1
Slot 2: Micro SIM 2
Page 23
23
DEUTSCH
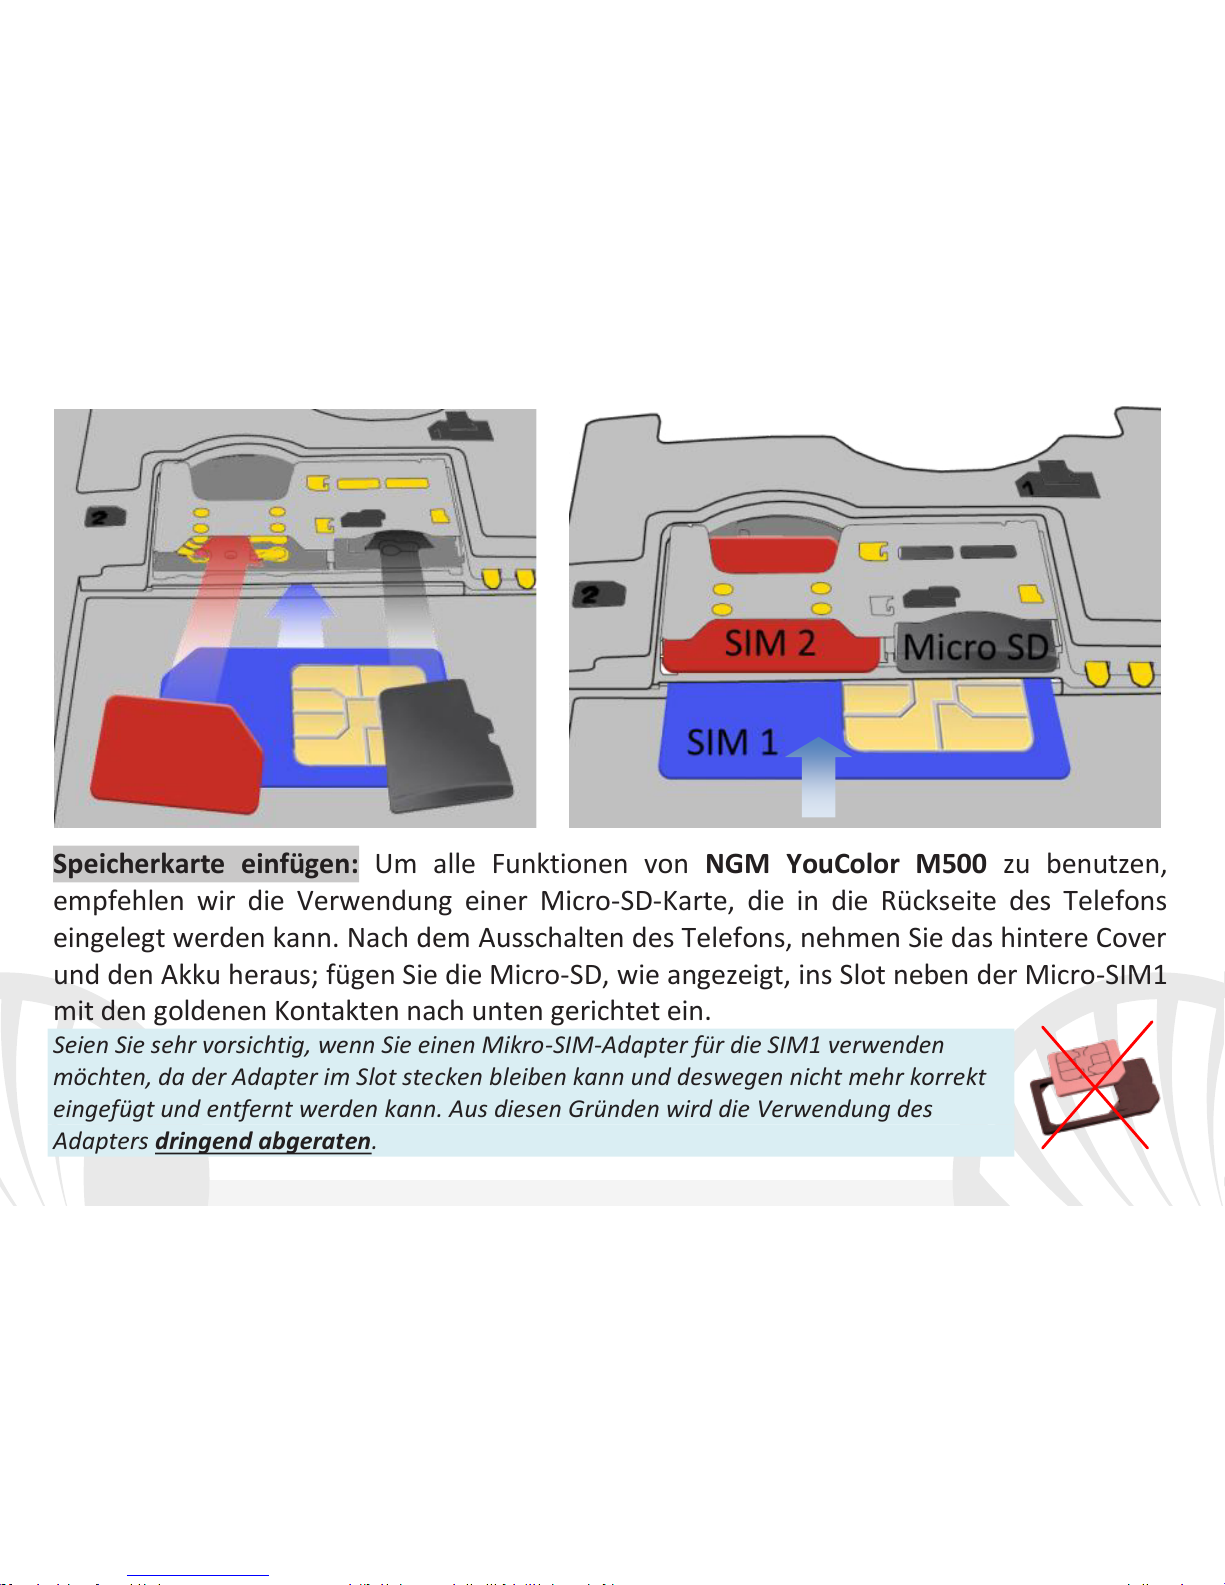
Speicherkarte einfügen: Um alle Funktionen von NGM YouColor M500 zu benutzen,
empfehlen wir die Verwendung einer Micro-SD-Karte, die in die Rückseite des Telefons
eingelegt werden kann. Nach dem Ausschalten des Telefons, nehmen Sie das hintere Cover
und den Akku heraus; fügen Sie die Micro-SD, wie angezeigt, ins Slot neben der Micro-SIM1
mit den goldenen Kontakten nach unten gerichtet ein.
Seien Sie sehr vorsichtig, wenn Sie einen Mikro-SIM-Adapter für die SIM1 verwenden
möchten, da der Adapter im Slot stecken bleiben kann und deswegen nicht mehr korrekt
eingefügt und entfernt werden kann. Aus diesen Gründen wird die Verwendung des
Adapters dringend abgeraten.
Page 24
24
DEUTSCH
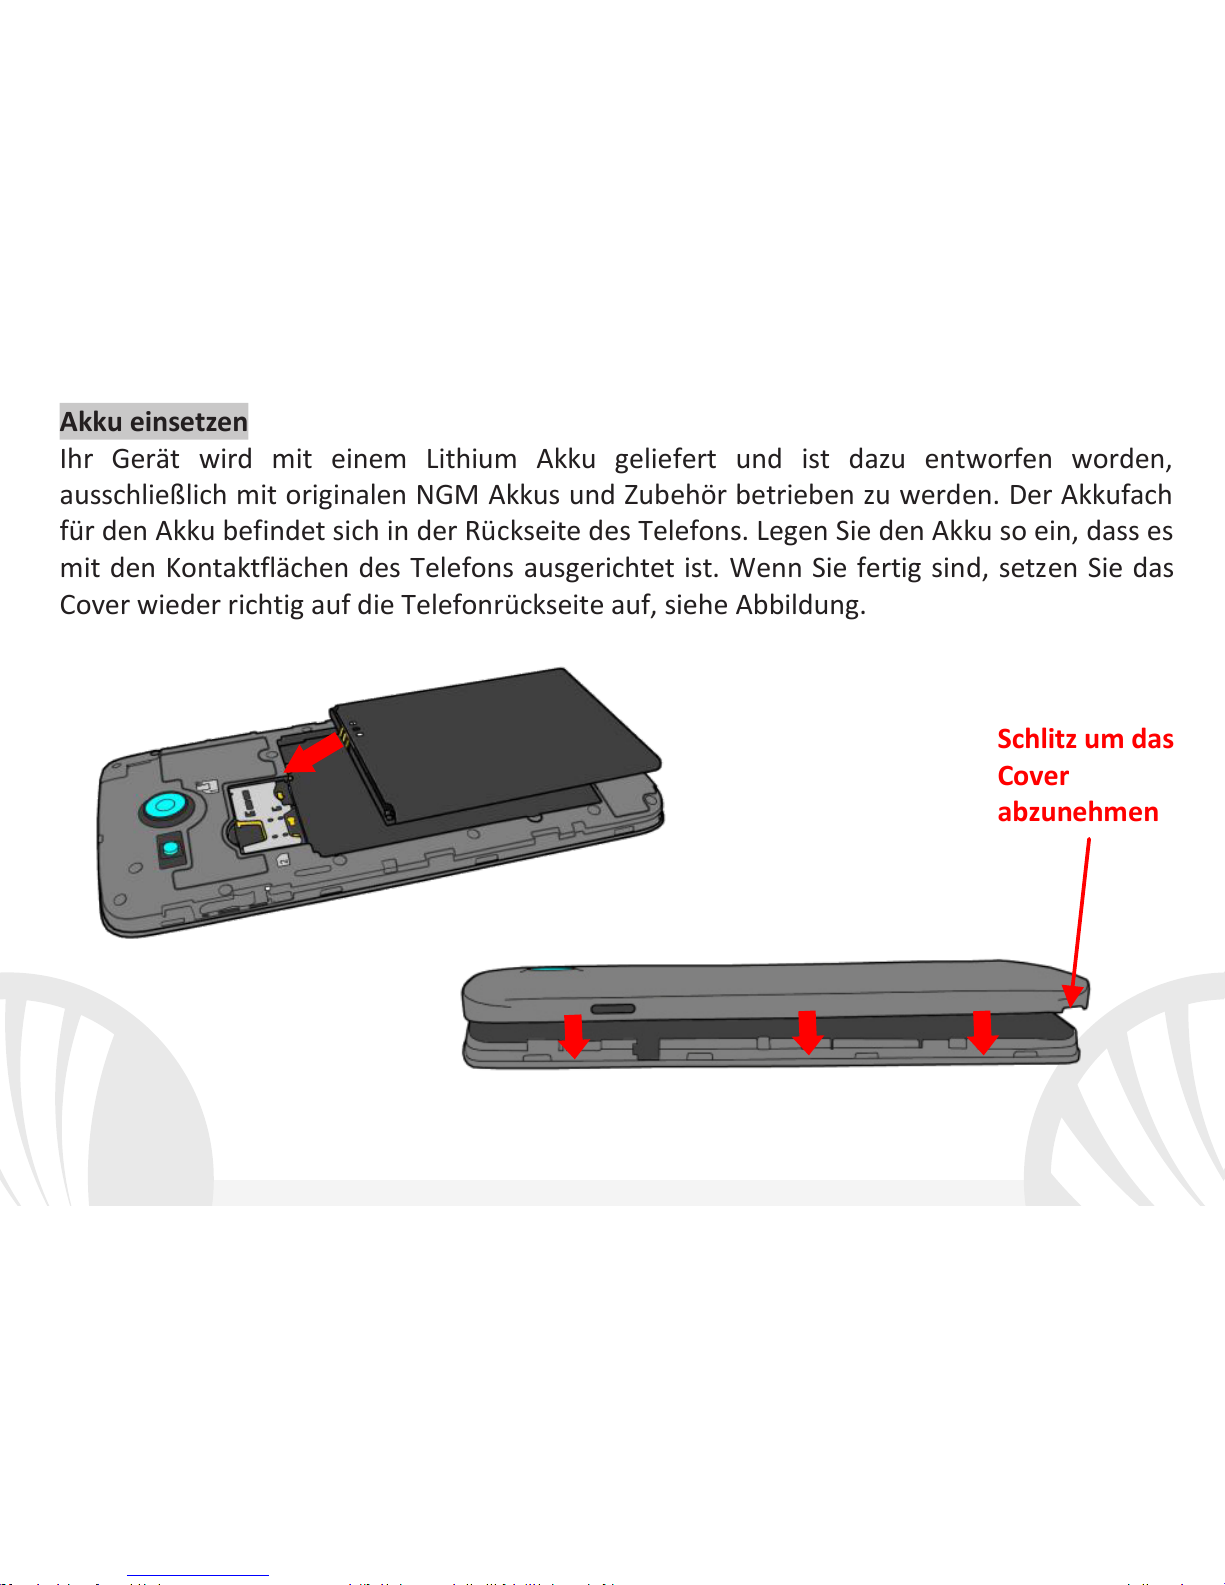
Akku einsetzen
Ihr Gerät wird mit einem Lithium Akku geliefert und ist dazu entworfen worden,
ausschließlich mit originalen NGM Akkus und Zubehör betrieben zu werden. Der Akkufach
für den Akku befindet sich in der Rückseite des Telefons. Legen Sie den Akku so ein, dass es
mit den Kontaktflächen des Telefons ausgerichtet ist. Wenn Sie fertig sind, setzen Sie das
Cover wieder richtig auf die Telefonrückseite auf, siehe Abbildung.
Schlitz um das
Cover
abzunehmen
Page 25

25
DEUTSCH
Akku aufladen
Laden Sie den Akku vollständig auf bevor Sie das Gerät benutzen. Verwenden Sie dazu das
mitgelieferte Ladegerät und die USB Buchse auf der oberen Seite des Telefons. Stecken Sie
das Ladegerät vorerst in die Steckdose, anschließend verbinden Sie das USB-Kabel zuerst
mit dem Ladegerät und dann mit dem Telefon. Der Akku kann auch an einem PC
aufgeladen werden, in diesem Fall wird aber der Ladevorgang langsamer sein. Wenn das
Telefon eingeschaltet ist, zeigt während der Ladung das Ladesymbol den Status des
Vorganges an. Sind alle Balken gefüllt, so ist der Akku geladen und das Telefon kann vom
Stromnetz getrennt werden.
Achtung: Verbinden Sie das Telefon nicht mit einem ein-oder ausschaltenden PC, um
Spannungssprünge zu vermeiden. Um die korrekte Funktion und die Produkt-Garantie zu
bewahren, verwenden Sie immer originale NGM Ladegeräte. Laden Sie das Gerät immer in
trockenen Innenräumen auf. Eine leichte Erwärmung des Gerätes während der Ladung ist
normal. Der Akku erreicht seinen vollen Leistungsumfang wenn es einige Male vollständig
aufgeladen wurde.
Ein- und ausschalten, Standby
Um das Telefon einzuschalten, drücken Sie einige Sekunden lang die Ein/Aus Taste. Um das
Gerät auszuschalten, halten Sie die Ein-Aus Taste nochmals verlängert gedrückt und
bestätigen Sie auf dem Touch Screen die Ausschaltung. Ein schneller Druck der Ein/Aus
Taste wird das Telefon in Standby stellen und den Bildschirm ausschalten; nochmaliger
leichter Druck wird das Standby aufheben (siehe unten).
Page 26
26
DEUTSCH
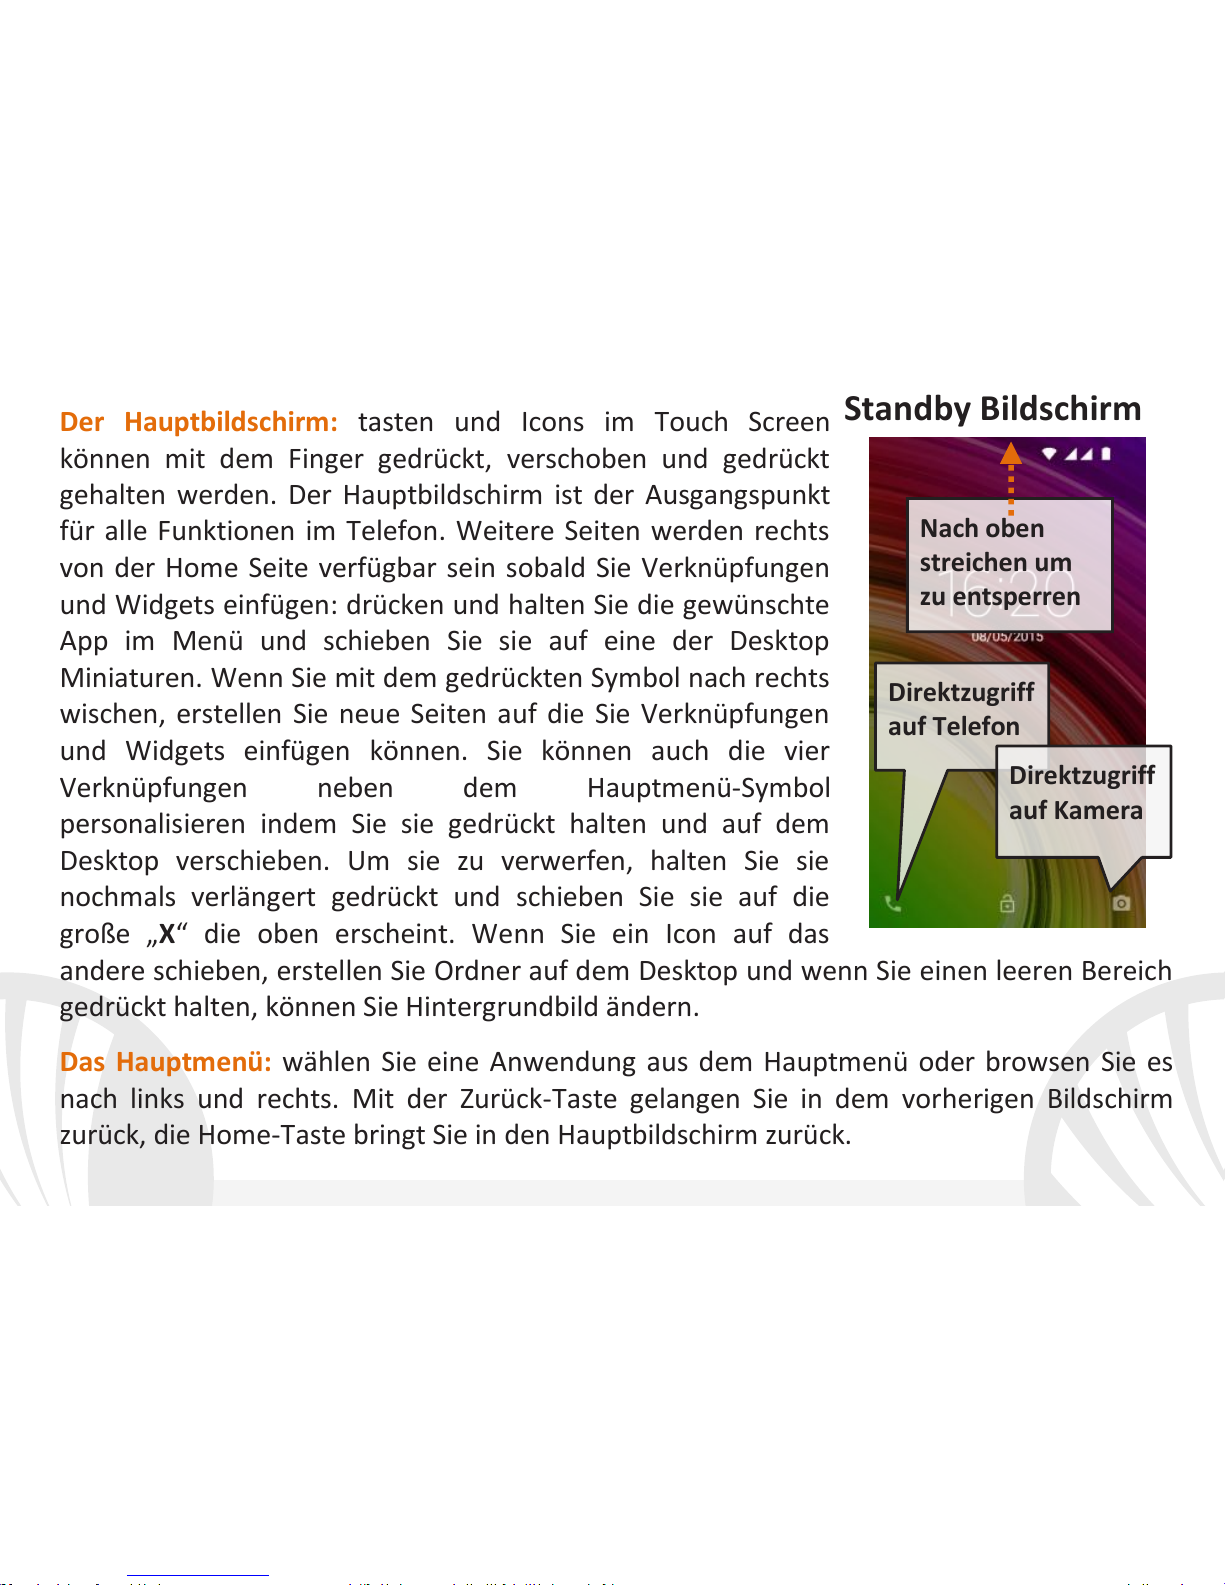
Der Hauptbildschirm: tasten und Icons im Touch Screen
können mit dem Finger gedrückt, verschoben und gedrückt
gehalten werden. Der Hauptbildschirm ist der Ausgangspunkt
für alle Funktionen im Telefon. Weitere Seiten werden rechts
von der Home Seite verfügbar sein sobald Sie Verknüpfungen
und Widgets einfügen: drücken und halten Sie die gewünschte
App im Menü und schieben Sie sie auf eine der Desktop
Miniaturen. Wenn Sie mit dem gedrückten Symbol nach rechts
wischen, erstellen Sie neue Seiten auf die Sie Verknüpfungen
und Widgets einfügen können. Sie können auch die vier
Verknüpfungen neben dem Hauptmenü-Symbol
personalisieren indem Sie sie gedrückt halten und auf dem
Desktop verschieben. Um sie zu verwerfen, halten Sie sie
nochmals verlängert gedrückt und schieben Sie sie auf die
große „X“ die oben erscheint. Wenn Sie ein Icon auf das
andere schieben, erstellen Sie Ordner auf dem Desktop und wenn Sie einen leeren Bereich
gedrückt halten, können Sie Hintergrundbild ändern.
Das Hauptmenü: wählen Sie eine Anwendung aus dem Hauptmenü oder browsen Sie es
nach links und rechts. Mit der Zurück-Taste gelangen Sie in dem vorherigen Bildschirm
zurück, die Home-Taste bringt Sie in den Hauptbildschirm zurück.
Standby Bildschirm
Direktzugriff
auf Telefon
Direktzugriff
auf Kamera
Nach oben
streichen um
zu entsperren
Page 27
27
DEUTSCH
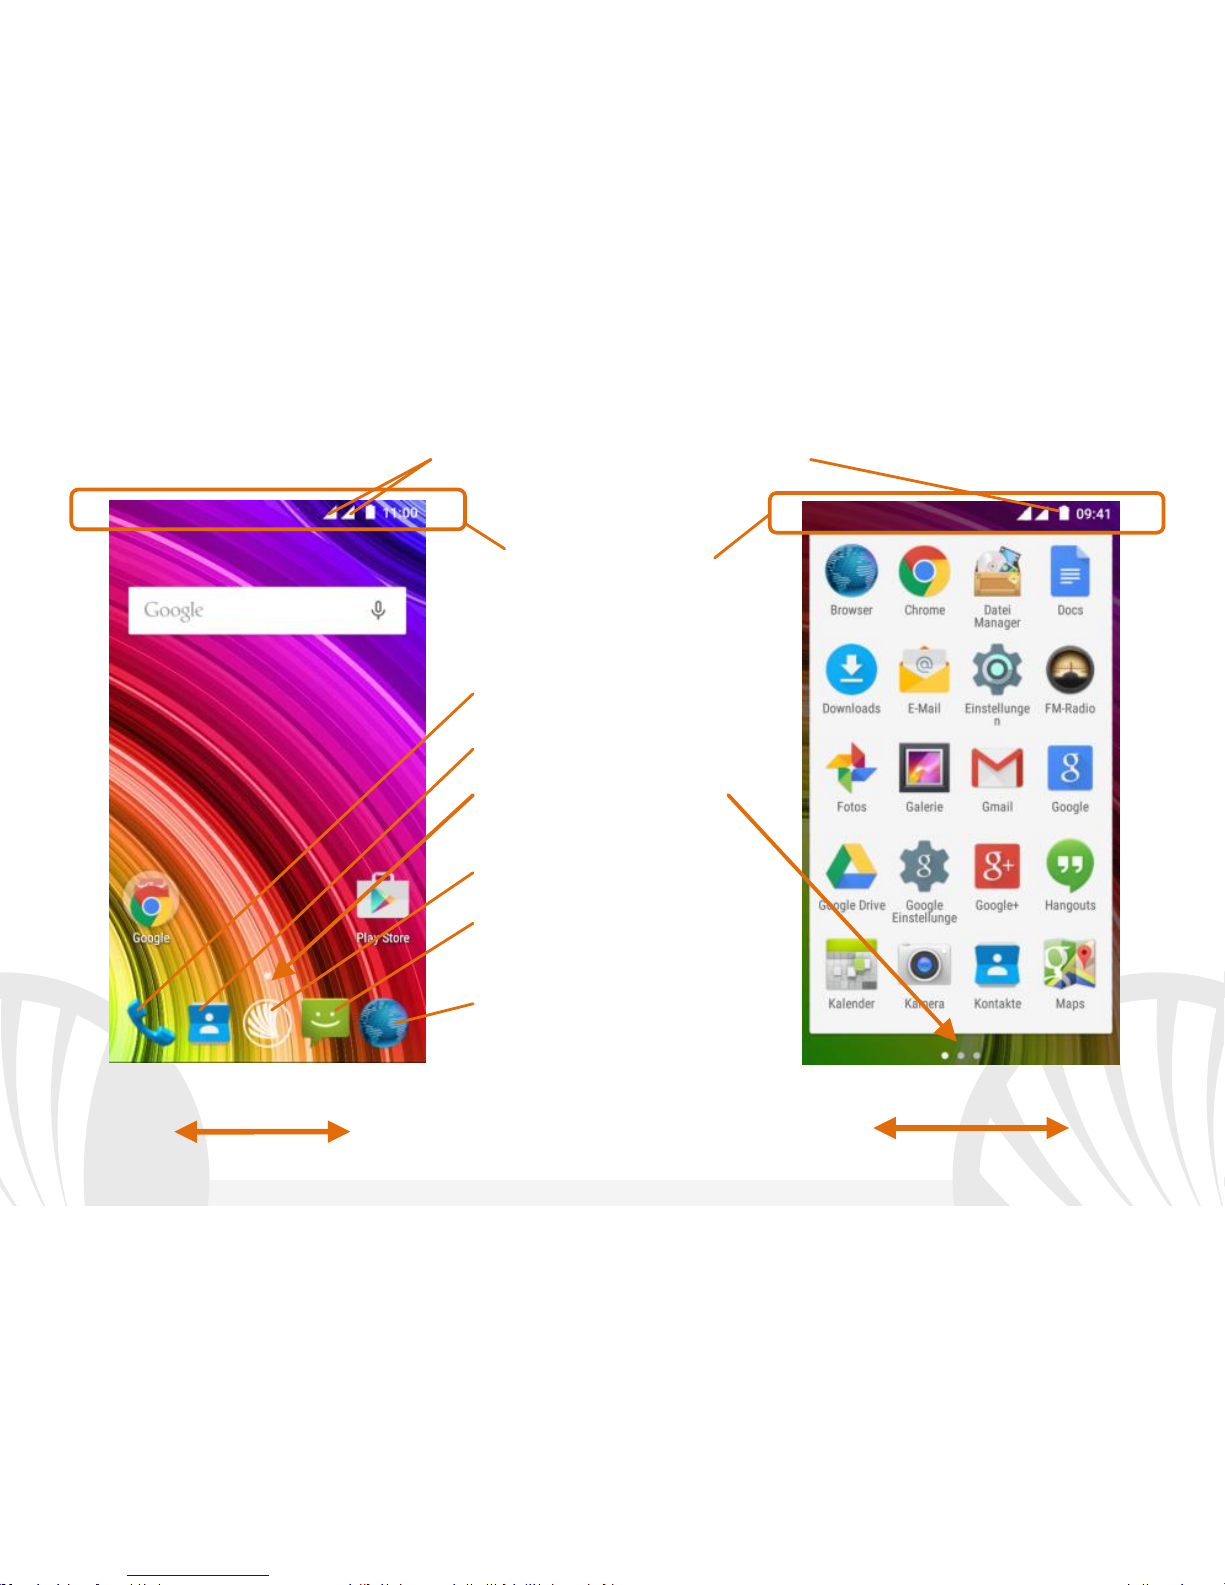
Hauptbildschirm
Hauptmenü
Hinweisbarre / Tafel
SIM Signalstärke und Akku Niveau
Bildschirmindikatoren
Telefon
Telefonbuch
Hauptmenü
Internet
Mitteilungen
HOME Bildschirme
Hauptmenü
Page 28
28
DEUTSCH
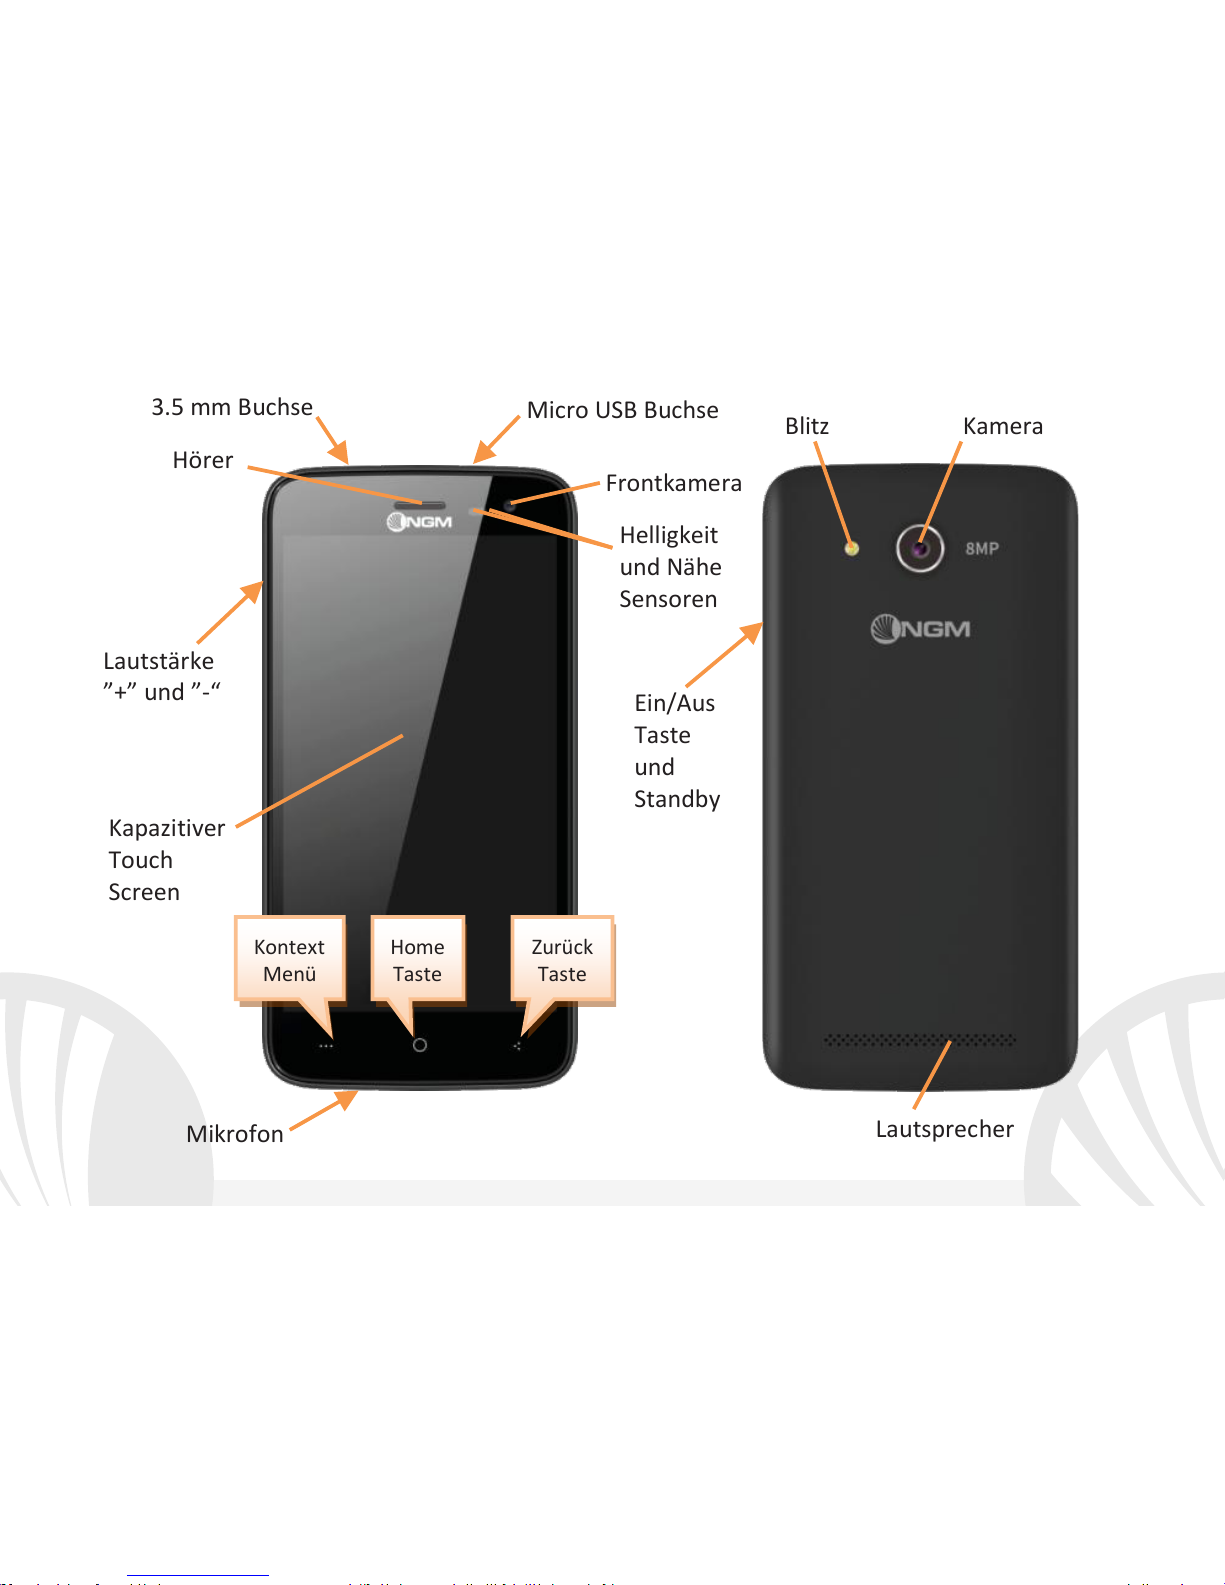
Ein/Aus
Taste
und
Standby
Kapazitiver
Touch
Screen
Blitz
Kamera
Micro USB Buchse
3.5 mm Buchse
Frontkamera
Hörer
Helligkeit
und Nähe
Sensoren
Lautsprecher
Lautstärke
”+” und ”-“
Mikrofon
Kontext
Menü
Zurück
Taste
Home
Taste
Page 29
29
DEUTSCH
Abkürzungen
Hinweistafel: um die Hinweistafel zu öffnen, berühren Sie die obere Seite des Bildschirmes
und ziehen Sie sie nach unten. Wenn Sie die mit dem Finger nach unten scrollen,
erscheinen zuerst die Benachrichtigungen und wenn Sie nochmal nach unten streichen,
öffnen Sie die Quick-Setup Tasten. Mit löschen Sie die Hinweise aus der Hinweistafel.
Wenn nicht mehr nötig, schieben Sie sie wieder nach oben oder drücken Sie die Zurück
Taste. Die Benachrichtigungen werden auch im Entsperrungsbildschirm angezeigt.
Kürzlich verwendete Anwendungen: Aus jedem Bildschirm können Sie die Taste
gedrückt halten um eine Liste der zuletzt verwendeten, direkt auswählbaren Anwendungen
anzuzeigen.
Displaysperre und Vibration: aus dem Hauptmenü wählen Sie Einstellungen > Sicherheit >
Bildschirmsperre. Wählen Sie den gewünschten Entsperrungs-Modus aus (Keine, Slide,
Entsperren mit Stimme, Sequenz, PIN oder Kennwort) und bestätigen Sie. Eine schnelle
Aktivierung der Display-Sperre wird durch den schnellen Druck der Ein/Aus Taste auf der
Telefonseite erhalten. Um den Bildschirm wieder zu aktivieren, folgen Sie den Anleitungen.
Kontext Menü: viele Anwendungen haben ein Kontextmenü . Wenn Sie diese Taste
drücken, öffnen Sie das Kontextmenü das sich auf die aktuell verwendete Anwendung und
deren Funktionen bezieht.
Page 30

30
DEUTSCH
Doppelte SIM Verwaltung
Aus dem Hauptmenü wählen Sie Einstellungen > SIM-Verwaltung. Um in jedem Moment
beliebig die SIM Karten zu aktivieren oder zu deaktivieren, wählen Sie die Ein/Aus Schalter
neben der gewünschten SIM Karte aus. Aus diesem Menü aus können auch die Farbe und
den Namen für jede SIM entscheiden, eine der beiden als Standard für Anrufe, Nachrichten
und Datenverbindung einstellen oder "immer fragen" wenn Sie keine Standard SIM
einstellen möchten.
Sie können die Datenverbindung beliebig auf einer der beiden Slots aktivieren, das 3G
Service wird automatisch auf die ausgewählte SIM verschoben. So können Sie einfach die
Datenverbindung (die normalerweise nur auf Slot SIM1 verfügbar ist) umschalten ohne
physisch die SIM Karten austauschen zu müssen.
Smart Gestures
In Einstellungen > Smart Gestures könne Sie diese innovativen NGM Funktionen aktivieren
um die wichtigsten Telefon-Funktionen gemütlich und schnell zu verwalten.
Gastmodus
Werden alle Nachrichten, Anrufprotokolle, Fotos und Video-
Galerien vorläufig
ausgeblendet und jegliche Änderung auf dem Desktop wird unmöglich sein. Wenn der
Gastmodus aktiv ist, wird auf der Hinweisleiste ein Symbol erscheinen. In Einstellungen >
Sicherheit, können Sie ein Kennwort einrichten mit dem Sie diesen Modus verwalten
können.
Page 31
31
DEUTSCH
Schnelle Aktivierung der Vibration
Deaktivieren Sie schnell den Klingelton für eingehende Anrufe und Nachrichten, indem Sie
die Lautstärke "-" Taste drücken. Sobald das Minimum erreicht wird, wird das Telefon auf
Vibration gestellt. Auf die gleiche Weise können Sie auch die Benachrichtigungen verwalten
(siehe Abschnitt der Benachrichtigungen).
ANRUFE VERWALTEN
Aus dem Hauptbildschirm wählen Sie das Telefon-Icon und geben Sie die gewünschte
Nummer mit der virtuellen Tastatur ein (öffnen Sie sie mit der Taste).
Drücken Sie auf das Telefon Symbol und dann auf die gewünschte SIM.
Um einen Anruf zu beenden, drücken Sie auf das rote Ende-Icon.
Um einen Anruf anzunehmen, wählen Sie die Antworten-Taste auf dem Bildschirm-
Popup das auf dem oberen Rand des Bildschirms erscheint oder tippen Sie auf dem
Popup um die Anruf-Anwendung anzuzeigen. Schieben Sie das mittlere Telefon-Symbol
nach rechts auf das blaue Telefon um zu antworten; um den Anruf abzulehnen schieben
Sie das Telefon-Symbol nach links auf das rote Telefon; um mit einer SMS Nachricht
abzulehnen schieben Sie das Telefon-Symbol nach oben. Um einen eingehenden Anruf
stumm zu stellen, drücken Sie kurz auf eine der Lautstärke-Tasten (auf der linken
Telefonseite).
Page 32
32
DEUTSCH
Eine Nummer aus den Anrufprotokollen zurückrufen
Öffnen Sie das Telefon-Menü und wählen Sie Telefon Anrufprotokolle aus dem
Kontextmenü aus (zuerst müssen Sie die virtuelle Tastatur verstecken); Sie werden alle
verpassten, angenommenen und ausgehenden Anrufe finden.
Wählen Sie die gewünschte Nummer und die SIM mit der Sie anrufen möchten falls Sie
keine Standard SIM für Anrufe eingestellt haben und wählen Sie Rückruf.
KONTAKTE VERWALTEN
Einen neuen Kontakt hinzufügen
Im Hauptmenü wählen Sie Kontakte.
Drücken Sie auf das Symbol unten.
Wählen Sie den Speicherort aus (Konto, Telefon, SIM1 oder SIM2).
Geben Sie Namen, Nummer und andere Details ein (nur wenn Sie auf Telefon speichern)
und bestätigen Sie.
Einen neuen Kontakt aus den Anrufprotokollen hinzufügen
Aus dem Telefonmenü, öffnen Sie die Anrufprotokolle (im Kontextmenü)
Klicken Sie auf das leere Kontaktbild und wählen Sie dann das Symbol oben rechts
Wählen Sie Neuen Kontakt erstellen auf der oberen Leiste aus oder fügen Sie die
Nummer zu einem in der Liste ausgewählten Bestehenden Kontakt hinzu. Nachdem Sie
Namen und eventuelle andere Infos hinzugefügt haben (wenn Sie auf Telefon speichern),
bestätigen Sie mit Speichern.
Hinweis: Im Kontextuellen Menü des Telefonbuchs haben Sie Zugang zu
Importieren/Exportieren und zu weiteren nützlichen Funktionen.
Page 33
33
DEUTSCH
Klingeltöne einstellen
Wählen Sie Einstellungen > Klingeltöne und Benachrichtigungen > Allgemein.
Wählen Sie Sprachanruf Klingelton > SIM1 oder SIM2 und wählen Sie den gewünschten
Klingelton für jede SIM aus. Für benutzerdefinierte Klingeltöne: in Musik wählen Sie das
gewünschte Stück mit einem langen Tastendruck aus und wählen Sie Klingelton im
Kontextmenü. Das Musikstück wird danach unter den Klingeltönen verfügbar sein.
Benachrichtigungen unterbrechen und verwalten: Android
TM
5.0, Lollipop hat neue Funktionen
eingeführt. In Einstellungen > Töne und Benachrichtigungen > Unterbrechungen können Sie
festlegen, an welchen Tagen und Uhrzeiten Sie keine Benachrichtigungen erhalten möchten:
Nicht unterbrechen: Alle Benachrichtigungen werden empfangen
Nur prioritäre Unterbrechungen erlauben: es werden nur Benachrichtigungen mit Priorität
erlaubt, die Kriterien werden im nächsten Menü ausgewählt (Ereignisse und Erinnerungen,
Anrufe oder Nachrichten). (Warnungen werden immer als Prioritätsunterbrechungen
bewertet)
Immer Unterbrechen: an den angegebenen Tagen und Uhrzeiten werden nie
Benachrichtigungen angezeigt, auch die Prioritären nicht.
Sobald Sie die prioritären Benachrichtigungen festlegen, die Sie trotzdem erhalten möchten,
können sie einen Zeitrahmen festlegen in dem Sie alle anderen nicht prioritären
Benachrichtigungen unterbrechen möchten. Sobald die Unterbrechung aktiviert wird, wird ein
weißer Stern auf der Hinweisbarre angezeigt. In Einstellungen > Töne und Benachrichtigungen >
Benachrichtigungen können Sie die Benachrichtigungen von spezifischen Anwendungen selektiv
deaktivieren, in App Benachrichtigung.
Hinweis: Klingeltöne in den Formaten *mid,*wav,*ogg und *Mp3.
Page 34
34
DEUTSCH
SMS und MMS lesen und schreiben
SMS und MMS lesen: wenn Sie ein neues SMS oder MMS empfangen, wird ein Icon in der
Hinweistafel erscheinen. Mit einem Klick auf das Symbol können Sie direkt das Gespräch
öffnen und die eingehende Nachricht lesen. Sie könne die eingehenden Nachrichten auch
aus der Nachrichten Anwendung im Hauptmenü sehen.
SMS und MMS versenden: aus Home oder aus dem Hauptmenü wählen Sie Nachrichten
und dann das + Icon unten. Geben Sie die ersten Buchstaben eines Namens ins
Empfängerfeld ein und wählen Sie aus der Popup-Liste direkt die Nummer des Empfängers
aus, oder wählen Sie das Symbol und markieren Sie den/die Empfänger. Geben Sie den
Text in das dedizierte Feld mit der virtuellen Tastatur ein. Wählen Sie das "+" Icon um
eventuelle Multimedia-Dateien einzufügen (die Nachricht wird automatisch in MMS
verwandelt) und wählen Sie und die gewünschte SIM.
KONNEKTIVITÄT: zur besseren Nutzung des Telefon-Potenzials und des Betriebssystems,
müssen Sie über einer aktiven Datenverbindung verfügen; die Datenverbindung von NGM
YouColor M500 ist zum Zeitpunkt der ersten Einschaltung auf dem Handy aktiv. Falls Ihr
Telefonvertrag keine Datenverbindung vorsieht, könnten zusätzliche Kosten auftreten; es
ist daher ratsam eine WiFi Internetverbindung zu konfigurieren. Um den Datenverkehr auf
einer der SIM-Karten zu aktivieren, wählen Sie Einstellungen > SIM Verwaltung >
Datenverbindung, oder aktivieren Sie es über die Abkürzung in der Hinweistafel.
Page 35
35
DEUTSCH
Internetverbindung mit Wi-Fi®: Sie können sich ans WLAN Netz mit der Wi-Fi Funktion
verbinden. Um sie zu aktivieren, wählen Sie im Hauptmenü Einstellungen > WiFi I/O.
Folgen Sie immer allen Hinweisen und Warnungen wenn Sie sich in solchen Bereichen
befinden, in denen der Gebrauch von Wireless Geräten verboten ist, sowie zum Beispiel auf
Flugzeugen oder in Krankenhäusern usw. Stellen Sie das WiFi in diesen Bereichen aus.
Verbindung zu einem Bluetooth®-Gerät: schalten Sie das Bluetooth-Gerät ein, das Sie
anschließen möchten. Folgen Sie eventuell die Anleitungen des Gerätes.
Aus dem Hauptmenü wählen Sie Einstellungen > Bluetooth ein/aus um Bluetooth
einzuschalten. Im Kontextmenü finden Sie zusätzliche Funktionen und Einstellungen.
Wählen Sie dann Nach Geräten Suchen um die Suche nach neuen Bluetooth Geräten zu
starten.
Wählen Sie das gewünschte Gerät aus und wählen Sie „Koppeln“. Das Telefon wird
versuchen, sich zu verbinden, eventuell wird ein Kopplungscode verlangt.
Internet verbinden: Aus dem Hauptmenü, wählen Sie Browser. Wählen Sie die URL in die
Adressenbarre ein um die Navigation zu beginnen. Wenn Sie mit dem Telefondaten-
Netzwerk navigieren, informieren Sie sich über die Kosten bei Ihrem Netzbetreiber oder
wählen Sie eine so genannte "flat" Daten-Tarife. Ansonsten können Sie sich auch mit WiFi
ans Internet verbinden (siehe „Konnektivität“).
Gmail Konto Konfiguration: um besser die Funktionen des AndroidTM Systems
auszunutzen, müssen Sie ein Gmail Konto konfigurieren oder einen bereits bestehenden
einfügen. Dies ermöglicht Ihnen den Zugriff auf alle AndroidTM Systemanwendungen.
Page 36

36
DEUTSCH
E-Mail: wenn Sie einen Standard Konto konfigurieren, können Sie leicht Ihre E-Mails
verwalten und automatisch auf Ihrem Telefon ansehen. Falls Sie einen verschiedenen
Provider verwenden möchten als das Standard Konto, können Sie ein zusätzliches Konto in
der E-Mail Anwendung im Hauptmenü konfigurieren.
Synchronisierung: die Synchronisierung ist die einfachste Art, die eigenen nützlichen
Dateien zu verwalten weil sie eine Datensicherung auf Ihrem Internet-Konto vollbringt.
Falls Sie das Telefon verlieren sollten, es beschädigt wird oder falls Sie es wechseln, werden
Sie diese Dateien nicht verlieren weil sie direkt aus dem Internet-Konto abgerufen werden
können. Die Synchronisation kann für jede installierte synchronisierbare Anwendung
aktiviert werden; Sie finden die Liste dieser Anwendungen in Einstellungen > Konto [Liste
der installieren Apps]. Um ein neues Konto hinzuzufügen, wählen Sie Konto hinzufügen.
Eine aktive Datenverbindung wird verwendet, die extra Gebühren haben könnte. Es ist
daher ratsam, eine WiFi Verbindung zu benutzen.
GPS Geolokalisierung: Das Global Positioning System (GPS) ist ein weltweit verbreitetes,
kontinuierliches Lokalisierungssystem. Um auf das GPS zuzugreifen, wählen Sie
Einstellungen > Standort I/O. Wenn die GPS Funktion eingeschaltet ist, fängt das Telefon
an, Daten von den Satelliten einzusammeln um die aktuelle Position zu bestimmen. Die FixZeiten können von verschiedenen Faktoren beeinflusst werden (z.B. Bewölkung, hohe
Gebäude im Umkreis). Um Ressourcen zu sparen (Akku und Speicher), ist es ratsam, diese
Funktion auszuschalten wenn sie nicht nötig ist.
Page 37
37
DEUTSCH
Hinweis: die Formatierung und Ausgabe dieser Anleitung ist vom AndroidTM
Betriebssystemen abhängig; der Hersteller übernimmt keine Verantwortung für die Nicht-
Einhaltung der angegebenen Richtlinien oder den nicht ordnungsgemäßen Gebrauch des
Mobiltelefons. NGM behält sich das Recht vor, Änderungen am Inhalt dieser
Bedienungsanleitung auch ohne öffentliche Bekanntgabe vorzunehmen. Der Inhalt dieser
Anleitung kann vom tatsächlichen, im Mobiltelefon angezeigten, Inhalt abweichen. In
diesem Fall gilt das, was im Mobiltelefon angezeigt ist.
Copyright © 2015 NGM Italia
Kein Teil dieser Anleitung darf reproduziert, verbreitet, übersetzt oder übermittelt werden, in
keinerlei Form und mit keinerlei elektronischen oder mechanischen Mitteln oder durch
Fotokopierung, Aufnahme oder Speicherung in Informations-
Archiven oder
Wiederherstellungssystemen ohne vorherige schriftliche Genehmigung von NGM Italia erhalten zu
haben.
Bluetooth® ist ein kommerzieller Brand, in der ganzen Welt registriert von Bluetooth SIG, Inc.
Wi-Fi® und das Wi-Fi Logo sind von Wi-Fi Alliance registrierte kommerzielle Brands.
Page 38
38
ENGLISH
Welcome to the NGM AndroidTM world. Thank you for purchasing NGM YouColor
M500. With this device you can have access to the many features of the new
Android
TM
5.0, Lollipop OS to manage your contacts, email, social networks and to
discover the opportunities of Internet with just a single touch! Discover the full
potential of your new "smart" phone. Compared to the usual mono SIM
Smartphones, NGM YouColor M500 offers the convenience of Dual SIM that has
always characterized the entire range of NGM phones, i.e. the ability to handle two
SIM cards and consequently two telephone numbers at the same time. You will
discover other useful features such as setting the preferred SIM for calls, messages
and data connection. By visiting the official website www.ngm.eu you can browse
through the whole range of NGM mobile phones, ask for after sales assistance, access
the forum for technical assistance and download software updates.
Warning: Data Connection of NGM YouColor M500 is active as soon as you first turn
on the phone (and also after every factory data reset). If you do not have a special
or "flat" rate for data connection with your SIM card, you are recommended to turn
off data traffic and set up a Wi-Fi connection, in order to avoid additional costs.
Page 39
39
ENGLISH
Set up
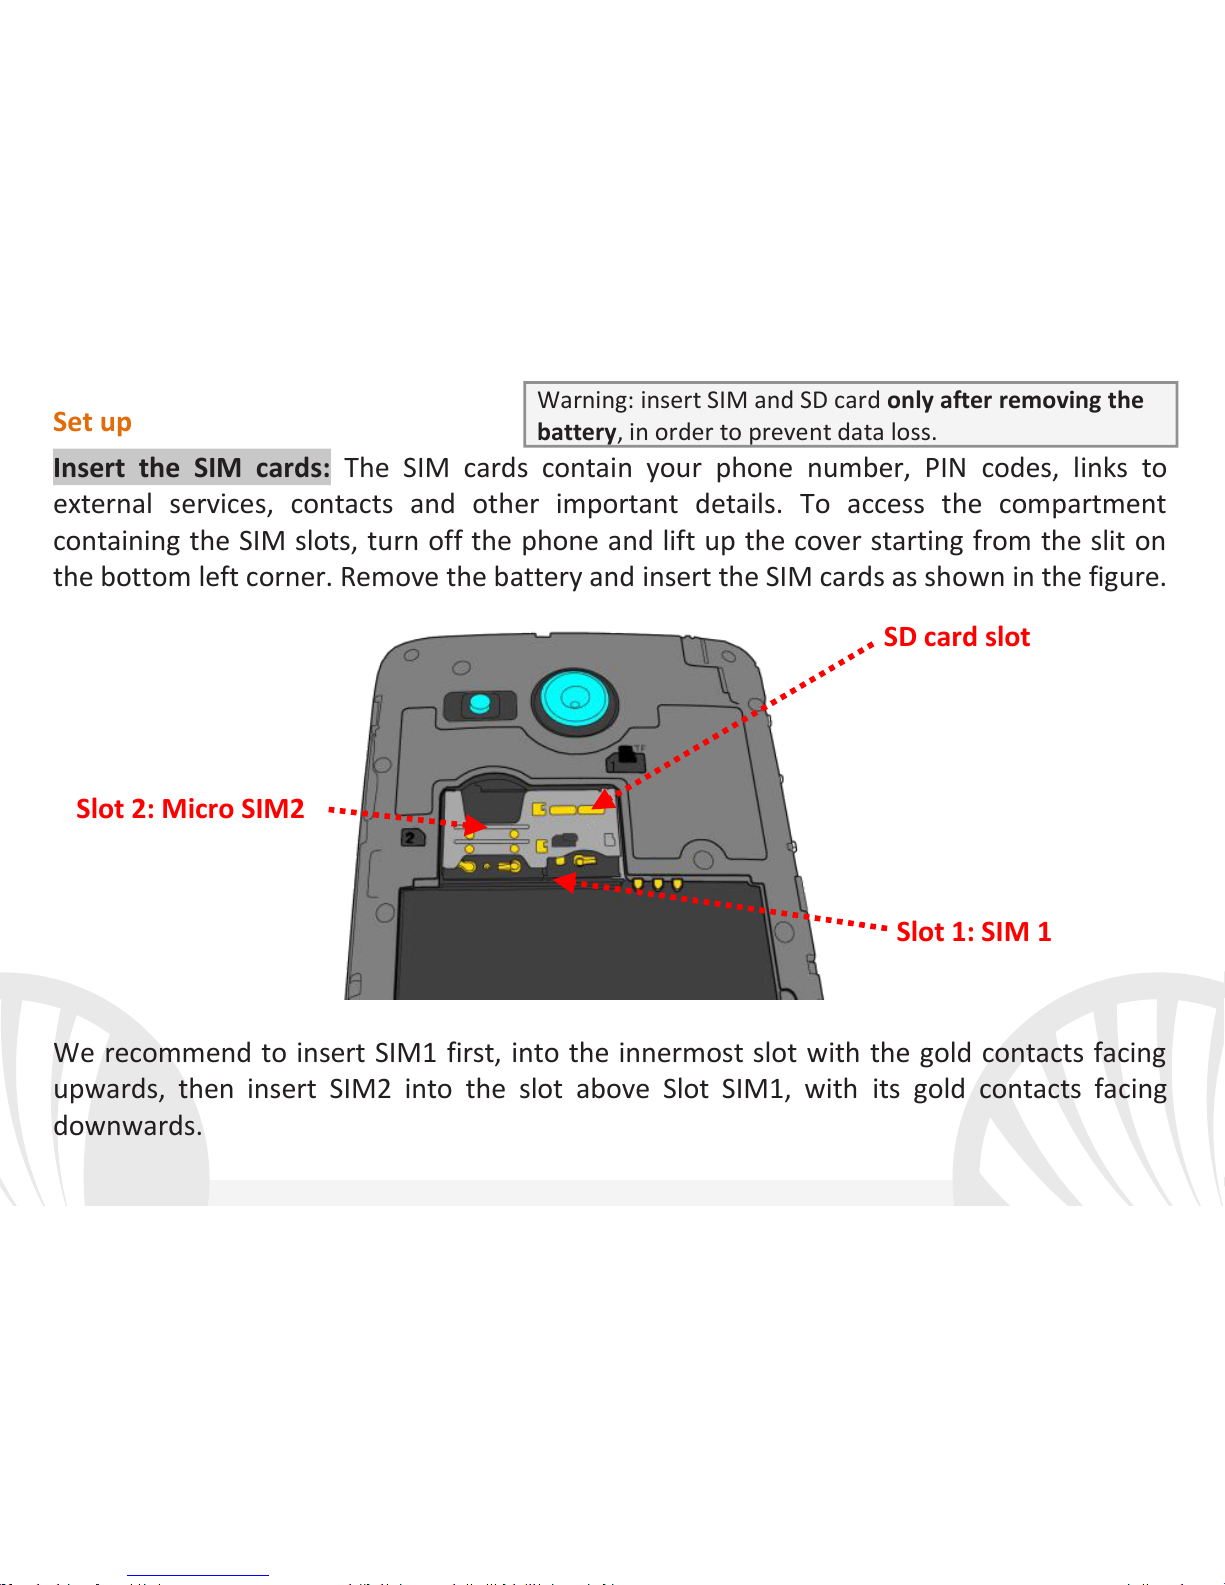
Insert the SIM cards: The SIM cards contain your phone number, PIN codes, links to
external services, contacts and other important details. To access the compartment
containing the SIM slots, turn off the phone and lift up the cover starting from the slit on
the bottom left corner. Remove the battery and insert the SIM cards as shown in the figure.
We recommend to insert SIM1 first, into the innermost slot with the gold contacts facing
upwards, then insert SIM2 into the slot above Slot SIM1, with its gold contacts facing
downwards.
Warning: insert SIM and SD card only after removing the
battery, in order to prevent data loss.
SD card slot
Slot 1: SIM 1
Slot 2: Micro SIM2
Page 40
40
ENGLISH
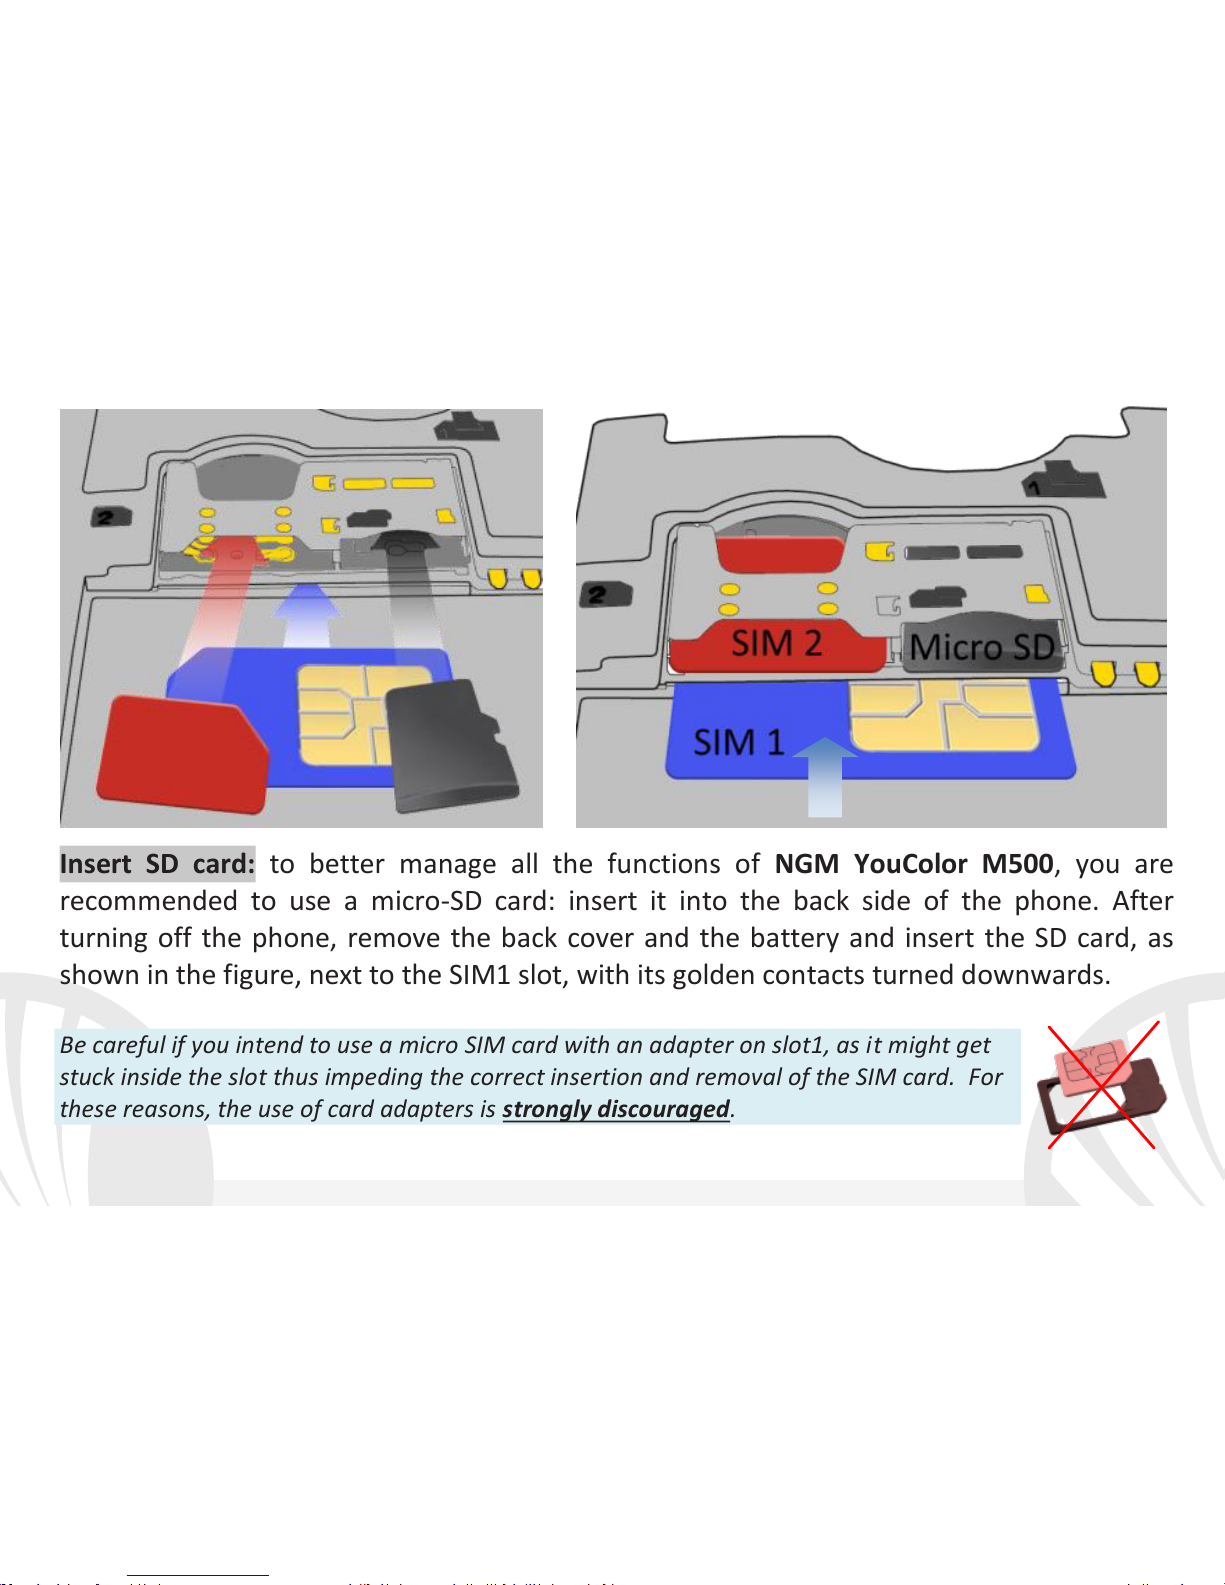
Insert SD card: to better manage all the functions of NGM YouColor M500, you are
recommended to use a micro-SD card: insert it into the back side of the phone. After
turning off the phone, remove the back cover and the battery and insert the SD card, as
shown in the figure, next to the SIM1 slot, with its golden contacts turned downwards.
Be careful if you intend to use a micro SIM card with an adapter on slot1, as it might get
stuck inside the slot thus impeding the correct insertion and removal of the SIM card. For
these reasons, the use of card adapters is strongly discouraged.
Page 41
41
ENGLISH
Inserting the battery
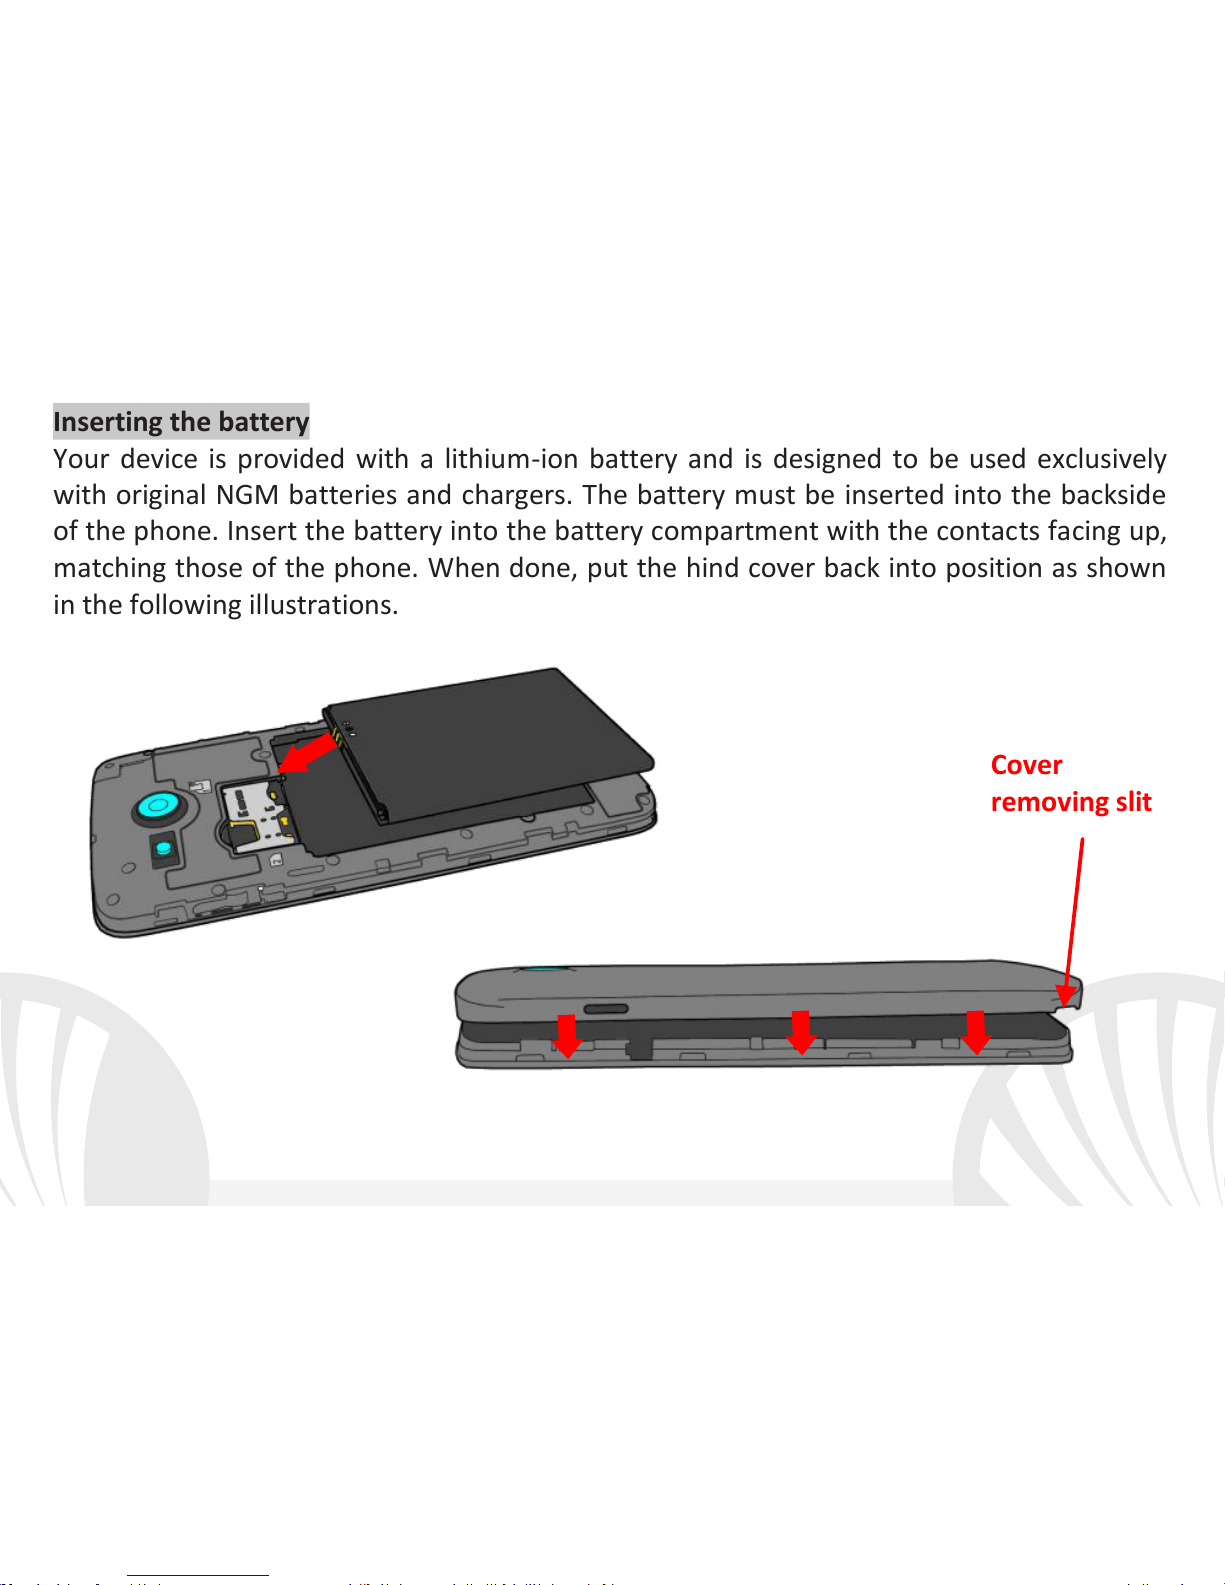
Your device is provided with a lithium-ion battery and is designed to be used exclusively
with original NGM batteries and chargers. The battery must be inserted into the backside
of the phone. Insert the battery into the battery compartment with the contacts facing up,
matching those of the phone. When done, put the hind cover back into position as shown
in the following illustrations.
Cover
removing slit
Page 42

42
ENGLISH
Charge the battery
Charge the battery before starting to use the device. Use the supplied USB cable and the
USB connector on the top side of the phone. Connect the charger to the provided wall
socket adapter, and then the device to the USB cable. You can also charge the phone by
connecting it with the PC USB port, but in this case charging will take longer. When the
battery is charging, an animated icon on the screen will show the charging progress if the
phone is on. Once the battery icon is filled, it is fully charged and the phone can be
disconnected from the grid.
Warning: Do not connect the phone to a booting-up or running down PC to avoid voltage
jumps. To preserve the functionality of the product and the integrity of the warranty, we
recommend the use of original NGM chargers. Please charge the battery indoors, in a dry
and favorable environment. It’s normal for the battery to get slightly warm during the
charging process. The battery will reach its full capacity when cycled several times.
Power on, power off and standby
To turn on the phone, press and hold the power on/off key To turn off your device, press
and hold the same key and confirm by selecting "Shutdown". A quick pressure sets the
phone in stand-by mode (screen off) or allows you to go back to the lock screen (see
below).
Page 43
43
ENGLISH
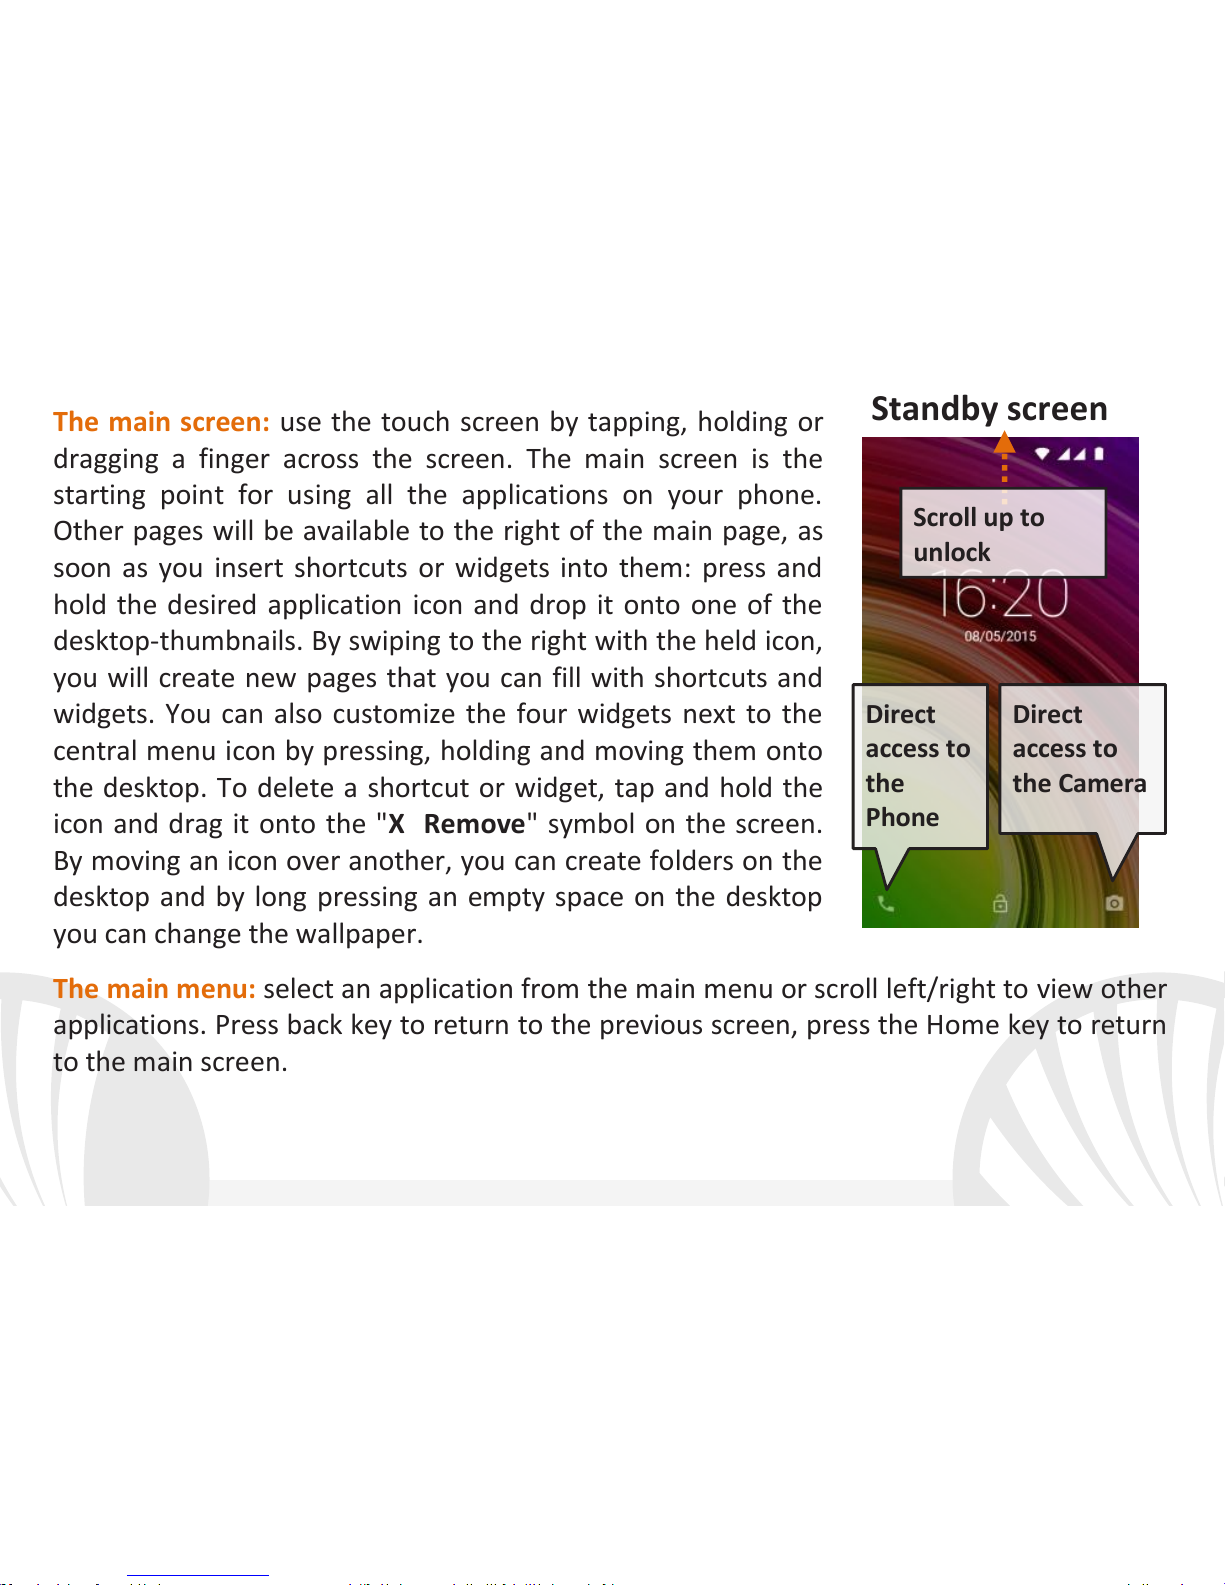
The main screen: use the touch screen by tapping, holding or
dragging a finger across the screen. The main screen is the
starting point for using all the applications on your phone.
Other pages will be available to the right of the main page, as
soon as you insert shortcuts or widgets into them: press and
hold the desired application icon and drop it onto one of the
desktop-thumbnails. By swiping to the right with the held icon,
you will create new pages that you can fill with shortcuts and
widgets. You can also customize the four widgets next to the
central menu icon by pressing, holding and moving them onto
the desktop. To delete a shortcut or widget, tap and hold the
icon and drag it onto the "X Remove" symbol on the screen.
By moving an icon over another, you can create folders on the
desktop and by long pressing an empty space on the desktop
you can change the wallpaper.
The main menu: select an application from the main menu or scroll left/right to view other
applications. Press back key to return to the previous screen, press the Home key to return
to the main screen.
Standby screen
Direct
access to
the
Phone
Direct
access to
the Camera
Scroll up to
unlock
Page 44
44
ENGLISH
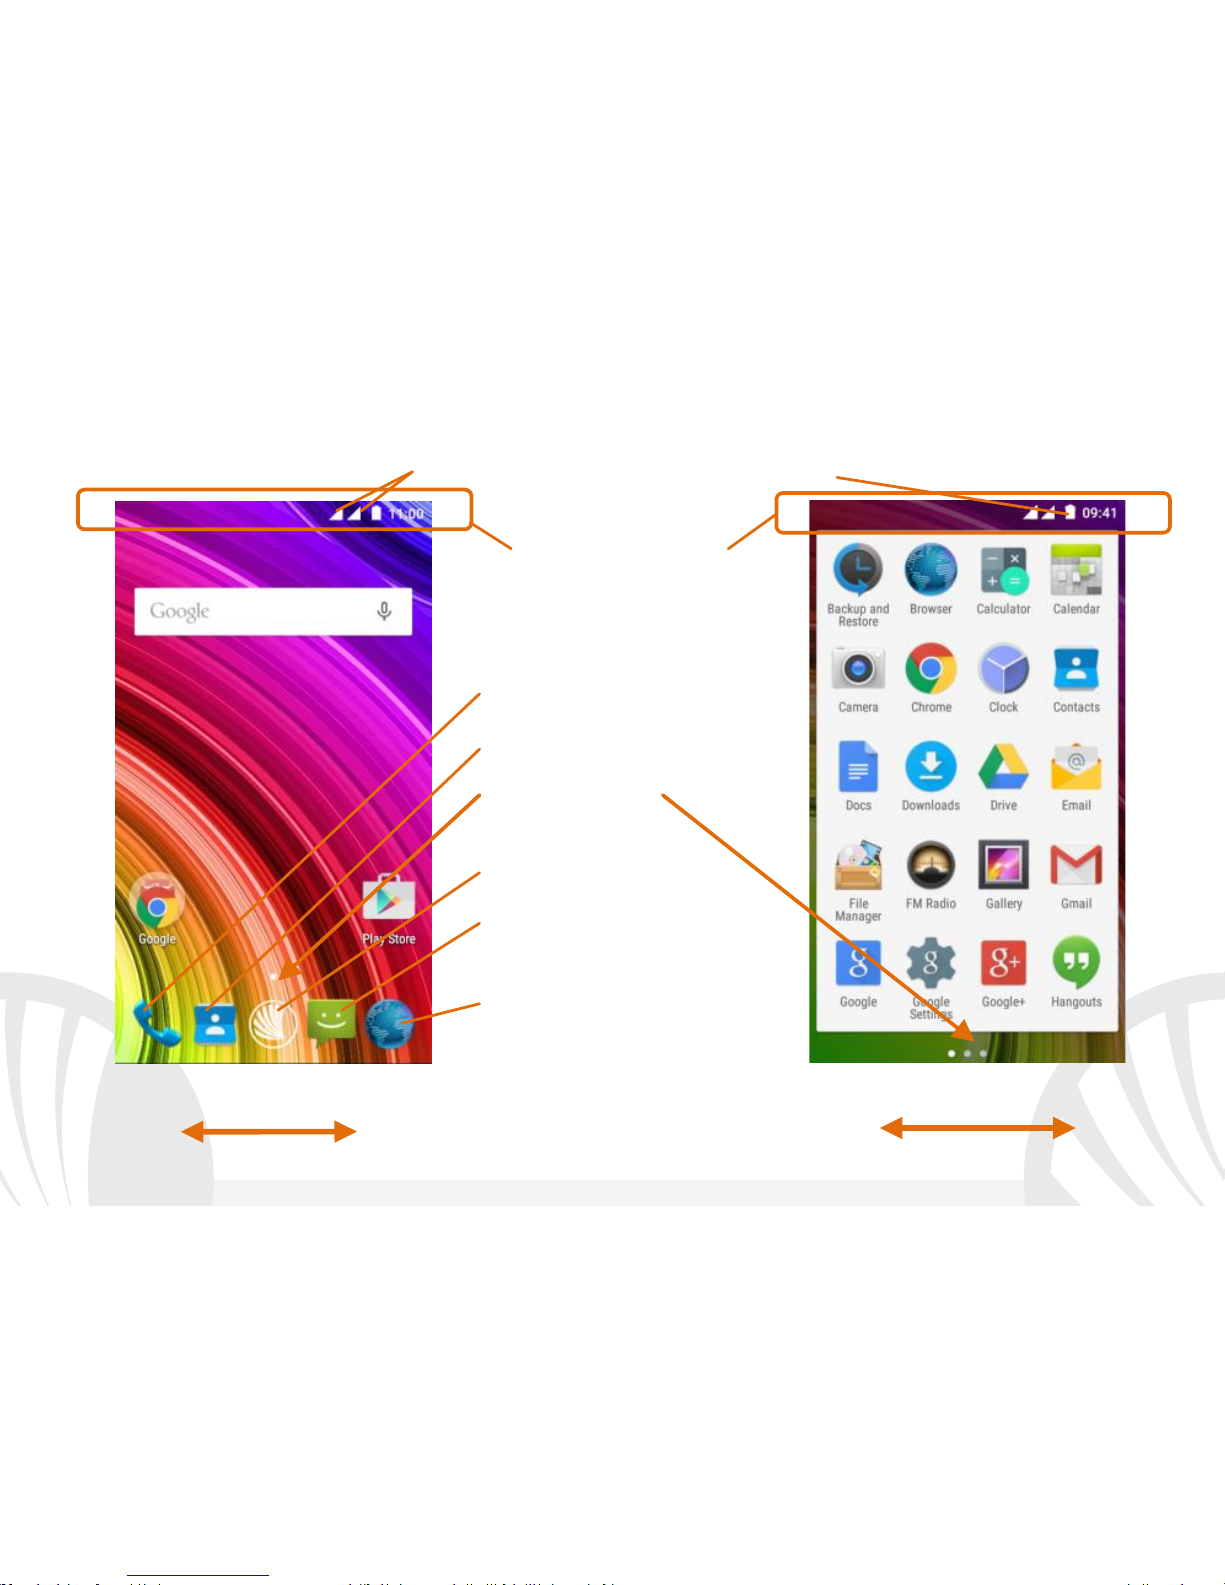
Home Screen
Main Menu
Notification panel/bar
SIM signal intensity and battery level
Page Indicators
Phone
Phonebook
Main Menu
Browser
Messaging
Scroll HOME pages
Scroll menu
Page 45
45
ENGLISH
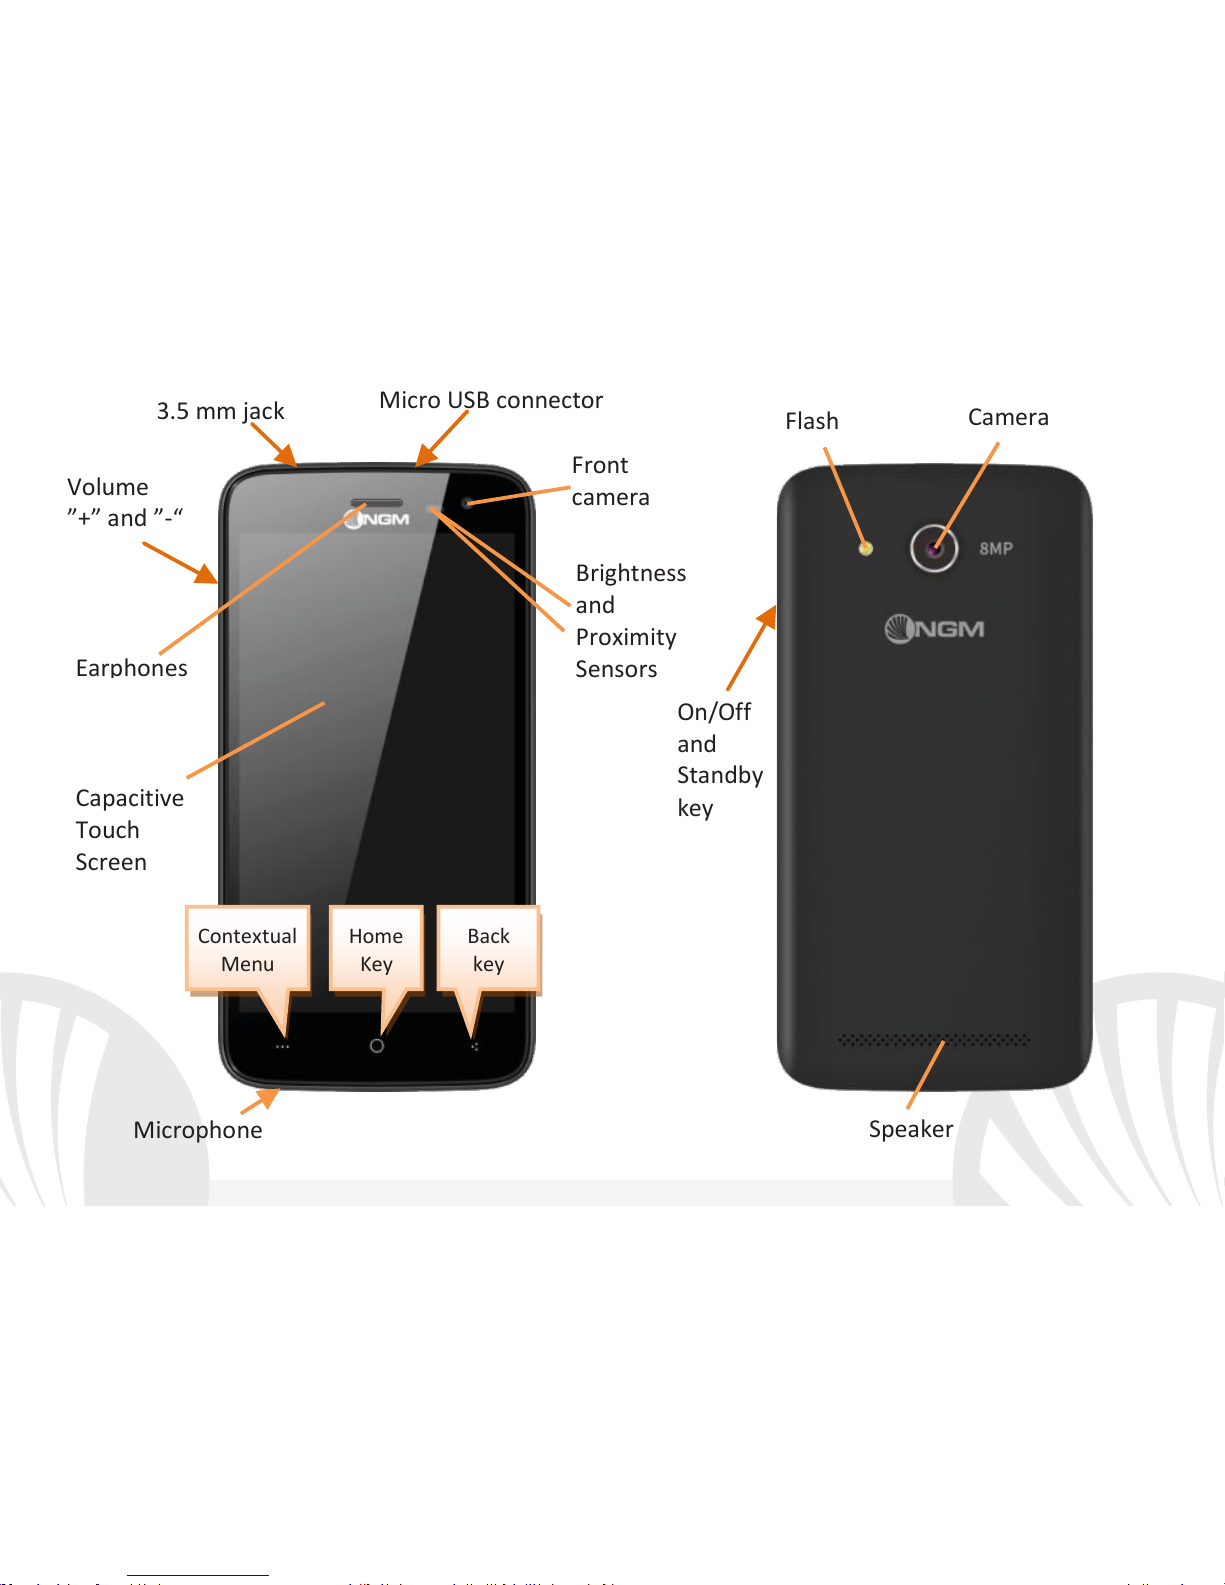
On/Off
and
Standby
key
Capacitive
Touch
Screen
Flash
Camera
Micro USB connector
3.5 mm jack
Front
camera
Earphones
Brightness
and
Proximity
Speaker
Volume
”+” and ”-“
Microphone
Contextual
Menu
Back
key
Home
Key
Page 46
46
ENGLISH
RAPID ACCESS
Notification panel: to open the Notification Panel, touch the upper icons bar. When
scrolling down, the notifications will be shown first; if you continue scrolling down, you will
also display the Quick Setup keys. With , you will erase all notifications in the panel. To
hide the panel, drag up the bottom of the panel or tap the Back key. Notifications will also
be visible in the unlock screen.
Recent applications: when you are inside any application, long press the key: a list of
the applications you have recently accessed will be shown and can be directly selected.
Lock screen and vibration: from the main menu, select Settings > Security > Screen Lock.
Select the desired unlocking mode (None, Slide, Voice Unlock, Pattern, PIN or Password)
and confirm. To quickly lock the screen, briefly press the power on/off key. To unlock it,
follow the instructions on the screen.
Contextual Menu: many apps have a Contextual Menu . By selecting it, you can display
a contextual menu referred to the application itself, with related functions.
Page 47

47
ENGLISH
Managing the two SIM cards
From the main menu, select Settings > SIM Management. Select the on/off keys next to
the phone operators corresponding to "SIM1" and "SIM2" to activate or deactivate
selectively the SIM at any time. From this menu you can also customize the color and name
for each SIM icon and decide which SIM to use as default for calls, messages and data
connection or choose "always ask" if you don't want to set a SIM card as default.
Select a SIM card on which to activate the data connection, the 3G service will be
automatically set on that SIM. This allows you to move the 3G connection (normally
available on slot1 only) from one SIM to the other without physically exchanging them.
Smart Gestures
From Settings menu, you can activate a few innovative Smart Gestures, that can help you
manage the main features of the phone comfortably and rapidly
Guest mode: the activation of the guest mode will hide messages, call logs, photos and
videos and any modification of the desktop will be inhibited. When this mode is active, an
icon will be visible in the notification bar. In Settings > Security, you can set a password to
manage this mode.
Page 48
48
ENGLISH
MANAGING CALLS
From the main screen touch the Phone icon; use the virtual keypad to enter the desired
phone number (select icon to display the virtual keypad)
Press the handset icon and choose the desired SIM to call with.
To end the call press the red end call key.
To answer a call, select Reply on the popup that appears at the top of the screen, or tap
the pop-up itself to display the call screen. Now drag the phone icon to the right onto the
blue handset to answer the call; to reject it, drag it to the left onto the red handset, to
reject with a message drag the phone icon upwards. To silence an incoming call, press
Volume "+" or "-" (on the left side of the phone).
Call a number from the call log
From the main menu, first select the Phone App and then select Call Log from the
contextual menu (hide the virtual keypad first); this will display the call logs with the
missed, received and outgoing calls.
Select the desired number and then Call back. In case no default SIM has been set
choose which SIM to call with.
Page 49
49
ENGLISH
MANAGE CONTACTS
Add a new contact
From the main menu select the Contacts icon.
Press on the bottom.
Select the storage where you want to save the contact (Account, Phone, SIM1 or SIM2).
Insert Name, Number and other contact details (if saving on Phone) and confirm with
Save.
Add a new contact from call log
From Phone menu, access the Call Logs (contextual menu).
Click on the empty contact icon then select the icon in the top right.
Choose Create New Contact on the top or add the number to an Existing contact by
selecting it from the list. Once you selected the saving path and added name and any
further information (when saving in Phone), confirm with Done.
Set ringtones
From the main menu, select Settings > Ringtones and Vibration > General.
Select Voice call ringtone > SIM1 or SIM2 and choose the desired ringtone for each SIM
card. If you want to set a custom ringtone: in Music, select the desired audio track and
choose Use as Ringtone in the contextual menu. The audio file will be added to the
available ringtones list.
Note: you can set ringtones in *mid,*wav, *ogg or *mp3 formats.
Note: In the contact contextual menu, you can access the
Import/Export functions and several other settings.
Page 50

50
ENGLISH
Quickly turn on/off the vibration mode: to quickly disable call and message ringtones
press the Volume "-" key. Once the minimum volume has been reached, the phone will
enter the vibration mode.
In the same way you can handle notifications interruptions (refer to the next paragraph)
Interruptions and app notifications: Android
TM
5.0, Lollipop contains new features. In
Settings > Sound & Notifications > Interruptions you can choose not to receive
notifications on specific days and times. In particular, you can set three states:
Don't interrupt: You will receive all notifications
Allow only priority interruptions: you will only receive priority notifications,
selectable in the next menu (events and reminders, calls or messages. Alerts are
always considered priority interruptions)
Always interrupt: you will not receive any notification, not even priority, in established
days and times
Once the priority notifications from which you still want to receive notifications are set,
you can set a time frame in which you stop receiving all other notifications that are not
considered priority.
Activating an interruption a star will appear on notification bar.
In Settings > Sound and Notifications > Notifications, you can choose not to receive
notifications from specific applications selectable from the notifications app menu.
Page 51
51
ENGLISH
Sending and reading SMS and MMS
Reading SMS and MMS: when you receive a new SMS or MMS, an icon appears in the
notification panel. By clicking on the displayed icon, you can directly access the
conversation and read the incoming message. In any case, you can view the incoming
messages from the home screen or menu by selecting Messaging.
Send SMS and MMS: from the Home page or from the main menu, choose Messaging and
then the + icon on the bottom. Type the first letters of a name into the recipients field to
search for a contact and select it from the pop-up or directly enter the phone number;
otherwise select the icon next to the field and select the recipient(s) from the contacts.
Write the text into the dedicated space with the virtual keypad. Select the "+" icon to insert
multimedia files (the message will automatically be converted into MMS). Press either
key, selecting the SIM you want to use.
CONNECTIVITY: to better use the potentiality provided by the device and its operating
system, you must have an active data connection; data connection of NGM YouColor M500
is active when you first power ON the phone. If it is not included into your mobile phone
plan, data traffic may cause you extra costs, so it is recommended to configure an Internet
connection via WiFi. To enable data traffic on one of the SIM cards, select Settings > Dual
SIM Settings > Data connection, or activate it from the Quick Setup buttons in the
notifications panel.
Page 52
52
ENGLISH
Connect to the Internet using Wi-Fi® You can connect to the WLAN using Wi-Fi option. To
activate it, from the main menu choose Settings > WiFi I/O. Please follow all warnings and
indications concerning the use of wireless devices in areas where the use of such functions
is restricted (airplanes, hospitals, etc.). Go offline mode when you have to use only the
functions that do not require Network access. Connecting to a Bluetooth® device: turn ON
the Bluetooth device you want to connect with. Refer to the device documentation.
From the main menu, choose Settings > Bluetooth on/off to turn on Bluetooth. In the
contextual menu you will find additional functions and settings.
Choose Search for devices to automatically find other Bluetooth devices.
Among the discovered devices, select the device name to associate with. The phone will
attempt to associate with the device, which may be asked for a pairing code.
Connect to the Internet: from the main menu, choose Browser. Type the URL into the
address bar to start browsing. If you choose to navigate using data connection, be aware of
costs or choose a "flat" data contract with your service provider. Alternatively, use WiFi
(see "Connectivity") where possible. Gmail account setup: In order to better manage the
Android
TM
OS functionalities, it is recommended to configure a new Gmail account, or
insert an existing one. This will allow you to access all Android™ OS applications.
E-mail: by configuring a default account you can easily manage your e-mails and display
them automatically on your phone. If you want to use also a different Email account, you
can configure a new account with another provider within the Email app in the Main
Menu.
Page 53

53
ENGLISH
Synchronization: synchronization is the most efficient approach to manage your useful
data because it allows you to make a backup of the data on your device with an internet
account. In case of replacement, loss or damage of the phone you will not experience loss
of data. The synchronization can be activated individually for each synchronized application
installed; you can find the application list in Settings > Account[Installed App list]. To add
a new account, select Add Account. The synchronization uses an active data connection,
which could result in data traffic costs. It is advisable to use a WiFi connection when
available.
GPS geolocalization: The Global Positioning System (GPS) is a satellite-based positioning
system, with a global and continuous coverage. To access GPS, select Settings >
Localization I/O. When the GPS function is activated, the phone starts to collect data from
satellites and determines the current position. The Fix Times (position detection) are
variable and can be affected by several external factors (clouds, high buildings, etc.). Limit
the use of battery and memory by switching off this function when you don’t need it.
Page 54
54
ENGLISH
Warning: formatting and delivery of this user manual is based on the Android
TM
operating
system , NGM Italia will not bear responsibility for any incompliance with the above
guidelines or improper use of the mobile phone. NGM reserves the right to modify any of
the content in this user guide without previous public announcement. The content of this
manual may vary from the actual content displayed in the mobile phone. In that case, the
latter shall govern.
Copyright © 2015 NGM Italia
No part of this manual may be reproduced, distributed, translated, or transmitted in any form or by
any means, electronic or mechanical, including photocopying, recording, or storing in any
information storage and retrieval system, without the prior written permission of NGM Italia.
Bluetooth® is a registered trademark of the Bluetooth SIG, Inc. worldwide.
Wi-Fi® and the Wi-Fi logo are registered trademarks of the Wi-Fi Alliance.
Page 55
55
ESPAÑOL
Bienvenido al mundo de NGM AndroidTM. Gracias por haber comprado NGM
YouColor M500. Con este dispositivo podrá acceder a las múltiples funcionalidades
del Sistema Operativo Android
TM
5.0, Lollipop para gestionar sus contactos, los
emails, las redes sociales y para descubrir las oportunidades de la red Internet con un
simple toque. Descubra todo el potencial de su nuevo teléfono "inteligente". Con
respecto a los Smartphones mono SIM que están en el mercado, NGM YouColor
M500 ofrece la comodidad del Dual SIM, que desde siempre caracteriza le entera
gama de los teléfonos NGM, es decir, la posibilidad de gestionar dos tarjetas SIM y
dos números de teléfono al mismo tiempo. Descubrirá funciones de gran utilidad
como la configuración de la SIM preferida para las llamadas, llamadas de vídeo, los
mensajes y la conexión de datos. Visitando el sitio Web oficial www.ngm.eu podrá
conocer la entera gama de teléfonos NGM, acceder al forum de ayuda técnica y
descargar actualizaciones software.
Atención: la conexión Datos de NGM YouColor M500 se activa cuando se enciende
por primera vez el teléfono (o después de restablecer las configuraciones de
fábrica). Si usted no tiene una tarifa especial o "plano" para la conexión de datos
con la tarjeta SIM, se recomienda desactivar el tráfico datos y configurar una
conexión WiFi, con el fin de evitar gastos adicionales.
Page 56
56
ESPAÑOL
Montaje
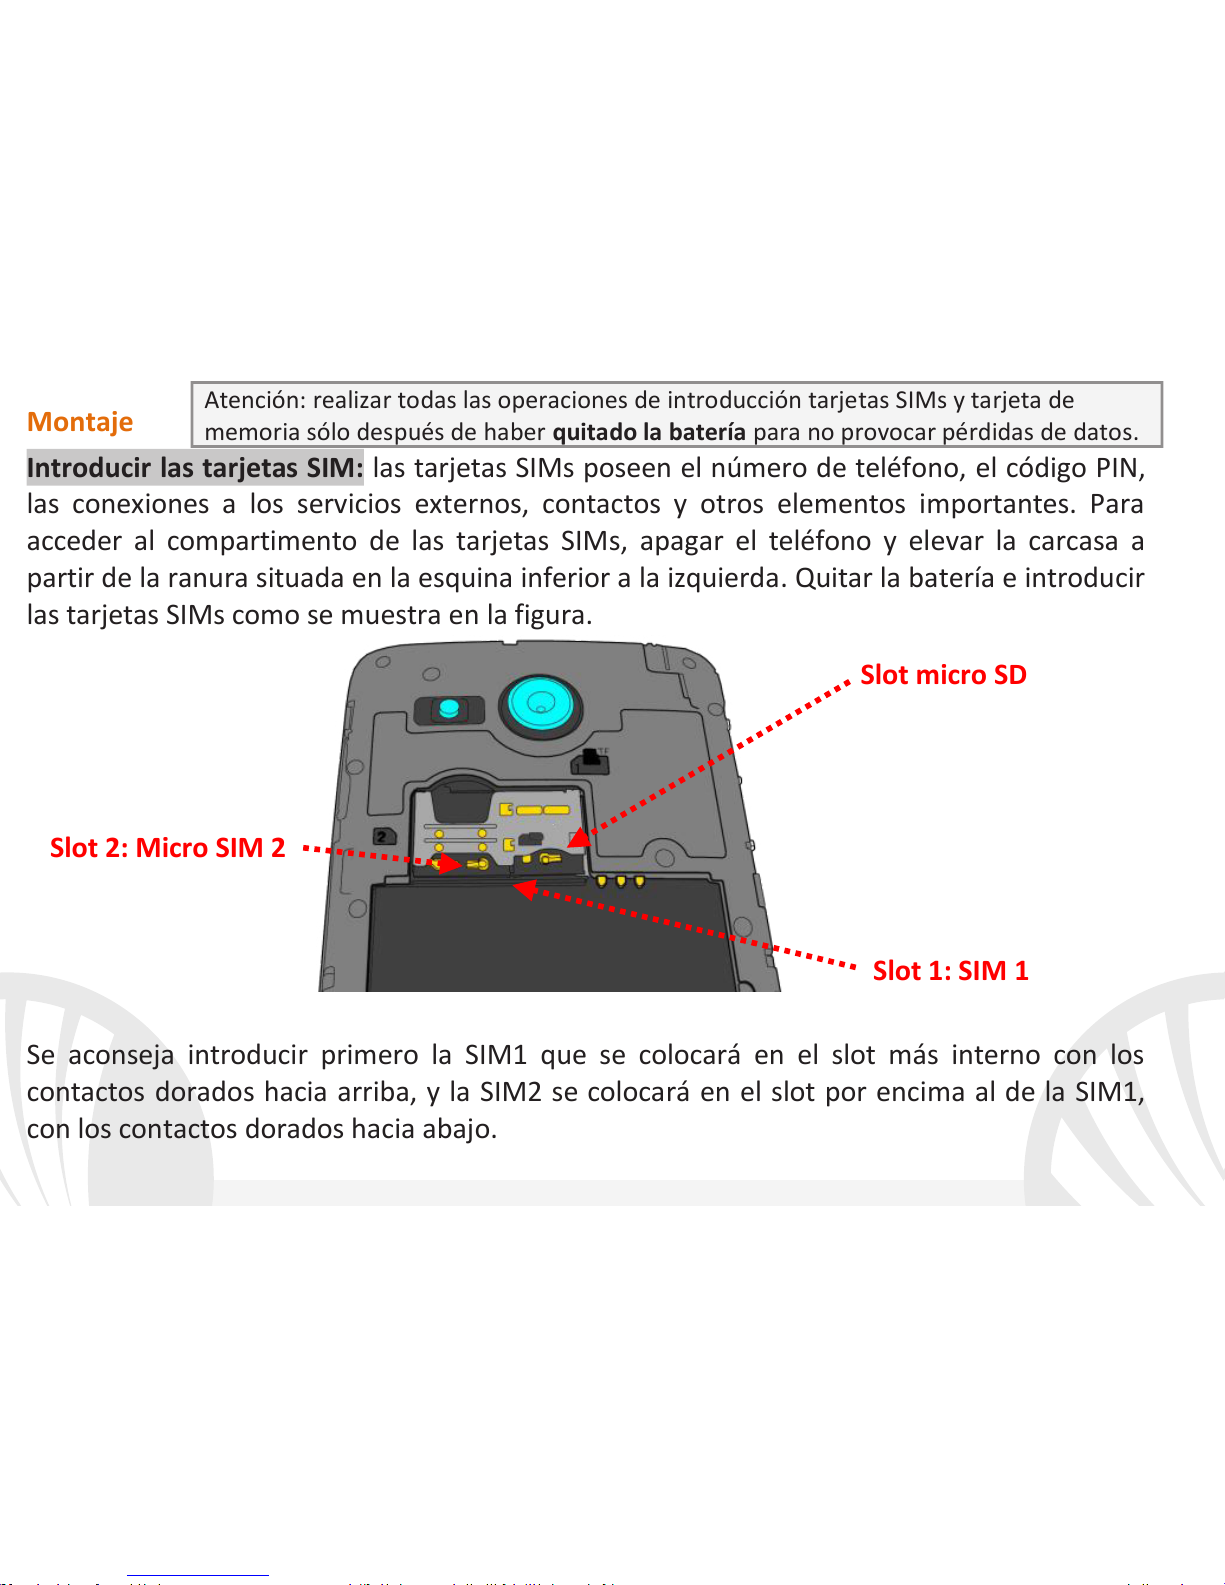
Introducir las tarjetas SIM: las tarjetas SIMs poseen el número de teléfono, el código PIN,
las conexiones a los servicios externos, contactos y otros elementos importantes. Para
acceder al compartimento de las tarjetas SIMs, apagar el teléfono y elevar la carcasa a
partir de la ranura situada en la esquina inferior a la izquierda. Quitar la batería e introducir
las tarjetas SIMs como se muestra en la figura.
Se aconseja introducir primero la SIM1 que se colocará en el slot más interno con los
contactos dorados hacia arriba, y la SIM2 se colocará en el slot por encima al de la SIM1,
con los contactos dorados hacia abajo.
Atención: realizar todas las operaciones de introducción tarjetas SIMs y tarjeta de
memoria sólo después de haber quitado la batería para no provocar pérdidas de datos.
Slot micro SD
Slot 1: SIM 1
Slot 2: Micro SIM 2
Page 57
57
ESPAÑOL
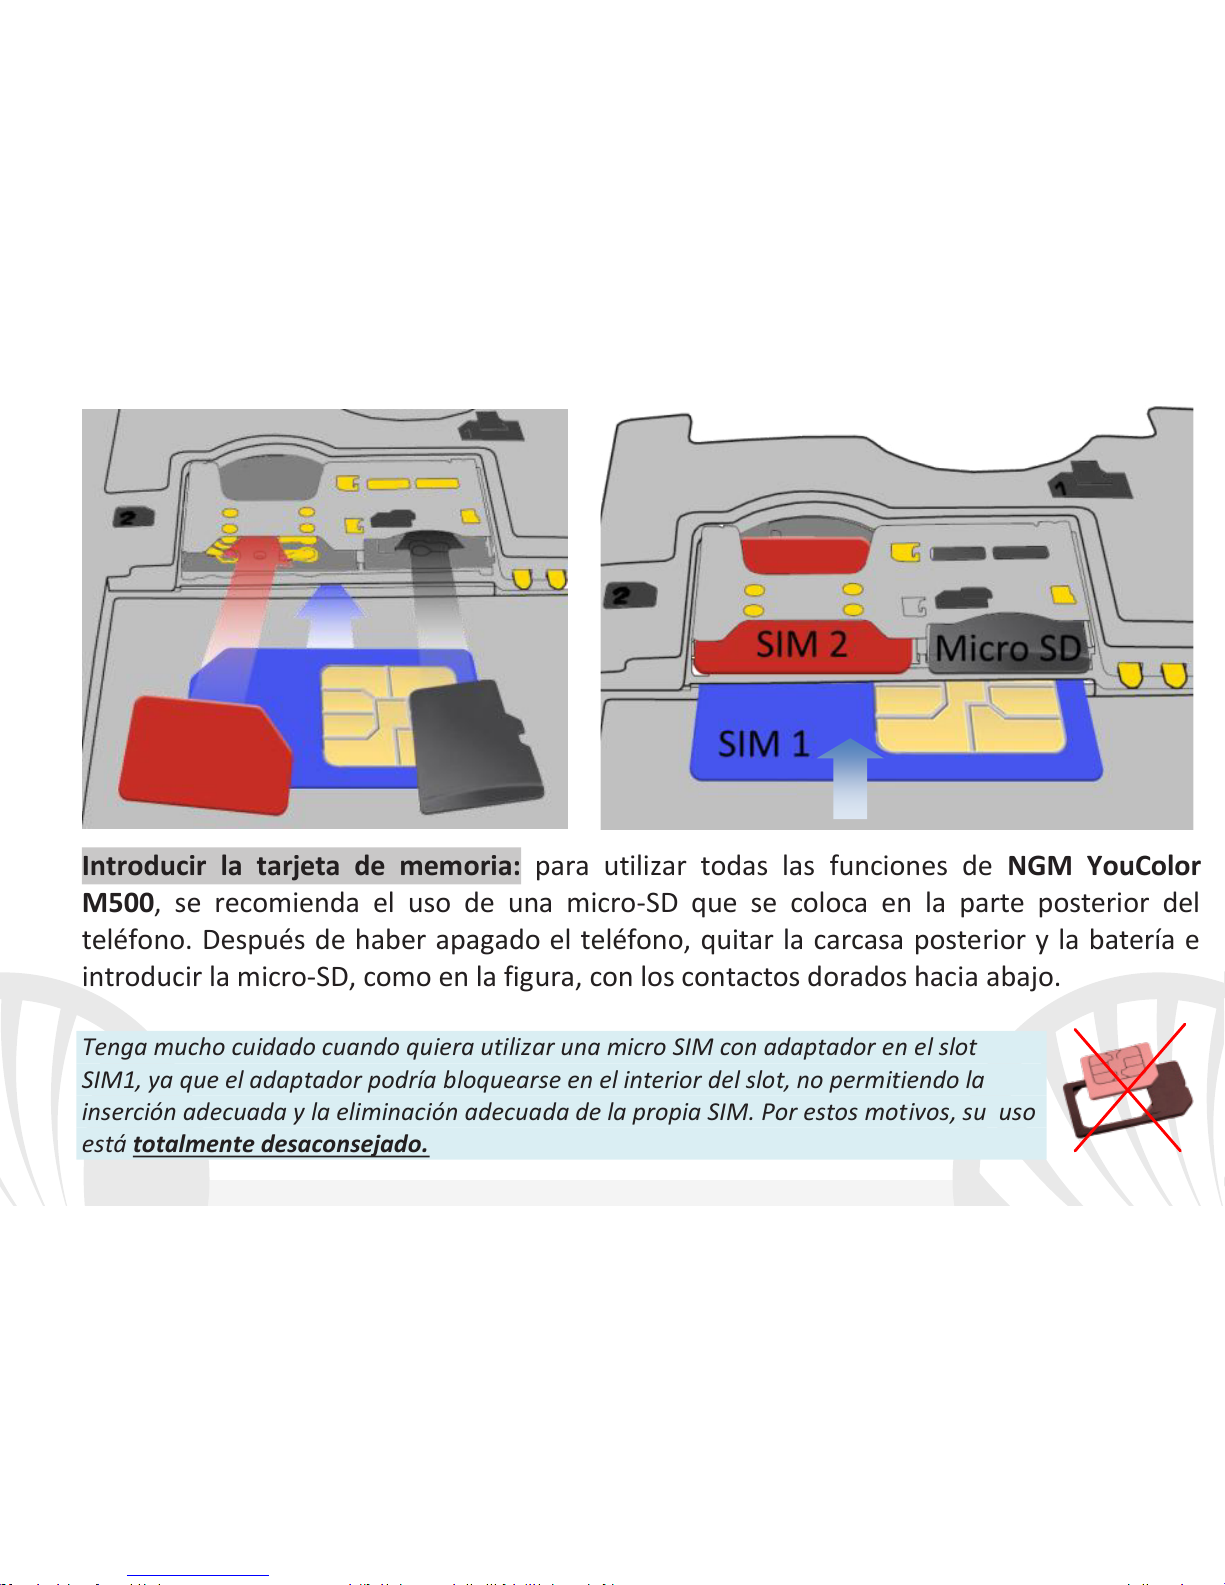
Introducir la tarjeta de memoria: para utilizar todas las funciones de NGM YouColor
M500, se recomienda el uso de una micro-SD que se coloca en la parte posterior del
teléfono. Después de haber apagado el teléfono, quitar la carcasa posterior y la batería e
introducir la micro-SD, como en la figura, con los contactos dorados hacia abajo.
Tenga mucho cuidado cuando quiera utilizar una micro SIM con adaptador en el slot
SIM1, ya que el adaptador podría bloquearse en el interior del slot, no permitiendo la
inserción adecuada y la eliminación adecuada de la propia SIM. Por estos motivos, su uso
está totalmente desaconsejado.
Page 58
58
ESPAÑOL
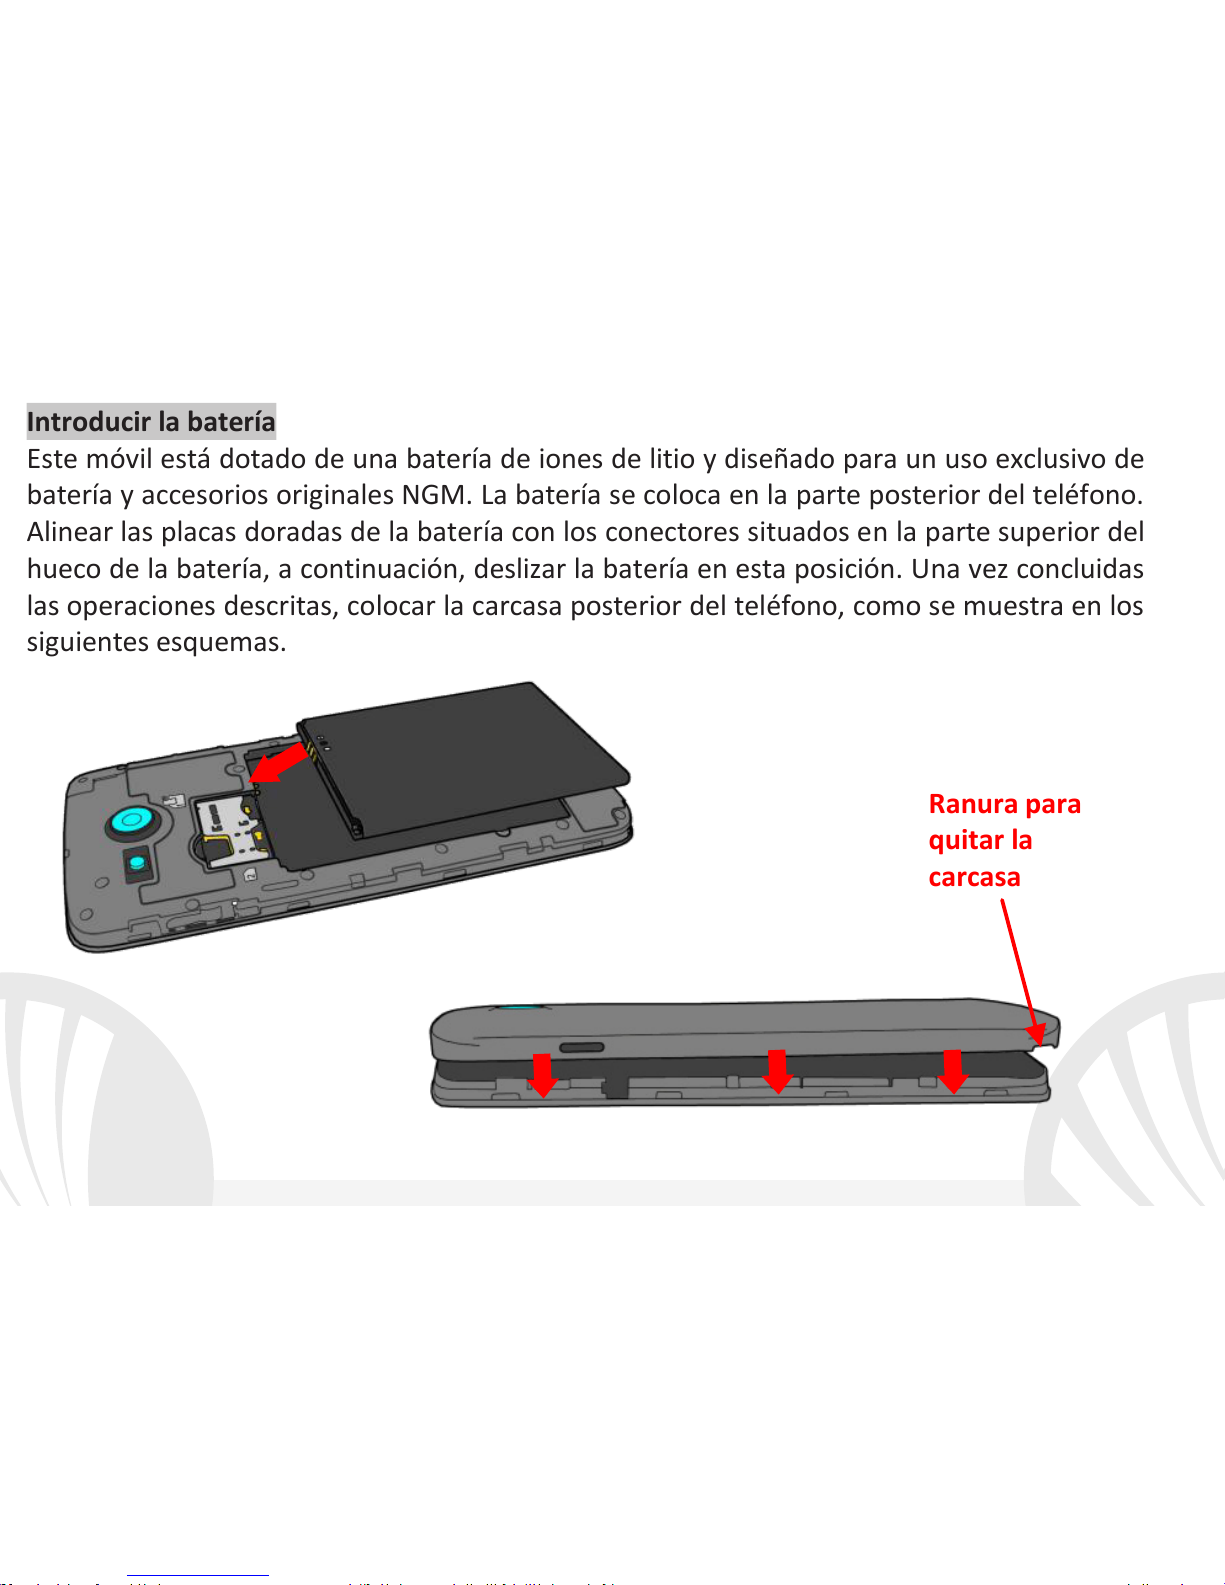
Introducir la batería
Este móvil está dotado de una batería de iones de litio y diseñado para un uso exclusivo de
batería y accesorios originales NGM. La batería se coloca en la parte posterior del teléfono.
Alinear las placas doradas de la batería con los conectores situados en la parte superior del
hueco de la batería, a continuación, deslizar la batería en esta posición. Una vez concluidas
las operaciones descritas, colocar la carcasa posterior del teléfono, como se muestra en los
siguientes esquemas.
Ranura para
quitar la
carcasa
Page 59

59
ESPAÑOL
Cargar la batería
Cargar la batería antes de empezar a utilizar el teléfono. Utilizar el cable USB que se ha
proporcionado y el conector USB situado en la parte superior del teléfono. Conectar el
cargador a una toma de corriente eléctrica y el dispositivo al cable USB. Se puede cargar el
teléfono conectándolo al PC, pero en este caso la carga será más lenta. Cuando la batería
se está cargando, en la pantalla se visualizará un icono animado que muestra el estado de
carga del proceso. Cuando el icono de la batería está lleno, la carga se ha completado y se
puede desconectar el teléfono de la red eléctrica.
Atención: no conectar el teléfono a un ordenador que se está encendiendo o apagando
para evitar cambios de tensión. Para conservar la correcta funcionalidad del producto y la
integridad de la garantía se recomienda el uso del cargador original NGM. Proceder con la
carga exclusivamente en un lugar abierto y seco. Un ligero calentamiento del teléfono
durante el proceso de carga es normal. La batería alcanzará su eficiencia funcional sólo
después de algunos ciclos completos de carga.
Encender, apagar y standby
Para encender el dispositivo, mantener pulsada la tecla on/off . Para apagar el dispositivo,
tener pulsada la misma tecla y asegurar que se quiere apagar seleccionando “Apagar”. Una
breve presión de la tecla permite pasar rápidamente a la modalidad de standby (pantalla
apagada) o de volver desde esta pantalla a la pantalla de desbloqueo (ver abajo).
Page 60
60
ESPAÑOL
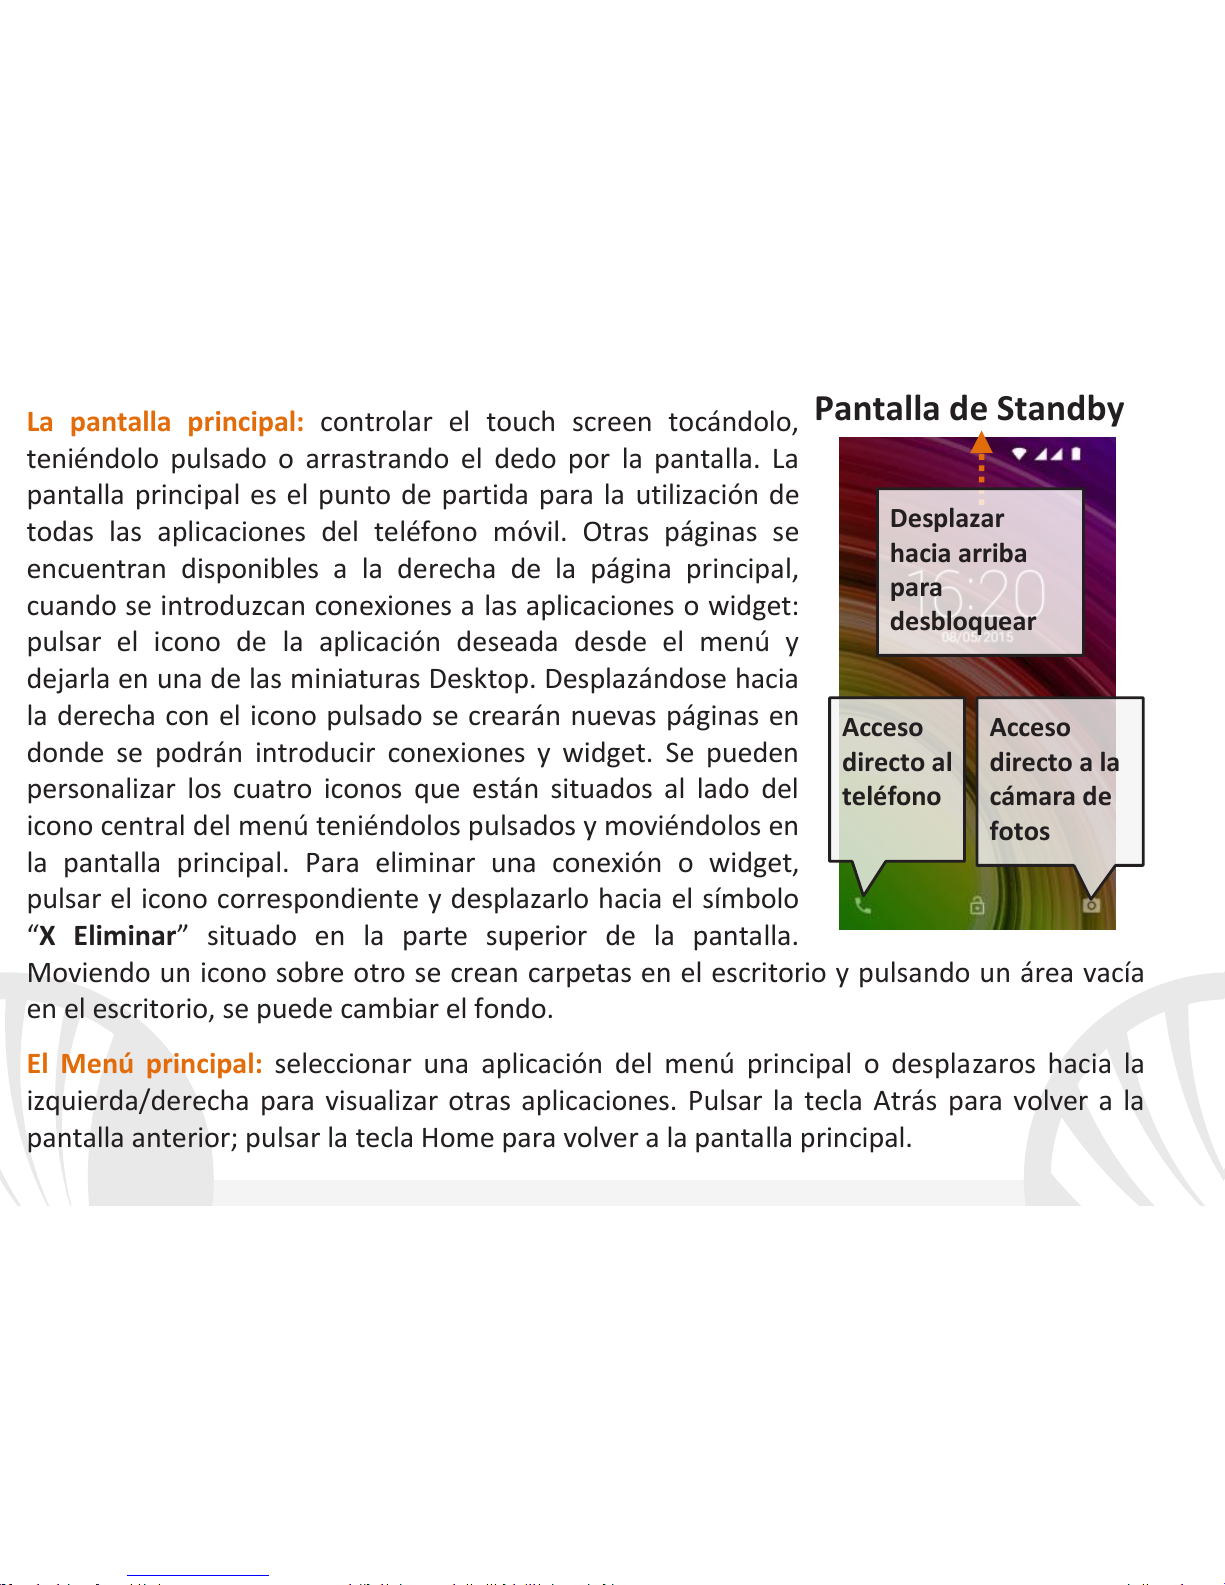
La pantalla principal: controlar el touch screen tocándolo,
teniéndolo pulsado o arrastrando el dedo por la pantalla. La
pantalla principal es el punto de partida para la utilización de
todas las aplicaciones del teléfono móvil. Otras páginas se
encuentran disponibles a la derecha de la página principal,
cuando se introduzcan conexiones a las aplicaciones o widget:
pulsar el icono de la aplicación deseada desde el menú y
dejarla en una de las miniaturas Desktop. Desplazándose hacia
la derecha con el icono pulsado se crearán nuevas páginas en
donde se podrán introducir conexiones y widget. Se pueden
personalizar los cuatro iconos que están situados al lado del
icono central del menú teniéndolos pulsados y moviéndolos en
la pantalla principal. Para eliminar una conexión o widget,
pulsar el icono correspondiente y desplazarlo hacia el símbolo
“X Eliminar” situado en la parte superior de la pantalla.
Moviendo un icono sobre otro se crean carpetas en el escritorio y pulsando un área vacía
en el escritorio, se puede cambiar el fondo.
El Menú principal: seleccionar una aplicación del menú principal o desplazaros hacia la
izquierda/derecha para visualizar otras aplicaciones. Pulsar la tecla Atrás para volver a la
pantalla anterior; pulsar la tecla Home para volver a la pantalla principal.
Pantalla de Standby
Acceso
directo al
teléfono
Acceso
directo a la
cámara de
fotos
Desplazar
hacia arriba
para
desbloquear
Page 61
61
ESPAÑOL
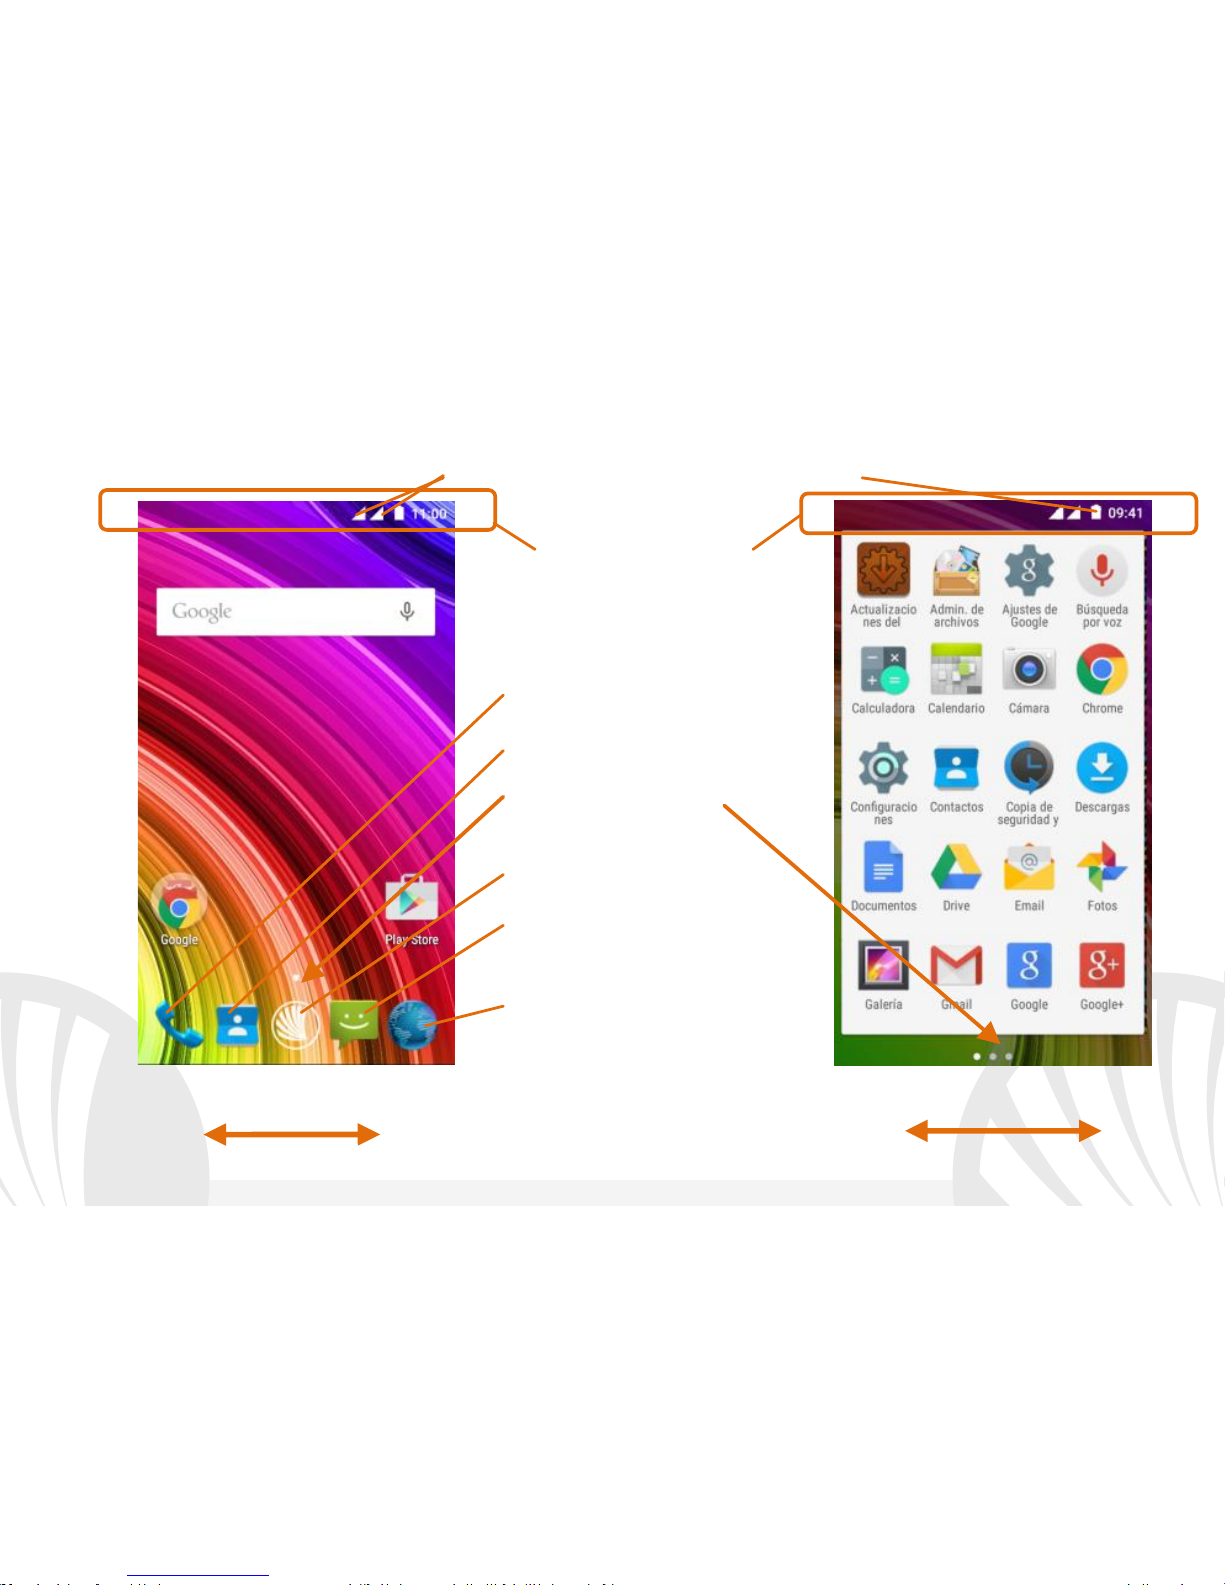
Pantalla Principal
Menú Principal
Panel/barra de notificación
Intensidad señal SIM y nivel batería
Indicadores páginas
Teléfono
Agenda
Menú Principal
Internet
Mensajes
Desplazamiento pantalla HOME
Desplazamiento Menú
Page 62
62
ESPAÑOL
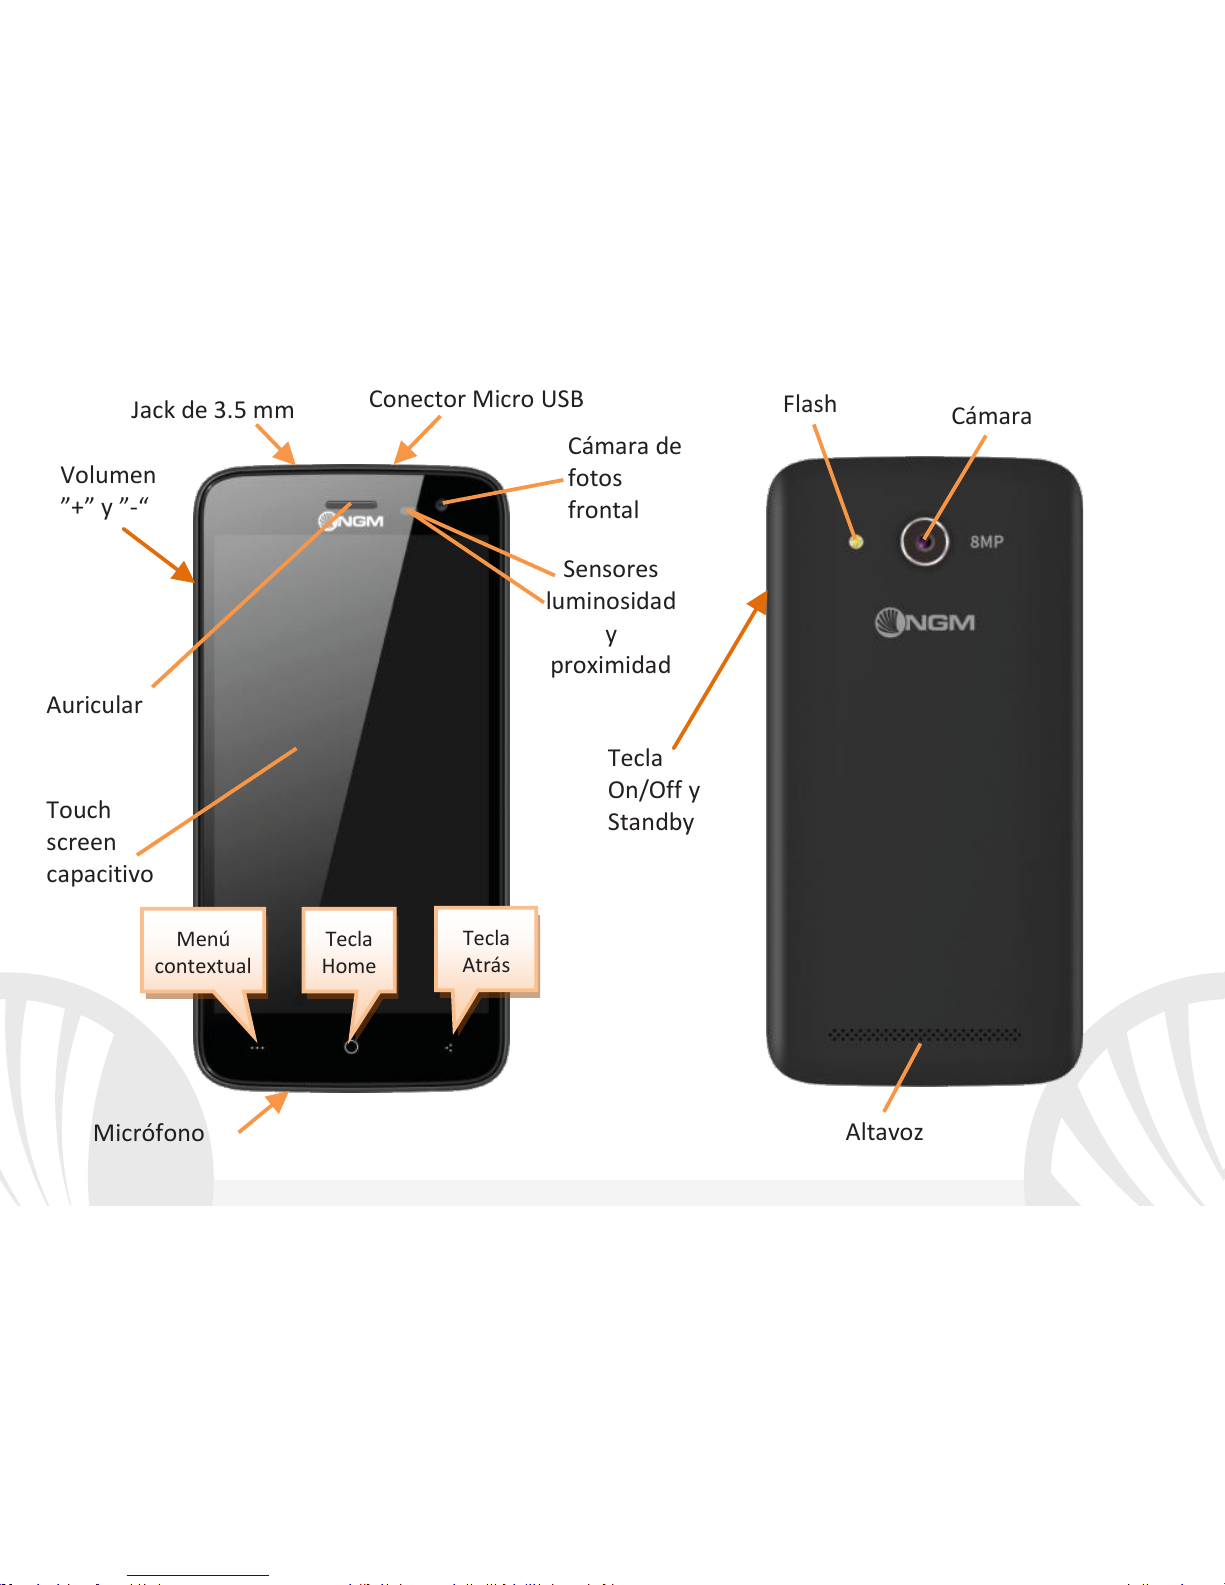
Tecla
On/Off y
Standby
Touch
screen
capacitivo
Flash
Cámara
Conector Micro USB
Jack de 3.5 mm
Cámara de
fotos
frontal
Auricular
Sensores
luminosidad
y
proximidad
Altavoz
Volumen
”+” y ”-“
Micrófono
Menú
contextual
Tecla
Atrás
Tecla
Home
Page 63
63
ESPAÑOL
ACCESOS DIRECTOS
Panel de notificación: para abrir el panel de notificación, tocar el área de los iconos
situados en la parte alta de la pantalla. Desplazando hacia abajo se visualizarán las
primeras notificaciones, continuando desplazando hacia abajo podrá visualizar además las
teclas de configuración rápida. Con cancelar las notificaciones del panel. Para esconder
el panel, arrastrar hacia arriba la parte baja del panel o tocar la tecla Atrás. Las
notificaciones se visualizarán también en la pantalla de desbloqueo.
Aplicaciones recientes: cuando se encuentre en cualquier aplicación, pulse y mantenga
pulsada la Tecla : muestra la lista de aplicaciones que se han utilizado recientemente,
directamente seleccionables.
Bloqueo pantalla y vibración: desde el menú principal, seleccionar Configuraciones >
Seguridad > Bloqueo pantalla. Seleccionar la modalidad deseada (Ninguno, Deslizar,
Desbloqueo vocal, Secuencia, PIN o Contraseña) y confirmar. Para bloquear rápidamente
la pantalla, pulsar brevemente la tecla On/Off del teléfono. Para desbloquear la pantalla,
seguir las indicaciones de la pantalla.
Menú contextual: muchas aplicaciones requieren el uso de la tecla Menú Contextual
Pulsando en tal icono se puede visualizar un menú contextual referido a la misma
aplicación con las relativas funciones.
Page 64

64
ESPAÑOL
Gestionar las dos SIMs
Desde el menú principal, seleccionar Configuraciones > Configuraciones Dual SIM.
Seleccionar el interruptor al lado de los operadores telefónicos correspondientes a “SIM1”
y “SIM2” para activar o desactivar selectivamente las SIMs en cualquier momento. Desde
este menú se puede personalizar el color y nombre del icono de cada SIM y decidir qué SIM
usar como predefinida para llamadas, mensajes y conexión datos, o eligiendo "preguntar
siempre" si no se quiere configurar una SIM predefinida.
Seleccionando una SIM en donde activar los datos, en esa misma SIM se activará
automáticamente el servicio 3G. Esto permite cambiar fácilmente el 3G de una SIM a otra,
generalmente asignado al slot1, sin invertir físicamente las tarjetas SIM.
Smart Gestures
Desde el menú Configuraciones, seleccionando Smart gesture, podrá activar las
innovativas funciones NGM que permiten gestionar las principales funcionalidades del
teléfono con la máxima comodidad y velocidad
Modalidad esconder
Los mensajes, el registro llamadas y la galería de fotos y vídeos se esconderán
temporalmente y se inhibirá cualquier modificación del escritorio. Cuando esta modalidad
está activada, se visulaizará un icono en la barra de las notificaciones. En Configuraciones >
Seguridad, es posible configurar una contraseña para gestionar esta modalidad.
Page 65
65
ESPAÑOL
GESTIONAR UNA LLAMADA
Desde la pantalla principal, tocar el icono Teléfono; digitar el número telefónico a llamar
usando el teclado virtual (para visualizarla seleccionar el icono )
Pulsar el icono con el teléfono y luego la SIM deseada.
Para terminar, tocar el icono rojo de fin llamada.
Para responder a una llamada, seleccionar Responder en el popup que aparece en la
parte alta de la pantallla, o tocar el popup para visualizar la pantalla de llamada. Ahora
arrastrar el icono central hacia la derecha sobre el icono azul para responder; para
rechazar la llamada arrastrarlo hacia la izquierda sobre el icono rojo, para rechazarla
mediante un mensaje desplazar el icono hacia arriba. Para silenciar una llamada, tocar la
tecla Volumen “+” o “–“ (en el lado izquierdo del teléfono).
Llamar un número del registro llamadas
Desde el menú principal, entrar en el menú Teléfono y seleccionar Cronología llamadas
desde el menú contextual (primero esconder el teclado virtual); se visualizará el registro
llamadas con las llamadas perdidas, recibidas y realizadas.
Seleccionar el número deseado y Llamar. Elegir con qué SIM iniciar la llamada en el caso
en el que no se haya configurado una SIM predefinida.
Page 66
66
ESPAÑOL
GESTIONAR CONTACTOS
Añadir un nuevo contacto
Desde el menú principal, seleccionar el icono Contactos.
Pulsar el icono en la barra inferior.
Elegir dónde se quiere guardar el nuevo contacto (cuenta, teléfono, SIM1 o SIM2).
Introducir Nombre, Número y otros datos del contacto. Confirmar que se quiere guardar.
Añadir un nuevo contacto del registro llamadas
Desde el menú Teléfono, acceder al Registro Llamadas (menú contextual).
Pulsar en la imagen de contacto vacía seleccionar el icono arriba a la derecha.
Seleccionar Crear contacto nuevo o añadir el número a un Contacto existente
eligiéndolo de la lista. Después de añadir nombre y otras informaciones, confirmar con
Guardar.
Configurar las melodías
En el menú principal, seleccionar primero Configuraciones > Sonar y vibrar > General.
Seleccionar Melodía Teléfono > SIM1 o SIM2 y elegir la melodía deseada para cada SIM.
Si se desea establecer una melodía personalizada: en Música seleccionar la pista de
audio deseada pulsando prolongadamente y seleccionar Usar como Melodía en el
menú contextual. El archivo audio será introducido en la lista de las melodías disponibles.
Nota: es posible utilizar el archivo de melodías en formato *mid,*wav, *ogg o *mp3.
Nota: En el menú contextual de la agenda se tiene acceso a las funciones de
importación/exportación de los contactos y varias configuraciones útiles.
Page 67

67
ESPAÑOL
Activar o desactivar rápidamente la vibración: para desactivar rápidamente la melodía de
llamadas y mensajes pulsar la tecla volumen “–“, alcanzado el volumen mínimo, el teléfono
entrará en modo vibración.
Interrupciones de notificación y notificaciones aplicaciones: Android
TM
5.0, Lollipop ha
introducido nuevas funcionalidades. En Configuraciones > Sonido y notificaciones >
Interrupciones puede optar por no recibir notificaciones en determinados días y horarios.
Se pueden configurar 3 estados:
No interrumpir: se recibirán todas las notificaciones
Permitir solo interrupciones con prioridad: se recibirán sólo notificaciones con
prioridad, seleccionables en el menú siguiente (eventos y recordatorio, llamadas o
mensajes. Los avisos se consideran siempre interrupciones con prioridad)
Interrumpir siempre: no se recibirá ninguna notificación, ni prioritaria, en los días y
horarios establecidos.
Una vez establecidas las notificaciones prioritarias, de donde quiere recibir las
notificaciones, podrá establecer un arco de tiempo en donde interrumpir la recepción de
todas las demás notificaciones no consideradas prioritarias.
En la activación de las interrupciones aparecerá una estrella en la barra de las
notificaciones. En Configuraciones > Sonido y notificaciones > Notificaciones, se puede
bloquear la recepción de notificaciones que provienen de aplicaciones específicas
seleccionables desde el menú Notificaciones aplicaciones.
Page 68
68
ESPAÑOL
Enviar y leer SMS y MMS
Leer SMS y MMS: cuando se recibe un nuevo SMS o MMS, se visualiza un icono en el panel
de notificación. Clicando en el icono visualizado, se puede acceder directamente a la
conversación y leer el mensaje recibido. Es posible visualizar los mensajes recibidos desde
la pantalla principal o desde el menú, seleccionando Mensajes.
Enviar SMS y MMS: desde la página o desde el menú principal, seleccionar Mensajes y
luego el icono + en la parte inferior. Digitar las primeras letras de un nombre en el campo
destinatario para encontrar un contacto y seleccionarlo desde la lista pop-up o introducir
directamente el número del destinatario, o seleccionar el icono y señalar el/los
destinatarios. Introducir el texto en su correspondiente espacio con el teclado virtual.
Seleccionar "+" para incluir adjuntos multimediales (el mensaje se convertirá en MMS) y
pulsar eligiendo la SIM deseada.
CONECTIVIDAD: para utilizar mejor la potencialidad ofrecida por el terminal y su sistema
operativo, es necesario tener una conexión datos activa; la conexión Datos de NGM You
Color M500 se activa en el momento que se enciende el teléfono la primera vez. Si no se ha
realizado un contrato, el tráfico datos implicará gastos, se recomienda, en este caso,
configurar el acceso a Internet trámite WiFi. Para habilitar el tráfico datos sobre una de las
SIMs, seleccionar Configuraciones > Configuraciones Dual SIM > Conexión de datos, o
activarlo mediante el botón de configuración rápida en el panel de las notificaciones.
Page 69
69
ESPAÑOL
Conectarse a Internet con la función Wi-Fi®: podrá conectarse a la red WLAN utilizando la
función Wi-Fi. Para activarla, desde el menú principal elegir Configuraciones > WiFi I/O.
Prestar atención a todas las advertencias e indicaciones específicas del personal autorizado
cuando se encuentre en áreas donde el uso de los dispositivos wireless está limitado
(aviones, hospitales, etc). Pasar a la Modalidad offline cuando se utilizan sólo los servicios
que no necesitan acceso a la red.
Conectarse a un dispositivo Bluetooth®: activar el dispositivo Bluetooth al que se quiere
conectar. Consultar la documentación del dispositivo.
Desde el menú principal, seleccionar Configuraciones > Bluetooth on/off para activar el
Bluetooth. En el menú contextual encontraréis más informaciones y configuraciones.
Elegir Buscar dispositivos.
Entre los dispositivos detectados, seleccionar el nombre del dispositivo con el que se
quiere asociar. El teléfono intentará asociarse con el dispositivo, a continuación se pedirá
un código de asociación.
Conectarse a Internet: desde el menú principal, elegir Navegador. Digitar el URL en la
barra de direcciones para iniciar la navegación. Si se elige navegar con la conexión datos de
la red telefónica, informarse de los gastos o elegir un contrato datos “flat” con el propio
operador. Como alternativa, utilizar la conexión WiFi (ver párrafo “Conectividad”).
Configuración cuenta Gmail: para disfrutar mejor de las funcionalidades del sistema
Android
TM
, es necesario un cuenta Gmail nueva o introducir una ya existente. Esto le
permitirá acceder a todas las aplicaciones del sistema AndroidTM.
Page 70

70
ESPAÑOL
Email: configurando una cuenta predefinida es posible gestionar fácilmente el correo
electrónico y visualizarlo automáticamente en el propio teléfono. Si se desea utilizar un
proveedor de servicios de correos diferente del sugerido por el teléfono como cuenta
predeterminada, debe configurar una cuenta Email en el Menú principal.
Sincronización: la sincronización es el modo más eficaz para gestionar los propios datos
útiles porque permite realizar un backup de tales datos presentes en el dispositivo con la
cuenta Internet. En caso de cambio, pérdida o deteriodo del teléfono no se verificarán
pérdidas de estos datos. La sincronización se puede activar por cada aplicación instalada
sincronizable; la lista de dichas aplicaciones se encuentra en Configuraciones > Cuenta
[lista de Aplicaciones instaladas]. Para añadir una nueva cuenta, elegir Añadir cuenta. La
operación de sincronización utiliza una conexión datos activa, que podría implicar gastos de
tráfico datos. Se aconseja, por lo tanto, utilizar una conexión WiFi, cuando sea disponible.
Geolocalización GPS: il Global Positioning System (GPS) es un sistema de posicionamiento
por satélite, con cobertura global y continua. Para acceder al GPS, seleccionar
Configuraciones > Acceso ubicación (I/O). Cuando la función GPS está activada, el teléfono
comienza a recopilar datos de los satélites disponibles y establece la posición actual. Los
tiempos de Fix (Detección de la ubicación) son variables y pueden ser afectados por varios
factores externos. Para limitar el consumo de batería y memoria se recomienda desactivar
el GPS cuando no se utiliza.
Page 71
71
ESPAÑOL
Atención: el formato y la entrega de este manual se basa en el sistema operativo AndroidTM;
el fabricante no asume ninguna responsabilidad por cualquier incumplimiento de las
directrices establecidas anteriormente o cualquier uso inapropiado del teléfono. El
fabricante se reserva el derecho de modificar sin previo aviso la información contenida en
este manual. El contenido de este manual podría cambiar con respecto al contenido
mostrado por el teléfono. En tal caso, prevalece el contenido mostrado por el teléfono.
Copyright © 2015 NGM Italia
Ninguna parte de esta publicación puede ser reproducida, distribuida, traducida, transmitida en
cualquier forma o por cualquier medio, electrónico o mecánico, incluyendo fotocopia, grabación o
almacenamiento en cualquier sistema de almacenamiento de información o de recuperación de
información, sin el consentimiento previo por escrito de NGM Italia .
Bluetooth® es una marca comercial registrada en todo el mundo del Bluetooth SIG, Inc.
Wi-Fi® y el logo Wi-Fi son marcas comerciales registradas de Wi-Fi Alliance.
Page 72
72
FRANÇAIS
Bienvenue dans le monde NGM Android™. Merci de l'achat de NGM Youcolor M500.
Avec cet appareil, vous accéderez aux nombreuses fonctionnalités du système
d'exploitation Android
TM
5.0, Lollipop pour gérer vos contacts, e-mails, réseaux
sociaux et découvrir les opportunités du réseau Internet en un seul toucher! Explorez
tout le potentiel de votre nouveau téléphone "intelligent". Par rapport aux
Smartphone mono SIM, NGM Youcolor M500 offre la commodité du Dual SIM, qui
depuis toujours caractérise l'entière gamme des téléphones NGM, c'est à dire la
possibilité de gérer deux SIM et par conséquent deux numéros téléphoniques. Vous
découvrirez les fonctionnalités utiles telles que la configuration d’une SIM préférée
pour les appels, messages et connexion de données. Visitant le site officiel
www.ngm.eu vous pourrez connaitre l'entière gamme des mobiles NGM, essayez
notre service pratique et fonctionnel e-commerce pour acheter des téléphones et
accessoires, demander assistance, accès au forum d'assistance technique et
télécharger des mises à jour logicielles.
Attention: la connexion de données de NGM Youcolor M500 est active au premier
allumage du téléphone (ou après chaque éventuel rétablissement des paramètres
d'usine). Si vous ne disposez pas d'un tarif spécial ou "flat" pour la connexion des
données avec votre SIM, il est conseillé de désactiver le trafic données et configurer
une connexion Wi-Fi, afin d'éviter les frais supplémentaires.
Page 73
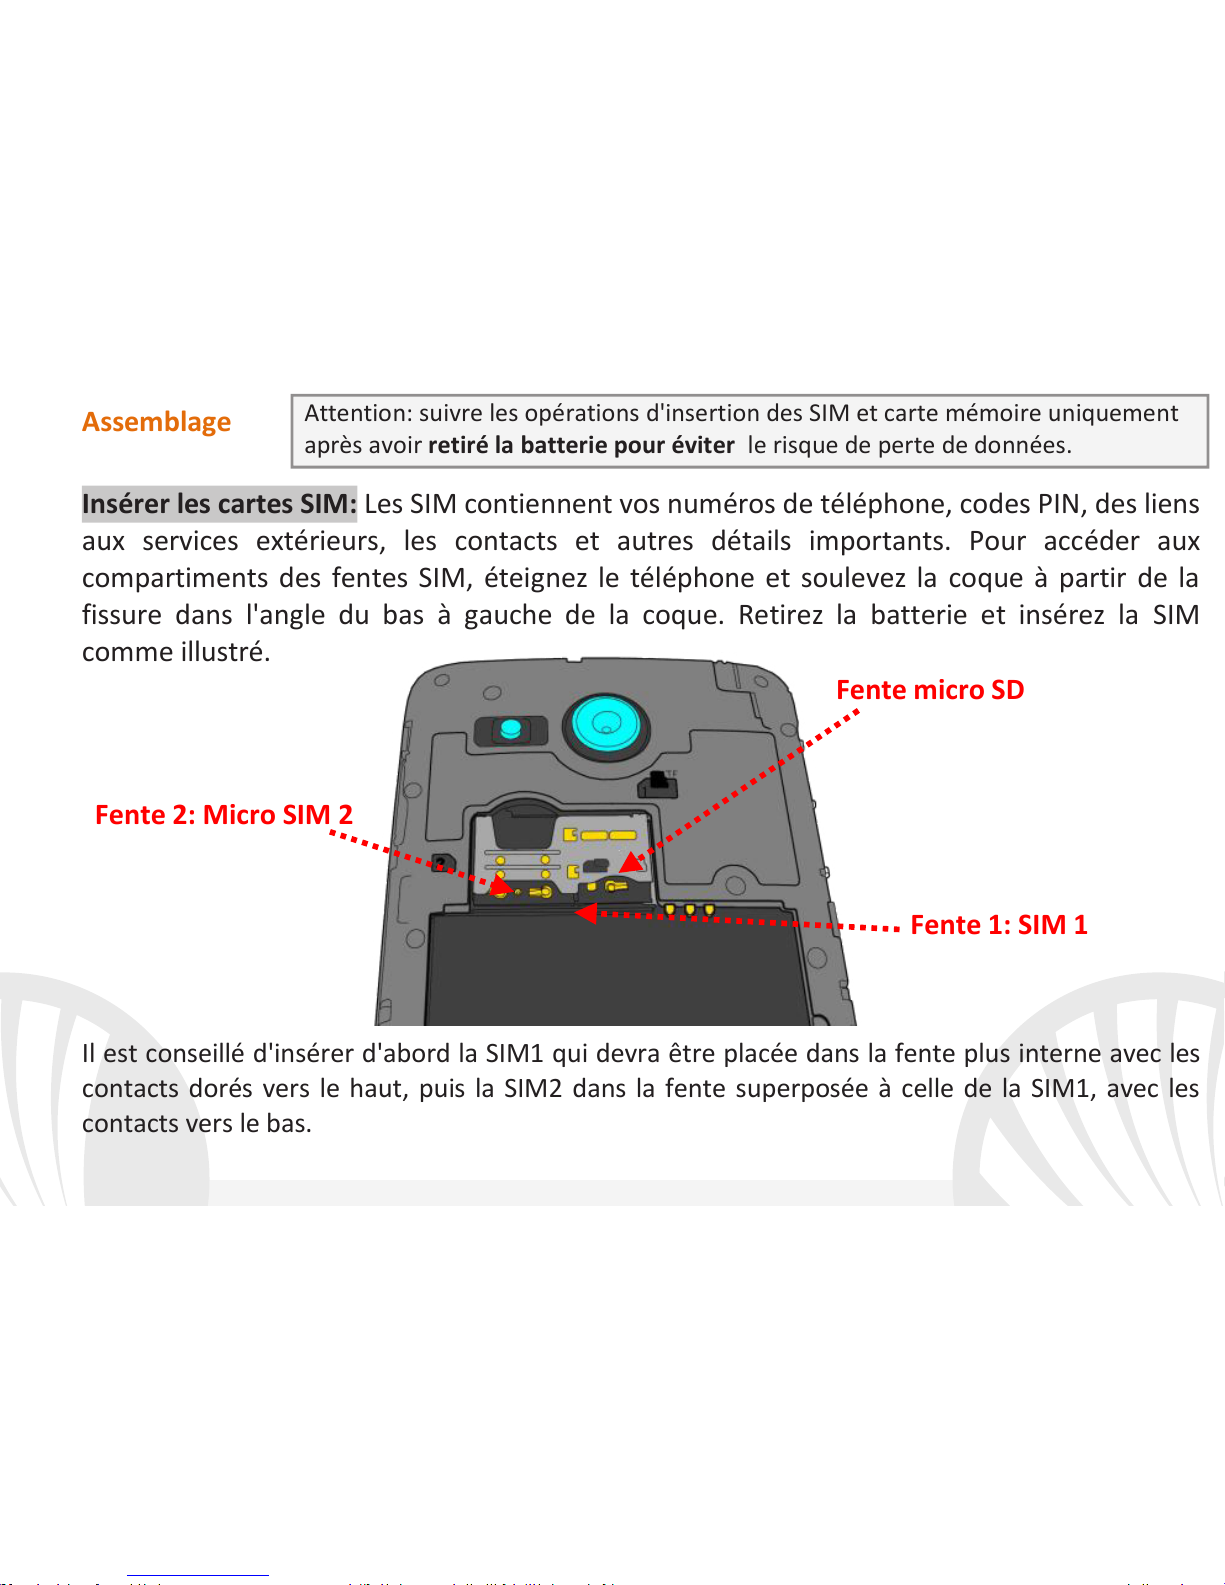
73
FRANÇAIS
Assemblage
Insérer les cartes SIM: Les SIM contiennent vos numéros de téléphone, codes PIN, des liens
aux services extérieurs, les contacts et autres détails importants. Pour accéder aux
compartiments des fentes SIM, éteignez le téléphone et soulevez la coque à partir de la
fissure dans l'angle du bas à gauche de la coque. Retirez la batterie et insérez la SIM
comme illustré.
Il est conseillé d'insérer d'abord la SIM1 qui devra être placée dans la fente plus interne avec les
contacts dorés vers le haut, puis la SIM2 dans la fente superposée à celle de la SIM1, avec les
contacts vers le bas.
Attention: suivre les opérations d'insertion des SIM et carte mémoire uniquement
après avoir retiré la batterie pour éviter le risque de perte de données.
Fente micro SD
Fente 1: SIM 1
Fente 2: Micro SIM 2
Page 74
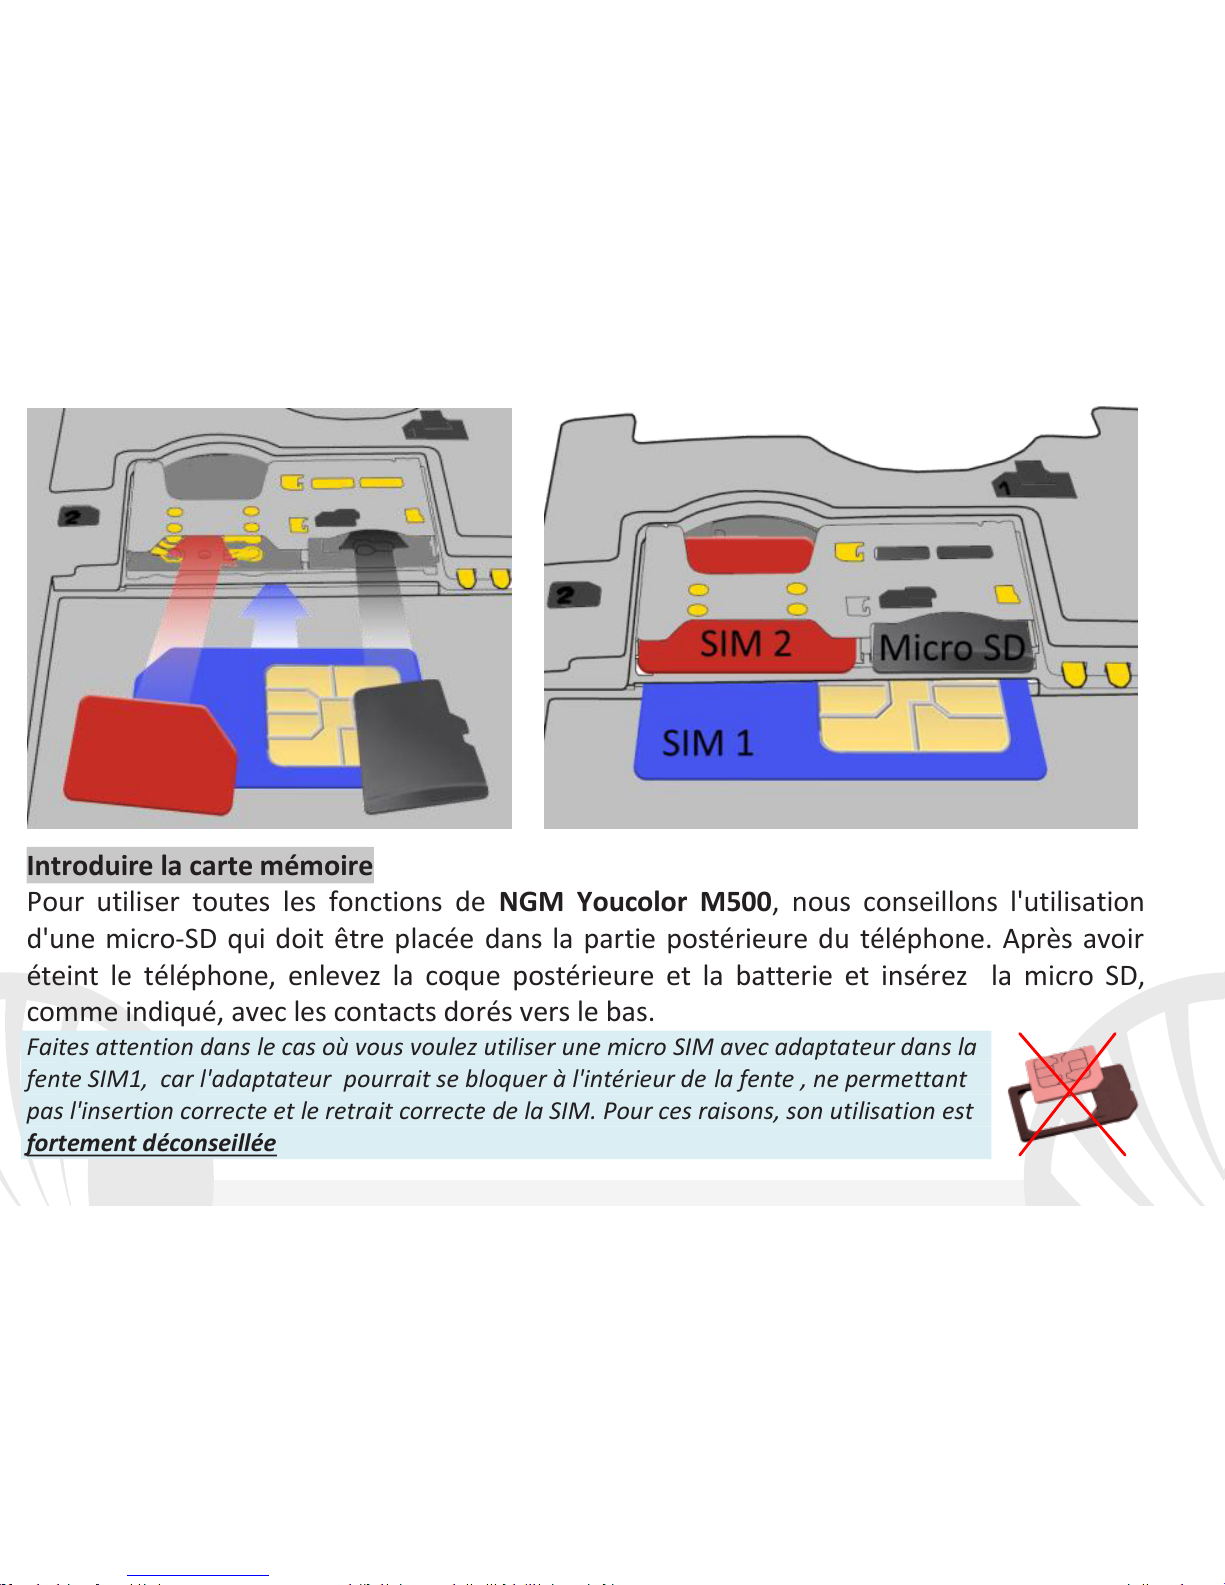
74
FRANÇAIS
Introduire la carte mémoire
Pour utiliser toutes les fonctions de NGM Youcolor M500, nous conseillons l'utilisation
d'une micro-SD qui doit être placée dans la partie postérieure du téléphone. Après avoir
éteint le téléphone, enlevez la coque postérieure et la batterie et insérez la micro SD,
comme indiqué, avec les contacts dorés vers le bas.
Faites attention dans le cas où vous voulez utiliser une micro SIM avec adaptateur dans la
fente SIM1, car l'adaptateur pourrait se bloquer à l'intérieur de la fente , ne permettant
pas l'insertion correcte et le retrait correcte de la SIM. Pour ces raisons, son utilisation est
fortement déconseillée
Page 75
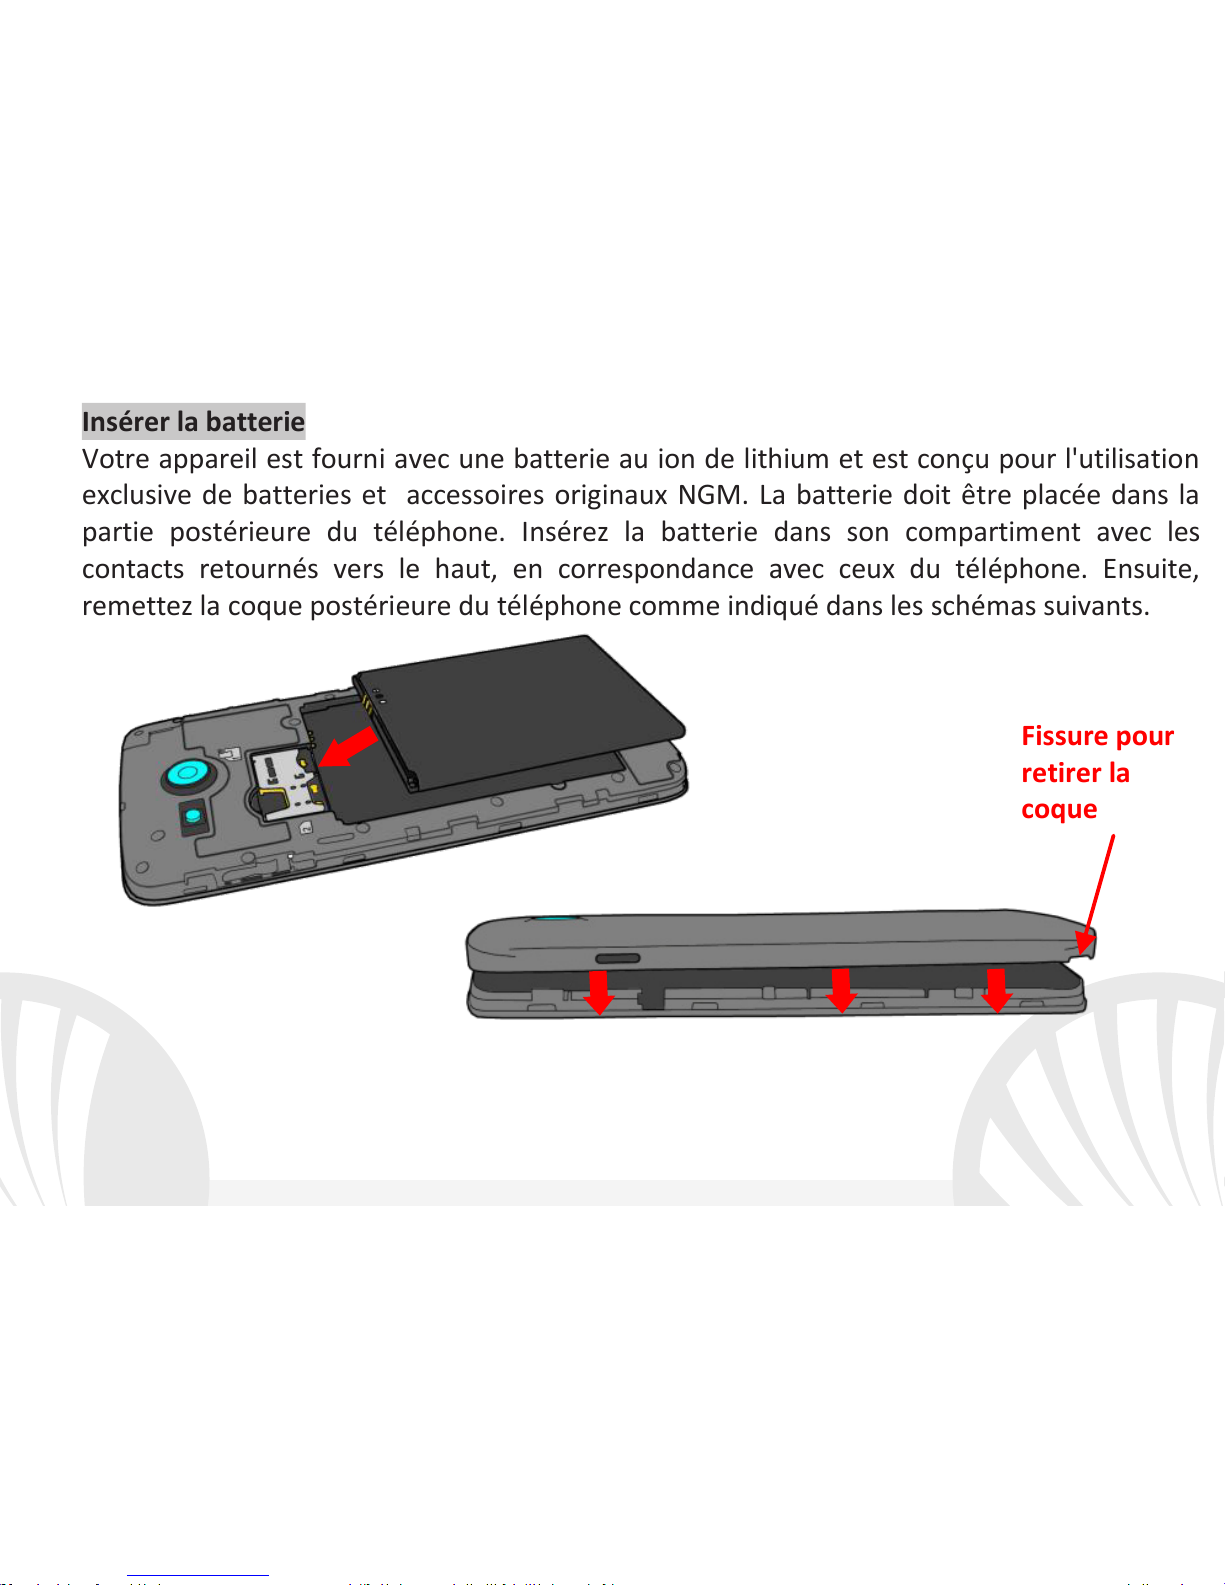
75
FRANÇAIS
Insérer la batterie
Votre appareil est fourni avec une batterie au ion de lithium et est conçu pour l'utilisation
exclusive de batteries et accessoires originaux NGM. La batterie doit être placée dans la
partie postérieure du téléphone. Insérez la batterie dans son compartiment avec les
contacts retournés vers le haut, en correspondance avec ceux du téléphone. Ensuite,
remettez la coque postérieure du téléphone comme indiqué dans les schémas suivants.
Fissure pour
retirer la
coque
Page 76

76
FRANÇAIS
Charger la batterie
Charger la batterie avant de commencer à utiliser l'appareil. Utilisez le câble USB fourni et
le connecteur USB placé sur le côté supérieur du téléphone. Branchez le chargeur à une
prise de courant, puis l'appareil au câble USB. Vous pouvez charger le téléphone aussi en le
reliant au PC, mais dans ce cas la charge sera plus lente. Lorsque la batterie est en charge,
une icône animée sur l'écran indique l'état d'avancement du processus, si le téléphone est
allumé. Une fois que l'icône de la batterie est pleine, la charge est complétée et le
téléphone peut être déconnecté du réseau électrique
Attention: Ne connectez pas votre téléphone à un ordinateur que vous allumez ou éteignez
pour éviter les surtensions. Afin de préserver le bon fonctionnement du produit et l'intégrité
de la garantie, nous vous recommandons l'utilisation de chargeurs originaux NGM.
Procédez à la Charge exclusivement dans des endroits couverts et secs. Un léger
réchauffement du téléphone pendant la charge est normal. La batterie atteindra son
efficacité fonctionnelle uniquement après quelques cycles complets de recharge.
Allumer, éteindre et standby
Pour allumer le dispositif, appuyez et maintenez la touche ON/OFF. Pour éteindre votre
appareil, appuyez et maintenez la même touche et confirmez l'arrêt en sélectionnant
"Éteindre". Une pression brève permet de passer rapidement en mode standby (écran
éteint) ou de revenir de cette modalité à l' écran de déverrouillage(voir ci-dessous).
Page 77
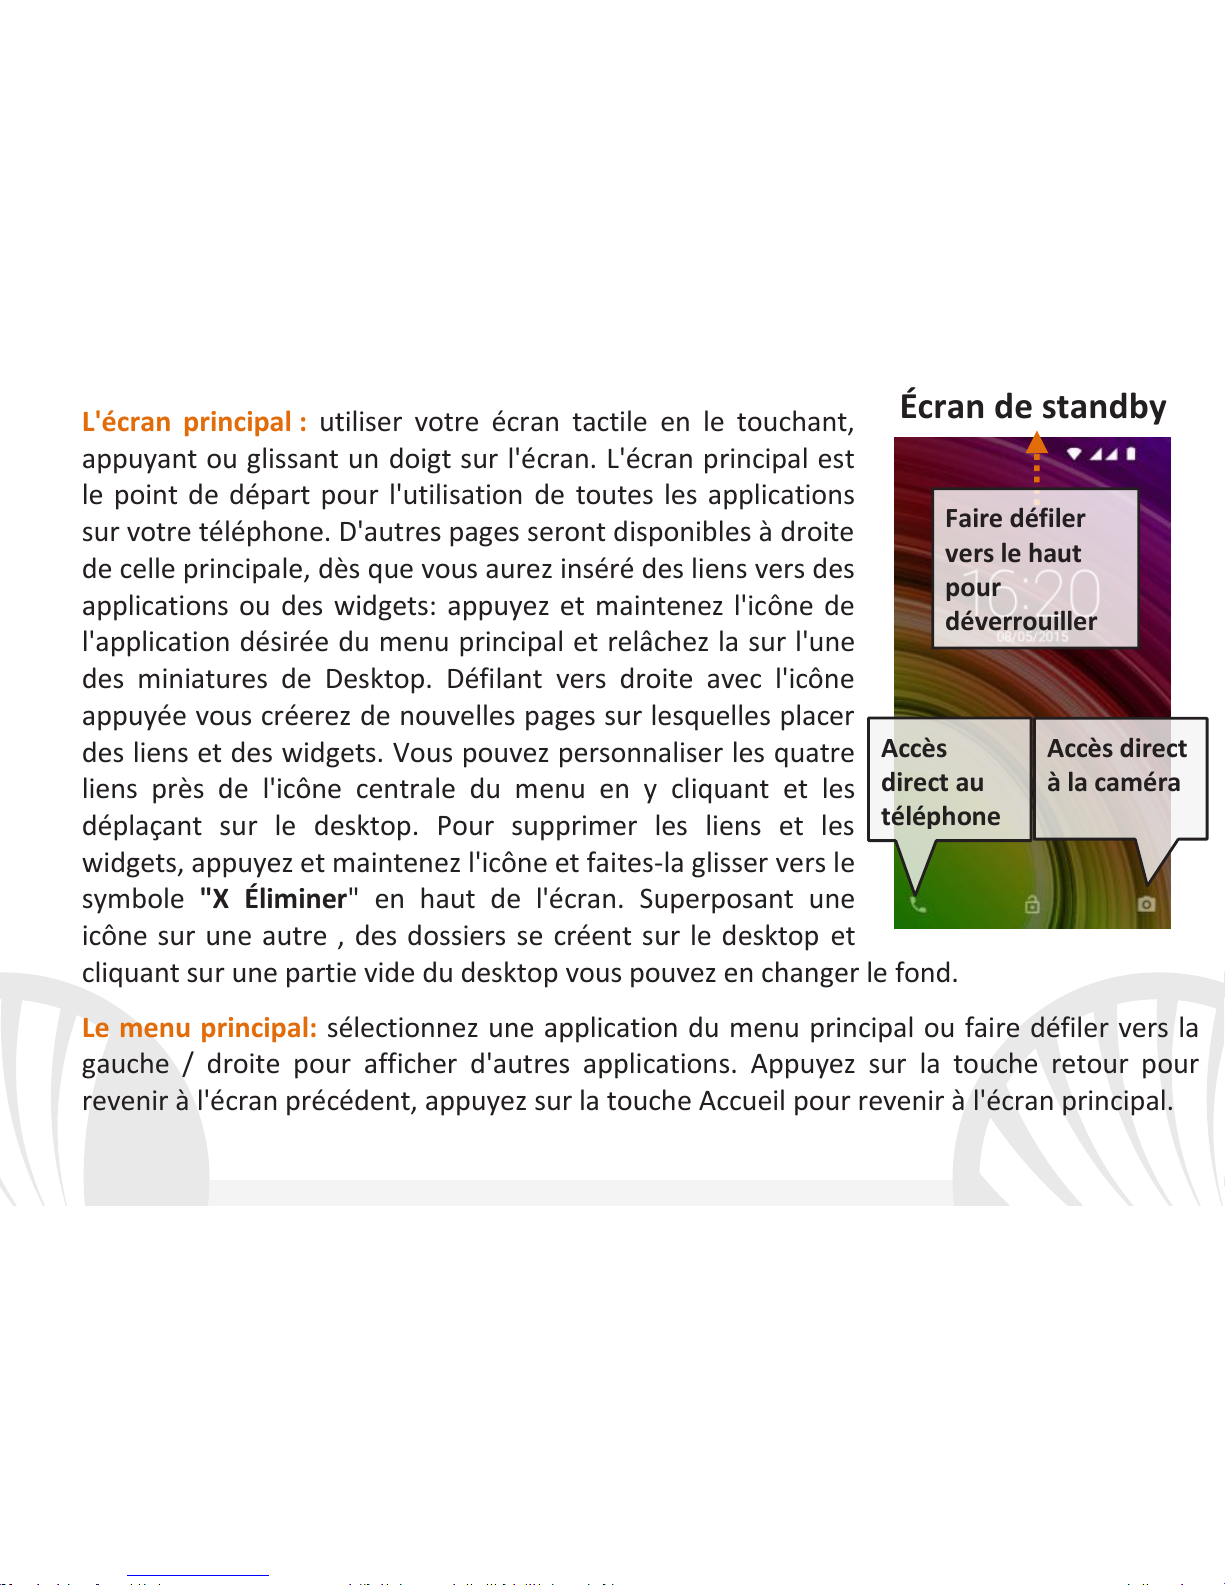
77
FRANÇAIS
L'écran principal : utiliser votre écran tactile en le touchant,
appuyant ou glissant un doigt sur l'écran. L'écran principal est
le point de départ pour l'utilisation de toutes les applications
sur votre téléphone. D'autres pages seront disponibles à droite
de celle principale, dès que vous aurez inséré des liens vers des
applications ou des widgets: appuyez et maintenez l'icône de
l'application désirée du menu principal et relâchez la sur l'une
des miniatures de Desktop. Défilant vers droite avec l'icône
appuyée vous créerez de nouvelles pages sur lesquelles placer
des liens et des widgets. Vous pouvez personnaliser les quatre
liens près de l'icône centrale du menu en y cliquant et les
déplaçant sur le desktop. Pour supprimer les liens et les
widgets, appuyez et maintenez l'icône et faites-la glisser vers le
symbole "X Éliminer" en haut de l'écran. Superposant une
icône sur une autre , des dossiers se créent sur le desktop et
cliquant sur une partie vide du desktop vous pouvez en changer le fond.
Le menu principal: sélectionnez une application du menu principal ou faire défiler vers la
gauche / droite pour afficher d'autres applications. Appuyez sur la touche retour pour
revenir à l'écran précédent, appuyez sur la touche Accueil pour revenir à l'écran principal.
Écran de standby
Accès
direct au
téléphone
Accès direct
à la caméra
Faire défiler
vers le haut
pour
déverrouiller
Page 78
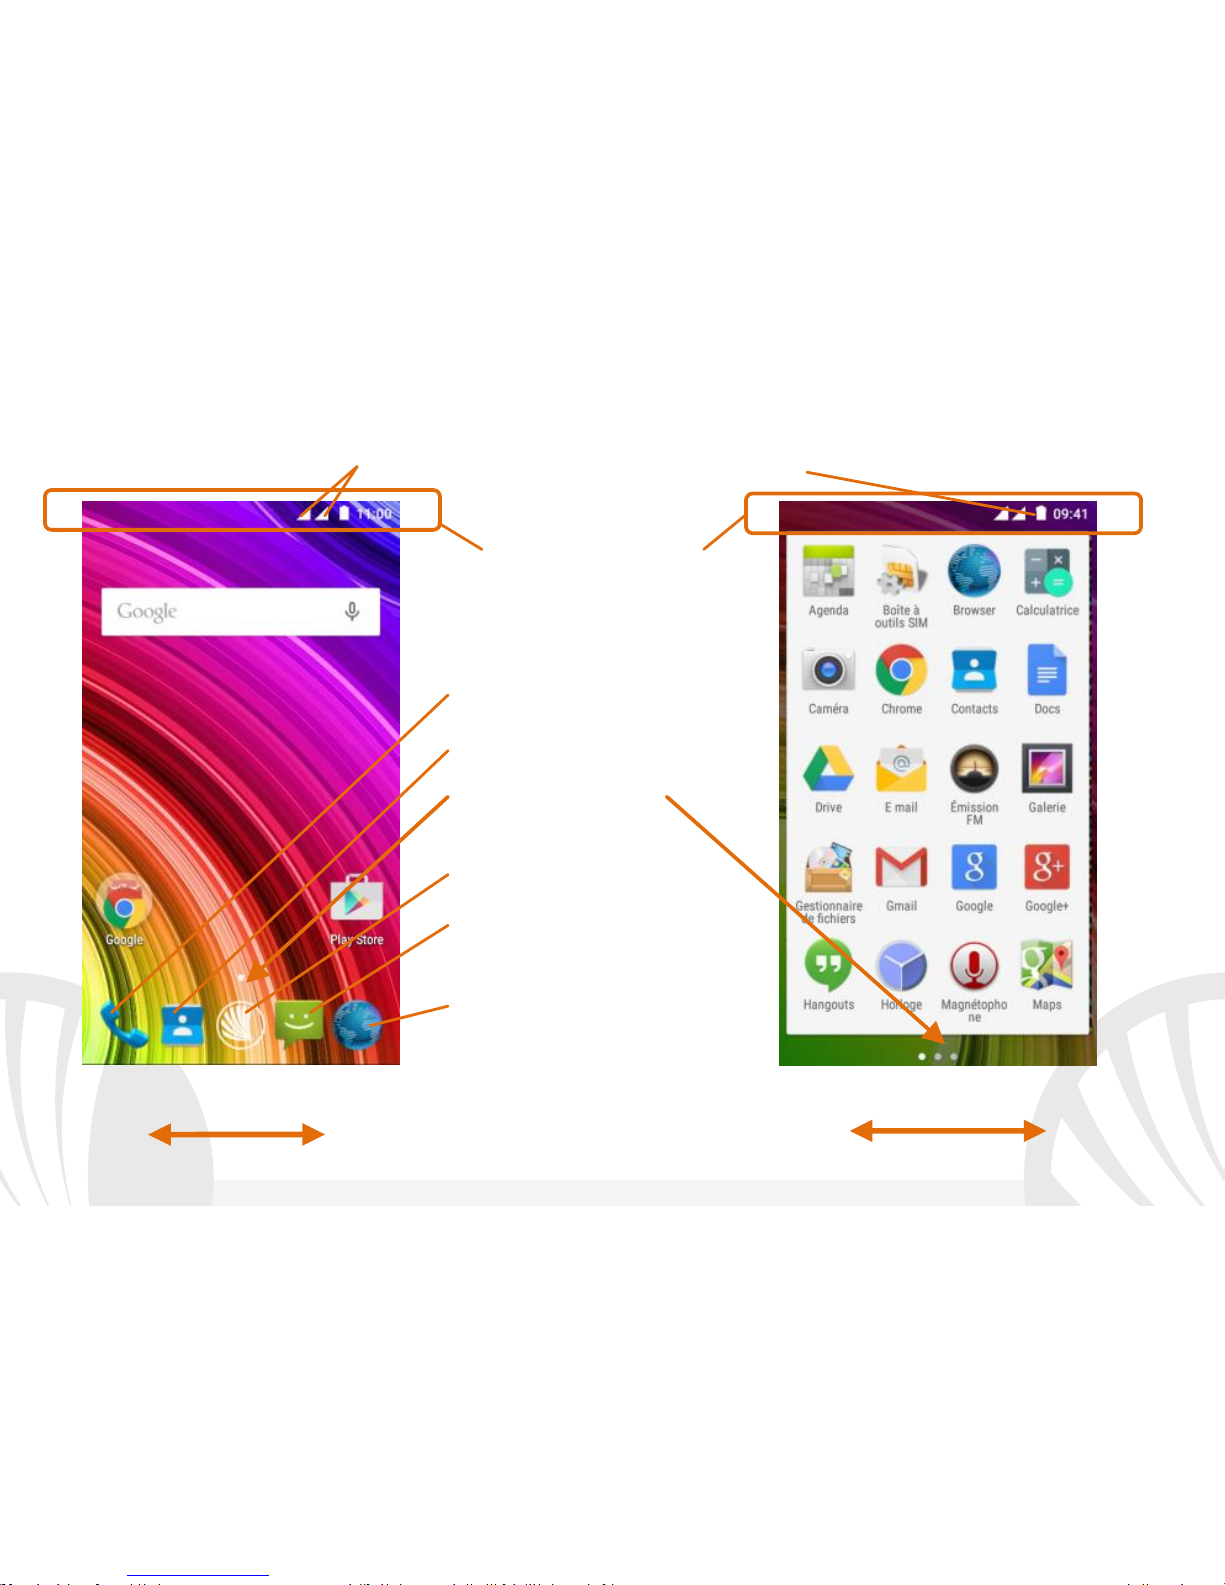
78
FRANÇAIS
Affichage principal
Menu principal
Panneau/barre de notification
intensité du signal SIM et niveau de batterie
Indicatrice de page
Téléphone
Rubrique
Menu principal
Internet
Messages
Parcourir écran HOME
Parcourir menu
Page 79
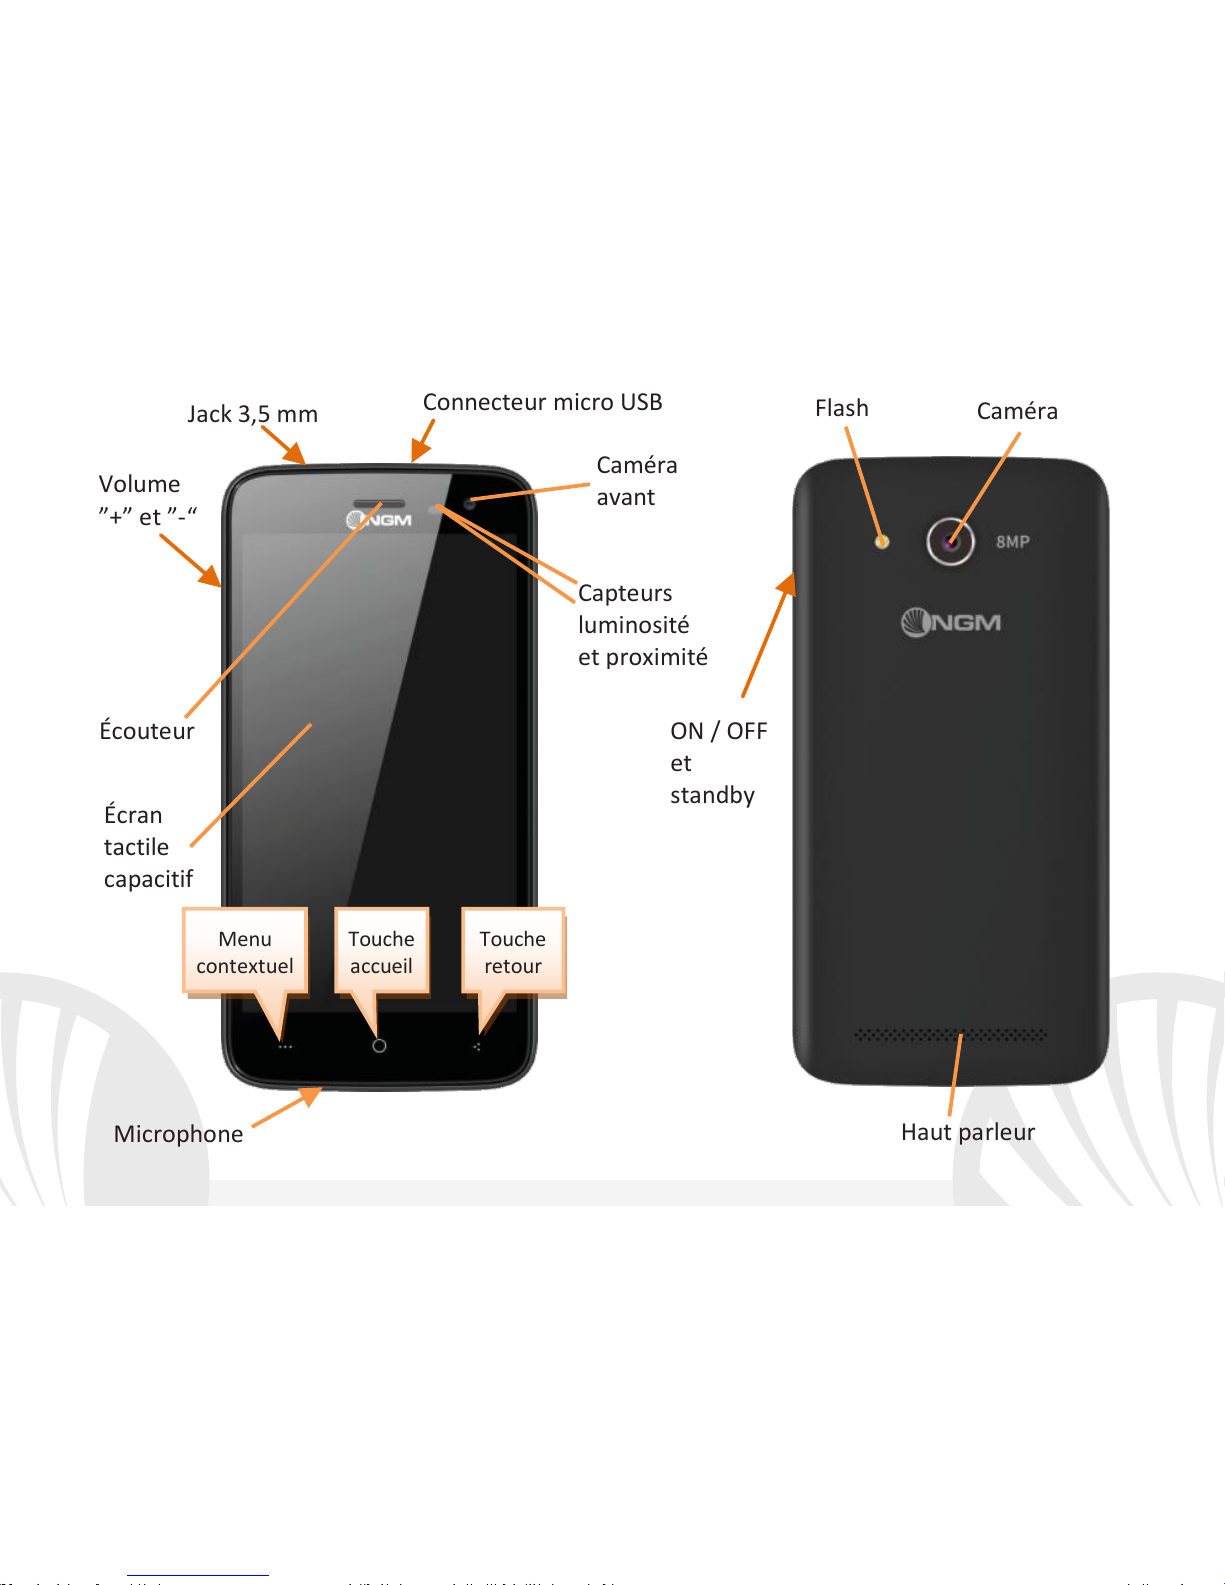
79
FRANÇAIS
ON / OFF
et
standby
Écran
tactile
capacitif
Flash
Caméra
Connecteur micro USB
Jack 3,5 mm
Caméra
avant
Écouteur
Capteurs
luminosité
et proximité
Haut parleur
Volume
”+” et ”-“
Microphone
Menu
contextuel
Touche
retour
Touche
accueil
Page 80
80
FRANÇAIS
Choix rapide
Panneau de notification: pour ouvrir le panneau de notification, touchez le champs des
icônes dans la partie haute de l'écran. Défilant vers le bas les notifications seront d'abord
visualisées, en continuant à défiler vers le bas vous pourrez visualiser aussi les touches de
configuration rapide. Avec éliminer les notifications dans le panneau. Pour masquer le
panneau, faites glisser vers le haut la partie inférieure du panneau ou sur la touche Retour.
Les notifications seront également visibles dans l'écran de déverrouillage.
Applications récentes: lorsque vous vous trouvez dans n'importe quelle application,
appuyez et maintenez la touche : vous verrez la liste des applications récentes
auxquelles vous vous êtes connectées, directement sélectionnables.
Verrouillage écran et vibration: dans le menu principal, sélectionnez Paramètres >
Sécurité > Verrouillage écran. Sélectionnez le mode désiré (Aucun, glissement,
déverrouillage vocal, motif, PIN ou Mot de passe) Et confirmez. Pour verrouiller
rapidement l'écran, appuyez brièvement sur la touche ON/OFF du téléphone. Pour
déverrouiller l'écran, suivre les indications à l'écran.
Menu contextuel: beaucoup d'applications prévoient l'utilisation du Menu contextuel
En cliquant sur cette touche, vous pouvez visualiser un menu contextuel se référant à
l'application même et ses fonctions relatives.
Page 81

81
FRANÇAIS
Gérer les deux cartes SIM
Dans le menu principal, sélectionnez Paramètres > Gestion SIM. Sélectionnez ou
désélectionnez l'interrupteur près des opérateurs téléphoniques correspondants à "SIM1"
et "SIM2" pour activer ou désactiver de manière sélective les SIM à tout moment. Dans ce
menu, vous pouvez également personnaliser la couleur et le nom de l'icône de chaque SIM
et décider laquelle utiliser comme prédéfinie pour les appels, les messages et la connexion
de données ou choisissant "toujours demander" si vous ne désirez pas configurer une SIM
prédéfinie.
Sélectionnant une SIM sur laquelle activer les données, sur cette même SIM sera
automatiquement activé le service 3G. Ceci permet de passer facilement d'une SIM à
l'autre le 3G, qui est habituellement confiné exclusivement à la fente 1, sans devoir les
inverser physiquement.
Smart Gestures
Du menu Paramètres, vous pouvez activer les fonctions innovatrices NGM qui vous
permettent de gérer les fonctionnalités principales du téléphone avec la praticité maximum
et la rapidité.
Mode guest
Les messages, le registre des appels et la galerie de photos et vidéos seront
temporairement cachés et toute modification sur le desktop sera interdite. Lorsque cette
modalité est activée, une icône sera visible sur la barre des notifications. Dans Paramètres
> Sécurité, il est possible configurer un mot de passe pour gérer cette modalité.
Page 82
82
FRANÇAIS
Gérer un appel
De l'écran principal, appuyez sur l'icône téléphone, composez le numéro à appeler
utilisant le clavier virtuel ( pour le visualiser sélectionnez l'icône )
Appuyez l'icône combiné puis la SIM désirée.
Pour terminer, appuyez sur l'icône rouge de fin d'appel.
Pour répondre à un appel, sélectionnez Répondre dans la fenêtre qui apparaît en haut
de l'écran, ou appuyez sur la fenêtre pour visualiser l'écran d'appel. Puis, faites glisser le
combiné central à droite vers le combiné bleu, pour répondre, pour rejeter un appel ,
par contre, faites-le glisser vers la gauche sur le combiné rouge, pour rejeter avec un
message portez le combiné vers le haut. Pour rendre silencieux un appel entrant,
appuyez sur la touche Volume "+" ou "-" (Sur le côté gauche du téléphone).
Rappeler un numéro du registre des appels
Du menu principal, entrez dans le menu téléphone et sélectionnez chronologie d'appels
du menu contextuel ( d'abord faites disparaitre le clavier virtuel), d'où sera visualisé le
registre des appels manqués, reçus et effectués.
Sélectionnez le numéro désiré puis Rappeler, donc choisissez avec quelle SIM lancer
l'appel dans le cas où aucune SIM soit prédéfinie.
Page 83
83
FRANÇAIS
GÉRER LES CONTACTS
Ajouter un nouveau contact
Dans le menu principal, sélectionnez Contacts.
Appuyez sur l'icône dans le bas.
Choisir où enregistrer le nouveau contact (compte, téléphone, SIM1 ou SIM2).
Insérez Nom, Numéro et éventuels autres détails du contact (d'autres détails peuvent
être ajouter uniquement si sauvegardés sur téléphone) et confirmez
Ajouter un nouveau contact du registre des appels
Du menu Téléphone, accédez au Registre des appels (menu contextuel).
Cliquez sur l'image du contact vide puis sélectionnez l'icône en haut à droite.
Sélectionnez Créer Nouveau contact dans le haut, ou ajoutez le numéro à un contact
existant en le sélectionnant dans la rubrique. Après avoir ajouté un nom et éventuelle
autre information (si vous enregistrez sur Téléphone), Confirmez avec Sauvegarder.
Configurer les sonneries
Du menu principal, sélectionnez Paramètres > Audio et notifications > Général.
Sélectionnez Sonnerie téléphone > SIM1 ou SIM2 et choisissez la sonnerie désirée pour
chaque SIM. Si vous souhaitez définir une sonnerie personnalisée: dans Musique
sélectionnez la piste audio désirée en appuyant longuement et choisissez Utiliser comme
Sonnerie dans le menu contextuel. Le fichier audio sera ajouté à la liste des sonneries
disponibles.
Note: possibilité d’utiliser sonneries des fichiers de format*mid,*wav ,ogg *mp3.
Note: Dans le menu contextuel de la rubrique vous accéder aux fonctions
de importation/exportation des contacts et des différents paramètres utiles.
Page 84

84
FRANÇAIS
Activer/Désactiver la vibration: pour désactiver la sonnerie d'appel et messages appuyez
la touche volume "-", jusqu'à atteindre le volume minimum, le téléphone entrera en mode
vibration. De la même façon, vous pouvez gérer les interruptions des notifications.
Interruption de notifications et notification applications Androïd
TM
5.0, Lollipop a
introduit de nouvelles fonctionnalités. En Paramètres > Audio et Notifications >
Interruptions vous pouvez choisir de ne pas recevoir des notifications pendant certains
jours et à certaines heures. En particulier, vous pouvez configurer trois statuts:
Ne pas interrompre: toutes les notifications seront reçues
Autoriser uniquement les interruptions avec priorité: uniquement les notifications
prioritaires seront reçues, sélectionnables dans le menu (événements et rappels,
appels ou messages. Les avis sont toujours considérés interruptions avec priorité)
Toujours interrompre: aucune notification même prioritaire ne sera reçue, pendant les
jours et heures établis
Une fois les notifications prioritaires établies, desquelles vous voulez recevoir quand même
les notifications, vous pouvez configurer une période de temps pendant laquelle
interrompre la réception de toutes les notifications pas considérées prioritaires. Á
l'activation des interruptions une étoile apparaitra sur la barre des notifications. En
Paramètres > Audio et notifications > Notifications, vous pouvez bloquer la réception des
notifications provenant des applications spécifiques sélectionnables du menu Notifications
applications.
Page 85
85
FRANÇAIS
Envoyer et lire SMS et MMS
Lire SMS et MMS: lorsque vous recevez un SMS ou MMS , une icône apparaît dans le
panneau de notification. En cliquant sur l'icône qui apparaît, vous pouvez accéder
directement à la conversation et lire le message entrant. Il est possible visualiser les
messages entrants dans l'écran principal ou du menu, sélectionnant Messages.
Envoyer SMS et MMS: de la page ou menu principal, choisissez Messages et donc l'icône
dans le bas. Composer les premières lettres du nom dans le champ du destinataire pour
rechercher un contact et le sélectionner dans la rubrique ou composez directement le
numéro, ou sélectionnez l'icône près du champs et cochez le/les destinataires.
Introduire le texte dans l'espace adéquat avec le clavier virtuel. Sélectionnez "+" pour
inclure des pièces jointes multimédia (le message sera converti en MMS) et appuyez sur
choisissant la SIM désirée.
CONNECTIVITÉ: pour utiliser au mieux la potentialité offerte par le terminal et son système
d'exploitation, il est nécessaire disposer d'une connexion de données active; la connexion
de données de NGM Youcolor M500 est active au moment du premier allumage du
téléphone. S'il n'est pas prévu par votre abonnement, le trafic de données implique des
frais, nous vous conseillons donc de configurer l'accès Internet par le WiFi. Pour activer le
trafic de données sur une des SIM, sélectionnez Paramètres > Gestion SIM > Connexion de
données, ou l'activer appuyant sur paramètres rapides sur le panneau des notifications.
Page 86
86
FRANÇAIS
Se connecter à Internet avec la fonction Wi-Fi® vous pouvez vous connecter au réseau
WLAN utilisant la fonction Wi-Fi. Pour l'activer, choisissez dans le menu principal
Paramètres > WiFi I/O. Respectez toutes les indications précisées par le personnel autorisé
dans les lieux où l'utilisation d'appareils wireless est limitée (avions et les hôpitaux). Passer
en mode hors connexion lorsque vous devez utiliser uniquement les services qui ne
nécessitent pas l'accès au réseau. Se connecter à un dispositif Bluetooth® allumez le
dispositif Bluetooth auquel vous désirez vous connecter. Se référer à la documentation du
dispositif. Dans le menu principal, sélectionnez Paramètres> Bluetooth on/ off pour
activer le Bluetooth. Dans le menu contextuel, vous trouverez les fonctions et paramètres
supplémentaires. Choisir Rechercher les appareils pour démarrer automatiquement la
recherche de dispositifs Bluetooth. Parmi les dispositifs détectés, sélectionner le nom du
dispositif à associer. Le téléphone tentera de s'associer à l'appareil, il pourrait être
demandé d'entrer un code d'appareillage. Se connecter à Internet: dans le menu principal,
choisir Navigateur. Composer l'URL dans la barre d'adresse pour lancer la navigation. Si
vous choisissez de naviguer utilisant la connexion de données du réseau téléphonique,
informez vous des frais ou choisir un abonnement de données «flat» avec votre opérateur.
En alternative, utiliser la connexion Wi-Fi (voir paragraphe"Connectivité").
Configuration compte Gmail: pour profiter au mieux des fonctionnalités du système
Android
TM
, il est nécessaire configurer un compte Gmail nouveau ou en insérer un
prédéfini. Cela vous permettra d'accéder à toutes les applications du système Android
TM
.
Page 87

87
FRANÇAIS
Email: configurant un compte prédéfini, vous pouvez facilement gérer les emails et les
visualiser automatiquement sur votre téléphone. Si vous souhaitez utiliser un fournisseur
de service de messagerie différent de ceux suggérés par le téléphone, vous pourrez créer
un compte supplémentaire dans l' application Email dans le menu principal.
Synchronisation: la synchronisation est le moyen le plus efficace pour gérer vos propres
données utiles car cela permet de faire une sauvegarde de données de votre appareil avec
le compte Internet. En cas de remplacement, perte ou dommages du téléphone, vous ne
perdrez pas ces données. La synchronisation peut être activée pour chaque application
installée synchronisable, la liste de ces applications se trouve dans Paramètres > (Compte)
[Liste des applications installées]. Pour ajouter un nouveau compte, cliquez Ajouter
compte. La synchronisation utilise une connexion de données active qui pourrait entraîner
des frais de trafic de données. Il est conseillé d'utiliser une connexion Wi-Fi lorsque cela est
disponible.
Géolocalisation GPS : le système de positionnement global (GPS) est un système de
positionnement par satellites, une couverture globale et continue. Pour accéder au GPS,
sélectionnez Paramètres > Position I/O. Lorsque le GPS est activé, le téléphone recueille
des données des satellites disponibles et détermine sa position actuelle. Les temps de FIX
(détection de position) sont variables et peuvent être affectés par plusieurs facteurs
externes (nébulosité, le blindage des bâtiments, etc.) Pour réduire la consommation de la
batterie et de la mémoire, il est recommandé de désactiver le GPS lorsqu'il n'est pas utilisé.
Page 88
88
FRANÇAIS
Attention: la mise en forme et la fourniture de ce manuel sont basées sur le système
d'exploitation AndroidTM; le fabricant n'assume aucune responsabilité pour toute violation
des lignes de conduite énoncées ci-dessus ou pour toute utilisation impropres du téléphone.
Le producteur se réserve le droit de modifier sans préavis les informations contenues dans
ce guide. Le contenu de ce manuel pourrait différer du contenu réel illustré sur le téléphone.
Dans ce cas, le second l'emporte.
Copyright © 2015 NGM Italia
Aucune partie de ce manuel peut être reproduite, distribuée, traduite, transmise sous aucune forme ou
moyen électronique ou mécanique, y compris photocopie, enregistrement ou sauvegarde dans un
système de stockage et de récupération, sans l'autorisation écrite par NGM Italia.
Bluetooth® est une marque commerciale déposée dans le monde de Bluetooth SIG, Inc
Wi-Fi®et le symbole Wi-Fi sont des marques commerciales déposées de Wi-Fi Alliance.
Page 89
89
ITALIANO
Benvenuti nel mondo di NGM AndroidTM. Grazie per aver acquistato NGM YouColor
M500. Con questo dispositivo potrete avere accesso alle molteplici funzionalità del
sistema operativo Android
TM
5.0, Lollipop per gestire i vostri contatti, email, i social
network e per scoprire le opportunità della rete Internet con un solo tocco! Esplorate
tutte le potenzialità del vostro nuovo telefono “intelligente”
. Rispetto agli
Smartphone mono SIM sul mercato, NGM YouColor M500 offre la comodità del Dual
SIM che da sempre caratterizza l’intera gamma dei telefoni NGM, ovvero la possibilità
di gestire due SIM e conseguentemente due numeri telefonici contemporaneamente.
Scoprirete delle funzioni utilissime come l’impostazione della SIM preferita per
chiamate, messaggi e connessione dati. Visitando il sito ufficiale www.ngm.eu potrete
conoscere l’intera gamma di telefoni NGM, provare il nostro pratico e funzionale
servizio di e-commerce per acquistare telefoni ed accessori, richiedere assistenza,
accedere al forum di assistenza tecnica e scaricare aggiornamenti software.
Attenzione: la connessione dati di NGM YouColor M500 è attiva al momento della
prima accensione del telefono (ed anche dopo ciascun eventuale ripristino delle
impostazioni di fabbrica). Se non si dispone di una tariffa agevolata o “flat” per la
connessione dati con la propria SIM, si consiglia di disattivare il traffico dati e
configurare una connessione Wi-Fi, al fine di evitare costi aggiuntivi.
Page 90
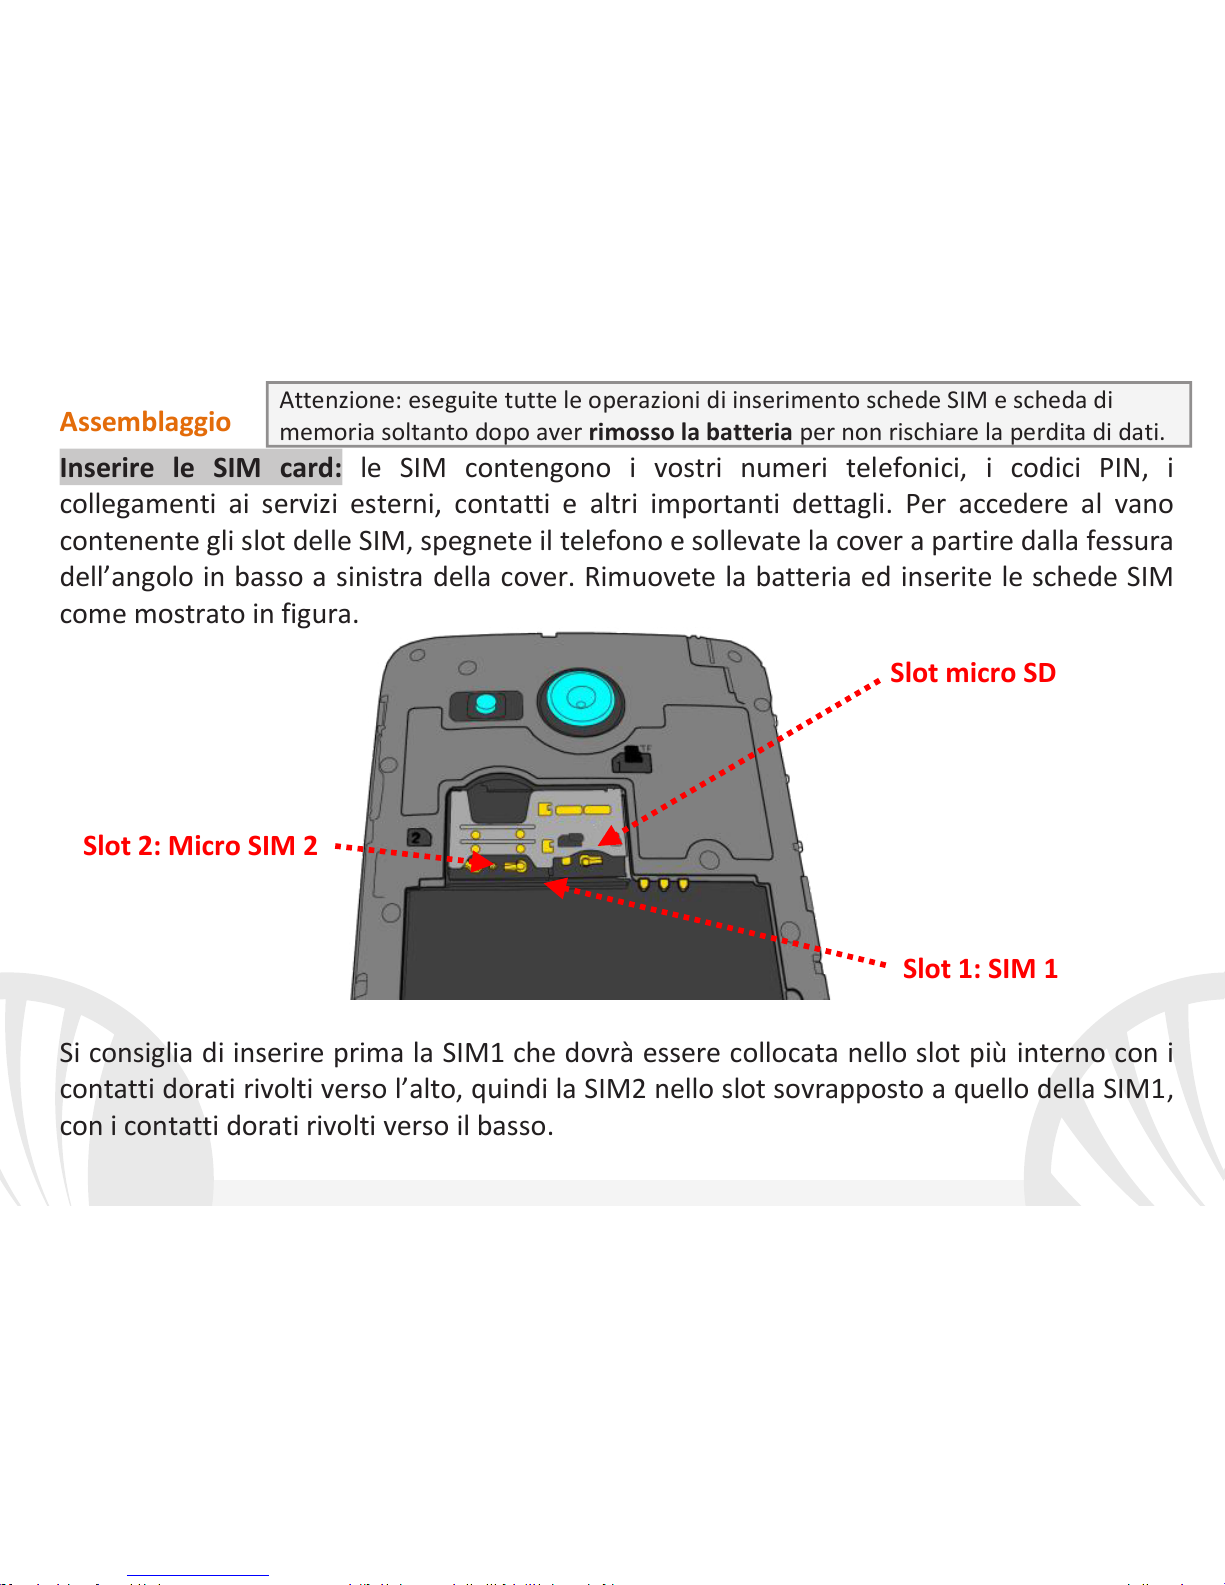
90
ITALIANO
Assemblaggio
Inserire le SIM card: le SIM contengono i vostri numeri telefonici, i codici PIN, i
collegamenti ai servizi esterni, contatti e altri importanti dettagli. Per accedere al vano
contenente gli slot delle SIM, spegnete il telefono e sollevate la cover a partire dalla fessura
dell’angolo in basso a sinistra della cover. Rimuovete la batteria ed inserite le schede SIM
come mostrato in figura.
Si consiglia di inserire prima la SIM1 che dovrà essere collocata nello slot più interno con i
contatti dorati rivolti verso l’alto, quindi la SIM2 nello slot sovrapposto a quello della SIM1,
con i contatti dorati rivolti verso il basso.
Attenzione: eseguite tutte le operazioni di inserimento schede SIM e scheda di
memoria soltanto dopo aver rimosso la batteria per non rischiare la perdita di dati.
Slot micro SD
Slot 1: SIM 1
Slot 2: Micro SIM 2
Page 91
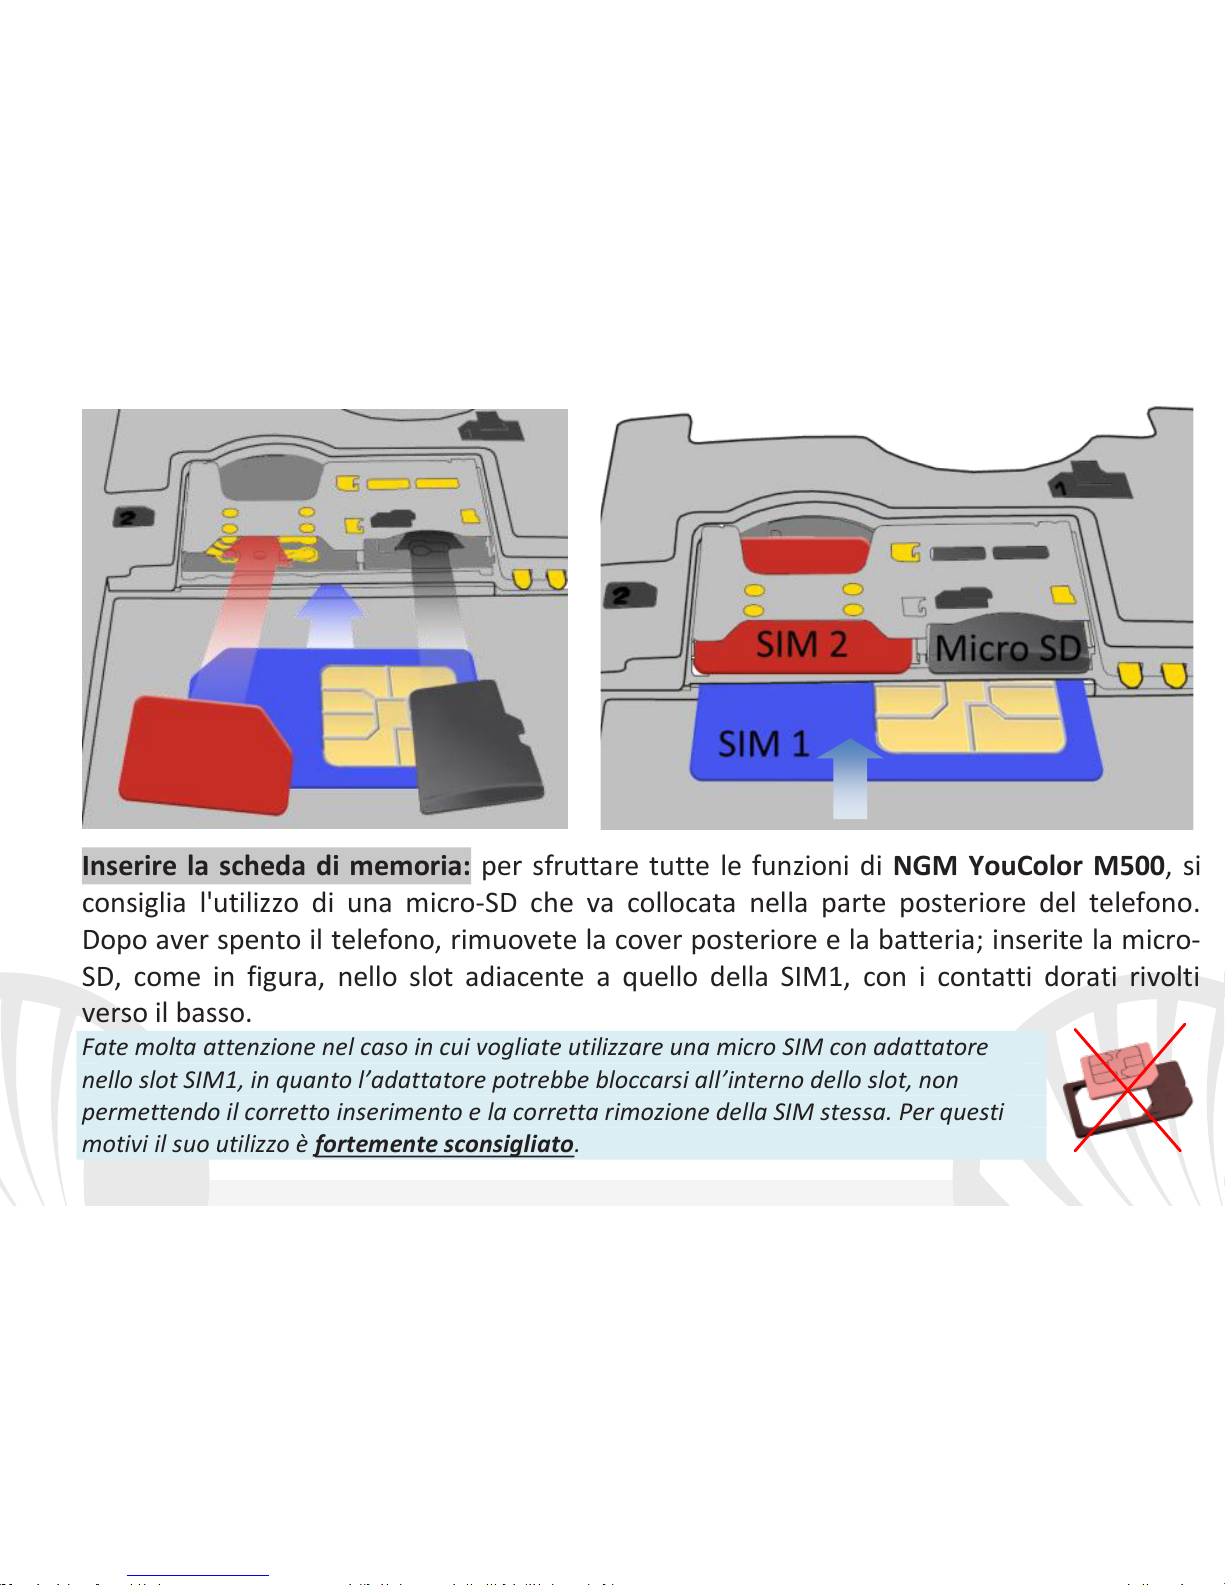
91
ITALIANO
Inserire la scheda di memoria: per sfruttare tutte le funzioni di NGM YouColor M500, si
consiglia l'utilizzo di una micro-SD che va collocata nella parte posteriore del telefono.
Dopo aver spento il telefono, rimuovete la cover posteriore e la batteria; inserite la micro-
SD, come in figura, nello slot adiacente a quello della SIM1, con i contatti dorati rivolti
verso il basso.
Fate molta attenzione nel caso in cui vogliate utilizzare una micro SIM con adattatore
nello slot SIM1, in quanto l’adattatore potrebbe bloccarsi all’interno dello slot, non
permettendo il corretto inserimento e la corretta rimozione della SIM stessa. Per questi
motivi il suo utilizzo è fortemente sconsigliato.
Page 92
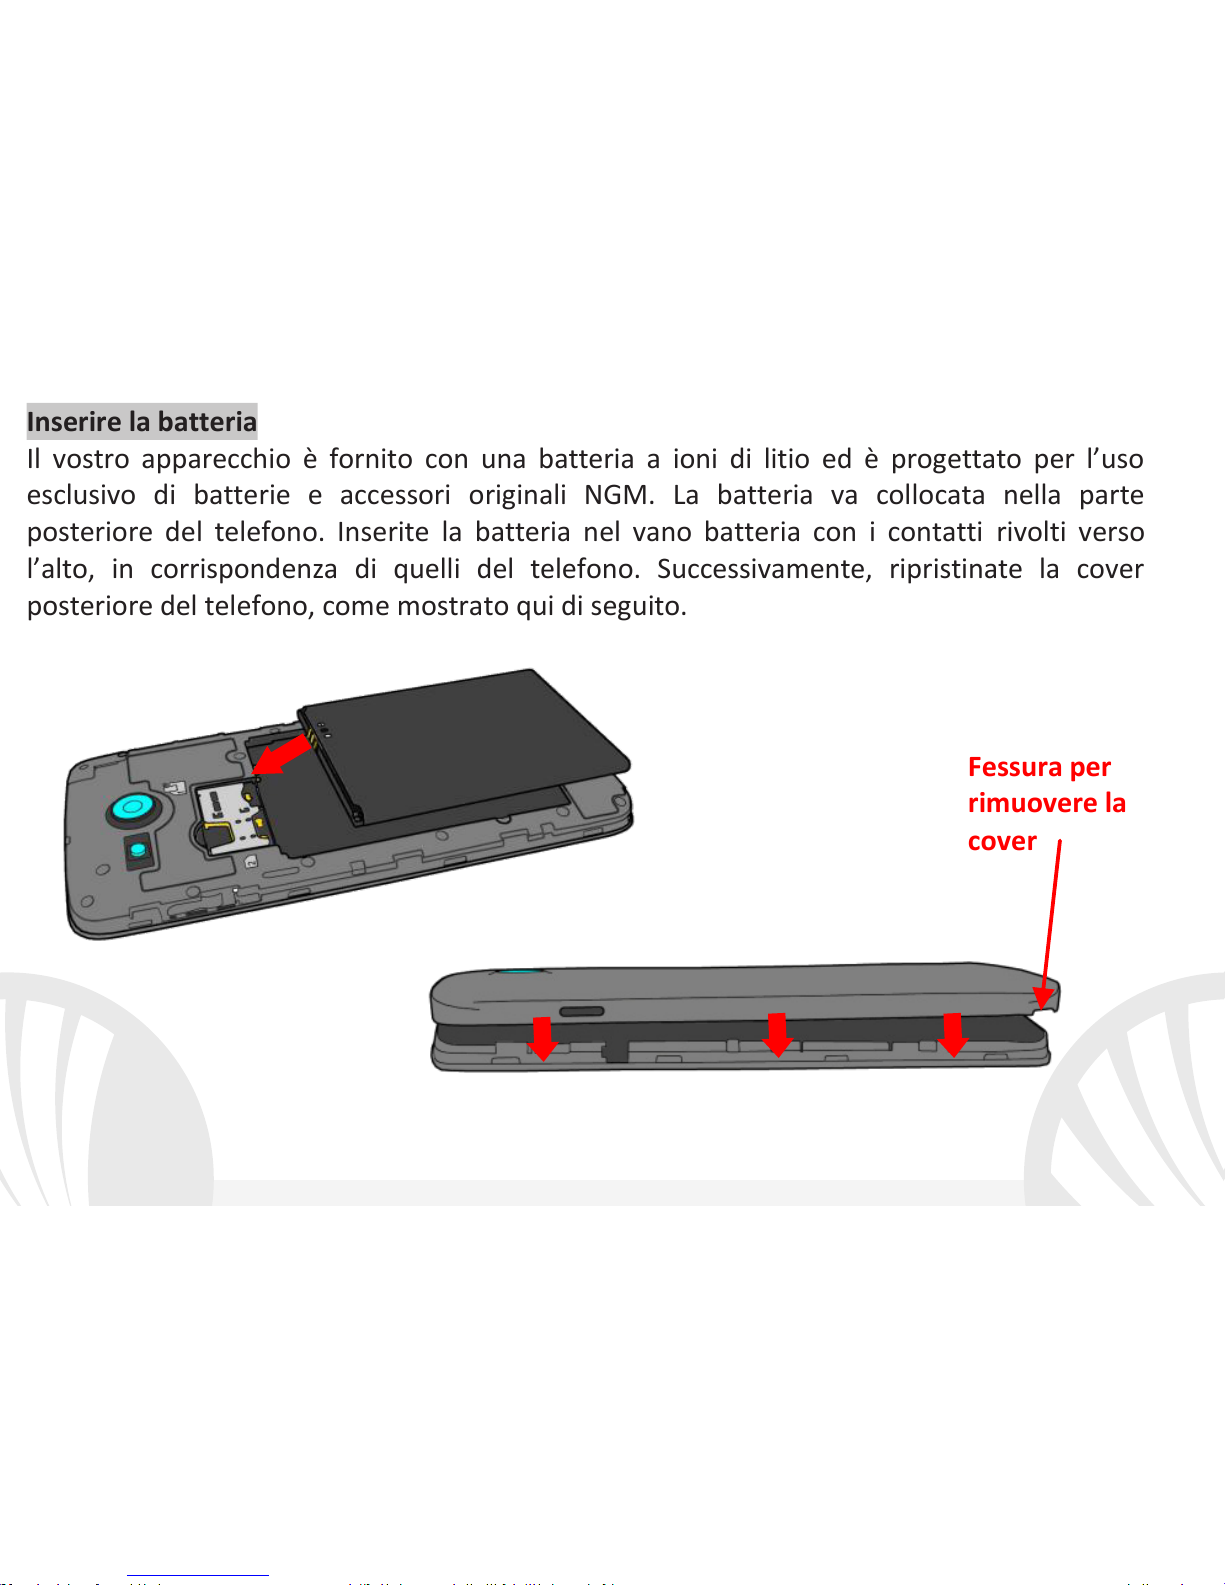
92
ITALIANO
Inserire la batteria
Il vostro apparecchio è fornito con una batteria a ioni di litio ed è progettato per l’uso
esclusivo di batterie e accessori originali NGM. La batteria va collocata nella parte
posteriore del telefono. Inserite la batteria nel vano batteria con i contatti rivolti verso
l’alto, in corrispondenza di quelli del telefono. Successivamente, ripristinate la cover
posteriore del telefono, come mostrato qui di seguito.
Fessura per
rimuovere la
cover
Page 93

93
ITALIANO
Caricare la batteria
Caricate la batteria prima di iniziare ad utilizzare l’apparecchio. Utilizzate il cavo USB in
dotazione ed il connettore USB posto sul lato superiore del telefono. Connettete il
caricatore ad una presa della rete elettrica e quindi il dispositivo al cavo USB. Si può
caricare il telefono anche collegandolo con il PC, ma in questo caso la carica sarà più lenta.
Quando la batteria è in carica, un’icona animata sullo schermo mostra lo stato di
avanzamento del processo se il telefono è acceso. Una volta che l’icona della batteria è
riempita, la carica è completata e il telefono può essere disconnesso dalla rete elettrica.
Attenzione: Non collegate il telefono ad un computer che si sta accendendo o spegnendo
per evitare sbalzi di tensione. Per preservare la corretta funzionalità del prodotto e
l'integrità della garanzia si raccomanda l'utilizzo di caricabatterie originali NGM. Procedete
alla ricarica esclusivamente al coperto e in luoghi asciutti. Un leggero riscaldamento del
telefono durante il processo di ricarica è del tutto normale. La batteria raggiungerà la sua
piena efficienza funzionale solo dopo alcuni cicli completi di ricarica.
Accensione, spegnimento e standby
Per accendere il dispositivo, tenete premuto il tasto on/off. Per spegnere il dispositivo,
tenete premuto lo stesso tasto e confermate lo spegnimento selezionando “Spegni”. Una
pressione breve permette invece di passare rapidamente alla modalità di standby (schermo
spento) o di tornare da questa allo schermo di sblocco (vedi sotto).
Page 94
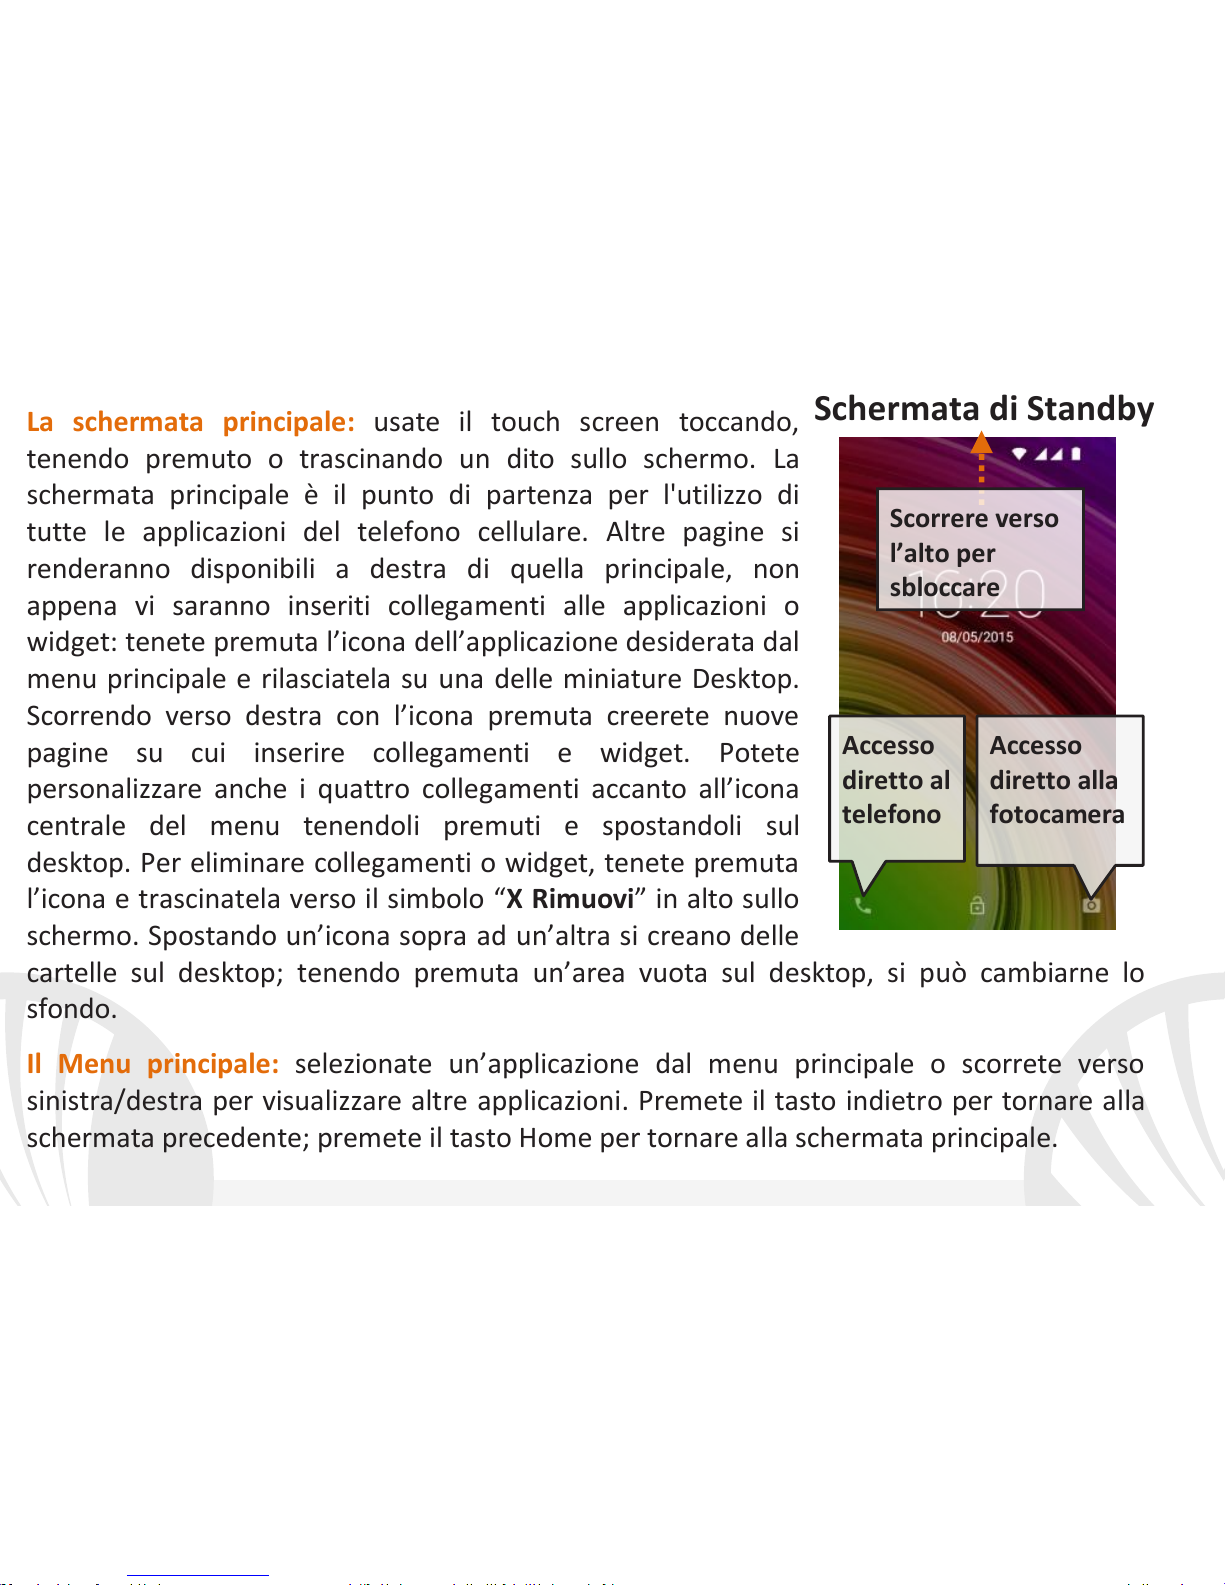
94
ITALIANO
La schermata principale: usate il touch screen toccando,
tenendo premuto o trascinando un dito sullo schermo. La
schermata principale è il punto di partenza per l'utilizzo di
tutte le applicazioni del telefono cellulare. Altre pagine si
renderanno disponibili a destra di quella principale, non
appena vi saranno inseriti collegamenti alle applicazioni o
widget: tenete premuta l’icona dell’applicazione desiderata dal
menu principale e rilasciatela su una delle miniature Desktop.
Scorrendo verso destra con l’icona premuta creerete nuove
pagine su cui inserire collegamenti e widget. Potete
personalizzare anche i quattro collegamenti accanto all’icona
centrale del menu tenendoli premuti e spostandoli sul
desktop. Per eliminare collegamenti o widget, tenete premuta
l’icona e trascinatela verso il simbolo “X Rimuovi” in alto sullo
schermo. Spostando un’icona sopra ad un’altra si creano delle
cartelle sul desktop; tenendo premuta un’area vuota sul desktop, si può cambiarne lo
sfondo.
Il Menu principale: selezionate un’applicazione dal menu principale o scorrete verso
sinistra/destra per visualizzare altre applicazioni. Premete il tasto indietro per tornare alla
schermata precedente; premete il tasto Home per tornare alla schermata principale.
Schermata di Standby
Accesso
diretto al
telefono
Accesso
diretto alla
fotocamera
Scorrere verso
l’alto per
sbloccare
Page 95
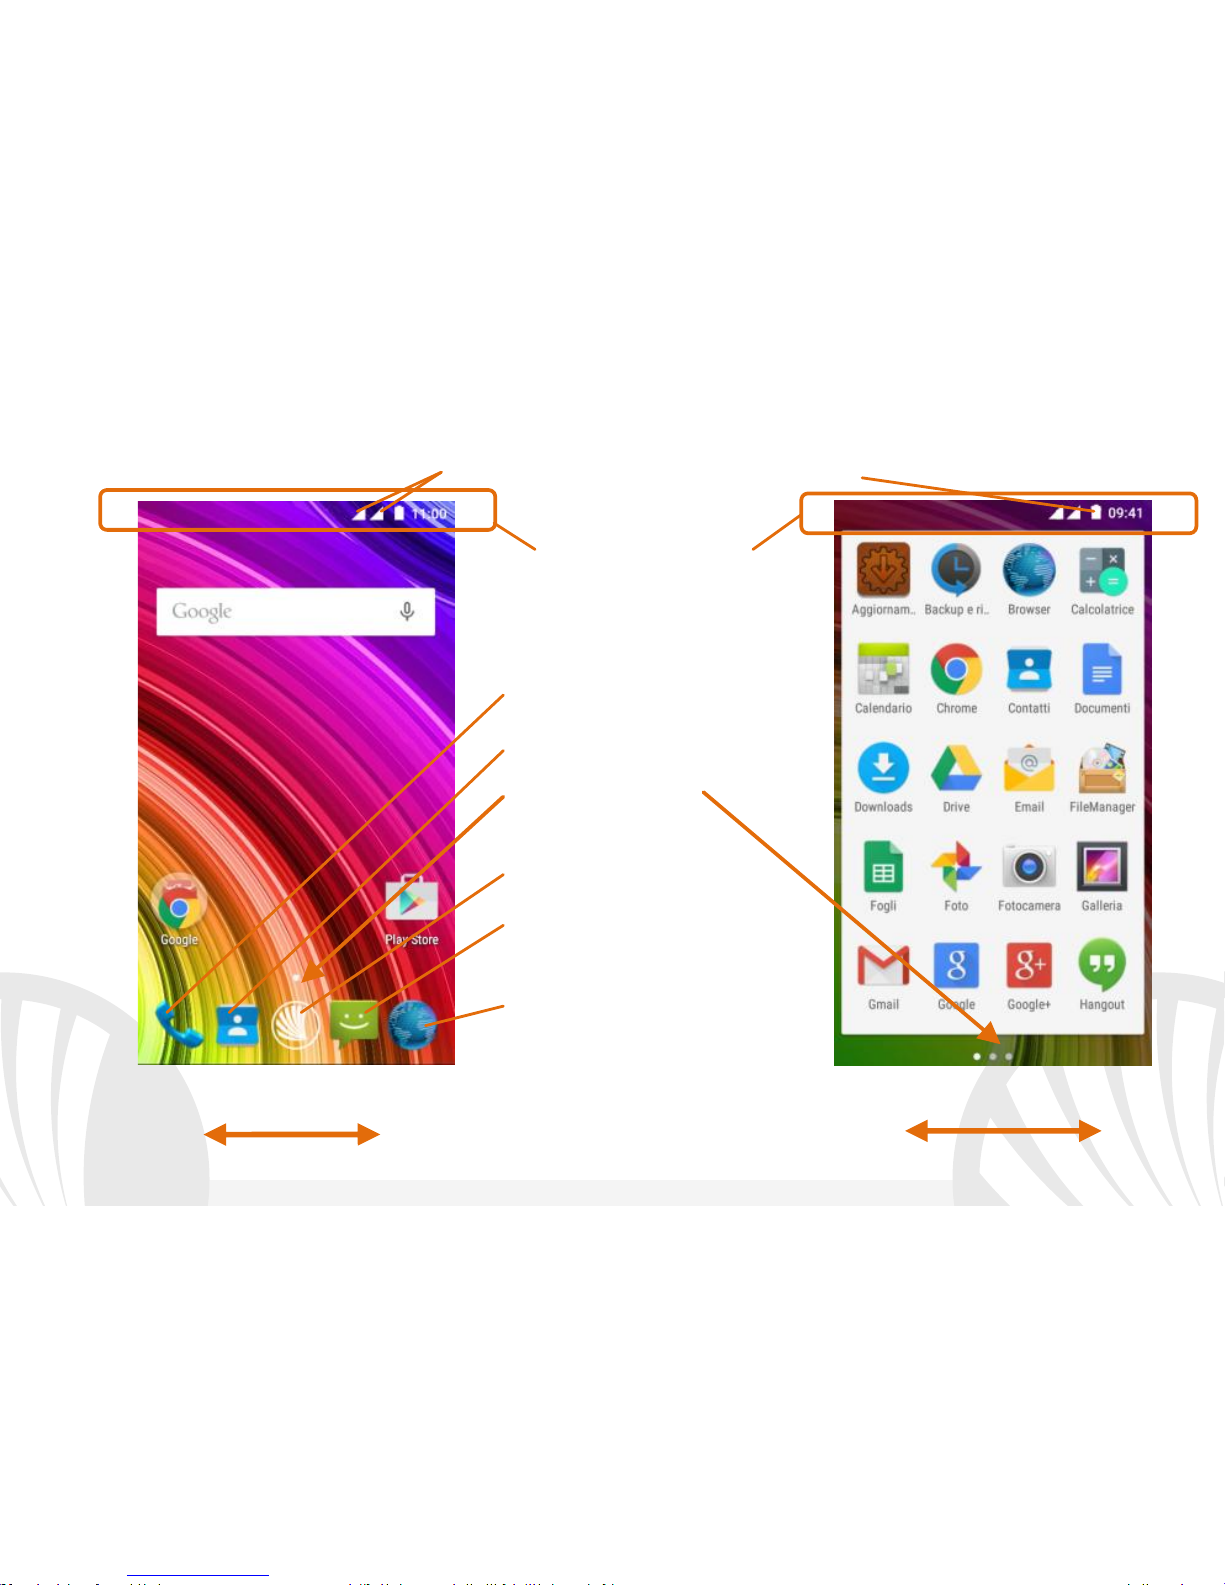
95
ITALIANO
Schermata Principale
Menu Principale
Pannello/barra di notifica
Intensità segnale SIM e livello batteria
Indicatori pagine
Telefono
Rubrica
Menu Principale
Internet
Messaggi
Scorrimento schermate HOME
Scorrimento menu
Page 96
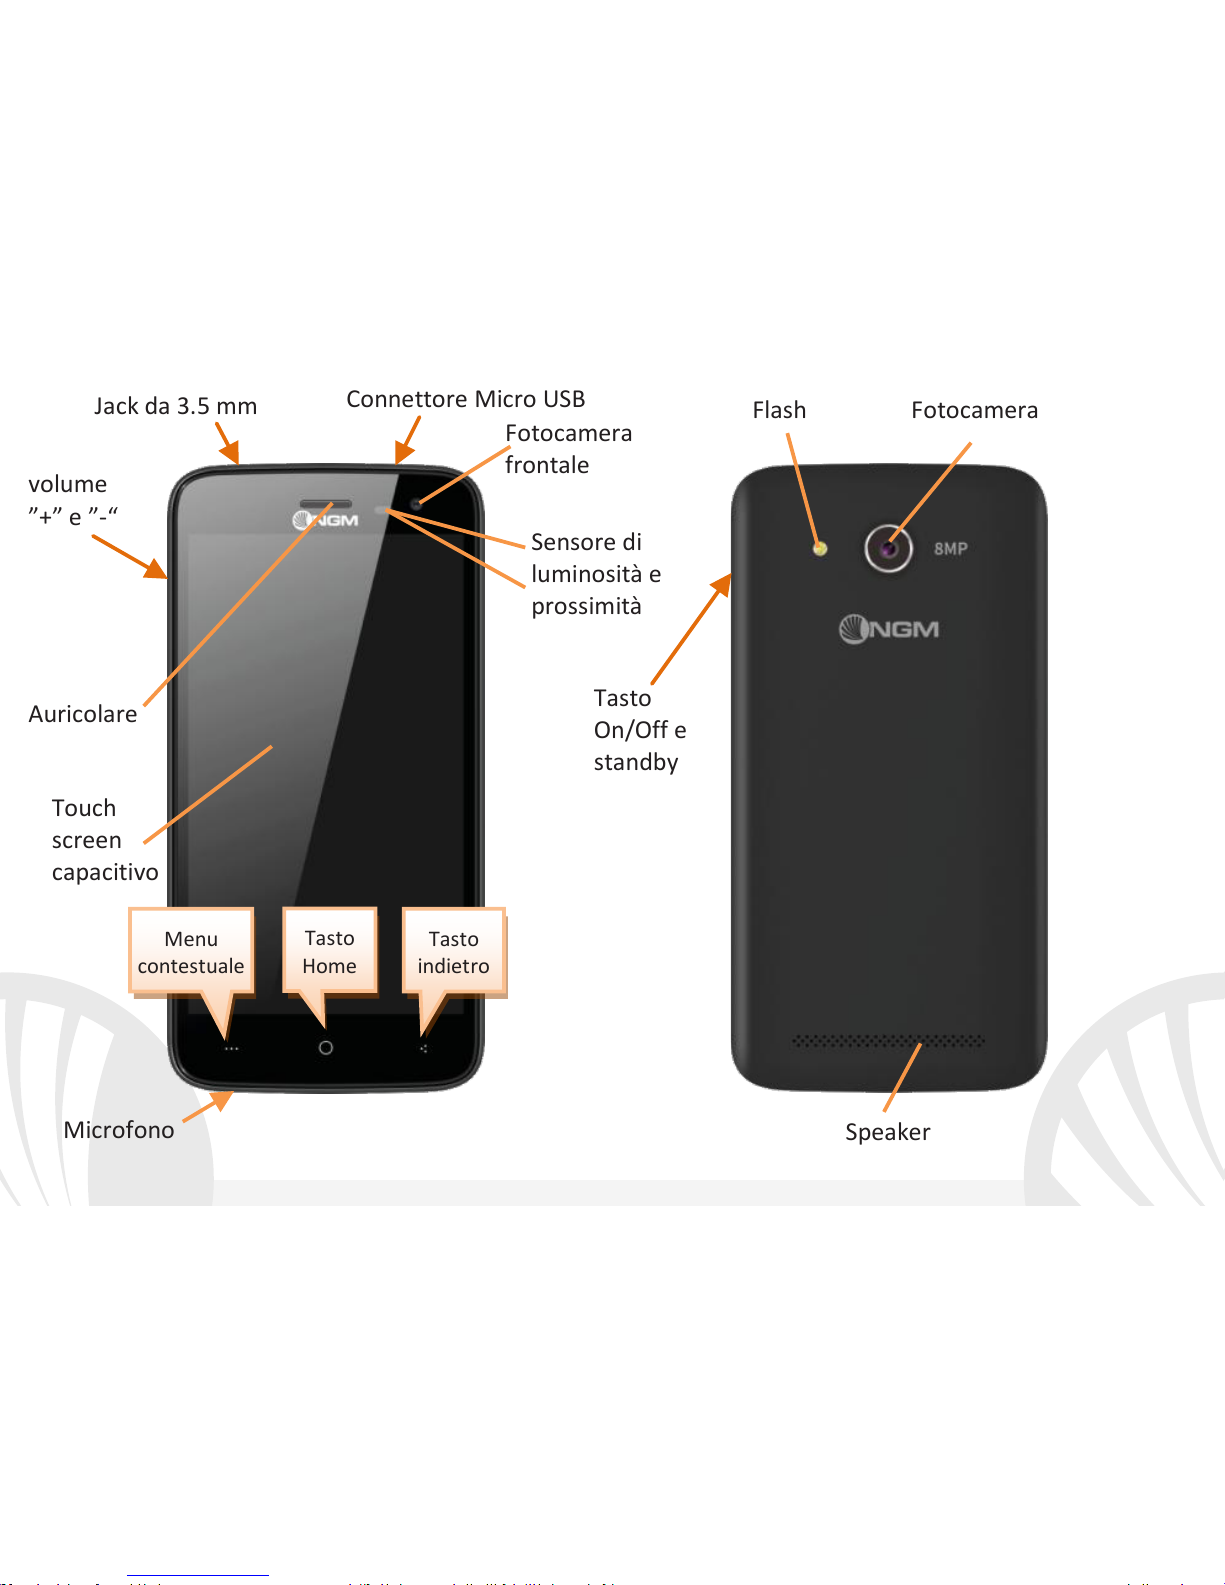
96
ITALIANO
Tasto
On/Off e
standby
Touch
screen
capacitivo
Flash
Fotocamera
Connettore Micro USB
Jack da 3.5 mm
Fotocamera
frontale
Auricolare
Sensore di
luminosità e
prossimità
Speaker
volume
”+” e ”-“
Microfono
Tasto
Home
Menu
contestuale
Tasto
indietro
Page 97
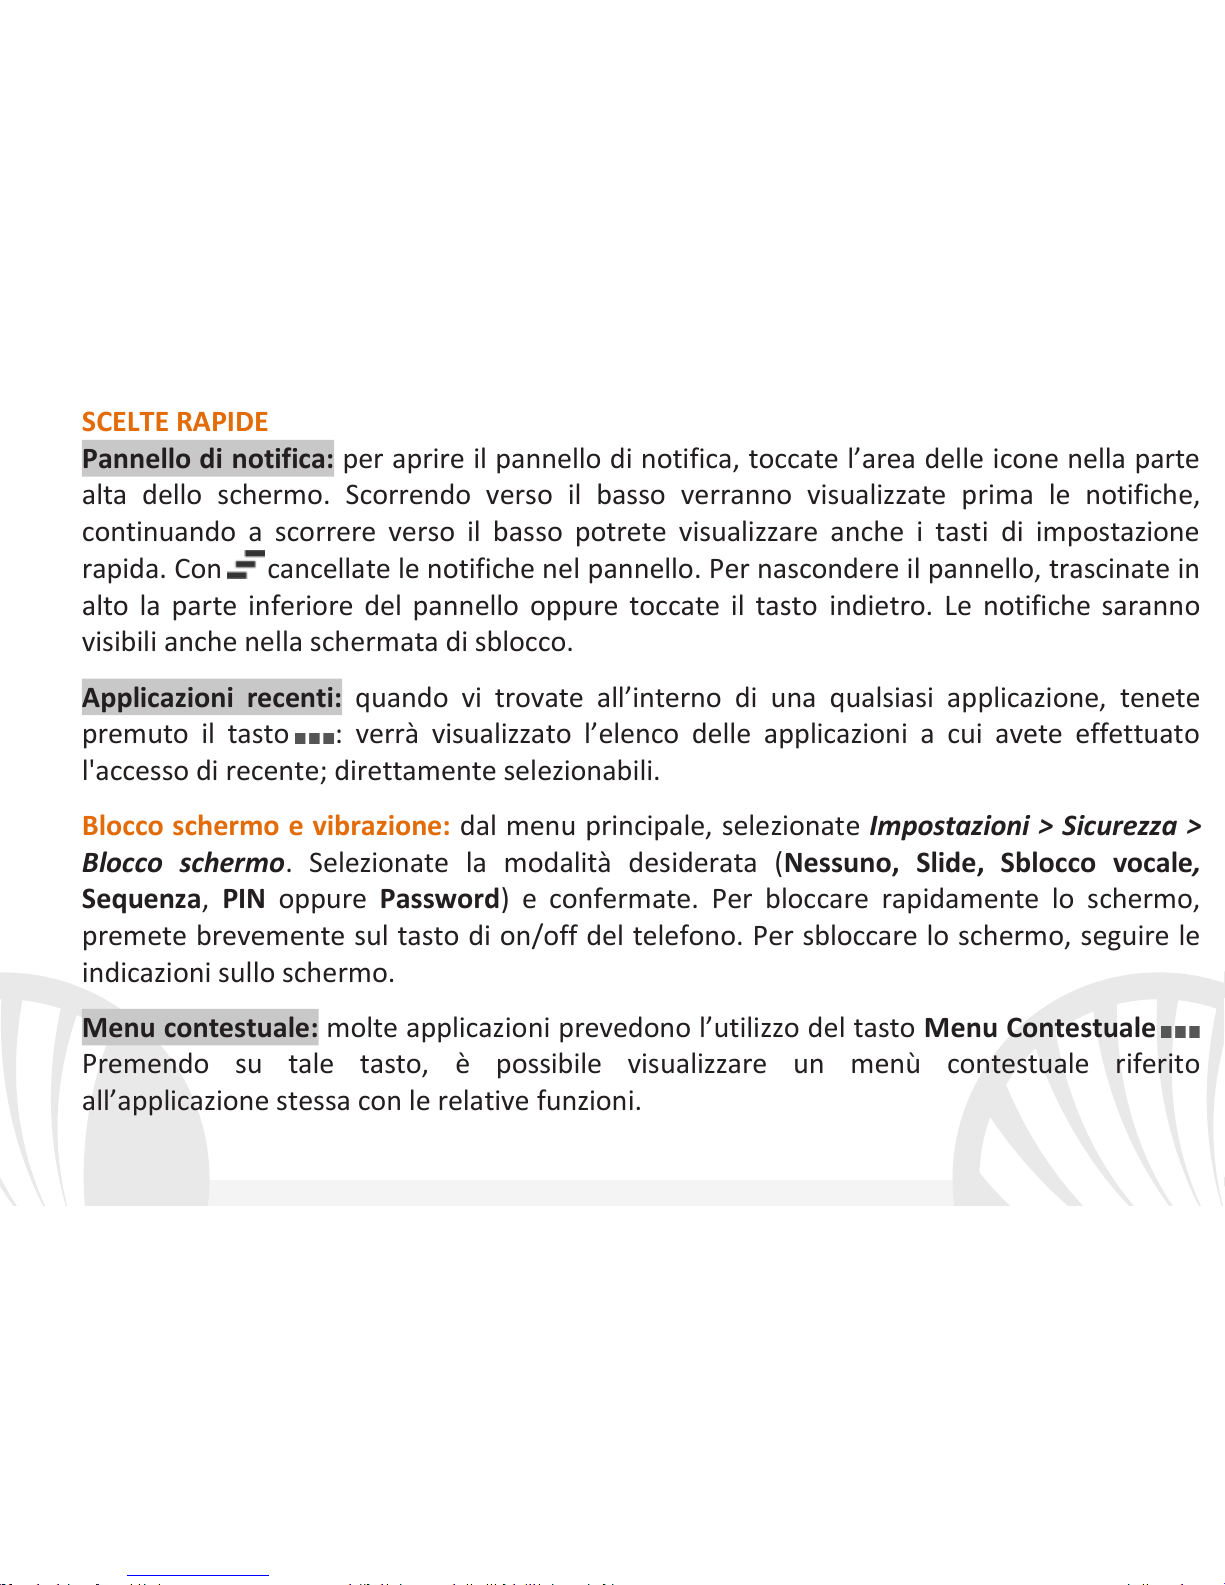
97
ITALIANO
SCELTE RAPIDE
Pannello di notifica: per aprire il pannello di notifica, toccate l’area delle icone nella parte
alta dello schermo. Scorrendo verso il basso verranno visualizzate prima le notifiche,
continuando a scorrere verso il basso potrete visualizzare anche i tasti di impostazione
rapida. Con cancellate le notifiche nel pannello. Per nascondere il pannello, trascinate in
alto la parte inferiore del pannello oppure toccate il tasto indietro. Le notifiche saranno
visibili anche nella schermata di sblocco.
Applicazioni recenti: quando vi trovate all’interno di una qualsiasi applicazione, tenete
premuto il tasto : verrà visualizzato l’elenco delle applicazioni a cui avete effettuato
l'accesso di recente; direttamente selezionabili.
Blocco schermo e vibrazione: dal menu principale, selezionate Impostazioni > Sicurezza >
Blocco schermo. Selezionate la modalità desiderata (Nessuno, Slide, Sblocco vocale,
Sequenza, PIN oppure Password) e confermate. Per bloccare rapidamente lo schermo,
premete brevemente sul tasto di on/off del telefono. Per sbloccare lo schermo, seguire le
indicazioni sullo schermo.
Menu contestuale: molte applicazioni prevedono l’utilizzo del tasto Menu Contestuale
Premendo su tale tasto, è possibile visualizzare un menù
contestuale riferito
all’applicazione stessa con le relative funzioni.
Page 98

98
ITALIANO
Gestire le due SIM
Dal menu principale, selezionate Impostazioni > Gestione SIM. Selezionate o deselezionate
l’interruttore accanto agli operatori telefonici corrispondenti a “SIM1” e “SIM2” per
attivare o disattivare selettivamente le SIM in qualsiasi momento. Da questo menu è anche
possibile personalizzare il colore e nome da attribuire all’icona di ciascuna SIM e decidere
quale SIM usare come predefinita per chiamate, messaggi e connessione dati oppure
scegliere “chiedi sempre” se non si desidera impostare una SIM predefinita.
Selezionando una SIM su cui attivare i dati, verrà attivato automaticamente anche il
servizio 3G su quella stessa SIM. Questo permette di spostare facilmente da una SIM
all’altra il 3G, di solito confinato esclusivamente allo slot 1, senza doverle fisicamente
invertire.
Smart Gestures
Dal menù Impostazioni, selezionando Smart gesture, potete attivare le innovative funzioni
NGM che vi permetteranno di gestire le principali funzionalità del telefono con la massima
comodità e rapidità.
Modalità ospite
I messaggi, il registro chiamate e la galleria verranno temporaneamente nascosti e verrà
inibita qualsiasi modifica del desktop. Quando questa modalità è attiva, un’icona sarà
visibile sulla barra delle notifiche. In Impostazioni > Sicurezza, è possibile impostare una
password per gestire questa modalità.
Page 99
99
ITALIANO
GESTIRE UNA CHIAMATA
Dalla schermata principale, toccate l’icona Telefono; digitate il numero telefonico da
chiamare usando la tastiera virtuale (per visualizzarla selezionate l’icona )
Premete l’icona cornetta e scegliete la SIM desiderata.
Per terminare, toccate l’icona rossa di fine chiamata.
Per rispondere ad una chiamata, selezionate Rispondi sul popup che compare in alto
sullo schermo, oppure toccate il popup per visualizzare la schermata di chiamata. A
questo punto trascinate la cornetta centrale verso destra sulla cornetta blu per
rispondere; per rifiutare la chiamata invece, trascinatela verso sinistra sulla cornetta
rossa, per rifiutare tramite messaggio portate la cornetta verso l’alto. Per silenziare una
chiamata in arrivo, toccate il tasto Volume “+” o “–“ (sul lato sinistro del telefono).
Richiamare un numero dal registro chiamate
Dal menu principale, entrate nel menu Telefono e selezionate Cronologia chiamate dal
menù contestuale (prima nascondete la tastiera virtuale); viene visualizzato il registro
chiamate con le chiamate perse, ricevute e in uscita.
Selezionate il numero desiderato e poi Richiama, quindi scegliete con quale SIM avviare
la chiamata nel caso in cui non sia stata impostata alcuna SIM predefinita.
Page 100
100
ITALIANO
GESTIRE CONTATTI
Aggiungere un nuovo contatto
Dal menu principale, selezionate l’icona Contatti.
Premete l’icona in basso.
Scegliete dove salvare il nuovo contatto (account, telefono, SIM1 o SIM2).
Inserite Nome, Numero ed eventuali altri dettagli del contatto (altri dettagli si possono
solo aggiungere se si salva sul telefono) e confermate il salvataggio.
Aggiungere un nuovo contatto dal registro chiamate
Dal menu Telefono, accedete al Registro Chiamate (menù contestuale).
Premete sull’immagine di contatto vuota quindi selezionate l’icona in alto a
destra.
Scegliete Crea Nuovo contatto in alto, oppure aggiungete il numero ad un Contatto
esistente scegliendolo dall’elenco. Dopo aver aggiunto nome ed eventuali altre
informazioni (se salvate sul Telefono), confermate con Salva.
Impostare le suonerie
Dal menu principale, selezionate Impostazioni > Audio e notifiche > Generale.
Selezionate Suoneria Telefono > SIM1 o SIM2 e scegliete la suoneria desiderata per
ciascuna SIM. Per impostare una suoneria personalizzata: in Musica selezionate il brano
audio desiderato con una pressione prolungata e scegliete Usa come Suoneria nel menu
contestuale. Il file audio sarà inserito nell’elenco delle suonerie disponibili.
Note: è possibile utilizzare come suonerie dei file nei formati *mid,*wav,*ogg o *mp3.
Note: Nel menu contestuale della rubrica si ha accesso alle funzioni di
importazione/esportazione dei contatti e varie impostazioni utili.
 Loading...