

Page 1

User Manual
Page 2

2
User Manual
Summary
Before using your phone ...................................................................................................................................................... 5
Introduction ...................................................................................................................................................................... 5
For your safety ...................................................................................................................................................................... 5
Guidelines ......................................................................................................................................................................... 5
Mobile phone profile ............................................................................................................................................................ 6
Profile ................................................................................................................................................................................ 6
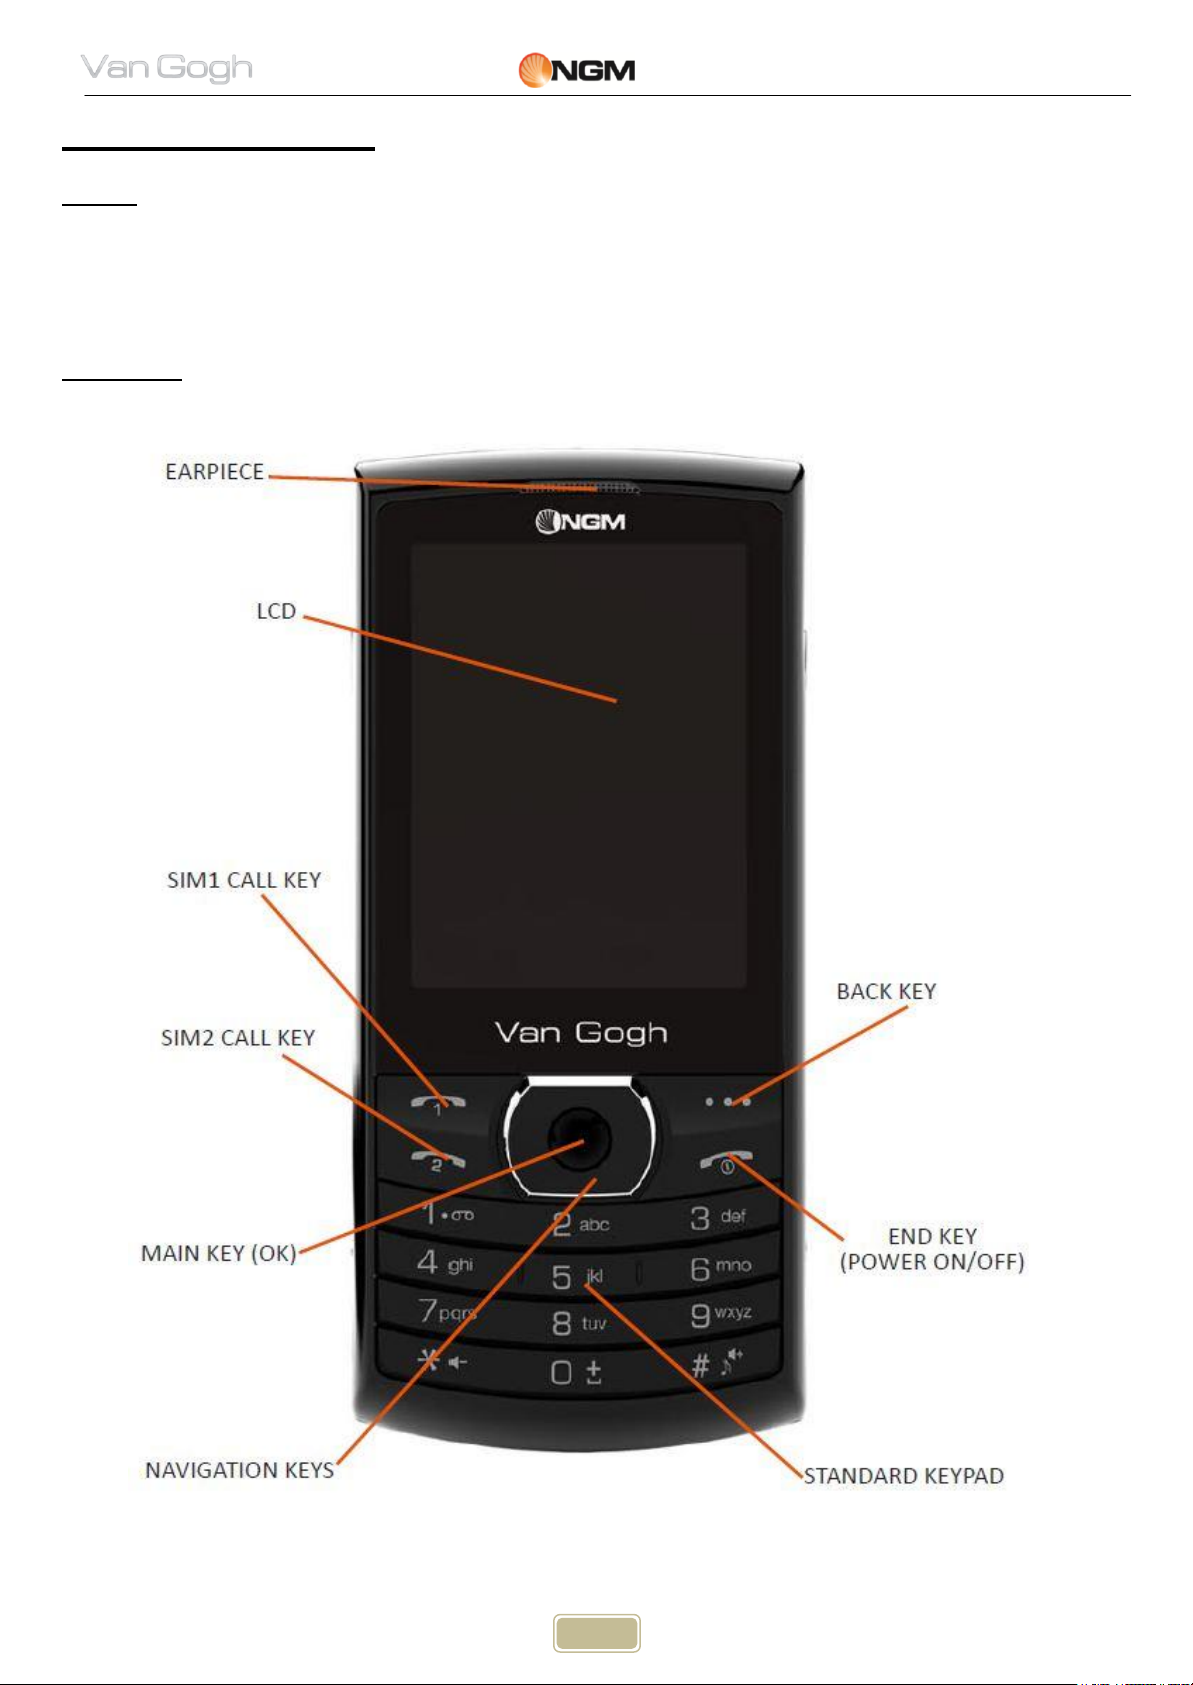
Front view ......................................................................................................................................................................... 6
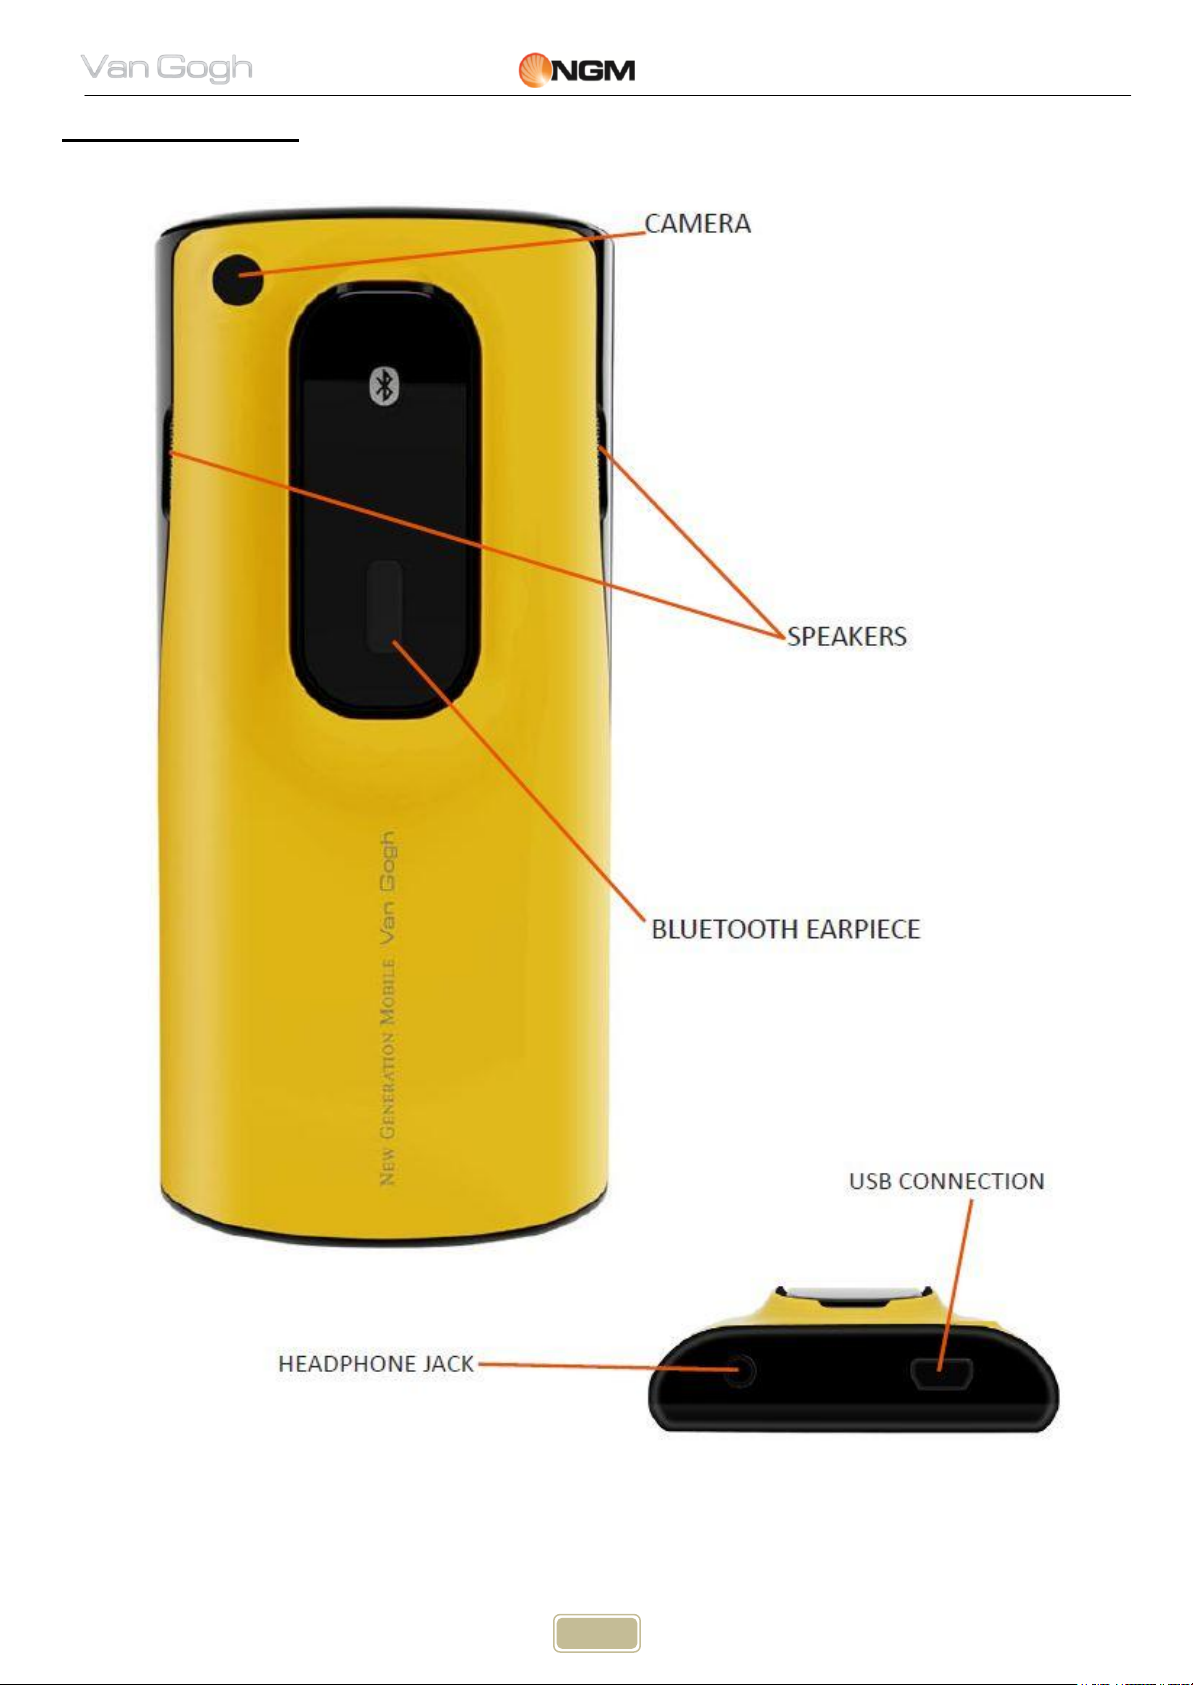
Rear and above view ......................................................................................................................................................... 7
Get started ............................................................................................................................................................................ 8
SIM Card Installation ......................................................................................................................................................... 8
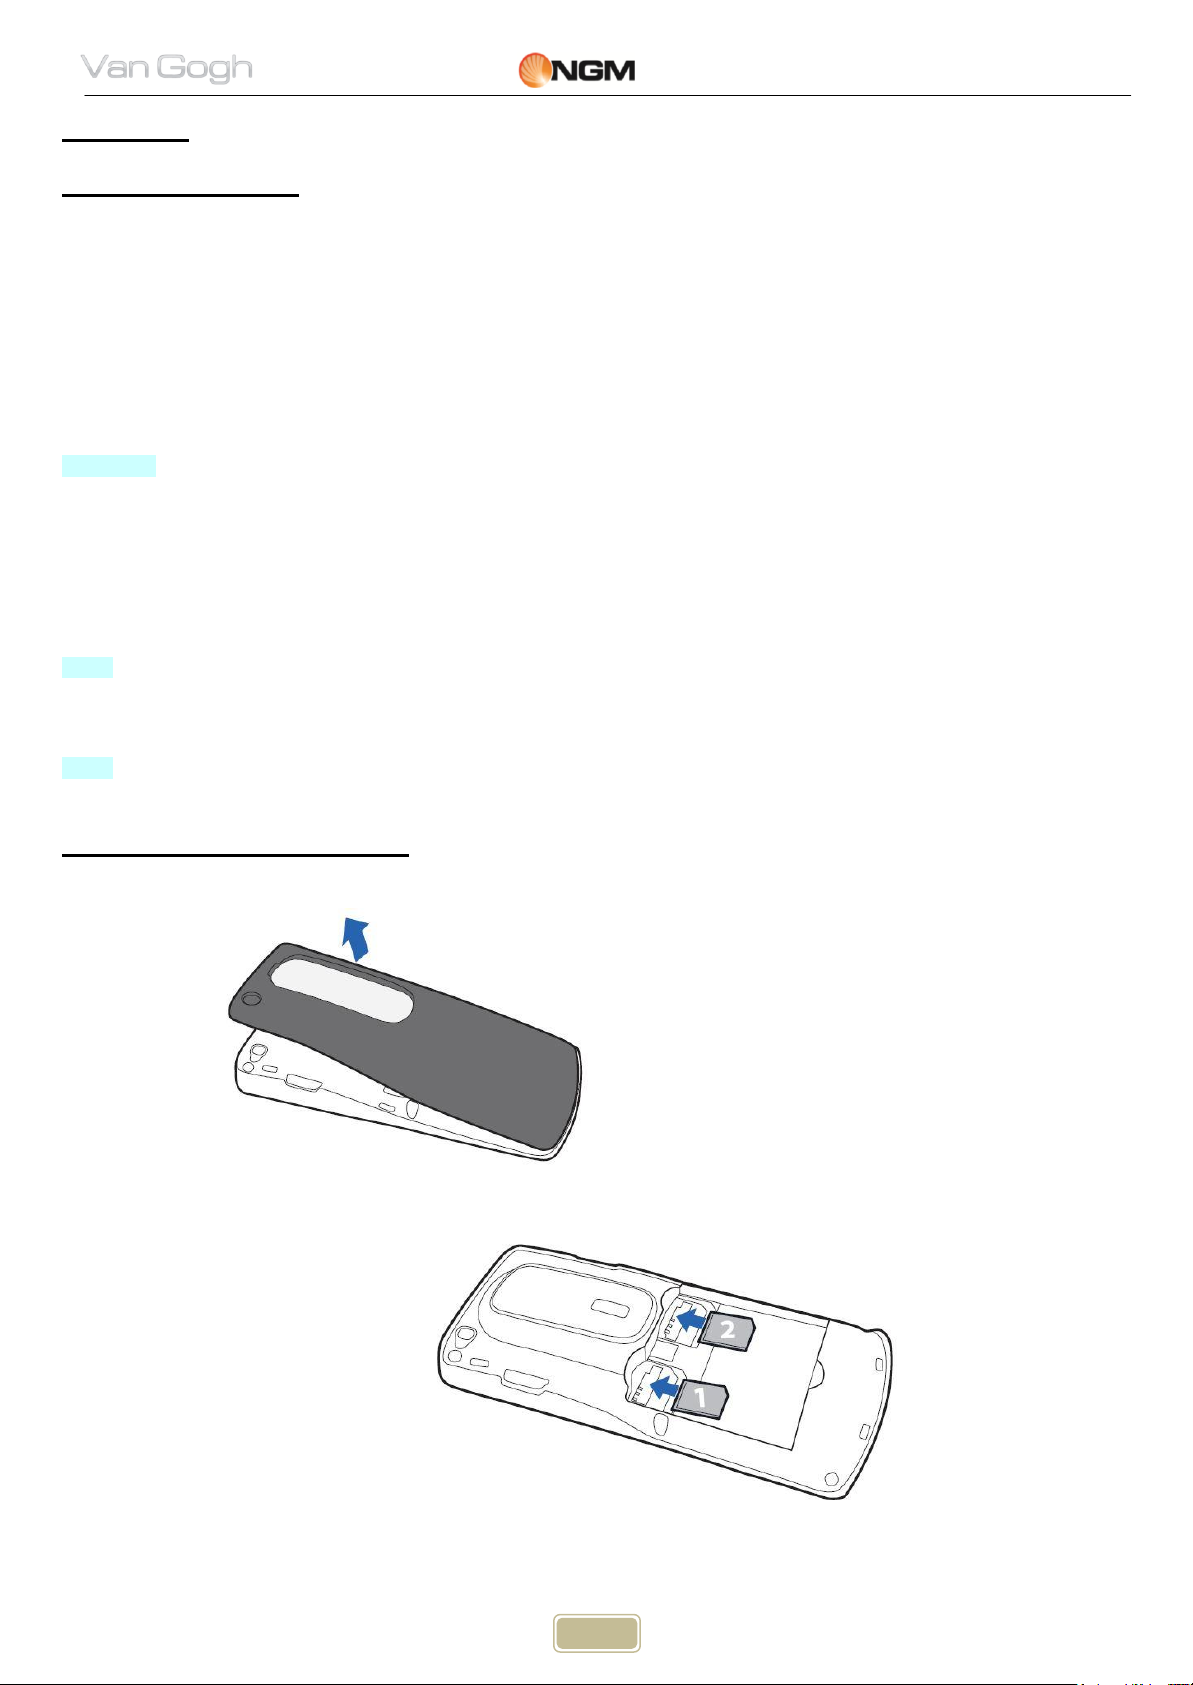
SIM cards installation diagram ......................................................................................................................................... 8
Memory Card Installation ................................................................................................................................................. 9
Battery Installation ........................................................................................................................................................... 9
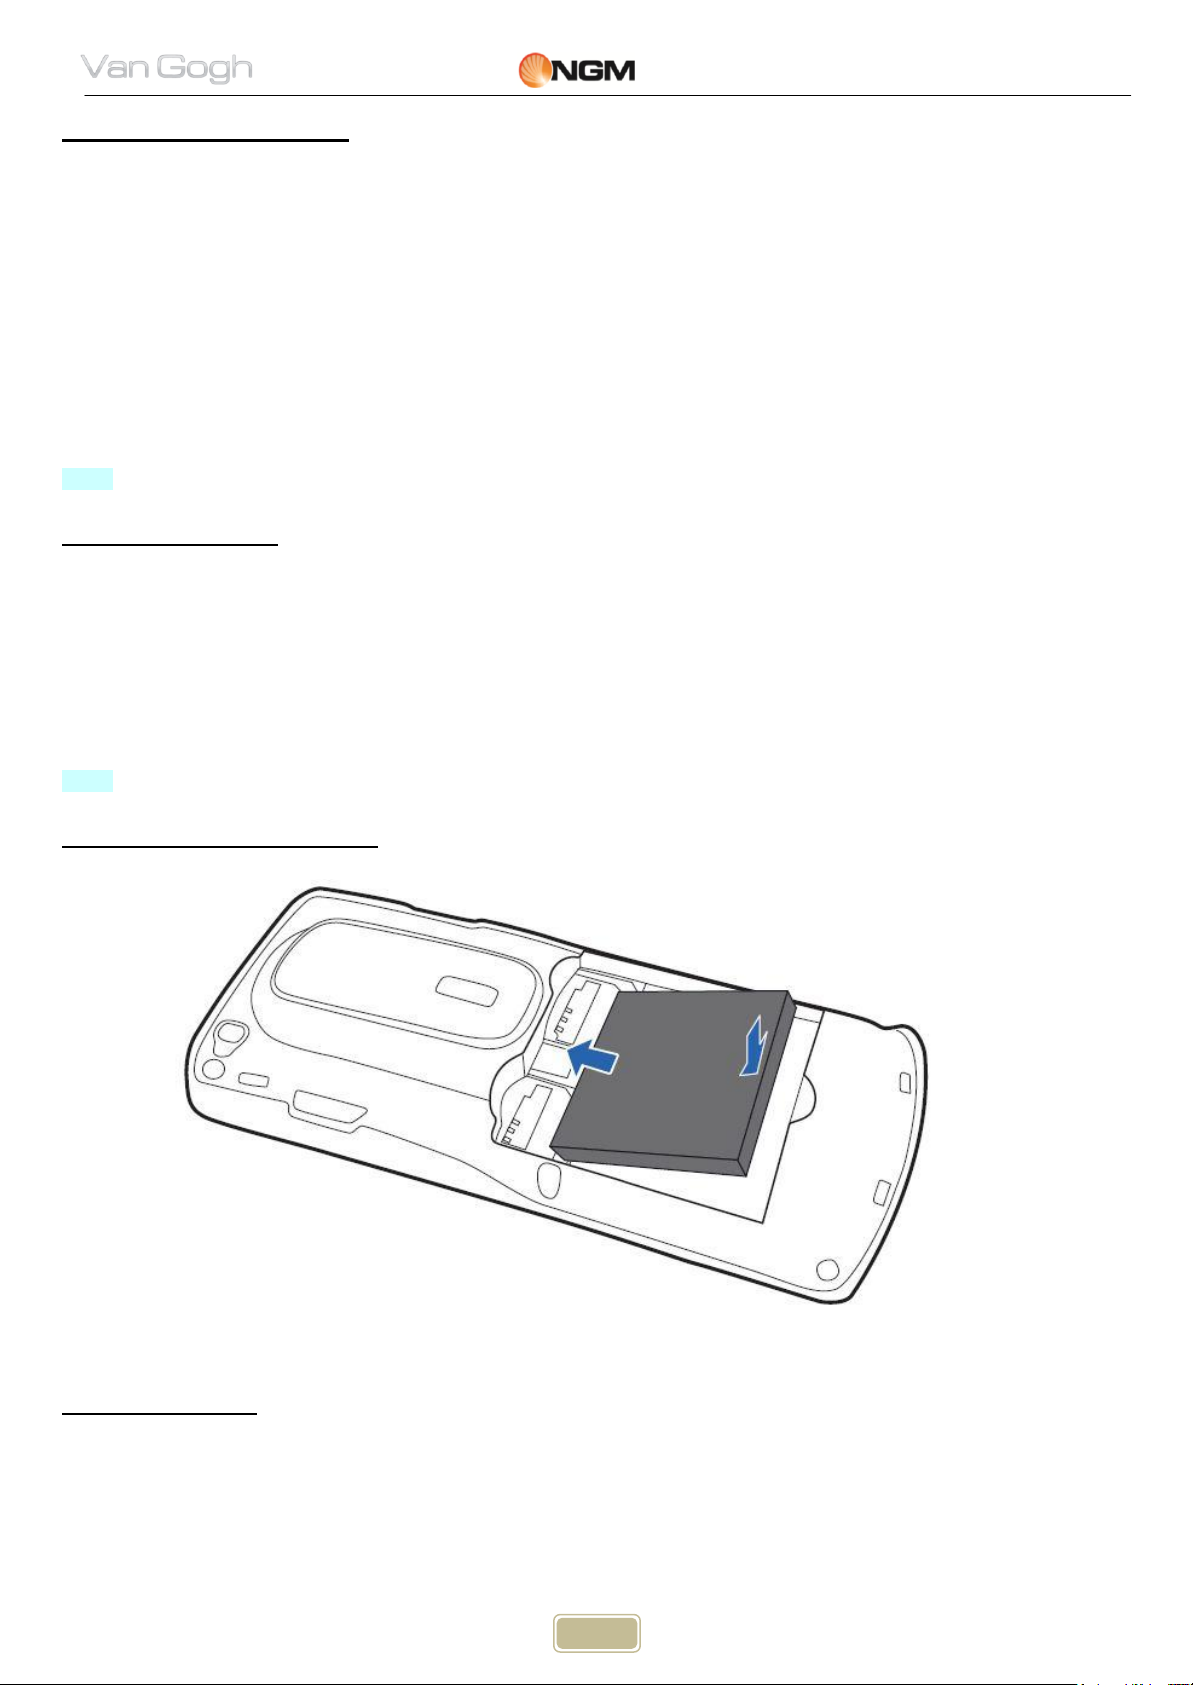
Battery installation diagram ............................................................................................................................................. 9
Battery Charging ............................................................................................................................................................... 9
Connections Diagram ...................................................................................................................................................... 10
Bluetooth earpiece
Notices on using the battery ........................................................................................................................................... 11
PIN Code ......................................................................................................................................................................... 12
General Instructions ........................................................................................................................................................... 12
OK Key and Navigation Keys ........................................................................................................................................... 12
Send Keys ........................................................................................................................................................................ 12
End Key and Back Key ..................................................................................................................................................... 12
Standard Keyboard ......................................................................................................................................................... 13
FM Radio Keys ................................................................................................................................................................. 13
Keyboard Lock ................................................................................................................................................................. 13
Standby mode ................................................................................................................................................................. 14
Language and Input Mode .............................................................................................................................................. 14
Call Hint ........................................................................................................................................................................... 14
Services ........................................................................................................................................................................... 15
Caller groups ................................................................................................................................................................... 15
Basic Operations ................................................................................................................................................................. 15
Switch On ........................................................................................................................................................................ 15
Switch Off ........................................................................................................................................................................ 15
How to Dial a Call ............................................................................................................................................................ 16
Adjust Receiver Volume .................................................................................................................................................. 16
Answer a Call ................................................................................................................................................................... 16
Dial Hold .......................................................................................................................................................................... 16
Fast SMS Reading ............................................................................................................................................................ 16
Missed Calls .................................................................................................................................................................... 17
Answering Machine ........................................................................................................................................................ 17
Use of Menu functions........................................................................................................................................................ 17
Call Logs .......................................................................................................................................................................... 17
Applications .................................................................................................................................................................... 19
Phonebook ...................................................................................................................................................................... 20
......................................................................................................................................................... 10
2
Page 3

3
User Manual
Services ........................................................................................................................................................................... 21
Messages ........................................................................................................................................................................ 23
SMS............................................................................................................................................................................ 23
MMS ........................................................................................................................................................................... 23
Broadcast Messages ............................................................................................................................................ 24
Vocal messages..................................................................................................................................................... 24
Multimedia ...................................................................................................................................................................... 24
Camera ..................................................................................................................................................................... 24
Image viewer ......................................................................................................................................................... 26
Video recorder ....................................................................................................................................................... 26
Media player ........................................................................................................................................................... 26
Sound recorder ..................................................................................................................................................... 27
FM Radio .................................................................................................................................................................. 27
Slide Show .............................................................................................................................................................. 28
Organizer......................................................................................................................................................................... 28
Calendar ................................................................................................................................................................... 28
Tasks ......................................................................................................................................................................... 28
Alarm ......................................................................................................................................................................... 28
World Clock ............................................................................................................................................................. 28
Notes ......................................................................................................................................................................... 29
NGM special functions .................................................................................................................................................... 29
Calls and SMS firewall ........................................................................................................................................ 29
Privacy firewall
...................................................................................................................................................... 29
Answering machine ............................................................................................................................................. 29
Phone control ......................................................................................................................................................... 30
Remote control ...................................................................................................................................................... 30
Background sounds
............................................................................................................................................. 32
SMS delayed sending .......................................................................................................................................... 32
File manager
Bluetooth
User profiles
Settings
................................................................................................................................................................... 32
........................................................................................................................................................................ 33
.................................................................................................................................................................... 34
........................................................................................................................................................................... 34
Phone settings ....................................................................................................................................................... 34
SIM manager
Network settings
Security settings
Restore factory settings
Coffer function
.......................................................................................................................................................... 35
................................................................................................................................................... 35
................................................................................................................................................... 35
..................................................................................................................................... 36
................................................................................................................................................................ 36
Coffer Phonebook ................................................................................................................................................. 36
Coffer messages
................................................................................................................................................... 36
Coffer Call log ........................................................................................................................................................ 37
Change Coffer Lock .............................................................................................................................................. 37
Block incoming calls ............................................................................................................................................ 37
Password reminder .............................................................................................................................................. 37
Text input
........................................................................................................................................................................ 38
3
Page 4

4
User Manual
USB connection
Maintenance and Safety
Abbreviations
Certifications ....................................................................................................................................................................... 42
............................................................................................................................................................... 38
................................................................................................................................................. 38
.................................................................................................................................................................. 41
4
Page 5

5
User Manual
Before using your phone
Introduction
Thank you for purchasing the GSM/GPRS NGM Van Gogh mobile phone.
Please read this User's Manual carefully to understand the functions and operation of the mobile phone. Store this
manual in a safe place for future reference
The information in this manual is believed to be correct at the time of printing; NGM reserves the right, however, to
change or modify any of the specifications
without notice. Some of the contents in this manual may differ from your phone, depending on the software
installed, your SIM card or your service provider.
For your safety
Guidelines
For your safety
For your safety and proper use of the telephone, please observe the following guidelines:
• Do not switch the phone in proximity to chemical plants, gas stations or other areas at risk of explosion.
• When driving, use only the headset, do not forget to always park your car at the roadside before starting a
conversation with the apparatus.
• Since the use of mobile phones can cause interference on aircraft, not use any phone on an airplane. Such a
wireless phone use is dangerous and illegal, always switch off your phone before boarding.
• Pay special attention to the use of the phone near cardiac pacemakers, hearing aids and other medical equipment,
because the phone can be source of interference.
• The use of non genuine parts and accessories will void the warranty.
• Do not disassemble the phone without permission. In case of failure, please contact the supplier as soon as
possible.
• Do not connect the charger to the phone when there is no battery connected. Turn off your phone before removing
the battery, otherwise, the phone's memory may be damaged.
• When the phone is connected to the charger, always make sure that the room there is good ventilation or a heat
sink, and the unit is away from flammable items or explosives.
• To avoid the risk of demagnetization, keep the phone away from magnetic objects such as CDs, credit cards, etc.
• Make sure the phone does not come into contact with any type of liquid in the case of such cases, remove the
battery and contact your supplier immediately.
• Do not use the phone in situations with ambient temperature is too high or too low, do not expose the unit to
strong direct sunlight or humid environments. The operating temperature for the correct phone and its accessories is
between 0 ° and 40 °. The altitude when using the telephone should not exceed 2,000 meters.
• Do not use liquid or soft cloth moistened with detergent to clean the phone energetic.
• The phone has features of sound recording, video and photographs, which must be used according to the laws and
regulations.
• Keep the phone away from children. Do not throw or shake the phone, because the internal circuits and structures
accurately could be damaged.
• Do not dispose of batteries with household waste.
Note: The manufacturer assumes no responsibility for any failure of the policy set forth above or for any
unauthorized use of your phone. The manufacturer reserves the right to alter without notice the information
contained in this guide. The contents of this manual may differ from actual content displayed in the phone.
In this case, the latter shall prevail.
5
Page 6
6
User Manual
Mobile phone profile
Profile
Phone profile
The phone comes equipped with a screen, a vibrating motor, and a USB multifunction connector (data/charging).
The next pages show front and rear / lateral (side) views of the phone.
Front view
6
Page 7
7
User Manual
Rear and above view
7
Page 8
8
User Manual
Get started
SIM Card Installation
Installing the SIM Cards
Since the phone supports two SIM cards, when registering a mobile phone number, you can apply for two separate
phone numbers, two different mobile phone network service providers and thus obtain two SIM (Subscriber
Identification Module) cards.
With these two SIM cards, you can use all the features of your phone. The SIM cards save the parameters required
for communications and personal information, including PIN (Personal Identification Number), address book,
messages and other system services additional.
Warning: do not deform or scratch the SIM cards nor let it contact static, dust or moisture. If it is lost, please
immediately contact your network operator for help.
Before SIM card installation, please switch off the mobile phone. The SIM cards must be inserted in the back of the
phone, after removing the battery. Insert the SIM cards in their slots with the gold contacts facing down and the
notched corner facing outwards. Insert the main SIM card in the SIM1 slot and secondary SIM card 2 in the SIM2
slot. See the diagram below.
Note: if a SIM card is inserted into the SIM1 slot only, then only the host works; likely, if a SIM card is inserted into
the SIM2 slot only, then only the slave works. When two SIM cards are inserted into the SIM1 slot and SIM2 slot
respectively, you can choose work mode freely as you wish.
Note: as the SIM card is small object, keep it out of children’s touch or prevent children swallowing it!
SIM cards installation diagram
8
Page 9
9
User Manual
Memory Card Installation
Installing a Memory card
As the mobile phone does not have enough storage space, to use some functions, you need to install a memory
card (this mobile phone use T-FLASH cards.)
To install a T-FLASH card: power off the phone, open the back cover to remove the battery, insert the T-Flash card
into its dedicated slot (underneath the SIM cards' slots), and restore the battery and the cover before restarting the
mobile phone.
To make the insertion of microSD card easier, it may be advisable to do this before introducing the SIM cards in their
slots.
Note: as the T-FLASH card is small object, keep it out of children’s touch or prevent children gulping it!
Battery Installation
Installing the Battery
Your device is provided with a lithium-ion battery and is designed to be used exclusively with original NGM batteries
and chargers. Battery must be inserted from the backside of the phone. Align the battery contacts with the phone
connector inside the dedicated slot, and let it slide down in position. Once the battery is inserted, close the rear cover
by gently pushing it in position.
Note: do install the battery as per the diagram to prevent the battery contact patch being damaged.
Battery installation diagram
Battery Charging
Battery Charge
Please charge completely the battery before starting to use the device. The new battery cannot reach the optimal
efficiency unless it has undergone several continuous complete charges and discharges.
9
Page 10
10
User Manual
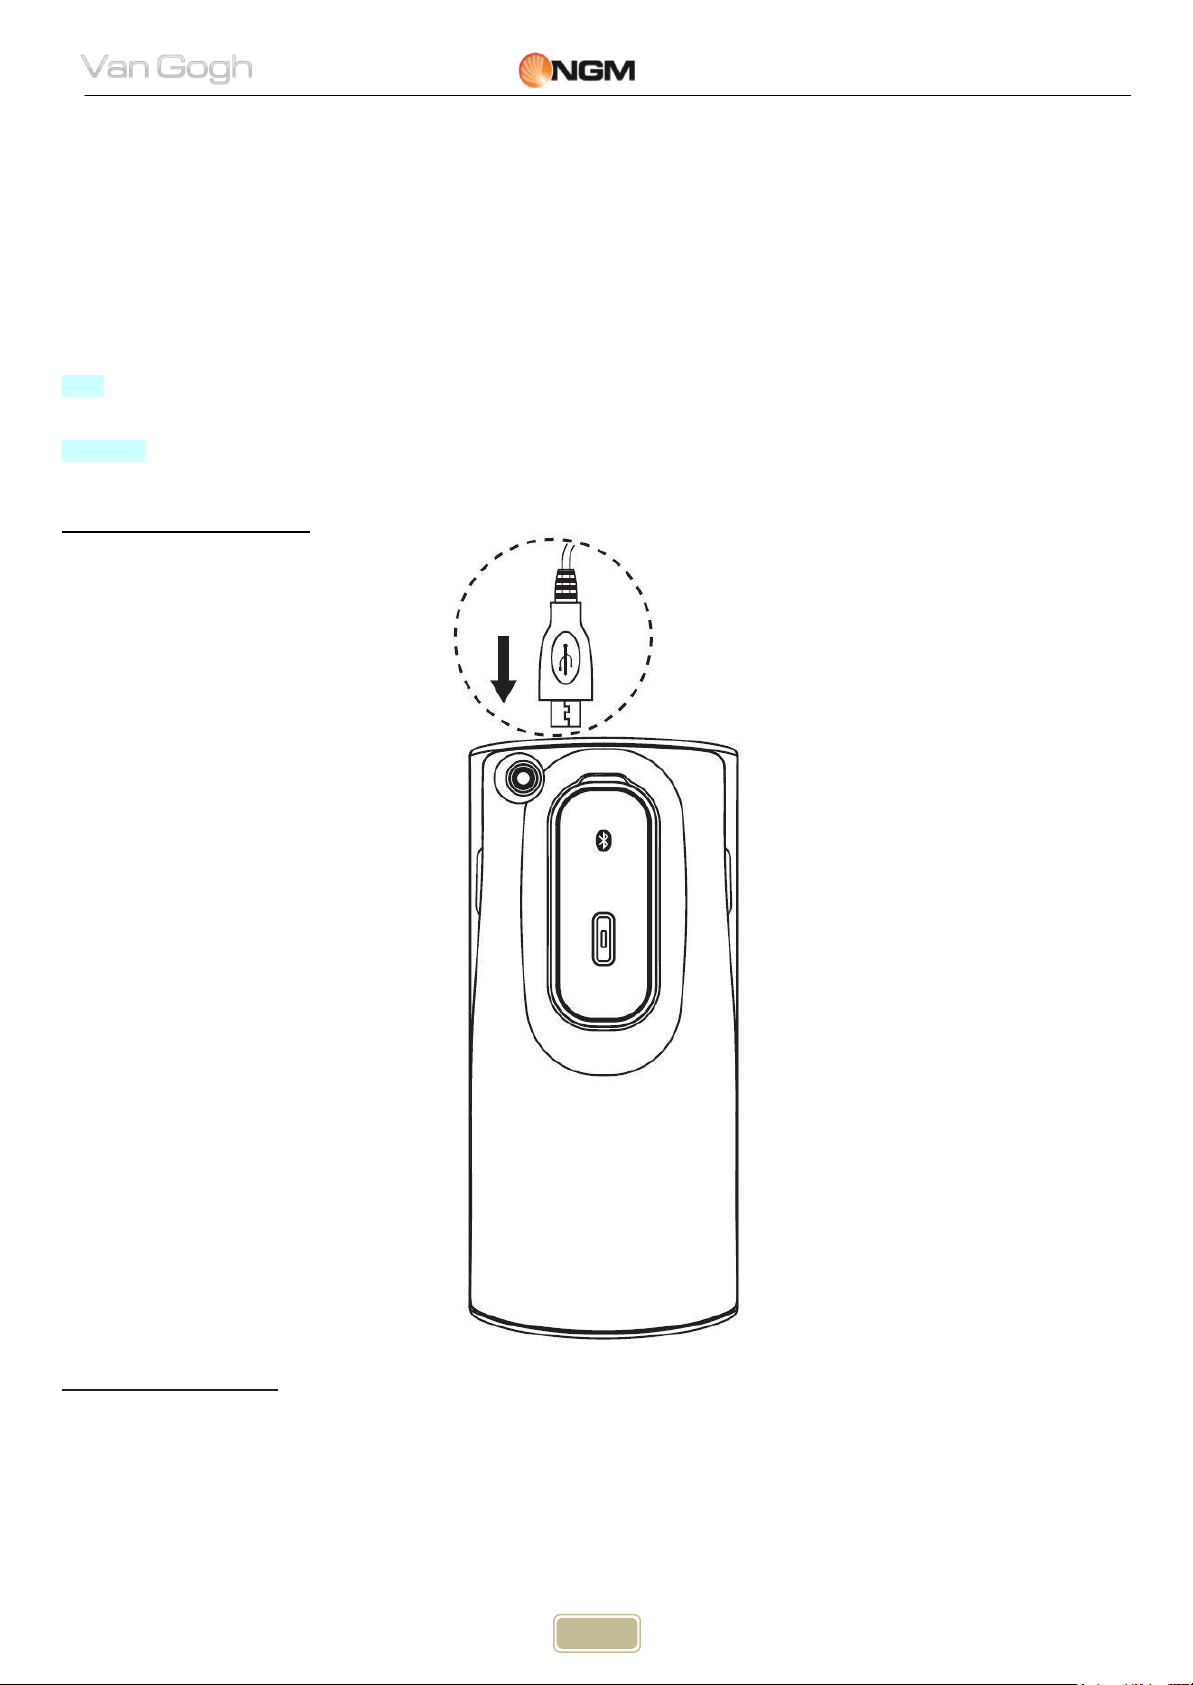
Use the USB cable provided, and connect it one end to the USB connector placed on the right side of the phone, and
the other end to the wall socket adaptor.
When the battery is used up, charge it in time. Over-discharge can damage the battery.
After the battery is charged full, cut off the connection of charger with the AC power supply and the connection with
the mobile phone.
When battery is charging, an animated icon on screen will show the charging progress. Once the progress bar is
completed phone can be disconnected from the grid.
Follow the diagram below to connect the charger.
Note: Use only the provided USB cable for recharging the device. Charge the battery indoors in a dry and favourable
environment. It's normal for the battery to get slightly warm during the charging process.
Warning: use only original accessories to charge the battery. The use of other accessories may damage your mobile
phone and cause risks!
Connections Diagram
Bluetooth earpiece
VAN GOGH phone sports a built in, removable Bluetooth™ earpiece, placed on the back of the device. The earpiece
will be charged at the same time of the phone, when the phone charger is plugged into power. If you need to
recharge the earpiece separately when the phone is in use, choose Menu > Bluetooth > BT earpiece charge.
Do not forget to disable this option when it’s not necessary, because it is one way to reduce the usage of the phone’s
10
Page 11
11
User Manual
battery.
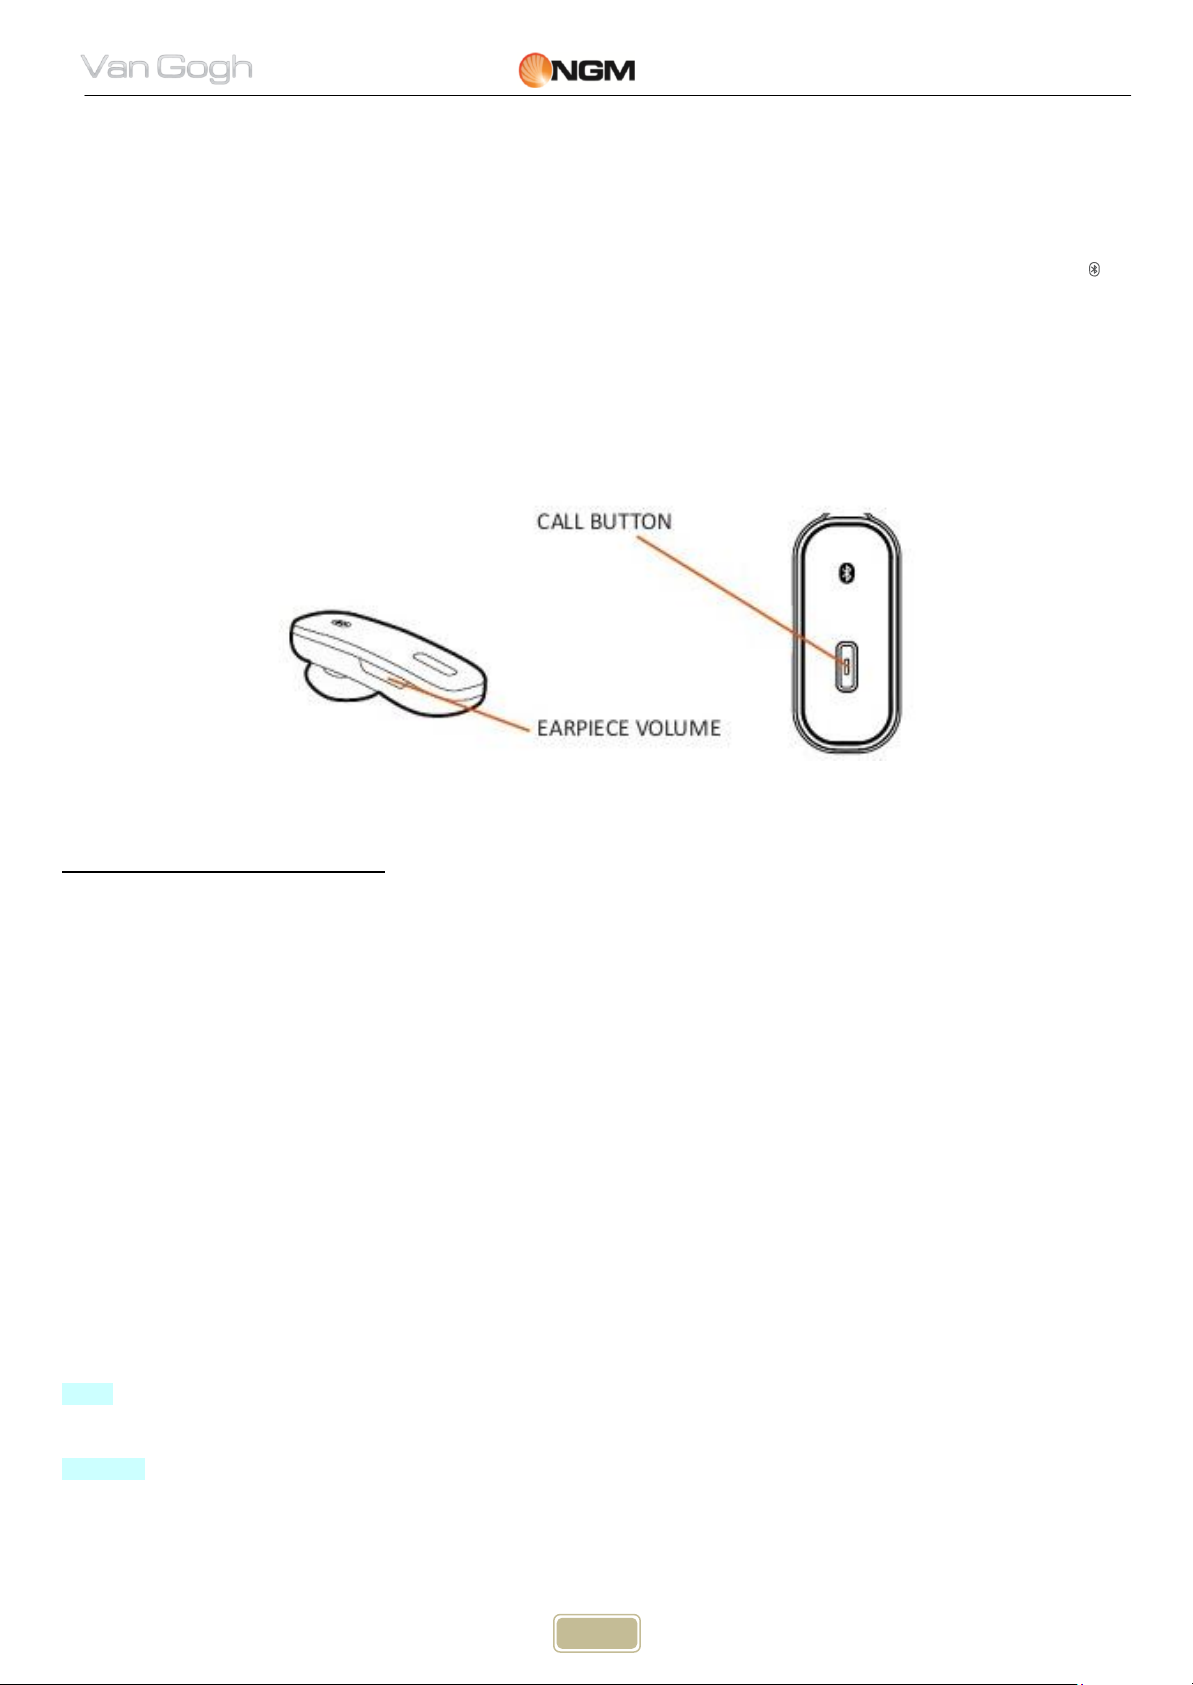
The first time you use the Bluetooth earpiece, it needs to be paired with the phone. Press
earpiece, until the LED starts blinking.
Then, launch a search of Bluetooth devices as previously described, and finally pair the earpiece with the phone.
After connecting, the earpiece is ready for use; you should see icon shown on the top of the phone screen.
Subsequently, you will only need to pair Van Gogh earpiece when you encounter some connection problems with
the phone.
Press down the Answer/end key (Call button) to switch on / off the Bluetooth earpiece; press down the Answer/end
key also to answer a call, or use the Call key of your phone. To end a call, use the End key of your phone, or the
Answer/end key of the earpiece.
To reject a call, use the End key of your phone, or press the Answer/end key for 2 seconds on the Bluetooth earpiece
when the phone is ringing.
the call button of the
Note: listening to a headset at high volume can damage your hearing. Use only the minimum volume setting
necessary to hear the conversation or music.
Notices on using the battery
Notices on using the battery
The performance of the battery is affected by many factors, including radio barrier network settings, signal strength,
signal strength, work temperature, chosen and used functions or settings as well as phone accessories, tones, data
or other applications.
For optimal performances, please follow the rules below:
New battery or the battery having been idle for long need charging for long. The standard voltage scope for the
battery is 3.6V-4.2V.
During charging, keep the battery at room temperature or similar temperature.
With time passing by, the battery will gradually be worn and thus need longer time to charge. This is normal.
However, after normal charging, if call duration decreases but charging time increases, you need to buy another
battery from the original manufacturer or authorized by the original manufacturer. The battery of interior quality
can damage your mobile phone and cause danger!
If the phone is overused at low battery when charging, there might need a longer time for the charge indicator to
be shown on the screen.
Note: please dispose the battery according to the local regulations. Try to recycle the battery as possible. Do not
treat the waste battery as common waste.
Warning: do not throw the battery into fire so as to prevent fire hazard. The broken battery may cause explosion.
11
Page 12

12
User Manual
Warning
Charging the mobile phone by improper means can cause to explosion. Always refer to the related regulations for the
disposal of the battery.
PIN Code
PIN Codes
PIN1 Code: it is the personal identification number used to enter SIM and able to prevent others using SIM1 without
permission. If the mobile phone has activated the PIN1 code protection, when the mobile phone is switched on, the
screen will display “Input PIN”. In the process of inputting PIN1 code, the screen will use “*” to represent the input
content. While obtaining SIM, you can obtain its PIN1 code.
PIN2 Code: it is the personal identification number used for some special functions.
PUK Code and PUK2 Code (8 digits): to change the locked PIN code, you need to use PUK (Personal Unblocking
Key) code. To change the locked PIN2 code, you need to use PUK2 code. If
these two codes are not provided together with the SIM cards, ask the local service provider for them.
Warning: if you input the wrong PIN code for three times continuously, the SIM card will be locked. Please contact
the network operator immediately for help. Attempt to unlock the code may make the SIM card ineffective forever!
General Instructions
OK Key and Navigation Keys
OK Key and Navigation Keys
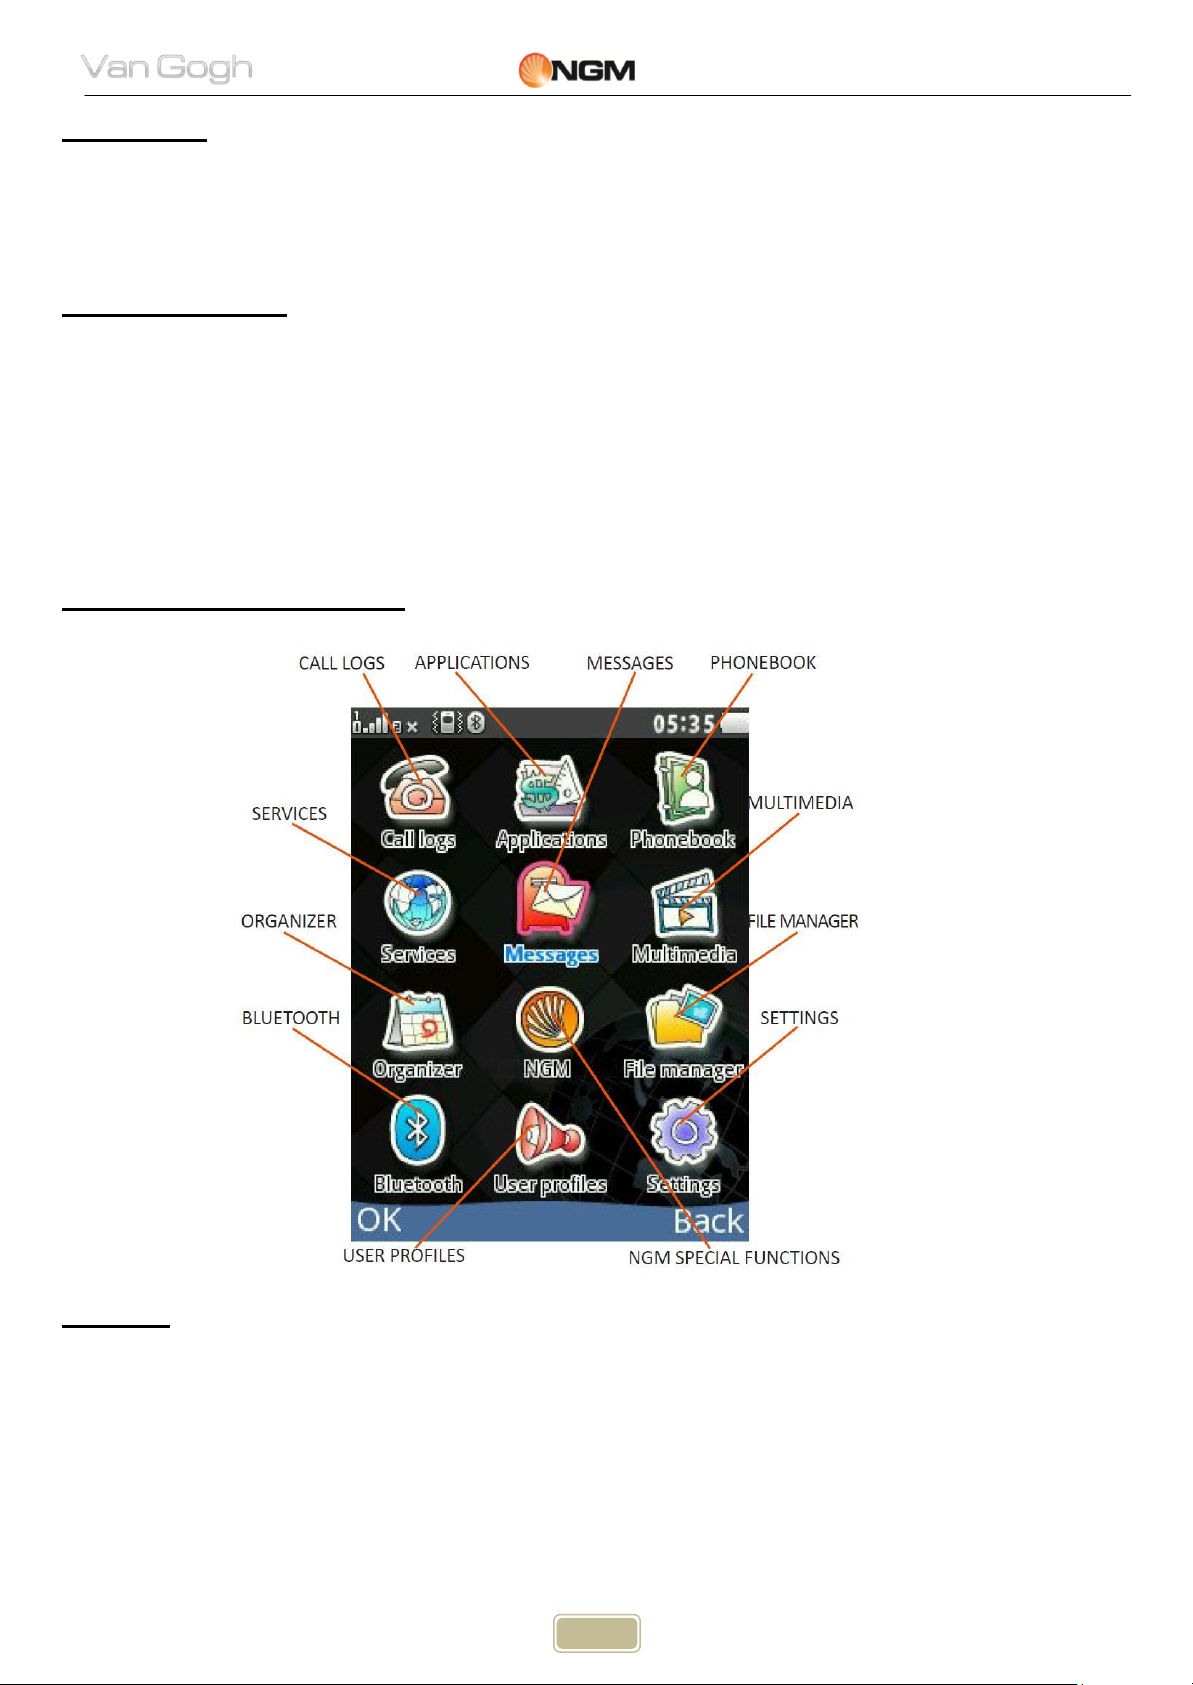
OK key is commonly used on various situations. In standby mode, this key will bring up the main menu, that you can
browse through using the Navigation keys (up/down, left/right). Once a menu is open, use the Navigation keys to
browse through the options and OK key to confirm.
Send Keys
Send 1 and Send 2 keys
Use these keys to make a call (after dialing the number, o after selecting an entry from the Phonebook) via SIM1 or
via SIM2. In standby mode, pressing one of these keys will bring up the
recent call history (SIM1 and SIM2 can support up to 20 voices, including Missed calls, Dialed calls and Received
calls). Select a contact from the list e press again SIM1 or SIM2 Send keys to call the number.
End Key and Back Key
End Key and Back Key
In call mode, End key will end the current call; in other situations, it will exit the current menu and return to standby
mode. Pressing the key for 4~5 seconds will switch on or switch off the
mobile. The Back key will exit the current menu or sub-menu and return to the previous screen; when inserting text,
this key will delete the character to the left of the cursor.
12
Page 13

13
User Manual
Pressing “#” for some seconds will activate/deactivate the vibration mode.
Standard Keyboard
Standard Keyboard
The phone features a standard modern telephone keypad, with numeric keys 0-9 (A-Z), * key and # key, total 12
keys.
These keys are used to input numbers, passwords, letters and symbols when writing messages, or to choose menu
options.
In different mode or different menus, “*” key and “# “ key have different functions.
FM Radio Keys
OK key: in FM radio mode, press this key to turn on/off the FM radio.
Navigation keys (Left/Right): to start a manual search for radio stations, scrolling the frequency up and down
slowly. You can fine tune the radio frequency by +0.1 MHz. or by -0.1 MHz using these keys. Or, if the automatic
tuning is set on “on” (Up key), pressing the left/right key will make the tuning jump from one radio station to the
next.
Numeric keys (1-9): if pressed briefly, these keys call up the corresponding channels, previously saved in the
channels list; if pressed for a few seconds, they tune the current radio frequency in the corresponding channel.
"*" and "#": these keys act as volume control.
Keyboard Lock
Keypad Lock
In standby mode, select Menu, then choose SETTINGS > Security Settings > Auto Keypad lock, then select the
desired time; after the phone is idle for the selected time period, the keypad become locked. Press * key to unlock.
When the keypad is locked, it's possible to answer a phone call just pressing the OK key; after the call is ended, the
keypad will be locked again. You can also lock the keyboard on demand, pressing the OK key for some seconds from
the standby mode; press OK key and then * key to unlock.
13
Page 14
14
User Manual
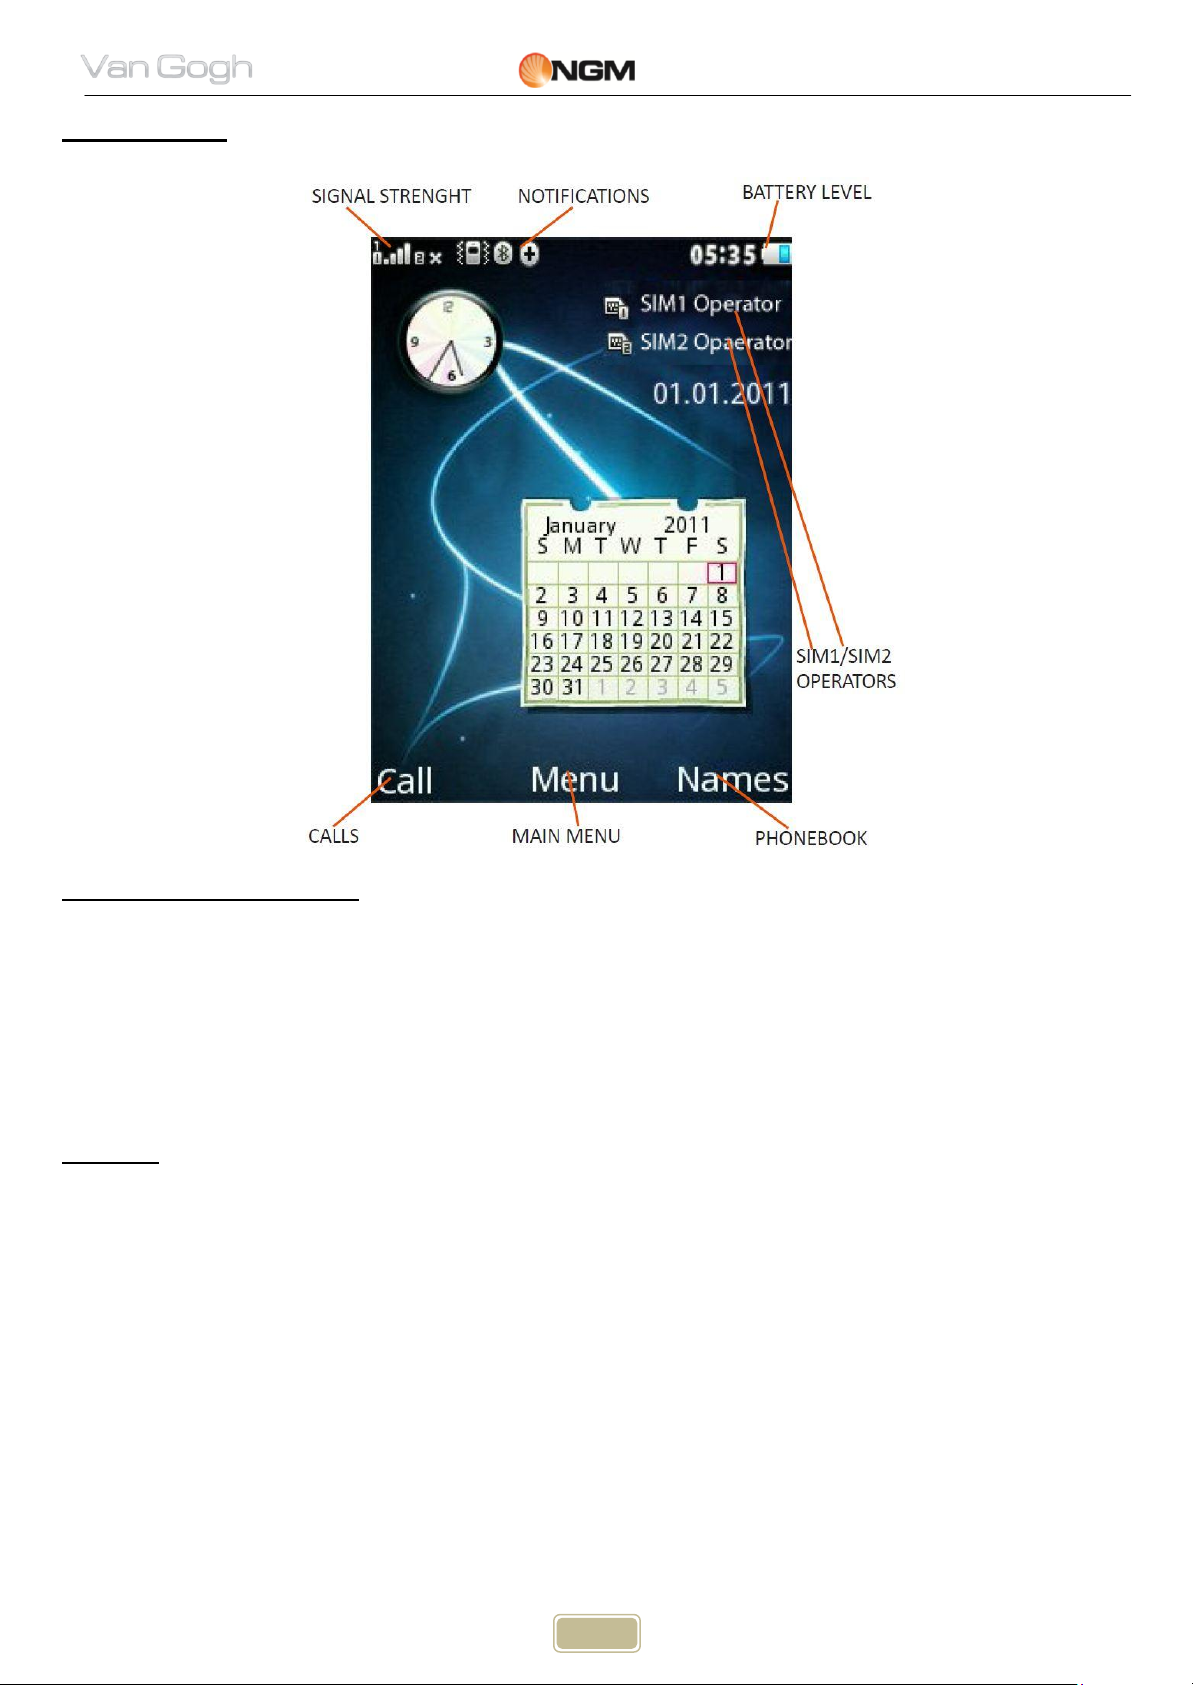
Standby mode
Language and Input Mode
Language and Input Mode
Italian is the language by default and as input mode. For different areas, there are 4 languages available (English,
French, Spanish, German) with the corresponding input modes.
How to change the menu language: SETTINGS > Phone settings > Language > [select a language].
How to change the input language: SETTINGS > Phone settings > Writing language > [select a language].
Call Hint
Incoming Call Hints
The mobile phone is inbuilt with vibration motor and buzzer and provides several incoming call modes:
Ring only
Vibration only
Vibration and ring
Vibration and then ring
Silent
In order to change the alert mode, choose: USER PROFILES > [ Selected Profile] > Options > Customize >
Alert type (there are separate settings for each SIM card).
In standby mode, press and hold the # key to quickly turn on Vibrate mode and to turn off the ringer. By pressing
and holding the same key again, the previous user profile will be restored.
14
Page 15

15
User Manual
Services
Services
Services are provided with SIM kit. The mobile phone support service function. The detailed menu items depend on
SIM card and the network. When the network provides such function and your SIM card supports such function, the
service menu will automatically be posted in the services of the mobile phone.
Caller groups
Caller groups
The callers’ groups in the mobile phone include various contacts sharing common characteristics and features (i.e.
family, friends, work colleagues, etc.). You can set different ringtones and pictures for each callers’ group.
To create a group, choose: Phonebook > Options > Callers Groups > Add new group.
After creating the group with a customized name, select it with OK key, then choose Add to view the number list
and add the contact to the group.
Note: you can add to the group phone contacts only – not SIM contacts.
Basic Operations
Switch On
Switch On
Press the Switch-on/off (End) key to start the mobile phone, then the screen will display the switch-on image.
When the standby screen is displayed, press the OK key to enter the main menu. Then you can enter SIM
MANAGER menu to set phone modes, including Dual SIM active, Only SIM1 active, Only SIM2 active and
Flight Mode. The defaulted one is Dual SIM active.
Note: selecting SIM MANAGER > SIM Selection Method > Dynamic, every time you switch on the phone you will
be prompted to choose a Dual SIM setting. If you select Static (default mode),the phone will run according to the
last setting.
After inserting SIM card, the mobile phone will automatically check the SIM card availability, and then it will be show
the following informations on the display by sequence:
1. “Input phone password”— if you have set the password.
2. “Input PIN” — if you set SIM card password.
3. “No service”— indicates failure to register; the phone cannot make any calls.
4. “Emergency calls only”— indicates that the phone has registered to other network and can only make
emergency calls.
5. “Searching”— the mobile phone is searching an appropriate network.
6. “Operator name”— indicates network successfully registered.
Note: if you do not know your PIN code, please contact the network service provider. The mobile default password
code is “1122”.
Switch Off
Switch off
To switch off the mobile phone, press the End key. When the screen displays the switch-off animation, the host and
the slave SIM will be off at the same time. Do not take out the battery to switch off the mobile phone. If so, the SIM
card can be easily damaged and some data will be lost.
15
Page 16

16
User Manual
How to Dial a Call
How to Make a Call
With the number keypad, you can enter phone numbers (if wrong characters are input, press the Back key to
delete them). Press the Dial keys to dial the phone number. In SIM1 and SIM2 On state, you can choose to dial a
call via SIM1 or SIM2 (Send1 and Send2 keys, respectively). To end a call, press the End key; or to cancel a dial,
press the Back key or the End key. After the call is connected, you can see the call timer on the screen. If your
dialled number is saved in mobile phone memory, the contact name will be displayed on screen.
Dial a call via Phonebook: enter the Phonebook menu and search the desired name/phone number, and then
press Dial keys to dial..
Redial latest dialed number: in standby state, press Dial keys (SIM1 or SIM2) to view the list of the latest dialed
20 phone number or names. Roll to the desired phone number or name and press Dial keys to dial call.
Adjust Receiver Volume
How to Adjust the Receiver Volume
When speaking to someone, press the Navigation keys Up (+ volume) or Down (- volume) to adjust the receiver
volume.
Answer a Call
How to Answer a Call
When there is an incoming call, you will be alerted with ring, vibration, vibration and ring, or vibration then ring,
according to the settings of the mobile phone.
To receive a call, press Dial/Send Keys or OK key. If you prefer to use whatever key to answer, you can select:
SETTINGS > User Profiles > [ Selected Profile] > Options > Customize > Answer mode > Any key.
To refuse a call, press the End key directly.
If the CLI (Call Line Identity) is opened, the phone number of the caller will be shown on the screen. If this number
has been saved in the phonebook, the name corresponding to this number will be displayed on the screen.
Dial Hold
Place a Call on Hold
If you have applied for dial hold, in the call conversation process, choose “Call Center > Call Settings > SIM (1 or
2) Call Settings > Call Waiting” to have the following function menus:
Activate: to activate the function allowing to place a call on hold.
Deactivate: to deactivate the same function.
Query status: to query the current call status.
Note: some menu's elements need the network support; others may occur under special conditions. Please contact
the network operator for further details.
Fast SMS Reading
Fast SMS Reading
When the user receives some new SMS, the screen will display an icon of unread SMS. Press Read to enter and read
the SMS. The SIM card 1 unread SMS icon is marked with “1” and SIM card 2 unread SMS icon is marked with “2”.
16
Page 17
17
User Manual
Missed Calls
Missed Calls
When there is a missed call incoming, the screen will display a missed call icon (separately for each SIM card). Press
Send key (SIM1/SIM2) to enter and read details about the missed calls.
Answering Machine
Answering machine
The telephone answering machine is a device designed to record audio messages directly on its local memory without
connecting to a server to listen the recordings, thus avoiding the relative charges. Moreover, you can customize your
answering machine message, using the phone’s microphone. The answering machine will turn on after a preset
number of rings, or can be operated manually as answer option. You will be notified with an icon (separately for SIM1
and SIM2) when you got messages left on your answering machine. If you want to listen to messages, select NGM >
Answer machine > Leaving messages .
Use of Menu functions
Call Logs
Call Logs
Call center includes Call history and Call Settings. In dual-SIM mode, you can separately search the call register of
SIM1 and SIM2 and set separately some operations corresponding to SIM1 and SIM2. In mono-SIM standby mode,
you can set the available SIM card and see its call register.
17
Page 18
18
User Manual
Call Waiting: you can freely choose to turn On or Off this function. The call hold cannot be active unless this
function is activated. This function requires network support.
Call Divert: this kind of function cannot be used unless you apply to the network operator for it. With this
function, you can divert calls meeting the following conditions to another number.
Name
Descriptions
Divert All Voice Calls
The network will divert all voice calls without conditions.
Divert if Unreachable
When the network cannot find your mobile phone (switched-off or out of the
service area), it will divert the calls.
Divert if no Answer
When the mobile phone does not answer the call, the network will
automatically divert it.
Divert if Busy
When you already are in a conversation, the network will divert the call.
Divert All Data Calls
The network will divert all data calls without conditions.
Cancel All Diverts
Cancel all divert conditions.
Activate all: global barring for all the outgoing and incoming calls.
Cancel all: remove all barring, allowing to dial out and receive calls as usual.
Change barring password: you can apply to the network to change the password for call barring.
Auto redial
Call time display
Call time reminder
Call Settings
SIM1/SIM2 call settings
In dual-SIM mode, you can maintain separate Settings for SIM1 and SIM2.
Caller ID: you can choose ID as set by Network, Hide ID or Send ID.
o Set by network: while in conversation, you can send your Caller ID in the form preset by the system.
o Hide ID: while in conversation, you will not send your Caller ID. If the system does not support such
function, call may fail.
o Send ID: while in conversation, you can send your Caller ID to the system
Note: this function requires network support.
Call Barring:
Outgoing calls:
o All calls: you can bar all outgoing calls.
o International calls:you can bar international calls only.
o International calls except to home: when abroad, you can dial the calls to the country you are currently
in and to your own country (the service providers allows to do so).
Incoming calls:
o All calls: you can bar all incoming calls.
o When roaming: you can bar all incoming calls except the calls of the local service area.
Advanced settings
You can set this function as On or Off. After the first automatic redial fails, you can have at most ten times to
connect a phone number.
The phone screen can display the talking time of your current call.
The phone has time reminder: you can set a sound warning at any time you like or at any time interval (between 3060 seconds).
18
Page 19

19
User Manual
Reject by SMS
Last call: with this function, you can view the last call duration.
Dialed calls: with this function, you can view the global duration of all dialed calls.
Received calls: with this function, you can view the global duration of all received calls.
Reset all: with this function, you can clear all your call duration records.
Last Call Cost : with this function, you can view the last call cost.
Total Cost: with this function, you can view the global cost of all dialed calls.
Reset cost: with this function, you can clear all your call cost records.
Max Cost: with this function, you can limit call costs in the specified pricing unit or currency unit. PIN2 code
must be input to set call cost.
Price per unit: this function needs network support. For more details, please consult the network operator.
Last sent: you are able to view traffic sent in the last GPRS connection.
Last received: you are able to view traffic received in the last GPRS connection.
All sent: you are able to view global traffic sent.
All received: you are able to view global traffic received.
Reset counter: you can clear all your traffic data records.
You can automatically reject a call by SMS, using a predefined message to select in Message > Templates.
SIM 1/2 Call History
Call history allows you to to view missed calls, dialed calls and received calls in both SIM cards. Use the tabs to
browse through the lists (All calls, Dialled calls, Received calls or Missed calls).
In missed calls, received calls and dialed calls function list, you can see: date, time, duration of the call; call back the
number; edit or delete the phone number in the list; save the number to phonebook or send SMS and MMS to the
number; add the number to the Blacklist; delete call logs; view call time, call costs, SMS counter and GPRS counter.
Note: SIM1 and SIM2 contain up to 20 entries each (including Dialled calls, Received calls and Missed calls).
For each call in the list, you can watch the following counters:
Call timers
Call Cost
This function needs the support of the network service provider.
Note: real call's duration and time/cost counting for billing purpose on the network operator side may differ: this can
be attributed to network functions, bill roundings, taxes, etc.
SMS counter
With this function, you can view the number of sent messages and received messages.
GPRS counter
Applications
Miscellaneous applications
Java
It is necessary to set the required configuration information to launch the applications, since almost all of Java
applications need network access. For this reason, the configuration information will depend on the SIM card you are
currently using.
Java application link
Facebook™, Twitter™, MSN™ and all the downloaded Java applications will be available on this menu.
Java settings
Java audio : set the volume to level (values between 1 and 7) or turn it off.
Java backlight: turn on/off the LCD backlight.
Java vibration : turn on/off the vibration.
Heap size: the maximum heap size is 1048576 bytes.
19
Page 20

20
User Manual
Find/Find Next: search for a word inside an ebook.
Jump to: jump to a specific line in the text.
Go to bookmark: jump quickly to the bookmark in the text.
Add bookmark: add a bookmark in the text.
Delete bookmark: delete a bookmark from the text.
Text info: show detailed information on the selected ebook.
Settings: set font size, scrolling mode, auto scroll, scroll speed, full screen view, alignment and character
encoding.
Apply global settings: apply the chosen settings.
Help: show the instructions for the use of the shortcuts. Use key 0 to go to text settings screen; use key 1 for
help; use key 2 to add a bookmark; use key 3 to go to “Find” screen; use key 4 to go to"Jump to” screen; use
key 5 to go to the bookmark; use key 6 to find the next occurrence of a word; use key 7 to toggle the auto
scroll; use key 8 to delete a bookmark; use key 9 to toggle full screen mode.
Close: close the selected ebook.
After inserting your first number, use the upper direction key for “+” and the lower direction key for “-”, the
left direction key for "×" and the right direction key for "÷, then insert your second number;
Press Clear key to clear the latest inputs or results digit by digit; press Clear key long to clear all content or
result;
Press “OK” key to obtain the result.
Java default security
You can choose between Third party security, Untrusted domain, Restore default and Domain options
(enable/disable Third party and/or Untrusted domain).
Java network
You can select the SIM card (SIM1 or SIM2) to use in Java activities.
Activate SIM: activate the selected SIM.
Select profile: select the desired Java profile from the list.
Games
The phone is provided with a game (Puzzle). For further details, please refer to the instructions included with the
game (Help).
Ebook reader
At the start the application will show the currently available ebooks list. If there are any e-books previously saved,
select Options, then Global Settings > Storage and select the file path.
When you get the list of available e-books, select a file to read it, or choose Options:
Calculator
Note: the precision of this calculator is limited and can be used for simple calculation.
Currency Converter
This application enable the user to convert from a currency of one selected country (local, L) to the currency of a
second selected country (foreign, F). It is necessary to know or to have reference to the then existing exchange
currency rate in order to use the application.
Phonebook
Phonebook
Contacts can be saved to the SIM card or phone memory. The phonebook will show all the contacts from the SIM
cards and phone. Only two details can be saved to a SIM card, name and phone number. More details can be stored
in the phone memory, including multiple phone numbers, email address, pictures, and ringtones.
The phone stores up to 1000 entries. Available options:
View
Display the contact name, the number, and other details.
Send text message
Send a SMS to the selected contact.
20
Page 21

21
User Manual
o
Speed dial: you can toggle this option on and off; it allows to assign a phone number to each numeric key (2-
9) for speed dials.
o
IP dial: you can set up to three different IP numbers for IP dials.
o
My number: you can edit your vCard and send it as text message, as multimedia message, or via Bluetooth.
o
Extra numbers: you can save (separately for SIM1 and SIM2) some particular numbers as owner numbers,
service numbers and SOS numbers. You can also build a list (separately for SIM1 and SIM2) of fixed dialing:
after that you can only make calls to contacts that appear in your fixed dialing list (except for emergency calls).
o
Memory status :you can display the current status of the phonebook memory, including the memory available
on SIM1 and SIM2. The display format for the memory usage is “used/total”.
o
Preferred storage: you can select which list to display (SIM1, SIM2, phone and all the possible
combinations).
o
Copy contacts: copy all the contacts from phone to a SIM card (and vice versa) or from a SIM card to
another.
o
Move contacts: move all the contacts from phone to a SIM card (and vice versa) or from a SIM card to
another.
o
Delete all contacts: delete all contacts from SIM1, from SIM2 or from phone.
Services
The first sections of Services menu are reserved to network operator services (SIM1 and SIM2), and therefore they
Send multimedia message
Send a MMS to the selected contact.
Call
Call the selected contact.
IP Dial
Call the selected contact through an IP Dial. An IP dial allows user to make international calls from the mobile phone
to the lowest rates available. This function requests network operators offering VoIP services.
Edit
Edit the details of the selected contact.
Delete
Delete the selected contact from the list.
Copy
Copy the selected contact from phone to a SIM card (and vice versa), or from a SIM card to another; moreover, you
can copy that same contact into the Black List, the White List or in a file (.vcf format).
Move
Move the selected contact from phone to a SIM card (and vice versa) or from a SIM card to another.
Send contact
Send the vCard of the selected contact as text message, as multimedia message, or via Bluetooth.
Add to Black List
Add the selected contact to the Black List.
Mark several
Select more than one contact at a time to speed up the operations on the phonebook.
Caller Groups
You can organize your contacts into caller groups such as family, friends, business, etc. and customize the attributes
for each group. You can choose a name (Add new group), a ringtone and a picture for each group.
Note: Only contacts from the phone memory can be added to caller groups.
Phonebook settings
Services
21
Page 22

22
User Manual
may vary according to the quantity and type of options available.
The next two sections are dedicated to Internet service (WAP) and to Data account.
WAP (Internet)
Homepage: set the initial or main web page from where to start navigation.
Bookmarks: save a link to a web page (Google already linked). Available options:
Go to: open the selected web page.
View: view bookmark details (title and web address).
Edit: edit the selected bookmark.
Delete: delete the selected bookmark.
Delete all files: delete all the bookmarks.
Add bookmark: manually add a bookmark (specify title and web address).
Set as Homepage: set the current web page as Homepage.
Send bookmark: send the selected bookmark as SMS , as MMS, via Bluetooth or as Email.
New folder: create a new folder.
Copy: copy to vBookmark (a folder of choice) or to external memory (Phone or Memory card).
Move: move to vBookmark (a folder of choice) or to external memory (Phone or Memory card).
Memory status: check the free space available for the bookmarks.
Input address: manually add a web address.
Last web address: go back to the last web page.
Recent pages: show the last 10 web pages visited.
Offline pages: when your phone is not connected to the Internet, you can read the content of a web
page that has been previously saved.
Service inbox: get service infos from the network operator (e.g. head news referred to specific arguments,
web links, etc.).
Settings:
Select SIM: SIM1, SIM2 or Always ask.
Profiles: select an account from the list or add a new one. The selected account may be activate or edited. To
edit an existing account or insert a new one, you need filling the following fields:
Profile name: choose a name.
Homepage: set the initial web page for this profile.
Data account: set the network ID.
Connection type: HTTP or WAP.
User name: insert user name, if required.
Password: insert password, if required.
Browser options : clear cache, clear cookies or clear authentication infos.
Preferences: set a time-out, show/hide pictures, enable/disable cache and enable/disable cookies.
Security settings: view your list of trusted certificates.
Service message settings: enable/disable push notifications, enable/disable service message loading,
enable/disable messages from trusted addresses only (White List), build a White List.
Restore browser settings: reset the browser to factory settings.
Data account
GSM Data: you can configure your Data account, inserting account name, number, user name, password, line
type, speed, primary and econdary DNS.
GPRS: you can choose a preloaded account, or you can configure a new account inserting account name, APN,
username, password, authentication type, primary and secondary DNS.
Note: please contact your network operator for further details about settings and connection charges. Network
services may vary from provider to provider and are subject to change.
Auto matching
This option allows to enable/disable the Automatching function for the connection profiles, based on automatic
identification of the provider for each SIM card used.
22
Page 23

23
User Manual
Messages
Messages
SMS
Both SIM cards can send and receive SMS. Each SMS is sent to the SMS center of the network and routed from there
to the end user (the user GSM). If you do not turn on your phone or if your phone is unable to receive text messages
(because the memory is full, for example), the network saves temporarily the message. The duration of storage
depends on the settings of the sender and the network.
This function of sending and receiving text messages may incur significant costs. For more information, contact your
mobile operator.
When SMS capacity is exhausted, SMS icon will flash in the standby interface. SMS reception can be affected by the
exhaustion of storage space. Delete some SMS to solve the problem.
If the recipient has received your SMS, you will be alerted by a tone phone (if the alert function is activated).
Note: when sending SMS, the phone can display the notification "Message sent". This means that the SMS was
actually sent to the SMS reception center set up in the phone, but the recipient could not have received the
message. For more information, please consult your provider.
MMS
MMS is a standard way to send messages that include multimedia content (short video clips, photos and audio). If
MMS is over the size limit, the phone won't display the message. The phone will automatically resize the images
attached to the MMS, so that they can be fully shown on the screen. The visualization of each single MMS depends
heavily upon the receiving devices. .
Note: you can't send or receive multimedia content if your network operator/service provider does not support this
service. Multimedia content can't be received or shown if the recipient doesn't have a MMS-compatible cell phone.
The SMS menu and the MMS menu have some common features:
Write a message
Choose this option to write a new text message or multimedia message. This unit uses the T9 predictive method,
which helps to simplify the writing of text messages.
Each SMS can contain 160 characters of text; concatenating multiple messages (up to a maximum of 4) may form a
message containing a total of up to 640 characters. In writing, press the appropriate button to change the input
method. Press the Back key to delete the last entry; press and hold to clear it all.
If the text contains more than 160 characters will be split into two or more parties. You can insert pictures,
animations, sounds etc.. within a message. However, the SMS won't be received and displayed if the network and
the receiving phone do not support it. To send an SMS / MMS, enter a number directly or choose a number from the
phonebook. In dual-SIM, you can choose to send SMS / MMS via SIM1 or SIM2.
Inbox
This submenu shows the list of the messages received. Options available:
o Reply: reply to the message received.
o Call sender: make a voice call to the message's sender.
o Forward: directly forward the message received.
o Delete: delete the message received.
o Delete all: delete all the messages in the Inbox folder.
o Mark as unread: mark multiple messages simultaneously.
o Advanced: available options: Use number, Use URL, Use Email, Use USSD, Copy to phone/SIM,
Move to phone/SIM, Copy all and Move all (from SIM and from phone).
o Edit options: use Mark text to select a portion of text to copy, and Copy all to select and copy the
whole of a text.
Drafts
Use the Drafts folder to save messages you're still working on, before you send them. You can send, edit, delete or
apply the Advanced options to the messages saved in this folder.
Outgoing
When message sending is unsuccessful, the message will be saved in this folder. Anyway, it is possible to directly
save the edited SMS in this folder; these messages (not yet sent) will show the field Phone Number as empty. All
23
Page 24

24
User Manual
the messages in the Outgoing folder are subject to the usual options: Send (from SIM1 or SIM2), Edit, Delete,
Copy to phone/SIM, Move to phone/SIM, Copy all and Move all.
Outbox
This submenu shows the list of the sent messages. When sending SMS/MMS you can select the option “Save and
send”; the message will be saved in the “Outbox” folder. The available options are the same as for Inbox.
Junkbox
Unwanted messages are saved into this folder, where you can view them sorted also by contact name or by SIM card
of reception.
Delay send SMS
You can postpone sending the message, scheduling the sending at a particular date and time. You can also specify
multiple recipients, set the repetition of sending, and choose which SIM to use.
Templates
Some ready-to-use templates are available, for various situations (SMS and MMS).
Delete messages
Delete messages from some folders or all messages (SMS and MMS).
SMS settings
Use this submenu for setting text and multimedia message options (separately for SIM1 and SIM2).
o Profile settings: set the SMS/MMS Center number before sending and receiving SMS e MMS.
Note: this number is provided by the network operator.
o Voicemail server: set name and number for the voicemail server.
o Common settings
o Delivery report: it is a notification sent to you that lets you know when your text message has been
delivered to the recipient, and when.
o Reply path: when the receiver of your SMS responds, it knows what SMS gateway to send the reply back
to. This option requires SMS Center support.
o Save sent message: a copy of each message that you send will be saved in the Outbox folder.
o Memory status: check here memory capacity on SIM card and Phone, related to the messages.
o Preferred storage: select the storage path for message files (Phone or SIM card).
Delete messages
Delete messages globally, or selectively (inbox, drafts, outbox, etc.).
Broadcast Messages
Activate this function to receive broadcast messages. These messages are sent to every device on a network and
usually contain information as weather forecasts, traffic conditions, etc.
Vocal messages
Here you can listen to answering machine messages stored in your phone's own internal memory. This feature allows
to save money avoiding connection to mobile network operator's voicemail system.
Multimedia
Multimedia, how funny is that!
Camera
Use the inbuilt camera to take your photos. The camera lens is on the back side of the phone and the LCD screen
acts as a viewfinder. It is advisable to keep the phone in a horizontal position to view correctly the tools available on
the LCD screen. The photos shall be saved in a JPG file format. Some software could be necessary to view the
photos, if you download your camera phone pictures onto the computer.
24
Page 25
25
User Manual
Option Description
Switch to video recorder
Switch swiftly to video recorder.
Camera settings
Shutter sound (Sound 1, Sound 2, Sound 3 or Off), EV (from
-2 to +2), Contrast (Low, Medium or High), Anti-flicker (50Hz
or 60Hz), Delay timer (5, 10, 15 seconds or Off), Continuous
shot (1, 3, 5 shots or Off).
Image settings
Image size (240x320, 320x240, 640x480, 800x600 or
1600x1200) and Image quality (Low, Normal or Good.
White balance
Auto, Daylight, Tungsten, Fluorescence, Cloudy or
Incandescence.
Scene mode
Automatic or Night.
Effect settings
Normal, Gray scale, Sepia, Sepia green , Sepia blue, Color
invert.
Storage
Phone or Memory card.
Restore default
Restore default settings.
If there is insufficient space on the drive to store the images, it should be necessary to remove some old pictures (or
any other type of files) from “File manager” menu to free up disk space.
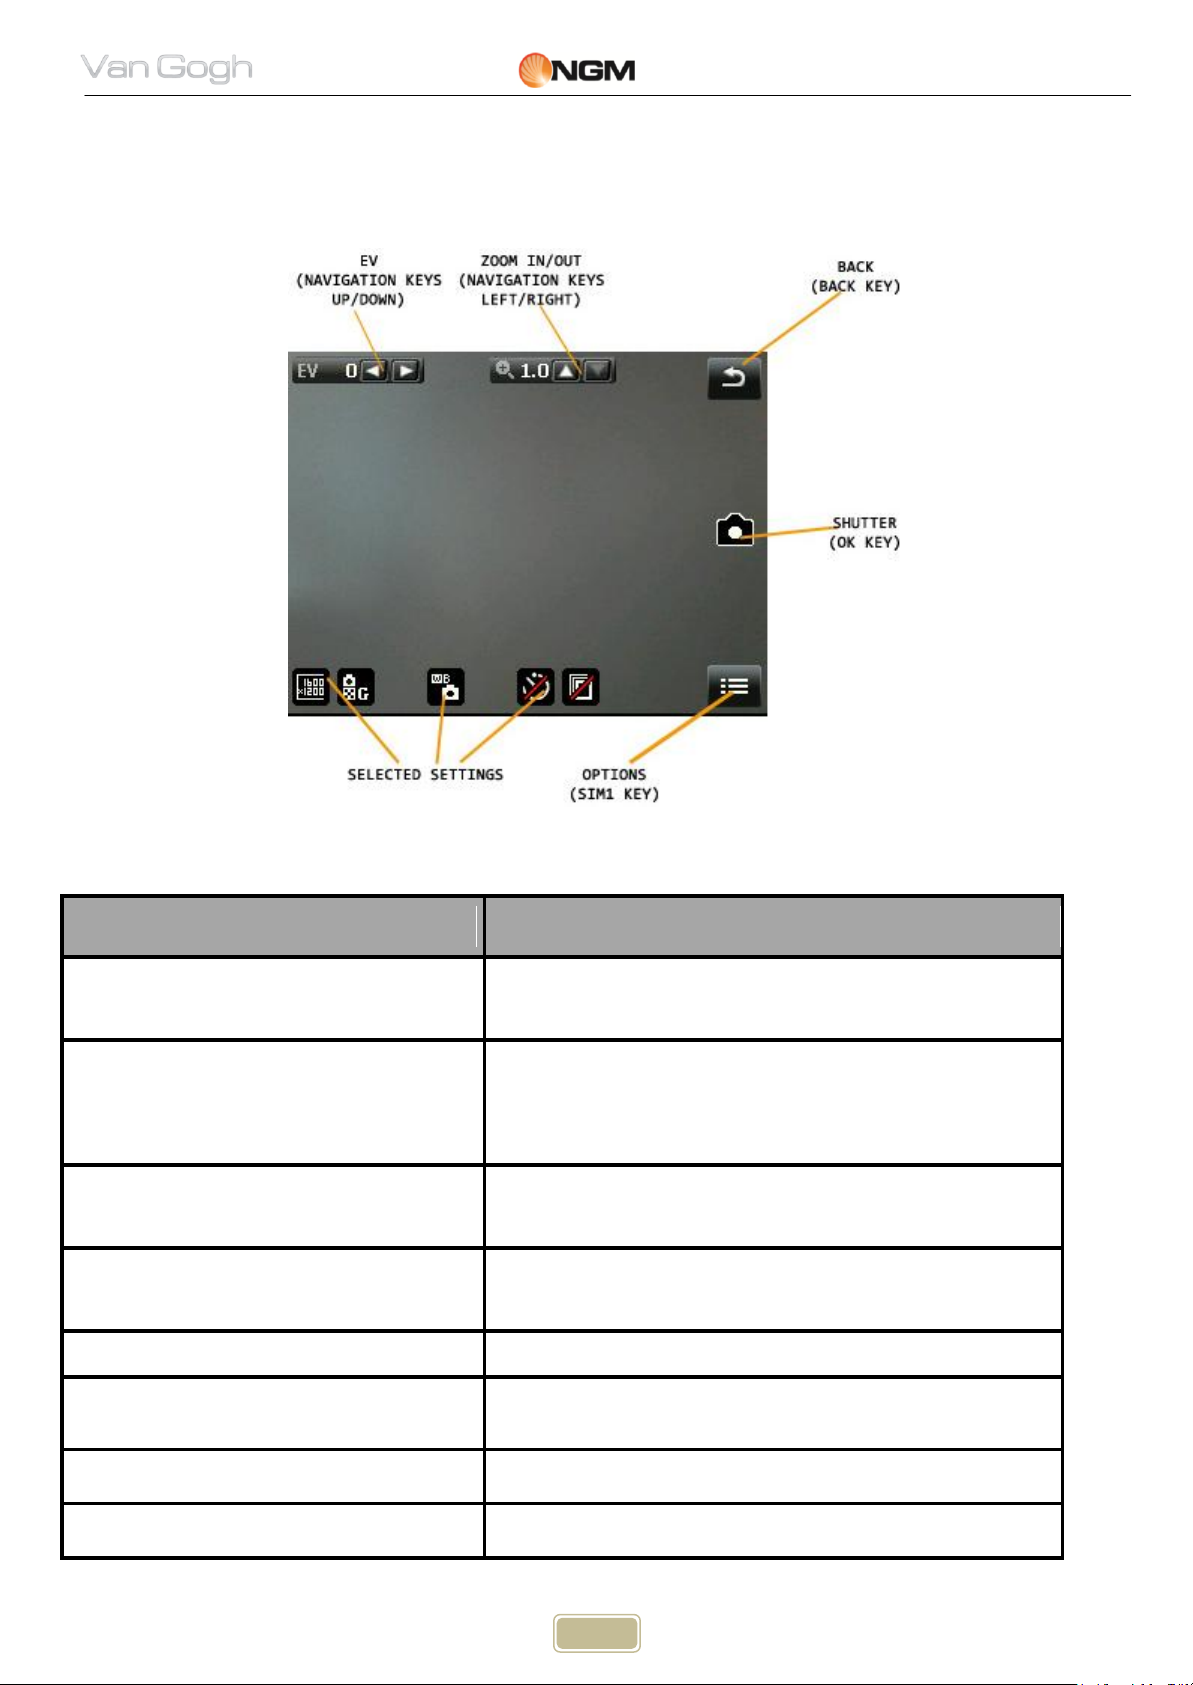
See picture below showing the Camera screen (in horizontal view), and its main functions:
Once activated, the Camera screen will offer the following options (use the SIM1 Key to get access to Options):
25
Page 26
26
User Manual
Option Description
View
View the selected picture and the related infos.
Browsing style
Display the pictures as list, or as grid.
Send
Send the file as MMS or via Bluetooth.
Use as
Use the selected picture as wallpaper, as screen saver, power
on picture, power off picture, or caller picture.
Rename
Rename the selected picture.
Delete
Delete the selected picture.
Sort by
Sort the pictures by name, type, time or size.
Delete all files
Delete all the image files from the chosen storage location.
Storage
Select the storage path for images (Phone or Memory card).
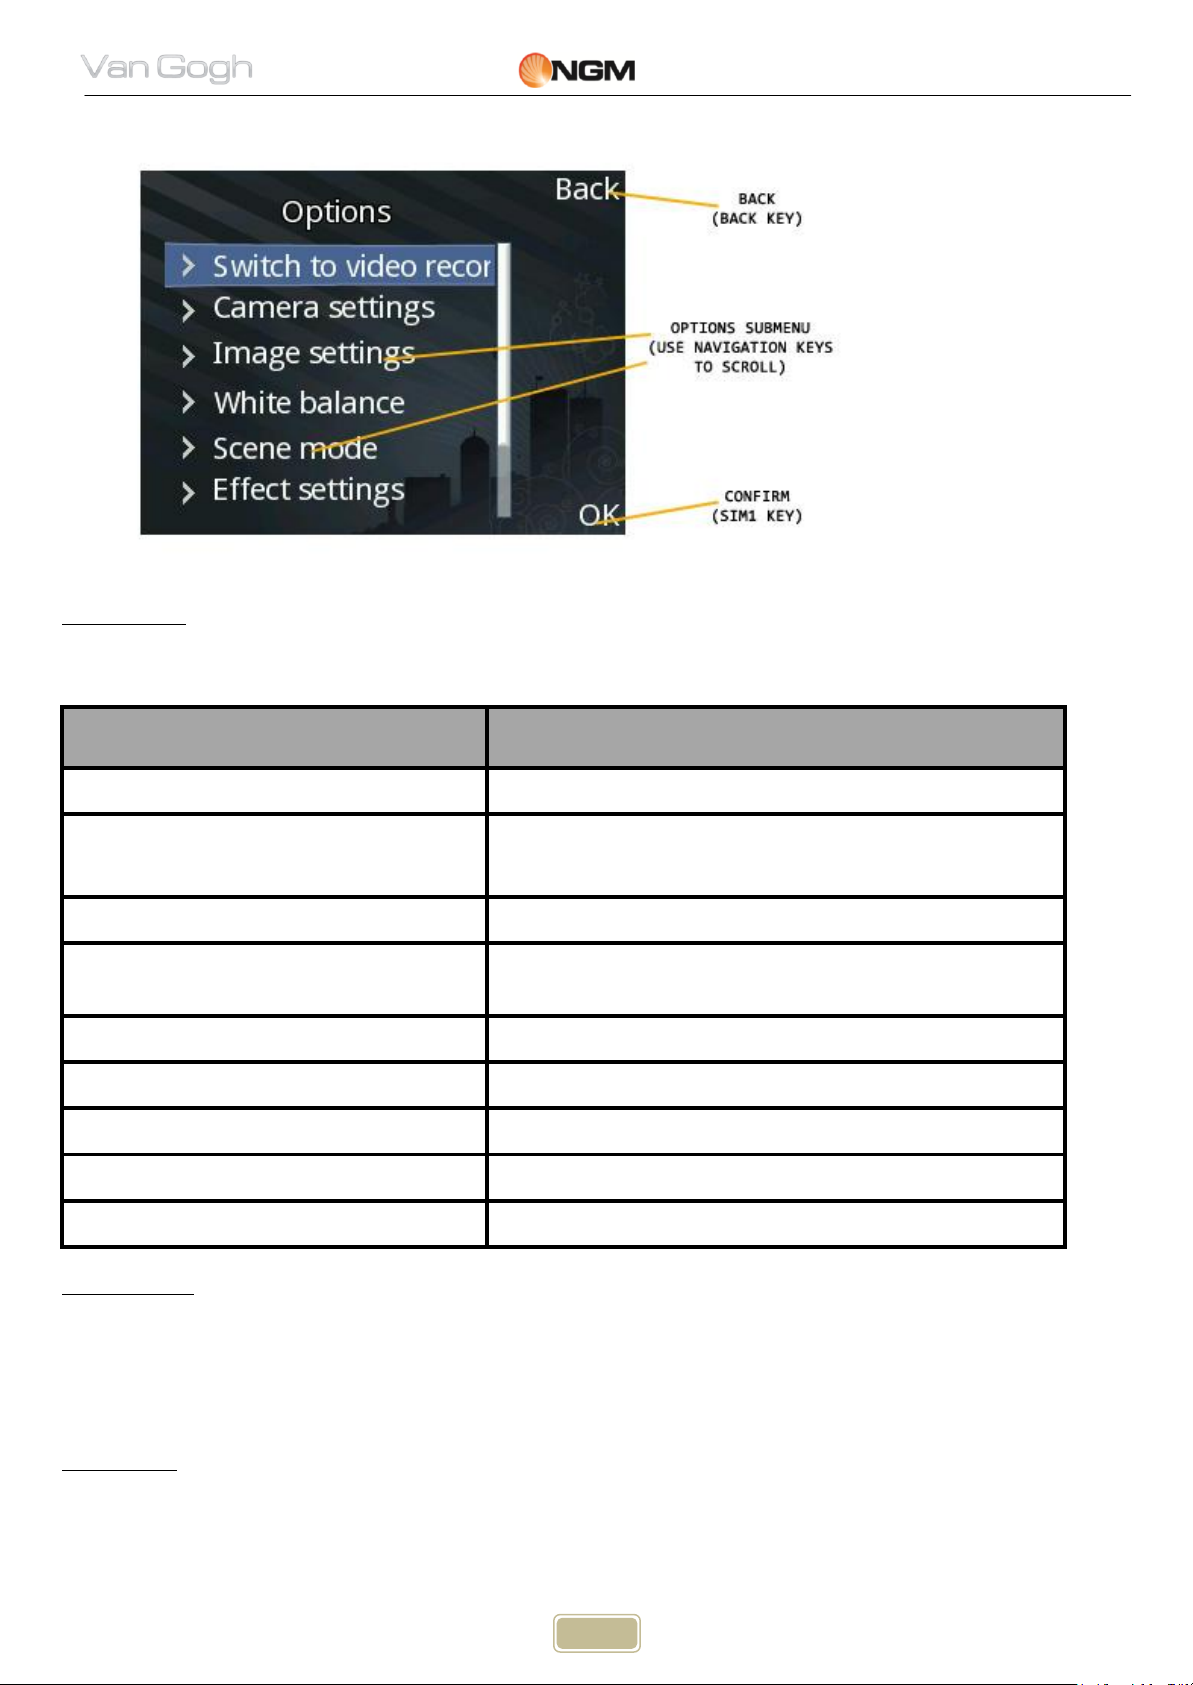
To browse/set the various available options, please see the following picture (in horizontal view):
Image viewer
Use this menu to view an image file previously saved in phone or memory card. This application supports JPG picture
format. Available options:
Video recorder
Use this menu to record a video file. The lens for the camcorder is the same as the one for the camera. Press OK
key to start a new video recording. The video duration is dependent on the fixed maximum recording time or storage
memory.
The available options remain the same as per the Camera function, except for some specific features of the
photografic function. To browse/select the various options, use the same procedure already shown for Camera.
Media player
From this menu you can choose to play audio/video files saved stored on phone or on memory card. To download
files from your PC, T-Flash card must be inserted on the phone; then shut down the phone and connect it to your
computer with the USB cable; the computer will detect the mobile phone automatically as a Mass Storage device .
26
Page 27

27
User Manual
Download the desired MP3 files in “My Music” folder of the Memory card, otherwise the audio file will not play. Audio
Player supports MP3, MIDI and AMR formats. If the operating system of your PC is Windows 2000 or later, any
driver is required. Options available:
1) Current playlist
This option opens the graphic interface of the Media player. With the OK key and the navigation keys is possible to
start/stop/pause the playing, to open the libraries, jump to the next/previous file. Available options: Current
playlist, Library, Settings (for Player, Display and Bluetooth) and Details (to view the details of the selected file,
as title, time, size, quality, etc.).
2) All songs
Search and show all the audio files available in Phone and Memory card.
3) All videos
Search and show all the video files available in Phone and Memory card.
4) Playlists
Show all the user-defined playlists.
Before proceeding with the creation of a new playlist, it’s necessary to start a search for the multimedia files
available in Phone and Memory card (see above).
Sound recorder
Use this menu to start a new audio recording and play audio files previously saved in phone or memory card. From
the list, select “Options” to get the following operations:
New record: to start a new recording.
Play: play the selected file.
Append: combine two recorded files into one single file (only for files recorded in AMR format).
Rename: rename the selected file.
Delete: delete the selected file.
List: to view the list of all the recorded files.
Settings: to select the storage path for the recorded files (Phone or Memory card). The recording formats
are AMR, AWB o WAV. It’s also possible to choose the recording quality (High or Low).
Use as: use the selected recorded file, inserting it in the list of audio files available for User profiles.
Send: send the file as MMS or via Bluetooth.
FM Radio
The phone includes a built-in FM radio. The earphones are required to listen to FM Radio: insert first the earphones
jack in the socket on the right side of the phone. The earphones cable acts as antenna, so let it hang free from the
connector. It is possible to make/receive a telephone call when you are listening to the radio. When the conversation
is rolling along, radio will automatically switch to silent mode. If some application is currently using GPRS or CSD to
send/receive data, there could be interference with radio signal.
After starting FM radio, the phone will show number, name (if already saved), and frequency of the radio channel. If
you already saved some radio channels into the phone, you can select the desired channnel or press any numerical
key (1 to 9) to choose the corresponding channel.
Options
Channel list: save up to 30 radio channels (the first 9 can be directly recalled from the keyboard).
Manual input: insert here directly a specific radio frequency. The frequency range of FM (frequency
modulation) radio is 87.5 MHz to 108 MHz.
Auto search: start an automatic search and save the frequency in the Channel list.
Settings: enable/disable Background play, enable/disable loudspeaker, choose a recording format, choose
audio quality and select the storage path for the recordings.
Record: record an audio file from a radio program.
Append: combine two recorded files into one single file (only for files recorded in AMR format).
File list: view the recorded audio files.
27
Page 28

28
User Manual
FM Radio screen allows you to access to the most common operations through navigation keys, OK key, * and #
keys (volume level).
Slide Show
View your pictures as a slide show, setting the type of play, speed, effects, background music, etc.
Organizer
Organizer: easily managing your tasks and projects
Organizer gathers several homogeneous features.
Calendar
With this function, you can set the alarm clock to keep track of your schedule and record your monthly schedule.
Roll the highlight block to the desired date and then the current date will be highlighted in blue. To view all memos
of one day, press OK and see the schedule.
Available options:
o View: you can view the schedule of the date where the cursor is on, and set the time, date, content
and whether to activate alarm on this schedule of todays. When editing the schedule, you can choose
an alarm type with the left and right direction keys. In addition, you can have such operations as
Delete, Delete and Add on the schedule.
o View all: you can view the entire schedule of the date where the cursor is on and set the time, date,
content and whether to activate alarm on this schedule. The options available are the same as the
previous feature.
o Add event: you can select the type of task to memorize (Reminder, Meeting, Course) and set
start/end date and hour, subject of the task, activate/deactivate alarm, set the frequency for
repeating, location and priority.
o Delete event: you can delete the selected task.
o Jump to date: you can move the cursor to the specified date on the calendar.
o Go to weekly/monthly view: change the way the time is displayed on the calendar.
Tasks
With this option, you can quickly add and update tasks or memos for various events. For each task it ’s possible to
set date and hour, an alarm and its eventual repetition (if the event is a repeating event), location and priority. If
you have set an alarm for the memo, when the set time is reached, the mobile phone will ring and display the
memo content.
Alarm
The time format for the alarm clock is identical to that of clock. When the mobile phone is off, the alarm clock can
still work provided the battery is sufficient. The system has set 5 alarm clock options and the defaulted is off. You can
activate one option or all options according to the actual demand.
Every alarm clock option can set independent time and date. When the time is reached, the mobile phone will give
out alert tone and flicker the current time on the screen. Press Stop to stop alarm clock; press Snooze, then the
mobile phone will pause ringing and continue after a given time period.
If alarm time is reached but the mobile phone is switched off, then the mobile phone will be switched on
automatically and ring. If Stop is pressed, then the mobile phone will ask you whether to switch on the mobile
phone. Press “No” to switch off the mobile phone and “Yes” to register at the network and switch on the mobile
phone.
World Clock
World Clock allows you to keep track of current time for major cities and time zones on a real world map. Press the
navigation keys left/right to move your cursor across the map to highlight individual time zones. It’s also available an
option to enable/disable the daylight saving time for a foreign city..
28
Page 29

29
User Manual
Notes
Notes lets you write and save short text notes for many different purposes.
NGM special functions
Special Functions: NGM takes care of your privacy
Calls and SMS firewall
Here you can set and enable a Black List and a White List, for Messages as well as for Calls. Both SIM1 and SIM2
shares the same Firewall.
A Black List of contacts (phone numbers) allows everyone to call you or send messages to you, except for the
members of the Black List.
When this access control function is active, a blacklisted caller will just hear busy tone all the time; later, you will get
a network SMS alert (if allowed in your network services) informing you about the number of the caller who was
trying to contact you. Messages received from a blacklisted number will be automatically transferred to the
Junkbox folder.
A White List of contacts allows nobody to call you or send messages to you, except for the members of the White
List. When this access control function is active, a non-whitelisted caller will just hear busy tone all the time; later,
you will get a network SMS alert (if allowed in your network services) informing you about the number of the caller
who was trying to contact you. Messages received from a non-whitelisted number will be automatically transferred
to the Junkbox folder.
Regardless of White and Black list, you can also block the calls coming from anonymous callers or from callers
not stored in the Phonebook.
- Create a Black/White list for incoming calls: select
- Create a Black/White list for incoming messages: select “SMS”, and add the contacts to the Black or
White List.
- Enable a Black/White list and the block for anonymous numbers or for numbers not stored in
the Phonebook: select:
Firewall > Call firewall > Firewall mode : here you can enable/disable the firewall and which single firewall to
enable: Black List, White List, Unknown numbers, Anonymous numbers.
Limit incall firewall allows to customize the period of activation of the firewall during the day.
Privacy firewall
After digiting the phone password (the default password is 1122‖), you can enable/disable from here the locking on
Phonebook, Messages, Call History and your private folders (one,
time).
Answering machine
The telephone answering machine is a device designed to record audio messages directly on its local memory
without connecting to a server to listen the recordings, thus avoiding the relative charges. Moreover, you can
customize your answering machine message, using the phone’s microphone. The answering machine will turn on
after a preset number of rings, or can be operated manually as answer option. You will be notified with an icon
“Calls”, and add the contacts to the Black or White List.
two, three of them or all of them at the same
29
Page 30

30
User Manual
(separately for SIM1 and SIM2) when you got messages left on your answering machine. In Messages, you can
listen to answering machine messages stored in your phone’s own internal memory. This feature allows to save
money avoiding connection to mobile network operator’s voicemail system. In Settings, you can enable/disable the
auto-answer, select the storage path for the messages (phone or memory card), set the pickup time (3, 5, 10 or 30
seconds), set the max. record duration (30 seconds, 1 minute, 3 minutes, 5 minutes, or unlimited), select the
greeting message (predefined file or user-defined audio), and finally enable remote access to the answering machine
through a DTMF compatible phone. To listen for messages from remote, enable the answering machine as well as
Remote access in Settings menu; you need then a touch-tone telephone to send DTMF. When the voice mail system
answers and prompts you to leave a message, then digit “#” and wait until the system prompts you to enter your
password (1234 by default)).
Note: remote access supports only the listening function.
Phone control
Phone Control is a function that has been designed to improve mobile device users’ privacy and security. It is
composed of two applications (SIM binding and Remote Control), allowing user to manage security in different
modes and with varying levels of security strength.
SIM binding
The SIM binding function is offered to help end-user to find his phone just in case it has been lost or stolen. The
function is based on the binding between SIM card and phone: the device shall be able to recognize when a different
SIM card has been inserted in the phone and immediately alert by SMS the 5 trusted numbers previously set by the
user. By activating this option, the phone password will be requested (1122). Please refer to the paragraph
“Security settings” in the chapter “Settings” for the instructions on how to modify this password. Select “SIM
binding” and choose “On” to enable the function. The user must now insert at least one number for SMS
notification.
From Phone Control menu, select “Trusted Numbers” and insert up to 5 phone numbers to receive the message.
After completing configuration, at every start-up the phone will check the presence of the SIM cards to which is
bound to. If the two SIM cards are inverted or one of them has been removed, the phone shall starts regularly. If a
not-bound SIM card is inserted on SIM1 or SIM2 slot, the phone shall display the “Input phone password” popup
(the default password is 1122, freely modifiable by user). If the password is correctly inserted, the phone shall
starts regularly, but a popup should advise the user that the SIM card is changed: “SIM card is changed. Do you
want to bind it?” Choosing “Yes”, the current SIM cards will be bound replacing the old ones; choosing “No”, the old
binding will remain active. If the password is wrongly inserted, the phone shall start and provide the “new” user all
the functionalities except the “Phone control” menu. In the meantime, one alert SMS ( - Attention: this phone
number is using your mobile phone IMEI: XXXXXXXXXXXXXXX - ) shall be sent to all the trusted phone numbers set
in the menu from each replaced SIM card. Every time the power on password is wrongly inserted, the phone shall
continue to send SMS out. If SIM1 has no money or is out of range, SIM2 shall provide to send alert SMS out. If the
SMS is not correctly sent out for any reason, the phone shall attempt to send the SMS out periodically, until the SMS
is correctly sent out.
Note: if Phone lock is enabled, this function chronologically comes before SIM binding. This means that even if
the SIM binding is activated, it will be unavailable if the wrong password is inserted (because the phone simply
won’t boot).
Tip: to avoid this problem, it’s advisable to disable Phone lock and enable Privacy firewall instead, since this
function assures the same high level of security and does not inhibit the use of SIM binding.
Remote control
The Remote control function is offered to provide end-user the possibility to manage some phone functions
remotely from another phone able to send SMS out. Using this function, end user can, when he has not the
phone with him, forward calls, power the phone off, activate the answering machine. By activating this option, the
phone password will be requested (1122). Please refer to the paragraph “Security settings” in the chapter
“Settings” for the instructions on how to modify this password. Select “Remote control” and choose “On” to
enable the function. The user must now insert at least one number for SMS notification. From Phone Control
30
Page 31

31
User Manual
menu, select “Trusted Numbers” and insert up to 5 phone numbers to receive the message. After completing
configuration, the phone shall accept remote commands from one of the trusted numbers.
1) Call forwarding
If the user wants to forward all the incoming calls to another number, he can send to VAN GOGH (with remote
control enabled) one SMS containing the following text:
*#CALLFWD*#destination number, where “destination number” is the number where the user wants to receive
the forwarded calls.
Example:
- if the VAN GOGH number with remote control enabled is +390000000000;
- if the phone number to remotely control the VAN GOGH is +391111111111 (trusted number);
- if the phone number where you want to forward the calls is +392222222222.
The operations sequence shall be:
a) +391111111111 send one SMS to +390000000000 with the content:
*#CALLFWD*#2222222222.
b) +390000000000 receive one SMS from +391111111111 and automatically set the forwarding to
+392222222222.
c) all the incoming calls to +390000000000 shall be forwarded to +392222222222.
Note: the SMS content is “case insensitive”, so it may be indifferently written with capital letters, lower-case
letters or a combination of the two.
2) Remote shutdown (and activate the phone password at power on)
If the user wants to remotely shut down the phone, he can send to VAN GOGH (with remote control enabled) one
SMS containing the following text:
*#SHUTDOWN*#
Example:
- if the VAN GOGH number with remote control enabled is +390000000000;
- if the phone number to remotely control the VAN GOGH is +391111111111 (trusted number).
The operations sequence shall be:
a) +391111111111 send one SMS to +390000000000 with the content: *#SHUTDOWN*#
b) +390000000000 receive one SMS from +391111111111 and automatically shut down.
c) the phone password is automatically activated, so that it will require the use of the password at the next start-up.
If the password is correctly inserted, the phone shall starts regularly, and won’t require the use of the password
anymore (except for the case of the user that choose this particular setting).
Note: the SMS content is “case insensitive”, so it may be indifferently written with capital letters, lower-case
letters or a combination of the two.
3) Activate the answering machine
If the user wants to record all the incoming calls on the answering machine, he can send to VAN GOGH (with remote
control enabled) one SMS containing the following text:
*#ANSW*#
Example:
- if the VAN GOGH number with remote control enabled is +390000000000;
- if the phone number to remotely control the VAN GOGH is +391111111111 (trusted number).
The operations sequence shall be:
d) +391111111111 send one SMS to +390000000000 with the content: *#ANSW*#.
e) +390000000000 receive one SMS from +391111111111 and automatically activate the answering machine for
31
Page 32

32
User Manual
both the SIM cards.
f) all the incoming calls on +390000000000 shall be recorded on the answering machine.
Note: the SMS content is “case insensitive”, so it may be indifferently written with capital letters, lower-case
letters or a combination of the two.
Trusted numbers
Here you can insert up to 5 numbers to realize SIM binding, remote control, and send GPS
Background sounds
Background sounds help to recreate the realistic ambient sounds during a particular call (i.e. “platform” “airport”,
“station”, “restaurant” and other user-recordable sounds). This option can be selected by default or can be set just in
time when there is an incoming call.
You can control the volume level and reproduction mode (once, continuous, interval). The phone includes 10 prerecorded background sounds; user can add his own sounds in .wav format (8 MHz, 16 bits samples).
SMS delayed sending
You can postpone sending the message, scheduling the sending at a particular date and time. You can also
specify multiple recipients, set the repetition of sending, and choose which SIM to use.
File manager
position information.
Managing your files and folders
From this menu you can manage photos, MP3s, games, videos, ebooks, folders, etc. You first need to select the
storage location:
[Phone] - the storage location is the phone’s memory.
[Memory Card] - the storage location is the T-flash card.
For each storage path, the available options are:
o Open: view the root directory.
Format: formatting will remove all the data from memory card or phone, including the folders created
o
by user. After formatting, you’ll need to reboot the phone; Audio and Images folders will be
automatically restored, and the folder Photos will be automatically created after the first shot.
Rename: this option is not available for the phone; it allows to rename the memory card in use.
o
Details: this option is not available for the phone; it displays the free space and the total capacity of
o
the memory card in use.
From root directory of each storage path, the available options are:
o Open: open folder (Video, Audio, Music, Photos, Received, etc.)
New folder: create a new folder in the root directory.
o
Rename: rename an existing folder.
o
Delete: delete an existing folder.
o
Sort by: sort the folders by Name, Type, Time or Size, or let them unsorted.
o
32
Page 33

33
User Manual
Inside any folder, the files options available are the same described in the paragraphs dedicated to the
multimedia applications (Camera, Video player, Music, etc.), plus the following ones:
o New folder: create a new sub-folder.
Rename: rename a file in the list.
o
Delete: delete a file in the list.
o
Sort by: sort the files by Name, Type, Time or Size, or let them unsorted.
o
Mark several: to select a list of files at one time.
o
Copy: copy the file(s) in another folder.
o
Move: move the file(s) in another folder.
o
Delete all files: delete all the files in the current folder.
o
Details: view the details of the selected file (date, size, copyright).
o
These options are available in all the folders, including user created folders.
Bluetooth
Using Bluetooth functions
The phone supports Bluetooth. Bluetooth is a short-range radio transmission system that is useful for sending data
between electronic devices, as cell phones, computers, earphones, car-kits, etc. Bluetooth allows to send photos,
video clips, audio files, electronic business cards and reminders. You can also wirelessly connect to your PC and
send files or establish a low-speed connection to the Internet.
When a Bluetooth connection is established, the distance between the communicating Bluetooth devices must be
usually not more than 10 meters to guarantee optimal performance. In any case, walls and other solid barriers
can shield the Bluetooth connection, and other electronic devices can cause interference. In order to verify the full
compatibility of this phone with other Bluetooth devices, please check with the device’s manufacturer for the
latest information. Do not use Bluetooth in the hospitals, on aircrafts, etc.
Bluetooth Menu
Power: turn the Bluetooth power on/off. When not in use, Bluetooth power consumption could be rather
o
high. So, it is advisable to turn off Bluetooth function when you are not using it.
BT earpiece charge: VAN GOGH phone sports a built in, removable Bluetooth™ earpiece, placed on the
o
back of the device. The earpiece will be charged at the same time of the phone, when the phone charger is
plugged into power. If you need to recharge the earpiece separately when the phone is in use, choose this
option and set ON. Do not forget to disable this option when it’s not necessary, because it is one way to
reduce the usage of the phone’s battery.
Visibility: when Visibility is on, other Bluetooth devices can detect your phone and its name after starting a
o
search. If the audio player is on, your device will be undetectable.
Search new device: with this function you can see all the devices that have been paired with the phone in
o
the course of time and their type of connection. The option Inquiry new device will start a search for all
Bluetooth devices compatible with your phone, and will pair the phone with the selected Bluetooth device.
It’s obviously possible to cancel the unwanted connections.
Search audio device: with this function you can start a search for all the Bluetooth audio devices
o
compatible with your phone. Then, you can pair the phone with the selected Bluetooth audio device. When
searching for Bluetooth devices of another kind, please use the function Search new device instead.
o Device name: view or change the name with which your phone is detected by other
o Advanced: when Bluetooth is powered on, this submenu allows to access the following settings:
Audio path: set Audio path (Phone or Bluetooth earphone).
Storage: set storage path for Bluetooth file transfer (Phone or Memory card).
Sharing permission: to access the Bluetooth shared files as read-only or with full control.
My address: view the phisical address (MAC, Media Access Control) of your device.
33
Bluetooth devices.
Page 34

34
User Manual
Tip: when searching for other Bluetooth devices, make sure that the devices are inside the range reachable by
Bluetooth signal. When pairing other devices, it shall be necessary to agree on a password shared with the
Bluetooth devices’ users. To pair the earphones with your phone, insert its own password.
User profiles
Create and modify user profiles
Your mobile phone is provided with multiple profiles so that you can customize some settings in different cases for
different events. Firstly, choose a profile and then activate it. You can have such profiles as General, Meeting,
Outdoor, Indoor, Silent, Vibration, Headset and Bluetooth.
The features of each profile can be edited (Customize, OK key) to fit your needs as follows:
o Tone setup: to set the tones for Incoming Call (SIM1 and SIM2), Power On, Power Off, SMS Message
(SIM1 and SIM2), and Keypad.
o Volume: to set the volume of Ring Tone (SIM1 and SIM2), Keypad Tone and SMS Tone. Alert type: you
can choose the current ring mode among Ring only, Vibration only, Vibration and Ring, or Vibration then
Ring (separately for SIM1 and SIM2).
o Ring type: you can choose the current ring type among Single, Repeat and Ascending.
Extra Tones: to enable/disable Warning Tone, Error Tone, Camp on Tone, and Connect Tone.
o
Answer with any key: you can choose to use any key to answer a call.
o
After customizing the settings, select the profile and choose “OK” to activate ( in “Profile
Note: after inserting headset plug into the matching jack or connecting a Bluetooth device, the mobile phone will
automatically change into Headset profile or Bluetooth profile. Unplug the headset or disconnect the device to
return to the previous profile.In idle state, you can press # key to switch to Silent profile and again to the previous
profile.
Settings
Options”).
Customizing Phone Settings
Phone settings
Display
Wallpaper: for each SIM card, you can use as wallpaper some System images as well as User defined
o
images (previously saved in Phone or Memory card).
Themes: two colour themes are available.
o
Screen saver:
o
o Idle widget: widgets are graphical objects that displays on the main screen an updated information
arrangement changeable by the user. The available widgets are Calendar, Clock (3 different clock faces),
Date and SIM Info.
o Greeting text: enable/disable the display of a greeting text (freely customizable) on
Show owner number: enable/disable owner number display during calls, separately for both SIM cards.
o
LCD backlighting: set the LCD backlighting, controlling the Brightness and the Timer (5 sec. ~ 1 minute).
o
Language
You can select the desired language to use in the menu (Italian, English, French, Spanish, German).
Settings: enable/disable the screen saver, and fix the waiting time (5 sec., 15 sec., 30 sec.
or 1 minute).
Select: eight System screen savers are available as well as a User defined screen saver
(previously
saved in Phone or Memory card).
startup.
34
Page 35

35
User Manual
Writing language
You can select the desired language to use for messaging.
Time and date
Set home city: select the town you want to use as reference point.
o
Set foreign city: select a foreign city, with a different time zone.
o
Set time/date: set the current date and time, and enable/disable daylight saving.
o
Set format: set the date and time format.
o
Update with time zone: if enabled, this allows to update the current date and time automatically, according
o
to the time zone you’re in.
Note: if the battery is removed from the phone, or if the device is not used for a long time, it shall be necessary
to set again date and time.
Schedule power on/off
You can easily make a schedule when your phone will turn on or off (4 different time slots).
Special note: please disable the updating option in all areas where the use of mobile phones is inhibited.
Auto update of date and time
Toggle on/off the automatic update of date and time. This updating doesn’t affect alarm
clock or calendar. The update must be supported by network operator.
UART settings
Enable the UART settings on one of the two SIM cards.
SIM manager
In every moment you can choose the most appropriate setting for your SIM cards according
to the situation:
Dual SIM active
SIM selection method
Network settings
For each SIM, the following options are available:
Note: disposition and availability of these options may vary according to the operator of
each SIM.
Security settings
Security SIM (1 and 2): you can set up the SIM card lock on your phone, so that it can’t be used without a
Personal Identification Number (PIN). When the lock is enabled, you must enter the PIN each time you turn the
phone on. You also have the option to change the PIN, create and enable a list of fixed dials, create and enable a
Only SIM1 active
Only SIM2 active
Flight mode
Static: at start-up, the phone will automatically load the last selected option (Dual SIM, SIM1, SIM2 or
o
Flight mode)
Dynamic: at each start-up, the phone will request which option to load.
o
Network selection: for each SIM you can decide between an automatic selection and a manual one.
o
o Preferences: for each SIM you can browse a list of networks where to register and assign a priority.
35
Page 36

36
User Manual
list of barred dials.
Phone lock: you can set up the phone lock, digiting the requested password (the default password is “1122”).
When the lock is enabled, the phone will prompt you for your password before you can make or receive calls.
Insert the default password (or a personal one; see below how to change the password) to unlock, and confirm.
Auto keypad lock: you can enable here the Automatic keypad lock. The phone will automatically lock the
keypad after a certain time (5, 30, 60 seconds or 5 minutes). Press “Unlock” (SIM1 send key) and then “*” to
unlock.
Change Password: you can change here the password for the phone lock (the default password is
“1122”) with another one easier to remember and more secure. The new password has to be between 4-8
digits long..
Privacy firewall: please see the description of this function under NGM Special Functions.
Restore factory settings
Reset your device to the original settings. The password required to perform this operation is “1122”.
Coffer function
Privacy comes first
Insert *0000# (default value, freely editable) from call screen and access a private area of your phone, where you
will find the following options: Coffer Phonebook, Coffer Messages, Coffer Call Log, Change Coffer Lock,
Block Incoming Calls, and Password Reminder.
Coffer function is useful for storing contacts, SMS, call logs, etc., which you prefer to conceal from others.
The Coffer password insertion works only from the standby screen.
The contacts saved in the Coffer and the SMS coming from them as well as the whole call
log, will be stored in the coffer only, and no trace of them will be visible outside of it.
The features of Phonebook, SMS, MMS, etc. inside the coffer are quite the same of the
corresponding items in the “public area” of your phone.
Coffer Phonebook
The Coffer Phonebook stores up to 50 contacts. The contacts may be saved with their real names and real phone
number, and, simultaneously, with nicknames and fake numbers. When receiving a call from a number inserted
in this area, the phone will display the nickname of the caller, and his/her fake number.
Quick search
Display all the contact stored in the Phonebook. Selecting a contact you can open the Options: Send SMS, Call, View,
Edit, Delete, Delete all, Save. Saving a contact equals to moving it into the Phonebook out of the Coffer.
If the contact has a fake name or a fake number, they will be shown on the screen.
Add entry
Here you can add name, number, nickname or fake number. The contacts can be added manually, or retrieving them
from the “public” Phonebook.
Note: if a fake name/fake number has been set up, it will be displayed for incoming calls, outgoing calls and SMS
sent or received; otherwise it will be displayed “Unknown contact”.
Settings
Memory Status : show the current status of the phonebook memory (100 entries max.). The display format for the
memory usage is “used/total”.
Delete all: delete all the contacts from the Coffer phonebook.
Incoming call tone mode: enable/disable the tone for the incoming calls of the Coffer area.
Coffer messages
Write message
36
Page 37

37
User Manual
Write a new text message, and send it via SIM1 or SIM2. Each message may be up to 1140 characters in length.
Inbox
Here you can view the messages received.
Reply: reply the selected SMS.
Edit: edit the SMS to forward it later.
Delete: delete the selected SMS.
Delete all: delete all the received SMS.
Note: when selecting a contact in Coffer area to send a SMS, only the contacts saved in the
be displayed.
Tip: if you receive new messages when the folder Inbox is full, the phone will automatically
overwrite old messages.
Drafts
Outgoing
If you decide to select the option “Save” and send the message at a later time, the message will be saved in the
Coffer “Outgoing” folder.
Outbox
you can select the option “Save and send”, the message will be saved in the Coffer
“Outbox” folder.
Coffer SMS Tone Mode
Enable/disable the tone for the incoming SMS of the Coffer area.
Coffer Call log
These logs contain records of missed calls, received calls and dialled calls with Coffer phonebook contacts.
From one of these lists, press Send key to call the selected number. Select Delete call logs to delete all the
records.
Tip: if your phone displays a notification of missed call, press “Read” to immediately open the Missed calls list.
If a fake name/fake number has been set up, it will be displayed in the call logs.
Change Coffer Lock
Use this option to change the Coffer password: digit the default password first, and then the new one for two times.
For instance, digit *0000# first in the stand-by screen; then choose Change Coffer Lock, digit the old code
“0000”, and then the new one ( “1111”, for example). You will be required to enter your new password again,
then the change will take effect. The next time you access the Coffer area, you’ll have to digit *1111# in the
stand-by screen.
Note: do not ever forget your Coffer lock; otherwise, you will be prevented from accessing the Coffer area and
your data will be lost.
Block incoming calls
You can choose to block all the calls coming from Coffer area contacts.
Password reminder
Use this option to save and store strictly personal numbers as bank accounts, credit cards,
ATM codes, various passwords, etc.
This folder shows the drafts that have been saved.
This folder shows a list of sent messages (up to 10 SMS). When sending a message
Coffer phone book will
37
Page 38

38
User Manual
Text input
Writing messages: any preferred method?
The mobile phone provides multiple convenient input modes, with support of other functions. Besides the standard
mode, you have the opportunity to use the T9 method (set as default method), a system for predictive text entry.
Basic letter input
Choose between the modes “T9 en”, “T9 En”, “T9 EN”, “abc” , “ABC” and “123”, and insert the desired
characters with the keyboard. The initials may vary according to the selected language.
Numeric input (123)
This mode is mainly used to input phone numbers etc. After “Numeric” method has been chosen, you can input
digit into the place where the cursor is flickering.
Symbol input
To see the symbol list, press “*” key in the “Write message” screen . If you want to use one symbol, press the
up/down/left/right keys to select it.
USB connection
Notices before use
Always make sure you connect and stop any USB devices correctly.
Never use Windows formatting command to format the mobile disk of the mobile phone; otherwise, it could
be severely damaged.
USB work environment:
Minimum Operating System: Windows 2000 / XP.
o
Other operating systems could require the installation of a USB driver for PC/phone
o
Maintenance and Safety
connection.
Maintenance and Safety tips
Please read and observe the following information for a safe and proper use of your phone and to prevent amage.
Keep this User Guide in an easy to find place.When you need a quick reminder on how to respond to a particular
situation, go to the relevant section for the information you need.
Post-sale service
For details, please refer to the Guarantee Certificate or Warranty Card inside the box.
Charger & External Power Adapter Safety Tips
Charger and adapter are designed for indoor use only. Do not use them in wet environments.
Battery Safety Tips
Please dispose of your battery properly.
o
Do not disassemble or short-circuit the battery.
o
38
Page 39

39
User Manual
o
o
o
o
General Notice
o
o
o
o
o
o
o
o
o
Keep the battery’s metal contacts clean.
Recharge the battery after long periods of non-use to maximize battery life.
Battery life could vary due to usage patterns and environmental conditions.
The self-protection function of the battery cuts the power of the phone when its operation is in an
abnormal status. In this case, remove the battery from the phone, reinsert it, and turn the phone on.
Using a damaged battery or placing a battery in your mouth may cause serious injury.
Do not place items containing magnetic components such as a credit card, phone card, bank book, or
subway ticket near your phone. The magnetism of the phone may damage the data stored in the
magnetic strip.
Talking on your phone for long period of time may reduce call quality due to heat generated during
use.
When the phone is not used for a long period time, store it in a safe place with the power cord
unplugged.
Using the phone in proximity to receiving equipment (i.e. TV or Radio) may cause interference to the
phone.
Do not immerse your phone in water. If this happens, remove the battery and take it to the next
Authorized Service Center.
Do not paint your phone.
The data saved in your phone might be deleted due to careless use, repair of the phone, or upgrade
of the software. Please backup your important phone numbers. (Ring tones, text messages, voice
messages, picture, and videos could also be deleted.) The manufacturer is not liable for damage due
to the loss of data.
Do not turn your phone on or off when the device is close to your ear.
39
Page 40
40
User Manual
Problems
Possible Causes
Unable to switch on
1. Does the battery have enough electrical power?
2. Is the battery placed correctly?
SIM failure
1. The SIM card is dirty. Clean it.
2. Reinstall the SIM card.
3. The SIM card is damaged. Replace it.
Poor signal
Check the signal strength icon on the screen. If the icon contains 4 bars, the
signal is at its strongest; if it is below 1 bars, the signal is very poor.
Unable to dial out
1. Maybe you have set Hide My Caller ID but your network operator
does not provide this service for you.
2. There are lots of interference sources in your neighborhood.
3. Maybe you have activated some call restriction function.
Unable to charge the battery
1. The battery may be over-discharged; so it requires a longer charging
period than normal.
2. Its performance has got worse; it is necessary to replace the battery.
Unable to register to the network
1. Too weak signals or strong interferences.
2. SIM card not properly installed. Bad contact or SIM card damaged. If
the SIM card is broken, please contact the network operator to
replace it.
Photos taken are too dark
1. Brightness is set too low.
2. Ambient light is poor.
Photos taken are unclear
1. Check if your subject is moving too fast.
2. Maybe the phone slightly moved while the shutter was open.
Photos taken are distorted
The subject may be too close for the camera lens.
Service menu is not accessible
Maybe your SIM card doesn't support Services function.
The picture selected as wallpaper is only
partially visible
The size of the photo is probably too large. The recommended size is
320x240.
Troubleshooting
Before contacting after-sales service, perform the following simple checks. They may save you the time and
expense of an unnecessary service call.
40
Page 41
Abbreviations
SMS
Short Message Service
MMS
Multimedia Message Service
SIM
Subscriber Identity Module
GSM
Global System for Mobile Communication
PIN
Personal Identity Number
PUK
PIN Unblocking Key
IMEI
International Mobile Equipment Identity
USSD
Unstructured Supplementary Service Data
APN
Access Point Name
GPRS
General Packet Radio Service
UART
Universal Asynchronous Receiver/Transmitter
Page 42

User Manual
0700
Certifications
Certifications
Declaration of Conformity (R&TTE)
We, NGM Italia
declare under our sole responsibility that the product identified as
GSM Mobile Phone : Van Gogh
conforms to the following standards and specifications:
Health EN 50360, EN 62209-1
Safety EN 60950-1+A11
EMC EN 301 489-1/-7/-17
Radio EN 301 511
EN 300 328
We declare that [all the series of fundamental radio test have been conducted and that] the aforesaid product
meets all the essential requirements of the Directive 1999/5/EC.
The conformity assessment procedure referred to in Article 10 and detailed in Annex IV of Directive 1999/5/EC has
been followed with the involvement of the following notified bodies:
PHOENIX TESTLAB GmbH
Königswinkel 10, D-32825 Blomberg, Germany
All technical documents conserved at NGM Italia S.r.l.
Available on request.
(UE Authorized Representative)
NGM Italia S.r.l.
Via L. Da Vinci, 7 – Ponticelli
56020 Santa Maria a Monte (Pi)
S.A.R. (Specific Absorption Rate)
SAR certification information (Specific Absorption Rate)
This phone meets European Union (EU) requirements concerning exposure to radio waves coming from
telecommunication and radio devices. The exposure standard for mobile phones employs a unit of measurement
known as SAR (Specific Absorption Rate).
The SAR limit recommended by the EU Council is 2.0 W/kg averaged over ten grams of body tissue.
The highest SAR value for this model phone when tested for use at the ear was 0,606 watt /kg. Although the SAR
is determined at the highest certified power level, the actual SAR of the phone while operating can be well below
the maximum value. This is because the phone is designed to operate at multiple power levels so as to use only
the power required to reach the network. In general, the closer you are to a base station, the lower the power
output of the phone. The Declaration of Conformity here above proves that the designated product is in
compliance with the essential requirements and other relevant provisions of the R&TTE - Directive (European
Radio & Terminal Telecommunications Equipment)1999/5/EC
42
 Loading...