

Page 1

Ver.1.0.20110718
Page 2

Manuale Utente
2
Contents
1. For your Safety ............................ 5
2. Mobile Phone Profile .................. 8
3. Preparation before use ............. 10
Installing the SIM Cards .......................... 10
Installing the Memory card ..................... 12
Installing the Battery ............................... 13
Charging the Battery ............................... 14
PIN codes ................................................ 16
4. General instructions .................. 18
Dial keys (Send SIM1 and SIM2) .............. 18
End key (Switch on/off) ........................... 18
Standard keypad ..................................... 18
Radio FM keys ......................................... 19
Keypad lock ............................................. 20
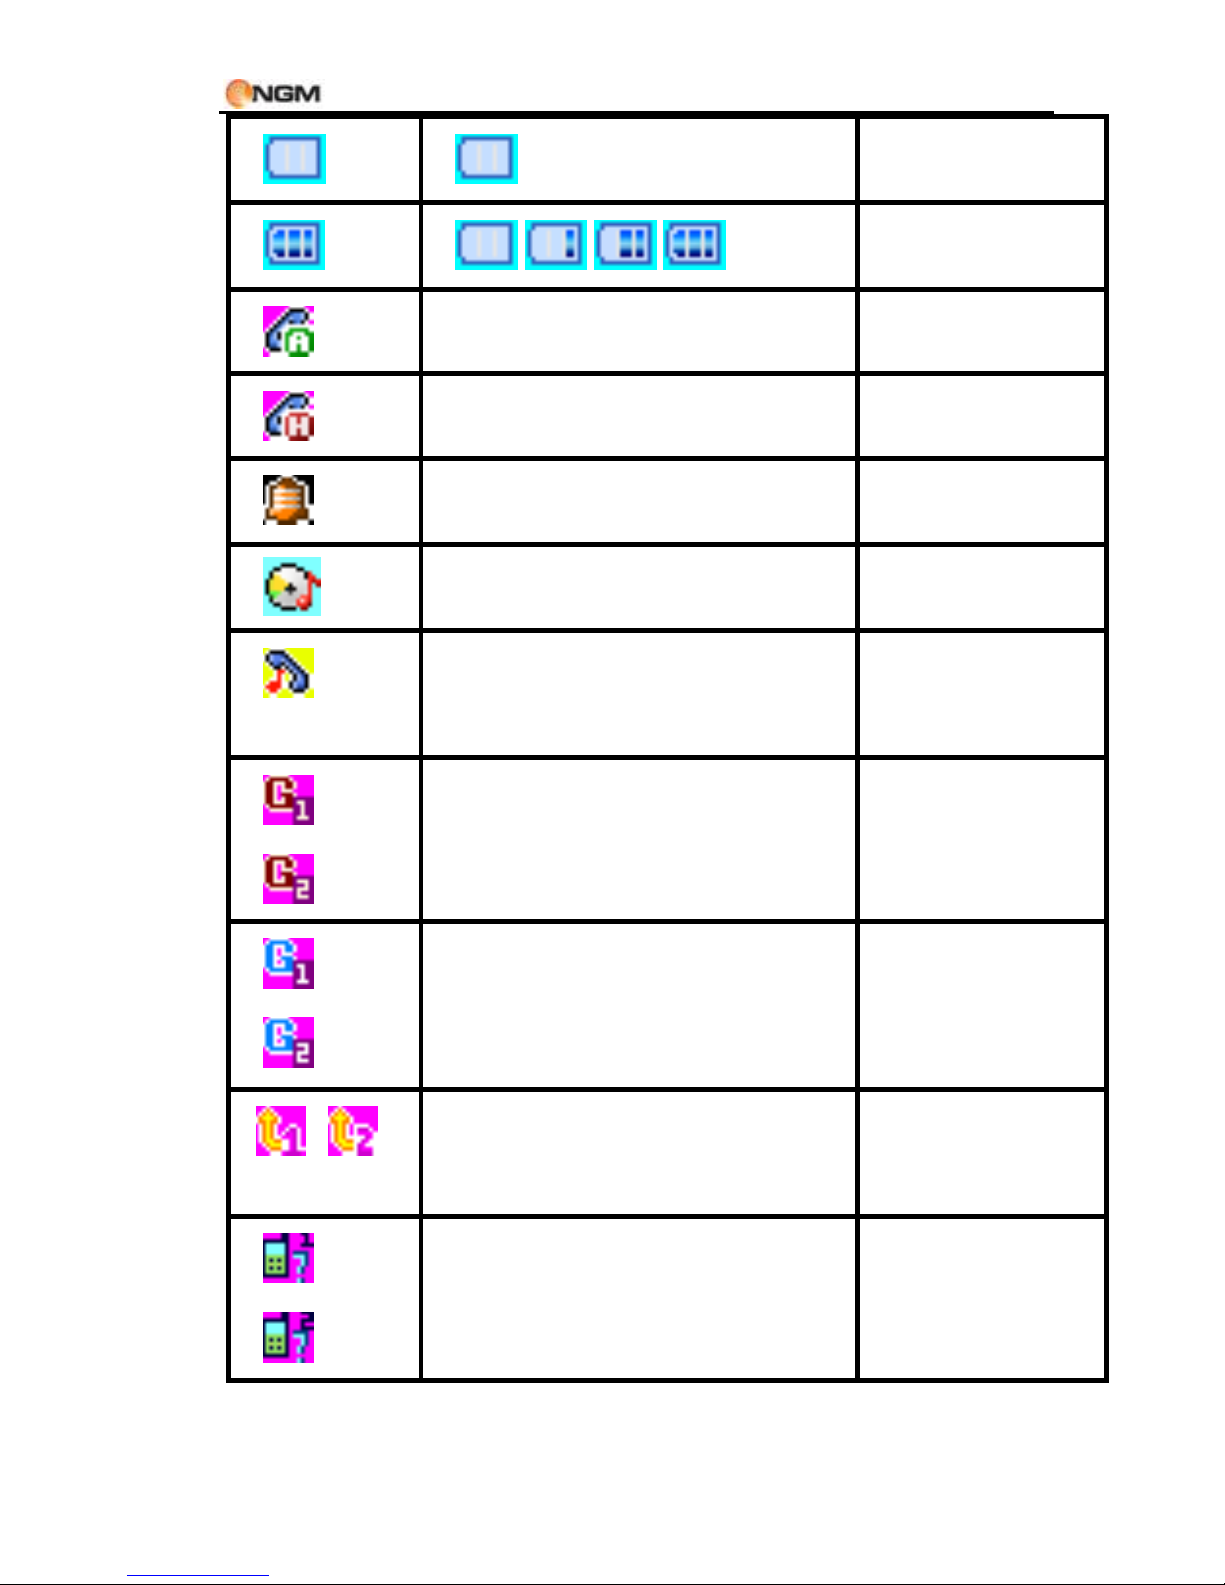
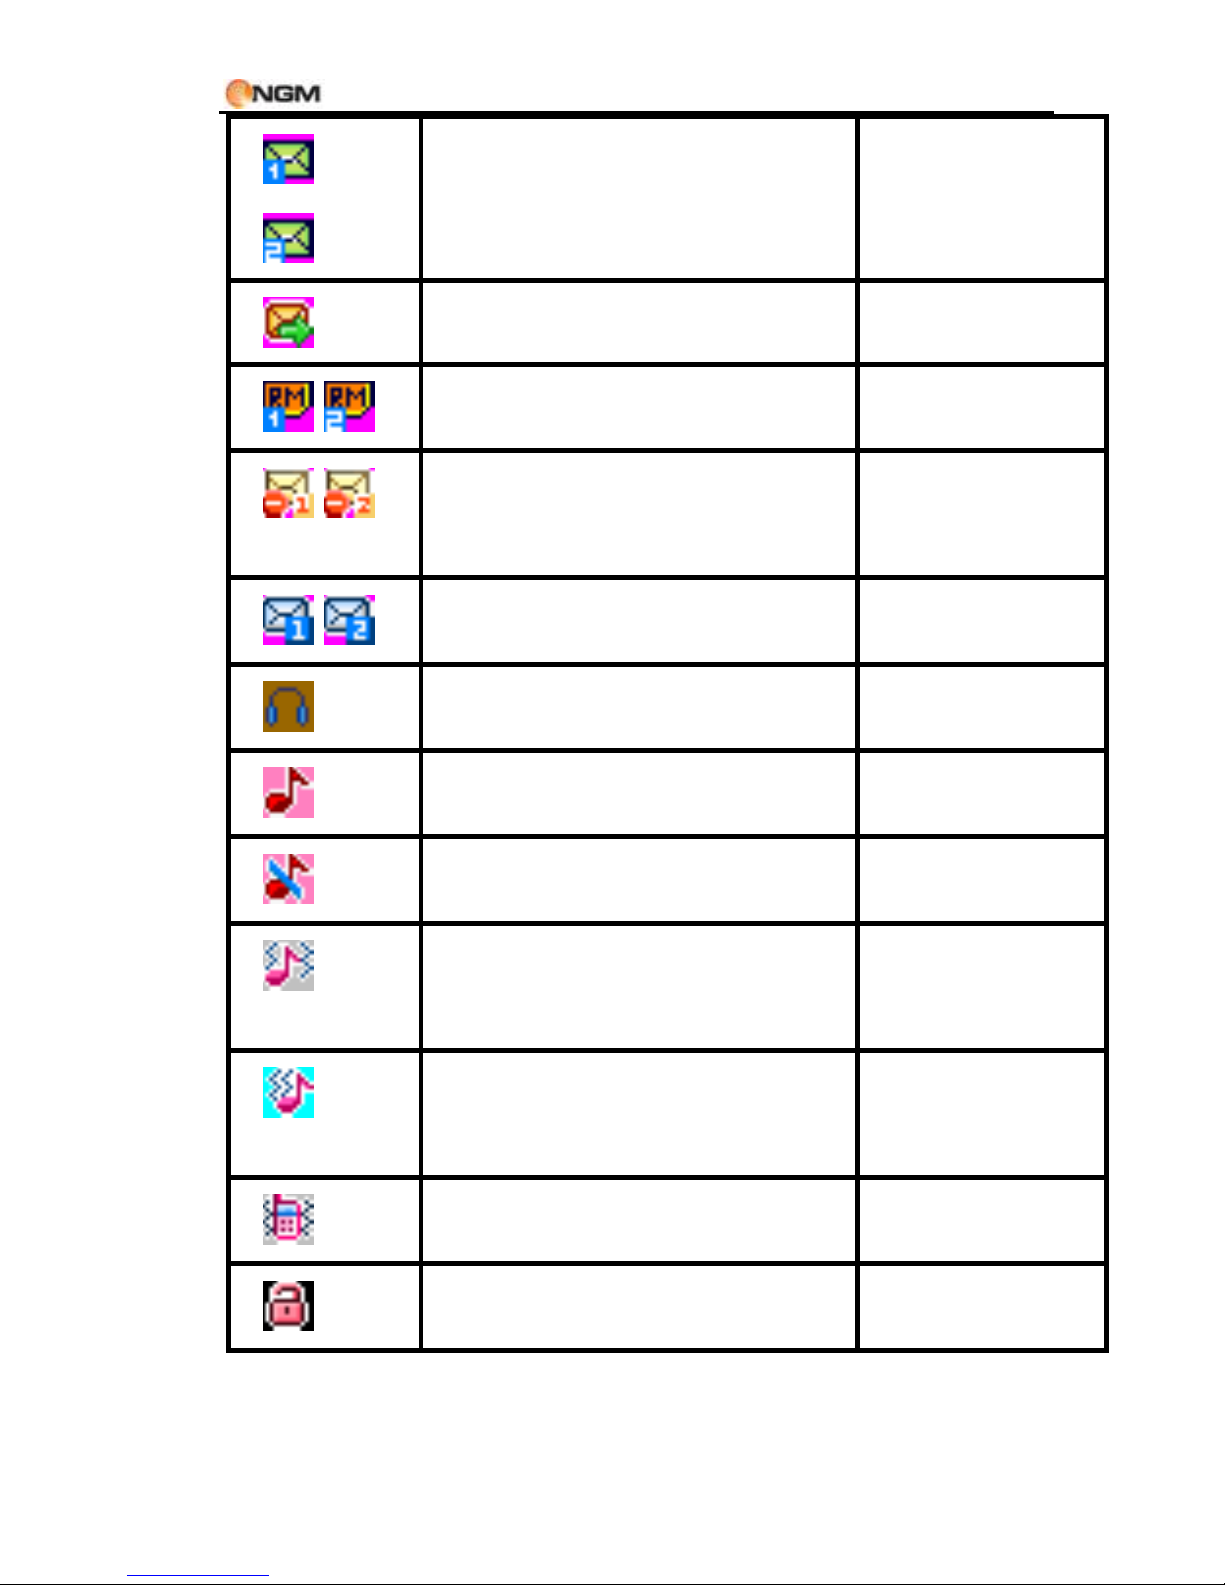
Icons in standby state ............................. 20
Language and Input mode ...................... 23
Services ................................................... 23
Page 3

Manuale Utente
3
Callers’ groups ........................................ 24
5. Basic operations ........................ 24
Switch On ................................................ 24
Switch Off ................................................ 25
How to dial a call .................................... 26
Answer a call ........................................... 27
Sending DTMF tones ............................... 27
Place a Call on hold ................................. 28
Fast SMS Reading .................................... 28
Missed calls ............................................. 29
Answering machine ................................. 29
6. Use of Menu functions ................. 30
Phonebook .............................................. 30
Call center ............................................... 33
Multimedia ............................................. 38
NGM special functions ............................ 43
FM Radio ................................................. 47
Settings ................................................... 49
Organizer ................................................ 56
Messaging ............................................... 64
Services ................................................... 76
Page 4

Manuale Utente
4
7. Coffer function .......................... 79
8. Text input .................................. 85
9. USB connection ......................... 86
10. Maintenance & Safety ................ 86
Post-sale service ...................................... 87
Battery information and care .................. 87
General notice ......................................... 88
Troubleshooting ...................................... 89
11. Abbreviations ............................. 92
12. Certifications .............................. 93
Page 5

Manuale Utente
5
1. For your Safety
For your safety and proper use of the
mobile phone, please read the following
guidelines carefully: Do not switch the mobile
phone on when close to chemical factory, gas
station or other explosive objects.
During driving, please use headset for safety
purpose; unless otherwise in emergency,
always stop the car on roadside to have a call
conversation.
Because the use of the mobile phone can
cause interference in the aircraft, never use
the mobile phone in aircraft. The use of the
mobile phone is dangerous and illegal; do
switch off the mobile phone before boarding.
Pay special attention to the use of the mobile
phone near heart pacemaker, deaf-aid and
some other medical equipment, because the
mobile phone can cause interference with
them.
Page 6

Manuale Utente
6
Non-original factory’s accessories and parts
will lose guarantee.
Do not dismantle the mobile phone without
permission. In case of failure, please contract
the supplier as soon as possible.
Do not plug the charger into the mobile
phone and charge without battery. Always
power off the mobile phone when taking out
the battery; otherwise the memory of the
phone may be damaged.
When charging the mobile phone, always
keep it in the place with good ventilation,
heat sink and away from flammable and
explosive objects.
In order to avoid demagnetization, always
keep the mobile phone away from magnetic
objects such as CD, credit card etc.
Ensure the mobile phone not to contact any
liquid; once such case occurs, remove the
battery and contact the supplier
immediately.
Do not use the mobile phone in the
environment at too high or too low
temperature, never expose the mobile
phone under strong sunshine or too wet
environment. The suitable temperature for
Page 7

Manuale Utente
7
the phone and accessories is 0℃-40℃. The
height to use the phone shall be less than
2,000m.
Do not use liquid or wet cloth with strong
cleanser to clean the mobile phone.
This mobile phone has shooting, videoing
and audio recording functions, which shall be
used as per the related laws and regulations.
Always keep the mobile phone out of
children’s reach. Do not throw or vibrate the
mobile phone because violent treatment to
the mobile phone may damage the inner
circuits and precise structures.
Please do not discard the waste battery into
general household garbage. Please deal with
the waste battery according to provisions
where they are definitely made.
Tip: This user manual is based on simplified
Chinese operation mode; so it may vary in English
operation mode.
Warning: We will not be bear any responsibility
for any incompliance with the above guidelines or
improper use of the mobile phone. Our company
keeps the right to make modifications to any of
the content here in this user guide without public
announcement in advance. The content of this
Page 8
Manuale Utente
8
manual may vary from the actual content
displayed in the mobile phone. In such case, the
latter shall govern.
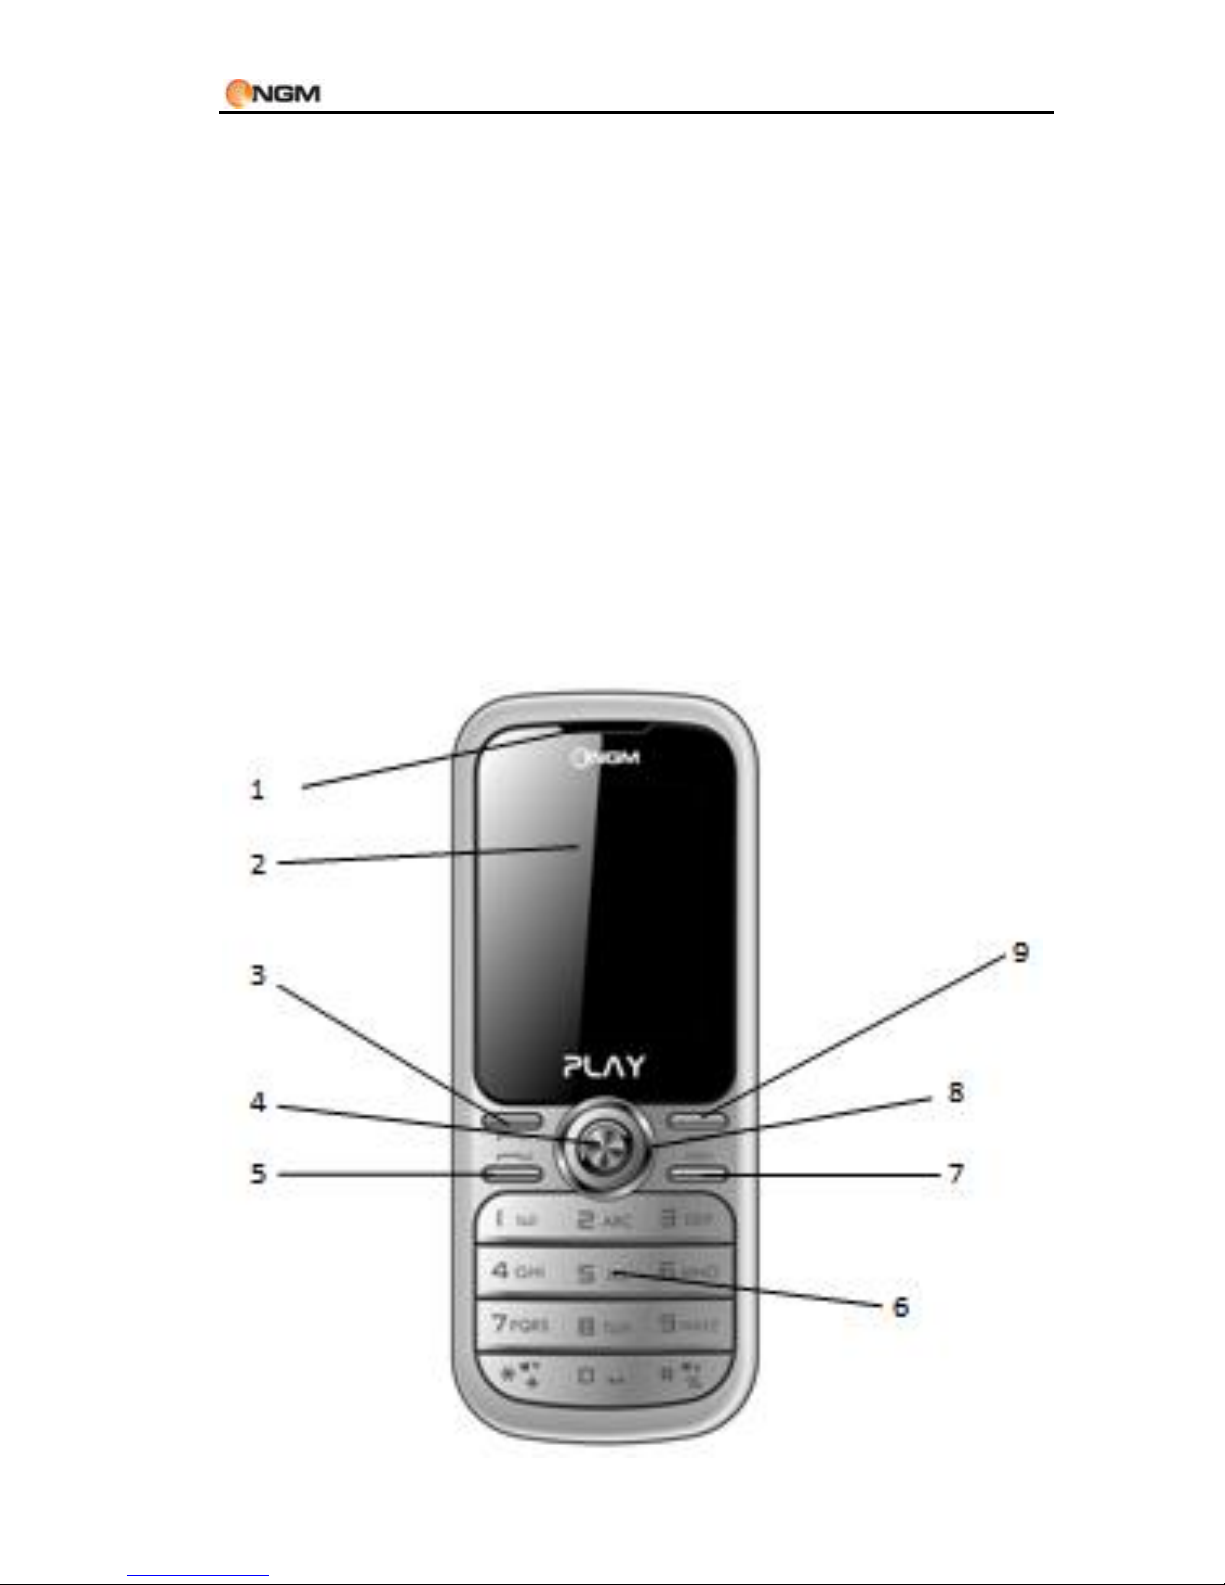
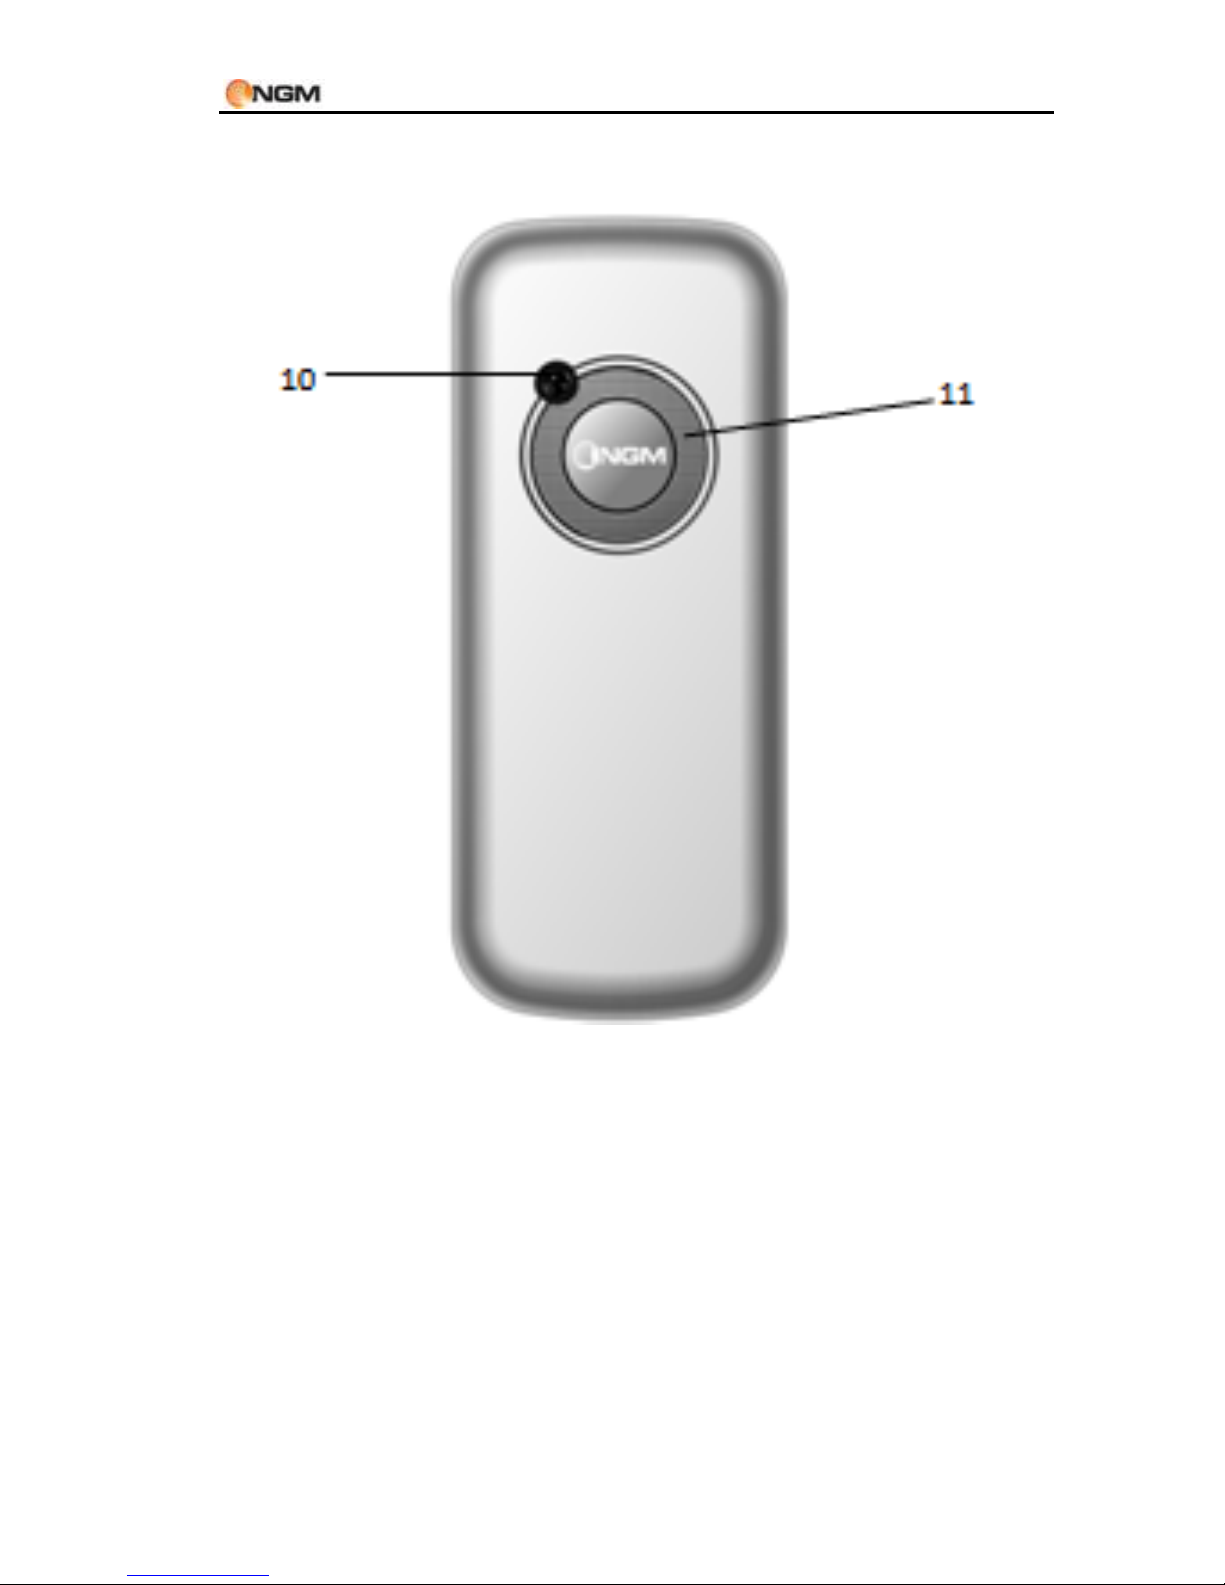
2. Mobile Phone Profile
The mobile phone include a standard keyboard,
an LCD screen , one vibration motor, one
charger/ data common transmission port.
(Below are the front and the back of the mobile
phone).
Page 9
Manuale Utente
9
1.
Earpiece
7.
Back key
2.
LCD
8.
Navigation key
3.
SIM1 Send key
9.
End key
4.
OK /Main menu key
10.
Camera
5.
SIM2 Send key
11.
Speaker
6.
Standard keyboard
Page 10

Manuale Utente
10
3. Preparation before use
Installing the SIM Cards
When registering mobile phone number, you
can apply for two different phone numbers, two
different mobile phone network service providers
and thus obtain two SIM (Subscriber
Identification Module) cards.
With these two SIM cards, you can use all
functions of your mobile phone. The SIM cards
save the parameters needed for communications
and personal data, including PIN (Personal
Identification Number) code, phonebook, short
message and other extra system services.
Warning: do not distort or scratch the SIM card
nor let it contact static, dust or moisture. If it is
lost, please contact immediately your network
operator for help.
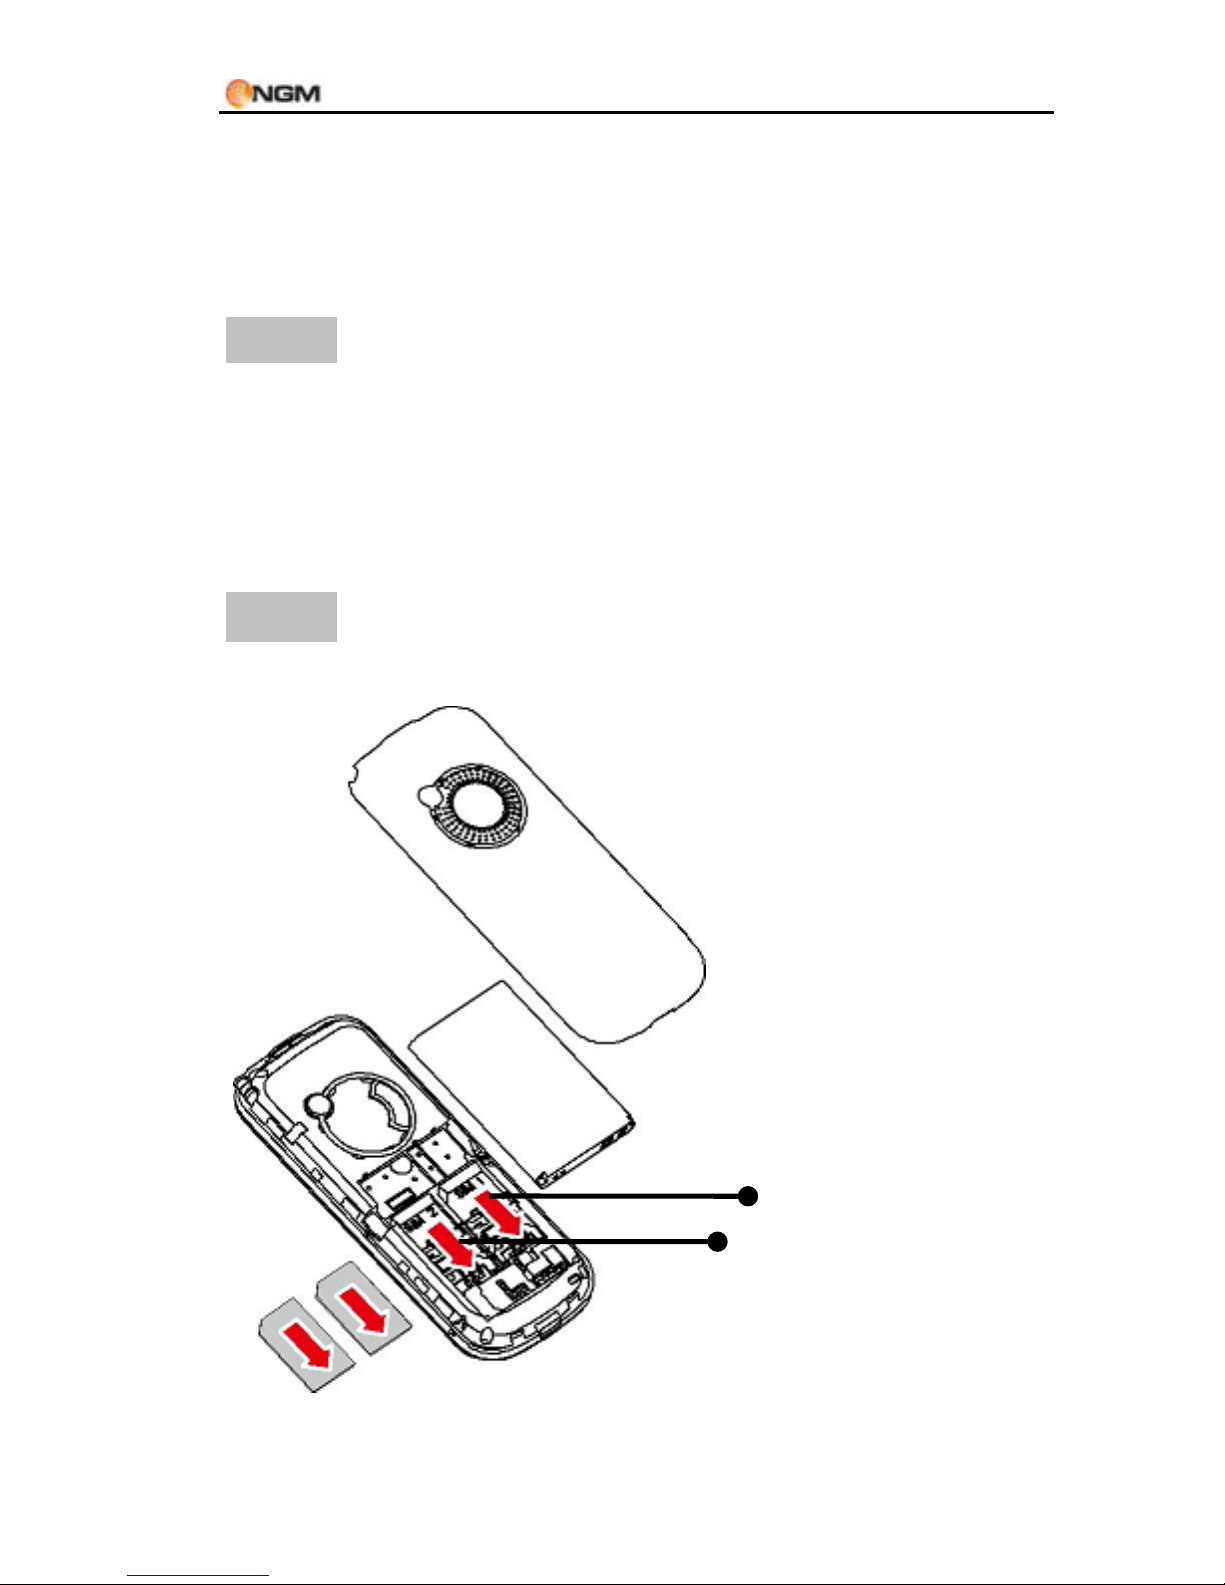
Before SIM card installation, please switch off
the mobile phone. The SIM cards are installed in
the back of the mobile phone.
Page 11
Manuale Utente
11
Follow the following diagram to install the
SIM card. Please insert the host SIM card into the
SIM1 slot and the slave SIM card into the SIM2
slot.
Note: if a SIM card is inserted only into the
SIM1 slot, then only the host works; likely, If SIM
card is inserted only into the SIM2 slot, then only
the slave works. When two SIM cards are inserted
into the SIM1 slot and SIM2 slot respectively, you
can choose work mode freely as you wish.
Note: the SIM card is small object, keep it out of
children’s touch or prevent children gulping it!
SIM 2
SIM 1
Page 12
Manuale Utente
12
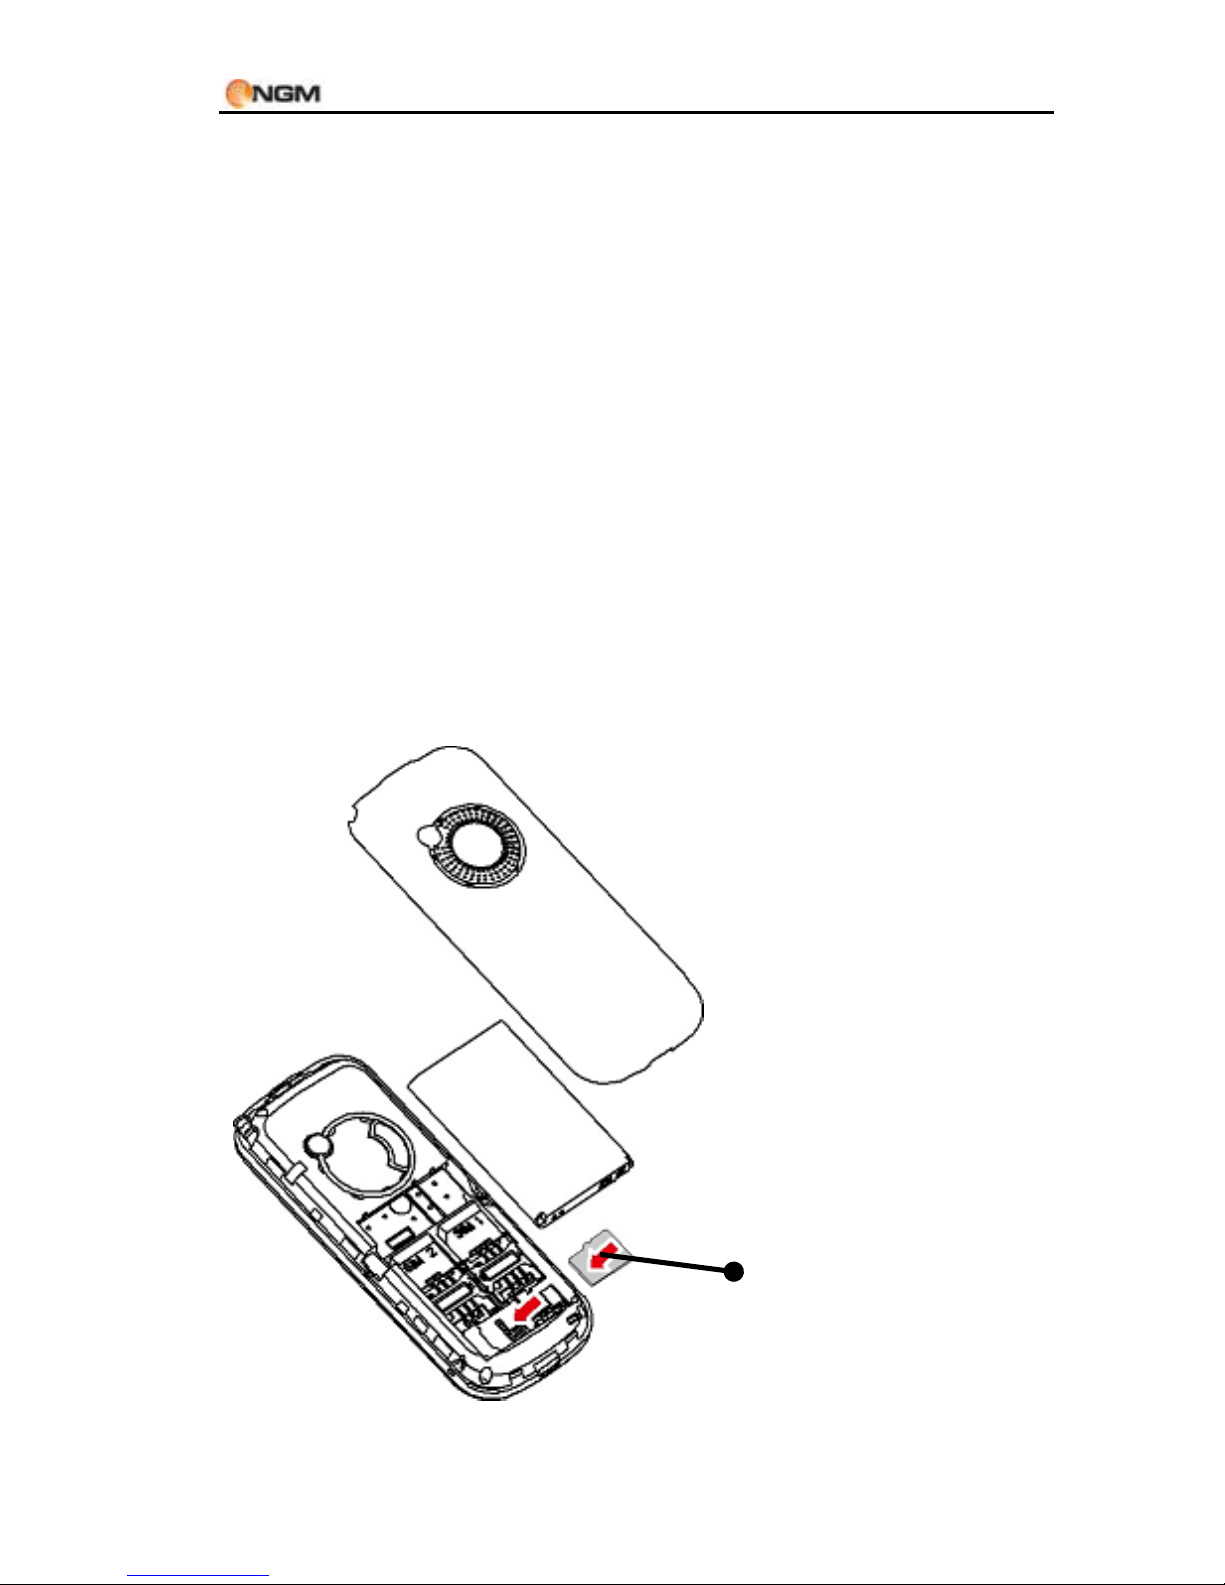
Installing the Memory card
As the mobile phone does not have enough
storage space, to use some functions, you need
to install a memory card (This mobile phone use
T-FLASH card.)
Install T-FLASH card: Open the back cover to
take out the battery, release the T-Flash card lock,
insert the T-Flash card into its slot, and restore
the lock and the battery before restarting the
mobile phone.
Memory card
Page 13
Manuale Utente
13
Battery
Note: as the T-FLASH card is small object, keep
it out of children’s touch or prevent children
gulping it!
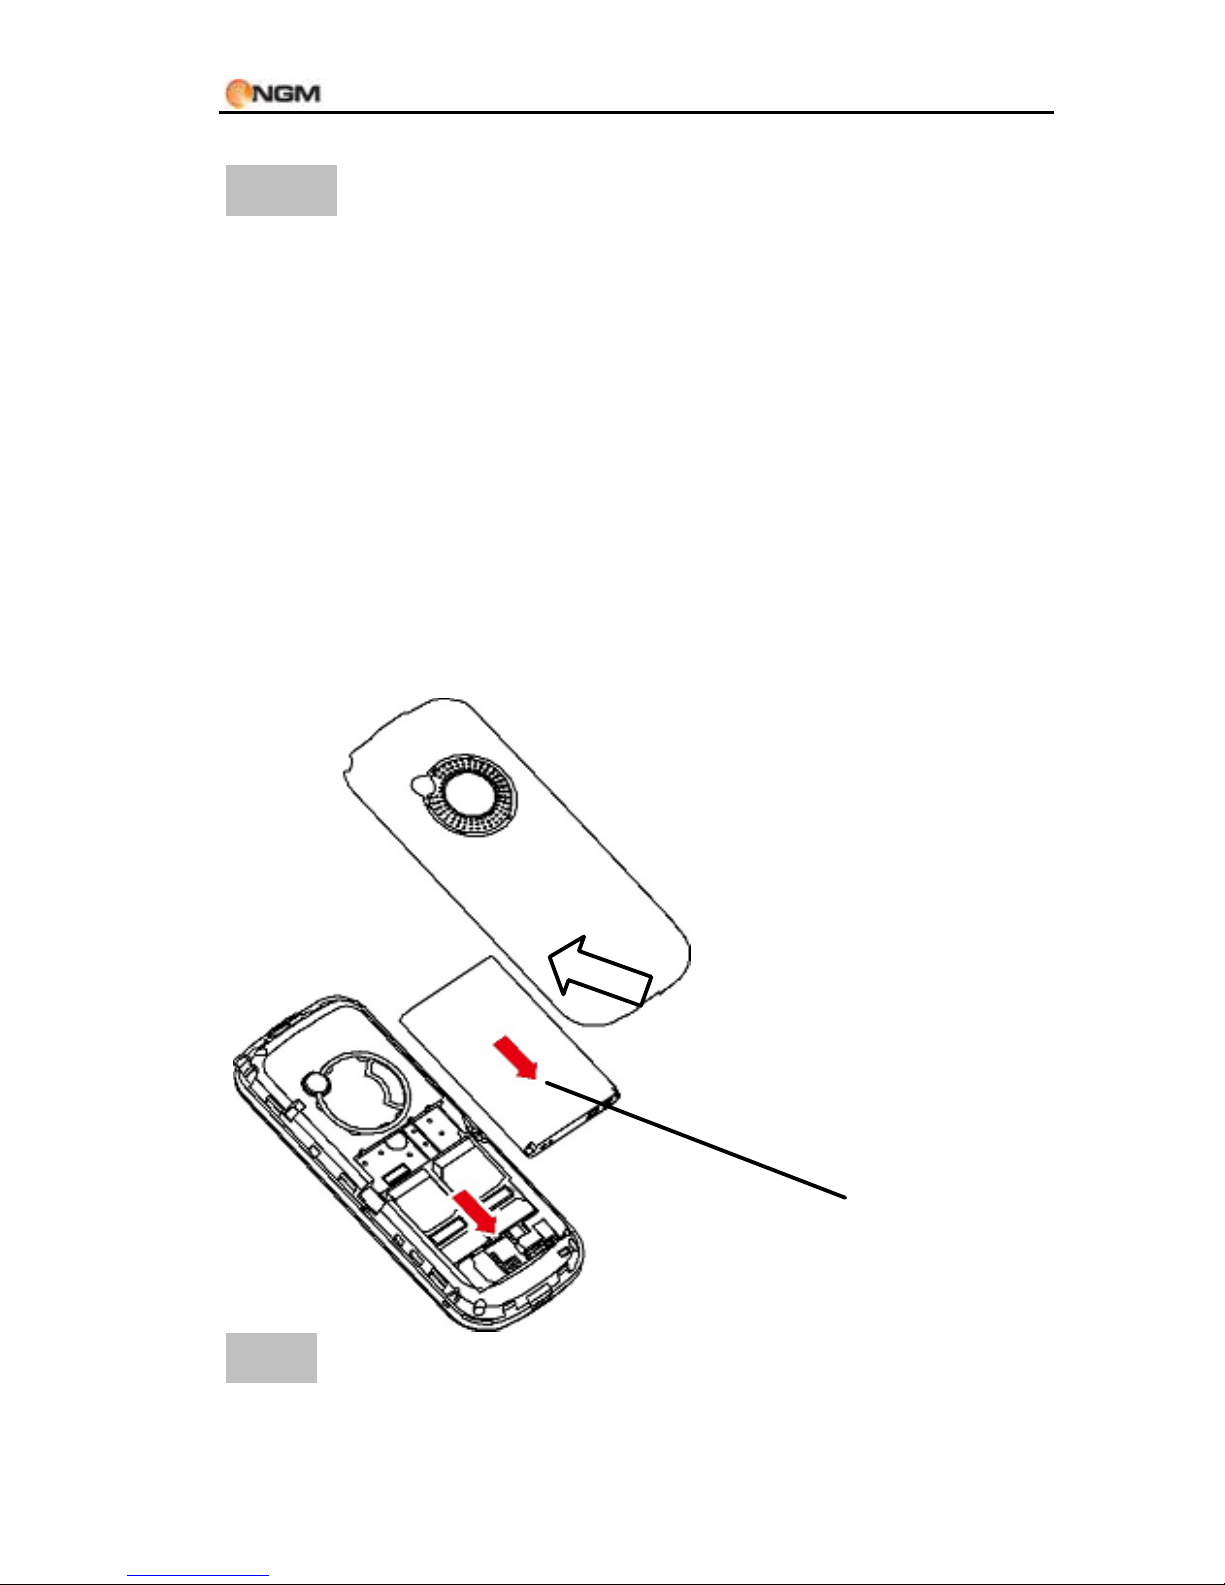
Installing the Battery
The mobile phone is suitable for original
battery and accessories. When the battery is idle,
it is recommended to put it into the protection
box. Please refer to the following diagram to
install the battery.
Note: do install the battery as per the diagram so
as prevent the battery contact patch being
Battery
Page 14
Manuale Utente
14
damaged.
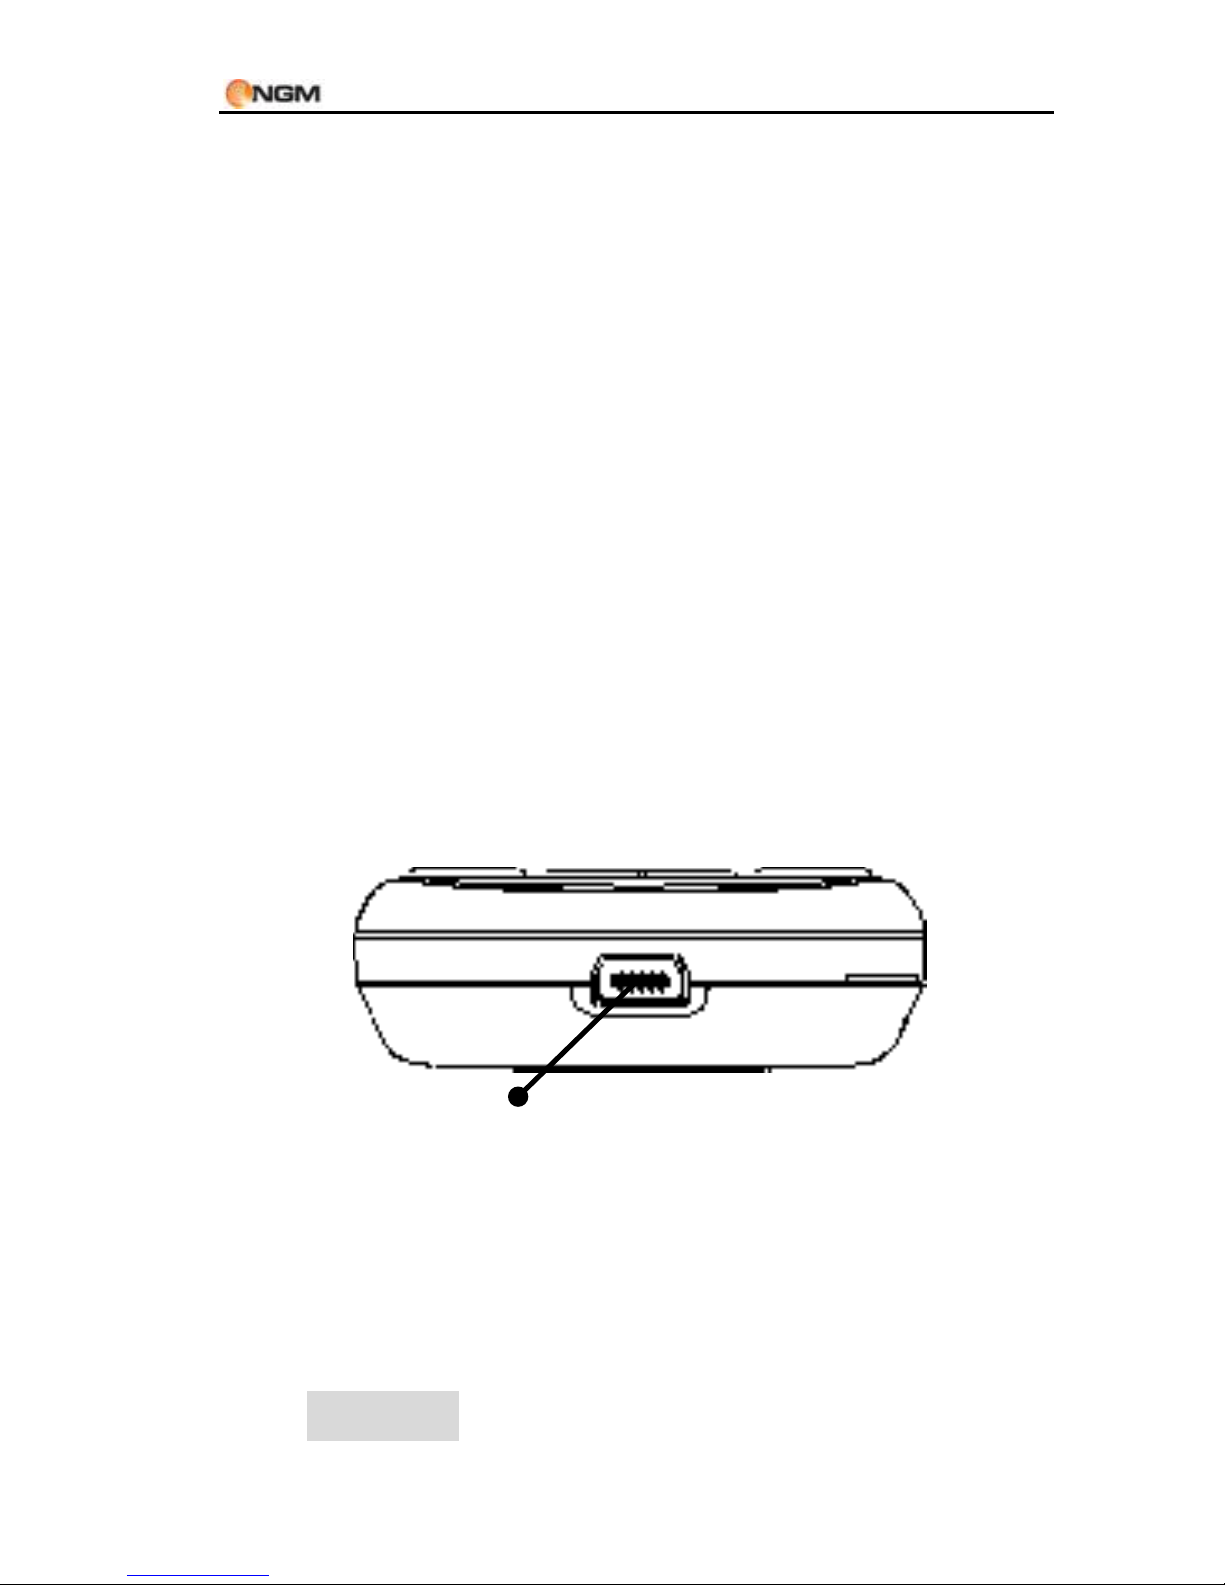
Charging the Battery
The new battery cannot reach the optimal
efficiency unless it has undergone several
continuous complete charges and discharges.
When the battery is used up, charge it in
time. Over-discharge can damage the battery.
After the battery is charged full, cut off the
connection of charger with the AC power supply
and the connection with the mobile phone.
Follow the following diagram to connect the
charger.
During charging, the battery capacity icon
on the screen flickers from the right to the left.
After the battery is charged full, the icon is full of
bars. Slight heat during charging is normal.
Warning: When a travel charger and its
Charger/USB connection
Page 15

Manuale Utente
15
accessories are used to charge the battery, please
firstly check if they are original or recognized by
the original manufacturer. The use of other
accessories may damage your mobile phone and
cause risks! Always use them indoor and dry
places.
Notices on using the battery
The performance of the battery is affected
by many factors, including radio barrier network
settings, signal strength, signal strength, work
temperature, chosen and used functions or
settings as well as phone accessories, tone, data
or other applications.
For optimal performances, please follow the
rules below:
New battery or the battery having been idle
for long need charging for long. The standard
voltage scope for the battery is 3.7V-4.2V.
During charging, keep the battery at room
temperature or similar temperature.
With time passing by, the battery will
gradually be worn and thus need longer time
to charge. This is normal. However, after
normal charging, if call duration decreases
but charging time increases, you need to buy
another battery from the original
manufacturer or authorized by the original
Page 16
Manuale Utente
16
manufacturer. The battery of interior quality
can damage your mobile phone and cause
danger!
If the phone is overused at low battery when
charging, there might need a longer time for
the charge indicator to be shown on the
screen.
Note: please dispose the battery according to the
local regulations. Try to recycle the battery as
possible. Do not treat the waste battery as
common waste.
Warning: do not throw the battery into fire so as
to prevent fire. The broken battery may cause
explosion.
PIN codes
PIN1 code: it is the personal identification
number used to enter SIM and able to prevent
others using SIM1 without permission. If the
mobile phone has activated the PIN1 code
protection, when the mobile phone is switched
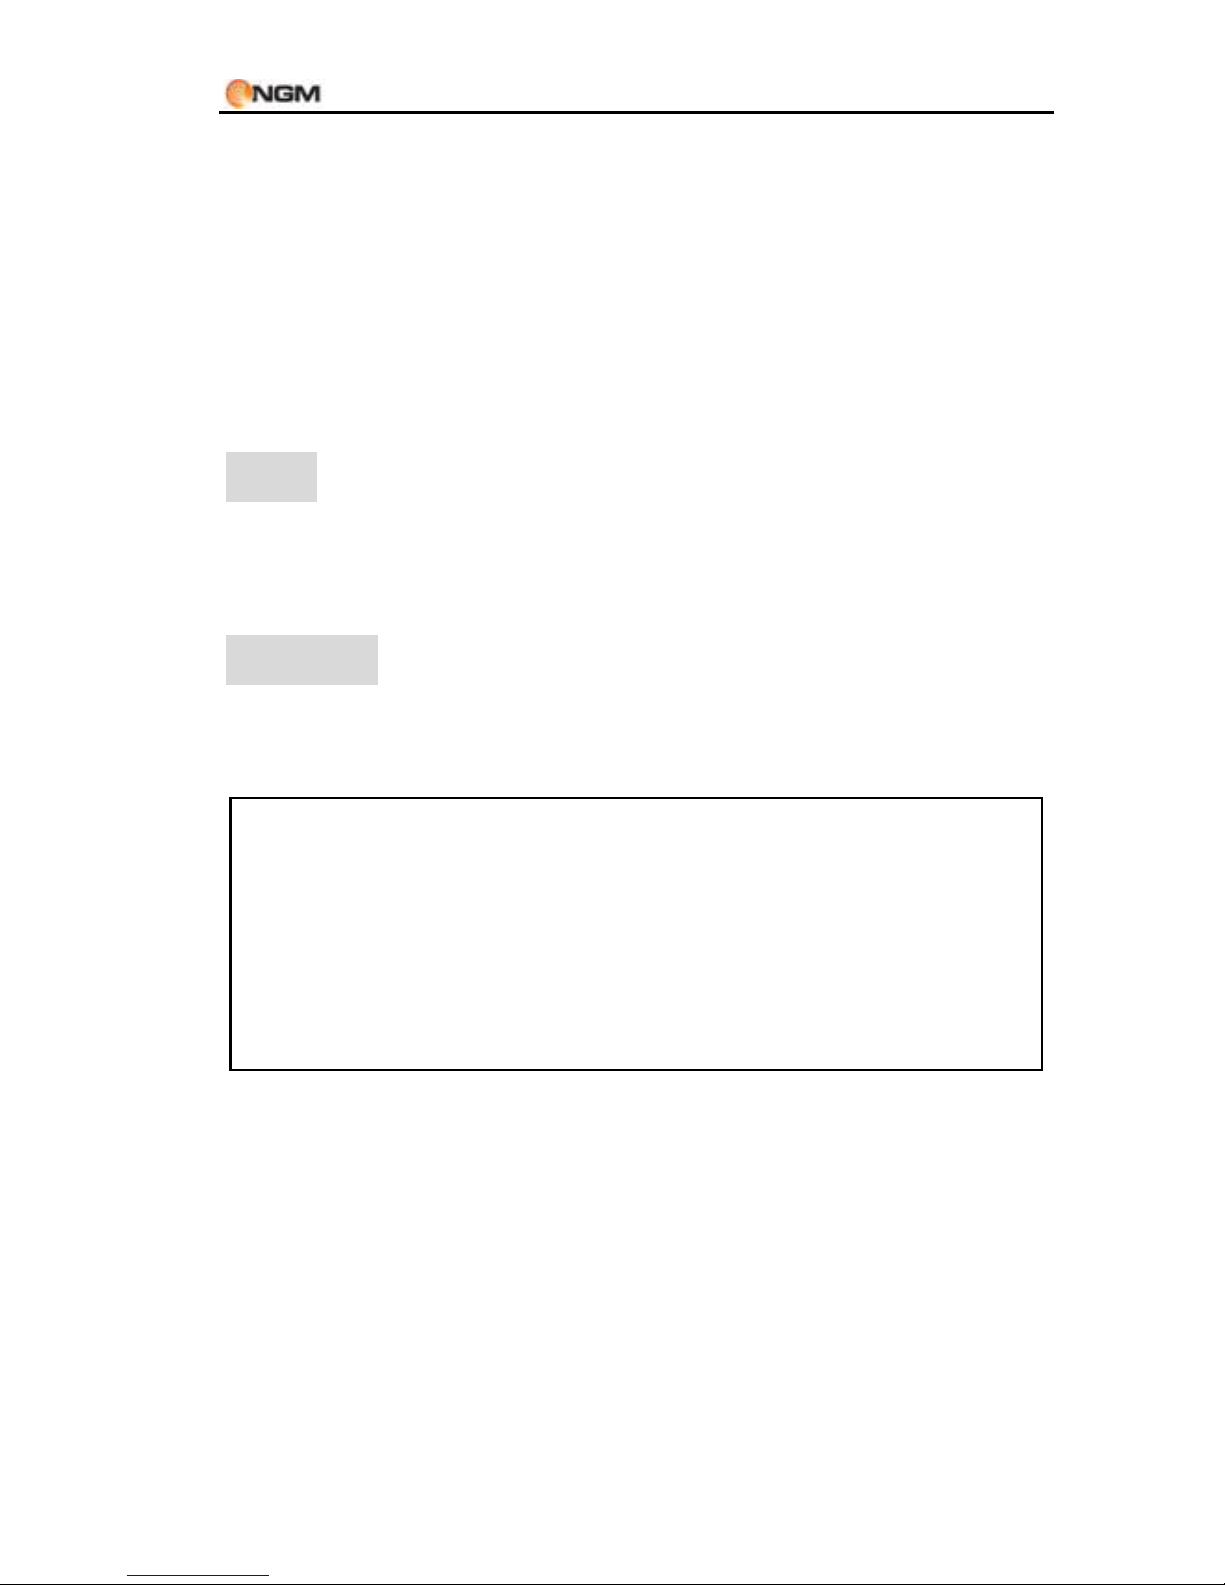
Warning
Charging the mobile phone by improper
means can cause to explosion. Always refer to
the related regulations for the disposal of the
battery.
Page 17

Manuale Utente
17
on, the screen will display “Input PIN”. In the
process of inputting PIN1 code, the screen will
use “*” to represent the input content. While
obtaining SIM, you can obtain its PIN1 code.
Codice PIN2: it is the personal identification
number used for some special functions such as
paid call, etc.
PUK code and PUK2 code (8-digits): To
change the locked PIN code, you need to use PUK
(Personal Unblocking Key) code. To change the
locked PIN2 code, you need to use PUK2 code. If
these two codes are not provided together with
the SIM cards, ask the local service provider for
them.
Warning: if the PIN code is input wrongly for
three times successively, the SIM card will be
locked. Please contact the network operator
immediately for help. Attempt to unlock the code
may make the SIM card ineffective forever!
Page 18

Manuale Utente
18
4. General instructions
Dial keys (Send SIM1 and SIM2)
These are the keys used to dial a call (with
phone number entered or in phonebook state) or
receive an incoming call. In standby state, press
these keys to display the latest call register (SIM1
and SIM2 support respectively 20 call entries,
including received calls, missed calls and dialed
calls).
End key (Switch on/off)
In call state, it is used to interrupt a call; in
call conversation state, it is used to end a call or
exit from the current menu and back to the
standby state. Hold this key for 4~5 seconds to
switch on/off the mobile phone.
Standard keypad
On the keypad, you can see A-Z ( 0-9
number keys )number keys, * key and # key,
totally 35 keys. Press these keys to input phone
number, password, English letters, and symbols
Page 19

Manuale Utente
19
or choose menus.
In different modes or different menus, “+”
and “-“ keys have different functions.
When playing music, “+” and “-” keys act as
volume control.
Radio FM keys
OK key: in FM radio mode, press this key to
turn on/off the FM radio.
Left/Right (navigation keys): to start a
manual search for radio stations, scrolling
the frequency up and down slowly. You can
fine tune the radio frequency by +0.1 MHz.
or by -0.1 MHz using these keys.
Up/Down (navigation keys): to start/stop a
broadcast recording.
Numeric keys (1-9): if pressed briefly, these
keys call up the corresponding channels,
previously saved in the channels list; if
pressed for a few seconds, they tune the
current radio frequency in the corresponding
channel.
“*” and ” #“: these keys act as volume
control.
Page 20
Manuale Utente
20
Keypad lock
When in standby interface, if the mobile
phone is idle for certain time, it can be locked by
long pressing of the central key and then
unlocked by pressing the same key and “*” key in
sequence. After the mobile phone is locked, the
keypad cannot be activated easily; in case of
incoming call, likewise, press the answer key to
receive it; after that, the keypad will be locked
automatically. If the automatic keypad lock is
enabled, the keypad will be automatically locked
when the phone is idle for a certain time
(idle-time is user-defined).
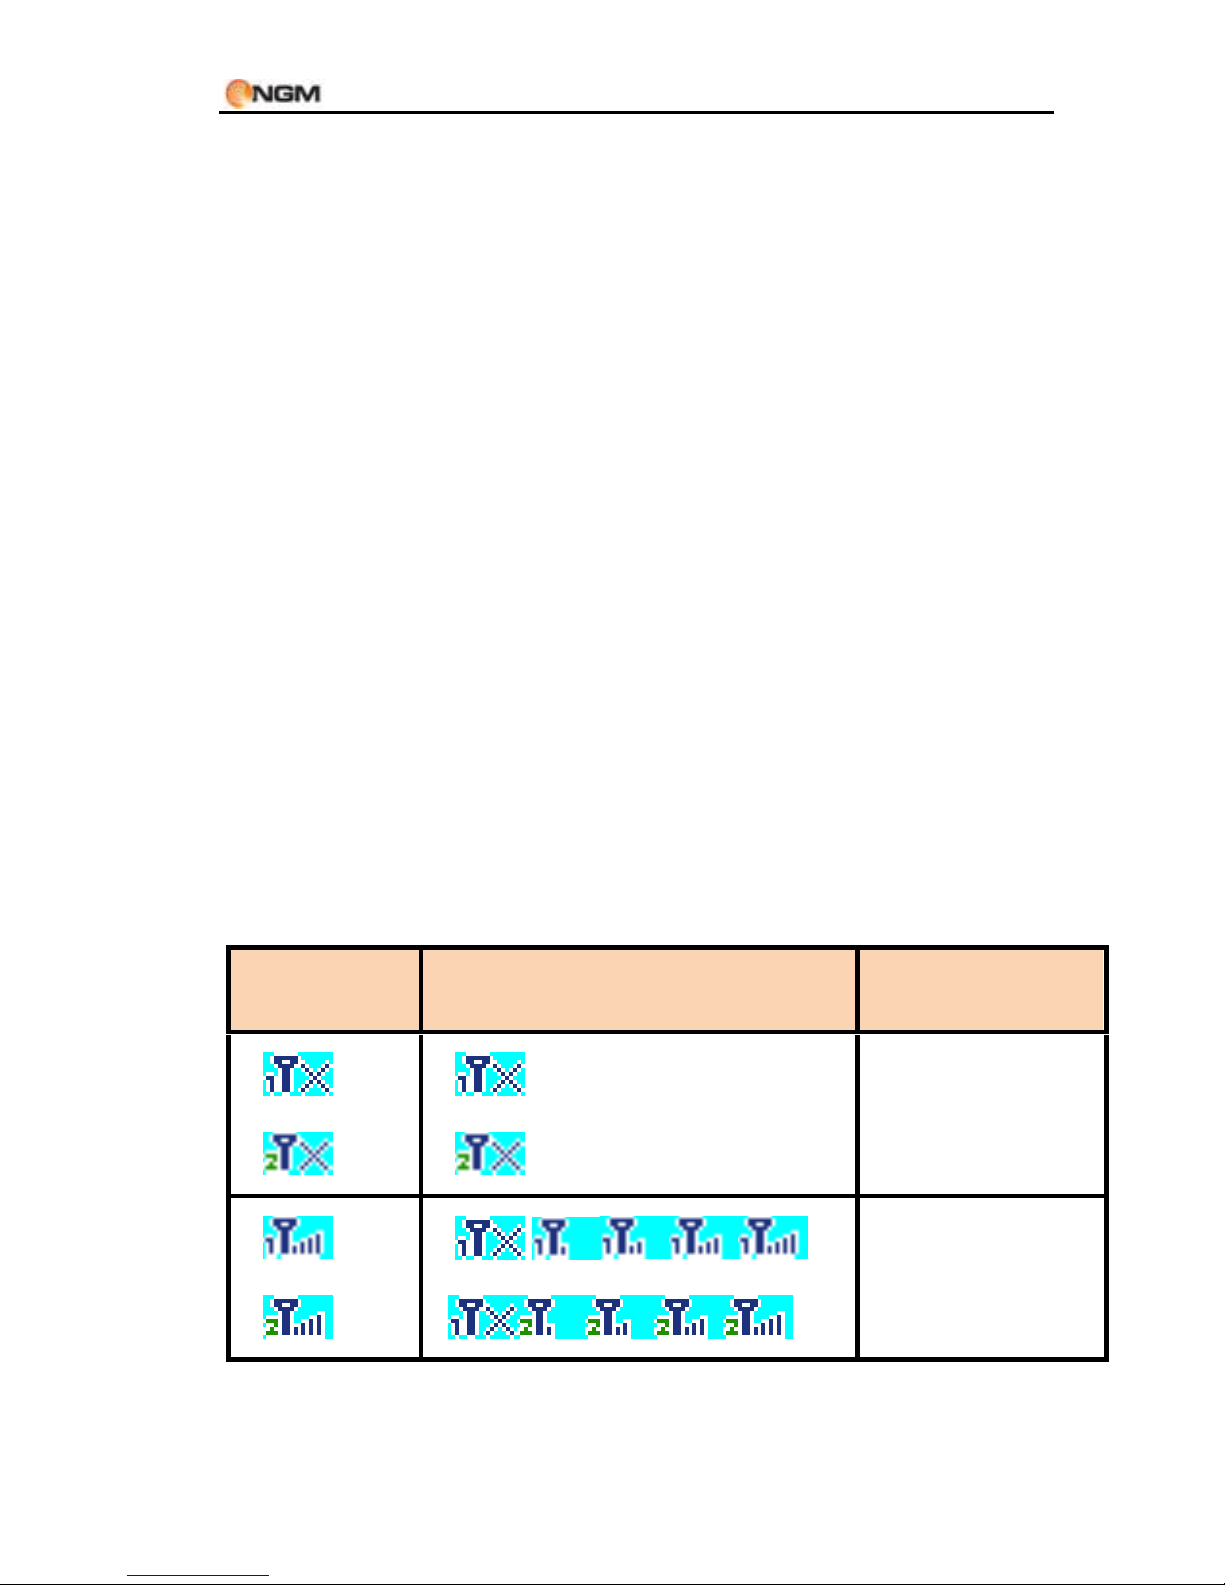
Icons in standby state
Icon
State
Description
SIM1 / SIM2
No signal
SIM1 / SIM2
Signal
strength
Page 21
Manuale Utente
21
Battery
discharged
Battery
charging
Active call
Call on hold
Alarm
enabled
Audio
playing
Background
sounds
enabled
SIM1 / SIM2
GPRS
network
SIM1 / SIM2
establishing
GPRS
connection
SIM1 / SIM2
call
forwarding
SIM1 / SIM2
missed calls
Page 22
Manuale Utente
22
SIM1 / SIM2
new
messages
SMS sending
SIM1 / SIM2
roaming
SIM1 / SIM2
MMS
processing
SIM1 / SIM2
new MMS
Earplugs
inserted
Ring only
profile active
Silent profile
active
Vibrate and
ring profile
active
Vibrate then
ring profile
active
Vibrate
profile active
Keypad lock
enabled
Page 23

Manuale Utente
23
Language and Input mode
Italian is the language by default and as input
mode. For different areas, there are 4
languages available (english, french, spanish,
german) with the corresponding input modes.
How to change the menu language: SETTINGS >
Phone settings > Language > [select a
language].
How to change the input language: SETTINGS >
Phone settings > Input text > Writing language >
[select a language].
Call hint
The mobile phone is inbuilt with vibration motor
and buzzer and provides several incoming call
modes:
Ring only
Vibrate
Ring and vibrate
Ring after vibrate
Services
Services are provided with SIM kit. The
mobile phone support service function. The
Page 24

Manuale Utente
24
detailed menu items depend on SIM card and the
network. When the network provides such
function and your SIM card supports such
function, the service menu will be automatically
displayed between the services of the mobile
phone.
Callers’ groups
The callers’ groups in the mobile phone
include various contacts sharing common
characteristics and features (i.e. family, friends,
work colleagues, etc.). You can set different
ringtones and pictures for each callers’ group.
5. Basic operations
Switch On
Press the Switch-on/off (End) key to start
the mobile phone, then the screen will display
the switch-on image. When the standby screen is
displayed, press the OK key to enter the main
menu. Then you can enter SETTINGS > Dual SIM
settings menu to set phone modes, including
Dual SIM open, Only SIM1 open, Only SIM2
open and Flight Mode. The defaulted one is Dual
SIM open.
Page 25

Manuale Utente
25
After inserting SIM card, the mobile phone
will automatically check the SIM card availability,
and then it will be show the following
informations on the display by sequence:
1. “Input phone password”— if you have set
the password.
2. “Input PIN” — if you set SIM card password.
3. “No service” — indicates failure to register;
the phone cannot make any calls.
4. “Emergency calls only” — indicates that the
phone has registered to other network and
can only make call to 112.
5. “Searching” — the mobile phone is
searching an appropriate network.
6. “Operator name” — indicates network
successfully registered.
Note: if you do not know your PIN code, please
contact the network service provider. The mobile
default password code is “1122”.
Switch Off
To switch off the mobile phone, press the
End key. When the screen displays the switch-off
animation, the host and the slave SIM will be off
at the same time. Do not take out the battery to
switch off the mobile phone. If so, the SIM card
can be easily damaged and some data will be
Page 26

Manuale Utente
26
lost.
How to dial a call
With the number keypad, you can enter
phone numbers (if wrong characters are
input, press the Back key to delete them).
Press the Dial keys to dial the phone number.
In SIM1 and SIM2 On state, you can choose
to dial a call via SIM1 or SIM2 (Send1 and
Send2 keys, respectively). To end a call, press
the End key; or to cancel a dial, press the
Back key or the End key. After the call is
connected, you can see the call timer on the
screen. If your dialled number is saved in
mobile phone memory, the contact name
will be displayed on screen.
Dial a call via Phonebook: enter the
Phonebook menu and search the desired
name/phone number, and then press Dial
keys to dial.
Redial latest dialed number: in standby
state, press Dial keys (SIM1 or SIM2) to view
the list of the latest dialed 20 phone number
or names. Roll to the desired phone number
or name and press Dial keys to dial call.
Page 27

Manuale Utente
27
How to Adjust the Receiver Volume
When speaking to someone, press the
Navigation keys Up (+ volume) or Down (- volume)
to adjust the receiver volume.
Answer a call
When there is an incoming call, you will be
alerted with ring, vibration, vibration and ring, or
vibration then ring, according to the settings of
the mobile phone.
To receive a call, press Dial/Send Keys or OK
key. If you prefer to use whatever key to answer,
you can select: SETTINGS > User Profiles >
[ Selected Profile] > Options > Customize >
Answer mode > Any key.
To refuse a call, press the End key directly.
If the CLI (Call Line Identity) is opened, the
phone number of the caller will be shown on the
screen. If this number has been saved in the
phonebook, the name corresponding to this
number will be displayed on the screen.
Sending DTMF tones
With this option enabled, when calling up a
voice mailbox or another automated phone
system press the desired number key and the “*
“and “#” keys to send DTMF (Dual Tone
Page 28

Manuale Utente
28
Multi-Frequency) tones, in order to access
options or extension numbers.
Place a Call on hold
If you have applied for dial hold, in the call
conversation process, choose “Call Center > Call
Settings > SIM (1 or 2) Call Settings > Call
Waiting” to have the following function menus:
Activate: to activate the function allowing to
place a call on hold.
Deactivate: to deactivate the same function.
Query status: to query the current call
status.
Note: some menu's elements need the network
support; others may occur under special
conditions. Please contact the network operator
for further details.
Fast SMS Reading
When the user receives some new SMS, the
screen will display an icon of unread SMS. Press
Read to enter and read the SMS. The SIM card 1
unread SMS icon is marked with “1” and SIM card
2 unread SMS icon is marked with “2”.
Page 29

Manuale Utente
29
Missed calls
When there is a missed call incoming, the
screen will display a missed call icon (separately
for each SIM card). Press Send key (SIM1/SIM2)
to enter and read details about the missed calls.
Answering machine
The telephone answering machine is a device
designed to record audio messages directly on its
local memory without connecting to a server to
listen the recordings, thus avoiding the relative
charges. Moreover, you can customize your
answering machine message, using the phone’s
microphone. The answering machine will turn on
after a preset number of rings, or can be
operated manually as answer option. You will be
notified with an icon (separately for SIM1 and
SIM2) when you got messages left on your
answering machine. If you want to listen to
messages, select NGM Special Functions >
Answer machine > Messages left.
Page 30

Manuale Utente
30
6. Use of Menu functions
Phonebook
Contacts can be saved to the SIM card or phone
memory. The phonebook will show all the
contacts from the SIM cards and phone. Only two
details can be saved to a SIM card, name and
phone number. More details can be stored in the
phone memory, including multiple phone
numbers, email address, pictures, and ringtones.
The phone stores up to 1000 entries.
Available options:
Quick search
Find quickly a contact in the Phonebook.
Add new contact
Add a new contact in the Phonebook,
choosing between Phone and SIM cards.
Page 31

Manuale Utente
31
Mark several
You can select more than one contact at a
time to speed up the operations on the
phonebook.
Caller groups
You can organize your contacts into caller groups
such as family, friends, business, etc. and
customize the attributes for each group. You can
choose a name (Add new group), a ringtone and
a picture for each group.
Note: Only contacts from the phone memory
can be added to caller groups.
Extra numbers
You can save (separately for SIM1 and SIM2)
some particular numbers as owner numbers,
service numbers and SOS numbers. You can also
build a list (separately for SIM1 and SIM2)
of fixed dialing: after that you can only make
calls to contacts that appear in your fixed dialing
list (except for emergency calls).
Page 32

Manuale Utente
32
Phonebook settings
Memory status: you can display the current
status of the phonebook memory, including
the memory available on SIM1 and SIM2.
The display format for the memory usage is
“used/total”.
Preferred storage: you can select the storage
path for the current number.
Fields: you can select the fields to be shown
in each contact information.
My number: you can edit your vCard and
send it as text message, or as multimedia
message.
vCard version: you can choose between two
different formats, vCard 2.1 and vCard 3.0
Delete all contacts: delete all contacts from
SIM1, from SIM2 or from phone.
Reminder time: you can set here a time to
get a reminder for all birthdays entered in
the contact details.
Phonebook import: you can import a backup
copy of the phone book (previously saved in
the phone or in the memory card).
Caller picture
You can choose a picture to match with the
selected number.
Page 33
Manuale Utente
33
Caller ringtone
You can choose a ringtone to match with
the selected number.
Call center
Call center includes Call History and Call Settings.
In dual-SIM mode, you can separately search the
call register of SIM1 and SIM2 and set separately
some operations corresponding to SIM1 and
SIM2. In mono-SIM standby mode, you can set
the available SIM card and see its call register.
SIM call history
Call history allows you to to view missed calls,
dialed calls and received calls in both SIM cards.
In missed calls, received calls and dialed calls
function list, you can see: date, time, duration of
the call; call back the number; edit or delete the
phone number in the list; save the number to
phonebook or send SMS and MMS to the
number; add the number to the Blacklist.
Note: SIM1 and SIM2 contain up to 20
entries each (including Dialled calls, Received
Page 34

Manuale Utente
34
calls and Missed calls).
Call timers
Last call: with this function, you can view the
last call duration.
Total sent: with this function, you can view
the global duration of all dialed calls.
Received calls: with this function, you can
view the global duration of all received calls.
Reset all: with this function, you can clear all
your call duration records.
Call cost
This function needs the support of the network
service provider.
Last call cost: with this function, you can
view the last call cost.
Total cost: with this function, you can view
the global cost of all dialed calls.
Reset cost: with this function, you can clear
all your call cost records.
Max. cost: with this function, you can limit
call costs in the specified pricing unit or
currency unit. PIN2 code must be input to set
call cost.
Price per unit: this function needs network
Page 35

Manuale Utente
35
support. For more details, please consult the
network operator.
Note: real call's duration and time/cost counting
for billing purpose on the network operator side
may differ; this can be attributed to network
functions, bill roundings, taxes, etc.
Text message counter
With this function, you can view the number
of sent messages and received messages.
GPRS counter
Page 36

Manuale Utente
36
Call settings
[SIM call settings]
Caller ID: you can choose ID as set by Network,
Hide ID or Send ID.
Set by network: while in
conversation, you can send your
Caller ID in the form preset by the
system.
Hide ID: while in conversation, you
will not send your Caller ID. If the
system does not support such
function, call may fail.
◆ Send ID: while in conversation, you
can send your Caller ID to the system.
Note: this function requires network support.
Call waiting: you can freely choose to turn On or
Off this function. The call hold cannot be active
unless this function is activated. This function
requires network support.
Call divert: this kind of function cannot be used
unless you apply to the network operator for it.
With this feature you can divert calls meeting the
Page 37
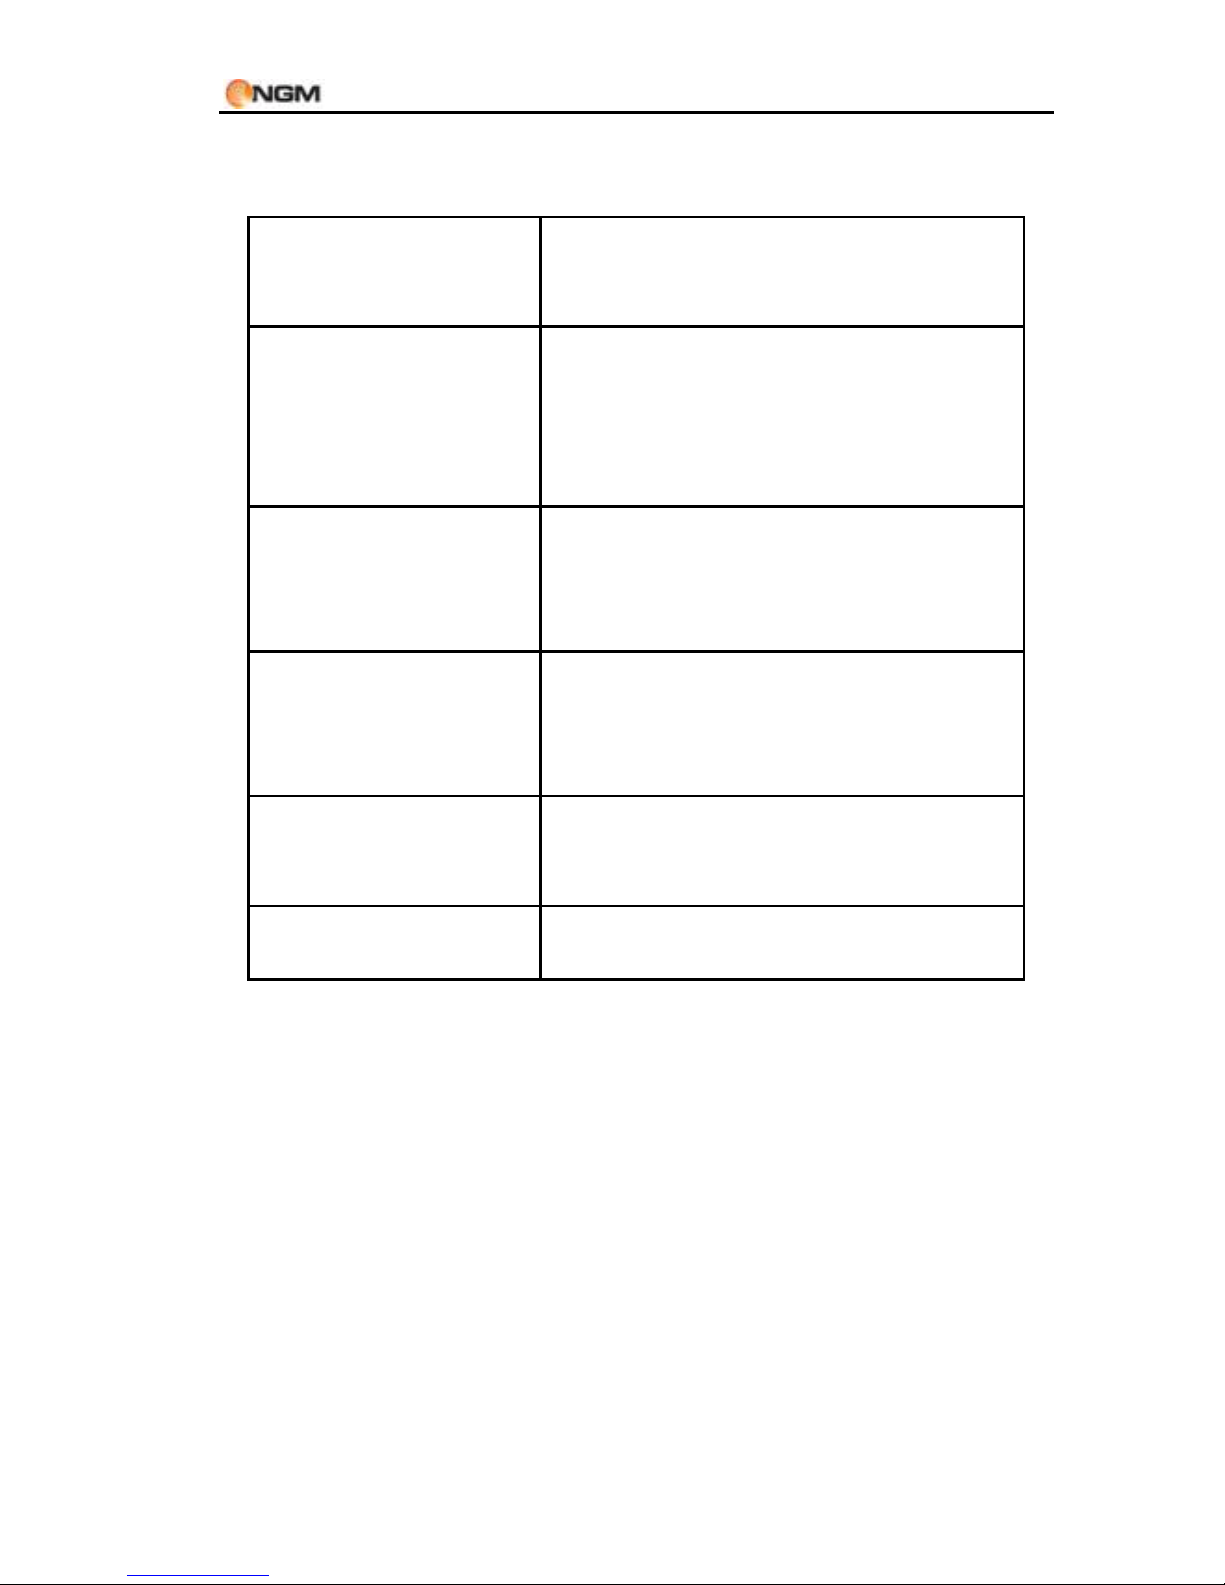
Manuale Utente
37
following conditions to another number.
Divert All
Voice Calls
The network will divert all
voice calls without
conditions.
Divert if
Unreachable
When the network
cannot find your mobile
phone (switched-off or
out of the service area), it
will divert the calls.
Divert if no
Answer
When the mobile phone
does not answer the call,
the network will
automatically divert it.
Divert if Busy
When you already are in
a conversation, the
network will divert the
call.
Divert All
Data Calls
The network will divert all
data calls without
conditions.
Cancel All
Diverts
Cancel all divert
conditions.
[Impostazioni avanzate]
Auto redial: you can set this function as On
or Off. After the first automatic redial fails,
you can have at most ten times to connect a
phone number.
Speed dial: if enabled, this function allows
to match a phone number with each
Page 38
Manuale Utente
38
numeric key (2-9), and make speed calls.
Call time display: if enabled, the phone
screen will display the talking time of your
current call.
Call time reminder: the phone has a time
reminder: you can set a sound warning at
any time you like or at any time interval
(between 30-60 seconds).
Note: some settings require network support.
Multimedia
Camera
Use the inbuilt camera to take your photos. The
camera lens is on the back side of the phone and
the LCD screen acts as a viewfinder. The photos
shall be saved in a JPG file format. Some software
could be necessary to view the photos, if you
download your camera phone pictures onto the
computer.
If there is insufficient space on the drive to store
the images, it should be necessary to remove
some old pictures (or any other type of files)
Page 39
Manuale Utente
39
from “File manager” option to free up disk
space.
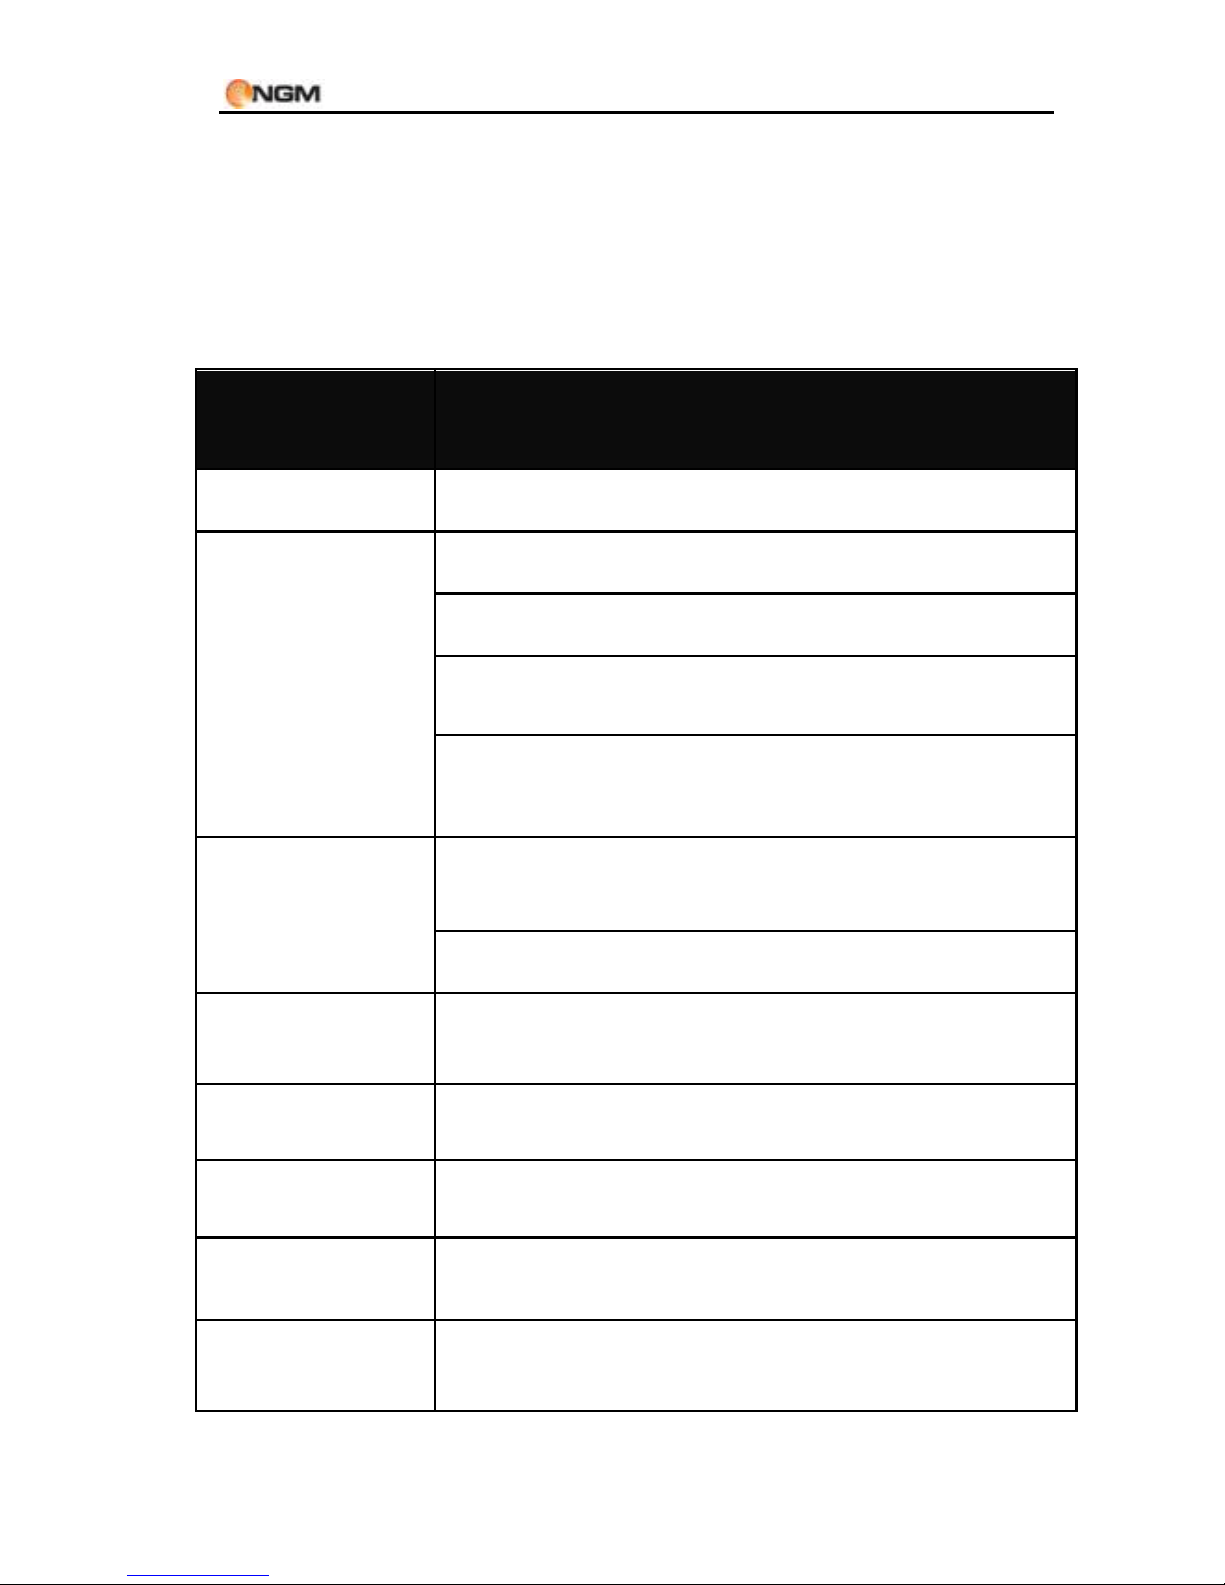
Camera Options:
Options
Descriptions
Photos
Displays all pictures taken.
Camera
settings
EV: in the range EV-1 to EV+1.
Anti-flicker: 50Hz (preset) or 60Hz.
Delay timer: 5 sec., 10 sec., 15 sec. or Off
Continuous shot: 1 shot or Off
Image settings
Image size: 128x104 or 352x288
Image quality: Good, Normal, Low.
White balance
Auto, Daylight, Fluorescence, Incandescence.
Scene mode
Automatic or Night.
Effect settings
Normal, Gray scale, Sepia, Sepia green, Sepia
blue, Color invert.
Storage
Select the storage path for image files (Phone
or Memory card).
Restore
default
Restore the default settings.
Page 40
Manuale Utente
40
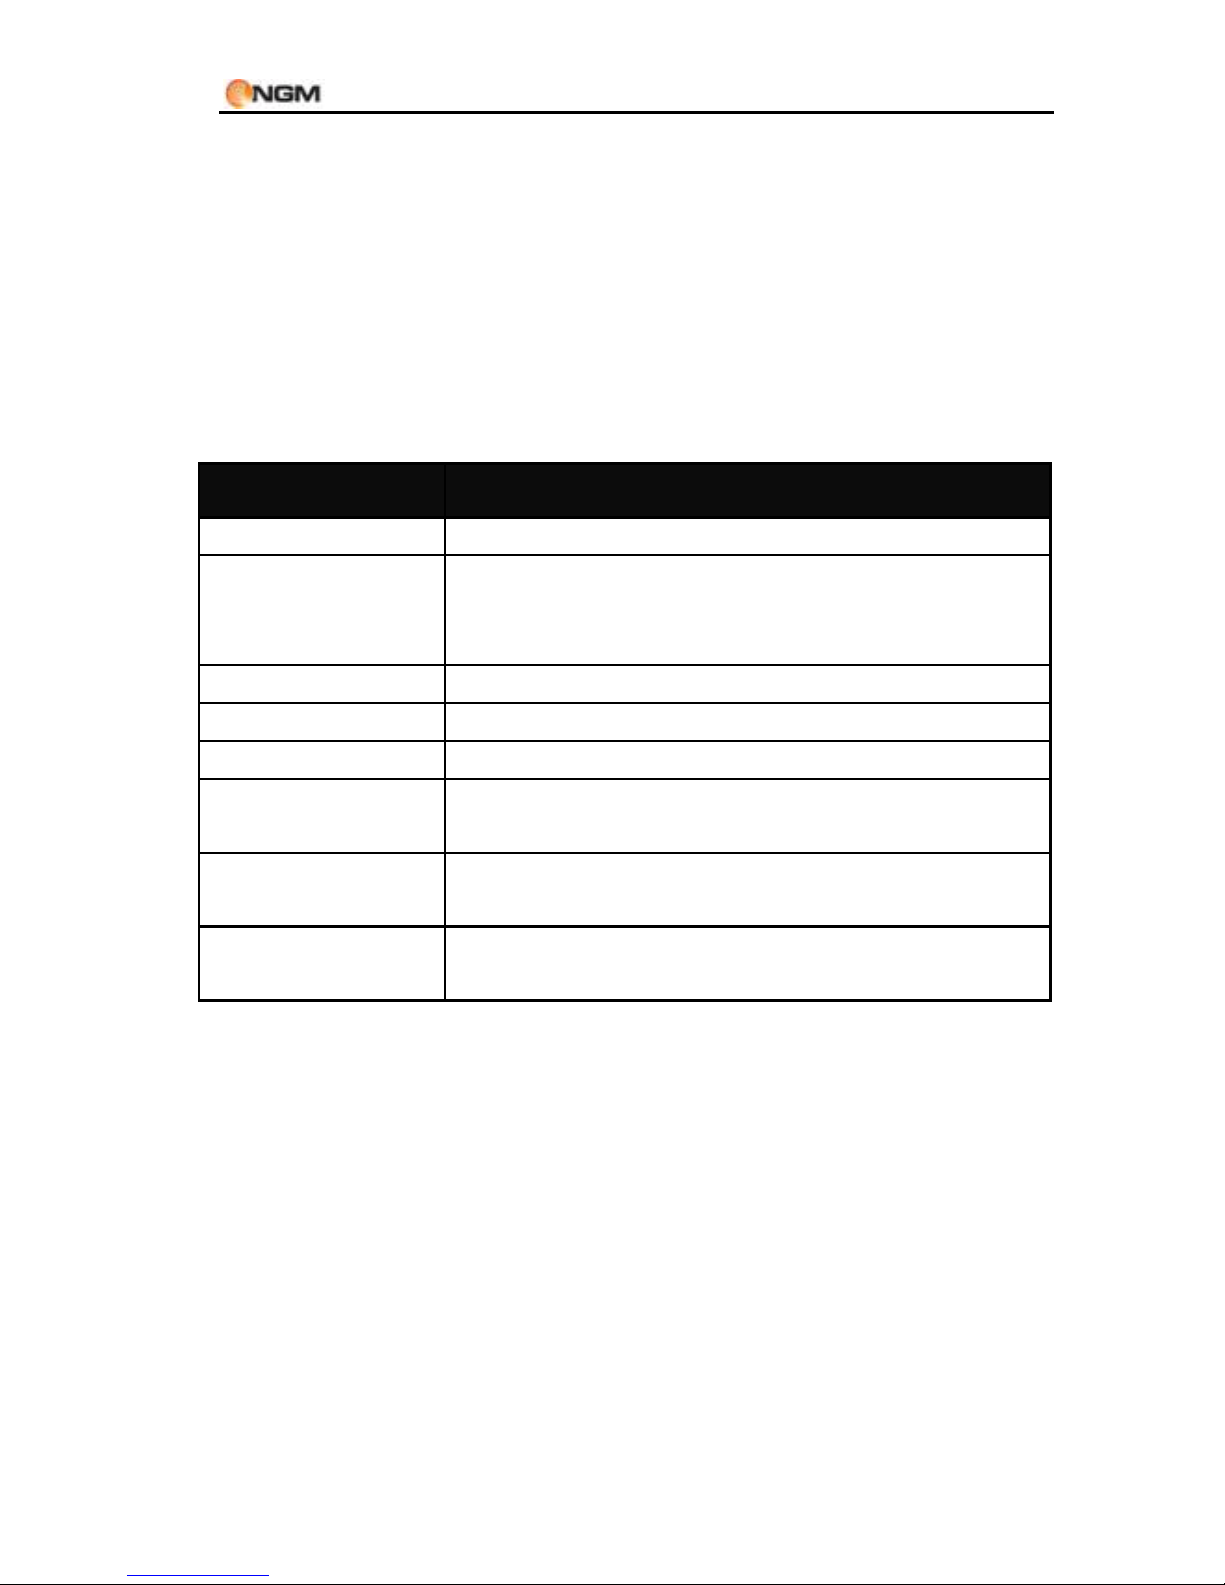
Image viewer
Use this menu to view an image file previously
saved in phone or memory card. This application
supports JPG picture format. Available options:
Options
Descriptions
View
View the selected picture.
Use as
Use the selected picture as wallpaper, as
screen saver, power on picture, power off
picture, or caller picture.
Send
Send the file as MMS.
Rename
Rename the selected picture.
Delete
Delete the selected picture.
Delete all files
Delete all the image files from the chosen
storage location.
Sort by
Sort the pictures by name, type, duration or
size.
Storage
Select the storage path for the image files
(Phone or Memory card).
Audio player
From this menu you can choose to play
audio files saved stored on phone or on memory
card. To download files from your PC, T-Flash
card must be inserted on the phone; then shut
down the phone and connect it to your computer
Page 41
Manuale Utente
41
with the USB cable; the computer will detect the
mobile phone automatically as a Mass Storage
device. Download the desired MP3 files in "My
Music" folder of the Memory card, otherwise the
audio file will not play. Audio Player supports
MP3, MIDI and AMR formats. If the operating
system of your PC is Windows 2000 or later, any
driver is required.
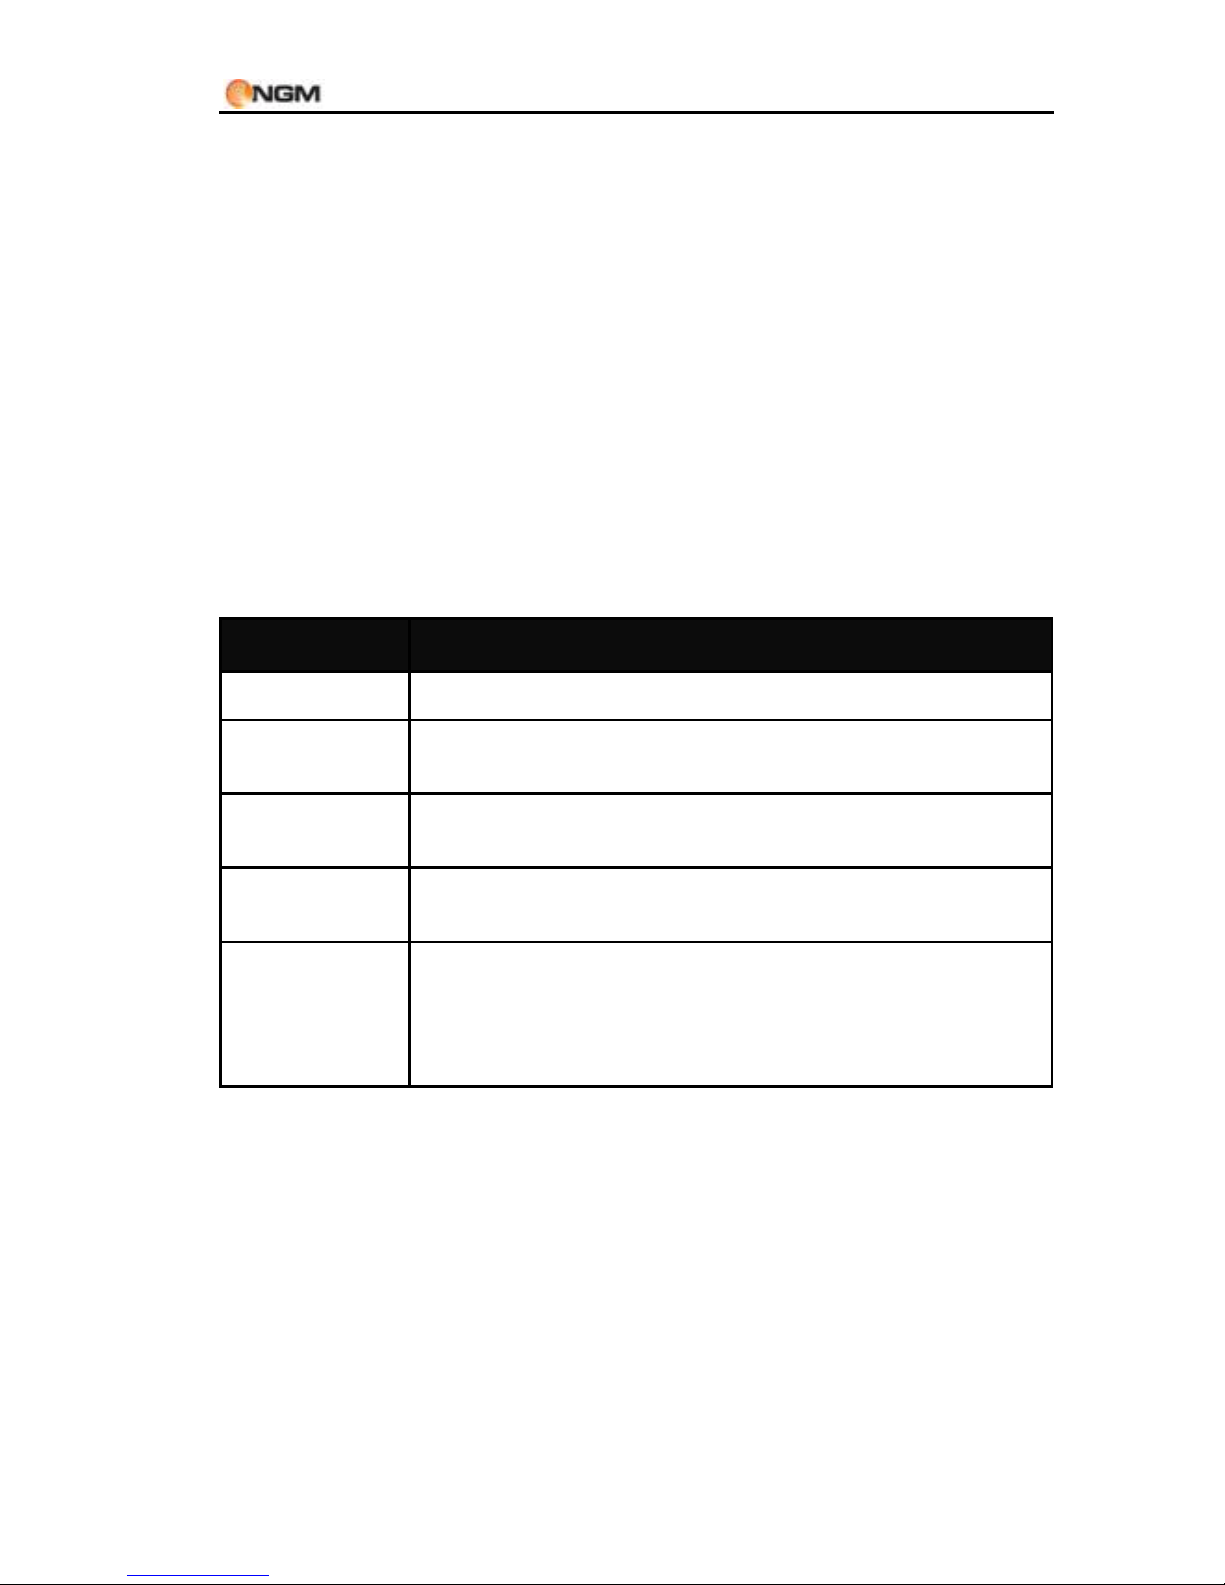
Descrizione delle opzioni del riproduttore audio:
Options
Descriptions
Play
Play the selected file.
Details
File name, channel, bitrate/audio sample rate,
size, time, etc.
Add to
ringtones
Add the selected track to the ringtones.
Refresh
list
Refresh the playlist, according to the changes
made in “ My music” folder.
Settings
Player settings: storage path, enable/disable
automatic list generation, enable/disable
repeat mode, enable/disable shuffle mode and
enable/disable background play.
Audio recorder
Use this menu to start a new audio
recording and play audio files previously saved in
phone or memory card. From the list, select
Page 42

Manuale Utente
42
“Options” to get the following operations:
Play: play the selected file.
Append: combine two recorded files
into one single file (only for files
recorded in AMR format).
Rename: rename the selected file.
Delete: delete the selected file.
Delete all files: delete all the audio
files from the chosen storage location.
Use as: use the selected recorded file,
inserting it in the list of audio files
available for User's profiles.
Send: send the file as MMS.
Schedule FM recording
This feature allows to schedule up to four
FM radio recordings. If enabled, you will be
allowed to schedule date and time of the radio
show recording, the frequency with which to
repeat regularly the recording, the channel, and
finally file format, quality, storage path and
eventual appending of the recording.
Page 43

Manuale Utente
43
NGM special functions
Calls and SMS firewall
Here you can set and enable, separately for each
SIM, a Black List and a White List, for Messages as
well as for Calls.
A Black List of contacts (phone numbers)
allows everyone to call you or send
messages to you, except for the members
of the Black List. When this access control
function is active, a blacklisted caller will
just hear busy tone all the time; later, you
will get a network SMS alert (if allowed in
your network services) informing you
about the number of the caller who was
trying to contact you. Messages received
from a blacklisted number will be
automatically transferred to the Junkbox
folder.
A White List of contacts allows nobody to
call you or send messages to you, except for
the members of the White List. When this
access control function is active, a
non-whitelisted caller will just hear busy tone
all the time; later, you will get a network SMS
alert (if allowed in your network services)
Page 44

Manuale Utente
44
informing you about the number of the
caller who was trying to contact you.
Messages received from a non-whitelisted
number will be automatically transferred to
the Junkbox folder.
Regardless of White and Black list, you can
also block the calls coming from
anonymous callers or from callers not
stored in the Phonebook.
Create a Black/White list for
incoming calls: select the SIM card of your
choice, then “Calls”, and add the contacts
to the Black or White List.
Create a Black/White list for
incoming messages: select the SIM card of
your choice, then “SMS”, and add the
contacts to the Black or White List.
Enable a Black/White list and the
block for anonymous numbers or for
numbers not stored in the Phonebook:
select the SIM card of your choice, then
select:
o Calls > Settings : here you can
enable/disable the following firewall
combinations : Black List, White List,
Page 45

Manuale Utente
45
Numbers not stored in the
Phonebook, Anonymous numbers,
Black List + anonymous, Black List +
not stored in the Phonebook. The
option Firewall close allows to disable
at the same time all the firewall
combinations previously enabled.
o SMS > Settings: here you can
enable/disable the following firewall
combinations : Black List, White List,
Numbers not stored in the
Phonebook, Black List +not stored in
the Phonebook. The option Firewall
close allows to disable at the same
time all the firewall combinations
previously enabled.
Note: when the firewall type has been selected, you
will be requested to set (if you want) the Activation
Time and the Rejection Method (for the Calls
Firewall). After setting parameters, you will be asked
if you want to use the same settings for the
complementary list on the same SIM card.
Answering machine
The built-in Answering machine allows people to
leave voice messages for you when you can't
Page 46

Manuale Utente
46
answer your phone.
Message received
Here you can listen to the recorded phone
message that are stored in memory.
Settings
From here, you can toggle on/off the answering
machine, select the storage path, fix the pick up
time (3, 5, 10 or 30 seconds), fix the record
duration (30 seconds, 1 minute, 3 minutes, 5
minutes or unlimited), use the default greeting
message or select one from your audio files,
enable/disable remote access using any DTMF
telephone.
For remote access, with the above said option
enabled, you need a DTMF (touchtone)
telephone. When the answering machine has
picked up the call, you'll hear the invitation to
leave a message; at this point you shall digit “#”
and then wait for the prompt to digit your
password (1234 as default)..
Note: remote access supports listening only.
Page 47

Manuale Utente
47
Background sounds
Background sounds help to recreate the realistic
ambient sounds during a particular call (i.e.
“platform” “airport”, “station”, “restaurant” and
other user-recordable sounds). This option can
be selected by default or can be set just in time
when there is an incoming call.
You can control the volume level and
reproduction mode (once, continuous, interval).
The phone includes 10 pre-recorded background
sounds; user can add his own sounds in .wav
format (8 MHz, 16 bits samples).
SMS delayed sending
You can postpone sending the message,
scheduling the sending at a particular date and
time. You can also specify multiple recipients, set
the repetition of sending, and choose which SIM
to use.
FM Radio
The phone includes a built-in FM radio that you
can turn on by pressing the main key, and it is
Page 48

Manuale Utente
48
provided with a telescopic antenna to receive
radio signals. It’s also possibile to listen to the
radio through the earphones supplied with the
product, inserting the cable in the USB port at
the bottom of the phone. This way, the
earphones cable acts as antenna, so let it hang
free from the connector. It is possible to
make/receive a telephone call when you are
listening to the radio. When the conversation is
rolling along, radio will automatically switch to
silent mode. If some application is currently using
GPRS or CSD to send/receive data, there could be
interference with radio signal.
After starting FM radio, the phone will show
number, name (if already saved), and frequency
of the radio channel. If you already saved some
radio channels into the phone, you can select the
desired channnel or press any numerical key (1 to
9) to choose the corresponding channel.
Options
Channel list: save up to 9 radio channels,
that can be directly recalled from the
keyboard (numerical keys 1 to 9).
Manual input: insert here directly a specific
radio frequency . The frequency range of FM
Page 49

Manuale Utente
49
(frequency modulation) radio is 87.5 MHz to
108 MHz.
Auto search: start an automatic search and
save the frequency in the Channel list.
Settings: enable/disable Background play,
enable/disable loudspeaker, choose a
recording format, choose audio quality and
select the storage path for the recordings.
Record: record an audio file from a radio
program.
Append: combine two recorded files into
one single file (only for files recorded in
AMR format).
File list: view the recorded audio files.
Settings
Dual SIM settings
In every moment you can choose the most
appropriate setting for your SIM cards according
to the situation:
Dual SIM open
Only SIM1 open
Only SIM2 open
Page 50

Manuale Utente
50
Flight mode
User profiles
Your mobile phone is provided with multiple
profiles so that you can customize some settings
in different cases for different events. Firstly,
choose a profile and then activate it. You can
have such profiles as General, Meeting, Outdoor,
Indoor, Silent, Vibration, and Headset.
The features of each profile can be edited to fit
your needs as follows:
Tone settings: to set the tones for Incoming Call
(SIM1 and SIM2), Power On, Power Off, SMS
Message (SIM1 and SIM2), and Keypad.
Volume: to set the volume of Ring Tone (SIM1
and SIM2) and Keypad Tone.
Alert type: you can choose the current ring
mode among Ring only, Vibration only, Vibration
and Ring, or Vibration then Ring (separately for
SIM1 and SIM2).
Ring type: you can choose the current ring type
among Single, Repeat and Ascending
(separately for SIM1 and SIM2).
Extra tone: to enable/disable Warning Tone,
Error Tone, Camp on Tone, SMS Repeat Tone
Page 51

Manuale Utente
51
and Connect Tone.
Answer mode: you can choose to use any key to
answer a call.
After customizing the settings, choose
“Activate” in “Options” to start the selected
profile.
Note: after inserting headset plug into the
matching jack, the mobile phone will
automatically change into Headset profile.
Unplug the headset to return to the previous
profile. In standby state, you can press # key to
switch to Silent profile and again to the previous
profile.
Phone settings
From this menu, you can access various
configuration options.
Time and date: you can set here Time zone,
Time and date, Time and date format,
enable/disable the automatic update of
time and date, according to the time zone
you’re in.
Note: this update must be permitted by the
network operator.
Page 52
Manuale Utente
52
Note: if the battery is removed from the phone, or
if the device is not used for a long time, it shall be
necessary to set again date and time.
Schedule power On/Off: you can easily
make a schedule when your phone will
turn on or off (4 different time slots).
Special Note: please disable this option in
all areas where the use of mobile phones is
inhibited.
Language: you can select the desired
language to use in the menu (Italian,
English, French, Spanish, German).
Writing language: you can select the
desired language to use for messaging, and
enable/disable T9 system for predictive
text input.
Display: you can set features as Wallpaper,
Screen Saver, Power On and Power Off
display, Time and date display, Owner
number.
Greeting text: enable/disable the display
of a greeting text (freely customizable) on
startup.
Shortcuts: add/remove elements from the
list of functionalities that are accessible via
keyboard shortcuts (see below).
Page 53

Manuale Utente
53
Dedicated key: create keyboard shortcuts
for the most commonly used functions,
assigning a function to each navigation key
(up, down, left, right).
Auto update of date and time: toggle
on/off the automatic update of date and
time. This updating doesn't affect alarm
clock or calendar. The update must be
supported by network operator.
Miscellaneous settings: set the LCD
backlighting, controlling the Brightness
and the Timer (5 sec. ~ 1 minute).
Network settings
In dual-SIM mode, there are separate
network settings for SIM1 and SIM2 cards.
Network selection: for each SIM you can
decide between an automatic selection and a
manual one.
Preferences: for each SIM you can
browse a list of networks where to register and
assign a priority.
Page 54

Manuale Utente
54
Security settings
SIM 1 and SIM2 security settings:
SIM lock: you can set up the SIM
card lock on your phone, so that it
can't be used without a Personal
Identification Number (PIN). When
the lock is enabled, you must enter
the PIN each time you turn the
phone on.
Fixed dial: This function needs the
support of the SIM card and the
network operator. When it is
activated, you can only dial the
phone numbers saved in host fixed
dial list. To activate it, you need to
input host PIN2 code.
Barred dial: you can set barring all or
some dials. (SIM card support
needed).
Change password: you can change
the PIN (personal identification
number) code into a 4-digit number
that is easier to remember.
Phone lock: you can set up the phone lock,
digiting the requested password (the
default password is “1122”). When the
lock is enabled, the phone will prompt you
for your password before you can make or
Page 55

Manuale Utente
55
receive calls. Insert the default password
(or a personal one; see below how to
change the password) to unlock, and
confirm.
Auto keypad lock: you can activate here
the Automatic keypad lock. The phone will
automatically lock the keypad after a
certain time (5, 30, 60 seconds or 5
minutes). Press "Unlock" (OK key) and
then "*" to unlock.
Change password: you can change here
the password for the phone lock (the
default password is “1122”) with another
one easier to remember and more secure.
The new password has to be between 4-8
digits long.
Privacy firewall: this feature is accessible
after digiting the phone password (preset
“1122”). From here you can enable/disable
the Phonebook lock, the Private message
lock and the Call History lock.
Restore factory settings
You can restore the factory settings of the
mobile phone. The default password is “1122”.
Page 56

Manuale Utente
56
Organizer
Calendar
With this function, you can set the alarm clock to
keep track of your schedule and record your
monthly schedule. Roll the highlight block to the
desired date and then the current date will be
highlighted in red. To view all memos of one day,
press OK and see the schedule.
Available options:
View today: you can view the schedule of
the date where the cursor is on, and set the
time, date, content and whether to activate
alarm on this schedule of today. In addition,
you can have such operations as Delete,
Delete all, Edit, Send vCalendar and Save as
file.
View all: you can view the entire schedule of
the date where the cursor is on and set the
time, date, content and whether to activate
alarm on this schedule. The options available
are the same as the previous feature.
Add event: you can select the type of task to
memorize (Reminder, Meeting, Course) and
Page 57

Manuale Utente
57
set start/end date and hour, subject of the
task, activate/deactivate alarm, set the
frequency for repeating, location and
priority.
Delete event: you can delete the selected
task.
Jump to date: you can move the cursor to
the specified date on the calendar.
Go to weekly/monthly view: change the
way the time is displayed on the calendar.
Tasks
With this option, you can quickly add and update
tasks or memos for various events (date, phone
call, anniversary, etc). It's also possible set an
alarm, specify a reminder repetition (if the event
is a repeating event), mark the task as complete.
If you have set an alarm for the memo, when the
set time is reached, the mobile phone will ring
and display the memo content. The options
available are the same as the Calendar feature.
Page 58

Manuale Utente
58
Alarm
The time format for the alarm clock is identical to
that of clock. When the mobile phone is off, the
alarm clock can still work provided the battery is
sufficient. The system has set 5 alarm clock
options and the defaulted is off. You can activate
one option or all options according to the actual
demand. Every alarm clock option can set
independent time and date. When the time is
reached, the mobile phone will give out alert
tone and flicker the current time on the screen.
Press Stop to stop alarm clock; press Snooze,
then the mobile phone will pause ringing and
continue after a given time period.
If alarm time is reached but the mobile
phone is switched off, then the mobile phone will
be switch on automatically and ring. If Stop is
pressed, then the mobile phone will ask you
whether to switch on the mobile phone. Press
“No” to switch off the mobile phone and “Yes” to
register at the network and switch on the mobile
phone.
Page 59

Manuale Utente
59
World Clock
World Clock allows you to keep track of current
time for major cities and time zones on a real
world map. Press the navigation keys left/right to
move your cursor across the map to highlight
individual time zones. It's also available an option
to enable/disable the Daylight saving time for a
foreign city.
Extra
This section contains the applications: Calculator,
Currency converter, and eBook reader.
Calculator
After inserting your first number, use the
upper direction key for “+” and the lower
direction key for “-”, the left direction key
for "×" and the right direction key for "÷,
then insert your second number;
Press the Clear key to clear the latest inputs
or results digit by digit; press the Clear key
long to clear all content or result;
Press “OK” key to obtain the result.
Note: the precision of this calculator is limited and can
be used for simple calculation.
Page 60

Manuale Utente
60
Currency converter
To save exchange rate, press “OK”, then choose to set
exchange rate. Choose one exchange rate from the
displayed options. After that, press “OK” to confirm.
Then the exchange rate will be saved in the memory
until you enter a new one to replace it. To convert
currency, enter the sum to be converted, press “OK” and
then choose to local currency or foreign currency.
eBook Reader
After starting the Ebook reader, you will get the list of
the available ebooks (Bookshelf). If any ebook is
currently available, select Options to access sub-menus
Update bookshelf and Global settings.
After uploading some e-books, you can select one from
the list, choose Options and access sub-menus:
Open eBook: open the selected ebook.
Update bookshelf: update ebooks list after additions
and deletions.
Global settings: set font size, enable/disable auto scroll,
set scroll speed, enable/disable full screen mode,
change the character encoding, set text alignment,
select storage path.
Book info: show information about the selected e-book.
Delete: delete the selected e-book.
Delete all files: delete all the e-books in the Bookshelf.
Sort by: sort the ebooks by name, type, time, or size.
Page 61

Manuale Utente
61
Apply global settings: apply the selected settings.
Help: here you find instructions on how to use shortcuts
for Ebook reader. Use 0 key to go to Global settings
screen; use 1 key to open this same Help; use 2 key to
add a bookmark; use 3 key to go to “Find” screen; use 4
key to go to “Jump to” screen; use 5 key to go to a
bookmark; use 6 key to find the next instance of a word;
use 7 key to toggle the auto scroll; use 8 key to delete a
bookmark; use 9 key to toggle full screen mode.
After opening an ebook, you get the following Options:
Find/Find next: search for a word inside the text.
Jump to: move through texts to locate particular lines.
Go to bookmark: display a list of bookmarks you have
made in the text.
Add Bookmark: add a bookmark on the current page.
Delete Bookmark: delete a bookmark on the current
page.
Book info: show information about the current ebook.
Settings: see the Global settings (above).
Apply global settings: apply the selected settings.
Help: see Help above.
Close: close the current ebook
Page 62

Manuale Utente
62
Games
The phone comes with an embedded game
(Enigma). Please refer to the attached
instructions (Help) for further details.
Game settings
Background music: enable/disable
Background music.
Sound effect: enable/disable the sound
effects in the game.
Vibration: enable/disable the vibration.
Volume: set the global volume level.
File manager
With File manager, you can manage the contents
and properties of files and folders on your device
memory and memory card.
[Phone] -- the storage path is the phone memory.
[Memory card] -- the storage path is the memory
card.
For each storage path, the available options are:
Page 63

Manuale Utente
63
o Open: view the root directory.
o Format: formatting will remove all the data
from memory card or phone, including the
folders created by user. After formatting, you'll
need to reboot the phone; Audio and Images
folders will be automatically restored, and the
folder Photos will be automatically created
after the first shot.
o Rename: rename an existing folder.
o Details: display the free space and the total
capacity of the selected drive.
From root directory of each storage path, the
available options are:
o Open: open folder (Video, Audio, Music,
Photos, Received, etc.)
o New folder: create a new folder in the root
directory.
o Rename: rename an existing folder.
o Delete: delete an existing folder.
o Sort by: sort the folders by Name, Type, Time
or Size, or let them unsorted.
Inside any folder, the files options available are
the same already described in MULTIMEDIA, plus
Page 64

Manuale Utente
64
the following ones:
o New folder: create a new sub-folder.
o Rename: rename a file in the list.
o Delete: delete a file in the list.
o Sort by: sort the files by Name, Type, Time
or Size, or let them unsorted
o Mark several: to select a list of files at one
time.
o Copy: copy the file(s) in another folder.
o Move: move the file(s) in another folder.
o Delete all files: delete all the files in the
current folder.
o Details: view the details of the selected file
(date, size, copyright).
These options are available in all the folders,
including user created folders.
Messaging
SMS (Text message)
Both SIM cards are able to send and receive SMS.
When an SMS message is sent from a mobile
phone, it will reach an SMS center first. The SMS
Page 65

Manuale Utente
65
center then forwards the SMS message towards
the destination. If the recipient is unavailable (for
example, when the mobile phone is switched off),
the SMS center will store the SMS message. It will
forward the SMS message when the recipient is
available. The storage duration of the message
depends on sender's settings and network
operator's policy.
Sending and receiving text messages can become
costly depending upon the text message plan you
have with your provider. Please contact your
service provider/network operator for further
details. If SMS storage capability is exhausted, a
SMS icon will flash in standby screen.
Unnecessary SMS storage can affect the
reception of new SMS; please delete older
messages to prevent such problems.
When a message has been received, you will
get a notification message tone (if the option has
been previously selected)
Note: when sending SMS, the phone will usually
show the “Message sent” notification. This
means that the SMS has been sent to the SMS
Center, but the message could anyway not be
received by recipients. Please contact your service
provider/network operator for further details.
Page 66

Manuale Utente
66
Write message
Select this option to write a new text message or
a multimedia message. This device implements
the T9 input mode, a predictive text method for
quickening and simplifying the whole message
writing process.
Each SMS can contain at most 160 characters; by
linking two or more messages together (up to a
maximum of 4) you can build a combined
message (up to a maximum of 640 characters).
Press the # key to change the input method.
Press the “Back” key to remove the last incorrect
character and keep it pressed longer to delete
large portions of text.
When the message exceeds 160 characters, it will
be automatically broken into multiple parts. You
can insert pictures, animations, ringtones, etc.
in SMS. Anyway, the message can't be received or
shown if it's not supported by the recipient's
phone or by the network.
For sending SMS/MMS, dial the recipient's
number or select it from the Phonebook. In
Dual-SIM mode, you can choose whether to send
SMS/MMS via SIM1 or via SIM2.
Page 67

Manuale Utente
67
Inbox
This submenu shows the list of the messages
received.
View: view the message received.
Reply: reply to the message received.
Delete: delete the message received.
Forward: directly forward the message
received.
Copy to phone: copy the selected messages
from SIM card to phone.
Move to phone: move the selected messages
from SIM card to phone.
Delete all: delete all the messages in the Inbox
folder.
Copy all: copy all the messages from SIM card to
phone or vice versa.
Move all: move all the messages from SIM card
to phone or vice versa.
Use number: extract a number from a message,
then save it or dial it.
Use URL: connect to the website whose link
appears in the received SMS .
Use USSD: use the Unstructured Supplementary
Services Data (USSD) through a GSM network.
Page 68

Manuale Utente
68
Outbox
This submenu shows the list of the sent messages.
When sending SMS/MMS you can select the
option “Save and send”; the message will be
saved in the “Outbox” folder. The available
options are the same as for Inbox.
Junkbox
Unwanted messages are saved into this folder,
where you can view them sorted also by contact
name or by SIM card of reception.
Templates
Some ready-to-use templates are available,
for various situations.
SMS settings
Use this submenu for setting text message
options (separately for SIM1 and SIM2).
Profile settings: set the SMS Center number
before sending and receiving SMS.
Note: this number is provided by the network
operator.
Common settings
o Delivery report: it is a notification
sent to you that lets you know if
Page 69

Manuale Utente
69
your text message has been
delivered to the recipient and
when.
o Reply path: when the receiver of
your SMS responds, it knows what
SMS gateway to send the reply
back to. This option requires SMS
Center support.
Memory status: check here memory
capacity on SIM card and Phone, related
to the messages.
Preferred storage: select the storage
path for message files (Phone or SIM
card).
MMS
MMS can contain words, sound and photos.
If the MMS is out of the limit, the mobile phone
will be unable to receive the MMS. If the SMS
contains photos, the mobile phone will adjust
photos so as to display them on the screen
completely.
The display effect of MMS depends on
reception devices.
Note: You cannot use photo messages unless the
network operator or service provider supports to
Page 70

Manuale Utente
70
do so. You cannot receive and display MMS unless
the mobile phone has the compatible MMS or
e-mail function.
Write message
To
Add Number-- Input the number of the
receiver.
Add E-mail-- Input the e-mail of the
receiver.
Edit – Edit the number of the
receiver.
Delete -- Delete the number of the
receiver.
Delete all -- Delete the numbers of all
the receivers.
Subject: You can edit the subject of the MMS.
Edit content
Press Edit key to have the following options:
Done: You can confirm what you wrote
in the message.
Writing language: You can select the
language to use in the message and
the Input method.
Add picture: You can insert your
desired picture.
Page 71

Manuale Utente
71
Add audio: You can insert your desired
audio.
Add video: You can insert your desired
video.
Add attachment: You can insert you
desired attachment.
Add slide before: You can add a slide
before the current page.
Add slide after: You can add a slide
after the current page.
Add bookmark text: You can add a
bookmark from your personal list.
Preview: You can preview the editing
effect of the current MMS.
Slide timing: You can set the play time
of every slide.
After editing, you can press “Done” key to finish
the MMS. In this option you can send the MMS as
following methods: Send only, Save and send, Save
to Drafts or Save as Template. You can also set the
sending options, including: Validity period, Delivery
report, Read report, Priority.
Inbox
You can see the MMS in the inbox and have the
following operations:
Page 72

Manuale Utente
72
View: You can view the MMS and save photos,
audio and annex.
Reply: Reply the sender with MMS Reply by
SMS: Reply the sender with SMS.
Reply all: If the MMS you received has been
sent to many receivers by the sender, with such
function, you can send a reply MMS to the same
receivers.
Forward: You can directly forward this MMS to
others.
Delete: Delete the current MMS.
Delete all: You can delete all MMS in inbox.
Save as template: You can save the MMS as
template.
Properties: View the detailed information of the
current message.
Use details: You can extract the number in the
MMS and save it or dial a call. You can also use
the URL in the MMS.
Outbox
You can view the MMS send and saved in the
Outbox and failed and have such operations as
View, Send, Delete and Delete all, Save as
template, Properties and Use details.
Page 73

Manuale Utente
73
Drafts
You can save the edited MMS into the drafts,
and also you can have such operations as View,
Send, Edit, Delete and Delete all, Save as
template, Properties and Use details on the
MMS in the drafts.
Templates
There are 5 preset short sentences for MMS in
the mobile phone and you can have such operations
as View, Write message and Properties from
Template. You can also access and edit the
user-defined templates.
Message settings: You can set some parameters of
the MMS in the menu.
First of all, from Profiles you can select one MMS
profile from the list of the most popular providers.
From Common settings, sono disponibili le seguenti
regolazioni:
Compose:
Creation mode -- "Free" , “Restricted "
and “Warning”.
Picture resizing -- You can reduce the
size of the inserted photo, including:
Page 74

Manuale Utente
74
160x120, 320x240 and Off.
Best page time -- You can set On or Off
to activate such function.
Auto signature -- You can set On or Off
to activate such function.
Signature -- You can edit the content of
the automatic signature.
Send:
Validity period -- You can set the time
to save in the MMS service center and
send, including Maximum, 1 hour, 6
hours, 12 hours, 1 day, 1 week.
Delivery report -- You can set On or Off
to activate such function.
Read report -- You can set On or Off to
activate such function.
Priority -- Including Medium, High,
Low.
Slide timing -- You can set the interval
of the receiver to see the MMS,
defaulted as 5 seconds (max. 60
seconds).
Delivery time -- Immediate, 1 hour
later, 12 hours later and 24 hours later.
Retrieve:
Home network -- Immediate, Rejected
Page 75

Manuale Utente
75
and Delayed.
Roaming -- The same as to the main
network, including and As home,
Delayed and Rejected.
Read report -- On request, Send, Never
send
Delivery report -- You can set On or Off
to activate such function.
Filter:
Anonymous -- Allow or Reject.
Advertisement -- Allow or Reject.
Memory status:
You can see the utilization rate of the mobile
phone, including the used space and the usable
space.
Voice mail server
This service requires a previous activation
by your service provider. Please contact the
provider for further details and to get your voice
mail number.
Connect to voice mail: dial the voice
mail number.
Edit: edit the voice mail number.
Tip: in standby mode, press key “1” to
Page 76

Manuale Utente
76
dial the voice mail number (after setting its
number). In Dual-SIM mode, you can choose to
call the voice mail via SIM1 or SIM2.
Broadcast messages
Activate this function to receive broadcast
messages. These messages are sent to every
device on a network and usually contain
information as weather forecasts, traffic
conditions, etc. In Dual-SIM mode, you can have
separate settings for SIM1 and SIM2.
Receive mode: enable/disable the function.
Read message: read the broadcast
messages.
Languages: select the language for the
broadcast messages.
Channel settings: select, add, edit or delete
the number of the channel.
Note: please contact the provider for further
details or related costs.
Services
The first sections of Services menu are
Page 77

Manuale Utente
77
reserved to network operator services (SIM1 and
SIM2), and therefore they may vary according to
the quantity and type of options available.
Internet service (WAP)
Homepage: set the initial or main web page from
where to start navigation.
Bookmarks: save a link to a web page (Google
already linked). Available options:
o Go to: open the selected web page.
o Edit: edit the selected bookmark.
o Send bookmark: send the selected
bookmark as SMS or as MMS.
o Delete: delete the selected bookmark.
o Delete all files: delete all the bookmarks.
o Add bookmark: manually add a bookmark
(specify title and web address).
Recent pages – show the last 10 web pages
visited.
Offline pages – show the web pages that have
been saved.
Input address – manually add a web address.
Service inbox – get service infos from the
network operator (e.g. head news referred to
Page 78

Manuale Utente
78
specific arguments, web links, etc.).
Settings
Select SIM (SIM1 or SIM2)
Profiles: select an account from the list or
add a new one. The selected account may be
activate or edited. To edit an existing account
or insert a new one, you need filling the
following fields:
Profile name: choose a name.
Homepage: set the initial web page for this
profile.
Data account: set the network ID.
Connection type: HTTP or WAP.
User name: insert user name, if required.
Password: insert password, if required
Browser options – select a time-out,
show/hide pictures in the web pages, enable
or disable cache and cookies.
Service message – enable/disable push
notificationsenable/disable messages from
trusted senders only, set a SL configuration,
build a list of trusted senders.
Clear cache – clear cache memory to speed
up the connection.
Clear cookies – clear all the cookies.
Trusted certificates: show a list of trusted
Page 79

Manuale Utente
79
certificates.
Data account
GSM Data — you can edit each account by
inserting number, name, DNS etc.
GPRS — here you can find the most common
GPRS settings. For each account, you can view,
add or edit the following details: account name,
APN, user name, password, authentication type,
primary DNS and secondary DNS.
Note: please contact your network operator for
further details about settings and connection
charges. Network services may vary from
provider to provider and are subject to change.
Automatching
This feature allows to enable/disable the
automatching for the connection profiles, with
automatic recognition of the service providers of
the SIM cards in use.
7. Coffer function
Insert *0000# (default value, freely editable )
from stand-by screen and access a private area of
Page 80

Manuale Utente
80
your phone, where you will find the following
options: Coffer Phonebook, Coffer Messages,
Coffer Call Log, Change Coffer Lock, Block
Incoming Calls, and Password Reminder.
Coffer function is useful for storing contacts, SMS,
call logs, etc., which you prefer to conceal from
others.
The Coffer password insertion works only from
the standby screen.
The contacts saved in the Coffer and the SMS
coming from them as well as the whole call log,
will be stored in the coffer only, and no trace of
them will be visible outside of it.
The features of Phonebook, SMS, MMS, etc.
inside the coffer are quite the same of the
corresponding items in the "public area" of your
phone.
Coffer Phonebook
The Coffer phonebook stores up to 100 contacts.
The contacts may be saved with their real names
and real phone number, and, simultaneously,
with nicknames and fake numbers. When
receiving a call from a number inserted in this
area, the phone will display the nickname of the
Page 81

Manuale Utente
81
caller, and his/her fake number.
Quick search: You can see all contacts on the
phonebook. Press the left softkey to enter the
option menu of a contact and then you can
have such operations as Send, View, Edit,
Delete, Delete All and Save etc. Saving is to
move the contact into the phonebook out of
the coffer. Press the dial key to dial a call. If
the contact has false name or false phone
number, then screen will display false name
or number and the call history this time can
be saved in the coffer.
Add entry: you can add name, number, false
name or false number.
Note: if a fake name/fake number has been set up, it
will be displayed for incoming calls, outcoming calls
and SMS sent or received; otherwise it will be
displayed “Unknown contact”.
Settings
Memory status: show the current status of the
phonebook memory (10 entries max.). The display
format for the memory usage is “used/total”.
Delete all: delete all the contacts from the Coffer
phonebook.
Incoming call tone mode: enable/disable the
Page 82

Manuale Utente
82
tone for the incoming calls of the Coffer area.
Coffer Messages
Write message
Write a new text message, and send it
via SIM1 or SIM2. Each message may be
up to 160 characters in length. A
message longer than 160 characters will
be cut up into multiple messages of 160
characters each.
Inbox
Here you can view the messages
received (up to 20 SMS).
Reply: reply the selected SMS.
Edit: edit the SMS to forward it
later.
Delete: delete the selected SMS.
Delete all: delete all the received
SMS.
Note: when selecting a contact in Coffer area to
send a SMS, only the contacts saved in the Coffer
phonebook will be displayed.
Tip: if you receive new messages when the folder
Inbox is full, the phone will automatically overwrite
old messages.
Page 83

Manuale Utente
83
Outbox
This folder shows a list of sent messages
(up to 10 SMS). When sending a
message you can select the option “Save
and send”; the message will be saved in
the Coffer "Outbox” folder.
Coffer SMS Tone Mode
Enable/disable the tone for the incoming
SMS of the Coffer area.
Coffer Call Log
These logs contain records of missed calls, received
calls and dialled calls with Coffer phonebook
contacts (up to 30 records). From one of these lists,
press Send key to call the selected number.
Select Delete call logs to delete all the records.
Tip: if your phone displays a notification of missed
call, press “Read” to immediately open the Missed
calls list. If a fake name/fake number has been set up,
it will be displayed in the call logs.
Page 84

Manuale Utente
84
Change Coffer Lock
Use this option to change the Coffer password: digit
the default password first, and then the new one for
two times. For instance, digit *0000# first in the
stand-by screen; then choose Change Coffer Lock,
digit the old code “0000”, and then the new one
( “1111”, for example). You will be required to enter
your new password again, then the change will take
effect. The next time you access the Coffer area,
you'll have to digit *1111# in the stand-by screen.
Note: do not ever forget your Coffer lock;
otherwise, you will be prevented from accessing the
Coffer area and your data will be lost.
Block Incoming Calls
You can choose to block all the calls coming from
Coffer area contacts.
Password Reminder
Use this option to save and store strictly
personal numbers as bank accounts, credit cards,
ATM codes, various passwords, etc. There are 5
Page 85

Manuale Utente
85
entries allowed.
8. Text input
Basic letter input
Use “#” key to choose between the modes “T9
Abc”/”T9 abc”/“T9 ABC”, and “Abc”/”abc”/“ABC”,
then insert the desired characters with the
keypad.
Numeric input (123)
This mode is mainly used to input phone
numbers etc. After “Numeric” method has
been chosen, you can input digit into the place
where the cursor is flickering.
Symbol input
To see the symbol list, press “*” key in the
"Write message" screen . If you want to use one
symbol, press the up/down/left/right keys to
select it.
Page 86

Manuale Utente
86
9. USB connection
Notices before use
Always make sure you connect and stop any
USB devices correctly.
Never use Windows formatting command to
format the mobile disk of the mobile phone;
otherwise, it could be severely damaged.
USB work environment:
o Minimum Operating System: Windows
2000 / XP.
o Other operating systems could require
the installation of a USB driver for
PC/phone connection.
10. Maintenance & Safety
Please read and observe the following
information for a safe and proper use of your
phone and to prevent damage. Keep this User
Guide in an easy to find place.When you need a
quick reminder on how to respond to a particular
situation, go to the relevant section for the
information you need.
Page 87

Manuale Utente
87
Post-sale service
For details, please refer to the Guarantee
Certificate or Warranty Card inside the box.
Charger & External Power Adapter
Charger and adapter are designed for indoor use
only. Do not use them in wet environments.
Battery information and care
o Please dispose of your battery properly.
o Do not disassemble or short-circuit the
battery.
o Keep the battery’s metal contacts clean.
o Recharge the battery after long periods of
non-use to maximize battery life.
o Battery life could vary due to usage patterns
and environmental conditions.
o The self-protection function of the battery
cuts the power of the phone when its operation
is in an abnormal status. In this case, remove the
battery from the phone, reinsert it, and turn the
phone on.
Page 88

Manuale Utente
88
General notice
o Using a damaged battery or placing a battery
in your mouth may cause serious injury.
o Do not place items containing magnetic
components such as a credit card, phone card,
bank book, or subway ticket near your phone.
The magnetism of the phone may damage the
data stored in the magnetic strip.
o Talking on your phone for long period of time
may reduce call quality due to heat generated
during use.
o When the phone is not used for a long period
time, store it in a safe place with the power
cord unplugged.
o Using the phone in proximity to receiving
equipment (i.e. TV or Radio) may cause
interference to the phone.
o Do not immerse your phone in water. If this
happens, remove the battery and take it to
nexian Authorized Service Center.
o Do not paint your phone.
o The data saved in your phone might be
deleted due to careless use, repair of the
phone, or upgrade of the software. Please
backup your important phone numbers. (Ring
Page 89
Manuale Utente
89
tones, text messages, voice messages, picture,
and videos could also be deleted.) The
manufacturer is not liable for damage due to
the loss of data.
o Do not turn your phone on or off when the
device is close to your ear.
Troubleshooting
Problems
Possible Causes
Unable to switch
on
1. Does the battery have
enough electrical power?
2. Is the battery placed
correctly?
SIM failure
1. The SIM card is dirty. Clean it.
2. Reinstall the SIM card.
3. The SIM card is damaged.
Replace it.
Poor signal
the screen. If the icon contains 4
bars, the signal is at its
strongest; if it is below 1 bars,
the signal is very poor.
Page 90

Manuale Utente
90
Unable to dial
out
1. Maybe you have set
Hide My Caller ID but
your network operator
does not provide this
service for you.
2. There are lots of
interference sources in
your neighborhood.
3. Maybe you have
activated some call
restriction function.
Unable to
charge the
battery
1. The battery may be
over-discharged; so it
requires a longer
charging period than
normal.
2. Its performance has got
worse; it is necessary to
replace the battery
Page 91
Manuale Utente
91
Unable to
register with the
network
1. Too weak signals or strong
interferences.
2. SIM card not properly
installed. Bad contact or
SIM card damaged. If the
SIM card is broken, please
contact the network
operator to replace it
Photos taken are
too dark
1. Brightness is set too low.
2. Ambient light is poor.
Photos taken are
unclear
1. Check if your subject is
moving too fast.
2. Maybe the phone slightly
moved while the shutter
was open.
Photos taken are
distorted
The subject may be too close for
the camera lens.
Service menu is
not accessible
Maybe your SIM card doesn't
support Services function.
The picture
selected as
wallpaper is only
partially visible
The size of the photo is probably
too large. The recommended
size is 320x240.
Page 92
Manuale Utente
92
11. Abbreviations
SMS
Short Message Service
MMS
Multimedia Message Service
EMS
Enhanced Message Service
SIM
Subscriber Identity Module
GSM
Global System for Mobile
Communication
PIN
Personal Identity Number
PUK
PIN Unblocking Key
IMEI
International Mobile Equipment
Identity
CSD
Circuit Switched Data
APN
Access Point Name
CB
Cell Broadcast
GPRS
General Packet Radio Service
Page 93
Manuale Utente
93
12. Certifications
Dichiarazione di conformità (R&TTE)
We, NGM Italia
declare under our sole responsibility that the product identified as
GSM Mobile Phone: Play
conforms to the following standards and specifications:
Health EN 50360, EN 62209-1
Safety EN 60950-1+A11
EMC EN 301 489-1/-7/-17
Radio EN 301 511
EN 300 328
We declare that [all the series of fundamental radio test have been conducted
and that] the aforesaid product meets all the essential requirements of the
Directive 1999/5/EC.
The conformity assessment procedure referred to in Article 10 and detailed in
Annex IV of Directive 1999/5/EC has been followed with the involvement of the
following notified bodies:
PHOENIX TESTLAB GmbH
Königswinkel 10,
D-32825 Blomberg, Germany
Page 94

Manuale Utente
94
All technical documents conserved at NGM Italia S.r.l.
Available on request.
(UE Authorized Representative)
NGM Italia S.r.l.
Via L. Da Vinci, 7 – Ponticelli
56020 Santa Maria a Monte (Pi)
S.A.R. (Specific Absorption Rate)
SAR certification information (Specific Absorption Rate)
This phone meets European Union (EU) requirements concerning exposure to
radio waves coming from telecommunication and radio devices. The exposure
standard for mobile phones employs a unit of measurement known as SAR
(Specific Absorption Rate). The SAR limit recommended by the EU Council is 2.0
W/kg averaged over ten grams of body tissue.
The highest SAR value for this model phone when tested for use at the ear was
1,106 watt/kg. Although the SAR is determined at the highest certified
power level, the actual SAR of the phone while operating can be well
below the maximum value. This is because the phone is designed to
operate at multiple power levels so as to use only the power required to
reach the network. In general, the closer you are to a base station, the
lower the power output of the phone. The Declaration of Conformity
here above proves that the designated product is in compliance with
the essential requirements and other relevant provisions of the R&TTE -
Directive (European Radio & Terminal Telecommunications
Equipment)1999/5/EC
 Loading...