

Page 1
Page 2

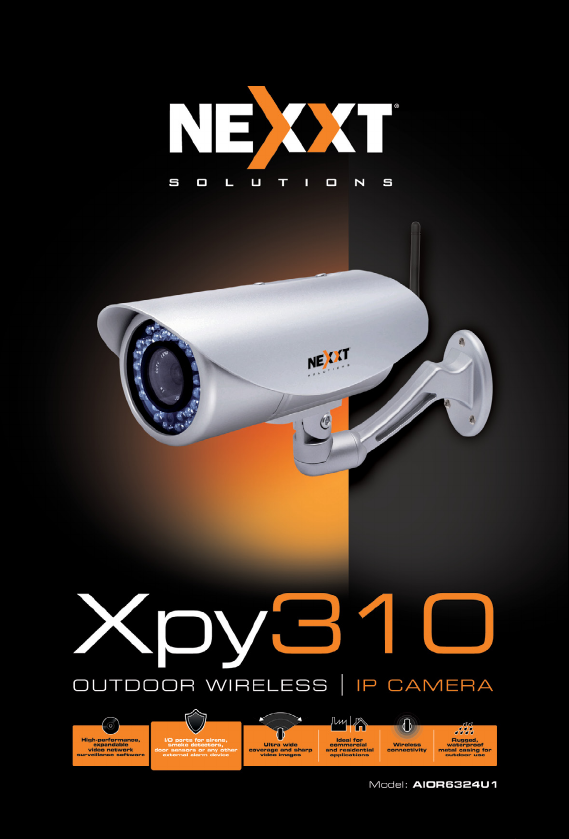
Nexxt Solutions - Outdoor Wireless IP Camera
Outdoor Wireless IP Camera
INTRODUCTION
Thank you for purchasing the Nexxt Solutions XPY-310
Outdoor Wireless IP Camera. Featuring an infrared
cut-off filter, our new XPY is an integrated wireless
IP Camera solution that combines high quality digital
video with network connectivity and a powerful web
server to bring a clear picture to your desktop or
mobile phone from anywhere on your local network
or over the Internet.
2
Page 3

Nexxt Solutions - Outdoor Wireless IP Camera
BEFORE YOU BEGIN
•
This camera can be mounted indoors or outdoors.
•
Use the supplied power adaptor to connect the
camera to the AC mains (12V DC, 1.0A).
The warranty does not cover any damage caused
by applying the wrong voltage.
•
Never attempt to disassemble the unit. The warranty does not cover damages as a result of tampering
with, or the improper alteration of the device.
•
Do not point the camera at the sun or at any other
strong light source.
•
Do not install the camera where it can be exposed
to rain or water
•
Wait at least 10 seconds when powering the
camera on and off. Otherwise, it can cause serious
damage to the CPU.
•
When updating the camera, please make sure that:
-
the camera is connected directly to a computer
using a network cable;
-
all other programs and windows on the computer
have been closed;
-
the camera remains connected during the entire
firmware update.
3
Page 4

Nexxt Solutions - Outdoor Wireless IP Camera
FEATURES
•
The camera combines a high-sensitivity 1/4 CMOS
image sensor with a powerful wireless web server
in order to capture clear images from anywhere,
and to transmit them instantly on your local
network or over the internet.
•
Can be used on WiFi or wired networks.
•
It uses the MJPEG hardware compression technique, which can display high-quality and real-time
video transmission at 25fps on a LAN/WAN connection
•
Input and output ports with smart motion detection
to connect sirens, smoke detectors, door sensors
or any other external alarm devices.
•
Selectable image resolution of 640x480 and
320x240 pixels.
•
The system can be expanded at any time by adding
multiple cameras.
•
View multiple cameras in split screen view or
choose full screen in order to monitor the activity
from a single camera.
•
Cameras can be viewed via standard PC or Mac
browsers, including Internet Explorer, Safari,
Chrome and Firefox.
•
Infrared LEDs for night vision (up to 20 meters).
•
Includes multi-level user management system,
which can be configured with passwords for
controlled access.
•
Easy- to-use web browser controls. They also allow
quick configuration changes via the Settings menu.
•
Compatibility with smartphones enables you to
view real-time videos over the internet using any
standard browser.
•
Supports image snapshots and image forwarding
4
Page 5

Nexxt Solutions - Outdoor Wireless IP Camera
via email and FTP upload.
•
Bullet type, robust construction with waterproof
casing.
•
Powder coated finish to protect camera against
rust.
•
Fog resistant safety glass for extra protection.
•
Wide range of temperature operation: -5 to +45 °C
(+22 to +113 °F).
•
Versatile installation: the camera can be mounted
on the wall or ceiling.
NOTES ON WINDOWS AND MAC COMPATIBILITY:
-
IP camera setup should be completed on a
Windows PC only using Internet Explorer.
-
Live viewing, taking snapshots, recording and camera configuration are fully supported on computers
with Windows operating systems.
Mac users are only able to:
-
view live images via compatible web browsers
including Safari, Firefox and Chrome but are limited
to viewing one camera at a time.
-
take and save snapshot images via the web
browser interface.
PACKAGE CONTENTS
Open the box and make sure all items listed below
are included:
•
Wireless IP Camera
•
Wi-Fi antenna
•
AC power adaptor
•
Quick installation guide
•
CD-ROM (includes the IP Super Client software and
a digital copy of the manual)
•
Network cable
•
Mounting bracket and hardware
5
Page 6

Nexxt Solutions - Outdoor Wireless IP Camera
CAMERA INSTALLATION
Our WiFi Outdoor Surveillance Camera can be set
up in minutes for instant monitoring and live viewing
on your Windows computer and 3G Smartphone all via your wireless network router or switch. For
optional recording capabilities, simply install the recording software in your Windows PC and configure
it according to your particular needs.
Begin by screwing the antenna and bracket to the
1.
camera. Connect the camera using the power
adaptor that comes with the product.
Using a standard Ethernet network cable, connect
2.
the camera to your network.
The camera can either be connected to a router/
switch or directly to a PC with an Ethernet
network cable. We recommend setting up the
camera on your network using a wired connection
prior to using the device in a wireless configuration.
Continue with the setup of the camera
3.
(as described in the following chapter). Once the
camera has been successfully connected to your
network, it can be mounted on the wall or ceiling
using the wall plugs and screws included with the
device. (The camera set up must be performed
using Windows operating system only).
6
Page 7
Nexxt Solutions - Outdoor Wireless IP Camera
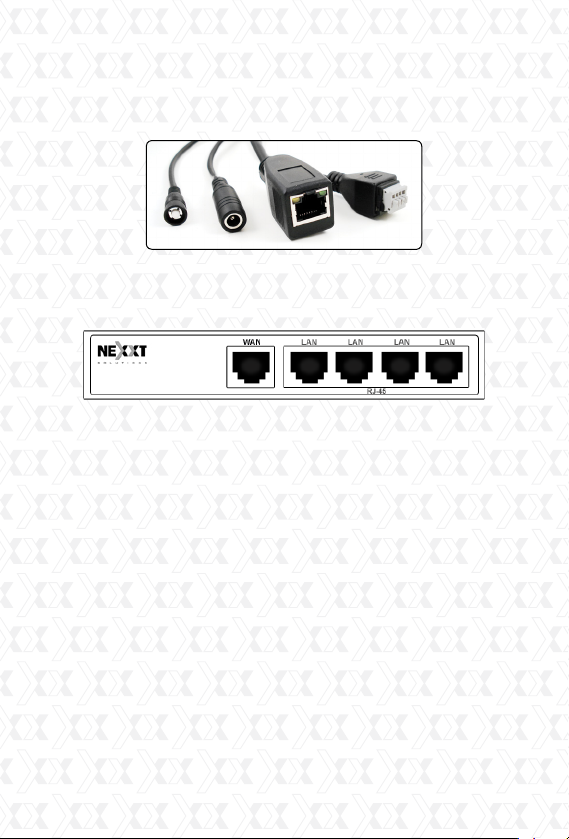
Plug the LAN cable into the RJ-45 connector
1.
on the end of the cable attached to the rear of
the camera.
2.Plug the other end into an available RJ-45 port
on your router.
3. Connect the power cable to the wall outlet.
Please note that if you are using the camera on
a wireless network, you will need to configure the
camera for wired use, prior to configuring wireless settings in the device (later described in this
manual).
Accessing the IP camera
Using the IP Super Client Software
Note: The IP network camera is designed to work in
a local area network (LAN) or over the internet. For
the first method, we highly recommend using the
software included in the CD. The installation steps
are described below.
7
Page 8

Nexxt Solutions - Outdoor Wireless IP Camera
1. Introduction
The IP camera Super Client is an easy-to-use
software designed for surveillance applications
with multiple cameras. This software includes PT
controls, recording, alarm notifications, in addition
to a central management feature that allows the
administration, configuration and access control
settings for each individual device.
Functions:
•
Supports up to 81-video monitoring in one screen.
•
Supports multi-level structured device list.
•
Supports scheduled recording with alarm.
•
Supports panoramic recording.
•
Supports motion detection, sound alert and
external alarm trigger.
•
Supports audio, SMS, SMS modem, dialing, email,
FTP and alarm output switch.
•
Supports inquiries, browsing of alarm and operation log records.
•
Supports multi-level access management.
•
Supports remote login to check records and alarm
records.
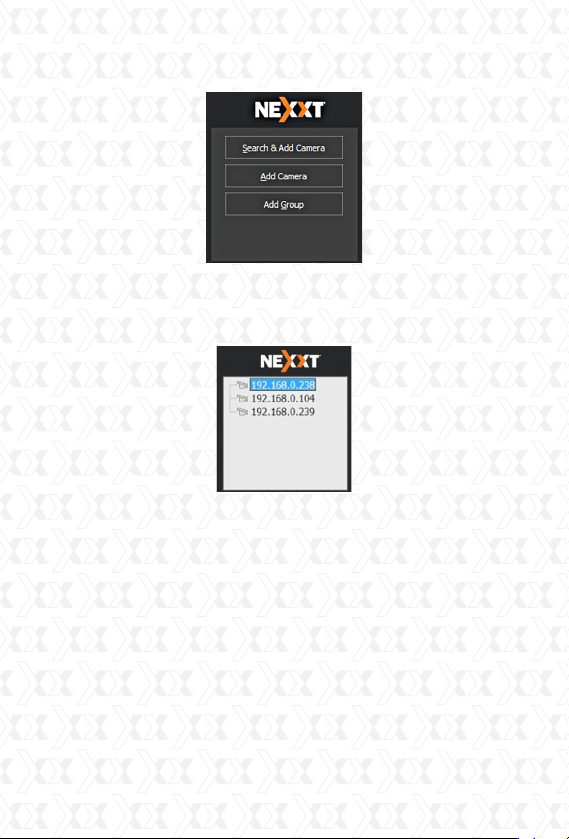
Adding devices
After installing the client software, we need to add
the devices. When running the program, the device
list on the right of the main interface is empty; there
is a guide to show you how to add the devices.
8
Page 9
Nexxt Solutions - Outdoor Wireless IP Camera
Click the right button to choose “add new device”
or “add new group”. This program supports a
multi-level structure to manage existing devices.
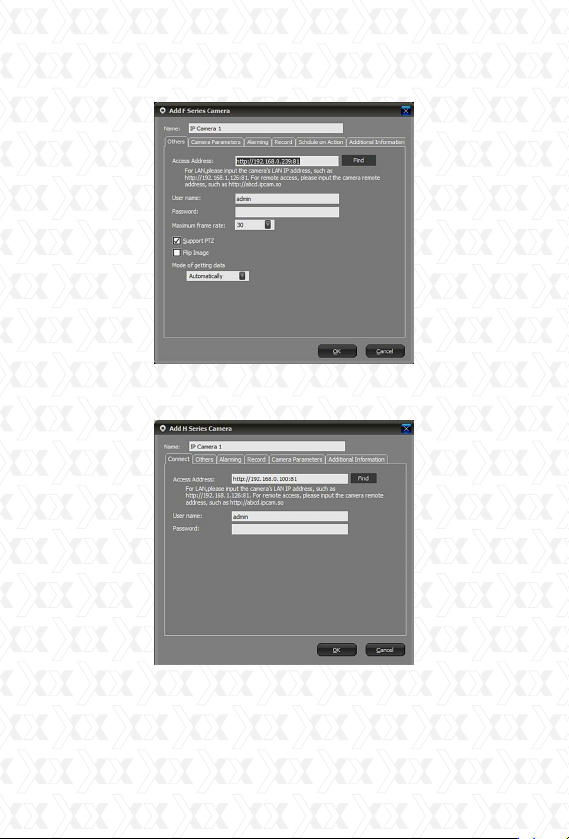
Now, let’s take the 310-series and 330-series as
examples to introduce the adding device option.
9
Page 10
Nexxt Solutions - Outdoor Wireless IP Camera
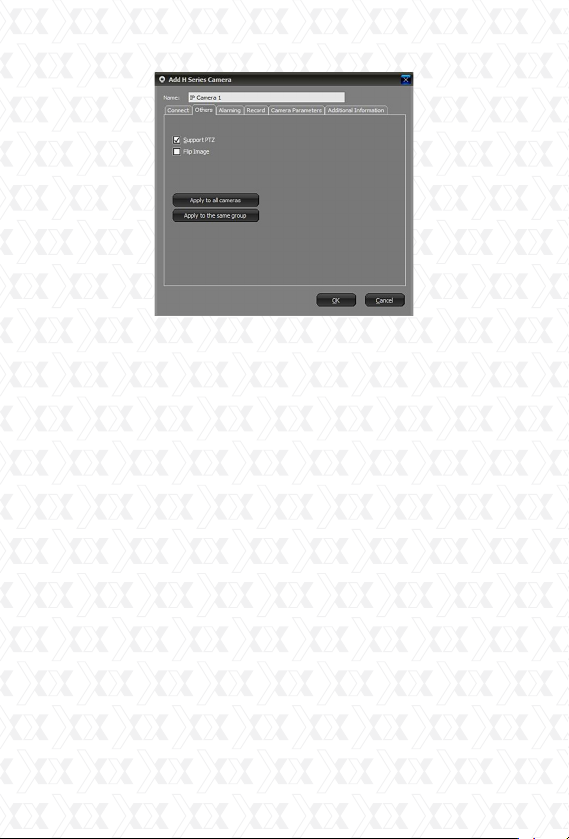
310-Series Image:
330-Series Image:
10
Page 11
Nexxt Solutions - Outdoor Wireless IP Camera
Name: name assigned to the camera, used to distinguish it from other devices connected. This name
will be displayed on the camera list.
Basic information: the basic information used for
connecting the camera, such as connection method,
username, password, PT protocol, etc.
Device parameters: set size of the image and frame
rate. Not all series have this option available.
Alarm: This menu contains all the alarm-related
settings.
Record: This menu contains all recording related
settings.
Connection Information
IP/Domain mode: This mode provides LAN access
to the camera, or to a camera which has a domain
or fixed IP. To use this mode, an incoming port should
be assigned. By default, this port is set to 81.
Username/Password: The username and password
used to access the camera.
11
Page 12
Nexxt Solutions - Outdoor Wireless IP Camera
Forwarding Server: It provides access to videos by
retrieving the files from the server. This requires the
setup of server settings. This mode cannot support
PT control.
Support P2P: Supports P2P technology. This mode
cannot support PT Control.
Camera Parameters
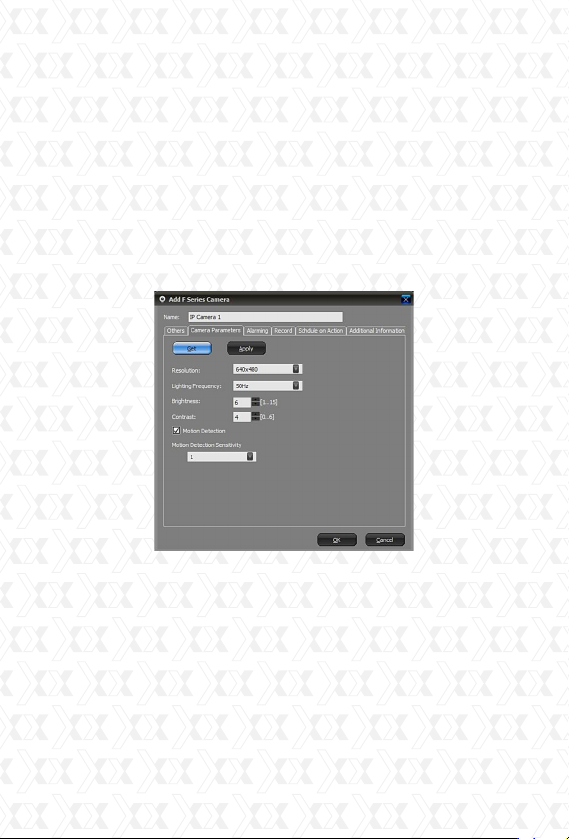
310-Series Image
12
Page 13
Nexxt Solutions - Outdoor Wireless IP Camera
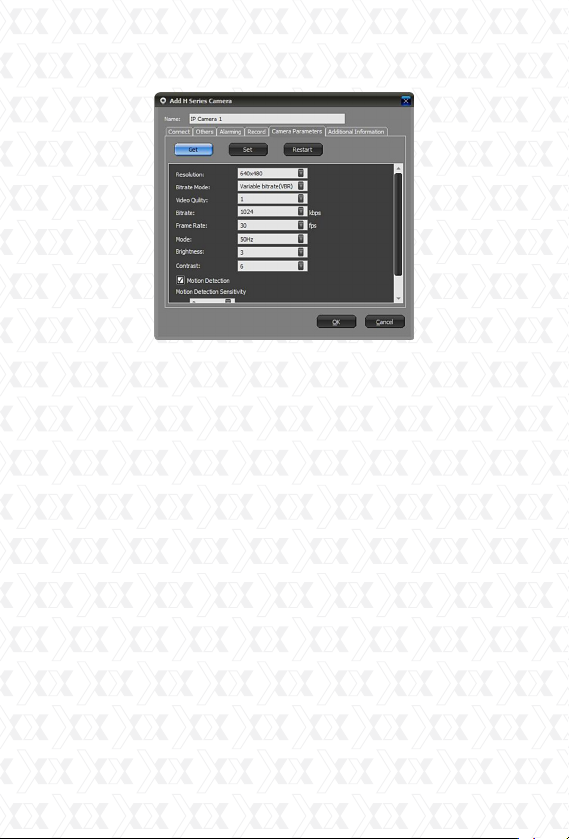
330-Series Image:
This menu is used to quickly set the camera
parameters. Not all models have this function. Click
the Get button to obtain the current settings. Click
Apply or Set depending on the model to save your
modifications.
Alarm
It includes all the alarm-related settings. Please
refer to the Alarm section for more details.
Record
It includes all the recording-related settings. Please
refer to the Recording section for more details.
Freq./Time setup
It is used to schedule a timing action to change the
lightning frequency.
Additional information
It is used to enter personal-related information, such
as user name, telephone, address, and memo.
13
Page 14
Nexxt Solutions - Outdoor Wireless IP Camera
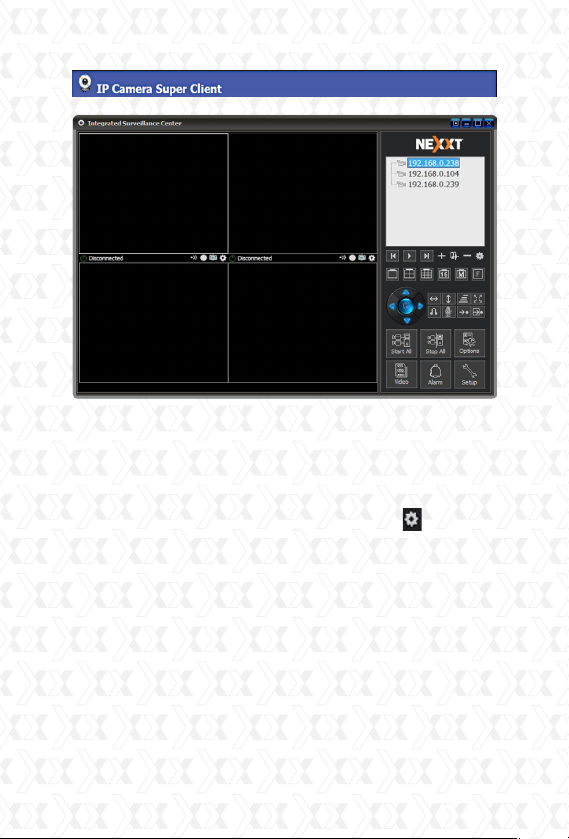
Device Tree Components: this tree provides a visual
representation of all detected devices. Supports
multi-level structure from which users can connect
or disconnect devices in a particular group. Users
can double click on a device to connect it and see
the video in the display area, or click the
Camera/Group Options button to modify the
settings.
Display Control Panel: users can choose between
full view in a single screen or a split screen configuration of 4, 9,16,25,36,49, 64 or 81 frames.
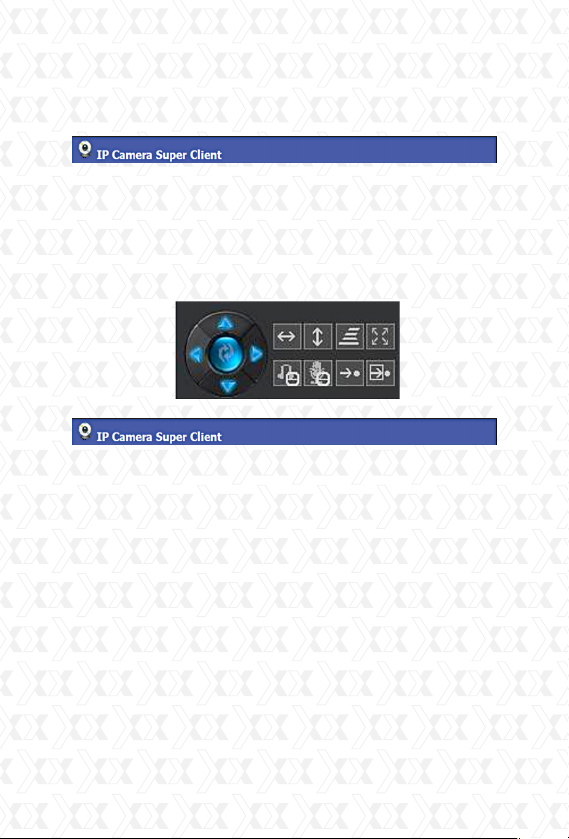
PT Control Panel: direction buttons for controlling
the Pan and Tilt feature of the camera.
14
Page 15
Nexxt Solutions - Outdoor Wireless IP Camera
Main Menu: Allows the user to connect or disconnect all the devices, open the history manager,
system setup, and other functions.
PT Control
This feature is available based on the model of the
camera. If your camera supports the Pan and Tilt
feature, enable it using the client software. Once
enabled, the movement of the camera can be
controlled with the buttons in the PT control area.
Video Recording
Video recording is a basic function of the client
software, where users can choose to record
continuously, schedule a recording or setup a
recording whenever an alarm is triggered. Under
the Scheduled recording option, users can set
specified dates and times. Records will be then
saved to the assigned folder path set in the options
settings, and will automatically overwrite the
earliest files when the disk is full. The user can set
the parameter of how long to keep the files. For the
IP camera with MJPEG format, the client software
can compress the saved data into MPEG4 format,
which can be used to reduce the usage of space on
the disk.
15
Page 16
Nexxt Solutions - Outdoor Wireless IP Camera
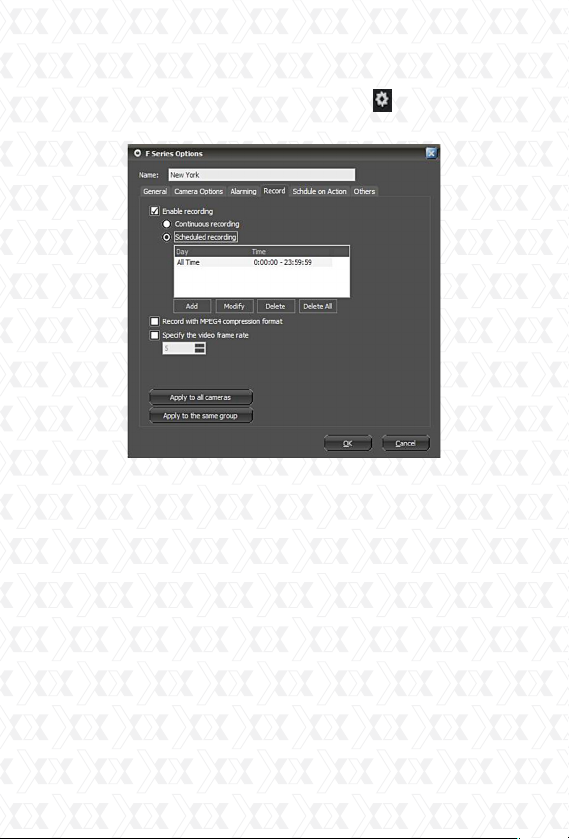
To set record function, right click the device and
choose Camera Options or click the Camera/
Group Options button. Next, go to Alarm tab.
Enable record: when selecting this option, the
recording function will be enabled.
Continuous recording: the client software will
record all the time.
Scheduled recording: users can appoint a certain
period in which the client will start recording.
16
Page 17
Nexxt Solutions - Outdoor Wireless IP Camera
Alarm
The Client software supports various kinds of alarm
triggers, alarm events, and can be used to set an
alarm schedule.
Select the camera in the display area or from the
device list, click the right button to choose Camera
Options, or click the Camera/Group Options
button. Next, go to Alarm tab.
17
Page 18
Nexxt Solutions - Outdoor Wireless IP Camera
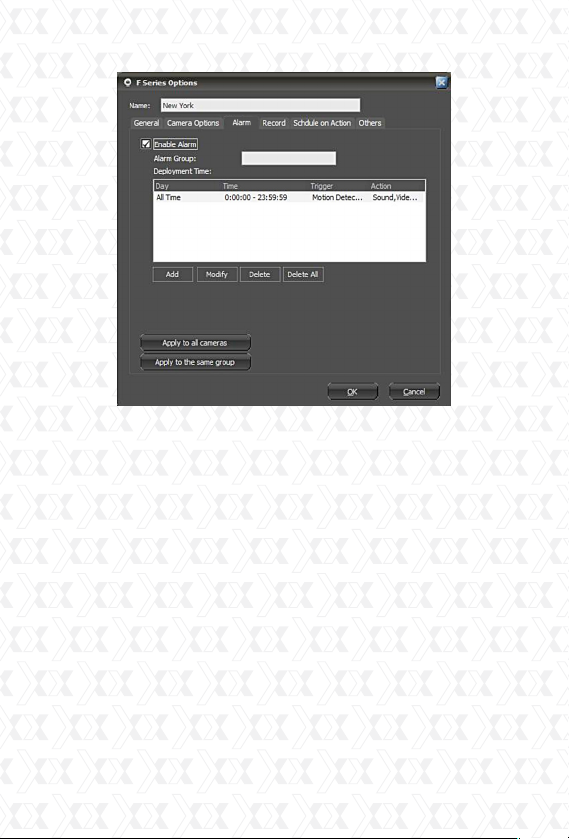
Enable alarm: in order to use the alarm function,
you must check this option.
Alarm group: it is a user-defined name to identify
and link cameras belonging to the same group.
Alarm lasting time: the period of time the software
will keep the alarm active. That will have the same
duration as the event causing the alarm, which
includes the capturing of audio and the video
recording time.
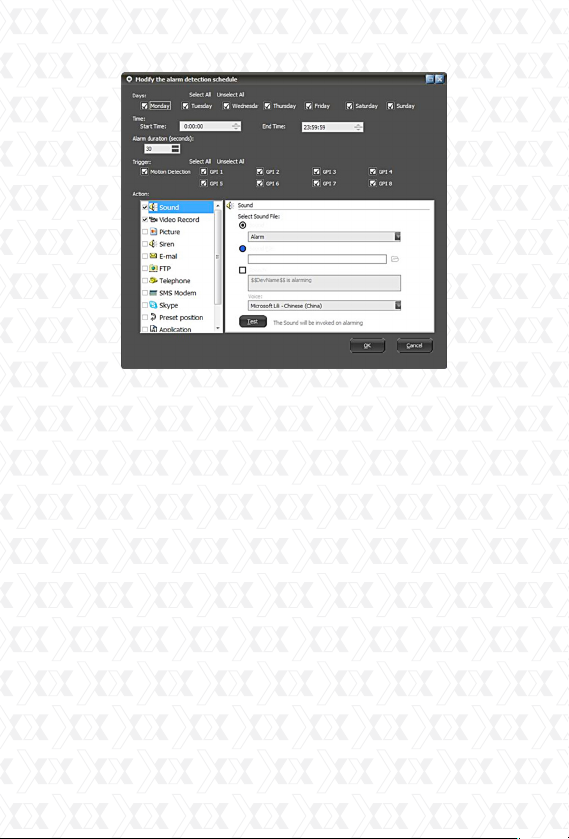
Schedule trigger: sets the schedule during which
alarm can be triggered.
18
Page 19
Nexxt Solutions - Outdoor Wireless IP Camera
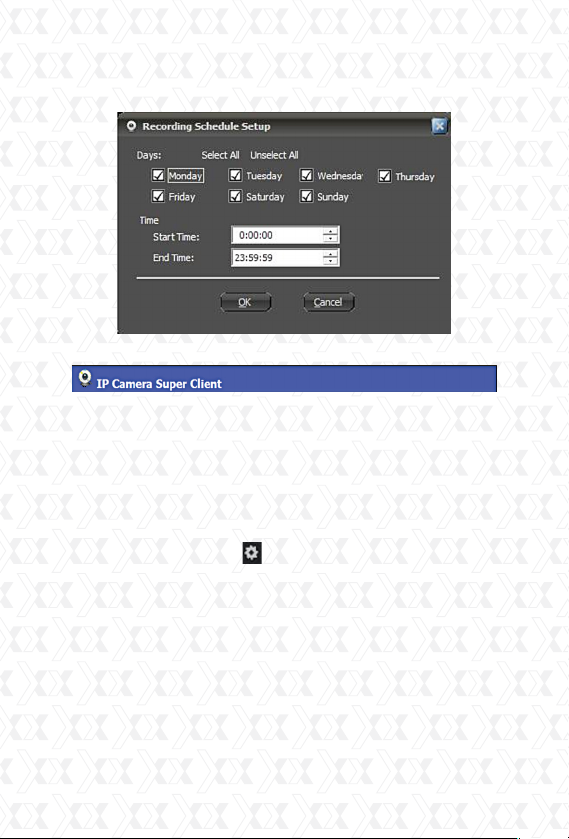
Days: specify the day(s) of the week the alarm will
be triggered.
Time: sets a starting and ending time for the alarm.
Trigger mode: specifies the type of event that would
trigger an alarm.
It currently supports motion detection and alarm
sensor input (depending on the model).
An action on alarm defines how the software will
respond once the alert is triggered.
The actions supported are: sound, video recording,
snapshots, alarm siren, email, FTP uploading, SMS,
calling, SMS modem, alarm-output switching,
program executing and URL opening.
Below is the detailed explanation for each alarm
action.
Sound: when an alarm is triggered, the program
will play a sound on the computer to frighten the
intruder. Sounds can be customized.
You can choose the sound from the list in the
19
Page 20

Nexxt Solutions - Outdoor Wireless IP Camera
program. Select the sound and click OK to save the
setting.
You can also choose other sound files from your
local disk drive. In other words, you can record
“Catch the thief” in a file, save it and then select the
sound file by clicking the folder button to add the file
you want.
If you want to read a text on alarm, you can check
the “Speech” icon and edit the contents to be read.
In addition to reading the normal text, the program
also displays the description of pre-defined features,
such the name of the alarm device and alarm time.
These pre-defined contents appear within the “$$”
symbols. The software includes the following
pre-defined content:
$$DevName$$: the name of the device sending the
alert signal.
$$AlarmTime$$: displays the time when the alarm
occurred.
$$Trigger$$: displays the event triggering the
alarm.
If you only need to read a text having no audio
being played, you can choose “sound file” without
specifying the use of one. Check the “Speech”
box below.
20
Page 21
Nexxt Solutions - Outdoor Wireless IP Camera
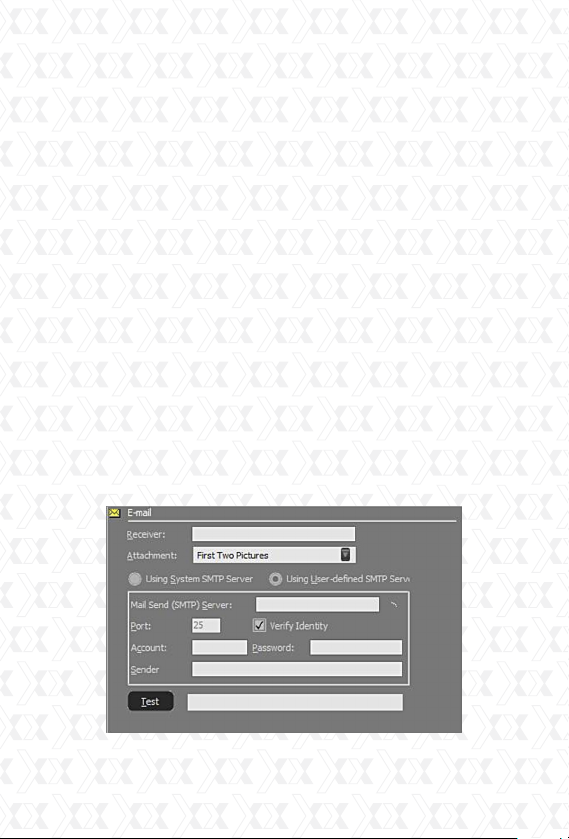
Email: when the alarm goes off, the program will
send an email acknowledgement with the pictures
or video recording attached.
Attachment: the user can choose to send emails
with or without attachments, or with pictures or
videos. However, when choosing to send an attachment, the user needs to have the live recording
function enabled first.
Receiver: it is the email address to which the alarm
acknowledgement will be sent to.
Copy: it is the email address or addresses to which
the alarm acknowledgement will send a copy of the
message and attachments. Use commas to separate multiple email addresses.
Test: when you click this button, the program will
send a test email. Users can check whether it was
correctly sent or not. If sending fails, the program
will show you the details of the failure.
Users have the option to choose the mail server
according to their own needs.
21
Page 22
Nexxt Solutions - Outdoor Wireless IP Camera
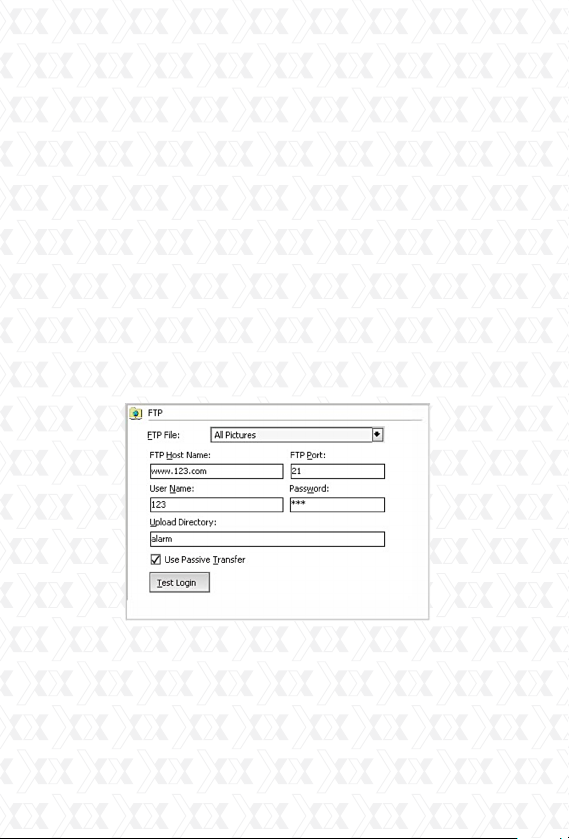
FTP Uploading: when the alarm is triggered, the
program will upload the snapshots to the FTP
server.
Upload file: three options are available: picture only,
video only, or both picture and video.
FTP host address: account information required to
access the File Transfer Protocol host.
FTP port: the default is set to 21.
User name: the user name used in the FTP login
window.
Password: the FTP password used in the login
window.
Upload Directory: This is the path used for
saving uploaded files. The program will create
a folder using the time the alarm went off. The
pictures and videos will be saved to this directory.
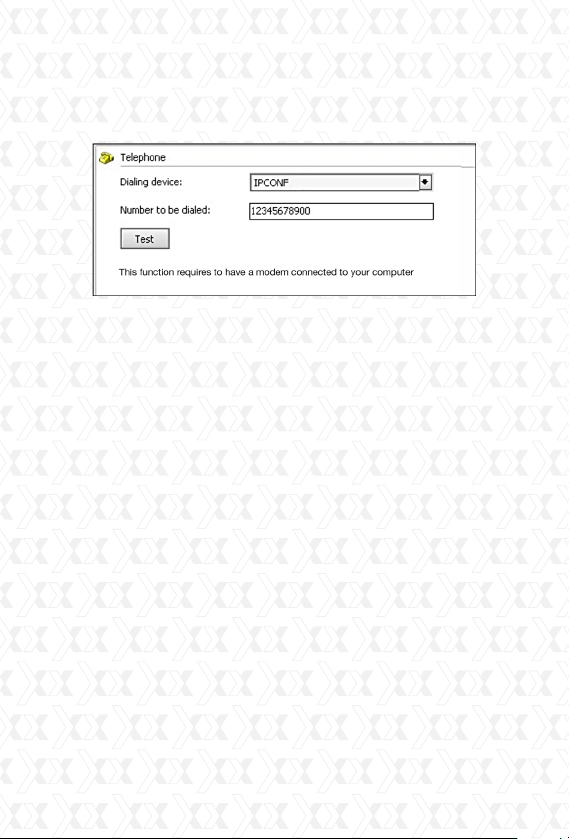
Dialing: when the alarm is triggered, the program
will dial the assigned telephone number automatically using the PC’s modem. This service requires
a modem to be installed on the PC which supports
dialing functions.
Dialing device: choose the modem from the list that
supports the dialing feature.
22
Page 23
Nexxt Solutions - Outdoor Wireless IP Camera
Number to be dialed: the number which will be dialed
once the alarm is triggered.
Test: click Test to make sure this setting is functional.
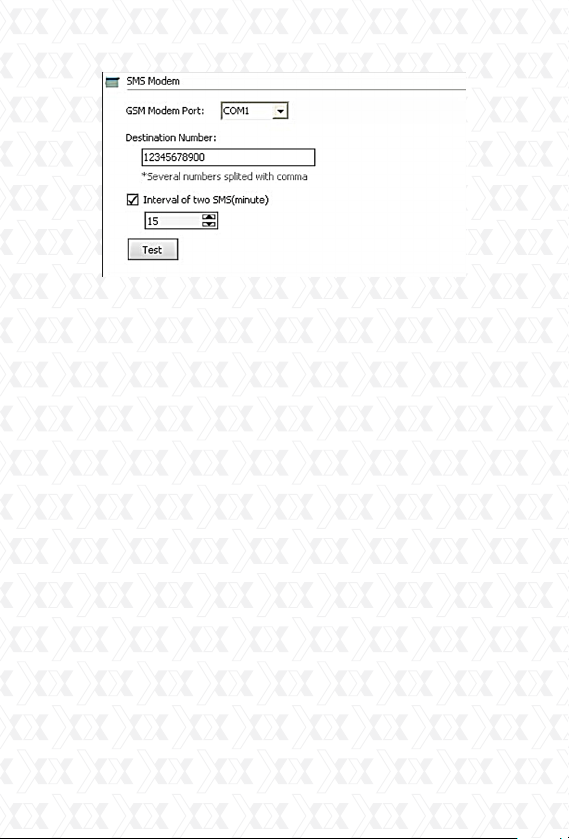
SMS modem: when an alarm is triggered, the pro-
gram will send a Short Message Service transmission
to the assigned phone through the modem.
This service requires an SMS modem to be installed
on the PC.
SMS modem port: the serial port number which is
attributed to the SMS modem.
Receiving phone number: the enabled-SMS land line
or mobile phone number which will receive the
incoming message when the alarm is triggered.
SMS interval (in minutes): defines the time interval
in minutes that the SMS alerts will go off while the
alarm is active.
Test: click this button to test this service, the
program will send a SMS to the assigned phone
number.
23
Page 24
Nexxt Solutions - Outdoor Wireless IP Camera
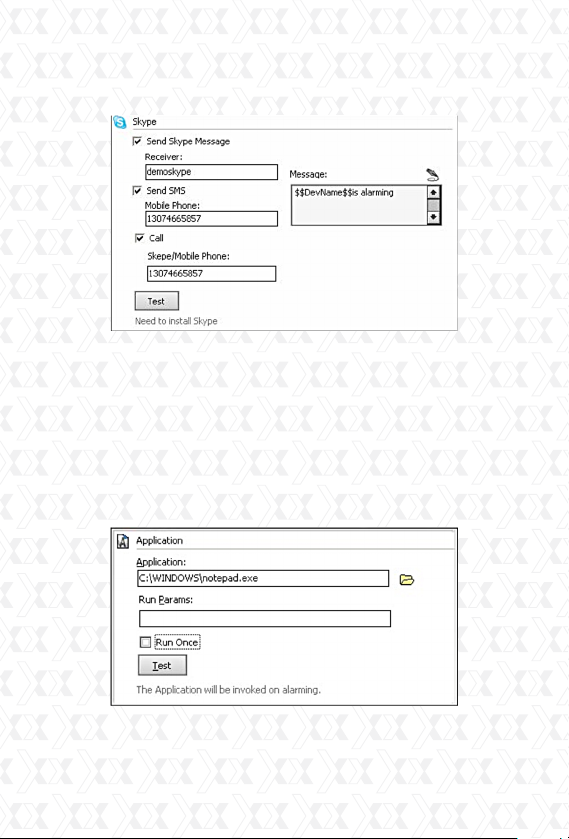
Skype: when an alarm is triggered, the program will
use Skype to send Skype messages, text messages,
Skype calls and call a mobile phone.
This feature requires for Skype to be installed on
your computer. When the alarm is triggered, the
program will call or open the Skype interface, so
that it can execute the actions mentioned above. If
Skype is not running, the program will automatically
start Skype. You can download Skype by going to
http://www.skype.com.
Send Skype Message: this option sends a text
“message” to the designated Skype account.
Send SMS: this option sends a text “message” to
the designated phone. Please note that this feature
requires a Skype account balance. To know more
about using Skype to send SMS, recharge information, etc., please visit the official Skype website.
Call: it places a call to the designated Skype account
or to a designated phone number. Please note that
the “dial a designated telephone number” feature
requires a Skype account balance. To know more
about using Skype to make calls, please visit the
Skype official website.
24
Page 25
Nexxt Solutions - Outdoor Wireless IP Camera
Test: click Test to make sure this setting is
functional.
Application: when the alarm is triggered, the
program will execute the selected program.
Program: it defines the path for the .exe file
belonging to the selected program.
Run parameter: the run parameter values should
be entered in this box.
Run once: this option will execute the command only
when the alarm goes off for the first time, with no
further action after that.
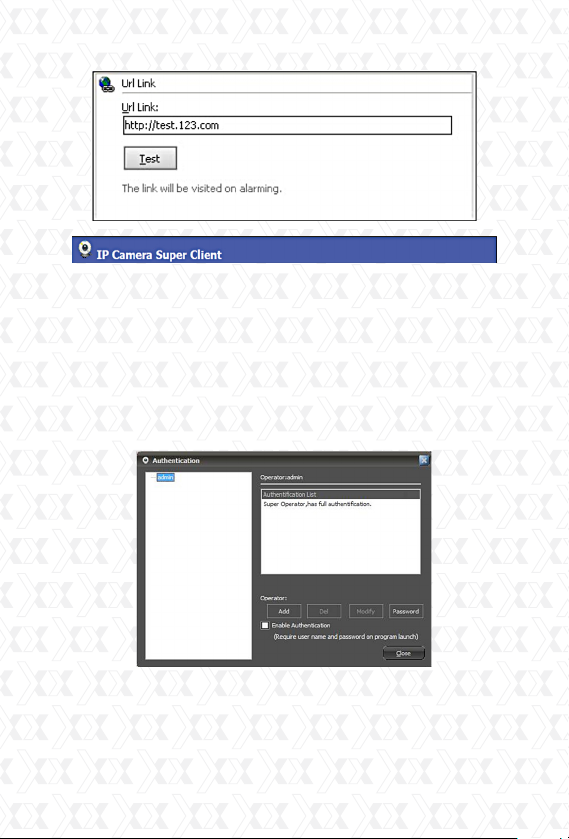
URL Link: when the alarm is triggered, the program
will open the assigned URL. Usually, this is used to
inform other systems about the alert.
25
Page 26
Nexxt Solutions - Outdoor Wireless IP Camera
User Account Administration
The Client supports a multi-level management system, whereby different users are granted specific
privileges and passwords for controlled access.
This function is not enabled by default. Please click
the Setup menu button on the lower right side of
the dialog window and choose User Account Setup
to continue.
When this feature is enabled, the program will
always request authentication from users.
By default, the admin account enjoys full administrator privileges. This account can never be deleted;
26
Page 27
Nexxt Solutions - Outdoor Wireless IP Camera
however, its password can be changed.
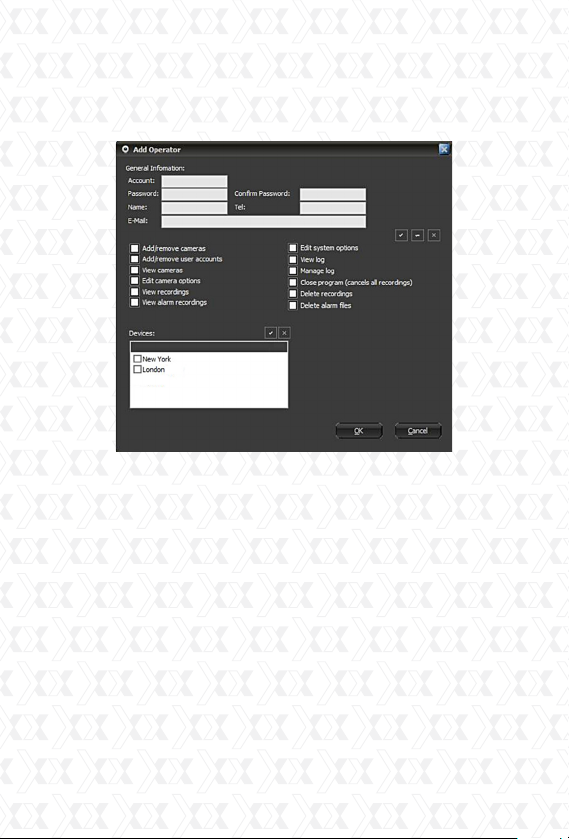
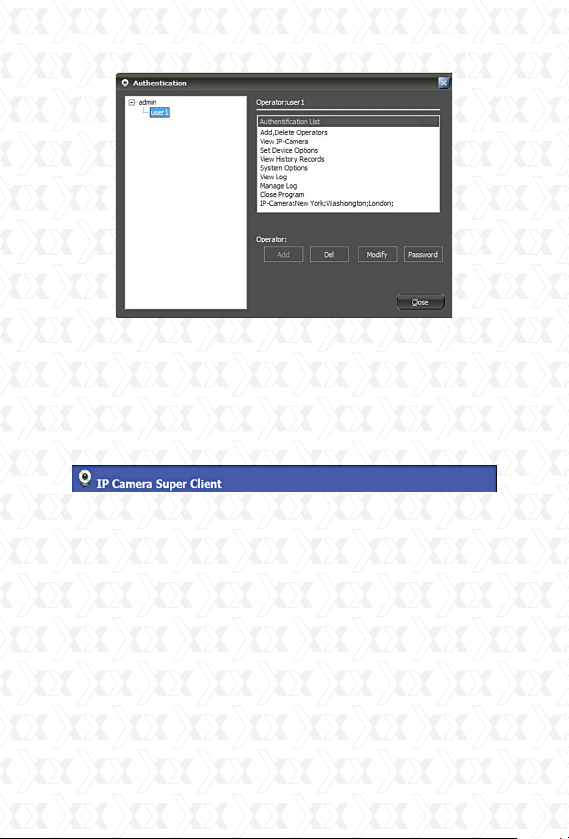
Add operator: click the Add button and the dialogue
box below will appear.
Once you type in the account information and assign
the corresponding permissions, click OK to save it.
Privileges to add or remove accounts mean that the
account operator can include or delete its dependant users. This takes effect only after logging in
with this account.
27
Page 28
Nexxt Solutions - Outdoor Wireless IP Camera
Delete: the currently selected operator will be
erased.
Modify authority: it changes the permission level
assigned to this operator.
Change password: it allows the user to modify the
existing password.
Log manager
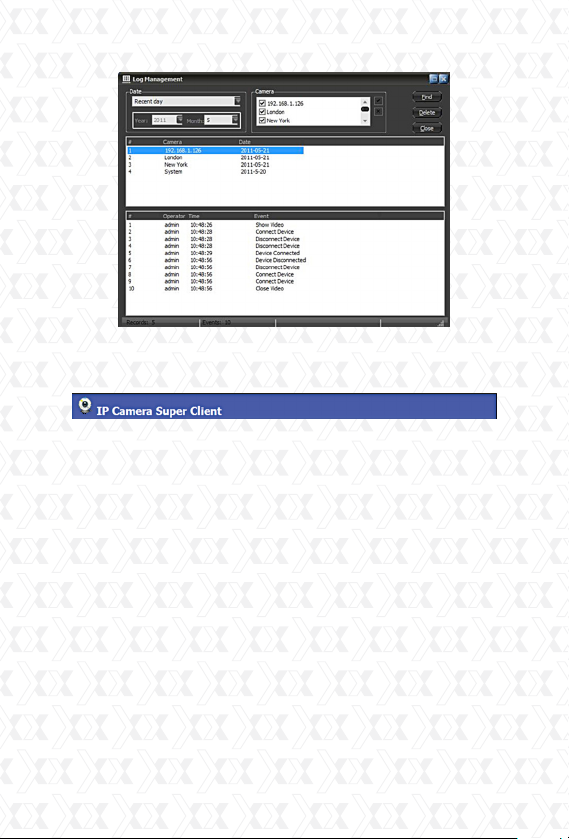
The client software has log management function. It
will keep records of user operation and device connection information. Click the Setup menu button on
the bottom right corner of the dialog box, and then
choose Log Management to open the window.
28
Page 29
Nexxt Solutions - Outdoor Wireless IP Camera
After selecting the desired device and date, click the
Find button.
Records publisher
Users can remotely view videos and alarm logs using
the records publishing tool from the client.
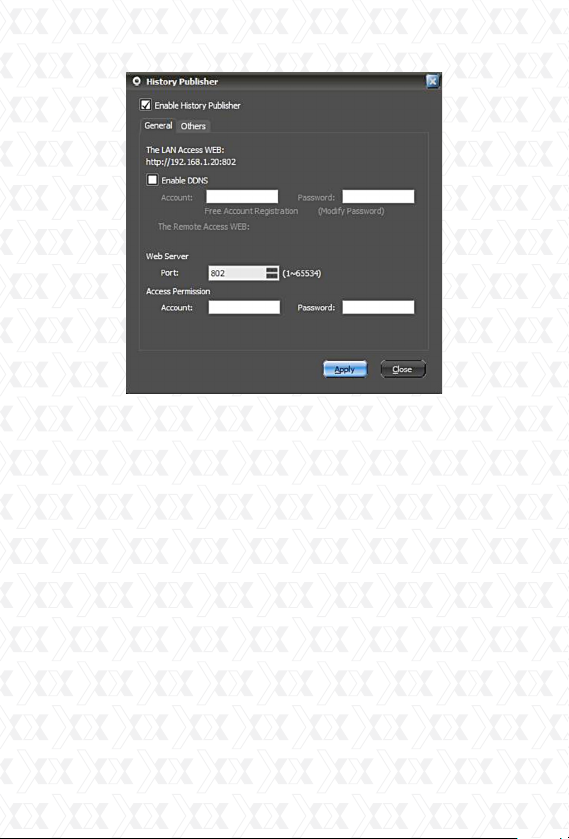
Click the Setup menu on the bottom right corner
of the dialog box, and choose Record History Web
Publisher. The following window will be displayed, as
shown below.
29
Page 30
Nexxt Solutions - Outdoor Wireless IP Camera
By default, this function is not enabled. You must
first select the Enable History Publisher option and
click the Apply button to enable this feature. The
LAN IP address will be displayed at this point. Users
can directly view records in the LAN if the PC has a
fixed IP address. Records can also be accessed by
entering the IP address and adding the port number. If using a dynamic IP, then the DDNS feature
must be active to be able to view this information
remotely. This tool should allow users to register a
DDNS account for free. The account name needs to
be longer than 5 characters.
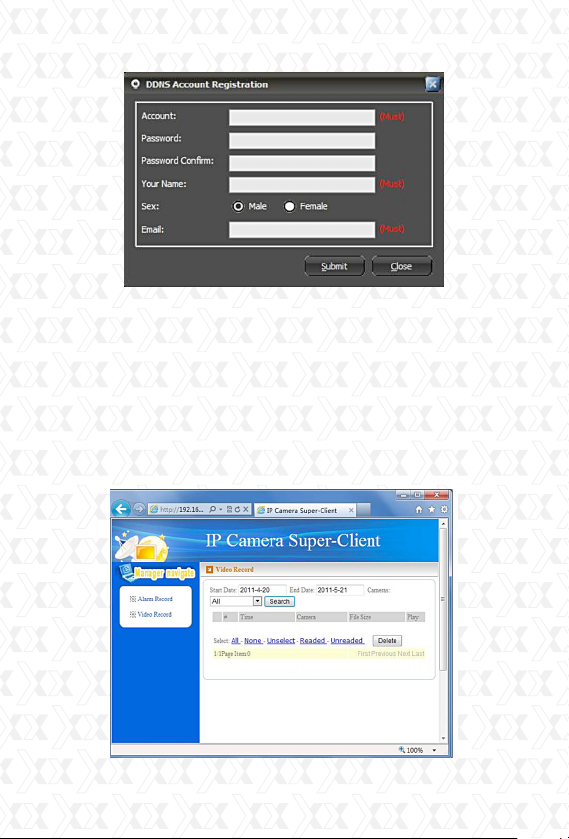
Click on the free account registration option. The
DDNS registration box will appear, as shown below.
Fill the form and click the Submit button to save
your settings. Once completed, it will exhibit the remote access URL. Please note that port forwarding
needs to be set up directly on your router.
30
Page 31
Nexxt Solutions - Outdoor Wireless IP Camera
Users can set a password for controlled access
permissions.
The Web server port is the port provided for remote visit. Normally, this value does not need to be
changed, but if that port is being occupied by other
devices, users can assign a different port number
within the 1 ~ 65535 range.
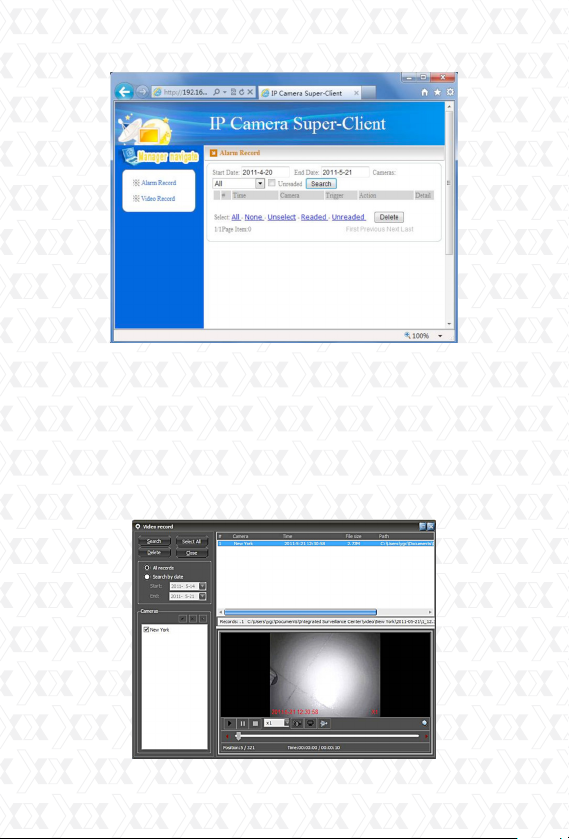
When entering the URL in IE address box, a page
like the one below this will be displayed.
31
Page 32
Nexxt Solutions - Outdoor Wireless IP Camera
A list containing all the devices with recorded video
files will appear. Next, click on any specific device,
and a list of recordings identified with the date will
be displayed at this stage.
When the operator chooses a certain date, the
page below will pop up on the screen.
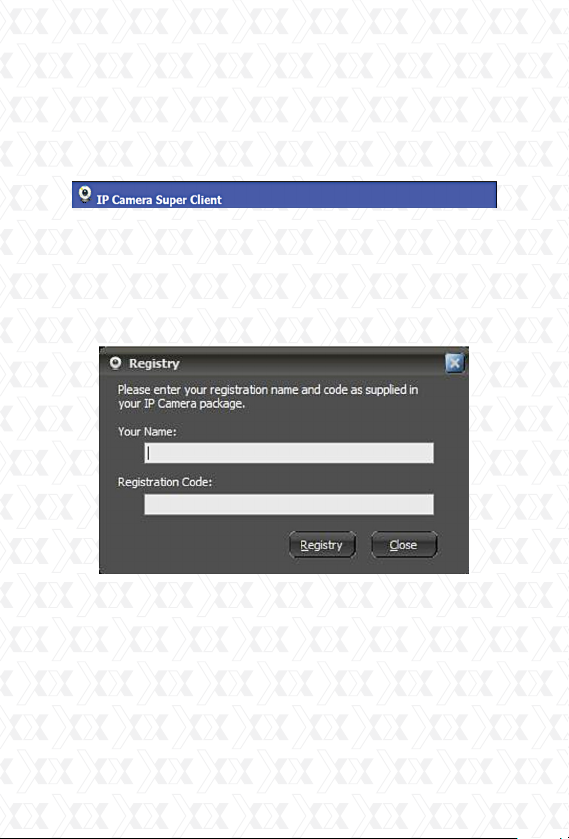
The list contains the files recorded that day. When
you click on a specific file, it will play the video.
32
Page 33
Nexxt Solutions - Outdoor Wireless IP Camera
During playback, the user can rewind or forward
the video, take a snapshot or invert the recorded
images.
The process to remotely access alarm records is
the same as with video records.
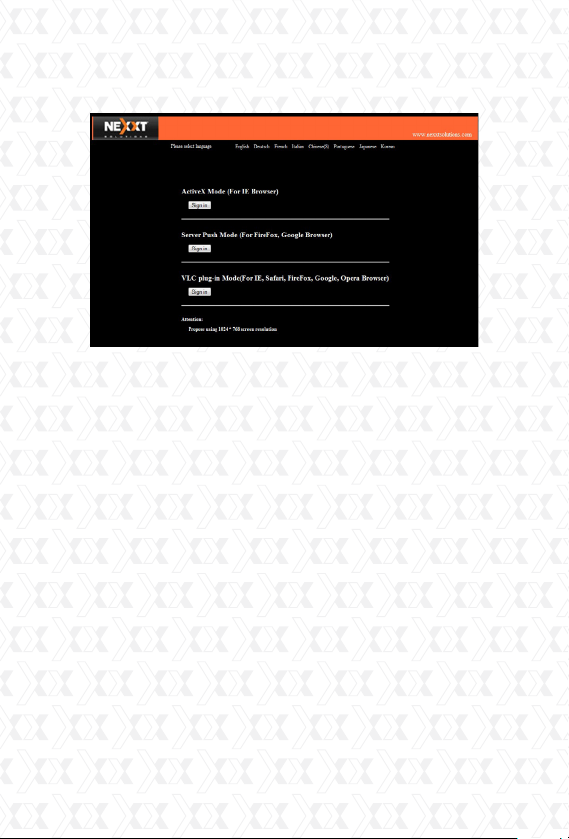
Registration
Go to the Setup menu and select Registration.
Enter the registration name and code, and click
Register to complete the process.
The registration name and code can be found on
the supplied CD-ROM.
Web browser
If you access the camera through the Internet
1.
Explorer browser directly, type the camera’s IP
address. To do so, follow the format http://XXX.
XXX.XXX.XXX:81, (“X” represents the IP address
and the “:81” represents the default port
number). When done, the camera login page
will be displayed on the screen.
33
Page 34
Nexxt Solutions - Outdoor Wireless IP Camera
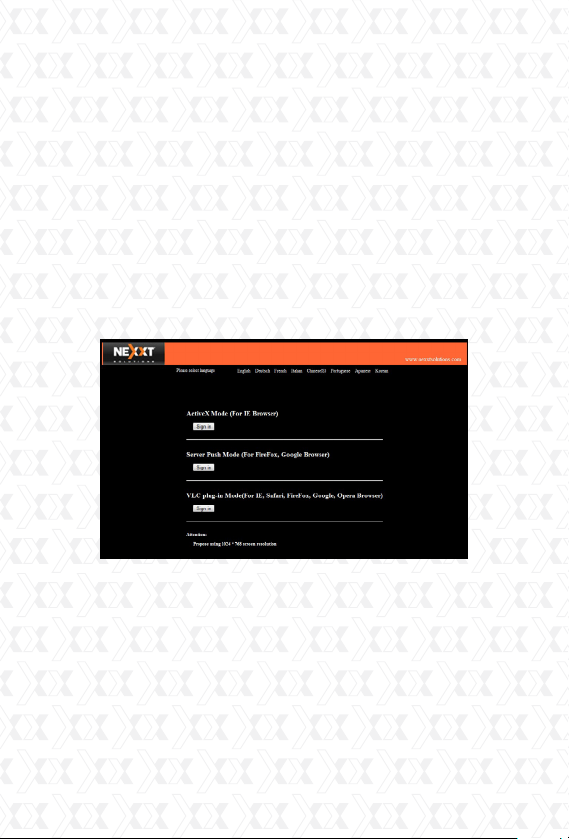
2.
Click “sign in” to enter your account and password
on the camera login page, as shown below.
By default, the administrator’s username is “admin”
and the password is left blank. You can log on to
this page as an Administrator, Operator or Visitor.
Access privileges will be assigned on the web
browser interface based on the user. Details
regarding access rights and user interface are
included below.
Visitor: When logged in as visitor, the user will be
able to view the main monitoring page for all the
enabled cameras on the network.
Operator: When logged in as an operator, the
user will have access to controls and to certain
parameters associated with the operation of the
camera.
Administrator: When logged in as an administrator, the user will have full access to controls, critical
functions and to the advanced configuration of the
camera.
34
Page 35
Nexxt Solutions - Outdoor Wireless IP Camera
3. If you are using a PC, follow the top link for IE
Browsers. This will activate ActiveX which allows
access to additional features of the user interface.
If you are a Mac user, you can view the camera via
a second link, Server Push Mode. This web browser
mode features limited functionality; however, it
allows you to view live video and take snapshot
pictures using the XPY-310.
Upgrade firmware
Enter the correct User Name and Password to upgrade the system firmware and Web user interface.
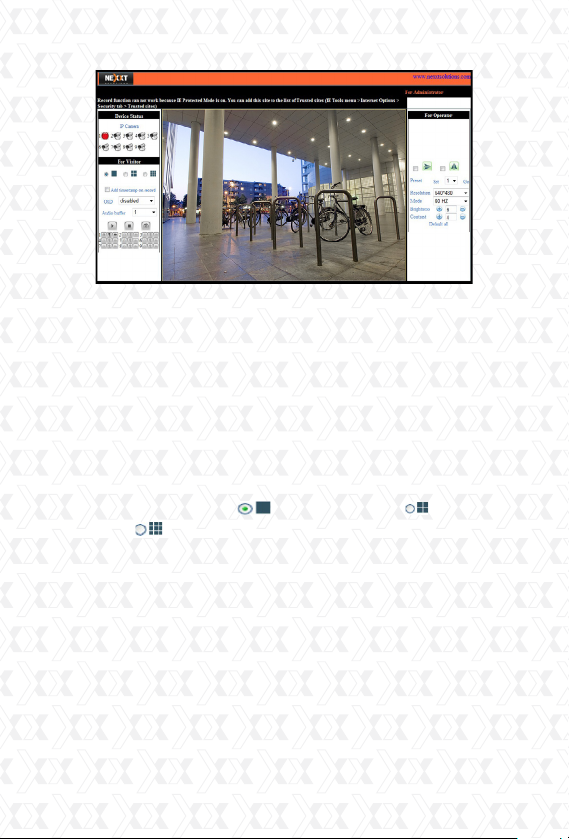
Main User Interface (as seen in Internet Explorer)
Device Status
35
Page 36
Nexxt Solutions - Outdoor Wireless IP Camera
Indicates the number of cameras connected on the
network.
For Viewer
When logged in as visitor, the user will be able to
view the main monitoring page for all the enabled
cameras on the network. This window allows you to
choose between Full View or Split Screen
configurations. Select the icons according to the view
preferred.
For example: select for Full Screen, for Quad
view or for Multi Split Screen.
Add timestamp on record
When checked, a timestamp will be added in the
bottom right corner of recorded videos.
OSD (On Screen Display) for multi-device settings
The On Screen Display allows you to see the date and
time on the video. Use this option to select the color
of the timestamp or to disable the OSD feature.
36
Page 37
Nexxt Solutions - Outdoor Wireless IP Camera
Add timestamp on record
When checked, a timestamp will be added in the
bottom right corner of recorded videos.
OSD (On Screen Display) for multi-device settings
The On Screen Display allows you to see the date
and time on the video. Use this option to select
the color of the timestamp or to disable the OSD
feature.
Audio buffer
Sets the audio buffer time in seconds.
Audio switch
Click to enable the audio stream from the
camera. The icon will change to . In order to be
able to listen to the sound around the camera, you
need to have an earphone or speaker connected to
the computer, and the microphone function enabled.
Click this icon once again when you want to disable
this feature.
Record
Click on the icon to begin video recording. The
camera will create an AVI file and save it in the
folder you specified. Click on this button again when
you wish to stop the recording. The audio will be
stored provided that the microphone function has
been previously enabled.
Snapshot: Click on the icon to take a snapshot
image. This button provides users a fast way to
capture a single image of the video from the
camera.
37
Page 38

Nexxt Solutions - Outdoor Wireless IP Camera
Note: the video file would be assigned a name
according to the following format:
Alias_actual date.avi
For example: if the name of the file containing
the video is XPY310_20101211124441.avi, it
means this recording belongs to the device having
‘XPY310’ as its alias, and that the video was
recorded at 12:44:41 on December 11, 2010.
For operator
When logged in as an operator, the user will have
access to the Operator Page, and to certain
parameters associated with the operation of the
camera.
Mirror
Click the icons to see the horizontal or vertical
mirror image. Video rotation options allow you to
adjust the image if you set up the camera upside
down or in a special position.
Resolution
Select either VGA (640x480) or QVGA (320x240).
Operating mode
Select 50Hz or 60Hz frequency, or Outdoor mode.
Color parameters: click Brightness and Contrast to
adjust the quality of the video.
Default All
Click to return the settings to their factory default
values.
38
Page 39
Nexxt Solutions - Outdoor Wireless IP Camera
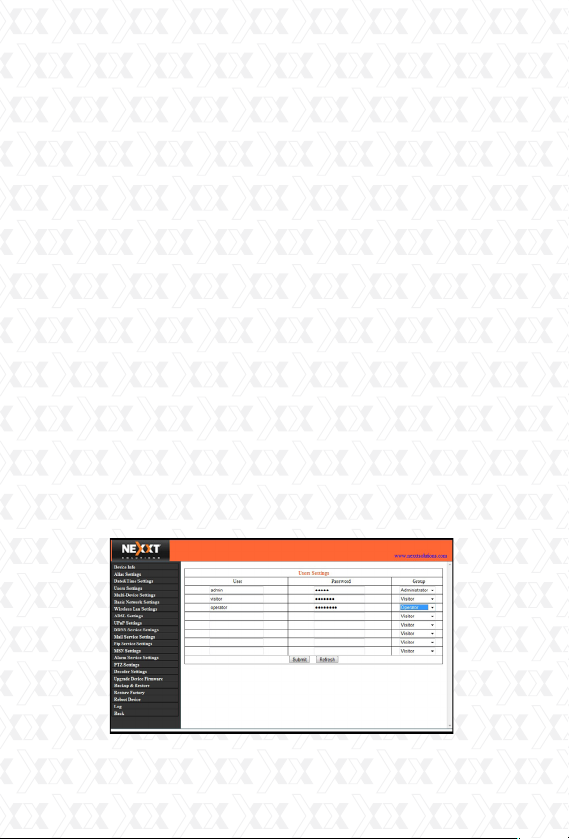
For Administrator
When logged in as an administrator, the user will
have full access to controls, critical functions and to
the advanced configuration of the system.
Device Information: it displays the device ID, firmware and embedded Web UI version of the device,
along with other basic information pertaining to the
camera.
Alias Settings: allow the administrator to set a
name to easily identify the IP camera. Anonymous is
the default alias for the XPY310.
Date & Time Settings: these are used to determine
the time zone for your country. You can choose Sync
with NTP Server or Sync with PC Time.
User Settings: the administrator can set up a maximum of eight (8) user accounts. New users can be
added as an administrator, operator or visitor, each
with their own username and password.
39
Page 40
Nexxt Solutions - Outdoor Wireless IP Camera
UPnP Settings - Access this page to find out if the
UPnP (Universal Plug and Play) is working correctly
on your computer.
Upgrade Device Firmware - Upgrade the camera’s
Firmware and device embedded web UI software on
this page.
Restore Factory Settings - Restores the original
settings of the device.
Reboot Device - Reboots the device.
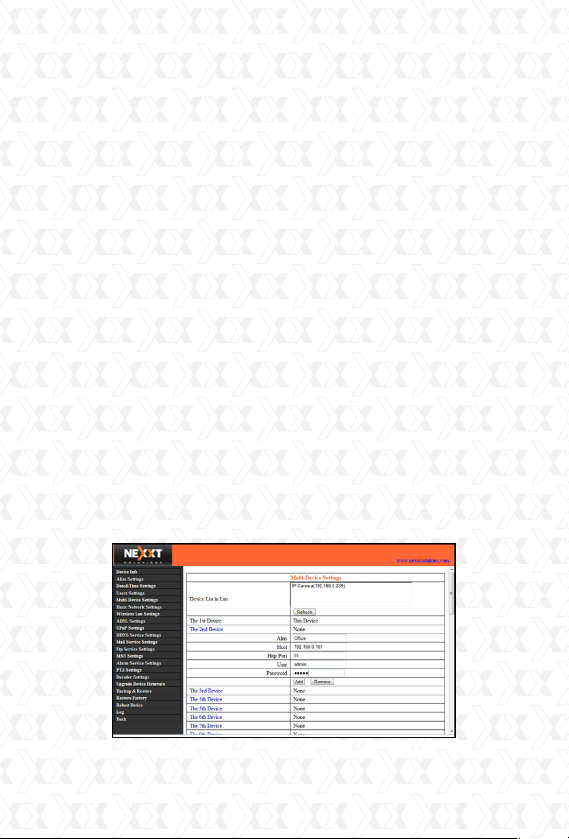
Multi-Device Settings
In the Multi Device Settings page, the user can
visualize all devices detected in the LAN. The
firmware inside the camera supports up to 9
cameras monitoring at the same time. You may
view either 9 or 4 cameras at once in a grid on one
screen, or choose to view a single camera at
a time.
The ‘1st device’ is the default IP camera. You can
add more cameras to the list in the network for
monitoring different areas.
40
Page 41

Nexxt Solutions - Outdoor Wireless IP Camera
To add cameras to the LAN
Click ‘The 2nd Device’ and double click the IP
camera from the ‘Device List in LAN’. The Alias,
Host and HTTP Port will fill in automatically. Enter
the correct User Name and Password then click
‘Add’. Repeat the same procedure to add additional
cameras.
To add cameras to the Internet
First make sure the camera added can be
accessed on the Internet with the IP address or
DDNS domain. (for example: http://XXX.XXX.XXX.
XXX:81 or http://ipcamera.dyndns.org:81).
Enter the Host in the format: XXX.XXX.XXX.XXX
port: 81 or Host: ipcamera.dyndns.org port: 81.
Enter the correct User Name and Password
followed by ‘Add’. Repeat the same procedure to
add more cameras.
Basic Network Settings
If the router that the IP camera connects to has
a DHCP function, you can choose ‘Obtain IP from
DHCP Server’ or you may fill in the network
parameters manually.
HTTP Port - In most cases, you can leave this value
as 80; however, if your Internet Service Provider
blocks this port, you may have to switch to another
port number, such as 8005.
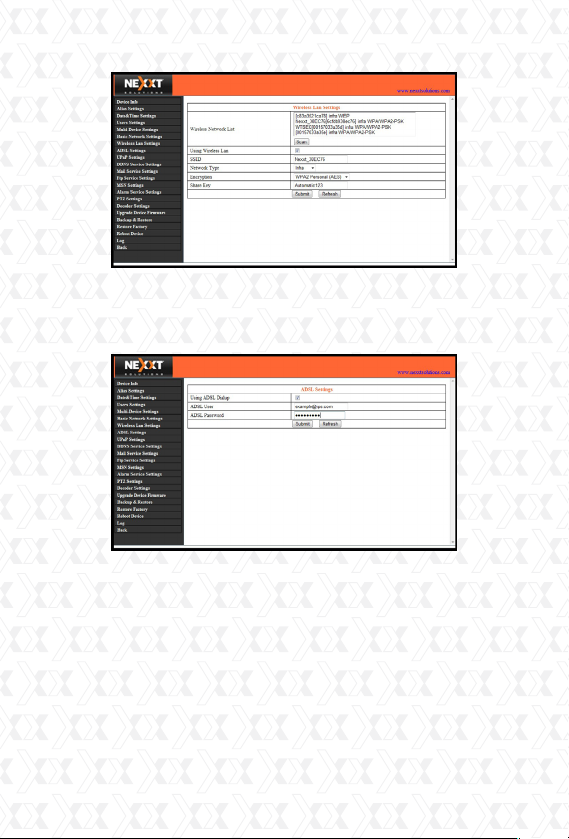
Wireless LAN Settings
Enter the wireless settings page of the Wireless
Router to find out the SSID, Channel, Encryption and
Authentication details. This product supports WEP
and WAP security encryption methods.
41
Page 42
Nexxt Solutions - Outdoor Wireless IP Camera
ADSL Settings
When connected to the Internet through ADSL,
you can enter the ADSL username and password
obtained directly from your ISP.
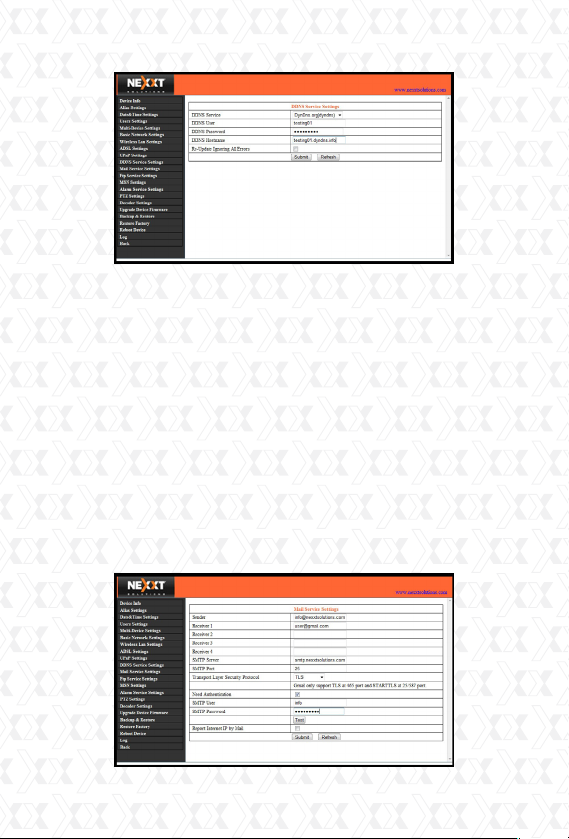
DDNS Service Settings
The system supports protocols from some DDNS
providers such as dyndns.org. Fill in the following
fields once the DDNS service has been setup.
User and Password: The User Name and Password
used when applying for the domain name.
DDNS Host: The domain name.
DDNS or Proxy Server: If you access the DDNS host
through a proxy, you should enter the Proxy IP here.
DDNS or Proxy Port: The Proxy Port.
42
Page 43
Nexxt Solutions - Outdoor Wireless IP Camera
Mail Service Settings
Configure the email addresses that will receive and
send mails after an alarm is triggered.
Sender - This device uses the sender mailbox to send
mails.
Receiver - The account used to receive mails from
the Sender. You can set up to 4 receiver mailboxes.
SMTP Server - The SMTP server for the sender
mailbox.
Need Authentication - Check the box if the email
needs authentication. If so, please enter the SMTP
User Name & Password.
Mail test: Set the Mail parameters and click ‘Submit’
before attempting to send a test email.
43
Page 44

Nexxt Solutions - Outdoor Wireless IP Camera
There are 8 possible Mail Test errors:
1. Cannot connect to the server.
2. Network Error. Please try later.
3. Server Error.
4. Incorrect username or password.
5. The Sender is denied by the server - The server
needs to authenticate the user; check settings and
try again.
6. The Receiver is denied by the server - Could be
caused by the anti-spam privacy settings of the
server.
7. The message is denied by the server - Could
be caused by the anti-spam privacy settings of the
server.
8. The server does not support the authentication
mode used by the device.
Report Internet IP by Mail - Check the box so when
the IP camera is powered on or the
Internet IP address changes, an email will be
sent. (For example: XPY-310 ‘s address is
http://119.123.207.96:9002). Make sure the
port is mapped to the router correctly by UPnP or
Virtual Map function.
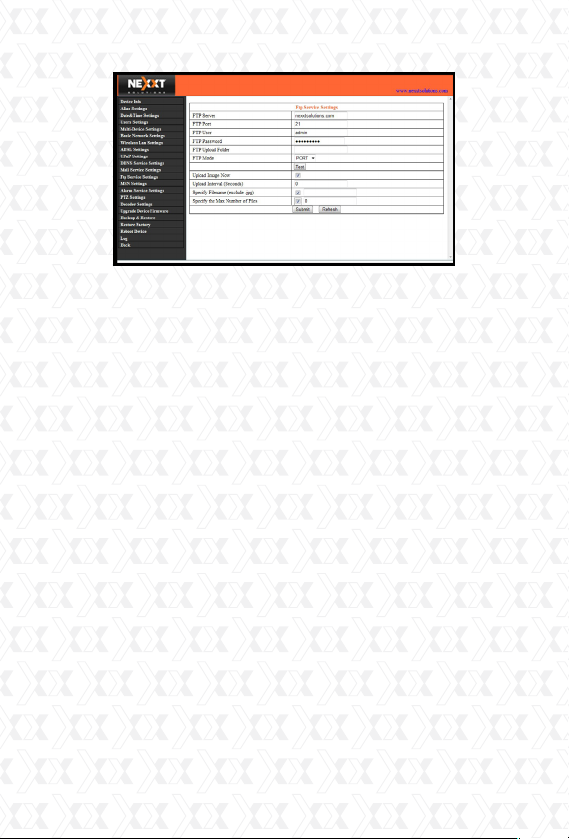
FTP Service Settings
Note: When under Alarm Service Settings the
option “Upload Image on Alarm” is checked, the FTP
Service takes effect.
44
Page 45
Nexxt Solutions - Outdoor Wireless IP Camera
FTP Server - The FTP server address.
FTP port - The port usually is 21.
FTP Mode - Supports standard (PORT) mode and
passive (PASV) mode.
Upload Image Now - Check the box to upload an
image. When checked, you can input the upload
interval time in seconds.
FTP Test - Set the FTP parameters and then
click ‘Submit’ before testing the FTP settings. If
successful, the user will be prompted accordingly.
Otherwise, an error message will be displayed.
There are 8 possible FTP test errors:
1. Cannot connect to the server - Please check FTP
Server settings.
2. Network Error. Please try later.
3. Server Error.
4. Incorrect username or password - Check the
username and password.
5. Cannot access the folder - Ensure the folder
exists and your account is authorized.
6. Error in PASV mode - Ensure the server supports
PASV mode.
7. Error in PORT mode - PASV mode should be
selected if the device is behind a NAT.
45
Page 46
Nexxt Solutions - Outdoor Wireless IP Camera
8. Cannot upload file - Ensure your account is
authorized.
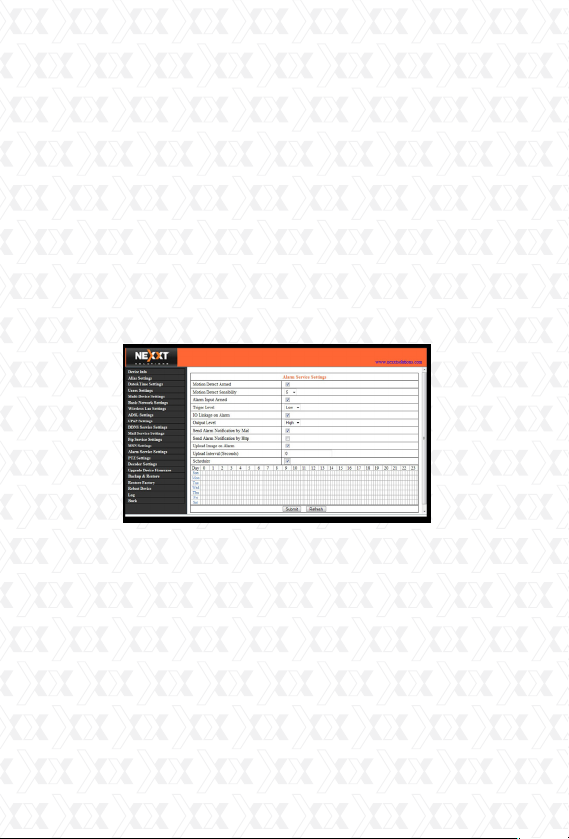
Alarm Service Settings (Motion Detection)
Enter the Alarm Service Settings page to configure
the Motion Detection function. When motion detection is enabled, the camera can be triggered to send
email alerts and upload images. In the camera
monitoring page, the green icons will turn to red and
you will hear an alert sound if motion is detected.
Note: The default path for saving recorded files is
C:\Documents and Settings\All Users\Documents.
Motion Detection Sensitivity - Sensitivity can be
determined in a scale from 1 to 10, 1 being the
setting with the highest motion detection sensitivity,
while 10 represents the lowest sensitivity available
you can preset.
Send Mail on Alarm - Sends picture & mail information to the set email address after the alarm is
triggered.
Upload Image on Alarm - Enable this function to
upload an image after the alarm is triggered.
46
Page 47

Nexxt Solutions - Outdoor Wireless IP Camera
REC on schedule and save to PC - Enable this
function for automatic recording to start on the
scheduled time for several seconds, and save the
video in the PC when an alarm has been triggered.
ACCESSING THE IP CAMERA
Using the WiFi capability
To use the wireless feature of the IP Camera, a
wireless router is required. Follow the instructions
below to get started after the camera has been
mounted properly.
1. Use the Network cable to connect the IP Camera
to the LAN.
2. Enter IP Camera Tool to search for the camera.
3. When IP address of the camera is listed in the
Result Field of the IP Camera Tool, it means the
basic configuration is completed.
4. Set the security settings in Internet Explorer on
the PC when you view it for the first time.
5. Log in to the web browser of the IP camera.
6. Now you can use the IP Camera as a Visitor,
Operator or Administration in the LAN.
7. Open the wireless router setup page and enter
the SSID, Channel, Security Method (NONE,
WEP), kAuthentication Type and Encryption.
Note: This product supports WEP and WAP
security encryption methods.
8. Click “Submit” to reboot the device.
9. Wait at least 30 seconds, then unplug the
ethernet cable followed by the power supply. Power
on the camera once again, making sure only the
power supply is connected. After 30 seconds, if the
47
Page 48
Nexxt Solutions - Outdoor Wireless IP Camera
LED blinks, it indicates the IP camera has started
working on WiFi mode.
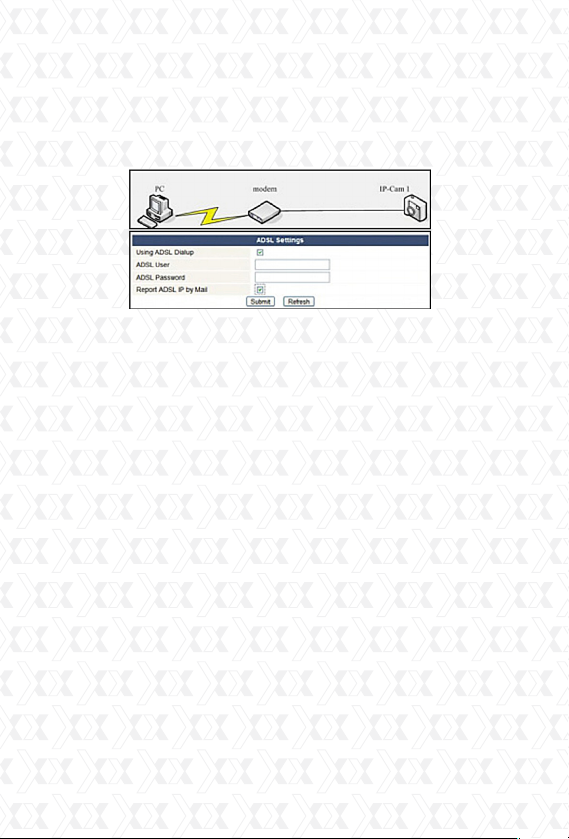
Connect to the Internet through ADSL directly
1. Use the Network cable to connect the IP Camera
to PC.
2. Enter IP Camera Tool to search for the camera.
3. Log in to the IP camera web browser page as an
Administrator.
4. Enter the ADSL Settings page to input ADSL
User Name and password.
5. Enter DDNS Settings Page and enable the DDNS
service. Next, click ‘Submit’ to reboot the camera.
6. By connecting the IP Camera to the ADSL
directly, you can access the Camera through the
Internet using the domain name.
Note: Choose the option ‘Report ADSL IP by Mail’,
for the ADSL IP address to be sent via email.
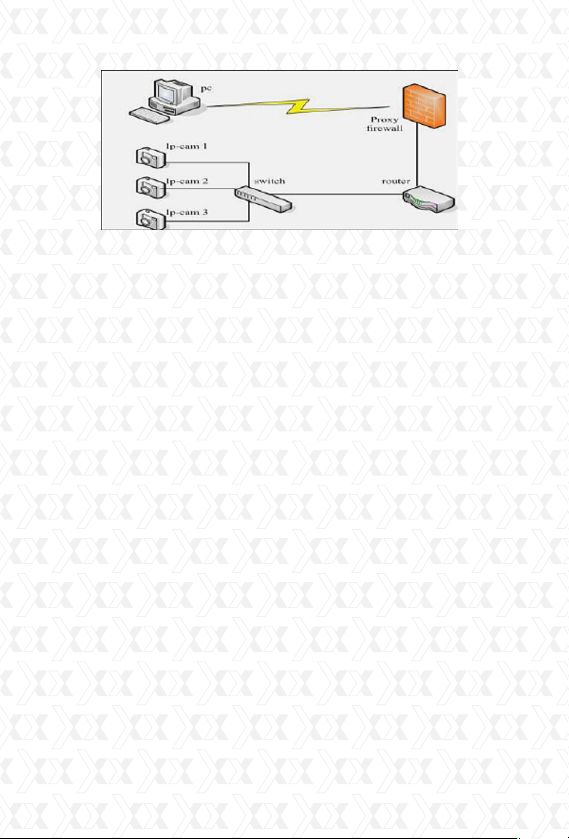
Connect to the Internet using a router
Follow the steps below to use a router to access the
Internet by shared ADSL. If a router is set for dial-up
Internet access, setting an ADSL dial-up account
and password on the IP Camera is not required.
48
Page 49
Nexxt Solutions - Outdoor Wireless IP Camera
1. Use the Network cable to connect the IP Camera
to the LAN.
2. Open the IP Camera Tool in order to search for
the camera.
3. Log in to the IP camera web browser page as an
Administrator.
4. Enter the DDNS Settings Page to enable the
DDNS service. Next, click ‘Submit’ to reboot the
camera.
5. Now access the Camera directly through the
Internet using the domain name.
Static IP address users
Static IP address users do not need to use DDNS
for remote access. When the settings of the IP
camera in LAN mode are complete, you can access
the Camera directly through the Internet using the
WAN IP.
Two methods are available to obtain the WAN IP
address.
49
Page 50
Nexxt Solutions - Outdoor Wireless IP Camera
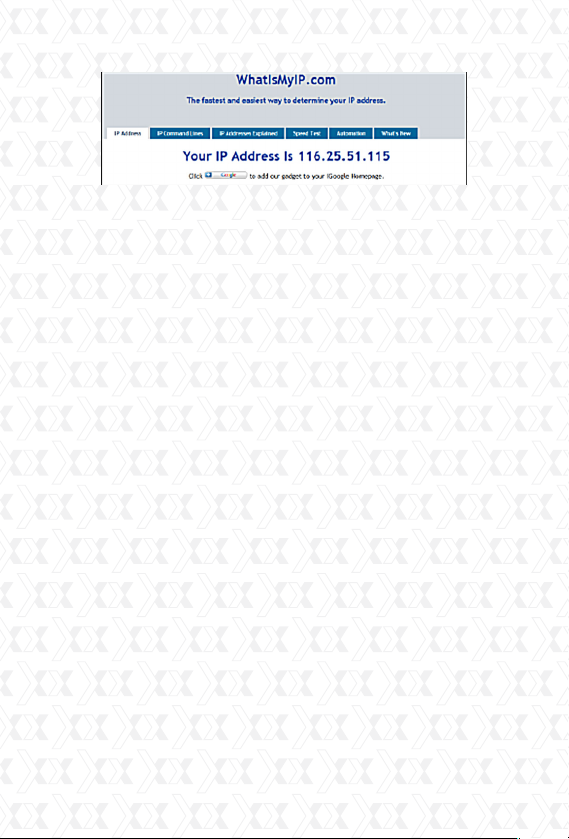
1: Obtain the WAN IP from a Website
You can discover this easily by turning on a
computer using the same connection as the IP
camera and entering this address: http://www.
whatismyip.com.The page at this address will show
you the current WAN IP.
2: Obtain the WAN IP address from the router
Obtain the IP address of the router (LAN Gateway
1.
address), User Name and Password for logging
into the router.
Enter the LAN IP address of the router
2.
(ie:192.168.1.1) in the address bar of your PC
browser to log on to the router.
Open the Status page to find out the WAN
3.
address of the router. In this example, the address
is 116.25.51.115.
Accessing the IP Camera over the Internet
Users can access the IP Camera from the Internet.
Enter the WAN IP address and port number into the
browser. For example, http://116.25.51.115:85.
Note: Make sure Port mapping is successful. Port
mapping can be configured in two ways:
• Enter the setting page of the router which the IP
camera connects with to enable the UPNP function. To do so, open the IP camera “Upnp Settings”
50
Page 51
Nexxt Solutions - Outdoor Wireless IP Camera
dialog box, and make sure the status for “Upnp is
successful”.
• If your router has the Virtual Map function, enter
the router settings page, add the IP camera’s IP
address and port number to the Virtual map list.
How to use DDNS
When using ADSL, the IP Camera will connect to
the Internet through ADSL automatically. For each
ADSL reconnection, your Internet Service Provider
will re-assign a new IP address for the IP Camera to
facilitate the access. DDNS (Dynamic Domain Name
Server) can map the dynamic IP address of an IP
Camera to a fixed domain name. Therefore, we can
access the IP Camera by the fixed domain name
whether the IP address changes or not. The IP
address is not necessary when using the DDNS via
the domain name to find your network.
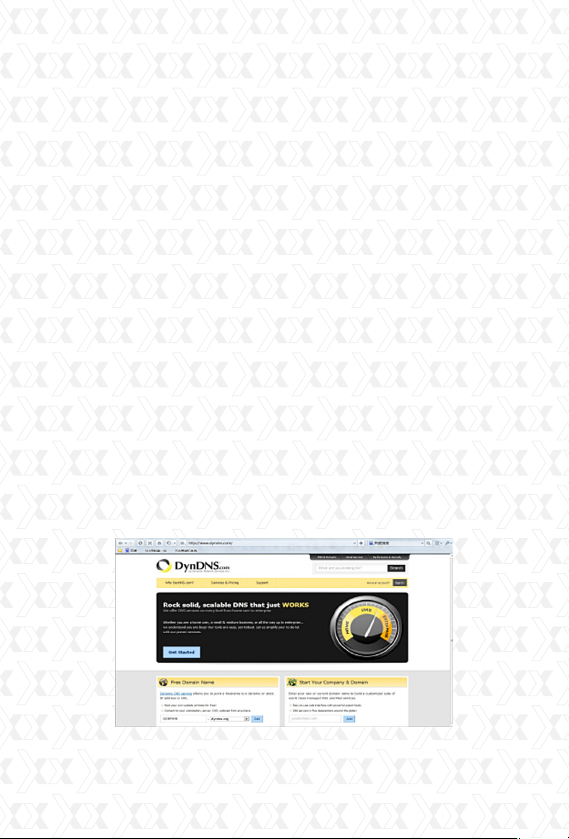
1. Go to the website that provides free domain
names, such as http://www.dyndns.com. Register
to apply for a free domain name.
51
Page 52

Nexxt Solutions - Outdoor Wireless IP Camera
Enter DDNS Settings Page to enable the DDNS
2.
service, and click ‘Submit’ to reboot the camera.
Re-log in to the Camera web browser as
3.
Administrator and enter the “DDNS Service
Settings” page to check if the DDNS Status has
been successfully changed to DynDNS.
Enter the ‘UPnP Settings’ page, the UPnP Status
4.
should be ‘Successful UPnP Session’. If not, you
may enter the “Basic Network Settings” page to
change the Http Port. Then click “SUBMIT” and
reboot device.
Re-log in to the Camera homepage to check and
5.
make sure the DDNS Status and UPnP Status
have been successfully configured.
You only need to enter the domain name (Domain
6.
name+Port number http://ipcam.domain.net:81)
in the IE address bar, and the browser will visit the
IP Camera. Wait for several minutes and the IP
Camera will access the Internet automatically.
Another way the user can access the IP camera
from a WAN is by using the DDNS domain name.
If the gateway settings and DDNS settings have
been completed, enter the DDNS dynamic domain
name (for example,http://ipcam.vicp.net, do not
add www.) in the address bar of IE to access the IP
Camera. If multiple IP Cameras are connected to
the same router, enter DDNS dynamic domain with
the port number (for example, http://ipcam.vicp.
net: 85) in the address bar of IE to access different
IP cameras.
Accessing the IP Camera from your mobile phone
Compatibility with mobile phones using 3G
52
Page 53

Nexxt Solutions - Outdoor Wireless IP Camera
technology (iPhone, Android, Blackberry, and PDAs)
enables you to view real-time videos and change
configuration settings over the internet using any
supported browser.
An IP camera can send a snapshot picture to an
email account accessible via a cell phone. Cell phone
surveillance also allows the user to adjust camera
settings and video resolution for a mobile feed where
video could then be accessible on a cell phone. There
are applications that allow for advanced PT control
at your fingertips, access to multiple cameras from
different locations and even remote video playback.
Follow the steps below to gain access to the IP
Camera from your mobile phone:
Go to mobile internet browser
1.
Enter http://the external IP address of your
2.
IP Camera: port number.
Demo example: http://y-cam.dtns.net:8152.
3.
This will bring up the authentication window to
4.
enter your user security settings.
Next, a window with 2 different options will pop up.
5.
Select the best option based on the web browser
6.
supported by your particular phone.
Click on ‘Live Video’ to see real time video footage
7.
captured by the camera.
Frequently Asked Questions
Note: Please check network connections first to
troubleshoot any potential problems. Check if any LED
on the network, server, hub, exchange or network
card is showing signs of malfunction. In case of
abnormal operation, verify that all connections on the
network have been done correctly.
53
Page 54

Nexxt Solutions - Outdoor Wireless IP Camera
In addition, you can see the list of problems below,
as it contains the solution to the most common
problems encountered while setting up the camera:
What do I do if I have forgotten the administrator
User Name and/or password?
To reset the administrator User Name and
password, press and hold down the RESET button
for 5 seconds. Release the power button and the
User Name and password will be reset back to their
factory default configuration.
Default administrator User Name: admin
Default administrator password: no password
IP Address configuration
Check whether the IP address of the IP Camera
server shares the same subnet as your work station: Click My Computer > Control Panel > Network
& Dial-up Connections > LAN > Attributes >Internet
Protocols (TCP/IP), and check the IP Address and
Subnet Mask. Make sure they are in the same
subnet when configuring the camera’s IP address
manually if you are unable to access IP Camera via a
web browser.
Network Configuration
Double check to ensure that your HTTP server
software is configured and running properly. If you
are running any firewall software, make sure it is
allowing inbound connections to port 80. Also, if you
happen to be using a cable/DSL router, verify that
you have set up the port forwarding feature
properly (consult your router’s documentation for
more information).
54
Page 55

Nexxt Solutions - Outdoor Wireless IP Camera
If none of these seem to be the problem, it is also
possible that your ISP is blocking inbound connections to port 80 - many ISPs have done this because
of internet worms, such as Code Red. If this is the
case, you will have to setup your HTTP server on an
alternate port (such as 8080).
Picture Problems
Video streaming is transmitted by the ActiveX
controller. If the ActiveX controller is not installed
correctly, no video image will be seen.
There are two ways to solve this problem:
1. Install the ‘IP Camera Tool’. ActiveX controller will
be installed simultaneously (recommended).
2. Download ActiveX controller and set the Security
Properties of IE on the PC when you view it for the
first time: Go to Tools > Internet Properties > Security > Custom Level > ActiveX control and Plug-ins.
All 3 options need to be set to ‘Enable’.
- Enable: Download unsigned ActiveX controls.
- Enable: Initialize and script ActiveX controls not
marked as safe.
- Enable: Run ActiveX controls and plug-ins.
Problems with network bandwidth
The image frame rate depends on the following
factors:
1. Network bandwidth.
2. PC performance, network environment and
display preference setting (brightness, theme,
etc).
3. The number of visitors (too many visitors will slow
55
Page 56

Nexxt Solutions - Outdoor Wireless IP Camera
down the image frame rate).
4. Choice of switch or hub (use a switch for multiple
IP cameras rather than a hub).
Pop up appears saying ‘Fail to connect to the
device’
This prompt will only appear when using multiple
cameras. Enter the Multi-Device Settings page (log
in as an Administrator) to check whether the Device
settings are correct.
When one of the multiple cameras disconnects,
the icon changes color to yellow and the pop-up
prompt “Failed to connect to the device” is
displayed.
Can’t access the IP camera on the internet?
There could be a number of reasons:
1. ActiveX controller is not installed correctly.
2. The port IP camera being used is blocked by Fire-
wall or an anti-virus software. Use a different port
number and try again.
3. Port mapping failed. There are two ways available
for configuring port mapping:
Open the setting page of the router which the IP
camera connects with to allow the UPNP function.
Go to the IP camera’s ‘UPnP Settings’ to enable
UPnP, making sure the ‘UPnP’ configuration is successful.
If your router has the Virtual Map function, enter
the router setting page, and add the IP camera’s IP
address and port number to the Virtual map list.
56
Page 57
Nexxt Solutions - Outdoor Wireless IP Camera
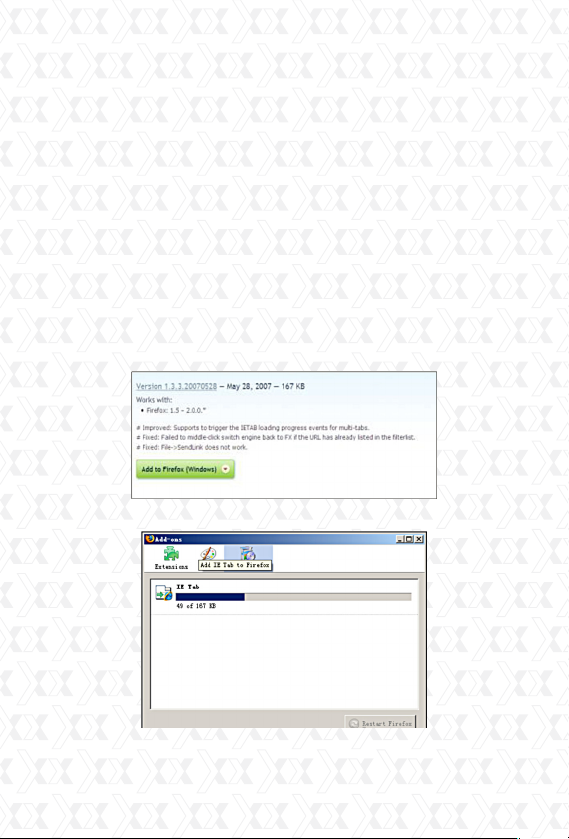
Problems with using the Firefox browser monitoring pages are not displayed normally
Due to security issues, the Firefox browser does
not support ActiveX controls, but it provides a
plug-in named IE-Tab which enables Firefox to
support ActiveX controls. Using the Firefox browser,
you can access the website as follows:
https://addons.mozilla.org/en-US/firefox/addon/1419.
On the download page, select the right version for
your browser, download it, and start installing the
plug in. The installation steps for the Firefox browser
(version 2.0.0.18) plug-in are detailed as follows:
1. Select the right version, as shown in the figure
below.
2. Click ‘Add to Firefox (in Windows)’ to start the download.
3. Wait for the download to complete. A dialog box will
pop-up as shown as in the chart below.
57
Page 58
Nexxt Solutions - Outdoor Wireless IP Camera
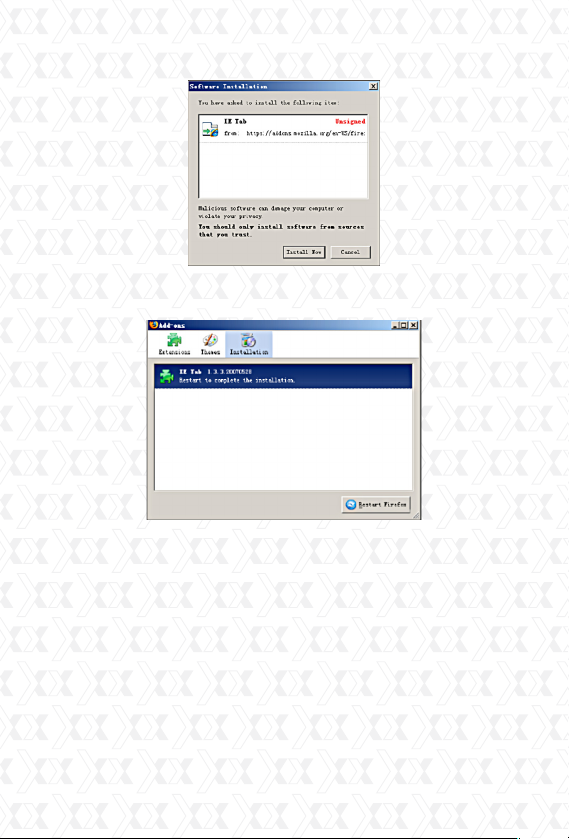
4. Click the ‘Install Now’ button to start installation.
5. When installation is complete, click ‘Restart
Firefox’ to initialize the browser.
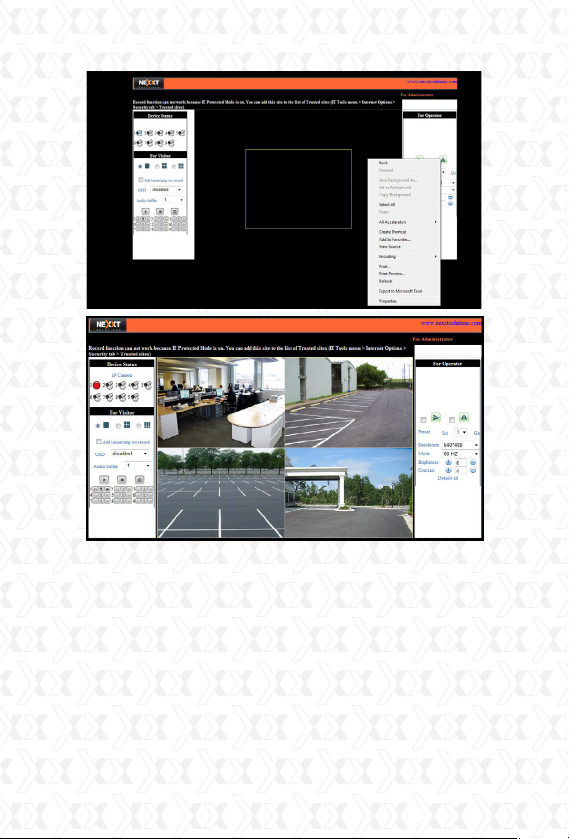
6. Log in to your device and locate the monitoring
page, right click on the web browser page and click
the new menu item named ‘View page in IE-Tab’ to
log in to the IP camera again.
58
Page 59
Nexxt Solutions - Outdoor Wireless IP Camera
Default Parameters
Default network parameters
IP address: Automatically obtained
Subnet mask: 255.255.255.0
Gateway: Automatically obtained
DHCP: Disabled
DDNS: Disabled
Username and password
Default Administrator User Name: admin
Default Administrator Password: no password
59
Page 60

Nexxt Solutions - Outdoor Wireless IP Camera
SPECIFICATIONS
Model
Specifications
Camera
Network
Alarm
General
Video
Image sensor
Lens
Infrared LED
Pixels
Night vision range
Filter
AWS/AGC/AES
Compression format
Minimum illumination
Viewing angle
Image format
Max. frame rate
Resolution
Network interface
Supported protocols
Wi-Fi
Motion detection
Alarm events
Periodic sending
User authentication
Web browser
Simultaneous viewers
Mobile compatibility
Power
Power consumption
Operating temperature
Storage temperature
Operating humidity
Storage humidity
Color
Dimensions
Gross weight
Certifications
Warranty
AIOR6324U1
1/4 color CMOS
6 mm
18 pcs
300,000
20 m
infrared cut-off filter (ICR) to ensure lifelike daytime color and sensitive night time performance
Auto
MJPEG
0.1 Lux
Horizontal: 39.8° Vertical: 34.2 °
PAL/NTSC
25 fps
Resolution 640×480 (VGA), 320×240 (QVGA)
RJ-45 (10BASE-T/100BASE-TX)
TCP/UDP/IP/ARP/ICMP/DHCP/DNS/HTTP/FTP/SMTP/NTP/PPPOE/UPNP/DDNS
IEE802.1 b/g
Motion detection and video recording to local storage
Notification via email, FTP - Video recording to local storage
Send pictures to Email/FTP within the time specified
User/password; administrator/operator/general user
IE 6.0 or above version, Mozilla Firefox, Safari, Opera, Chrome ,etc
10 viewers@320x240 4 viewers@640x480
Supports Nokia, Android, Windows mobile phone, iPhone and other smart cellular phones
with supported web browser (Google Browser and Firefox)
DC 12V 1.0 A
4W/6W (Infrared off/on)
-5 to+45 °C (22 to 113 F°)
-20 to+60 °C (-4 to 140 F°)
20- 80% RH
20- 95%RH
silver
19cm x 8cm x 8cm
1200 g
FCC
Limited one year warranty
60
 Loading...