

Page 1
Universal Remote
Cat. No.
1519003
Page 2

Table of Contents
Setup
Introduction ........................................................... 2
Setup ......................................................................3
Battery Installation ...........................................3
Battery Saver ....................................................3
TV Volume Punch-Through .............................3
TV/VCR Punch-Through ................................. 3
Button Functions ................................................... 4
DVD Functions ................................................ 5
SAT Functions .................................................. 5
TV/VCR and TV/DVD Combo units ............... 6
Code Programming ................................................ 6
Direct Code Entry............................................. 6
Code Search ...................................................... 7
Code Identification ...........................................8
Sleep Functions ..................................................... 8
Product Operation .................................................. 9
Troubleshooting..................................................... 9
Introduction
Thank you for buying this Nexxtech 4-in-one
Universal Remote. You can use your remote to
replace a broken or lost remote or combine the
functions of up to four remotes.
This remote control operates the common features
of most (but not all) models and brands of IR
(Infrared) controlled video equipment. This remote
may support functions that are not available on
your device. Some functions of your particular
device (such as menu functions) may not be
controlled by this remote. In such cases, use the
original remote control for your device. The
remote can also learn commands from your
original remote. It has partial LED backlighting.
Please use this manual to become familiar with
your remote, then install batteries and set up your
remote for your particular device and brand.
Battery Installation
1. Push down on the tab on the back of the remote
and lift off the cover.
2. Install 2 AAA alkaline batteries (not included)
into the battery compartment as indicated by
the polarity symbols (+ and -) marked inside.
3. Replace the cover.
When the remote’s range decreases or it does not
operate properly, replace the batteries. You have 2
minutes to change the batteries without losing
codes you have programmed. However, do not
press any buttons until batteries are installed. If
buttons are pressed without batteries in the remote,
all codes will be lost.
Battery Saver
Your remote automatically times out if the buttons
are pressed more than 30 seconds. This will save
your batteries should your remote get stuck in a
place (for example, between sofa cushions) where
the buttons remain pressed.
TV Volume/Mute Punch-Through
The TV Volume/Mute punch-through feature lets
you control the Volume and Mute function of your
TV in any mode programmed to be a VCR, DVD,
Cable, or SAT device without changing to TV
mode.
VCR/DVD Punch-Through
This remote lets you Punch-through to the last
VCR or DVD device used from any Mode programmed for TV or Cable. For example, if you
have 3 DVD/VCR devices programmed into this
remote, the last one you accessed on the remote
will be the one that has control of the 6 VCR/DVD
buttons when in any other TV or Cable programmed Mode.
23
Page 3

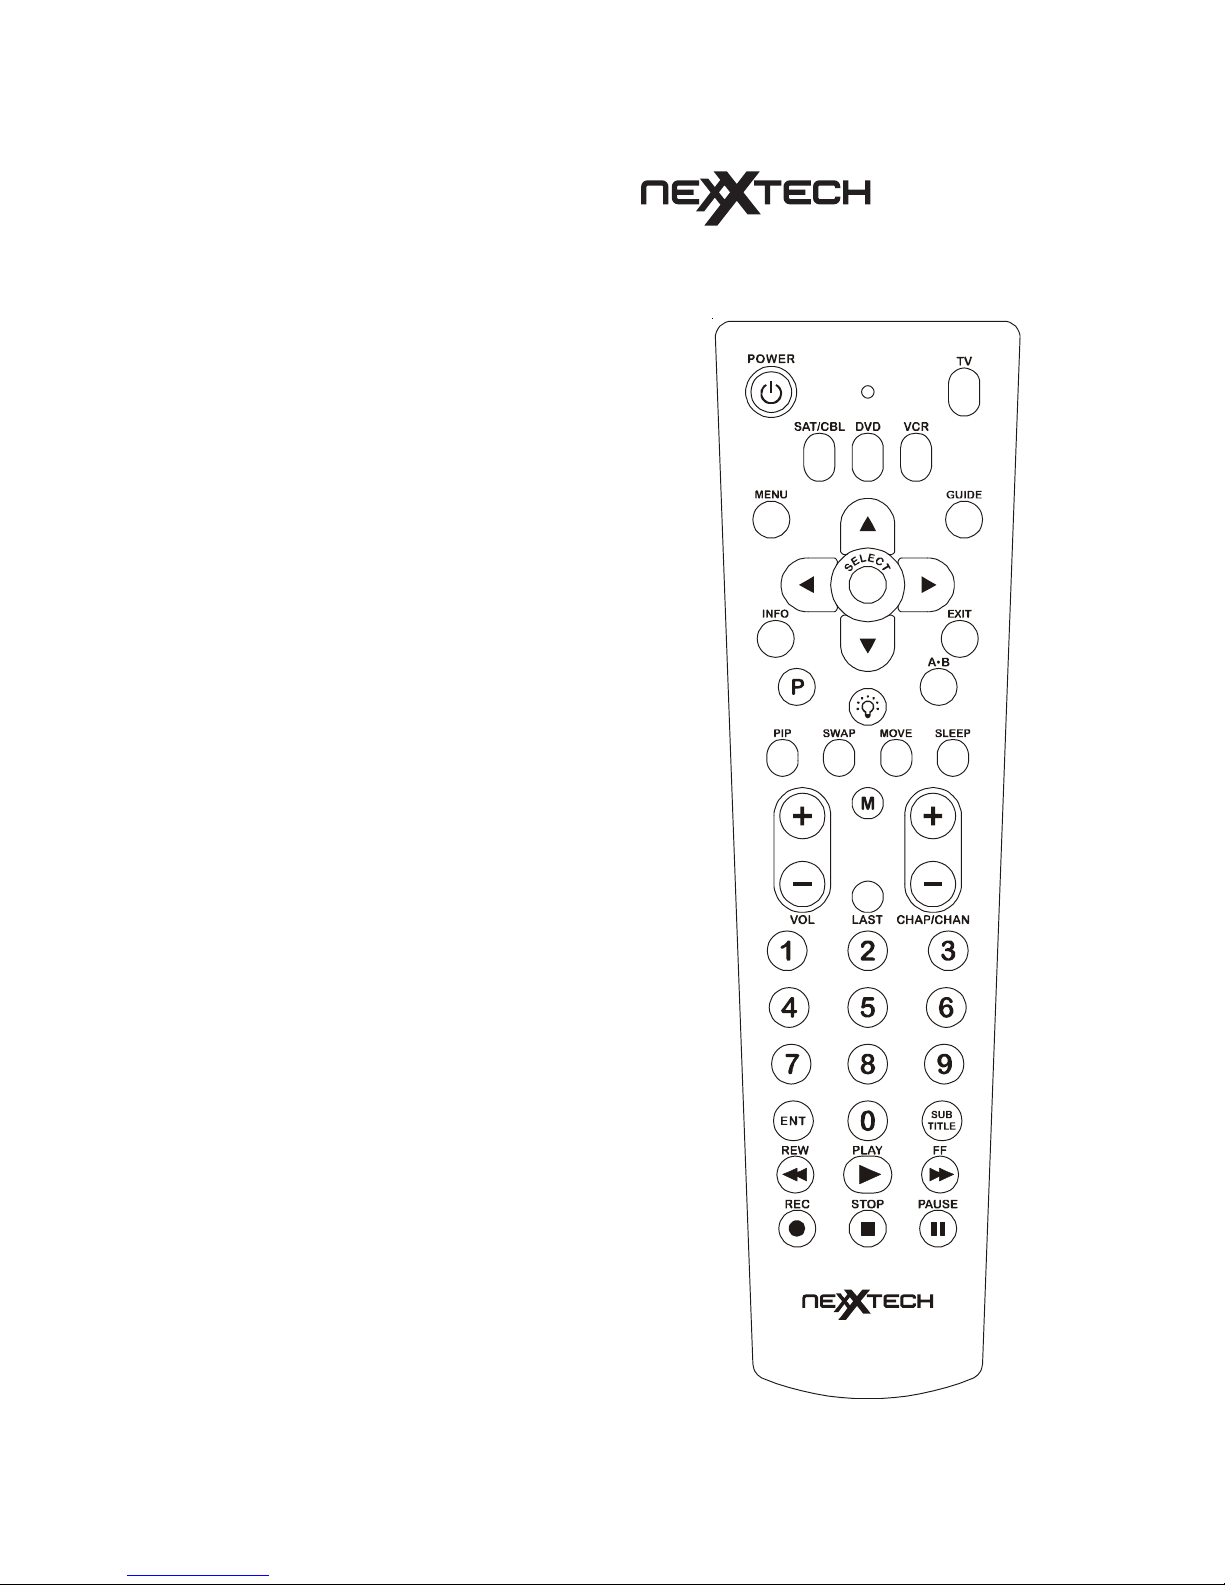
Button Functions
Button Functions, cont.
Note: Some buttons on the remote might have
functions that are labeled differently on the device
you are controlling, depending on the brand and
model of your device. For example, Last may be
called RECALL or Previous Channel; ENTER
may be called DISPLAY. Also, this remote can
only operate features that exist on your device. For
example, your device must have Previous Channel
capability for the Last button to operate this
feature.
The remote powers on in TV mode.
Power Used to turn selected device on or off.
Menu Used to view your devices menu
screen.
Guide Used to view the program guide.
Arrows Press Up, Down, Left, Right arrow
keys to navigate on-screen menus.
Select Used to select on-screen menu options.
Info Brings up current Channel and system
information.
Exit Used to exit or clear on-screen menus.
P (Program) See Page 6.
Backlight Stays on for 5 seconds after you press
the backlight button. Stays on for 5
seconds after last button press.
A-B Operates as TV/Video, TV/VCR, etc.,
depending on mode.
PIP TV Picture-in- Picture control.
Swap Swaps TV PIP screens.
Move Moves TV PIP screen position.
Sleep Turns the TV off after a preset period.
Vol+/- Used to adjust the volume level.
M (Mute) Used to mute or restore the volume.
Last Goes to last channel viewed.
CH+/- Used to change to next higher (or
lower) channel.
0-9 Used for channel number or numeric
entries.
Enter Used to enter channel numbers for
some devices.
Subtitle DVD Subtitle toggle.
Rew, Play, FF, Pause, Stop, Rec
VCR transport keys.
DVD Functions
FF and REW buttons control the speed of Fast Forward
and Reverse Playback respectively.
CHAP/CHAN+ and CHAP/CHAN- buttons respectively locate the succeeding or preceding Chapters or
Tracks on a disc.
INFO button brings up DVD Display or Control Menu
for Chapter/Track/Title number, Time remaining/elapsed
indication, system information, etc.
MENU brings up the DVD disc Menu screen - use with
the UP, DOWN, LEFT & RIGHT navigation buttons.
SELECT button is used for on-screen Menu selection.
Note some DVD players require the Play button to be
used.
EXIT button is used to Exit or Clear on-screen Menu
displays.
PLAY button is used to start Disc playback and for
Menu selection on some DVD players.
STOP button stops Disc playback.
PAUSE button pauses Disc playback - press PLAY to
resume.
SUBTITLE brings up DVD Subtitle Menu for Subtitle
selection and display.
GUIDE Used to view the program guide.
A.B brings up the DVD Player’s Setup Menu.
Note, not all DVD Players support all the functions
described above.
SAT Functions
GUIDE button displays on-screen Satellite Channel
Guide.
CHAP/CHAN+ and CHAP/CHAN- buttons perform
the “Page+” and “Page-” function for on-screen Guide
Menus used by some Satellite systems.
INFO button brings up Satellite Display screen for
current Channel and system information.
MENU brings up the Satellite Menu screen - use with
the UP, DOWN, LEFT & RIGHT navigation buttons.
SELECT button is used for on-screen Menu selection.
EXIT button is used to Exit or Clear on-screen Menu
displays.
A.B button performs the Satellite TV/SAT function.
45
Page 4

Button Functions, cont.
Code Programming, cont.
TV/VCR and TV/DVD Combo units
For TV/VCR and TV/DVD combo units, you will need
to set up two different buttons to control both parts of
the combo unit. (See “Direct Code Entry.”) For
example, set up a code under the TV button to control
the TV part of the combo unit AND a separate code for
the VCR or DVD under any other button you choose.
Code Programming
The P (Program) button is used to program the
remote. You can program the remote using the
code for your brand of device from the code list, or
search through the library of codes until you find a
code that works for your device. You can store any
kind of code under any mode (except TV). For
example, you can store a VCR code under the SAT
button, or a DVD code under the VCR button, etc.
However, you can only store TV codes under the
TV button.
Direct Code Entry
1. Press and hold the P (Program) button until the
red indicator stays on. Release the P button.
2. Press and release the desired mode button (TV,
VCR, etc.). The red indicator blinks, then stays
lit.
3. Enter the 3 digit code from the code list.
Note: The red indicator turns off after a valid
code entry and flashes for an invalid code.
4. With your device on, press Channel Up. If the
device responds, no further setup is required.
Note: If some buttons on your device do not
operate, try one of the other codes for your
brand.
Programming with Code Search
If your product does not respond after you have
tried all the codes for your brand, or if your brand
is not listed, try searching for your code by
following these steps.
1. Manually turn on the device (TV, VCR, etc.) to
be controlled.
2. Press and hold the P (Program) button until the
red indicator stays on. Release the P button.
3. Press and release the desired mode button (TV,
VCR, etc.). The red indicator blinks, then stays
lit.
4. Press the Channel Up button repeatedly (up to
300 times) until the device to be controlled
changes channels.
If you accidentally overshoot the desired code,
press the Channel Down button to backtrack
through the library until the device changes
channels. Pressing Channel Up changes the
direction to forward again.
5. Press and release the Enter button to set the
code.
If the device does not have a Channel Up button,
use Play (VCR/DVD) or Power instead. If you go
all the way through the code library without
finding the correct code the indicator blinks a few
times then goes off.
The Code Search method above assumes that you
want to store VCR codes under the VCR button,
DVD codes under DVD, etc. If (for example) you
want to store a SAT code under VCR, first press
and hold the P (Program) button until the red
indicator stays on. Release the P button. Then
press and release VCR. Then enter any SAT code
from the code list. Then proceed from step 4 for
Code Search above.
67
Page 5

Code Identification
Operation
1. Press and hold the P (Program) button until the
red indicator stays lit. Release the P (Program)
button.
2. Press and release the desired mode button (TV,
VCR, etc.). The red indicator blinks, then stays
lit.
3. Press and release the P (Program) button. The
indicator light blinks off.
4. To find the first digit for the code stored under
the mode key you pressed in step 2, press each
numeric key from 0-9 in turn. When the indicator blinks off, the number you pressed is the
first digit for the code you are searching for.
5. Repeat step 4 to find the second and third digits.
(Indicator goes off when third digit is found).
Sleep Function
The Sleep button accesses the sleep function of
your TV if it has that feature. If it doesn’t you can
enable the remote to turn off your TV after a
period of 1 to 99 minutes as shown below. The
remote must be in TV mode to set a Sleep Timer.
This feature works even if your TV does not have a
sleep feature.
1. Press and release the TV mode button.
2. Press and hold the Sleep button until the LED
remains lit (about 2-3 seconds).
3. Release the Sleep button.
4. Press and release the numeric buttons (01-99)
for the time required. The LED will blink off to
indicate button press acceptance.
5. TV Sleep Timer is set.
6. Leave the Remote pointing towards the TV
with an unobstructed path.
To cancel the Sleep Timer, press and hold the
Sleep button until the LED blinks, or press and
release the Power button in TV mode.
1. Press the mode button for the desired device.
2. Aim the remote at the device.
3. Press POWER to turn on the device.
4. Press other buttons to operate the features of
your device.
Note: The REC button must be pressed twice to
record from your VCR. For some brands of VCRs,
you might need to press the REC button once, then
press it again for three seconds.
Troubleshooting
Remote does not operate your device.
• Press the mode button of the device you want
to control.
• Program the remote with a new code.
• Install new batteries. (You might have to
reprogram your remote after installing new
batteries.)
• Remote may not be compatible with your
device.
Remote does not operate some features of your
device.
• Program remote with a new code.
• Remote may not be able to operate all features
of your device or button names might be
different than your device.
Indicator light blinks after you program a
device code.
• Remote did not accept the code.
• Try to program the code again or try a different
code.
89
Page 6

Limited Warranty - USA
Limited Warranty - Canada
Who is Providing This Warranty?
• Orbyx Electronics, LLC (“Orbyx), as the distributor of this
Nexxtech product (your “Product”).
What Does This Warranty Cover?
• This warranty covers defects in materials or workmanship in your
Product under normal use and conditions.
What is the Period of Coverage?
• This warranty covers your Product for 90 days from the original
purchase date.
Who Is Covered?
• This warranty covers the original consumer purchaser. Coverage
terminates if you sell or otherwise transfer your Product.
What Will We Do To Correct Problems?
• We will repair your Product or replace your Product with a new or
reconditioned equivalent product, at our option.
How Do You Get Service?
• Call Orbyx TOLL FREE at 1-866-363-3059 for instructions for
obtaining warranty service from Orbyx’s authorized service
providers.
• Or, return your Product directly to the retail store from which you
purchased the Product.
• When you obtain service for your Product, you must provide a
purchase receipt (or other proof of the original purchase date) and a
description of the defect(s).
What Does This Warranty Not Cover?
• This warranty DOES NOT COVER:
• damage due to misuse, abuse, alteration, unauthorized repair, or
accident (such as improper electrical current);
• damage due to “acts of God” (such as lightning) or other contingencies beyond our control;
• cosmetic damage;
• externally generated static, signal reception or antenna problems not
caused by your Product; or batteries.
• This warranty also DOES NOT COVER, and in no case will we be
liable for, any incidental damages (such as transportation costs to
and from an authorized service provider, or loss of time) or
consequential damages (such as costs of repairing or replacing other
property which is damaged, including tapes, discs, speakers not
included with your Product or other accessories, or external
electrical systems) resulting from the use of your Product. Some
states do not allow the exclusion or limitation of incidental or
consequential damages, so the above limitation or exclusion may not
apply to you.
• Defacing the serial number, or using your Product for commercial or
institutional purposes, voids this warranty.
Are There Other Warranties?
• There are no express warranties other than those expressed herein.
Neither the sales personnel nor any other person is authorized to
make any other warranties or to extend the duration of any
warranties.
• ANY IMPLIED WARRANTIES, INCLUDING ANY IMPLIED
WARRANTY OF MERCHANTABILITY (AN UNWRITTEN
WARRANTY THAT A PRODUCT IS FIT FOR ORDINARY USE),
ARE LIMITED TO 90 DAYS. Some states do not allow limitations
on how long an implied warranty lasts, so the above limitation may
not apply to you.
How Does State Law Apply?
• This warranty gives you specific legal rights, and you may also have
other rights which vary from state to state.
ORBYX ELECTRONICS WARRANTY
ORBYX Electronics warrants that this product will be free from
defects in materials and workmanship for a period of ninety (90) days
from the date of purchase. Within this period, simply take the product
and your proof of purchase to any ORBYX Electronics store or dealer
and the product will be repaired without charge for parts and labour.
ORBYX Electronics reserves the right to charge for transportation.
Any product which has been subject to misuse or accidental damage is
excluded from this warranty. This warranty is only applicable to a
product purchased through ORBYX Electronics’ company owned
stores and dealers and to a product that is presented for repair in a
country where ORBYX Electronics offers the product for sale. While
this warranty does not confer any legal rights other than those set out
above, you may have additional statutory rights which will vary under
the laws of the various countries, states, province and other governmental entities in which ORBYX Electronics operates. This warranty
is subject to all statutory rights you may have in the country of
purchase.
GARANTIE ORBYX ELECTRONICS
ORBYX Electronics garantit ce produit contre tout vice de matière ou
de fabrication pour une période de quatre-vingt-dix (90) jours à
compter de la date d’achat. Au cours de cette période, vous n’avez
qu’a retourner le produit, accompagné d’une preuve d’achat, à tout
magasin ou detaillant ORBYX Electronics où il sera réparé sans frais
pour les pièces et la main-d’oeuvre. ORBYX Electronics se réserve le
droit d’imputer des frais de transport. La garantie ne s’applique pas
aux produits endommagés suite à un mauvais usage ou à un accident.
La garantie s’applique qu’a un produit acheté dans un magasin de la
compagnie ORBYX Electronics ou chez un détaillant ORBYX
Electronics et à un produit qui est vendu dans le pays où l’on fait la
demande de réparation au titre de la garantie. Bien que cette garantie
n’accorde aucun droit particulier autre que ceux susmentionnés, il se
peut que vous puissez jouir d’autres droits qui varient selon le pays,
l’état, la province ou l’entité gouvernementale où ORBYX Electronics
exerce ses affaires. Cette garantie se conforme à tous les droits légaux
que vous pourriez avoir dans le pays d’achat.
Distributed exclusively in the U.S. by:
Orbyx Electronics, LLC
501 South Cheryl Lane,
Walnut, CA 91789.
Imported in Canada for/Importé au Canada pour:
Orbyx Electronics,
Concord, Canada, L4K 4M3.
For parts, service, and general inquiries please call:
1-866-363-3059.
Pour pièces, service et demandes générales, s’il vous plaît, appelez: 1866-363-3059.
Limited Warranty/Garantie Limiteé U.S.A & Canada
© 2004 ORBYX Electronics. All Rights Reserved.
10 11
Page 7

Universal Remote
Cat. No.
1519003
Distributed exclusively in the U.S. by:
Orbyx Electronics, LLC
501 South Cheryl Lane,
Walnut, CA 91789.
Imported in Canada for/Importé au Canada pour:
Orbyx Electronics,
Concord, Canada, L4K 4M3.
 Loading...