

Page 1
Page 2

Nexxt Solutions - NexxtGate Wireless Access Point
Copyright Statement
Nexxt Solutions™ is a registered trademark. Other trademarks or brand names contained
herein are the trademarks or registered brand names of their respective owners. Copyright
of the whole product as integration, including its accessories and software, belongs to Nexxt
Solutions Ltd. No individual or third party is allowed to copy, plagiarize, reproduce, or translate
it into other languages, without express consent from Nexxt Solutions, Ltd. All of the photos
and product specifications mentioned in this manual are used as reference only. Upgrades of
software and hardware may occur, and should there be any changes, Nexxt Solutions shall not
be responsible for notifying about any such modifications in advance. If you would like to know
more about our products, please visit our website at www.NexxtSolutions.com.
2
Page 3

Nexxt Solutions - NexxtGate Wireless Access Point
FCC STATEMENT
This equipment has been tested and found to comply with the limits for a Class B digital device,
pursuant to part 15 of the FCC Rules. These limits are designed to provide reasonable protection against harmful interference in a residential installation. This equipment generates, uses
and can radiate radio frequency energy and, if not installed and used in accordance with the
instructions, may cause harmful interference to radio communications. However, there is no
guarantee that interference will not occur in a particular installation. If this equipment does
cause harmful interference to radio or television reception, which can be determined by turning
the equipment off and on, the user is encouraged to try to correct the interference by one or
more of the following measures:
•
Reorient or relocate the receiving antenna.
•
Increase the separation between the equipment and receiver.
•
Connect the equipment into an outlet on a circuit different from that to which the receiver
is connected.
•
Consult the dealer or an experienced radio/TV technician for help.
This device complies with part 15 of the FCC Rules. Operation is subject to the following
two conditions:
This device may not cause harmful interference.
1.
This device must accept any interference received, including interference that may cause
2.
undesired operation.
Any changes or modifications not expressly approved by the party responsible for compliance
could void the user’s authority to operate the equipment.
Note: The manufacturer is not responsible for any radio or TV interference caused by
unauthorized modifications to this equipment. Such modifications could void the user’s authority
to operate the equipment.
FCC RF Radiation Exposure Statement
This equipment complies with FCC RF radiation exposure limits set forth for an uncontrolled
environment. This device and its antenna must not be co-located or operating in conjunction
with any other antenna or transmitter.
“To comply with FCC RF exposure compliance requirements, this grant is applicable to only
Mobile Configurations. The antennas used for this transmitter must be installed to provide
a separation distance of at least 20 cm from all persons and must not be co-located or
operating in conjunction with any other antenna or transmitter.”
3
Page 4

Nexxt Solutions - NexxtGate Wireless Access Point
CONTENTS
Chapter 1
Introduction
Product overview
1.1
Features
1.2
Chapter 2
Device layout
LED definition
2.1
Rear panel layout and connectos
2.2
System requirements
2.3
Environment requirements
2.4
Connecting the device
2.5
Chapter 3
Quick installation guide
Checking the LEDs
3.1
Initial configuration
3.2
Quick setup wizard
3.3
Chapter 4
AP Client Router & AP Router Operation Mode
Login
4.1
Status
4.2
Quick setup
4.3
Operation mode
4.4
Network
4.5
4.5.1
4.5.2
4.5.3
4.6.1
4.6.2
4.6.3
4.6.4
4.6.5
4.6.6
4.6.7
4.6.8
4.7.1
4.7.2
4.7.3
4.9.1
4.9.2
4.9.3
4.9.4
4.10.1
4.10.2
4.10.3
LAN
WAN
MAC clone
Wireless
4.6
Basic settings
Wireless mode
Security settings
MAC filtering
Wireless statistics
Distance setting
Antenna alignment
Throughput monitor
DHCP
4.7
DHCP settings
DHCP clients list
Address reservation
Wireless settings
4.8
Forwarding
4.9
Virtual servers
Port triggering
DMZ
UPnP
Security
4.10
Firewall
IP address filtering
Domain filtering
4
Page 5

Nexxt Solutions - NexxtGate Wireless Access Point
4.10.4
4.10.5
4.10.6
4.12.1
4.12.2
4.13.1
4.13.2
4.13.3
4.14.1
4.14.2
4.15.1
4.15.2
4.15.3
4.15.4
4.15.5
4.15.6
4.15.7
4.15.8
4.15.9
4.15.10
MAC address filtering
Remote management
Advanced security
4.11
Static routing
4.12
IP & MAC binding
Binding setting
ARP list
4.13
Dynamic DNS
Dyndns.org DDNS
Oray.net DDNS
Comexe.cn DDNS
4.14
SNMP
Community setting
SNMP system setting
4.15
System tools
Time
Firmware
Factory defaults
Backup & restore
Ping Watch Dog
Speed test
Reboot
Password
Syslog
Statistics
Appendix A: FAQ
Appendix B: Configuring the PC
Appendix C: Specifications
Appendix D: Glossary
Package Contents
Upon opening the box, make sure that the following items are included:
High Power Wireless Access Point
Power adapter
PSE module
Mounting kit
Quick installation guide
Resource CD
Note:
If any of the listed items is missing, mismatched, damaged or broken, contact your local dealer
immediately for replacement.
•
•
•
•
•
•
5
Page 6

Nexxt Solutions - NexxtGate Wireless Access Point
Chapter 1
Introduction
Thank you for purchasing the AELPLDR4U1 High Power Wireless Outdoor Access Point from
Nexxt Solutions.
1.1 Product overview
The 2.4 GHz High Power Wireless Outdoor Access Point is a dedicated Wireless Internet
Service Provider Customer-Premises Equipment (WISP CPE) device, providing the functions of
a Wireless Access Point (WAP), WISP Client, and a high-gain antenna in one weatherproof device designed for outdoor use. The high power design extends transmission range and delivers
a more reliable wireless connection. Equipped with a Power over Ethernet Port known as PoE,
this device can be installed in locations where AC power is not readily available. It also features
a web-based management utility for easy configuration and hassle-free network connection.
Convenient power, LAN and signal strength LED indicators allow users to monitor the status of
the network.
Three operation modes are provided in the access point to meet each user’s needs.
AP Client Router: choose this mode to enable users to share the internet as a WISP client
router.
AP Router: choose this mode to enable users to share internet via ADSL/Cable modem,
in a wireless broadband router configuration.
AP: choose this mode to enable wireless devices to access a network using, in an access
point configuration.
1.2 Features
•
Complies with IEEE 802.11g, IEEE 802.11b, IEEE 802.3, IEEE 802.3u standards.
•
Wireless Data transfer rates up to 54Mbps.
•
The access point serves as the connection point between wireless and wired networks or
as the center point of a stand-alone wireless network.
•
High output power for extended range and reliability
•
12 dBi, dual-polarized antenna easily builds up to 9.3-mile wireless.
•
Strong 24 dBm output power rating.
•
Easy to set up and manage with PPoE option. Ping Watch Dog feature automatically reboots
device when necessary
•
Controlled access and WEP, WPA/WPA2, WPA-PSK/WPA2-PSK encryption methods ensure
data integrity and privacy.
•
3 year full warranty, with a 2 year extension with online registration
•
Supports AP Client Router, AP Router and AP operation mode.
•
Supports Client Router Mode for WISP CPE
•
Supports passive power over Ethernet.
•
Supports Wireless Distribution System (WDS).
•
Up to 50Km.
•
Supports Antenna Alignment.
•
Throughput monitor detailed information about the current wireless data throughput.
•
Supports Layer 2 User Isolation.
•
Supports Ping Watch Dog.
•
Supports link speed test.
•
Supports Remote Management
6
Page 7

Nexxt Solutions - NexxtGate Wireless Access Point
•
Output transmit power adjustable.
•
Supports PPPoE, Dynamic IP, Static IP Internet Access.
•
Built-in NAT and DHCP server supporting static IP address distributing.
Supports UPnP, Dynamic DNS, Static Routing, VPN Pass-through.
•
Supports Virtual Server, Special Application and DMZ host.
•
Built-in firewall supporting IP address filtering, Domain Name filtering, and MAC
address filtering.
•
Provides WLAN ACL (Access Control List).
•
Supports configuration backup/restore and firmware upgrade.
•
Supports Web management.
7
Page 8
Nexxt Solutions - NexxtGate Wireless Access Point
Chapter 2
Device layout
2.1 LED
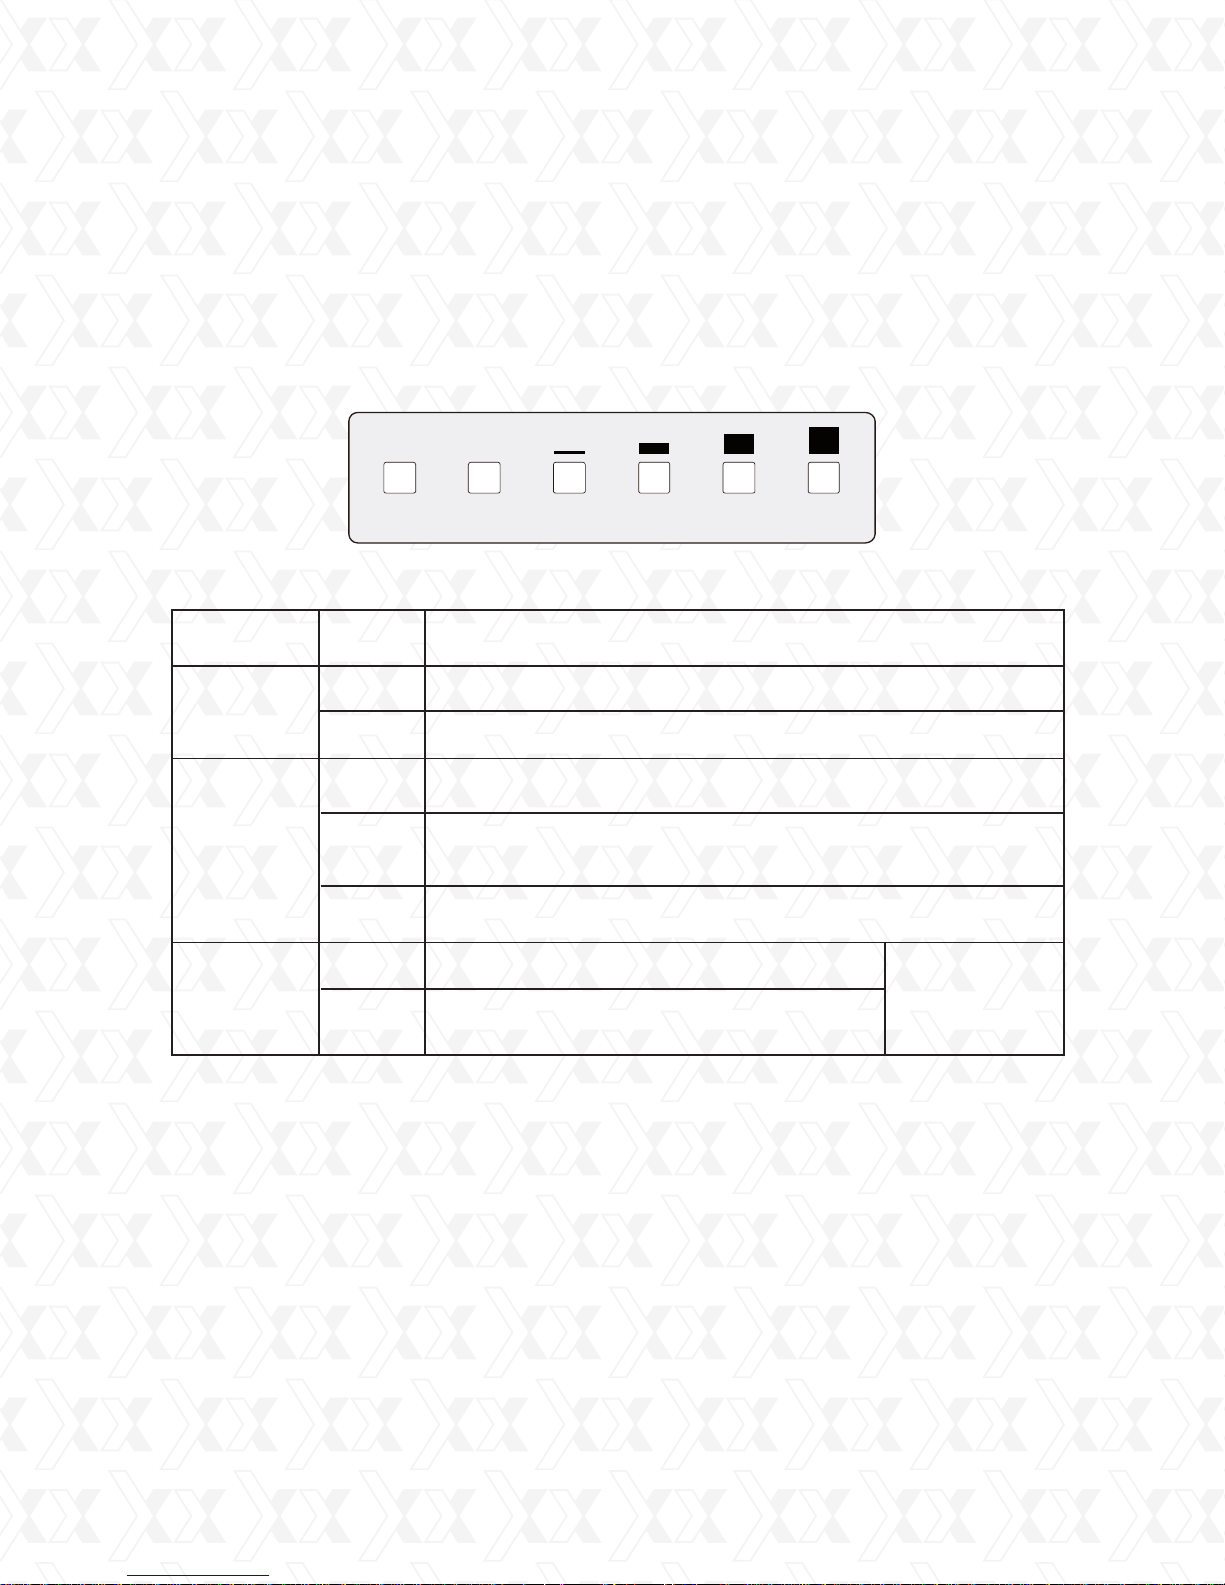
The AELPLDR4U1 access point features LED indicators, designed to display the connection
status and the strength of the wireless signal.
Wireless Signal StrengthPower LAN
Figure 2-1 Front Panel sketch
Name
Status Indication
Off No power
Power
On Power on
Off There is no device linked to the corresponding port
LAN
Wireless
On
Blinking
Off
Signal
Strength
Note:
Wireless Signal Strength Indicators:
In AP or Bridge mode, all the four LEDs will light up.
•
In Client or Repeater mode, the corresponding LED(s) will light up when the RSSI value
•
(wireless signal strength value) reaches the RSSI threshold. The value of RSSI threshold
can be set on the Wireless Advanced Settings page, as shown in Figure 4-26.
For example, if the RSSI value you set is 30, while RSSI threshold of the four LEDs are 15,
25, 35, 45 respectively, then the LEDs having RSSI thresholds of 15 and 25 will light up.
On
There is a device linked to the corresponding port but
no activity is being detected
There is an active device linked to the corresponding port
There is no remote wireless signal
Indicates the wireless signal strength
of a remote AP
Table 2-1
Client or
Repeater mode
8
Page 9

Nexxt Solutions - NexxtGate Wireless Access Point
2.2 Rear panel layout and connectors
Figure 2-2 Rear panel sketch
Ground
•
RESET button: use it to reset device to its factory default values
•
LAN: this port is used to connect to the PoE port of the PSE (Power Sourcing Equipment)
•
module.
: antenna jack to connect an additional high-power external antenna. Since the unit comes
with a built in antenna, usually it is not required to connect another one outside.
2.3 System requirements
•
Each PC in the LAN needs a working Ethernet Adapter and an Ethernet cable with RJ45
connectors
•
TCP/IP protocol must be installed on each PC
•
Web browser, such as Microsoft Internet Explorer 5.0 or later, Netscape Navigator 6.0
or later
•
If the device is configured in the AP client router mode, you will also need:
Wireless Internet Access Service (WISP).
•
If the device is configured in the AP router mode, you will also need:
Broadband Internet Access Service (DSL/Cable/Ethernet)
•
One DSL/Cable Modem that has an RJ45 connector (you do not need it if you connect the
router to the Ethernet)
2.4 Environment requirements
•
Operating temperature: -30ºC~70ºC
•
Operating Humidity: 10%~90% RH, non-condensing
9
Page 10
Nexxt Solutions - NexxtGate Wireless Access Point
2.5 Connecting the device
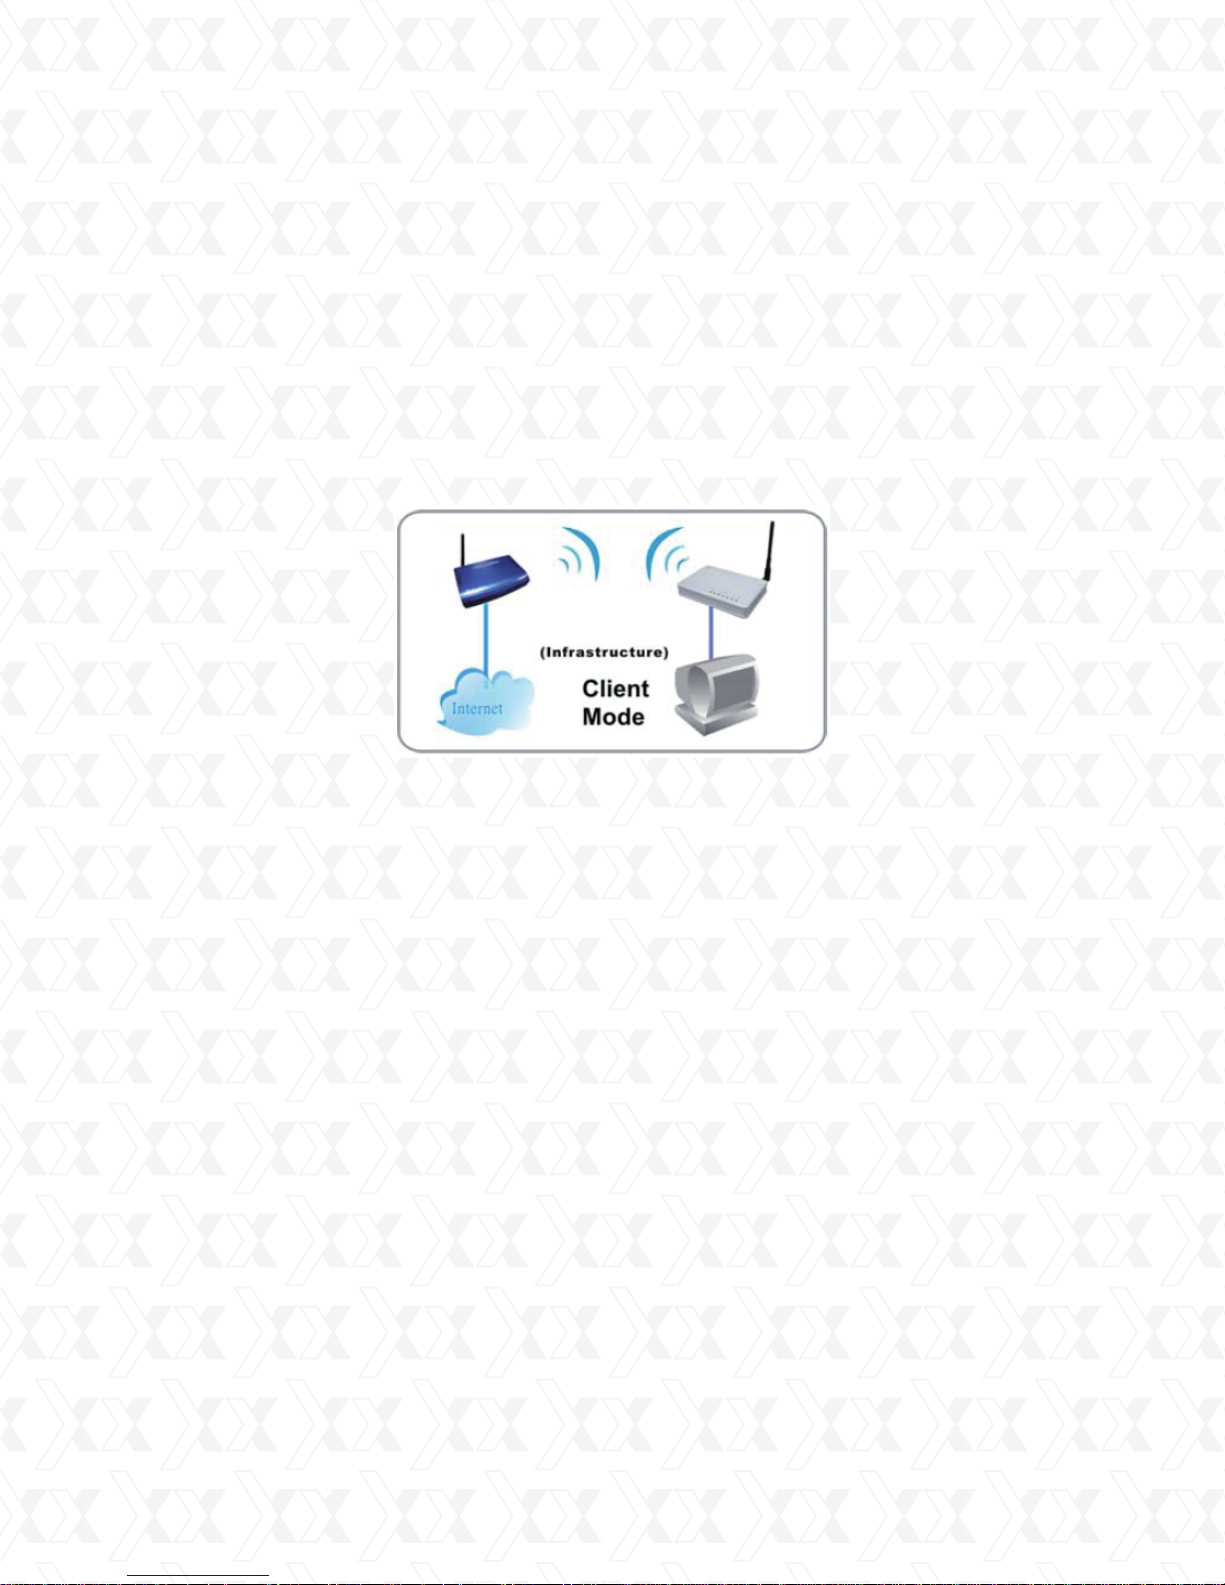
To establish an infrastructure network in AP Client Router mode as Figure 2-3, please take the
following steps:
Make sure you are provided with wireless Internet service by your WISP (Wireless Internet
1.
Service Provider).
Locate an optimum location for the AP. Try to place your AP in an appropriate position where
2.
it can well receive the signal from WISP.
Connect the AP to the desktop PC.
3.
Adjust the direction of the AP to get the best signal.
4.
Power on the AP before configuring the AP on the web-based page on your computer.
5.
Figure 2-3
10
Page 11
Nexxt Solutions - NexxtGate Wireless Access Point
Power adapter
Power Injector
Computer
AELPLDR4U1
PSE device
Chapter 3
Quick installation guide
This Chapter will guide you to configure the AP to function in your network and gain access
to the internet through your ISP immediately after successful configuration. A more detailed
description of the AP’s webbased utility and its functions can be found in “Chapter 4:
Configuring the AP”
Note: only a wired network connection can be used for the initial configuration of the access
point.
Before making any hardware connections, find a suitable location to place the access point.
The best spot is usually at the center of the wireless network, with unobstructed line-of-sight to
all wireless clients operating in the coverage area.
Also consider that the higher the antenna is placed, the better the device can perform. Do not
forget to make sure that the pole or structure you use to install the device is stable and firmly
secured in place.
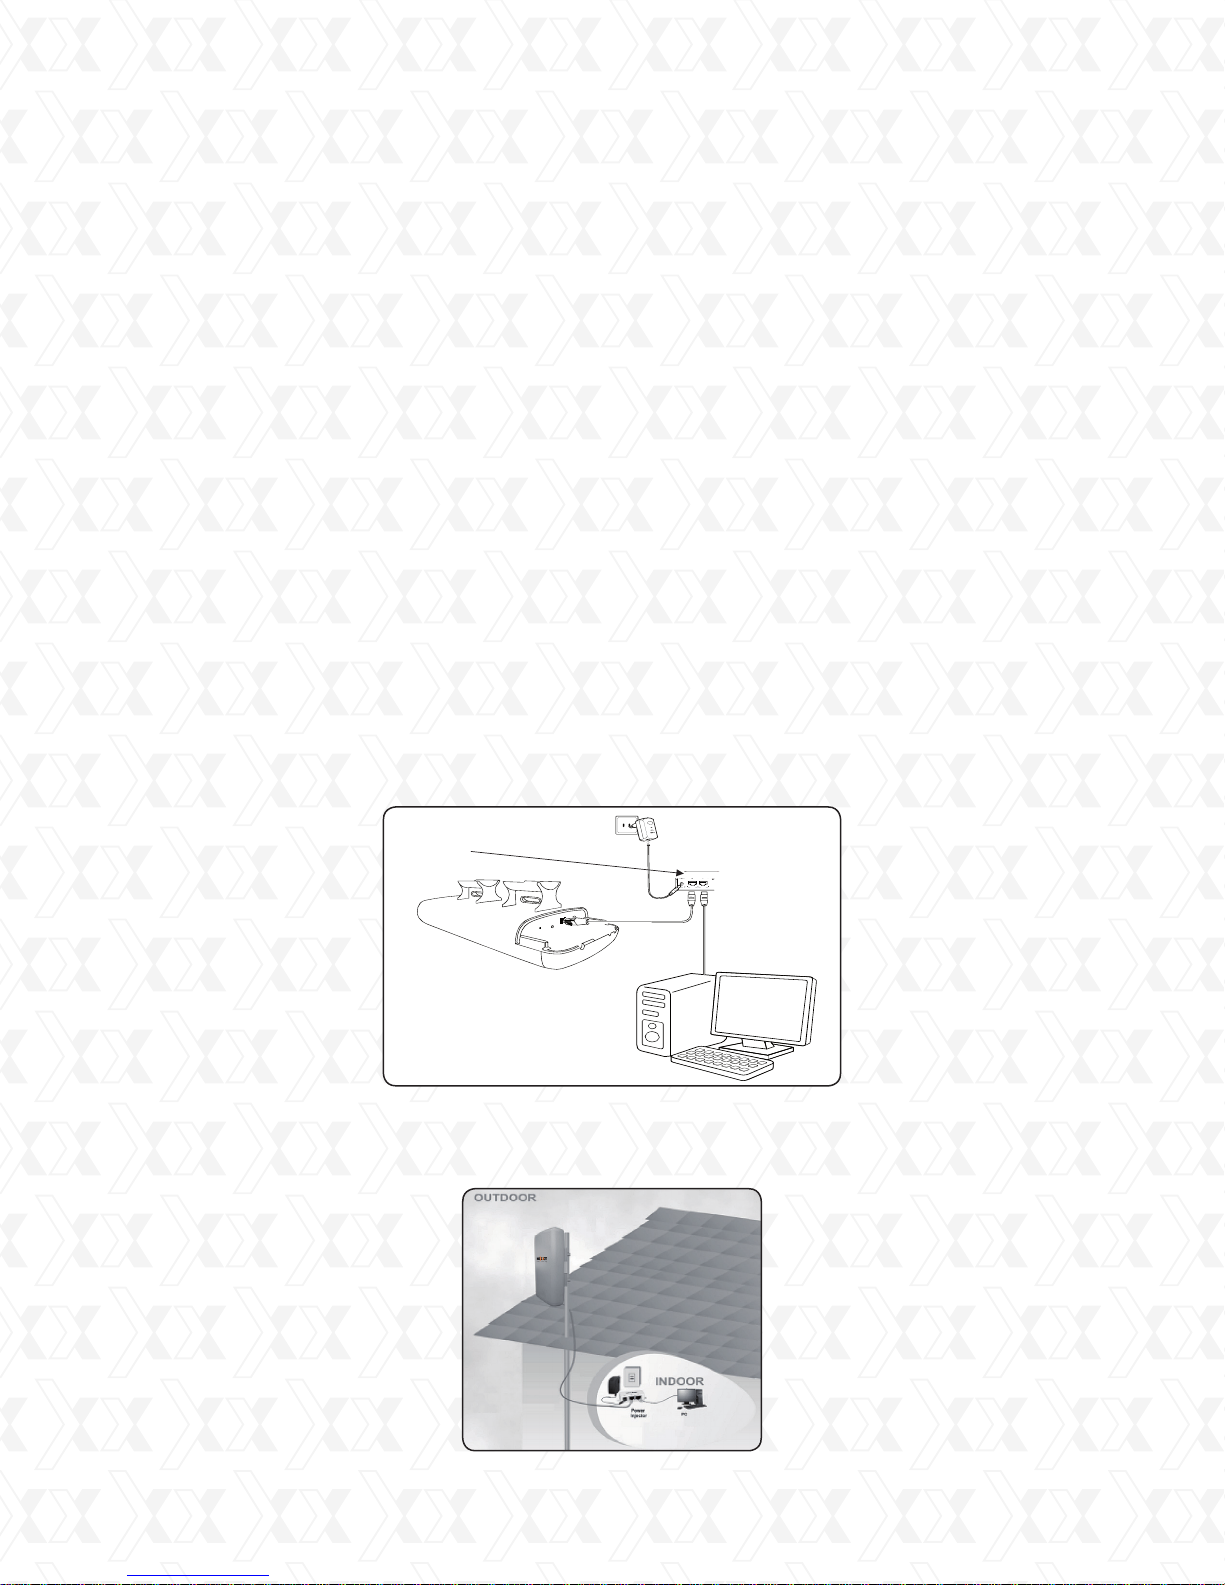
In order to integrate your new wireless access point into your installation, start by plugging
1.
one end of an Ethernet cable to the PoE port of the supplied PSE, and the other end of the
cable to the LAN port on the access point.
Use a second Ethernet cable to make the connection between the LAN port of the PSE
2.
module and your computer.
Power the device by plugging the included AC power adapter to DC jack on the PSE device,
3.
and the other end into a standard wall outlet.
If setting up the device in an outdoor location, the connection will be similar to the figure
4.
below, once the above steps have been successfully completed.
11
Page 12
Nexxt Solutions - NexxtGate Wireless Access Point
Flashing or steady orange
Steady orange Steady orange
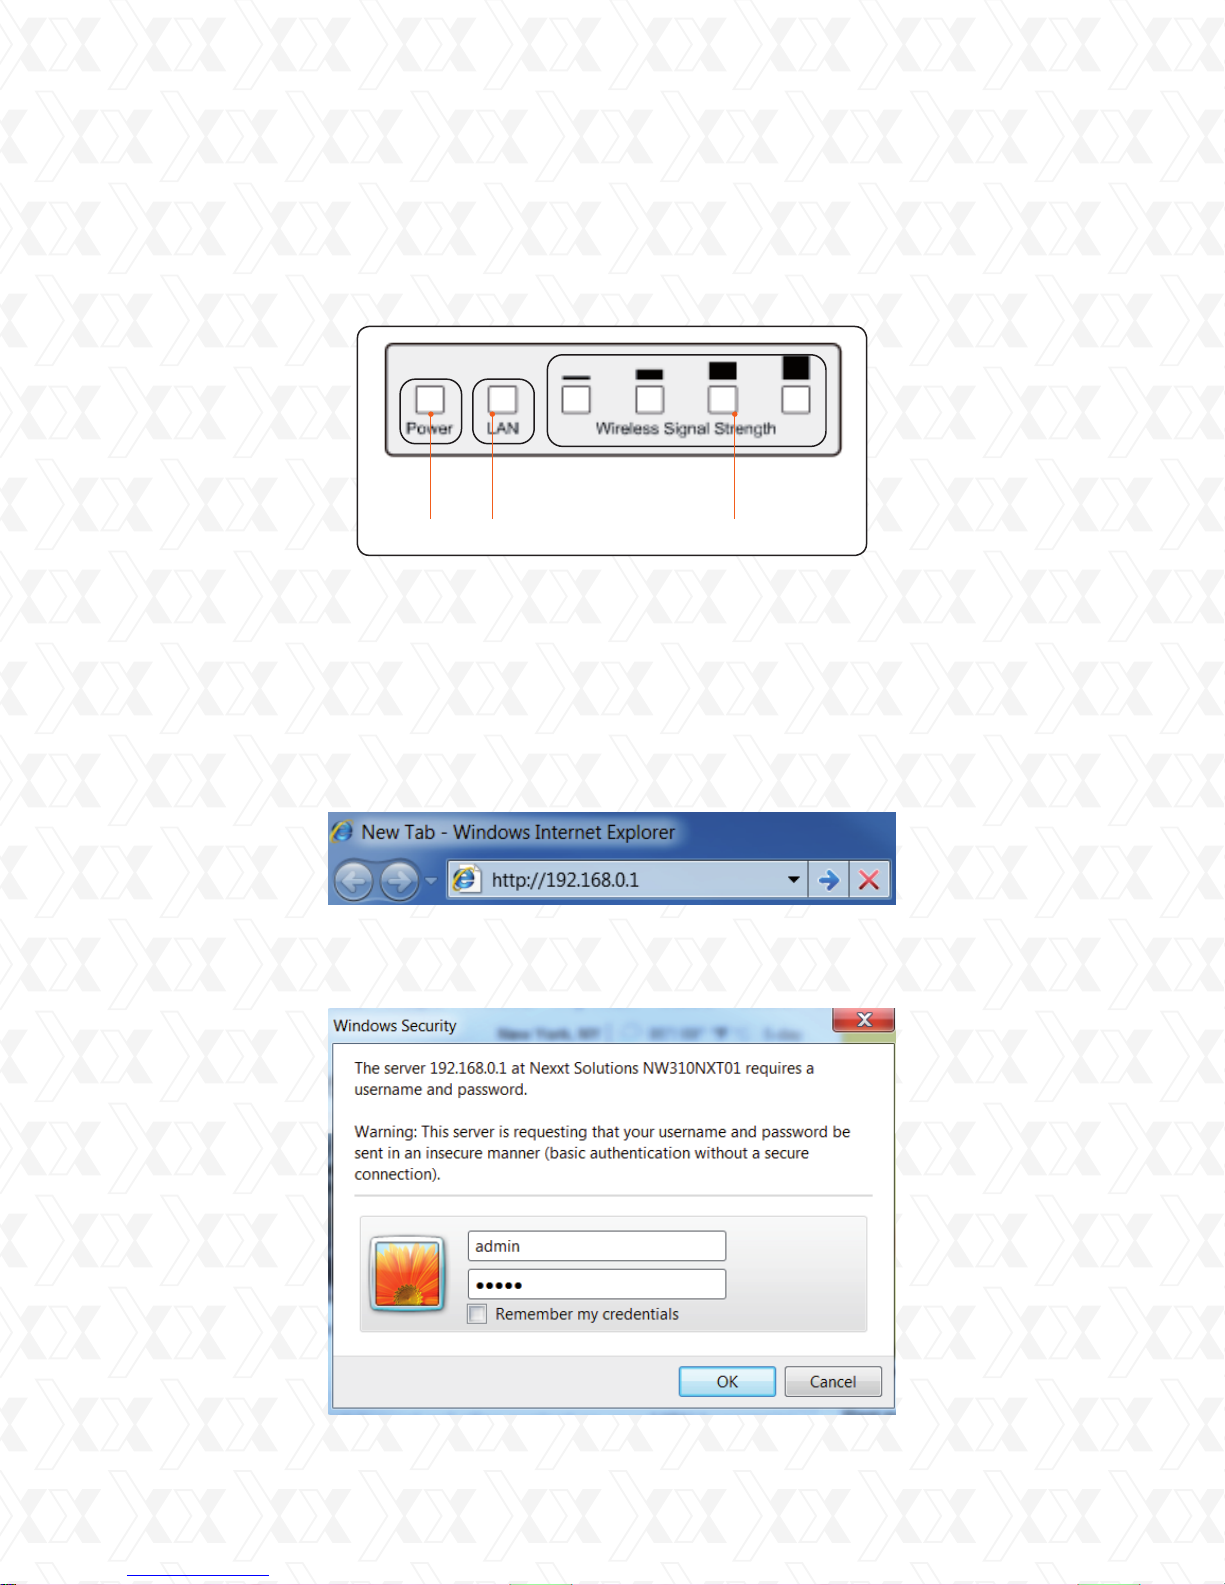
3.1 Checking the LEDs
Upon powering on all your network devices, check the status of the access point by verifying that
all the LEDs light up normally, as shown in the diagram below.
3.2 Initial configuration of the access point
Note: first make sure your wired station Static IP address is set within the same range as the
Wireless Access Point.
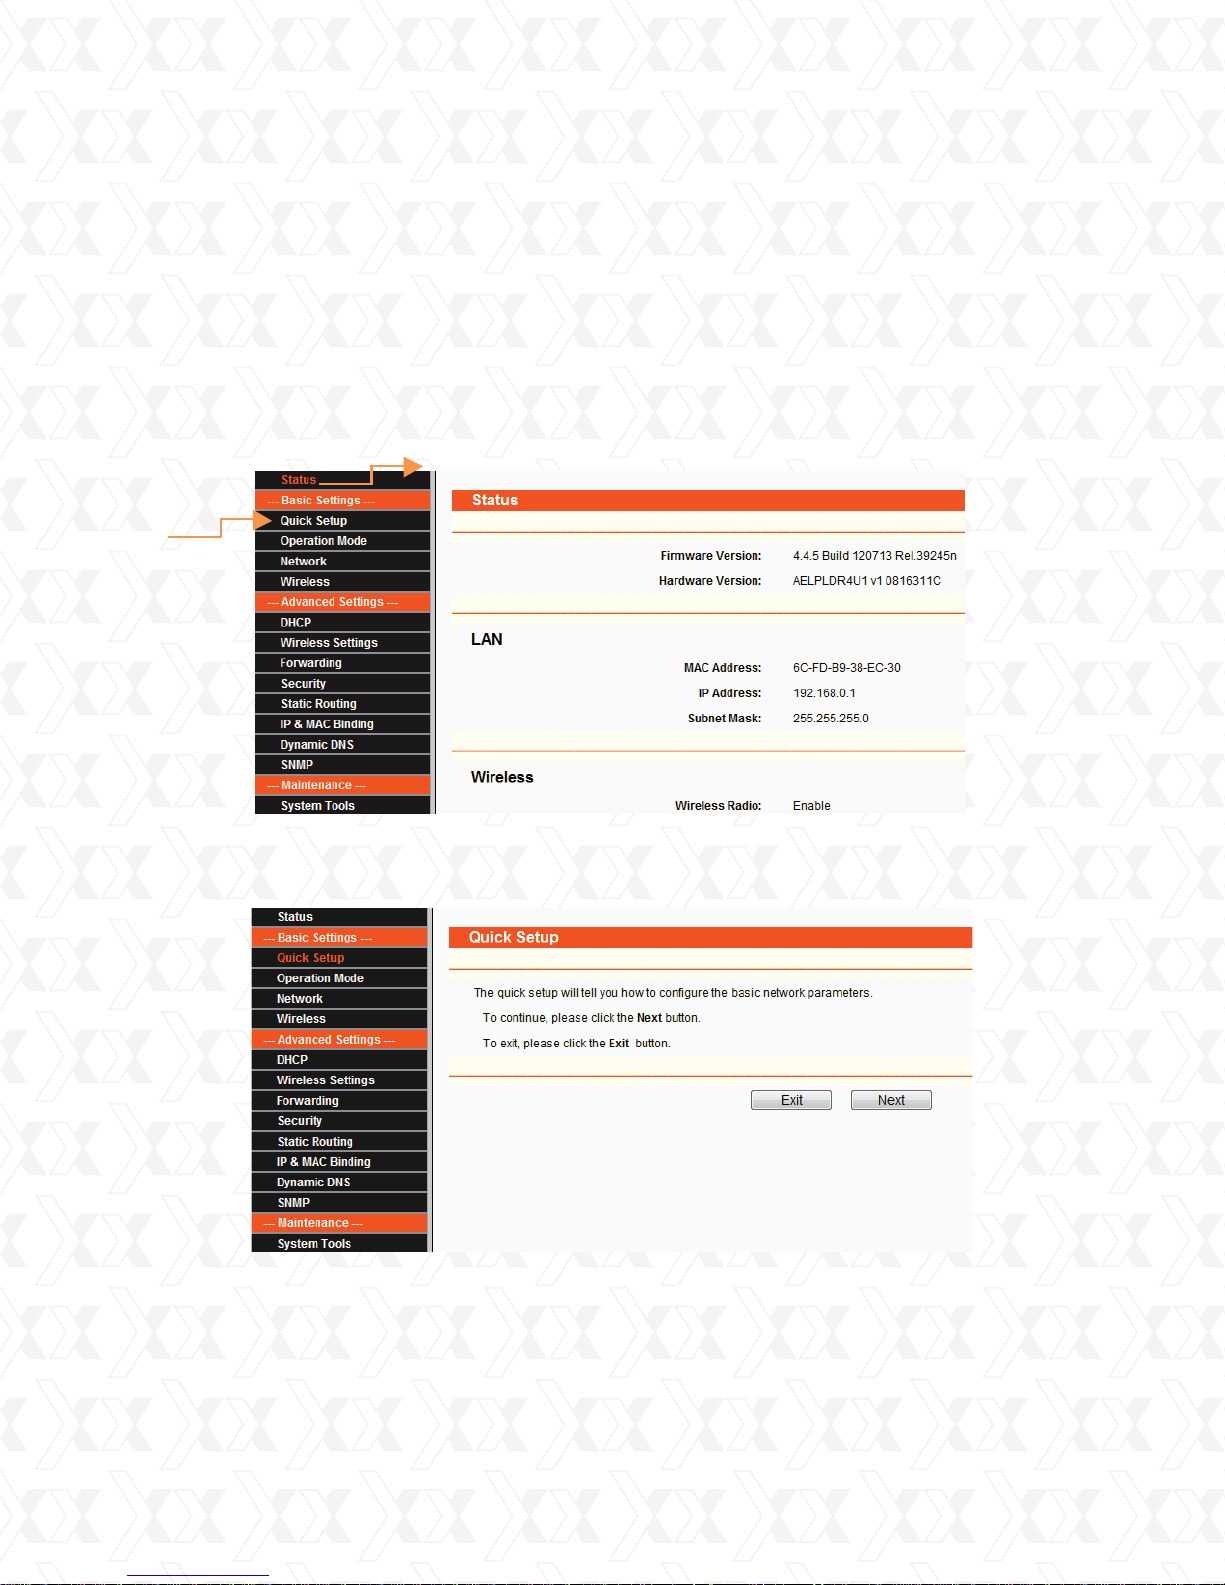
3.2.1 Login
Start your WEB browser. Type http://192.168.0.1 in the address field of the browser.
1.
Press enter to continue.
A dialog box will prompt you to enter the User name and Password. Enter the default values,
2.
both in lower case, and then click OK to complete the logging procedure.
12
Page 13
Nexxt Solutions - NexxtGate Wireless Access Point
Afterwards, you can assign a new password for security purposes without necessarily
3.
modifying the default user name.
If the login window fails to appear, it means that your Web-browser has been set
4.
to a proxy. Verify that your parameters and passwords are correct, before making
another attempt.
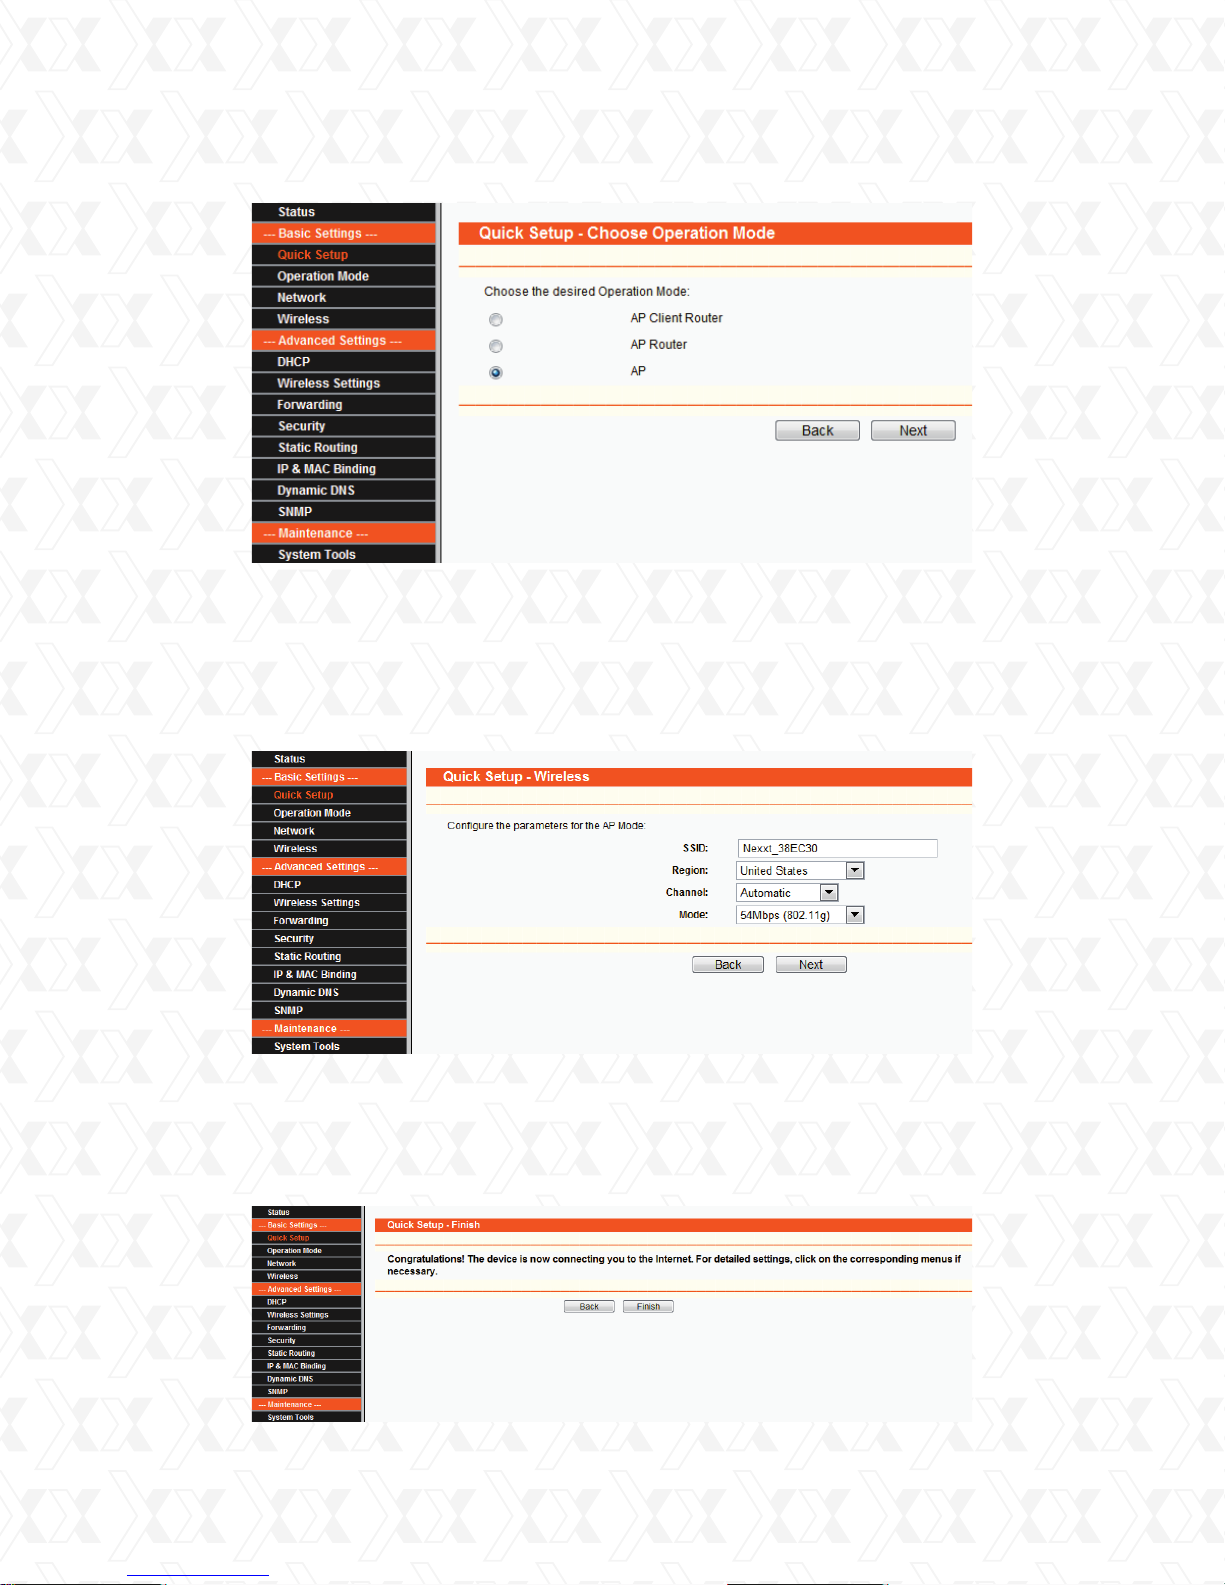
After successfully logging in, the main navigation page will appear on the screen.
5.
3.3 Quick setup wizard
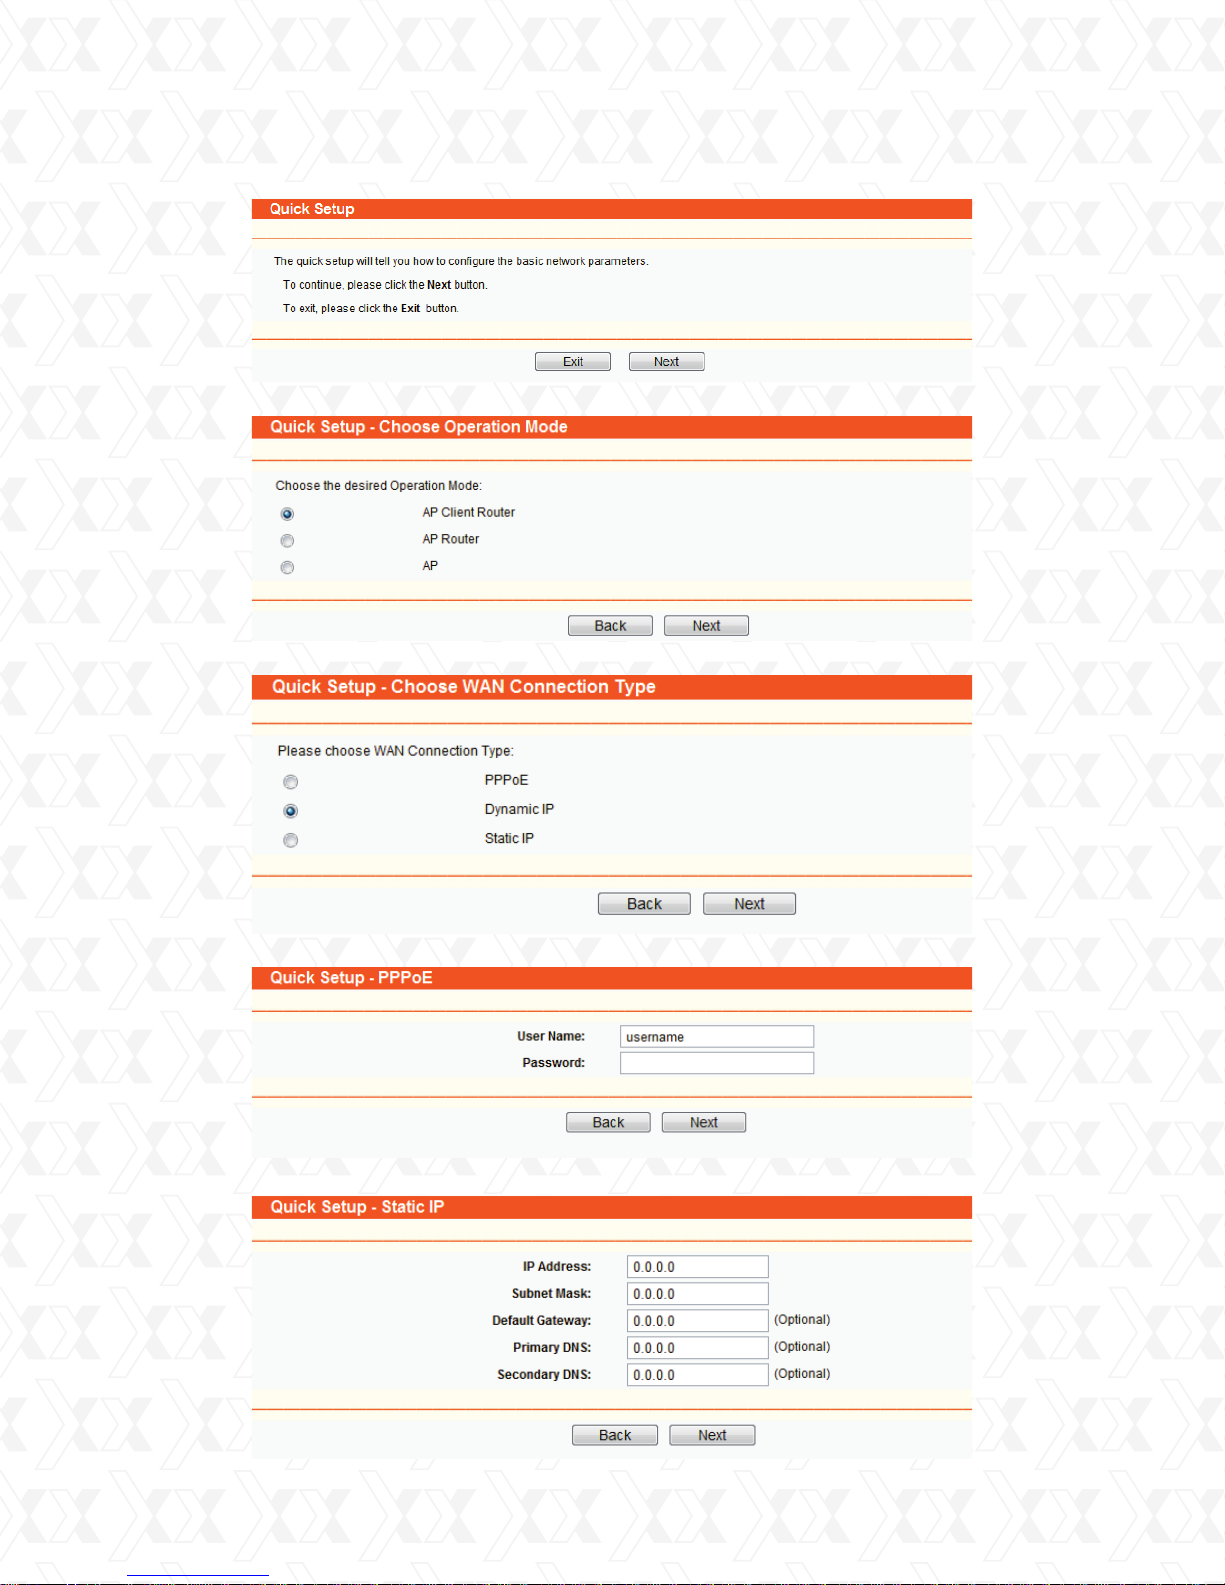
From the main menu on the left column of the screen, select the option Quick Setup.
1.
The Quick Setup window will pop up on the screen, as shown below. Click Next to open the
2.
following window.
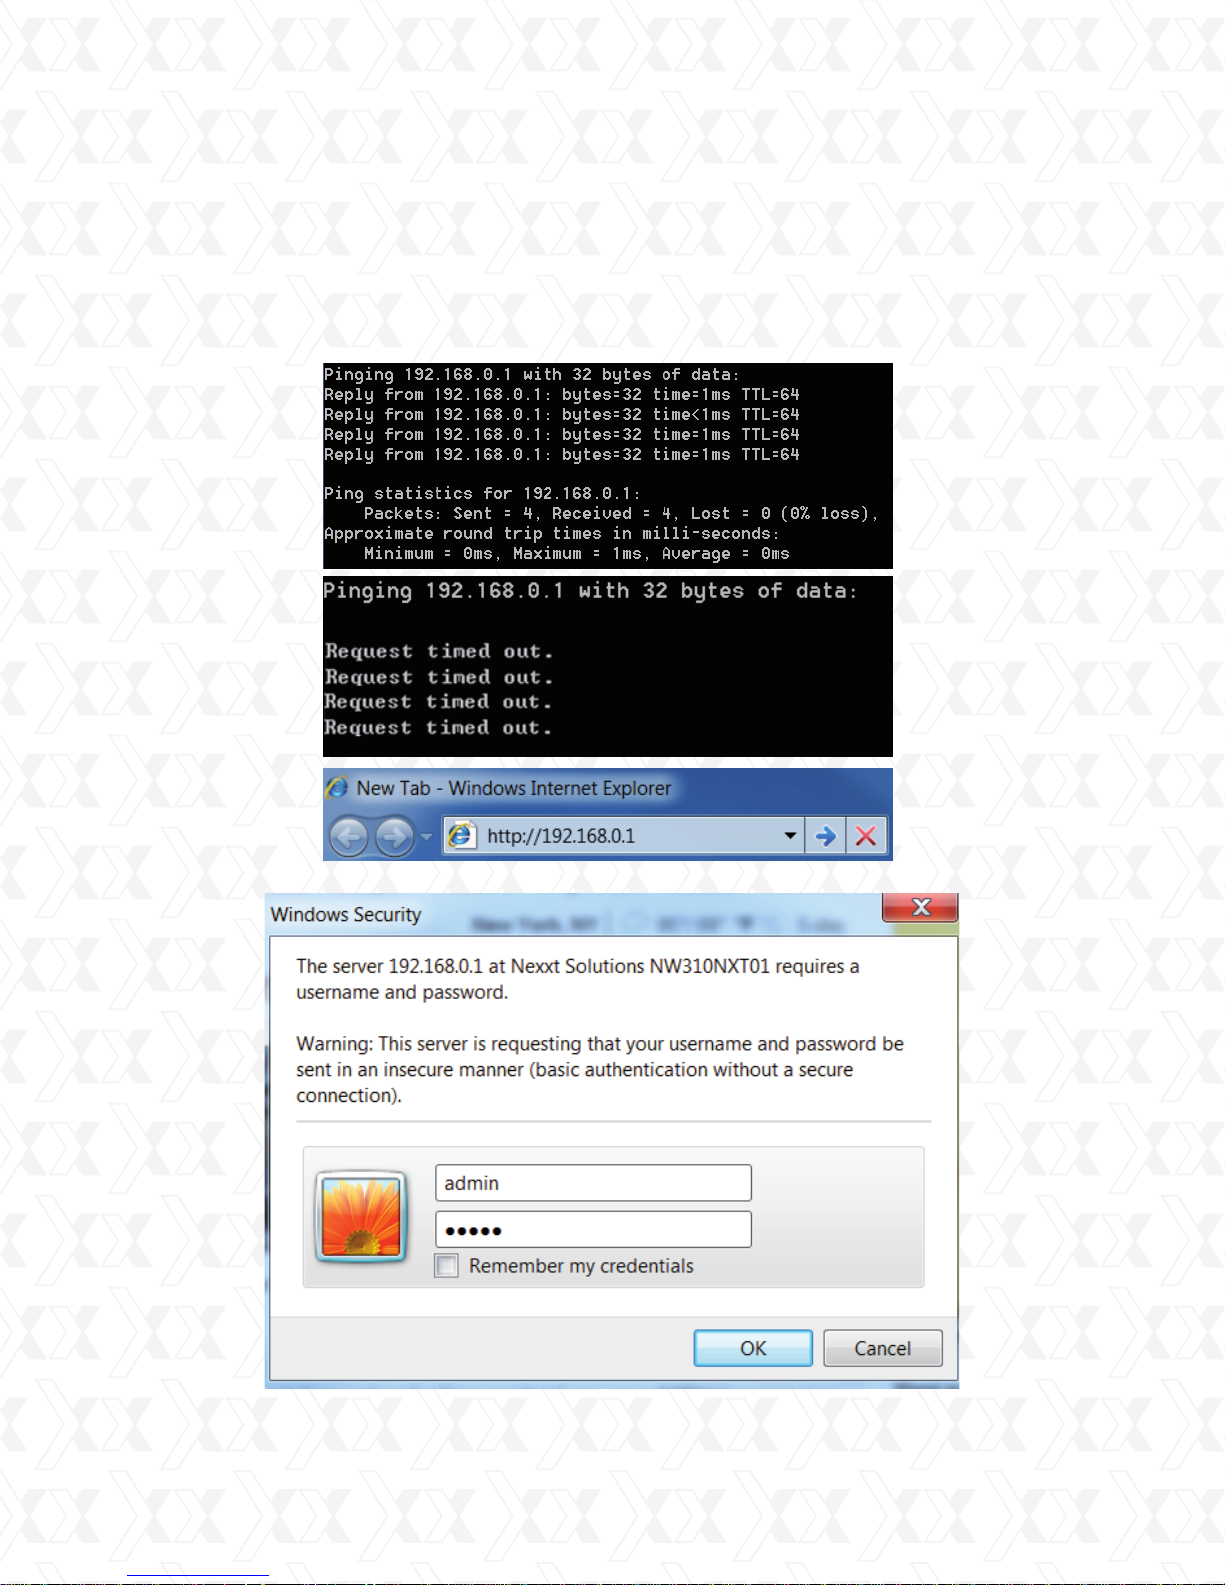
Three operation modes are provided in the access point to meet each user’s needs.
3.
•
AP Client Router: choose this mode to enable users to share the internet as a WISP client router.
•
AP Router: choose this mode to enable users to share internet via ADSL/Cable modem, in a wireless
broadband router configuration.
•
AP: choose this mode to enable wireless devices to access a network using Wi-Fi, in an access
point configuration.
13
Page 14
Nexxt Solutions - NexxtGate Wireless Access Point
4. For illustration purposes only, we will walk you through the AP option.
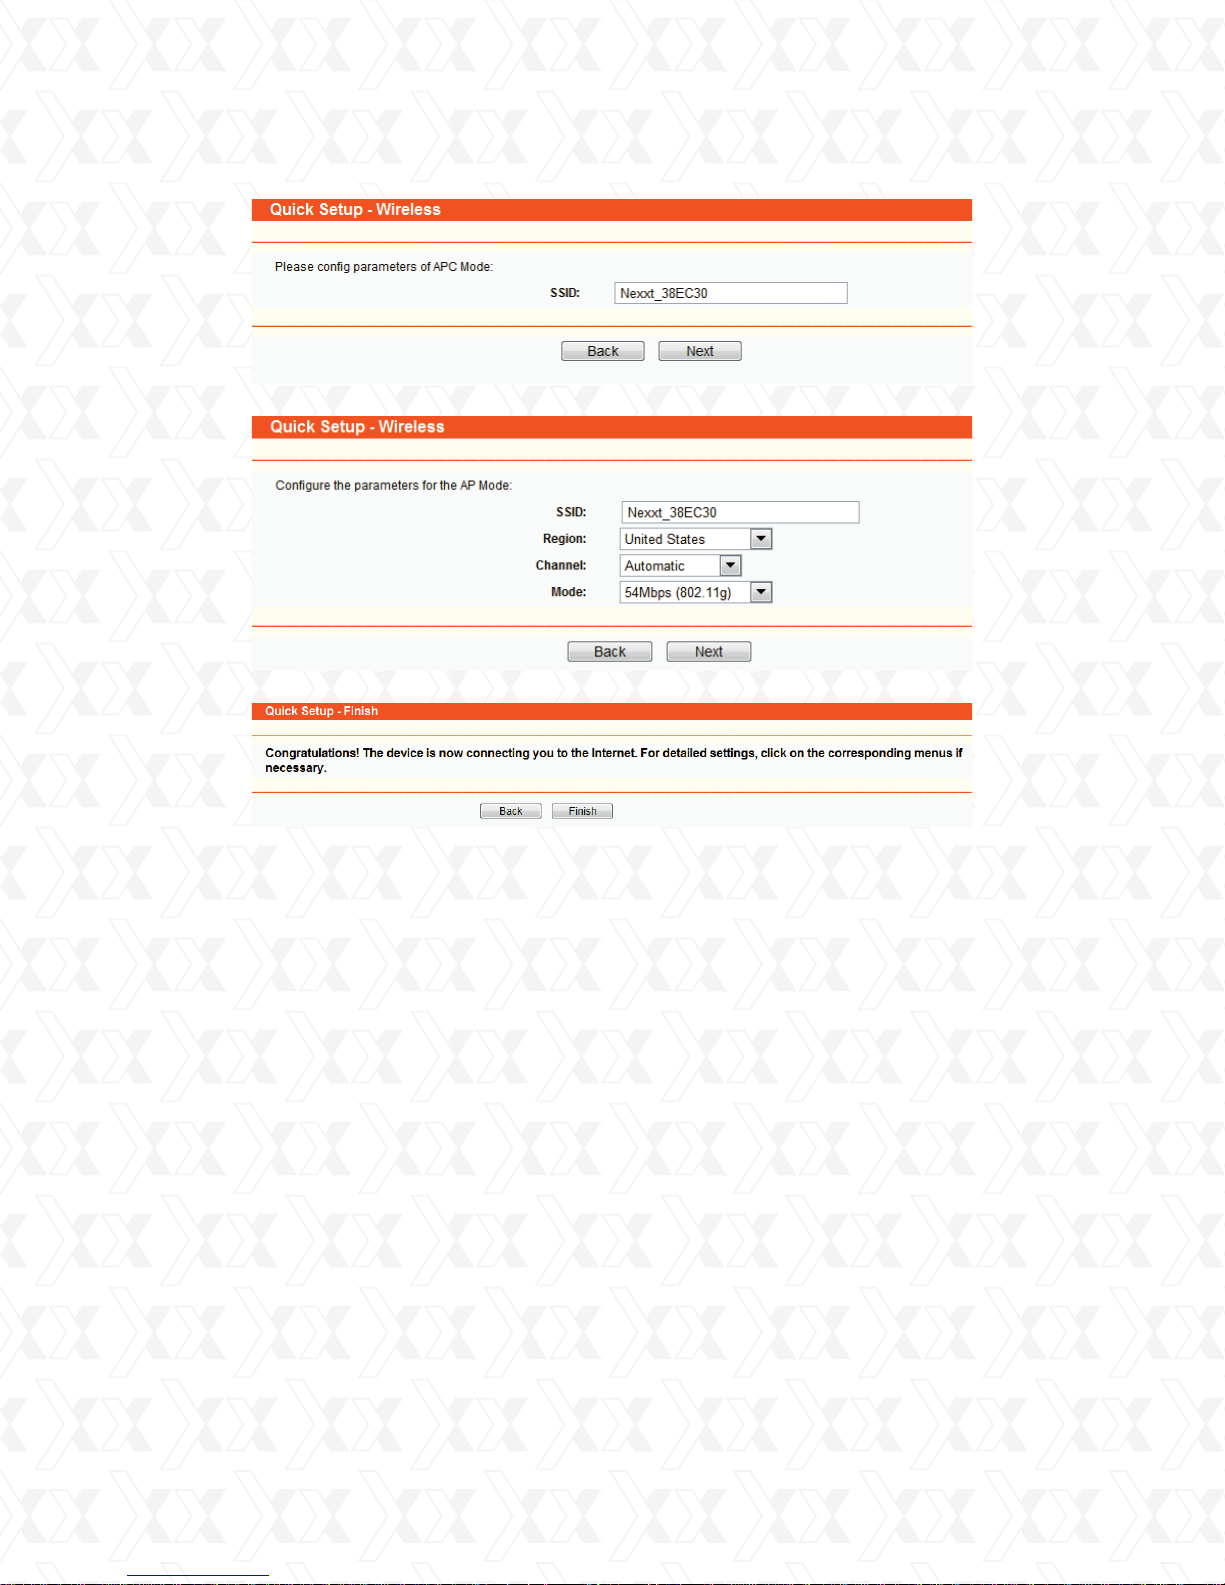
3.4 AP mode setting
1. Select AP on the Quick setup dialog box, as shown in the above illustration.
2. Click Next to open the wireless configuration window.
3.
Enter a unique name to identify your wireless network. However, choose a name that is
easily remembered by network users. In this example, we are using Nexxt_xxxxxx as the
SSID identifier.
4.
Select your region from the drop-down list, followed by next.
14
Page 15
Nexxt Solutions - NexxtGate Wireless Access Point
5.
Click Finish to exit the Quick Setup wizard and wait until the AP finishes rebooting
automatically. Changes will take effect only after the reboot is complete.
6.
Remove the LAN cable from your computer and the PSE module. Now, insert your
internet cable into the port labeled LAN located in the PSE device.
7.
From now on, you can refer to the manual for any customized settings such as
security, encryption, network modes, antenna alignment and more.
15
Page 16
Nexxt Solutions - NexxtGate Wireless Access Point
16
Page 17
Nexxt Solutions - NexxtGate Wireless Access Point
17
Page 18
Nexxt Solutions - NexxtGate Wireless Access Point
Chapter 4
AP client router & AP router operation mode
This Chapter describes how to configure some advanced settings for your Access Point
through the web-based management page. In the following sections, we will use the device in
AP Client Router operation mode as example.
4.1 Login
After your successful login, you can configure and manage the Access Point.. There are
fourteen main menus on the left of the Web-based management page. Submenus will be
available after you click one of the main menus. The fourteen main menus are: Status,
Quick Setup, Operation Mode, Network, Wireless, DHCP, Wireless Settings, Forwarding,
Security, Static Routing, IP & MAC Binding, Dynamic DNS, SNMP and System Tools. On the
right of the Web-based management page, you will find detailed descriptions and instructions
for the corresponding page. To apply any settings you have altered on the page, please click
Save.
For a description of each Web page key functions, please refer to the sections below.
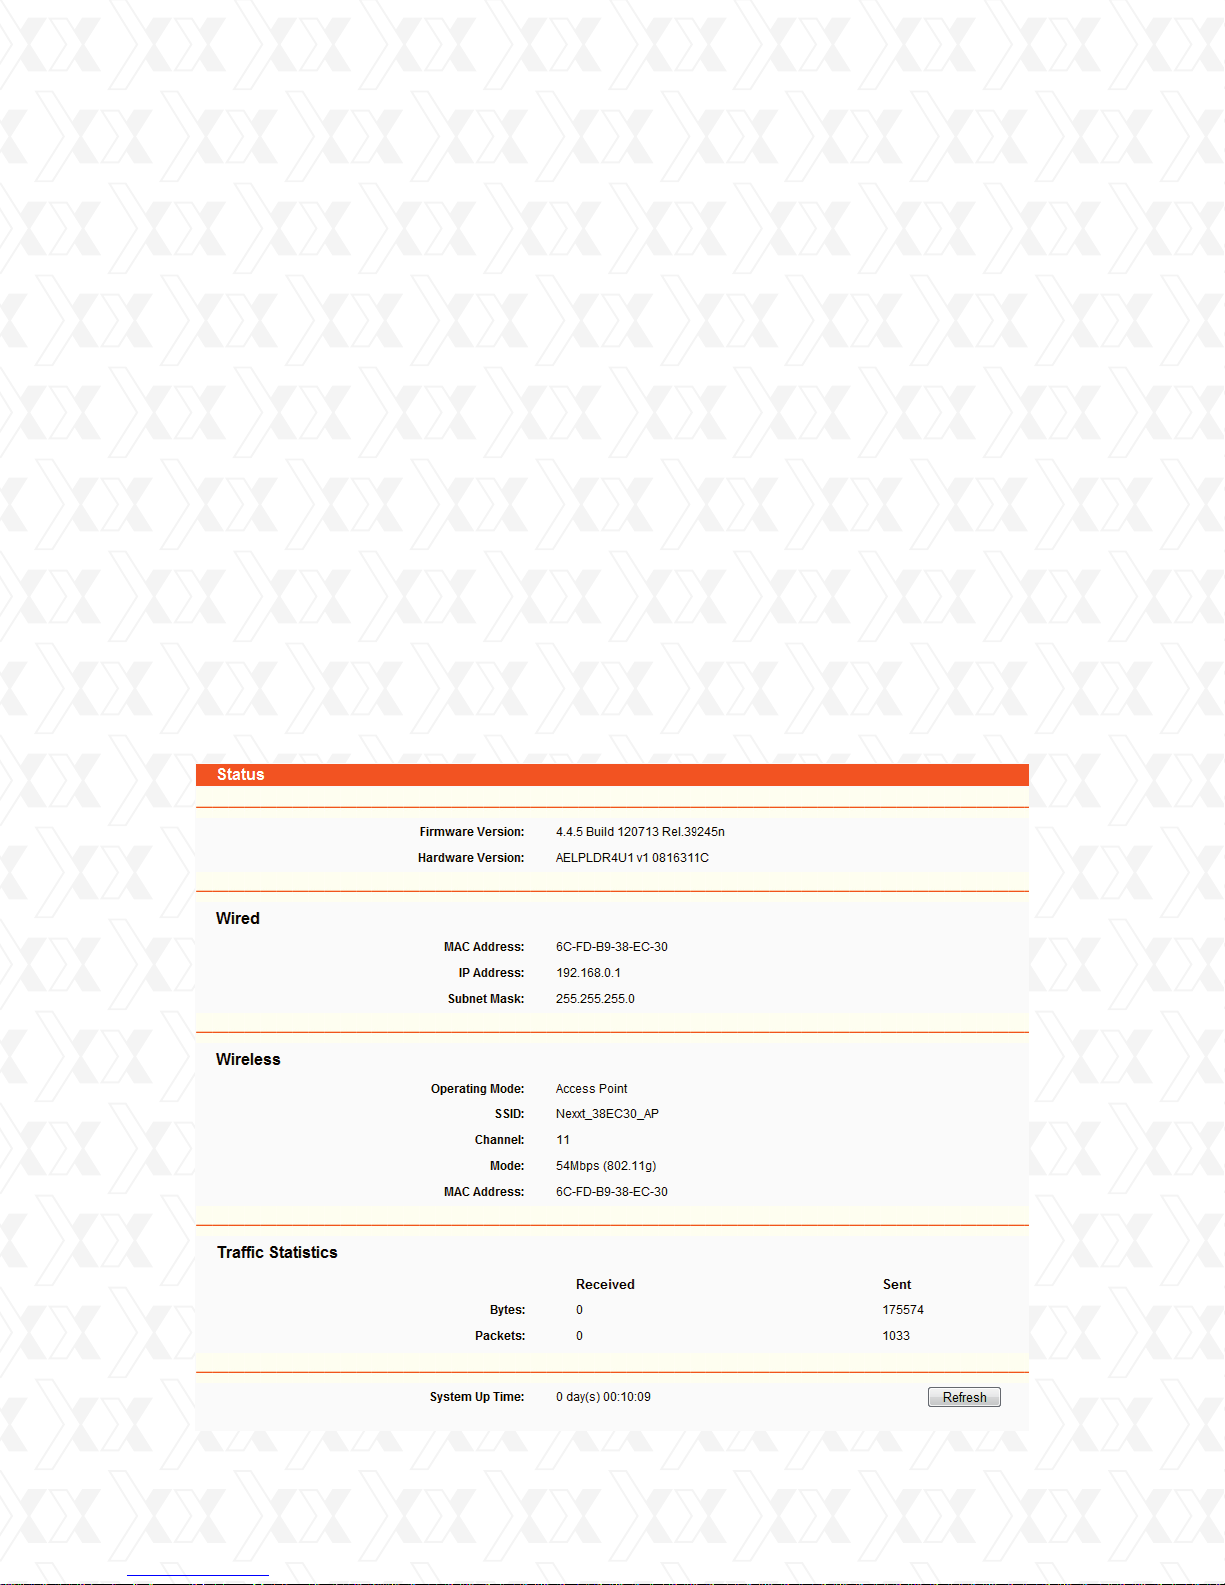
4.2 Status
In this screen, you will be able to view the AP’s current status and configuration settings, all of
which are read-only.
Figure 4-1 Status
18
Page 19
Nexxt Solutions - NexxtGate Wireless Access Point
1. LAN
This field displays the current settings or information belonging to the LAN, including the MAC
address, IP address and Subnet Mask.
2. Wireless
This field displays basic information or status belonging to the wireless function, including
Wireless Radio, SSID, Channel, Mode, and Wireless MAC address.
3. WAN
These parameters apply to the WAN port of the router, including MAC address, IP address,
Subnet Mask, Default Gateway and DNS server. If PPPoE is chosen as the WAN connection
type, the Disconnect button will be shown here while you are accessing the Internet. You can
also cut the connection by clicking the button. If you have not connected to the Internet, just
click Connect to establish the connection.
4. Traffic Statistics
This field displays the router’s traffic statistics.
5. System Up Time
The length of time since the system was last powered on or reset.
4.3 Quick setup
Please refer to Section 3.2: “Quick Setup”.
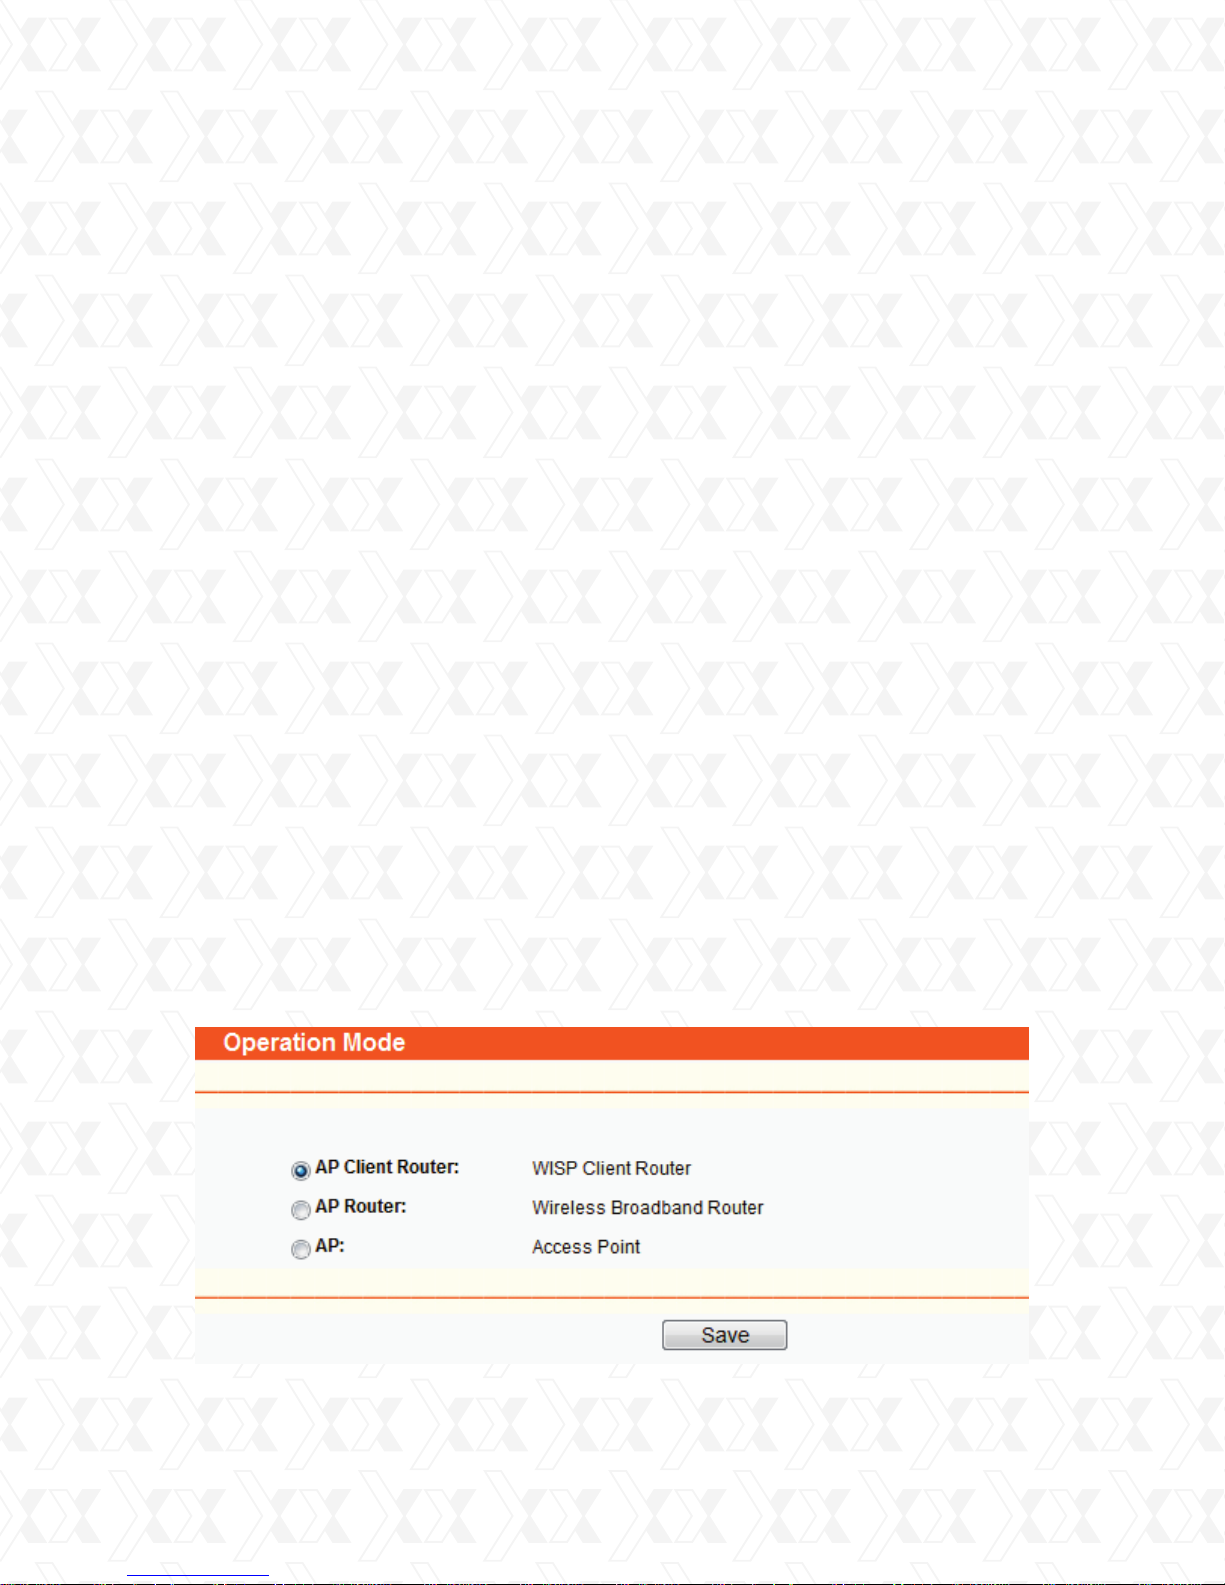
4.4 Operation mode
The Operation Mode window will allow you to choose the operational application for your AP.
The AP supports three mode types: AP Client Router, AP Router and AP. Please select the one
you prefer, as shown in Figure 4-2. Click Save to confirm your choice.
Figure 4-2 Operation Mode
19
Page 20
Nexxt Solutions - NexxtGate Wireless Access Point
•
AP Client Router - In this mode, the device enables multiple computers to share the Internet
from WISP. All LAN ports share the same IP from WISP through Wireless port.
While connecting to WISP, the Wireless port works as a WAN port when in AP Client mode.
The Ethernet port acts as a LAN port.
•
AP Router - In this mode, the device enables multiple computers to share the Internet via
ADSL/Cable Modem. The wireless port share the same IP to ISP through an ethernet WAN
port. The Wireless port acts like a LAN port when in the AP mode.
•
AP - In this mode, the device allows wireless communication devices to access a wireless
network using WIFI. Both, the ethernet port and the wireless port work as LAN ports.
4.5 Network
The Network option allows you to customize your local network manually by changing the default
settings of the AP.
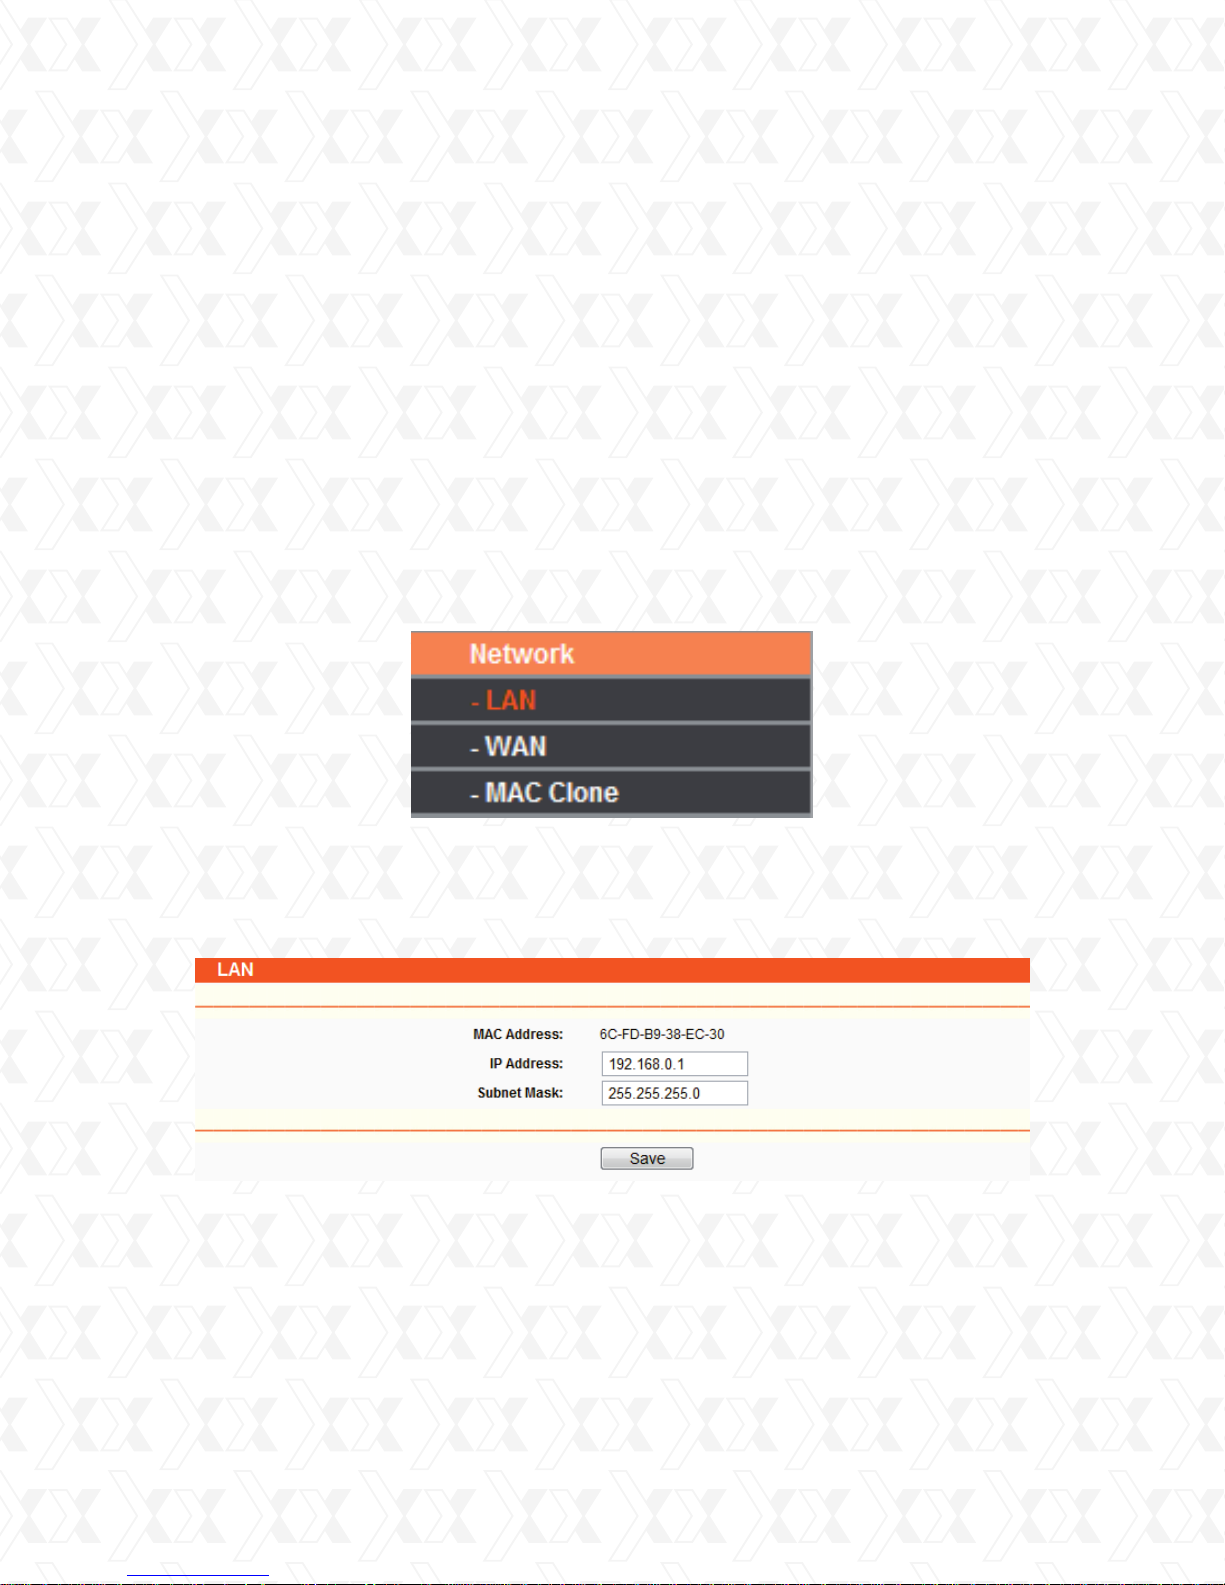
There are three submenus under the Network menu (shown in Figure 4-3): LAN, WAN and
MAC Clone. Click any of them in order to configure the corresponding function. Please refer to
the sections below for a detailed description of each submenu.
Figure 4-3 Network menu
4.5.1 LAN
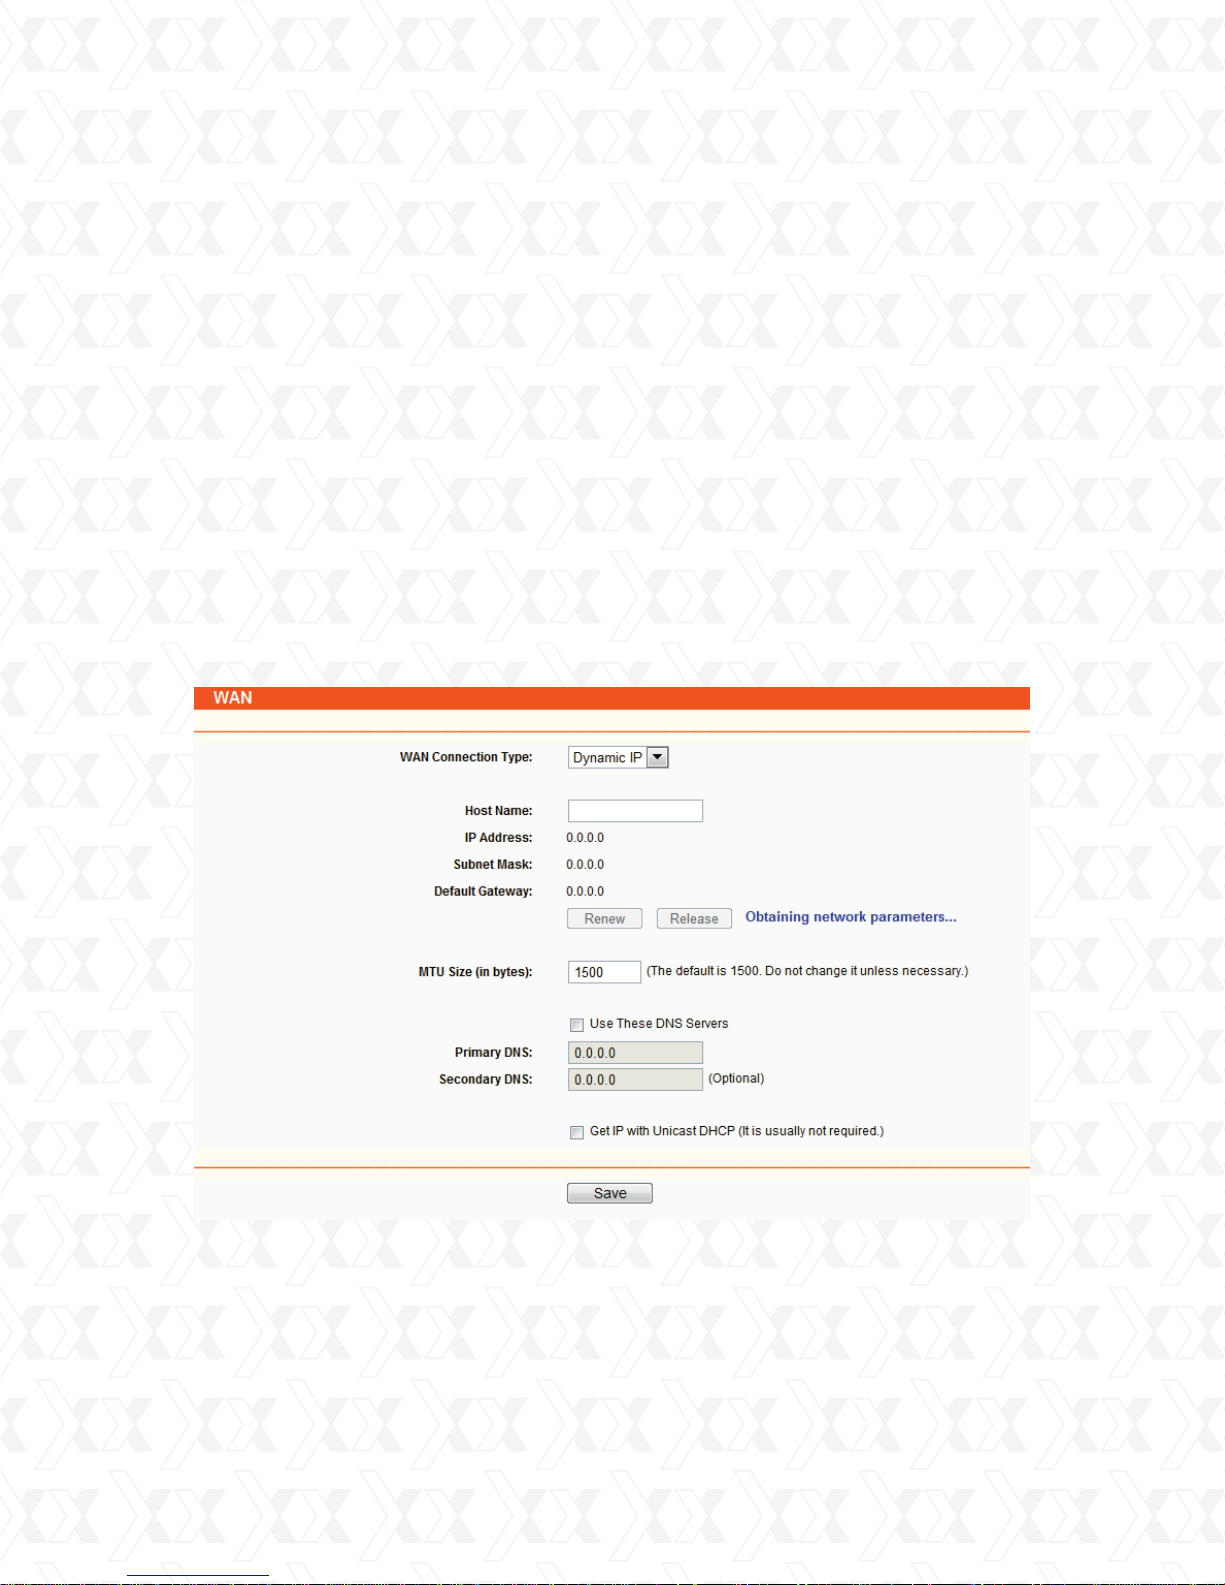
Go to Network > LAN to enable the configuration of IP parameters of the LAN port on
this page.
Figure 4-4 LAN
•
MAC Address - The physical address of the router, as seen from the LAN. This value cannot
be changed.
•
IP Address - Enter the IP address of your router in dotted-decimal notation (factory default:
192.168.0.1).
•
Subnet Mask - An address code that determines the size of the network. Normally use
255.255.255.0 as the subnet mask.
20
Page 21
Nexxt Solutions - NexxtGate Wireless Access Point
Note:
1.
If you change the IP Address of the LAN, you must use the new IP Address to login to
the Router.
2.
If the new LAN IP Address you set is not in the same subnet, the IP Address pool of
the DHCP server will not take effect until they are re-configured.
3.
If the new LAN IP Address you set is not in the same subnet, the Virtual Server and
DMZ Host will change accordingly at the same time.
4.5.2 WAN
Go to Network > WAN to enable the configuration IP parameters of the WAN port on this page.
First, please choose the WAN Connection Type (Dynamic IP/Static IP/PPPoE) for the Internet.
The default type is Dynamic IP. If you are not given any login parameters (fixed IP Address, logging
ID, etc), please select Dynamic IP. If you are given a fixed IP (static IP), please select Static IP. If you
are given a user name and a password, please select the type of your ISP provided (PPPoE). If you
are not sure which connection type you are currently using, please contact your ISP to obtain the
correct information.
1.
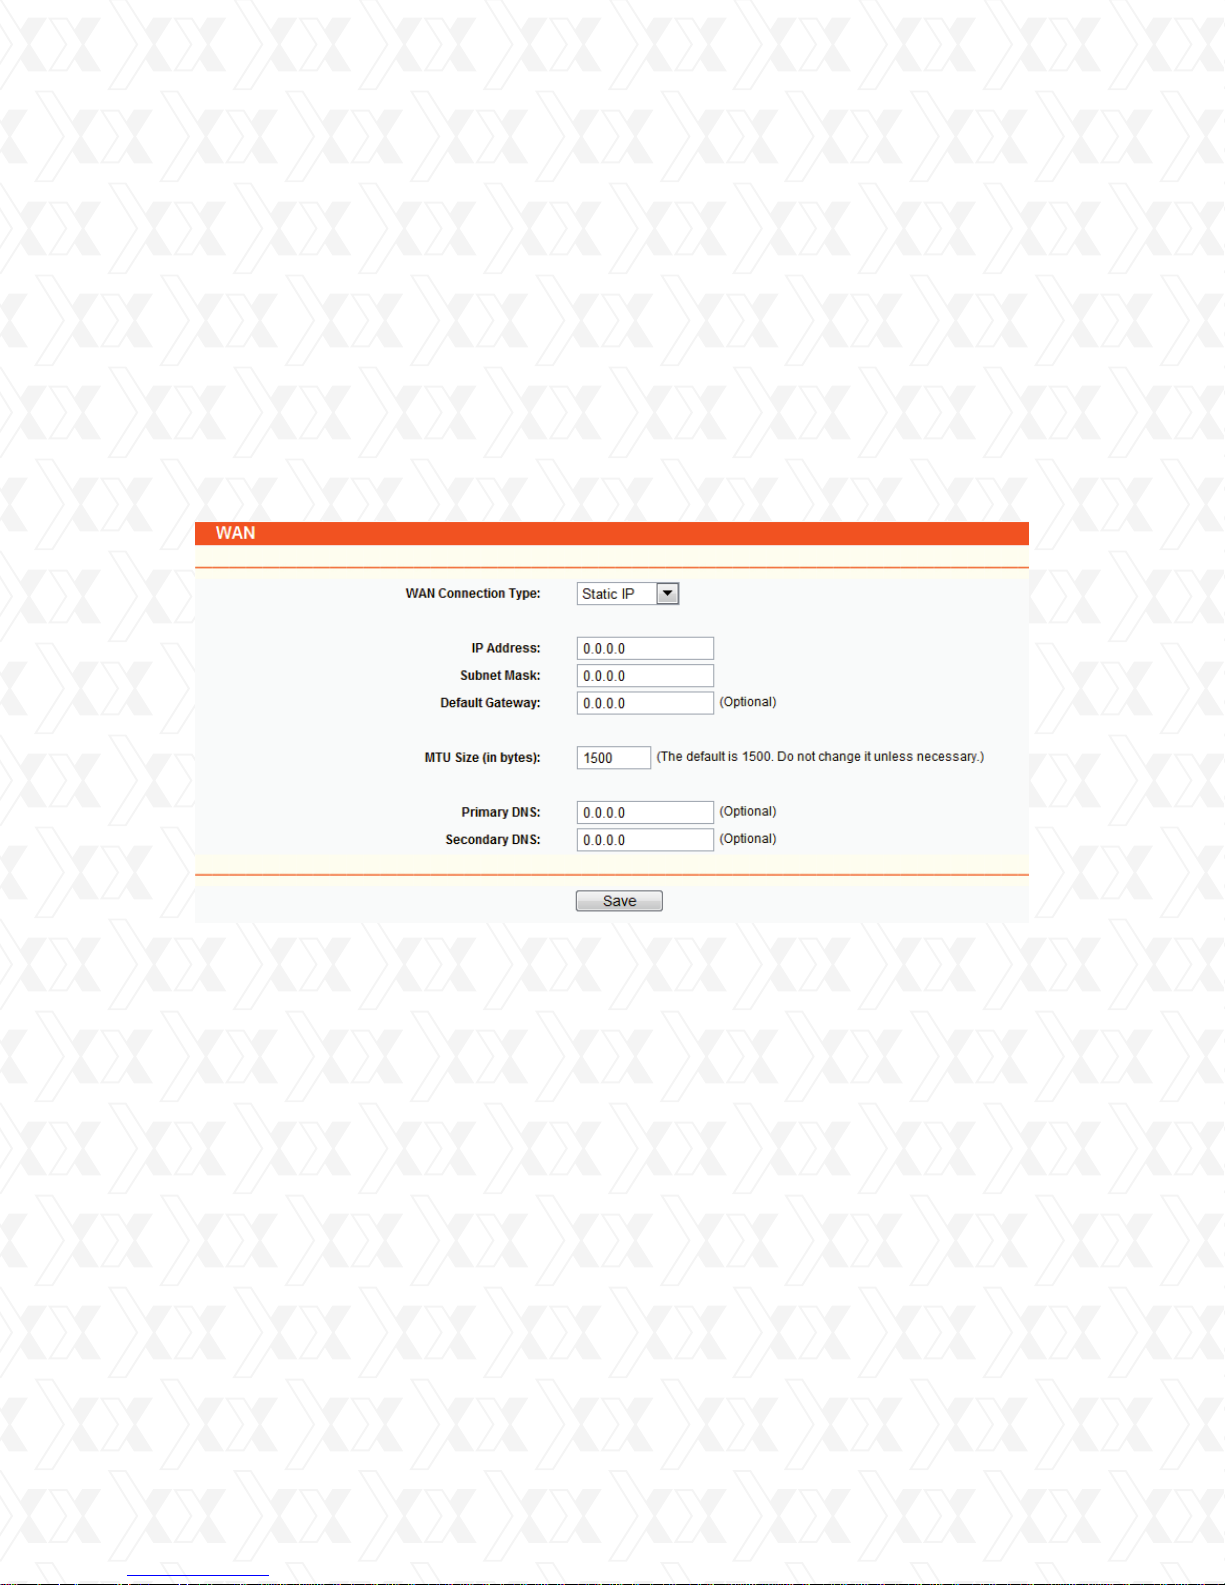
If you choose Dynamic IP, the router will automatically get IP parameters from your ISP.
Please refer to Figure 4-5 below.
This page displays the WAN IP parameters assigned dynamically by your ISP, including IP address,
Subnet Mask, Default Gateway, etc. Click Renew to obtain new IP parameters from your ISP.
Click the Release button to release the assigned IP parameters.
•
MTU Size - The normal MTU (Maximum Transmission Unit) value for most ethernet networks is
1500 bytes. For some ISPs you need to reduce the MTU. But this is rarely required, and should
not be done unless you are sure it is necessary for your ISP connection.
Figure 4-5 WAN – Dynamic IP
21
Page 22
Nexxt Solutions - NexxtGate Wireless Access Point
If your ISP gives you one or two DNS addresses, select Use These DNS Servers and enter the
primary and secondary addresses into the correct fields. Otherwise, the DNS servers will be
assigned dynamically from your ISP.
Note:
If you get address and find error when you go to a Web site, it is likely that your DNS servers are
set up improperly. You should contact your ISP to get DNS server addresses.
•
Get IP with Unicast DHCP - A few ISPs’ DHCP servers do not support the broadcast
applications. If you cannot get the IP Address normally, you can choose this option.
(This is rarely required.)
2.
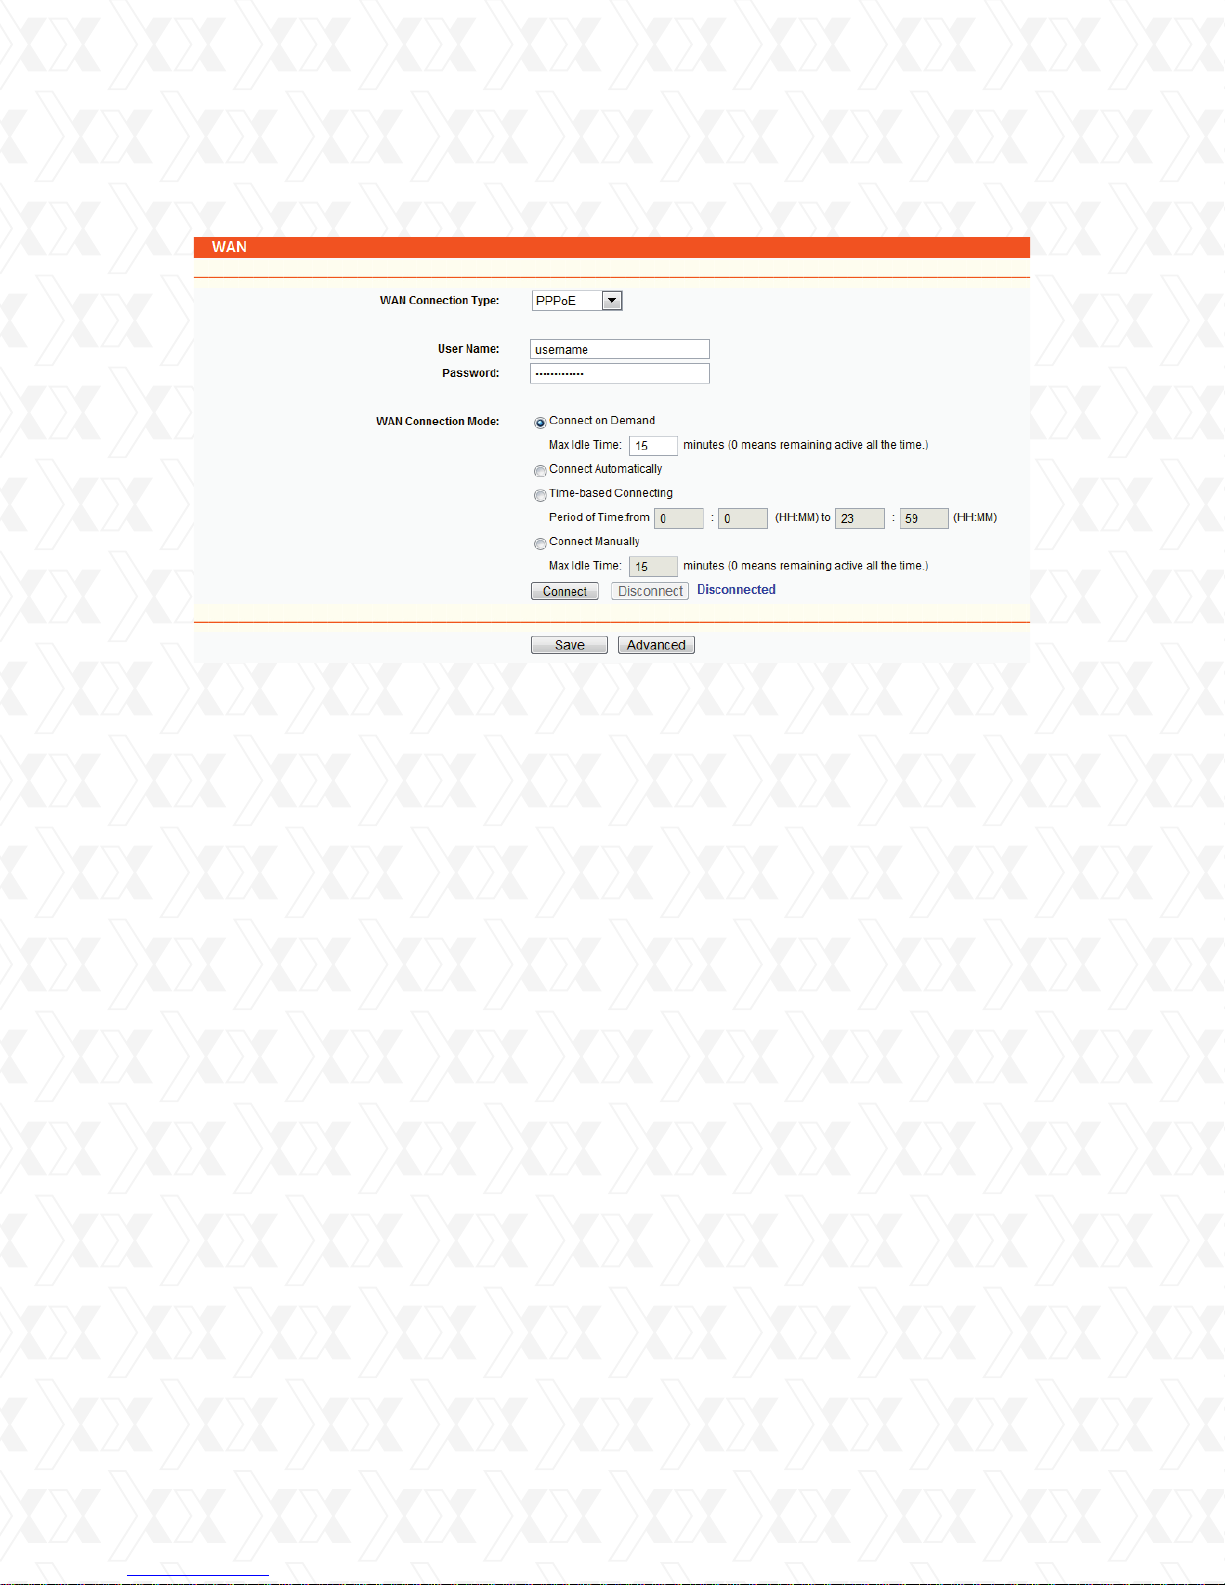
If you choose Static IP, you should have fixed IP Parameters specified by your ISP. The Static IP
settings page will appear as shown in Figure 4-6.
Figure 4-6 WAN - Static IP
In this case, you need to enter the following parameters into the spaces provided:
•
IP Address - Enter the IP address in dotted-decimal notation provided by your ISP.
•
Subnet Mask - Enter the subnet Mask in dotted-decimal notation provided by your ISP. Usually
255.255.255.0 is used as the subnet mask.
•
Default Gateway - (Optional) Enter the gateway IP address in dotted-decimal notation provided
by your ISP.
•
MTU Size - The normal MTU (Maximum Transmission Unit) value for most ethernet networks is
1500 Bytes. For some ISPs you may need to modify the MTU. But this is rarely required, and
should not be done unless you are sure it is necessary for your ISP connection.
•
Primary DNS - (Optional) Enter the DNS address in dotted-decimal notation provided by your ISP.
•
Secondary DNS - (Optional) Type another DNS address in dotted-decimal notation provided by
your ISP if provided.
22
Page 23
Nexxt Solutions - NexxtGate Wireless Access Point
3. If you choose PPPoE, you should enter the following parameters as shown in Figure 4-7.
Figure 4-7 WAN - PPPoE
•
User Name/Password - Enter the User Name and Password provided by your ISP. These fields
are case-sensitive.
•
Connect on Demand - You can configure the router to disconnect your Internet connection after
a specified period of inactivity (Max Idle Time). If your Internet connection has been terminated
due to inactivity, Connect on Demand enables the router to automatically re-establish your connection as soon as you attempt to access the Internet again. If you wish to activate Connect
on Demand, click the radio button. If you want your Internet connection to remain active at all
times, enter 0 in the Max Idle Time field. Otherwise, enter the number of minutes you want to
have elapsed before your Internet connection terminates.
Caution: Sometimes the connection cannot be terminated despite your setting of the “Max Idle
Time” interval. This is due to some applications are continually linked to the internet in the
background.
•
Connect Automatically: The connection can be re-established automatically after being disabled.
•
Time-based Connection - The connection will only be established within the period ranging from
the start time to the end time (both are in HH:MM format) you specify in the Period of Time
field.
Note:
Only when you have configured the system time on the System Tools -> Time page, the Time-based
Connection will take effect.
23
Page 24
Nexxt Solutions - NexxtGate Wireless Access Point
•
Connect Manually - You can set up the router so as to connect or disconnect it manually. After
a specified period of inactivity (Max Idle Time), the router will cancel your Internet connection,
in which case you will not be able to re-establish your connection automatically as soon as you
attempt to access the Internet again. To use this option, click the radio button. If you want your
Internet connection to remain active at all times, enter “0” in the Max Idle Time field. Otherwise,
enter the number of minutes that you wish to keep the connected status active unless a new
link is requested.
Caution: Sometimes the connection cannot be terminated despite your setting of the “Max Idle
Time” interval. This is due to some applications are continually linked to the internet in the
background.
Click the Connect button to connect immediately. Click the Disconnect button to disconnect
immediately.
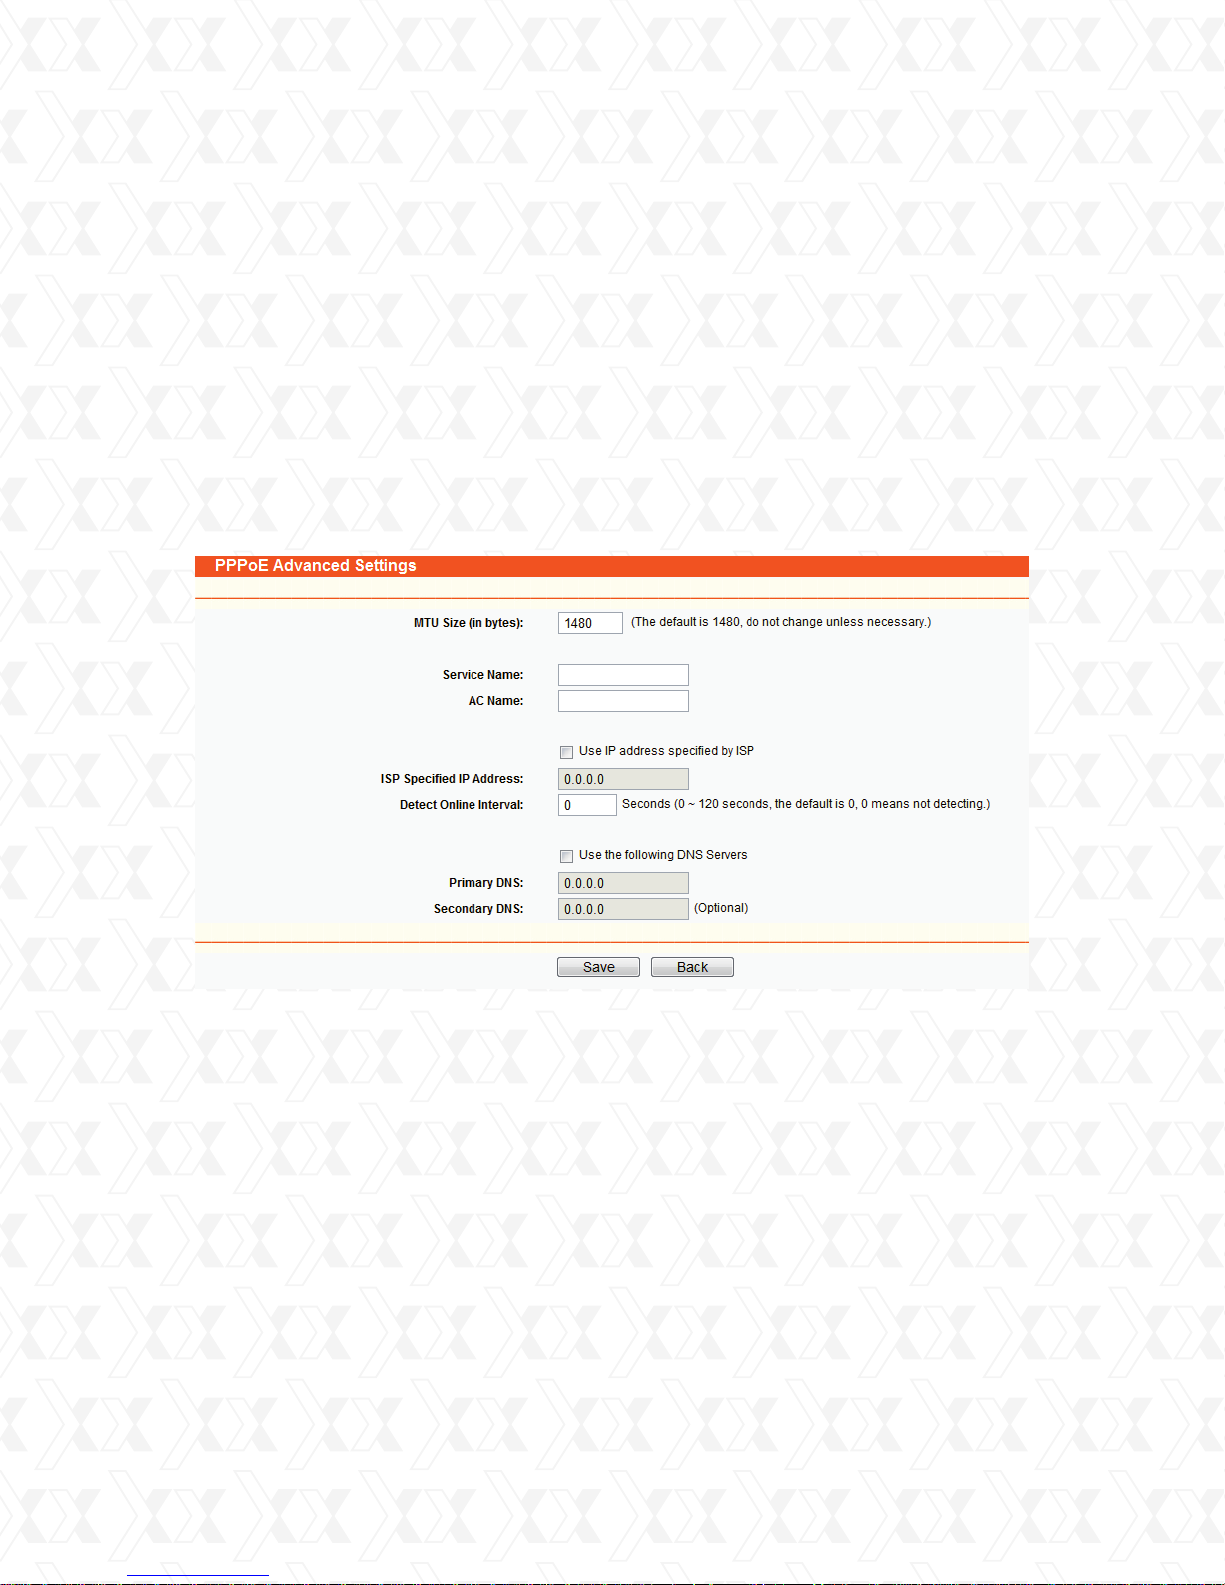
If you want to do some advanced configurations, please click the Advanced button, and the
page shown in Figure 4-8 will appear.
4.5.3 MAC clone
MAC Clone allows you to clone the MAC address of the managing PC’s adapter to the WAN
port. This is because some ISPs require that you register the MAC address of your adapter.
Usually, no changes are required here.
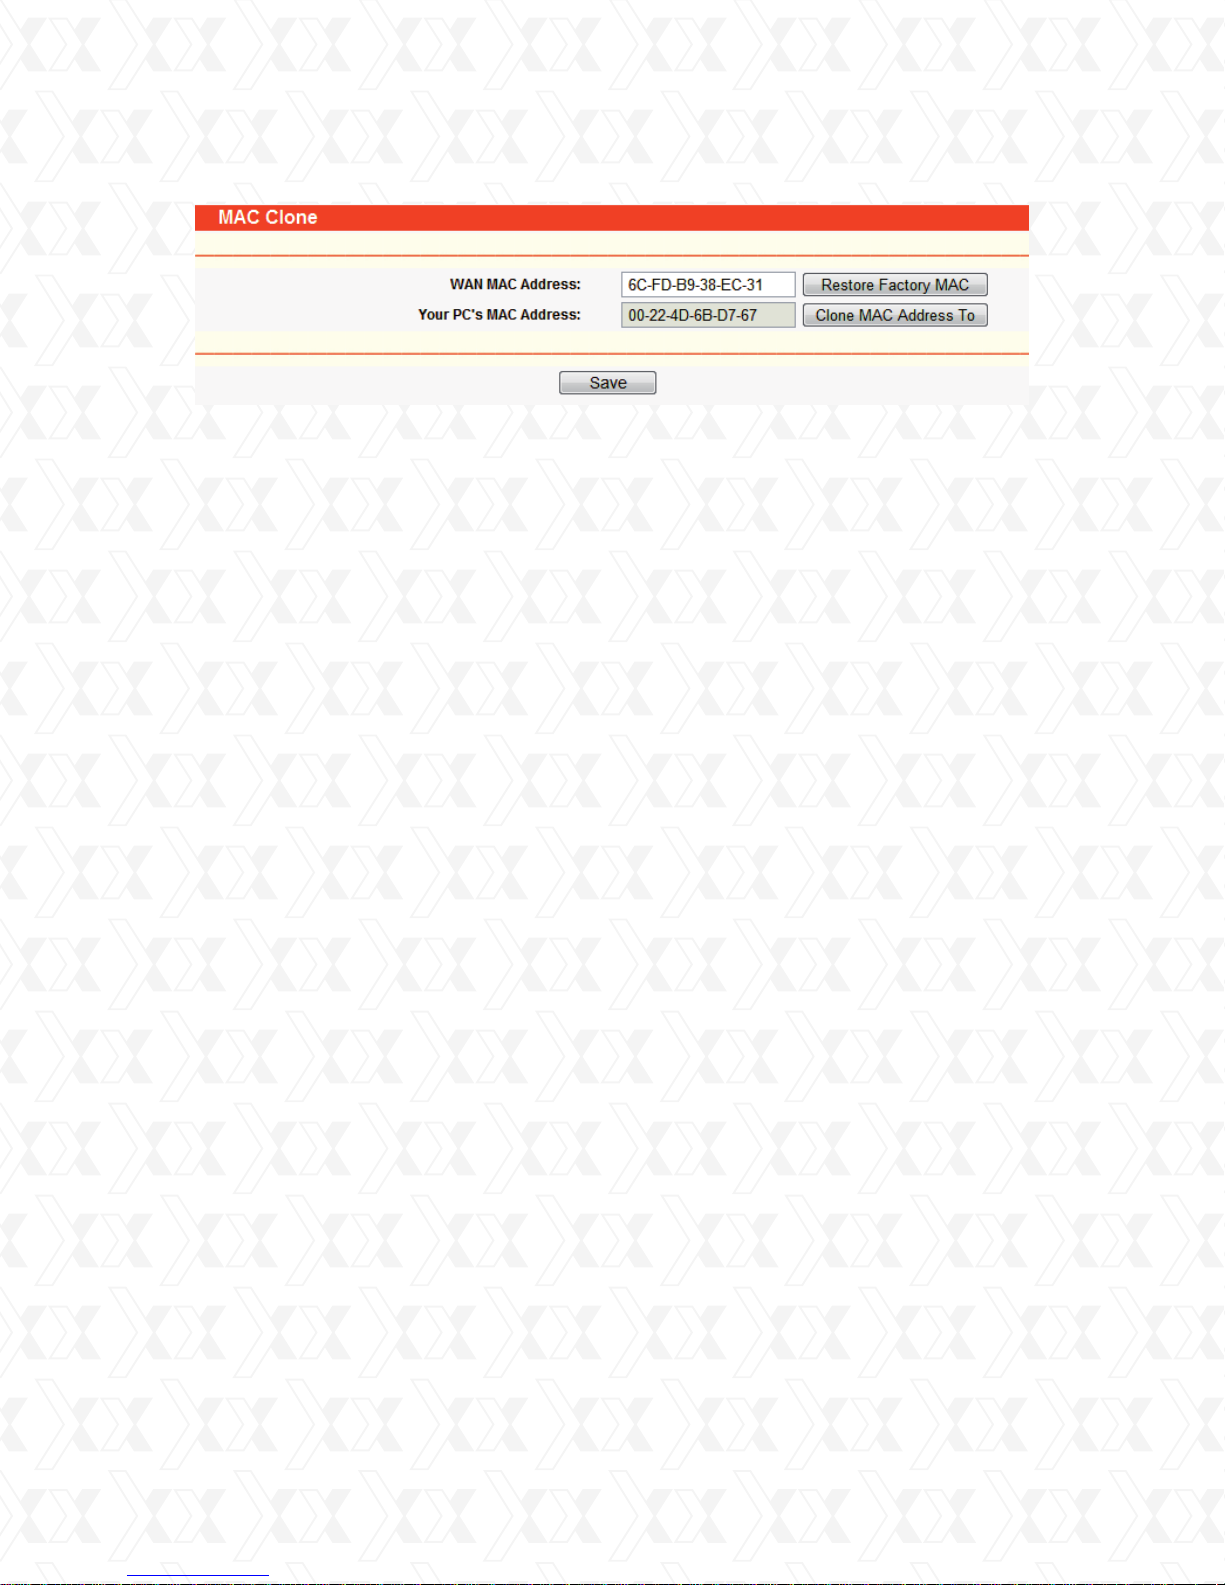
Go to Network > MAC Clone in order to configure the MAC address of the WAN port on the
current, page as shown in Figure 4-9.
Figure 4-8 PPPoE Advanced Settings
24
Page 25
Nexxt Solutions - NexxtGate Wireless Access Point
Figure 4-9 MAC Address Clone
Some ISPs require that you register the MAC Address of your adapter, which is connected to your
cable/DSL Modem or Ethernet during installation. Changes are rarely needed here.
•
WAN MAC Address - This field displays the current MAC address of the WAN port. If your ISP
requires that you register the MAC address, please enter the correct MAC address into this
field. The format for the MAC Address is XX-XX-XX-XX-XX-XX (X is any hexadecimal digit).
•
Your PC’s MAC Address - This field displays the MAC address of the PC that is managing the
router. If the MAC address is required, you can click the Clone MAC Address To button and this
MAC address will be copied in the WAN MAC Address field.
Click Restore Factory MAC to restore the MAC address of the WAN port to its factory default value.
Click Save to store your settings.
Note:
1) Only the PC on your LAN can use the Clone MAC Address To feature.
2) If you click Save, the Router will prompt you to reboot.
4.6 Wireless
The Wireless option, designed to improve functionality and performance of the wireless network,
can help you to make the AP the ideal solution for your wireless network.
This menu allows users to create a wireless local area network through a few simple settings.
Basic Settings are used for the configuration of some basic parameters of the AP. Wireless
Mode allows you to select the mode that the AP works on. Security Settings provides three
different security methods to protect your data and better safeguard your wireless network.
MAC filtering allows you to control the access of wireless stations to the AP. Wireless Statistics
shows you the statistics of current connected Wireless stations. Distance Setting is used to
adjust the wireless range in outdoor installations. Antenna Alignment shows the signal strength
variation of the remote AP while changing the antenna’s direction. Throughput Monitor provides
information about the wireless data throughput. Wireless statistics enables you to get detailed
information about the wireless stations currently connected.
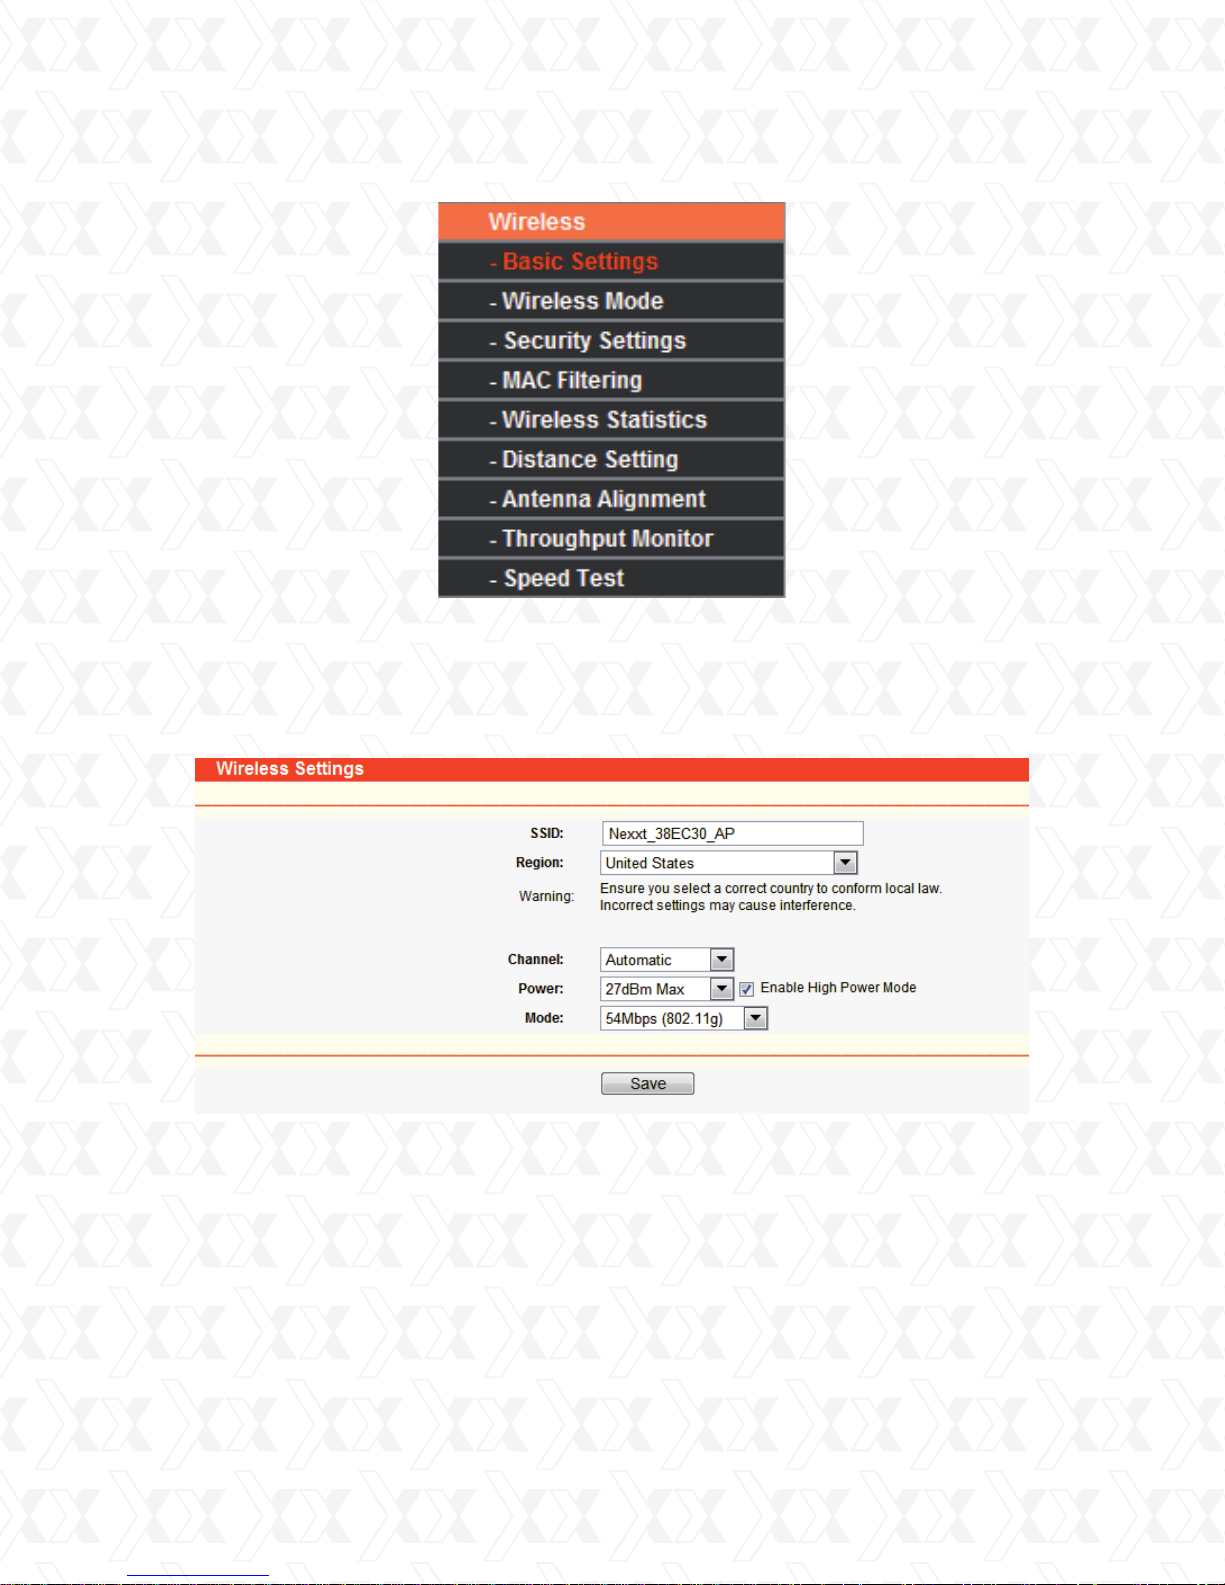
There are eight submenus under the Wireless menu (shown in Figure 4-10): Basic Settings,
Wireless Mode, Security Settings, MAC Filtering, Wireless Statistics, Distance Setting,
Antenna Alignment, Throughput Monitor, and Speed Test. Click any of them, and you will
be able to configure the corresponding function. A detailed description of each submenu is
provided below.
25
Page 26
Nexxt Solutions - NexxtGate Wireless Access Point
4.6.1 Basic settings
Figure 4-10 Wireless menu
Go to Wireless > Basic Settings in order to configure the basic parameters of your wireless
network, as illustrated below (Figure 4-11).
Figure 4-11 Wireless Settings in AP Client Router mode
•
SSID - Enter a string of up to 32 characters The same name or SSID (Service Set Identification) must be assigned to all wireless devices in your network. Considering your wireless
network security, the default SSID is set to be NEXXT_XXXXXX (in which xxxxxx represent the
last six unique characters of each router’s MAC address). But it is strongly recommended
that you change your network name (SSID) to a different value. This value is case-sensitive.
For example, TEST is NOT the same as test.
•
Region - Select your region from the pull-down list. This field specifies the region where the
wireless function of the device can be used. t may be illegal to use the wireless function of the
router in a region different from those specified in this field. If your country or region is not
listed, please contact your local government agency for assistance.
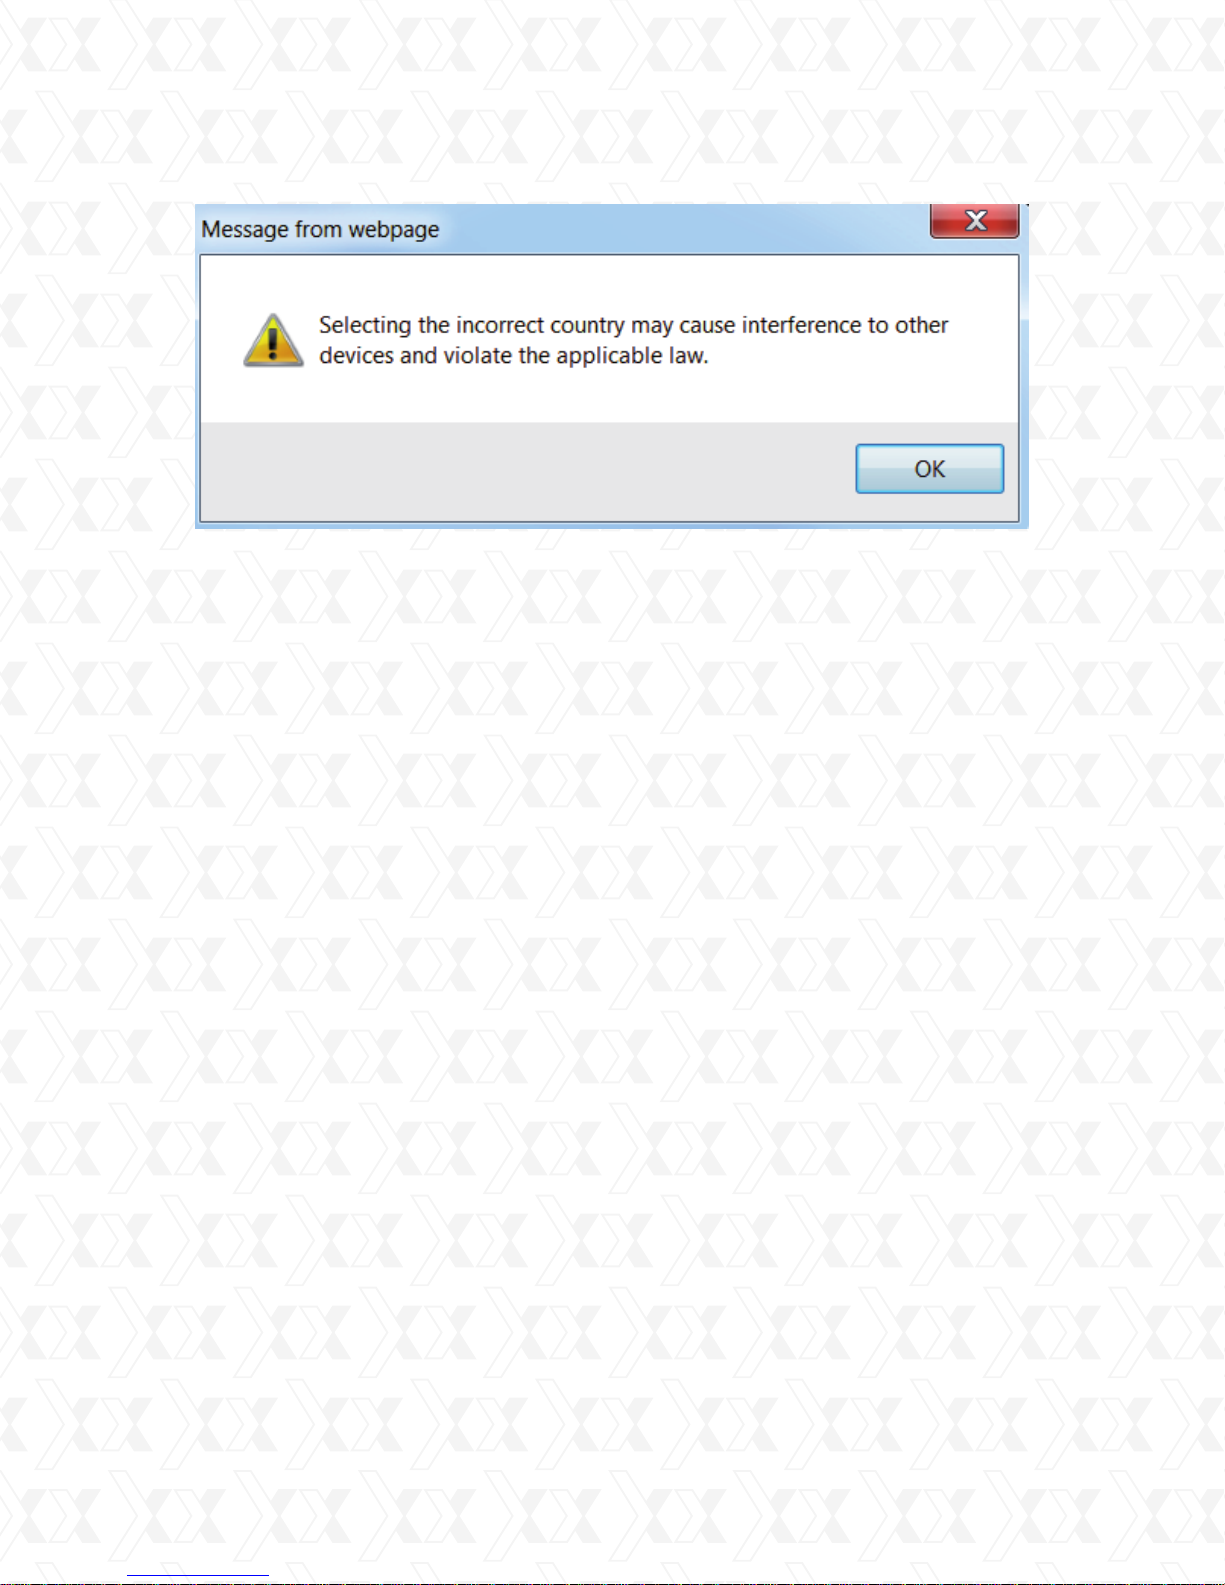
When you select your local region from the pull-down list, click the Save button. The dialog
box with this note will be displayed. Click OK to continue.
26
Page 27
Nexxt Solutions - NexxtGate Wireless Access Point
Dialog box
Note:
Based on local regulations, the North America version does not have the region selection
option available.
•
Channel - This field determines which operating frequency will be used. It is not necessary to change the wireless channel unless you notice interference problems with another
nearby access point.
•
Mode - Select the desired wireless mode. The options are:
•
54Mbps (802.11g) - Both 802.11g and 802.11b wireless stations can connect to the router.
•
11Mbps (802.11b) - Only 802.11b wireless stations can connect to the router.
•
Region - Specifies the region where the wireless function of the AP can be used. Select your
region from the drop-down list. If your country or region is not listed, please contact your local
government agency for assistance.
Make sure to click the Save button to store your settings on this page.
Note:
The device will reboot automatically after you click the Save button.
27
Page 28
Nexxt Solutions - NexxtGate Wireless Access Point
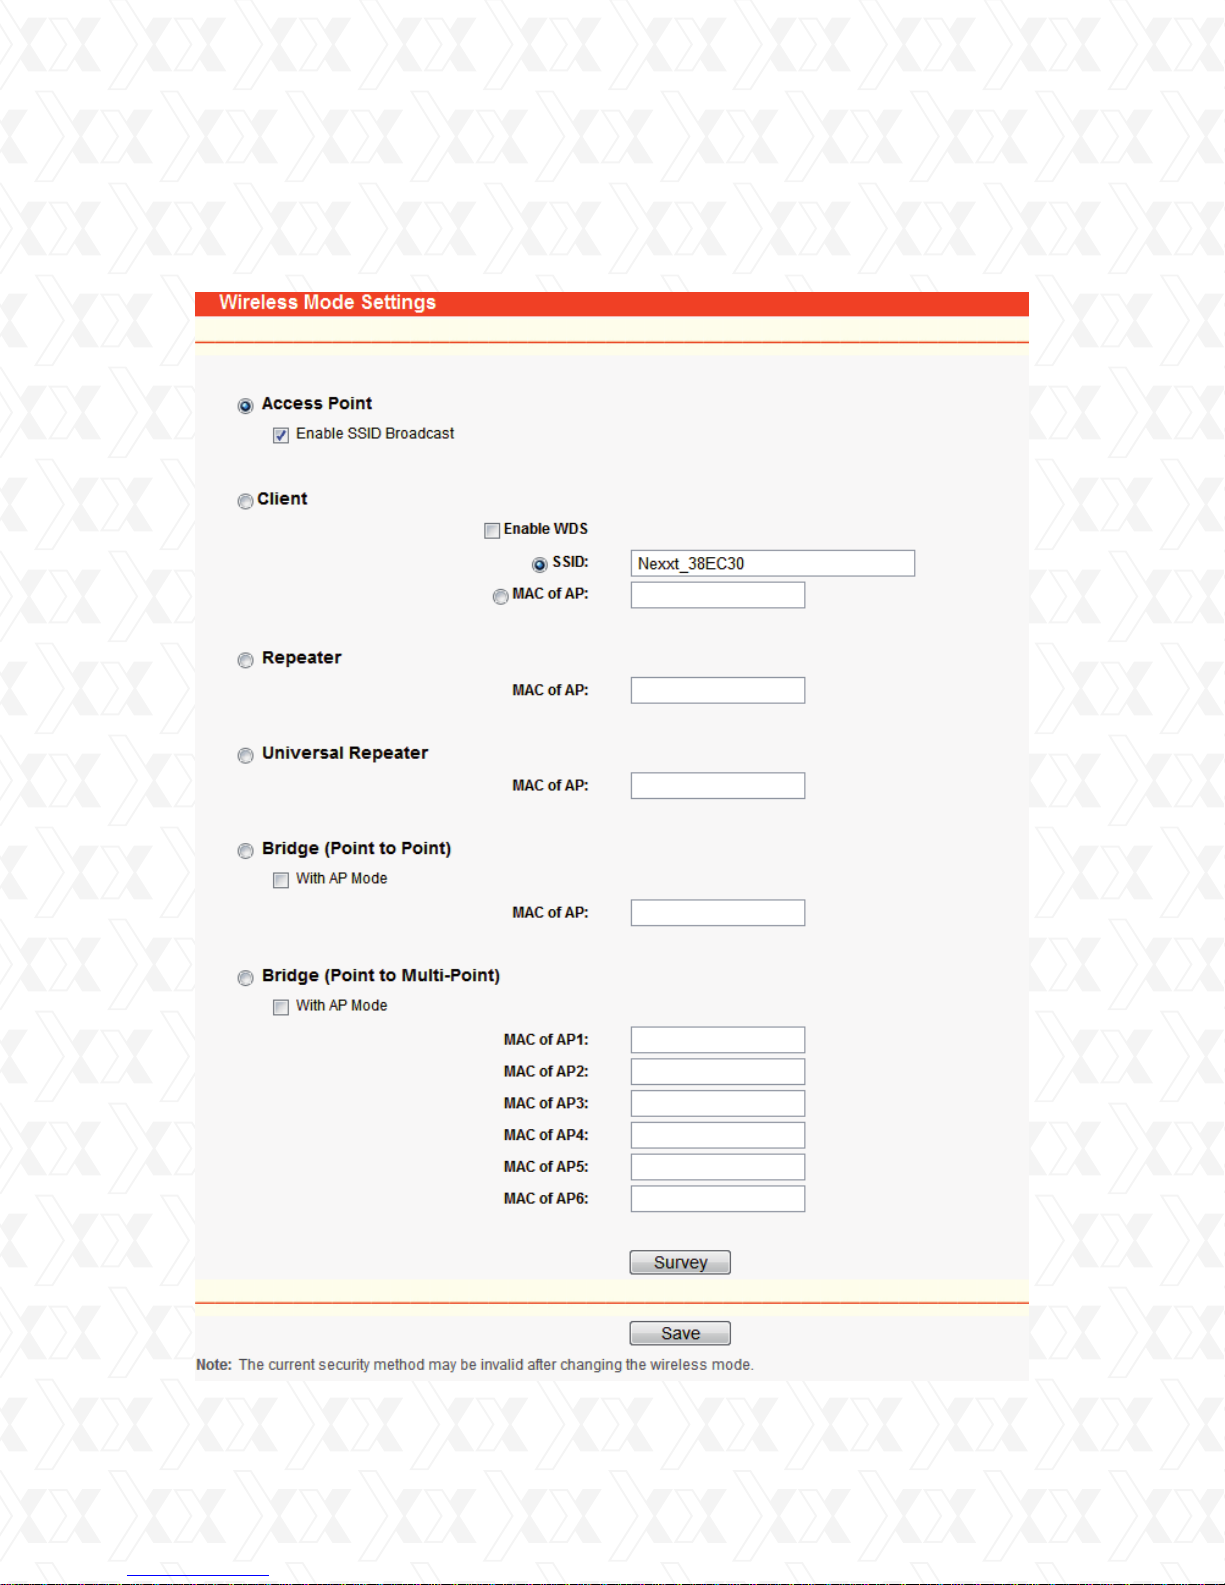
4.6.2 Wireless mode
Go to Wireless > Wireless Mode in order to configure the wireless mode to be used by your
device, as illustrated on this page (Figure 4-12).
Figure 4-12 Wireless Mode
28
Page 29
Nexxt Solutions - NexxtGate Wireless Access Point
Note:
When AP Client Router is selected, only the Client mode will be available, as shown as Figure 4-12.
However, when AP Router is selected, only the Access Point mode will be available.
•
Access Point - Access Point mode allows wireless stations, including AP clients, to access the
router. Enable SSID Broadcast - If you select the Enable SSID Broadcast checkbox, the Wireless
AP will start broadcasting its name (SSID) on the air.
•
Client - In Client mode, the access point will act as a wireless station to enable wired host(s) to
access the wireless AP.
•
SSID - Enter the SSID of AP that you want to access. If you check the radio button next to
SSID, the AP client will connect to the AP using its SSID. MAC of AP - Enter the MAC address
of AP that you want to access. If you check the radio button next to MAC of AP, the AP client
will connect to the AP using its MAC address.
Note:
To apply any settings you have changed on the page, you must click the Save button. In this case,
the AP will reboot automatically.
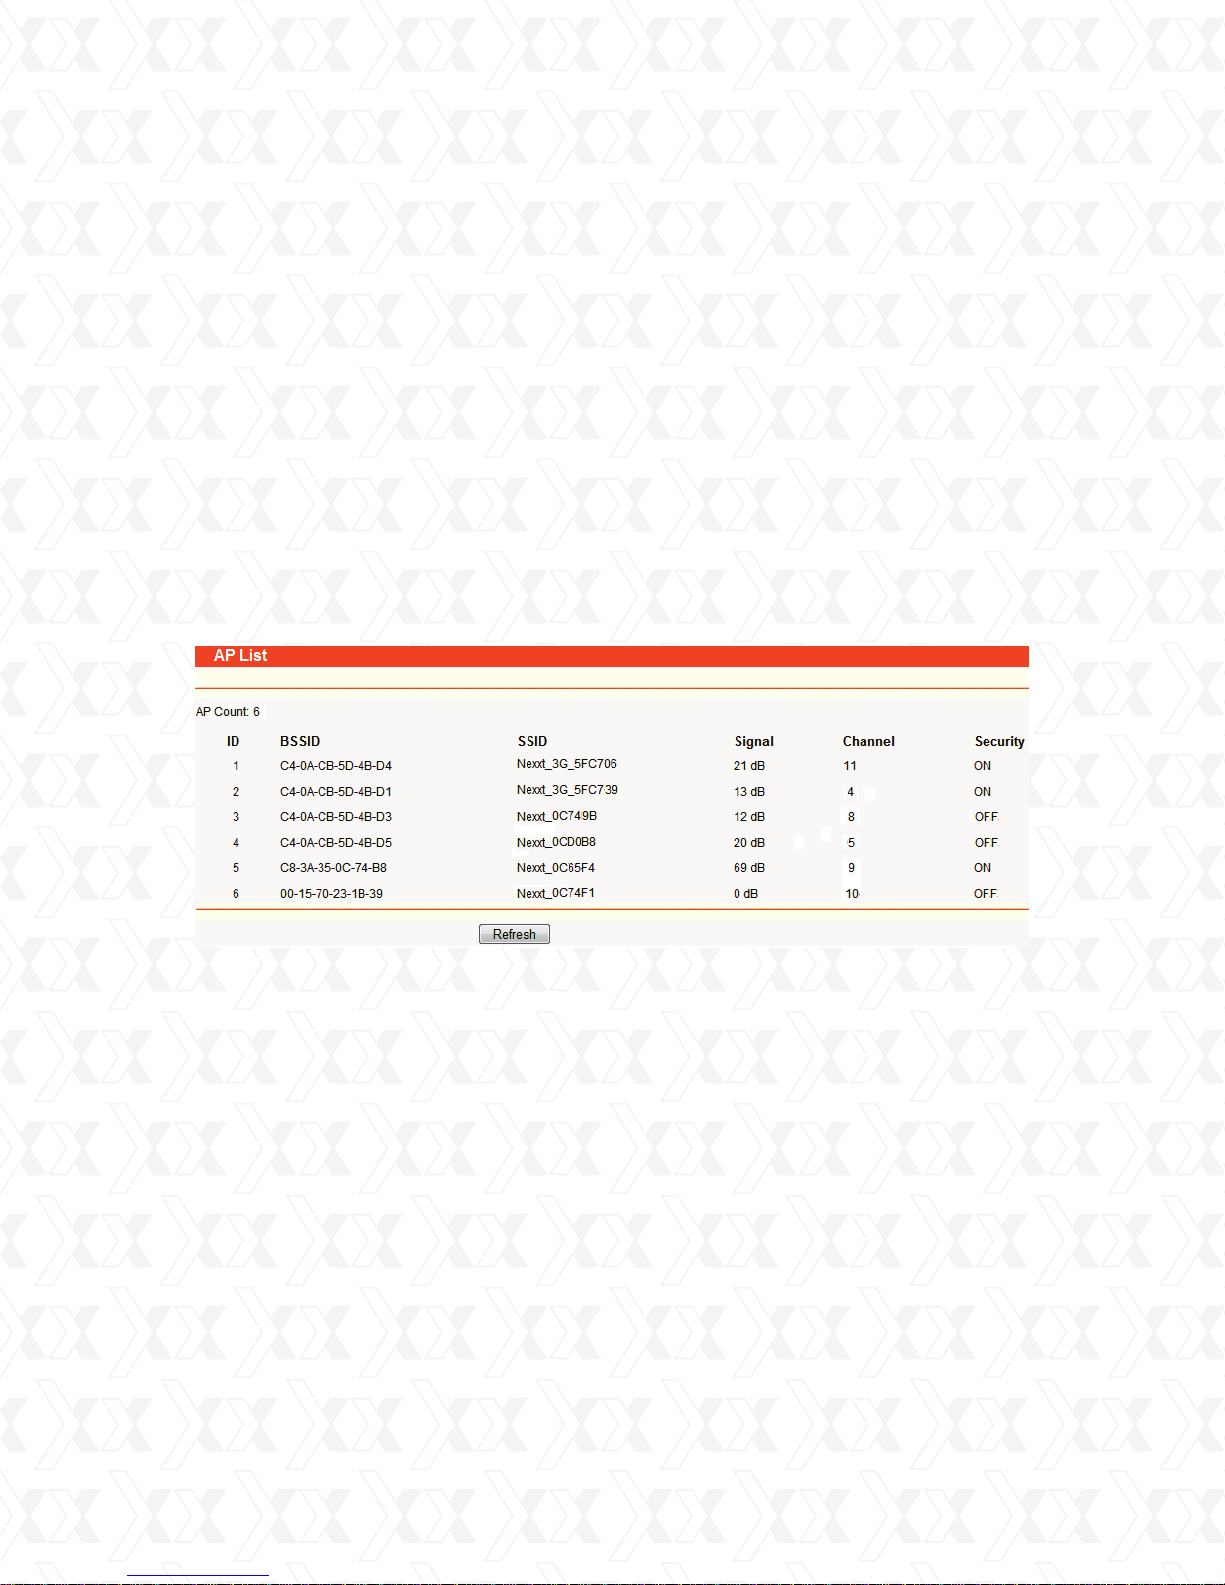
Click Survey to display the available access points within range after performing a scan. Choose
from the list any of the access points to connect to, as shown in Figure 4-13.
Figure 4-13 AP List
•
BSSID - The BSSID of the AP, usually also the MAC address of the AP.
•
SSID - The SSID of the AP.
•
Signal - The signal received from the AP.
•
Channel - The channel the AP works in.
Security - The AP communicates in privacy.
•
•
Choose - Choose one AP from list to connect to.
If you click Connect, the values you selected will be filled in the SSID and MAC of AP fields, as
shown in Figure 4-12.
Note:
If you want to configure other wireless mode settings, you can change your AP to AP operation
mode on the Operation Mode page, as shown in Figure 4-2.
29
Page 30
Nexxt Solutions - NexxtGate Wireless Access Point
4.6.3 Security settings
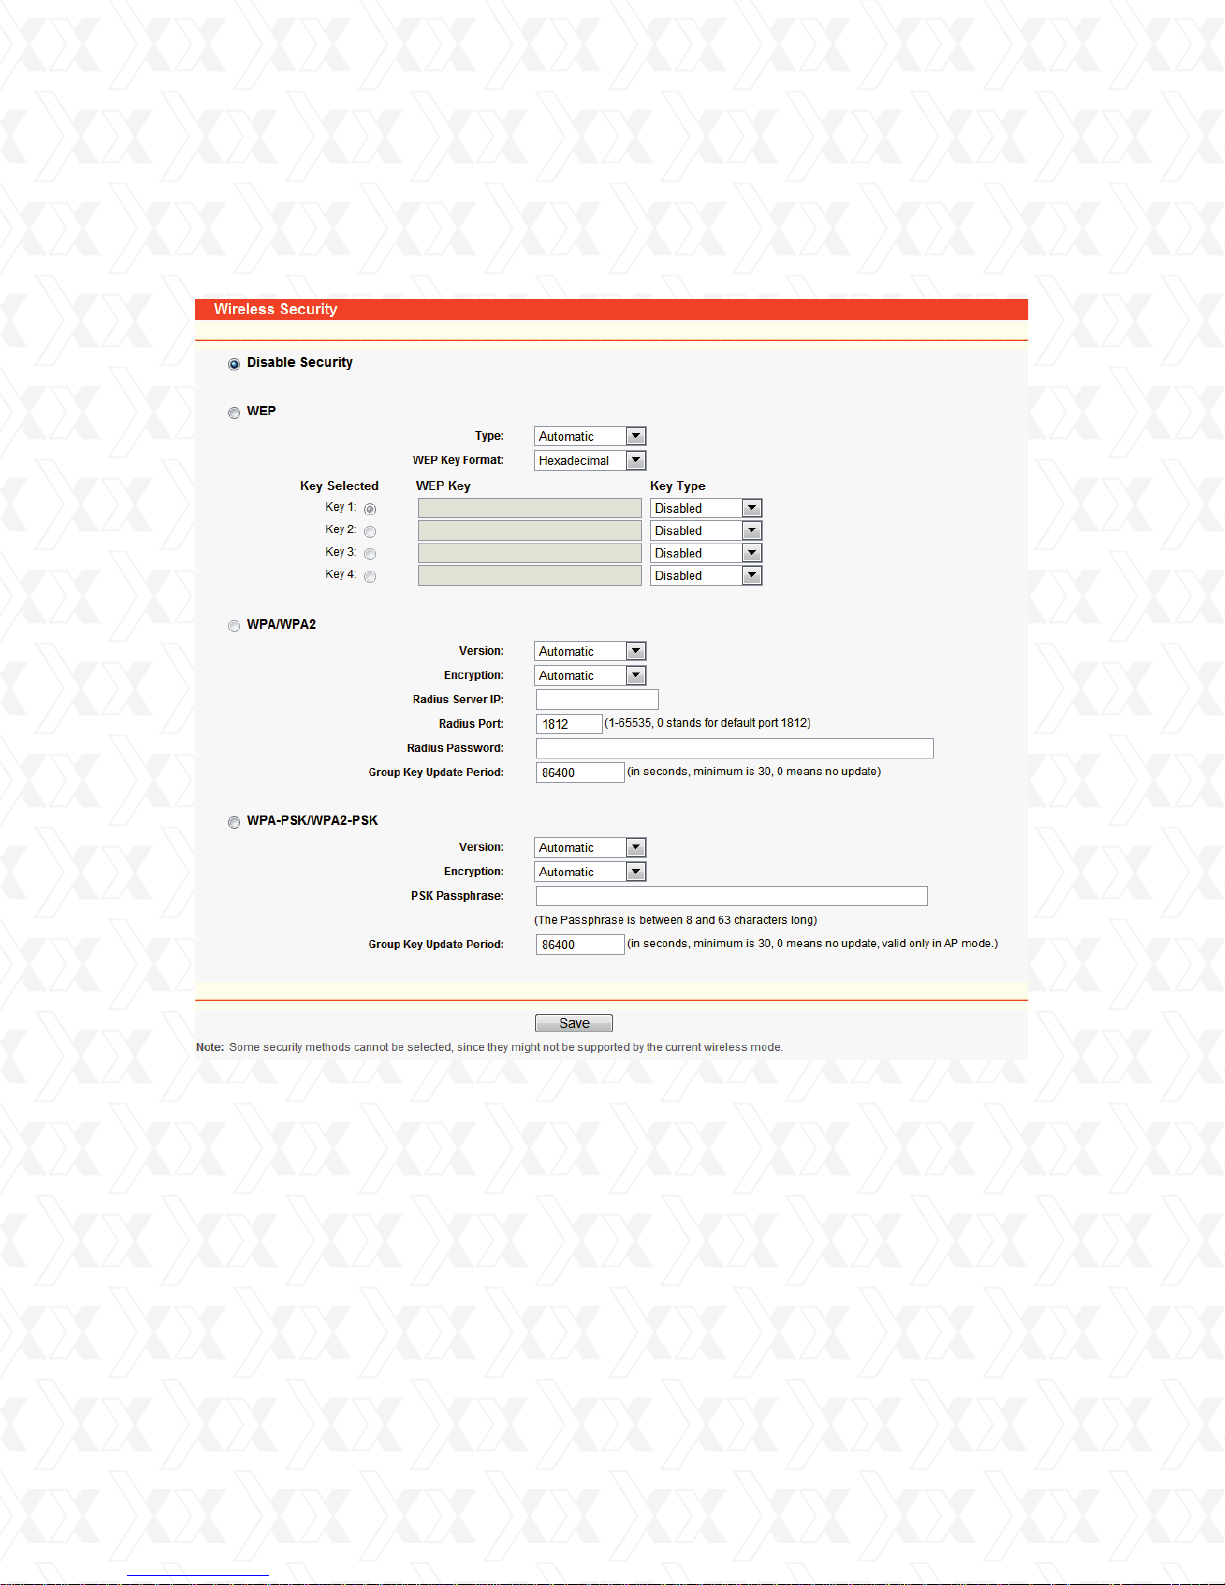
Go to Wireless > Security Settings in order to configure the security parameters of the
wireless network for your device, as illustrated on this page (Figure 4-14).
•
Disable Security - The wireless security function can be enabled or disabled. If disabled,
the wireless stations will be able to connect to the device without encryption. It is strongly
recommended to opt for one of the following encryption methods, to better protect your
network traffic.
•
WEP - Selects the 802.11 WEP security.
Type - Choose the type for the WEP security from the pull-down list. The available options are:
•
1)
Automatic - Selects Shared Key or Open System authentication form automatically based on
the wireless station’s capability and request.
2)
Shared Key – Selects the 802.11 Shared Key authentication.
3)
Open System – Selects the 802.11 Open System authentication.
Figure 4-14 Wireless Security
30
Page 31

Nexxt Solutions - NexxtGate Wireless Access Point
•
WEP Key Format - You can select ASCII or Hexadecimal format. ASCII format stands for any
combination of keyboard characters in the specified length. Hexadecimal format stands for any
combination of hexadecimal digits (0-9, a-f, A-F) in the specified length.
•
WEP Key - Select which of the four keys will be used and enter the matching WEP key information for your network next to the key radio button you checked. These values must be
identical on all wireless stations in your network.
•
Key Type - You can select the WEP key length (64-bit, or 128-bit, or 152-bit.) for encryption.
“Disabled” means this WEP key entry is invalid.
1.
For 64-bit encryption - You can enter 10 hexadecimal digits (any combination of 0-9, a-f,
A-F, zero key is not supported) or 5 ASCII characters.
2.
For 128-bit encryption - You can enter 26 hexadecimal digits (any combination of 0-9, a-f,
A-F, zero key is not supported) or 13 ASCII characters.
3.
For 152-bit encryption - You can enter 32 hexadecimal digits (any combination of 0-9, a-f,
A-F, zero key is not supported) or 16 ASCII characters.
Note:
If you do not set a passkey, the wireless encryption feature remains disabled even if you have
selected Shared Key, as your Authentication Mode.
•
WPA/WPA2 - Selects WPA/WPA2 based on the radius server.
•
Version - Choose the WPA encryption method from the pull-down list.
The available options are:
Automatic – It automatically sets WPA or WPA2 based on the wireless station’s capability
1.
and request.
WPA - Wi-Fi Protected Access.
2.
WPA2 - WPA version 2.
3.
•
Encryption - You can select either Automatic, or TKIP or AES.
•
Radius Server IP - Enter the IP address of the radius server.
•
Radius Port - Enter the port used by the radius server
•
Radius Password - Enter the password for the radius server.
•
Group Key Update Period - Specifies the group key update interval in seconds. The value
should be 30 or higher. Enter 0 to disable the update.
•
WPA-PSK/ WPA2-PSK - Selects WPA based on pre-shared passphrase.
•
Version: The user can choose any of the options below:
1.
Automatic - It automatically sets WPA-PSK or WPA2-PSK based on the wireless station’s
capability and request.
2.
WPA-PSK - Pre-shared key of WPA.
3.
WPA2-PSK - Pre-shared key of WPA2.
•
Encryption - When WPA-PSK or WPA is set as the Authentication Mode, you can either
select Automatic, or TKIP or AES as your Encryption type.
•
PSK Passphrase - You can enter a passphrase between 8 and 63 characters long.
Group Key Update Period - Specify the group key update interval in seconds. The value should
•
be 30 or higher. Enter 0 to disable the update.
Make sure to click the Save button to store your settings on this page.
Note:
The device will reboot automatically after you click the Save button.
31
Page 32
Nexxt Solutions - NexxtGate Wireless Access Point
4.6.4 MAC filtering
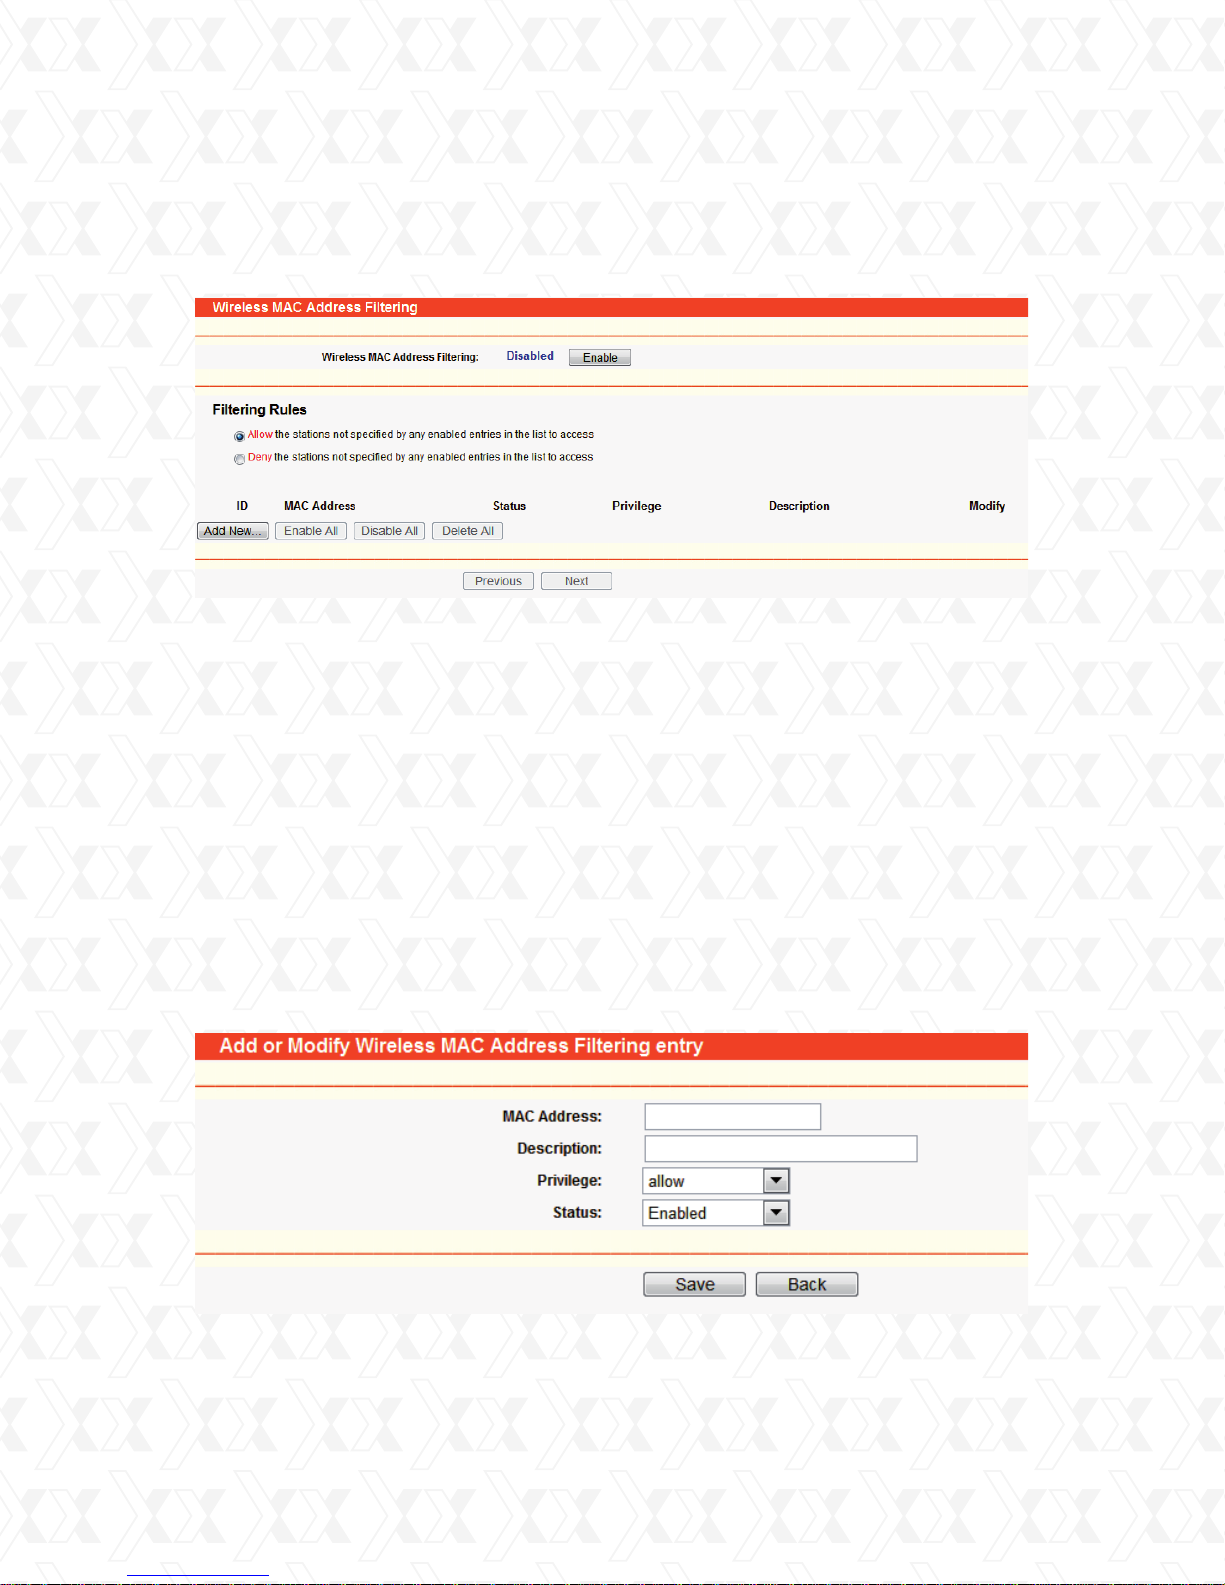
Go to Wireless > MAC Filtering in order to set up filtering rules designed to control the
wireless access to the device, as shown in Figure 4-15.
Figure 4-15 Wireless MAC address Filtering
The Wireless MAC Address Filtering feature allows you to control the wireless stations
accessing the AP, based on the station’s MAC address.
•
MAC Address - The wireless station’s MAC address that you want to access.
•
Status - The status of this entry, either Enabled or Disabled.
•
Privilege - Select the privileges for this entry. You may select one of the following Allow / Deny.
•
Description - A short description of the wireless station.
To set up an entry, follow these instructions:
First, you must decide whether the unspecified wireless stations can access the router or not.
If you desire that the unspecified wireless stations can access the router, please select the
radio button Allow the stations not specified by any enabled entries in the list to access,
otherwise, select the radio button Deny the stations not specified by any enabled entries in the
list to access.
To Add a Wireless MAC Address filtering entry, click the Add New… button. The Add or
Modify Wireless MAC Address Filtering entry page will appear, as shown in Figure 4-16.
Figure 4-16 Add or Modify Wireless MAC Address Filtering entry
To add or modify a MAC Address Filtering entry, follow the instructions below:
32
Page 33
Nexxt Solutions - NexxtGate Wireless Access Point
Enter the appropriate MAC Address into the MAC Address field. The format of the MAC
1.
Address is XX-XX-XX-XX-XX-XX (X is any hexadecimal digit). For example: 00-0A-EB-B0-00-0B.
Enter a short description of the wireless station in the Description field. For example:
2.
Wireless station A.
Privilege - Select the privileges for this entry, either Allow or Deny.
3.
Status - Select Enabled or Disabled as the status for this entry, from the Status pull-down list.
4.
Click the Save button to confirm this entry.
5.
To add additional entries, repeat steps 1-5.
To modify or delete an existing entry:
1.
Click the Modify button next to the entry you want to change. If you want to erase the entry,
click on the Delete in this step.
2.
Proceed with the changes you want to make.
3.
Click the Save button.
Click the Enable All button to activate all entries enabled.
Click the Disabled All button to cancel all entries disabled.
Click the Delete All button to erase all entries.
Click the Next button to go to the following page and click the Previous button to return to the
previous page.
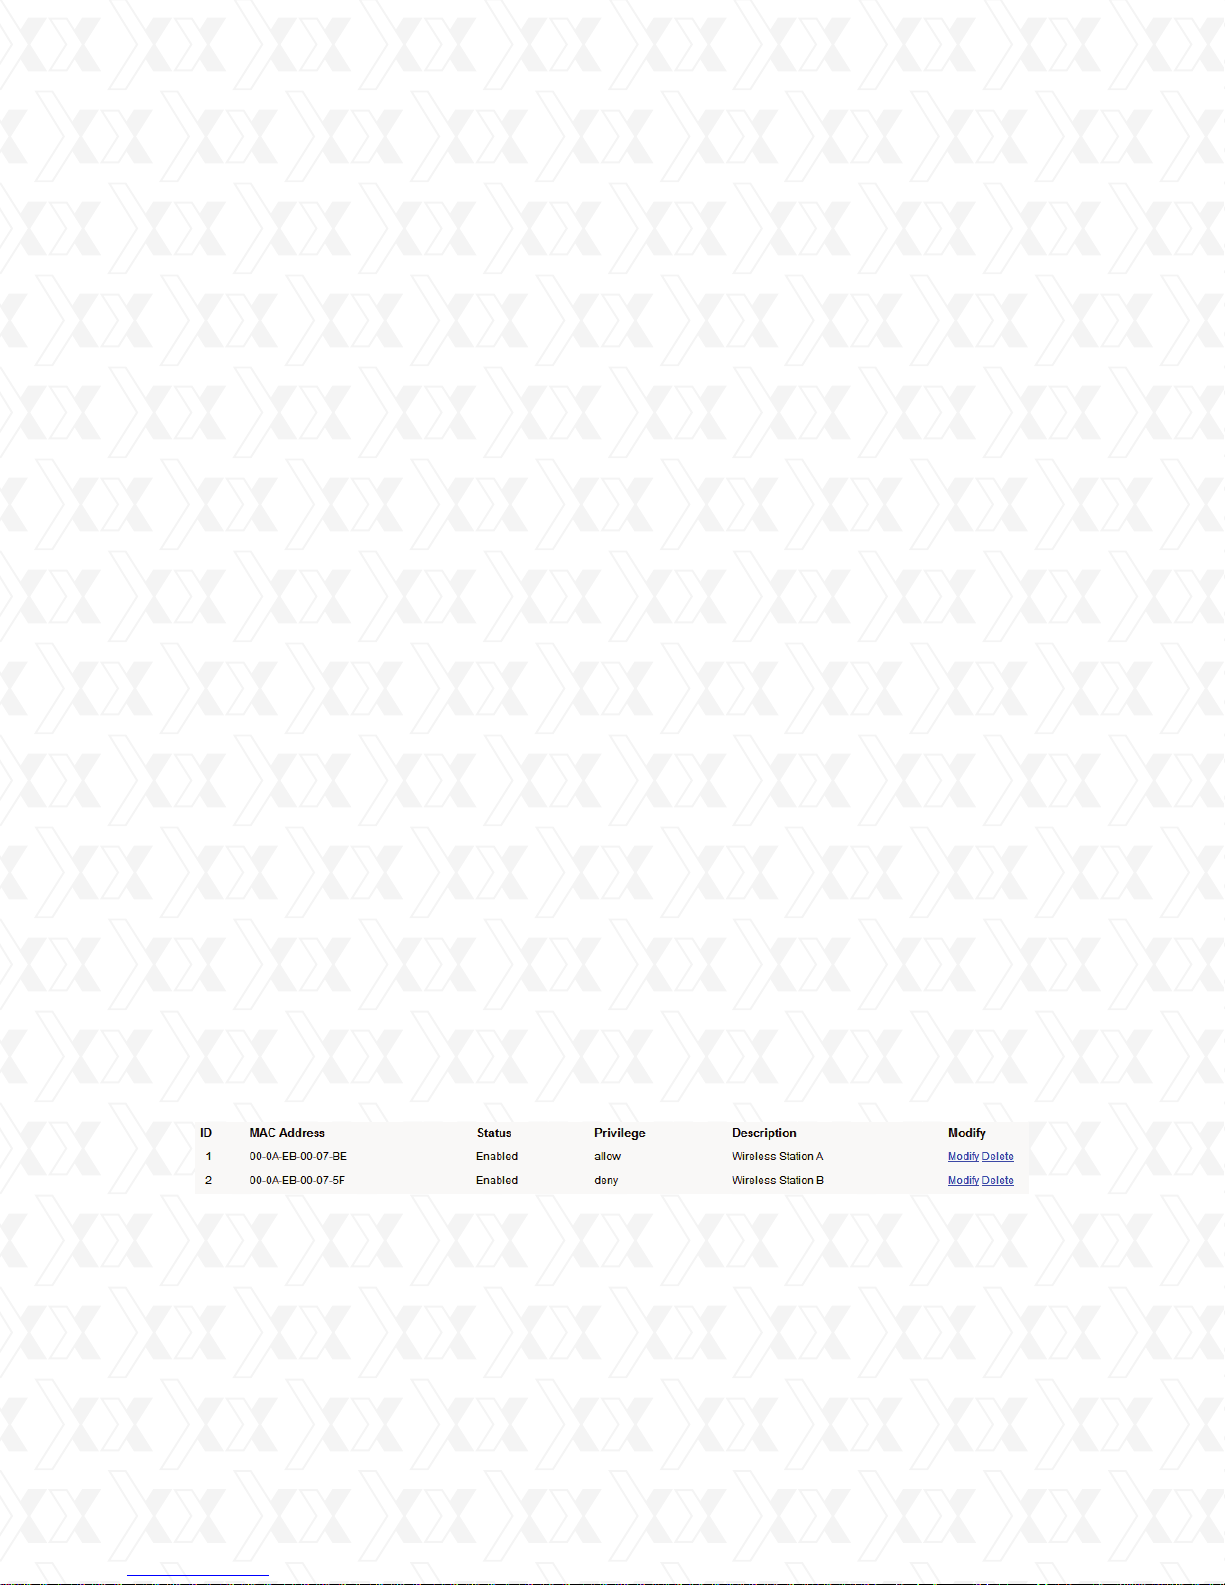
For example: If you want to grant access to wireless station A with MAC address 00-0A-EB00- 07-BE, but deny access to wireless station B with MAC address 00-0A-EB- 00-07-5F, while
all other wireless stations cannot access the router, you should configure the Wireless MAC
Address Filtering list by following these steps:
1.
Click the Enable button to enable this function.
2.
Select the radio button: Deny the stations not specified by any enabled entries in the list to
access for Filtering Rules.
3.
Delete all or disable all entries, if there are any entries already.
4.
Click the Add New... button and enter the MAC address 00-0A-EB-00-07-BE in the MAC
Address field, enter wireless station A in the Description field, select Allow in the Privilege
pull-down list and select Enabled in the Status pull-down list. Click the Save and the Return
button at the end.
5.
Click the Add New... button and enter the MAC address 00-0A-EB-00-07-5F in the MAC
Address field, enter wireless station B in the Description field, select Deny in the Privilege
pull-down list and select Enabled in the Status pull-down list. Click the Save and the Return
button to complete this procedure.
The filtering rules just configured should look similar to the following list:
Note:
1.
If you select the radio button Allow the stations not specified by any enabled entries in the
list to access for Filtering Rules, the wireless station B will still not be able to access the
router, however, other wireless stations that are not in the list will be able to access the router.
2.
If you enable the function and select the Deny the stations not specified by any enabled
entries in the list to access for Filtering Rules, and there are not any enabled entries in the
list, thus, no wireless stations can access the router.
33
Page 34
Nexxt Solutions - NexxtGate Wireless Access Point
4.6.5 Wireless statistics
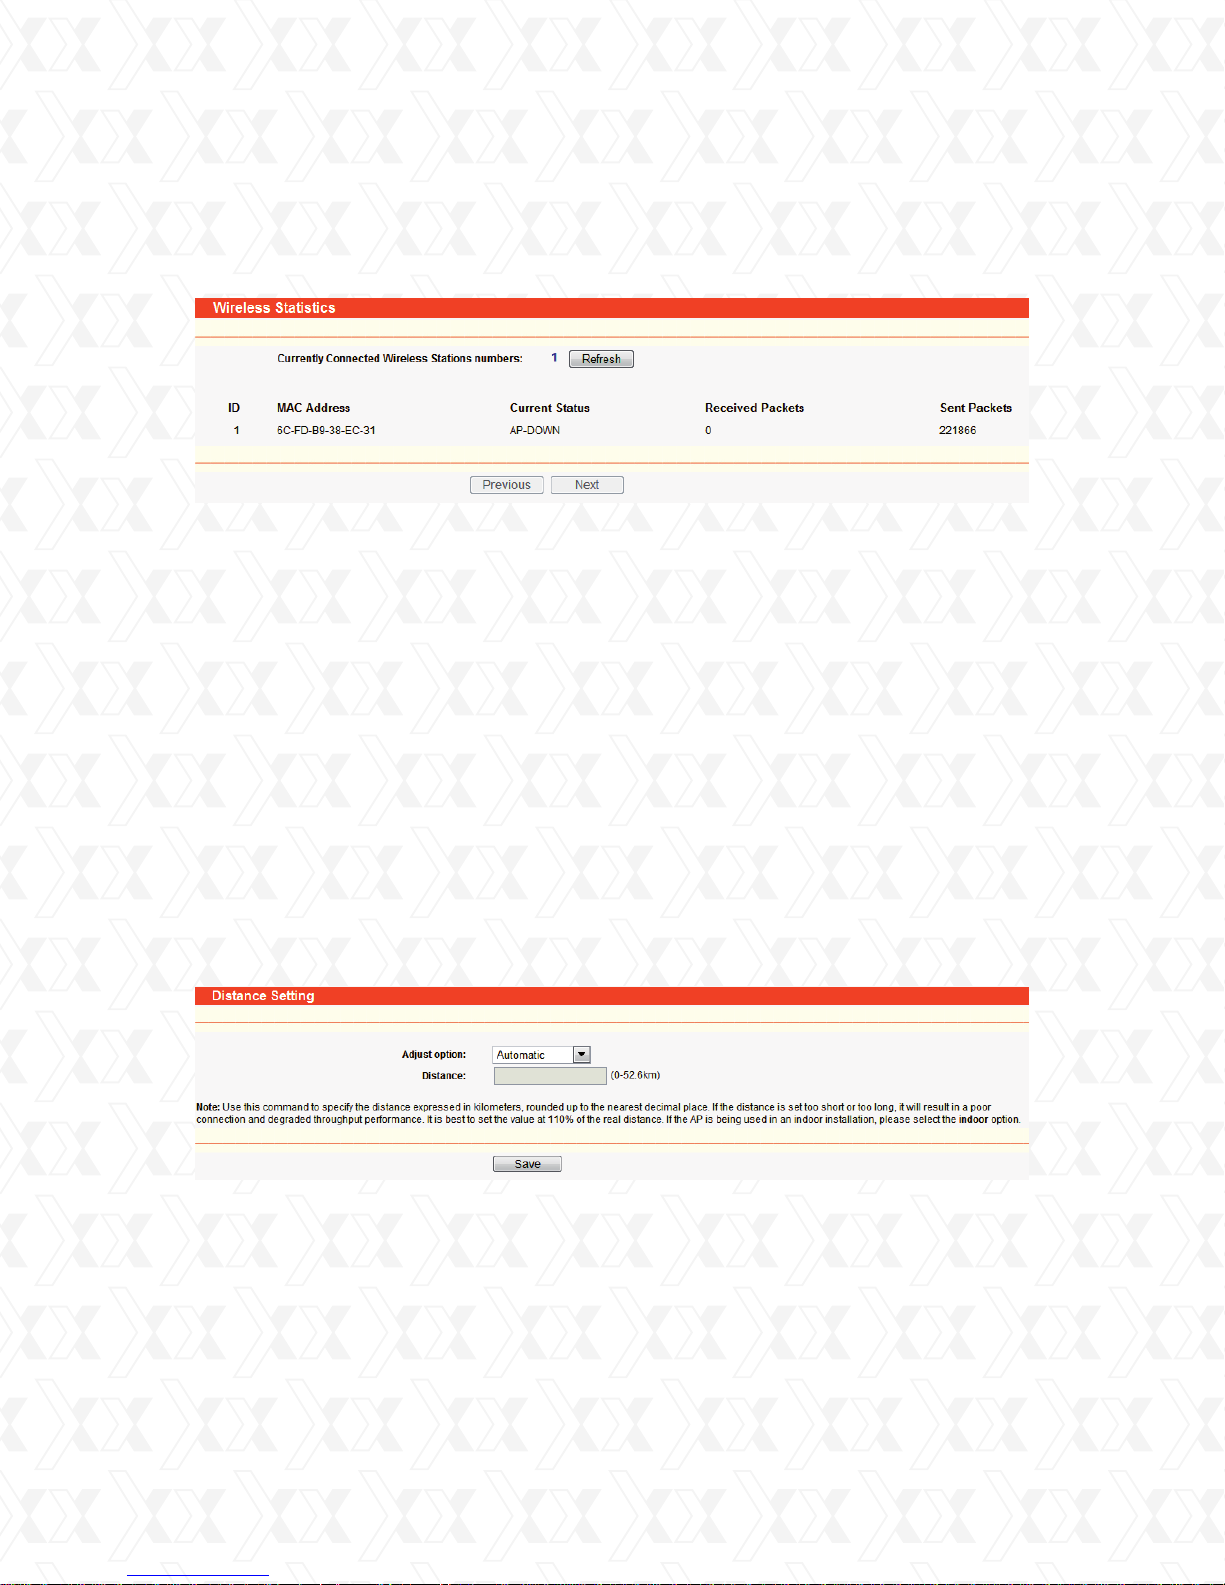
Selecting Wireless > Wireless Statistics will allow you to see the wireless transmission
information in the following screen, as shown in Figure 4-17.
Figure 4-17 Wireless stations linked to the router
•
MAC Address - The connected wireless station’s MAC address.
•
Current Status - The connected wireless station’s running status, one of
STA-AUTH / STA-ASSOC / AP-UP / WPA / WPA-PSK /WPA2/WPA2-PSK.
•
Received Packets - Packets received by the station
•
Sent Packets - Packets sent by the station
You cannot change any of the values on this page. To update this page and to show the current
connected wireless stations, click on the Refresh button.
If the numbers of connected wireless stations go beyond one page, click the Next button to go
to the next page and click the Previous button to return the previous page.
Note:
This page will be refreshed automatically every 5 seconds.
4.6.6 Distance setting
Go to Wireless > Distance Setting in order to adjust the wireless range in outdoor settings,
as shown in Figure 4-18. This parameter is critical for ensuring the stability of the link. Enter
the distance of your wireless link, and the software will optimize the frame ACK timeout value
automatically.
Figure 4-18 Distance Setting
•
Adjust option - Keep the default setting if the access point is mounted outdoors. You can also
choose to set up this parameter manually.
Distance: Use this command to specify the distance expressed in kilometers, rounded up to
•
the nearest decimal place. If the distance is set too short or too long, it will result in a poor
connection and degraded throughput performance. It is best to set the value at 110% of the
real distance. If the AP is being used in an indoor installation, please select the indoor option.
Click Save to confirm your settings.
34
Page 35
Nexxt Solutions - NexxtGate Wireless Access Point
4.6.7 Antenna alignment
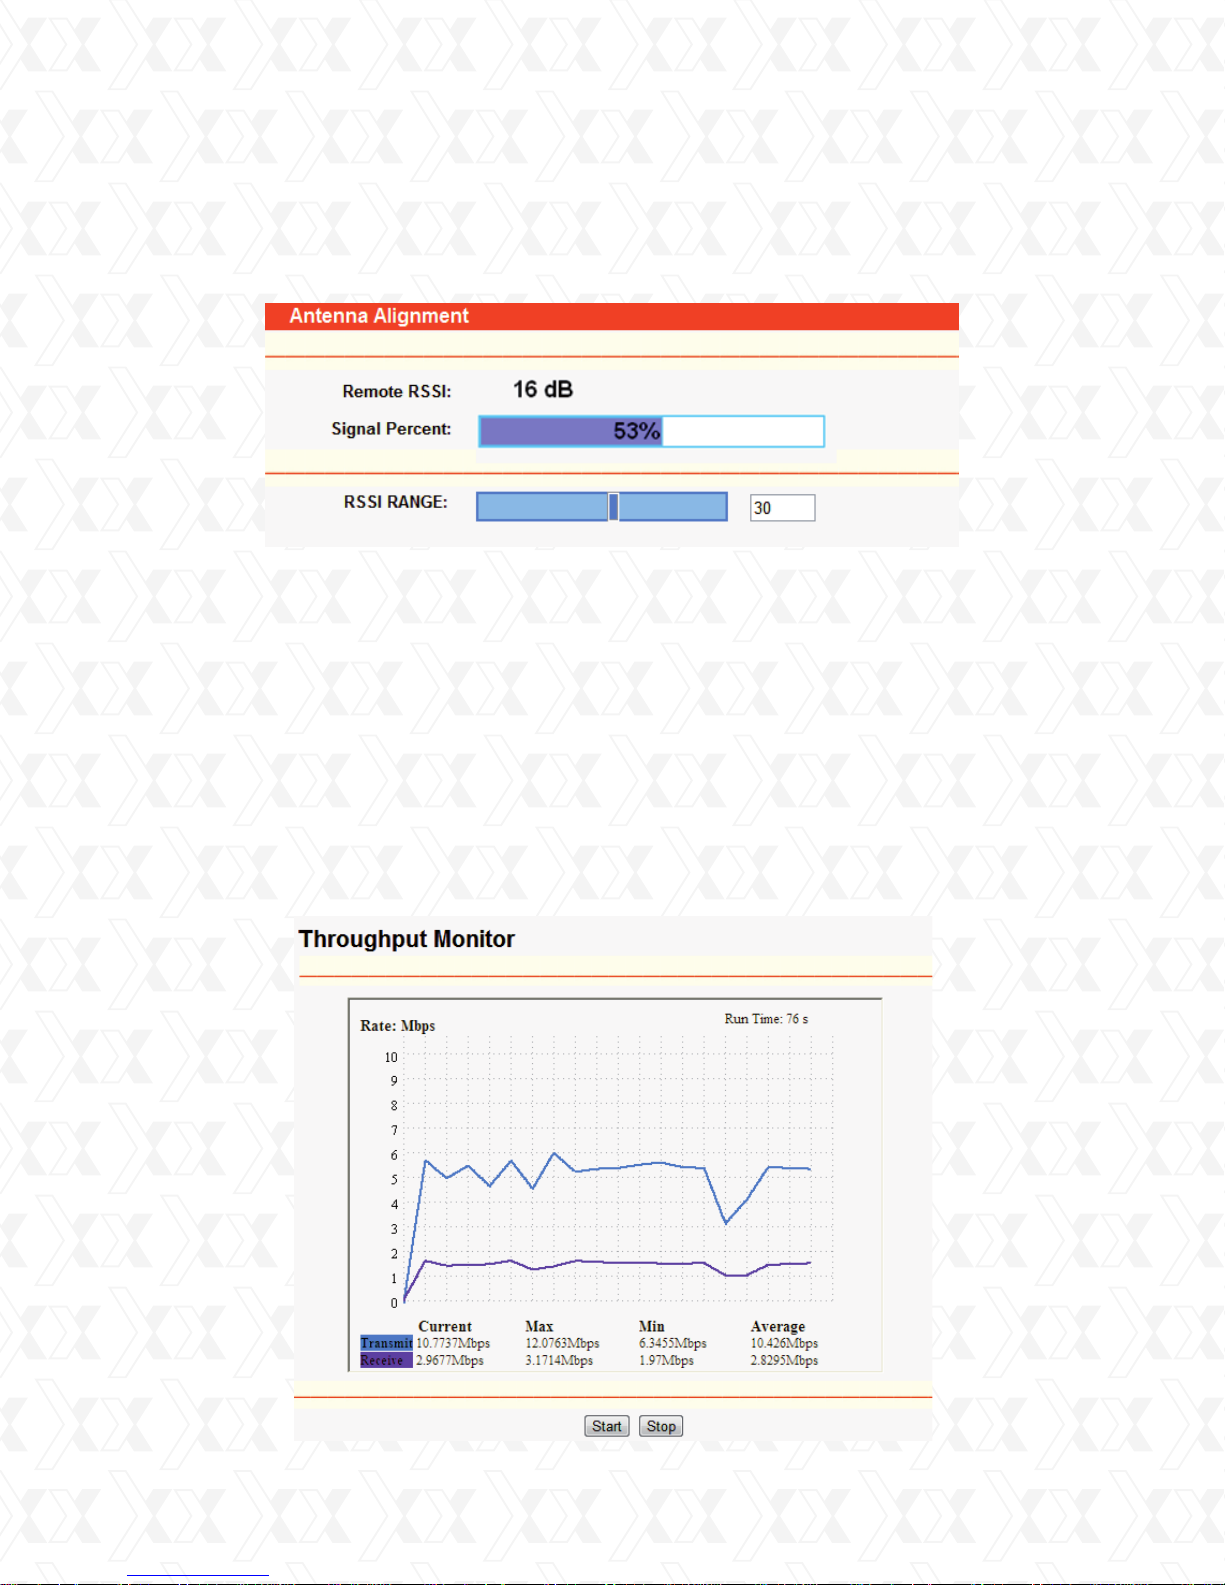
Go to Wireless > Antenna Alignment in order to visualize how the signal strength of the
remote AP varies when changing the antenna’s direction.
Figure 4-19 Antenna Alignment
•
Remote AP RSSI - Remote AP signal strength value.
•
Signal percent - The ratio of RSSI to RSSI RANGE (in percentage points).
•
RSSI RANGE - You can drag the slider bar to configure it or input the RSSI RANGE value.
The slider bar allows the range of the meter to be either increased or reduced. If the range
is reduced, the color change will be more sensitive to signal fluctuations. The slider can be
used to change an offset of the maximum indicator value.
Note:
This works only after the connection to the remote access point has been established in
client mode.
4.6.8 Throughput monitor
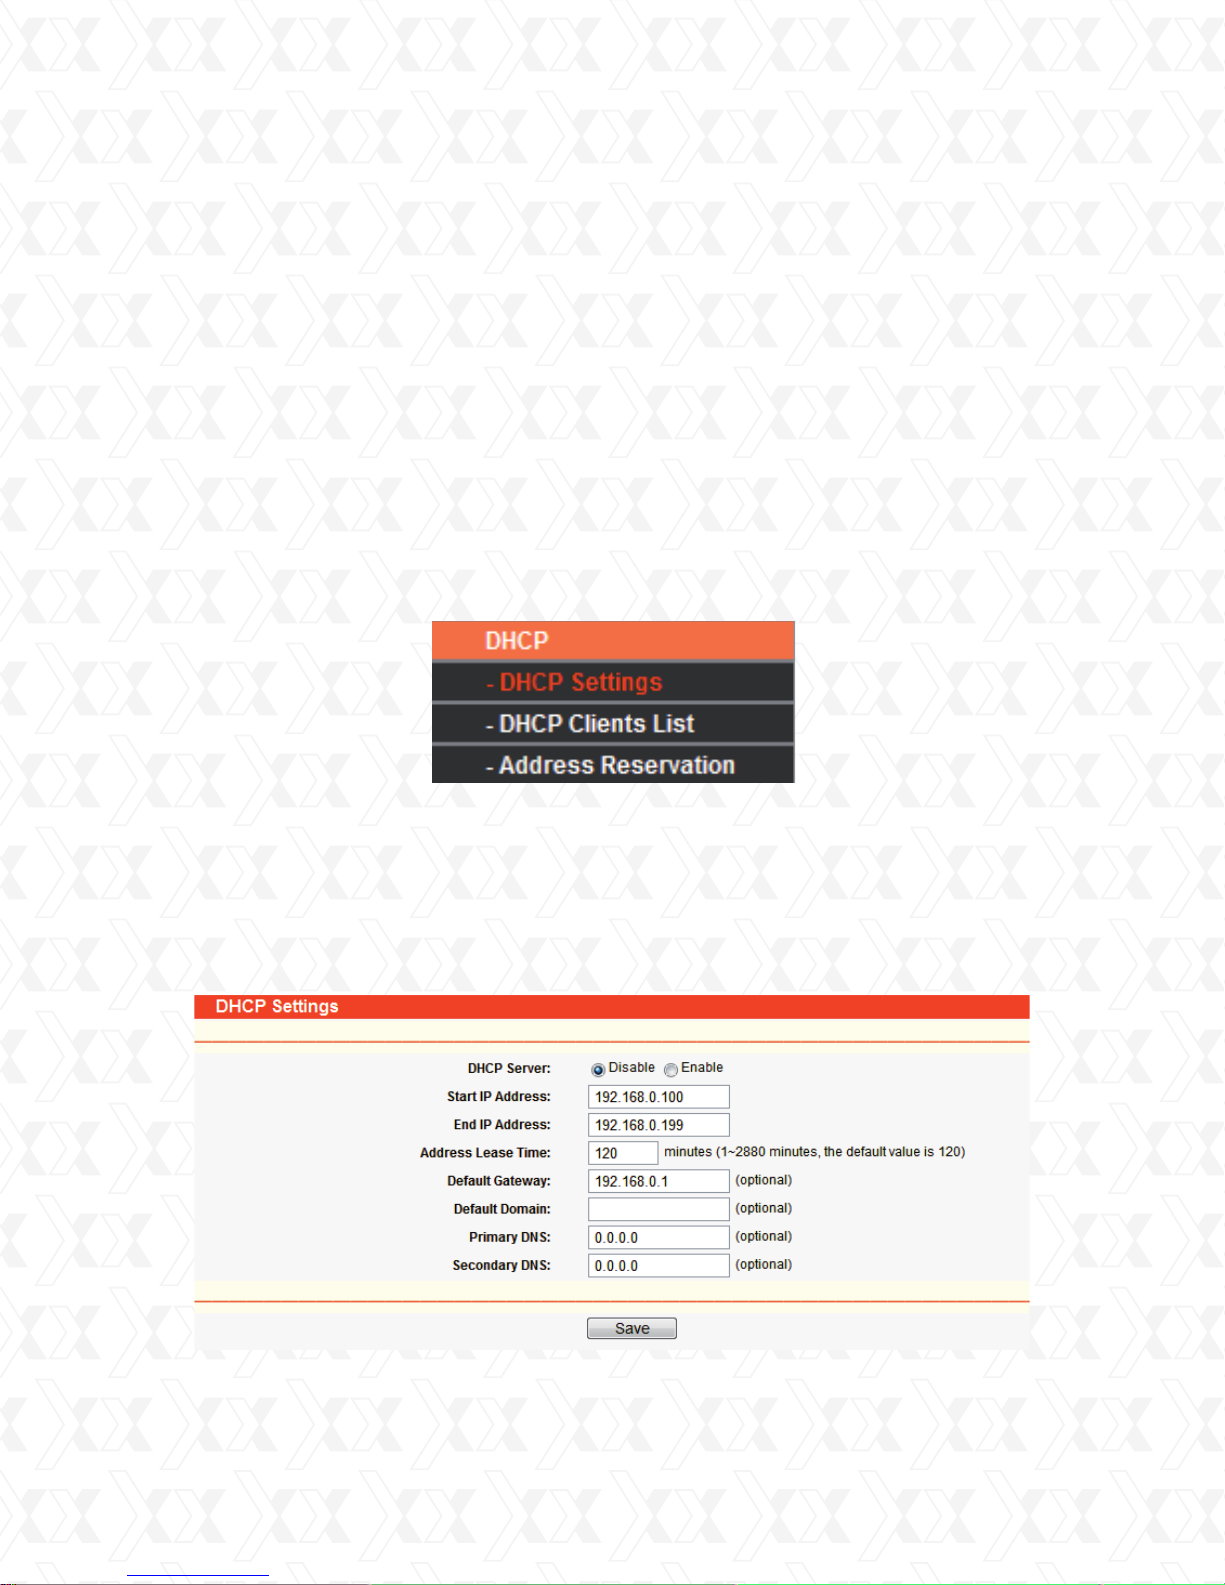
Go to Wireless > Throughput Monitor in order to visualize the wireless throughput information in the screen as illustrated in Figure 4-20.
Figure 4-20 Wireless Throughput
35
Page 36
Nexxt Solutions - NexxtGate Wireless Access Point
!
!
•
Rate - The unit used to measure throughput.
•
Run Time - How long this function has been running.
•
Transmit - Wireless transmit rate.
•
Receive - Wireless receive rate.
Click the Start button to start the wireless throughput monitor.
Click the Stop button to cancel the wireless throughput monitor.
4.7 DHCP
DHCP stands for Dynamic Host Configuration Protocol. The DHCP Server will automatically
assign dynamic IP addresses to the computers on the network. This protocol simplifies network
management and allows new wireless devices to receive IP addresses automatically without the
need to manually assign new IP addresses.
There are three submenus under the DHCP menu (as shown in Figure 4-21): DHCP Settings,
DHCP Clients List and Address Reservation. Clicking any of them will enable you to configure
the corresponding function. Detailed descriptions for each submenu are provided below.
Figure 4-21 DHCP menu
4.7.1 DHCP settings
Go to DHCP > DHCP Settings in order to set up the AP as a DHCP (Dynamic Host
Configuration Protocol) server, which provides the TCP/IP configuration for all the PCs that
are connected to the system on the LAN. The DHCP Server can be configured on this page
(Figure 4-22).
Figure 4-22 DHCP Settings
36
Page 37
Nexxt Solutions - NexxtGate Wireless Access Point
!
•
DHCP Server - Selecting the radio button next to Disable/Enable will switch the DHCP
server off or on in your AP. The default setting is Disable. If you disable the Server, you must
have another DHCP server within your network. Otherwise, you will have to configure the
IP address of the computer manually.
•
Start IP Address - This field specifies the first address in the IP Address pool.
192.168.0.100 is the default start IP address.
•
End IP Address - This field specifies the last address in the IP Address pool. 192.168.0.199
is the default end IP address.
•
Address Lease Time - Enter the amount of time for the PC to connect to the AP with its
current assigned dynamic IP address. The time is measured in minutes. After the time is up,
the PC will be automatically assigned a new dynamic IP address. The time range is 1 ~ 2880
minutes. The default value is 120 minutes.
•
Default Gateway (optional) - This field is used to enter the IP address of the gateway for your
LAN. The factory default setting is 0.0.0.0.
•
Default Domain (optional) - This field is used to enter the domain name of the your DHCP
server. You can leave the field blank.
•
Primary DNS (optional) - This field is used to enter the DNS IP address provided by your ISP.
Consult your ISP if you don’t know the DNS value. The factory default setting is 0.0.0.0.
•
Secondary DNS (optional) - This field is used to enter the IP address of another DNS server
if your ISP provides two DNS servers. The factory default setting is 0.0.0.0.
Click Save to save the changes.
Note:
To use the DHCP server function of the device, you should configure all computers in the LAN
as “Obtain an IP Address automatically” mode. This function will not take effect only after the
device reboots.
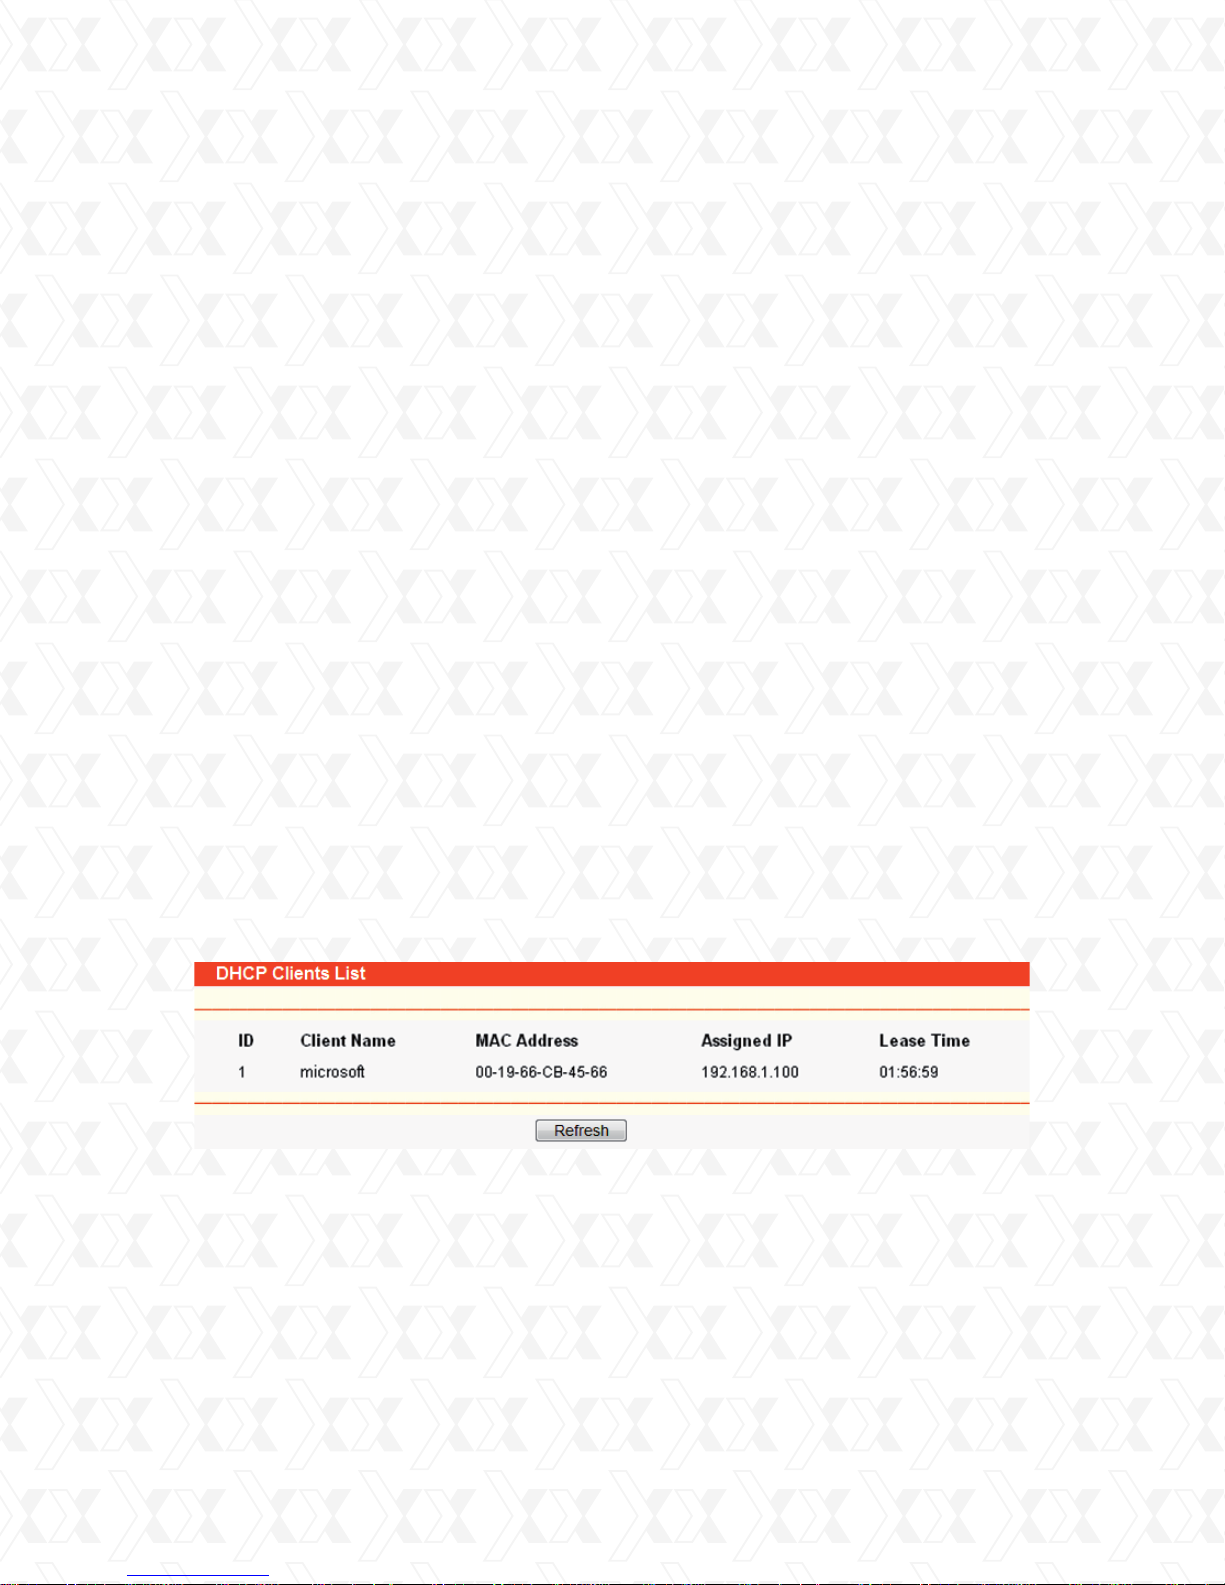
4.7.2 DHCP clients list
Go to DHCP > DHCP Clients List in order to visualize the Client Name, MAC Address,
Assigned IP and Lease Time for each DHCP Client attached to the device (Figure 4-23).
Figure 4-23 DHCP Clients List
•
ID - In this field, the index of the DHCP client is displayed.
•
Client Name - Here displays the name of the DHCP client.
•
MAC Address - In this field ,the MAC address of the DHCP client is displayed.
•
Assigned IP - In this field, the IP address that the AP has allocated to the DHCP client
is displayed.
•
Lease Time - In this field,, the time of the DHCP client leased is displayed. Before the time
is up, DHCP client will request to renew the lease automatically.
No values on this page can be modified. To update this page and to show the devices currently
attached, click on the Refresh button.
37
Page 38
Nexxt Solutions - NexxtGate Wireless Access Point
!
!
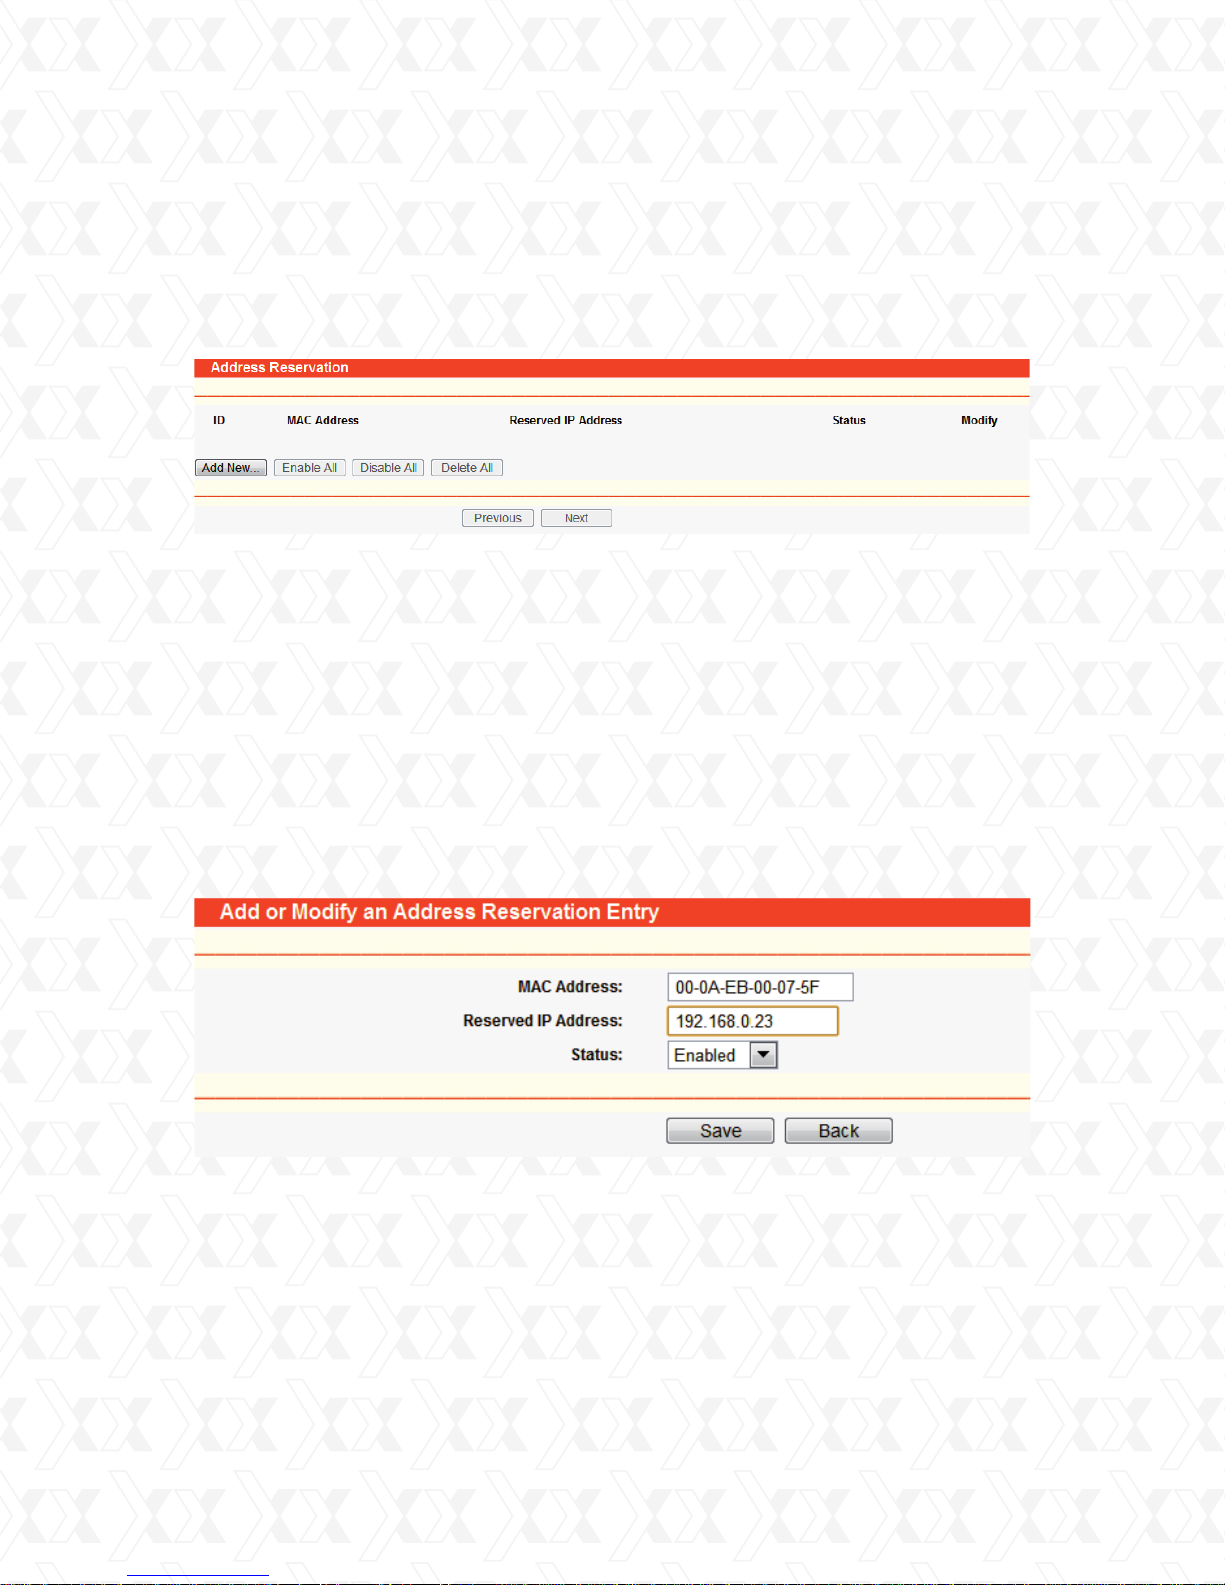
4.7.3 Address reservation
Go to DHCP > Address Reservation in order to specify a reserved IP address for a PC on the
LAN, so the PC will always obtain the same IP address each time when it accesses the AP.
Reserved IP addresses should be assigned to servers that require permanent IP settings.
The screen below is used for address reservation (shown in Figure 4-24).
Figure 4-24 Address Reservation
•
MAC Address - In this field the MAC address of the PC for which you want to reserve an
IP address for is displayed.
•
Reserved IP Address – In this field, the IP address that the AP reserved is displayed.
•
Status - It shows whether the entry is enabled or not.
•
Modify - Use it to either modify or delete an existing entry.
To reserve IP addresses:
1.
Click the Add New button on the Address Reservation page. The following window will be
displayed (Figure 4-25).
2.
Enter the MAC address (using the XX-XX-XX-XX-XX-XX format) and the IP address in
dotted-decimal notation of the computer you want to add.
3.
Click the Save button when finished.
!
Figure 4-25 Add or Modify an Address Reservation Entry
To modify a reserved IP address:
Select the reserved address entry you need and click Modify. If you wish to erase the
1.
entry, click Delete.
Click Save to keep your changes
2.
To delete all reserved IP addresses:
1.
Click Clear All.
Click Next to go to the following page, and Click Previous to return the last page.
38
Page 39
Nexxt Solutions - NexxtGate Wireless Access Point
Note:
Changes will take effect only after the device reboots.
4.8 Wireless settings
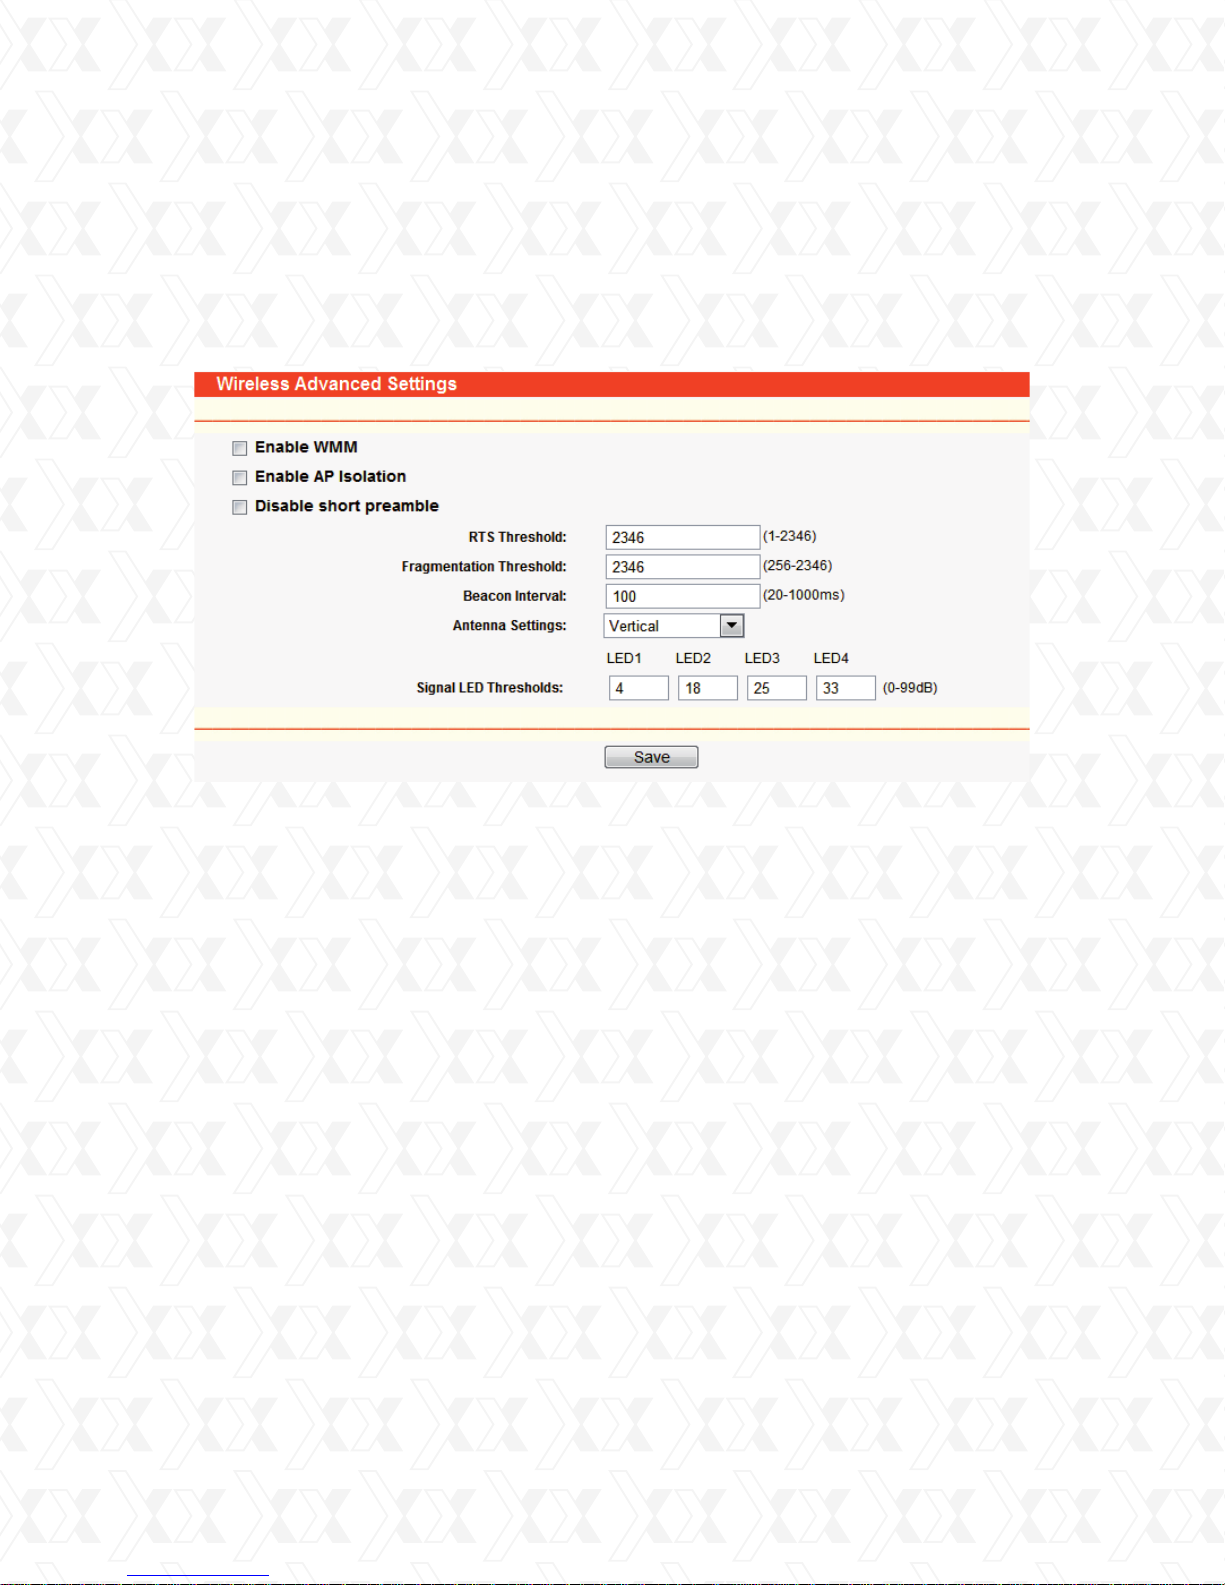
Go to Wireless Settings in order to enable the configuration of some advanced settings for the
device in the following screen, as shown in Figure 4-26.
!
Figure 4-26 Wireless settings
•
Enable WMM - WMM function guarantees that packets with high- priority messages to be
transmitted preferentially. It is strongly recommended to have this feature enabled.
•
Enable AP Isolation - This function can isolate wireless stations on your network from each
other. Wireless devices will not be able to communicate with each other through the WLAN.
This option is available only on Access Point mode.
•
Disable short preamble - Check this box to disable the short preamble and use the long
preamble only.. It is recommended not to modify these settings.
•
RTS threshold - Here you can specify the RTS/CTS (Request to Send/Clear to send)
threshold, which is the packet maximum size defining whether RTS/CTS frames should
be sent.
•
Fragmentation Threshold - The maximum packet size used for fragmentation.
•
Beacon Interval - The time interval between two successive beacons.
•
Power - The transmit power of the access point. The checkbox determines whether the
transmit power conforms to regulatory levels or not. Un-checking the Obey Regulatory
Power option may cause interference to other devices and also violate applicable laws in
some areas.
•
Antenna Settings - The polarization of an antenna.
•
Signal LED Thresholds - The RSSI thresholds of the signal LEDs.
39
Page 40
Nexxt Solutions - NexxtGate Wireless Access Point
4.9 Forwarding
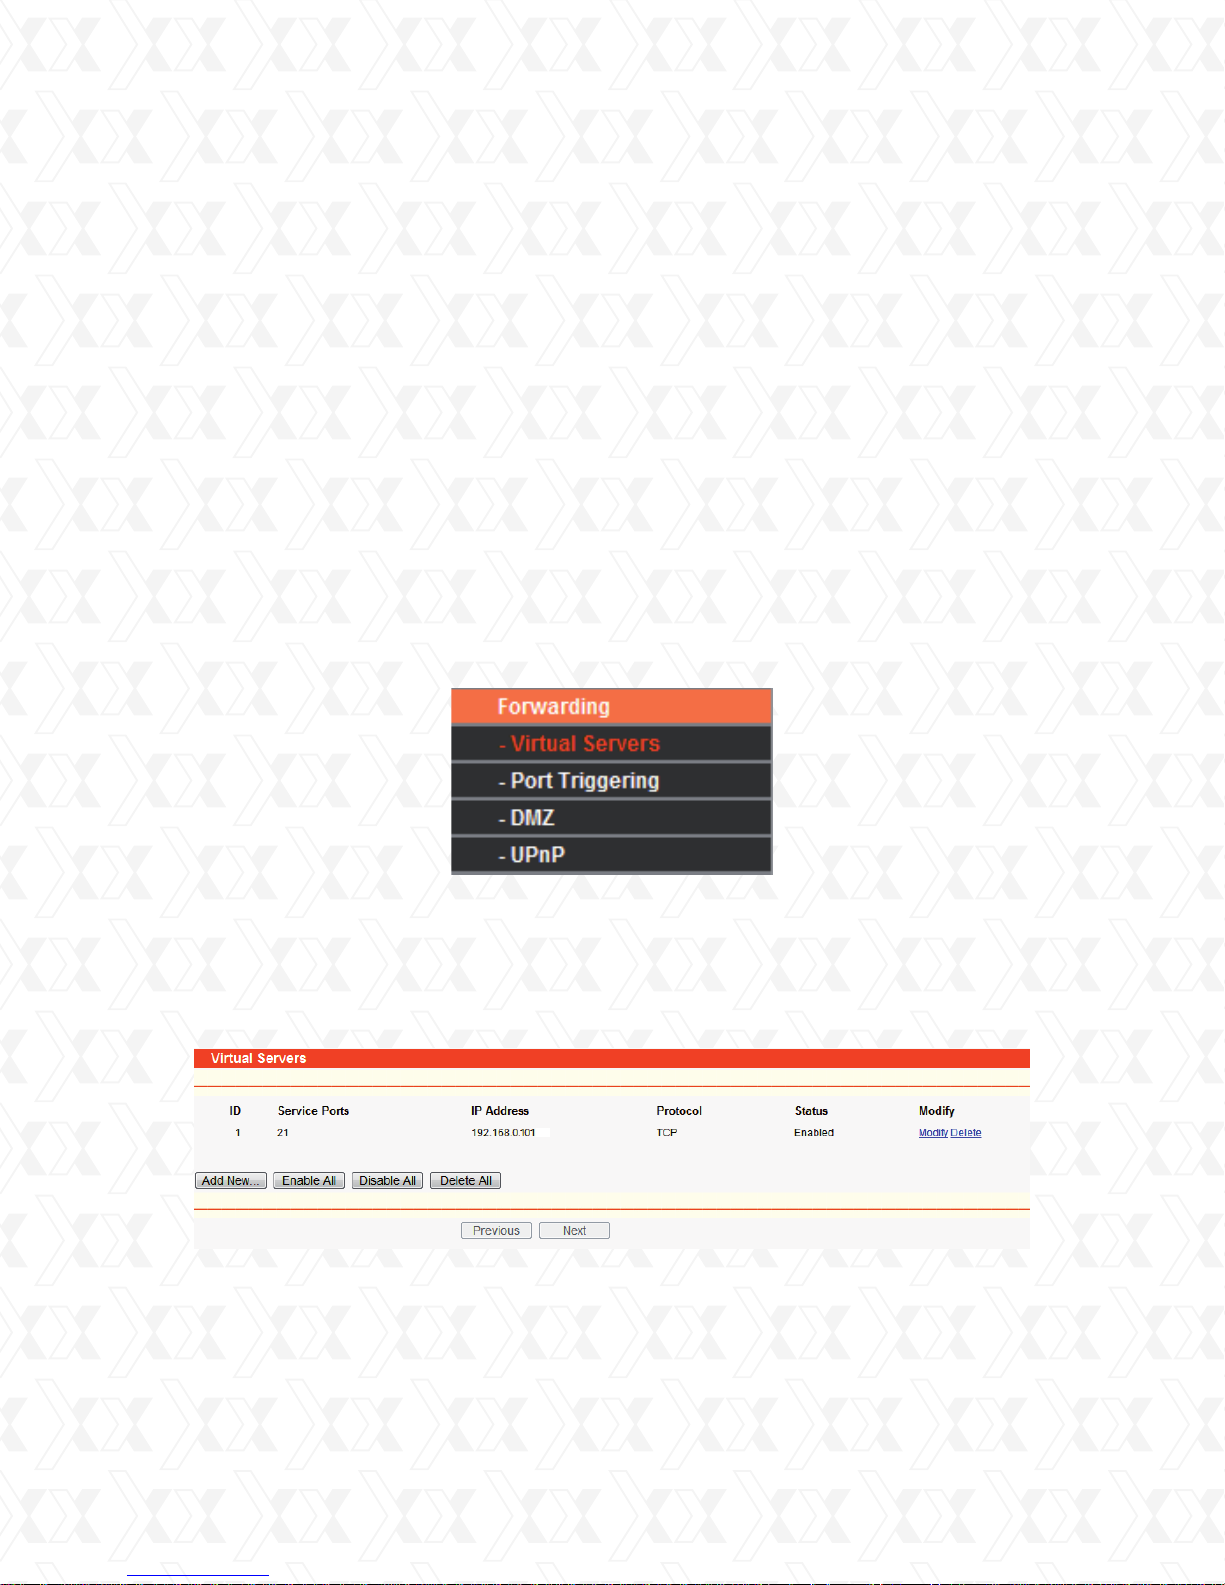
There are four submenus under the Forwarding menu (shown in Figure 4-27): Virtual Servers,
Port Triggering, DMZ and UPnP. Click any of them to be able to configure the corresponding
function. Detailed descriptions of each submenu are provided in the sections below.
Virtual servers can be used for setting up public services on your LAN, such as DNS, Email
and FTP. A virtual server is defined as a service port, and all requests from the Internet to this
service port will be redirected to the computer specified by the server IP. Any PC that is used as
a virtual server must have a static or reserved IP Address because its IP Address may change
when using the DHCP function. Port Triggering is used for some applications that
cannot work with a pure NAT router, like Internet games, video conferencing, Internet calling
and so on, which require multiple connections. The DMZ host feature allows one local host to
be exposed to the Internet to gain access to certain applications such as Internet gaming or
videoconferencing. DMZ host forwards all the ports at the same time. Any PC with a port being
forwarded must have its DHCP client function disabled and should have a new static IP Address
assigned to it, because its IP Address may change when using the DHCP function.
The Universal Plug and Play (UPnP) feature allows the devices, such as Internet computers,
to access the local host resources or devices as needed. UPnP devices can be automatically
discovered by the UPnP service application on the LAN.
!
!
Figure 4-27 The Forwarding menu
4.9.1 Virtual servers
Go to Forwarding > Virtual Servers in order to set up virtual servers on this page, as shown
in Figure 4-28.
!
!
Figure 4-28 Virtual Servers
•
Service Port - The numbers of External Ports. You can enter a service port or a range of
service ports (in XXX – YYY format, whereby XXX is the start port number, and YYY is the
end port number).
•
IP Address - The IP Address of the PC providing the service application.
40
Page 41
Nexxt Solutions - NexxtGate Wireless Access Point
•
Protocol - The protocol used for this application, either TCP, UDP, or All (all protocols
supported by the router).
•
Status - This field displays either Enabled or Disabled, as the current status for the device.
•
Modify - Click the Modify button next to in the entry you want to change. If you want to erase
that entry, click on Delete.
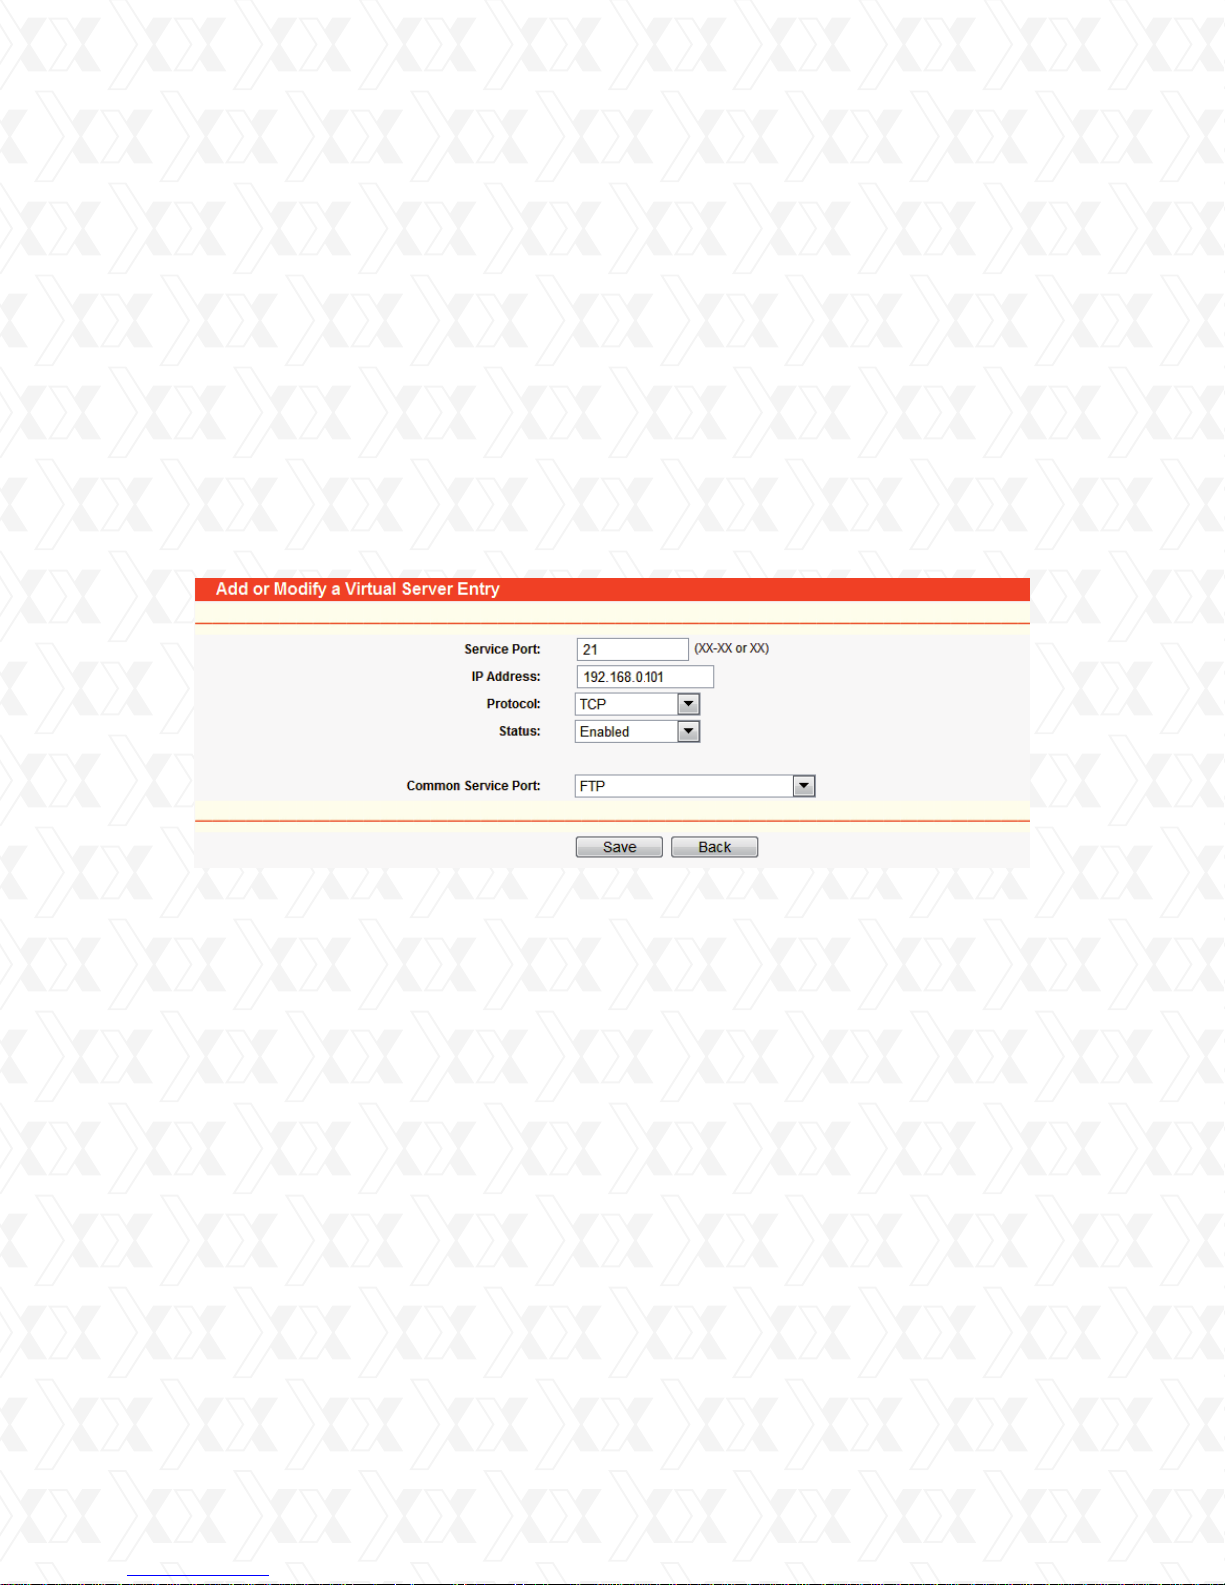
To setup a virtual server entry, follow the steps described below:
1.
Click the Add New… button on the virtual servers page. (Figure 4-29)
2.
Select the service you want to use from the Common Service Port list. If the Common
Service Port list does not have the service that you want to use, type the number of the
service port or service port range in the Service Port field.
3.
Type the IP Address of the computer in the Server IP Address field.
4.
Select the protocol used for this application.
5.
Select the Enable option to activate the virtual server.
6.
Click the Save button.
Figure 4-29 Add or Modify a Virtual Server Entry
•
Common Service Port - Some common services are already available from the pull-down list.
Note:
If your computer or server has more than one type of service available, please select
a different service, and enter the same IP Address for that computer or server.
To modify or delete an existing entry:
1.
Click the Modify button next to the entry you want to modify. If you want to erase this entry,
click on the Delete button.
2.
Proceed with the changes you want to make.
3.
Click the Save button when you are done.
Click the Enable All button to activate all entries.
Click the Disabled All button to cancel all entries.
Click the Delete All button to erase all entries.
Click the Next button to go to the following page. Click the Previous button to return to the last page.
Note:
If you set the virtual server of service port as 80, you must configure the Web management port
on System Tools –> Remote Management page to be any value other than 80, such as 8080.
Otherwise, there will be a conflict to disable the virtual server.
41
Page 42
Nexxt Solutions - NexxtGate Wireless Access Point
4.9.2 Port triggering
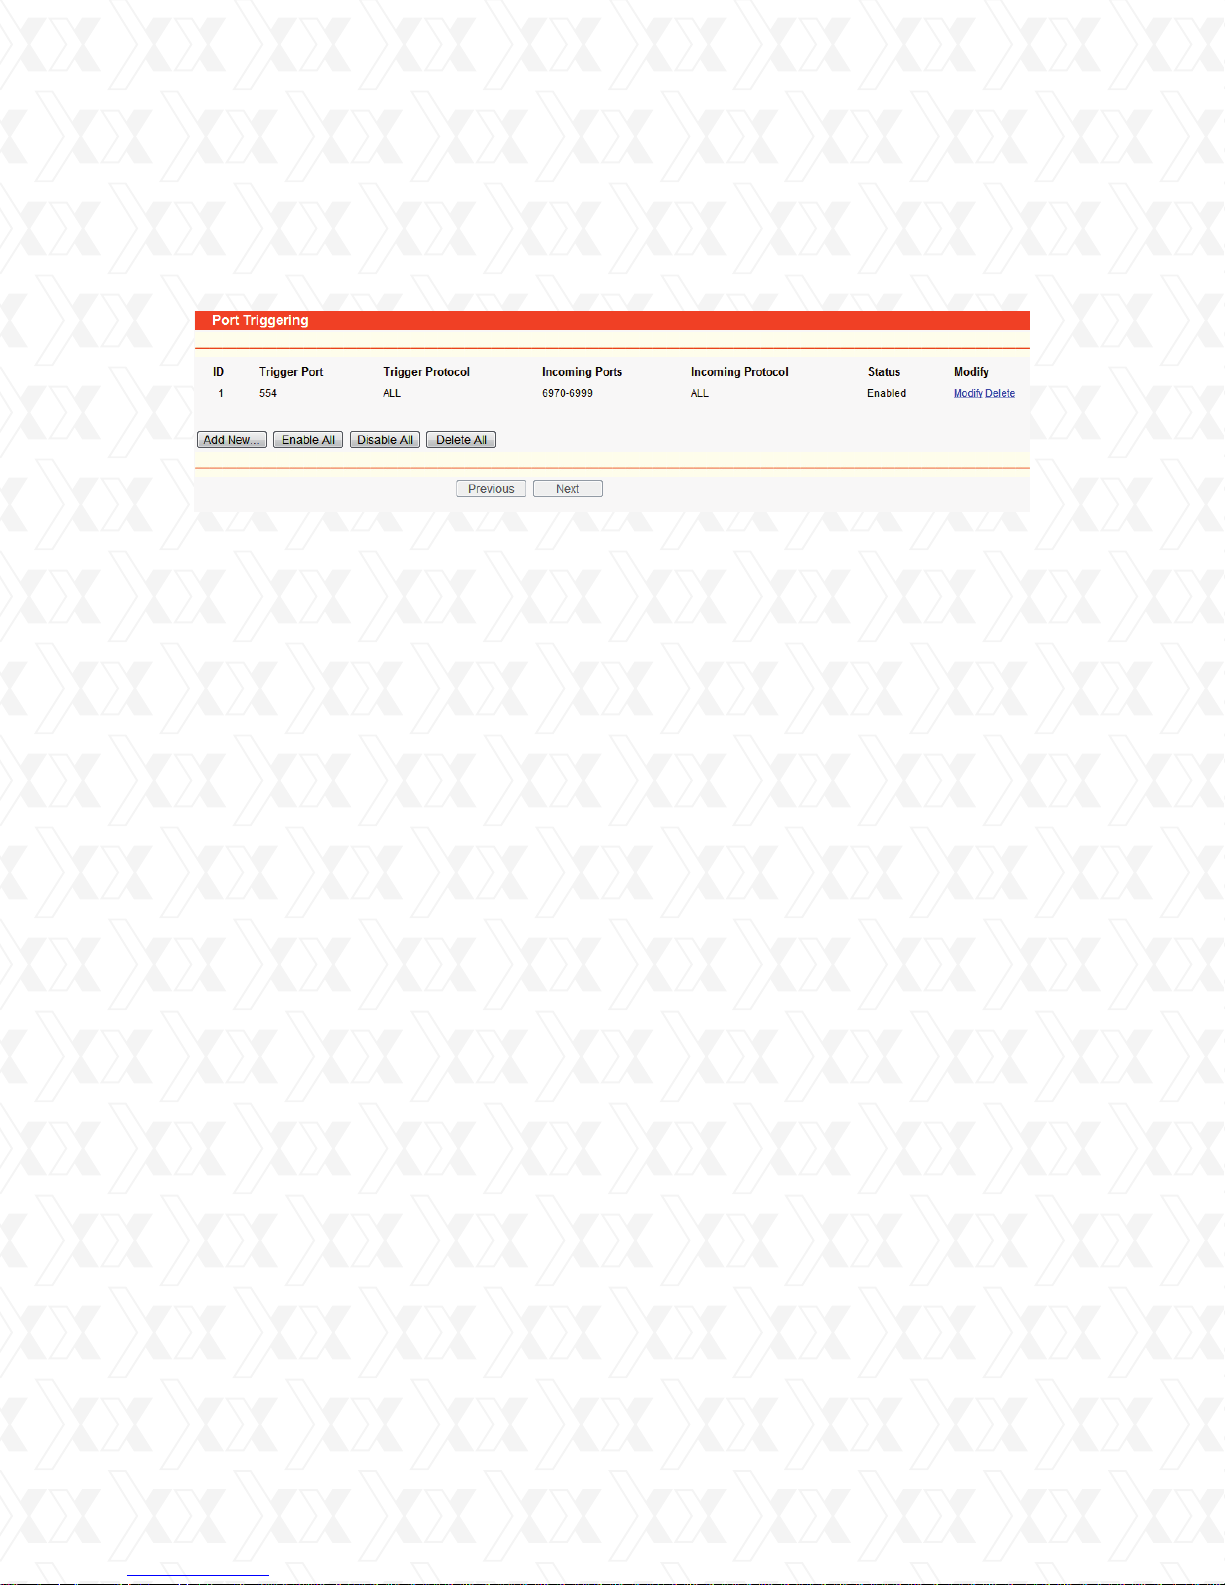
Go to Forwarding > Port Triggering in order to configure the Port Triggering parameters on
this menu, as shown in Figure 4-30.
Figure 4-30 Port triggering
Once configured, the operation is as follows:
A local host makes an outgoing connection to an external host using a destination port
1.
number defined in the Trigger Port field.
The router records this connection, opens the incoming port or ports associated with this
2.
entry in the Port Triggering table, and associates them with the local host.
When necessary, the external host will be able to connect to the local host using one of the
3.
ports defined in the Incoming Ports field.
•
Trigger Port - The port for outgoing traffic. An outgoing connection using this port will
“Trigger” this rule.
•
Trigger Protocol - The protocol used for Trigger Ports, either TCP, UDP, or All (all protocols
supported by the router).
•
Incoming Ports Range - The port or port range used by the remote system when it responds
to the outgoing request. A response using one of these ports will be forwarded to the PC that
triggered this rule. You can input at most 5 groups of ports (or port section). Every group
of ports must be separated by commas “,”. For example, 2000-2038, 2050-2051, 2085,
3010-3030.
•
Incoming Protocol - The protocol used for Incoming Ports Range, either TCP , UDP, or ALL
(all protocols supported by the router).
•
Status - This field displays either Enabled or Disabled, as the current status for the device.
To add a new rule, follow the steps below:
1.
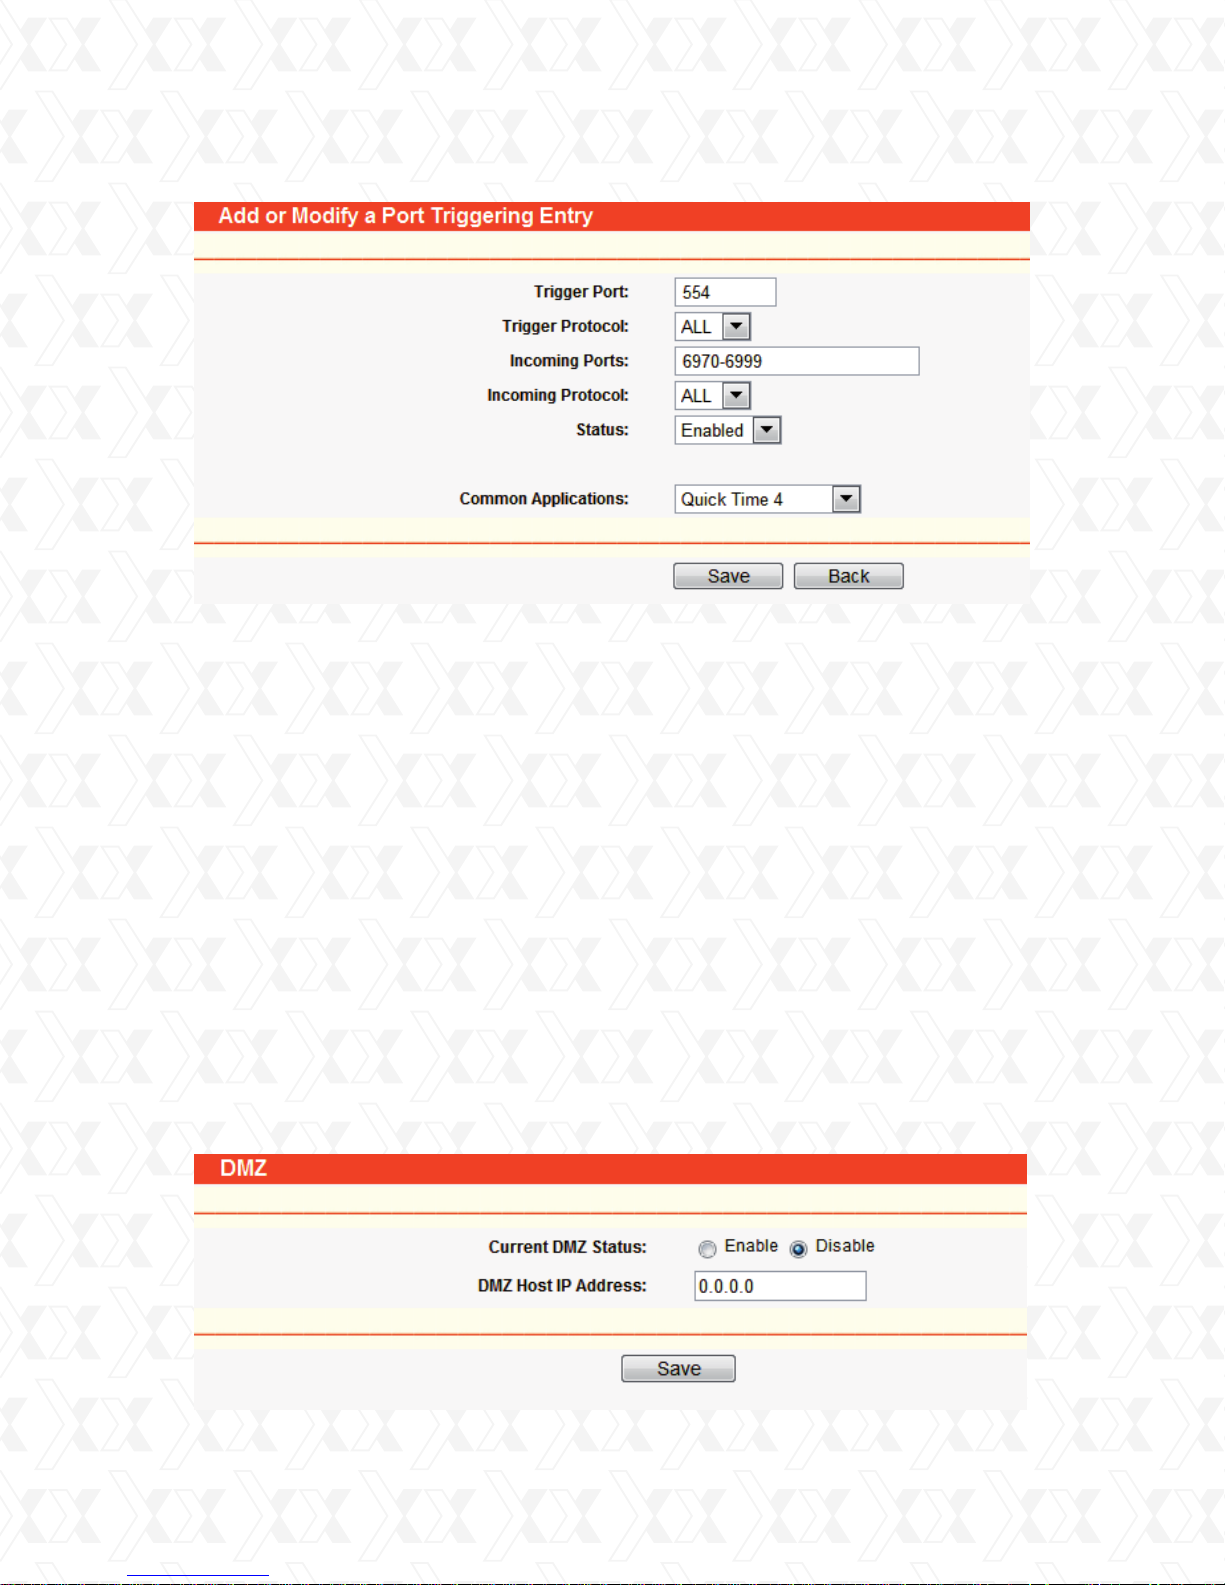
Click the Add New… button o the Port Triggering page. (Figure 4-31)
2.
Select a common application from the Common Applications drop-down list, then the port
parameters will be automatically filled in the corresponding field. If the Common Applications
list does not have the application you want, enter the port parameters manually.
3.
Select the protocol used for Trigger Port and Incoming Ports from the corresponding
pull-down list.
4.
Click on Enable on the Status field.
5.
Click the Save button to save the new rule.
42
Page 43
Nexxt Solutions - NexxtGate Wireless Access Point
Figure 4-31 Add or Modify a Triggering Entry
To modify or delete an existing entry, please complete the steps below:
1.
Click the Modify button next to the entry you want to change. If you want to delete that entry,
click the Delete in this stage.
2.
Proceed with the changes you want to make.
3.
Click the Save button when you are done.
Click the Enable All button to activate all entries.
Click the Disabled All button to cancel all entries.
Click the Delete All button to erase all entries.
Note:
When the trigger connection is released, will cause the closing of the corresponding opened
1.
ports.
Each rule can only be used by one host on the LAN at a time. The trigger connection of other
2.
hosts on the LAN will be refused.
Incoming Port Range enabled cannot overlap each other at the same time.
3.
4.9.3 DMZ (Demilitarized Zone)
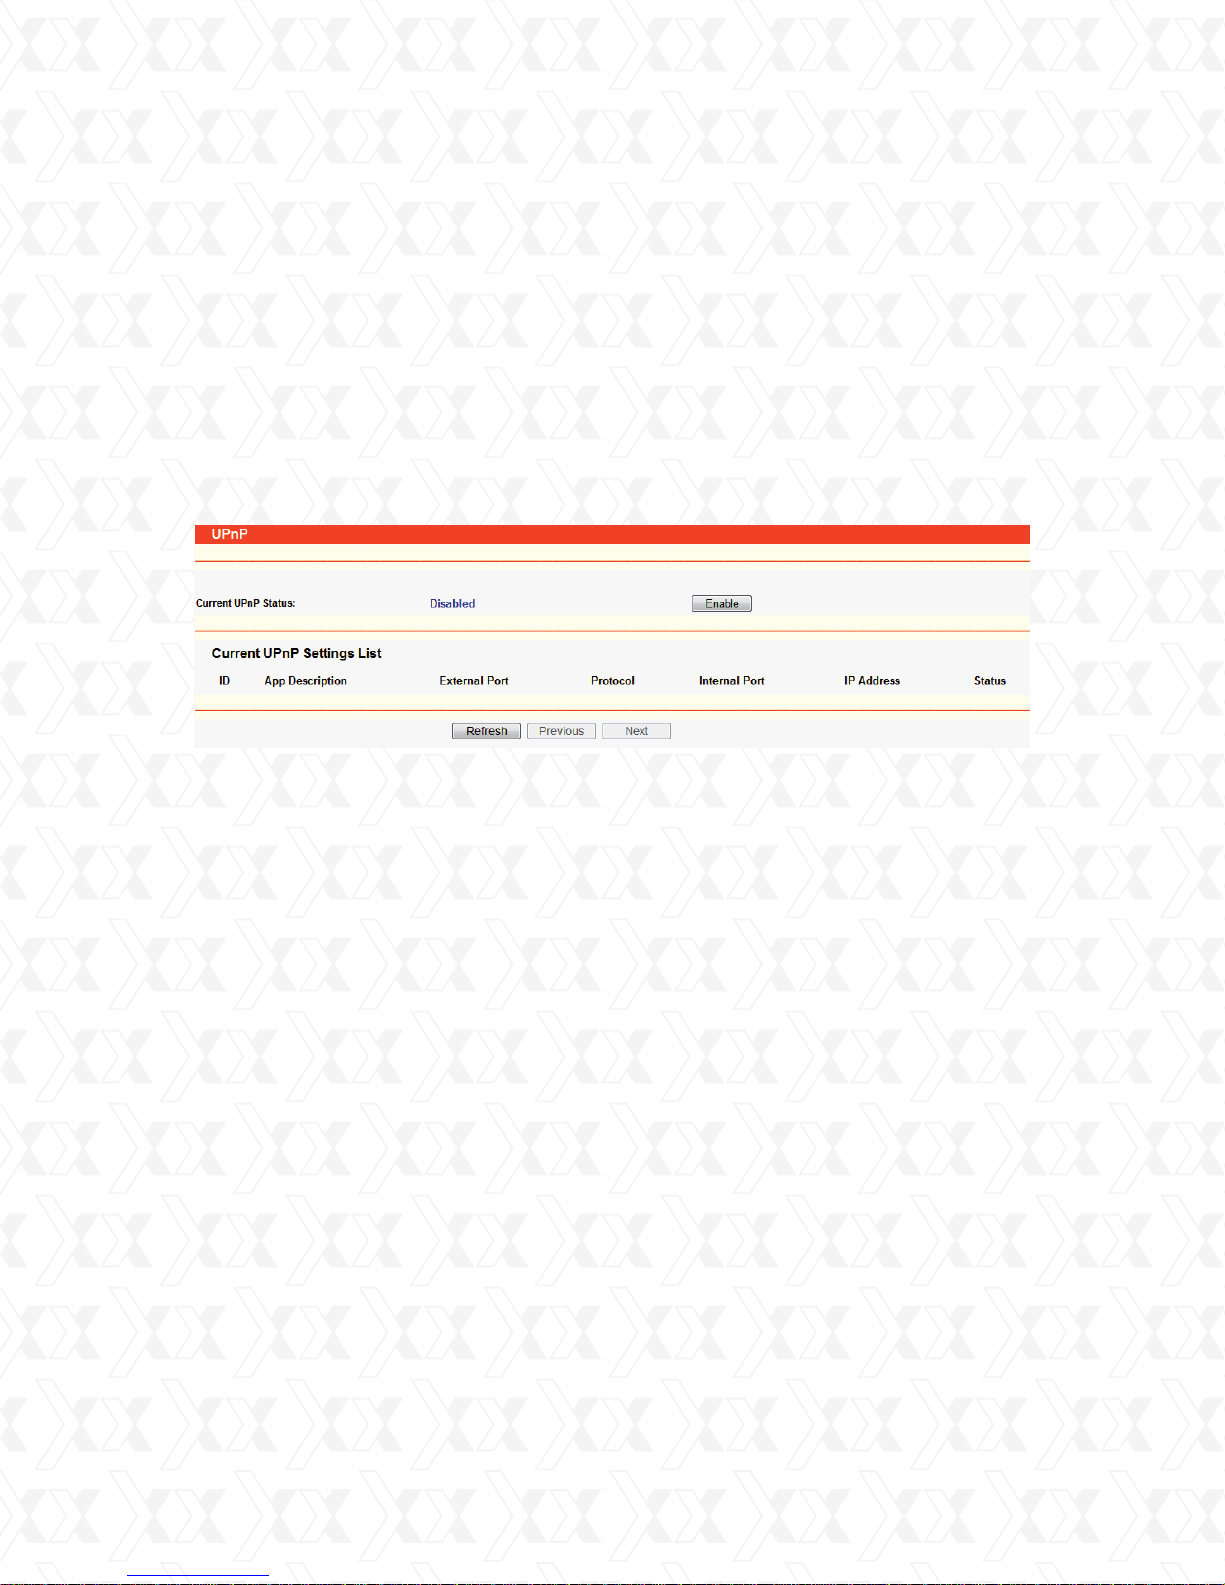
Go to Forwarding > DMZ in order to set up an DMZ host on this page, as shown in
Figure 4-32.
Figure 4-32 DMZ
43
Page 44
Nexxt Solutions - NexxtGate Wireless Access Point
To assign a computer or server to be a DMZ server:
1.
Click the Enable radio button.
2.
Enter the IP address in the DMZ Host IP Address field of the local PC that you want to set as
the DMZ host.
3.
Click the Save button when done.
Note:
Once you set the DMZ host, the firewall protection for that host will be disabled.
4.9.4 UPnP
Go to Forwarding > UPnP in order to configure the UPnP function on this page, as shown in
Figure 4-33:
Figure 4-33 UPnP Settings
•
Current UPnP Status - UPnP can be enabled or disabled by clicking the corresponding
button. As enabling UPnP may present a risk to security, this feature is disabled by default.
•
Current UPnP Settings List - This table displays the current UPnP information.
•
App Description - The description provided by the application in the UPnP request.
•
External Port - The external port that the router opened for the application.
•
Protocol - Shows which type of protocol is opened.
•
Internal Port – The Internal port that the router opened as a local host.
•
IP Address - The IP address of the local host that initiates the UPnP request.
•
Status - The port status is displayed in this field. “Enabled” means that the port is still active.
Otherwise, the port will be inactive.
Click Enable to activate the UPnP feature.
Click Disable to cancel the UPnP feature.
Click Refresh to update the Current UPnP Settings List.
44
Page 45
Nexxt Solutions - NexxtGate Wireless Access Point
4.10 Security
This menu offers an enhanced level of protection for your network. IP address Filtering allows
you to control the Internet Access of specific users on your LAN based on their IP addresses.
Domain Filtering allows you to control access to certain websites on the Internet by specifying
their domains or key words. Like IP Address Filtering, MAC Address Filtering allows you to control
access to the Internet of users on your local network based on their MAC Addresses. Advanced
Security helps to protect the router from cyber attacks. Remote Management allows you to
manage your Router from a remote location via the Internet.
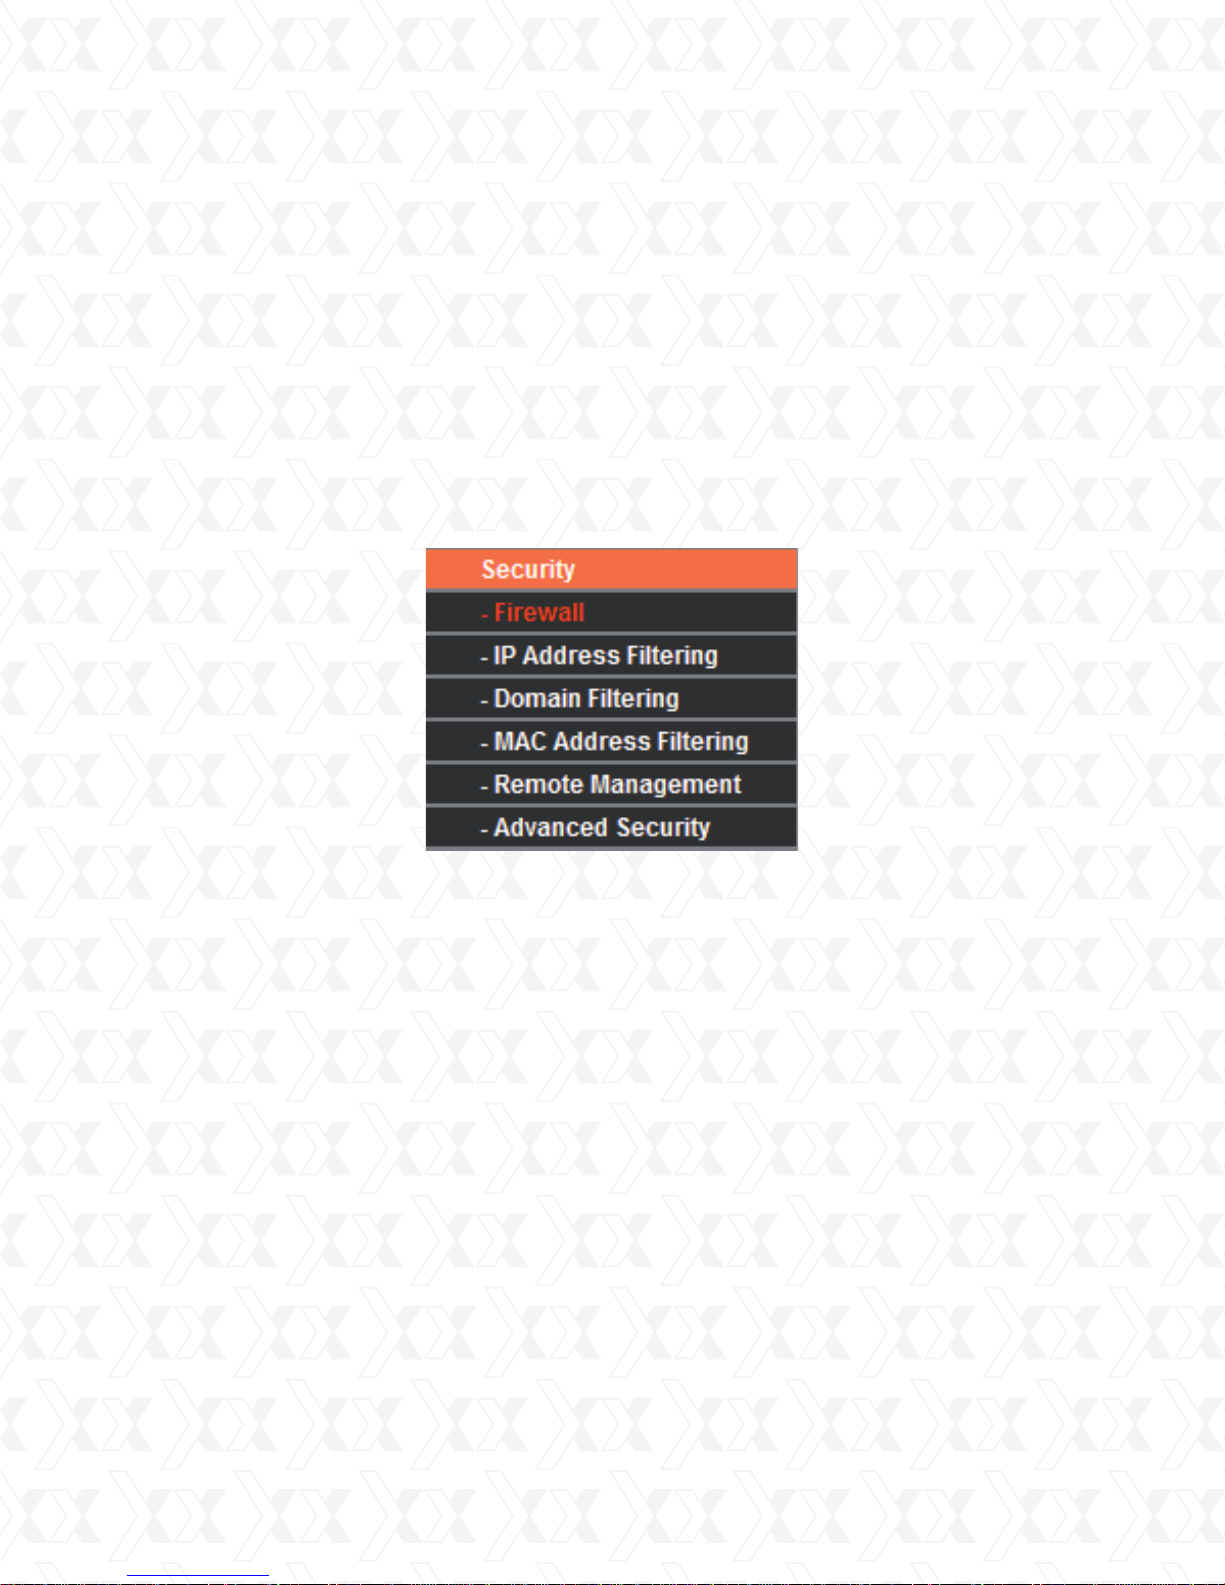
There are six submenus under the Security menu (shown in Figure 4-34): Firewall, IP Address
Filtering, Domain Filtering, MAC Address Filtering, Remote Management and Advanced
Security. Click any of them in order to configure the corresponding function. A detailed
description of each submenu is provided below.
!
Figure 4-34 The Security menu
45
Page 46
Nexxt Solutions - NexxtGate Wireless Access Point
4.10.1 Firewall
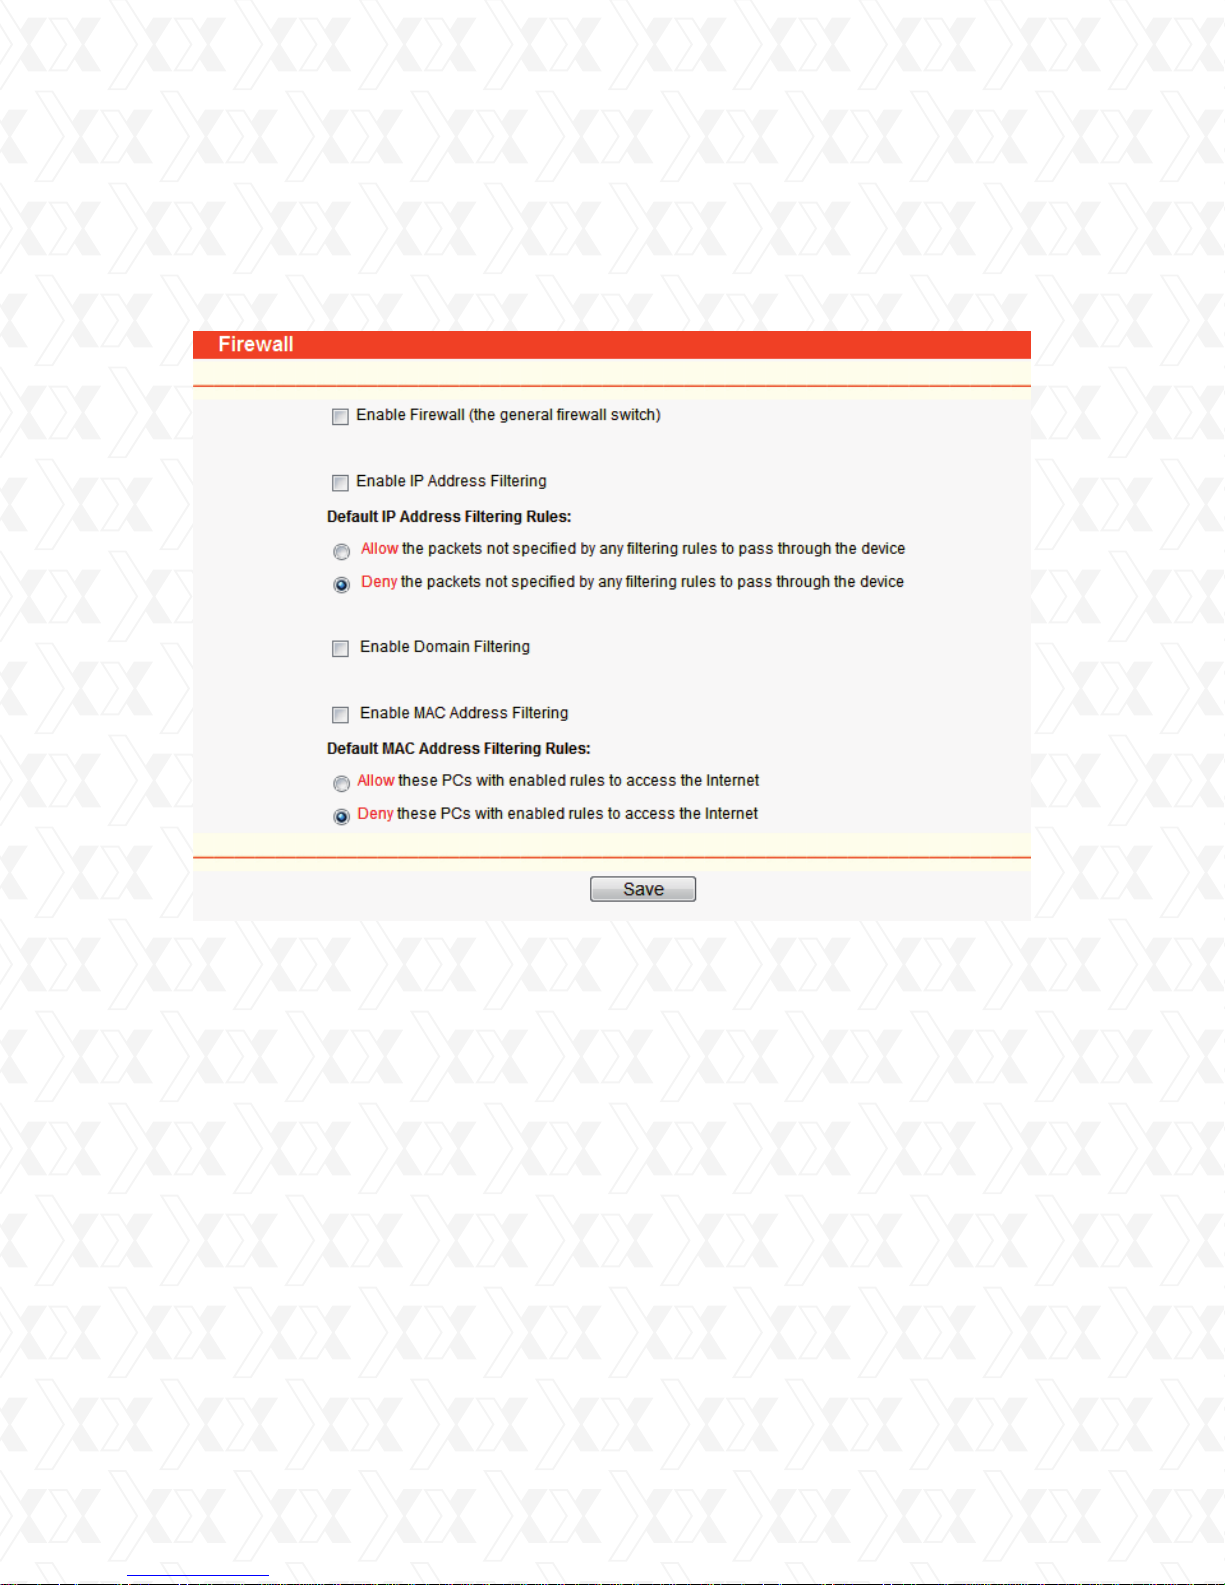
Go to Security > Firewall in order to enable the main firewall screen, as shown in Figure 4-35.
The default setting for the switch is off. Turning the general firewall switch to off will disable IP
Filtering, Domain Filtering and MAC Filtering even if their individual settings are enabled.
Figure 4-35 Firewall Settings
•
Enable Firewall - Check this box to activate the Firewall.
•
Enable IP Address Filtering - Check this box to activate IP Address Filtering on the AP. There are
two default filtering rules for IP Address Filtering: Allow or Deny the packets specified to pass
through the router.
•
Enable Domain Filtering - Check this box to enable Domain Filtering.
•
Enable MAC Filtering - Check this box to activate MAC Address Filtering on the AP. There are
two default filtering rules for MAC Address Filtering: Allow or Deny the packets specified to pass
through the router.
46
Page 47
Nexxt Solutions - NexxtGate Wireless Access Point
!
4.10.2 IP address filtering
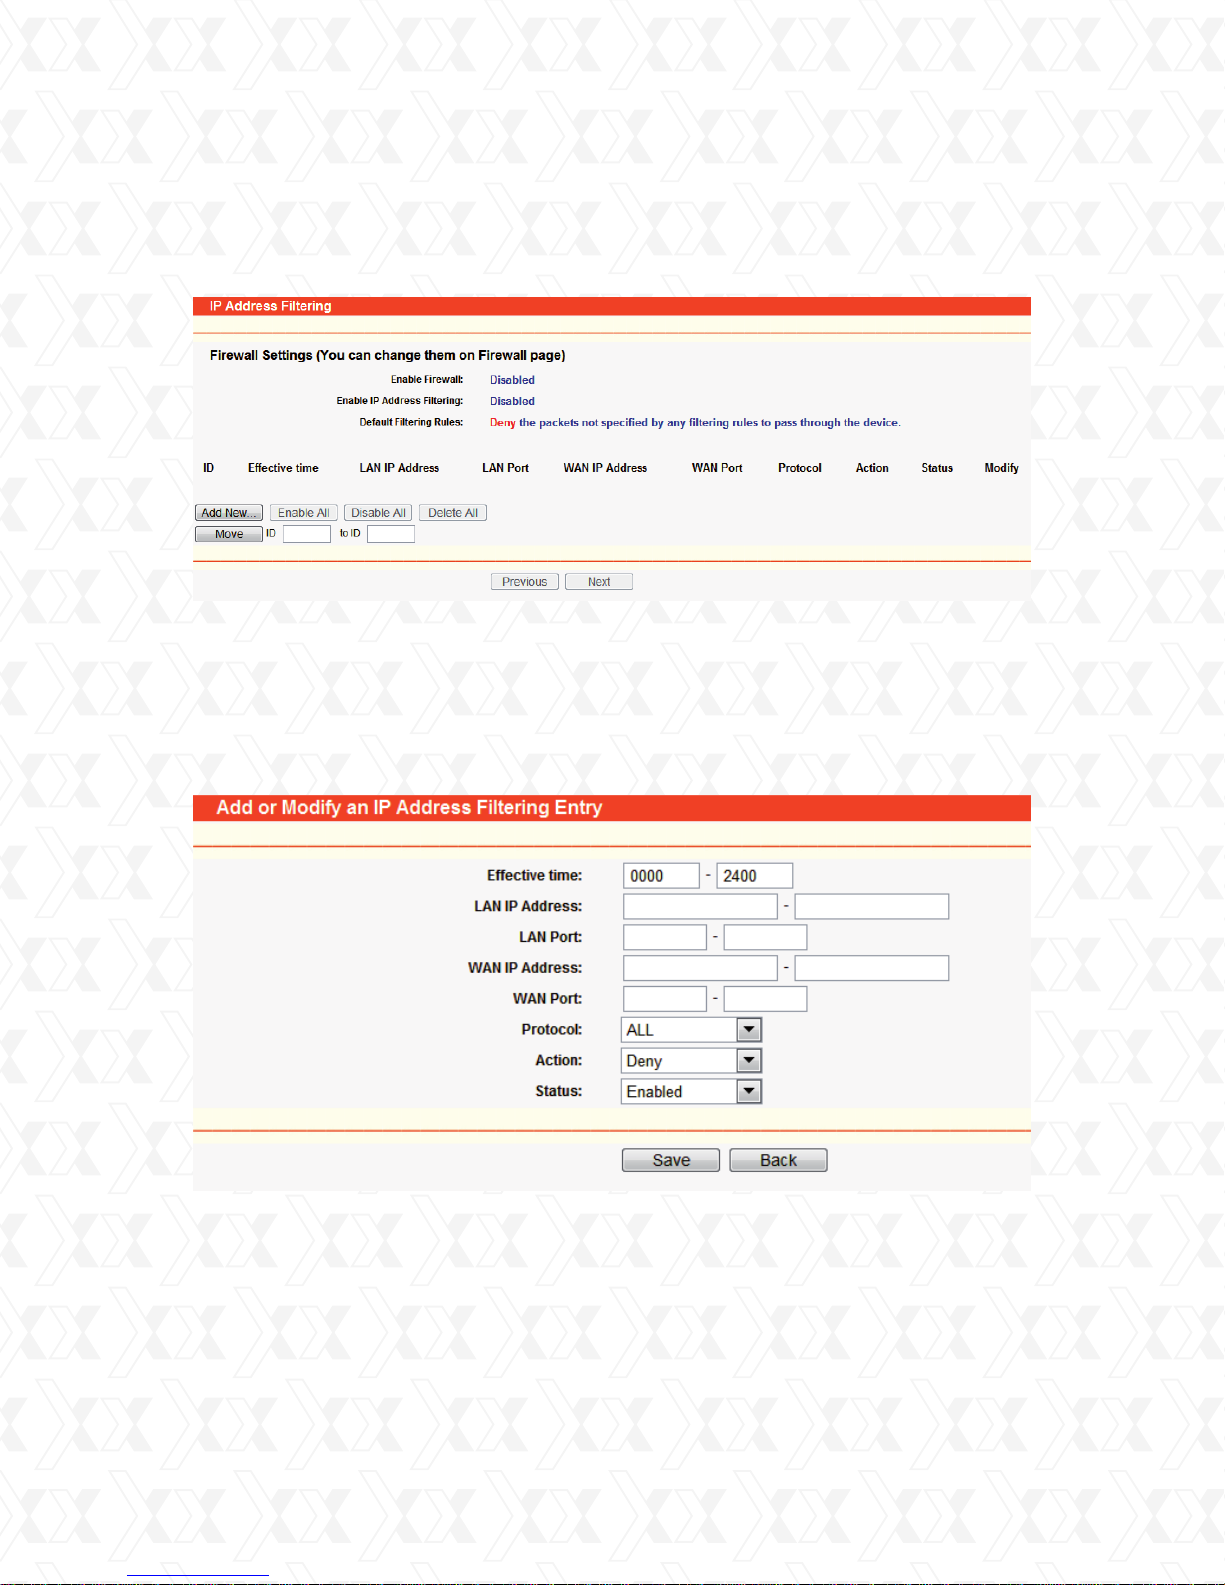
Go to Security > IP Address Filtering in order to configure the IP address filtering entry on the
current page, as shown in Figure 4-36.
Figure 4-36 IP address Filtering
Do not change the default setting if you want to keep the IP Address Filtering feature disabled.
To set up an IP Address Filtering entry, you should first enable the Firewall, followed by the
IP Address Filtering on the Firewall page, as shown in Figure 4-35, and then click the Add New…
button, as illustrated in Figure 4-36. This will cause the page Add or Modify an IP Address
Filtering entry to be displayed, just like the one shown in Figure 4-37 below.
Figure 4-37 Add or Modify an IP Address Filtering Entry
To create or modify an IP Address Filtering entry, follow these instructions below:
1.
Effective Time - Enter a time range using the HHMM format. It represents the period within
which the entry shall remain active. For example 0803 - 1705, means that the command will
be effective from 08:03 to 17:05.
2.
LAN IP Address - Enter a LAN IP Address or a range of LAN IP addresses in this field, in
dotted-decimal notation format. For example, 192.168.0.20 192.168.0.30. Leave the field
blank if you want all LAN IP Addresses to be used.
47
Page 48
Nexxt Solutions - NexxtGate Wireless Access Point
3.
LAN Port - Enter a LAN Port or a range of LAN ports in this field. For example, 1030 2000.
Leave the field blank if you want all LAN ports to be used.
4.
WAN IP Address - Enter a WAN IP Address or a range of WAN IP Addresses in this field, in
dotted-decimal notation format. For example, 61.145.238.6 - 61.145.238.47. Leave the
field blank if you want all WAN IP Addresses to be used.
5.
WAN Port - Enter a WAN Port or a range of WAN Ports in this field. For example, 25 110.
Leave the field blank if you want all WAN to be used.
6.
Protocol - Select the protocol to be used, either TCP, UDP, or All (all protocols supported by
the router).
7.
Action - Select either Allow or Deny through the router.
8.
Status - Select Enabled or Disabled for this entry from the Status pull-down list.
Click the Save button to confirm this entry.
To add another entry, repeat steps 1-9.
When finished, click the Back button.
To modify or delete an existing entry:
1.
Click the Modify next the entry you want to change. If you want to erase the entry, click the
Delete button.
2.
Proceed with the changes you want to make.
3.
Click the Save button.
Click the Enable All button to activate all entries.
Click the Disabled All button to cancel all entries.
Click the Delete All button to erase all entries.
You can change the entry’s order as desired. Fore entries are before hind entries. Enter the
ID number in the first box you want to move and another ID number in second box you want to
move to, and then click the Move button to change the entry’s order.
Click the Next button to move to the following page and click the Previous button to return to
the last page.
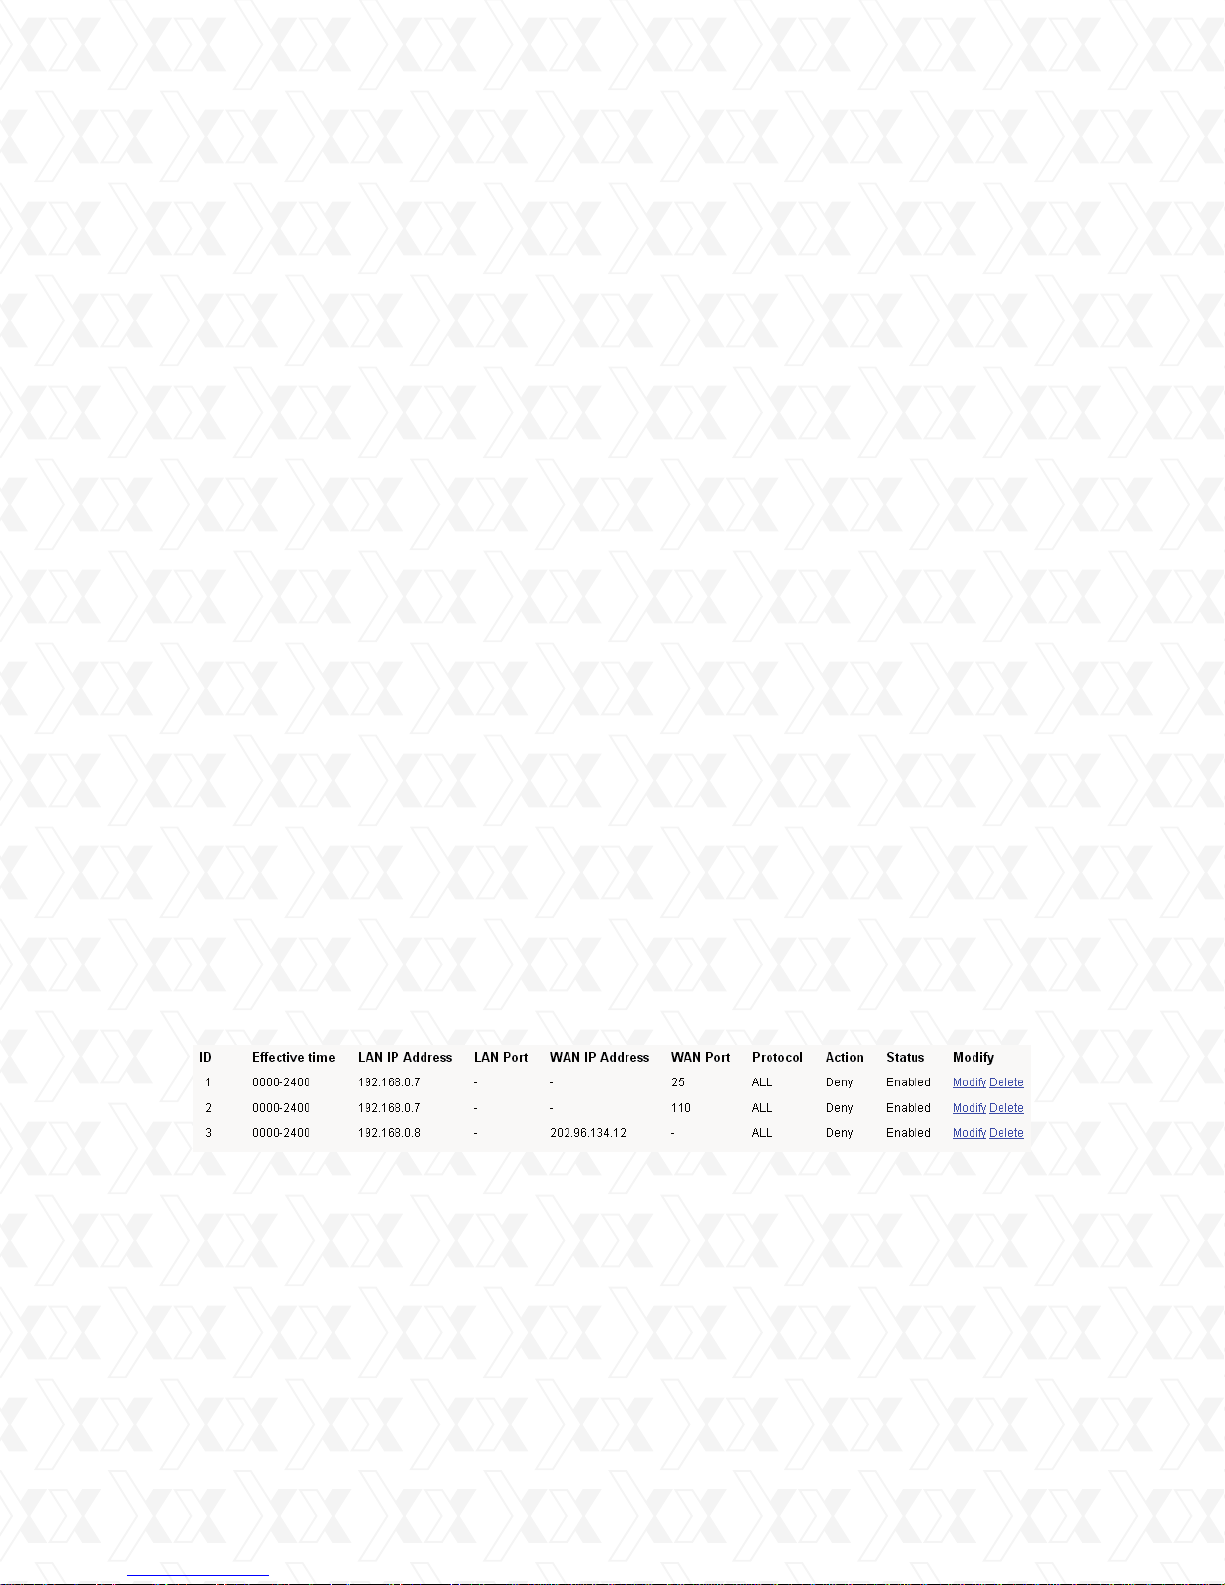
For example: If you wish to block e-mail received and sent by the IP Address 192.168.0.7
on your local network, and to make the PC with IP Address 192.168.0.8 unable to visit the
website of IP Address 202.96.134.12, while imposing no limitations on other PC(s), you should
specify the following IP address filtering list:
48
Page 49
Nexxt Solutions - NexxtGate Wireless Access Point
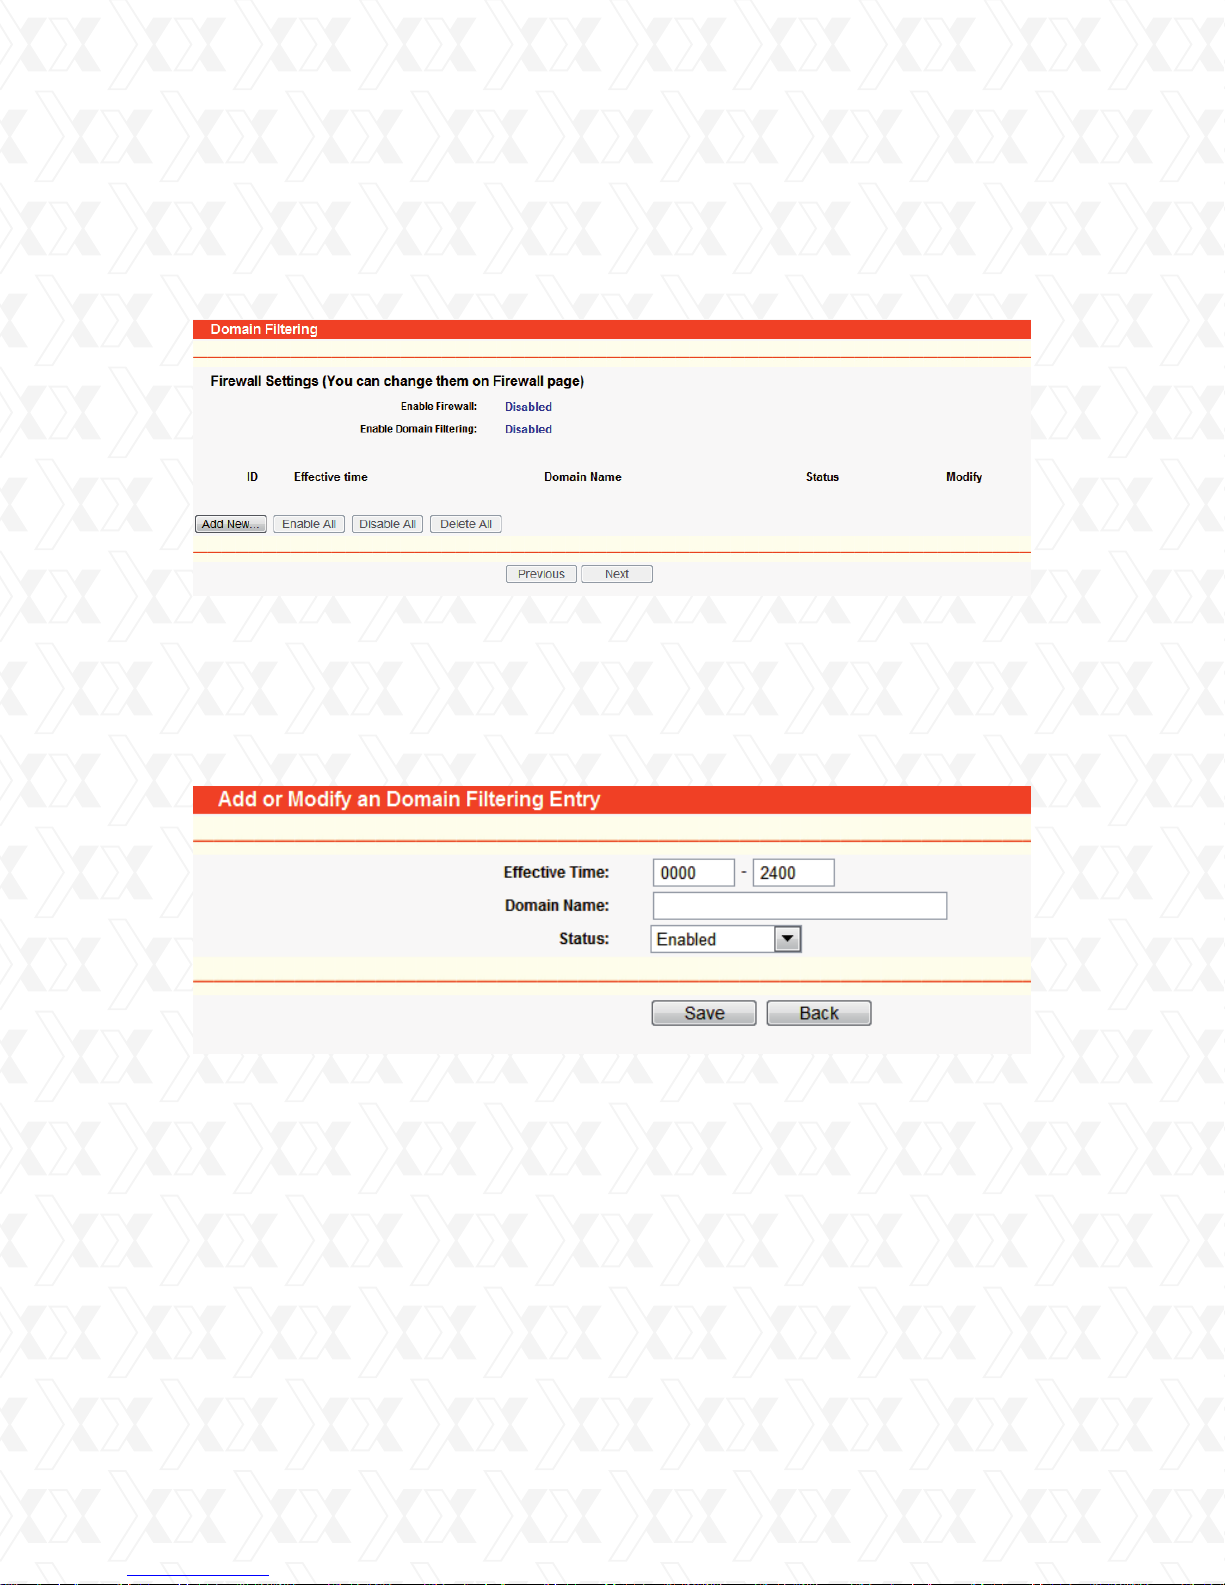
4.10.3 Domain Filtering
Go to Security > Domain Filtering in order to configure the domain filtering feature, as shown
in Figure 4-38.
Figure 4-38 Domain Filtering
Before adding a Domain Filtering entry, you must ensure that Enable Firewall and Enable Domain
Filtering have been selected on the Firewall page, as shown in Figure 4-35. To Add a Domain
filtering entry, click the Add New… button, as it appears in Figure 4-38. This will open the Add or
Modify a Domain Filtering entry page, as in Figure 4-39.
To add or modify a Domain Filtering entry, follow these instructions:
1.
Effective Time - Enter a time range using the HHMM format. It represents the period within
which the entry shall remain active. For example 0803 - 1705, means that the command will
be effective from 08:03 to 17:05.
2.
Domain Name - Type the domain or key word as desired in the field. Leave the field blank if
you want all websites on the Internet to be used. For example: www.xxyy.com.cn, .net.
3.
Status - Select Enabled or Disabled for this entry on the Status pull-down list.
4.
Click the Save button to confirm this entry.
To add or modify a Domain Filtering entry, follow these instructions:
Figure 4-39 Add or Modify a Domain Filtering entry
49
Page 50
Nexxt Solutions - NexxtGate Wireless Access Point
1.
Click the Modify button next the entry you want to change. If you want to erase the entry,
click the Delete button.
2.
Proceed with the changes you want to make.
3.
Click the Save button when done.
Click the Enabled All button to activate all entries .
Click the Disabled All button to cancel all entries.
Click the Delete All button to erase all entries
Click the Next button to go to the following page and the Previous button to return to the last
page.
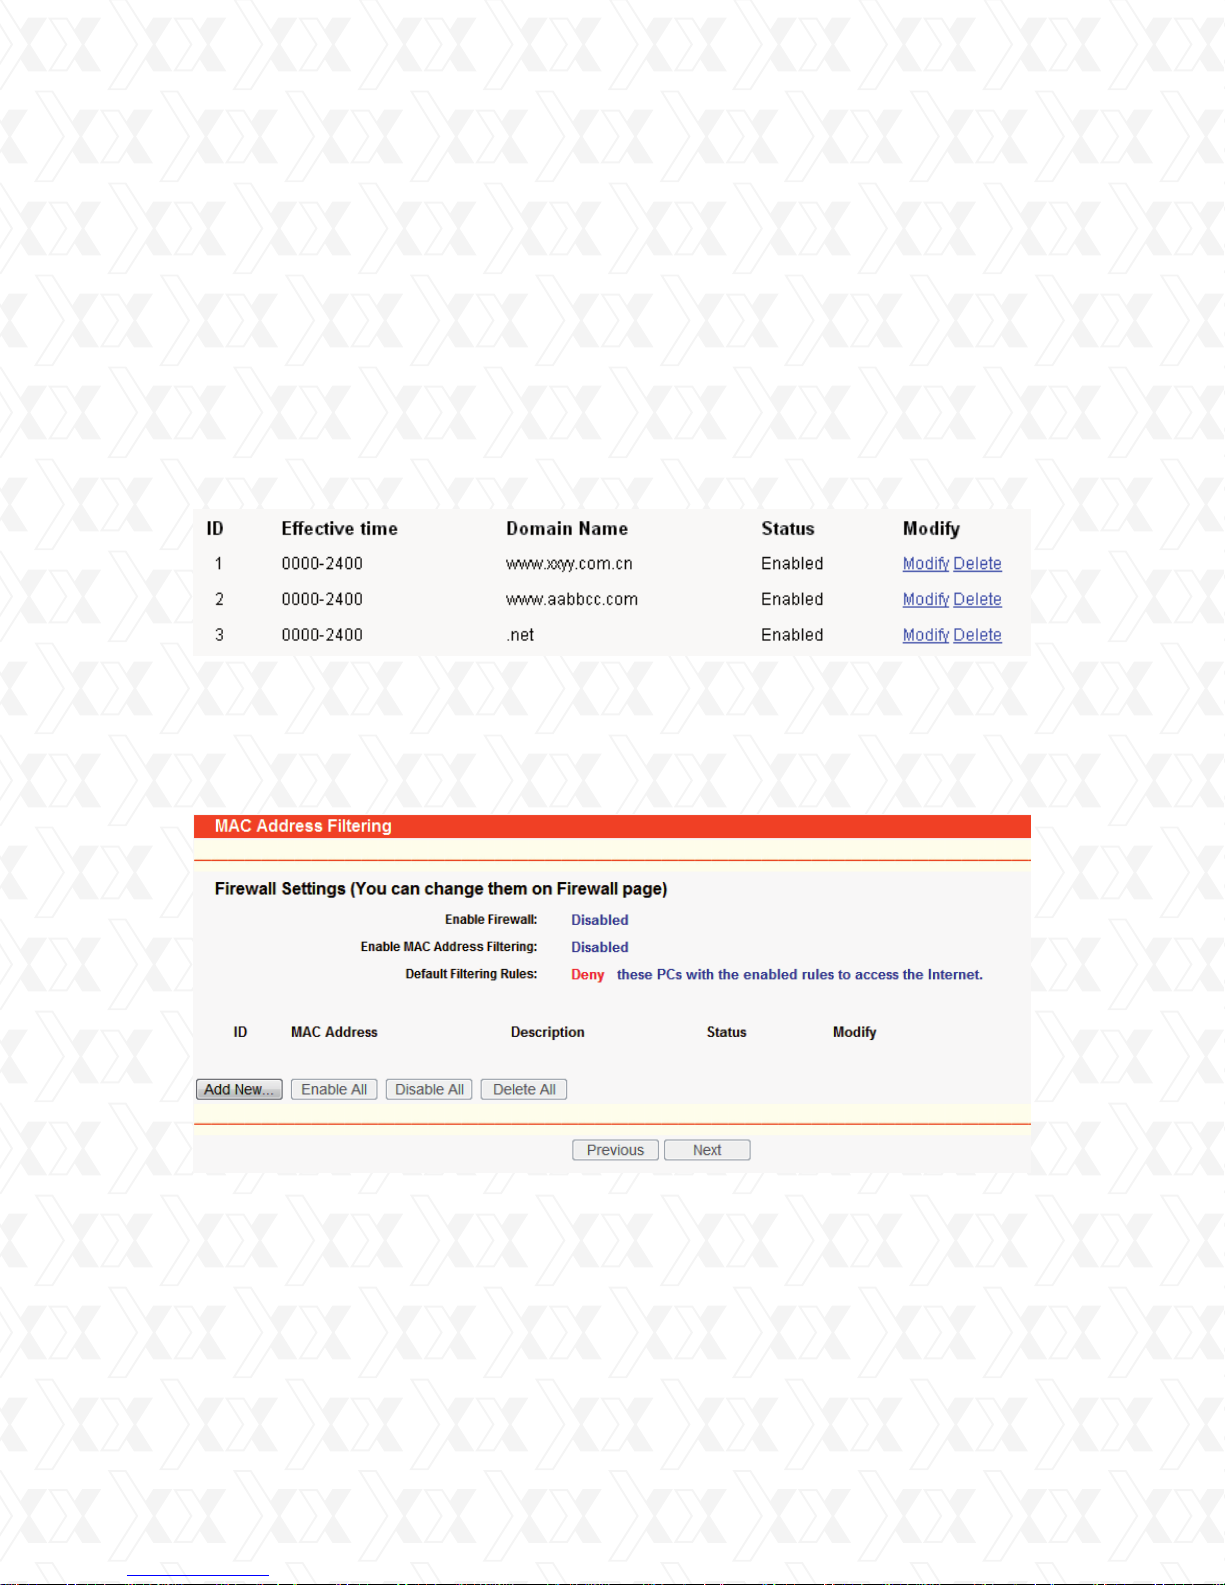
For example, if you want to block the PC(s) on your LAN to access websites www.xxyy.com.cn,
www.aabbcc.com and websites ending in .net on the Internet, while imposing no limitations
on other websites, you should specify the following Domain filtering list.
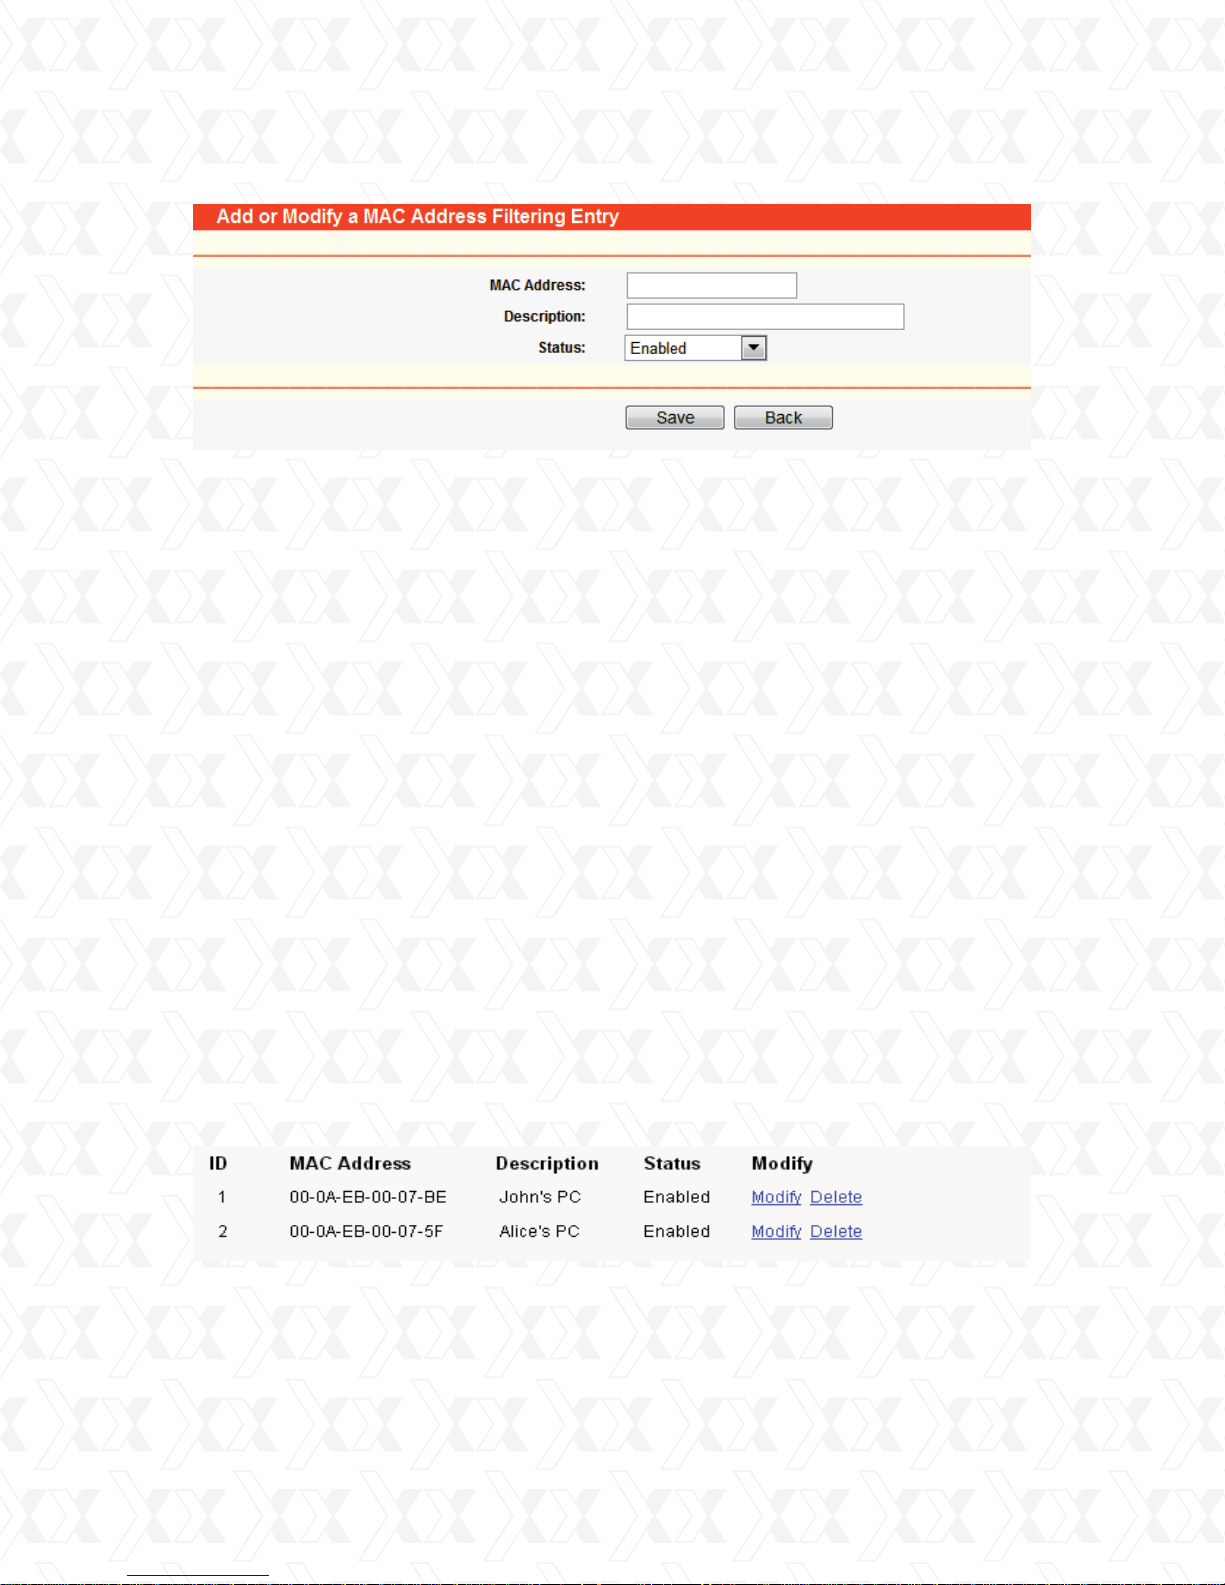
4.10.4 MAC address filtering
Go to Security > Domain Filtering in order to configure the MAC address filtering feature on the
current page, as shown in Figure 4-40.
Figure 4-40 MAC address Filtering
Before setting up MAC Filtering entries, you must first ensure that Enable Firewall and Enable
MAC Filtering have been selected on the Firewall page, as shown in Figure 4-35. To Add a MAC
Address filtering entry, click the Add New… button in Figure 4-40. Then the Add or Modify a
MAC Address Filtering entry page will be displayed, as shown in Figure 4-41:
50
Page 51
Nexxt Solutions - NexxtGate Wireless Access Point
Figure 4-41 Add or Modify a MAC Address Filtering entry
To add or modify a MAC Address Filtering entry, follow these instructions:
Enter the appropriate MAC Address into the MAC Address field. The format of the MAC
1.
Address is XX-XX-XX-XX-XX-XX (X represents any hexadecimal digit).
For example: 00-0E-AE-B0-00-0B.
Enter a short description of the PC in the Description field. Fox example: John’s PC.
2.
Status - Select Enabled or Disabled for this entry, from the Status pull-down list.
3.
Click the Save button to confirm this entry.
4.
To add additional entries, repeat steps 1-4.
When finished, click the Return button to go back to the MAC Address Filtering page.
To modify or delete an existing entry:
1.
Click the Modify button next to the entry you want to change. If you want to erase the
entry, click the Delete button.
2.
Proceed with the changes you want to make.
3.
Click the Save button once you are done.
Click the Enabled All button to activate all entries .
Click the Disabled All button to cancel all entries.
Click the Delete All button to erase all entries
Click the Next button to go to the following page and click the Previous button to return to the
last page.
Fox example: If you want to block the PC with MAC addresses 00-0A-EB-00-07-BE and
00-0A-EB-00-07-5F from accessing the Internet, first, enable the Firewall and MAC Address
Filtering on the Firewall page. Then, you should specify the Default MAC Address Filtering Rule
Deny these PC(s) with effective rules to access the Internet on the Firewall page, and include
the following MAC address filtering list on this page:
51
Page 52
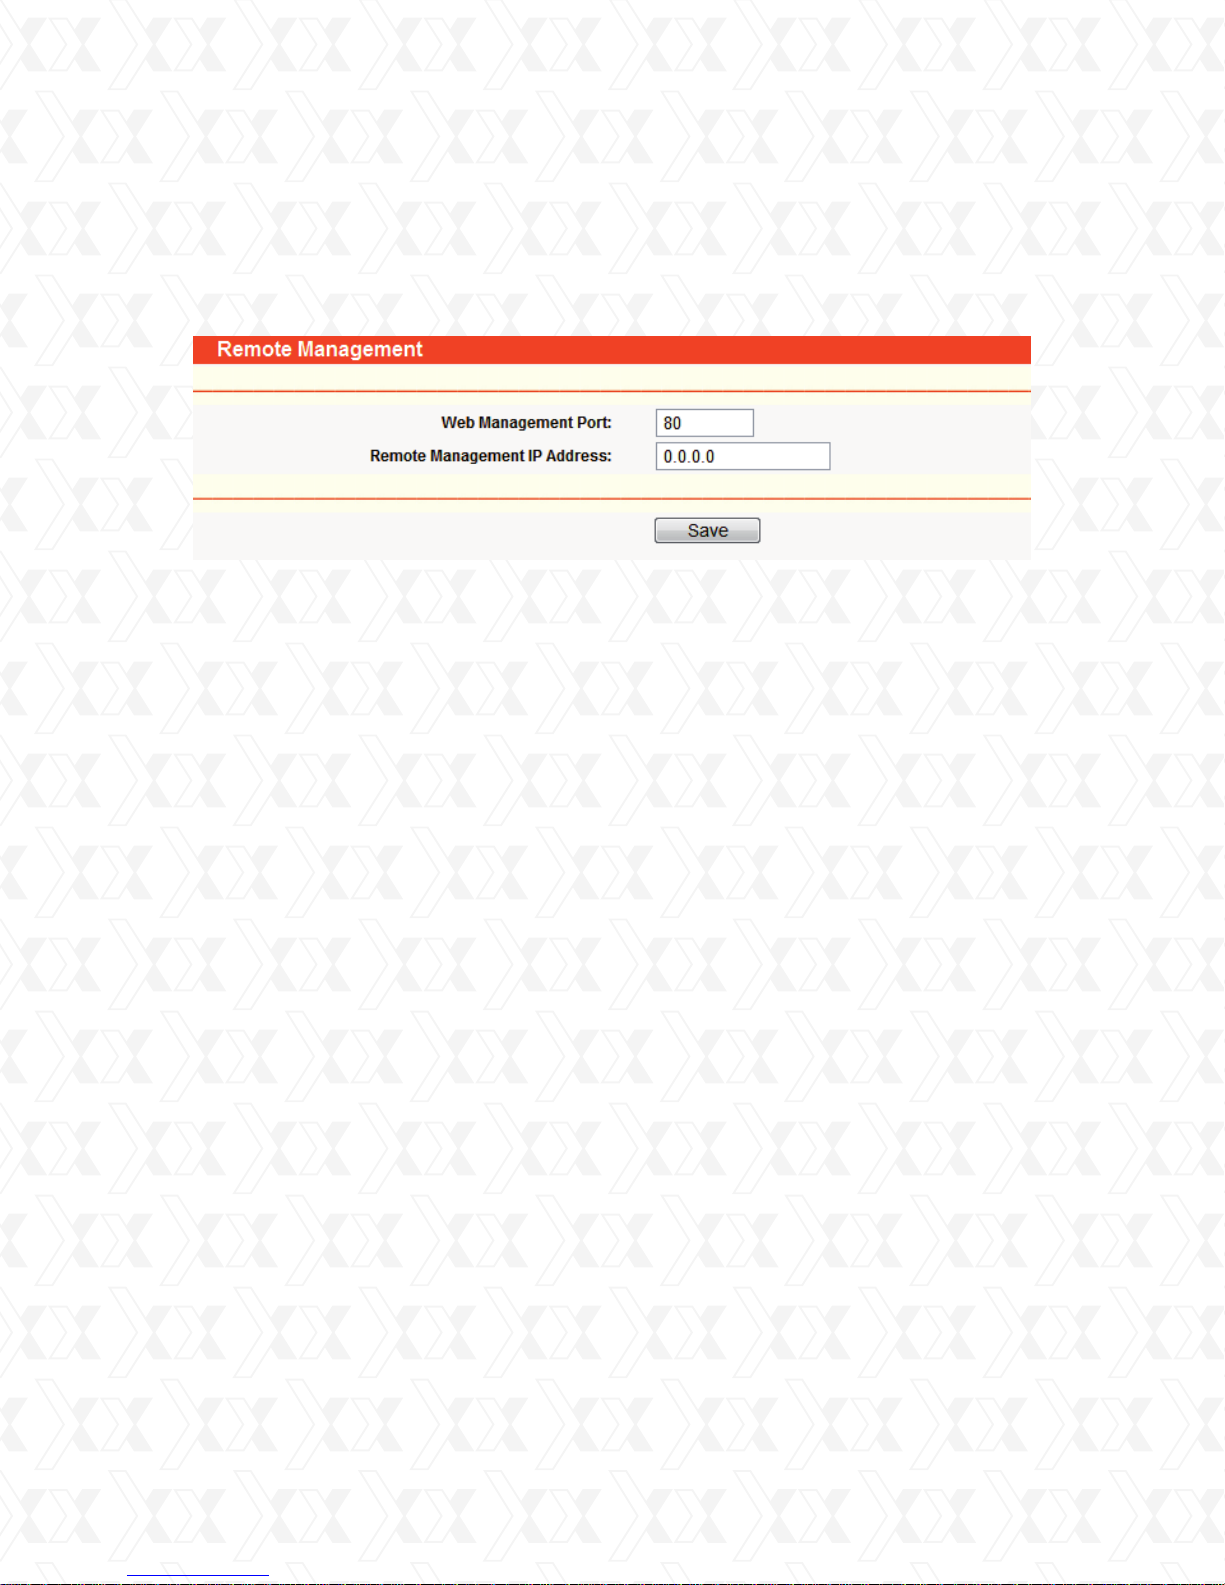
Nexxt Solutions - NexxtGate Wireless Access Point
4.10.5 Remote management
Go to Security > Remote Management in order to configure the Remote Management function
on this screen, as shown in Figure 4-42. This feature allows you to manage your Router from a
remote location via the Internet.
Figure 4-42 Remote Management
•
Web Management Port – The web browser normally uses the standard HTTP service port 80
for access.. This Router’s default remote management web port number is 80. For greater
security, you can change the remote management web port to a custom port by entering that
number in the box provided. Choose a number between 1 and 65534 but do not use the number
of any common service port.
•
Remote Management IP Address - This is the current address you will use when accessing
your Router from the Internet. This function is disabled when the IP address is set to the
default value of 0.0.0.0. To enable this function, change 0.0.0.0 to a valid IP address. If set to
255.255.255.255, then all the hosts will be able to access the Router from the internet.
Note:
To access the Router, you should type your Router’s WAN IP address into your browser’s
1.
address (in IE) or Location (in Navigator) box, followed by a colon and the custom port
number. For example, if your Router’s WAN address is 202.96.12.8, and the port number
used is 8080, please enter http://202.96.12.8:8080 in your browser. Later, you may be
asked for the Router’s password. After successfully entering the username and password,
you will be able to access the Router’s web-based utility.
Be sure to change the Router’s default password to a more secure password.
2.
52
Page 53
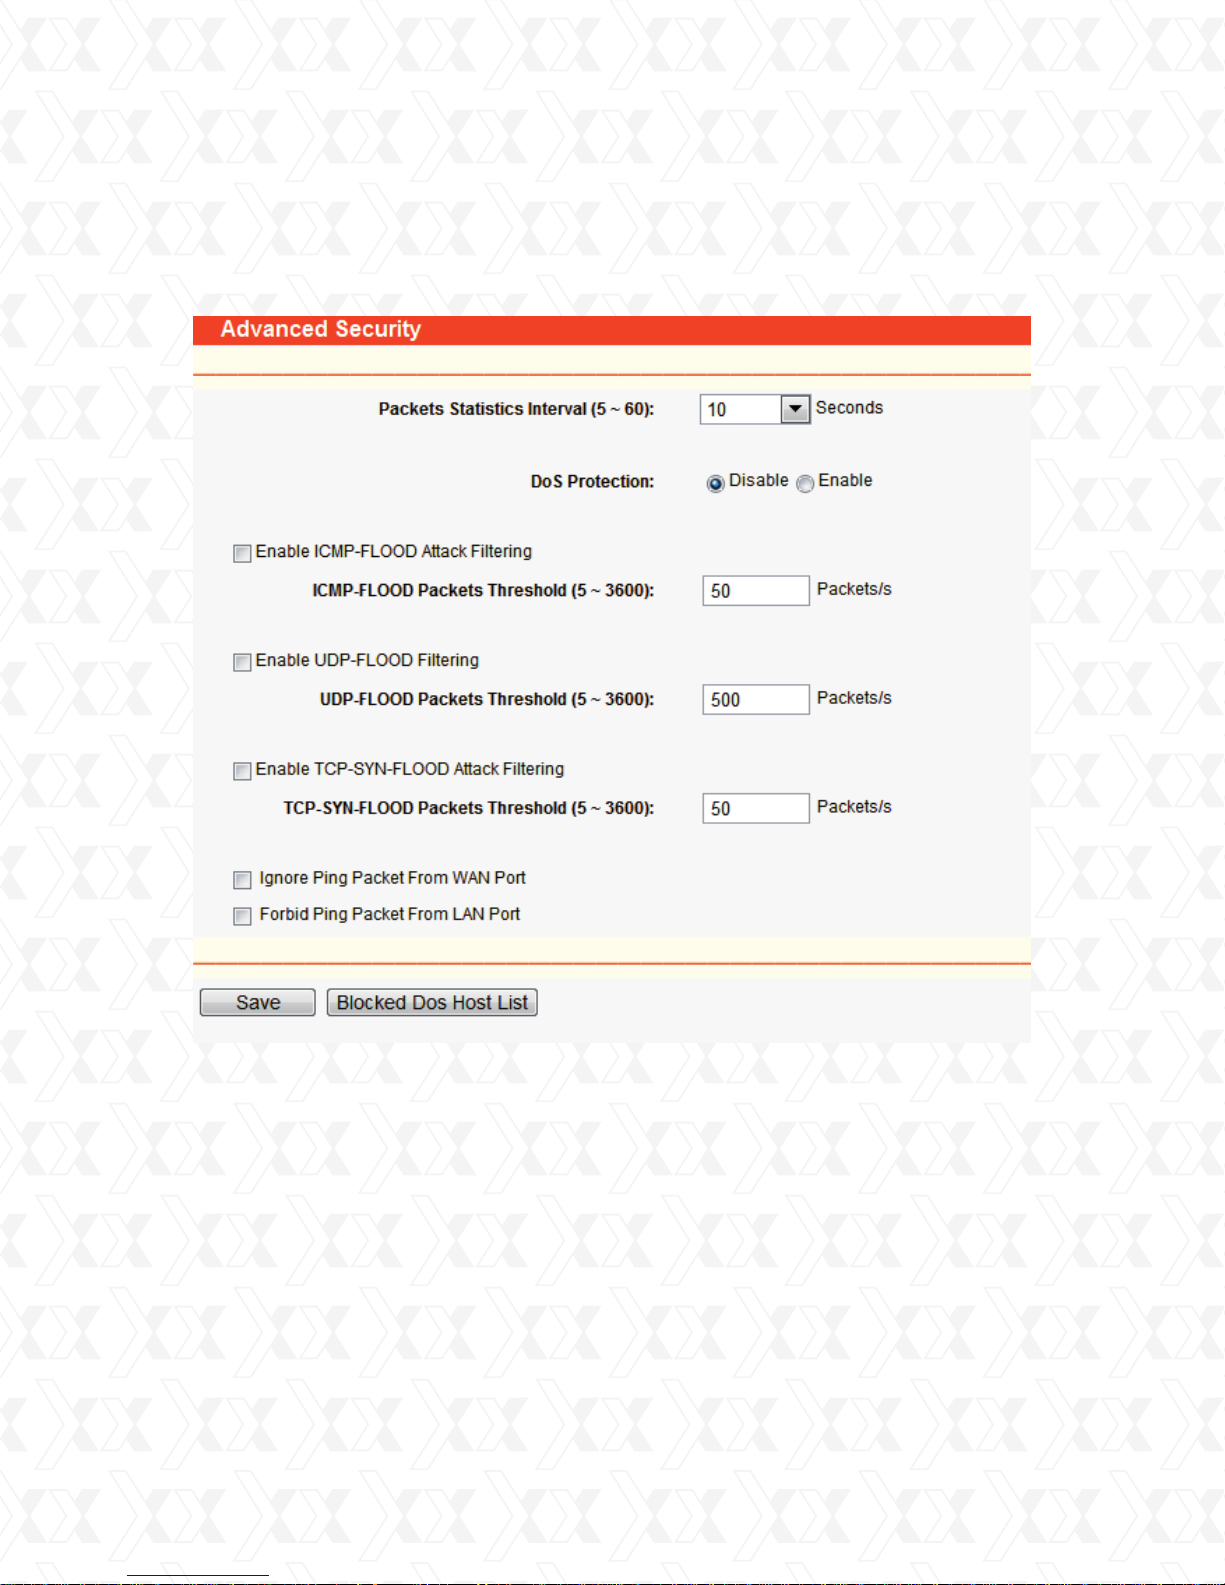
Nexxt Solutions - NexxtGate Wireless Access Point
4.10.6 Advanced security
Go to Security > Advanced Security in the menu in order to prevent the router from being
attacked by TCP-SYN Flood, UDP Flood and ICMP-Flood from LAN, as shown in Figure 4-43.
!
•
Packets Statistic interval (5 ~ 60) - The default value is 10. Select a value between 5 and 60
seconds from the pull-down list. The Packets Statistic interval value indicates the time section of
the packets statistic. The result of the statistic is used for analysis by SYN Flood, UDP Flood and
ICMP-Flood.
•
DoS protection - Enable or Disable the DoS protection function. Only when enabled, flood filters
will be effective.
•
Enable ICMP-FLOOD Attack Filtering – Check this box to Enable or Disable the ICMP-FLOOD
Attack Filtering.
Figure 4-43 Advanced Security settings
53
Page 54
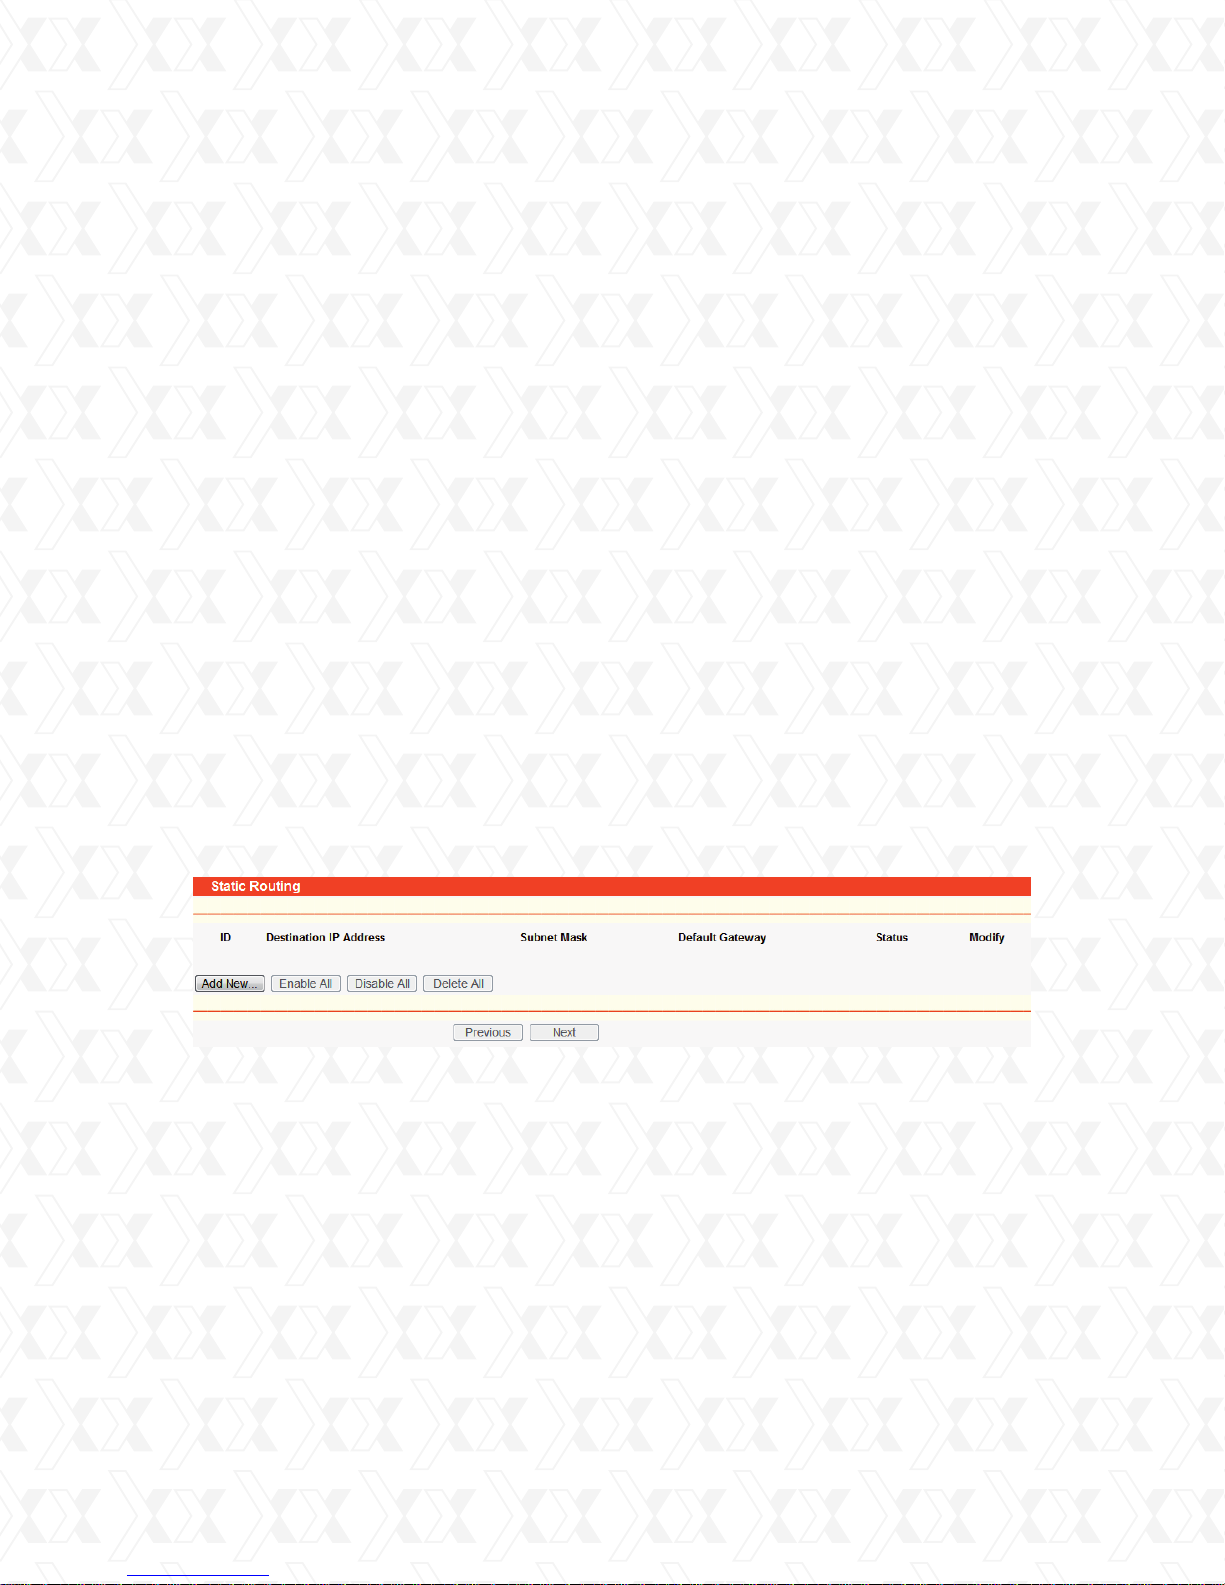
Nexxt Solutions - NexxtGate Wireless Access Point
•
ICMP-FLOOD Packets threshold: (5 ~ 3600) - The default value is 50. Enter a value between
5 ~ 3600 packets. When the current ICMP-FLOOD Packets number is beyond the set value,
the router will start up the blocking function immediately.
•
Enable UDP-FLOOD Filtering - Enable or Disable the UDP-FLOOD Filtering.
•
UDP-FLOOD Packets threshold: (5 ~ 3600) - The default value is 50. Select the desired setting
between 5 ~ 3600 packets. When the current UPD-FLOOD Packets numbers exceeds the set
value, the router will immediately start up the blocking feature.
•
Enable TCP-SYN-FLOOD Attack Filtering - Check this box to Enable or Disable the
TCP-SYN- FLOOD Attack Filtering.
•
TCP-SYN-FLOOD Packets threshold: (5 ~ 3600) - The default value is 50. Select the desired
setting between 5 ~ 3600 packets. When the current TCP-SYN-FLOOD Packets numbers
exceeds the set value, the router will immediately start up the blocking feature.
•
Ignore Ping Packet from WAN Port - Check this box to Enable or Disable this option. The default
setting is disabled. If enabled, the ping packet from the Internet will be denied access to the
router.
•
Forbid Ping Packet from LAN Port - Check this box to Enable or Disable Ping Packet access to
the router from the LAN port. The default value is disabled. If enabled, the ping packet from the
LAN port will be denied access to the router. (This can be used to defend the network against
some viruses)
Click the Save button to store the settings.
Click the Blocked DoS Host Table button to display the DoS host list with the items excluded.
4.11 Static routing
A static route is a pre-determined path that network information must travel to reach a specific
host or network. To add or delete a route, use the parameters under the Static Routing page, as
shown in Figure 4-44.
Figure 4-44 Static Routing
To add static routing entries:
1.
Click the Add New button. The screen, as shown in Figure 4-45 will open.
2.
Enter the following parameters.
•
Destination IP Address - The Destination IP Address is the address of the network or host that
you want to assign a static route to.
•
Subnet Mask - The Subnet Mask determines which portion of an IP Address is the network
portion, and which portion is the host portion.
•
Default Gateway - This is the IP Address of the gateway device that allows for contact between
the router and the network or host.
54
Page 55
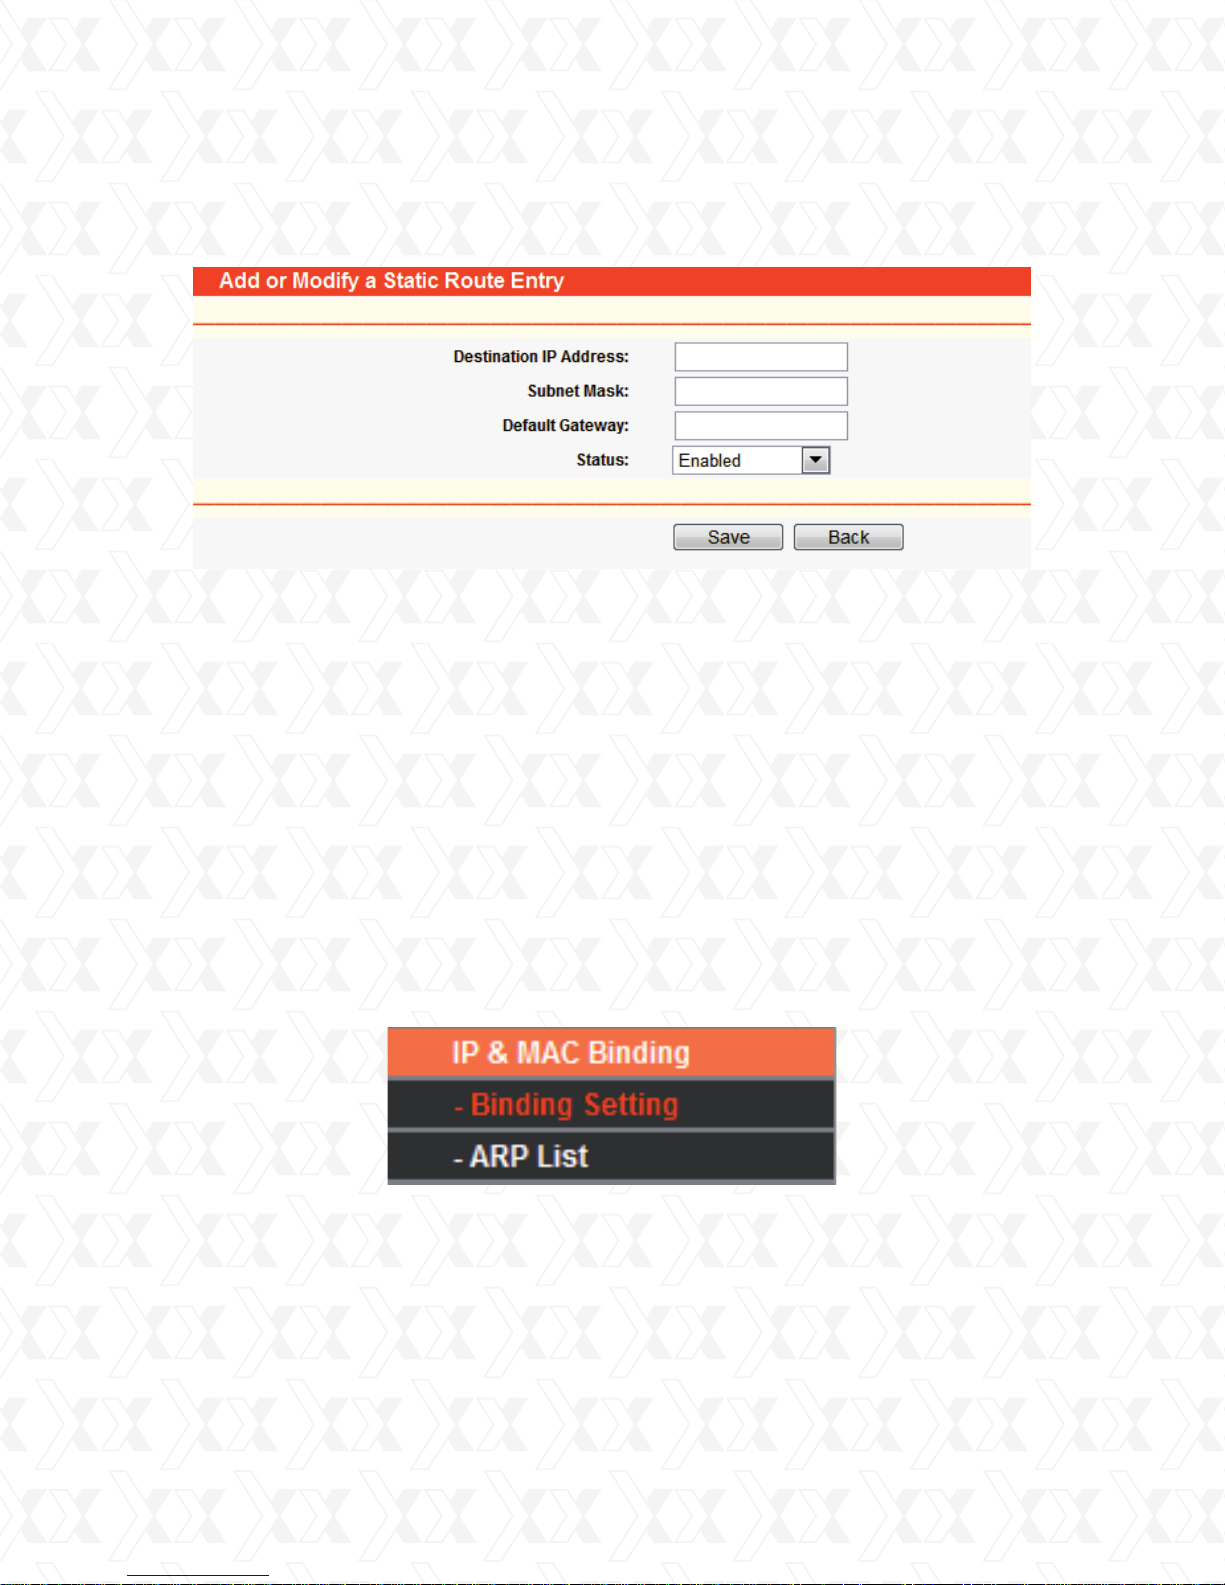
Nexxt Solutions - NexxtGate Wireless Access Point
3.
Select Enabled or Disabled for this entry from the Status pull-down list.
4.
Click the Save button to keep your settings.
Figure 4-45 Add or Modify a Static Route Entry
To modify or delete an existing entry:
1.
Click the Modify button next to the entry you want to change. If you want to erase the entry,
click the Delete button.
2.
Proceed with the changes you want to make.
3.
Click the Save button when done.
Click the Enabled All button to activate all entries.
Click the Disabled All button to cancel all entries.
Click the Delete All button to erase all entries.
4.12 IP & MAC binding
ARP Binding is useful for controlling access of specific computers in the LAN. This page displays
the IP & MAC Binding Setting table; which you can configure based on your particular needs.
There are two submenus under the IP & MAC Binding menu (shown in Figure 4-46):
Binding Setting and ARP List. Click any of them in order to configure the corresponding function.
Detailed descriptions for each submenu are provided below.
!
Figure 4-46 the IP & MAC Binding menu
55
Page 56
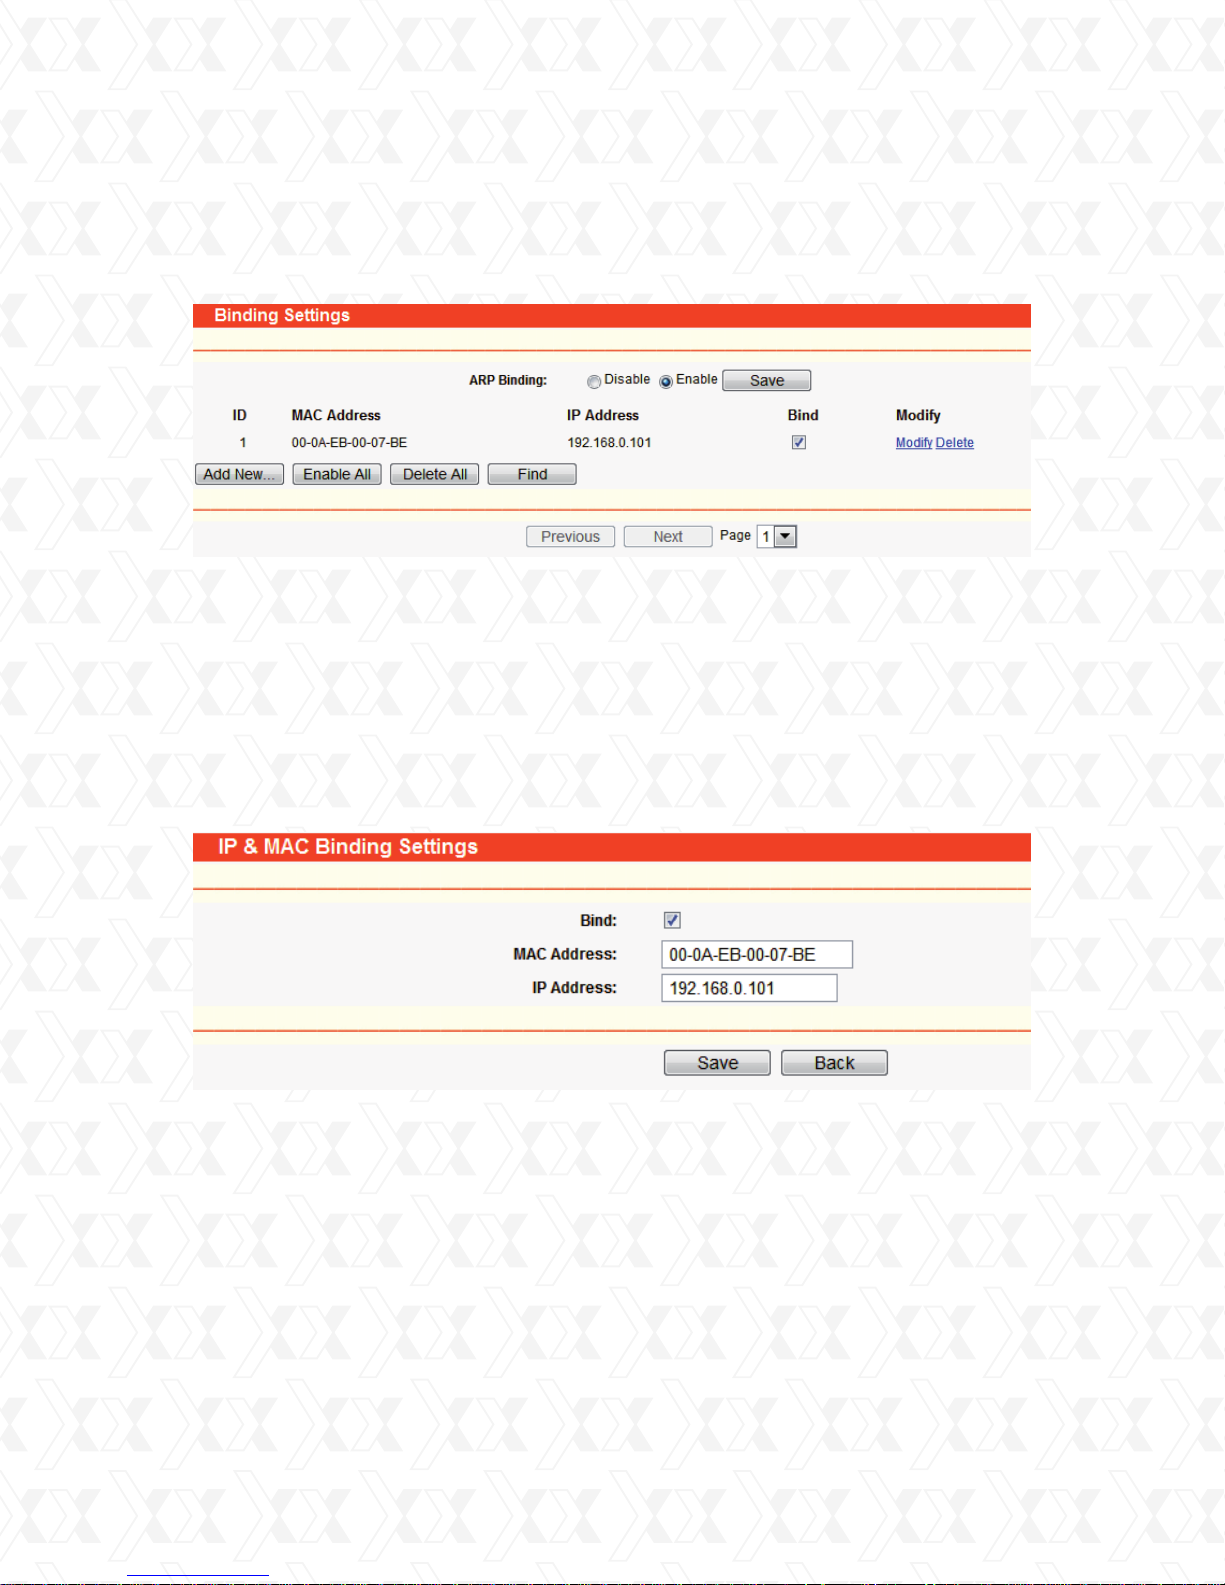
Nexxt Solutions - NexxtGate Wireless Access Point
4.12.1 Binding setting
Go to IP & MAC Binding > Binding Setting in order to configure the binding parameters,
as shown in Figure 4-47.
Figure 4-47 Binding Setting
•
MAC Address - The MAC address of the monitored computer in the LAN.
•
IP Address - The assigned IP address of the monitored computer in the LAN.
•
Bind - Check this option to enable ARP binding for a specific device.
•
Modify - Use this link to edit or delete an existing entry.
When you want to add or modify an IP & MAC Binding entry, you can click the Add New button
or Modify button, and then you will be directed to the next page. This page is used for adding or
modifying an IP & MAC Binding entry (shown in Figure 4-48).
Figure 4-48 IP & MAC Binding Setting (Add & Modify)
To add IP & MAC Binding entries, follow the steps below.
1.
Click the Add New... button, as shown in Figure 4-48.
2.
Enter the MAC Address and IP Address.
3.
Select the Bind checkbox.
4.
Click the Save button to accept your changes.
To modify or delete an existing entry, follow the steps below.
Find the desired entry in the table.
1.
Click Modify or Delete as desired, on the Modify column.
2.
56
Page 57
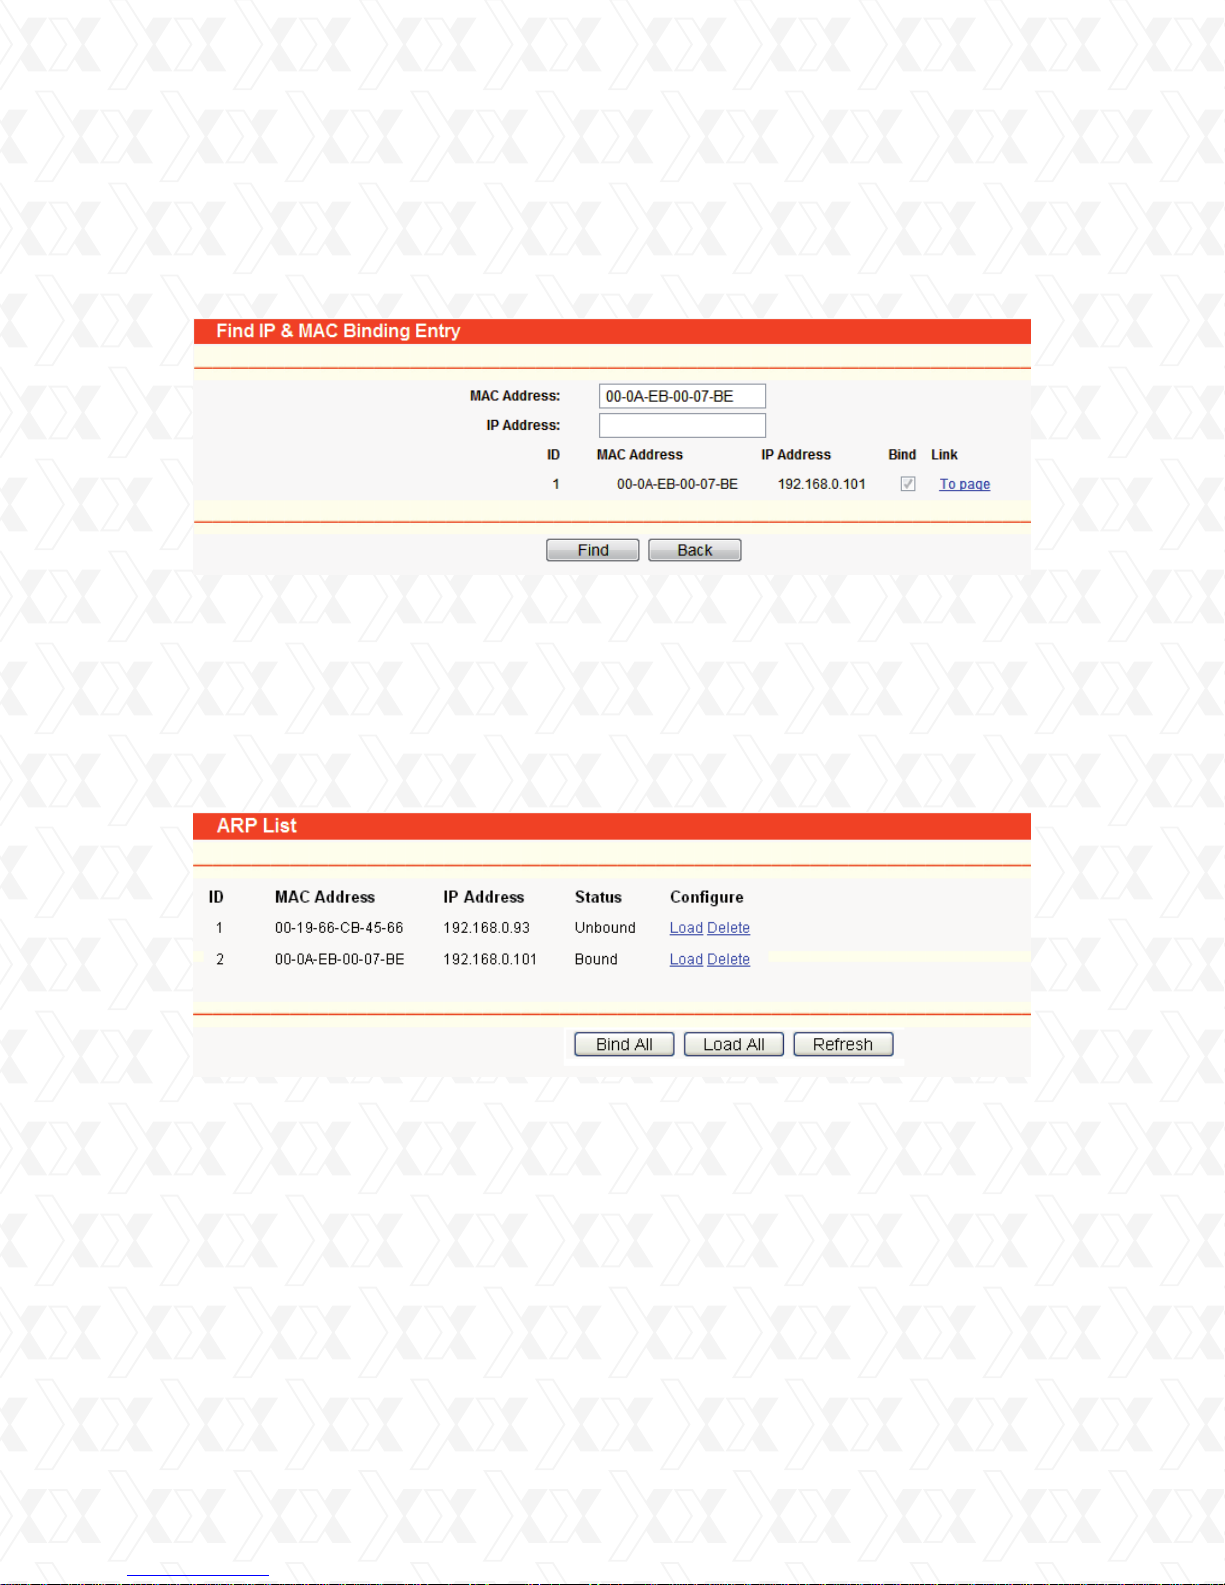
Nexxt Solutions - NexxtGate Wireless Access Point
To find an existing entry, follow the steps below.
1.
Click the Find button, to open the window.
2.
Enter the MAC Address or IP Address.
3.
Click the Bind button on the page, as shown in Figure 4-49.
Figure 4-49 Find IP & MAC Binding Entry
Click the Enabled All button to activate all entries .
Click the Delete All button to erase all entries.
4.12.2 ARP list
Go to IP & MAC Binding > ARP List in order to see the IP addresses on the LAN and their
associated MAC addresses included in the ARP list.
You can also use the list to configure the corresponding parameters from there. (Figure 4-50).
•
MAC Address - The MAC address of the monitored computer in the LAN.
•
IP Address - The assigned IP address of the controlled computer in the LAN.
•
Status - Indicates whether or not the MAC and IP addresses are bound.
•
Configure – To load or delete an item.
•
Load - To load the item into the IP & MAC Binding list.
•
Delete - To erase the item.
Click the Bind All button to bind all the current items. This option is only available when the ARP
binding is enabled.
Click the Load All button to include all items in the IP & MAC Binding list.
Click the Refresh button to update all items.
Figure 4-50 ARP List
57
Page 58
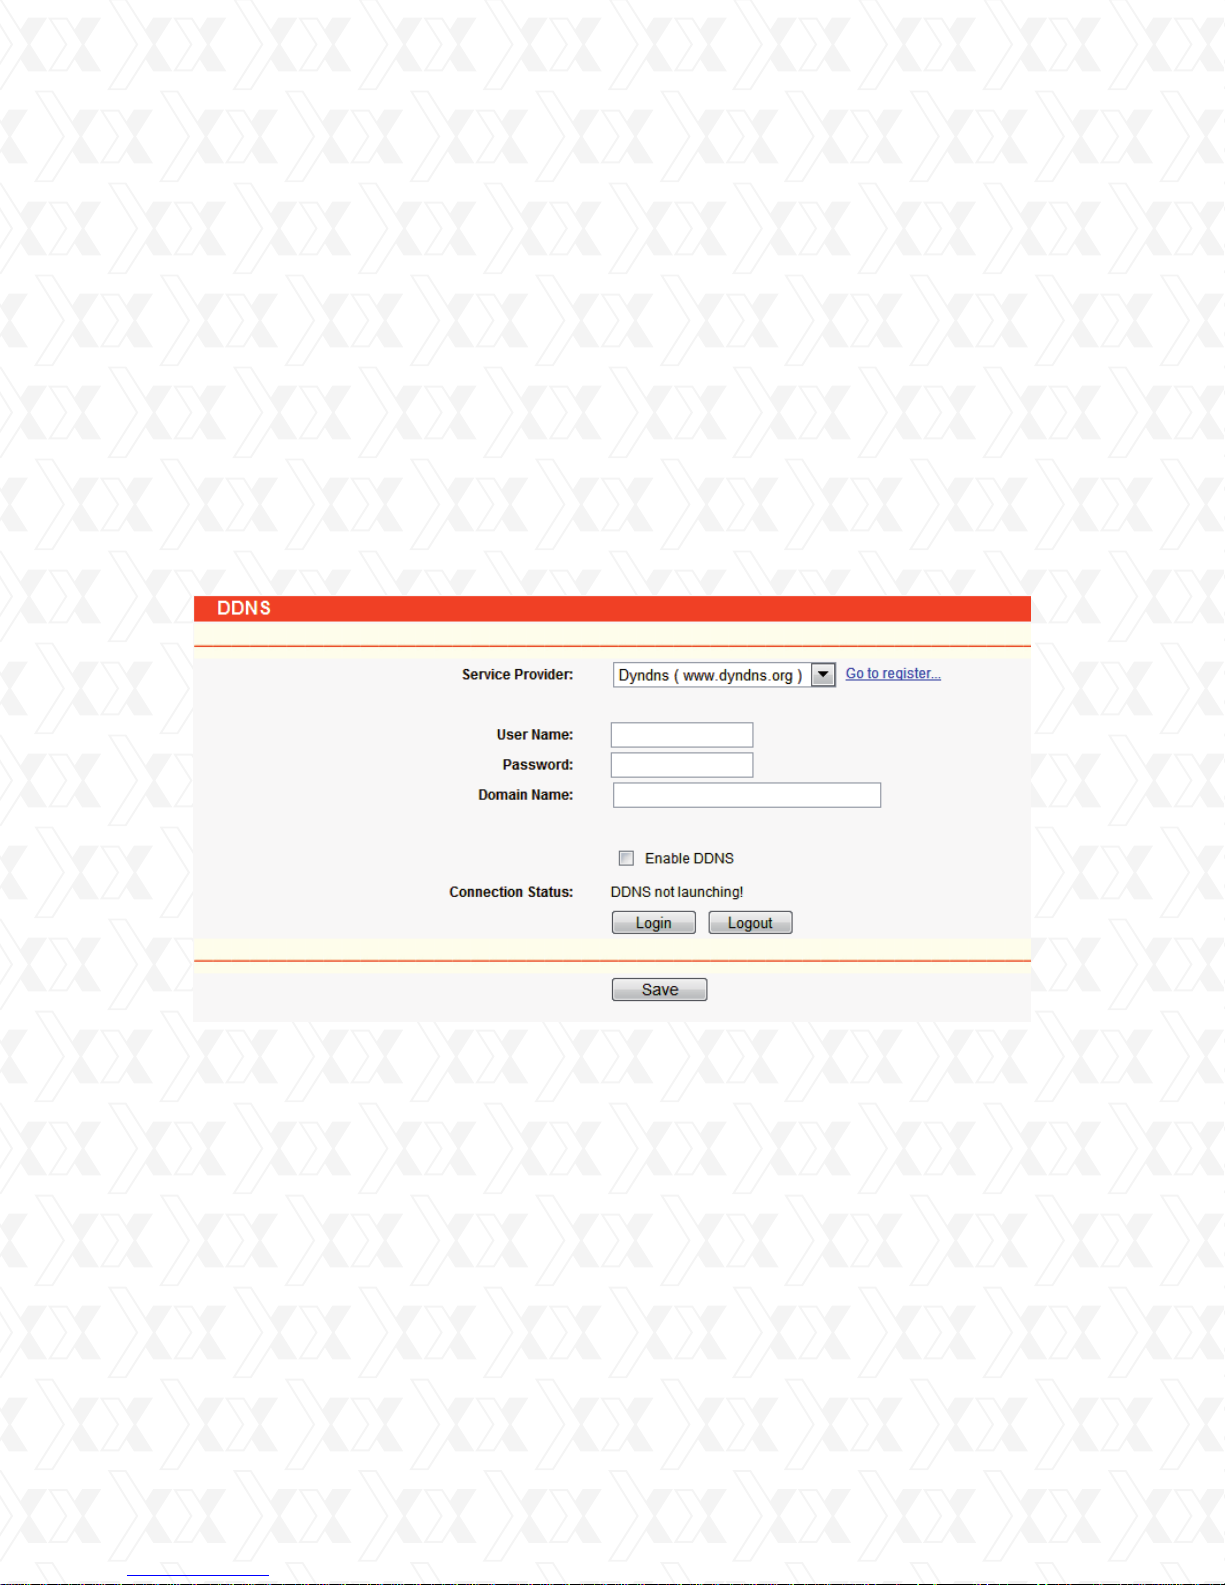
Nexxt Solutions - NexxtGate Wireless Access Point
Note:
An item cannot be entered into the IP & MAC Binding list if the IP address of the item has been
loaded before. An error warning will be displayed as well. Likewise, The Load All command will
only load the items without interfering with the IP & MAC Binding list.
4.13 Dynamic DNS
The router offers a Dynamic Domain Name System (DDNS) feature. DDNS lets you assign a fixed
host and domain name to a dynamic Internet IP Address. It is useful when you are hosting your
own website, FTP server, or other server behind the router. Before using this feature, you need
to sign up for DDNS service providers such as www.dyndns.org, www.oray.net or www.comexe.
cn. The Dynamic DNS client service provider will give you a password or key.
4.13.1 Dyndns.org DDNS
If your selected dynamic DNS Service Provider is www.dyndns.org, the page will appear as shown
in Figure 4-51.
To set up DDNS, follow these instructions:
1.
Enter the User Name for your DDNS account.
2.
Enter the Password for your DDNS account.
3.
Enter the Domain Name you received from the dynamic DNS service provider
4.
Click the Login button to log into the DDNS service.
•
Connection Status - The status of the DDNS service connection is displayed in this field.
Click Logout to exit the DDNS service.
Figure 4-51 Dyndns.org DDNS Settings
58
Page 59
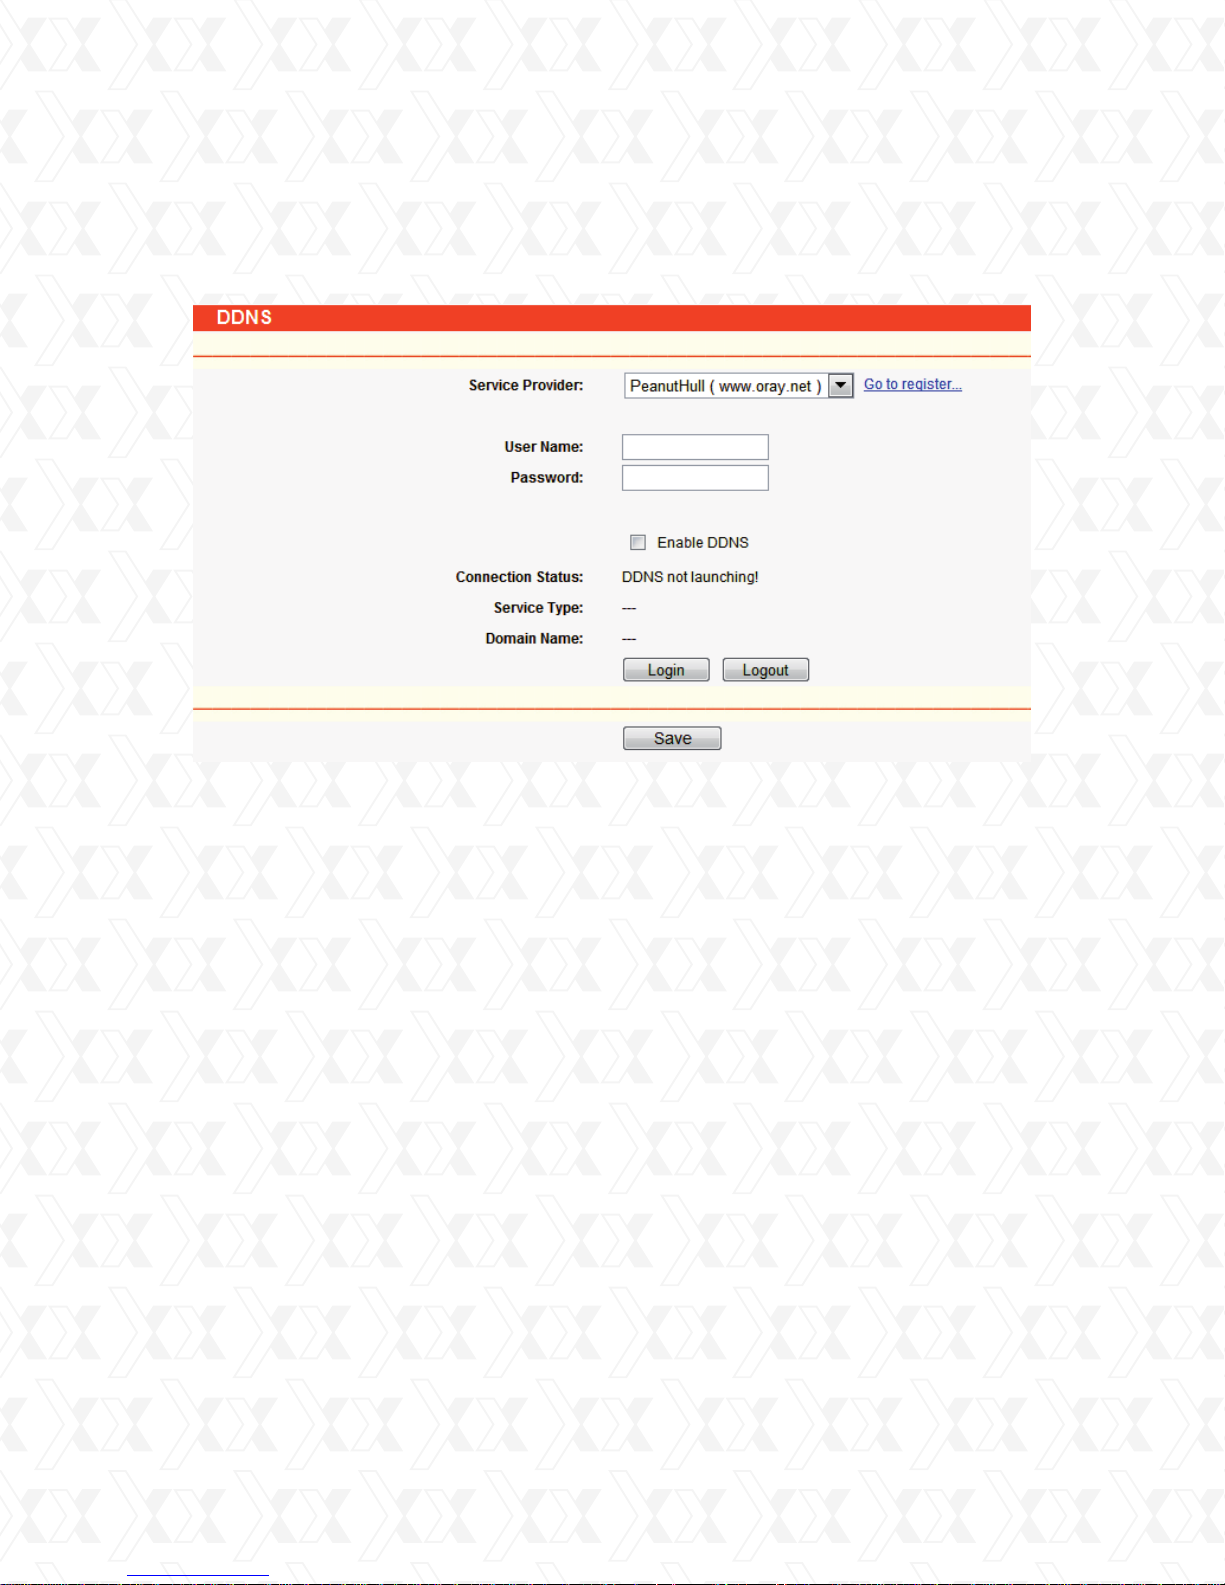
Nexxt Solutions - NexxtGate Wireless Access Point
4.13.2 Oray.net DDNS
If your selected dynamic DNS Service Provider is www.oray.net, the following page will appear, as
shown in Figure 4-52.
Figure 4-52 Oray.net DDNS Settings
To set up DDNS, follow these instructions:
1.
Enter the User Name for your DDNS account.
2.
Enter the Password for your DDNS account.
3.
Click the Login button to log in to the DDNS service.
•
Connection Status - The status of the DDNS service connection is displayed here.
•
Domain Name - The domain names are displayed in this field.
Click Logout to log out the DDNS service.
59
Page 60
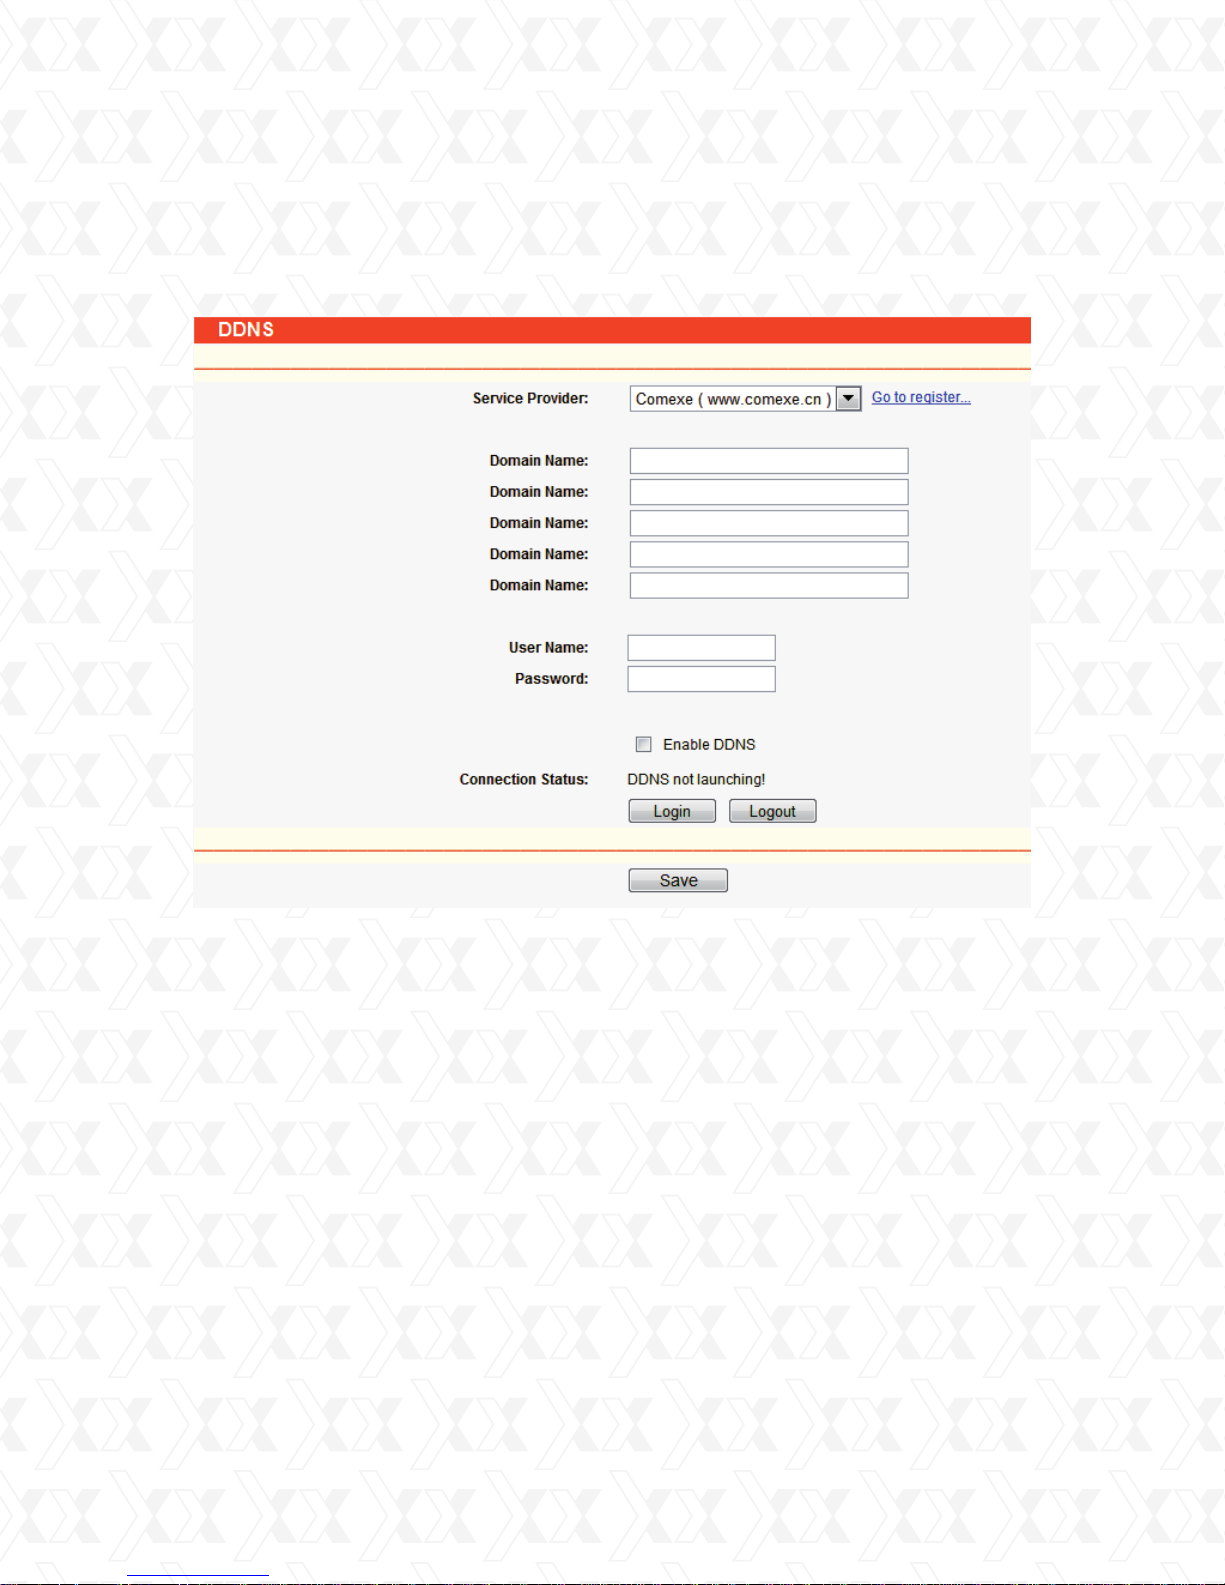
Nexxt Solutions - NexxtGate Wireless Access Point
4.13.3 Comexe.cn DDNS
If your selected dynamic DNS Service Provider is www.comexe.cn, the page will appear as shown
in Figure 4-53.
Figure 4-53 Comexe.cn DDNS Settings
To set up for DDNS, follow these instructions:
1.
Enter the domain names your dynamic DNS service provider gave.
2.
Enter the User Name for your DDNS account.
3.
Enter the Password for your DDNS account.
4.
Click the Login button to log in to the DDNS service.
•
Connection Status -The status of the DDNS service connection is displayed here.
Click Logout to log out the DDNS service.
60
Page 61
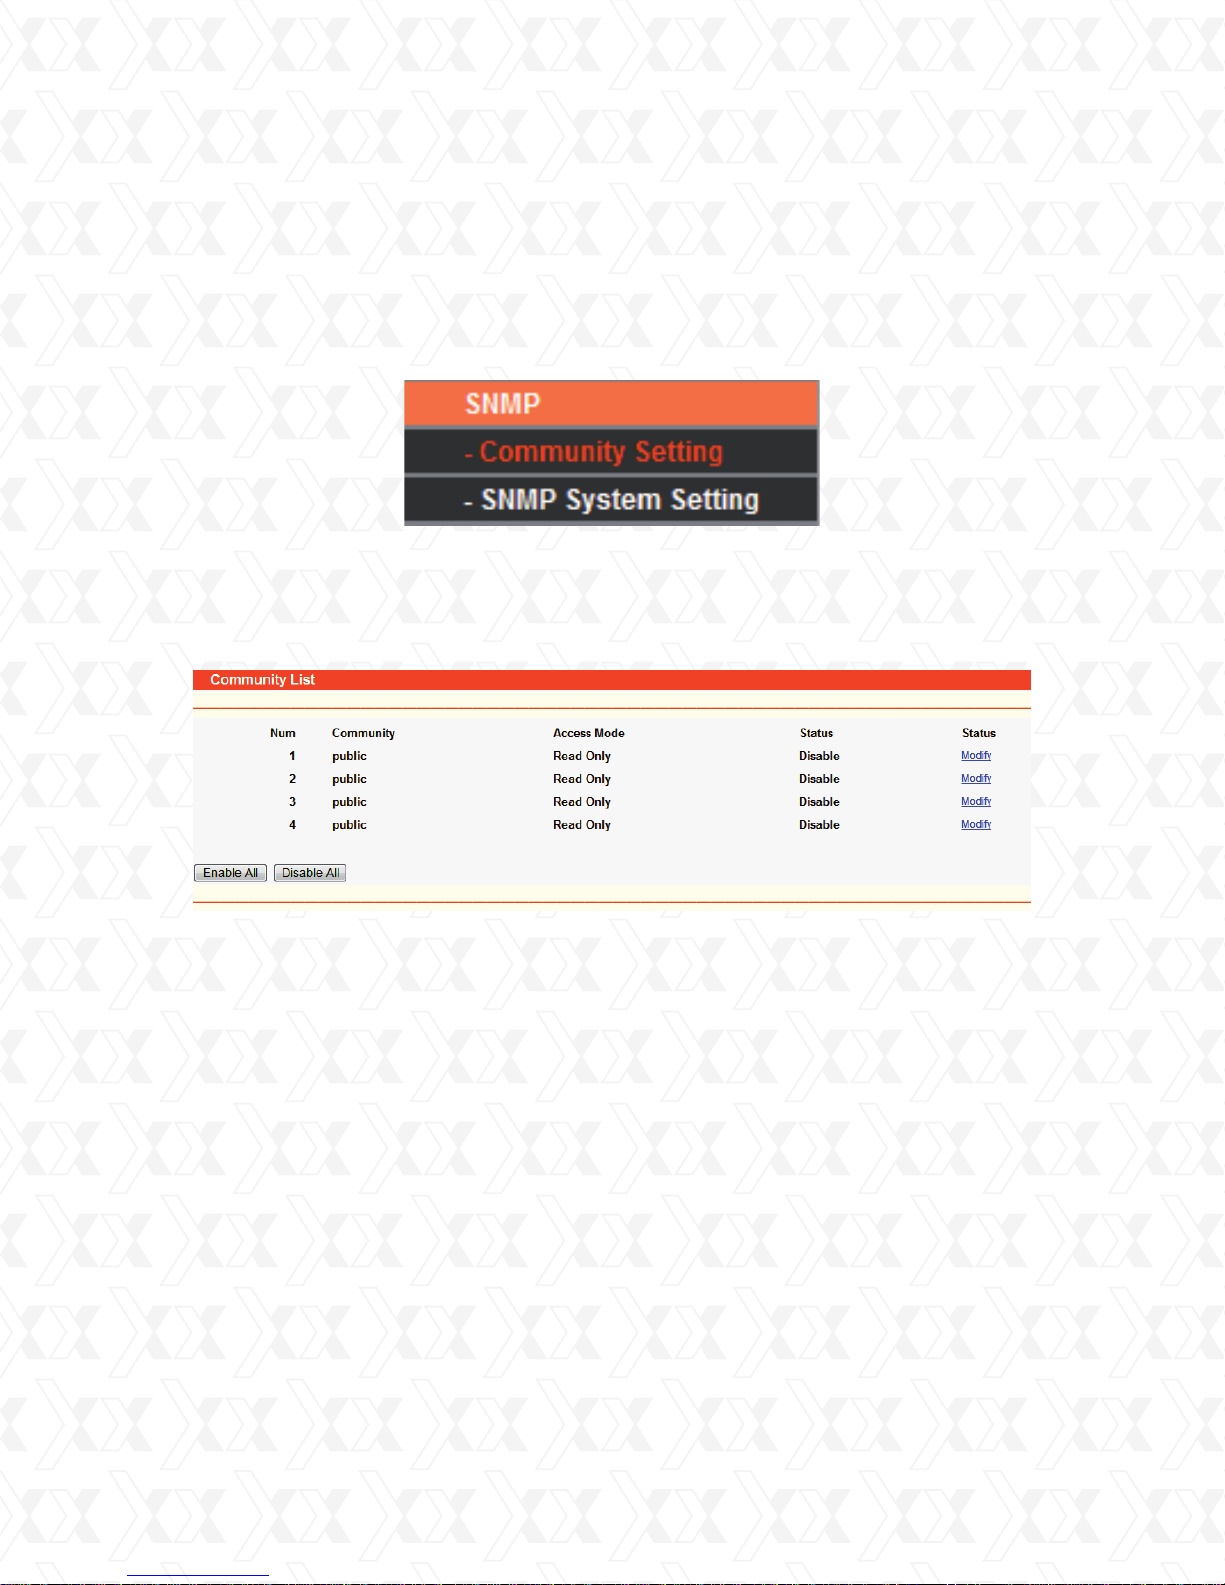
Nexxt Solutions - NexxtGate Wireless Access Point
4.14 SNMP
SNMP will allow the network management station to retrieve statistics and status from the
SNMP agent in this device. Simple Network Management Protocol (SNMP) is a popular network
monitoring and management tool, which encompasses a collection of specifications for network
management that include the protocol itself. To use this function, select Enable and enter the
following parameters in Figure 4-54.
Figure 4-54 SNMP Settings
4.14.1 Community setting
Go to SNMP > Community Setting in order to configure SNMP (Simple Network Management
Protocol) communities, which are helpful for managing client access authority levels.
!
Figure 4-55 Community Setting
•
Num - It displays the number for which the SNMP community is defined.
•
Community String - Enter the password used to authenticate the management station to the
device.
•
Access Mode - This field allows you to specify the access privileges of the community.
Read Only indicates that the community is only permitted to visualize the device configuration.
Read & Write indicates that the community has been granted permission to read and change
the device configuration.
•
Status - This field allows you to enable/disable the corresponding entry.
•
Modify - This field allows you to modify an entry.
To modify a community setting entry:
Find the desired entry in the table.
1.
Click the Modify button in front of the community you wish to change
2.
Modify the community access to the SNMP entity.
3.
From the Access Mode pull-down list, select the Read Only or Read&Write option.
4.
Select the Enabled option from the Status pull-down list.
5.
Click the Save button to save your changes.
6.
Click the Enabled All button to activate all entries.
Click the Disable All button cancel all entries.
61
Page 62
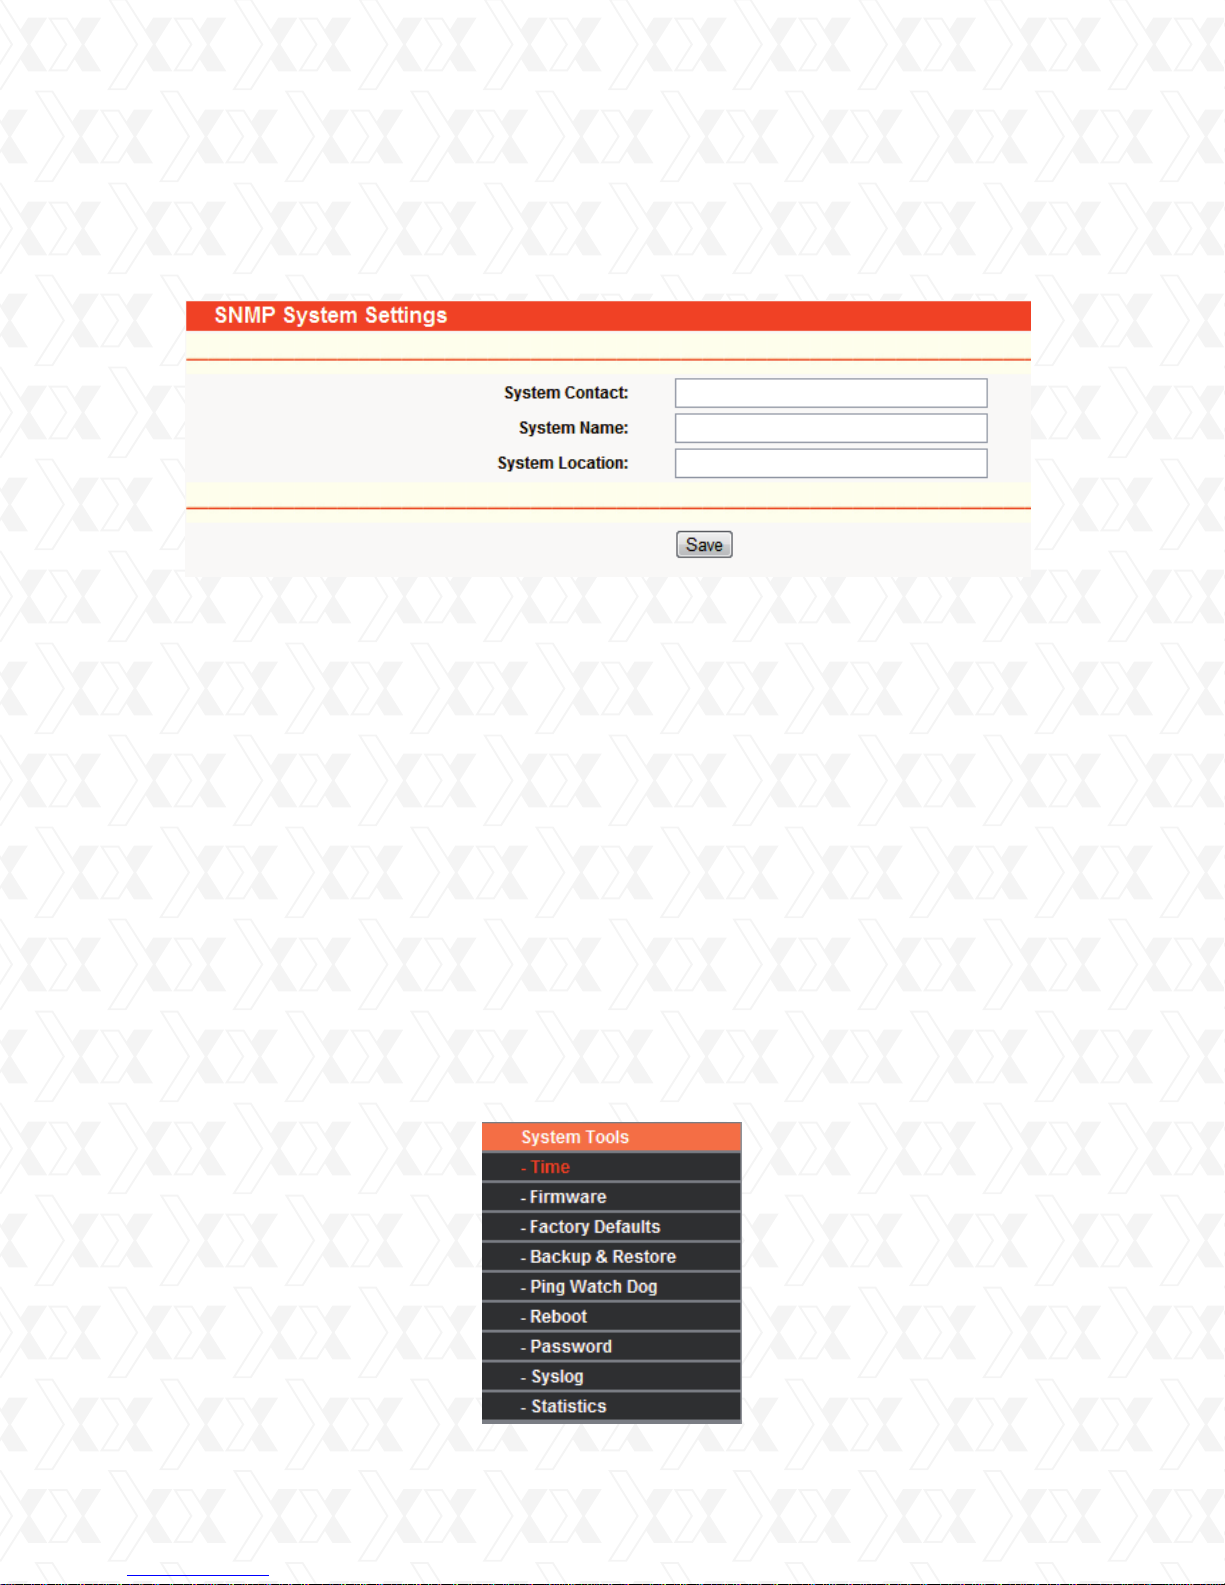
Nexxt Solutions - NexxtGate Wireless Access Point
4.14.2 SNMP System Setting
Go to SNMP > SNMP Setting in order to configure several system-related parameters
(iso.org.dod.internet.mgmt.mib-2.system), as shown in Figure 4-56.
!
Figure 4-56 SNMP System Setting
•
System Contact - The textual identification of the contact person for this managed node,
together with information on how to contact this person.
•
System Name - An administratively-assigned name for this managed node. By convention,
this is the node’s fully-qualified domain name.
•
System Location - The physical location of this node.
Click the Save button to keep the configuration of the current page.
4.15 System tools
System Tools option helps you to optimize the configuration of your device. You can upgrade the
AP to the latest version of firmware, as well as backup or restore the AP’s configuration files.
Ping Watch Dog is designed to constantly monitor a particular connection to a remote host
using the Ping tool. Speed Test helps to test the connection speed to and from any reachable
IP address on current network, especially when we are building wireless network between
devices which are far away from each other. It’s suggested that you change the default password
to a more secure one because it controls access to the device’s web-based management page.
Besides, you can find out what happened to the system in System Log.
There are ten submenus under the System Tools menu (shown as Figure 4-57): Time, Firmware,
Factory Defaults, Backup & Restore, Ping Watch Dog, Reboot, Password, Syslog and Statistics.
Clicking any of them will enable you to configure the corresponding function. The detailed
explanations for each submenu are provided below.
Figure 4-57 System Tools menu
62
Page 63
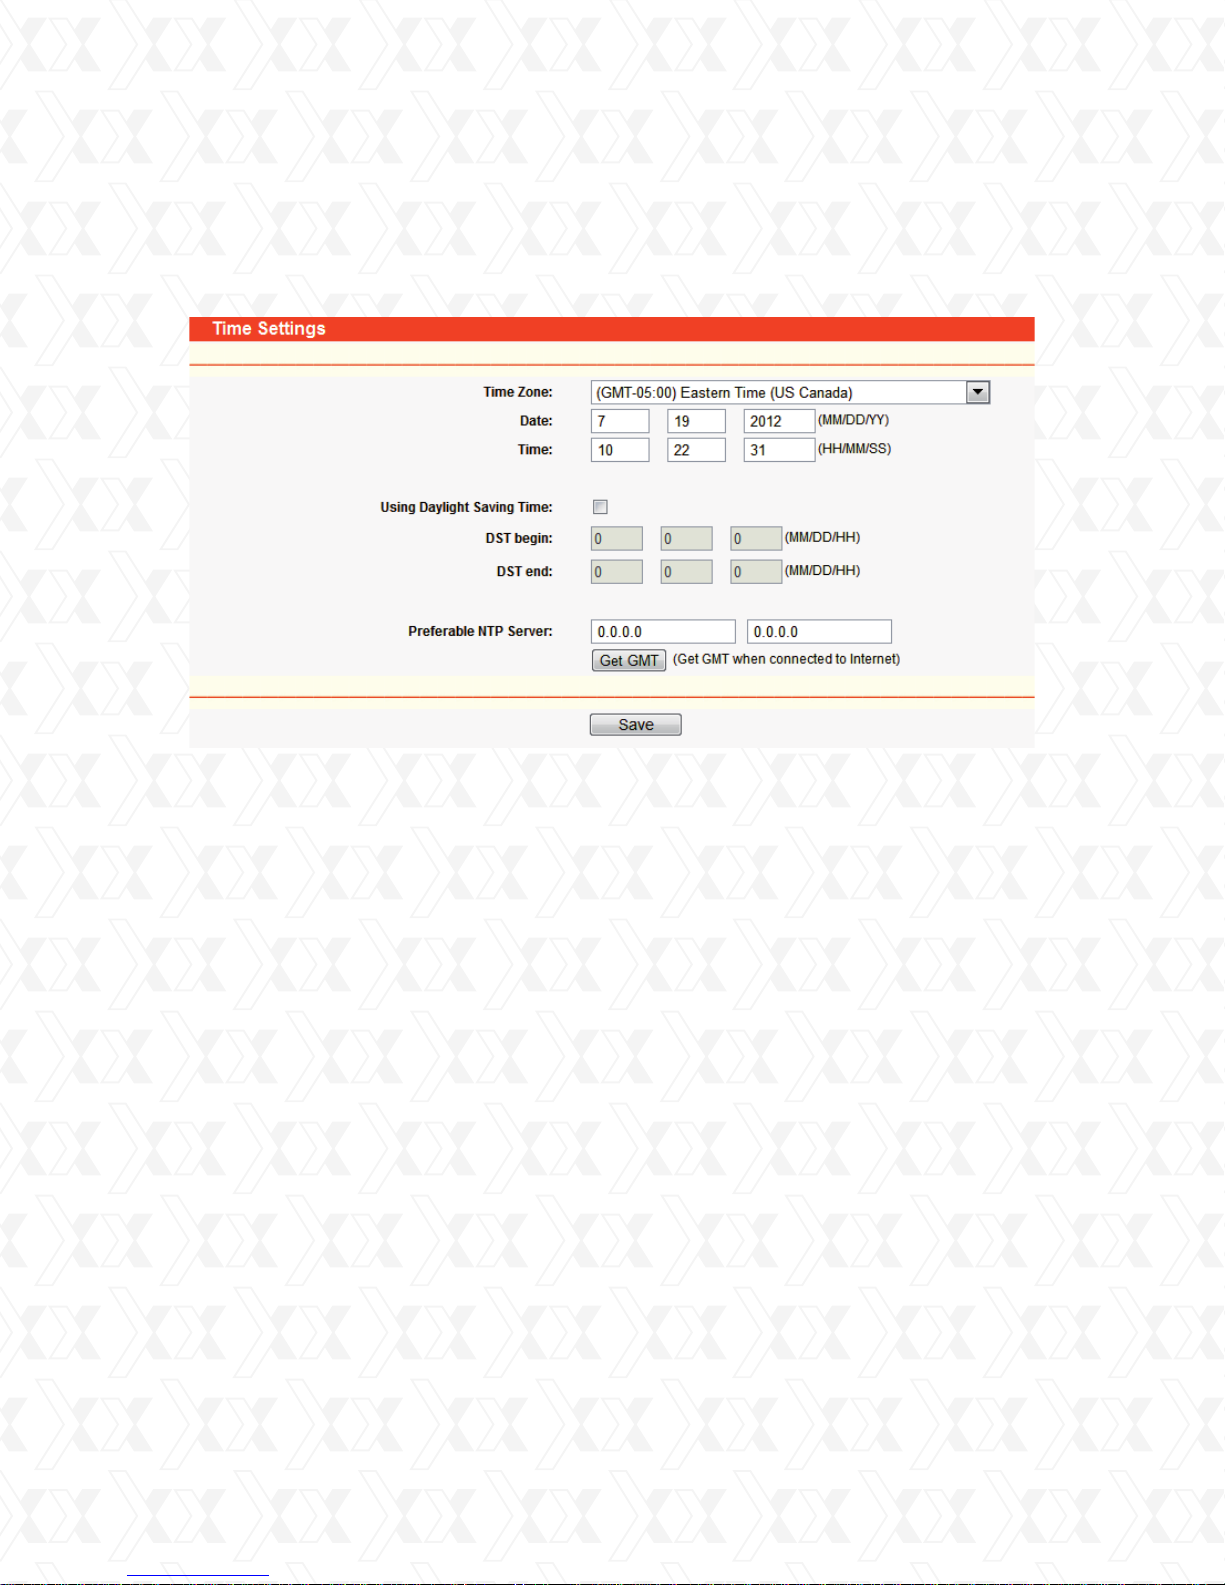
Nexxt Solutions - NexxtGate Wireless Access Point
4.15.1 Time
Go to System Tools > Time in order to set the time manually or get the GMT from the Internet
for the router on the page as shown in Figure 4-58.
Figure 4-58 Time settings
•
Time Zone - Select your local time zone from this drop-down list.
•
Date - Enter your local date in MM/DD/YY into the blank fields.
•
Time - Enter your local time in HH/MM/SS into the blank fields.
To configure Time settings, please follow the steps below:
Select your local time zone.
1.
Enter date and time in the corresponding blank fields.
2.
Click Save.
3.
Click the Get GMT button to get GMT time from the Internet if you have an active internet connection.
If you’re using Daylight saving time, please follow the steps below.
1. Select Using Daylight Saving Time.
2. Enter daylight saving start time and end time in the blanks.
Note:
This setting will be used for some time-based functions such as firewall. You must specify
1.
your time zone once you log in to the router successfully, otherwise, none of these functions
will work.
The time will be lost if the router is turned off.
2.
The router will obtain GMT automatically when it connects to Internet.
63
Page 64
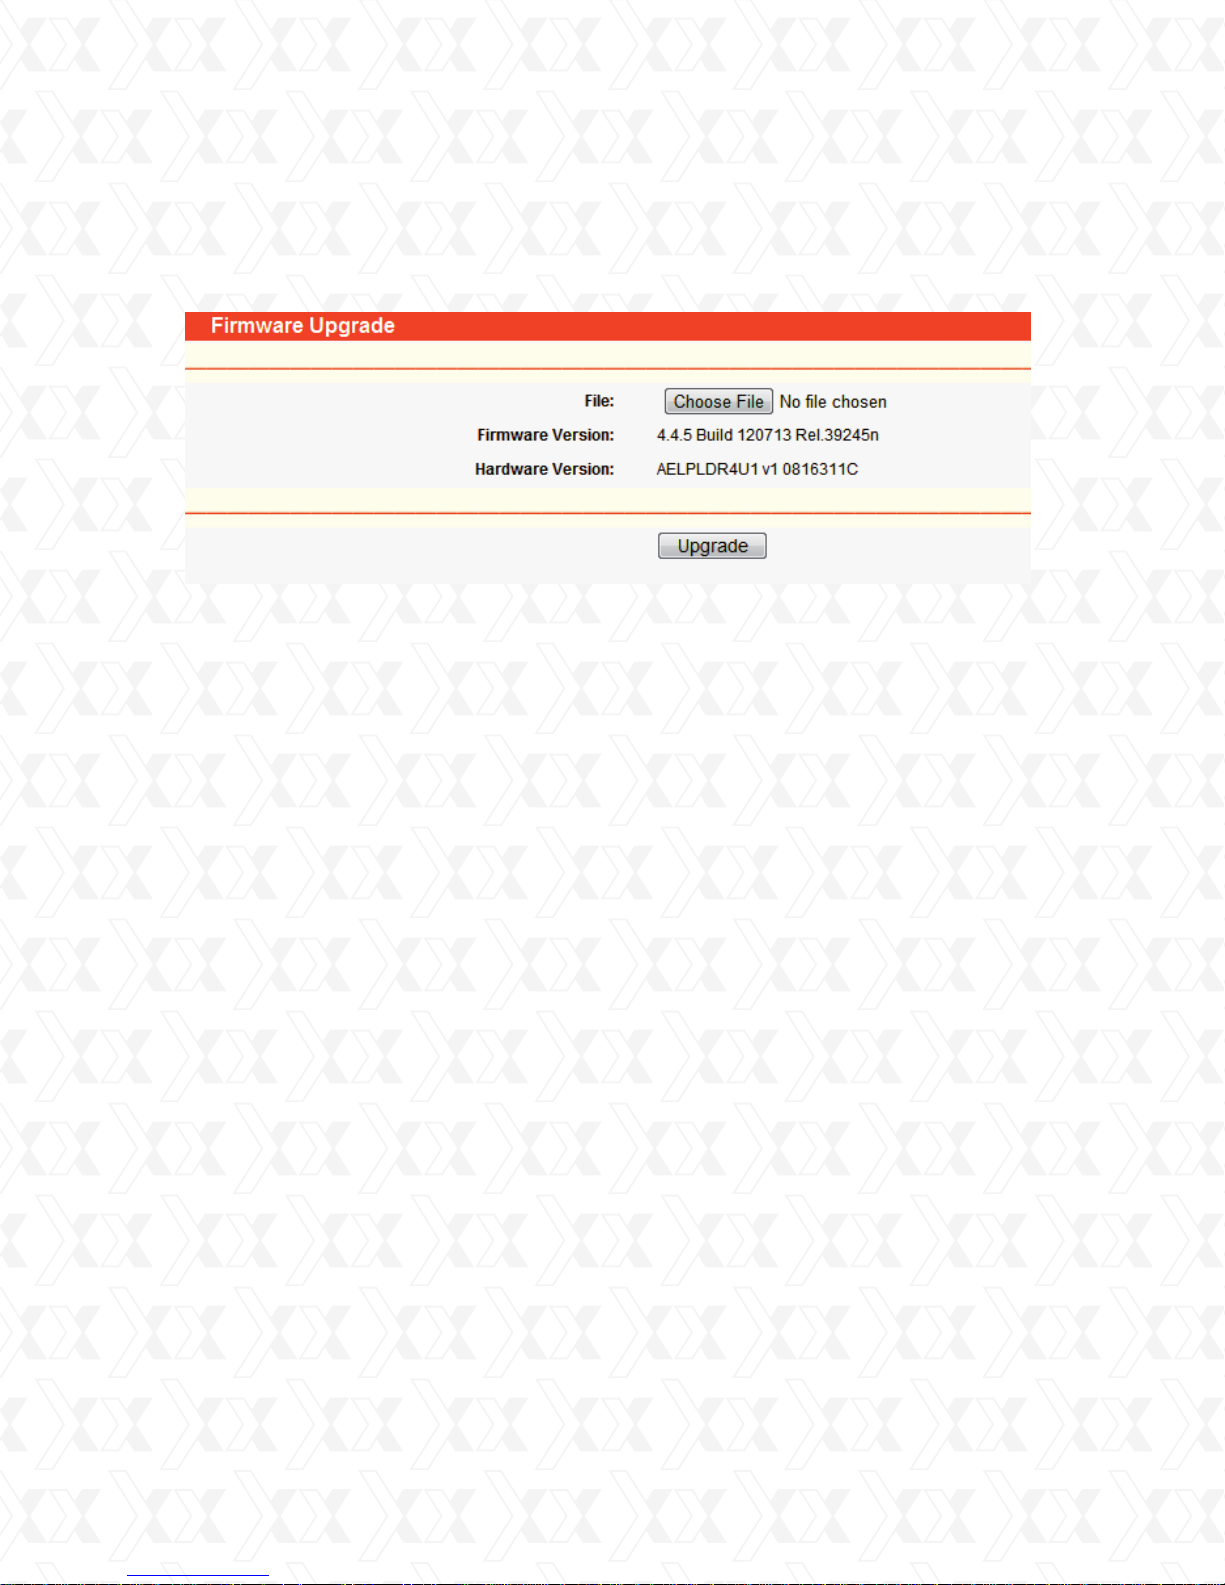
Nexxt Solutions - NexxtGate Wireless Access Point
4.15.2 Firmware
Go to System Tools > Firmware in order to upgrade the latest version of firmware for the device,
as seen on the screen shown in Figure 4-59.
Figure 4-59 Firmware Upgrade
New firmware versions are posted at http://www.tp-link.com and can be downloaded for free.
There is no need to upgrade the firmware unless the new firmware has a new feature you want
to use. However, when experiencing problems caused by the AP itself, you can try to upgrade the
firmware.
Note:
Before upgrading the AP’s firmware, you should write down some of your customized settings to
avoid losing important configuration settings of AP.
To upgrade the AP’s firmware, please take the following steps:
Download a more recent firmware upgrade file from our website
1.
(http://www.nexxtsolutions.com).
Click Choose File to view the folders and select the downloaded file.
2.
Click Upgrade.
3.
•
Firmware Version - Displays the current firmware version.
•
Hardware Version - Displays the current hardware version. The upgrade file must match the
current hardware version.
Note:
Do not turn off the AP or press the Reset button while the firmware is being upgraded.
The AP will reboot after the Upgrading is complete.
64
Page 65
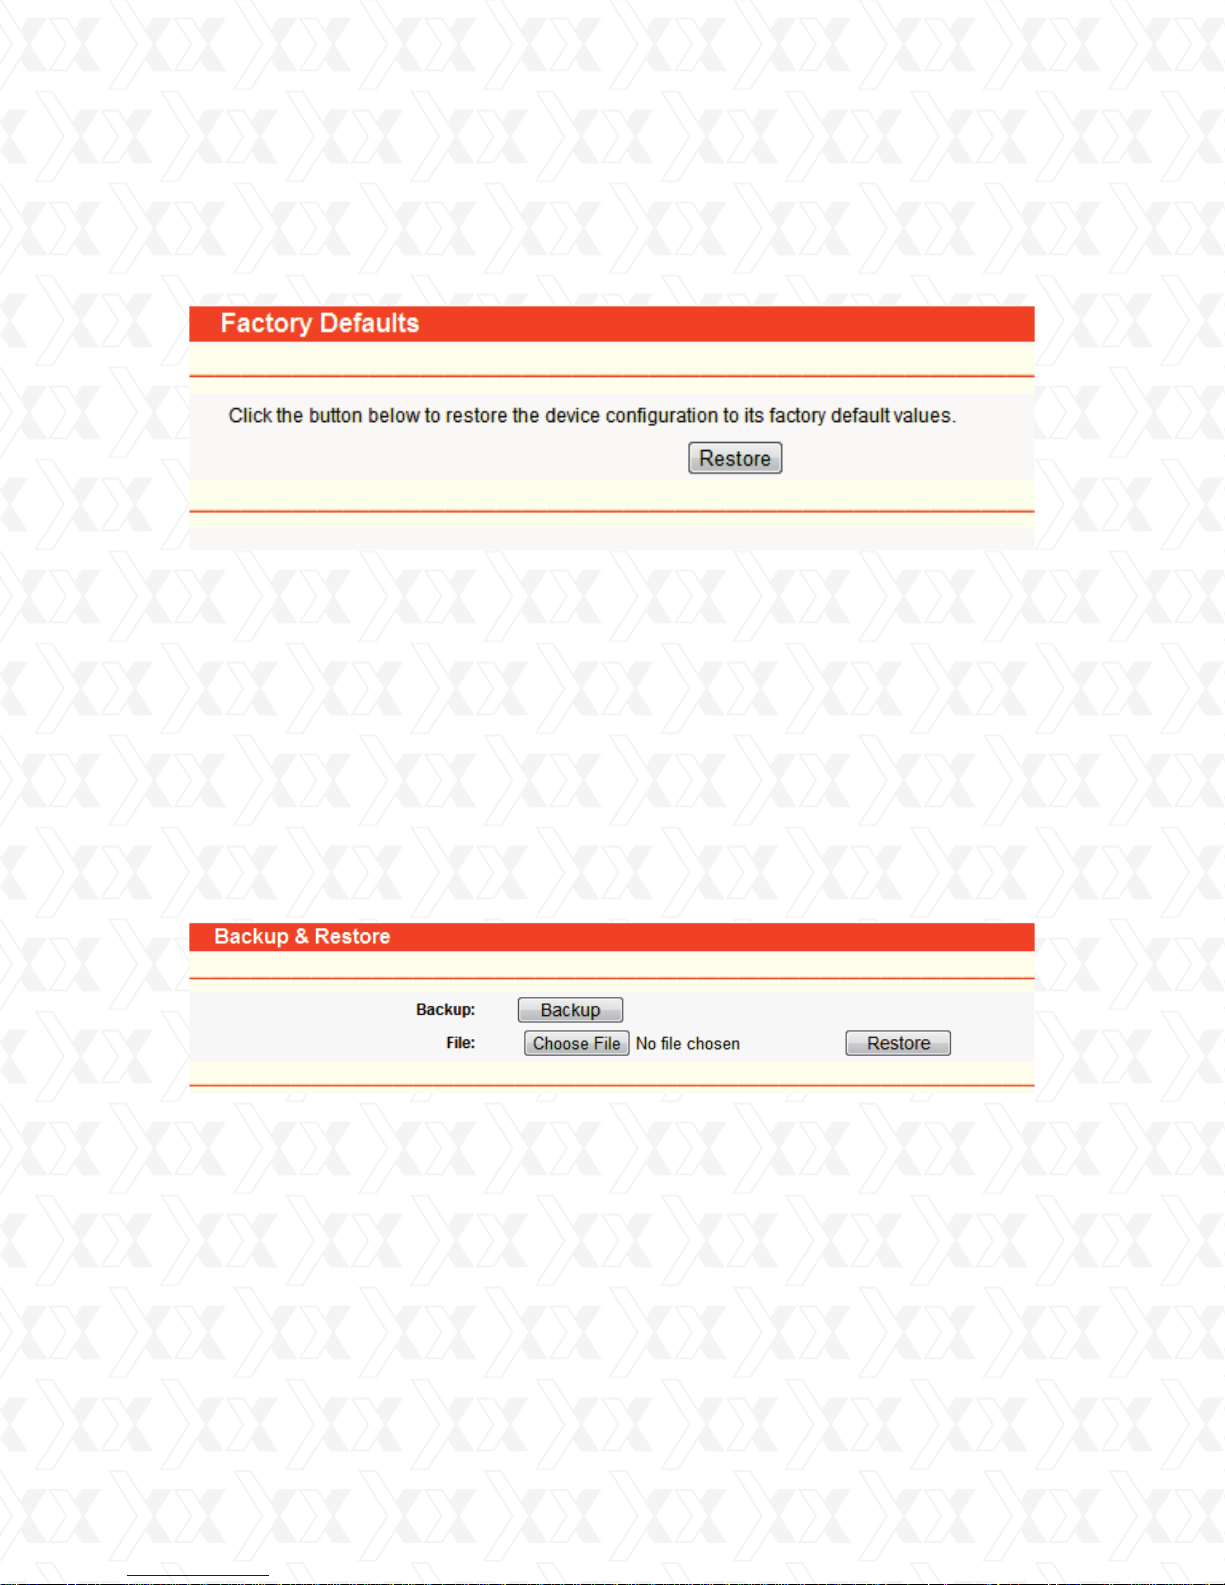
Nexxt Solutions - NexxtGate Wireless Access Point
4.15.3 Factory defaults
Go to System Tools > Factory Default in order to restore the router configuration to its factory
default values, as seen on the following screen (Figure 4-60).
Figure 4-60 Restore Factory Default
Click Restore to reset all configuration settings to their default values.
•
The default User Name: admin
•
Default Password: admin
•
Default IP Address: 192.168.0.1
•
Default Subnet Mask: 255.255.255.0
Note:
Any settings you have saved will be lost after the default settings are restored.
4.15.4 Backup & restore
Go to System Tools > Backup & Restore button to save all the configuration settings as
a backup file in your local computer, as shown in Figure 4-61.
Figure 4-61 Save or Restore the Configuration
Click the Backup button to save all configuration settings as a backup file in your local computer.
To restore the AP’s configuration, please take the following steps:
•
Click Choose File to find the location of configuration file which you want to restore.
•
Click Restore to update the configuration with the file using the path you have entered or
selected in the blank field.
Note:
The current configuration will be overwritten by the uploaded configuration file.
1.
If the process is not done correctly, it could render the device unmanageable.
2.
The upgrade process lasts around 20 seconds, after which the router will restart
3.
automatically. Keep the router on during the entire upgrading process to prevent any
potential damage to the unit.
65
Page 66
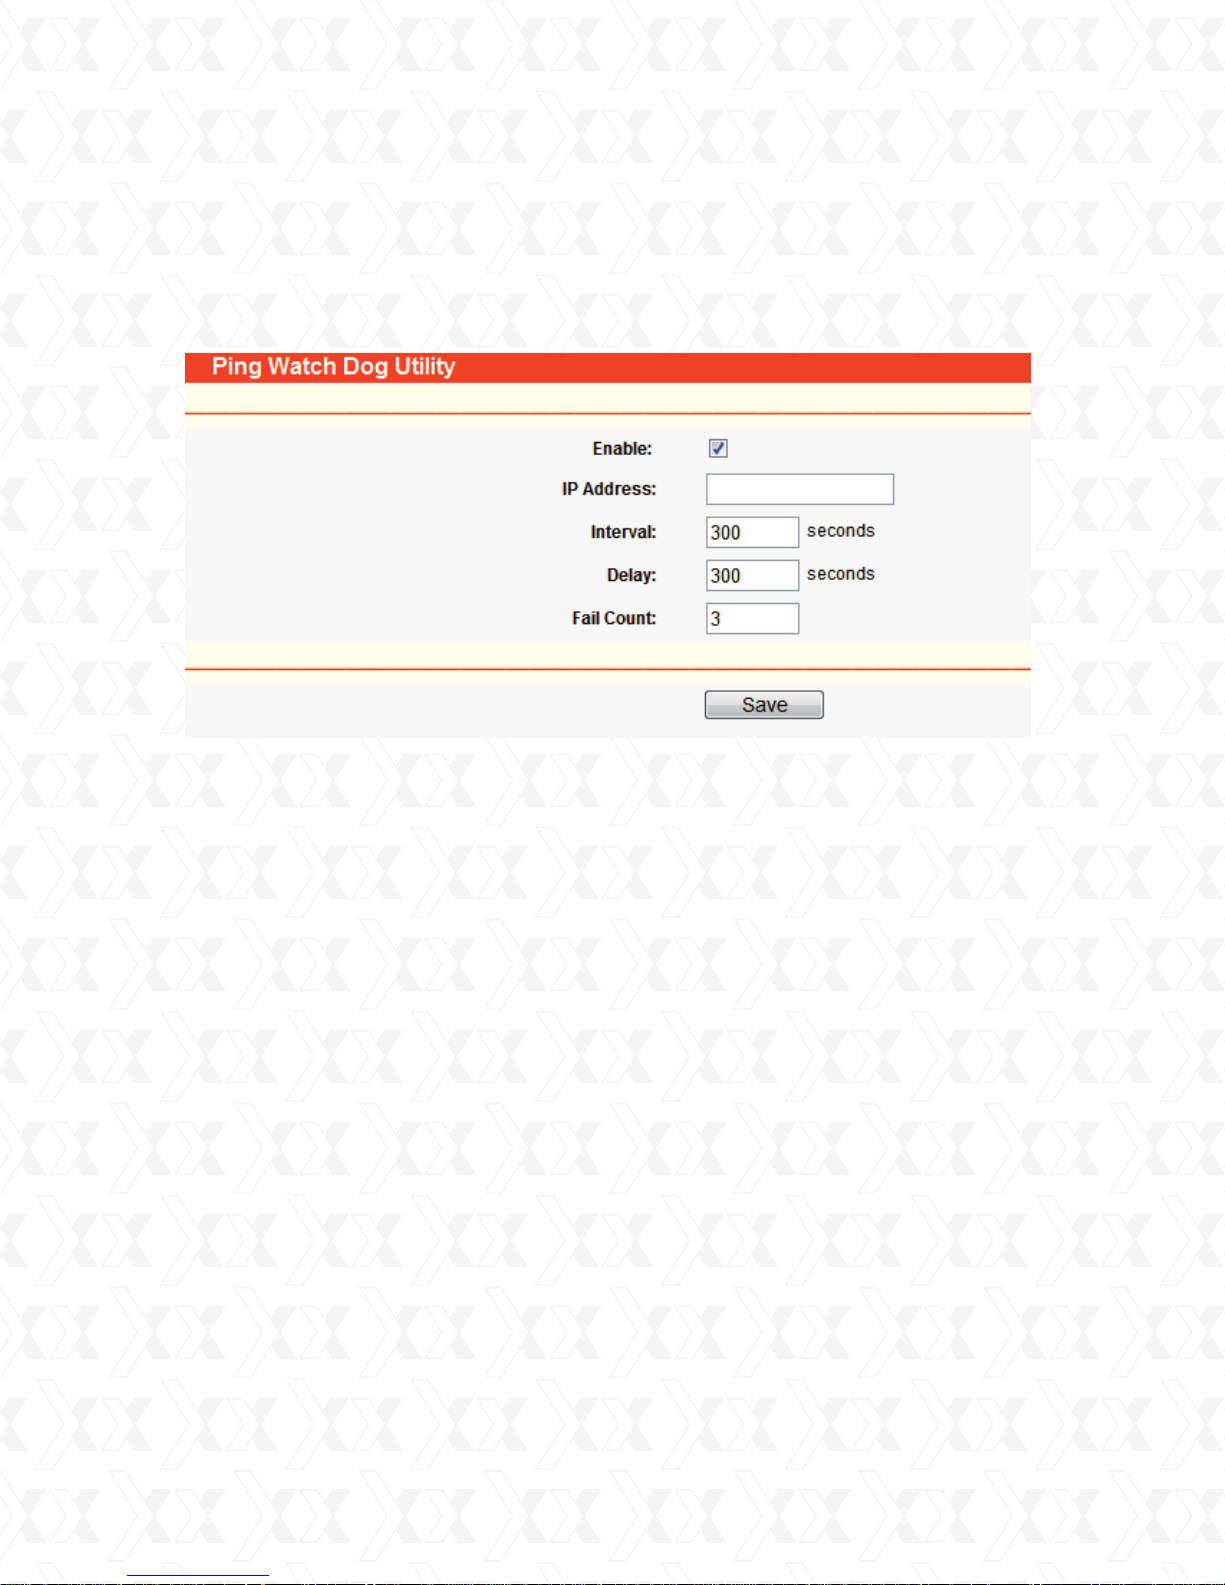
Nexxt Solutions - NexxtGate Wireless Access Point
4.15.5 Ping Watch Dog
Go to System Tools > Ping Watch Dog in order to constantly monitor a particular connection to
a remote host using the Ping tool. It makes this device continuously ping a user defined IP
address (it can be the internet gateway, for example). If it is unable to ping under the user-defined
constraints, this device will automatically reboot.
!
Figure 4-62 Ping Watch Dog Utility
•
Enable - Check this box to Enable or Disable the Ping Watch Dog..
•
IP Address - The IP address of the target host where the Ping Watch Dog Utility is sending
ping packets.
•
Interval - Sets the time interval between two consecutive ping packets being sent..
•
Delay - Sets the time delay before first ping packet is sent out when the device is restarted.
•
Fail Count - Upper limit of the ping packet the device can drop continuously. If this value is
overrun, the device will restart automatically.
Make sure to click the Save button to make your settings changes effective.
4.15.6 Speed test
Go to Wireless > Speed in order to test the connection speed to and from any reachable IP
address of the existing network, especially when establishing a wireless link between devices
which are far away from each other. It should be used for the preliminary throughput reading
between two network devices. This reading is a rough estimate. You can input the remote
device’s administrator Username and Password to get a precise reading, provided the remote
device do support the Speed Test Utility of our AP.
66
Page 67
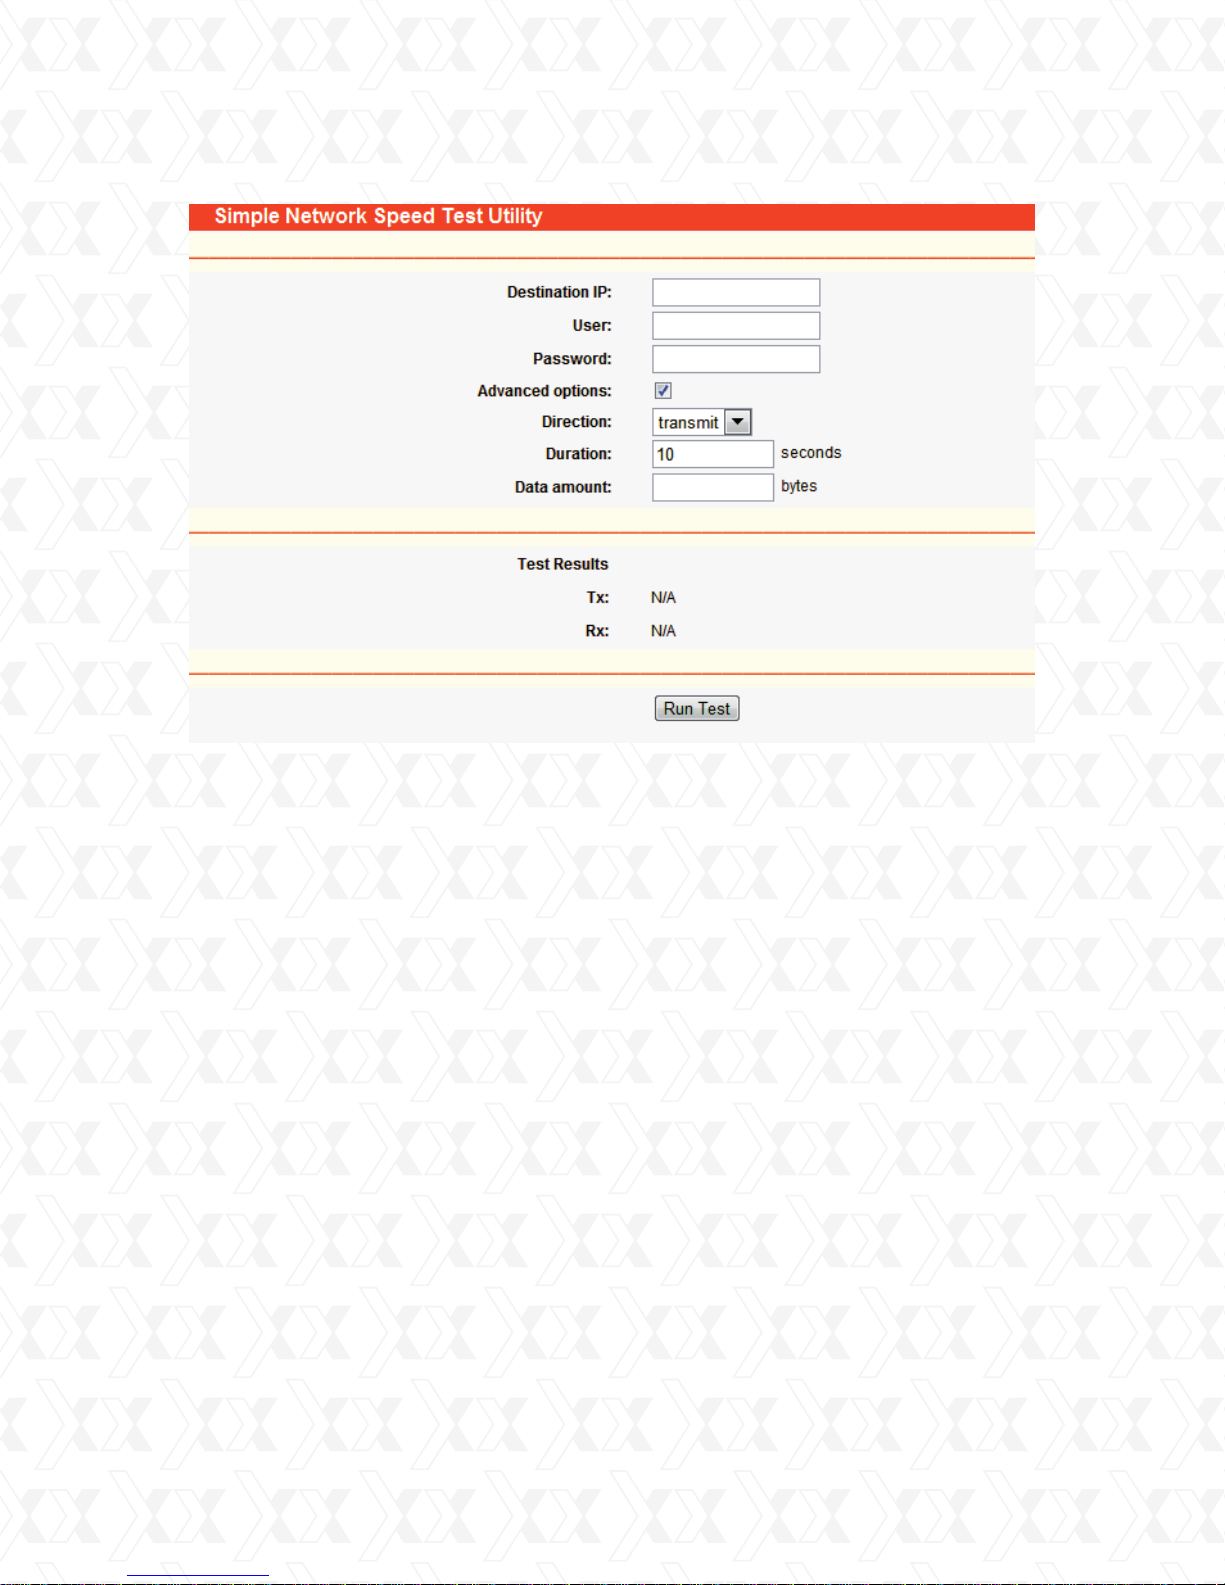
Nexxt Solutions - NexxtGate Wireless Access Point
Figure 4-63 Speed Test
•
Destination IP - The Remote device’s IP address.
•
User - Administrator password of the remote device. It should be filled correctly if you want
to get a precise reading. Otherwise, leave this field blank.
•
Advanced options - This command is used to display the advanced test options, when the
precise reading is being selected.
Note:
If either User or Password is incorrect, only a basic test will be performed. In other words, none
of the advanced options you set will take effect.
•
Direction - There are 3 options available for the traffic direction while estimating the throughput
•
transmit - Estimates the outgoing throughput (TX).
•
receive - Estimates the ingoing throughput (RX).
•
both - Estimates the incoming throughput (Rx) first, followed by the outgoing (Tx) throughput.
•
Duration - Use this box to specify how long the test should last.
•
Data amount - The maximum data amount to be sent out during the whole test.
Note:
If both Duration and Data amount are specified, the test will stop after any of them is met.
Be sure to click the Run Test button to start a new test after you filled enough information.
You can also stop a running test by clicking the Stop Test button at any time.
67
Page 68
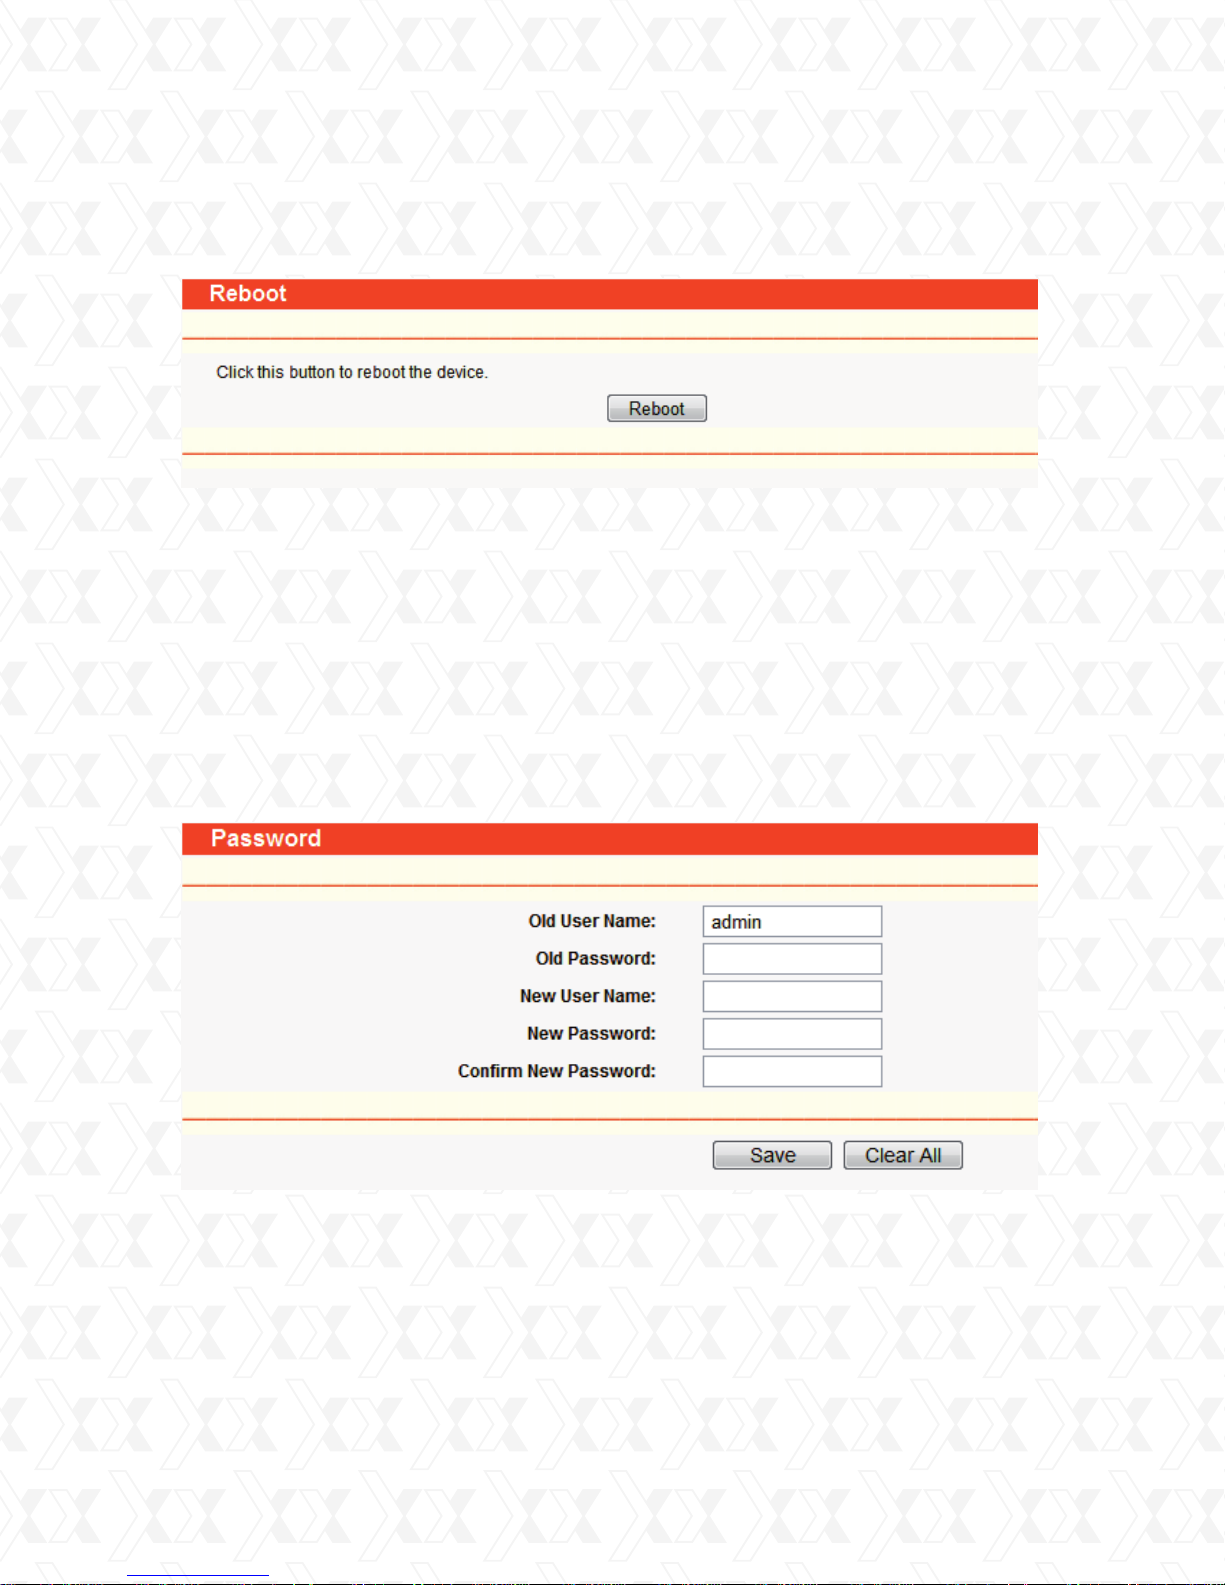
Nexxt Solutions - NexxtGate Wireless Access Point
4.15.7 Reboot
Go to System Tools > Reboot in order to reset the device, as shown in the screen below.
Figure 4-64 Reboot the AP
Click Reboot to initialize the AP.
Some device settings take effect only after the device is rebooted., which include:
•
Change LAN IP Address. (system will reboot automatically)
•
Upgrade the firmware of the AP (system will reboot automatically).
•
Restore the AP’s settings to factory default (system will reboot automatically).
•
DHCP service function.
•
Static address assignment of DHCP server.
4.15.8 Password
Go to System Tools > Password in order to change the router’s factory default user name and
password, using the screen shown in Figure 4-65.
Figure 4-65 Password
It is strongly recommended that you change the factory default user name and password of the
AP to more secure ones because they control access to the AP’s web-based utility. All users who
try to access the AP’s web-based utility or Quick Setup will be prompted to type the AP’s user
name and password.
Note:
The new user name and password must not exceed 14 characters in length and must not
include any space. Enter the new Password twice to confirm it.
Click Save when finished.
Click Clear All to delete all existing entries.
68
Page 69
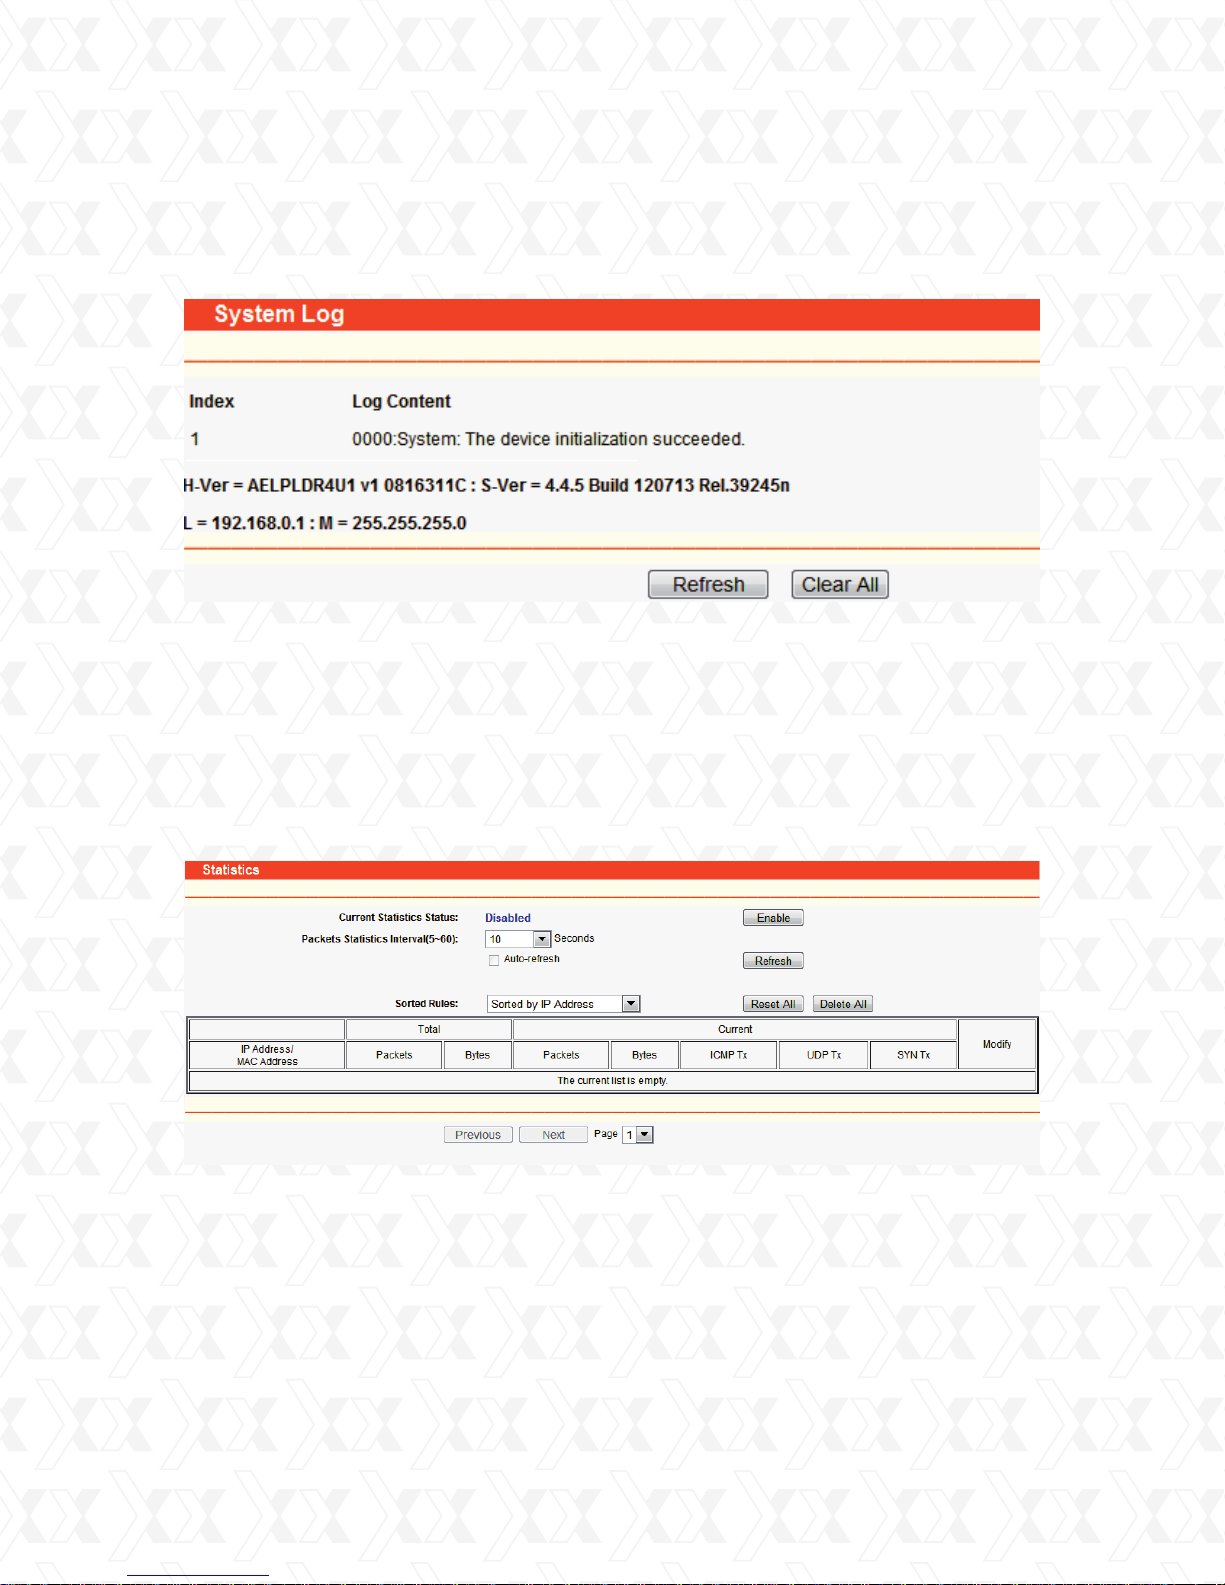
Nexxt Solutions - NexxtGate Wireless Access Point
4.15.9 Syslog
Go to System Tools > System Log to query the logs in order to visualize the activity of the device,
as shown in Figure 4-66.
Figure 4-66 System Log
The AP can keep logs of all traffic. You can query the logs to see the activity in the AP.
Click Refresh to show the latest log lists
Click Clear All to delete all the log entries.
4.15.10 Statistics
The Statistics page (shown in Figure 4-67) displays the network traffic of each PC on the LAN,
including total traffic and the traffic of the last Packets Statistic interval in seconds.
Figure 4-67 Statistics
•
Current Statistics Status - Enabled or Disabled. The default value is disabled. To enable,
click the Enable button. If disabled, the function of DoS protection in Security settings will
be ineffective.
•
Packets Statistics Interval - The default value is 10. Select a value between 5 and 60
seconds from the pull-down list. This statistics interval defines the time between each
transmission of data packets.
•
Sorted Rules - Select a rule from the pull-down list to display the corresponding statistics.
69
Page 70

Statistics Table:
Nexxt Solutions - NexxtGate Wireless Access Point
Total
Current
IP Address
Packets
Bytes
Packets
Bytes
ICMP Tx
UDP Tx
TCP SYN Tx
The IP Address displayed with statistics
The total amount of packets received and transmitted by the router.
The total amount of bytes received and transmitted by the router.
The total amount of packets received and transmitted in the last
Packets Statistic interval seconds.
The total amount of bytes received and transmitted in the last
Packets Statistic interval seconds.
The total amount of the ICMP packets transmitted to WAN
in the last Packets Statistic interval seconds.
The total amount of the UDP packets transmitted to WAN
in the last Packets Statistic interval seconds.
The total amount of the TCP SYN packets transmitted to WAN
in the last Packets Statistic interval seconds.
Click the Save button to store the Packets Statistic interval value.
Click the Auto-refresh checkbox to update the page automatically.
Click the Refresh button to refresh the page immediately.
70
Page 71
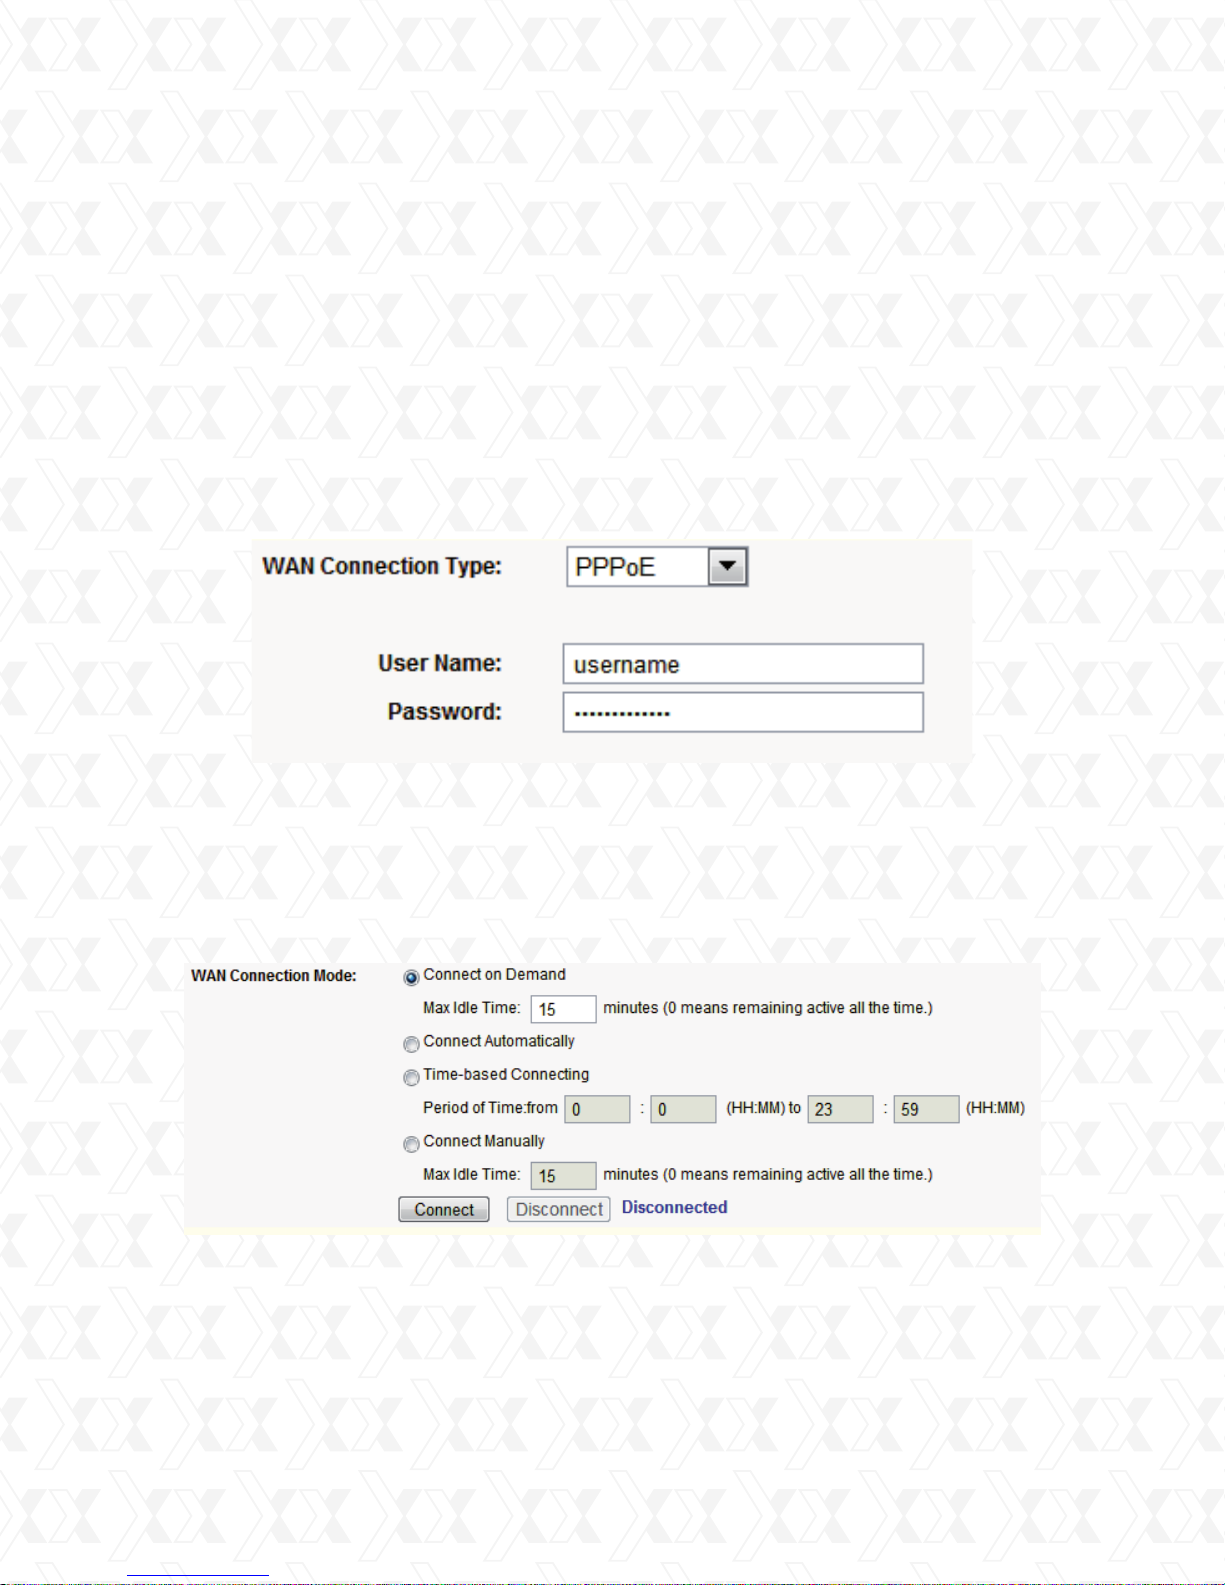
Nexxt Solutions - NexxtGate Wireless Access Point
Appendix A: FAQ
Go to System Tools > System Log to query the logs in order to visualize the activity of the device,
as shown in Figure 4-66.
1. How do I configure the router for ADSL users to access the Internet?
First, configure the ADSL Modem configured in RFC1483 bridge mode.
1.
Connect the Ethernet cable from your ADSL Modem to the WAN port on the router.
2.
The telephone cord plugs into the Line port of the ADSL modem.
Login to the router, click the “Network” menu on the left of your browser, and click “WAN”
3.
submenu. On the WAN page, select “PPPoE” for WAN Connection Type. Type user name
in the “User Name” field and password in the “Password” field, finish by clicking on the
“Connect” button.
Figure A-1 PPPoE Connection Type
If your ADSL lease is in “pay-according-time” mode, select “Connect on Demand” or
4.
“Connect Manually” as your Internet connection mode. Type an appropriate value for
“Max Idle Time” to avoid wasting paid time. Otherwise, you can select “Auto-connecting”
as your Internet connection mode.
Figure A-2 PPPoE Connection Mode
Note:
Sometimes the connection cannot be terminated despite your setting of the ”Max Idle Time”
1.
interval. This is due to some applications are continually linked to the internet in the background.
If you are a Cable user, please configure the router following the above steps.
2.
71
Page 72
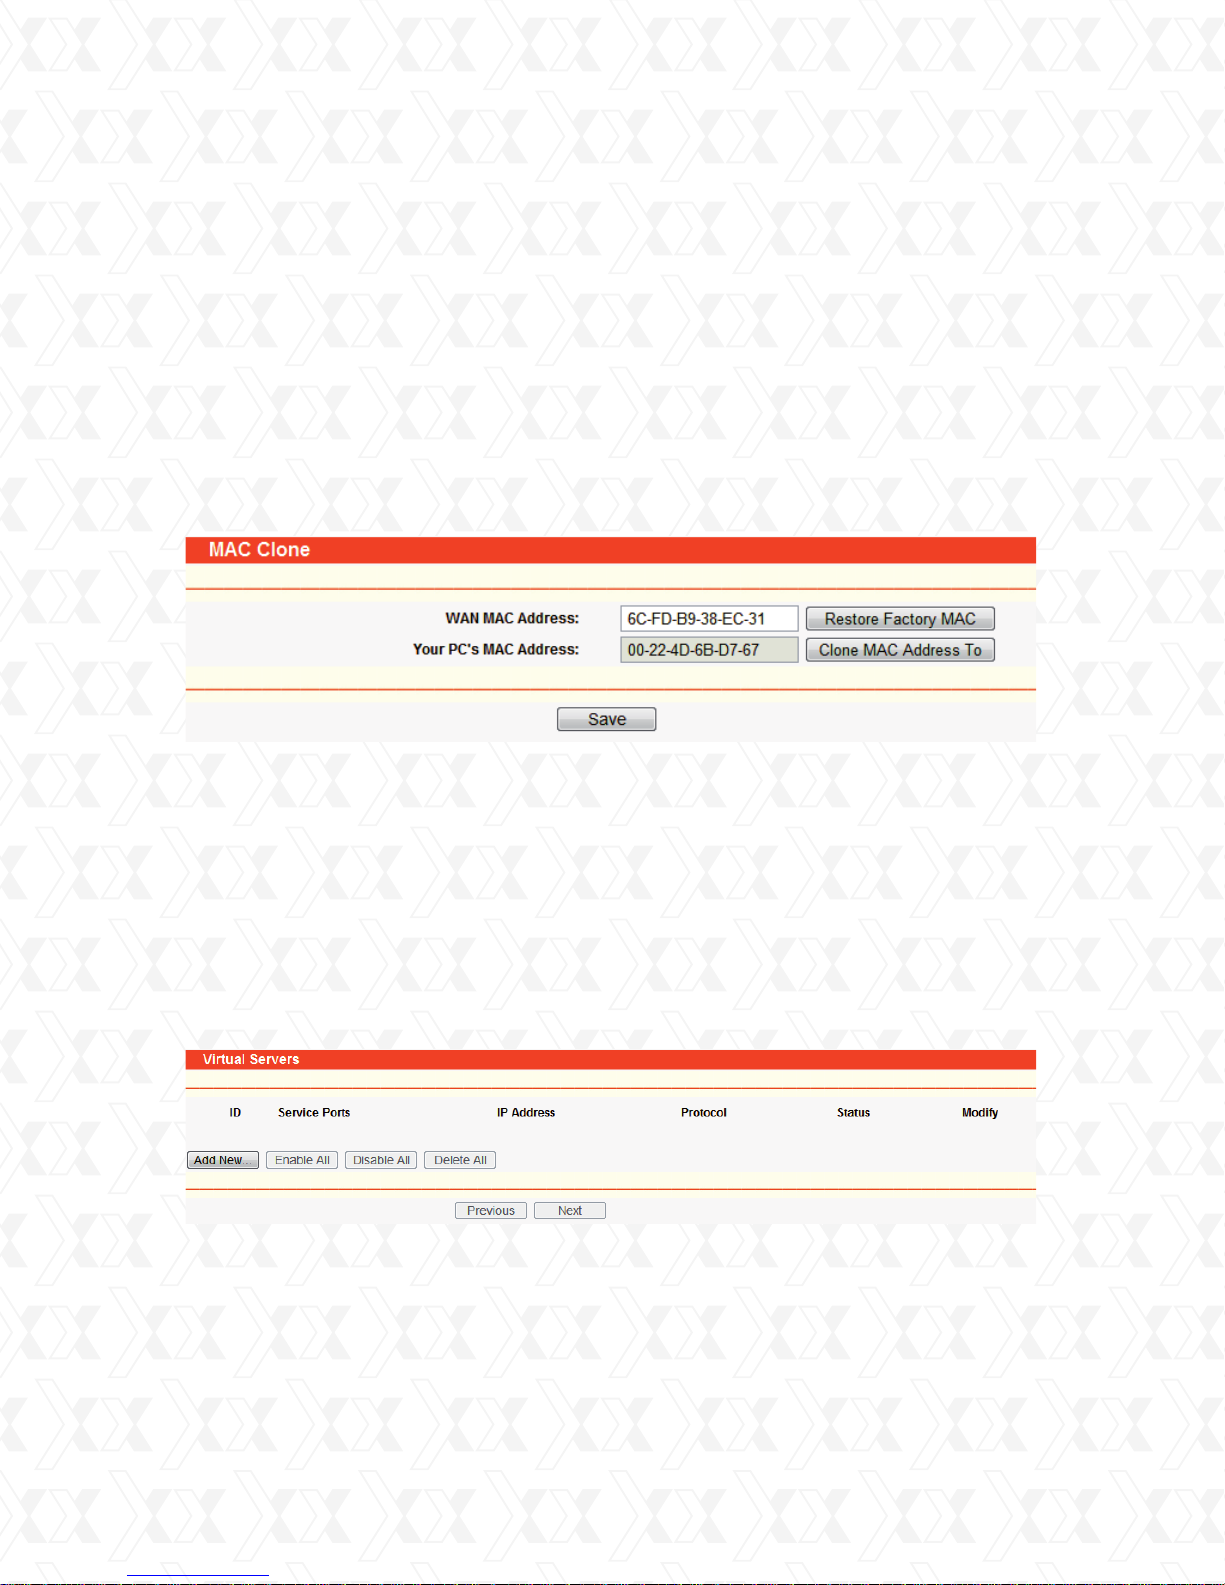
Nexxt Solutions - NexxtGate Wireless Access Point
2. How do I configure the router for Ethernet users to access the Internet?
Login to the router. Go to the “Network” in the menu located on the left of your browser, and
1.
select “WAN” in the submenu. Once the WAN page opens, select “Dynamic IP” as the WAN
Connection Type, and finish by clicking on the “Save” button.
Some ISPs require that you register the MAC Address of your adapter, which is connected to your
2.
cable/DSL Modem during installation. If your ISP requires MAC register, login to the router and
click the “Network” menu link on the left of your browser, and then click “MAC Clone”
submenu link. On the “MAC Clone” page, if your PC’s MAC address is proper MAC address, click
the “Clone MAC Address” button and your PC’s MAC address will copied into the “WAN MAC
Address” field. Or you may type the MAC Address directly into the “WAN MAC Address” field.
The format for the MAC Address is XX-XX-XX-XX-XX-XX. Then click the “Save” button. It will take
effect after rebooting.
Figure A-3 MAC Clone
3. I want to use Netmeeting, what do I need to do?
If you start Netmeeting as a host, you don’t need to do anything with the router.
1.
If you start as a response, you need to configure Virtual Server or DMZ Host.
2.
How to configure Virtual Server: Login to the router, click the “Forwarding” menu on the left of
3.
your browser, and click “Virtual Servers” submenu. On the “Virtual Server” page, click Add New,
then on the “Add or Modify a Virtual Server” page, enter “1720 in the “Service Port” blank field,
and your IP address in the corresponding field, using 192.168.0.169 as an example. Remember
to Enable and Save your settings at the end.
Figure A-4 Virtual Servers
72
Page 73
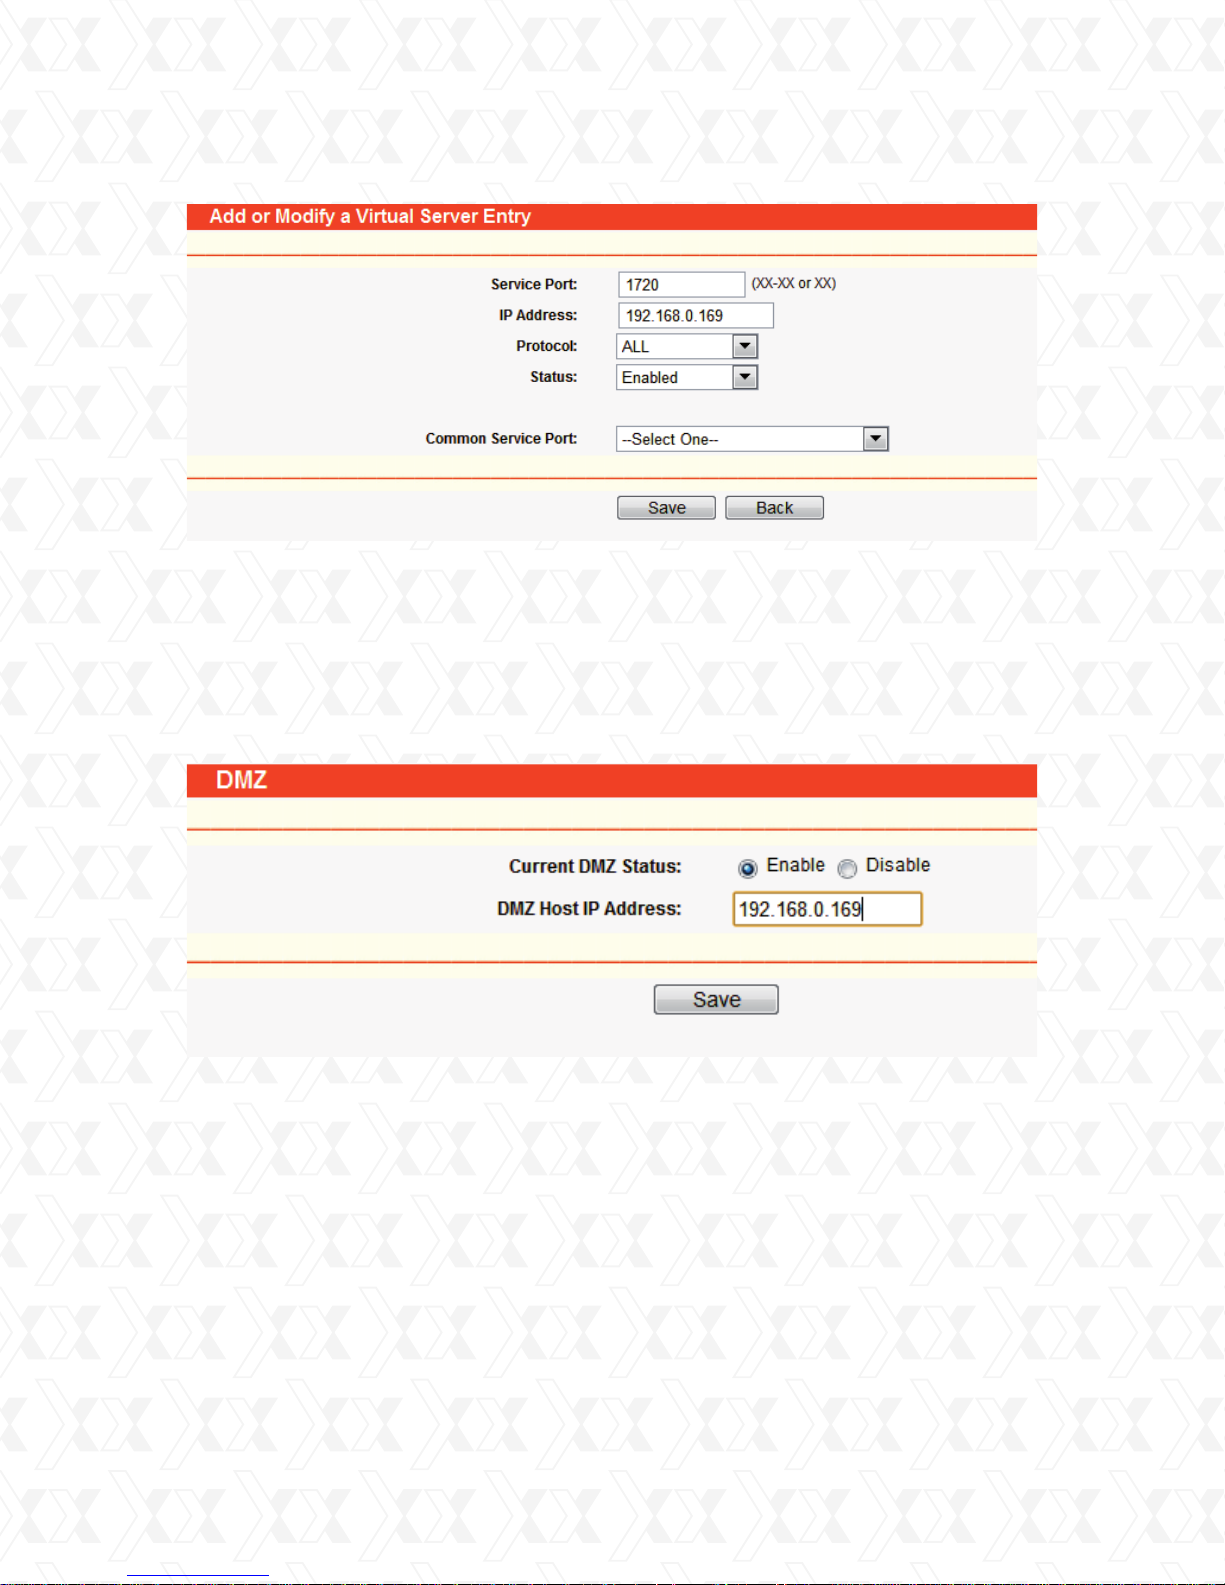
Nexxt Solutions - NexxtGate Wireless Access Point
Figure A-5 Add or Modify a Virtual server Entry
Note:
The caller on the other end should call your WAN IP, which is displayed on the “Status” page.
How to enable DMZ Host: Login to the router, click the “Forwarding” menu on the left of your
4.
browser, and click “DMZ” submenu. On the “DMZ” page, click the “Enable” radio button and type
your IP address into the “DMZ Host IP Address” field, using 192.168.0.169 as an example.
Remember to click the Save button when you are done.
4. I want to build a Web Server on the LAN, what should I do?
Because the Web Server port 80 will interfere with the Web management port 80 on the router,
1.
you must change the Web management port number to avoid it.
To change the Web management port number: Login to the router, click the “Security” menu on
2.
the left of your browser, and select “Remote Management” submenu. On the “Remote Management” page, type any port number other than 80, such as 88, into the “Web Management Port”
field. Click “Save” and reboot the router.
Figure A-6 DMZ
73
Page 74
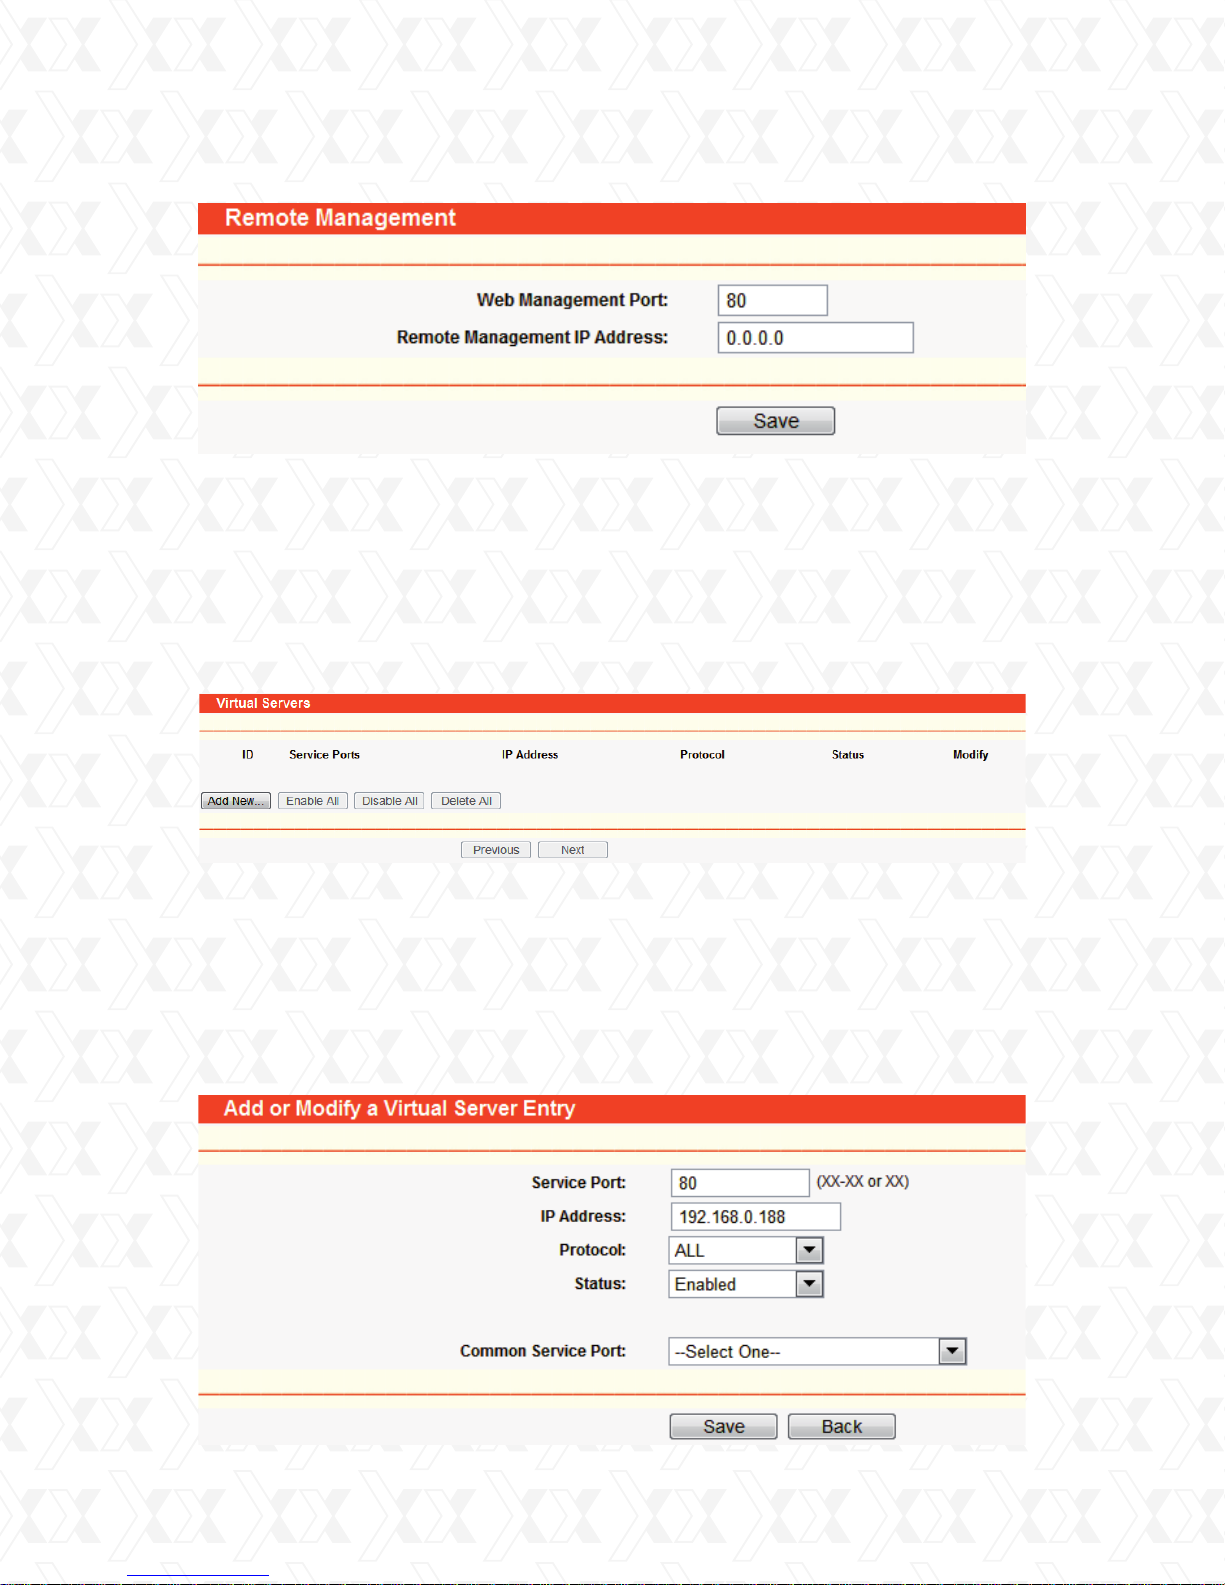
Nexxt Solutions - NexxtGate Wireless Access Point
Figure A-7 Remote Management
Note:
If the above configuration takes effect, type http://192.168.0.1:88/ to access the router in the
address field of the Web browser (the router’s LAN IP address: Web Management Port).
Login to the router, click the “Forwarding” menu on the left of your browser, and click the “Virtual
3.
Servers” submenu. On the “Virtual Server” page, click Add New, then on the “Add or Modify a
Virtual Server” page, enter “80” into the blank field next to “Service Port”, and your IP address
next to the corresponding blank field, taking 192.068.0.188 as an example. Remember to
Enable and Save your settings at the end.
Figure A-8 Virtual Servers
5. The wireless stations cannot connect to the router.
Make sure the “Wireless Router Radio” is enabled.
1.
Make sure that the wireless stations’ SSID matches the router’s SSID.
2.
Make sure the wireless stations have chosen the right KEY for encryption when the router
3.
is encrypted.
If the wireless connection is ready, but you can’t access the router, check the IP Address
4.
of your wireless stations.
A-9 Add or Modify a Virtual server Entry
74
Page 75
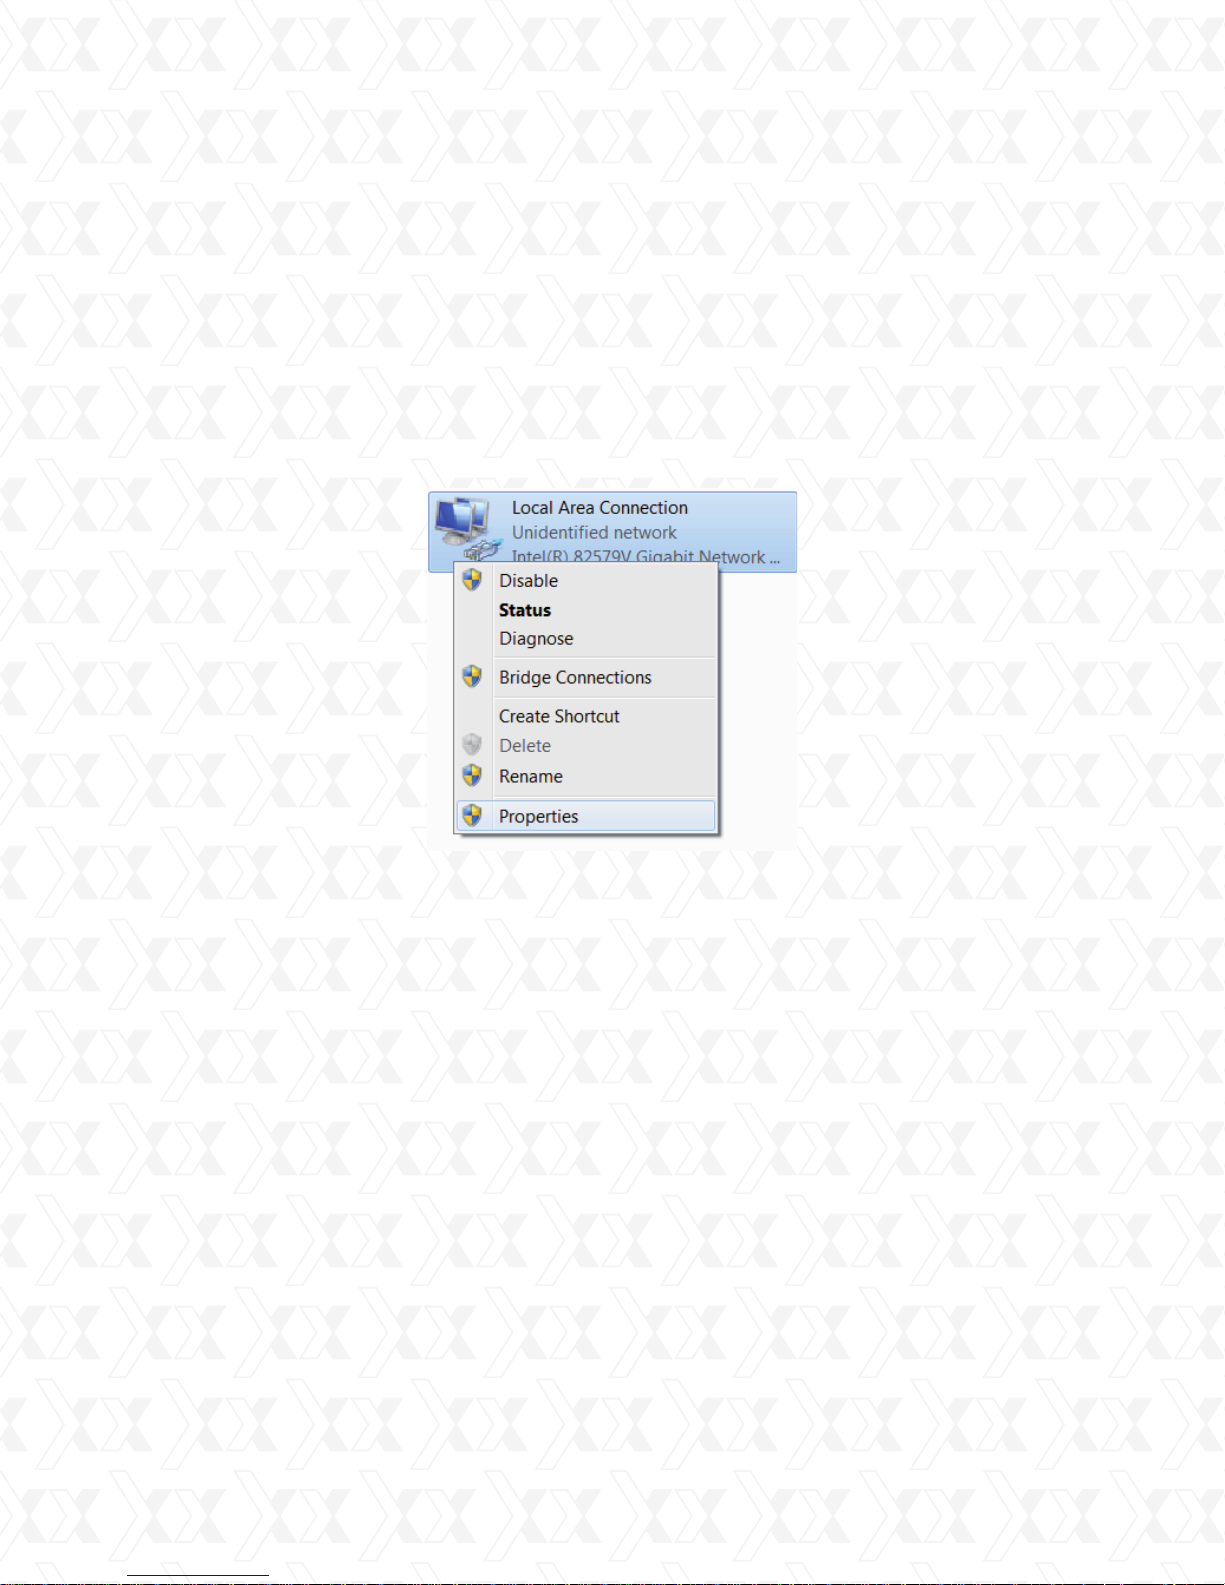
Nexxt Solutions - NexxtGate Wireless Access Point
Appendix B: Configuring the PC
In this section, we will explain how to install and configure the TCP/IP correctly in Windows XP.
First, make sure your Ethernet Adapter is working. Refer to the adapter’s manual for further
information, if needed.
1. Configure TCP/IP component
On the Windows taskbar, click the Start button, and then click Control Panel.
1.
After clicking the Network and Internet Connections icon, select the Network Connections tab
2.
in the new window.
Right click the icon displayed below, and select Properties on the popup menu.
3.
Figure B-1
In the page displayed below, double click on Internet Protocol (TCP/IP).
4.
75
Page 76
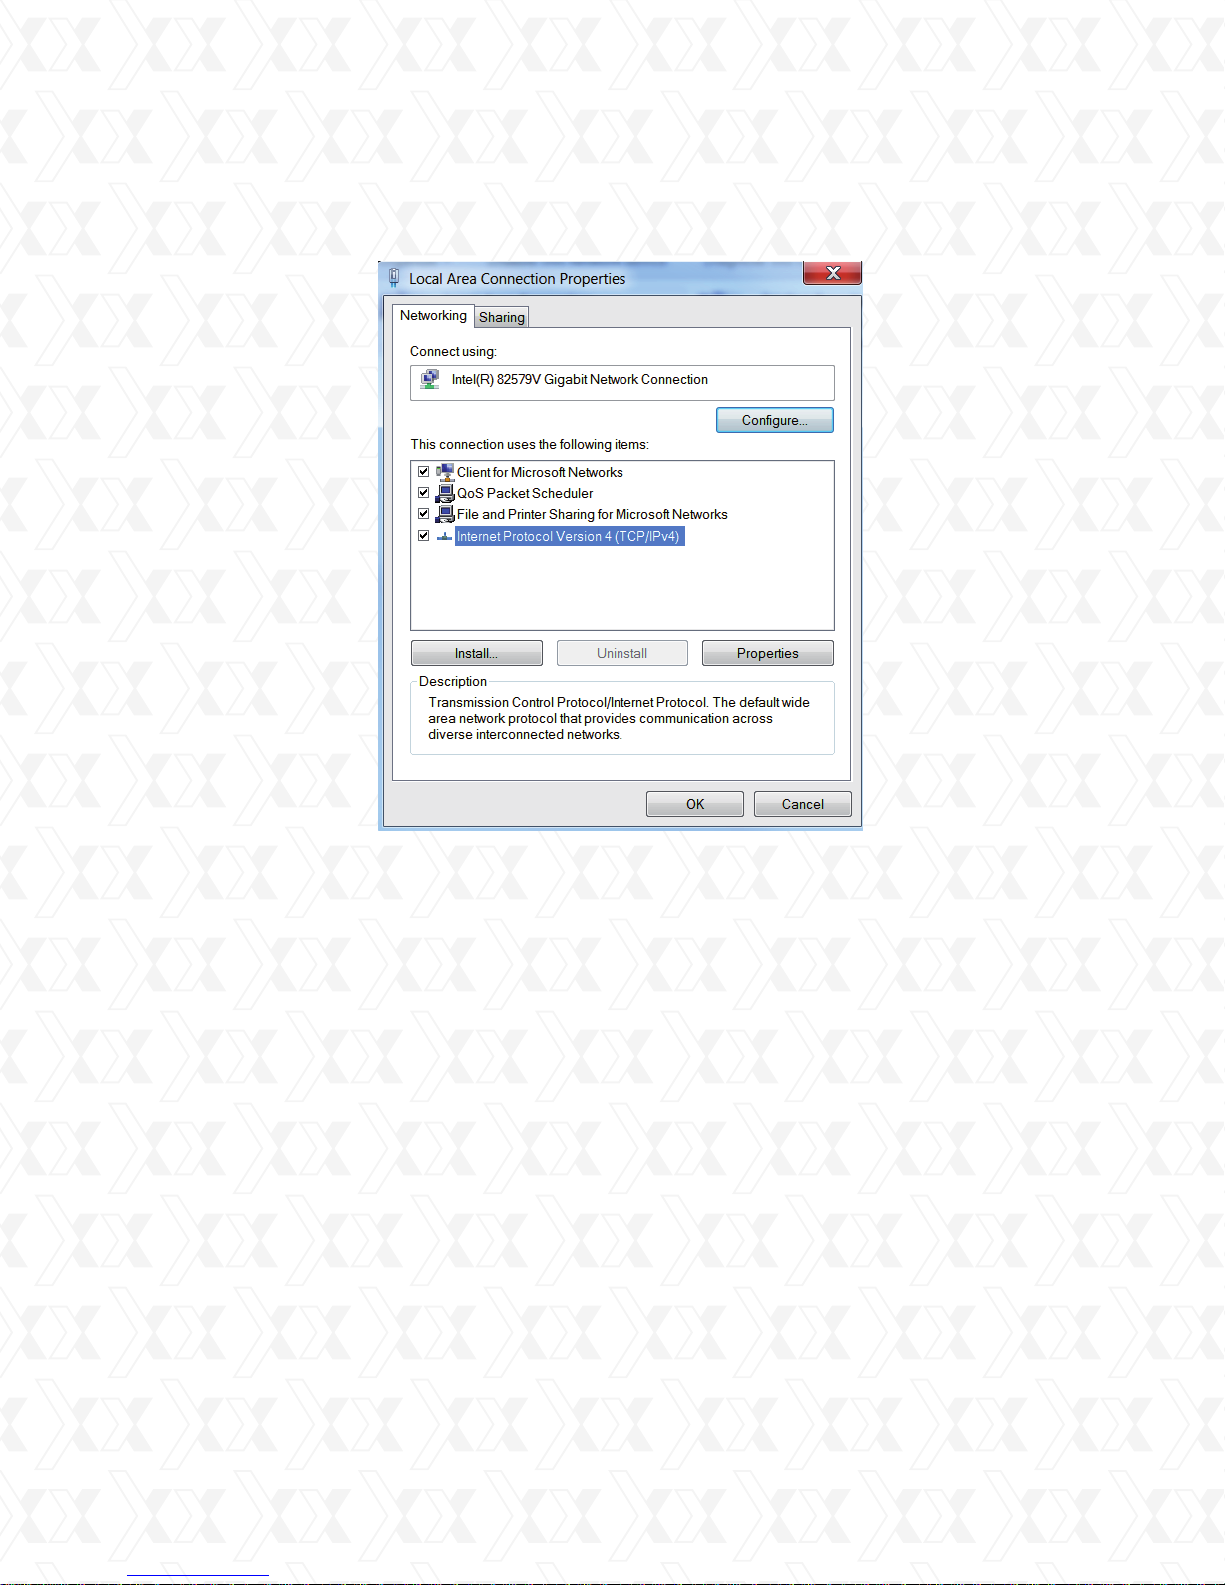
Nexxt Solutions - NexxtGate Wireless Access Point
Figure B-2
The following TCP/IP Properties window will be displayed, with the IP Address tab open by
5.
default.
Now you have two ways to configure the TCP/IP protocol below:
•
Setting IP address automatically
Select Obtain an IP address automatically, and then choose Obtain DNS server automatically, as
shown in the Figure below:
76
Page 77
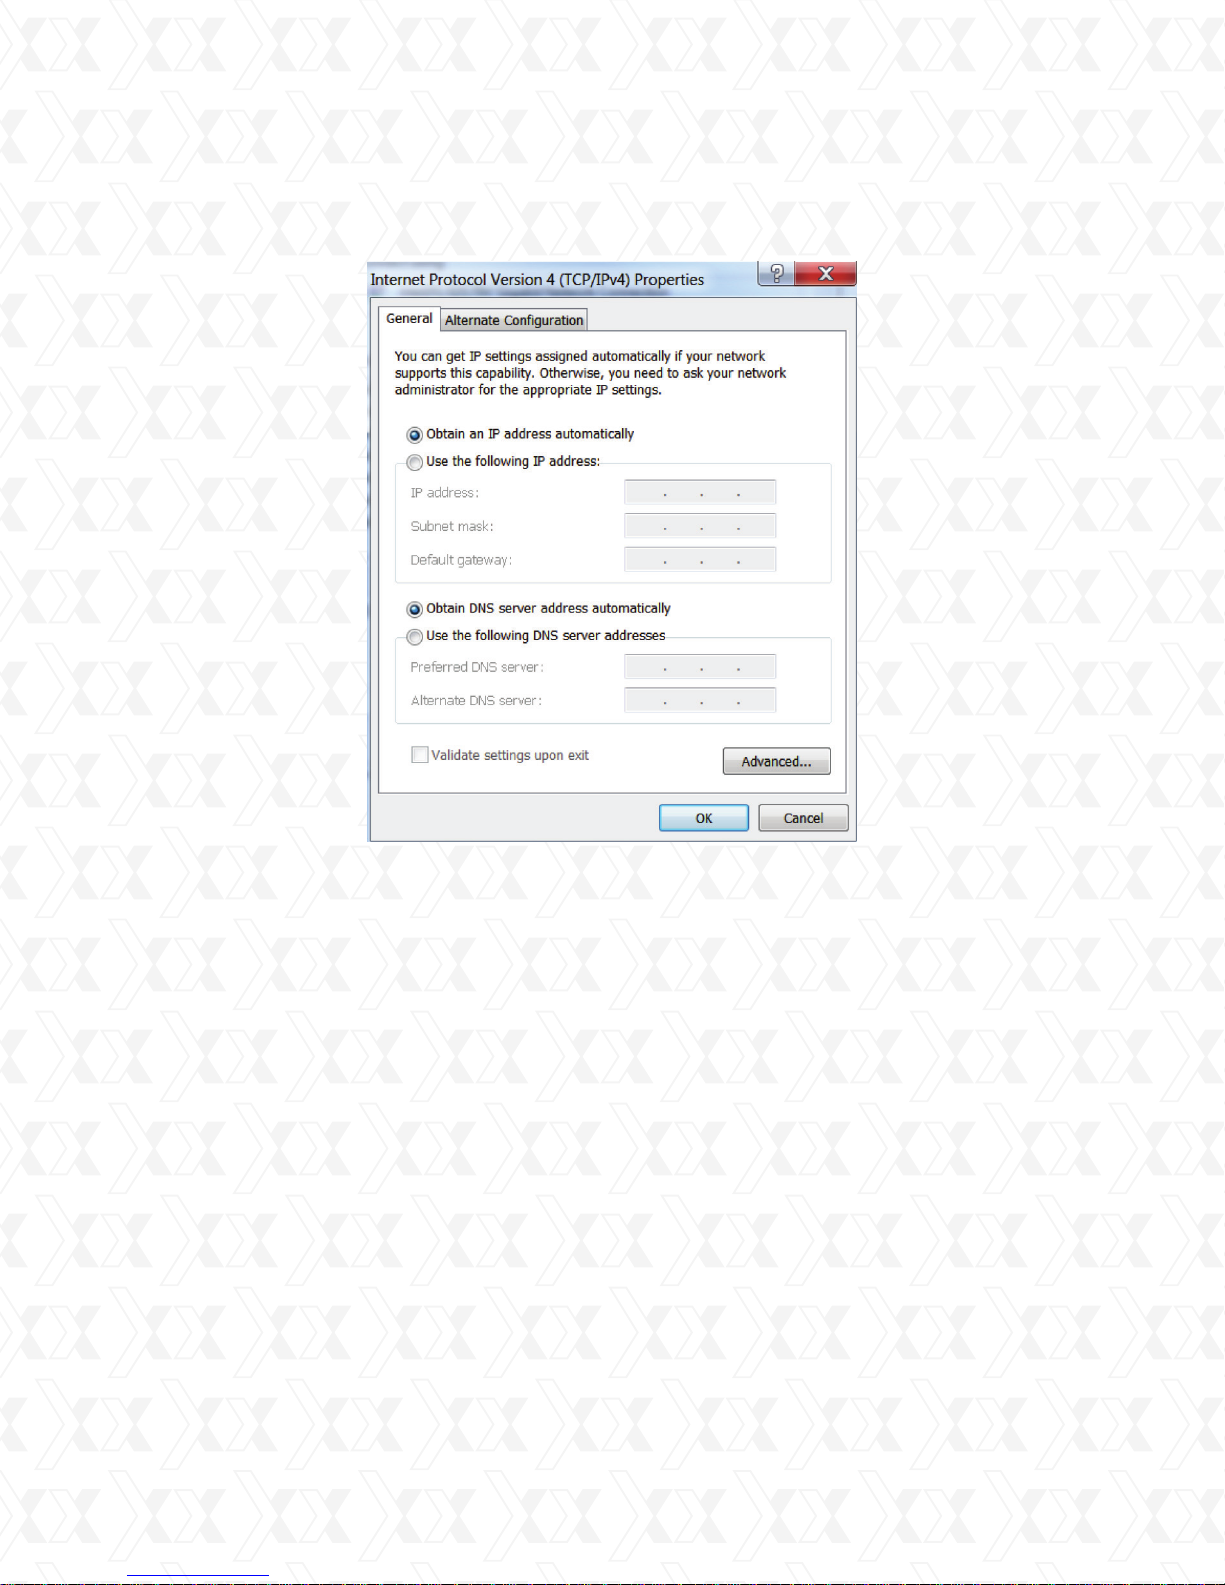
Nexxt Solutions - NexxtGate Wireless Access Point
Figure B-3
Note: For Windows 98 OS or before, the PC and router may need to be restarted.
Setting IP address manually
•
Select Use the following IP address radio button. The following items will be available.
1.
If the Router’s LAN IP address is 192.168.0.1, type IP address 192.168. 0.x (whereby x is
2.
any value from 1 to 253), and Subnet mask is 255.255.255.0.
Type the router’s LAN IP address (the default IP is 192.168.0.1) into the Default gateway
3.
field.
Select Use the following DNS server addresses. In the Preferred DNS Server field you can
4.
enter the same value as the Default gateway or type the local DNS server IP address.
77
Page 78
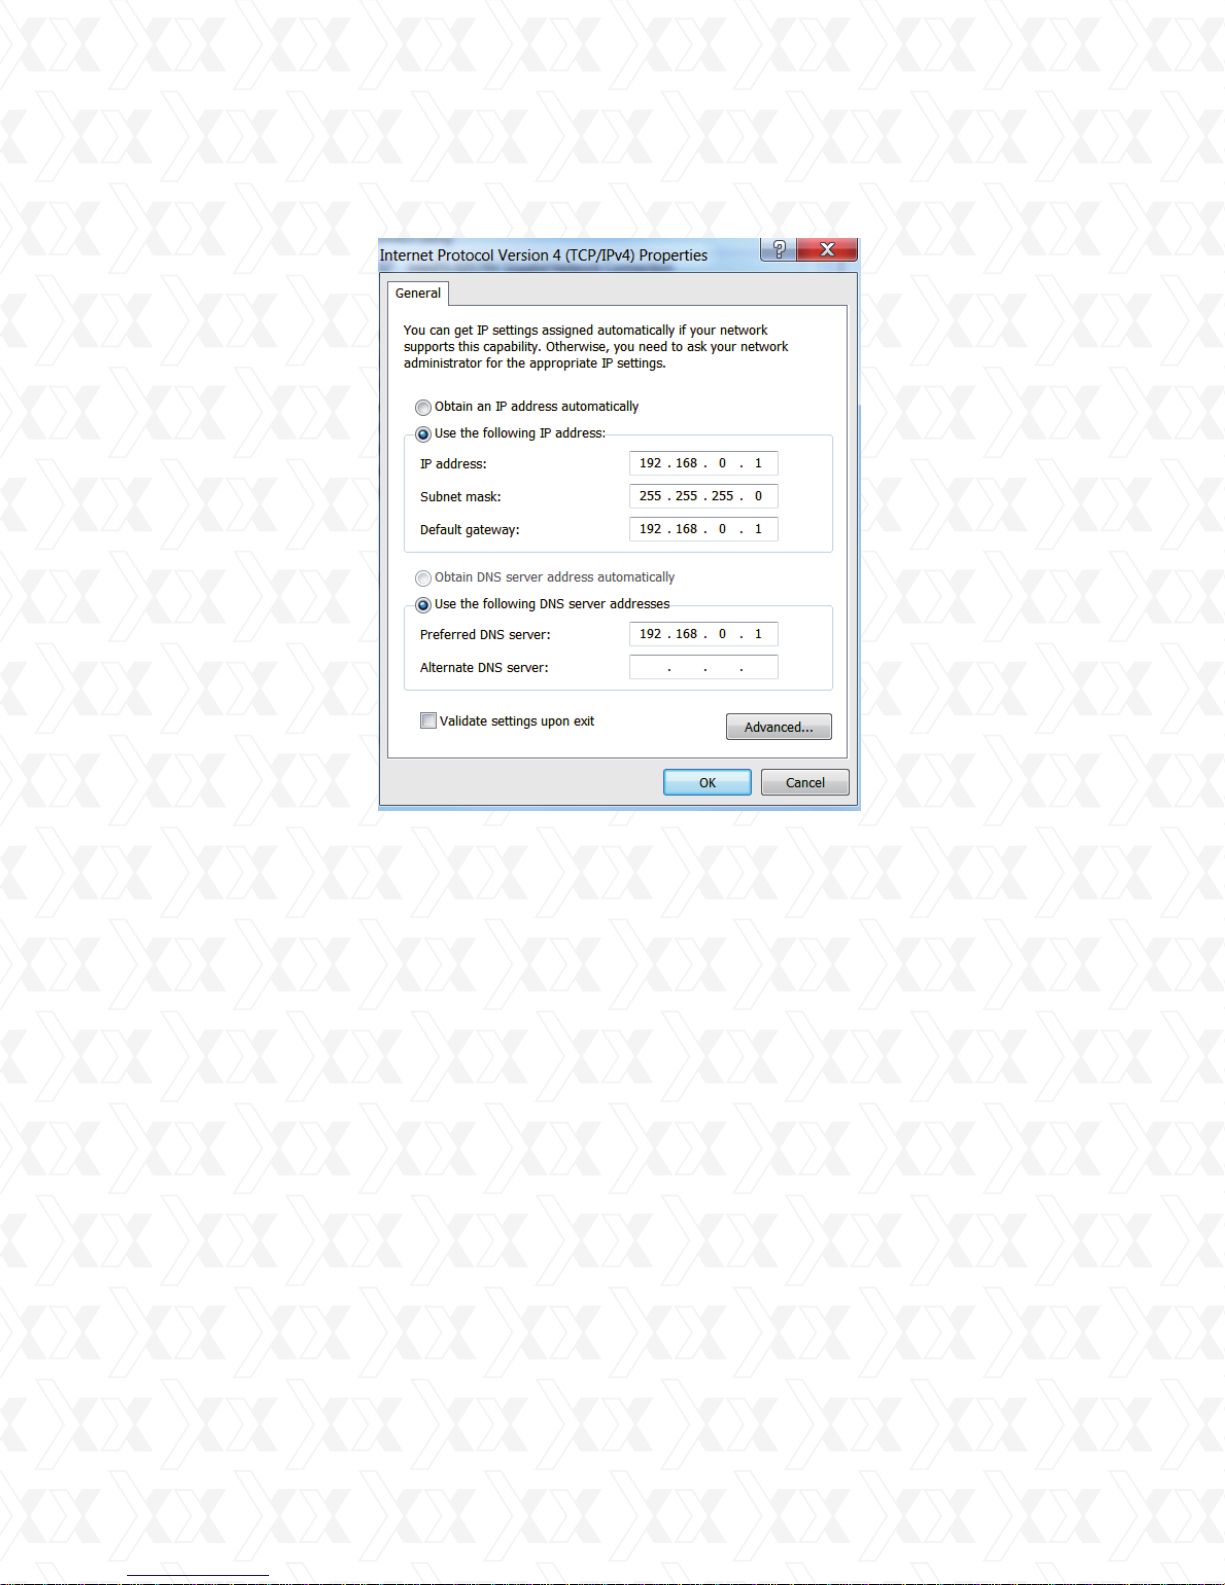
Nexxt Solutions - NexxtGate Wireless Access Point
Figure B-4
5. Click OK when done to save your settings.
78
Page 79
Nexxt Solutions - NexxtGate Wireless Access Point
Appendix C: Specifications
IEEE 802.3, 802.3u, 802.11b and 802.11g, TCP/IP, DHCPStandards and protocols
General
Interface
Beamwidth
Ports
Cabling Type
Modulation type
Receiver sensitivity
One 10/100M Auto-Sensing RJ45 Port(Auto MDI/MDIX),
supporting Passive PoE
2.4-2.4835GHzFrequency range
12dBi Dual-Polarized Aluminum AntennaAntenna
Horizontal: 60°
Vertical: 30°
One 10/100M Auto-Negotiation LAN RJ45 port,
supporting passive PoE
10BASE-T: UTP category 3, 4, 5 cable
(maximum 100m) EIA/TIA-568 100Ω STP (maximum 100m)
100BASE-TX: UTP category 5, 5e cable
(maximum 100m) EIA/TIA-568 100Ω STP (maximum 100m)
IEEE 802.11b: DQPSK, DBPSK, DSSS, and CCK
IEEE 802.11g: BPSK, QPSK, 16QAM, 64QAM, OFDM
802.11g54M: -76dBm 48M: -78dBm 36M: -82dBm 12M:
-91dBm 9M:-92dBm802.11b11M:-90dBm 5.5M:-92dBm 1M:-98dBm
Outdoor weatherproof ABSEnclosure
Grounding TerminalLighting protection
Output: 12VDC / 1A switching PSUPower supply
Dimensions
Working Temperature
Working Humidity
Storage Temperature
Storage Humidity
FCCCertifications
Wireless
54/48/36/24/18/12/9/6Mbps or 11/5.5/3/2/1MbpsWireless Data Rates
64/128/152-bit WEP, WPA/WPA2, WPA-PSK/WPA2-PSKWireless Encryptions
Physical and Environment
10.4 × 4.7 × 3.2 in. (265x120x83mm)
-30ºC~70ºC
10% ~ 90% RH, Non-condensing
-40ºC~70ºC(-40ºF~158ºF)
5% ~ 90% RH, Non-condensing
79
Page 80

Nexxt Solutions - NexxtGate Wireless Access Point
Appendix D: Glossary
2x to 3x eXtended Range™ WLAN Transmission Technology - The WLAN device with 2x to 3x
eXtended Range™ WLAN transmission technology is able to increase its sensitivity up to 105
dB, providing a robust, longer-range wireless connection in the coverage area. With this
range-enhancing technology, a 2x to 3x eXtended Range™ based-client and access point can
maintain up to three times the transmission distance of traditional 802.11b and 802.11g
solutions. While the typical transmission distance of 802.11b and 802.11g devices is about
300m, a 2x to 3x eXtended Range™ based client and access point is able to maintain a much
higher transmission range of nearly 830m.
802.11b - The 802.11b standard specifies a wireless networking at 11 Mbps using
direct-sequence spread-spectrum (DSSS) technology and operating in the unlicensed radio
spectrum at 2.4GHz, and WEP encryption for security. 802.11b networks are also referred to
as Wi-Fi networks.
802.11g - specification for wireless networking at 54 Mbps using direct-sequence
spread-spectrum (DSSS) technology, using OFDM modulation and operating in the unlicensed
radio spectrum at 2.4GHz, and backward compatibility with IEEE 802.11b devices, and WEP
encryption for security.
DDNS (Dynamic Domain Name System) - The capability of assigning a fixed host and domain
name to a dynamic Internet IP Address.
DHCP (Dynamic Host Configuration Protocol) - A protocol that automatically configure the
TCP/IP parameters for the all the PC(s) that are connected to a DHCP server.
DMZ (Demilitarized Zone) - A Demilitarized Zone allows one local host to be exposed to the
Internet for a special-purpose service such as Internet gaming or videoconferencing.
DNS (Domain Name System) – An Internet Service that translates the names of websites into
IP addresses.
Domain Name - A descriptive name for an address or group of addresses on the Internet.
DoS (Denial of Service) - A hacker attack designed to prevent your computer or network from
operating or communicating.
DSL (Digital Subscriber Line) - A technology that allows data to be sent or received over existing
traditional phone lines.
ISP (Internet Service Provider) - A company that provides access to the Internet.
MTU (Maximum Transmission Unit) - The size in bytes of the largest packet that can be
transmitted.
NAT (Network Address Translation) - NAT technology translates IP addresses of a local area
network to a different IP address for the Internet.
PPPoE (Point to Point Protocol over Ethernet) - PPPoE is a protocol for connecting remote
hosts to the Internet over an always-on connection by simulating a dial-up connection.
SSID - A Service Set Identification is a thirty-two character (maximum) alphanumeric key
identifying a wireless local area network. For the wireless devices in a network to communicate
with each other, all devices must be configured with the same SSID. This is typically the
configuration parameter for a wireless PC card. It corresponds to the ESSID in the wireless
Access Point and to the wireless network name.
WEP (Wired Equivalent Privacy) - A data privacy mechanism based on a 64-bit or 128-bit or
152-bit shared key algorithm, as described in the IEEE 802.11 standard.
Wi-Fi - is a trademark of the Wi-Fi Alliance, founded in 1999 as Wireless Internet Compatibility
Alliance (WICA), comprising more than 300 companies, whose products are certified by the
Wi-Fi Alliance, based on the IEEE 802.11 standards (also called Wireless LAN (WLAN) and
Wi-Fi). This certification warrants interoperability between different wireless devices.
WISP - Wireless Internet Service Providers (WISPs) are Internet service providers with networks
built around wireless networking. The technology used ranges from commonplace Wi-Fi mesh
networking or proprietary equipment designed to operate over open 900MHz, 2.4GHz, 4.9, 5.2,
5.4, and 5.8GHz bands or licensed frequencies in the UHF or MMDS bands.
WLAN (Wireless Local Area Network) - A group of computers and associated devices
communicate with each other wirelessly, which network serving users are limited in a local area.
80
 Loading...