

Page 1

Bluetooth® Headset & Intercom
for Scooters and Motorcycles
User's Guide
www.nexx-helmets.com
Page 2

Partnership with Sena Technologies, Inc
Sena Technologies, Inc reserves the right to make any changes and improvements to its product without providing prior notice.
Sena™ is a trademark of Sena Technologies, Inc. or its subsidiaries in the USA and other countries. 20S
™
, PRISM™, Snowtalk™, SX.COM 2™, SMH10™,
SMH5™, SMH5-FM™, SPH10™, SPH10H-FM™, SMH10R™, SPH10S™, SPH10H™, SR10™, SR10i™, SMH10™, EXPAND™, Bluetooth Pack for GoPro® are
trademarks of Sena Technologies, Inc. or its subsidiaries. These trademarks may not be used without the express permission of Sena.
GoPro® is a registered tradmeark of Woodman Labs of San Mateo, California. Sena Technologies Inc. (“Sena”) is not afliated with Woodman Labs. The
Sena Bluetooth Pack for GoPro® is an aftermarket accessory specially designed and manufactured by Sena Technologies, Inc. for the GoPro® Hero3
and Hero4 allowing for Bluetooth capabilities.
The Bluetooth® word mark and logos are owned by the Bluetooth SIG, Inc. and any use of such marks by Sena is under license. iPhone, iPod touch are
registered trademarks of Apple Inc. Zumo™ is a trademark of Garmin Ltd. or its subsidiaries. TomTom™ is the trademark or registered trademark owned
by TomTom International B.V. Other trademarks and tradenames are those of their respective owners.
Page 3

SX.COM 2
CONTENTS
1. INTRODUCTION .................................................................................4
2. PACKAGE CONTENTS ........................................................................5
3. GETTING STARTED .............................................................................6
Installing the SX.COM 2 ............................................................................... 6
Powering On ................................................................................................. 8
Powering Off ................................................................................................. 8
Charging the SX.COM 2 ............................................................................... 8
Checking Battery Level ................................................................................ 9
Adjusting the Volume Level ........................................................................10
Function Priority .......................................................................................... 10
Fault Reset .................................................................................................. 10
4. OPERATION QUICK REFERENCE ....................................................11
5. PAIRING AND USING THE SX.COM 2 WITH BLUETOOTH DEVICES .13
Mobile Phone Pairing ................................................................................. 13
Multipoint Mobile Phones Pairing ............................................................... 13
Bluetooth Stereo Device Pairing .................................................................14
Bluetooth GPS Navigation Pairing .............................................................. 14
Mobile Phone Call Making and Answering ................................................ 17
Stereo Music ...............................................................................................17
6. INTERCOM CONVERSATION ...........................................................18
Pairing with Other SX.COM 2 Headsets for Intercom Conversation ..........18
Starting and Ending Intercom Conversation .............................................. 18
Intercom and Mobile Phone Call ................................................................ 18
Intercom Failure .......................................................................................... 19
Intercom Reconnection .............................................................................. 19
7. SX.COM 2 CONFIGURATION SETTING ...........................................19
Enabling/Disabling Voice Activated Phone Answering ..............................20
Enabling/Disabling Voice Prompts .............................................................20
Delete All Bluetooth Pairing Information ..................................................... 20
Reset to Factory Default Setting ................................................................. 21
Exit Voice Conguration Menu ...................................................................21
8. FIRMWARE UPGRADE ......................................................................22
BATTERY INFORMATION .........................................................................23
MAINTENANCE AND CARE ......................................................................23
DISPOSAL ..................................................................................................24
CERTIFICATION AND SAFETY APPROVALS ..........................................24
FCC Compliance Statement ....................................................................... 24
FCC RF Exposure Statement ......................................................................25
FCC Caution ............................................................................................... 25
CE Declaration of Conformity ..................................................................... 25
Industry Canada Statement ....................................................................... 25
Bluetooth License ....................................................................................... 25
WAIVER AND GENERAL RELEASE .........................................................26
Two-year Limited Warranty ......................................................................... 27
Limitation of Liability ................................................................................... 28
Return for Full Refund ................................................................................ 28
WARNING ..................................................................................................28
Page 4
4
SX.COM 2
1. INTRODUCTION
Thank you for choosing the NEXX SX.COM 2, Bluetooth Headset and
Intercom for Scooters and Motorcycles. With the SX.COM 2, you can
call handsfree on your Bluetooth mobile phone, listen to stereo music
or GPS navigation voice instructions via Bluetooth, and have intercom
conversations in full duplex with a passenger or other riders.
The SX.COM 2 is compliant with the Bluetooth specication 3.0
supporting the following proles: Headset Prole, Hands-Free Prole
(HFP), Advanced Audio Distribution Prole (A2DP), and Audio Video
Remote Control Prole (AVRCP). Please conrm compatibility with other
devices with the manufacturers.
Please read this user guide carefully before using the headset. Also visit
www.nexx-helmets.com for the latest version of the user guide and for
additional information.
The SX.COM 2 includes the following features:
• Bluetooth handsfree for Bluetooth mobile phones
• Bluetooth stereo headset for Bluetooth stereo devices such as MP3
players
• Bluetooth stereo headset for Bluetooth GPS navigations
• Bluetooth intercom up to 200 meters (220 yards)*
• Easy two-button operation
• Installation friendly unibody design
• Firmware upgradeable
Key Specications:
• Bluetooth 3.0
• Supporting proles: Headset Prole, Hands-Free Prole (HFP),
Advanced Audio Distribution Prole (A2DP), Audio Video Remote
Control Prole (AVRCP)
* in open terrain
Page 5
5
English
SX.COM 2
2. PACKAGE CONTENTS
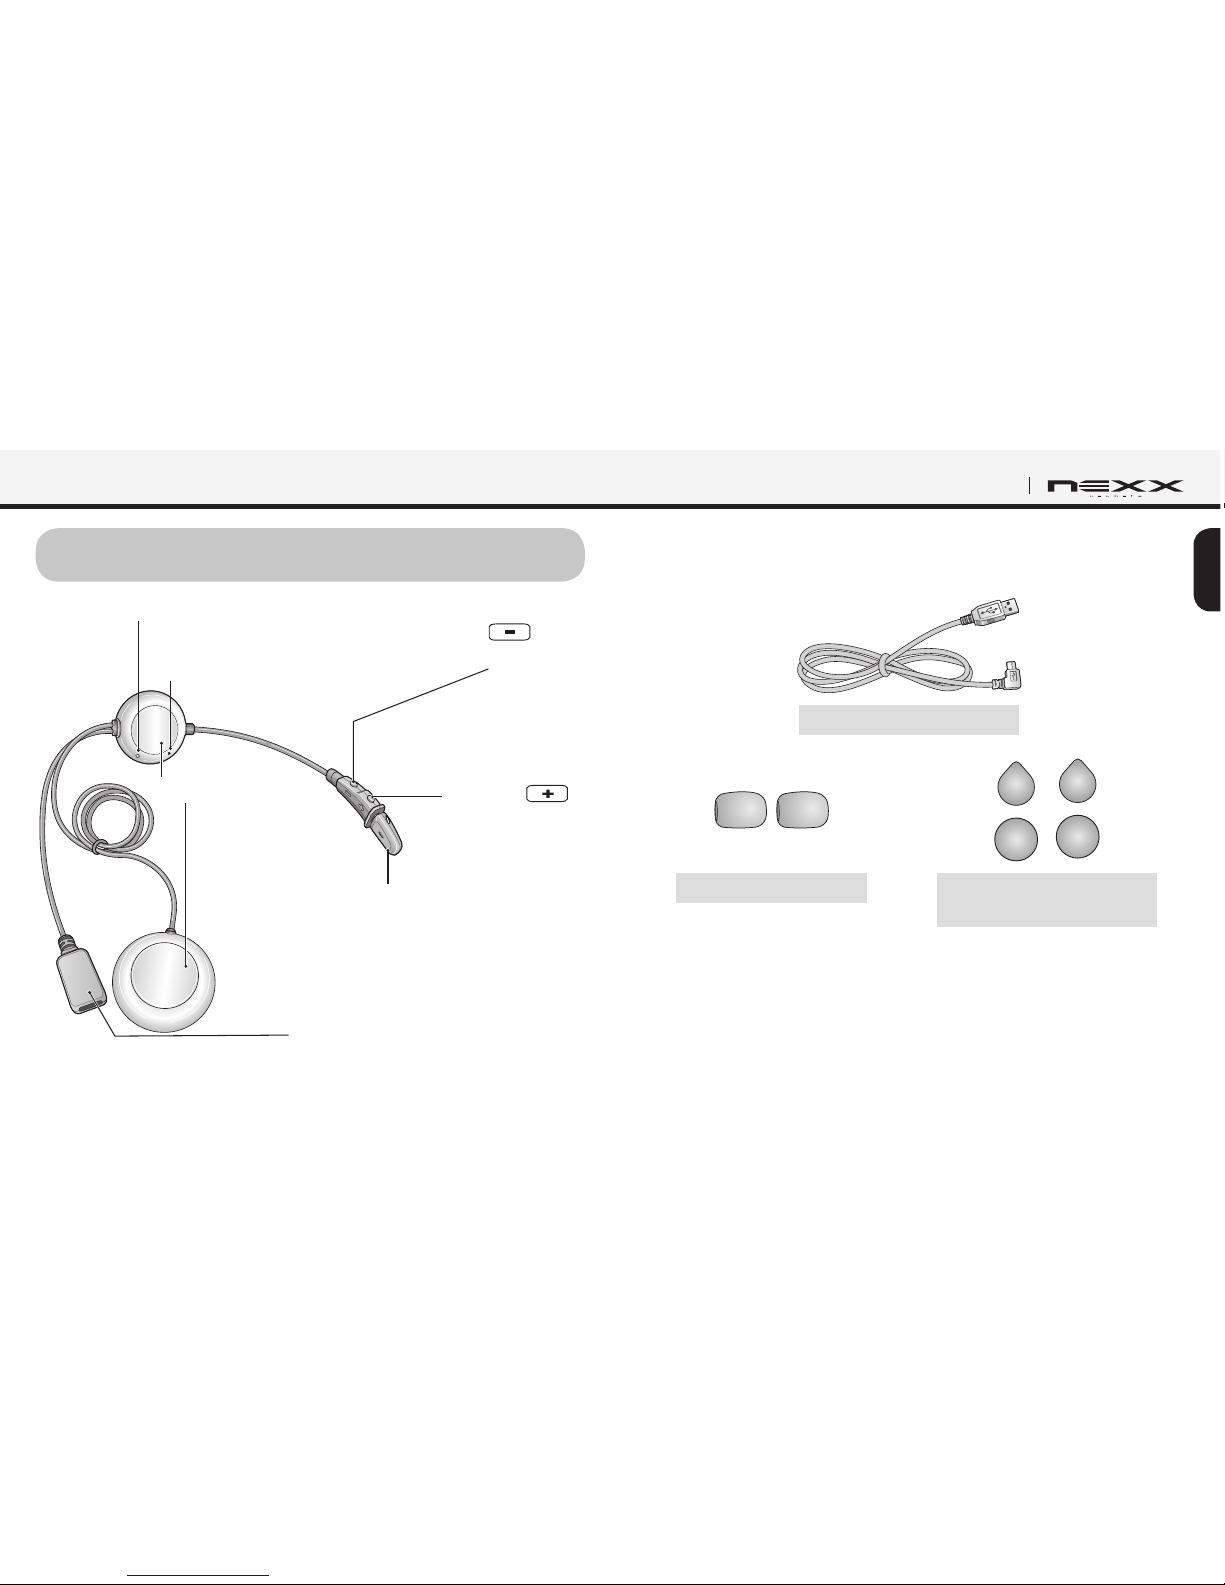
Status LED
Speakers
Microphone
(–) Button
(Intercom)
(+) Button
(Phone, Music)
Pin-hole
Reset Button
DC Power Charging &
Firmware Upgrade Port
USB Power & Data Cable
Microphone Sponges
Hook and Loop Fasteners
for Speakers
Page 6
6
SX.COM 2
3. GETTING STARTED
Installing the SX.COM 2 on Your Helmet
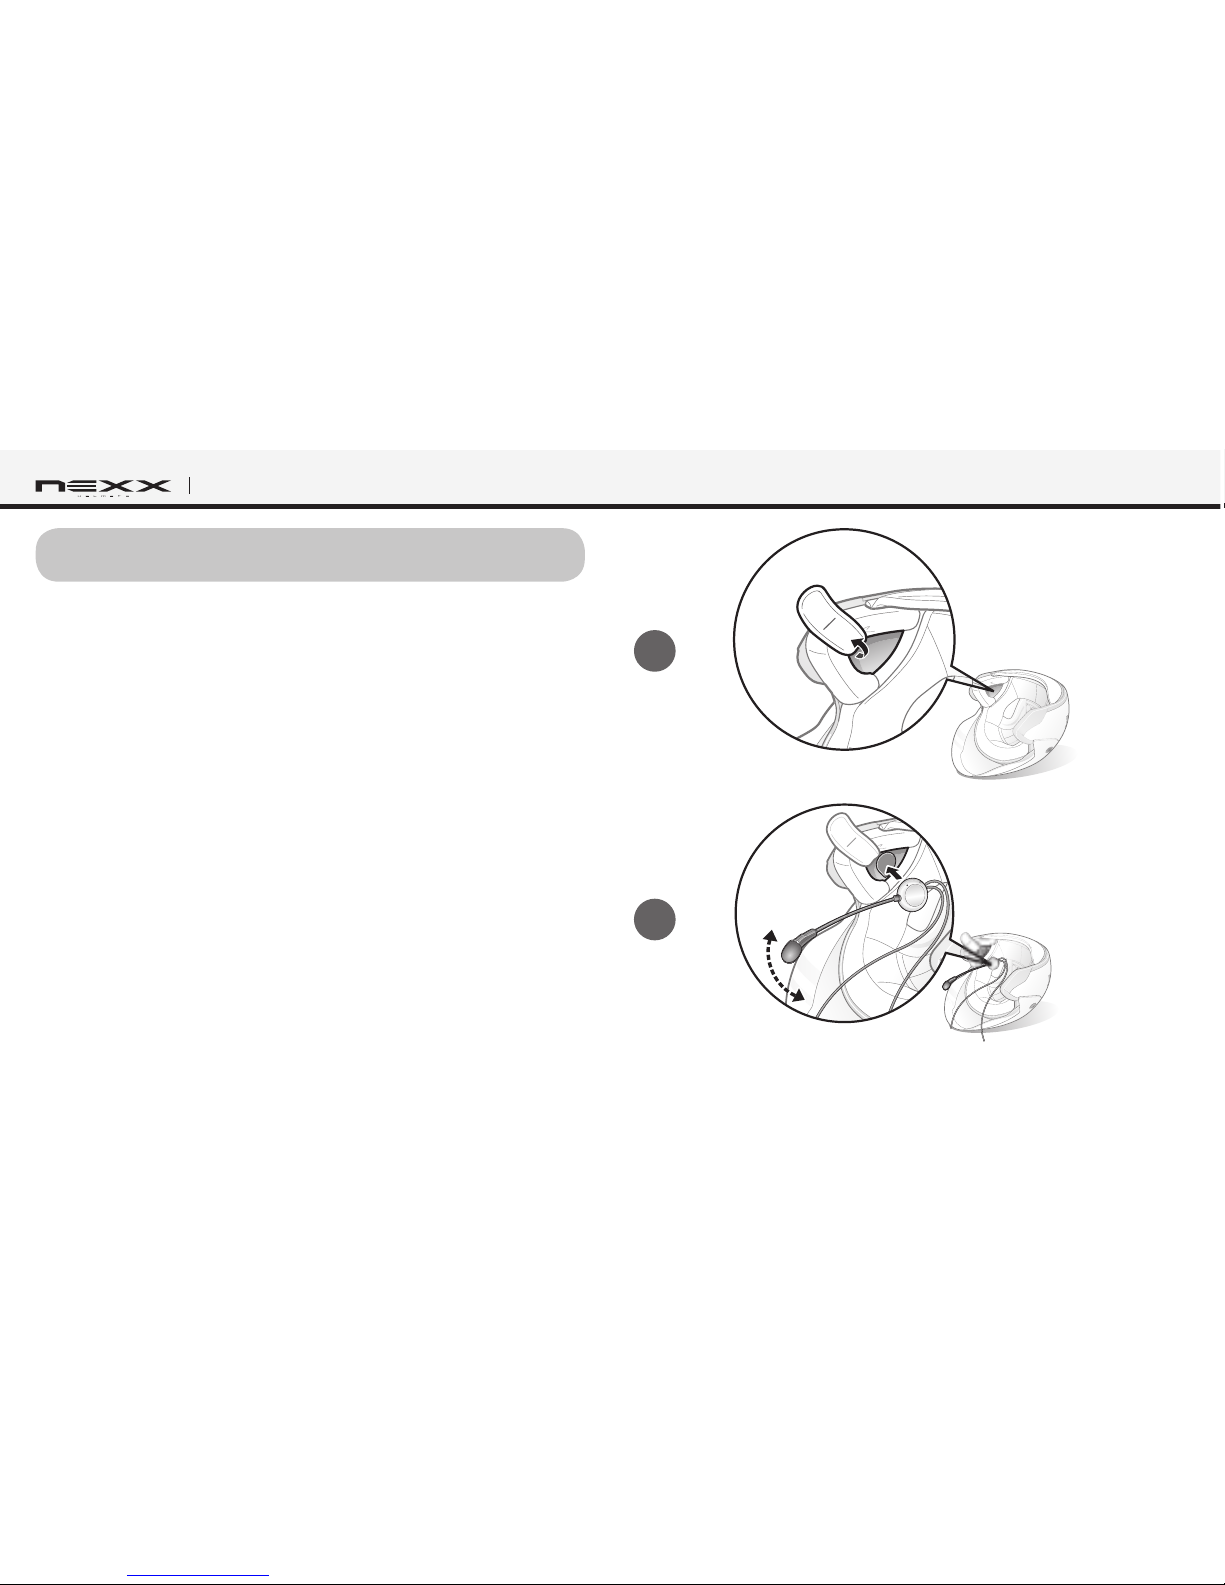
1.Peel off the hook fasteners for the speakers and attach them on the
back sides of the speakers.
2. Attach the loop fasteners for the speakers in the deep ear pockets of
your helmet.
1
2
Page 7

7
English
SX.COM 2
3
4
3. Place the speakers in the helmet along with the hook and loop
fasteners, centered to your ear.
4. Locate the microphone as closely as possible to your mouth when
wearing the helmet.
5. Hide the wire under the helmet padding after the installation
5
Page 8

8
SX.COM 2
Charging the SX.COM 2
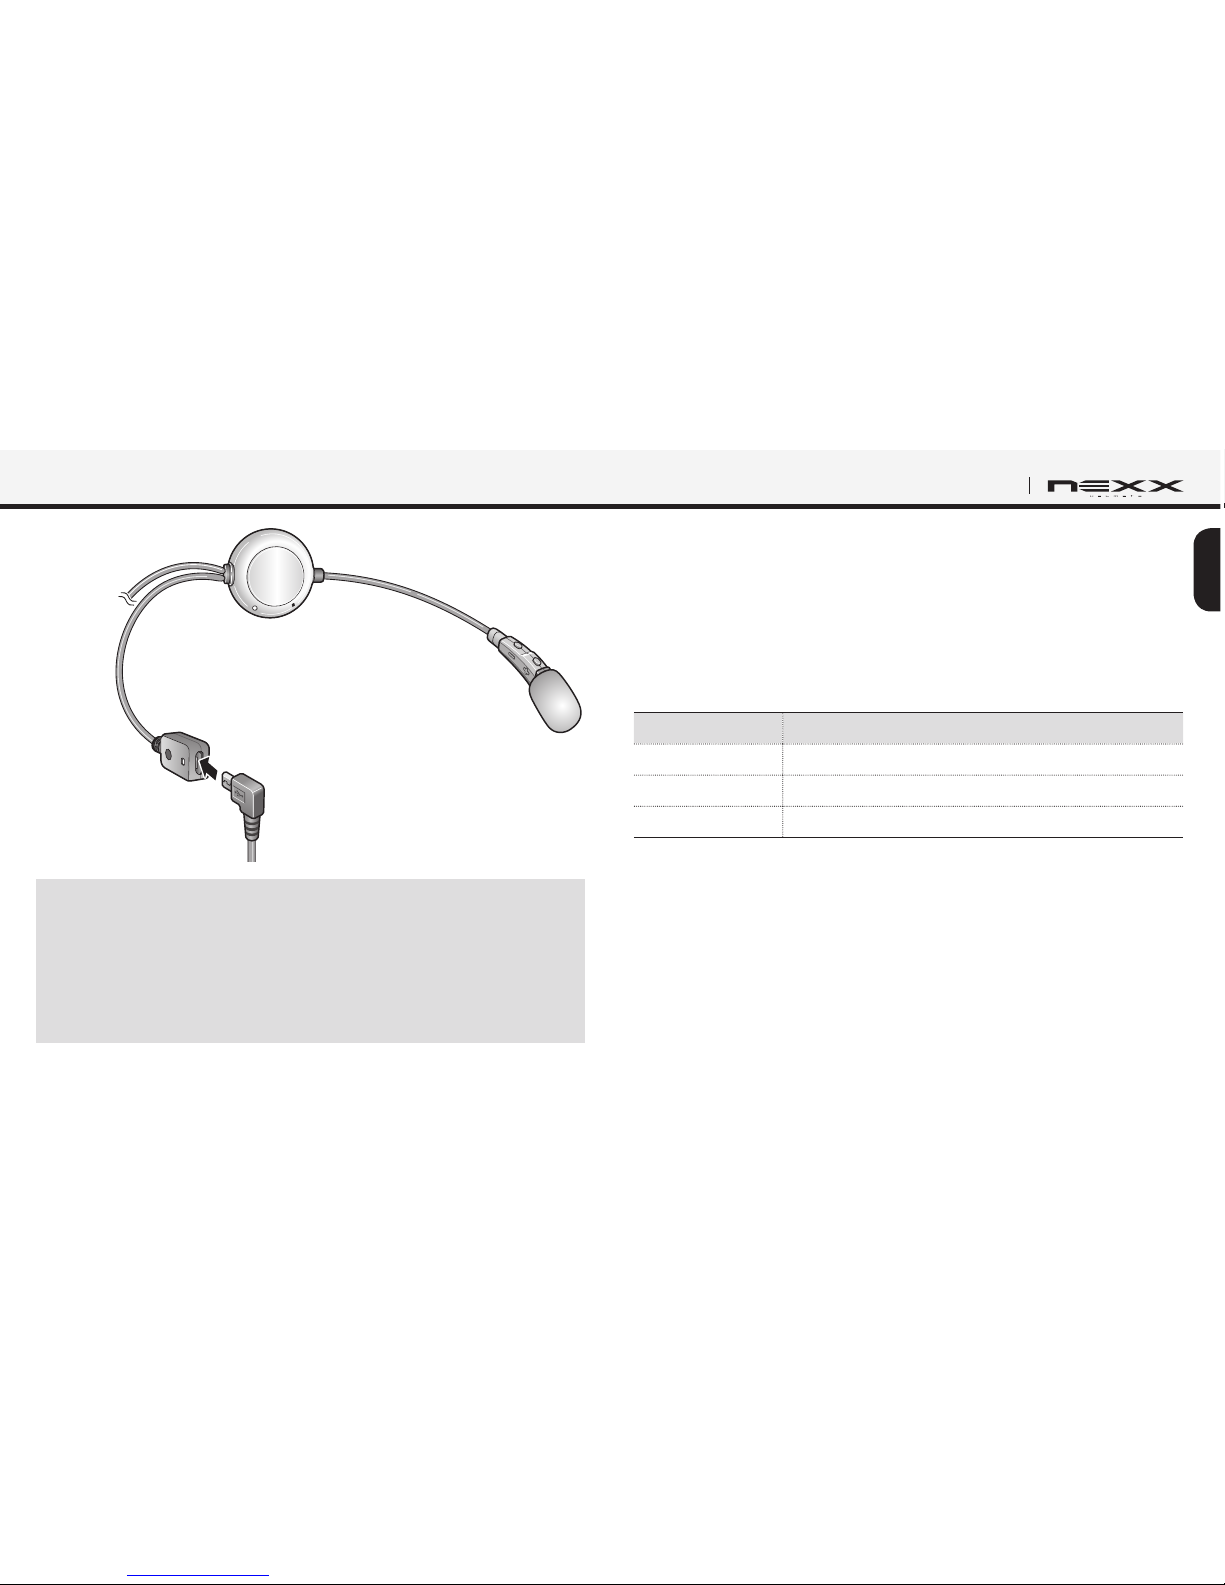
You can charge the SX.COM 2 by connecting the supplied USB power &
data cable into a computer USB port or USB wall charger. You can use
any standard micro-USB cable to charge the SX.COM 2. The LED turns
red while charging, and turns blue when the headset is fully charged. It
takes about 2.5 hours to fully charge.
Note:
Please make sure to take off your SX.COM 2-installed helmet while charging.
Powering On
Press and hold the (+) Button and the (–) Button at the same time for 1
second to power on. The blue LED turns on and you will hear ascending
beeps and “Hello”.
Powering Off
Press the (+) Button and the (–) Button at the same time. The red LED
turns on for about 2 seconds until it turns off completely and you will hear
“Goodbye” and descending beeps.
Page 9
9
English
SX.COM 2
Note:
1. The USB power & data cable is also used for firmware upgrade
of the SX.COM 2.
2. The USB wall charger is not included in the package. Any 3rd party USB
charger can be used with Sena products if the charger is approved by either
FCC, CE, IC, or other locally approved agencies that Sena accepts. Please
contact Sena regarding locally approved agencies Sena accepts.
Checking Battery Level
You can check the battery level in two different ways when the headset
is powering on.
LED Indicator
When the headset is powering on, the red LED ashes rapidly indicating
the battery level.
LED Status
4 ashes High, 70~100%
3 ashes Medium, 30~70%
2 ashes Low, 0~30%
Voice Prompt Indicator
When you power on the headset, keep pressing and holding the (+)
Button and (–) Button simultaneously for about 3 seconds until you hear
three high tone beeps. Then you will hear a voice prompt indicating the
battery level. However, if you release the buttons as soon as the headset
turns on, you will not hear the voice prompt for the battery level.
Page 10

10
SX.COM 2
Low Battery Warning
When the battery is low, the blinking blue LED in stand-by mode turns to
red and you will hear mid-tone triple beeps and a voice prompt saying
“Low battery”.
Adjusting the Volume Level
You can easily adjust the volume by pressing the (+) Button or the
(–) Button. You will hear a beep when the volume reaches maximum
or minimum level. The volume is set and maintained independently at
different levels for each audio source even when you turn off and on
the headset. For example, once you set the volume for mobile phone
handsfree, it will not change even if you adjust the volume when you
hear Bluetooth MP3 music. So you can always maintain the preferred
optimum volume level for each audio source.
Function Priority
The SX.COM 2 operates in the following order of priority:
(Highest) Mobile Phone
Intercom
(Lowest) Bluetooth Stereo Music
A lower priority function is always interrupted by a higher priority function.
For example, stereo music is interrupted by an intercom call, and intercom
conversation is interrupted by an incoming mobile phone call.
Fault Reset
When the SX.COM 2 is not working properly or is in faulty status for any
reason, you may reset by pushing the pin-hole reset button on the left
speaker unit. Insert a paper clip into the reset pin-hole and press and
hold the reset button for a second with light pressure. The SX.COM 2 will
be switched off. Turn the system back on and try again. However, this will
not restore the headset to factory default settings.
Page 11
11
English
SX.COM 2
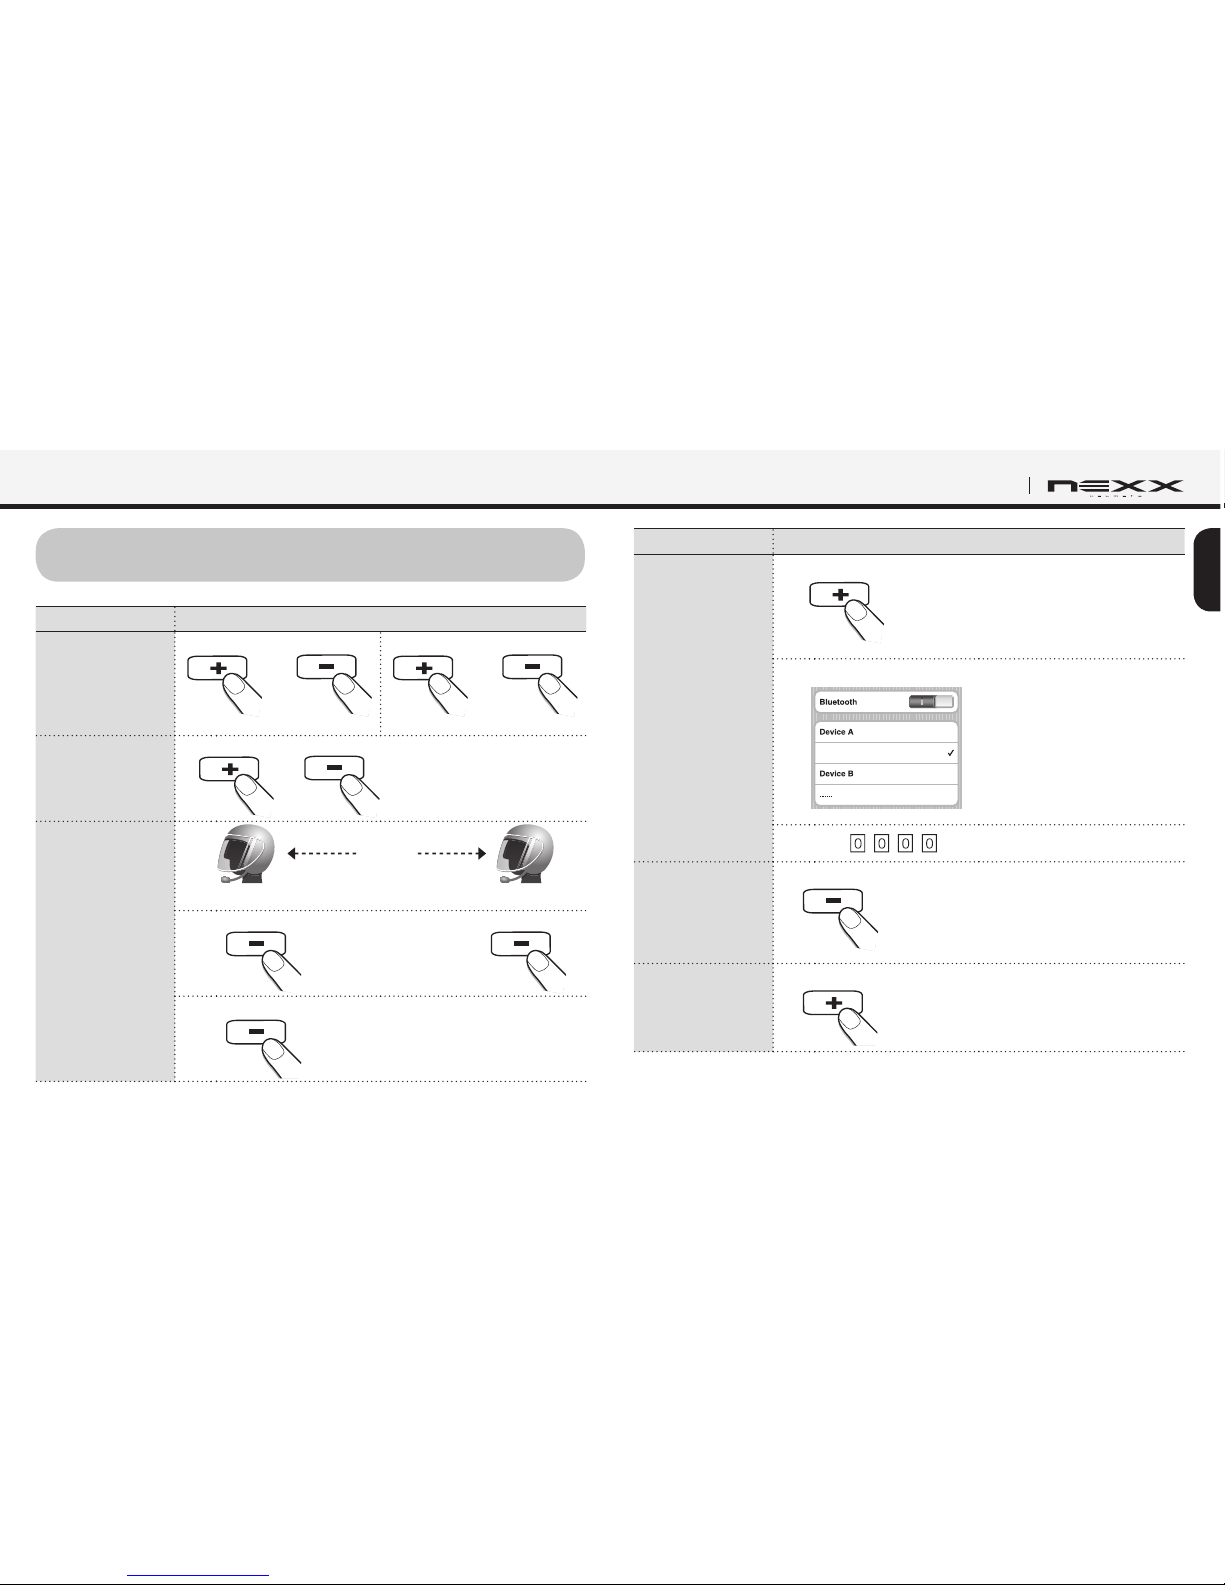
4. OPERATION QUICK REFERENCE
Function Operations
Power
On/Off
1 sec. 1 sec.
+
Power On
1 press 1 press
+
Power Off
Volume
Adjustment
1 press 1 press
or
Intercom
Pairing
pairing
A
B
1)
5 sec. 5 sec.
2)
1 sec.
Function Operations
Bluetooth
Pairing
(Phone, MP3,
GPS)
1)
Sena 3S v1.1
5 sec.
2)
Sena 3S v1.1
Select NEXX SX.COM 2
3)
Sena 3S v1.1
Enter PIN
Start & End
Intercom
Conversation
1 sec.
Conguration
10 sec.
Page 12
12
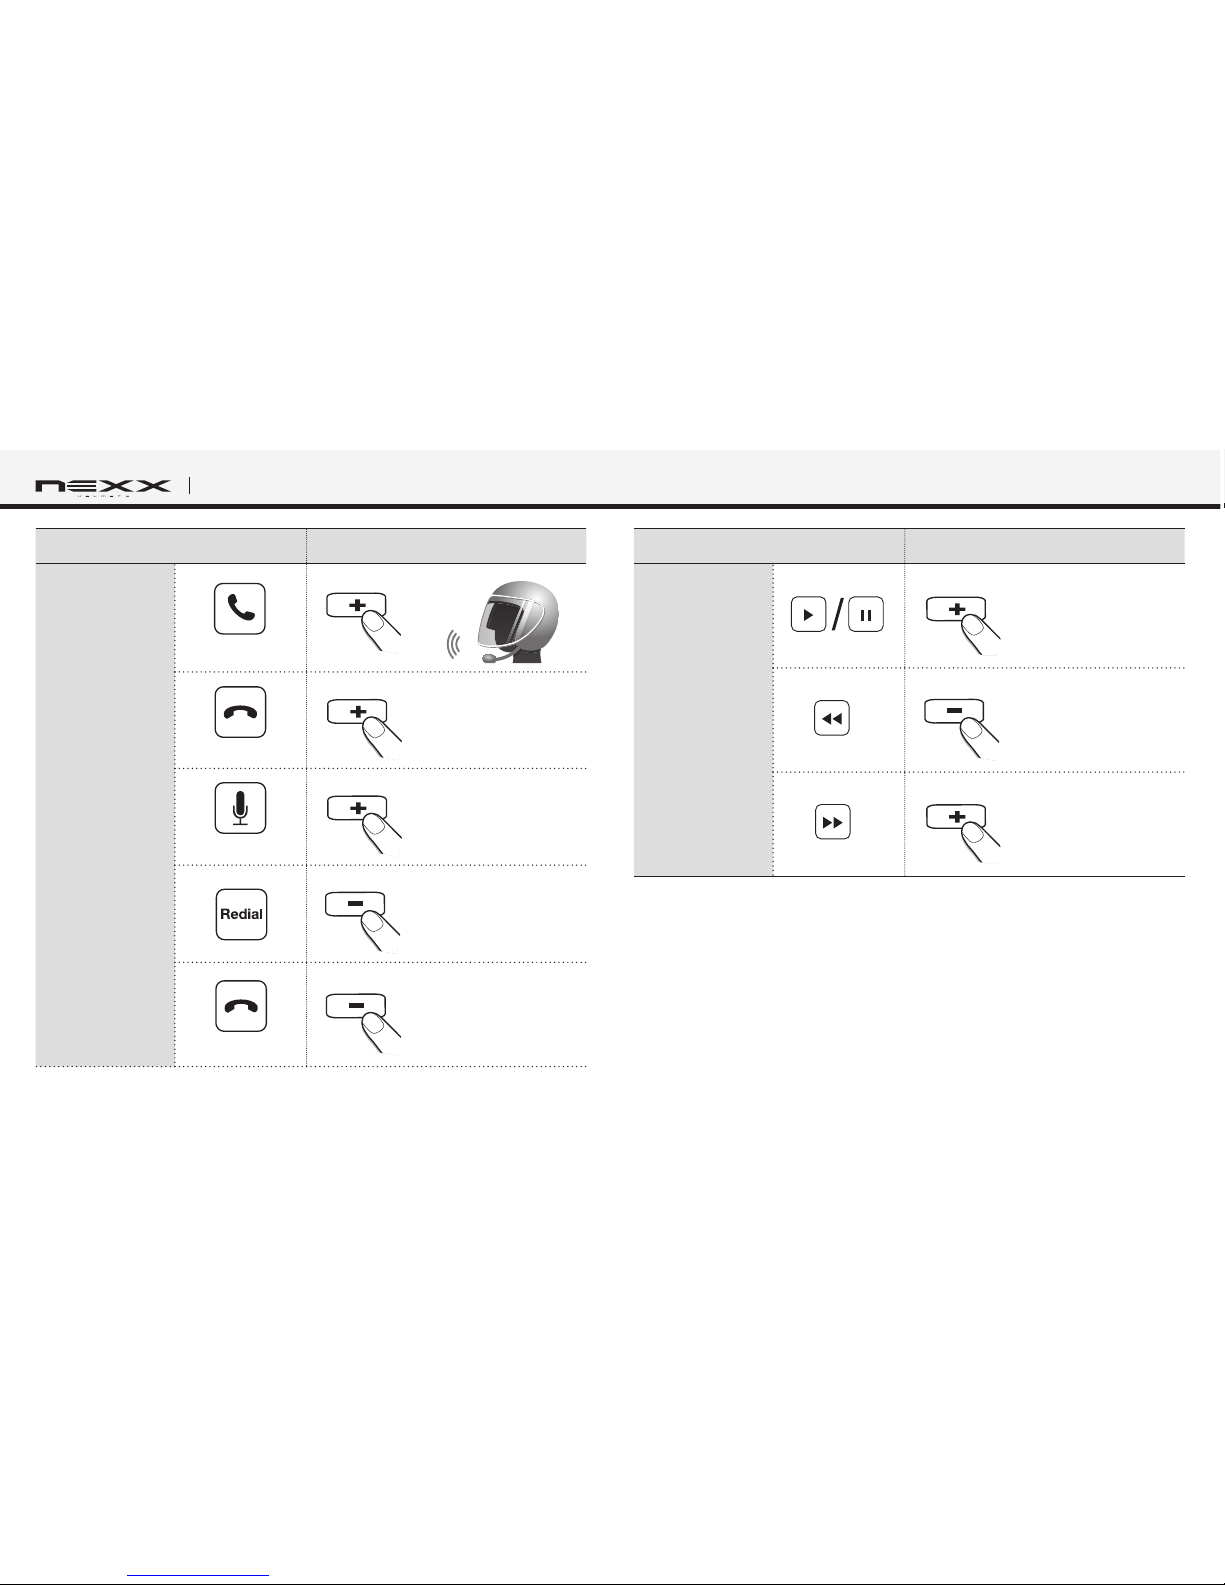
SX.COM 2
Function
Operations
Mobile
Phone
Answer
or
1 press
End
2 sec.
Voice Dial
*
3 sec.
*
3 sec.
Reject
2 sec.
Function
Operations
Music
1 sec.
2 sec.
2 sec.
*
You can use “Voice Dial” and “Redial” only in stand-by mode.
Page 13
13
English
SX.COM 2
5. PAIRING AND USING THE SX.COM 2 WITH
BLUETOOTH DEVICES
Mobile Phone Pairing
1 Turn on the SX.COM 2 and press and hold the (+) Button for 5
seconds until the LED ashes red and blue alternately and you hear
multiple beeps. You will hear a voice prompt saying “Phone pairing”.
2. Search for Bluetooth devices on your mobile phone. Select the NEXX
SX.COM 2 in the list of the devices detected on the mobile phone.
3. Enter 0000 for the PIN. Some mobile phones may not ask for the PIN.
4. The mobile phone conrms that pairing has completed and the
SX.COM 2 is ready to use. You will hear a voice prompt from the
SX.COM 2 saying “Your headset is paired”.
5. If the pairing process is not completed within three minutes, the
SX.COM 2 will return to stand-by mode.
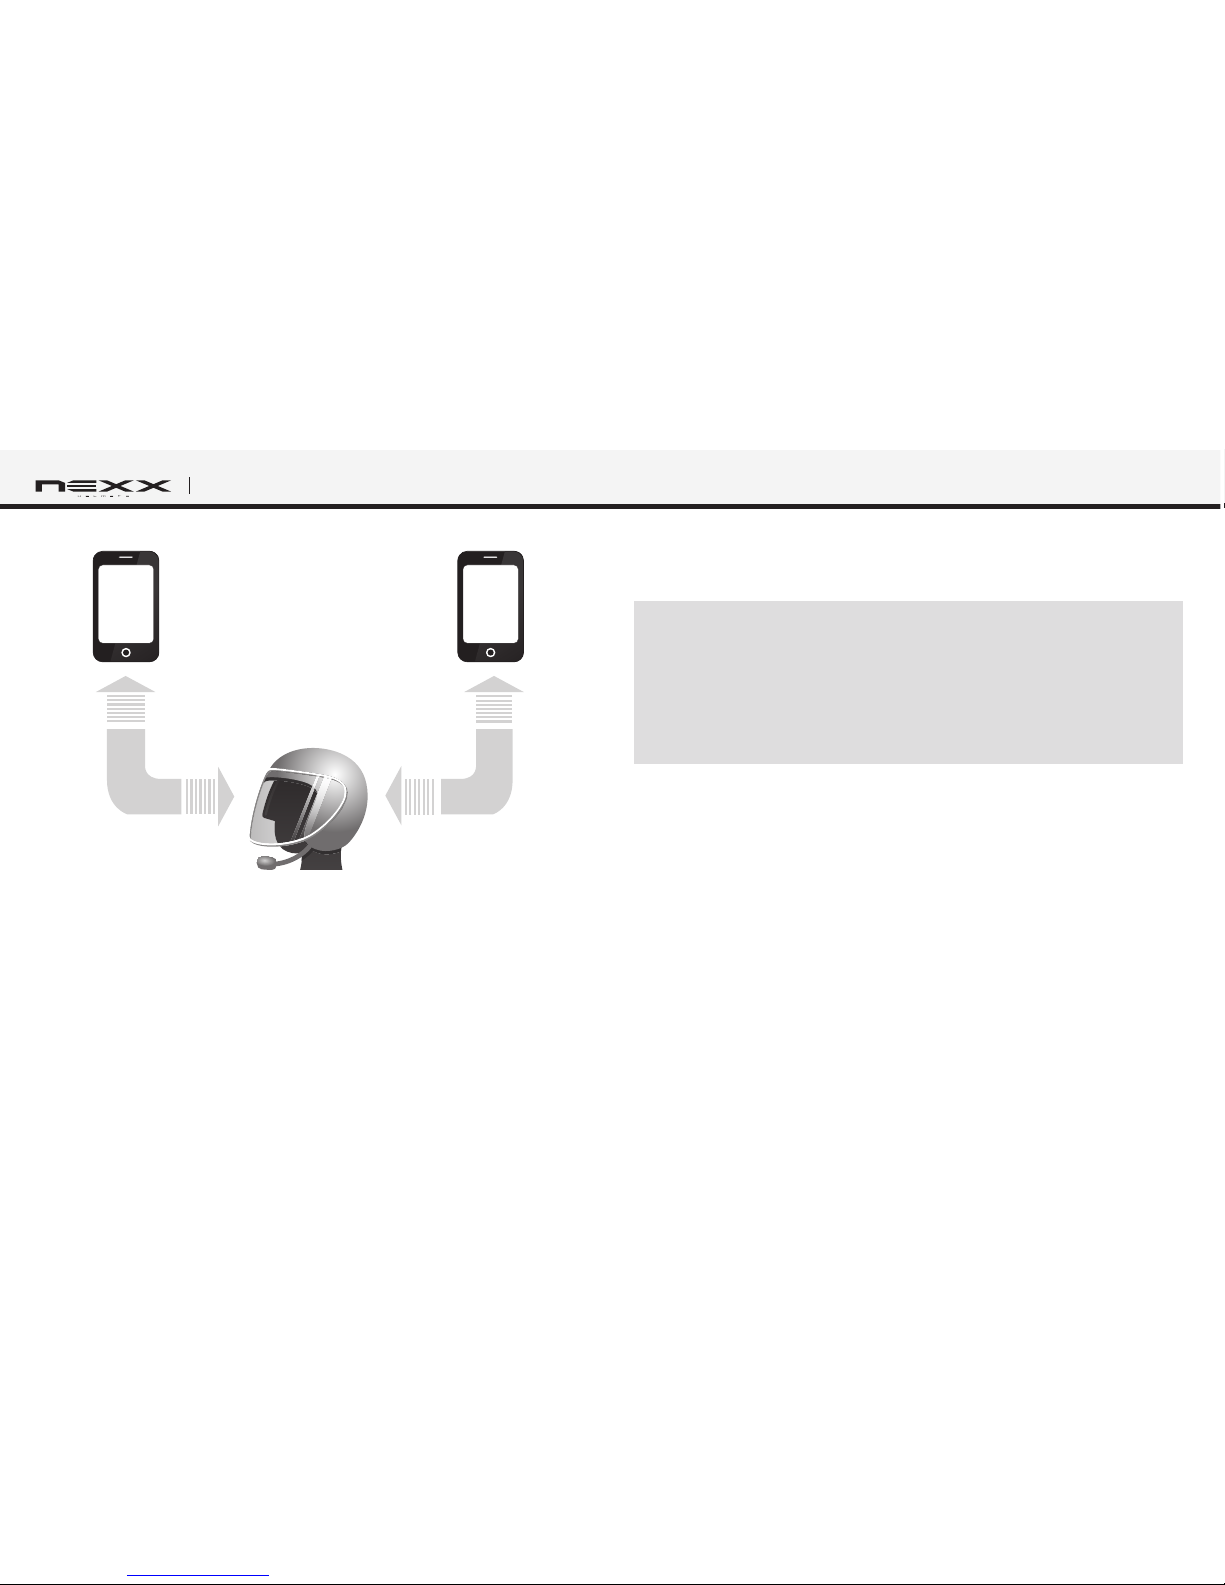
Multipoint Mobile Phones Pairing
You can simultaneously use two mobile phones which use the mobile
phone prole.
1. You can pair the rst mobile phone to the SX.COM 2 by following the
simple procedures in “Mobile Phone Pairing”.
2. To pair the second mobile phone, press and hold the (–) Button for
5 seconds until the red LED is rapidly ashing and you hear multiple
beeps.
3. Within 2 seconds, press and hold the (+) Button for 1 second, then
the LED turns to blue ashing and the beeps turn to high tone double
beeps. You will hear a voice prompt saying “Multipoint pairing”.
4. Search for Bluetooth devices on your mobile phone. Select the NEXX
SX.COM 2 in the list of the devices detected on the mobile phone.
5. Enter 0000 for the PIN. Some mobile phones may not ask for the PIN.
6. The mobile phone conrms that pairing has completed and the
SX.COM 2 is ready to use. You will hear a voice prompt from the
SX.COM 2 saying “Your headset is paired”.
Page 14
14
SX.COM 2
SX.COM 2
1st Mobile Phone 2nd Mobile Phone
Mobile Phone
Pairing
HFP
+
A2DP
HFP
Multipoint
Pairing
Multipoint Mobile Phones Pairing
Bluetooth Stereo Device Pairing
1. If the Bluetooth stereo device is integrated with the mobile phone
such as smartphones, you don’t need to pair the SX.COM 2 with it
separately. When the SX.COM 2 is paired with the mobile phone, it is
also paired as a stereo music device.
2. If you have a stand alone Bluetooth stereo device, follow the pairing
procedure separately. The procedure is the same as the procedure of
“Mobile Phone Pairing”.
Note:
1. If Bluetooth connection between the headset and a mobile phone is
disconnected, press and hold the (+) Button for 3 seconds to recover the
Bluetooth connection immediately.
2. If Bluetooth connection between the headset and a media player is
disconnected, press and hold the (+) Button for 1 second to recover the
Bluetooth connection and play.
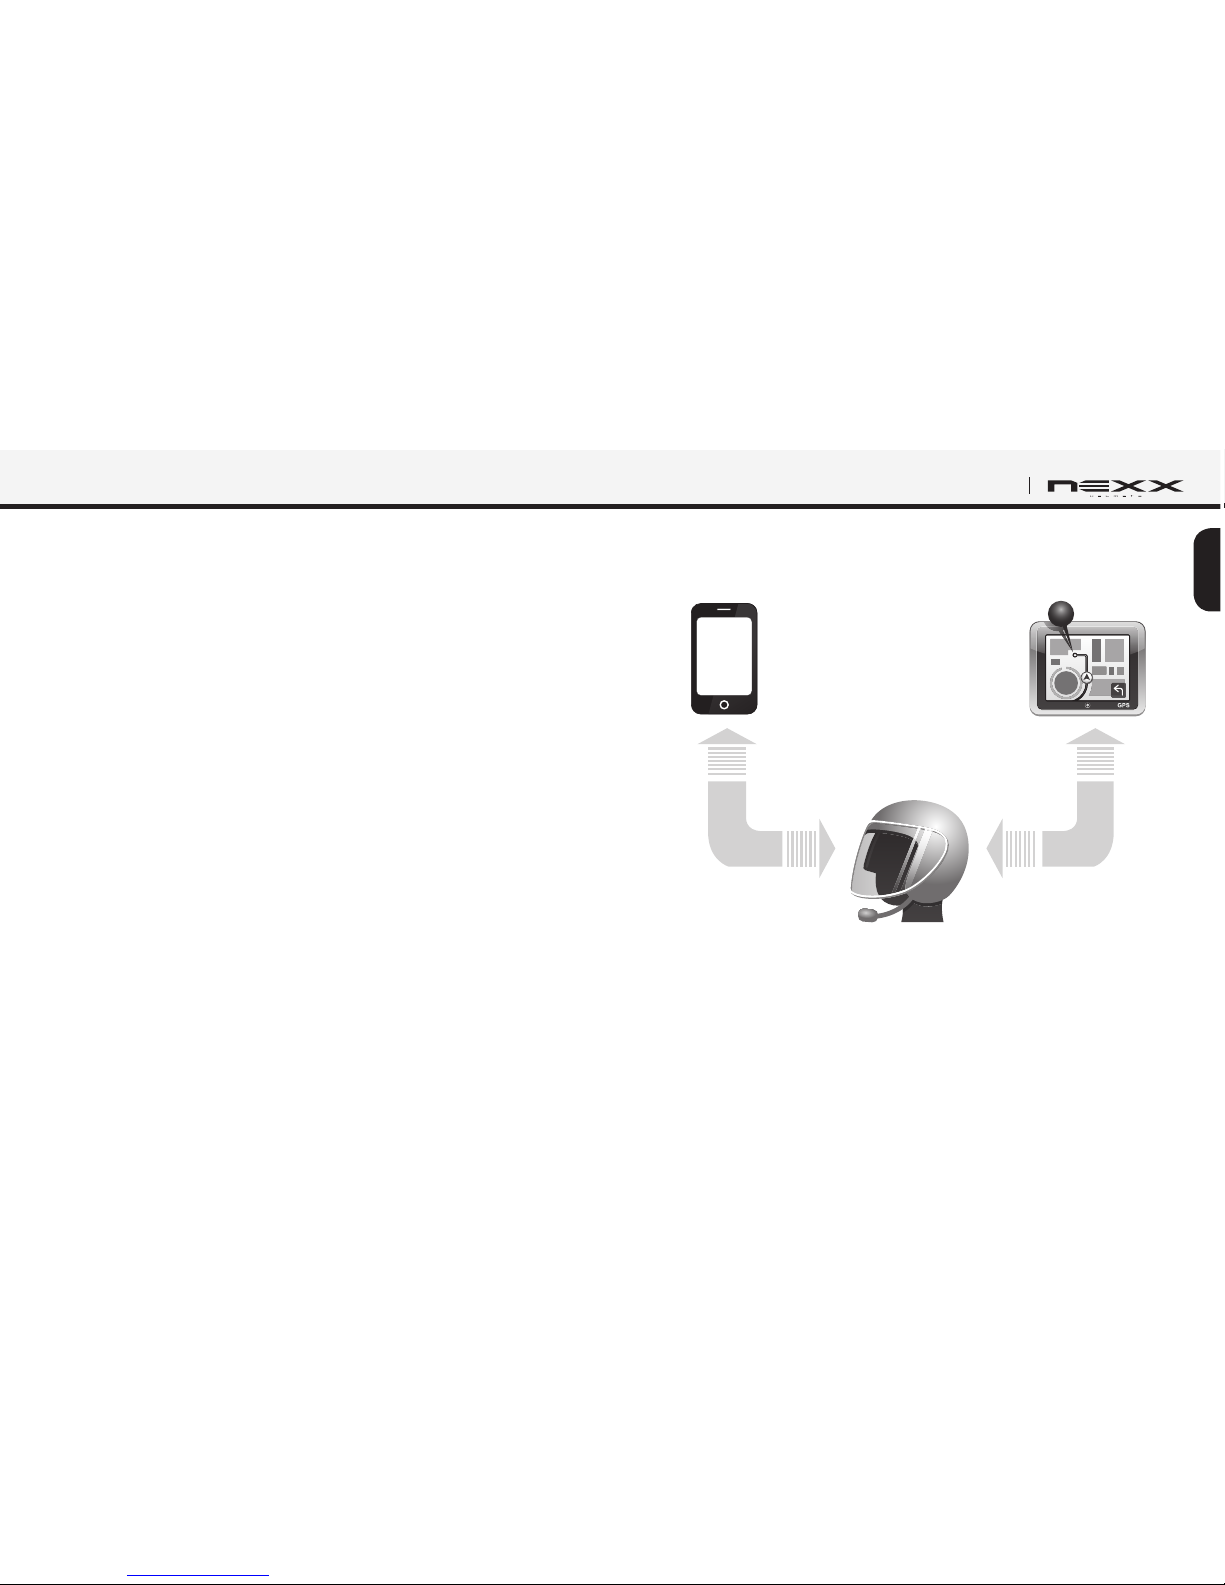
Bluetooth GPS Navigation Pairing
You can listen to voice instruction from Bluetooth GPS navigation. Some
GPS systems use mobile phone prole (HFP, Hands-Free Prole) and
others use stereo music prole (A2DP, Advanced Audio Distribution
Prole). Most motorcycle specic GPS systems use mobile phone
prole for turn-by-turn voice instruction. You can simultaneously use a
mobile phone and a GPS which uses mobile phone prole by one of the
following procedures.
Page 15
15
English
SX.COM 2
Multipoint GPS Pairing
If you use GPS only for turn-by-turn voice instructions, not for Bluetooth
stereo music streaming, multipoint pairing is recommended for the GPS
connection. Multipoint Bluetooth pairing allows the SX.COM 2 to connect
two HFP devices at the same time: mobile phone and GPS navigation.
Follow the steps below to pair the GPS using the multipoint pairing.
1. Turn on the headset and press and hold the (–) Button for 5 seconds
until the red LED is rapidly ashing and you hear multiple beeps.
2. Within 2 seconds, press and hold the (+) Button for 1 second, then
the LED turns to blue ashing and the beeps turn to high tone double
beeps. You will hear a voice prompt saying “Multipoint pairing”.
3. Search for Bluetooth devices on the GPS navigation screen. Select
the NEXX SX.COM 2 in the list of the devices detected on the GPS.
4. Enter 0000 for the PIN.
5. The GPS conrms that pairing has completed and the SX.COM 2 is
ready to use. You will hear a voice prompt from the SX.COM 2 saying
“Your headset is paired”.
6. If the pairing process is not completed within three minutes, the
SX.COM 2 will return to stand-by mode.
The pairing diagram for multipoint GPS pairing is shown in the gure
below.
GPS Navigation
SX.COM 2
Mobile Phone
Mobile Phone
Pairing
HFP
+
A2DP
HFP
Multipoint
Pairing
Multipoint GPS Pairing
Page 16

16
SX.COM 2
GPS Pairing as Mobile Phone
If GPS is not only used for turn-by-turn voice instructions but also is your
preferred Bluetooth stereo music source, you can pair the GPS to the
SX.COM 2 by following the simple procedures in “Mobile Phone Pairing”.
When you do this, the SX.COM 2 thinks the GPS is a mobile phone. But
the SX.COM 2 can directly pair an additional mobile phone.
Note:
You have to use a motorcycle specific GPS which transmits turn-by-turn
voice instruction to the headset by Bluetooth. Most automotive GPS systems
don’t have this feature.
GPS Navigation
Mobile Phone
SX.COM 2
HFP
HFP
+
A2DP
Multipoint
Pairing
Mobile Phone
Pairing
GPS Pairing as Mobile Phone
Page 17
17
English
SX.COM 2
Mobile Phone Call Making and Answering
1.
When you have an incoming call, simply press the (+) Button to answer
the call.
2. You can also answer the incoming call by loudly speaking any word
of your choice if Voice Activated Phone Answering, VOX phone
is
enabled. (Refer to “Enabling/Disabling Voice Activated Phone Answering”
for details.)
3. To end a call, press and hold the (+) Button for 2 seconds until you
hear a mid-tone single beep, or wait for the called person to end the
call.
4. To reject a call, press and hold the (–) Button for 2 seconds until you
hear a beep while the phone is ringing.
5. There are several ways to make a phone call:
• Enter numbers on your mobile phone keypad and make a call.
Then the call is automatically transferred to the headset.
• Press and hold the (+) Button for 3 seconds in stand-by mode
until you hear a high tone single beep to activate the voice dialing
of your mobile phone. For this, the voice dialing feature must be
available on the mobile phone. Refer to your mobile phone manual
for further instruction.
• To redial the last number, press and hold the (–) Button for 3
seconds in stand-by mode until you hear a high tone single beep.
You will hear a voice prompt saying “Last number redial”.
Note:
1. If you are using multipoint mobile phone connection and you have an
incoming call from the second phone during the call of the first phone, then
you may still receive the call from second phone. In this case, the call from
the first phone is on waiting mode. If you end a call, then it will automatically
guide you to the first phone call.
2. If you are using multipoint connection of mobile phone and GPS, you may not
listen to the GPS voice instruction during the phone call.
Stereo Music
You can listen to stereo music by Bluetooth wireless stereo. The
Bluetooth audio device must be paired with the SX.COM 2 by following
the
“Bluetooth Stereo Device Pairing” instructions. The SX.COM 2
supports
the Audio/Video Remote Control Prole (AVRCP), so if your Bluetooth
audio device also supports the AVRCP, you can use the SX.COM 2 to
remotely control music playback. So, you can not only adjust the volume
but also use the functions such as play, pause, track forward and track
backward.
• To adjust the volume, press the (+) Button or the (–) Button.
• To play or pause music, press and hold the (+) Button for 1 second
until you hear a double beep.
• To track forward or track back, press and hold the (+) Button or the (–)
Button for 2 seconds until you hear a double beep.
Page 18

18
SX.COM 2
6. INTERCOM CONVERSATION
Pairing with Other SX.COM 2 Headsets for
Intercom Conversation
The SX.COM 2 can be paired with another headset for Bluetooth intercom
conversation.
1. Turn on the two SX.COM 2 headsets (A and B) that you would like to
pair with each other.
2. Press and hold the (–) Button of the headset A and B for 5 seconds
until the red LEDs of both units start to ash rapidly. You will hear a
voice prompt saying “Intercom pairing”.
3. Simply press the (–) Button of either of the two headsets A or B (It
doesn’t matter that you choose A or B) and wait until the LEDs of
both headsets turn to blue and intercom connection is automatically
established. The two SX.COM 2 headsets A and B are paired with
each other for intercom conversation. If the pairing process is not
completed within one minute, the SX.COM 2 will return to stand-by
mode.
Starting and Ending Intercom Conversation
1. You can start an intercom conversation with your intercom friend by
pressing and holding the (–) Button for 1 second.
2. To terminate an intercom conversation, press and hold the (–) Button
for 1 second again.
Intercom and Mobile Phone Call
1. When you have an incoming mobile phone call during an intercom
conversation, you will hear a ring tone. You can choose whether to 1)
answer the mobile phone call and stop the intercom conversation, or
2) reject the phone call and stay on the intercom conversation.
• To answer the phone call and stop the intercom conversation, press
the (+) Button. When you hang up the phone call, the intercom will
automatically be recovered.
• To reject the phone call and stay on the intercom conversation,
press and hold the (–) Button for 2 seconds until you hear a beep.
Unlike other motorcycle Bluetooth headsets, this prevents a user from being
dropped out of an intercom conversation by an incoming mobile call.
2. When you have an incoming intercom call during a mobile phone call,
you will hear 4 high tone beeps, alerting you that there is an incoming
intercom call. You will also hear a voice prompt saying “Intercom
requested”. In this case, the intercom call does not override the
Page 19
19
English
SX.COM 2
mobile phone call because intercom has lower priority than mobile
call. You have to hang up the mobile phone call to make or receive an
intercom call.
Intercom Failure
When you try to start an intercom conversation with an intercom friend
who is already having a mobile phone call with another person, you will
hear a low tone double beep signifying a busy signal. You will also hear a
voice prompt saying “Intercom failed, try again later”. In this case, you
have to try again later. On the other hand, the intercom friend will hear
4 high tone beeps alerting them that there is an incoming intercom call.
Intercom Reconnection
If your intercom friend goes out of range while having an intercom
conversation, you may hear static noise and eventually the intercom
will be disconnected. In this case, the SX.COM 2 automatically tries to
reconnect the intercom every 8 seconds. You will hear high tone double
beeps until the intercom is reestablished. If you don’t want to make a
reconnection, press and hold the (–) Button for 1 second to stop the
attempt.
7. SX.COM 2 CONFIGURATION SETTING
You can set the conguration of the SX.COM 2 by the voice menu
instruction as below.
1. To enter into voice conguration menu, press and hold the (+) Button
for 10 seconds until the LED shows solid blue and you hear high tone
double beeps. You will hear a voice prompt saying “Conguration
menu”.
2. Press the (+) Button to navigate between menus. You will hear voice
prompts for each menu items as below.
3. You can enable or disable the feature or execute the command by
pressing the (–) Button.
4. If any button is not pressed within 10 seconds, the SX.COM 2 will exit
the conguration and goes back to standby.
5. If you want to exit the conguration immediately, press and hold the
(+) Button until you hear a voice prompt, “Exit conguration”, and
press the (–) Button.
Page 20
20
SX.COM 2
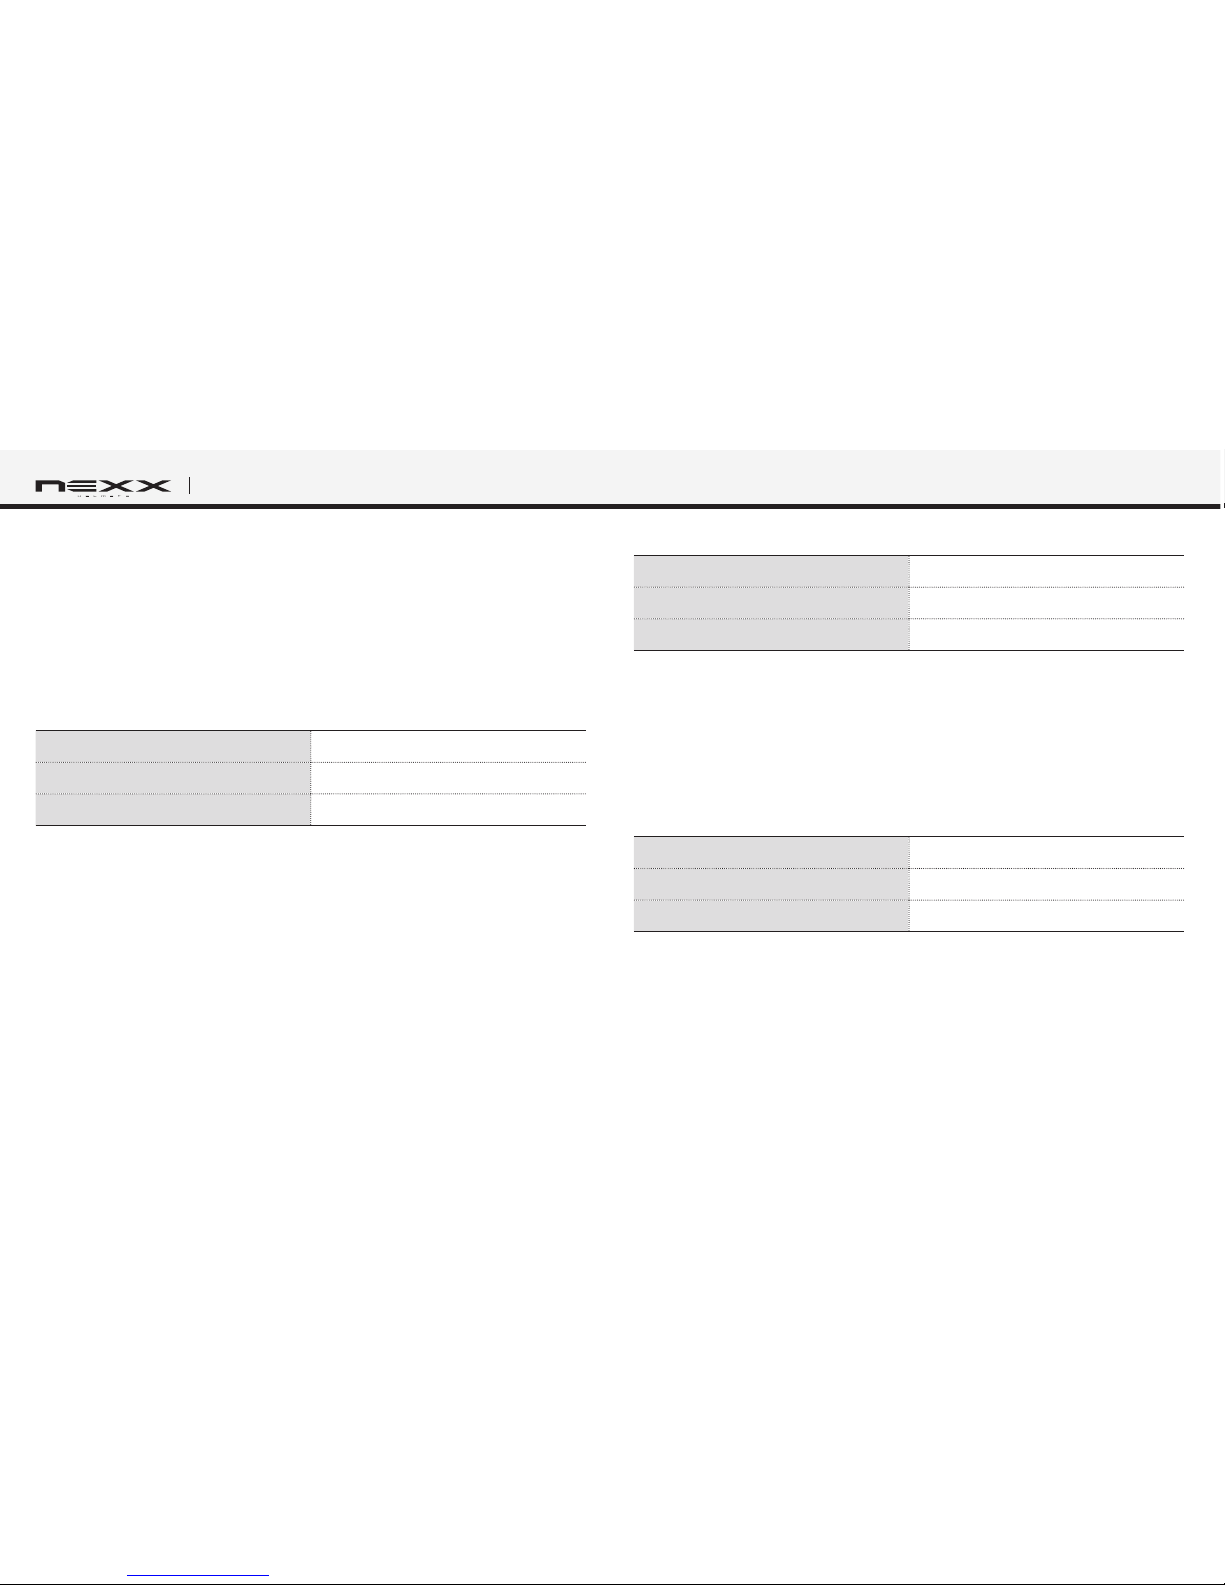
The voice prompts for each menu item are as below:
(1) VOX phone
(2) Voice prompt
(3) Delete all pairings
(4) Factory reset
(5) Exit conguration
Enabling/Disabling Voice Activated Phone Answering
Voice Prompt “VOX phone”
Factory Default
Enable
Enable / Disable
Press the (–) Button
If this feature is enabled, you can answer incoming calls by simply
saying a word loudly enough, unless you are connected to intercom. For
example, when you hear a series of beeps for an incoming call, you can
answer the phone by saying “Hello” or any other word loudly. However,
the phone VOX feature does not work if you are connected to intercom.
This is enabled from the factory but you can disable this. If this mode is
disabled, you have to press the (+) Button to answer an incoming call.
Enabling/Disabling Voice Prompts
Voice Prompt “Voice prompt”
Factory Default
Enable
Enable / Disable
Press the (–) Button
You can disable voice prompts by conguration setting, but the following
voice prompts are always on.
- Voice prompts for conguration setting menu
- Voice prompts for battery level Indicator
- Voice prompts for factory reset
Delete All Bluetooth Pairing Information
Voice Prompt “Delete all pairings”
Factory Default
N/A
Execute
Press the (–) Button
To delete all Bluetooth pairing information of the SX.COM 2, press and
hold the (+) Button until you hear a voice prompt, “Delete all pairings”,
and press the (–) Button to conrm.
Page 21
21
English
SX.COM 2
Reset to Factory Default Setting
Voice Prompt “Factory reset”
Factory Default
N/A
Execute
Press the (–) Button
To restore factory default settings on the SX.COM 2, press and hold
the (+) Button until you hear a voice prompt, “Factory reset”. Press the
(–) Button to conrm. The SX.COM 2 powers off with a voice prompt,
“Headset reset, goodbye”.
Exit Voice Conguration Menu
Voice Prompt “Exit conguration”
Factory Default
N/A
Execute
Press the (–) Button
To exit voice conguration menu and get back to stand-by mode,
press and hold the (+) Button until you hear a voice prompt, “Exit
conguration”. Press the (–) Button to conrm.
Press (+) Button Press (–) Button
“Vox phone”
Enable / disable
“Voice prompt”
Enable / disable
“Delete all pairings”
Execute
“Factory reset”
Execute
“Exit conguration”
Execute
Voice Conguration Menu & Button Operations
Page 22

22
SX.COM 2
8. FIRMWARE UPGRADE
The SX.COM 2 supports rmware upgrade function. Please visit Nexxpro,
S.A. Bluetooth web site at www.nexx-helmets.com to check the latest
software downloads.
Page 23
23
English
SX.COM 2
BATTERY INFORMATION
The product has an internal, non-removable, rechargeable battery. Do
not attempt to remove the battery from the device as you may damage
the device. The battery can be charged and discharged hundreds of
times, but it will eventually wear out. Recharge the battery only with Sena
approved chargers designated for this device. Use of an unapproved
charger may present a risk of re, explosion, leakage, or other hazard.
Always try to keep the battery between 15ºC and 25ºC (59ºF and 77ºF).
Extreme temperatures reduce the capacity and lifetime of the battery.
A device with a hot or cold battery may not work temporarily. Battery
performance is particularly limited in temperatures well below freezing.
Do not dispose of batteries in a re as they may explode. Batteries may
also explode if damaged. Never use any charger that is damaged.
Operating times may differ depending on the devices used together,
features used, battery age and condition, temperatures to which battery
is exposed, and many other factors.
MAINTENANCE AND CARE
The product should be treated with care and the following suggestions
will help you protect your warranty coverage.
1. Do not use or store the device in dusty, dirty areas. Its moving parts
and electronic components can be damaged.
2. Do not store the device in hot areas. High temperatures can shorten
the life of electronic devices, damage batteries, and wrap or melt
certain plastics.
3. Do not store the device in cold areas. When the device returns to
its normal temperature, moisture can form inside the device and
damage electronic circuit boards.
4. Do not attempt to open the product.
5. Do not drop or knock the device. Rough handling can break internal
circuit boards and ne mechanics.
6. Do not use harsh chemicals, cleaning solvents, or strong detergents
to clean the device.
7. Do not paint the device. Paint can clog the moving parts and prevent
proper operation.
Page 24
24
SX.COM 2
DISPOSAL
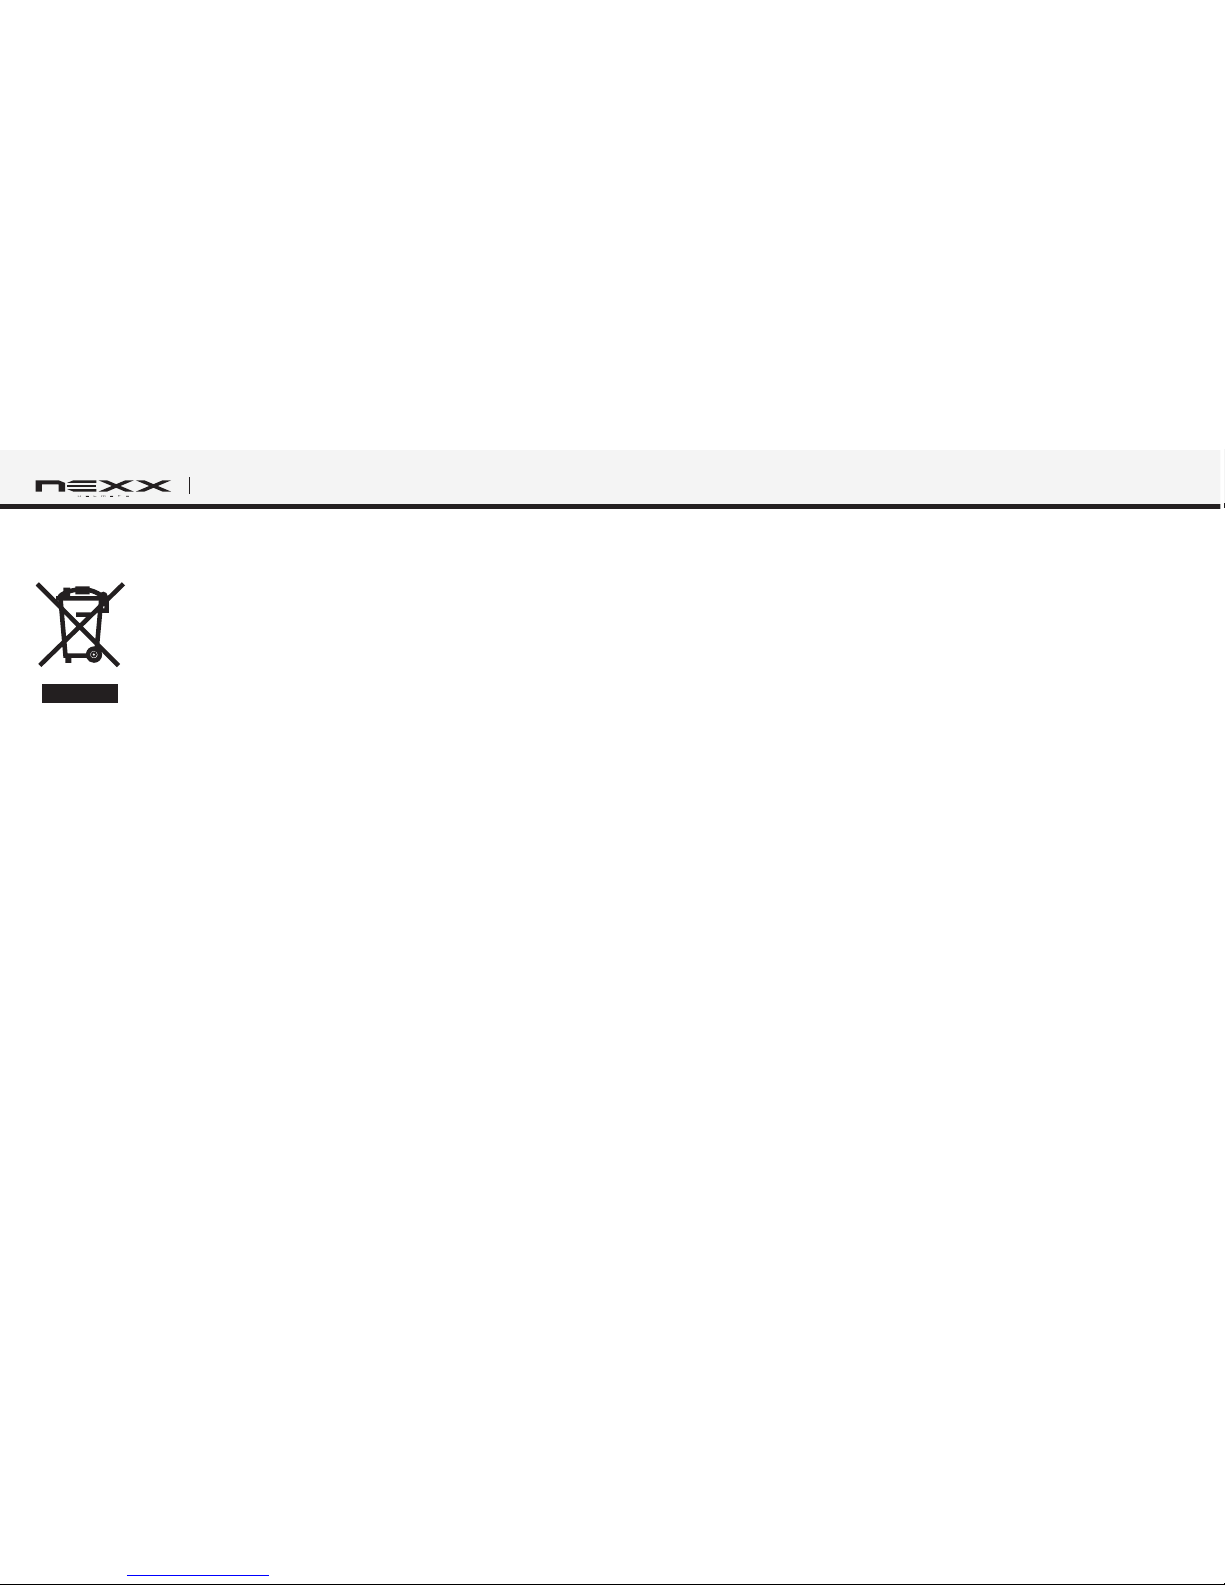
The crossed-out wheel bin symbol on the product,
literature, or packaging reminds you that all electrical and
electronic products, batteries, and accumulators must be
taken to separate collection at the end of their working
life. This requirement applies to the European Union and
other locations where separate collection systems are
available. To prevent possible harm to the environment or human health
from uncontrolled waste disposal, please do not dispose of these
products as unsorted municipal waste, but hand it in at an ofcial
collection point for recycling.
CERTIFICATION AND SAFETY APPROVALS
FCC Compliance Statement
This device complies with part 15 of the FCC Rules. Operation is subject
to the following two conditions:
• This device may not cause harmful interference.
• This device must accept any interference received, including
interference that may cause undesired operation.
This equipment has been tested and found to comply with the limits for
a Class B digital device, pursuant to part 15 of the FCC Rules. These
limits are designed to provide reasonable protection against harmful
interference in a residential installation.
This equipment generates, uses and can radiate radio frequency energy
and, if not installed and used in accordance with the instructions, may
cause harmful interference to radio communications. However, there is
no guarantee that interference will not occur in a particular installation.
If this equipment does cause harmful interference to radio or television
reception, which can be determined by turning the equipment off and
on, the user is encouraged to try to correct the interference by one or
more of the following measures:
• Reorient or relocate the receiving antenna.
• Increase the separation between the equipment and receiver.
Page 25
25
English
SX.COM 2
• Connect the equipment into an outlet on a circuit different from that to
which the receiver is connected.
• Consult the dealer or an experienced radio/TV technician for help.
FCC RF Exposure Statement
This equipment complies with FCC radiation exposure limits set forth
for an uncontrolled environment. End users must follow the specic
operating instructions for satisfying RF exposure compliance. The
antenna used for this transmitter must not transmit simultaneously with
any other antenna or transmitter, except in accordance with FCC multitransmitter product procedures.
FCC Caution
Any changes or modications to the equipment not expressly approved
by the party responsible for compliance could void user’s authority to
operate the equipment.
CE Declaration of Conformity
This product is CE marked according to the provisions of the R&TTE
Directive (99/5/EC). Hereby, Sena declares that this product is in
compliance with the essential requirements and other relevant
provisions of Directive 1999/5/EC. For further information please consult
www.SenaBluetooth.com. Please note that this product uses radio
frequency bands not harmonized within EU. Within the EU this product
is intended to be used in Austria, Belgium, Denmark, Finland, France,
Germany, Greece, Ireland, Italy, Luxembourg, The Netherlands,
Portugal, Spain, Sweden, United Kingdom and within EFTA in Iceland,
Norway and Switzerland.
Industry Canada Statement
This device complies with Industry Canada license-exempt RSS
standard(s).
Operation is subject to the following two conditions:
(1) this device may not cause interference.
(2) this device must accept any interference, including interference that
may cause undesired operation of the device.
Bluetooth License
The Bluetooth® word mark and logos are owned by the Bluetooth
SIG, Inc. and any use of such marks by Sena is under license. Other
trademarks and trade names are those of their respective owners.
The SX.COM is compliant with and adopts the Bluetooth® Specication
3.0 and has successfully passed all interoperability tests that are
specied in the Bluetooth® specication. However, interoperability
between the device and other Bluetooth®-enabled products is not
guaranteed.
Page 26

26
SX.COM 2
WAIVER AND GENERAL RELEASE
By using the product you waive all substantial legal rights including
the right to sue. Please read the following carefully before using the
device. If you do not accept all terms of this agreement, you should
immediately return the product for a full refund. By using the headset you
agree to be bound to this agreement and forfeit the right to sue. Using a
communication device while riding a motorcycle, scooter, moped, ATV,
quad-bike or any other vehicle or equipment, whether on land, water or
air (jointly referred to as “Vehicle”) requires your complete and undivided
attention. Nexxpro,s.a. (“NEXX”) and Sena Technologies, Inc., including
its Ofcers, Directors, Afliates, Parent Company, Representatives,
Agents, Contractors, Sponsors, Employees, Suppliers and Resellers
(jointly referred to as the “Company” or “Sena”) strongly advise you to
take all necessary precautions and remain alert to the trafc, weather
and road conditions if you choose to use the product headset, including
all derivative models irrespective of its commercial name or branding
(the “Device”), and stop your Vehicle on the roadside prior to initiating
or receiving calls. Any publications, advertisements, announcements or
similar notes that refer to using the Device while riding a Vehicle are
solely intended to address its technical capabilities and should not
be misconstrued as if encouraging users to operate the Device while
actively involved in trafc.
By way of purchasing this Device and not returning it for a full refund
(see below), you are irrevocably releasing, indemnifying from any
liability, loss, claim and expense (including attorney’s fees) and holding
NEXX and Sena harmless for any bodily injuries, harm or death as well
as losses or damages in goods, to any Vehicles including your own,
or to any property or asset that belong to you or to third parties, any
of which may result from using the Device under any circumstances
or conditions and irrespective of jurisdiction. NEXX and Sena will not
be responsible for any physical damages, irrespective of reasons,
conditions or circumstances, including malfunctioning of the Device,
and all risks associated with operating it rest solely and entirely with the
user of this Device, irrespective of whether the Device is used by the
original purchaser or any third party.
NEXX and Sena hereby noties you that using this Device may also be in
contravention to local, federal, state or national laws or regulations, and
that any use of the Device is entirely at your sole risk and responsibility.
1. You, your heirs, legal representatives, successors or assigns, hereby
voluntarily and forever release, discharge, indemnify and hold
harmless NEXX and Sena from any and all litigation, claims, debts,
demands, actions and liability which may arise, directly or indirectly,
from using the Device for any distress, pain, suffering, discomfort,
loss, injury, death, damages to or in respect to any person or property
however caused, WHETHER ARISING FROM THE NEGLIGENCE OR
OTHERWISE, and which may hereafter accrue to you on some future
date as a result of said use, to the fullest extent permitted by law.
Page 27
27
English
SX.COM 2
2. You fully understand and assume the risks in using the Device,
including risk of negligent acts or omissions by others.
3. You conrm that you are physically capable to use the Device and
that you have no medical conditions or needs that may infringe upon
your abilities to do so in a safe manner. You conrm that you are at
least eighteen (18) years of age and that you have been advised of
the risks associated with the use of the Device. You further conrm
that you will not consume any alcohol that may affect your alertness
or any mind-altering substance, and will not carry, use or consume
these substances before or during the use of the Device.
4. You fully acknowledge our warnings and understand that: (a) risks
and dangers exist in using the Device while in trafc, including but
not limited to injury or illness, strains, fractures, partial and/or total
paralysis, death or other ailments that could cause serious disability;
(b) these risks and dangers may be caused by the negligence of the
manufacturers or its agents or any third party involved in designing
or manufacturing the Device; (c) these risks and dangers may arise
from foreseeable or unforeseeable causes. You hereby assume
all risks and dangers and all responsibility for any losses and/or
damages, whether caused in whole or in part by the negligence or
other conduct of others, including the Company.
5. You conrm that you have read this release of liability and fully
understand its terms and that you have given up substantial rights
by not returning the Device for a full refund (see refund option below).
Two-year Limited Warranty
Nexxpro,s.a. (“NEXX”) warrants that this product (“Product”) shall
conform to and perform in accordance with published technical
specications and the accompanying written materials, and shall be free
of defects in materials and workmanship, for a period of two (2) year from
the date of purchase by the rst consumer purchaser of the Product.
The limited warranty extends only to the original consumer purchaser
of the Product and is not assignable or transferable to any subsequent
purchaser/end-user.
This warranty is limited to the repair and/or replacement, at NEXX’s
discretion, of defective or non-conforming Product, and NEXX shall
not be responsible for the failure of the Product to perform specied
functions, or any other non-conformance caused by or attributable to:
(a) any misapplication or misuse of the Product; (b) failure of Customer
to adhere to any of NEXX’s specications or instructions; (c) neglect
of, abuse of, or accident to, the Product; or (d) any associated or
complementary equipment or software not furnished by NEXX.
Limited warranty service may be obtained by delivering the Product to
NEXX or to the international distributor it was purchased through and
providing proof of purchase or receipt date. Customer agrees to insure
the Product or assume the risk of loss or damage in transit, to prepay
shipping charges to NEXX, and to use the original shipping container
or equivalent.
Page 28

28
SX.COM 2
Limitation of Liability
EXCEPT AS EXPRESSLY PROVIDED HEREIN, NEXX MAKES NO
WARRANTY OF ANY KIND, EXPRESSED OR IMPLIED, WITH RESPECT
TO ANY EQUIPMENT, PARTS OR SERVICES PROVIDED PURSUANT
TO THIS AGREEMENT, INCLUDING BUT NOT LIMITED TO THE
IMPLIED WARRANTIES OF MERCHANTABILITY AND FITNESS FOR A
PARTICULAR PURPOSE. NEITHER NEXX NOR ITS DEALER SHALL BE
LIABLE FOR ANY OTHER DAMAGES, INCLUDING BUT NOT LIMITED
TO DIRECT, INDIRECT, INCIDENTAL, SPECIAL OR CONSEQUENTIAL
DAMAGES, WHETHER IN AN ACTION IN CONTRACT OR TORT
(INCLUDING NEGLIGENCE AND STRICT LIABILITY), SUCH AS, BUT
NOT LIMITED TO, LOSS OF ANTICIPATED PROFITS OR BENEFITS
RESULTING FROM, OR ARISING OUT OF, OR IN CONNECTION WITH
THE USE OF FURNISHING OF EQUIPMENT, PARTS OR SERVICES
HEREUNDER OR THE PERFORMANCE, USE OR INABILITY TO USE
THE SAME, EVEN IF NEXX OR ITS DEALER HAS BEEN ADVISED OF
THE POSSIBILITY OF SUCH DAMAGES. IN NO EVENT WILL NEXX OR
ITS DEALERS TOTAL LIABILITY EXCEED THE PRICE PAID FOR THE
PRODUCT.
Return for Full Refund
IF YOU ARE UNWILLING TO ACCEPT AND AGREE TO THE ABOVE
CONDITIONS, YOU MAY RETURN THIS DEVICE TO NEXX FOR A FULL
REFUND, PROVIDED THAT YOU DO SO NO LATER THAN 14 BUSINESS
DAYS FOLLOWING THE PURCHASE OF THE DEVICE AND SUBJECT
TO THE WRAPPING BEING INTACT. WHEN DOING SO, PLEASE REFER
TO THIS SECTION. BY NOT RETURNING THE DEVICE FOR REFUND
WITHIN THE PERIOD PROVIDED, YOU ARE EXPLICITLY IN AGREEMENT
WITH THE ABOVE AND RENOUNCE ALL RIGHTS TO FUTURE CLAIMS
AND DEMANDS AGAINST NEXX AS DEFINED ABOVE.
WARNING
NEXX informs that using this device in public trafc may not be
authorized by the law. Please check your local law and use this device
only out of public trafc such as private properties or closed circuits. If
the simultaneous use of both ear speakers while riding a motorcycle is
prohibited by your local law, please use only a single ear speaker while
riding. NEXX denies any liability should you choose not to respect this
warning.
Using the headset with loud volume may be harmful to your eardrums
and cause hearing loss. Please maintain proper volume level to protect
your ears.
Page 29
29
English
SX.COM 2
User's Guide for Firmware v1.1
1.1
www.nexx-helmets.com
 Loading...