

Page 1
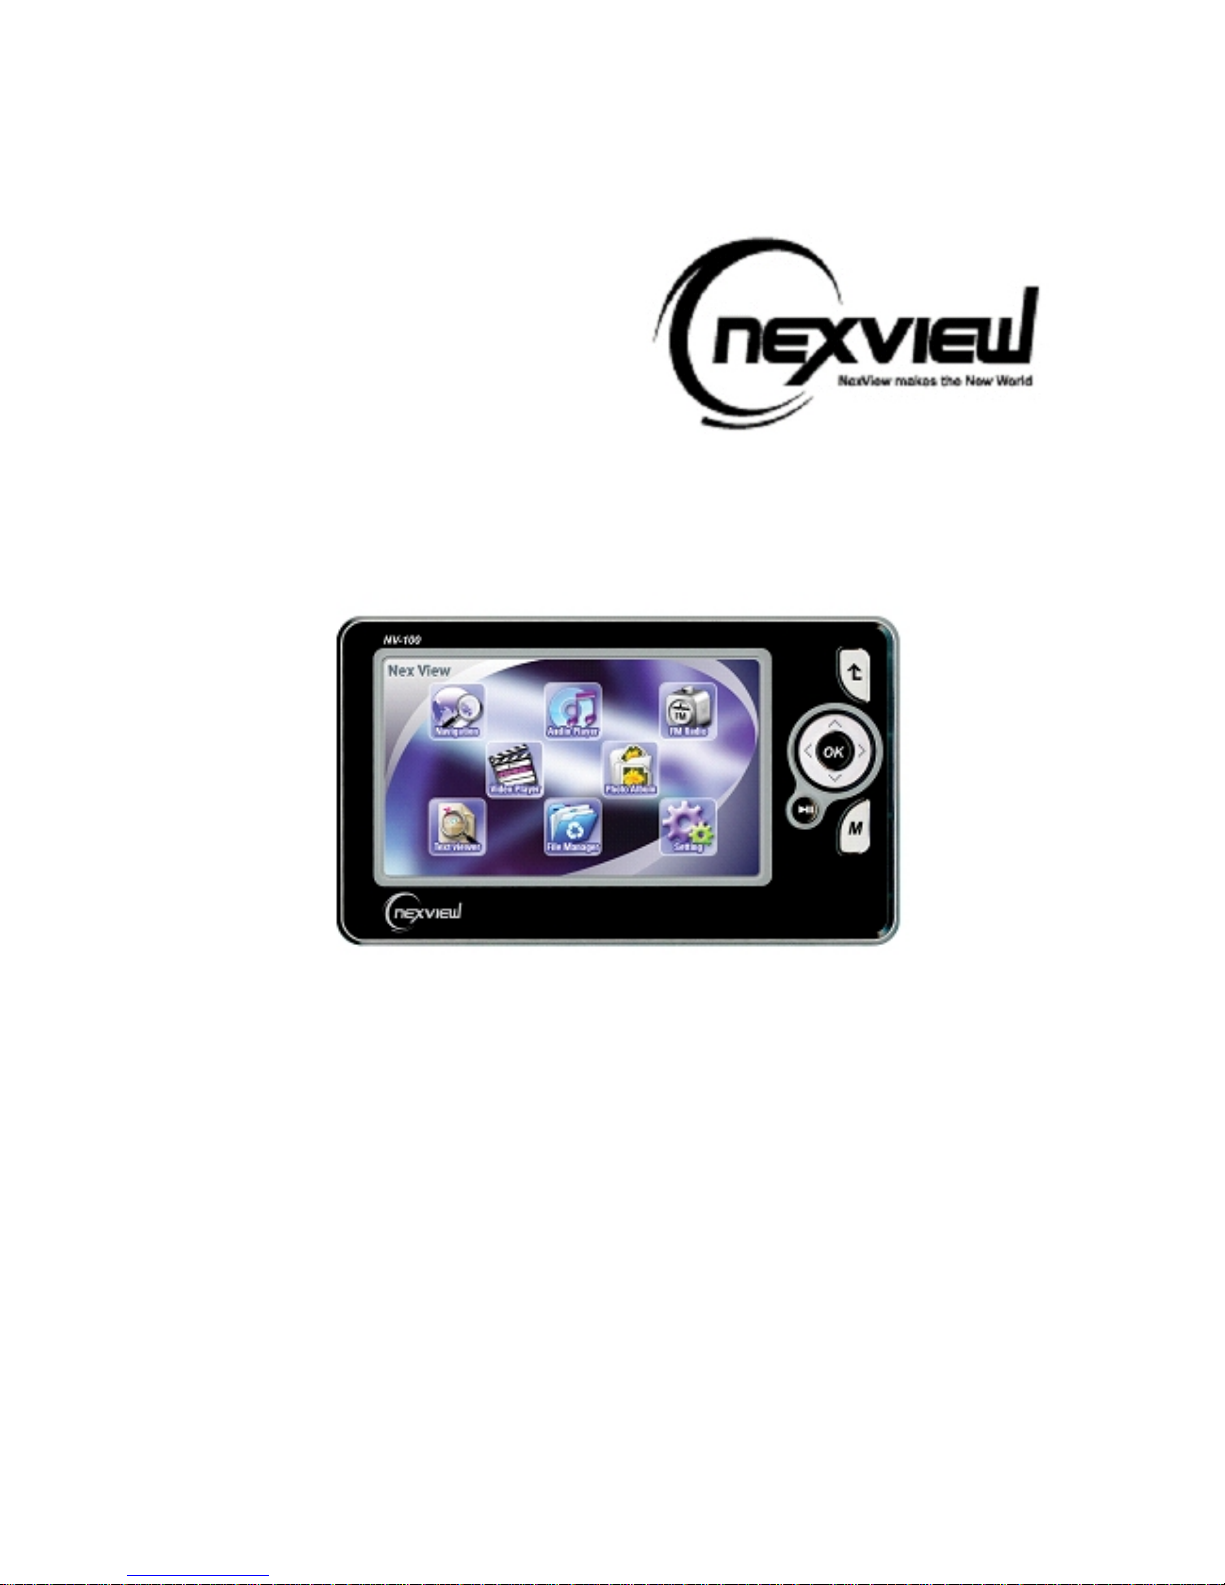
user manual
NV-100
Page 2

2
Before using NexView
1. Caution .................................................................................... 3
2. Components ............................................................................. 4
3. NexView at a grance................................................................... 5
3-1. Player ............................................................................... 6
3-2. Cradle ............................................................................... 7
4. Charging the Battery .................................................................. 8
4-1. With the Power Adaptor ....................................................... 8
4-2. With the Cradle .................................................................. 8
Using NexView
1. Main Menu ............................................................................... 9
2. GPS Navigation ....................................................................... 10
3. Audio Player ........................................................................... 11
4. FM Radio ............................................................................... 15
5. Video Player ........................................................................... 18
6. Photo Album............................................................................ 23
7. Text Viewer ............................................................................. 27
8. File Manager ........................................................................... 29
9. Settings ................................................................................ 31
9-1. Adjusting the Touch Point .............................................. 31
9-2. TV-OUT ........................................................................... 32
9-3. Power Management .......................................................... 32
9-4. Volume & Sound ............................................................... 33
9-5. Firmware Update .............................................................. 33
9-6. Selecting Language .......................................................... 36
9-7. Main Menu Setup .............................................................. 36
9-8. Viewing the System Information .......................................... 40
10. Using the Multitasking Function ................................................ 41
Connecting NexView to other devices
1. Connecting the Player to the Cradle ........................................... 42
2. Connecting the Player to a Computer ......................................... 43
3. Connecting the Player to a TV.................................................... 45
4. Connecting the Player with another mass storage device .............. 46
Others
1. General Specifications ............................................................ 47
2. Contact Information ................................................................. 49
Contents
Page 3
3
The Power Adaptor in the package is for NexView only. Do not use
it to charge other devices.
Do not expose NexView to moist or dusty place.
Do not expose NexView to a magnetic field.
Make sure NexView is never dropped or physically struck.
Do not use volatile matters to clean NexView.
Do not disassemble, repair or attempt to modify NexView without
professional help. Unauthorized disassembly, repair or modification
may render the warranty void.
The "System" and "Navigation" folders in NexView include important
system operating files, do not modify or delete these folders.
You can recover NexView's system by downloading and installing
recovery files from our website www.sciontech.co.kr
when above
folders are modified or deleted.
Before Using
1. Caution
1. Caution
Information in this manual is subject to change without notice.
Page 4
4
2. Components
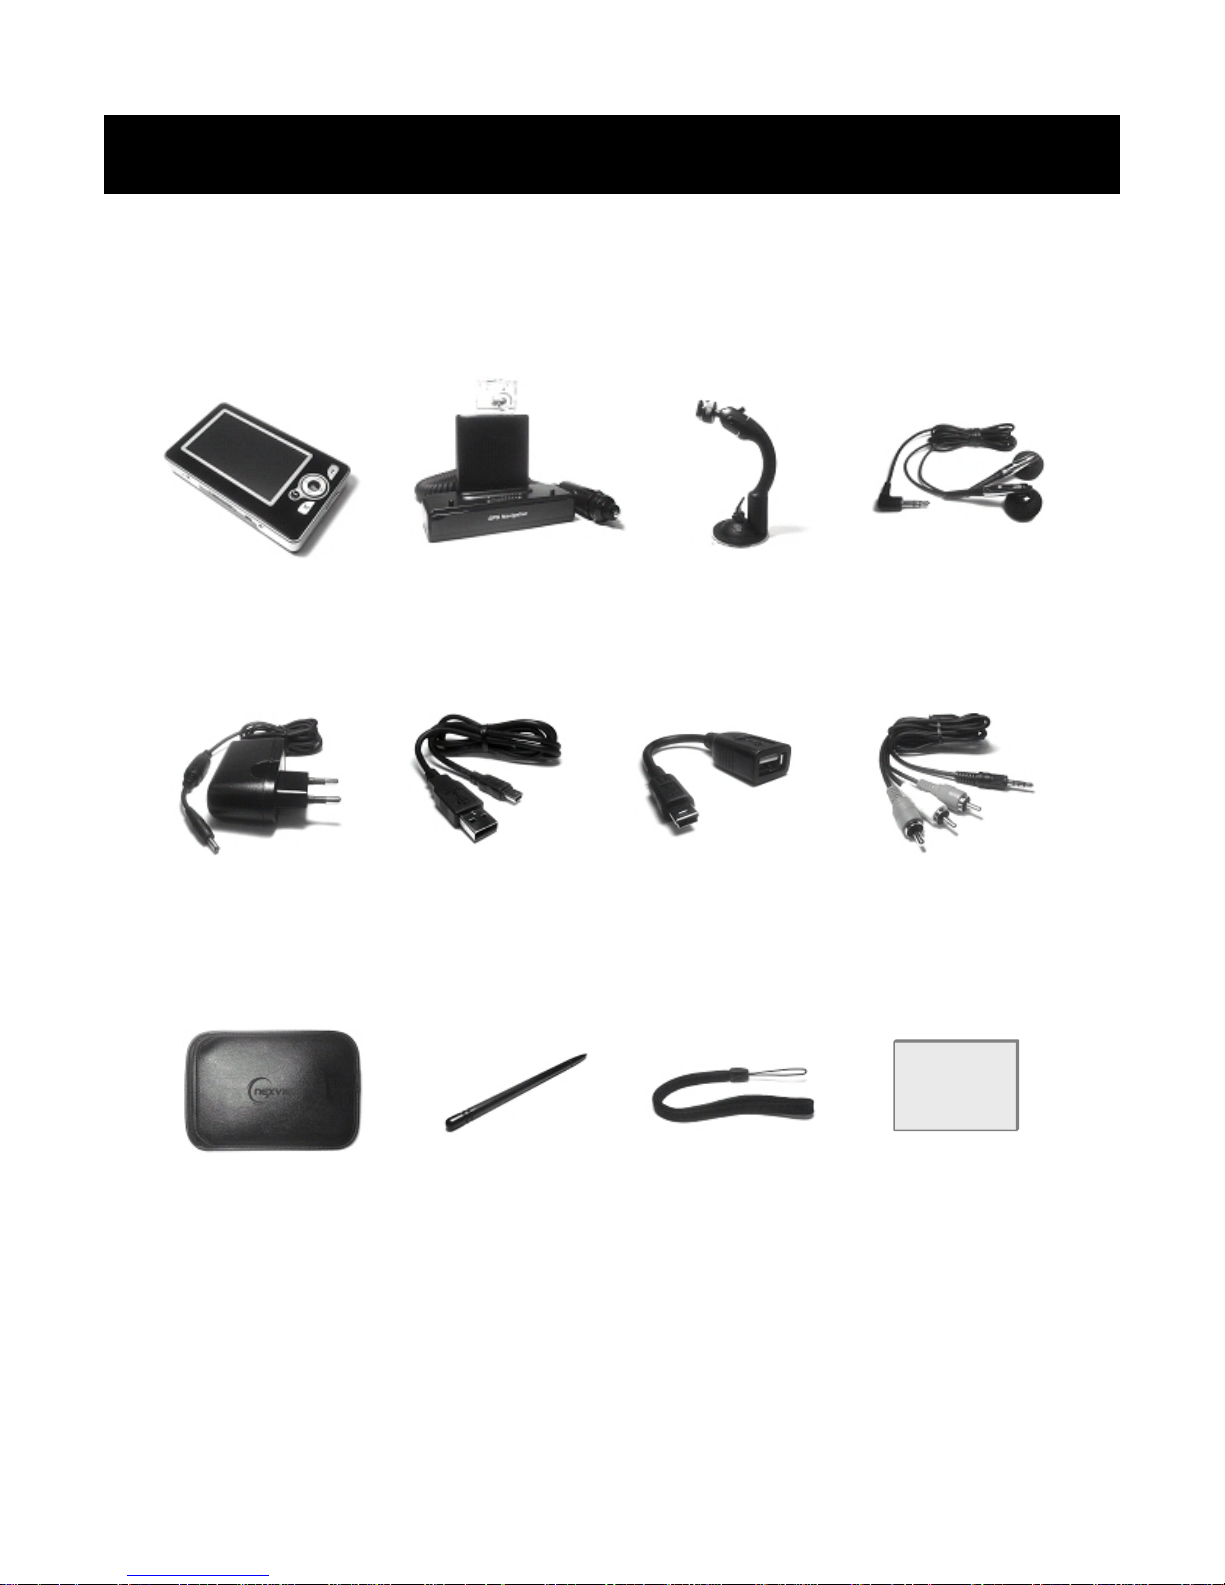
NexView
Cradle
Earphone
Power Adaptor USB Cable
USB Host
Cable
A/V Cable
User Manual
Suction Cup
Stylus Pen
Hand StrapPouch
User
Manual
Before Using
2. Components
Page 5
5
3-1. Player
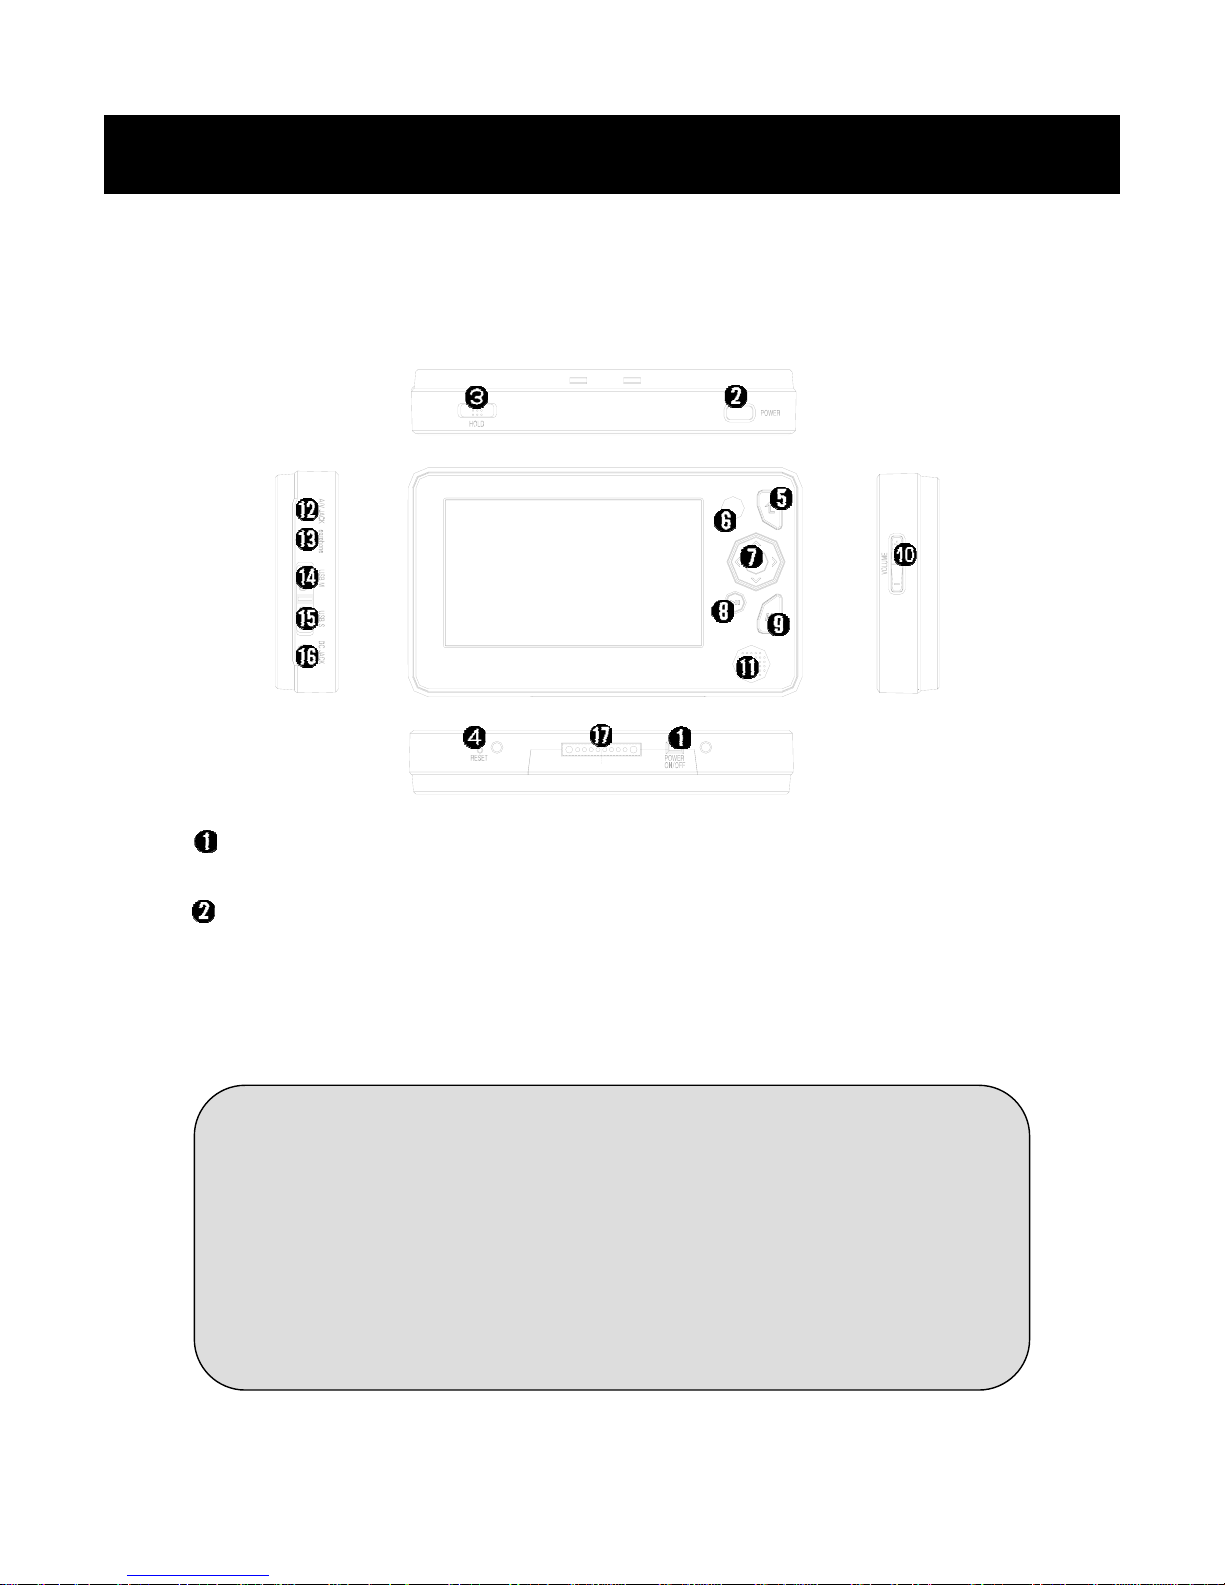
Power Switch: Turn off the Player by using the this switch when you
will not use NexView for a long time.
Sleep Button:
A. If you press this button shortly, the brightness of screen will be
changed or the LCD turned on or off.
B. If you press and hold this button, NexView will fall down to or
awake from the SLEEP MODE.
3. NexView at a glance
☼ SLEEP MODE
The SLEEP MODE is very similar with the state that the NexView
has been turned off by the Power Switch.
In this mode, the Player consume a little power from the battery,
but you can restart the system with very short time by pressing the
Sleep Button again.
We recommend you to use the SLEEP MODE than the turning off if
you will restart the Player soon.
Before Using
3. Nexview at a glance
Page 6
6
Hold Switch: Makes no other input applied.
Reset Button: Resets the system, but current settings will be maintained.
ESC Button: Press this button to cancel the program execution or to
return to the previous screen or menu.
Move Buttons: Press these to move to another items when you select
icons or files. These buttons are used for more functions while running
every program.
OK Button: Runs selected item.
Play/Pause Button: Plays and pauses playback in the Video Player
and Audio Player. Selects and deselects files in the File Manager and
the Playlist Editing Window.
M Button: Press this button shortly to move to another icon group in
any programs. And, press and hold to use the Multitasking function.
Volume Control Button: Controls the sound volume level of the Player.
And, moves to the previous or next page on the Text Viewer.
Speaker Out
A/V OUT Port
Earphone Port
USB Host Port
USB Device Port
Power Adaptor Port
Cradle Connection Part
Before Using
3. Nexview at a glance
Page 7
7
3-2. Cradle
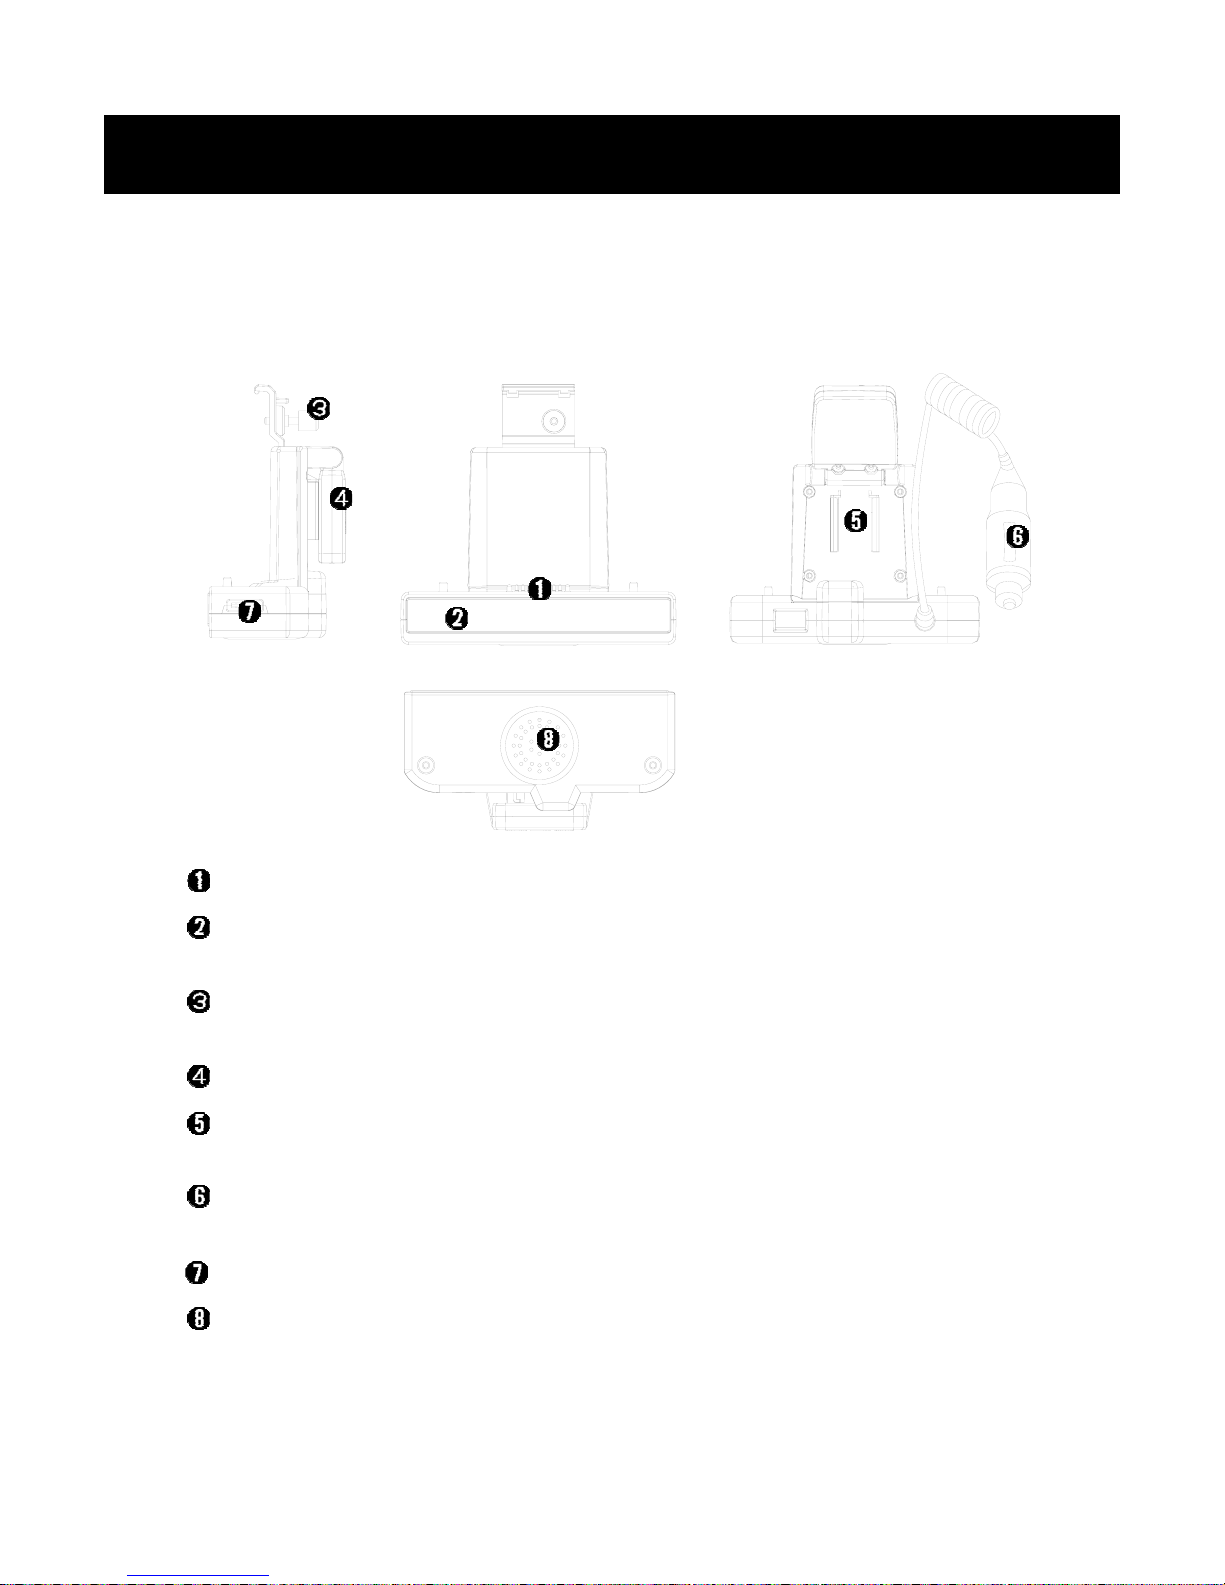
Player Connection Part
Cradle Power LED: Turned on the red color when power supplied to
the Cradle.
Fixing Bolt: Used for tight fixing connection between the Player and
the Cradle.
GPS Antenna: Receives GPS siganal from satellites.
Suction Cup Connection Part: Used for connecting the Suction Cup to
the Cradle.
Cigar Jack: Connected to a cigar jack port in your car and supplys
power to the Cradle.
Volume Control Switch: Controls the sound volume level of the Cradle.
Cradle Speaker Out
Before Using
3. Nexview at a glance
Page 8
8
4. Charging the Battery
An LED under the Play/Pause Button turned on the red color while
charging the battery, and turned off when the charging completed.
4-1. With the Power adaptor
Connect the Power Adaptor to the Power Adaptor Port on the left side of
the Player.
4-2. With the Cradle
Charging the Battery with the Cradle is can be done only when you use
NexView in your car.
Connect the Player to the Cradle, then connect the Cigar Jack ofthe
Cradle to a cigar jack port in your car.
See "Connecting the Player to the Cradle" on page 42 for the steps of the
connection.
Before Using
4. Charging the Battery
Page 9
9
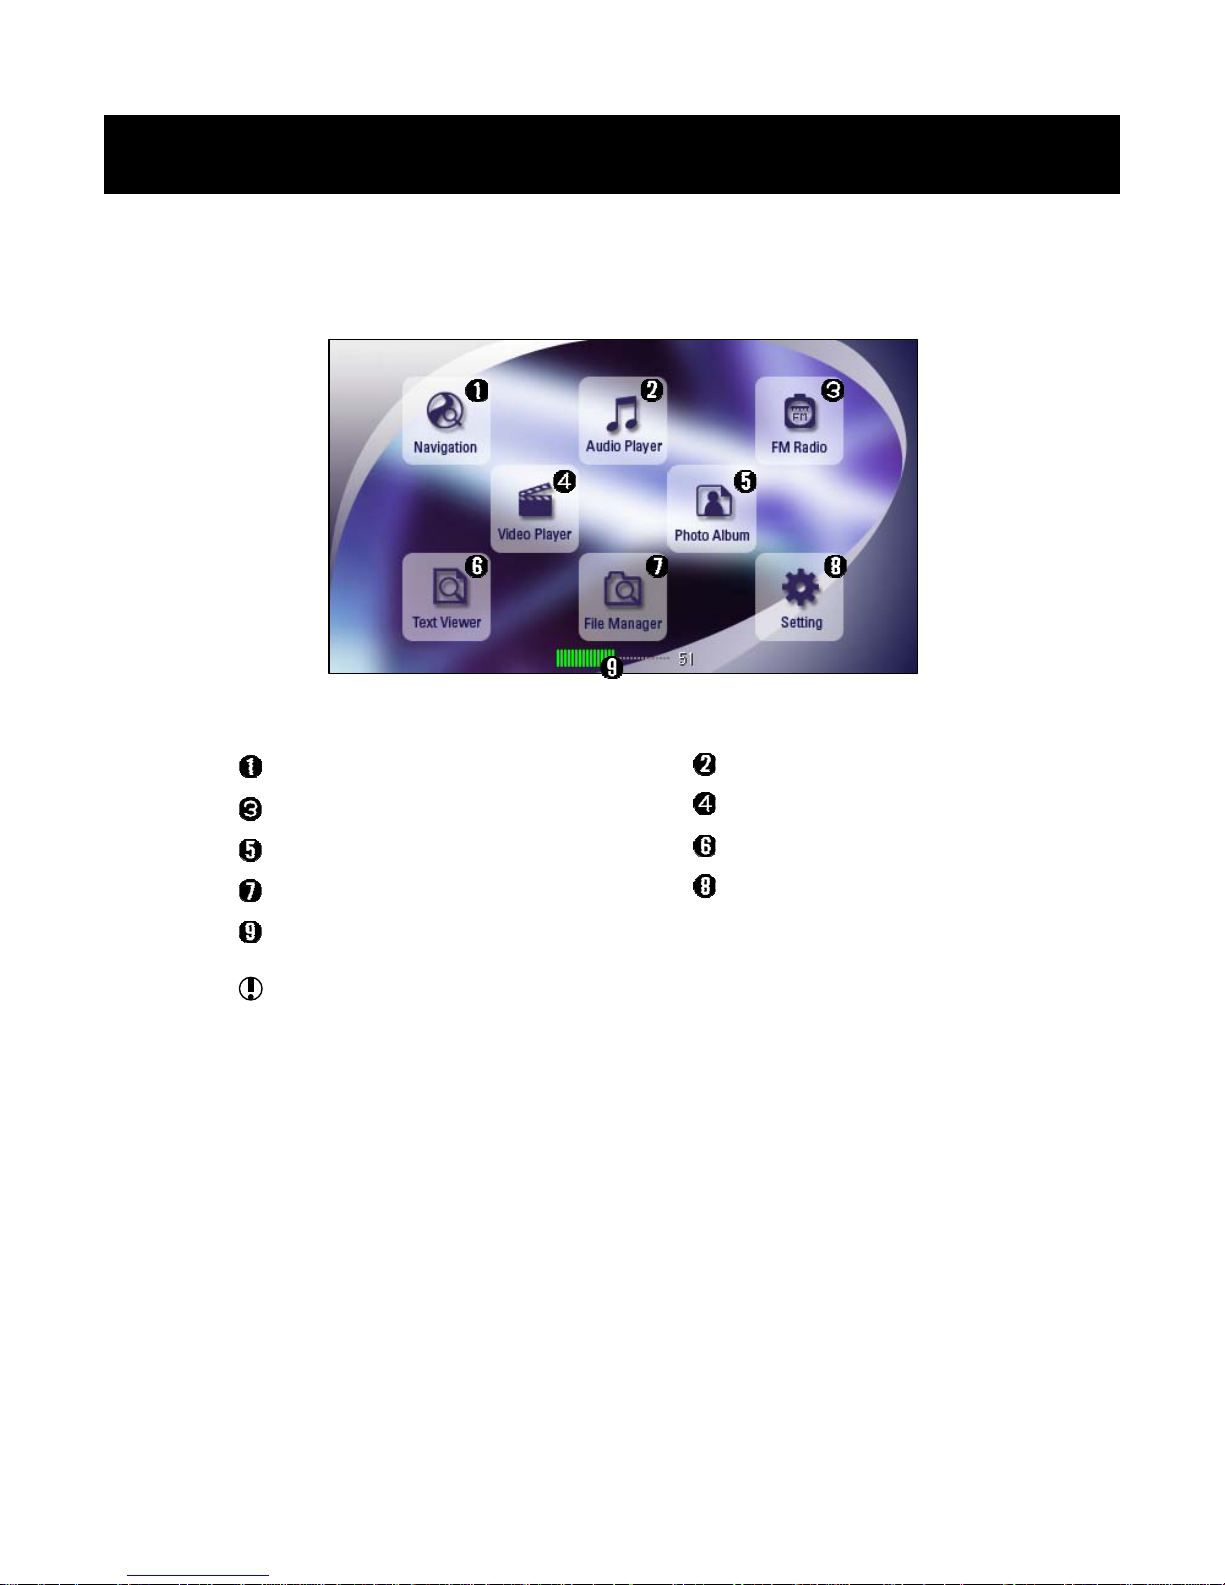
1. Main Menu
GPS Navigation
FM Radio
Photo Album
File Manager
The Player Sound Volume Level
The Player Sound Volume Level displays the general volume level
of the Player, it appears when you press the Volume Control
Button.
You can also control the level in the Volume & Sound menu.(See
"Volume & Sound" on page 33.)
The two types of the Main Menu lineup are supported, you can choose
One at the Desktop menu. (See "Main Menu Setup" on page 36.)
Using NexView
1. Main Menu
Audio Player
Video Player
Text Viewer
Settings
Page 10
10
2. GPS Navigation
< Steps before using the GPS navigation >
1. Connect the Player to the Cradle. Please refer to "Connectingthe
Player to the Cradle" on page 42.
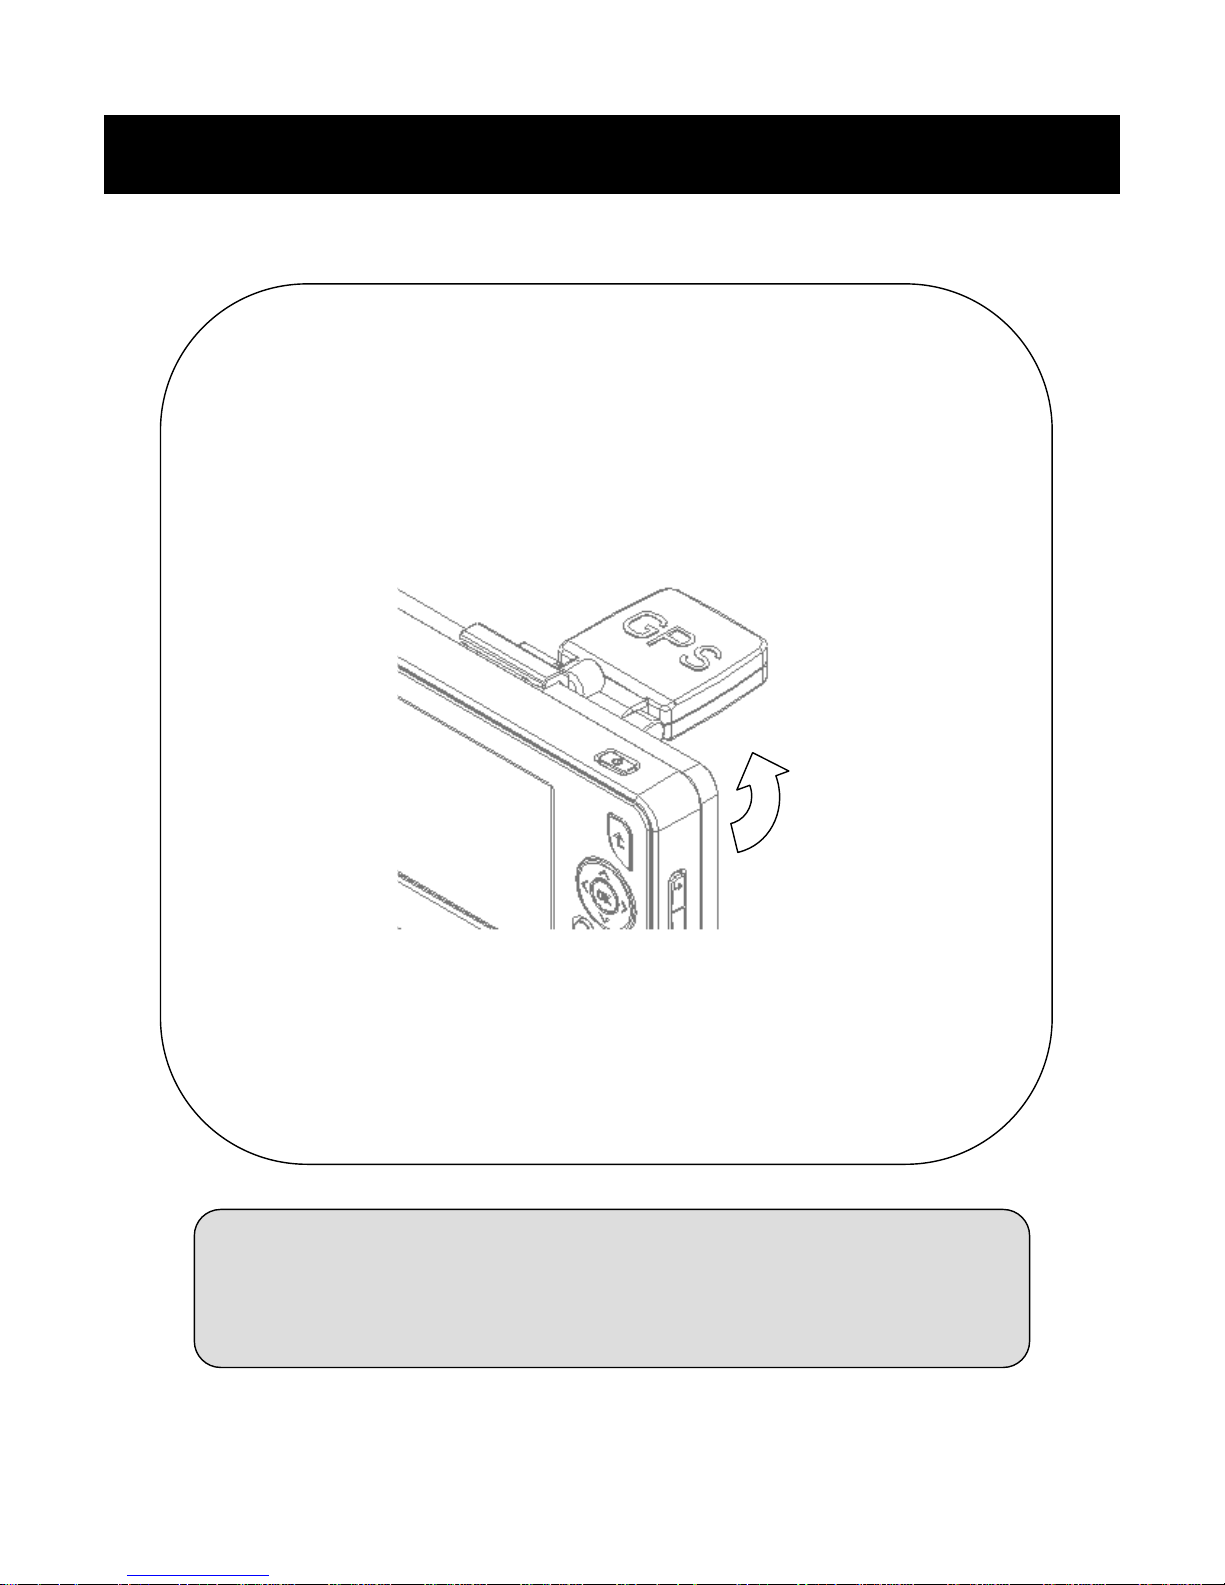
2. Set the GPS Antenna to horizontally and the "GPS" letters on the
antenna to faces upward.
3. Connect the Suction Cup to the Cradle and fix them on the
windshield or dashboard of your car.
4. Connect the cigar jack of Cradle to a car cigar jack port.
☼ NexView GPS Navigation Manual
A manual for the GPS Navigation is provided separately, please see
it for the detail functions of the GPS Navigation.
Using NexView
2. GPS Navigation
Page 11
11
3. Audio Player
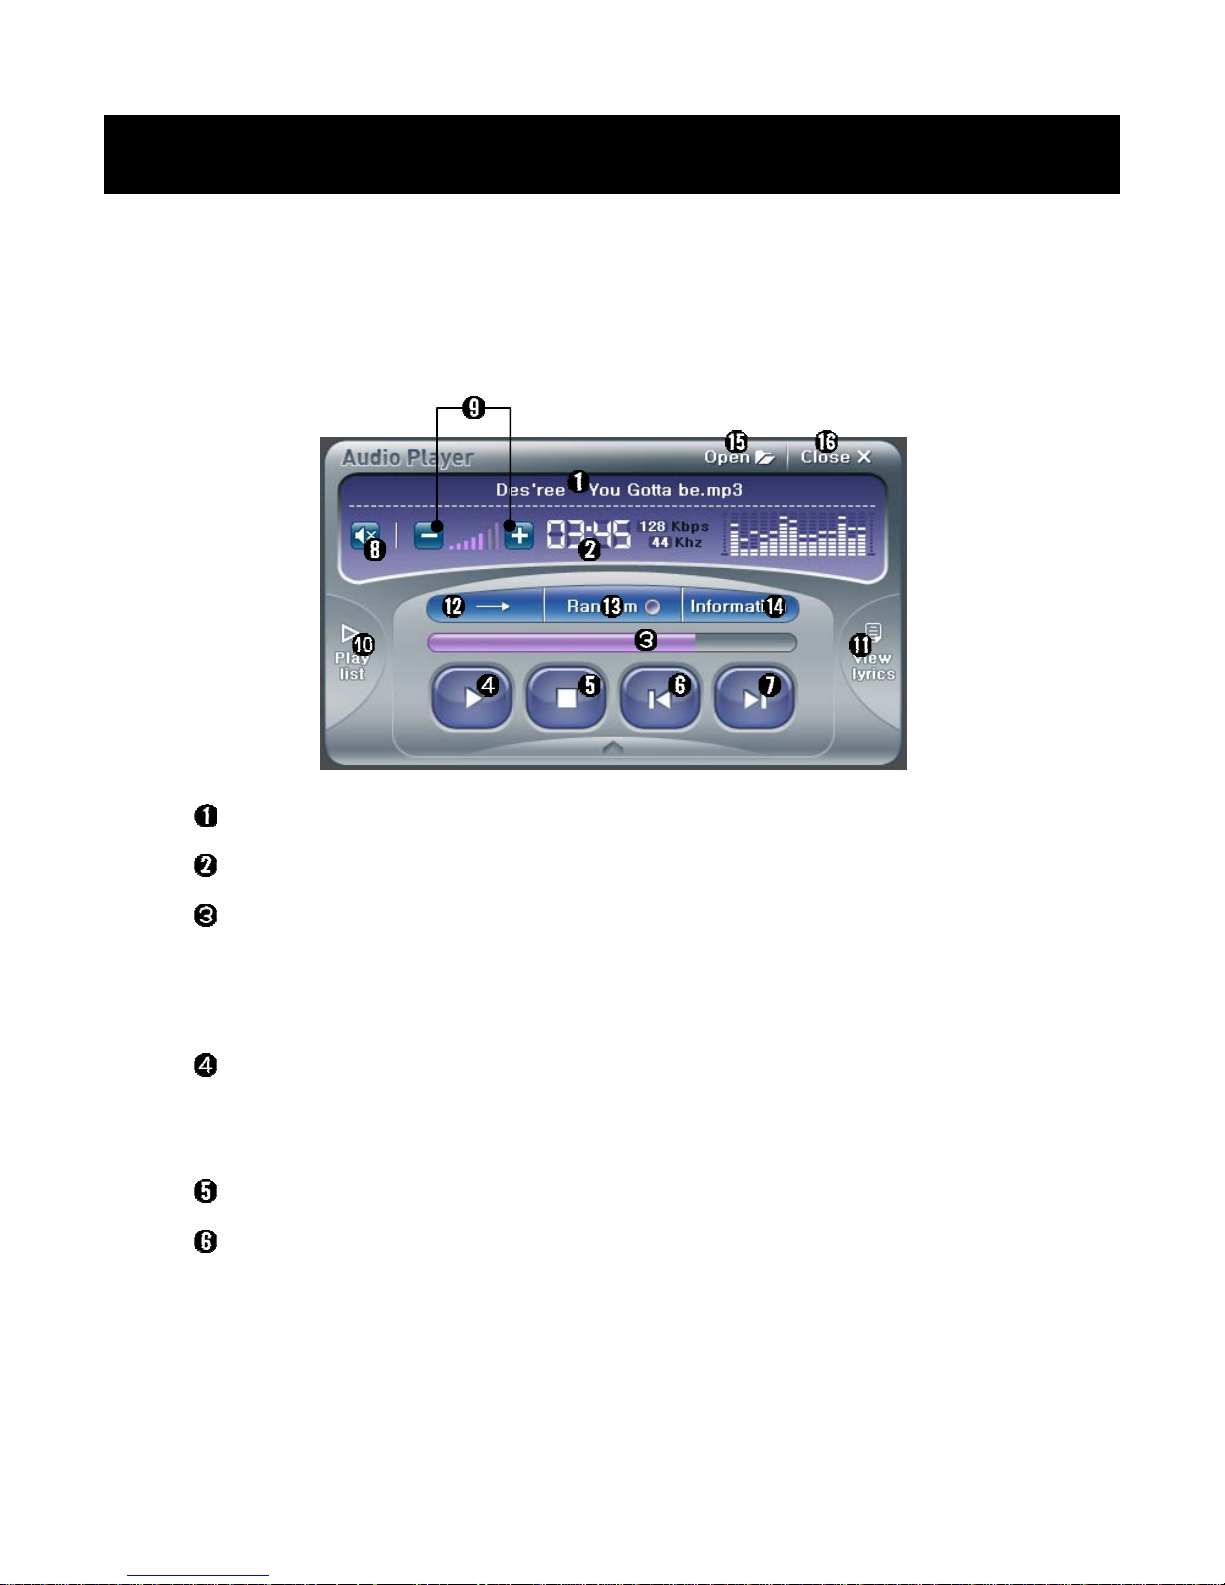
When you start the Audio Player, it will play the first music onthe
Playlist automatically.
Current File's Name
Playing Time
Progression Bar
• You can go to another frame by touching on this bar.
• You can move forward or back by 10 seconds with pressing the
Move Buttons(Left or Right).
Play/Pause Icon
• Plays and pause playback.
• Play/Pause Button has the same function.
Stop Icon
Previous Music Icon
• Touch on this icon to go to the previous music on the Playlist.
• Random music on the Playlist will be played if the Random Mode
was selected.
• The Move Button(Up) has the same function.
Using NexView
3. Audio Player
Page 12
12
Next Music Icon
• Touch on this icon to go to the next music on the Playlist.
• Random music on the Playlist will be played if the Random Mode
was selected.
• The Move Button(Down) has the same function.
Mute Icon
Volume Control Icons
• Controls the sound volume level of the Audio Player.
• Volume Control Button has the same function.
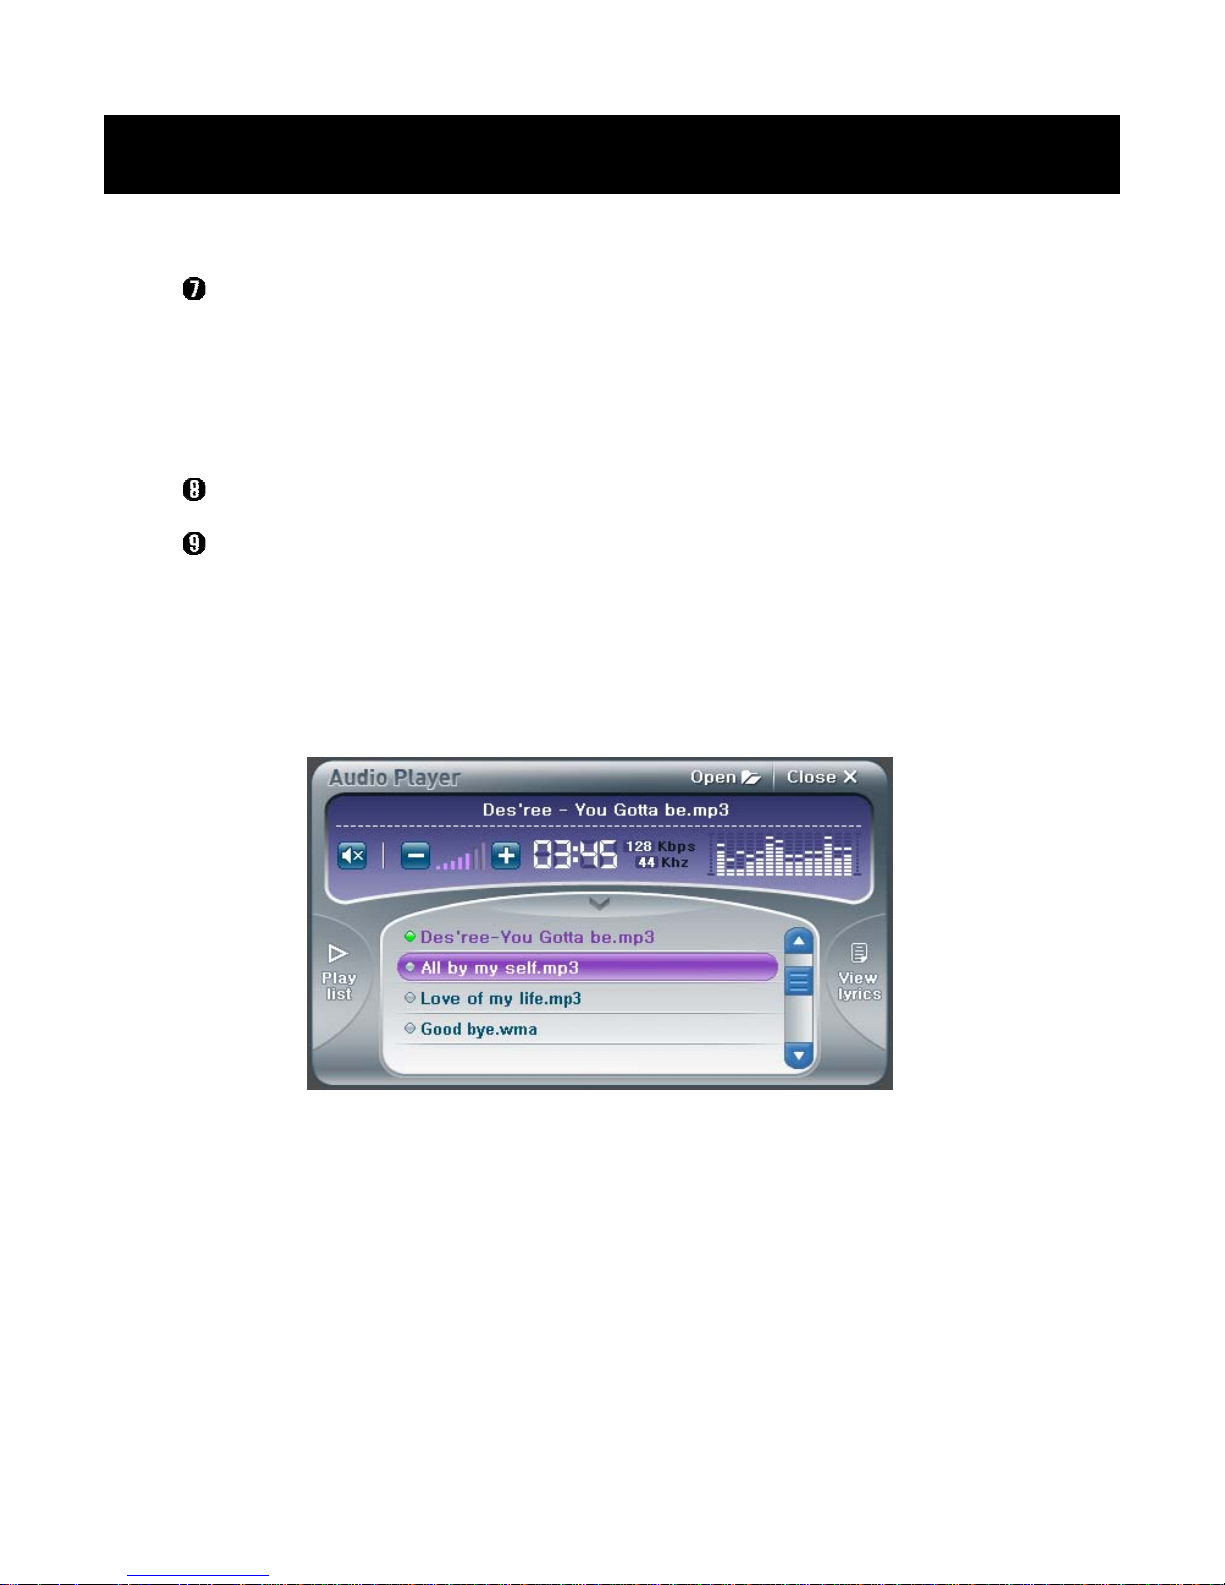
Playlist Icon
• Touch on this icon, and the Playlist Window will appear.
• Current playing file highlighted with the violet color.
• If you select another file on the list, it will be played at once.
• See "Open Icon" on page 14 for the steps of the Playlist editing.
Using NexView
3. Audio Player
Page 13
13
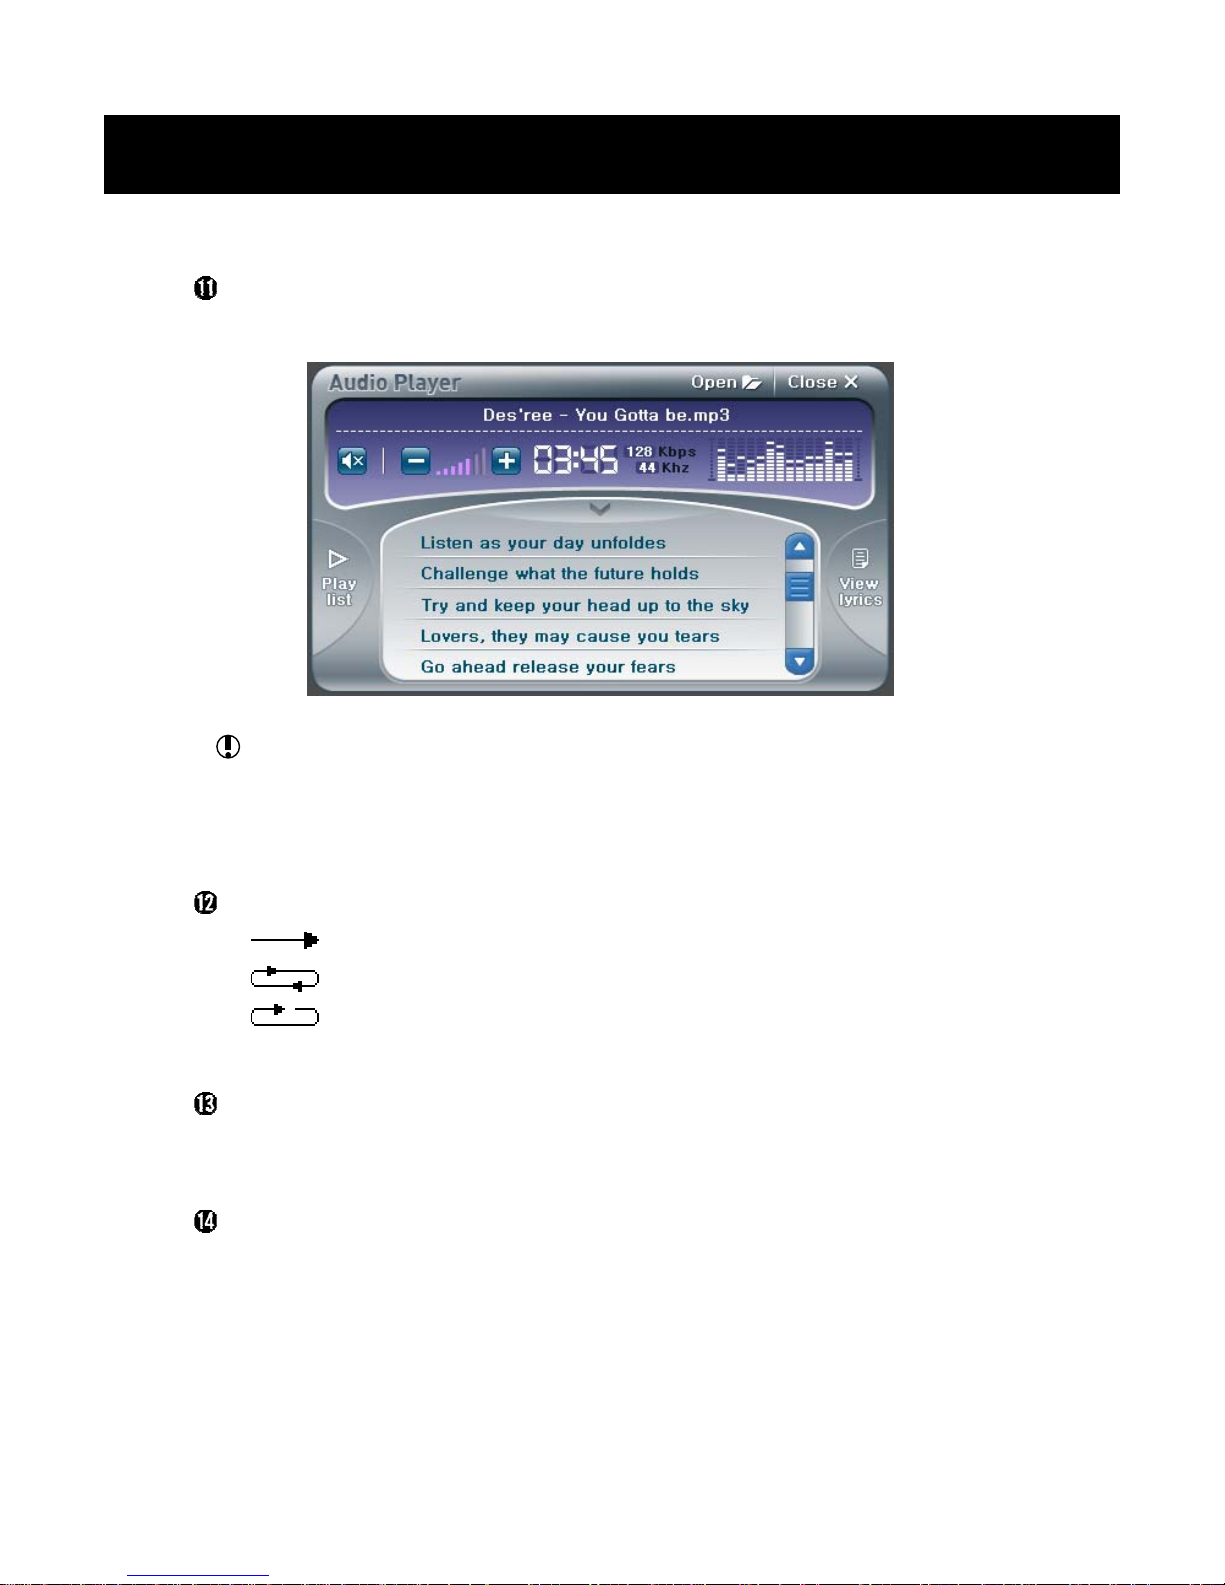
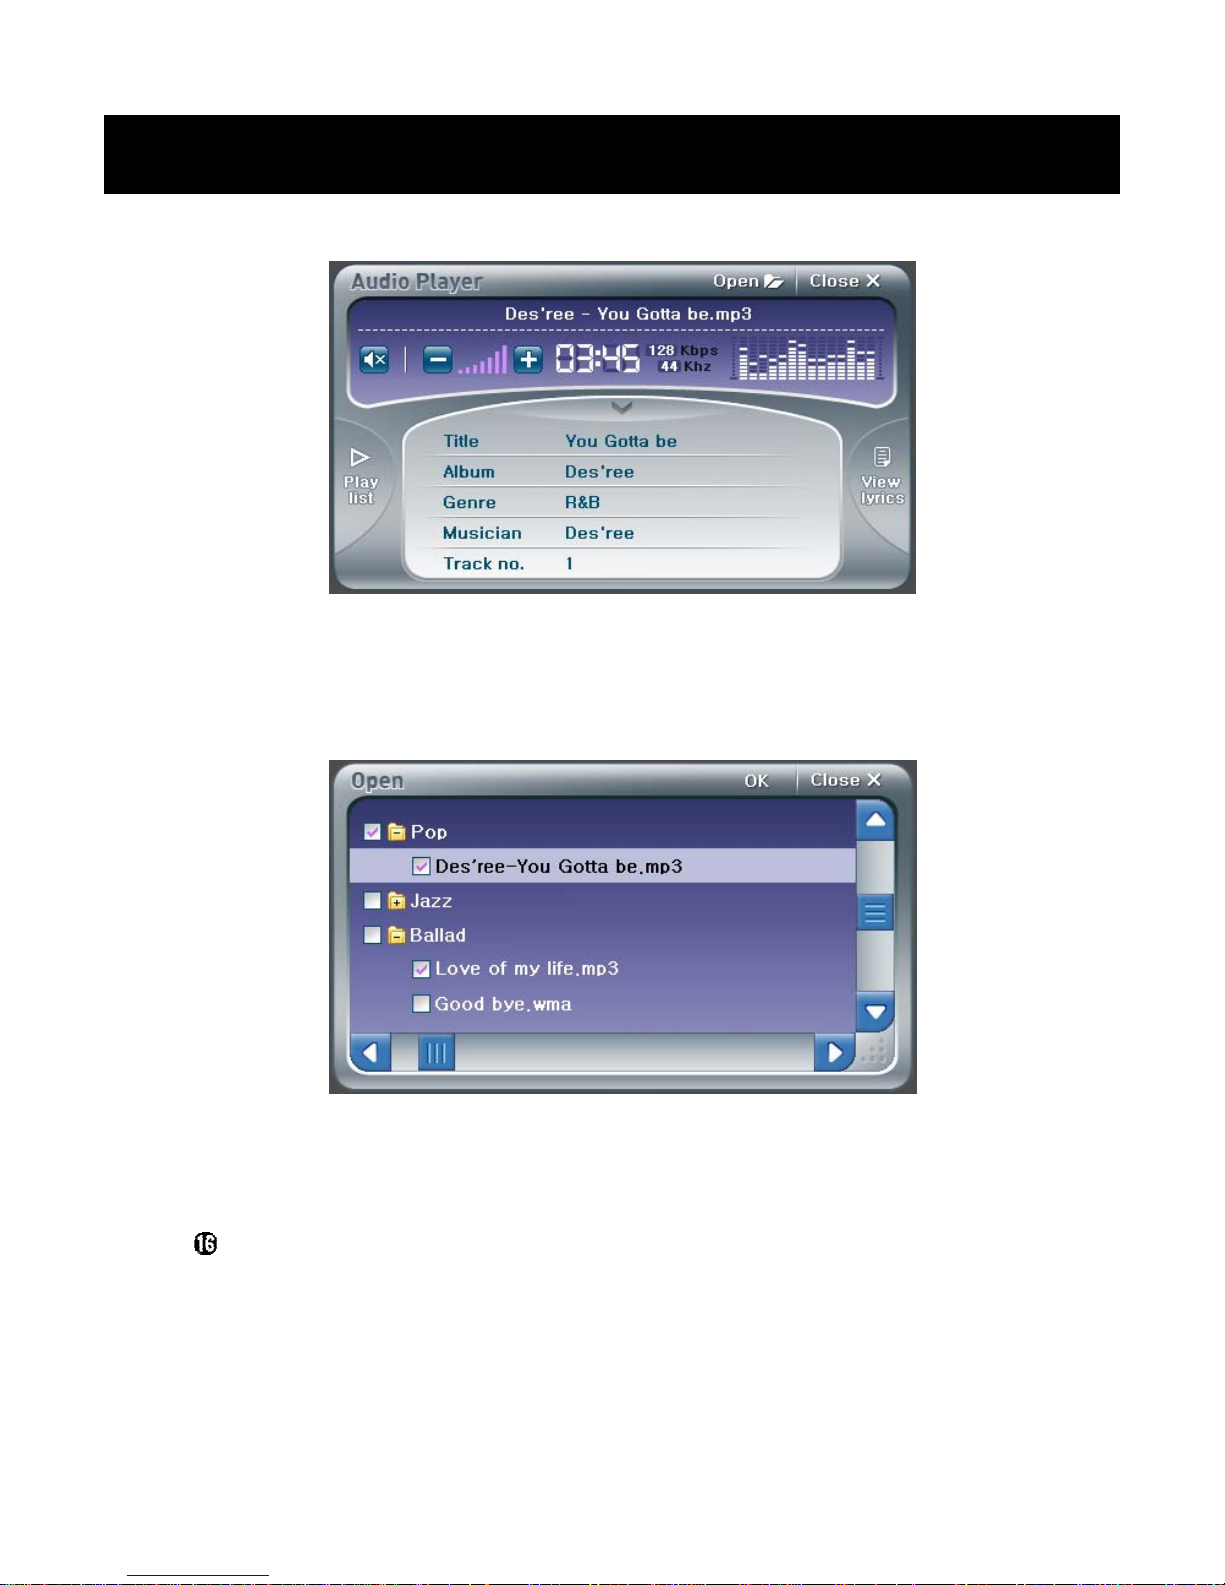
View Lyrics Icon
• Touch on this icon, and the Lyrics Window will appear.
For viewing the lyrics, the lyrics file's name should be same with
the music file's name, and both files should be located in the same
folder. NexView supports the lyrics files of LRC format.
Playback Mode Selection Icon
• Plays all musics on the Playlist only one time.
• Plays all musics on the Playlist repeatly.
• Plays the current music repeatly.
Random Mode Icon
• Plays musics on the Playlist not in sequency, but at random.
Information Icon
• Displays the information on the current music.
Using NexView
3. Audio Player
Page 14
14
Open Icon
• Touch on this icon, and the Playlist Editing Window will appear.
• Select all files you want to play, then touch on the OK Icon or press
the OK Button.
Close Icon
• Closes the Audio player.
• ESC Button has the same function.
Using NexView
3. Audio Player
Page 15
15
4. FM Radio
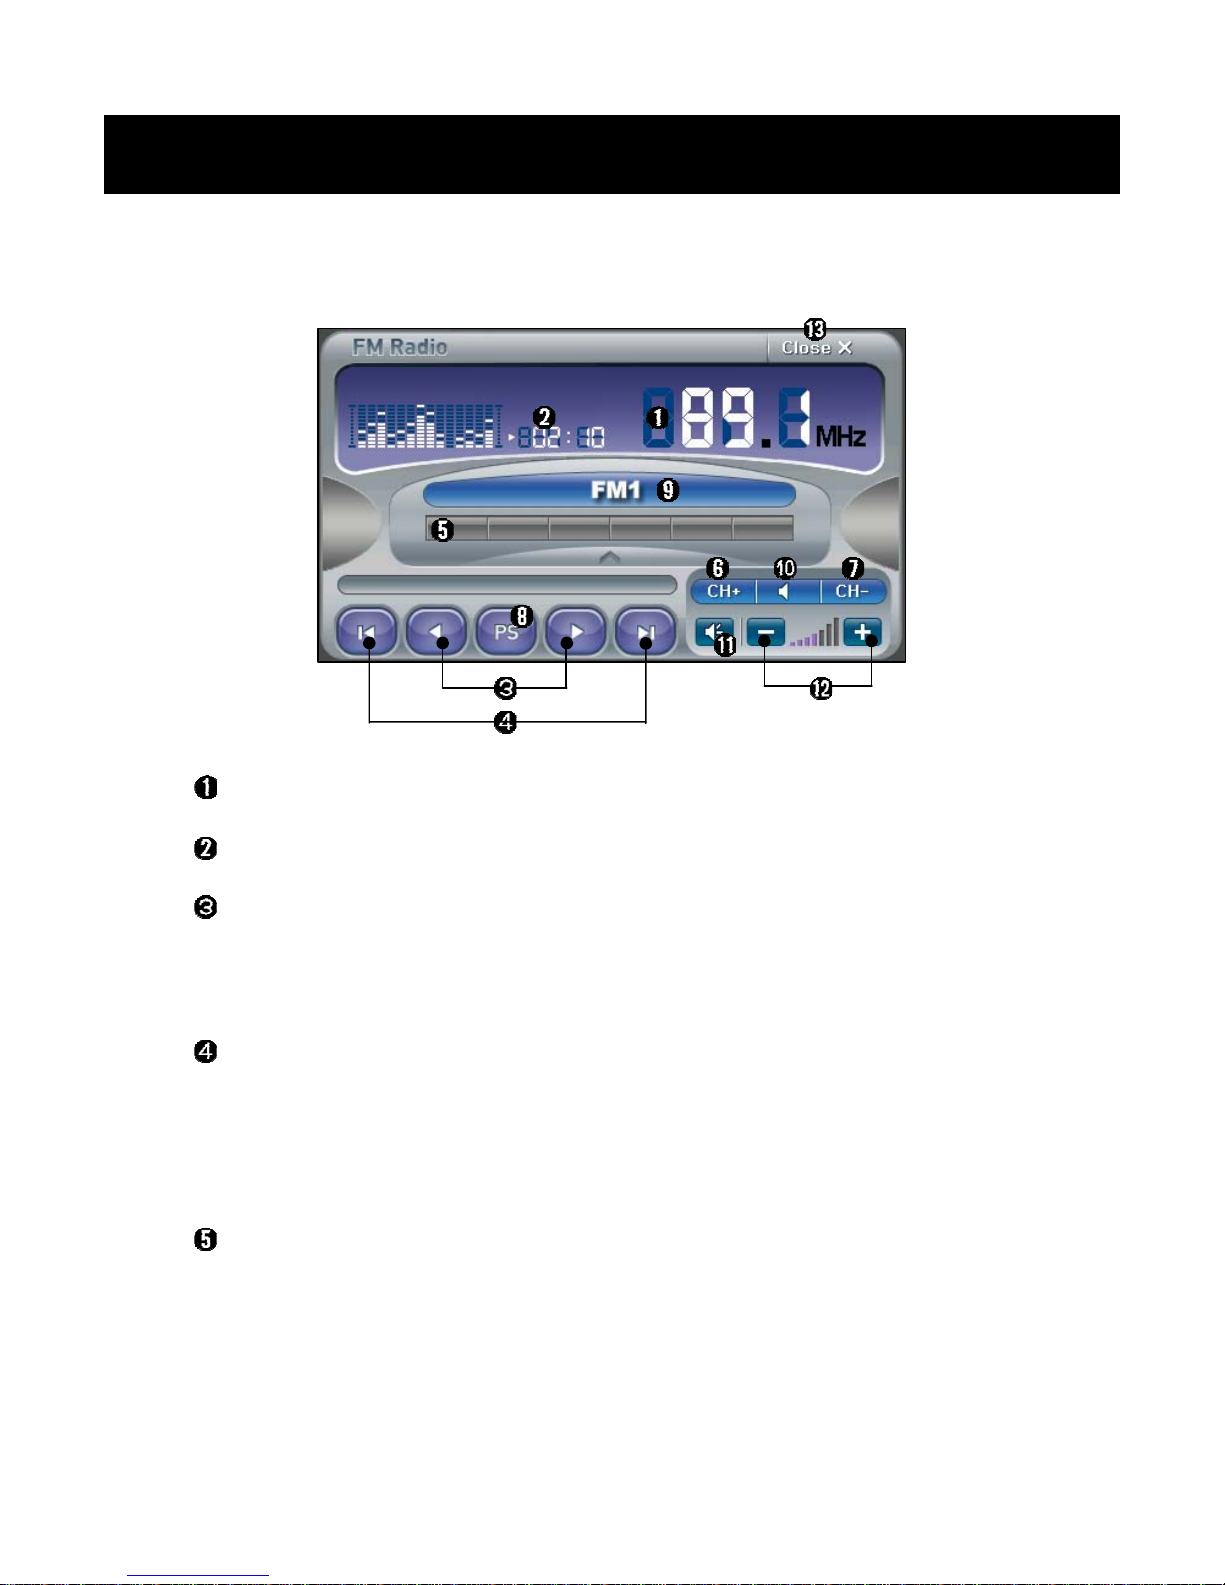
Current Frequency
Using Time
Frequency Shift Icons
• Shifts the frequency by 0.1MHz.
• Move Buttons(Left and Right) have the same function.
Auto Searching Icons
• Searchs the nearest broadcasting frequency from the current
frequency.
• Move Buttons(Up and Down) have the same function.
Channel Icons
• Each channels has and display the frequencies you appointed.
• Touch on any channel, and the memorized frequency will be played.
Using NexView
4. FM Radio
Page 16
16
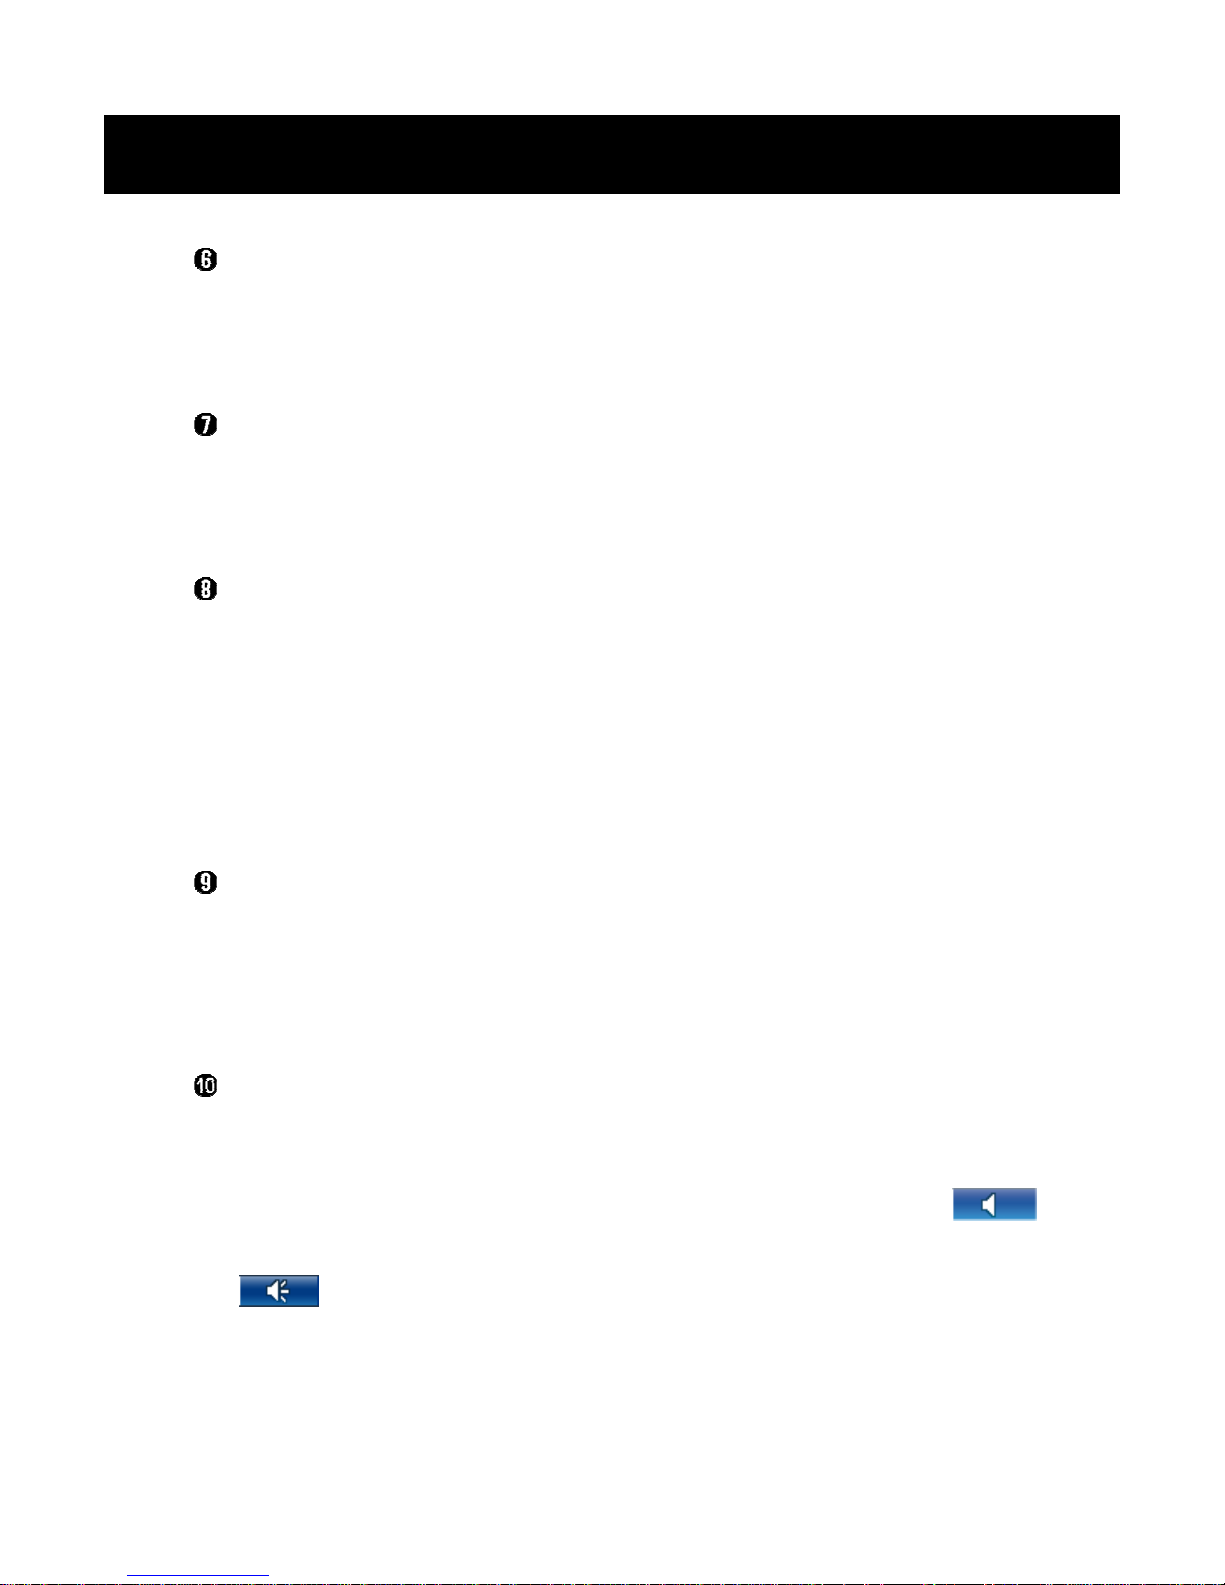
Memorizing Frequency Icon
• If you touch on this icon, the current frequency will be memorized to
an empty channel.
Deleteting Frequency Icon
• If you touch on this icon, the current frequency will be deleted from
the memorized channel.
Preset Icon
• If you touch on this icon, the FM Radio will automatically scan the
broadcasting frequencies and memorize them to empty channels.
• The scanning will be automatically stopped when all channels
memorize their own frequencies, or you can stop it during scanning
by touching on the Preset Icon again.
Channel Group Icon
• You can change channel groups by touching on this icon.
• There are 4 Channel groups in the FM radio, and each channel has
6 Channels.
Sound Output Selection Icon
• Select which one will be used for the FM radio sound output,
earphone or internal speaker.
• FM radio sound will be out through the earphone if the icon is ,
and the sound will be out through the internal speaker if the icon is
.
Using NexView
4. FM Radio
Page 17
17
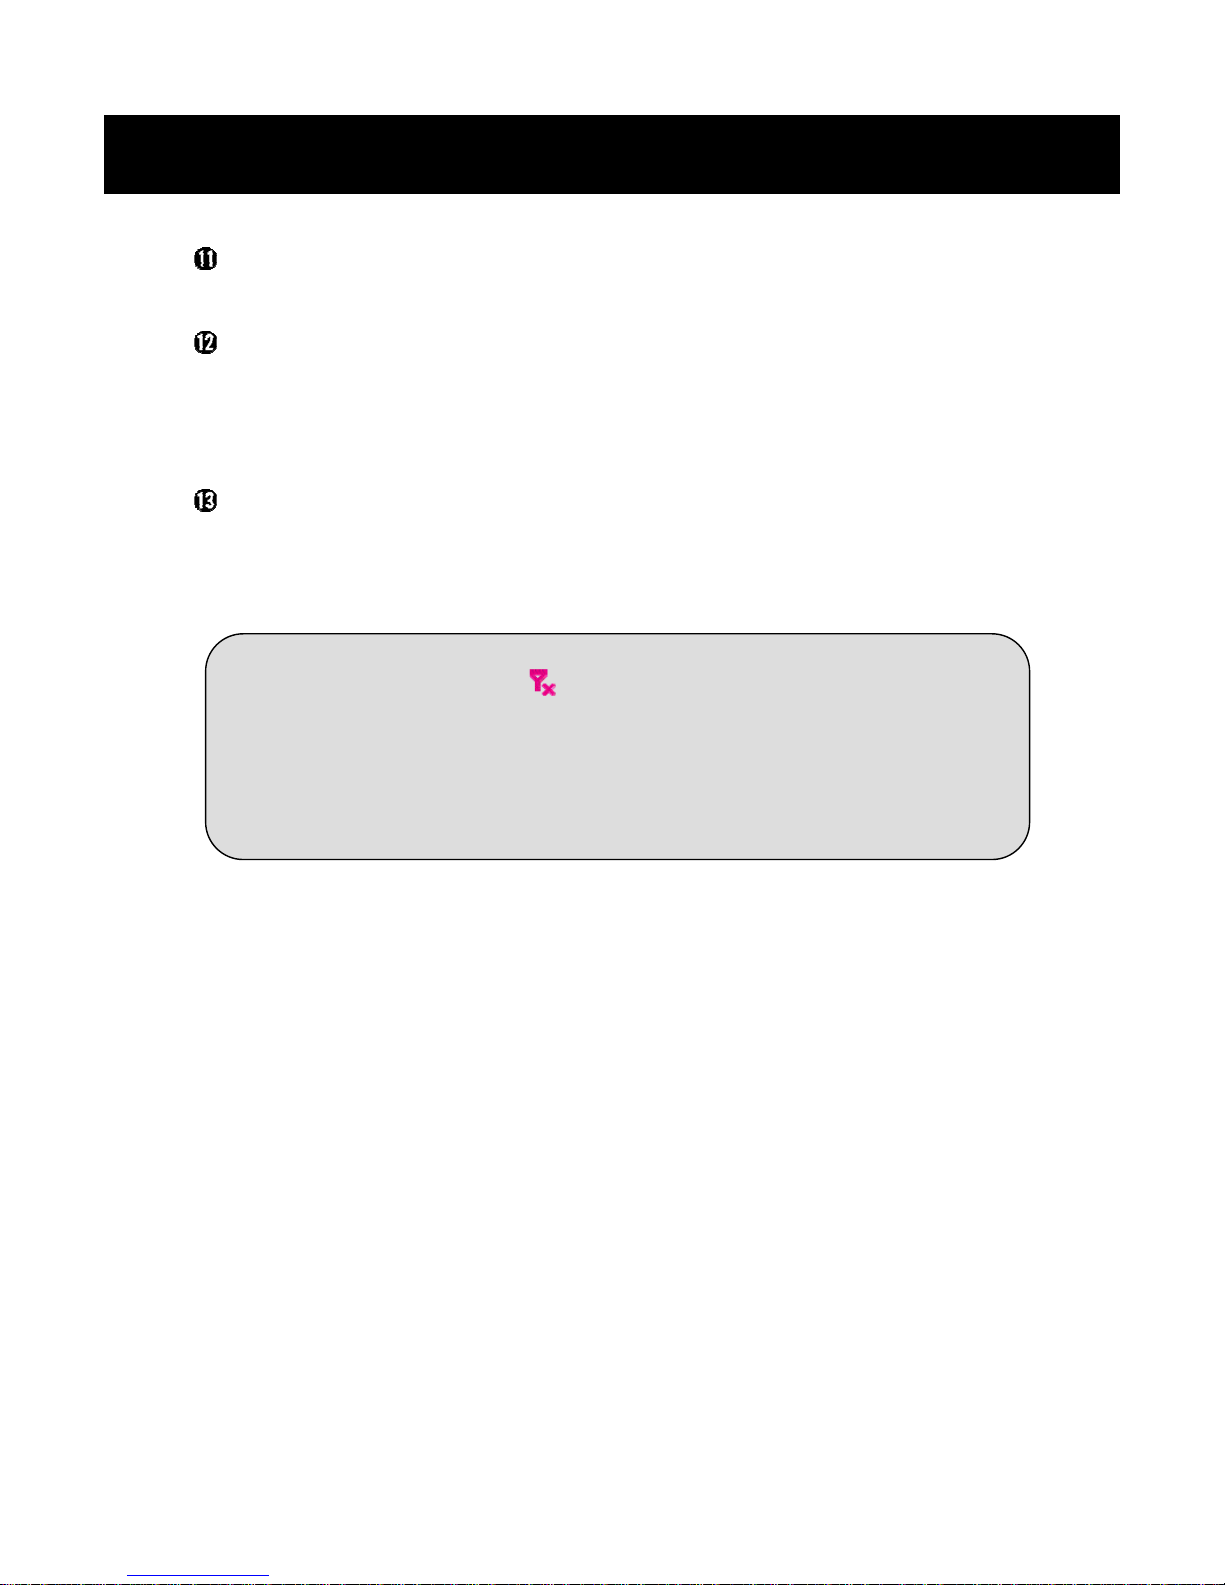
☼ No Antenna Indication
The earphone should be connected to the Player when you use the
FM radio because it does duty as an antenna. No Antenna
Indication appears on the screen if the earphone is not connected.
Mute Icon
Volume Control Icons
• Control the sound volume level of the FM Radio.
• Volume Control Button has the same function.
Close Icon
• Closes the FM Radio.
• ESC Button has the same function.
Using NexView
4. FM Radio
Page 18
18
5. Video Player
We recommend you to play under 320x240 resolution videos for WMV
format and under 720x480 resolution videos for MPEG, DivX, Xvid
formats.
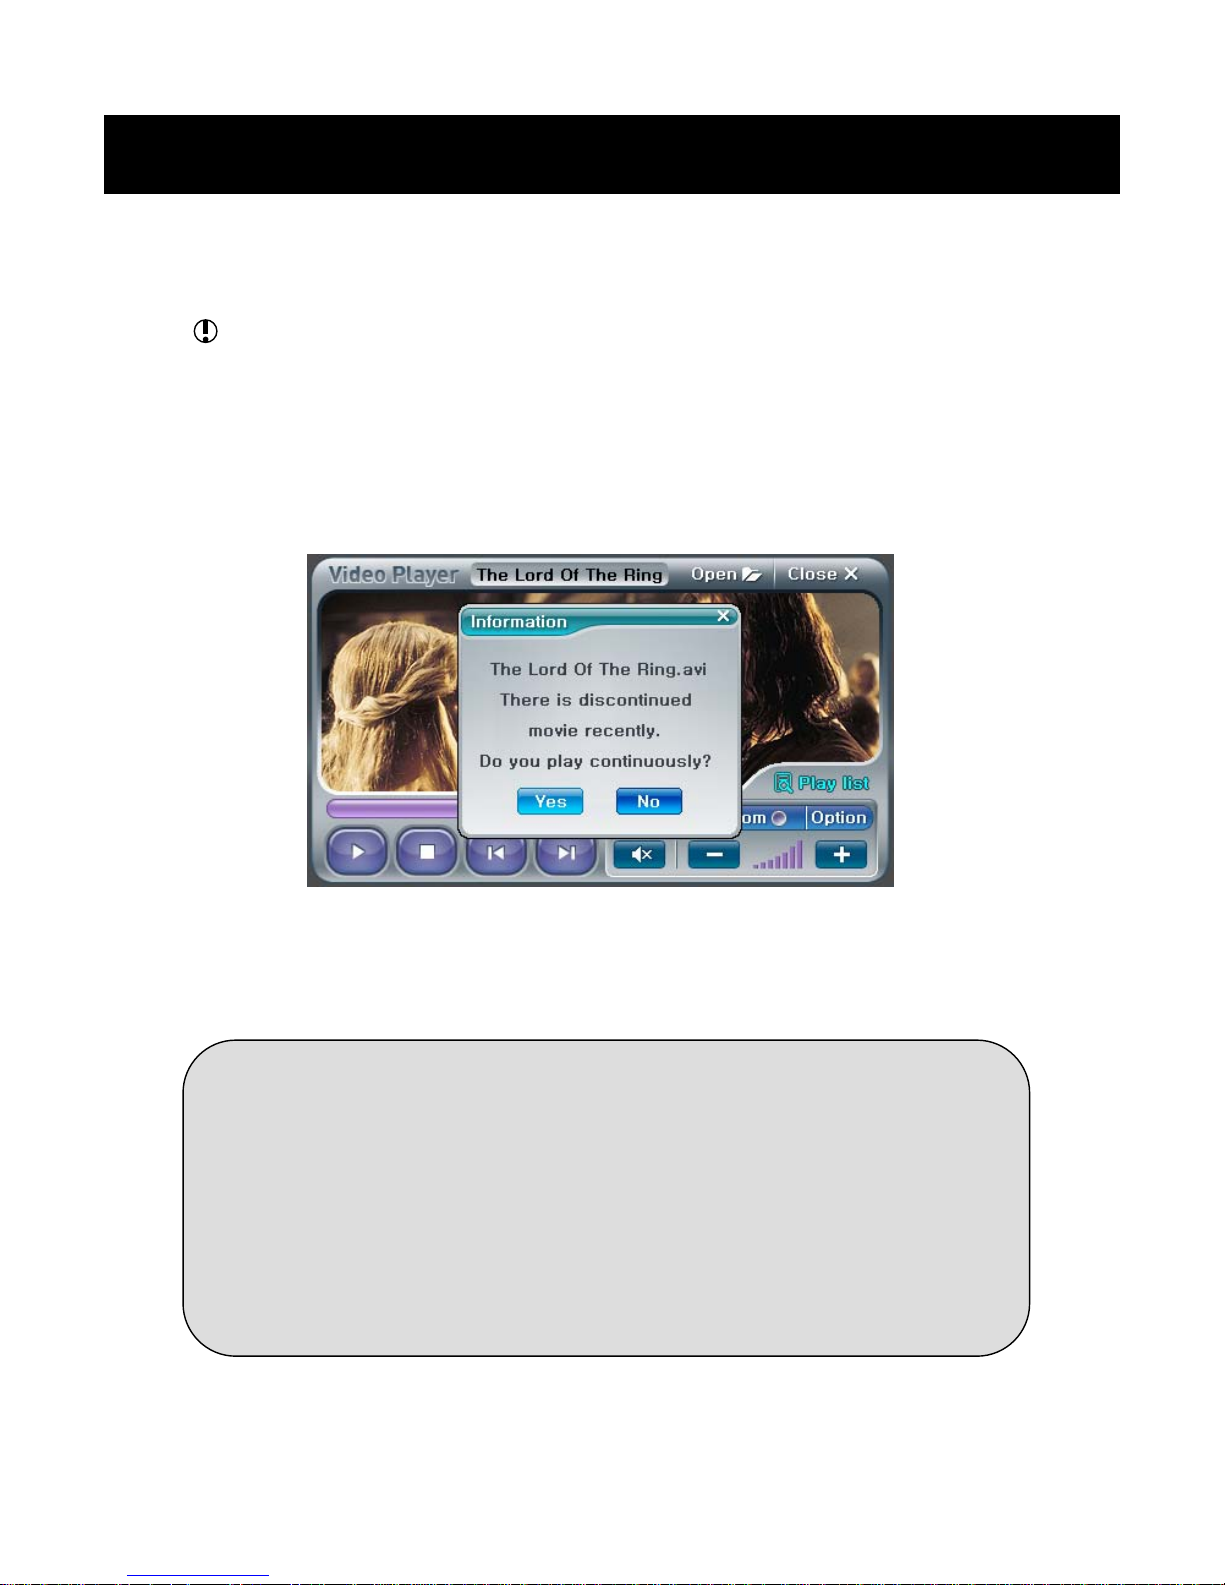
When you start the Video player, a window will appear to ask whether
you want to see the recent movie.
• If you select "Yes", the recent movie will be played.
• If you select "No", the first movie on the playlist will be played.
☼ Viewing the Video Player's Menu
When you start a movie, the Video Player will play it with the full
screen mode.
The Video Player's Menu will appear if you touch on any point of
the screen or press the M Button shortly.
The Video Player's Menu will disappear and the screen will return to
the full screen mode if you do above again.
Using NexView
5. Video Player
Page 19
19
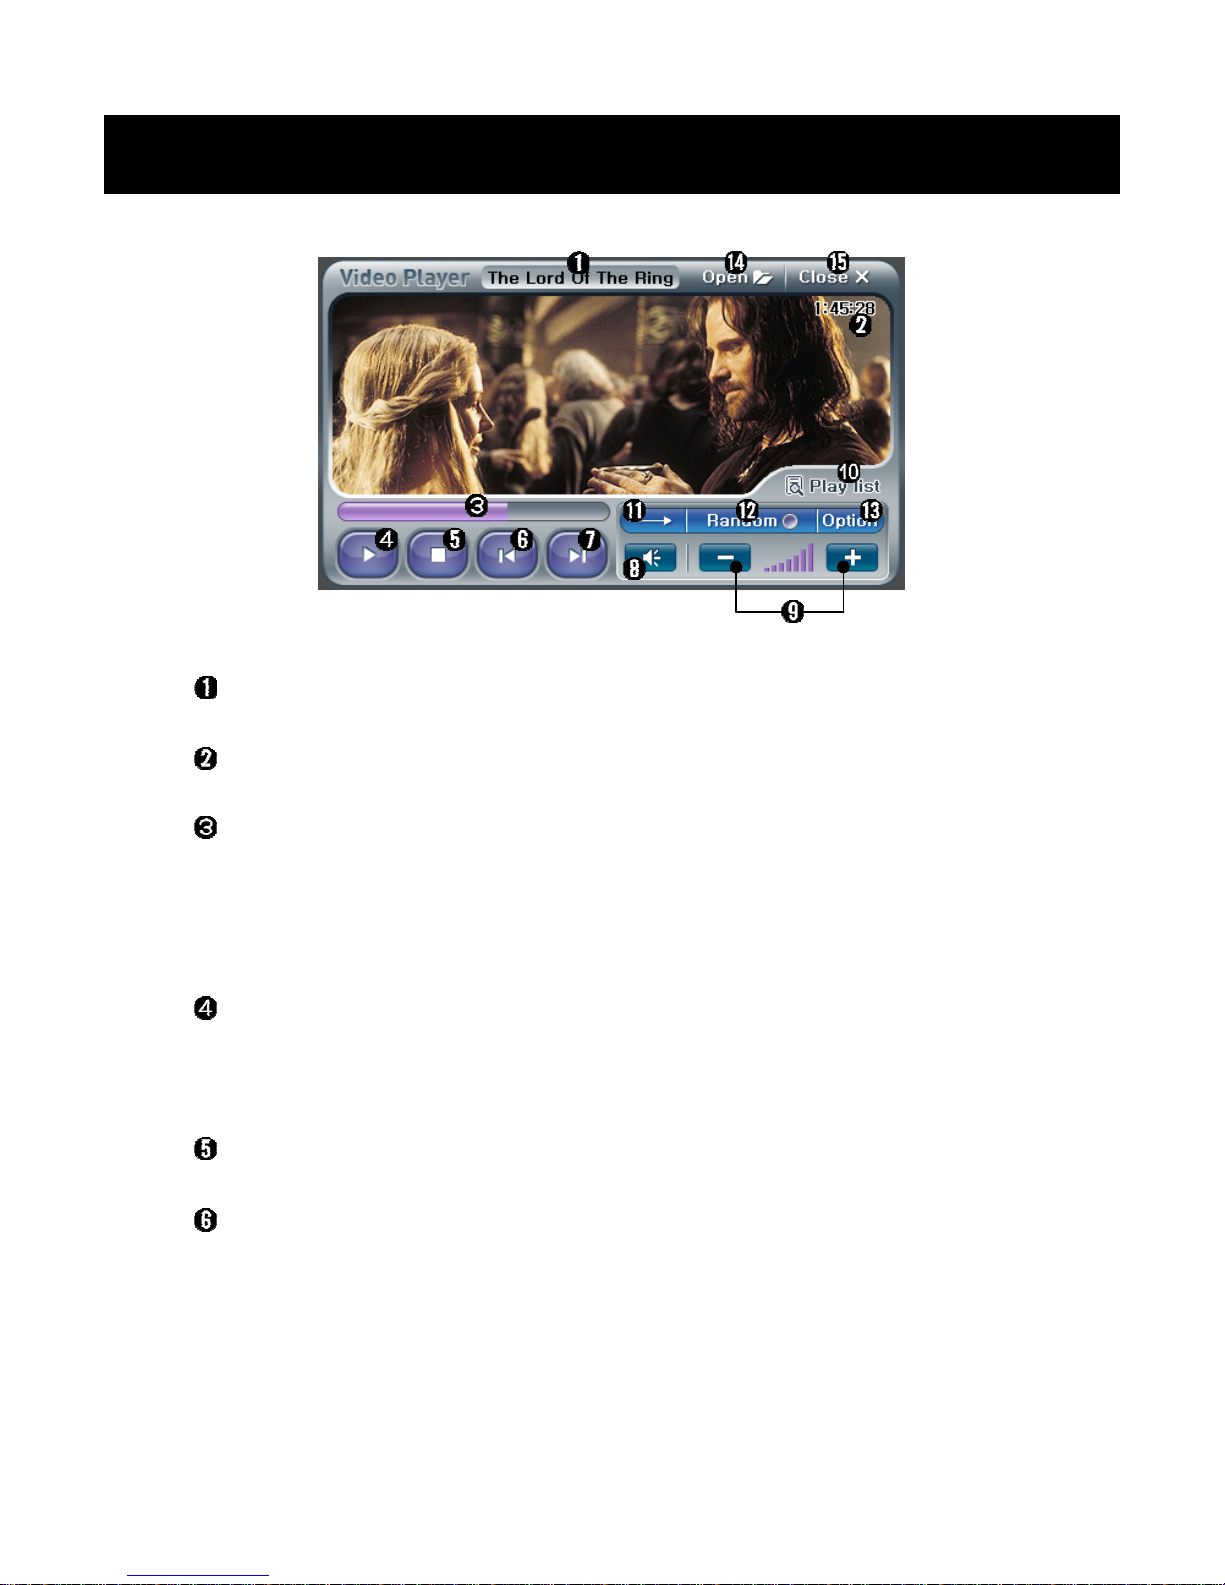
Current File's Name
Playing Time
Progression Bar
• You can go to another frame by touching on this bar.
• You can move forward or back 1/20 of the whole playing time with
pressing the Move Buttons(Left and Right).
Play/Pause Icon
• Plays and pause playback.
• Play/Pause button has the same function.
Stop Icon
Previous Movie Icon
• Touch on this icon to go to the previous movie on the Playlist.
• Random movie on the Playlist will be played if the Random Mode
was selected.
• The Move button(Up) has the same function.
Using NexView
5. Video Player
Page 20
20
Next Movie Icon
• Touch on this icon to go to the next movie on the Playlist.
• Random movie on the Playlist will be played if the Random Mode
was selected.
• The Move Button(Down) has the same function.
Mute Icon
Volume Control Icons
• Controls the sound volume level of the Video Player.
• Volume Control Button has the same function.
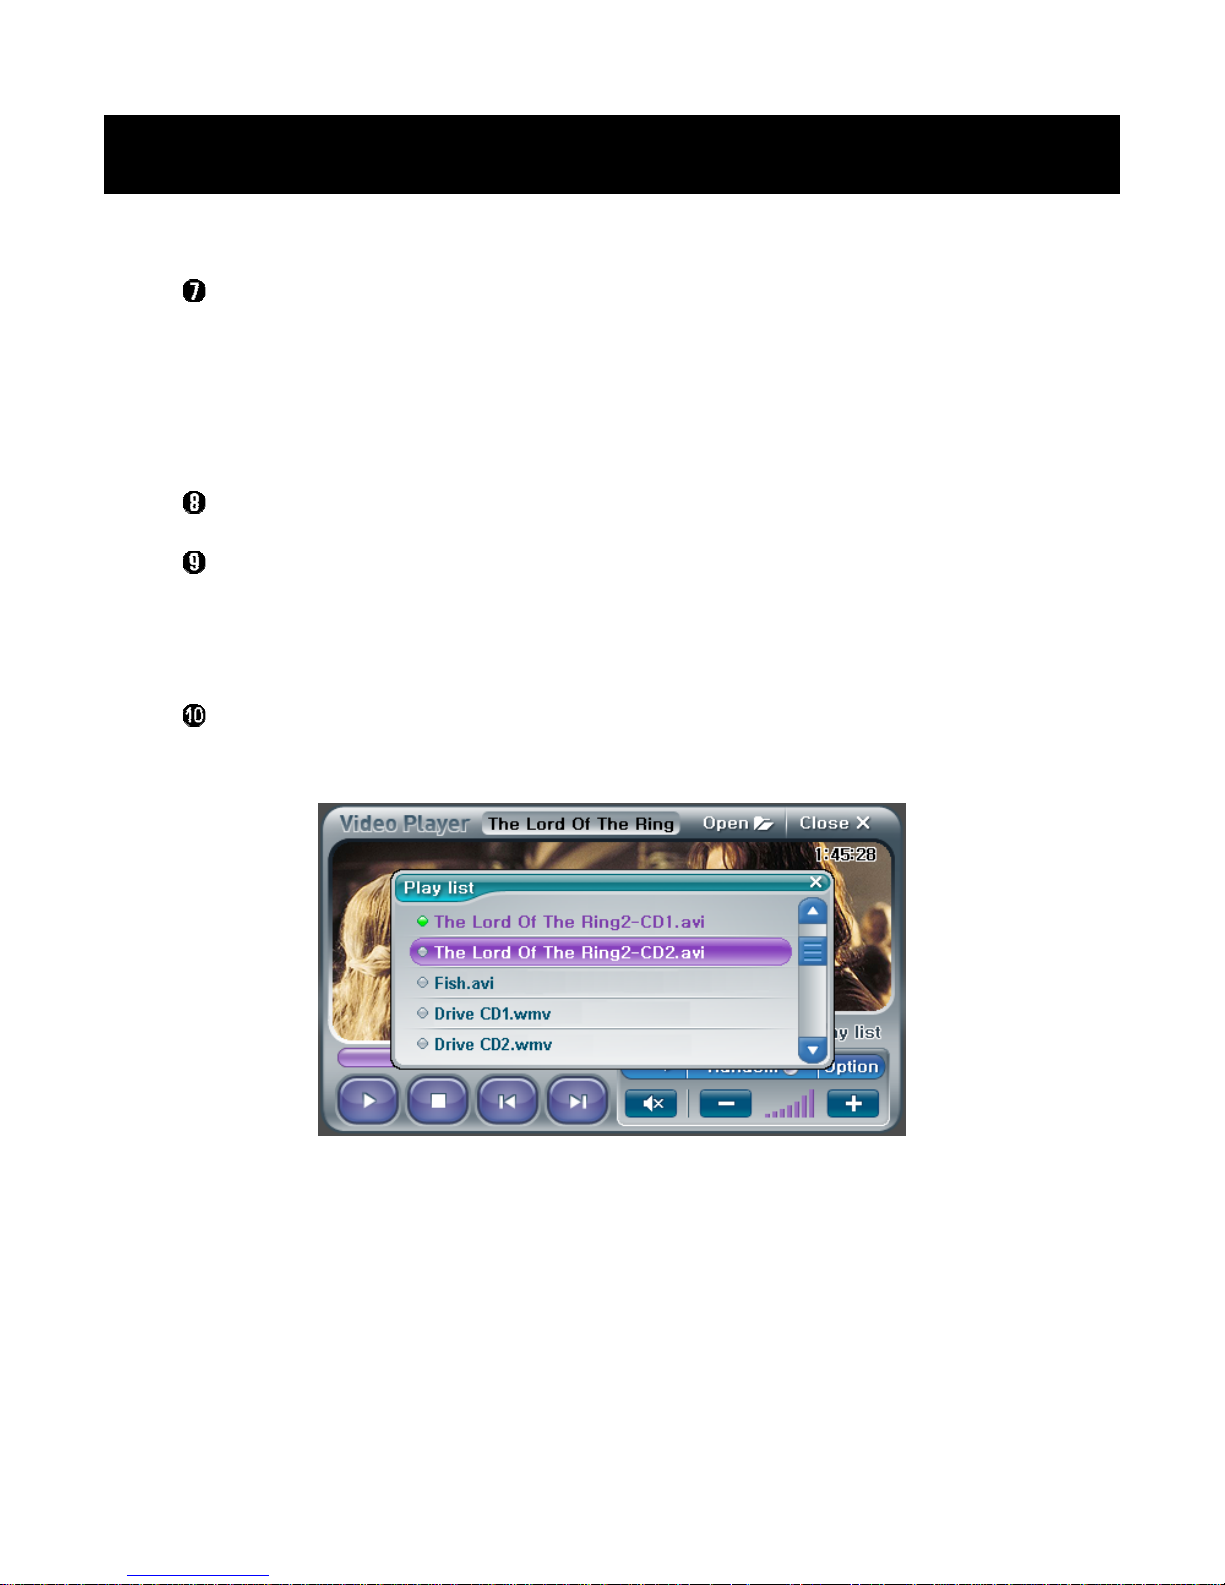
Playlist Icon
• Touch on this icon, and the Playlist Window will appear.
• Current playing file highlighted with the violet color.
• If you select another file on the list, it will be played at once.
• See "Open Icon" on page 22 for the steps of the Playlist editing.
Using NexView
5. Video Player
Page 21
21
Playback Mode Selection Icon
• Plays all movies on the Playlist only one time.
• Plays all movies on the Playlist repeatly.
• Plays the current movie repeatly.
Random Mode Icon
• Plays movies on the Playlist not in sequency, but at random.
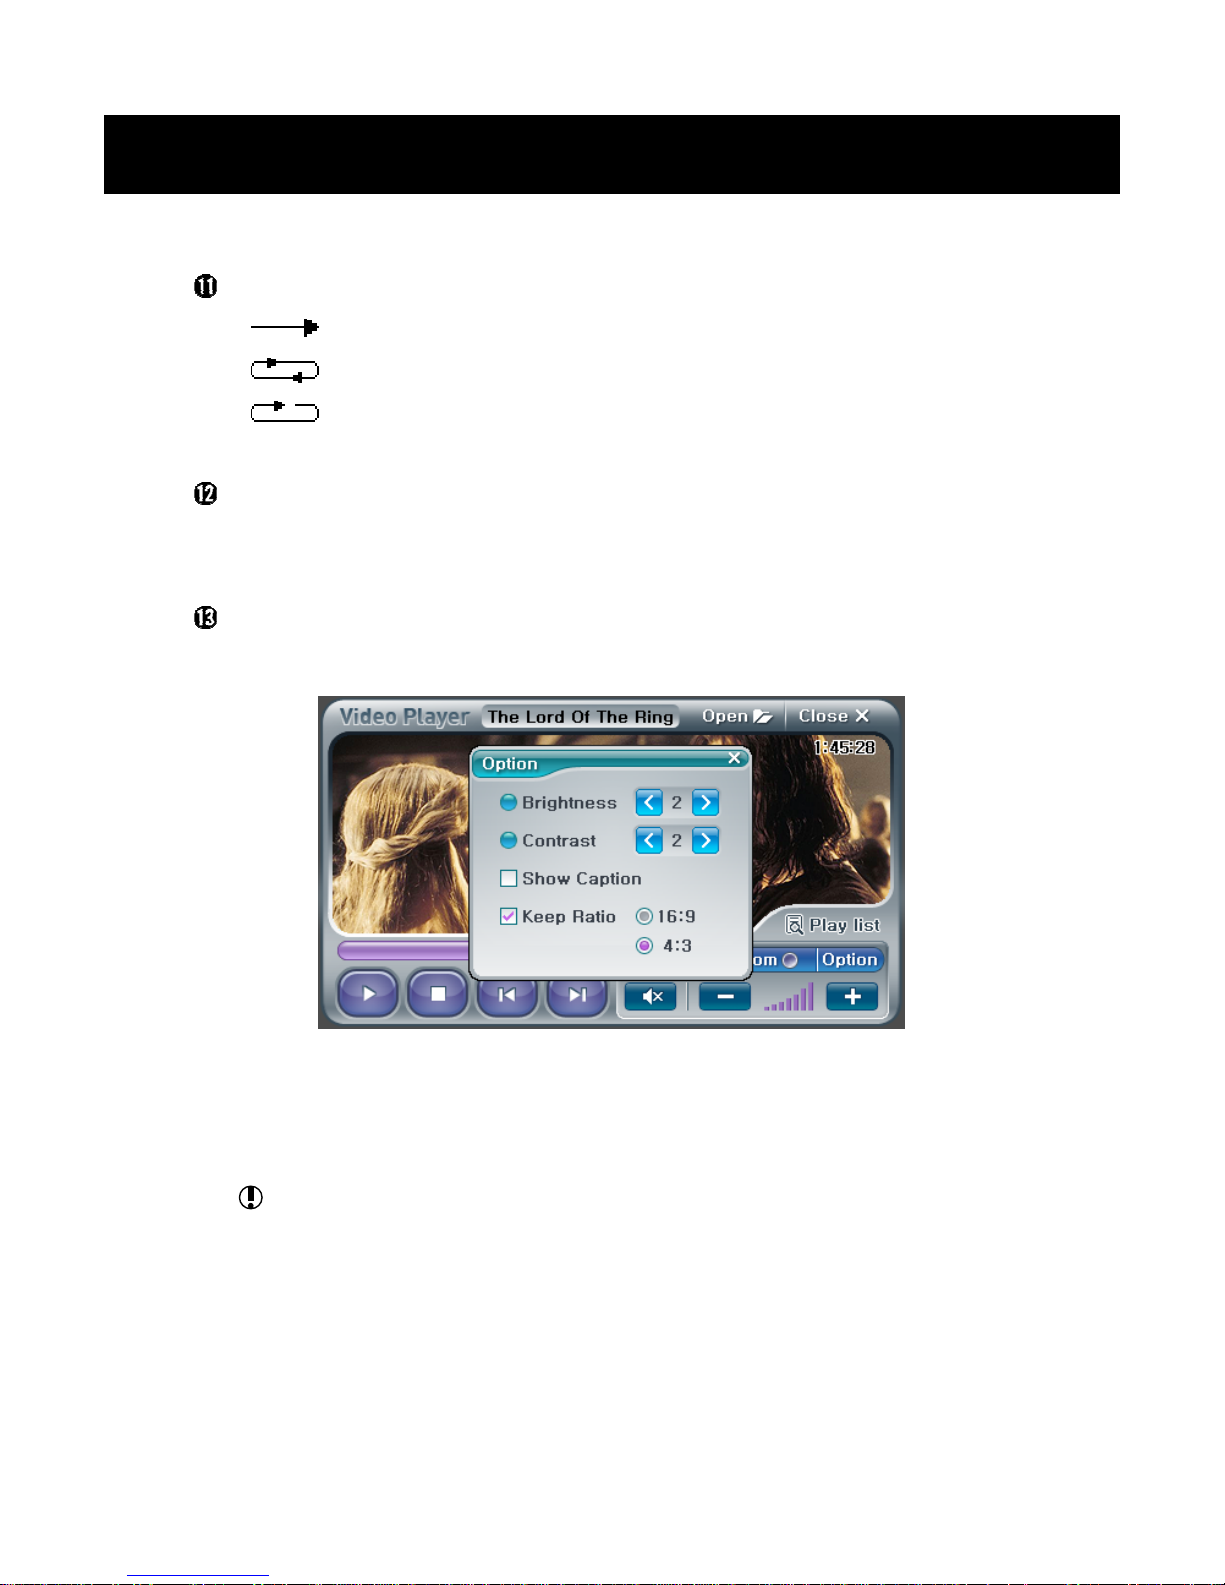
Option Icon
• Touch on this icon, and the Option Window will appear.
• Brightness: Adjust the brightness
• Contrast: Adjust the contrast
• Show Captioin: Choose whether you want to see the caption.
For viewing the caption, the captioin file's name should be same
with the movie file's name, and both files should be located in the
same folder. NexView supports the caption files of SMI format.
• Keep Ratio: Select the picture ratio.
Using NexView
5. Video Player
Page 22
22
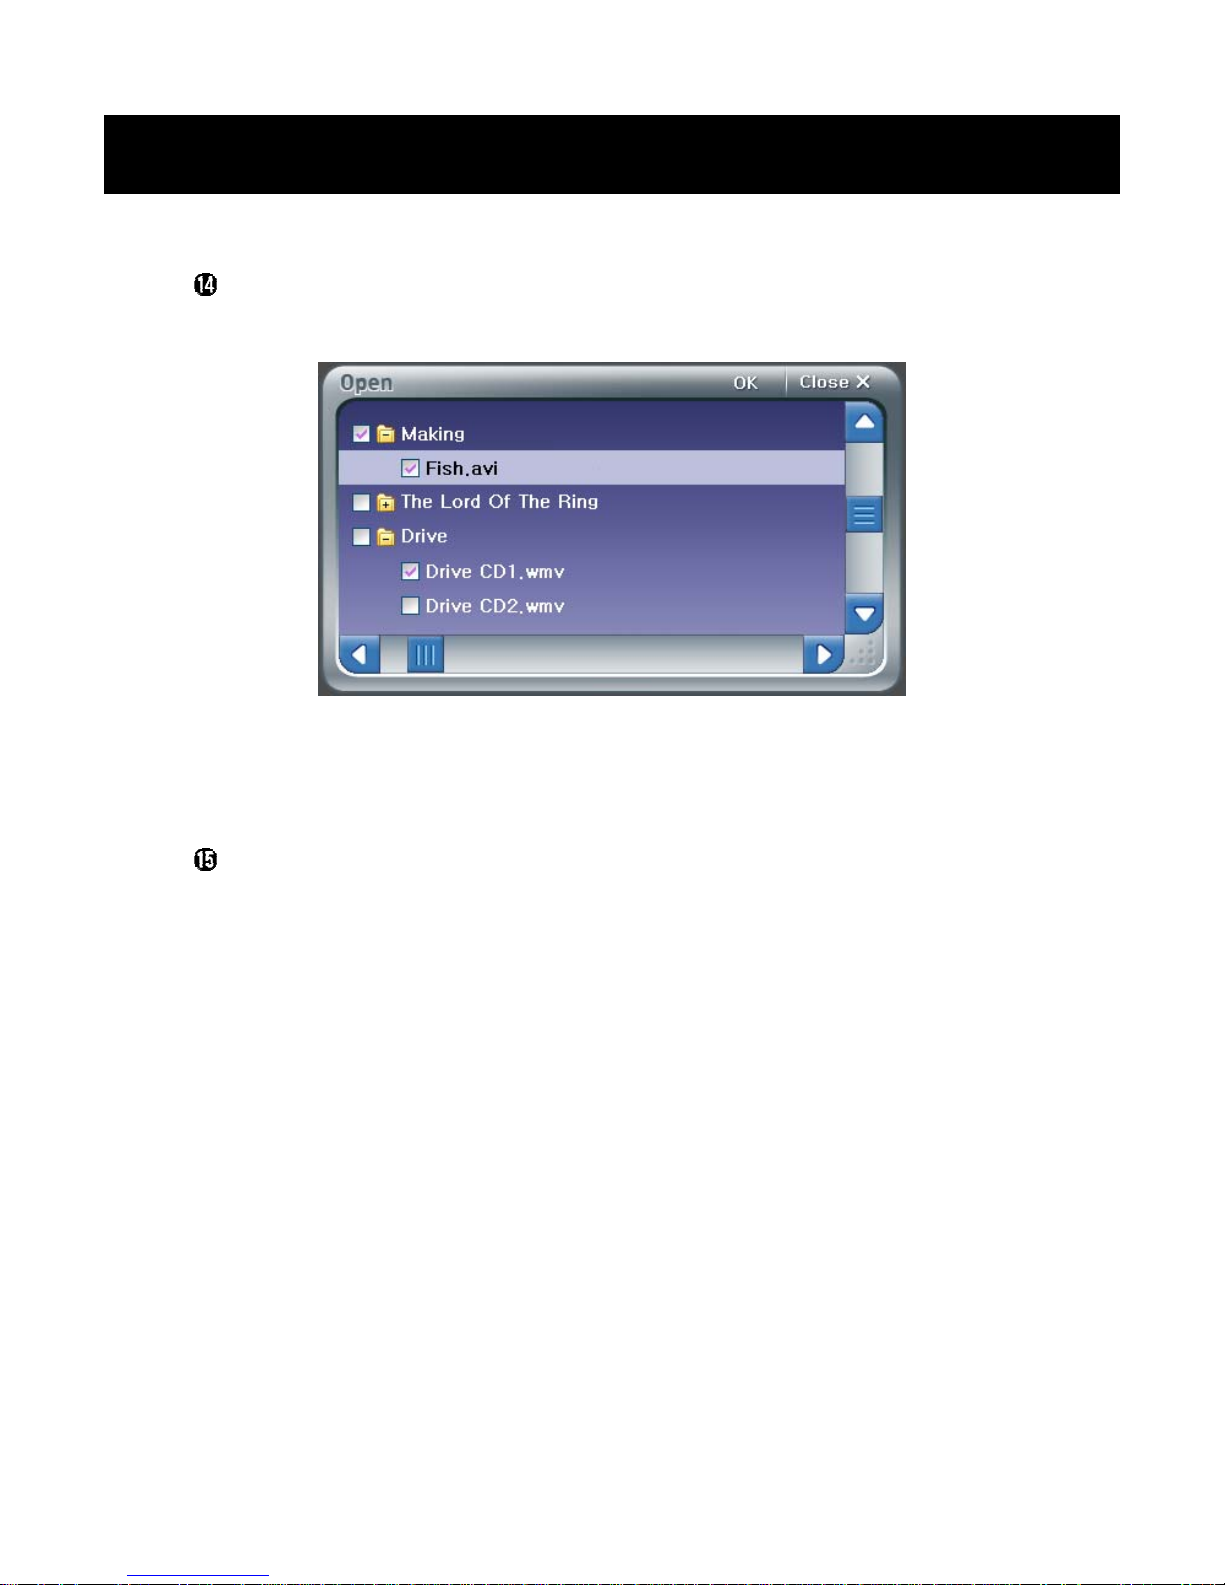
Open Icon
• Touch on this icon, and the Playlist Editing Window will appear.
• Select all files you want to play, then touch on the OK Icon or press
the OK Button.
Close Icon
• Closes the Video player.
• ESC Button has the same function.
Using NexView
5. Video Player
Page 23
23
6. Photo Album
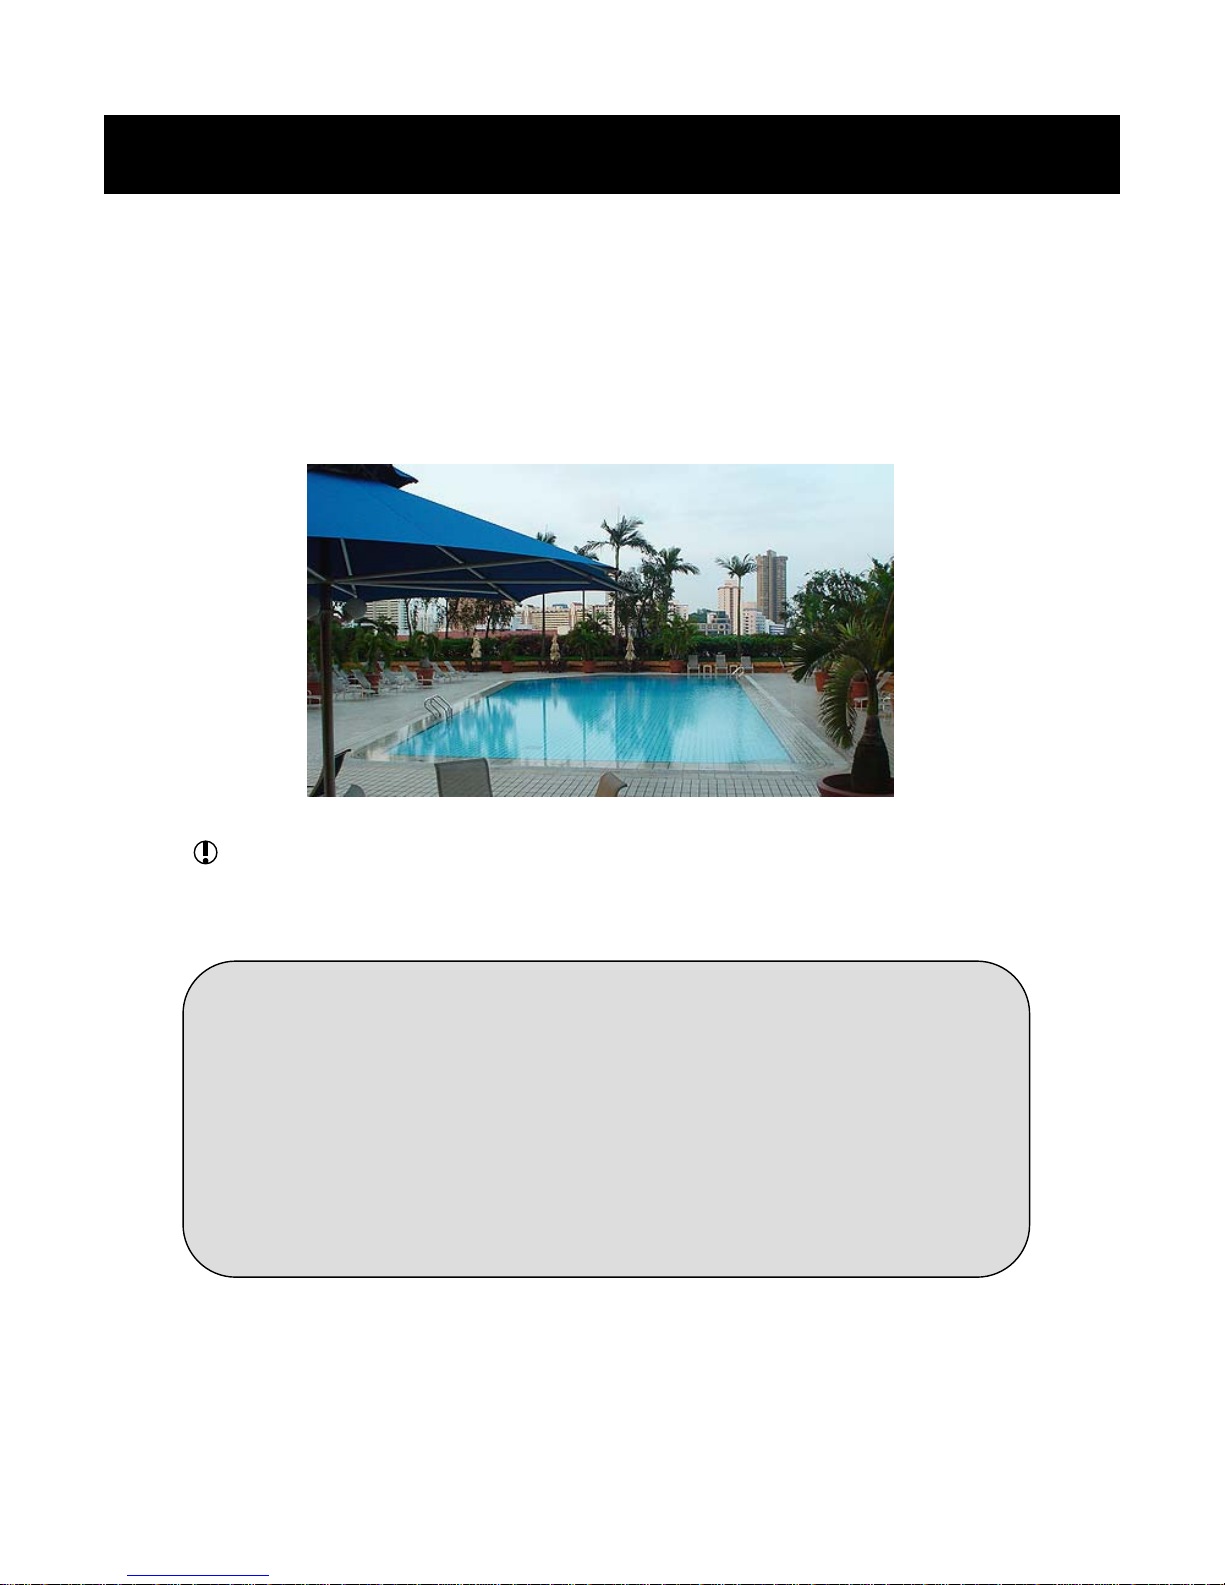
When you start the Photo Album, it will show the first photo on the
Playlist automatically.
The maximum pixel resolution of a photo that can be supported in the
Photo Album is 1600x1200.
☼ Viewing the Photo Album's Menu
When you start the Photo Album, it will show photos with the full
screen mode.
The Photo Album's Menu will appear if you touch on any point of
the screen or press the M Button shortly.
The Photo Album's Menu will disappear and the screen will returnto
the full screen mode if you do above again.
Using NexView
6. Photo Album
Page 24
24
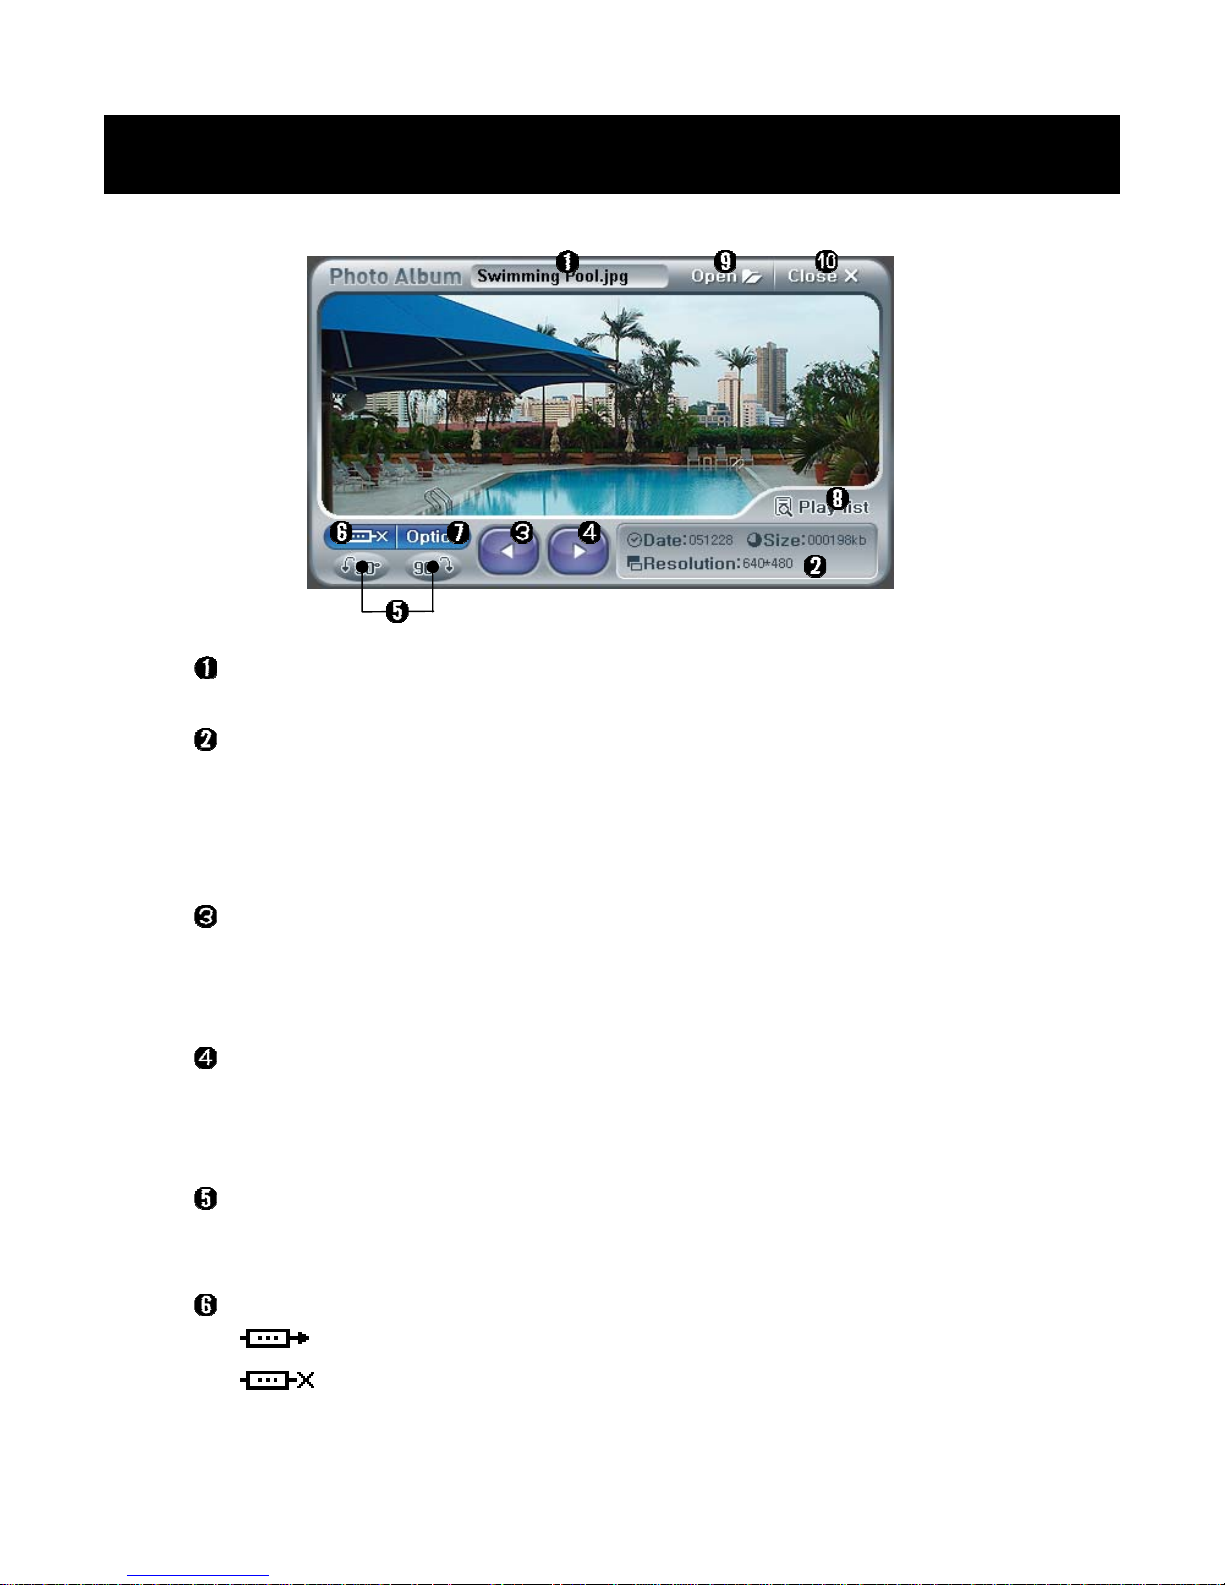
Current File's Name
File Information
• Date: Making date of the file
• Size: Size of the file
• Resolution: Resolution of the photo
Previous Photo Icon
• Touch on this icon to go to the previous photo on the Playlist.
• The Move Button(Left) has the same function.
Next Photo Icon
• Touch on this icon to go to the next photo on the Playlist.
• The Move Button(Right) has the same function.
Rotation Icons
• Rotate the photo.
Slide Show Icon
• Start the Slide Show
• Stop the Slide Show
Using NexView
6. Photo Album
Page 25
25
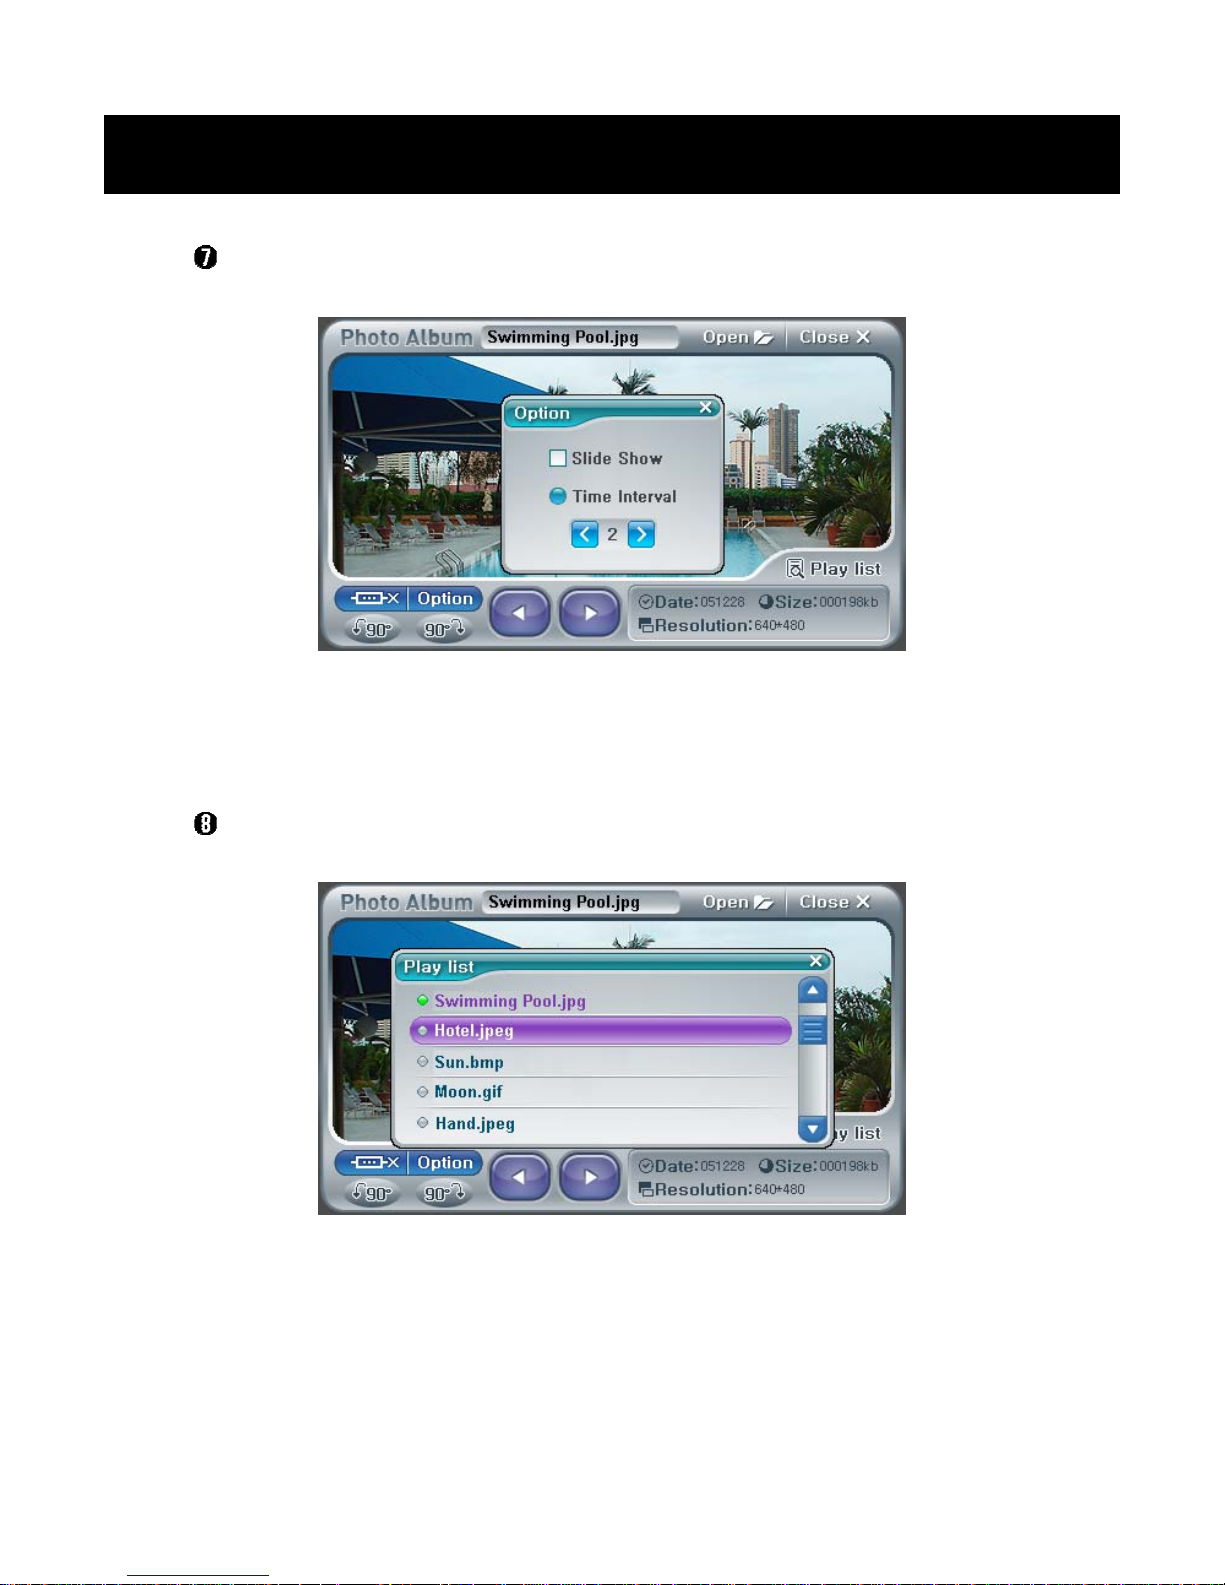
Slide Show Option Icon
• Touch on this icon, and the Option Window will appear.
• Slide Show: Choose whether the Slide Show plays.
• Time Interval: Select the time interval between each photos in the
slide show.
Playlist Icon
• Touch on this icon, and the Playlist Window will appear.
• Current playing file highlighted with the violet color.
• If you select another file on the list, it will be played at once.
• See "Open Icon" on page 26 for the steps of the Playlist editing.
Using NexView
6. Photo Album
Page 26
26
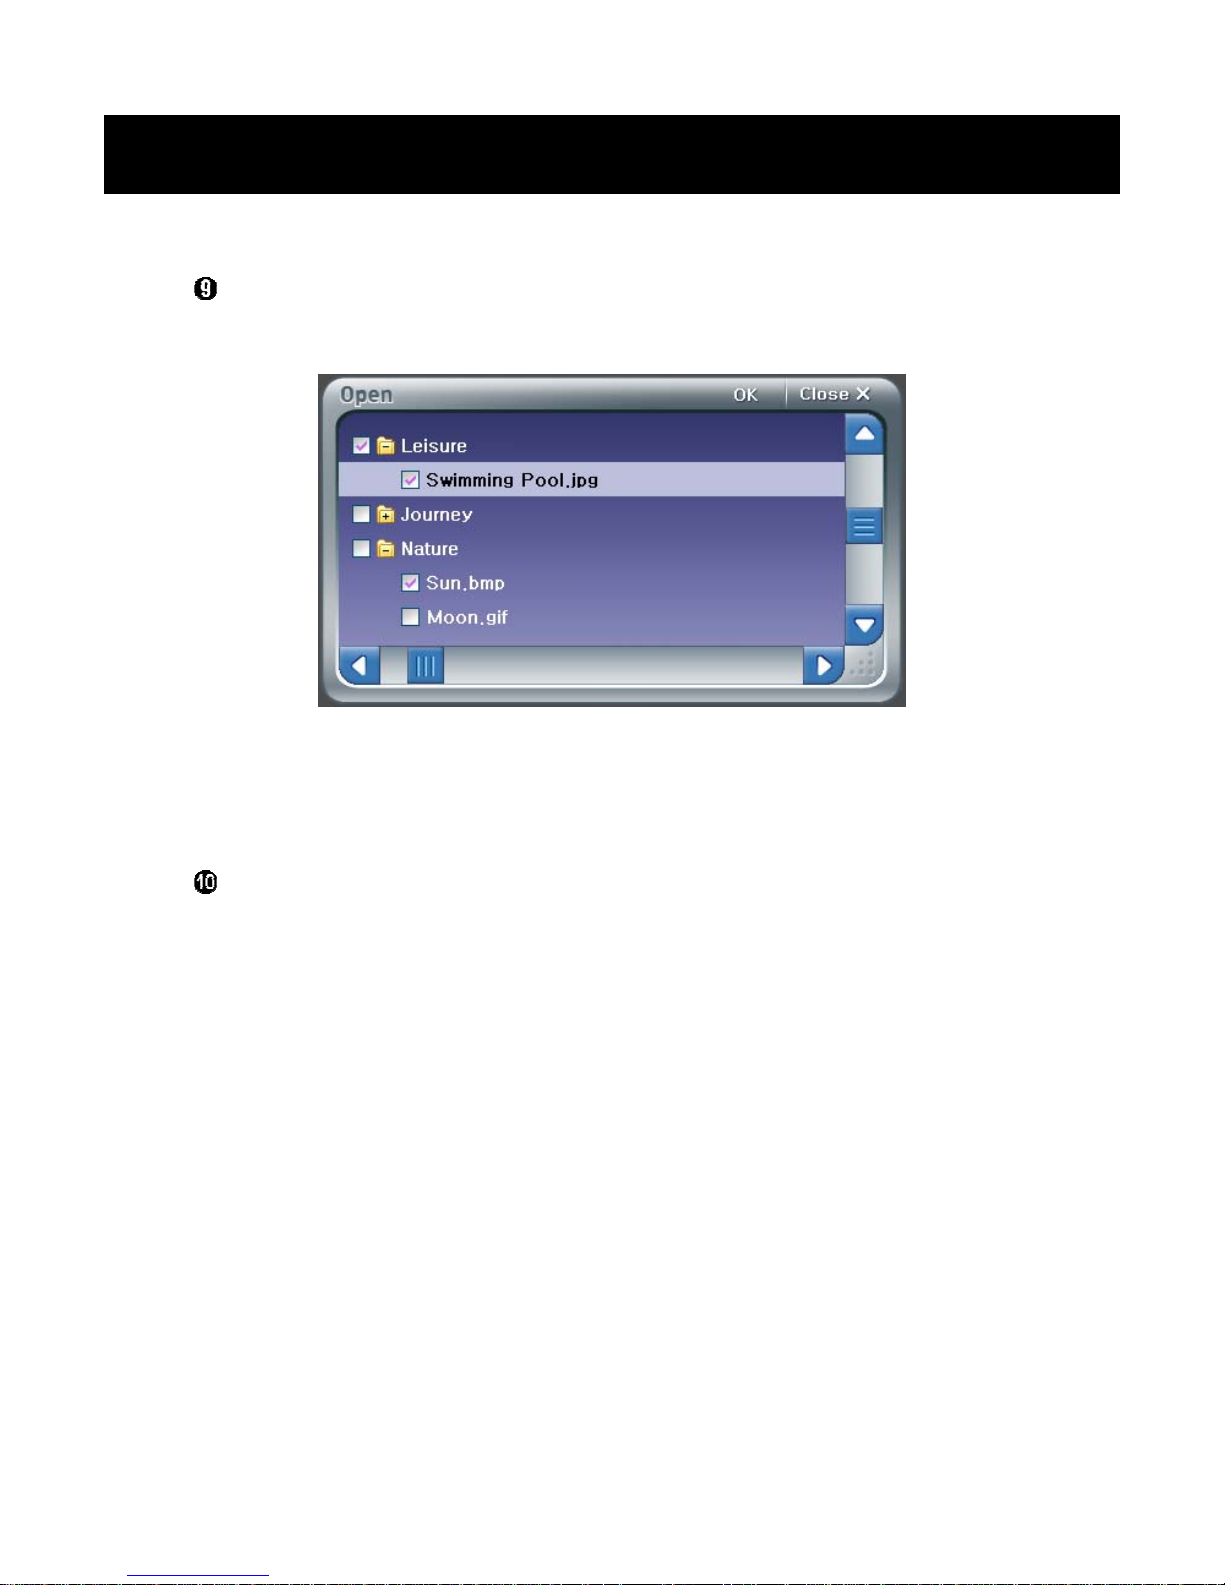
Open Icon
• Touch on this icon, and the Playlist Editing Window will appear.
• Select all files you want to play, then touch on the OK Icon or press
the OK Button.
Close Icon
• Closes the Photo Album.
• ESC Button has the same function.
Using NexView
6. Photo Album
Page 27
27
7. Text Viewer
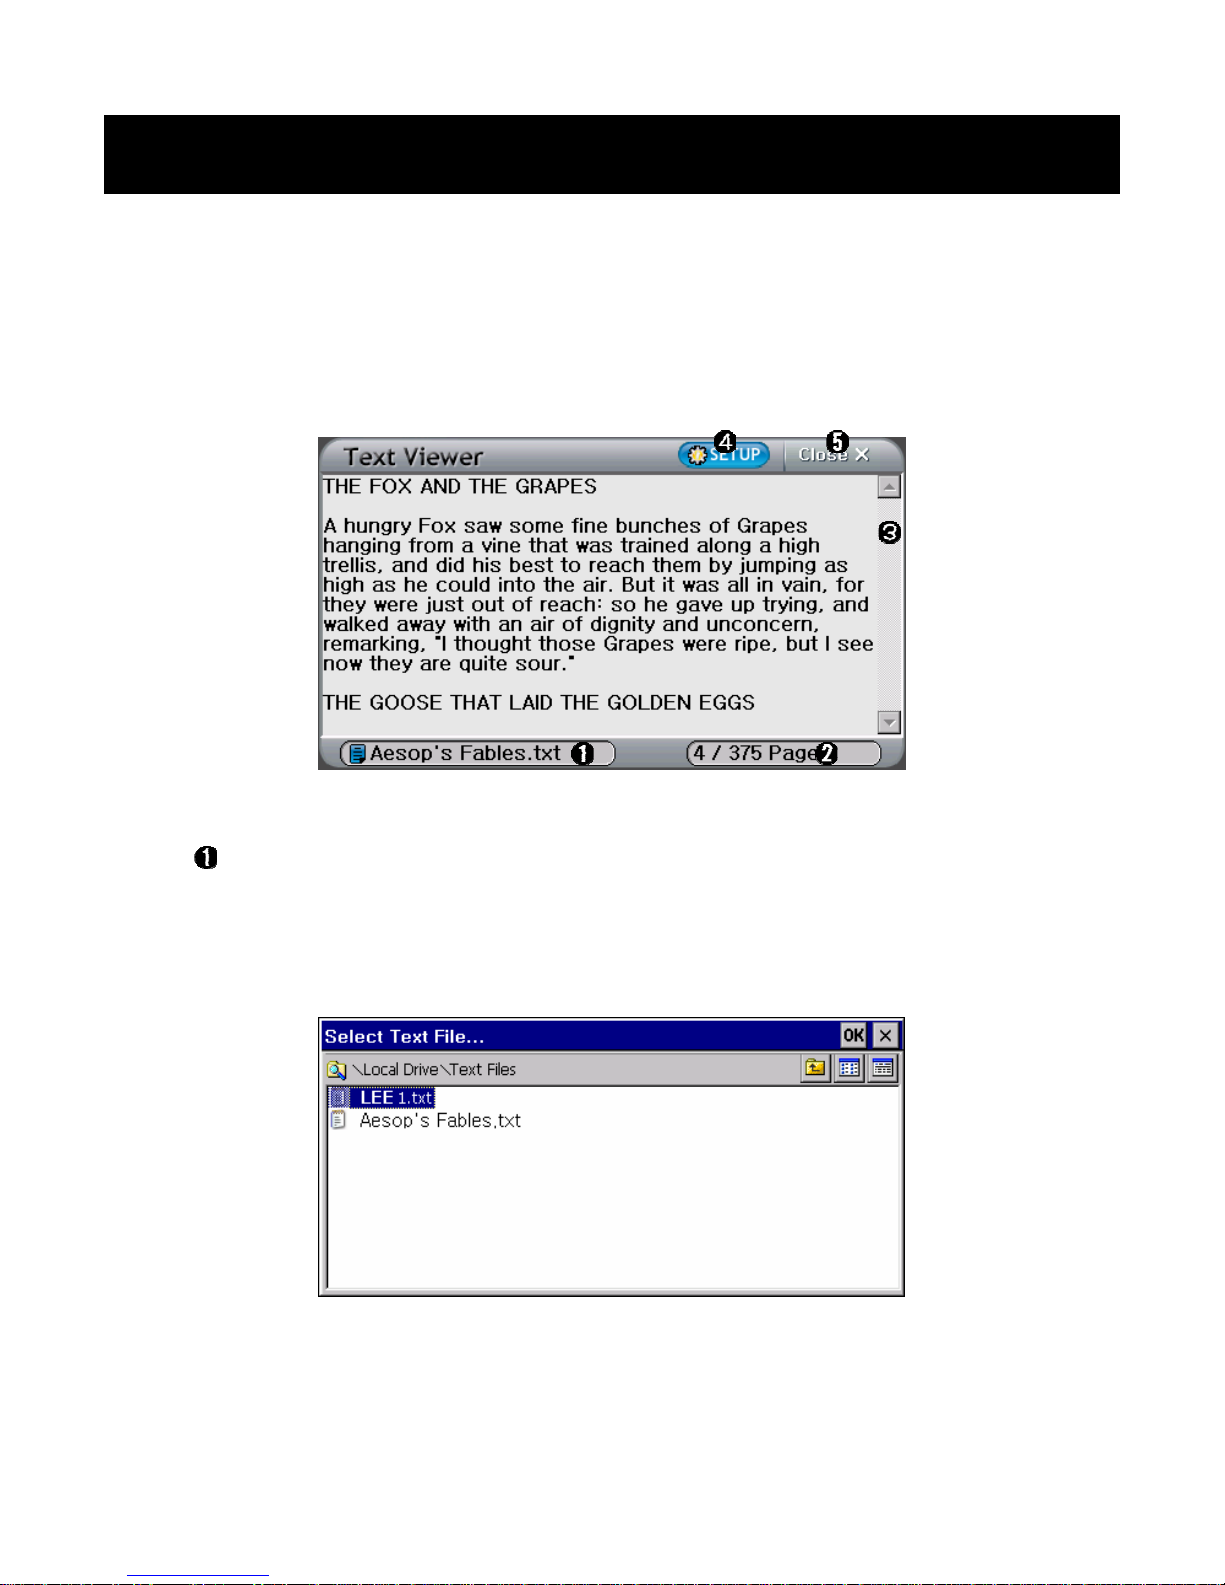
When you start the Text Viewer, it will show the recent document.
Current File's Name
• Touch on this icon or press the OK Button, and the file selection
window will appear. You can select a text file on this window that you
want to read.
Using NexView
7. Text Viewer
Page 28
28
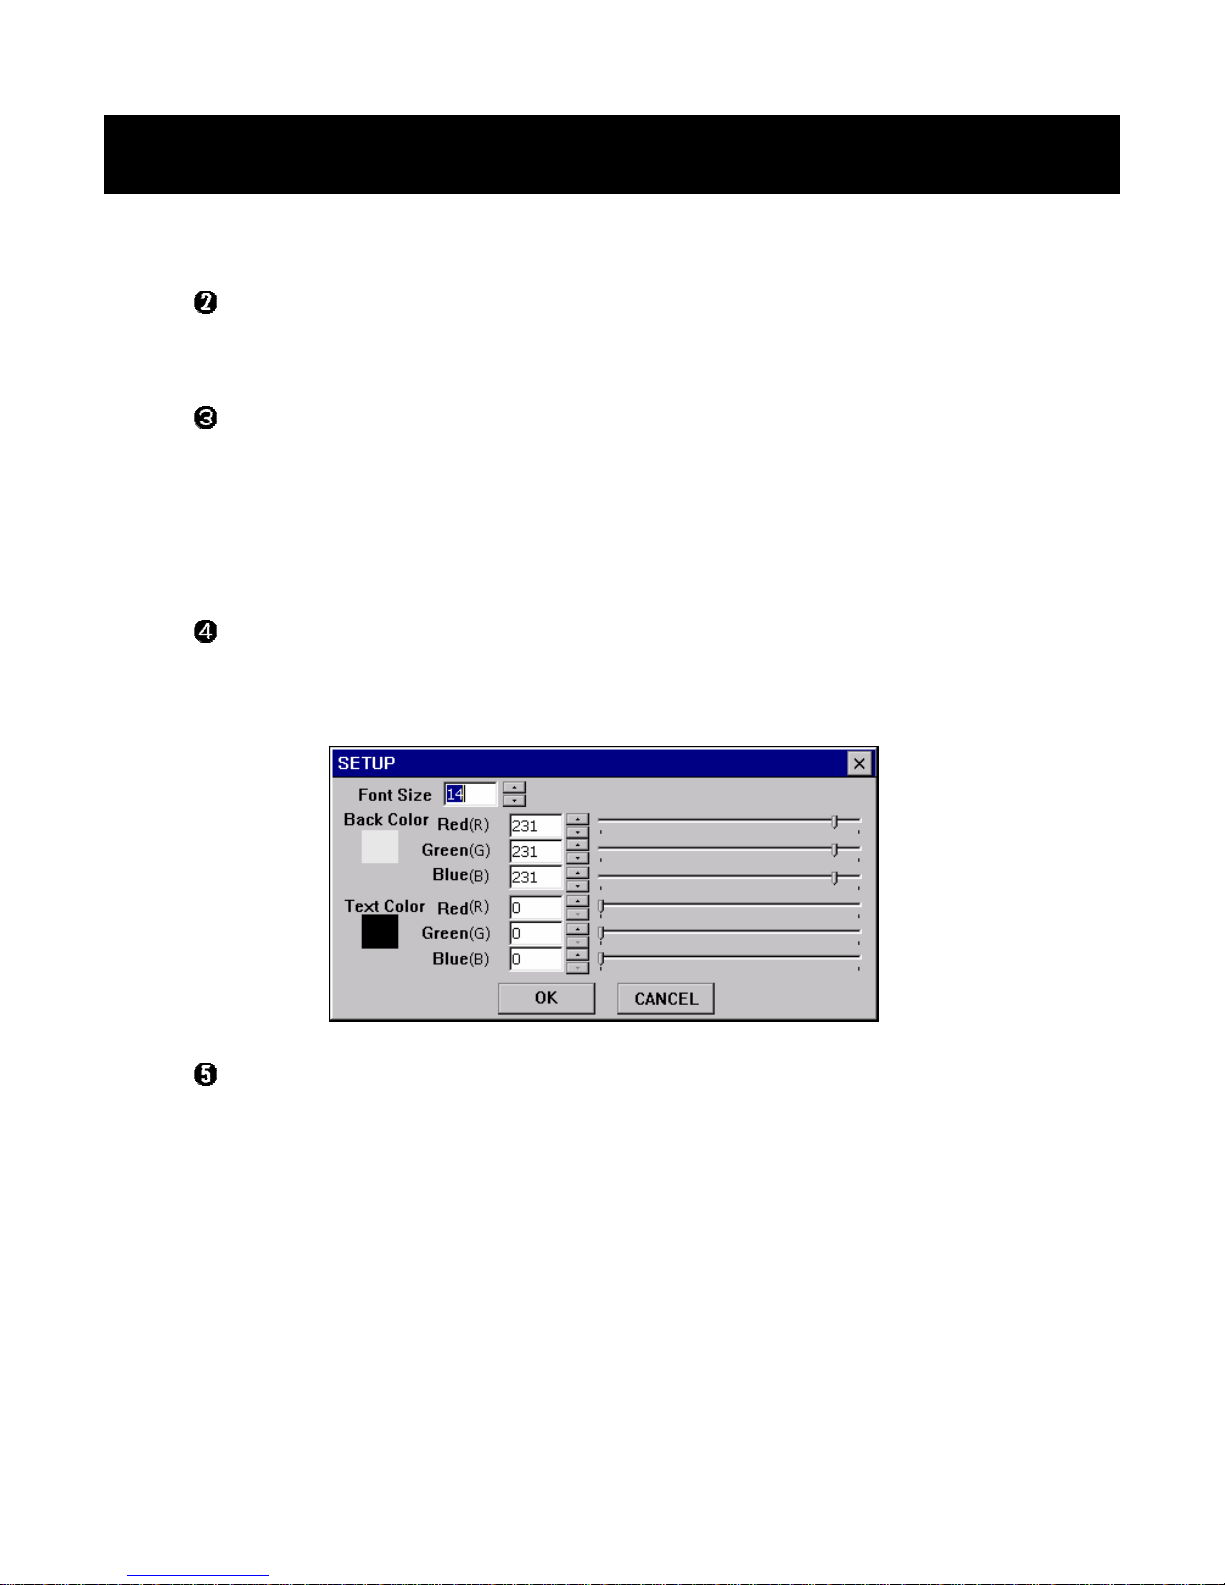
Pages Information
• Displays the current page's number and the last page's.
Scroll Bar
• You can go to another page or line by touching on this bar.
• The Volume Control Button scrolls up or down the text by a page.
• The Move Buttons(Up and Down) scrolls up or down the text by a
line.
Setup Icon
• Touch on this icon, and the Setup Window will appear. You can
select the font size, background color and text color.
Close
• Closes the Text Viewer.
• ESC Button has the same function.
Using NexView
7. Text Viewer
Page 29
29
8. File Manager
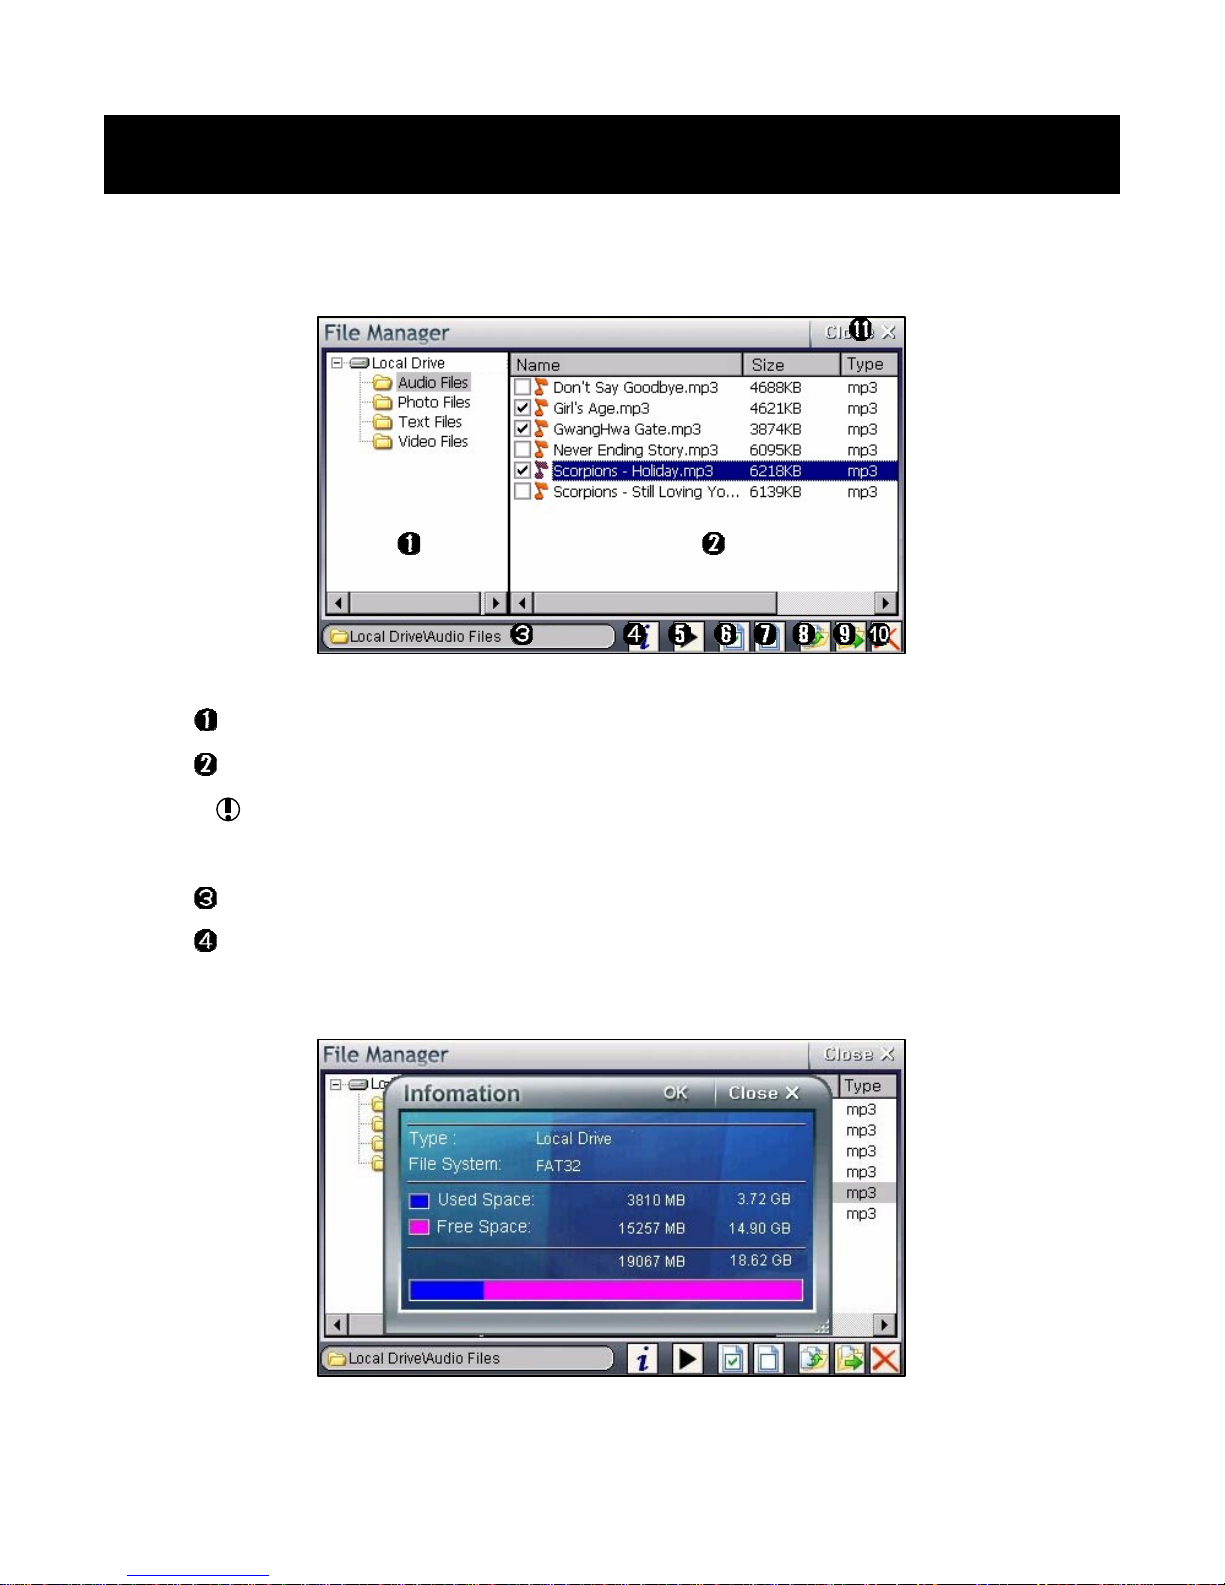
Directory Window
File Window
If you press the M button shortly, you can go from one window to
the other.
Current Directory Path
Memory Usage Information Icon
• Touch on this icon, and the Information Window will appear.
Using NexView
8. File Manager
Page 30
30
Excution Icon
• Execute the highlighted file.
• The OK Button has the same function.
Selecting All Icon
• Selects all files in the current folder.
Deselecting All Icon
• Deselects all files in the current folder.
You can select or deselect files one by one by touching on the file
name or pressing the Play/Pause Button.
Copy Icon
• Touch on this icon to copy the selected files to another folder.
Move Icon
• Touch on this icon to move the selected files to another folder.
Delete Icon
• Touch on this icon to delete the selected files.
Close Icon
• Closes the File Manager.
• ESC Button has the same function.
Using NexView
8. File Manager
Page 31
31
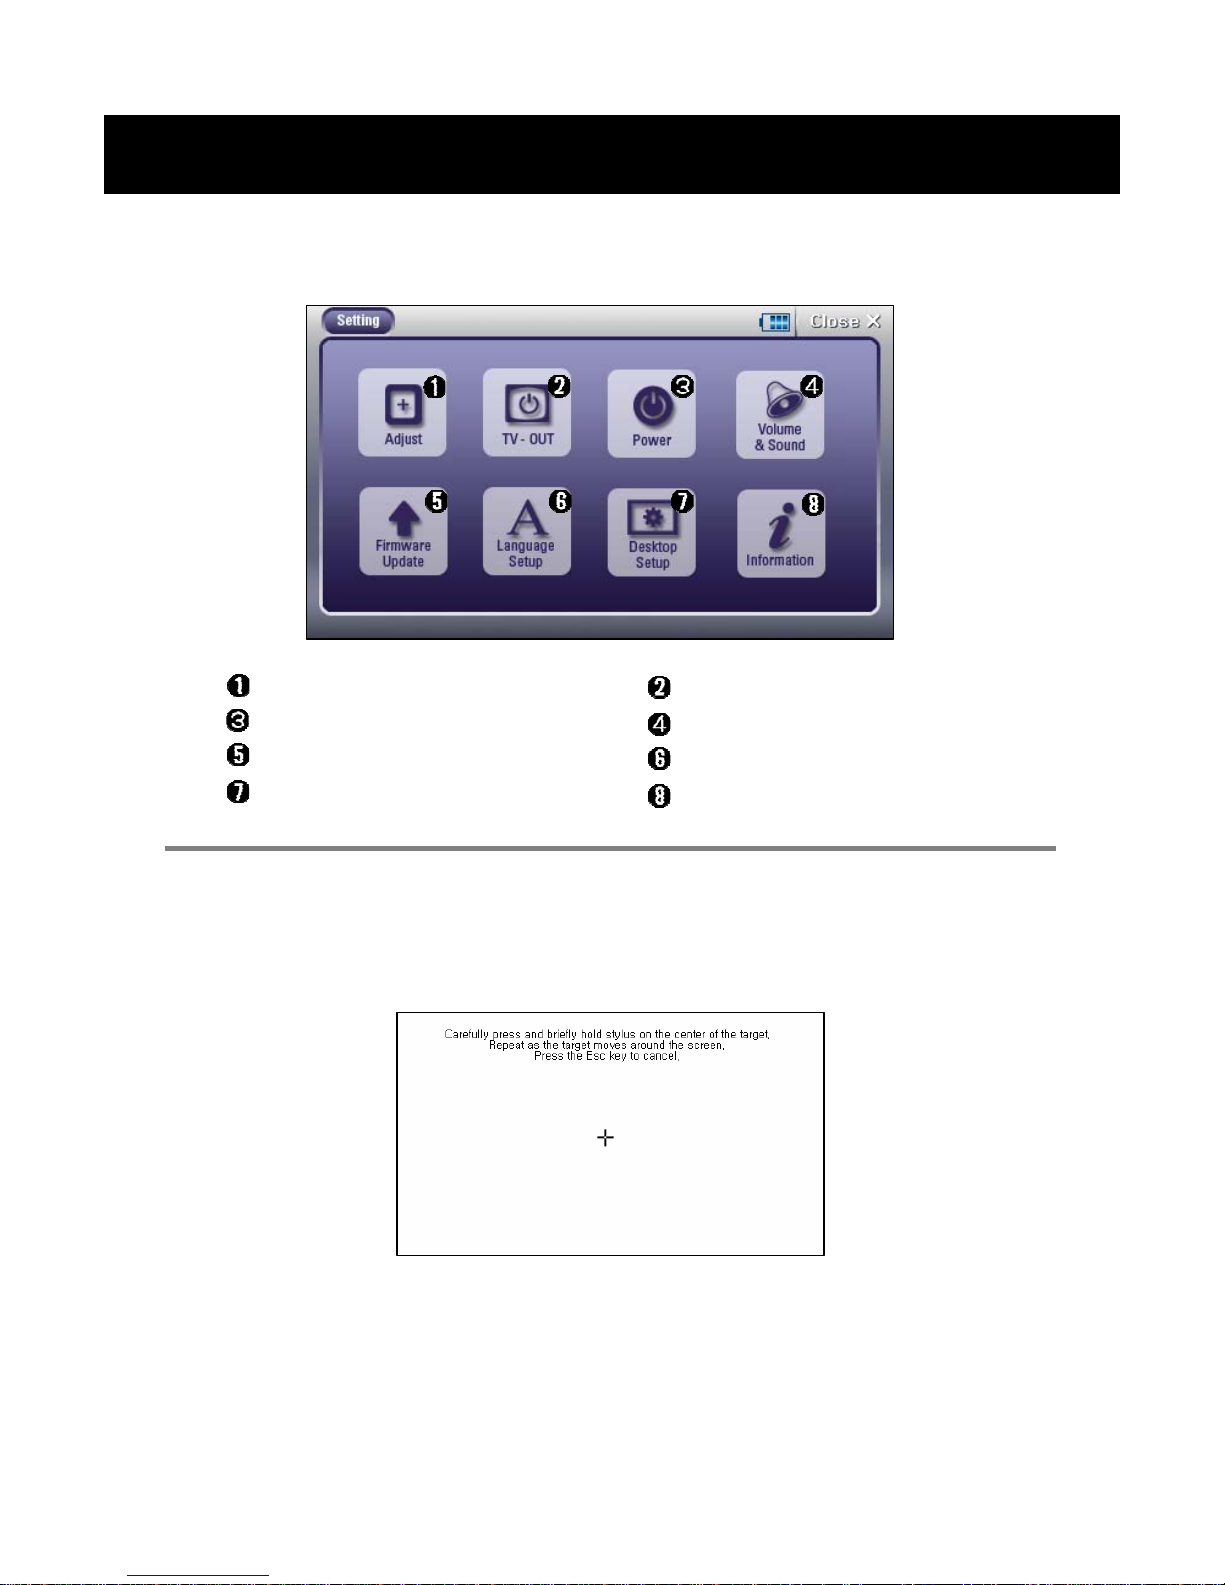
9-1. Adjusting the Touch Point
Touch on the Adjust icon.
Adjust the touch point with this menu when it is not matched well.
• Adjust the touch point as the guide on the screen.
• Touch softly and hold for over 3 seconds when you touch on the
target.
9. Settings
TV-OUT
Volume & Sound
Language Setup
Information
Adjust
Power
Firmware Update
Desktop Setup
Using NexView
9. Settings
Page 32
32
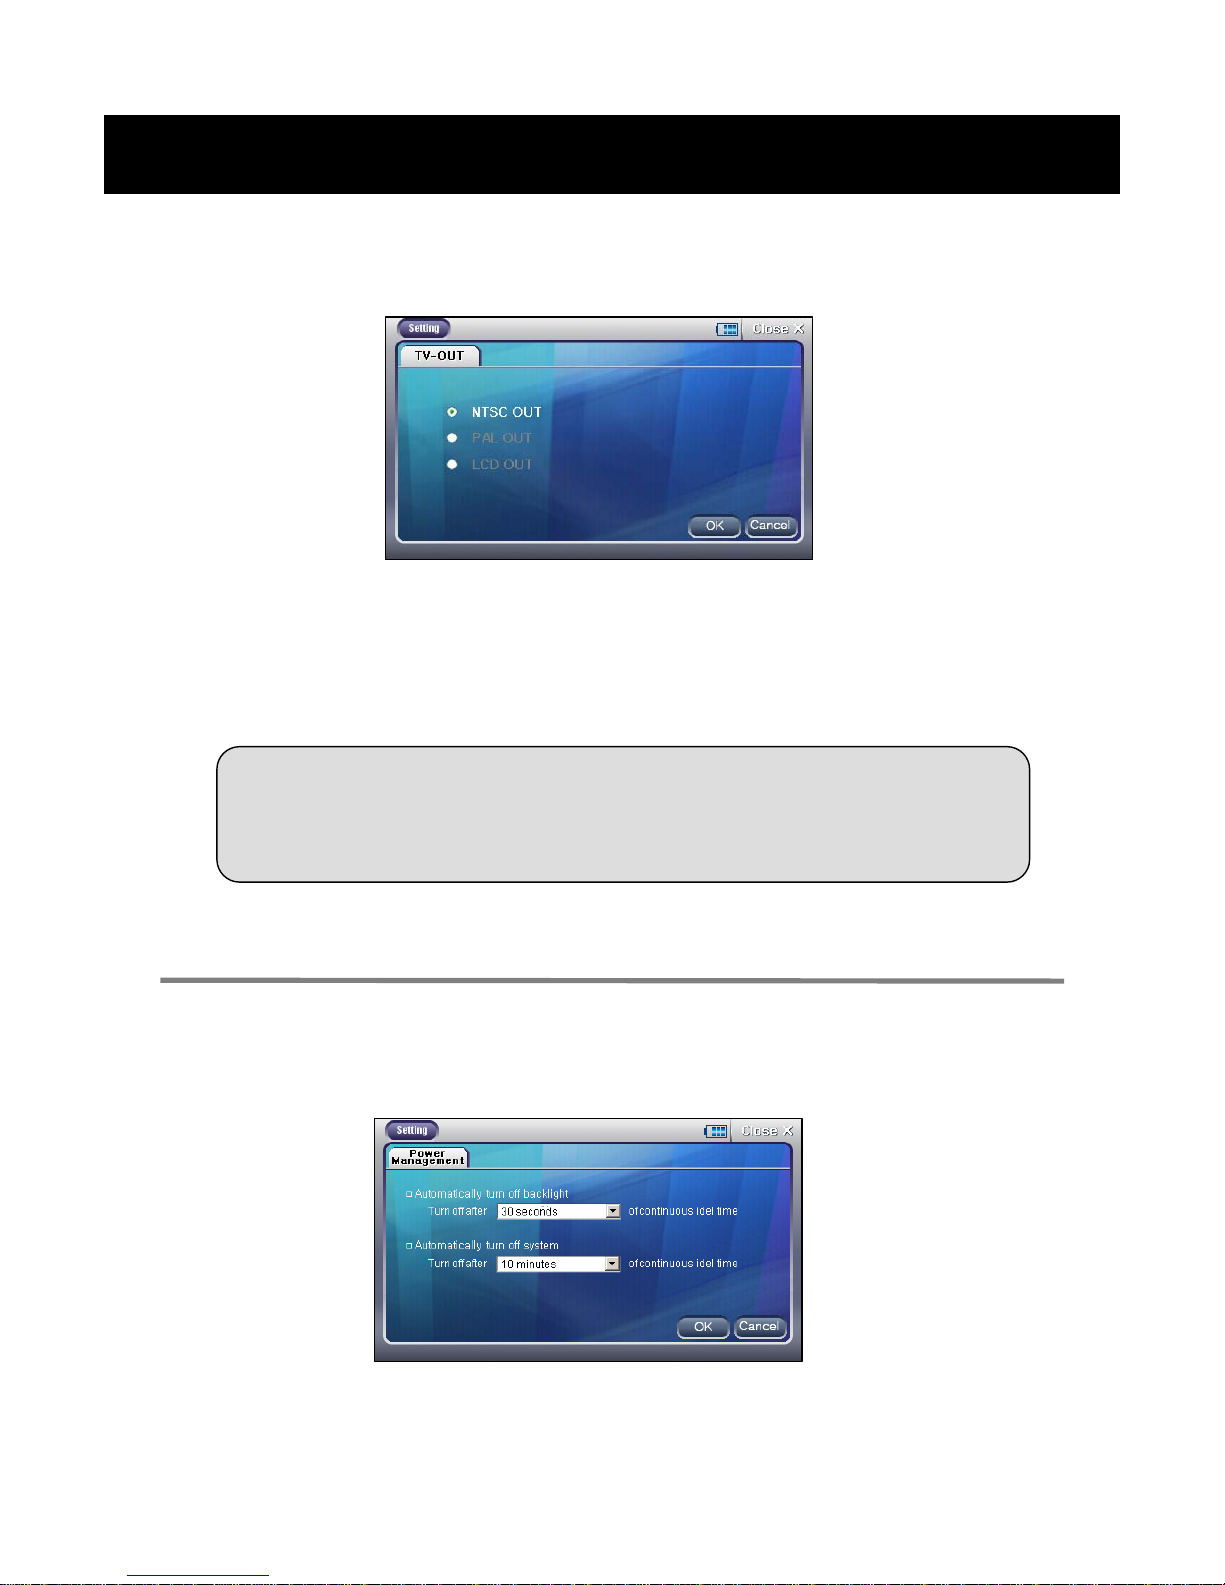
9-2. TV-OUT
Touch on the TV-OUT icon.
In order you to see the video output from NexView with your TV screen,
connect the Player to the TV, then set up this menu.
• Select the NTSC OUT or the PAL OUT when you want to see the output
with the TV.
• Select the LCD OUT when you want to see the output with the Player's
LCD.
☼ NTSC & PAL
NTSC and PAL are the types of TV resolution standard. Please
check the type of your TV before using the TV-OUT,
9-3. Power Management
Touch on the Power icon.
Set up the times for the power saving modes.
Using NexView
9. Settings
Page 33
33
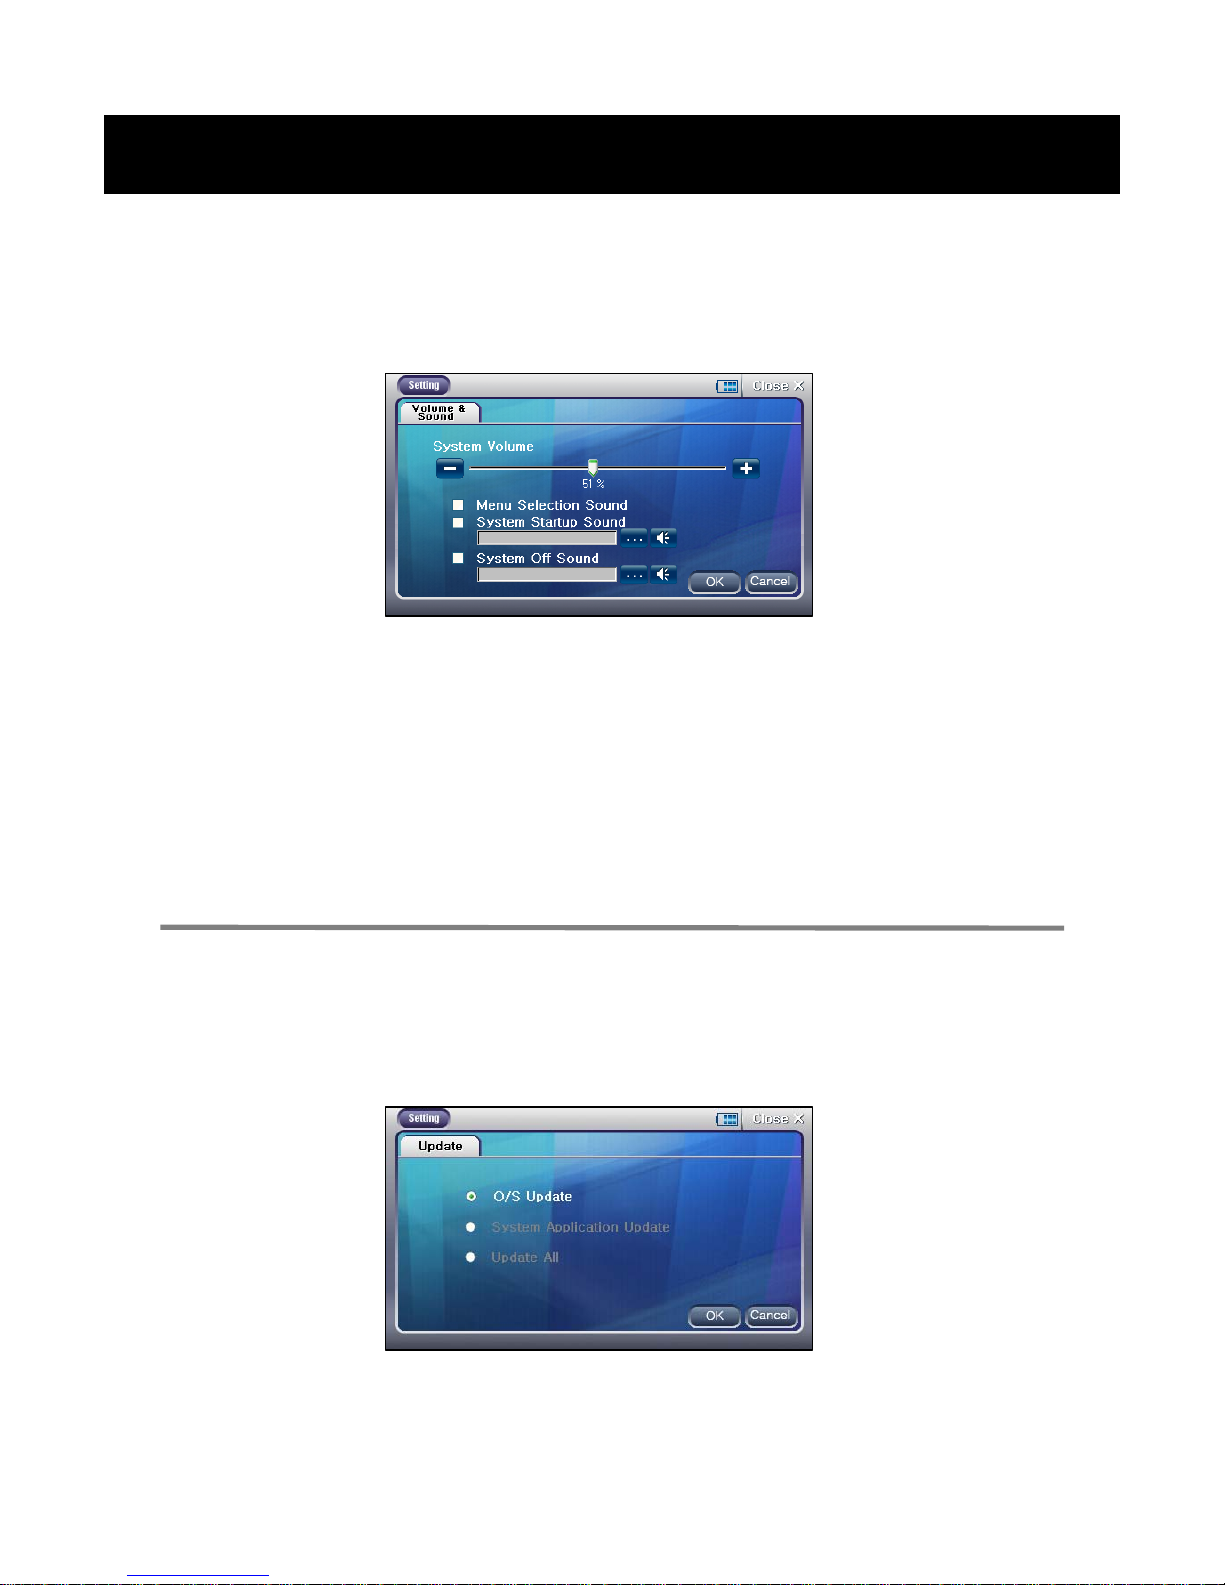
9-4. Volume & Sound
Touch on the Volume & Sound icon
• System Volume: Set up the general volume level of the Player.
• Menu Selection Sound: Choose whether the sounds effect will be used
when you select icons or files.
• System Startup Sound & System Off Sound: Choose sound files that
will be played while the system startup and off. The sound files should
be a WAV format.
9-5. Firmware Update
Touch on the Firmware Update icon
Using NexView
9. Settings
Page 34
34
• There are two types of Firmware Updates for NexView, the O/S Update
and the System Application Update.
• You can download the update files from our website www.sciontech.co.kr
.
< Steps for the O/S Update >
1. Download the latest version of O/S Update File to your
computer from the website.
2. Connect the Player to the computer with the USB cable.
3. Extract the file's compression.
4. Copy the extracted files to Local Drive\System\OS folder of
NexView.
5. Disconnect the Player from the computer.
6. Go to the Firmware Update menu.
7. Select the O/S Update, then touch on the Update icon.
8. Restart the Player.
The touch point is subject to be not matched well after the
O/S Update. In this case, adjust the touch point at the Adjust
menu. (See "Adjusting the Touch Point" on page 31.)
Using NexView
9. Settings
Page 35
35
< Steps for System Application Update >
1. Download the latest version of System Application Update File
to your computer from the website.
2. Connect the Player to the computer with the USB cable.
3. Extract the files's compression.
4. Copy the extracted files to Local Drive\System\System
Applications folder of NexView.
5. Disconnect the Player from the computer.
6. Go to the Firmware Update menu.
7. Select the System Application Update, then touch on the
Update icon.
• You can run both updates at a time by select the Update All if both
update files were all prepared.
☼ Checking the current software versions of NexView
You can see the current software versions of the Player at the
Information menu. (See "Viewing the System Information" on page
40.)
Using NexView
9. Settings
Page 36
36
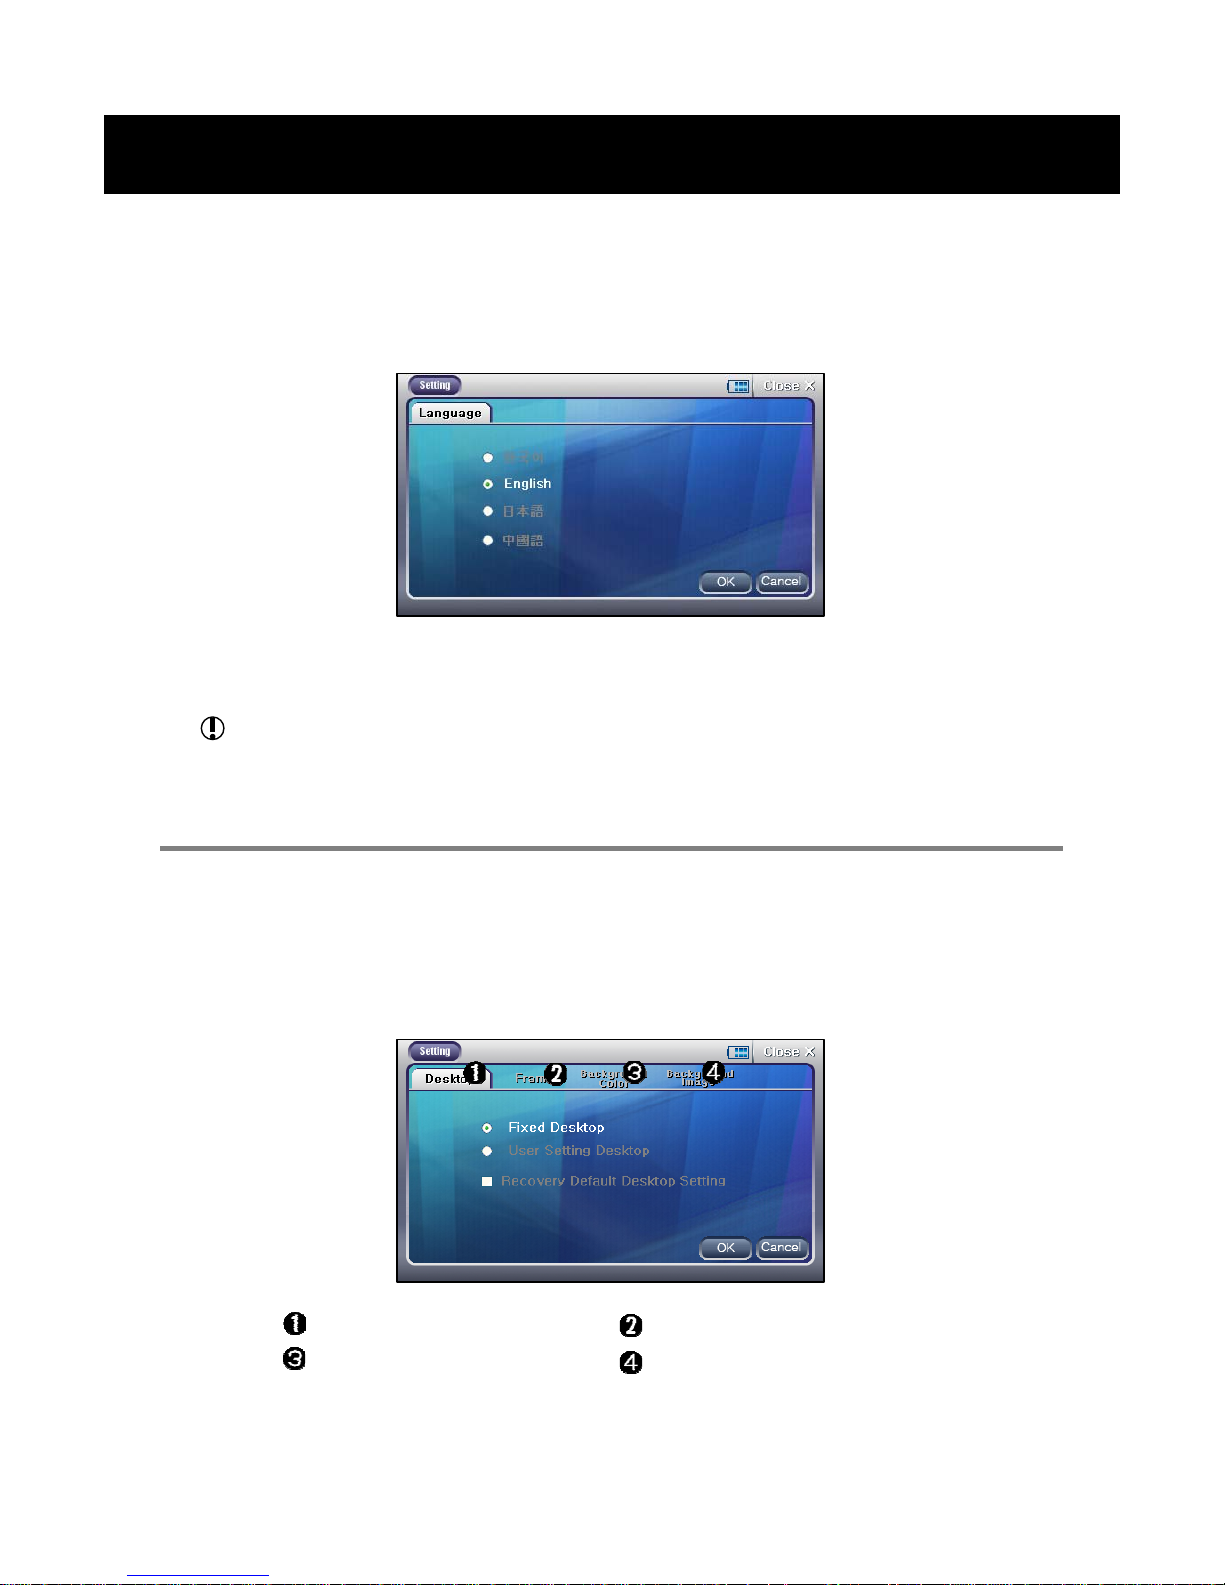
9-6. Selecting Language
Touch on the Language Setup icon.
Select a language, then restart the Player.
The touch point is subject to be not matched well after the O/S
Update. In this case, adjust the touch point at the Adjust menu.
(See "Adjusting the Touch Point" on page 31.)
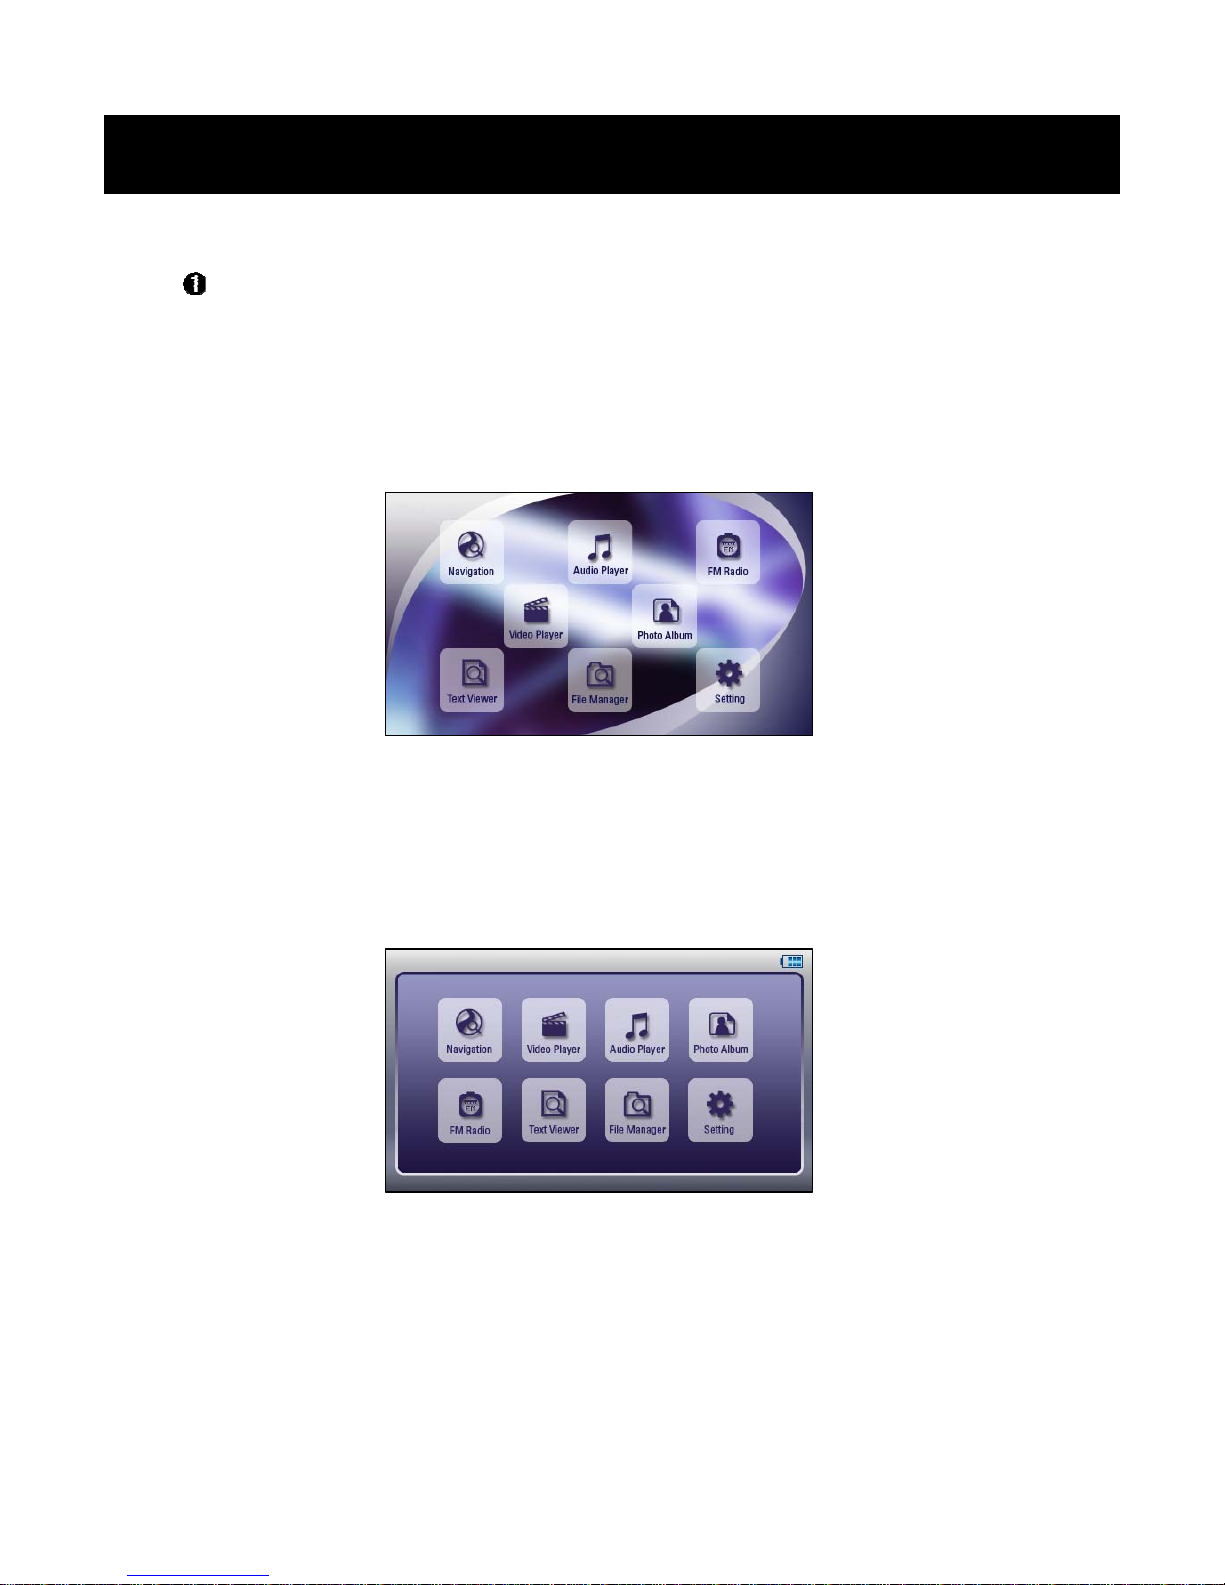
9-7. Main Menu Setup
Touch on the Desktop Setup icon.
Using NexView
9. Settings
Frame Tap
Background Image Tap
Desktop Tap
Background Color Tap
Page 37
37
Desktop Tap
You can select one from the two types of the Main Menu lineup.
• Fixed Desktop: The Main Menu lineup is fixed as the following
picture and nothing can be changed.
• User Setting Desktop: The Main Menu lineup is fixed as the
following picture and you can change the Frame, Background Color
and Background Image.
• Recovery Default Desktop Setting: The Main menu lineup will be
changed into the Fixed Desktop and all settings for the Frame,
Background color and Image will be cleared.
Using NexView
9. Settings
Page 38
38
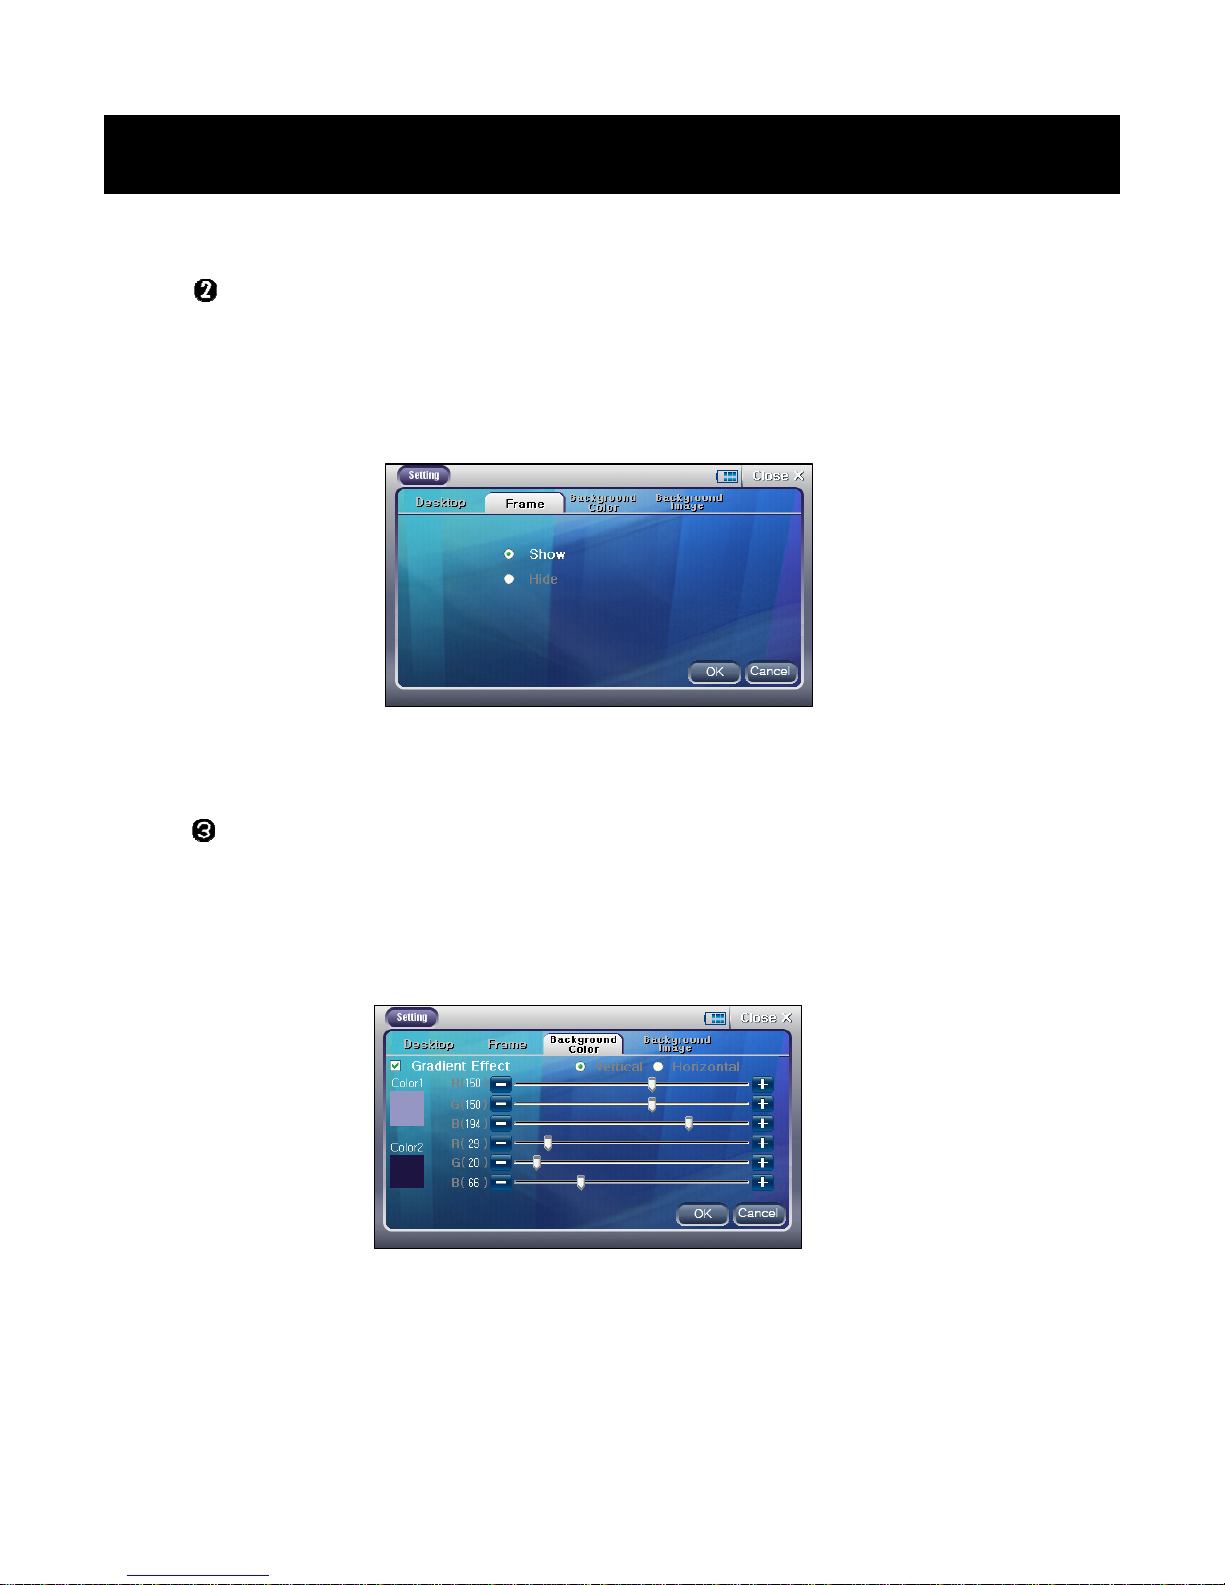
Frame Tap
• This tap will be activated only when you select the User Setting
Desktop at the Desktop Tap.
• Choose whether the Main Menu will show or hide the out frame.
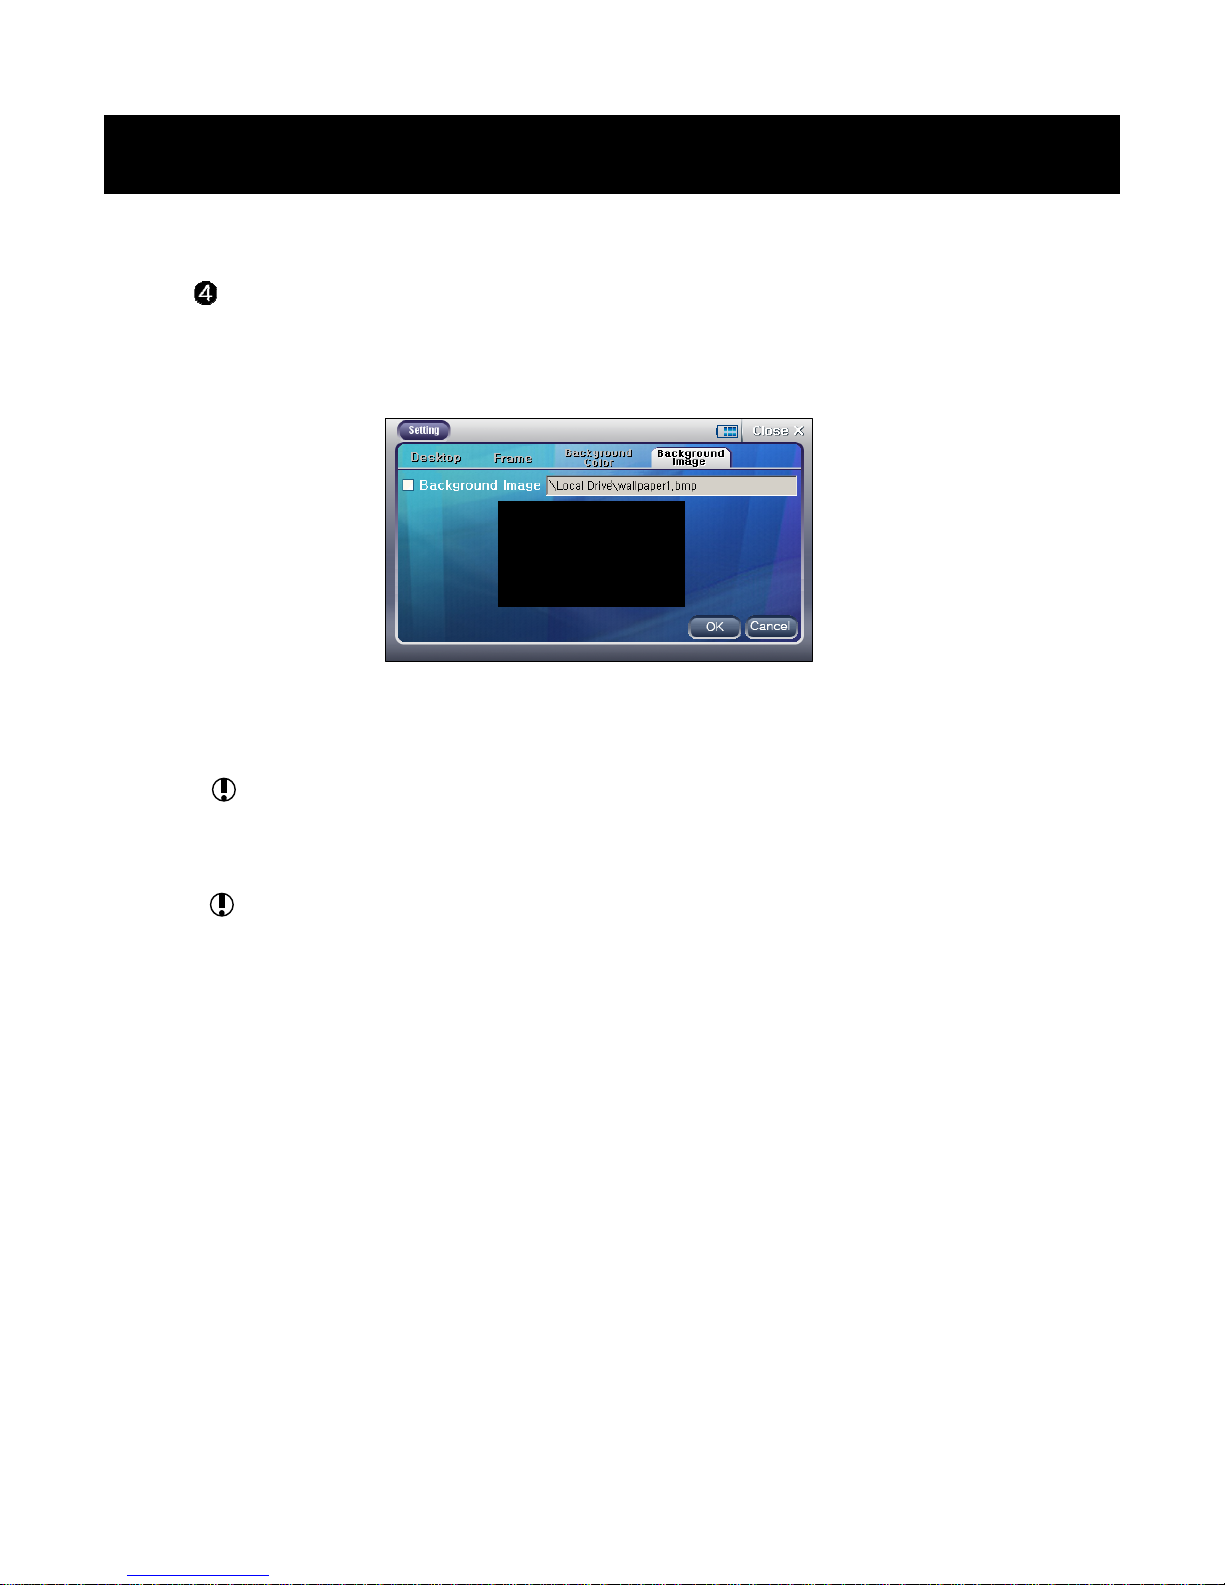
Background Color Tap
• This tap will be activated only when you select the User Setting
Desktop at the Desktop Tap.
• Select the background color and gradient effect for the Main menu.
Using NexView
9. Settings
Page 39
39
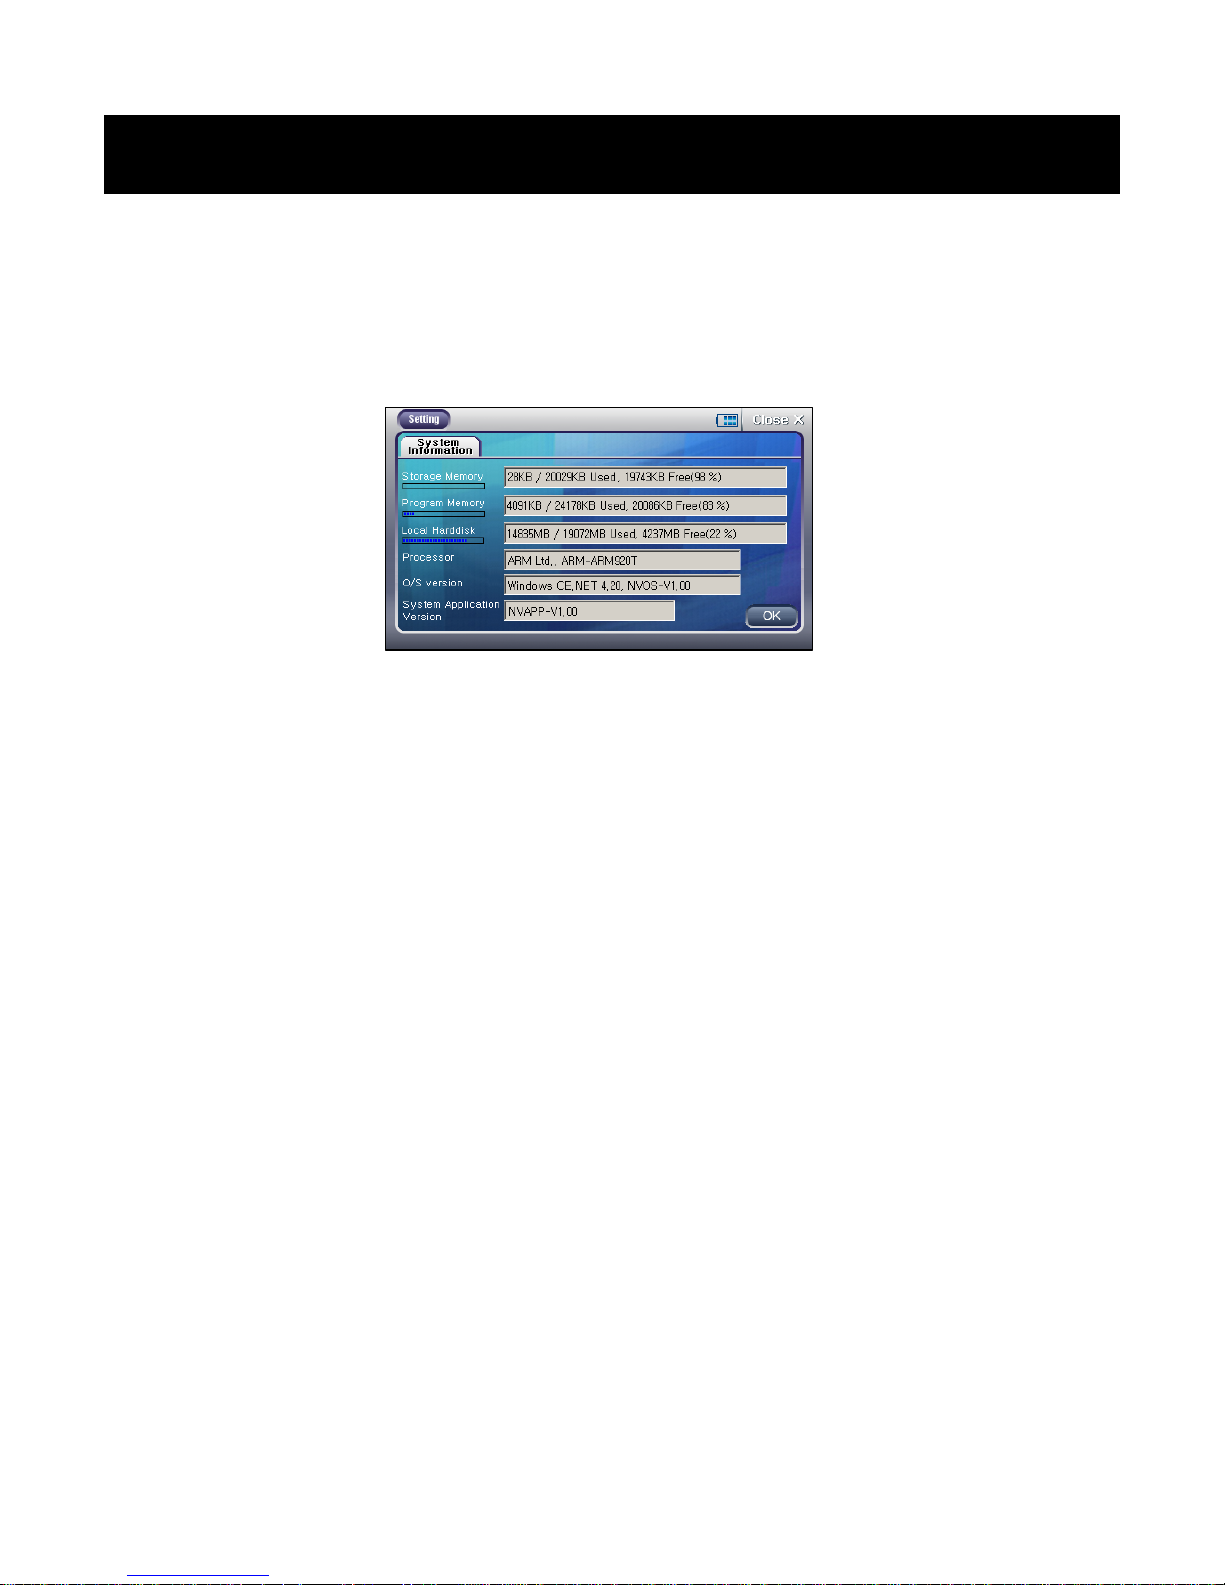
Background Image Tap
• This tap will be activated only when you select the User Setting
Desktop at the Desktop Tap.
• Choose a file for the background image of the Main Menu.
The background image file should be a BMP format and 480x272
resolution.
The background color and gradient effect will be ignored if you
choose a background image.
Using NexView
9. Settings
Page 40
40
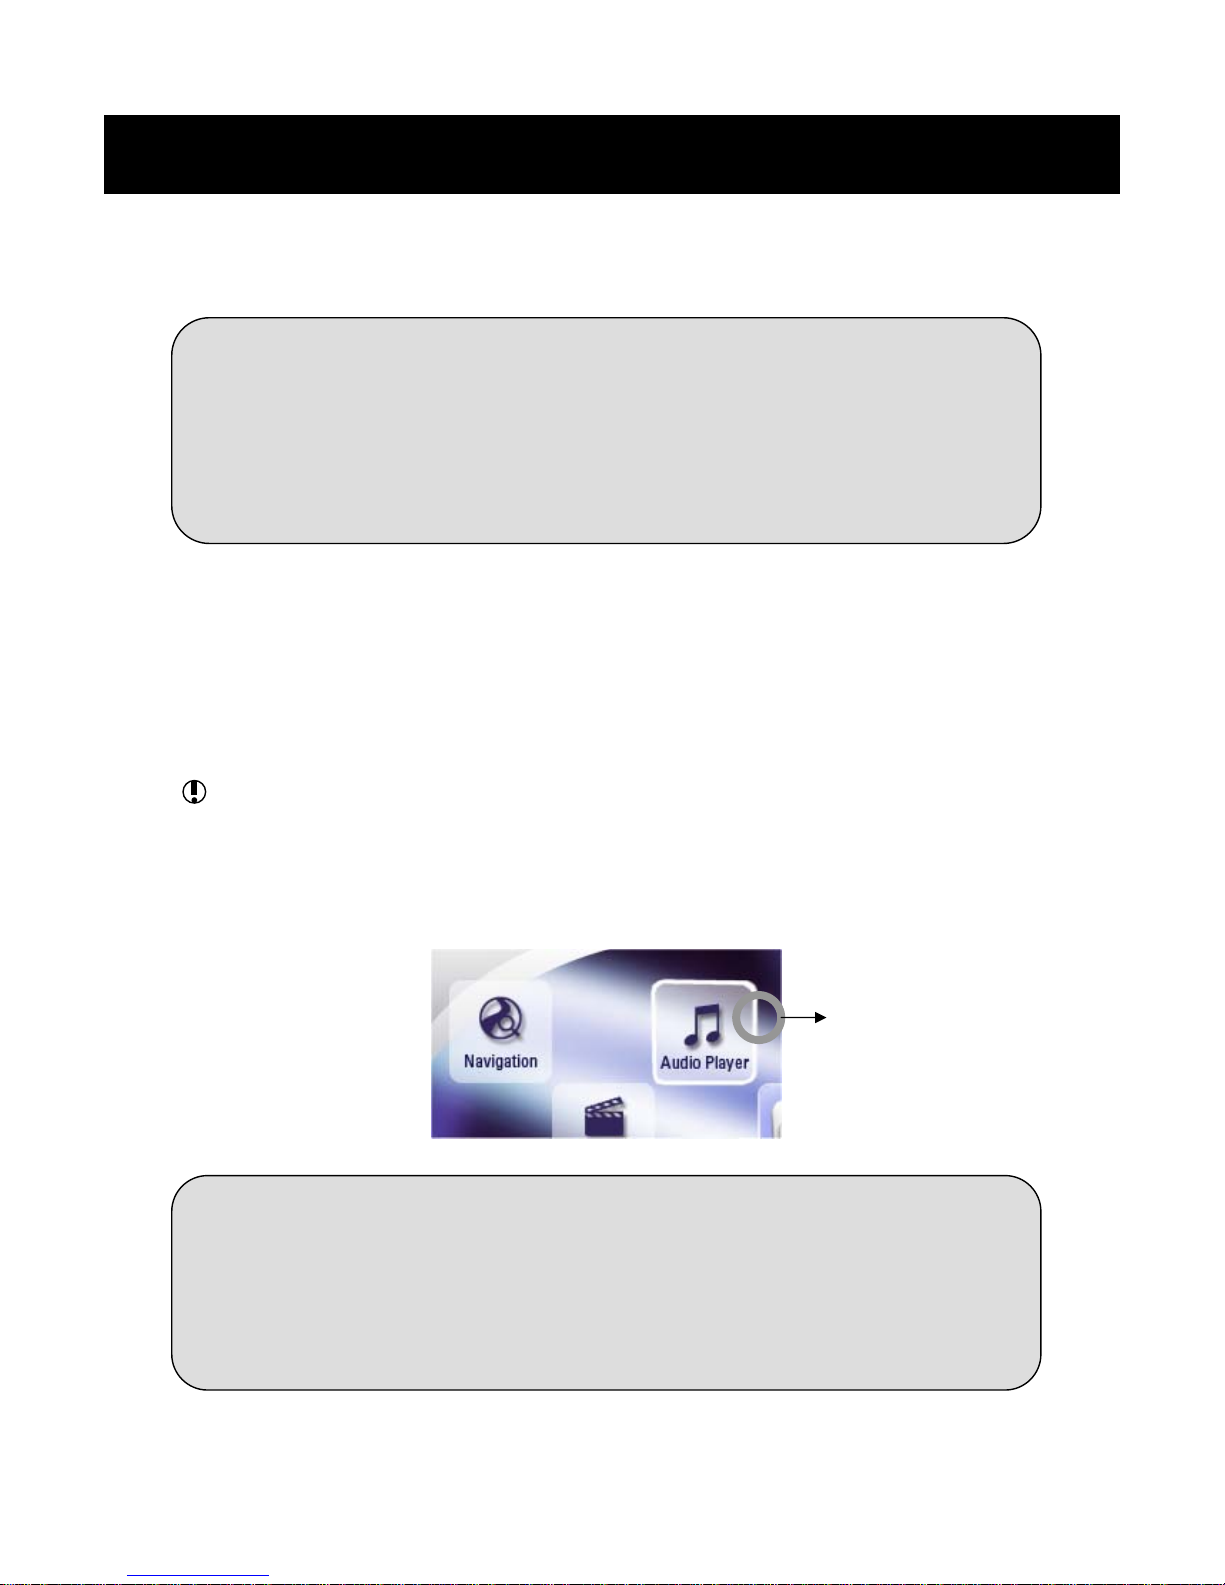
9-8. Viewing the System Information
Touch on the Information icon.
You can see the memory usage state and current software versionsof
the Player.
Using NexView
9. Settings
Page 41
41
10. Using the Multitasking Function
Push the M button and hold for over 2 seconds while a program like
Navigation and Audio Player running, and the Main Menu will
appear without stopping the current running program.
Select another program, then it will be excuted simultaneously with the
current running program.
The icons with twinkling edges in the Main Menu are current running
programs when you are using the Multitasking Function. If there is no
input for 5 seconds on that screen, the most recent one of the current
running programs will be opened automatically.
☼ What is Multitasking
Multitasking means that two or above programs can be executed ina
device simultaneously.
NexView supports the Multitasking, you can enjoy the various functions
of NexView simultaneously.
☼ The programs can be executed simlutaneously by the Multitasking
Function
• GPS Navigation & Audio Player
• Photo Album & Text Viewer & Audio Player
• Photo Album & Text Viewer & FM Radio
Current running
program
Using NexView
10. Using the Multitasking Function
Page 42
42
Connecting NexView to other devices
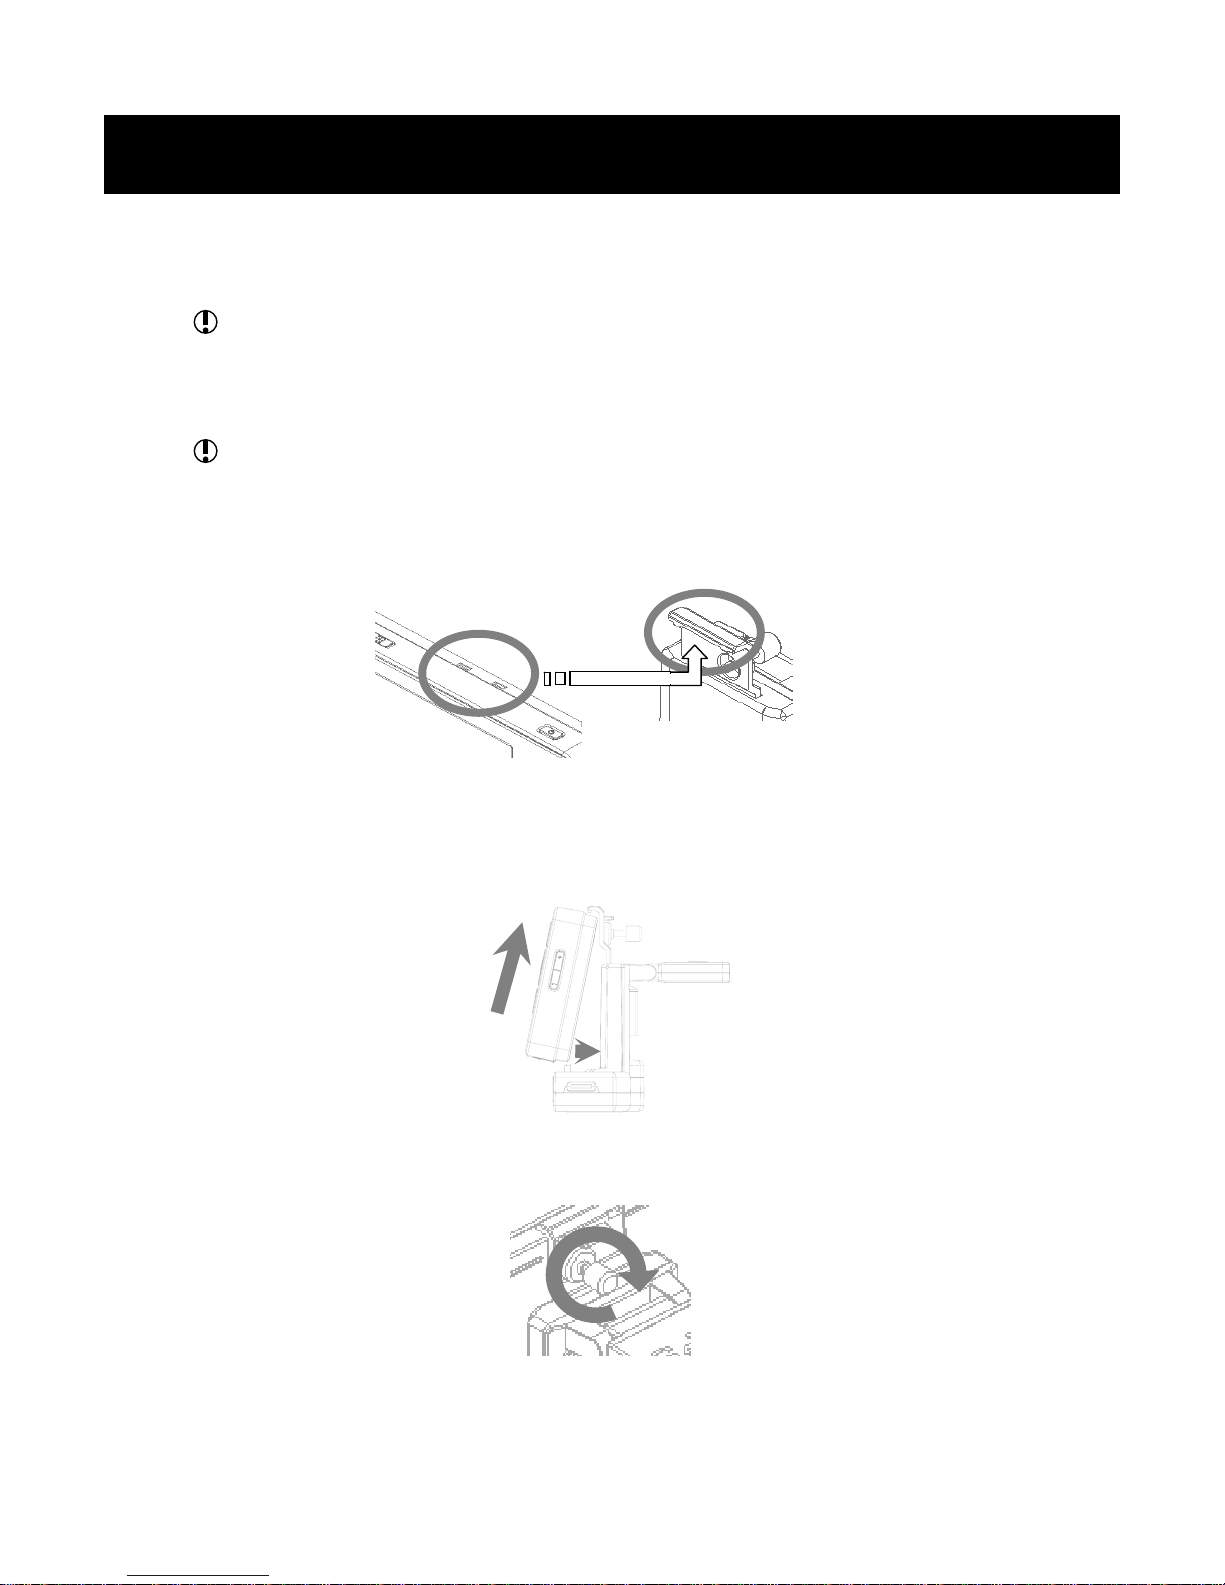
1. Connecting the Player
to the Cradle
① Put the rising parts of the Cradle to the grooves on the Player's top
side.
② Push the Player upward and into the Cradle, and make the connection
parts of them are well connected.
③ Fasten the Fixing Bolt on the backside of the Cradle.
1. Connecting the Player to the Cradle
Before connecting the Player to the Cradle, take the Cover off on
the Cradle Connection Part of the Player. Please cover it again when
the Player disconnected from the Cradle.
Don't connect the Power Adaptor or USB cables to the Player when
it is connected to the Cradle.
Page 43
43
NexView와 기기 연결하기
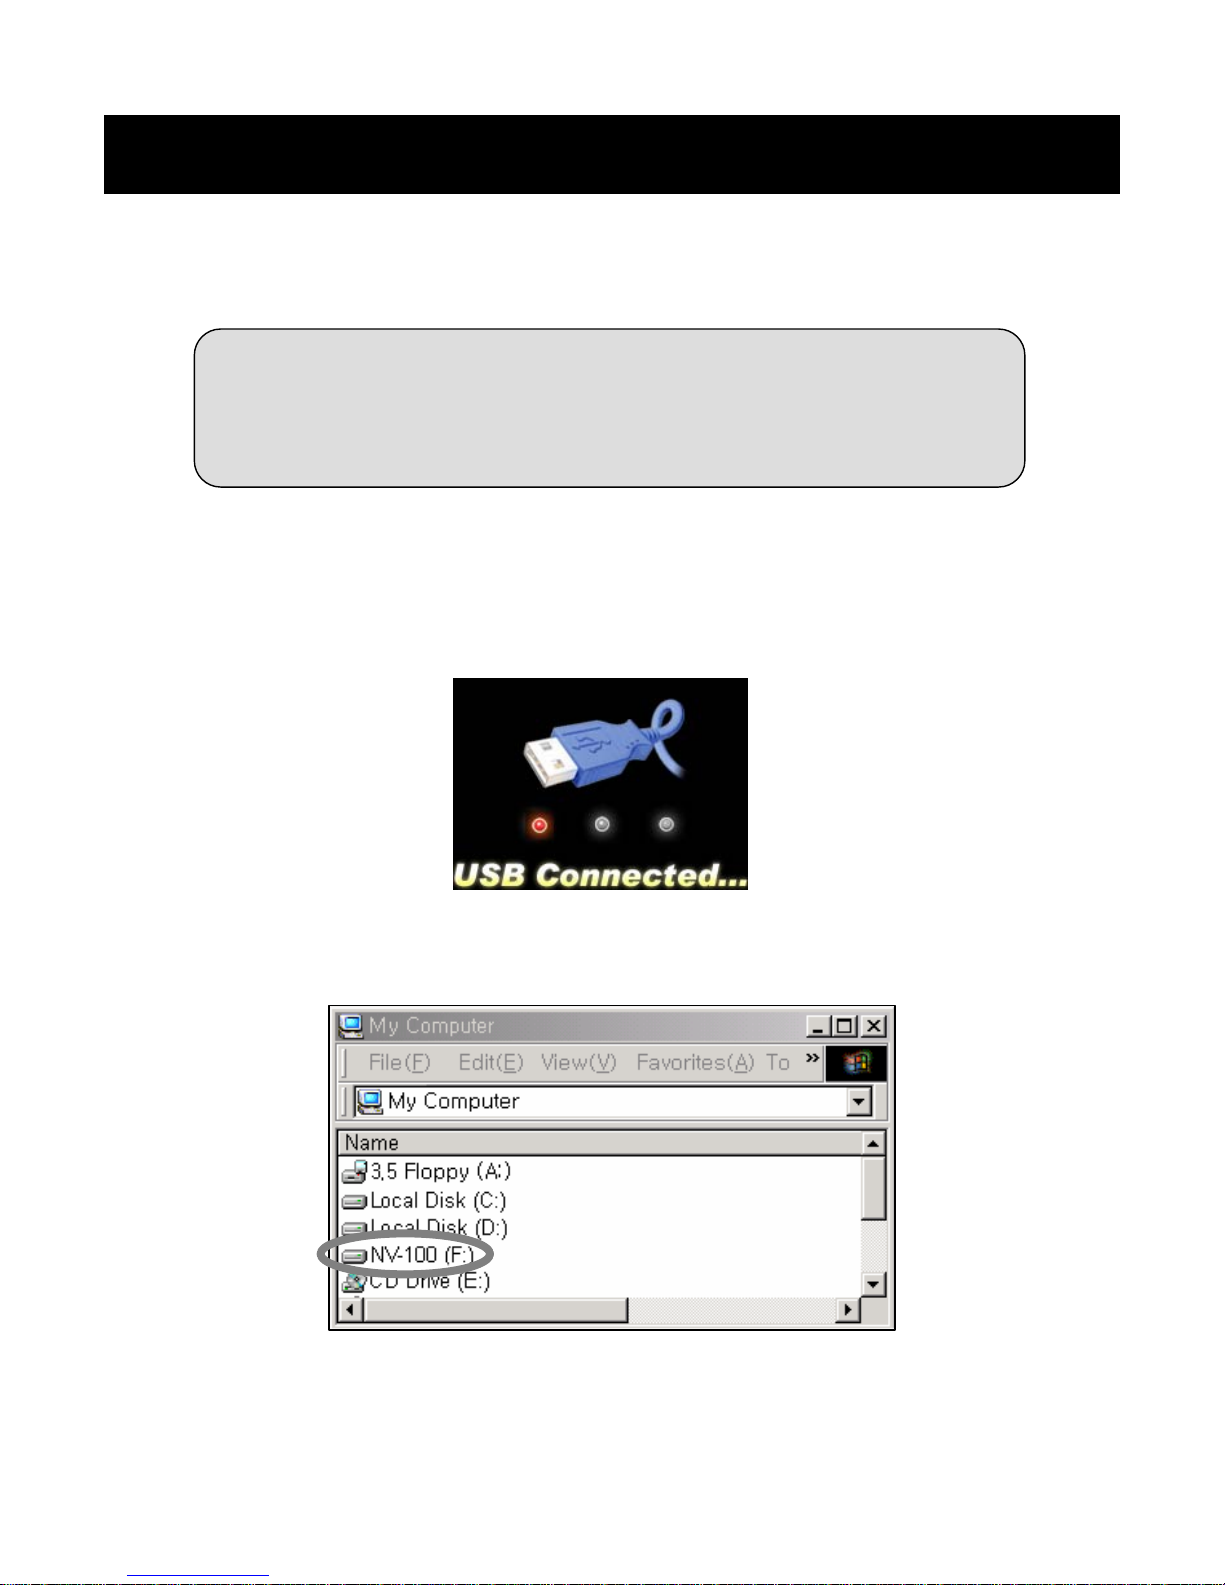
2. Connecting the Player to a Computer
① Connect the USB Cable to the USB Device Port (USB S) on the leftside
of the Player, and connect the other end to your computer.
②"USB Connected…" message appears on the Player's screen.
③ NexView appears as a mass storage device, NV-100 on your computer.
☼ PC system requirements
The PC system should be the Microsoft Windows XP or 2000 for the
NexView connection.
Connecting NexView to other devices
2. Connecting the Player
to a Computer
Page 44
44
NexView와 기기 연결하기
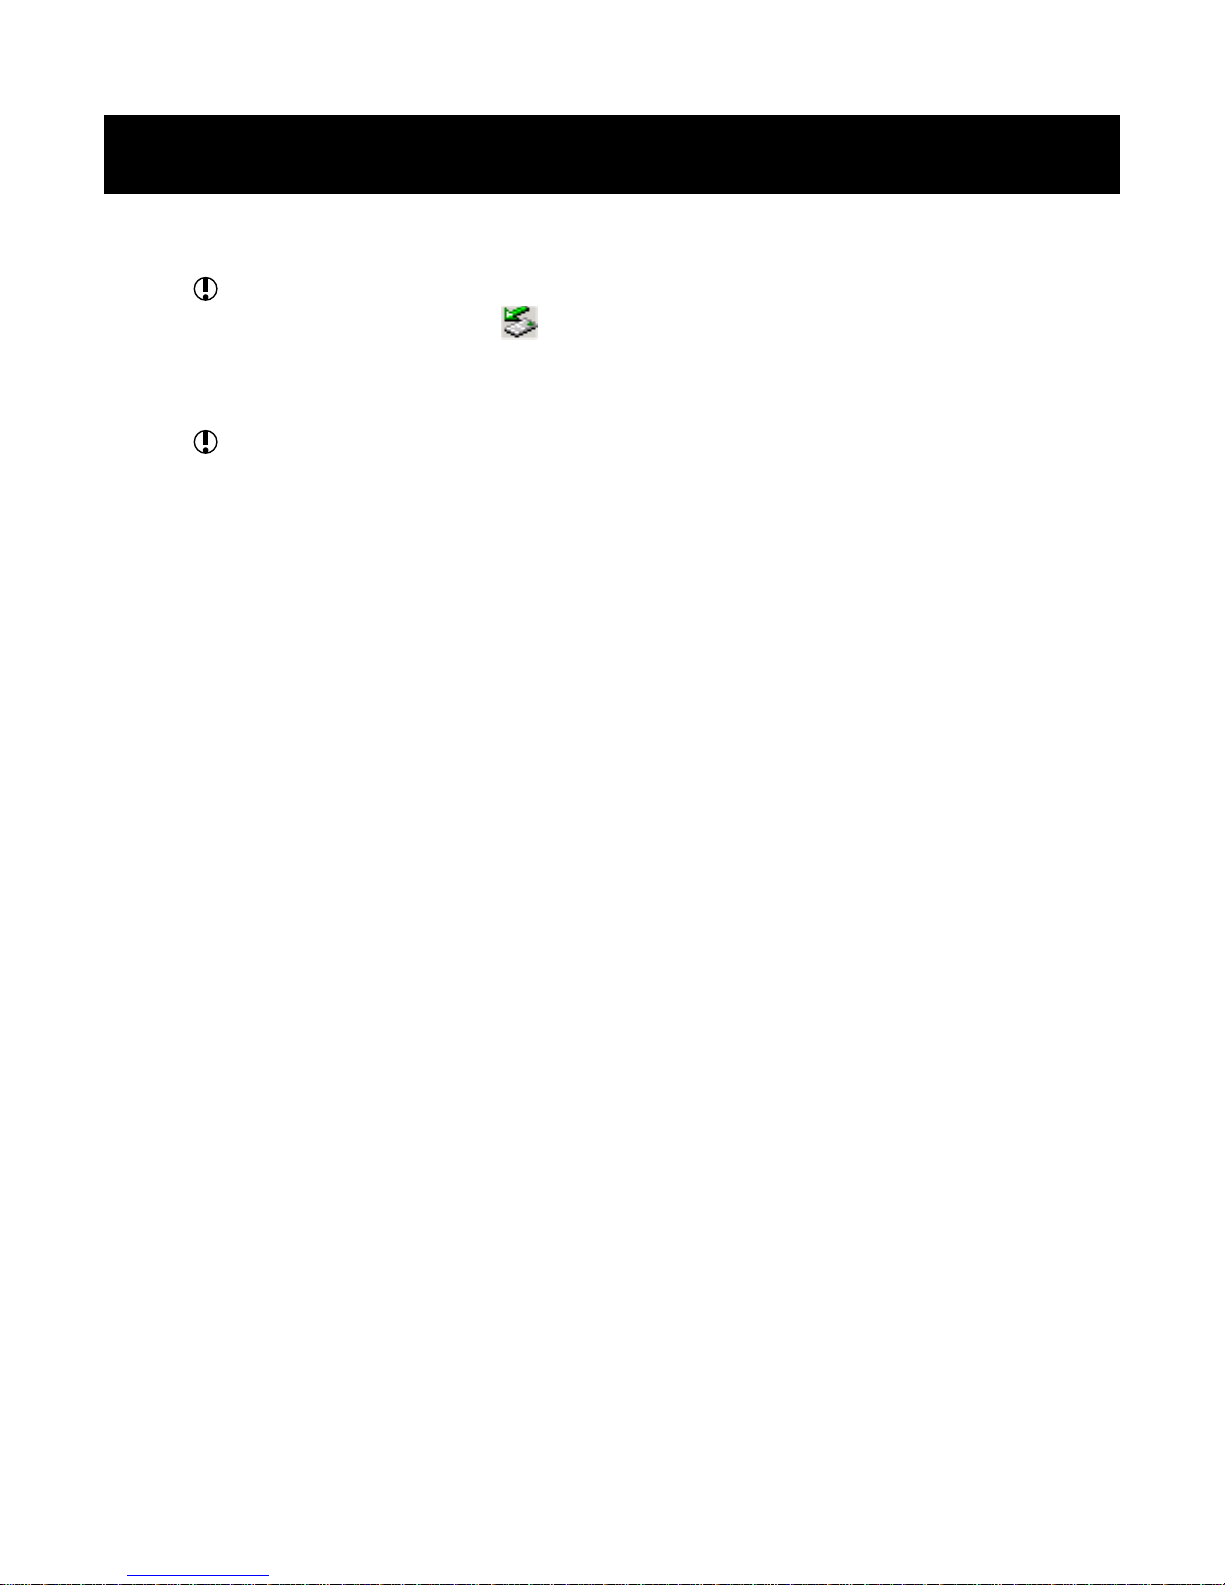
Before disconnecting the Player from the computer, click the Safely
Remove Hardware icon on the taskbar, then click Safely Remove
USB Mass Storage Device.
If the Player is connected to a computer with the USB cable when it
turned off, it can not be turned on by the Power Switch. In this case,
please disconnect the USB Cable from the Player, then turn it on.
Connecting NexView to other devices
2. Connecting the Player
to a Computer
Page 45

45
NexView와 기기 연결하기
3. Connecting the Player to a TV
① Connect the A/V Cable to the A/V OUT Port on the leftside of the
Player, and connect the other end to a TV.
② Select the NTSC OUT or the PAL OUT at the TV-OUT menu. See
"TV-OUT" on page 32.
Connecting NexView to other devices
3. Connecting the Player
to a TV
Page 46
46
NexView와 기기 연결하기
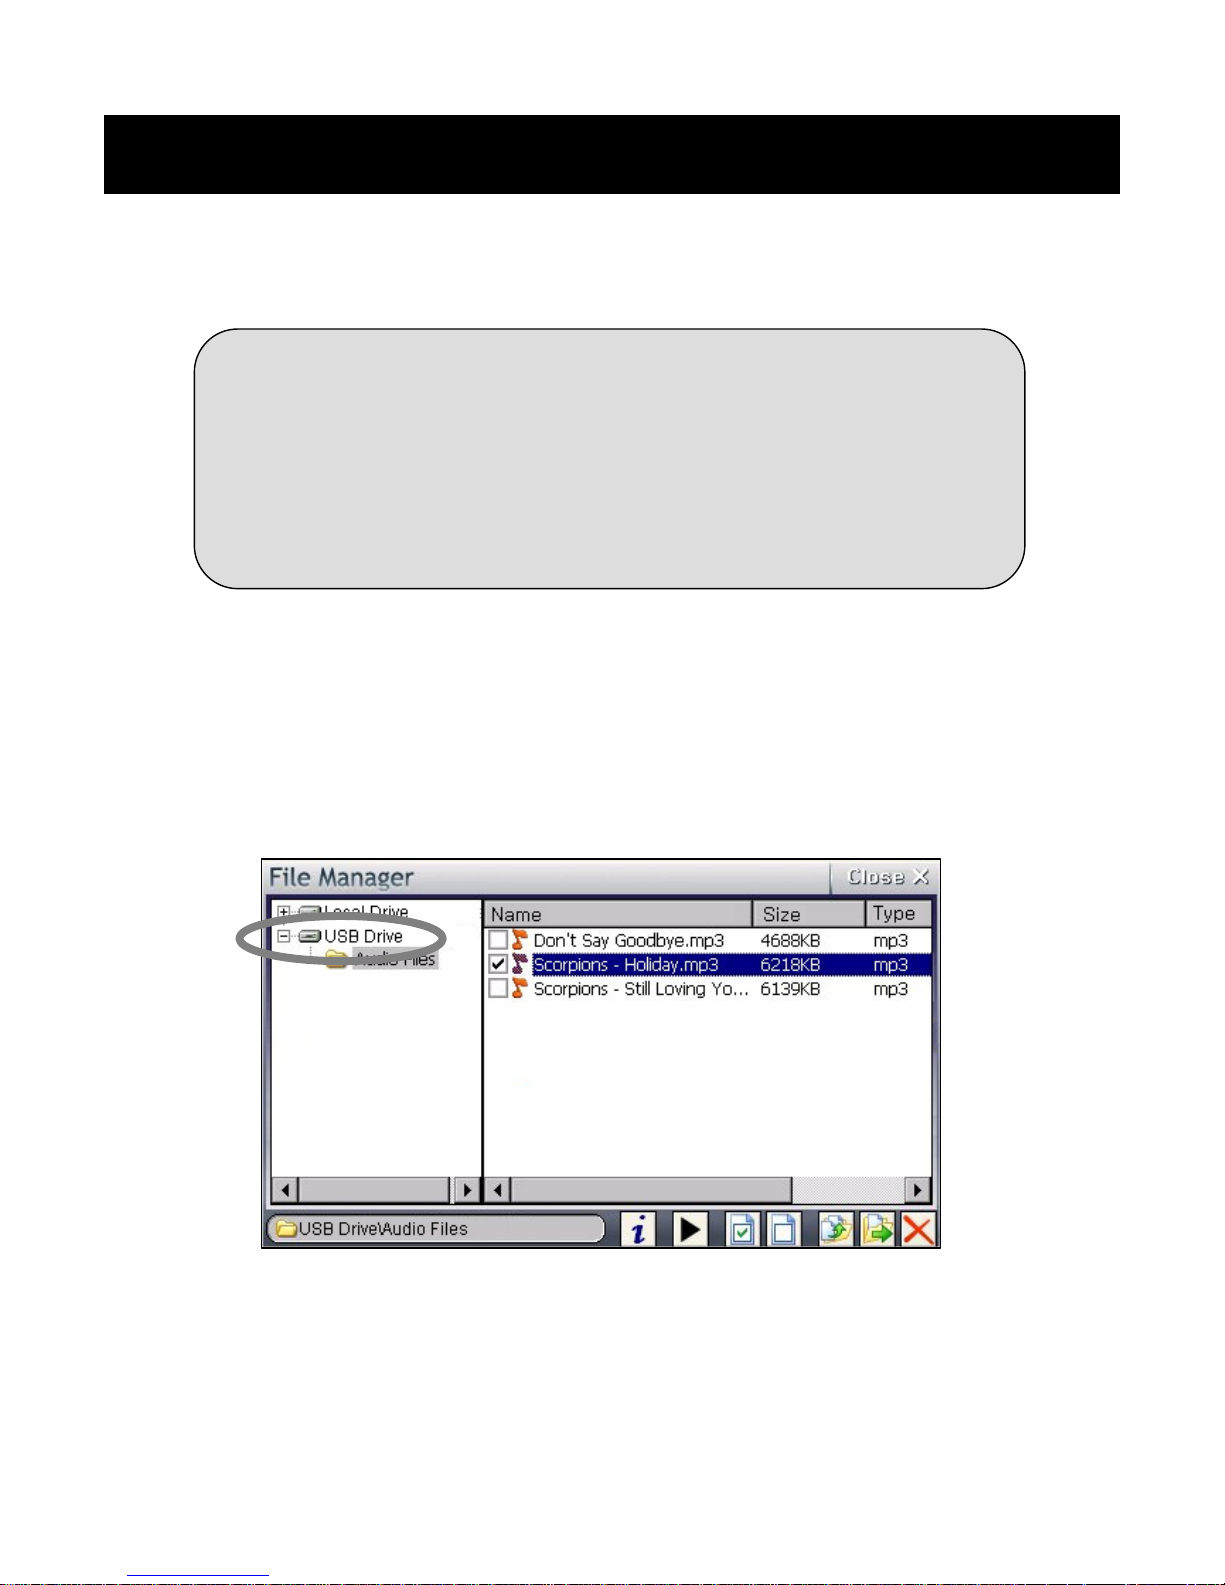
4. Connecting the Player with another Mass Storage Device
① Connect the USB Host Cable to the USB Host Port (USB M) on the
leftside of the Player, and connect the other end to another Mass
Storage Device.
② The connected Mass Storage Device appears as an USB Drive Disk
on NexView.
☼ USB Host function of NexView
NexView has the USB Host function, that makes NexView can be
connected with another Mass Storage Device like a Digital Camera
and USB Memory without computer.
You can play, manage, and store the files of your Mass Storeage
Devices with NexView at any where, at any time.
Connecting NexView to other devices
4. Connecting the Player with
another Mass Storage Device
Page 47
47
Others
1. General Specifications
1. General Specifications
Player: 0.5 W
Cradle: 2 W
Internal Speaker
Li-Polymer 3,000mAh
Battery
2.0 Device / 1.1 Host
USB
20 Gbyte
HDD
Player: 285g
Cradle: 190g
Weight
Player: 136x78x23 (mm)
Dimension
NexView NV-100
Product name
General
30 fpsFrame
SMI
Caption
WMV(7/8/9), ASF, AVI, DivX(3/4/5),
XviD, MPEG(1/2/4)
Format supported
4" Wide screen TFT LCD
480x272 resolution / 16 million colors
Touch-screen
LCD
Video
LRCLyrics
Over 90 dB
S/N Ratio
WMA, MP3, WAV
Format supported
Audio
Page 48
48
Composite Video-Out
Format
NTSC / PAL
Types
TV-OUT
24 channelsChannel
87.5 – 108 (MHz)
Frequency range
FM Radio
TXT
Format supportedText Viewer
JPEG, BMP
Format supportedPhoto Album
12 channelsChannel
Internal
GPS Antenna
Trimble Lassen iQ
GPS Receiver
GPS Navigation
Others
1. General Specifications
Page 49
49
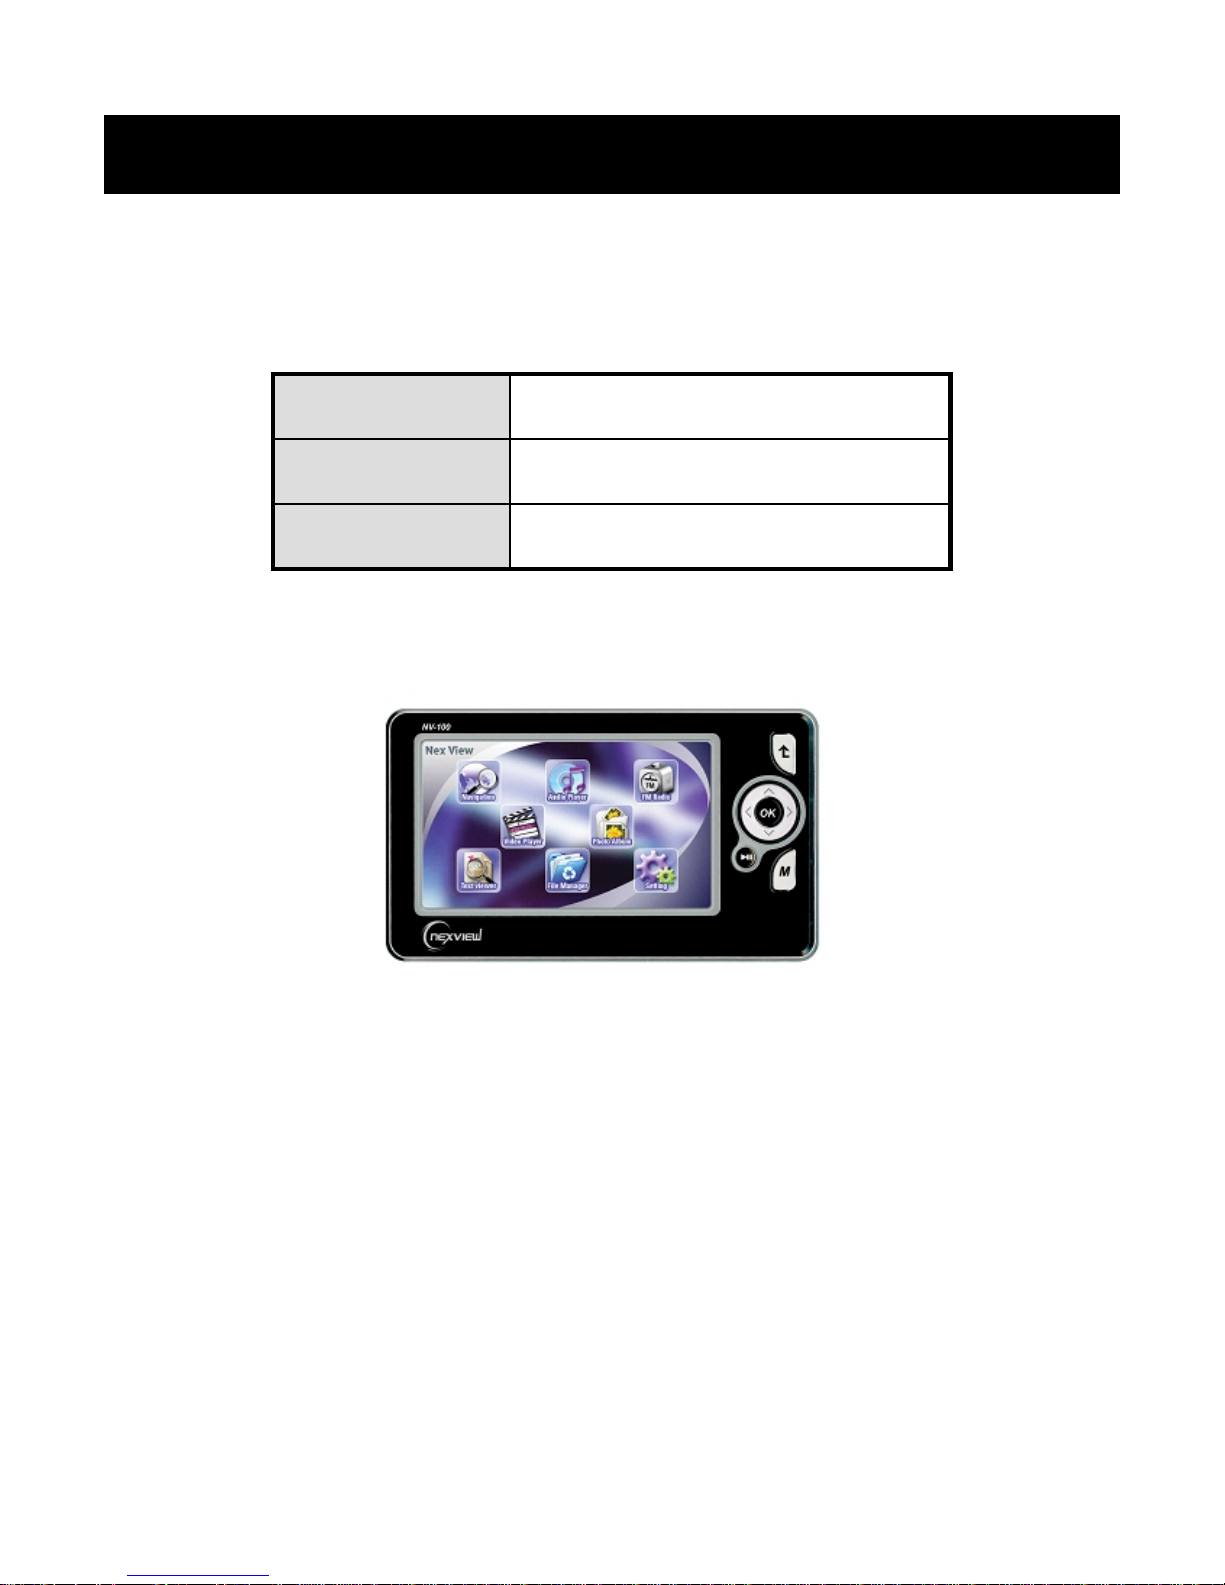
2. Contact Information
+82-2-3422-0490Tel.
E-mail
www.sciontech.co.kr
Website
Others
2. Contact Information
Page 50

50
기타
This device complies with part 15 of the FCC Rules. Operation issubject
to the following two conditions:
(1) This device may not cause harmful interference, and
(2) this device must accept any interference received, including
interference that may cause undesired operation.
Note: This equipment has been tested and found to comply with the
limits for a Class B digital device, pursuant to part 15 of the FCC Rules.
These limits are designed to provide reasonable protection against
harmful interference in a residential installation. This equipment
generates, uses and can radiate radio frequency energy and, if not
installed and used in accordance with the instructions, may cause
harmful interference to radio communications. However, there is no
guarantee that interference will not occur in a particular installation.
Changes or modifications not expressly approved by the party
responsible for compliance could void the user's authority to operate the
equipment.
Others
Page 51

http://www.sciontech.co.kr
 Loading...