

Page 1
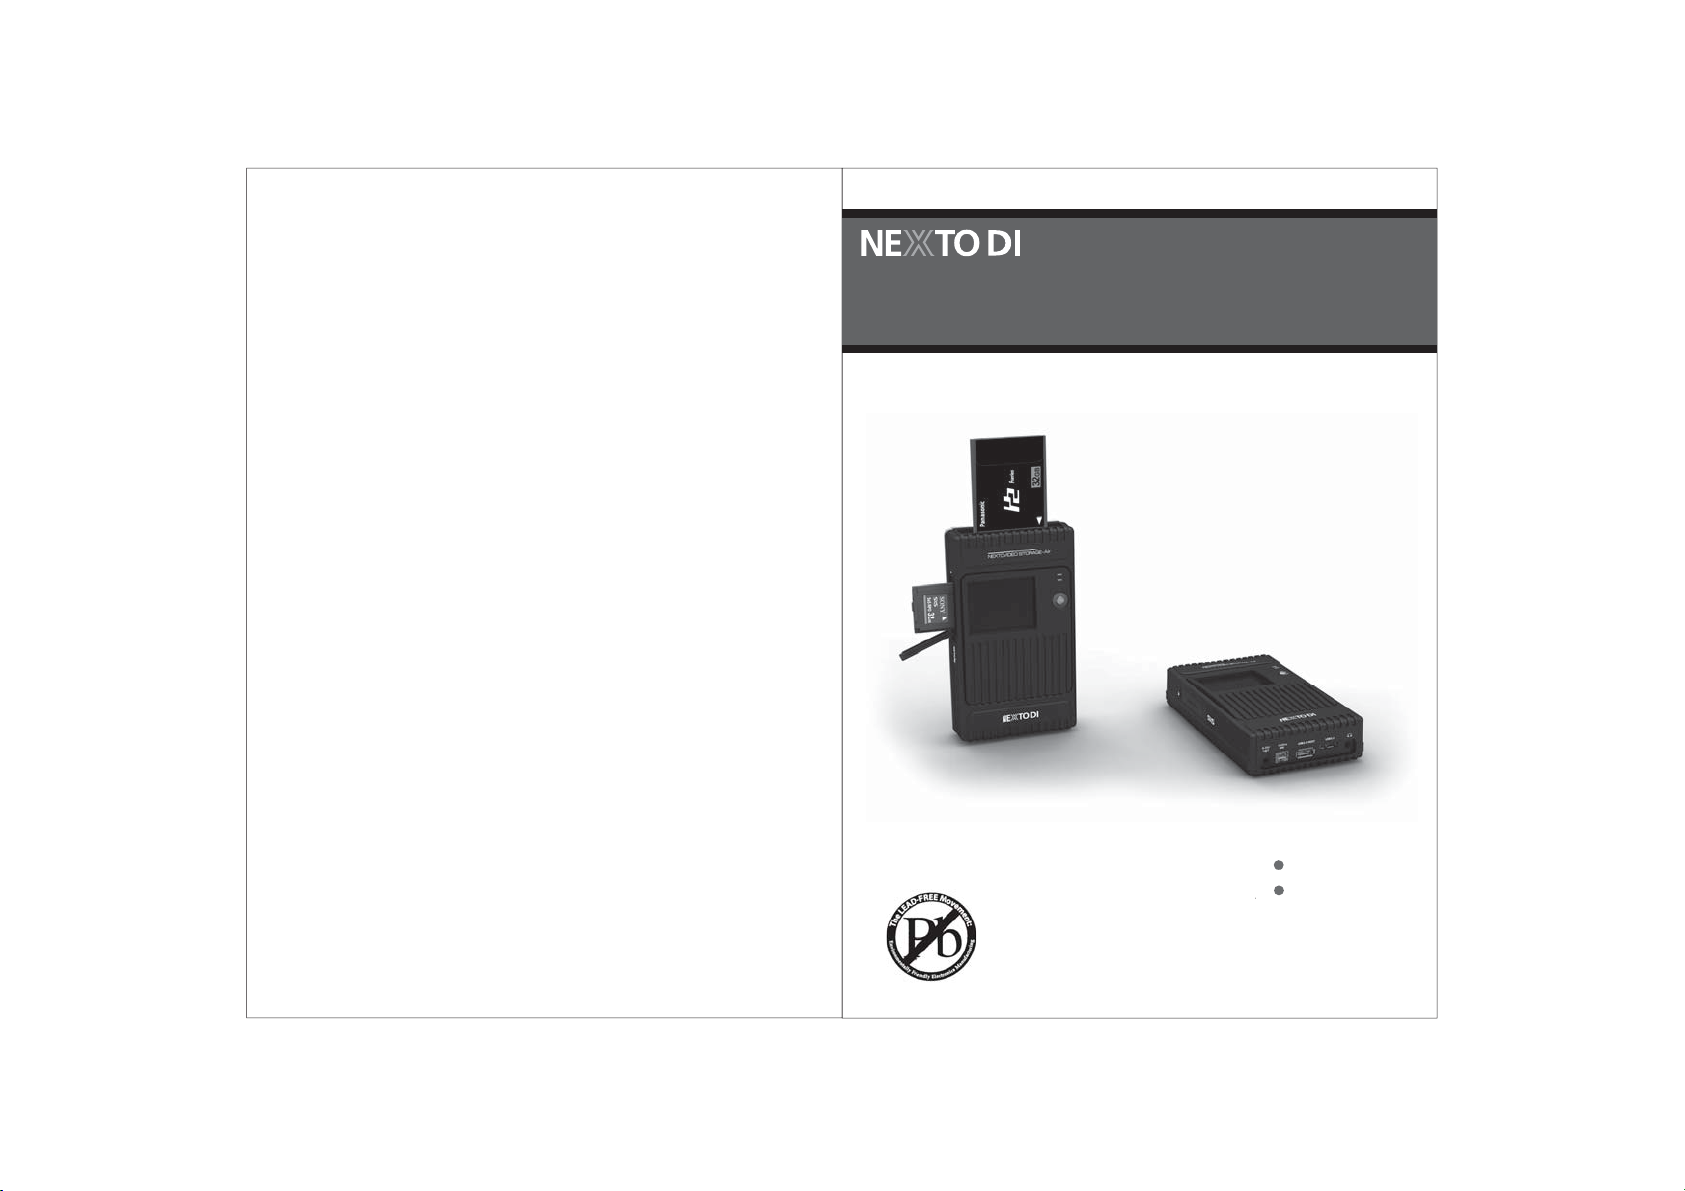
VIDEO STORAGE-Air
Portable Storage for Professional
Video Cameras
User Guide
Version 1/13
NextoDI Co., Ltd.
www.nextodi.com
Page 2
Introduction
Thank you for purchasing the NEXTO VIDEO STORAGE-Air (NVS2825).
The NVS2825 allows camera operators to save footage from camcorders to a hard
drive without the use of a computer. The camcorder can then be used to record
new data. The performance of the NVS2825 has been optimized so that data can
be transferred from a memory card to the NVS2825 more quickly than to other
storage devices. Data stored on the NVS2825 can later be copied to a computer.
The NVS2825 supports professional video cameras from various manufacturers,
in addition to supporting a variety of memory card formats, such as: SxS,
CardBus (including P2/P2E), Compact Flash (CF), SD, SDHC, SDXC.
The NVS2825 also supports a Wi-Fi connection to an iPhone/iPad. The user can
then preview copied data on their device and use “Pre-Editing” functions such as:
OK/NG cut selection, Edit Index File (Note), and Mark In/Out during video play.
Please read this manual before using the product. Follow operating instructions
carefully to avoid damage to the product, or personal injury. This guide assumes
that your NVS2825 unit contains a properly formatted hard disk and a charged
battery. If this is not the case, please refer to the User Manual for instructions
on formatting a hard disk and charging the battery.
"NextoDI", "NEXTO VIDEO STORAGE-Air", " NVS2825" and "X-Copy" are registered
trademarks of NextoDI Co., Ltd.
"Sony" and "SxS" are registered trademarks of the Sony Corporation.
"Panasonic" and "P2/P2E" are registered trademarks of the Panasonic Corporation.
"Windows" is a registered trademark of U.S. Microsoft Corporation in the USA and
other countries.
"Mac OS", “iPhone” and “iPad” are registered trademark of Apple Inc. in the USA
and other countries.
All other trademarks are the property of their respective owners.
All company names and product designations contained herein are trademarks of
their respective owners. All rights are reserved.
Important safety notice
● Do not drop, jar, bump, shock, or expose the NVS2825 to vibration
during video preview or while data is being transferred.
● Do not use near open flames (candles, stoves, grills, fires) or sparks
(fireworks, welding torches).
● For more secure data management, backup your data to an extra
hard drive periodically. Under no conditions is NextoDI, Inc. liable
for loss of, or damage to, a computer; or loss of, or damage to,
a program, records, or data; or any consequential or incidental
damages.
For more inquiries, contact or consult our technical advisory service:
http://www.nextodi.com/en/support/en_qna.php
* NextoDI Co., Ltd. reserves the right to make improvements and/
or changes to the product and programs described in this User's
Guide at any time without notice.
Page 3
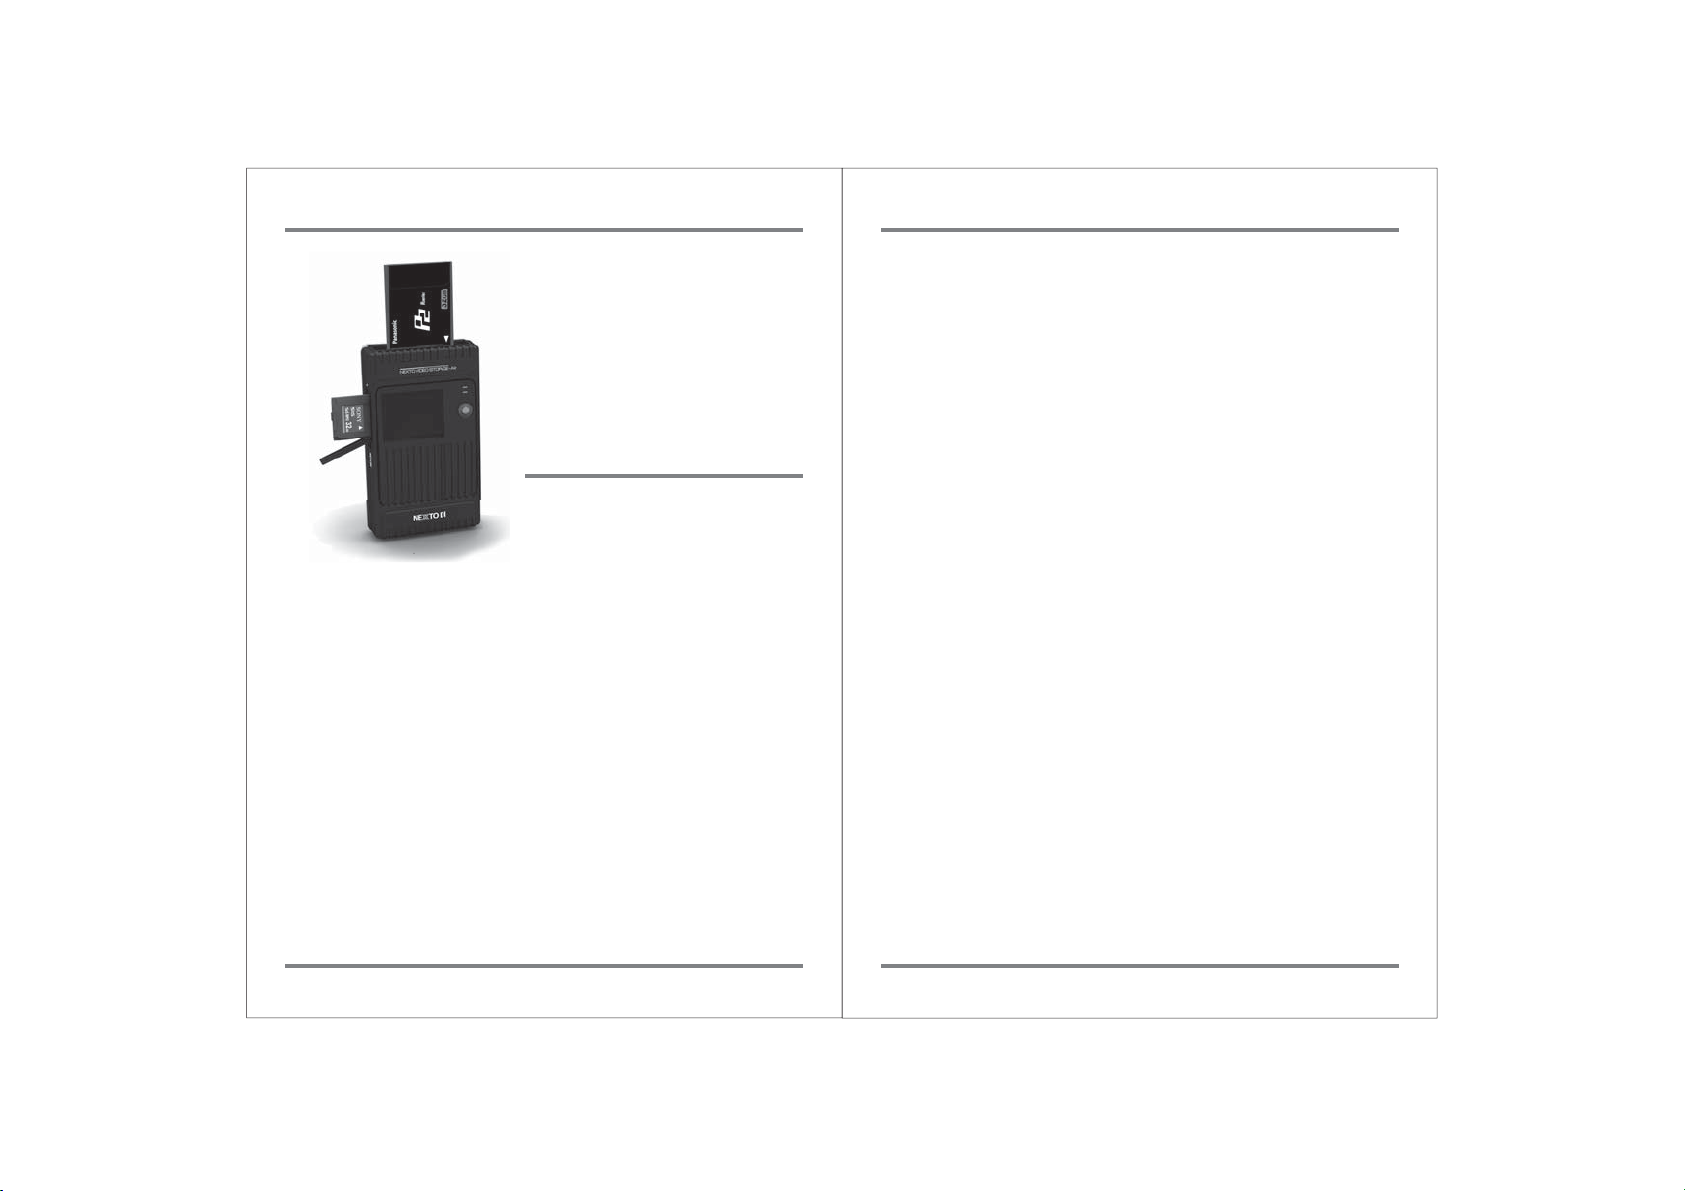
Table of Contents
1. PRODUCT DESCRIPTION ..............................................................................
2. CONTENTS OF THE NEXTO VIDEO STORAGE-AIR ...........................
3. SYMBOLS USED IN THIS DOCUMENT .....................................................
4. SAFETY INSTRUCTIONS ...............................................................................
5. ABOUT THE RECHARGEABLE BATTERY ...............................................
6. DEVICE DIAGRAM ........................................................................................
7. CHARGING THE RECHARGEABLE BATTERY .....................................
8. NVS2825 INTERFACE .................................................................................
9. FORMATTING THE HARD DRIVE ............................................................
10. USING THE NVS2825 AS A HARD DRIVE ........................................
11. DATA BACKUP (COPY) AND VERIFY ..................................................
12. VIDEO/PHOTO PREVIEW ........................................................................
13. USING AN EXTERNAL HARD DRIVE ...................................................
14. MAKING TWO COPIES IN A SINGLE BACKUP (MULTI-COPY) ...
15. MAKING A SECONDARY COPY (SYNC) ............................................
10
11
12
15
17
20
24
29
31
33
16. ADVANCED FUNCTIONS ........................................................................
HDD INFORMATION ...............................................................................
SELF TEST ...............................................................................................
DELETE TMP FOLDER .........................................................................
AUTO POWER OFF ...............................................................................
BUZZER .....................................................................................................
FOLDER RENAME ..................................................................................
MOTION SENSOR ...................................................................................
LANGUAGE SETTING ............................................................................
FIRMWARE UPDATE ...............................................................................
17. EXAMPLES OF BASIC FUNCTIONS .....................................................
18. CHECKING THE LIFETIME OF AN SxS CARD ..................................
19. PRE-EDITING THROUGH A WI-FI CONNECTION ...........................
1
5
20. TROUBLESHOOTING TIPS ......................................................................
21. BATTERY DISPOSAL ................................................................................
35
36
37
41
42
42
43
44
44
45
47
50
51
59
62
6
6
9
Page 4

1. Product Description
The NEXTO VIDEO STORAGE-Air (hereinafter NVS2825) provides the following
various functions:
1.1. Memory card backup and verify
The NVS2825 contains a 2.5”SATA hard drive or SSD (Solid State Disk) and
a Li-Poly rechargeable battery. The NVS2825 can copy the contents of a memory
card to the internal hard drive without a PC--even in the field where no electric
power source is available.
You can copy SxS cards, CF (using a CF card adapter) and SD/SDHC/SDX(using a
SD card adapter) through the ExpressCard slot on the left side of the device. You
can copy Cardbus memory cards (including P2/P2E) through the Cardbus slot on
the top of the device.
The NVS2825 provides a verify function which compares the data stored on the
hard drive with that on the memory card.
For complete backup information, refer to Chapter 11 of this manual.
1.2. Video/Photo Preview and Audio play
The NVS2825 can display video footage taken with professional video cameras
on a color TFT LCD and can also enable the playing of sound through an audio
jack located at the bottom of the device. When previewing the copied data, you
can control the play speed from 1x up to 64x.
For details on Video Preview, see chapter 12.
1.3. Multi-Copy
The NVS2825 can copy the contents of a memory card to the internal hard drive
and to an external USB hard drive at the same time, allowing you to make two
copies in a single operation. For details of the Multi-Copy feature,
see chapter 14.
1.4. Sync
The NVS2825 can synchronize the contents of a folder with the folder on an
external USB hard drive. This allows you to quickly and safely make a secondary
copy of the backup folder to an external USB hard drive without the use of a
computer. For details of the Sync function, see chapter 15.
1.5. Computer connection
The NVS2825 can be connected via USB3.0, IEEE 1394b (FireWire 800) to a
corresponding port on a computer in order to copy data. For details regarding
Computer Connections, see chapter 10.
1.6. Button operation
All of the functions of the NVS2825 are controlled by two buttons, one for power
(On/Off) and the other for function controls (control key). The power button can
also be used as a function key in some instances. For details on Power (On/Off)
and control key operation, see chapter 8.
1.7. Internal/External rechargeable battery
The NVS2825 contains an internal Li-Poly battery that enables the NVS2825 to be
used without the power adapter. The power adapter is used to charge the
internal Li-Poly battery or the external battery. The power adapter also supplies
power to the main unit. The external battery is used to power the external HDD
when performing the multi copy/sync function. The external battery can also be
used to charge the internal battery. For details on Charging the Internal Battery,
see chapter 7.
1.8. Internal hard drive
The NVS2825 offers these functions for the internal hard drive:
[Hard drive Information]
[Hard drive format]
[Hard drive self test]
For details see chapter 9 and chapter 16.
1.9. Firmware upgrade
When NextoDI develops new functionality—or offers support for new video
formats--firmware is provided to users through the website’s download page.
You can download the new firmware to a memory card or the internal hard drive
of the NVS2825. You can then upgrade your NVS2825 using the firmware update
function of the NVS2825. For details, see chapter 16.
01
PRODUCT DESCRIPTION PRODUCT DESCRIPTION
02
Page 5

1.10. Language selection
The NVS2825 supports various languages. You can select a language from the
menu of the NVS2825. For details, see chapter 16.
1.11. Buzzer on/off
The NVS2825 uses a buzzer to note the results of various operations. A user can
turn the buzzer on or off via the menu. For details, see chapter 16.
1.12. Auto-generation of Index Files
After a memory card has been copied, the NVS2825 generates: a nextoid2.htm
file which you can see on the web browser, the HTML files containing metadata,
and the thumbnails of the video footage. If you connect the NVS2825 with your
computer, it facilitates the easier editing of video files.
For details, see chapter 19.
1.13. Pre-Editing through Wi-Fi Connection
Through Wi-Fi, the NVS2825 enables the previewing of video and audio on your
iPhone/iPad. The NVS2825 also enables “Pre-Editing” functions such as:
cut selection, notes, and mark in/out.
For details, see chapter 19.
1.14. Changing the Folder Name
When the NVS2825 backs up a memory card, the user can choose a folder name
beginning with C1~C9 (i.e., C2121001.000) which refers to Camera1~Camera9.
The user can also choose a date-based folder name (i.e., 20121001.000).
For details, see chapter 16.
1.15. Motion Sensor
If the internal storage of the NVS2825 is an HDD, caution must be taken to avoid
any vibration, including: jarring, bumping, shocking, or dropping the unit while
in use. Exposure to such vibration could damage the sectors on the HDD. When
shaking is detected, the NVS2825 warns the user via an LCD indicator and
beeping sound. The NVS2825 contains a free-fall sensor that will cut off
power—in order to protect the internal data—should the unit be dropped.
For details, see chapter 16.
1.16. Auto Power Off
In order to save internal battery power, the NVS2825 will automatically shut off
when not in use for a specified period of time (latency period). The user can
select the latency period (e.g. 15/30/40/50/60/90 seconds).
For details, see Chapter 16.
03
PRODUCT DESCRIPTION PRODUCT DESCRIPTION
04
Page 6
메뉴끄기끄기
2. Contents of the NEXTO VIDEO STORAGE-Air
3. Symbols Used in This Document
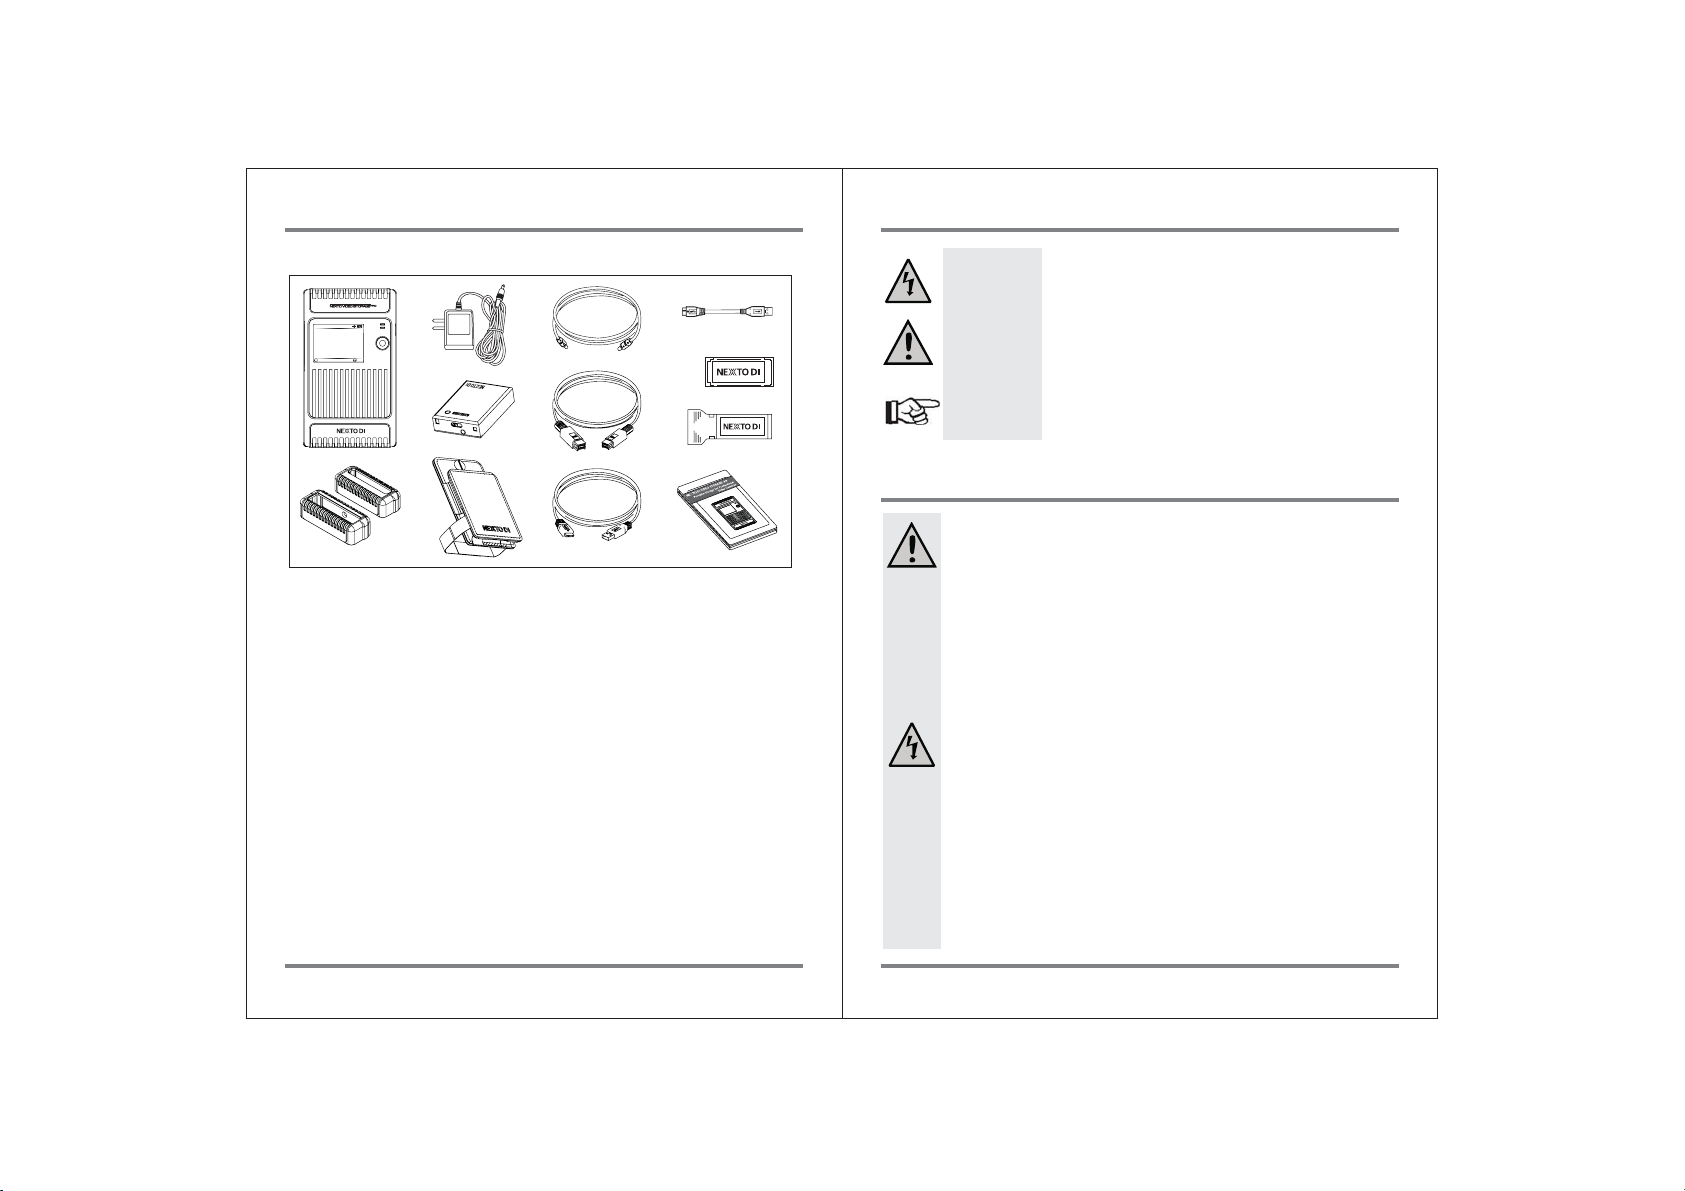
2.1 Main Package
③
145.0 GB
XCopy 대기
메뉴
④
⑥
⑩
⑦
①
⑤
②
① Main storage unit : Main Body + Internal HDD or SSD
② Shock protective rubber jacket
③ AC power adapter (wall plug; 6~25V)
④ Rechargeable external battery :
Supplies power to the main unit and external HDD
⑤ Leather Case
⑥ Rechargeable external battery cable for main unit connection
⑦ IEEE 1394b(FireWire 800) cable for computer connection
⑧ USB3.0 cable for computer connection
⑨ USB3 host cable for external USB 3.0 HDD connection
⑩ SD adapter
⑪ CF adapter
⑫ User guide
⑧
⑫
⑨
⑪
Warning
Caution
Reference
The flash icon in a triangle is used to alert you to
personal injury hazards such as electric shock.
An exclamation mark in a triangle indicates important
instructions which must be observed..
The "hand" icon gives you special tips and notes on
the operation.
4. Safety Instructions
Caution
In case of any damage due to failure to observe these operating
instructions, the warranty will be voided. NextoDI does not assume
liability for consequential damages. Nor do we assume liability for
damage to property or personal injury caused by improper use or
failure to observe the safety instructions. The warranty would be
voided in any such case.
The following safety instructions and warnings are not only to protect
you, but also to protect the device. Please read the following warnings:
Warning
● Unauthorized conversion and/or modification of the product is
forbidden for safety reasons.
● Never open the product housing. This device is not user serviceable.
● Damage to the Li-Poly rechargeable battery may result in explosion
or fire.
● Maintenance or repairs may only be carried out by an authorized
repair center.
● The AC power adapter unit is intended for use in dry conditions to
avoid electric shock.
05
CONTENTS OF THE NEXTO VIDEO STORAGE-AIR SYMBOLS USED IN THIS DOCUMENT
06
Page 7
Warning
● The case of the hard disk must not get damp or wet.
Protect the device from humidity and water, from sun, excessive
heat (>113°F) or cold (<32ºF), dust and dirt.
● When the product is brought from a cold place into a warm room,
condensation may form. This could damage the product. Always let
the product get to room temperature before use or before
connecting the AC power adapter unit. This could take several
hours.
● Do not use in tropical climate conditions
● The AC power adapter unit complies with safety class II. As a voltage
source only a proper power socket of the public power supply
system may be used. Note the input voltage/frequency imprinted
on the AC Adapter. It must correspond to the voltage/frequency of
the power outlet. The AC power adapter is equipped with an input
voltage range of 100 ~ 240V, 50/60Hz.
● The product is not a toy and should be kept out of reach of children.
● Do not place liquid near the product. Liquid could get inside the
housing and cause a fire or electric shock. In case of fire damage or
short circuit, de-energize the respective socket (e.g. turn off circuit
breaker) and only then pull the AC power adapter unit from the
socket. Do not attempt to use the product! Take it to your dealer
for repair immediately.
● Never touch the AC power adapter unit when your hands are damp
or wet.
● In industrial facilities, safety regulations for electrical equipment
and facilities must be observed. If the product is used at schools,
training facilities, or do-it-yourself/hobby shops, it should not be
handled unless supervised by trained, responsible personnel.
● Do not drop the NVS2825 device.
Caution
● The product must not get damp or wet. This product is not a toy.
It contains fragile and swallowable glass parts, small parts, and a
rechargeable battery. Any use other than that described above may
damage the product. Read these operating instructions thoroughly
and carefully. The instructions contain important information for
installation, operation, and handling. Take note of all safety
instructions.
07
SAFETY INSTRUCTIONS SAFETY INSTRUCTIONS
08
Page 8
A "Li-Poly" (lithium-polymer) rechargeable battery is integrated into the NVS2825.
This rechargeable battery does not have the so-called "memory effect"--the
rechargeable battery can be charged whenever you want. Furthermore,
it has a higher energy content than conventional NiCd and NiMH rechargeable
batteries. Note these important instructions when handling the Li-Poly
rechargeable battery.
The rechargeable battery can be recharged 400 times.
If the battery operation time gets shorter, it may be time to replace the battery.
Consult your authorized NEXTODI dealer to replace the internal battery.
Caution
● Never damage the rechargeable battery--do not remove it from the
NVS2825. Consult the chapter on "Battery Disposal". Damaging the
wrapping of the rechargeable battery might cause an explosion or
fire.
● Never short circuit the contacts of the rechargeable battery. Never
touch the connections or electrical components inside the NVS2825
with metal objects.
● Charge the rechargeable battery regularly, even if you do not use
the product. The NVS2825 needs some "current" (a small quantity)
at all times. Due to the Li-Poly rechargeable battery technology,
it is not necessary to discharge the battery before recharging.
Recharge the battery completely, about once a month. The device
will be ready for use at any time.
6. Device Diagram5. About the Rechargeable Battery
⑨
⑧
⑩
⑦
⑥
① DC IN slot for AC power adapter unit (wall plug; 6~25V).
② FireWire 800 (IEEE 1394b) slot for computer connection.
③ USB 3.0 Host slot for external USB HDD connection.
④ USB 3.0 Device slot for computer connection.
⑤ Audio Slot for audio jack : User can hear sound during the preview.
⑥ ExpressCard slot for connecting to SxS and CF/SD cards.
CF/SD cards need CF/SD adapters which are included in the NVS2825 box.
⑦ LCD Display
⑧ Control key. Controls up/down/left/right/select of cursor when power is on.
⑨ Power key. Controls power on/off and enables the selection of commands
when power is on.
The power key can be used as a reset key to press more than 7 seconds in
the event of a hardware or software malfunction.
⑩ CardBus slot for CardBus memory card (including P2/P2E) connection.
⑤
④
③
②
①
09
ABOUT THE RECHARGEABLE BATTERY DEVICE DIAGRAM
10
Page 9
8. NVS2825 Interface7. Charging the Rechargeable Battery
Menu
Off
7.1. Internal battery
The battery can be charged using the AC power adapter unit delivered with this
product.
● Turn off the NVS2825
● Connect the charger’s wall plug to the NVS’s "DC IN" slot
● Plug the AC power adapter unit into a wall socket
● The LED above the control key shows red when charging
● When the battery is charged, the red LED turns off
● If there is an error when charging, the LED blinks. If this happens,
unplug the AC adapter unit and plug it in again.
Users can also charge the NVS2825 via the car charger or the USB3.0/IEEE 1394b
(FireWire 800) cables.
With a completely empty rechargeable battery, the charging procedure lasts
approximately 4 hours using the AC power adapter, the car charger, or the IEEE
1394b (FireWire 800) cable. With the USB 3.0 cable, charging takes about 9 hours.
Reference
● You must turn off the NVS2825 in order to charge the unit.
● The NVS2825 can be charged via USB without using the AC power adapter
included in the box. A high powered USB connection is needed, i.e. a USB
connection with its own power supply, such as the USB port of a computer or
a USB hub with a power unit.
● If the NVS2825 is operated with a notebook, you must always use the AC
power adapter unit to charge the NVS2825. Notebooks may not deliver the
necessary amount of current via USB.
● The NVS2825 will operate for about two hours with a fully charged internal
battery.
● When connected to a computer using IEEE 1394b (FireWire 800) or USB, the
NVS2825 draws power from the computer, not the internal battery.
● If the NVS2825’s battery is completely discharged, the performance of the
battery may be degraded. It is recommended that the NVS2825’s battery be
recharged before the battery gauge reaches the empty level.
7.2. Rechargeable External battery
The external battery can be charged using the AC power adapter and the car
charger cable.
Reference
● Even if the NVS2825 is fully charged and has been powered off, the
rechargeable external battery will continue to consume power when
connected to the NVS2825.
● Please power off the rechargeable external battery when it is not in use.
● The car charger is used only for charging the internal battery or the
rechargeable external battery.
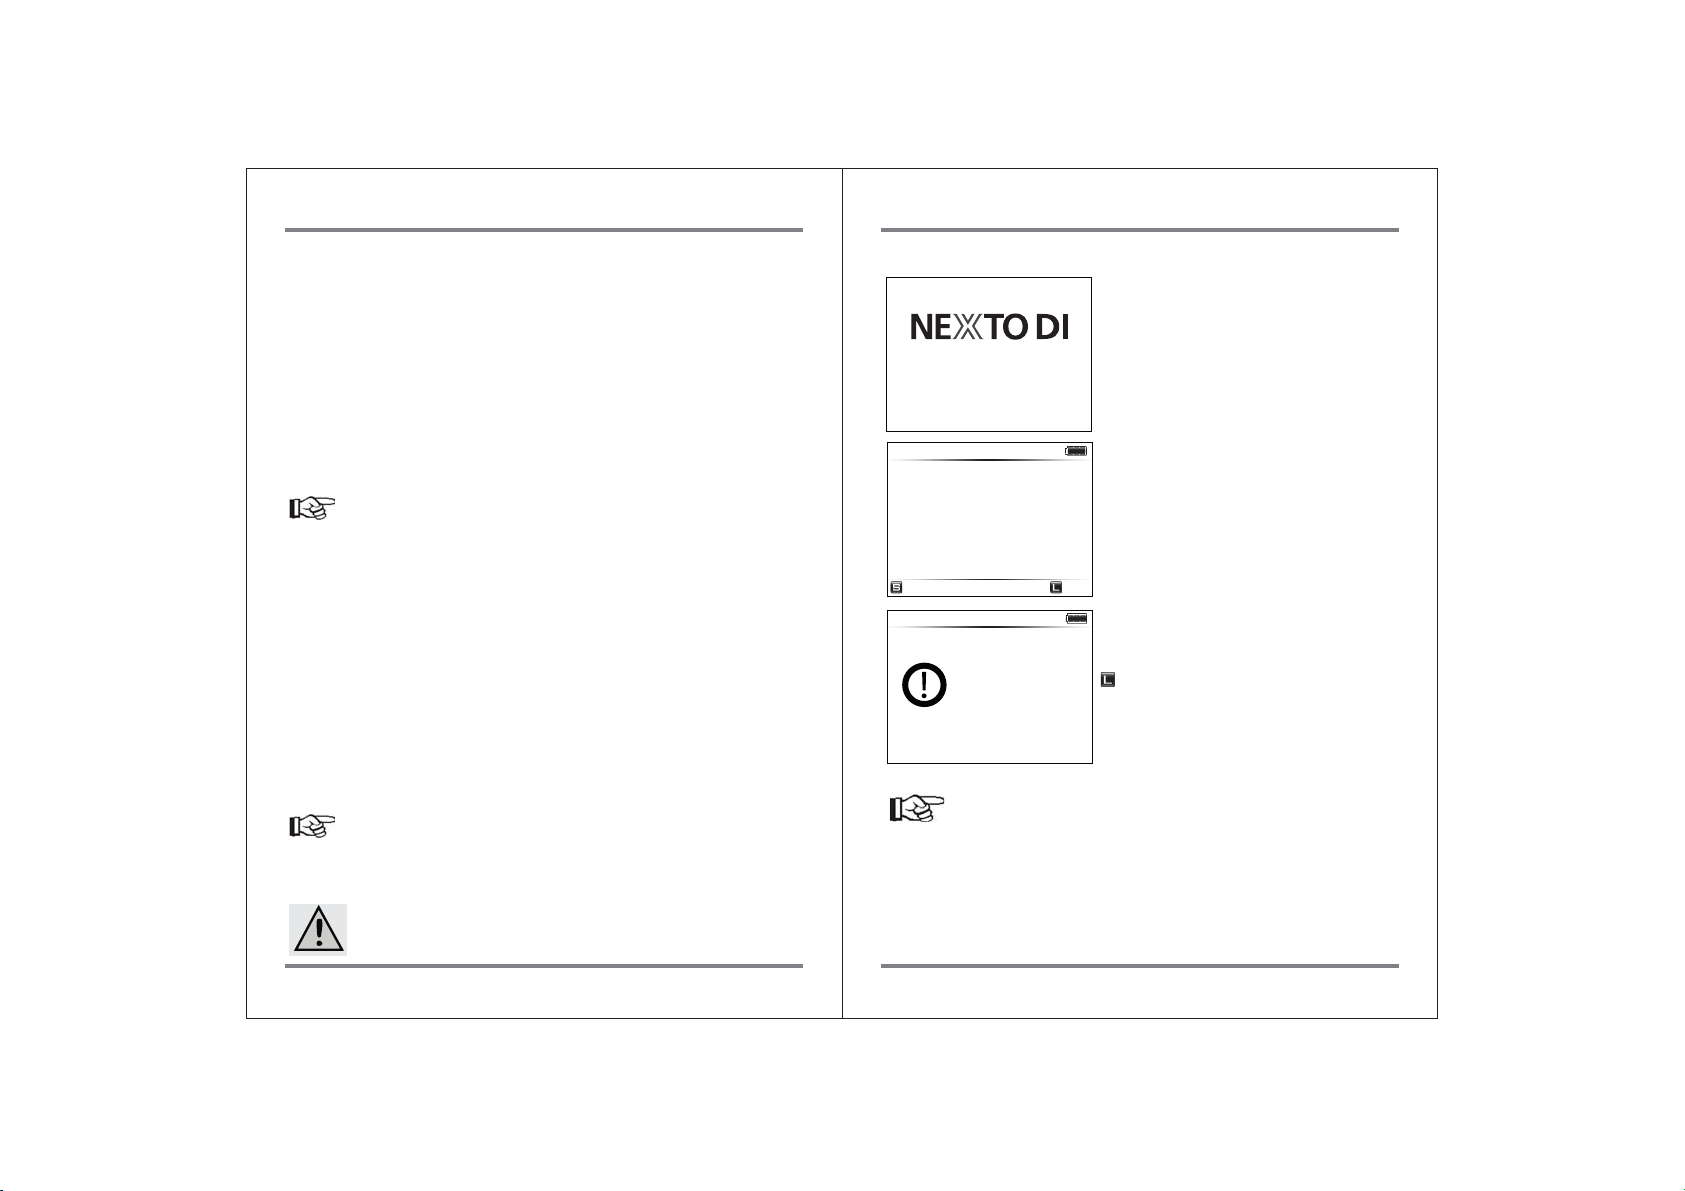
8.1. Turning the NVS2825 on/off
Press the power key on the right side of the
device for a few seconds in order to turn the
NVS2825 on. The power up logo and firmware
version will be shown on the LCD.
When you see the logo on the LCD screen,
Ver 1 .00
NEXTO VIDEO STORAGE AIR
698.6 GB
XCopy Ready
Menu
698.6 GB
Power Off
release the button. Otherwise, the NVS2825
will automatically power down.
After checking the system, the NVS2825 goes
into [XCopy ready] mode. You can copy a
memory card in this mode.
Off
The NVS2825 will automatically turn off when
not in use. The user can choose the amount of
idle time (e.g. 15/30/40/50/60/90 seconds)
prior to an automatic power off. When the
Off control option appears on the LCD, the
NVS2825 can be powered off by pressing down
on the control key or power key for more than
1 second.
For details on Setting Auto Power Off,
see chapter 16.
Reference
● The NVS2825 can be reset via the power key by pressing for more than
7 seconds.
Please note: When the internal HDD is active, a reset may cause damage to
the internal HDD.
11
CHARGING THE RECHARGEABLE BATTERY NVS2825 INTERFACE
12
Page 10
8.2. Key operation
Off
Menu
Off
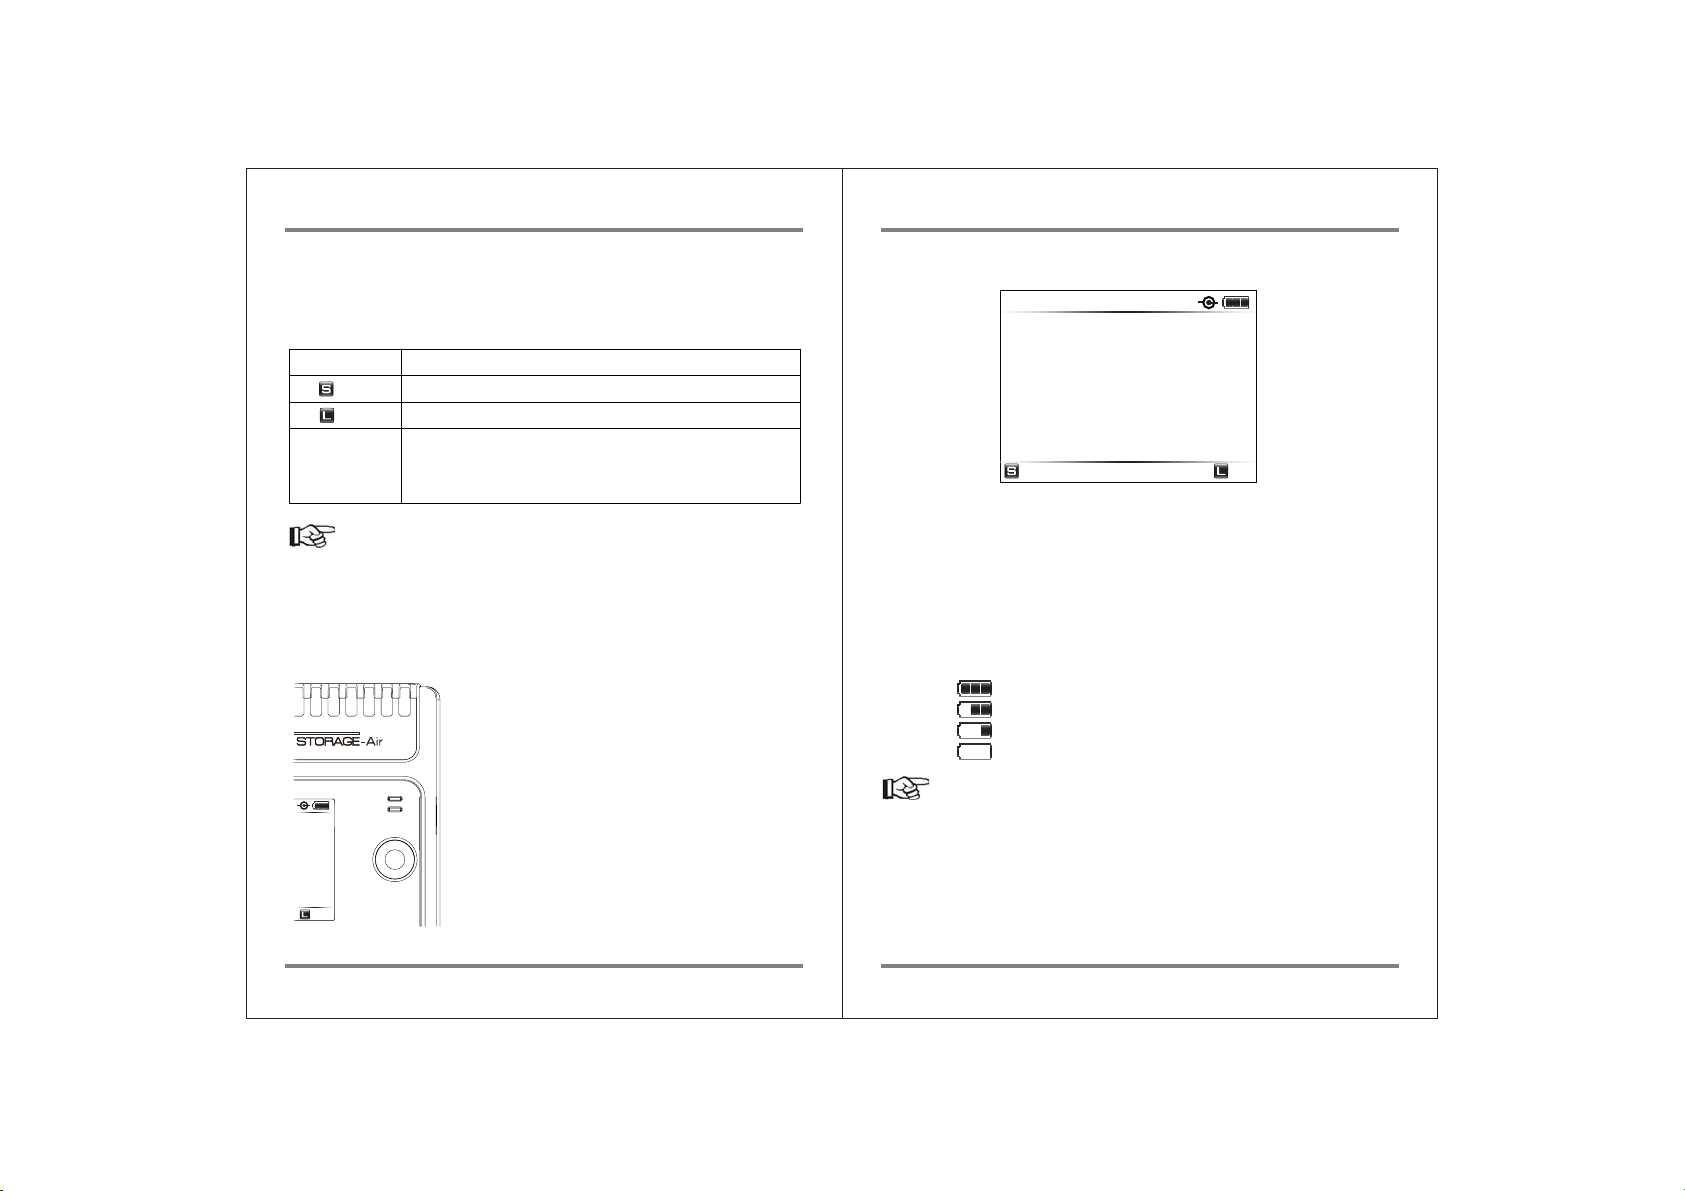
The NVS2825 is operated by a single control key which can be used in five
different ways. The display shows you the “S” (Short) or “L” (Long) symbol as a
means to invoke the desired function.
8.4. The LCD Display
① ②
698.6 GB
Symbols
(Short)
(Long)
▲▼◀▶
If the control key is not working: If the control key is malfunctioning, the menu
sub-functions cannot be used. However, functions such as copy and verify can
still be activated through the power key. The user could thus rely on the power
key—instead of the control key—to select the desired function from the menu.
Press once and release immediately.
Press and hold the key for more than one second.
Push the key in the appropriate direction.
Up/down/left/right movements are supported.
Pushing and Holding the key in the up or down direction,
results in repeated executions of the operation.
Operation
8.3. The LED indicator
① Red indicates battery is being charged. Green
indicates “power on.”
② Blinking red indicates that the key is pressed or a
data transfer is occurring.
LCD
①
②
Control
Off
button
③
④
① Remaining capacity of the internal hard disk.
A capacity check will be performed automatically during power on. If an
external hard drive is connected to the NVS2825, the capacity of external
hard drive will be displayed next to the capacity of the internal hard drive.
② Remaining capacity of the rechargeable battery / External Power Connection
Display
The battery capacity is displayed four ways: (3→2→1→empty) by the battery
gauge.
(Full): 80% ~ 100%
(2nd Gauge): 30% ~ 80%
(1
(Empty): Under 5%
XCopy Ready
Menu
st
Gauge): 5% ~ 30%
Off
Reference
● External Power Connection Display When the AC power adapter, the car charger or the
external battery has been connected, a round mark is shown on the left side of the
battery capacity display.
③ Current status of the device.
④ Available functions for the current screen. The display varies depending on
the function in use.
13
NVS2825 INTERFACE NVS2825 INTERFACE
14
Page 11
9. Formatting the Hard Drive
Selec t
Back
Selec t
Back
OK
Back
OK
Back
The hard disk in the NVS2825 should already be formatted with the "exFAT" file
system. Only one (or the first) partition can be used.
Do not attempt to format the NVS2825 disk with a computer. Use only the format
function on the NVS2825. This will allow the hard disk to be read by either the
Windows or Mac operating systems.
● Please back up all data to the extra hard drive before formatting
the internal or external HDD/SSD.
● The NVS2825 can only work with one partition in the file format
"exFAT".
Therefore, the NVS2825 offers users the function for formatting
the hard disk in the "exFAT file system.”
● In the event that several partitions exist in the HDD or memory
card, the NVS2825 will only recognize the first partition. Please
do not use several partitions.
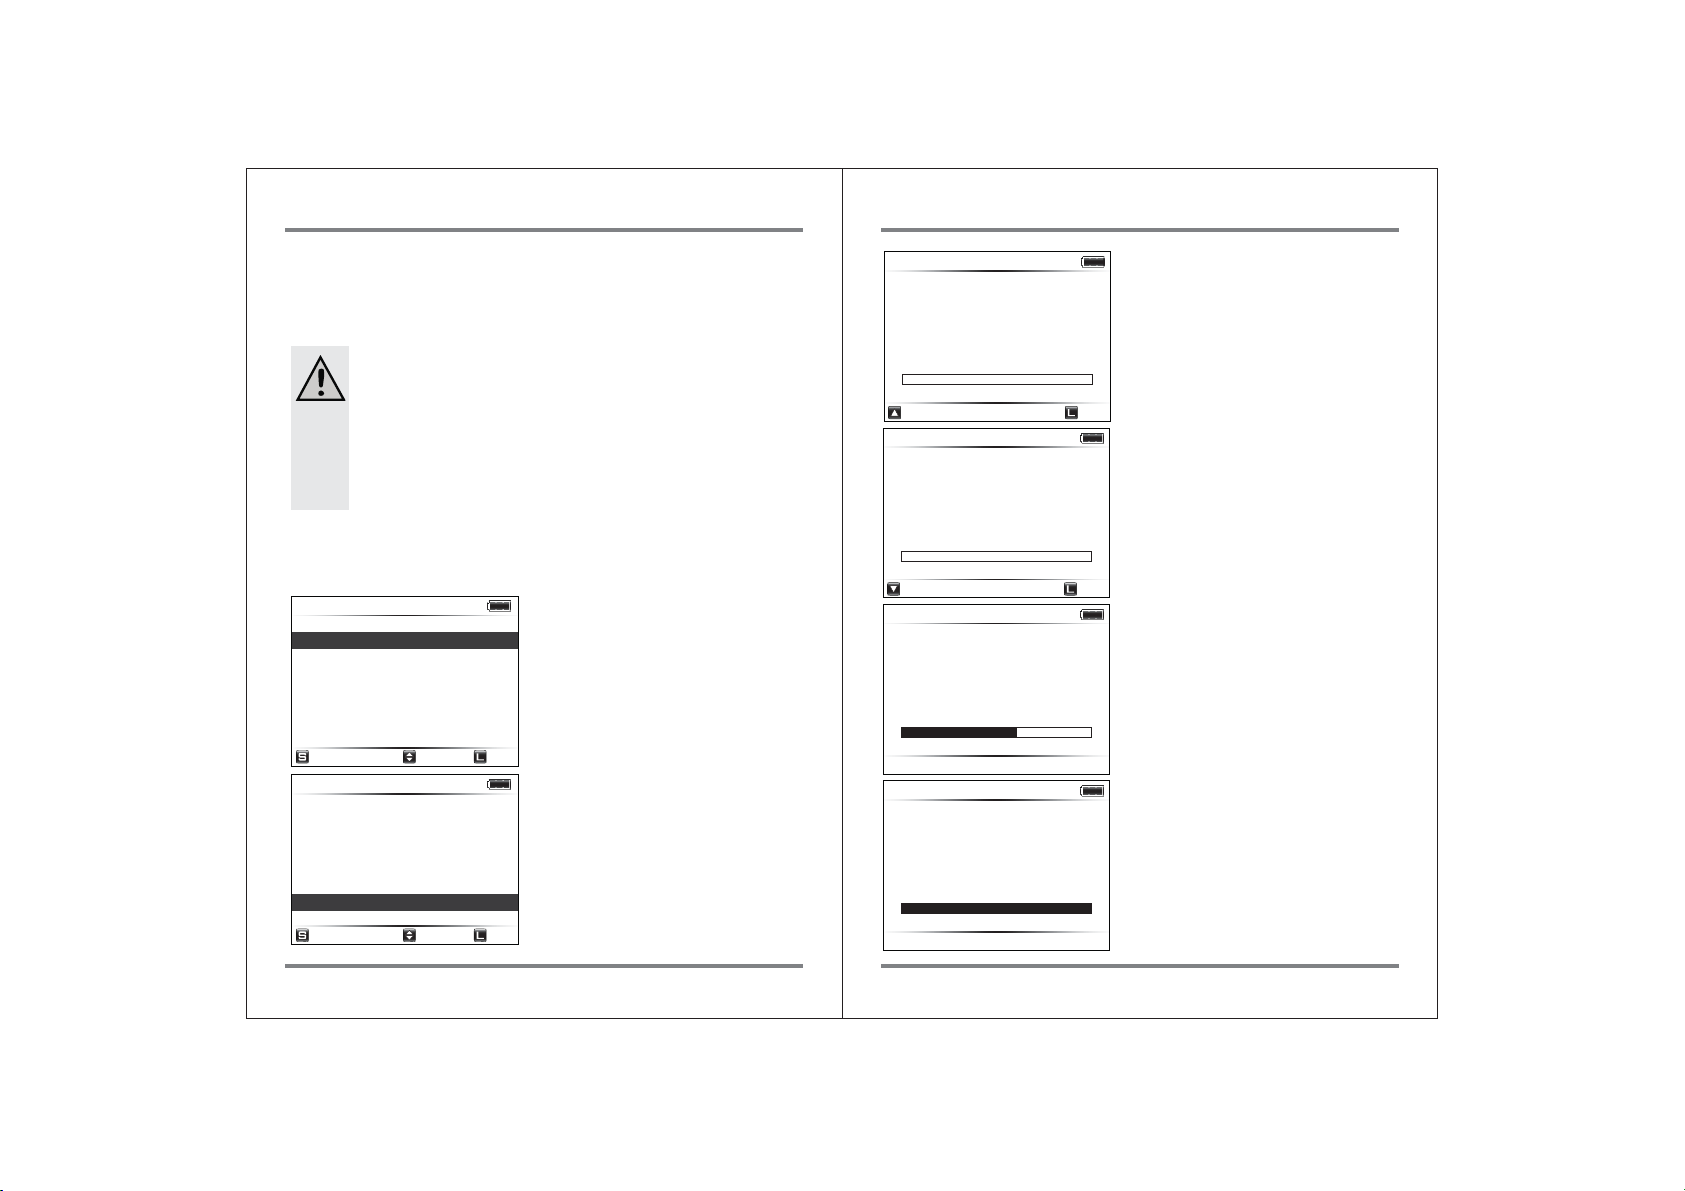
To Format a New Hard Disk
The NVS2825 must not be connected with a computer via USB or IEEE 1394b
(FireWire 800). Remove any memory card or USB device.
512.0 GB
Preview
HDD Management
Sync
Setup
Force Enable USB
Wi-Fi Mode
Select
512.0 GB Int. HDD
HDD Management
HDD Info
Self Test
TMP Folders
Format
Select
To re-partition/format the hard disk, press
the control key once at the [XCopy Ready]
mode to get to the menu ("S-Menu"). Move
the highlighted cursor to the [HDD
Management] menu by pushing the control
key downward. Press the control key once
to select [HDD Management].
Back
Move the highlighted cursor to the [Format]
menu option with the control key.
Press the control key once to select
[Format].
Back
512.0 GB Int. HDD
HDD Format
All data in HDD
will be deleted
Format HDD?
OK
512.0 GB Int. HDD
HDD Format
All data in HDD
will be deleted
Confirm HDD Format
OK
512.0 GB Int. HDD
HDD Format
Formatting
698.6 GB Int. HDD
HDD Format
Formatted
Confirm the selection by pushing the
control key upward.
You can cancel the operation by pressing
and holding the control key or power key.
Back
Then you can repartition and reformat the
hard disk; to confirm, push the control key
downward. All data on the hard disk will be
lost!
You can cancel the operation by pressing
and holding the control key or power key.
Back
The NVS2825 indicates the progress of the
formatting operation.
When the formatting is completed you are
ready to copy data to the hard disk.
15
FORMATTING THE HARD DRIVE FORMATTING THE HARD DRIVE
16
Page 12
10. Using the NVS2825 as a Hard Drive
Off
Off
Off
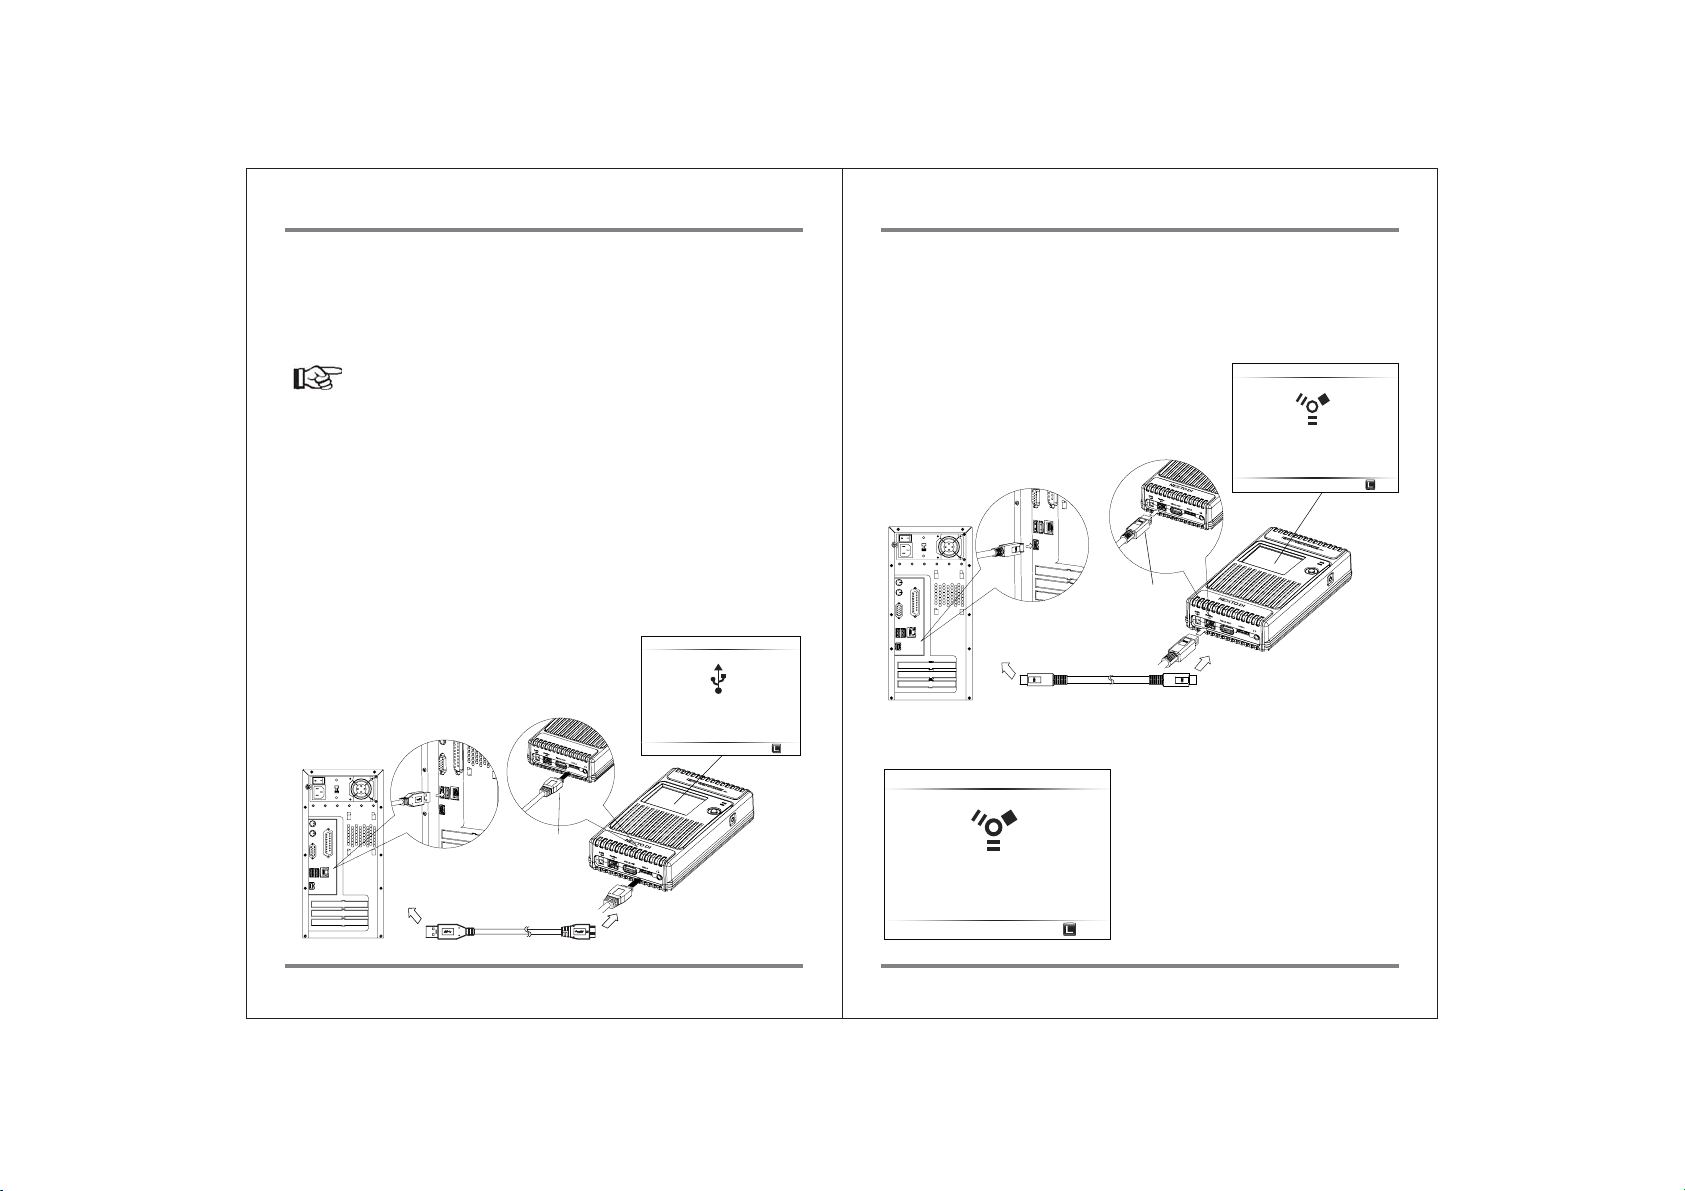
The NVS2825 can be connected to your computer for use as an external hard disk.
Two connection methods are supported.
1. Connect to the computer’s USB 3.0 slot via the NVS2825 "USB 3.0 slot" and the
USB 3.0 cable.
2. Connect to the computer’s IEEE 1394b (FireWire 800) slot via the NVS2825
"IEEE 1394b (FireWire 800) slot" and the IEEE 1394b (FireWire 800) cable.
Reference
Users of Windows XP and Windows Server 2003 must have Service Pack 2 or later and install
an update to support exFAT. Windows Vista must be Service Pack 1 or later for exFAT support.
The NVS2825 cannot be read by any version of Windows prior to Windows XP.
Mac OS X Snow Leopard 10.6.5 and later can fully access exFAT file systems.
A computer can only recognize the internal HDD/SDD of the NVS2825. A computer cannot
recognize an external USB HDD or any memory cards that are connected to the NVS2825.
Thus, the NVS2825 cannot be used as a memory card reader.
If connecting to the NVS2825 via USB, use the back slot of the computer. The front slot might
not be able to process the high speed of the signal.
10.1. Connecting via USB
① Turn your computer on. Wait until the operating system has completely
booted.
② Turn the NVS2825 on.
③ Connect the NVS2825 "USB 3.0" slot via the USB cable with a free USB 3.0 port
on your computer. A USB 2.0 port can also be used.
④ Check the "PC Connection" on the NVS2825’s
LCD display.
⑤ If your computer detects the NVS2825 correctly,
a new drive named [NEXTODI] will appear in the
“My Computer” display.
USB 3.0
(Standard-A)
USB 3.0
(Micro-B)
PC Connection
Off
10.2. Connecting via IEEE 1394b (FireWire 800)
① Turn your computer on. Wait until the operating system has completely
booted.
② Turn the NVS2825 on.
③ Connect the NVS2825 "IEEE 1394b (FireWire 800)" slot via the IEEE 1394b
(FireWire 800) cable with a free IEEE 1394b (FireWire 800) port on your
computer.
④ Check the "PC Connection" on the NVS2825’s LCD
display.
⑤ If your computer detects the NVS2825 correctly,
a new drive named [NEXTODI] will appear in the
“My Computer” display.
IEEE1394b
(FireWire 800)
IEEE1394b
(FireWire 800)
IEEE1394b(FireWire 800) Cable
The 4pin-9pin IEEE 1394b (FireWire 800)
cable does not provide power. Use the AC
power adapter unit or USB cable to provide
power. If no power is provided, the NVS2825
Connect Power
PC Connection
shows the “Connect power” message and
waits for external power to be applied.
PC Connection
Off
Off
USB 3.0 Cable
17
USING THE NVS2825 AS A HARD DRIVE USING THE NVS2825 AS A HARD DRIVE
18
Page 13
11. Data Backup (Copy) and Verify
Cance l
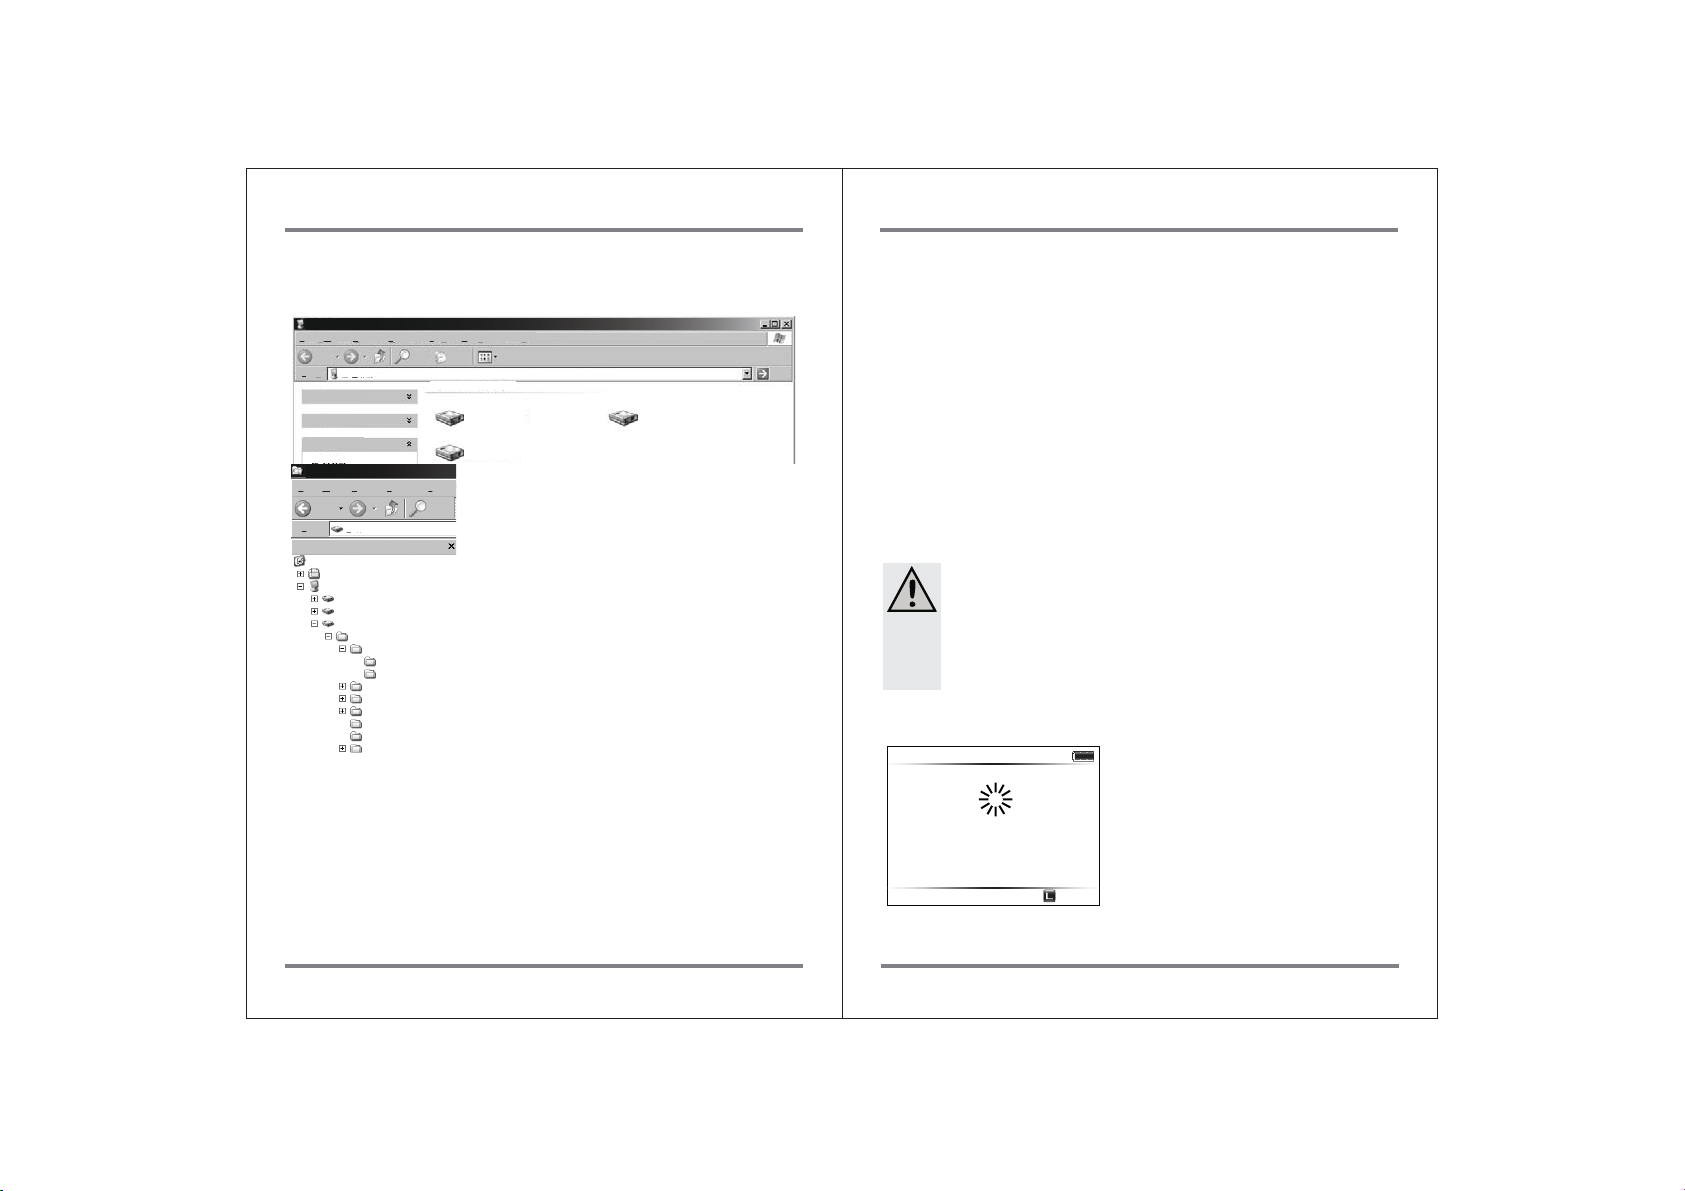
10.3. Browsing the contents of your hard drive
If your computer detects the NVS2825 correctly, a new drive named [NEXTODI]
will appear on “My Computer.”
My Computer
File Edit View Facorites Tools Help
Back
My Computer
Address
System Tasks
Other Places
Details
NEXTODI (E:)
File Edit View Facorites Tools
Back
Address
E:
Folders
Control Panel
My Documents
My Computer
WINDOWS (C:)
Local Disk (D:)
NEXTODI (E:)
NvsAir
20121010.000
5dmarkII_Movie
nextoid2_c
20121101.000
20121107.000
20121119.000
nextoid2
TMP.000
TMP.001
Search Folders
Hard Disk Drives
WINDOWS (C:)
NEXTODI (E:)
Local Disk (D:)
Back up data is stored in the "NvsAir" folder. This
folder is created automatically. The NVS2825
Search
generates a new folder for each memory card copy.
The name of the folder is determined by the shooting
date.
For example, 20121112.000 means the last footage
recorded on November 12, 2012. (If you copy multiple
items on a single day, the last three digits will be
changed to indicate the download sequence –
“000, 001,002, 003, etc.) The date code comes from
the video cameras. If the date setting on the video
camera is incorrect, the folder name of NVS2825 will
also be incorrect.
If a copying failure occurs, the copy is stored on your
computer as a TMP folder. The TMP folder contains
the same file names, but the data may be abnormal.
You may delete the TMP folder.
Go
10.4. Disconnecting the NVS2825 from Your Computer
For Windows
Right click the Storage device icon in the System Tray (lower right corner of your
screen) and select “Safely Remove Hardware” or “Unplug” or “Eject Hardware”.
Then disconnect the cable from your NVS2825 and your computer.
For MAC
Drag and drop the NEXTODI icon in the trash. Then disconnect the cable from the
NVS2825 and your computer.
This chapter explains the “Copy” and “Verify” functions.
Insert a memory card into the corresponding memory slot. The slot for the
Cardbus memory card (including P2/P2E cards) is located on the top side of the
NVS2825.
The slot for the SxS card and CF/SD cards is located on the left side of NVS2825.
The CF/SD card must be used with a CF/SD card adapter which is included in the
NVS2825 box.
When copying from a memory card, the NVS2825 should not be connected to a
computer. The NVS2825 can copy a memory card onto the internal hard disk via
the built-in memory slot or via the “USB-Host" slot connector with a USB cable.
After the backup, the copy procedure can be verified. The data on the memory
card and the data on the hard disk are compared with one another. This ensures
that the data has been copied properly (“Verify”). You can choose the
“New Copy” or the “Verify” function according to whether the contents of the
memory card have been copied before.
Reference
Do not connect more than one memory card to the NVS2825. Only the
first one connected will be detected.
Insert the memory card carefully. The pins may bend if you insert the
memory card incorrectly.
11.1. Parsing the memory
698.6 GB
SxS Detected
Checking...
The data on the memory card is compared
with the data stored on the NVS2825 hard
disk to determine whether it is new data or if
the data--or a portion of the data--has
already been stored on the NVS2825.
According to the comparison result, the
NVS2825 operates as follows:
Cancel
19
USING THE NVS2825 AS A HARD DRIVE DATA BACKUP (COPY) AND VERIFY
20
Page 14
Select
Cancel
Select
Cancel
Select
Cancel
Cancel
Select
Cancel
Off
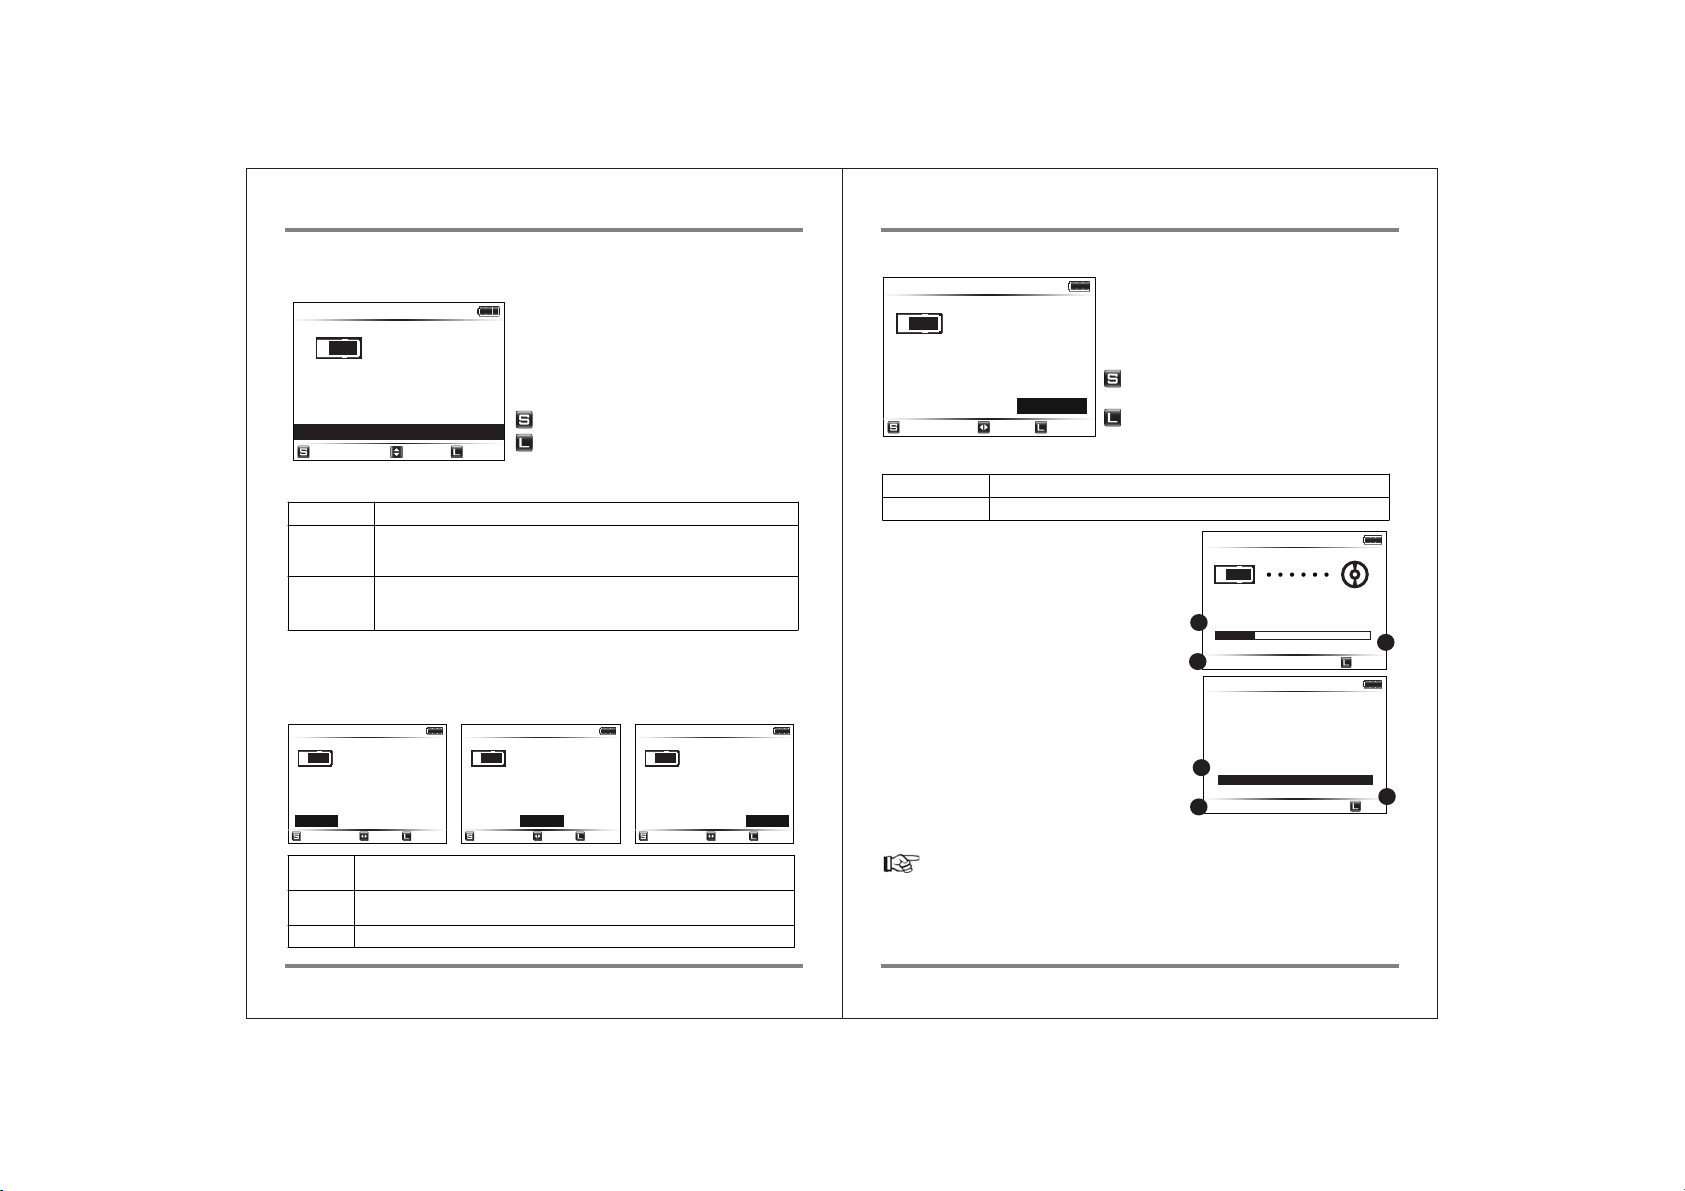
11.2. Copy
Cance l
Selec t
(1) If the memory card contains new data.
698.6 GB
SxS
3.6 GB
16 Files
Copy SxS?
Fast Copy
Copy & Verify
Safe Copy
Select
Three options are available for copying using the up/down key selection.
Fast Copy
Verify&Copy
Safe Copy
Make a new folder and copy all the memory card data into the folder.
Same as [Fast Copy] but after copying, the data on the memory card
is compared with the copied data in the NVS2825 hard drive.
Each bit is verified.
Before copying data, the NVS2825 verifies that its hard drive area is
safe. If a bad sector is detected, a new, safe area is found –
then copying [Fast Copy] will begin.
(2) Memory card with copied data
If the memory card was copied before, and not modified since, then you can
choose to [Verify] or [Copy] or [Delete].
695.0 GB
SxS
Same Copy is in
20090618.000
Verify SxS?
Verify Copy Delete
Select
Verify
Copy
Delete
3.6 GB
16 Files
Cancel
Compare data stored in the hard drive to the data stored in the memory
card.
Copy again. Make a new folder and copy all of the data in the memory
card to the hard drive.
Delete the data on the memory card so that it can be reused.
The NVS2825 will make a new folder on the
hard disk and copy all the files and folders in
the memory card onto the internal hard disk.
The contents of the memory card will not be
deleted.
: To Copy, press the control key briefly.
: To Cancel the copy, press the control key
Cancel
for more than 1 second
695.0 GB
SxS
Same Copy is in
20090618.000
New Copy SxS?
Verify Copy Delete
Select
3.6 GB
16 Files
Cancel
695.0 GB
SxS
Same Copy is in
20090618.000
Delete SxS?
Verify Copy Delete
Select
3.6 GB
16 Files
Cancel
11.3. Verify
695.0 GB
SxS
Same Copy is in
20090618.000
Verify SxS?
3.6 GB
16 Files
Sample Full
Select
Two options are available for verification using left/right key selection.
Sample verify
Full verify
Compare first 1MByte of each file.
All the data is compared.
11.4. Status
Current operation status is shown on the
LCD display.
(1) Total number of files in the memory card
versus the number of copied files.
(2) Amount of data copied.
(3) Elapsed time
11.5. Indication of Results
If the operation completes successfully,
the user is notified with a beep sound and
the lapsed time is displayed.
(1) Total number of files in the memory card
versus the number of copied files.
(2) Amount of data copied.
(3) Copy speed in (MB/s)
When you choose the verify function, the
NVS2825 compares the data stored on the hard
drive to that on the memory card. The
verification logic entails a full bit-by-bit
verification, and detects any differences.
: For verification, press the control key
briefly
: Cancel verification, press the control key
Cancel
for more than 2 seconds.
698.6 GB
SxS
Copying
4/16 906.3 MB
1
0m30s
3
695.0 GB
Copy Success
Copy Done
Remove SxS
16/16 3.6 GB
1
90.7 MB/s Off
3
Cancel
Reference
● Remove the memory card to return to the initial display.
● If you don't remove the memory card, the NVS2825 will automatically turn off within user
set-up time (e.g., 50 seconds) to preserve battery life.
● For “The Location of Stored Data” and “The Name of Back up Folder,”
please refer to Ch.10.
2
2
21
DATA BACKUP (COPY) AND VERIFY DATA BACKUP (COPY) AND VERIFY
22
Page 15
12. Video/Photo Preview
Select
Back
Select
Back
Select
Back
OK
OK
Preview
11.6. Error Display
When the error occurs during the back up, the error message is displayed and
NVS2825 will automatically turn off.
For the reminding of user, the NVS2825 displays the previous operational status
at the next power up. The user will then know whether the last backup was
successful.
698.6 GB
Device Read Error
ErrorNo: 0x33006000
SxS
Error
698.6 GB
OK
Previous
Copy Failed
20090618.003
16 Files
3.6 GB
695.0 GB
OK
Previous
Copy Success
20090618.003
16 Files
3.6 GB
Preview
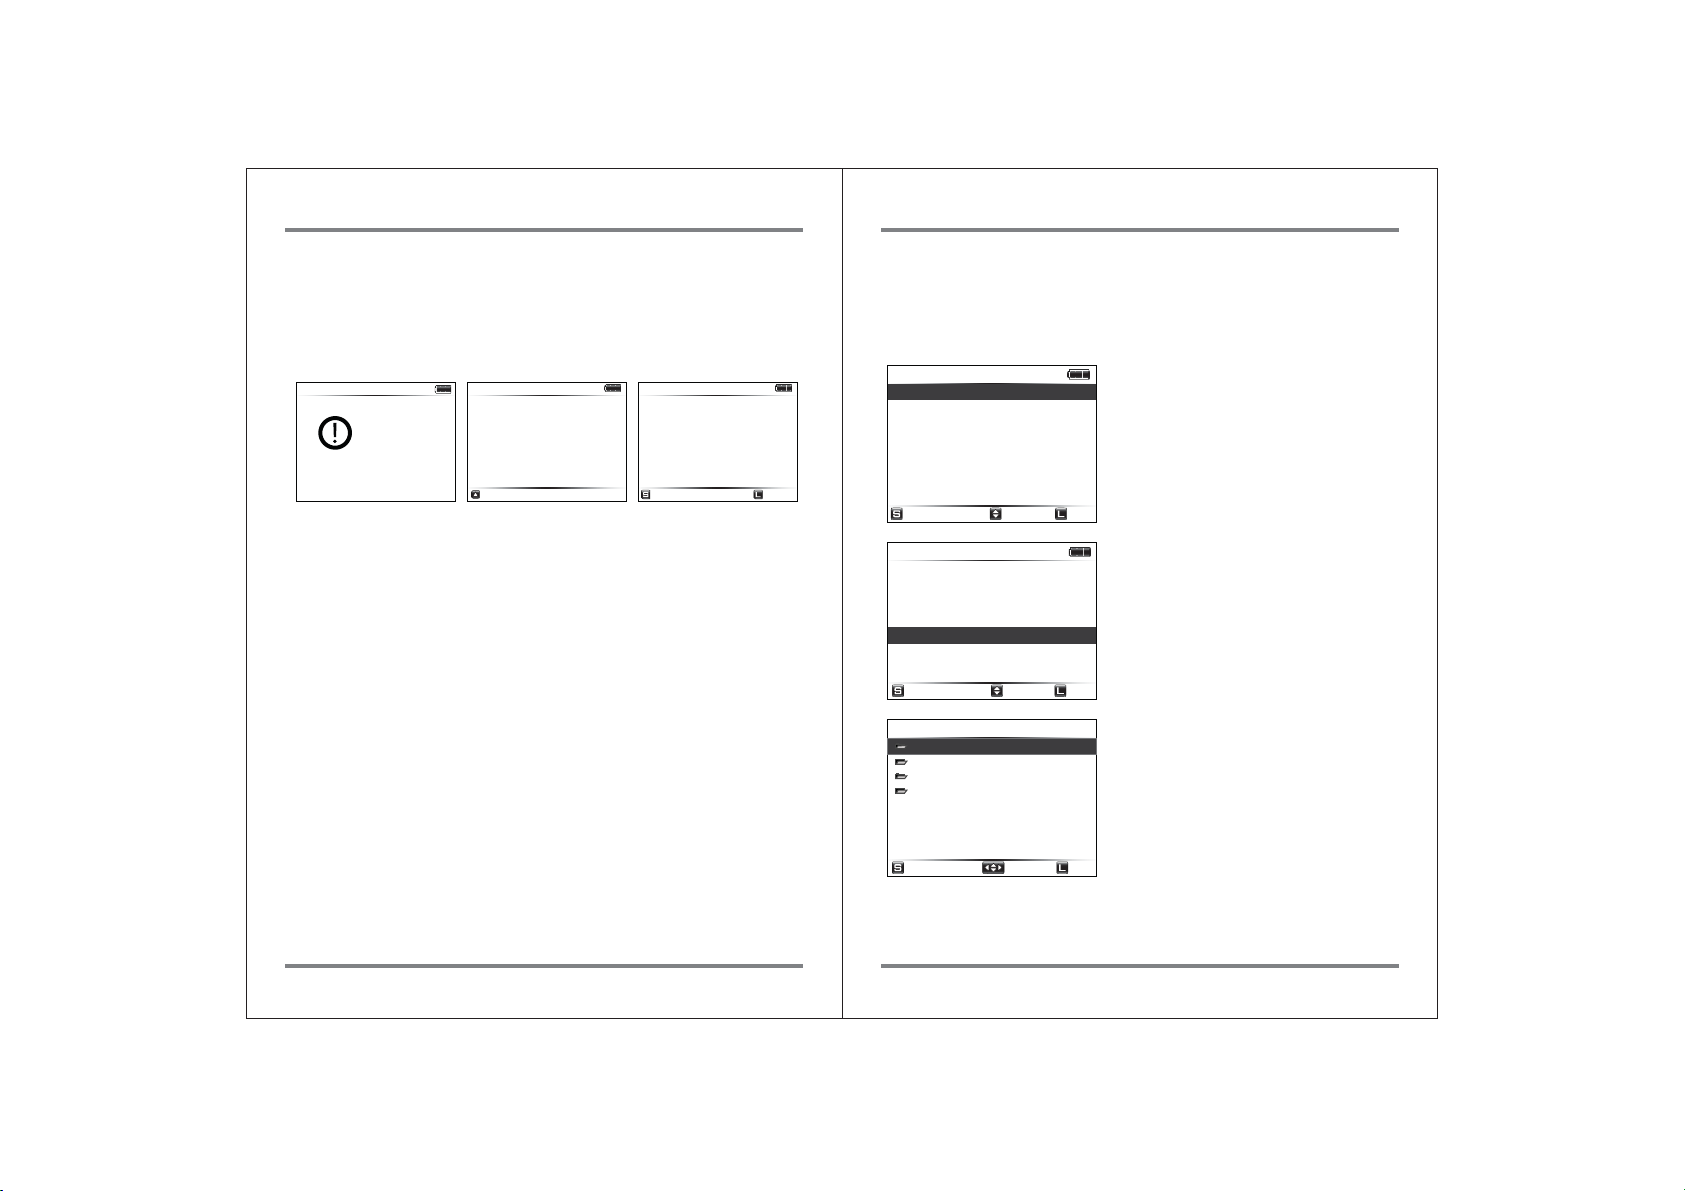
Depending on the file format, the NVS2825 will show stored video or photo files
after backup. A preview of both the internal and external device (SxS/P2/CF/SD/
USB) is supported. In addition, the preview function supports audio play with an
audio jack. Users can also choose to delete the backup folders.
12.1. Preview from the internal hard drive
512.0 GB
Preview
HDD Management
Sync
Setup
Force Enable USB
Wi-Fi Mode
Select
512.0 GB
Preview
Select a Source
Internal HDD
External Device
Select
20121113.000
20121109.000
20121107.000
20121103.000
Press the control key once at the
“XCopy Ready”mode to activate the menu.
Press the control key and select “Preview”.
Back
Select “INTERNAL HDD” to preview the video
file stored in the internal hard drive.
Back
2/3
The NVS2825 will display the contents of the
backup folder in date order. The most recent
folder is shown first. After you select a folder,
the NVS2825 will display a brief list of the
contents as shown in the figure below.
DATA BACKUP (COPY) AND VERIFY
Select
Back
VIDEO/PHOTO PREVIEW
2423
Page 16
Pause
Back
20121101.000
Select
Back
Select
Back
AutoVi ew
Back
Select
Back
Select
Back
55 Files / 528 MB
Show Video ... 4
Show Image ... 3
Delete This Folder
Copy to External Device
Select
720p_123.mxf 1/1
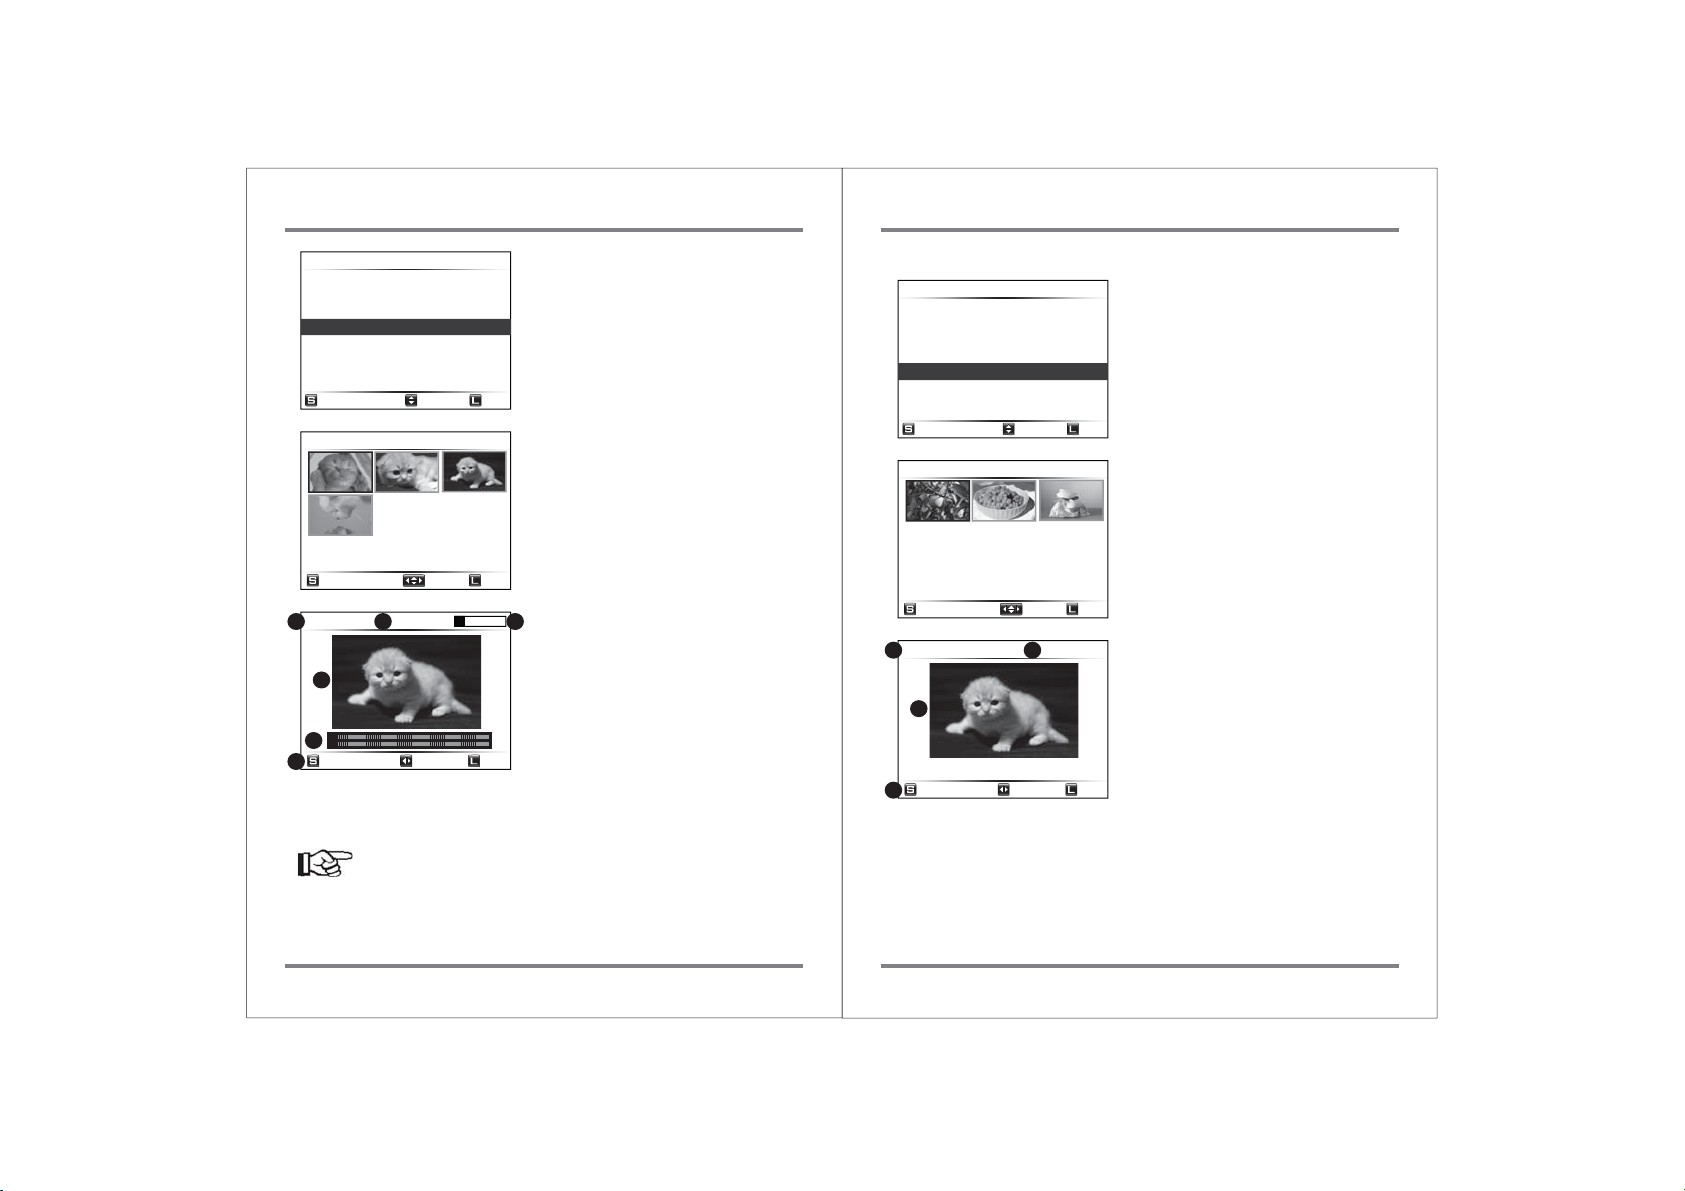
The user can select [Show Video] for video
preview, [Show Image] for photo preview,
[Delete] for deleting this backup, or [Copy]
for copying to an external hard drive.
Back
If “SHOW VIDEO” is selected, the NVS2825
will display the video files contained in that
folder as thumbnails.
Unsupported video files are shown with an
[X] mark. Video clips are selected for
preview by using an up/down/left/right
push of the control key. Press the control
Select
1x 00:00:05
key briefly to select a clip.
Back
The NVS2825 will show a preview of the
31 2
video file at reduced resolution. Moreover,
the NVS2825 will play audio--from
4
supported formats--via an audio jack.
The user can select play/pause by pressing
the control key. The user can also adjust the
preview speed by pushing the control key to
L
R
5
Pause
6
the left/right and the audio volume by
pushing the control key up/down.
Back
① Preview speed
② Elapsed time
③ Progress of preview in %
④ Preview video
⑤ Selectable command
Reference
⑥ Audio Bar
● See http://www.nextodi.com for supported preview formats.
● The preview of the NVS2825 is a “best effort” preview. Various preview
speeds, ranging from 1X to 64X, are supported.
● Some audio formats may not be supported by the NVS2825.
12.2. Image Preview
20121101.000
55 Files / 528 MB
Show Video ... 4
Show Image ... 3
Delete This Folder
Copy to External Device
Select
IMG_6745.JPG 1/1
Select
1x 00:00:05 3872x2592
21
3
AutoView
4
Select [Show Image] at the preview menu.
The number on the right is the number of
image files.
Back
The NVS2825 shows a list of image files
contained in that folder as thumbnails,
such as: [Show Video].
Back
If you select an image, the NVS2825 shows
the larger one. A user can control the
“left/right” button to preview the next
image or can short press the key ([S]) to
preview in slide show mode.
(1) File extension
(2) Resolution of images
(3) Preview Images
Back
(4) Selectable command
25
VIDEO/PHOTO PREVIEW VIDEO/PHOTO PREVIEW
26
Page 17
12.3. Delete the backup data
Select
Back
Cancel
Select
Back
Select
Back
OK
Back
OK
Back
OK
Select
Back
Off
20121101.000
55 Files / 528 MB
Show Video ... 4
Show Image ... 3
Delete This Folder
Copy to External Device
Select
OK
OK
20121101.000
55 Files / 528 MB
Delete?
20121101.000
55 Files / 528 MB
Are You Sure?
20121101.000
Back
Back
Back
Deleted
OK
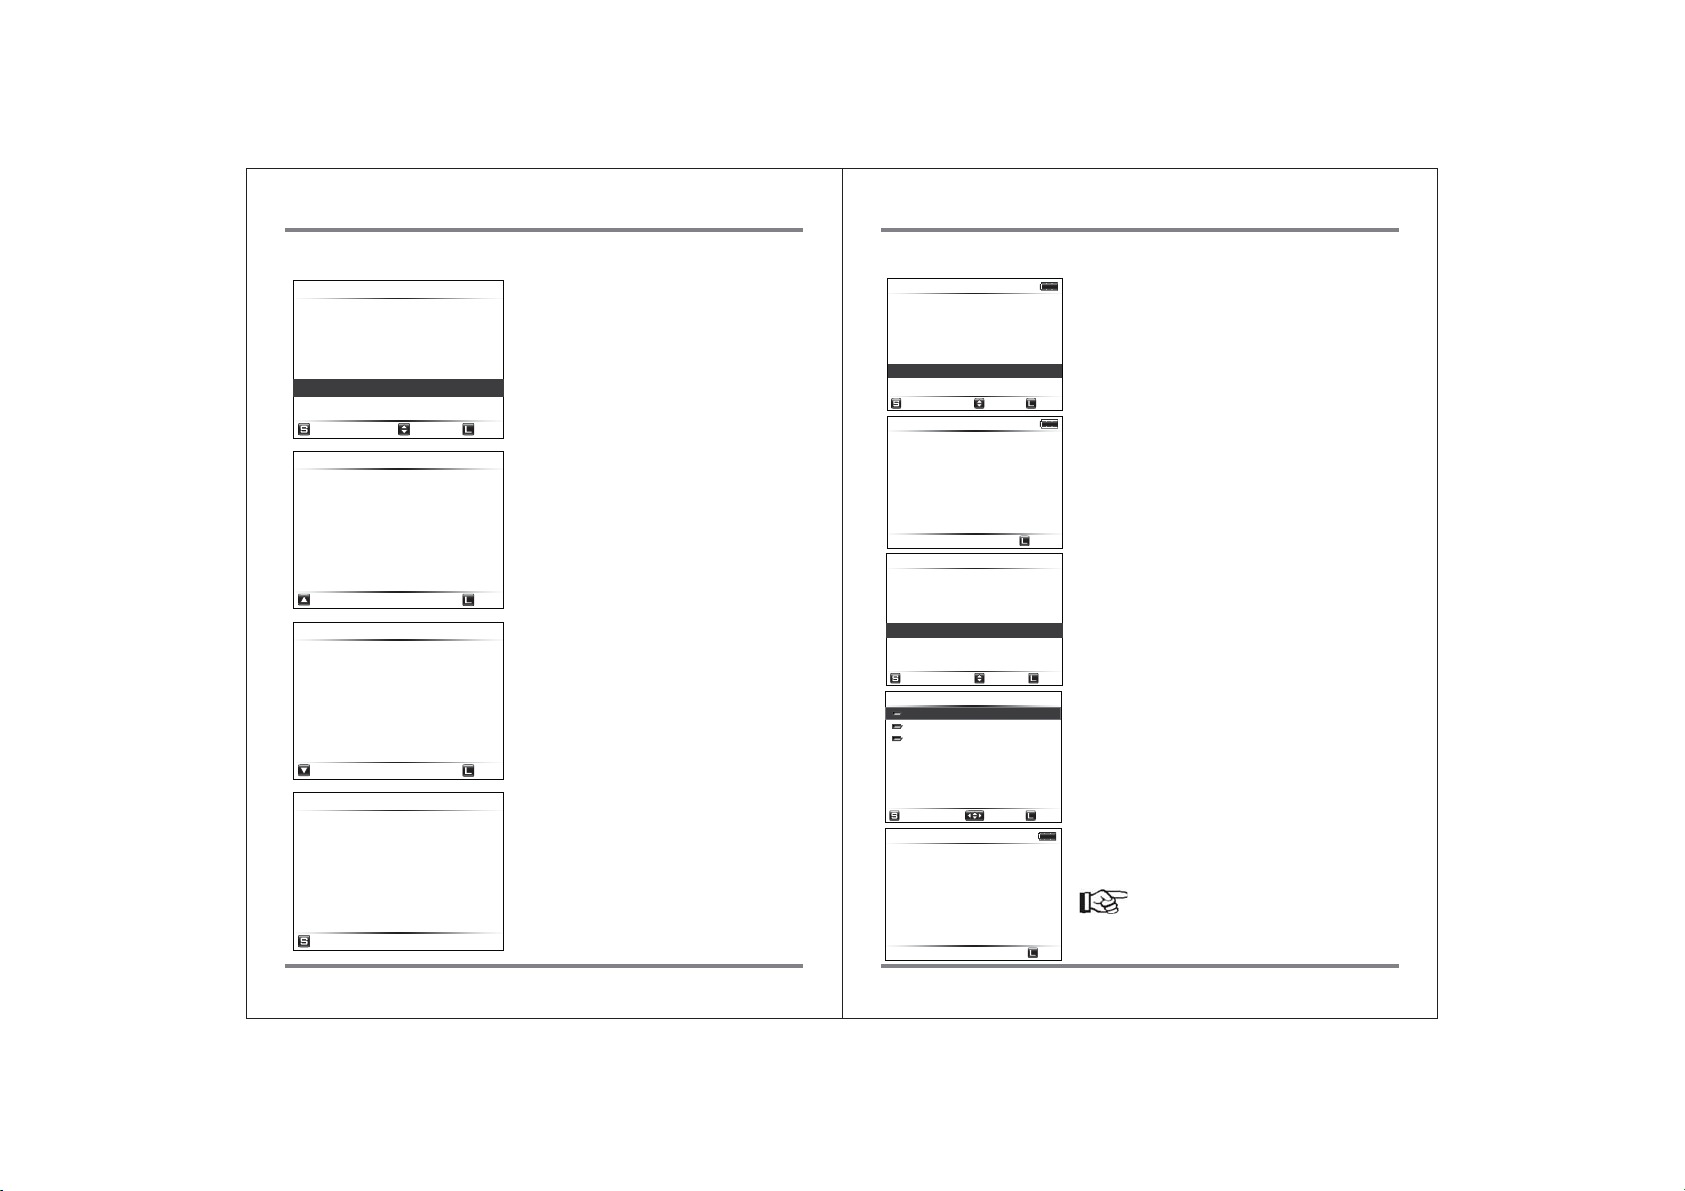
Select “Delete This Backup” from the
Preview menu.
The NVS2825 will ask you twice to confirm
the delete operation. (If you do not want to
delete, press the button for more than
1 second to go back to the main menu.)
Push the control key up and down to confirm
the deletion.
The specific folder is deleted.
Return to the main menu by pressing the
control key once.
12.4. Preview from an external device
512.0 GB
Preview
Select a Source
Internal HDD
External Device
Select
512.0 GB
Preview
Insert an
External Device
(CF/SD/SxS/XQD/P2/USB)
21 Files / 1.3 GB
Show Video ... 1
Show Image ... 4
Select
20121113.000
20121109.000
20121107.000
20121103.000
Select
512.0 GB
Preview
Remove USB
The NVS2825 supports the preview of video files
and the playing of audio files stored on an external
USB hard drive. In addition, the NVS2825 supports
the preview of video and the playing of audio files
that are stored on memory cards such as: SxS,
CardBus (including P2/P2E) and CF, SD, SDHC, SDXC.
Back
Select “External device” from the preview menu.
Cancel
(1) If an SxS, CardBus memory card (including P2/
P2E), CF, SD, SDHC or SDXC contains video or
image files—and is inserted into the NVS2825--
information about the video or image files will be
displayed.
Back
(2) If an external USB hard drive is connected,
2/3
the NVS2825 will detect and analyze the backup
folders. The NVS2825 will then display the backup
folders as in the figure. The rest of the operations
are the same as previewing from the internal hard
drive.
If you select “Back” by pressing and holding the
Back
control key, then a “Remove External USB HDD”
message will appear on the LCD display. Once the
cable or memory card has been removed, you will
automatically be returned to the main menu.
Reference
● Use “Force Enable USB”menu when the NVS2825 does
not recognize the external USB2.0/3.0 HDD. For details,
Off
see Ch13.
27
VIDEO/PHOTO PREVIEW VIDEO/PHOTO PREVIEW
28
Page 18
Cancel
13. Using An External Hard Drive
Selec t
Back
The NVS2825 allows a user to copy a memory card to both the NVS2825 hard
drive and to an external USB hard drive at the same time, making two copies of
data in a single operation. The NVS2825 provides “Multi-copy” and “Sync”
functions to make backup more reliable.
13.1. Connecting an external USB hard drive
USB 3.0 Host
(Standard-A)
Adapter
512.0 GB
USB Detected
Checking...
Cancel
USB Cable
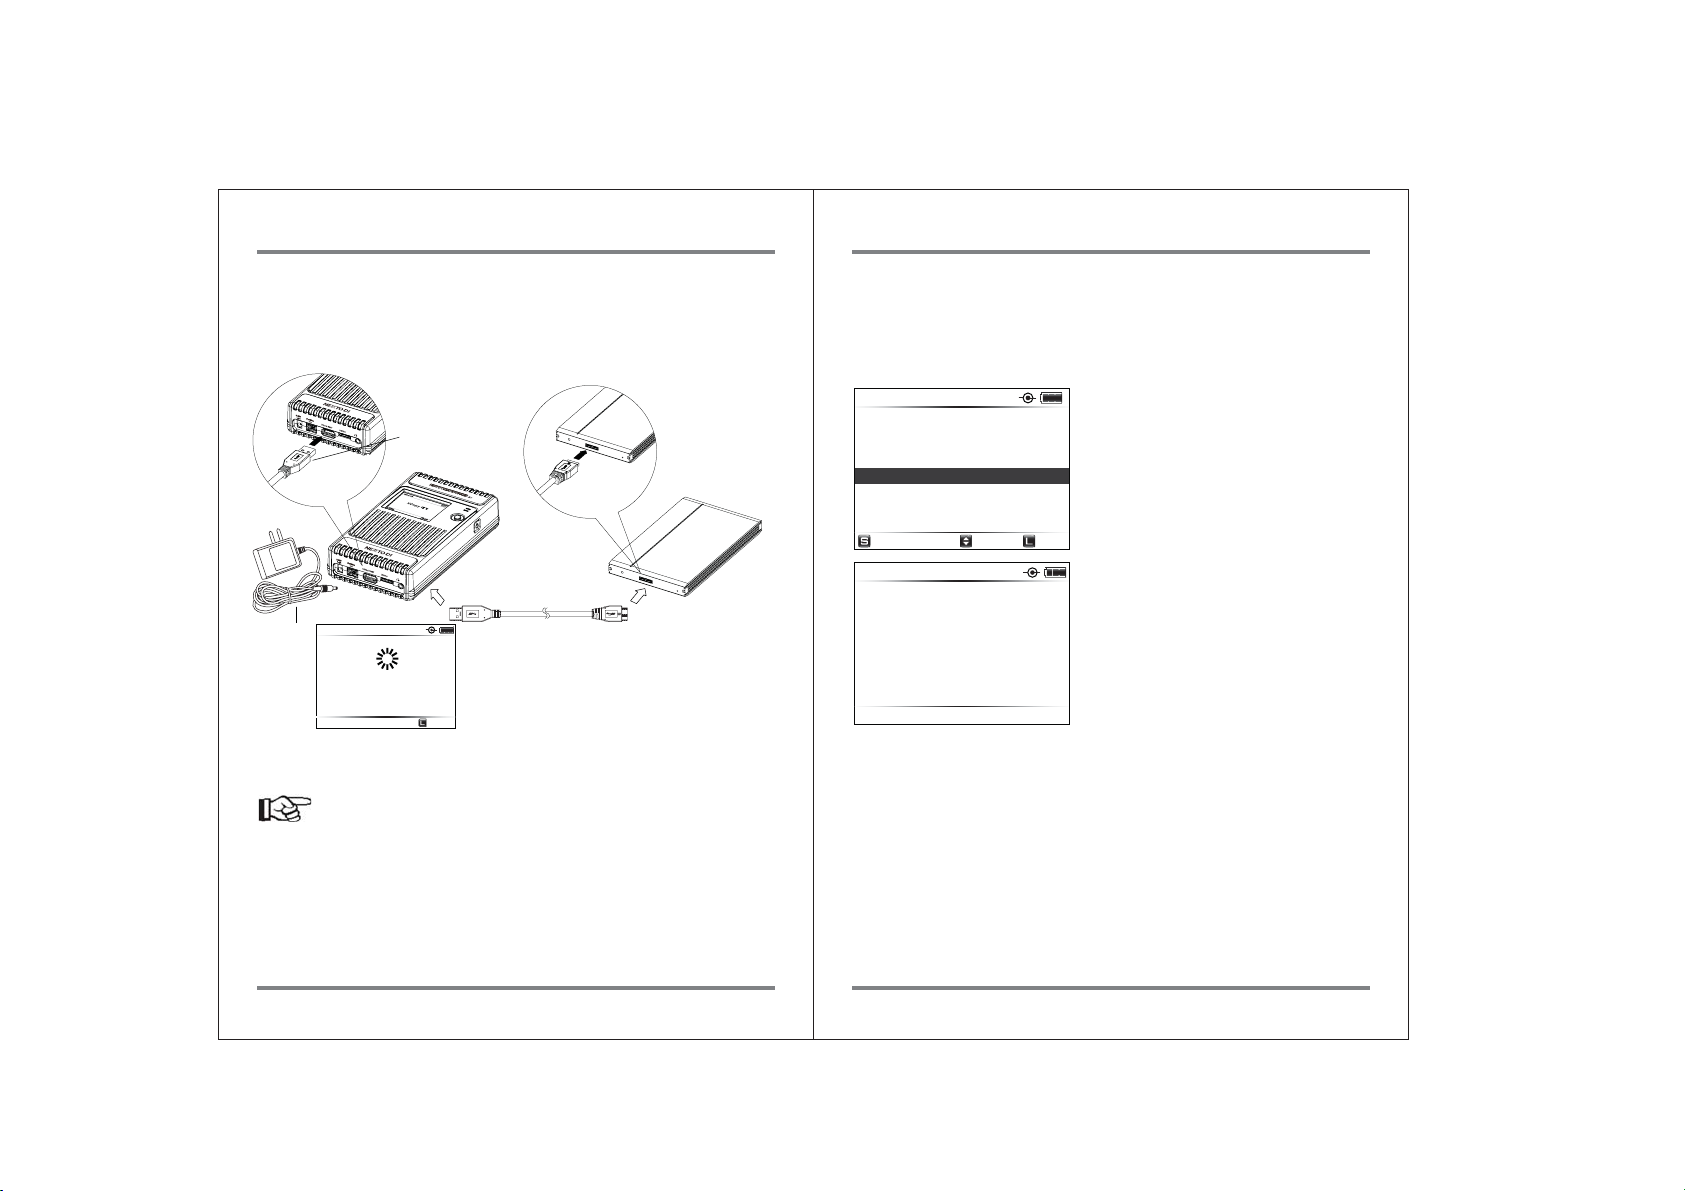
Connect an external USB hard drive using the supplied USB 3.0 micro-B cable
during “XCopy ready” mode. Connect the larger plug to the USB 3.0 port of the
NVS2825. The NVS2825 will detect the device and check the external hard drive.
Reference
● When using Multi Copy & Sync functions, the capacity of the external USB hard
drive should be larger than 128GB. If an external USB hard drive--less than
128GB--is connected, the Copy Menu will be displayed when inserting a
memory card.
● Connect both the NVS2825 and the USB external hard drive to their AC power
adapters. If the NVS2825 is used to copy to another NEXTO backup device
(via the USB adapter cable) the NVS2825 will not need to be connected to the
AC power adapter. (Other Nexto backup devices include the NextoDI ND2700/
ND2730)
13.2. Force Enable External USB HDD
Sometimes the NVS2825 cannot detect the external USB2.0/3.0 HDD automatically.
If this occurs, use the “Force Enable USB”menu.
512.0 GB
Preview
HDD Management
Sync
Setup
Force Enable USB
Wi-Fi Mode
Select
512.0 GB
Enable USB
Success
Press the control key once at the
“XCopy Ready”mode to activate the menu.
Press the control key and select
“Force Enable USB”.
Back
If the connected external USB2.0/3.0 HDD is
detected successfully, then a “Success”
message will appear on the LCD display.
29
USING AN EXTERNAL HARD DRIVE USING AN EXTERNAL HARD DRIVE
30
Page 19
14. Making Two Copies In A Single Backup (Multi-Copy)
Select
Cancel
Menu
Off
Cancel
Select
Cancel
Off
OK
Preview
Can cel
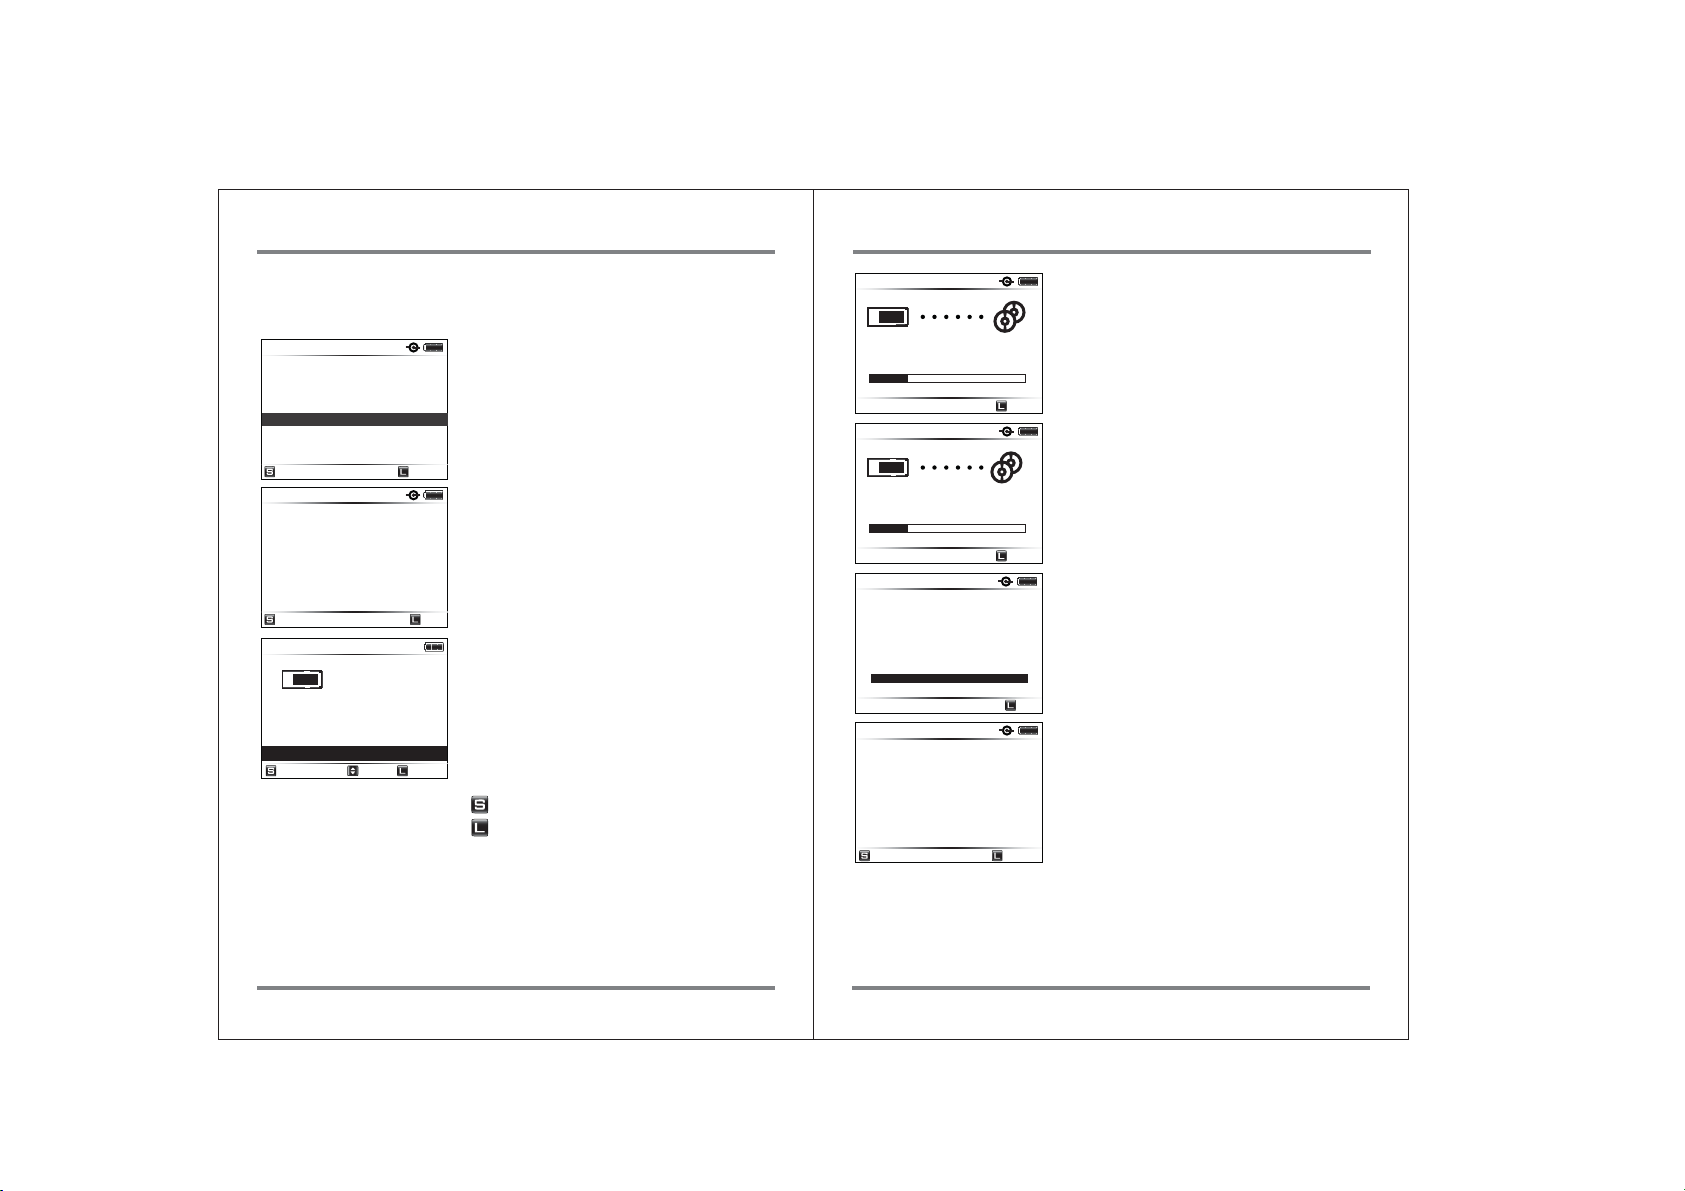
Copying a memory card to both the internal hard drive and an external USB hard
drive at the same time makes two copies of data in a single operation. The
“Multi-copy” function of the NVS2825 makes backup more reliable.
698.6 GB 456.8 GB
USB
Select a Mode
MCopy/Sync
Copy from USB
Select
698.6 GB 456.8 GB
If the proper external USB hard drive is
connected, the NVS2825 shows “Multi-Copy”
mode. (If the external USB hard drive connects
before the power is on, the NVS2825 will go
directly into “Multi-Copy” mode)
Cancel
The remaining operation is the same as the
“XCopy ready” mode. This mode can be exited
MCopy Ready
Menu
698.6 GB 456.8 GB
SxS
Copy SxS?
Fast Copy
Copy & Verify
Safe Copy
Select
3.6 GB
16 Files
by holding and pressing the key or by removing
the USB cable from the NVS2825.
Off
Insert the memory card when you are in the
“MCopy ready” mode. The NVS2825 detects/
parses the contents of the memory card and
asks you to confirm the mode of copy. Three
options are available as in the normal XCopy
mode(Fast Copy, Copy & Verify, Safe Copy).
For details, see chapter 11.
Cancel
: Copy: briefly press the key.
: Cancel the copy: press and hold the key for
more than 1 second.
When Multi-Copy is in progress, do not remove
the memory card or disconnect the USB external
hard drive.
698.6 GB 456.8 GB
SxS
Checking Bad Clusters
906.3 MB
0m30s Cancel
698.6 GB 456.8 GB
SxS
Copying
4/16 906.3 MB
0m30s Cancel
698.6 GB 456.8 GB
Copy Success
Remove SxS
16/16 3.6 GB
90.7 MB/s Off
698.6 GB 456.8 GB
Previous
Copy Success
20090618.003
16 Files
3.6 GB
OK
Preview
Multi-Copy completed.
Remove the memory card to return to the initial
display. If you do not remove the memory card,
the NVS2825 will automatically turn off in order to
preserve battery life. See chapter 10 for the
location and name of the backup folders.
If an error occurs during backup, the error
message will be displayed and the NVS2825 will
automatically turn off.
In order to remind the user, the NVS2825 displays
the previous backup status during the next power
on. The user will then know whether the last
backup was successful.
31
MAKING TWO COPIES IN A SINGLE BACKUP (MULTI-COPY) MAKING TWO COPIES IN A SINGLE BACKUP (MULTI-COPY)
32
Page 20
15. Making A Secondary Copy (Sync)
Cancel
Cancel
Select
Select
Back
Select
Cancel
OK
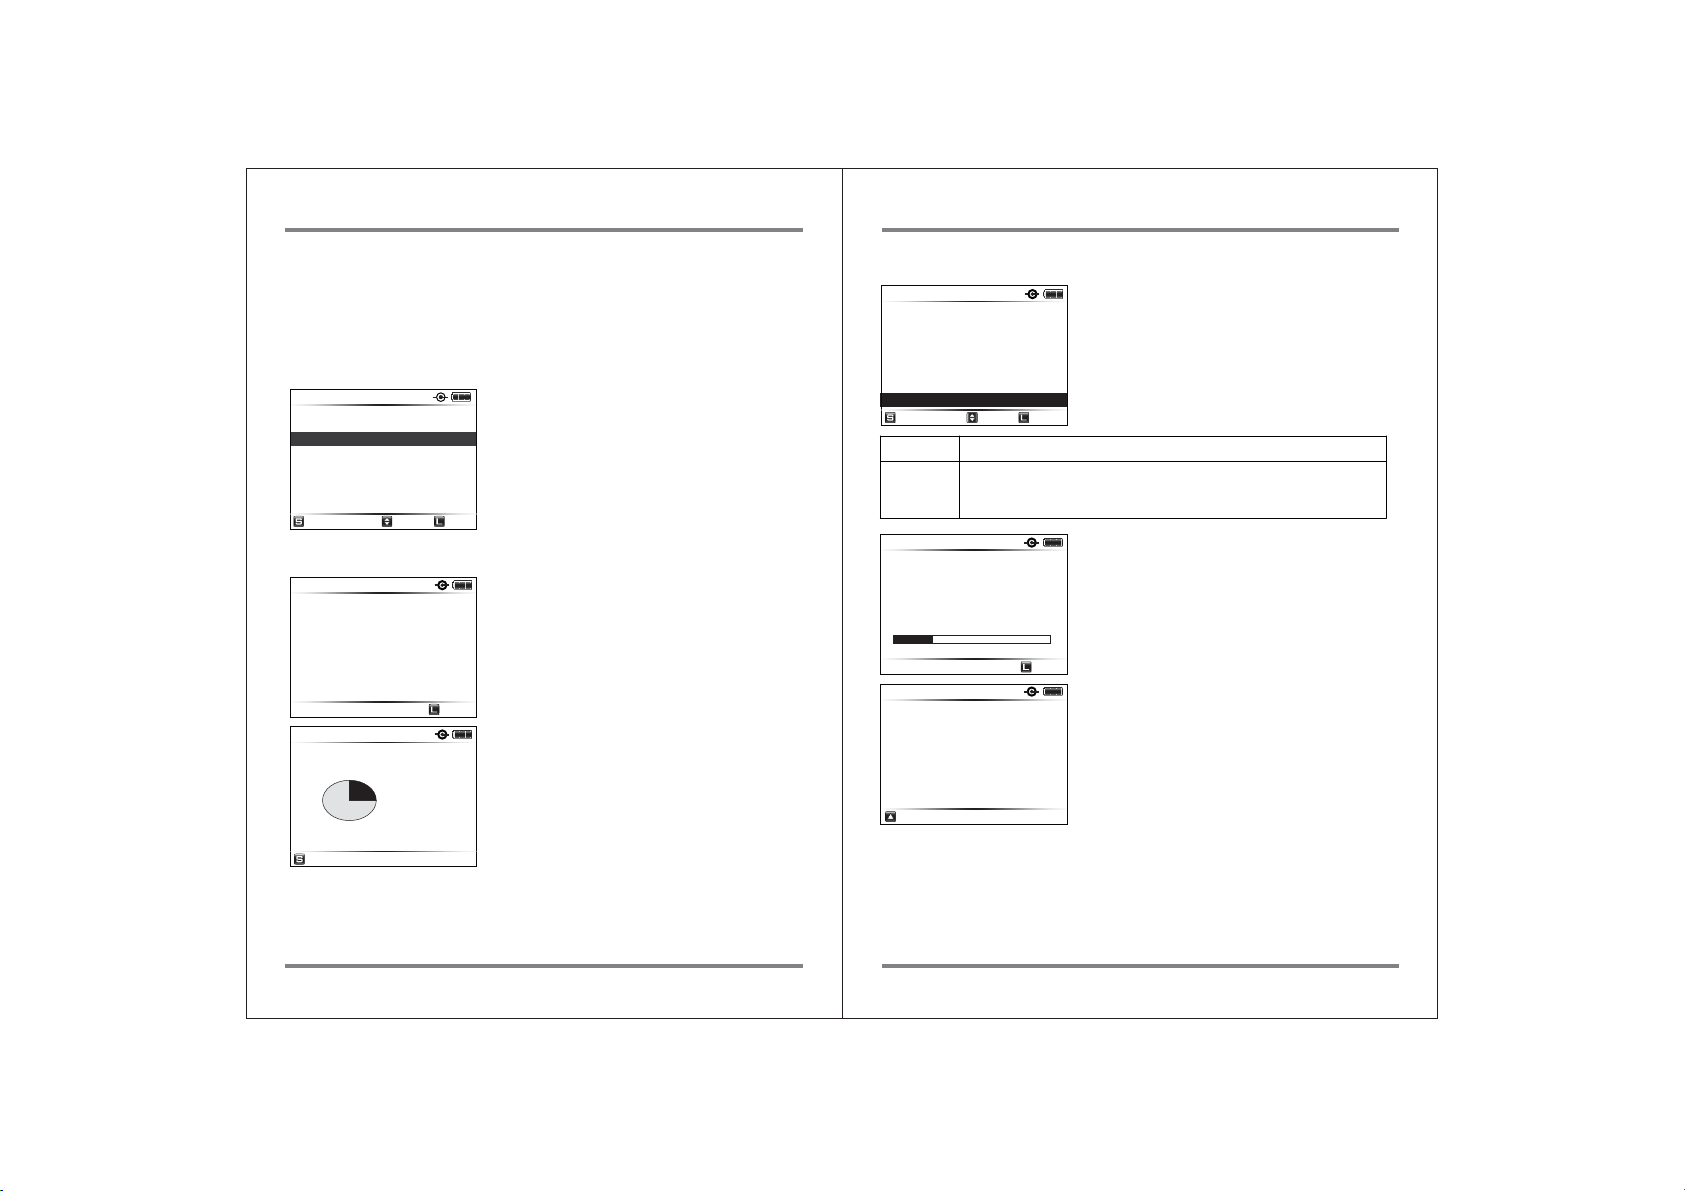
The “Sync” function synchronizes data between the [NvsAir] folder of the
NVS2825 and the [NvsAir] folder of an external USB hard drive connected to the
“USB 3.0 Host” connector via the USB 3.0 cable. This function compares the
folders stored in the [NvsAir] folder of the NVS2825 with the [NvsAir] folder of
an external hard drive.
A new folder can only be copied to the external hard drive if it resides in the
NvsAir folder of the NVS2825 unit—but not in the external hard drive.
232.6 GB
Preview
HDD Management
Sync
Setup
Force Enable USB
Wi-Fi mode
Select
Move to “SYNC” on the main menu and select it.
Back
(1) Selecting “SYNC” from the menu
232.6 GB
232.6 GB
Select
Sync
Insert an
External Device
HDD Info
Used: 92.3GB
Total: 456.8GB
After selecting SYNC from the menu, NVS2825 shows
“SYNC” mode as left.
Connect the external USB hard drive to the
[USB3.0-Host] port of the NVS2825 as shown in
chapter 13.
Cancel
If a proper external hard drive is connected, the
NVS2825 will display the status of that drive.
Press the control key to select and NVS2825 will display
the SYNC menu as below.
For more details for connection of external USB hard
drive, please refer to chapter 13.
(3) Sync function
232.6 GB
Sync
Sync to
External USB HDD?
Fast Copy
Safe Copy
Select
Fast Copy
Safe Copy
232.6 GB
Duplicates new folder to external hard drive
Before duplication, the NVS2825 verifies that the copy area of the
external hard drive is safe. If the copy area is not safe, the NVS2825
will automatically search for a new safe area and copy to that area.
Sync
20121101.000
4/16 906.3 MB
0m30s Cancel
232.6 GB
Copying
Previous
Sync Failed
OK
A user can select two modes of duplication, fast
copy or safe copy. Highlight the desired mode
using the up/down key, then briefly press to select
the mode. Press and hold the key [L] to cancel the
operation and go back to the main menu.
Cancel
The NVS2825 compares the [NvsAir] folder of the
internal hard drive with the [NvsAir] folder of the
external hard drive. If there is data in the [NvsAir] folder
of the internal hard drive that is not in the [NvsAir] folder
of the external hard drive, then the NVS2825 copies those
folders from the internal hard drive to the [NvsAir] folder
of the external hard drive. Thus, all of the data from the
backup folder of the internal hard drive would be copied
onto the external hard drive. However, the data from the
external hard drive would not be copied onto the
NVS2825’s internal hard drive.
If an error occurs during the “Sync” function,
the NVS2825 will automatically shut down and display an
error message at the next power up-- as shown in the
figure. Press the control key upwards to go back to the
main menu.
(2) Selecting “SYNC”from Mcopy ready mode
Mcopy ready mode means the external USB hard drive has been connected already, so just
selecting SYNC from the menu then NVS2825 shows SYNC mode directly as below.
33
MAKING A SECONDARY COPY (SYNC) MAKING A SECONDARY COPY (SYNC)
34
Page 21
16. Advanced Functions
Select
Back
Select
Back
Back
NVS2825 has several advanced function menus, accessible from the Main Menu.
Menu Operation
HDD
Information
Checks the used capacity and the remaining recordable capacity
on the NVS2825 hard drive.
Built-in test utility for detecting physical errors on the internal
Self Test
hard drive. This function does not fix errors.
If an error is detected during the self-test, consult your
authorized NEXTODI dealer.
Delete TMP
folder
If the copy function fails, a TMP folder will be generated. A user
can delete the TMP folder using this menu.
The NVS2825 cuts off power automatically to save internal
Auto Power
Off
battery power. User can select the latency time interval
(seconds before unit will automatically power off) from 15/30/
40/50/60/90 seconds.
Buzzer
On/Off setting for buzzer sound. Factory setting is On.
The name of the folder is determined by the shooting date
(e.g., 20121010.000). At the “Set Up” menu, the user can select
Folder
Rename
the “Folder Rename” menu as ON, and then can change the
folder name to begin with C1~C9 (i.e., C1121010.000) which
refers to Camera 1~Camera 9, instead of using a date-based
folder name. Factory setting is Off
Exposing the NVS2825 to any vibration during use--including
Motion
Sensor
jarring, bumping, or dropping--could damage the sectors on the
internal HDD. If shaking is detected, the NVS2825 warns the
user via an LCD indicator and a beeping sound. The NVS2825
contains a free-fall sensor which will attempt to protect the
internal data by cutting off the power should the unit be
dropped. The sensitivity of the motion sensor can be set to
Off/Lo/Hi. The factory default setting is “Hi.” (The motion
sensor is only included in HDD models—not in the SSD models.)
Language
Selection
Firmware
Upgrade
Change the language setting
Upgrade to new firmware from the firmware file stored in the
internal hard drive or on a memory card.
16.1. HDD Information
232.6 GB
Preview
HDD Management
Sync
Setup
Force Enable USB
Wi-Fi mode
Select
232.6 GB Int. HDD
HDD Management
HDD Info
Self Test
TMP Folders
Forma t
Select
232.6 GB Int. HDD
HDD Info
Used: 92.3GB
Total: 456.8GB
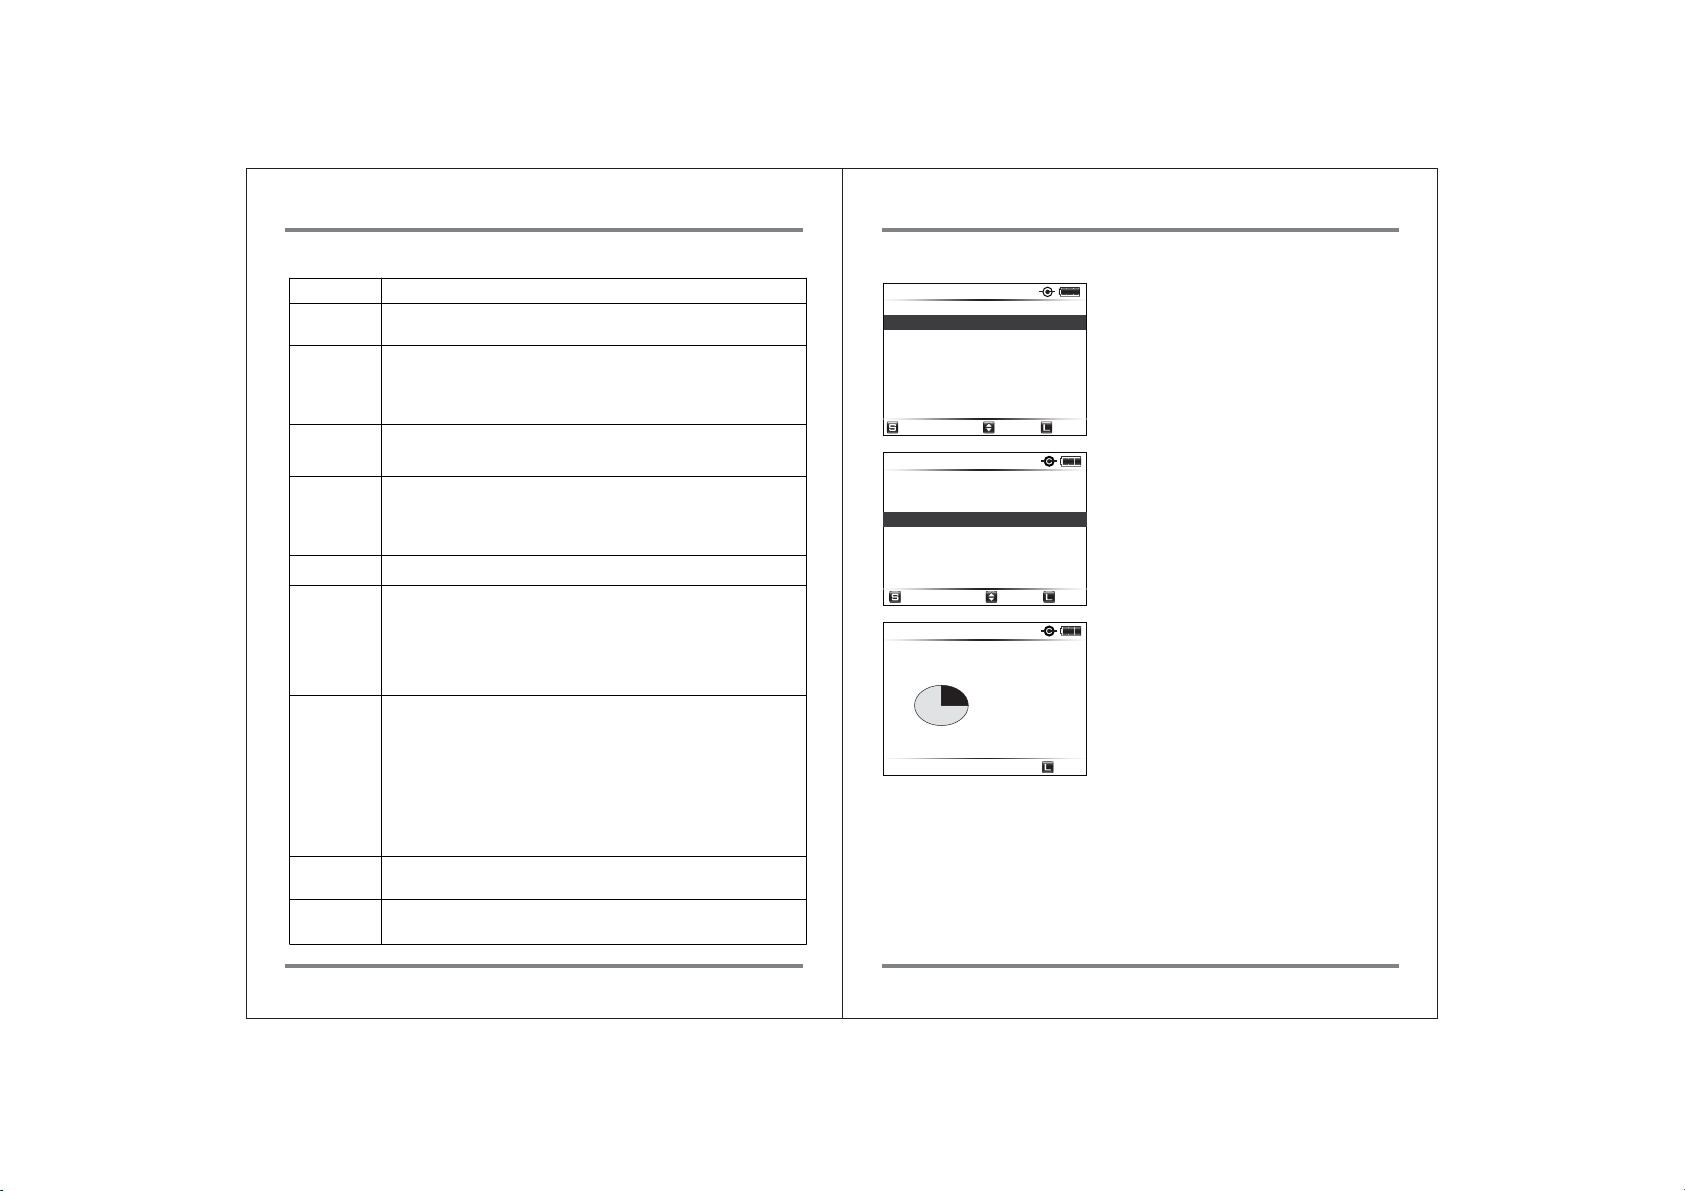
Select “HDD Management” from the main menu.
Back
Select “HDD Info” sub-menu from the “HDD
Management” menu.
Back
The NVS2825 will show the capacity status of
the internal hard drive using a pie diagram.
Back
35
ADVANCED FUNCTIONS ADVANCED FUNCTIONS
36
Page 22
Select
Back
16.2. Self Test
Select
Back
OK
Back
0m52s
5m 30s
Off
5m 30s
Off
(1) Quick test
232.6 GB Int. HDD
HDD Management
HDD Info
Self Test
TMP Folders
Format
Select
232.6 GB Int. HDD
Self Test
Select a method
HDD Smart Test
HDD Full Test
Select
232.6 GB Int. HDD
HDD Smart Test
It will take several
minute to test.
Are you ready?
OK
232.6 GB Int. HDD
HDD Smart Test
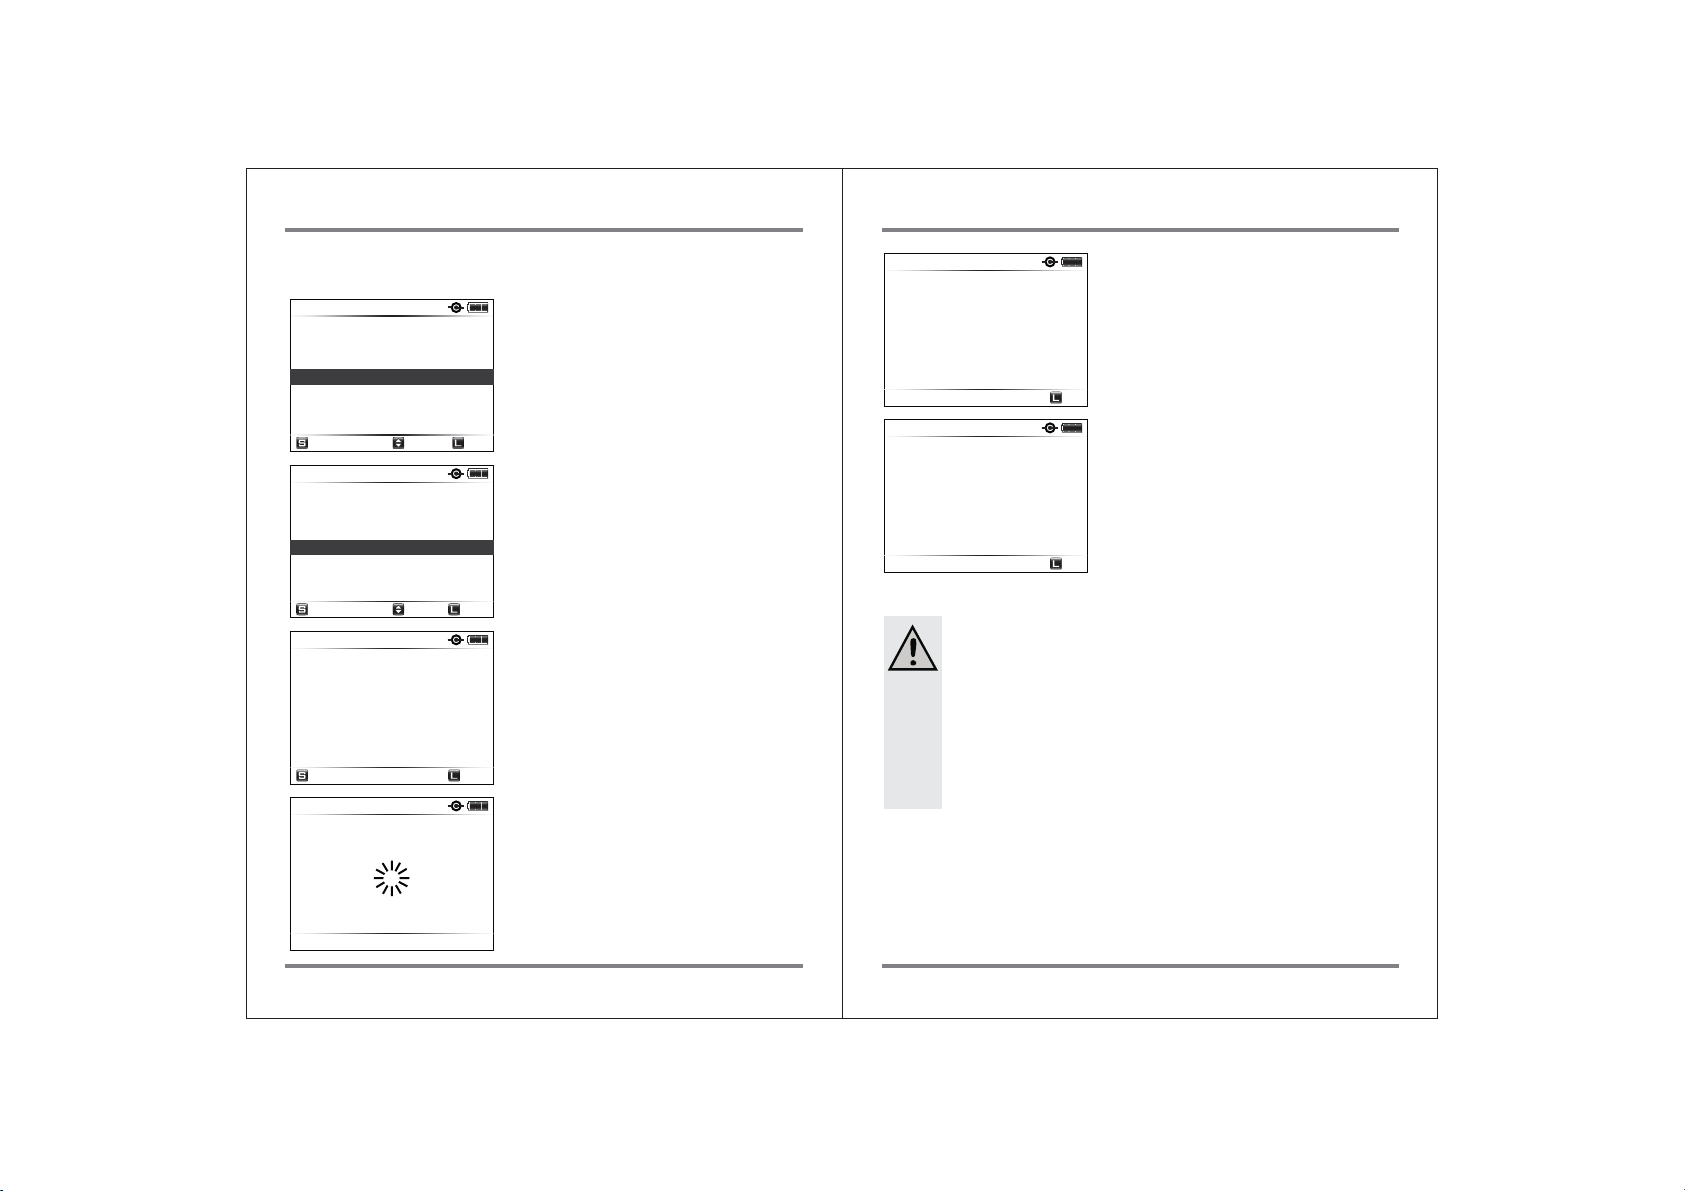
Select “Self test” sub-menu from the
“HDD Management” menu
Back
The User can choose between a quick test or
a full test. Choose the quick test. The quick
test uses a S.M.A.R.T test provided by the hard
drive.
(The Quick test cannot be used for SSD models
of the NVS2825.)
Back
The quick test takes several minutes to test
the internal hard drive. Pressing the control
key initiates the quick test.
Back
The display tells the user that the S.M.A.R.T
test is in progress.
232.6 GB Int. HDD
HDD Smart Test
Smart Test OK
5m 30s
232.6 GB Int. HDD
HDD Smart Test
This HDD may have
some errors. Please
check it again at PC.
5m 30s
Caution
● The NVS2825 buzzer—repeating every 3 seconds--indicates the
completion of the test. The power does not turn off automatically
at the completion of the test.
● The NVS2825 returns to the initial mode only after the user presses
the control key for more than 1 second.
● It is strongly recommended that the AC adapter be used during this
test in order to prevent battery failure during the process.
No problems found during the quick test.
Off
Error found during quick test. Further use of
NVS2825 may result in loss of backup data.
Consult your authorized NEXTODI dealer for
service.
Off
0m52s
37
ADVANCED FUNCTIONS ADVANCED FUNCTIONS
38
Page 23
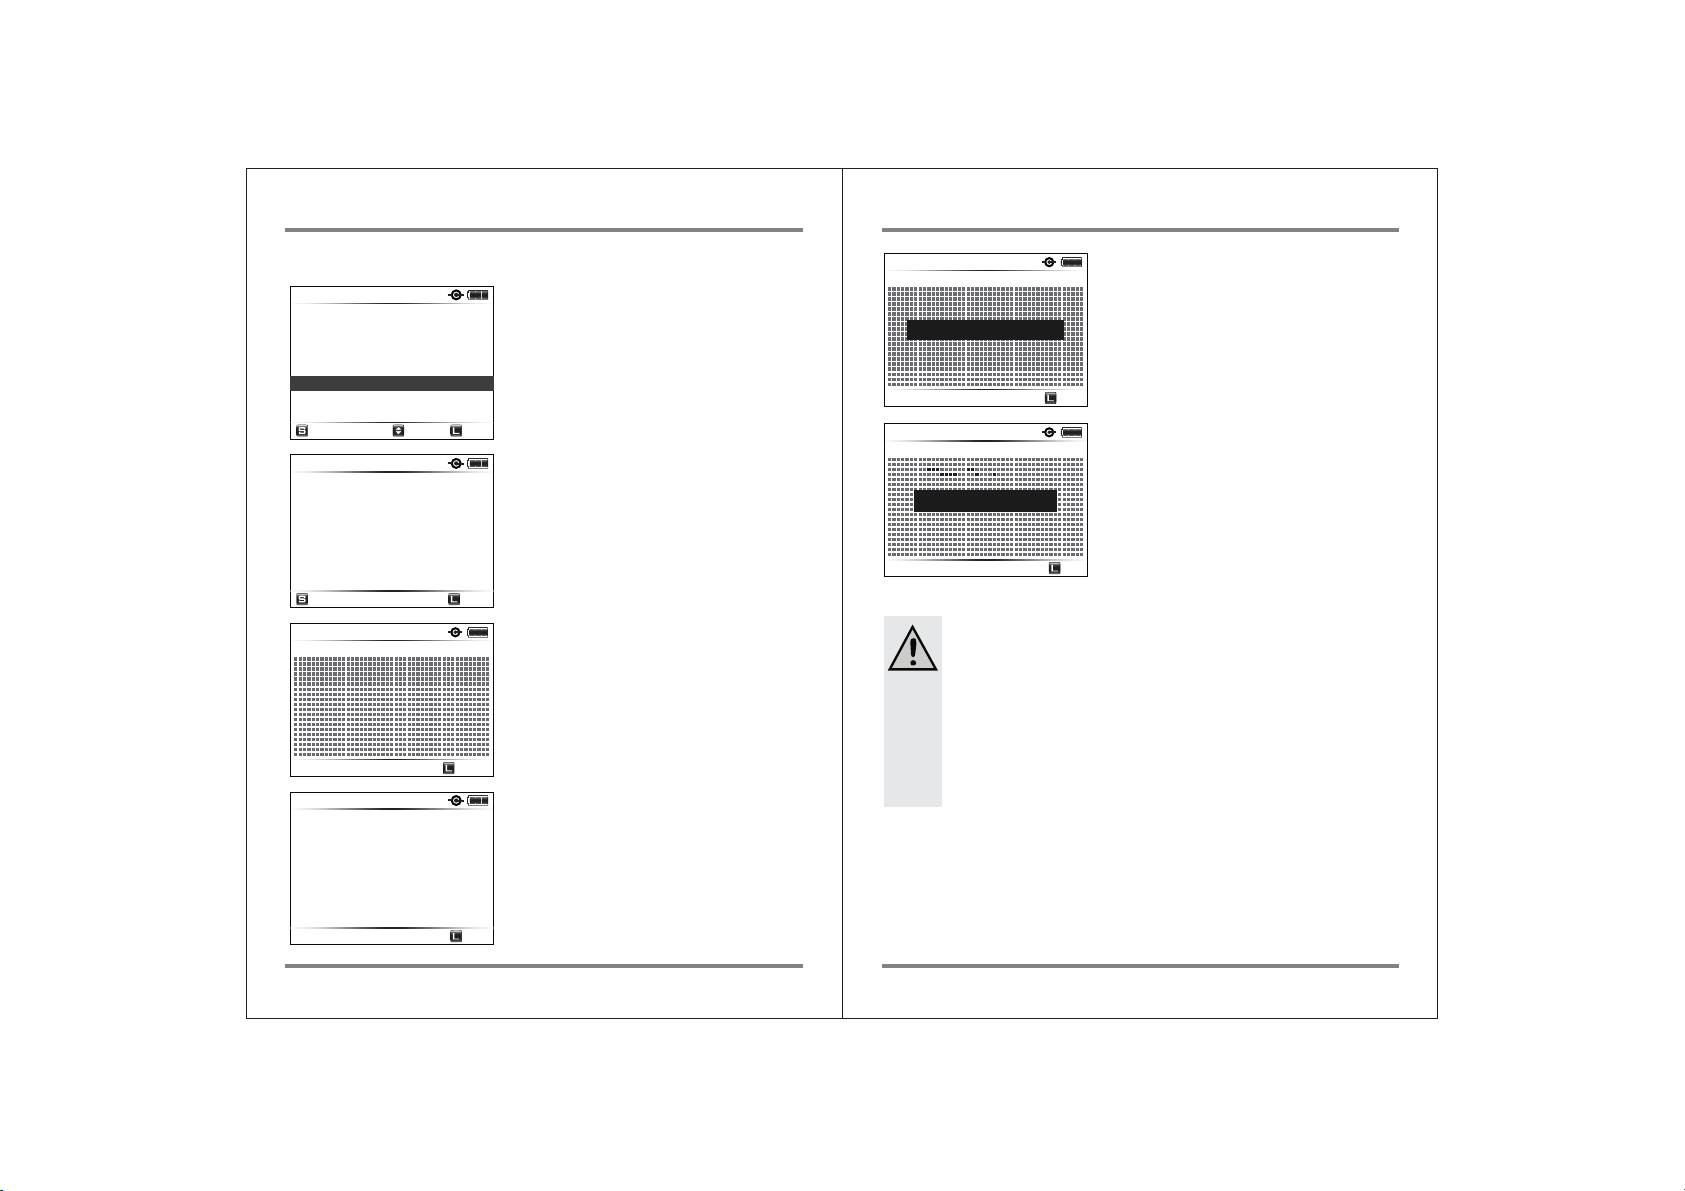
(2) Full test
Select
Back
OK
Back
5m 30s
Back
7m52s
Cancel
125m34 s
Back
125m34 s
Back
232.6 GB Int. HDD
Self Test
Select a method
HDD Smart Test
HDD Full Test
Select
232.6 GB Int. HDD
HDD Full Test
It will take several
hour to test.
Are you Ready?
OK
232.6 GB
Int. HDD
0 Bad Clusters Found
7m52s
232.6 GB Int. HDD
HDD Full Test
0 Bad Clusters Found
Test Cancelled.
Select “FULL TEST” from the self test menu.
Back
The full test will take several hours. It will
read all the sectors in the internal hard drive
to discover if any bad sectors exist.
Back
Full test in progress. This process will take
about 2~3 hours.
Cancel
The user can cancel the full test by pressing
the control key for more than 1 second.
232.6 GB
Int. HDD
125m34s
232.6 GB
Int. HDD
Check it again at PC.
125m34s
0 Bad Clusters Found
No errors found.
Full Test OK.
Back
11 Bad Clusters Found
Error found during full test. Further use of
NVS2825 may result in the loss of backup data.
Consult your authorized NEXTODI dealer for
service.
Back
Caution
● The NVS2825 indicates the completion of the test using the buzzer
sound. The power does not turn off automatically at the completion
of the test.
● The NVS2825 returns to the initial mode only after the user pushes
the control key for more than 1 second.
● It is strongly recommended that the AC adapter be connected for
this test in order to prevent battery failure during the process.
5m 30s
39
ADVANCED FUNCTIONS ADVANCED FUNCTIONS
Back
40
Page 24
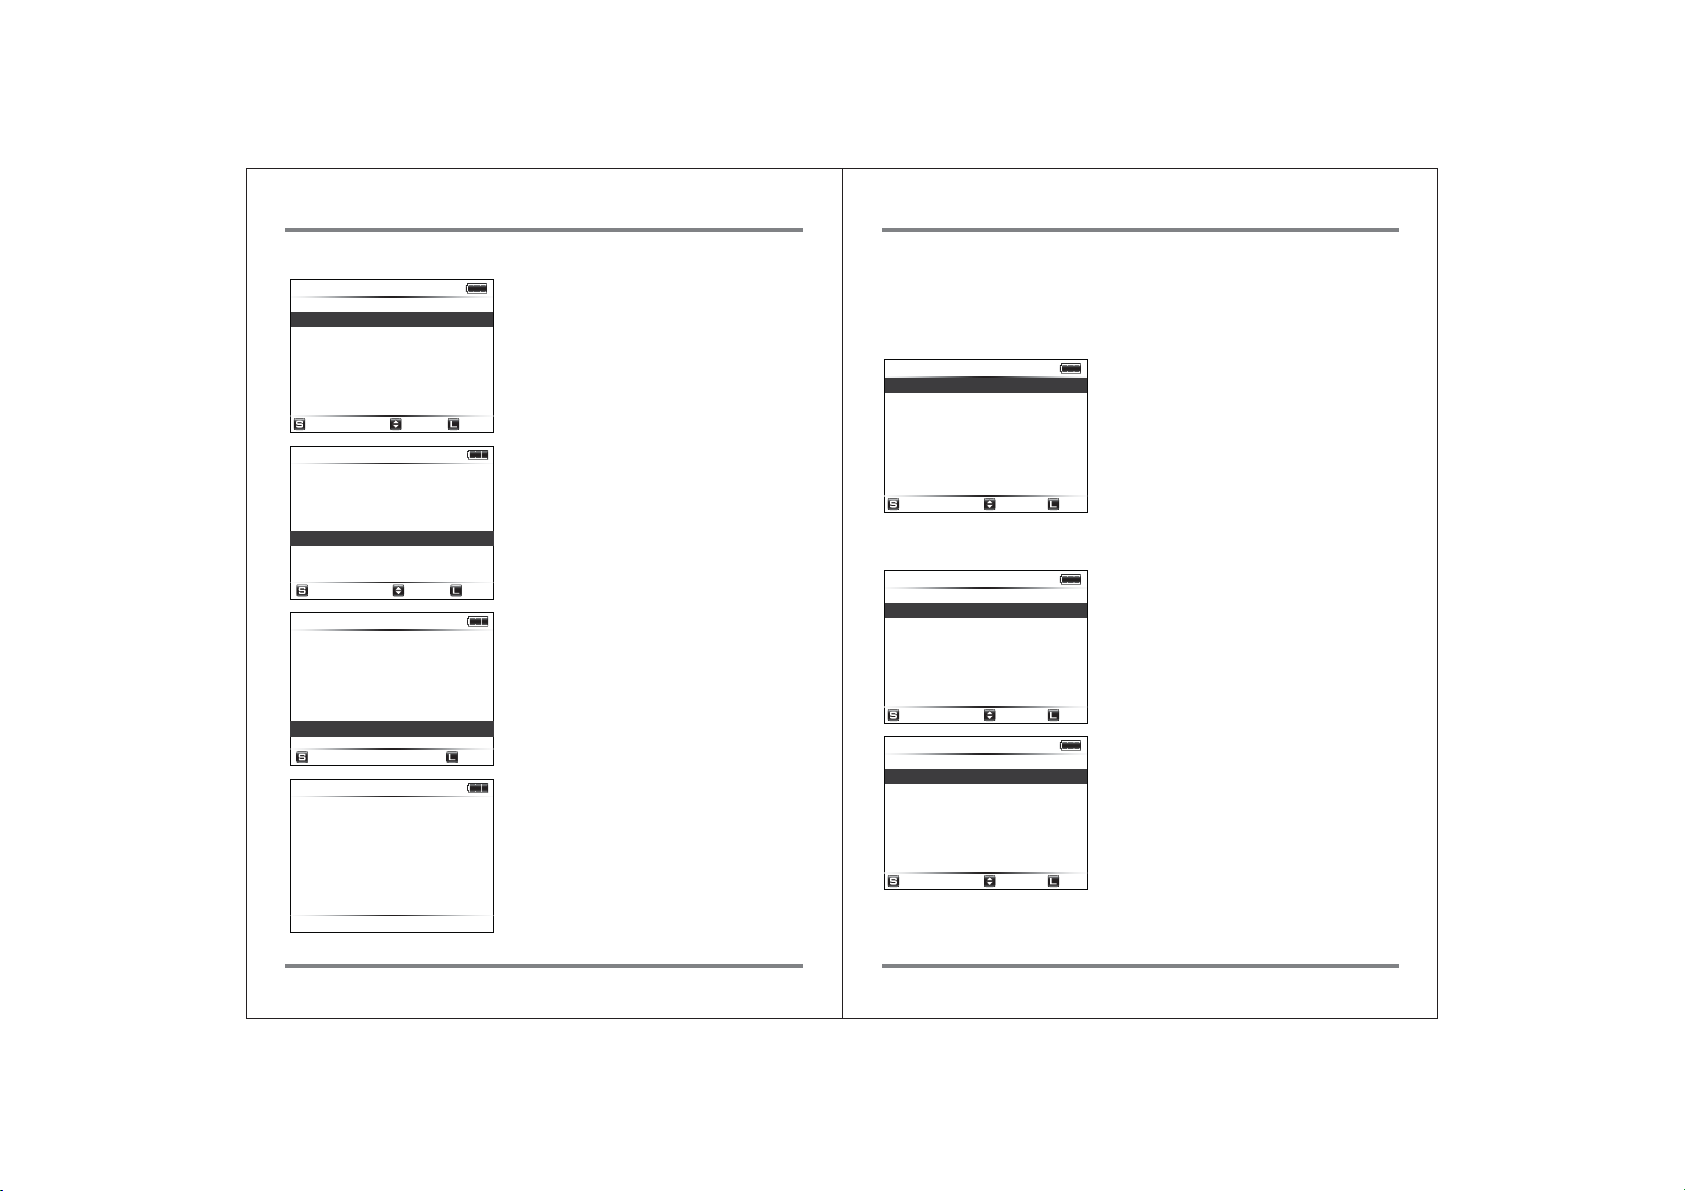
16.3. Delete TMP folder
Select
Back
Select
Cacel
Select
Back
Select
Back
Select
Back
Select
Back
232.6 GB
Preview
HDD Management
Sync
Setup
Force Enable USB
Wi-Fi mode
Select
232.6 GB Int. HDD
HDD Management
HDD Info
Self Test
TMP Folders
Format
Select
232.6 GB Int. HDD
TMP Folder
3 TMP Folder
Delete TMP Folders
Select
232.6 GB Int. HDD
TMP Folders
Deleting
Select “HDD Management” from the main
menu.
Back
Select the “TMP folders” sub-menu from the
“HDD Management” menu.
Back
If the TMP folder exists inside the [NvsAir]
folder, then the number of TMP folders will
appear on the LCD.
Press the control key briefly [S] to delete the
TMP folders.
Cacel
The LCD screen displays the message
“Deleting the TMP Folders.”
16.4. Auto Power Off
Select the “Auto Power Off” at the set up menu. You can choose the time interval
of the auto power off as 15, 30, 40, 50, 60 and 90 seconds by briefly [S] pressing
the control button.
232.6 GB
Auto PwrOff 50
Buzzer On
Index AutoGen. Off
Folder Rename Off
Motion Sensor Hi
Language
Firmware Update
Select
The latency time interval is 50 seconds.
If the NVS2825 is idle for 50 seconds, it will
automatically power off in order to save
internal battery power. Please note that if the
backup or video preview functions are in
progress--or if the Wi-Fi connection is active-the NVS2825 will not automatically power off.
Back
16.5. Buzzer
232.6 GB
Auto PwrOff 50
Buzzer On
Index AutoGen. Off
Folder Rename Off
Motion Sensor Hi
Language
Firmware Update
Select
232.6 GB
Auto PwrOff 50
Buzzer Off
Index AutoGen. Off
Folder Rename Off
Motion Sensor Hi
Language
Firmware Update
Select
The Buzzer is on. Select “BUZZER “from the
main menu to turn the buzzer sound on/off by
briefly pressing the control key. The factory
default setting is buzzer on.
Back
The Buzzer is now off. If the control key is
briefly pressed, the buzzer setting will go to
“buzzer on.”
Back
41
ADVANCED FUNCTIONS ADVANCED FUNCTIONS
42
Page 25
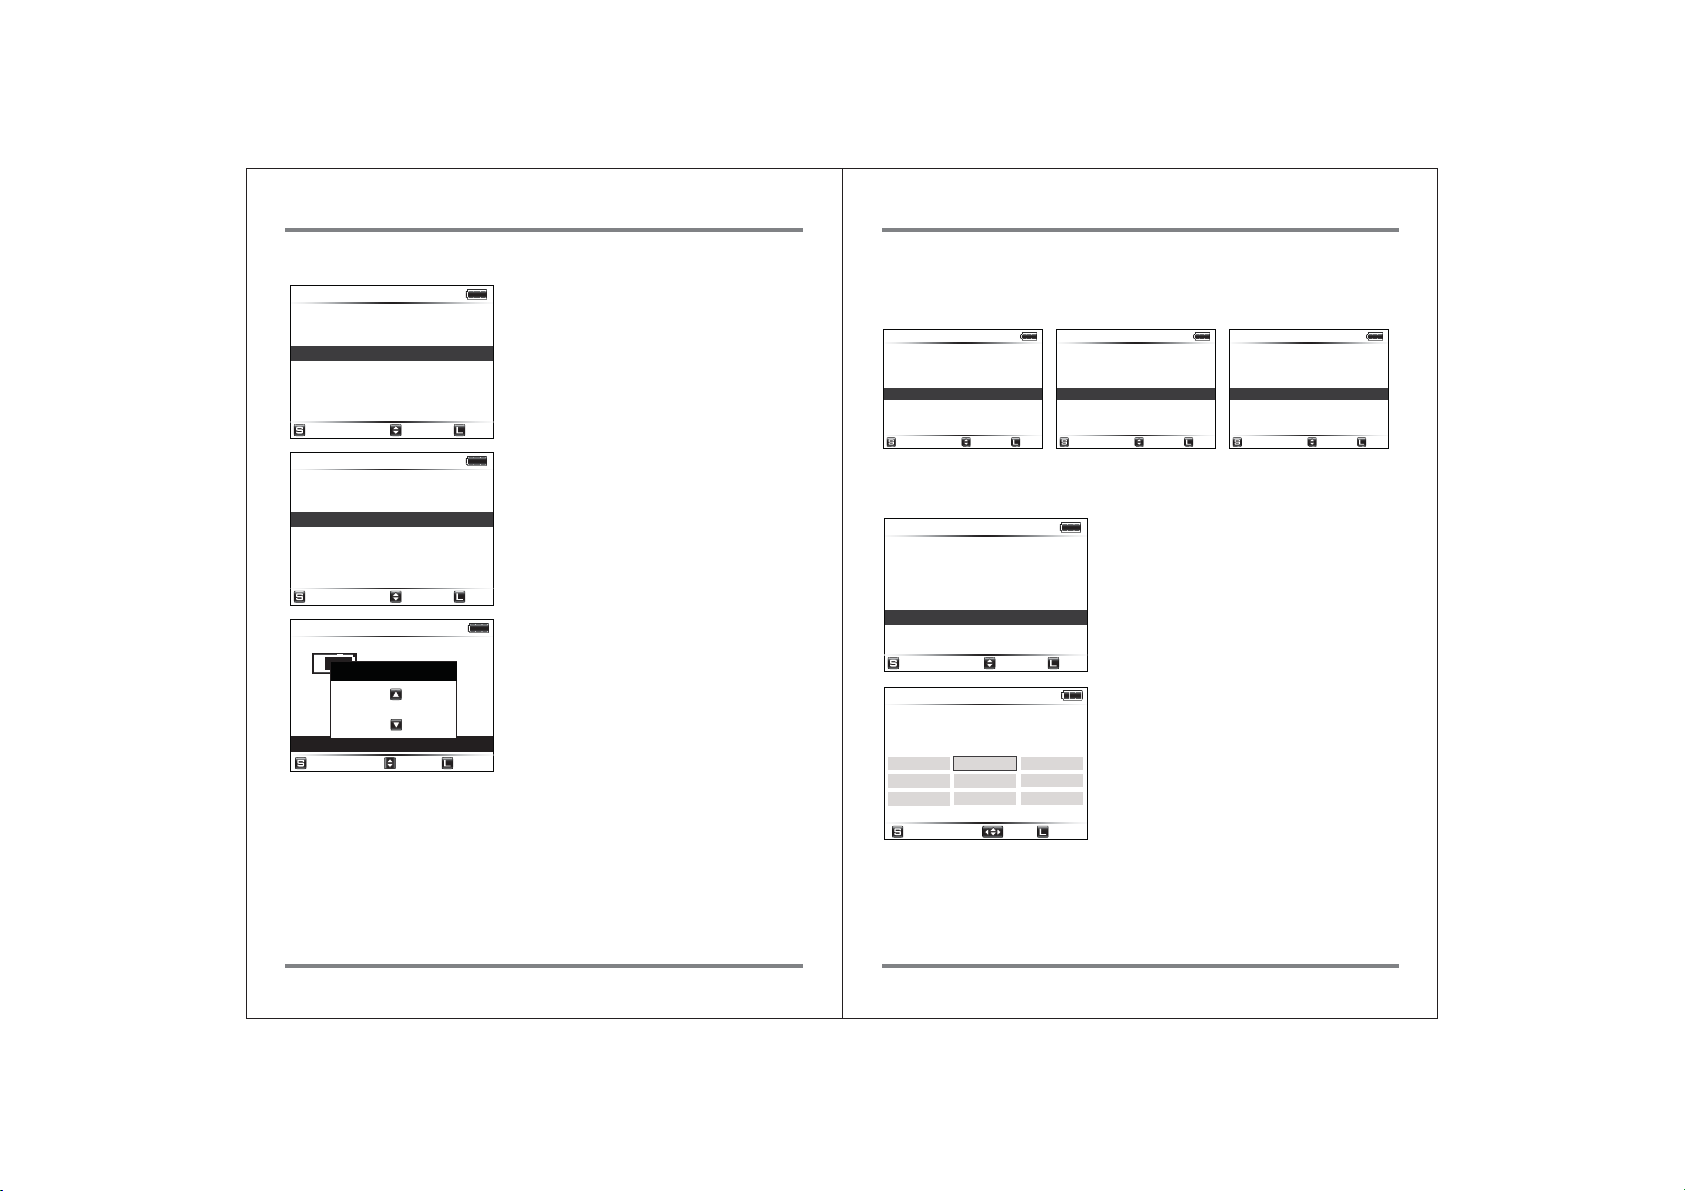
16.6. Folder Rename
Cancel
Select
Cancel
Select
Select
Back
Select
Back
Select
Back
Select
Back
Select
Back
Select
Back
232.6 GB
Auto PwrOff 50
Buzzer On
Index AutoGen. Off
Folder Rename Off
Motion Sensor Hi
Language
Firmware Update
Select
232.6 GB
Auto PwrOff 50
Buzzer On
Index AutoGen. Off
Folder Rename On
Motion Sensor Hi
Language
Firmware Update
Select
698.6 GB
3.6 GB
16 Files
Select
SxS
Select Name
Copy SxS?
20121121.000
Fast Copy
Copy & Verify
Safe Copy
Go to set up menu and select the “Folder
Rename” as On/Off by pressing the control
button briefly.
The folder rename is “Off.”
The name of the folder will be created by the
shooting date (e.g., 20121010.000).
Back
The “Folder Rename” menu is “ON.”
User can change the folder name to begin with
C1~C9 (e.g., C1121010.000) which refers to
Camera1~Camera9, instead of using only a
date-based folder name.
Back
User can choose the folder name before back
up.
Cancel
16.7. Motion Sensor
Go to the set up menu and select “Motion Sensor” as Hi/Lo/Off by briefly
pressing the control button.
232.6 GB
Auto PwrOff 50
Buzzer On
Index AutoGen. Off
Folder Rename On
Motion Sensor Hi
Language
Firmware Update
Select
232.6 GB
Auto PwrOff 50
Buzzer On
Index AutoGen. Off
Folder Rename On
Motion Sensor Low
Language
Firmware Update
Back
Select
232.6 GB
Auto PwrOff 50
Buzzer On
Index AutoGen. Off
Folder Rename On
Motion Sensor Off
Language
Firmware Update
Back
Select
16.8. Language setting
232.6 GB
Auto PwrOff 50
Buzzer On
Index AutoGen. Off
Folder Rename On
Motion Sensor Hi
Language
Firmware Update
Select
232.6 GB
Language
English
Français Español
Русский
Select
한글
中文
日本語
Italiano
Deutsch
The user can select the preferred language
using this function.
Select “Language” sub-menu from the main
menu.
Back
Select the desired language using the
up/down/left/right key function. Press the key
briefly to set the language as the default.
Cancel
Back
43
ADVANCED FUNCTIONS ADVANCED FUNCTIONS
44
Page 26
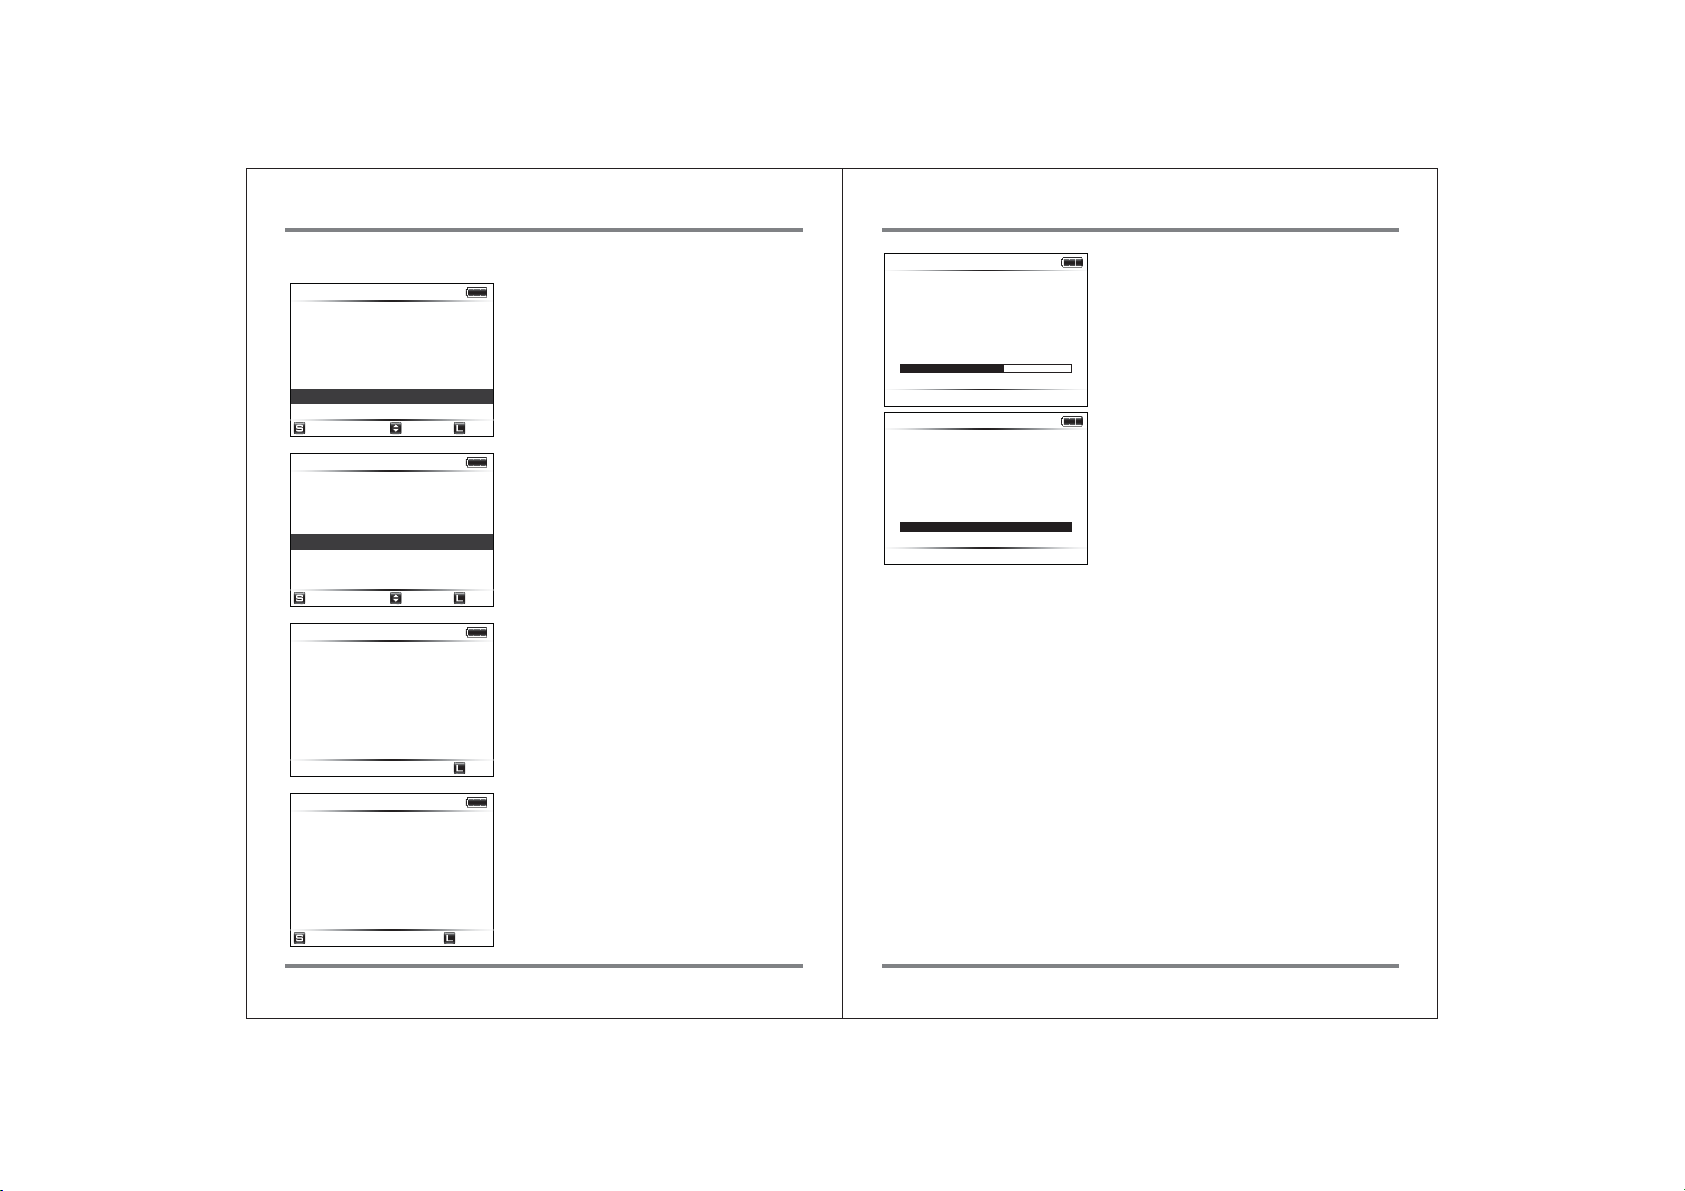
16.9. Firmware Update
Selct
Back
Back
Select
Cancel
Select
Back
232.6 GB
Auto PwrOff 50
Buzzer On
Index AutoGen. Off
Folder Rename On
Motion Sensor Hi
Language
Firmware Update
Select
232.6 GB
Firmware Update
Select a File
in HDD
in Memory Card
Selct
232.6 GB
Firmware Update
No valid FW Files
Select “FIRMWARE UPDATE” from the main
menu.
Back
The firmware file (NVSAIR.BIN) should be
placed in the root directory of a memory card
or the internal hard drive. Select [In HDD]
(hard disk drive) if the firmware file is in the
root directory of the internal hard drive.
Select [In Memory Card] if the firmware is in
the root directory of a memory card. If you
selected the memory card, insert the memory
Back
card into the NVS2825
If a valid firmware file is not contained in the
specified device, the NVS2825 will indicate an
error. Check whether the device contains valid
firmware in the root directory and repeat the
previous process.
Back
232.6 GB
Firmware Update
232.6 GB
Firmware Update
Updating
(1.0 1.01)
Update Completed
(1.0 1.01)
The LCD screen indicates that the NVS2825 firmware
is being updated. Do not turn the power off during
the firmware upgrade. Use of the AC power adapter
is recommended.
Firmware upgrade completed. The NVS2825 turns
off automatically.
232.6 GB
Firmware Update
FW File Found
Update?
(1.0 1.01)
Select
45
ADVANCED FUNCTIONS ADVANCED FUNCTIONS
If valid firmware is found at the specified
location, the NVS2825 indicates a “FW File
Found” message on the LCD. Confirm the
firmware upgrade by pressing the control key
briefly [S].
Cancel
46
Page 27
17. Examples of Basic Functions
Cancel
Cance l
OK
Off
Menu
Off
Cancel
Menu
Off
Menu
Off
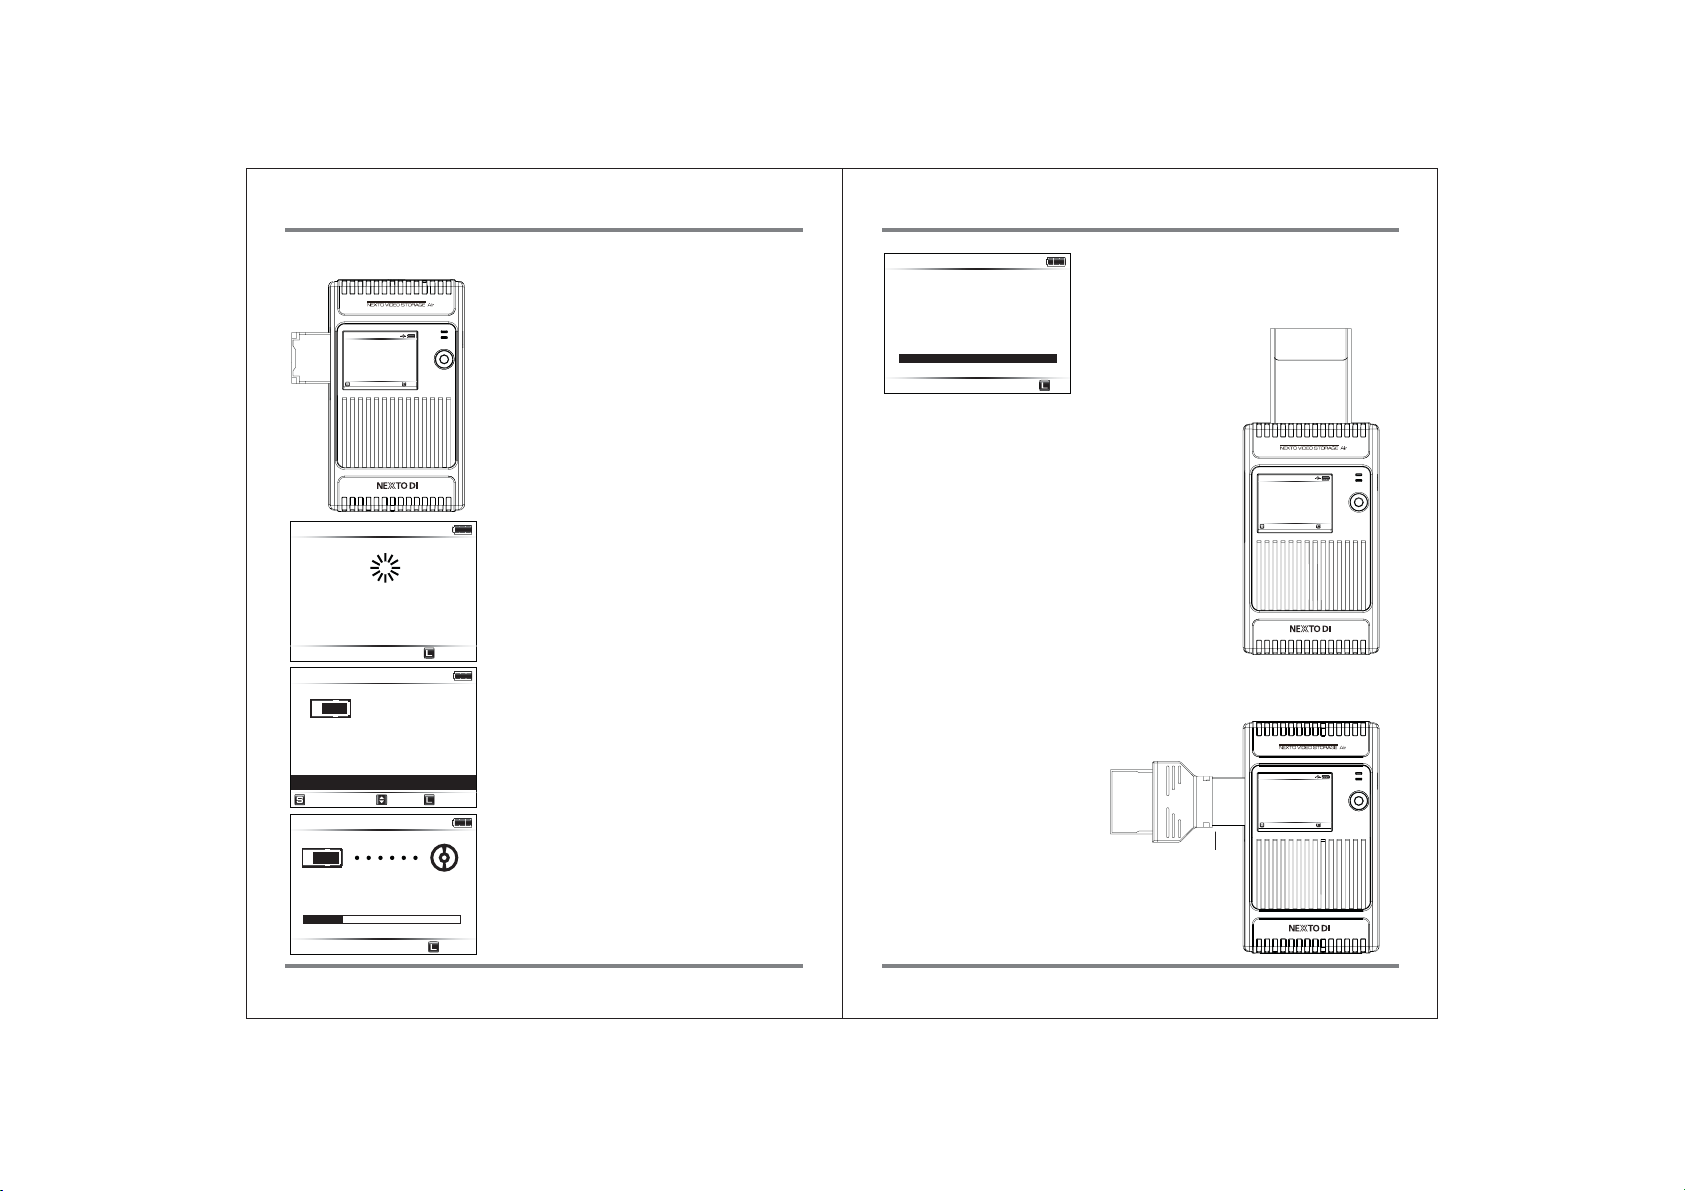
17.1. Copying from an SxS card
698.6 GB
XCopy Ready
Menu
Off
SxS Detected
Checking...
Copy SxS?
Fast Copy
Safe Copy
Copying
Cancel
3.6 GB
16 Files
Cancel
SxS
Card
698.6 GB
698.6 GB
SxS
Copy & Verify
OK
698.6 GB
SxS
4/16 906.3 MB
Turn on the NVS2825 by pressing the power
button for several seconds. Wait for the
“XCopy ready”mode, then insert an SxS card into
the ExpressCard slot located on the left side of
the device.
The NVS2825 detects the memory card and
analyzes it.
The result of the backup analysis is shown on
the LCD. The total number of files--in addition to
the data capacity of the SxS card -- is shown
on the LCD. The NVS2825 will wait for the
completion of the backup analysis before
starting to copy.
The copy status is shown on the LCD.
695.0 GB
Copy Success
Copy Done
Remove SxS
16/16 3.6 GB
90.7 MB/s Off
If the copy is successfully completed, the result
will be shown on the LCD. Remove the SxS card
to return to the initial “XCopy ready” mode.
CardBus Memory card
(including P2/P2E cards)
17.2. Copying a Cardbus memory card
(including P2/P2E cards)
The Memory card slot for a CardBus-type memory card
(including P2/P2E) is located on the top of the NVS2825.
Insert the CardBus memory card into the slot. The remaining
procedure is the same as for SxS memory cards.
17.3. Copying a CF card
Copying a CF card is the same as copying an SxS card--except
that the CF card requires the CF card adapter which is
delivered with the NVS2825.
First, connect the CF card to
the CF card adapter, then insert
the card into the ExpressCard slot
of the NVS2825.
The NVS2825 will display an error
message if an empty CF card
adapter is inserted.
CF card
CF card
adapter
698.6 GB
Menu
698.6 GB
Menu
XCopy Ready
XCopy Ready
Off
Off
0m30s Cancel
47
EXAMPLES OF BASIC FUNCTIONS EXAMPLES OF BASIC FUNCTIONS
48
Page 28
Menu
Off
18. Checking the Lifetime of an SxS card
Cance l
Cance l
OK
OK
SD/SDHC/SDXC card
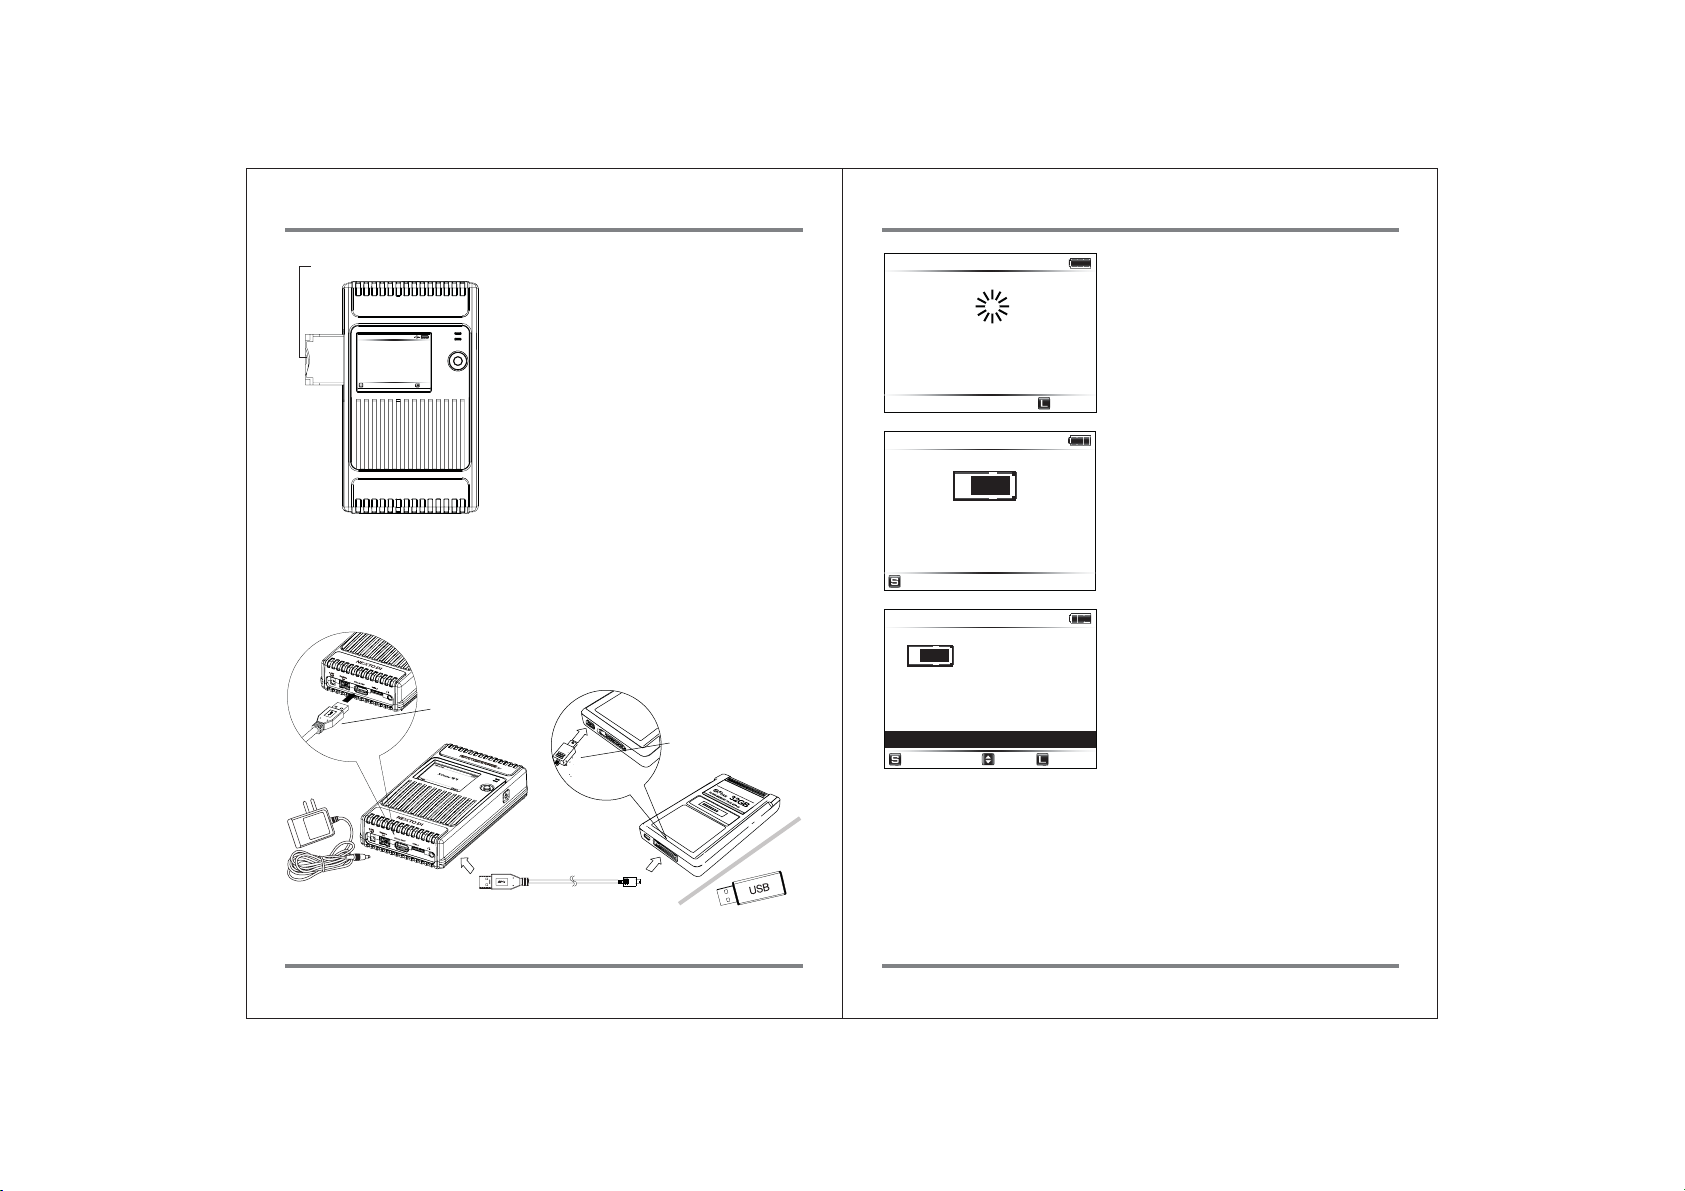
17.4. Copying an SD card
Copying an SD/SDHC/SDXC card is the same as
copying an SxS card--except that the SD/SDHC/
SDXC card requires the SD card adapter which is
delivered with the NVS2825.
First, connect the SD/SDHC/SDXC card to the SD
card adapter, then insert the card into the
ExpressCard slot of the NVS2825.
SD card
adapter
698.6 GB
Menu
XCopy Ready
Off
The NVS2825 will display an error message if an
empty SD card adapter is inserted.
17.5. Copying from an IKEGAMI GFPAK
The NVS2825 supports copying from the IKEGAMI GFPAK using the “USB-Host” slot
connected via the USB cable.
USB Host
(Standard-A)
USB Device
(Mini-B)
698.6 GB
698.6 GB
OK
698.6 GB
SxS
OK
SxS Detected
Checking...
SxS
Lifetime
Limit Expired
Copy SxS?
Fast Copy
Copy & Verify
Safe Copy
Cancel
3.6 GB
16 Files
Cancel
The NVS2825 can automatically check the
lifetime of an SxS card.
If the lifetime of the card has expired, a
message will be shown on the LCD screen of
the NVS2825. After a few seconds, the NVS2825
will automatically go to the SxS backup menu.
You can go to the backup menu immediately
by briefly pressing the control button.
If the SxS card contains new data that has
never been stored in the internal drive of
the NVS2825, the backup menu will be shown
on the LCD.
Adapter USB Cable
When copying from a GFPAK, the NVS2825 should be powered by the AC power adapter.
The detailed connection is shown above.
49
EXAMPLES OF BASIC FUNCTIONS CHECKING THE LIFETIME OF AN SxS CARD
50
Page 29
19. Pre-Editing through a Wi-Fi connection
905_01 28_01. MP4
Off
Cancel
Cance l
OK
Select
Back
Select
Back
The NVS2825 automatically generates HTML index files which contain metadata and
thumbnails of each video file.
You can use an iOS device (iPhone/iPad) to access data stored on the NVS2825 through
a Wi-Fi connection
The index files make it possible to: preview video, play audio, make cuts (OK/NG cut),
attach notes—and more—from an iOS (iPhone/iPad) device. The index files can also be
accessed from a computer.
The default “auto index generation” setting (Index AutoGen.) on the NVS2825 is “On.”
If you turn this setting “Off” you will not be able to perform pre-editing functions from an
iOS (iPhone/ iPad) device.
Caution
● The thumbnail images of the AVC video format cannot be shown
when the “Index Auto. Generation” (“Index AutoGen.”) function is
turned off.
19.1. Changing the Index Auto Generation setting (“Index AutoGen.”)
232.6 GB
Auto PwrOff 50
Buzzer On
Index AutoGen. On
Folder Rename On
Motion Sensor Hi
Language
Firmware Update
Select
232.6 GB
Auto PwrOff 50
Buzzer On
Index AutoGen. Off
Folder Rename On
Motion Sensor Hi
Language
Firmware Update
Select
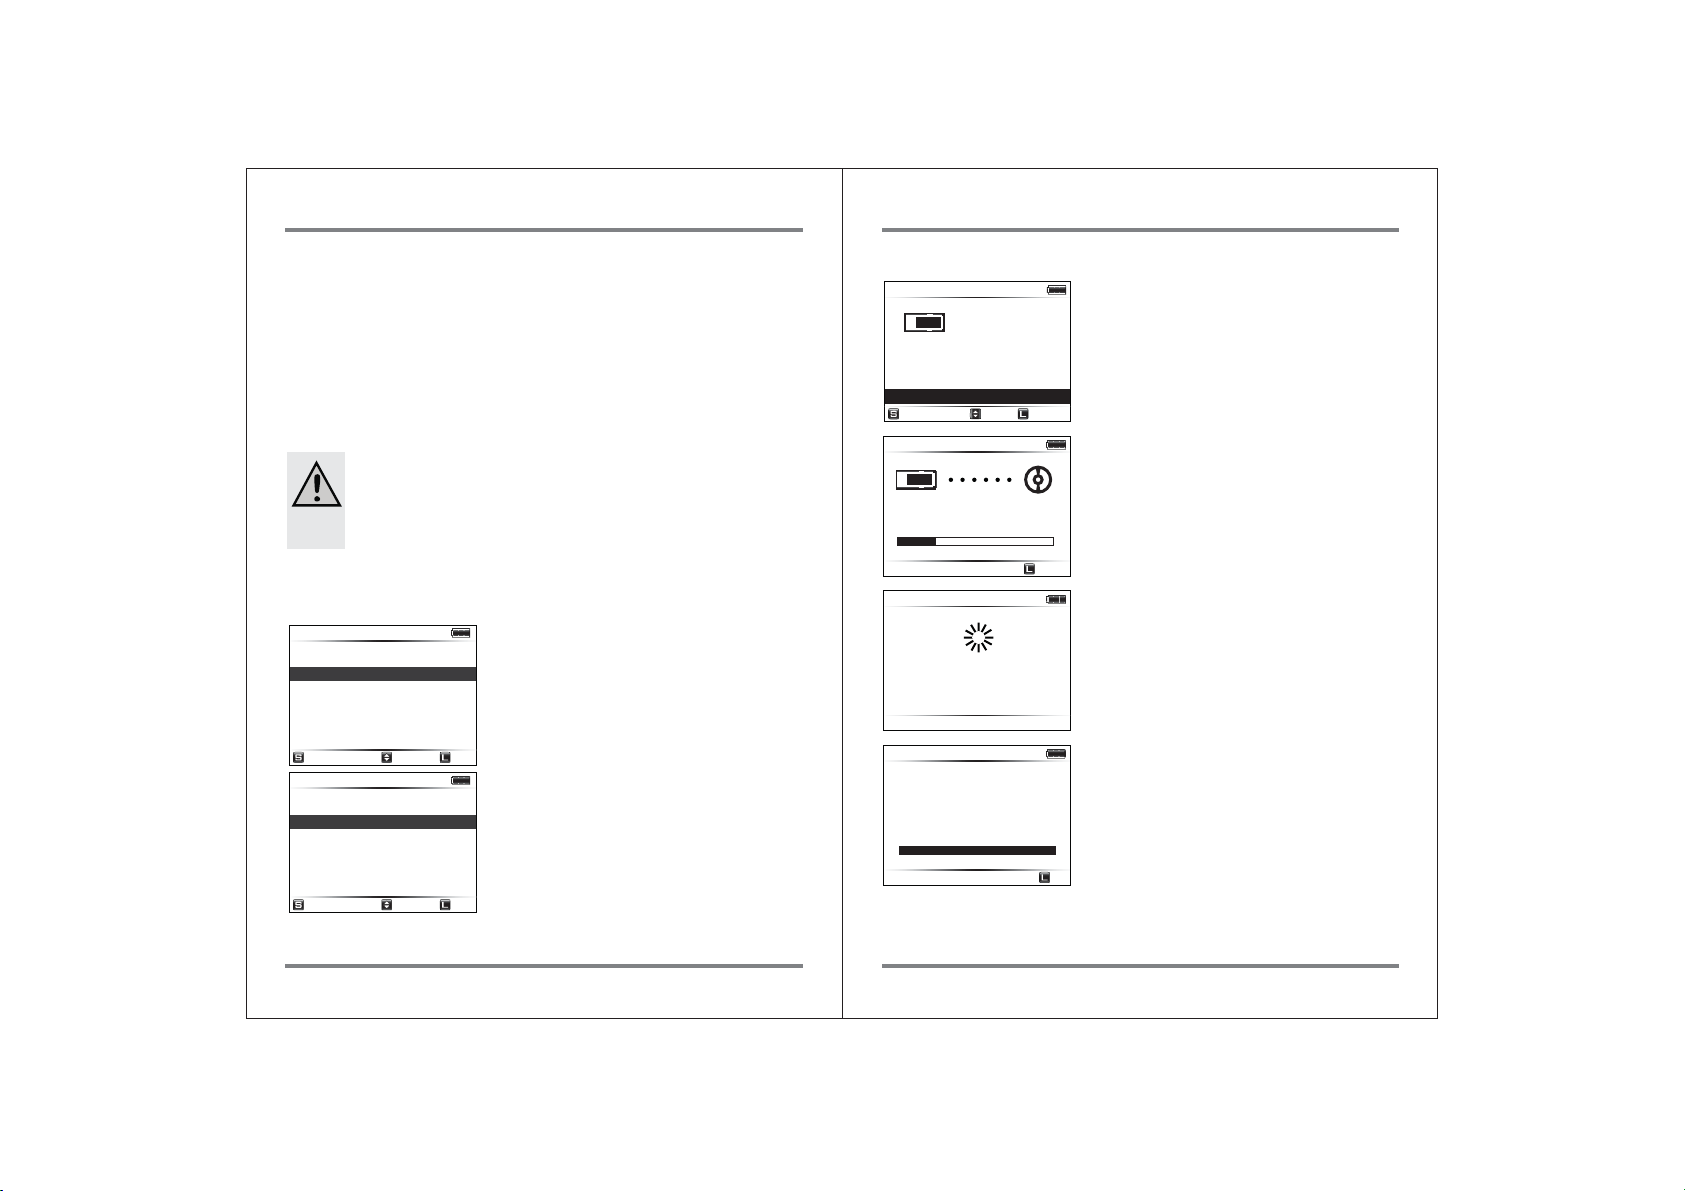
This function can be turned on or off from the main
menu by using the control button
Index AutoGen. Is “On”
Back
Index AutoGen. Is “Off”
Back
19.2. Backing Up and Generating Index Files
698.6 GB
SxS
Copy SxS?
Fast Copy
Copy & Verify
Safe Copy
OK
698.6 GB
SxS
Copying
4/16 906.3 MB
0m30s Cancel
698.6 GB
3.6 GB
16 Files
Building
Index files
905_0128_01.MP4
695.0 GB
Copy Success
Copy Done.
Remove SxS
16/16 3.6 GB
90.7 MB/s Off
If a memory card with new data is inserted, the
NVS2825 asks whether you want to begin copying.
Cancel
This screen indicates that the NVS2825 is copying
the memory card data to the internal hard drive.
After copying, the NVS2825 generates an index file
that displays thumbnails of the video footage.
Backup and index generation has successfully
completed.
51
PRE-EDITING THROUGH A WI-FI CONNECTION PRE-EDITING THROUGH A WI-FI CONNECTION
52
Page 30
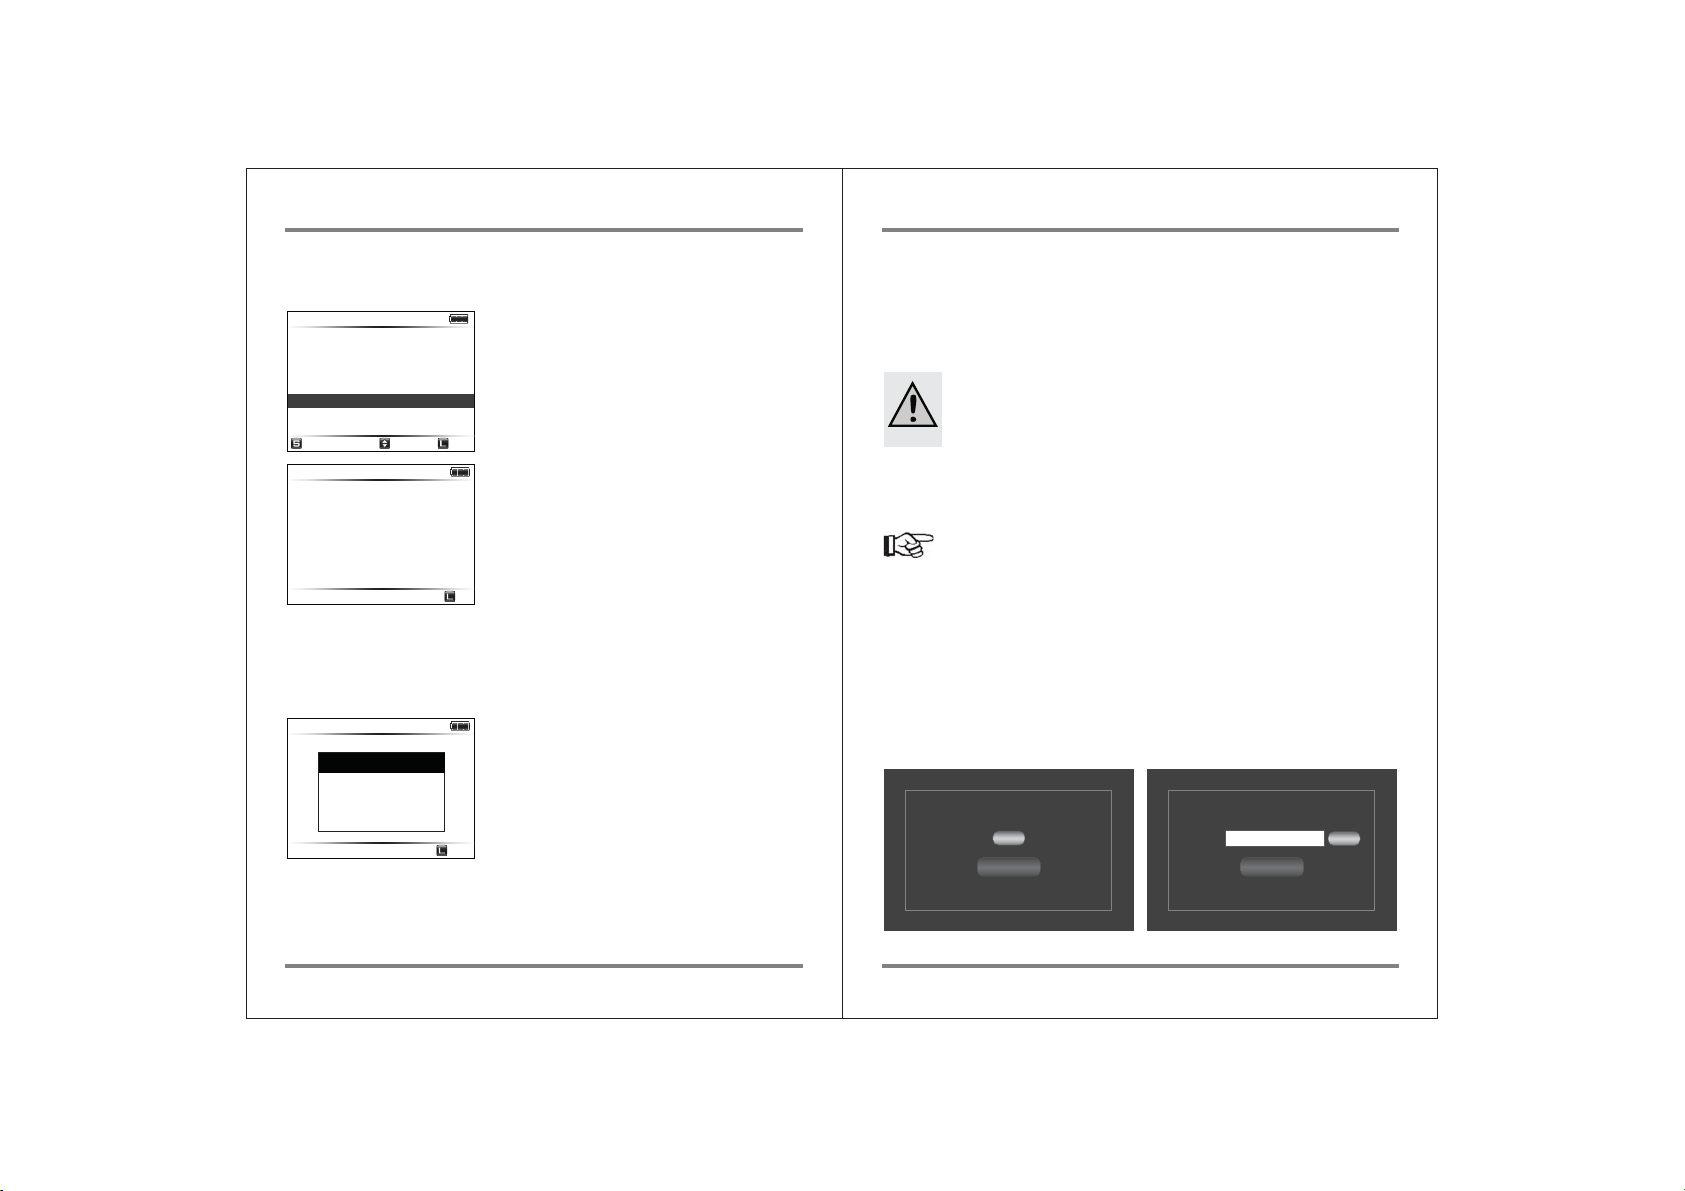
19.3. Connecting an iOS device to the NVS2825 via Wi-Fi
Select
Back
Off
Off
(1) Set the NVS2825 to Wi-Fi mode
232.6 GB
Preview
HDD Management
Sync
Setup
Force Enable USB
Wi-Fi Mode
Select
232.6 GB
Wi-Fi Ready
SSID
NVS-000000
(2) Go to the set up menu of your iOS device (iPhone or iPad) and select Wi-Fi.
(3) Select “NVS-######” from the list of iOS networked devices.
(4) If the iOS device has successfully connected to the NVS2825, a “Connected” message
will be shown as below.
232.6 GB
New Connection
Wi-Fi Ready
MAC ID: 0000
SSID
10.0.0. 2
NVS-000000
Connected
(5) Now that your iOS device is connected to the NVS2825, you can access the data stored
on the NVS2825 with either an App or a web browser. The “NVSPlayer”App can be
downloaded from the App Store, if available. Or, users (both iOS and Android) can
access the data from the NVS2825 via a web browser.
Please enter “10.0.0.1” in the URL (address) field.
Using the control button, select the Wi-Fi mode
from the main menu.
Back
If the Wi-Fi connection is successful,
a “WiFi Ready” message will be displayed
on the LCD screen.
Off
Off
19.4. Checking the footage stored on an NVS2825 from an iOS /
Android device (Pre-Editing)
Users can use the NVSPlayer App for an iOS device (iPhone/iPad) or a web browser
(for an Android device) to preview footage stored on the NVS2825. The user can
then pre-edit the footage through functions such as cut selection, note function,
and more.
Caution
● The NVS2825 does not support multiple Wi-Fi connections. Only one
user can access the NVS2825 at a time.
(1) Log in to the NVS2825
After you have successfully connected your iOS/Android device via Wi-Fi as shown
above, you may choose to log in to the NVS2825 with a password
Reference
To enter the log-in stage, simply double click on the “NVSPlayer”App for iOS or enter
“10.0.0.1” on the URL field for an Android device.
① No password in use
If the user has not set up a password, only this log-in menu will be shown
To go to the backup folder function, click “Go.”
② Password in use
If the user has set up a password, this “password” menu will be shown.
To go to the backup folder function, type the password and click ”Go.”
In order to protect backup data, the user can set up a password. Select “Set
Password” on the bottom-left of the log-in menu screen. Follow the procedure
below.
NVS-Air Login
Login
Set Password
[Fig. 1] No password in use
[Fig. 2] Password in use
NVS-Air Login
LoginPassword:
Set Password
53
PRE-EDITING THROUGH A WI-FI CONNECTION PRE-EDITING THROUGH A WI-FI CONNECTION
54
Page 31
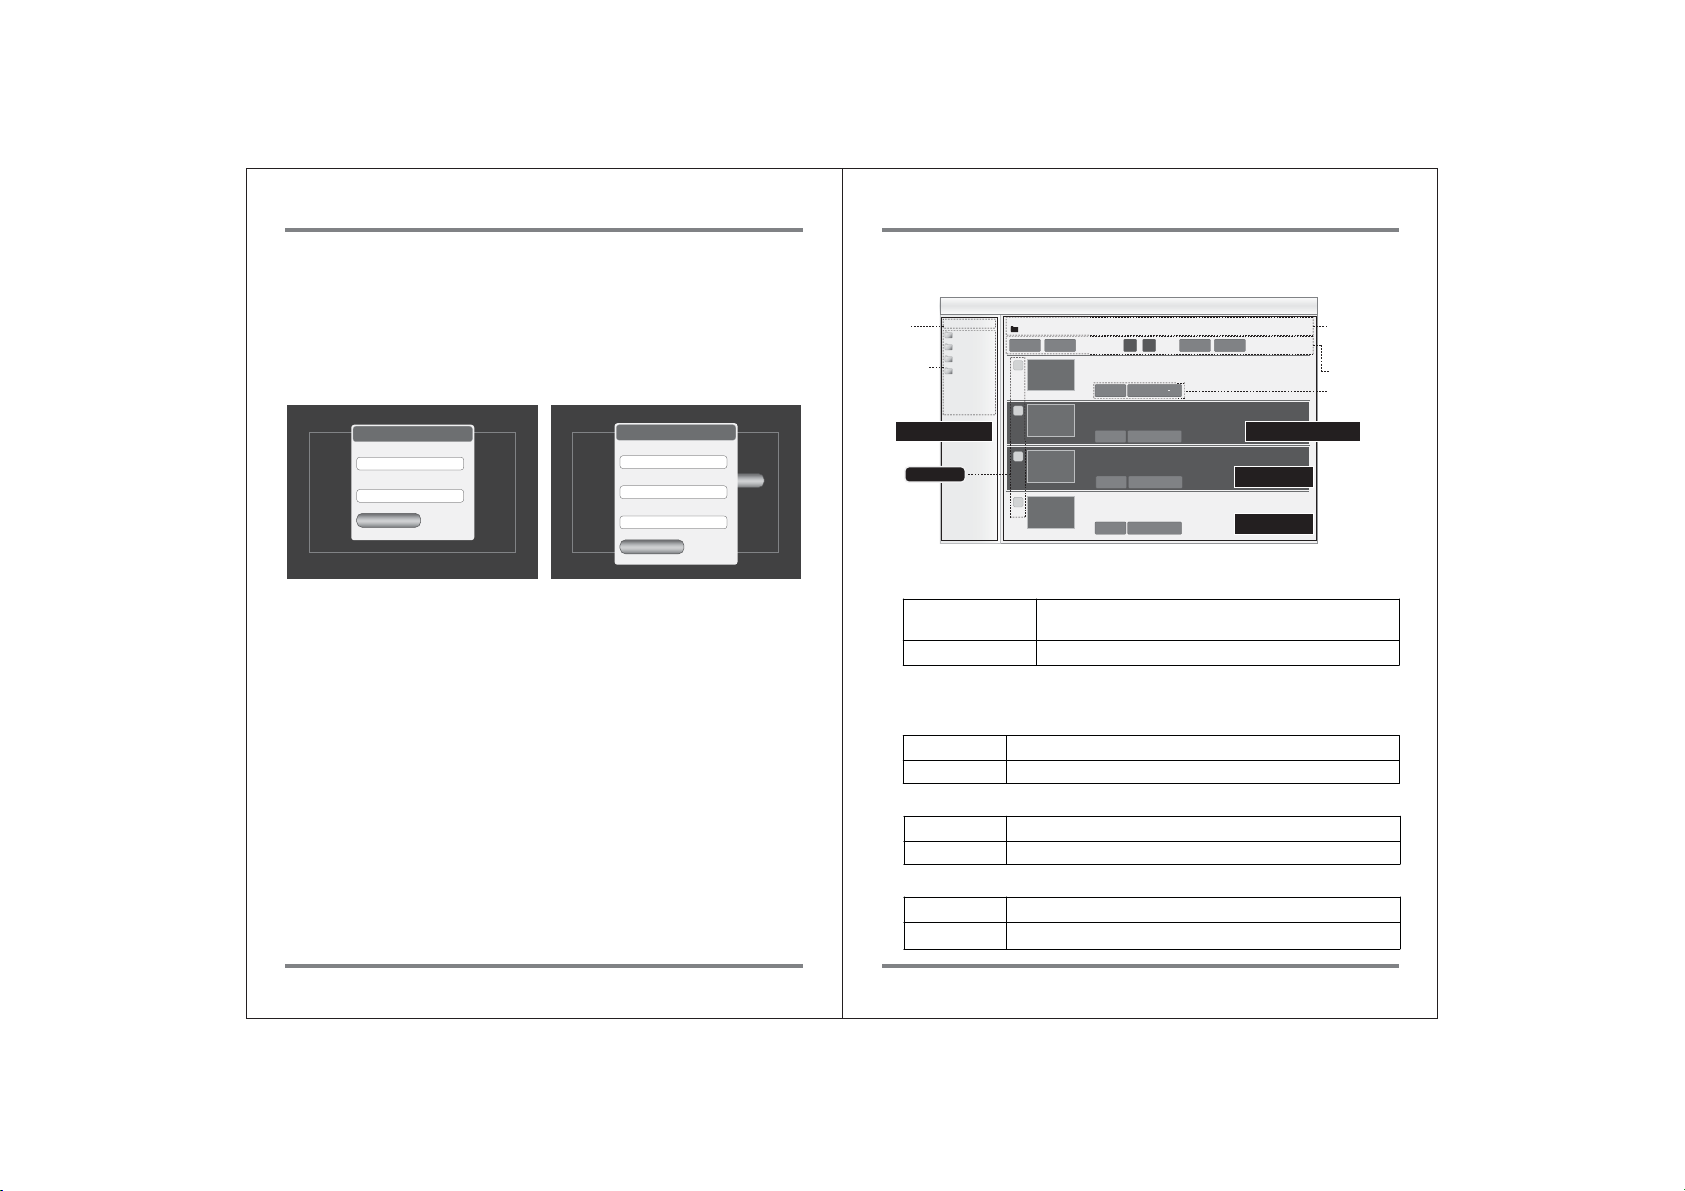
■ Set Password
① No password in use
After you click “Set Password” the following menu displays. Type the selected
password into each box. Click on “Set Password.”
② Change password
Previous password exists. User now wishes to establish a new password.
Set Password X
NVS-Air Login
New Password:
Login
Confirm Password:
Set Password
Set Password
[Fig. 3] No password in use
[Fig. 4] Change password
Set Password X
Original Password:
NVS-Air Login
New Password:
Set Password
Confirm Password:
Set Password
(2) Choose the folder that contains the clip(s) to edit.
Toggle for
Trash↔Back up
folder
Folder List
Trash Folder
20121123.000
Select All Clear All NG OK Hide NG Trach NG
20121123.000
20121123.000
20121123.000
① Menu Frame
LoginPassword:
Checkboxes
NVS’s HDD Information
①② ③ ④
20121123.000
Total Files: 25 Total Video Files:5 Total Size: 3.6GB
FileName: /NVSAir/20121107.000/NTSC_HQ 720_30P/905_0124_01.MP4
Duration: 00:11:50
CreateDate: 2012-11-09 13:59:28
Note:
Edit Note Show Detail Note
FileName: /NVSAir/20121107.000/NTSC_HQ 720_30P/905_0124_01.MP4
Duration: 00:11:50
CreateDate: 2012-11-09 13:59:28
Note:
Edit Note Show Detail Note
FileName: /NVSAir/20121107.000/NTSC_HQ 720_30P/905_0124_01.MP4
Duration: 00:11:50
CreateDate: 2012-11-09 13:59:28
Note:
Edit Note Show Detail Note
FileName: /NVSAir/20121107.000/NTSC_HQ 720_30P/905_0124_01.MP4
Duration: 00:11:50
CreateDate: 2012-11-09 13:59:28
Note:
Edit Note Show Detail Note
② Contents Frame
NG cut clip
OK cut clip
Folder Information
①Selected Folder
name
②Number of files
③Number of video
files
④Total size in MB
Functions for
each folder
Functions for
each video clip
[Fig. 5] Sample backup folder screen
(A) Menu Frame
Trash/Back up
Folder Toggle
Folder List
Switching between the Trash and Backup Folders.
Folder list which is created at each back up
(B) Contents Frame
1) Functions for each folder
① Check Boxes: Selecting a Function
Select All
Clear All
Select all check boxes for every video clip
Clear all selected check boxes
② Select NG/OK Function
Mark NG
Mark OK
Mark the selected video clip “NG cut”on the check box
Mark the selected video clip “OK cut” on the check box
③ Hide/Show Function
Hide NG
Show All
Hide all NG cuts in the list
Show all video clips including NG cuts
55
PRE-EDITING THROUGH A WI-FI CONNECTION PRE-EDITING THROUGH A WI-FI CONNECTION
56
Page 32
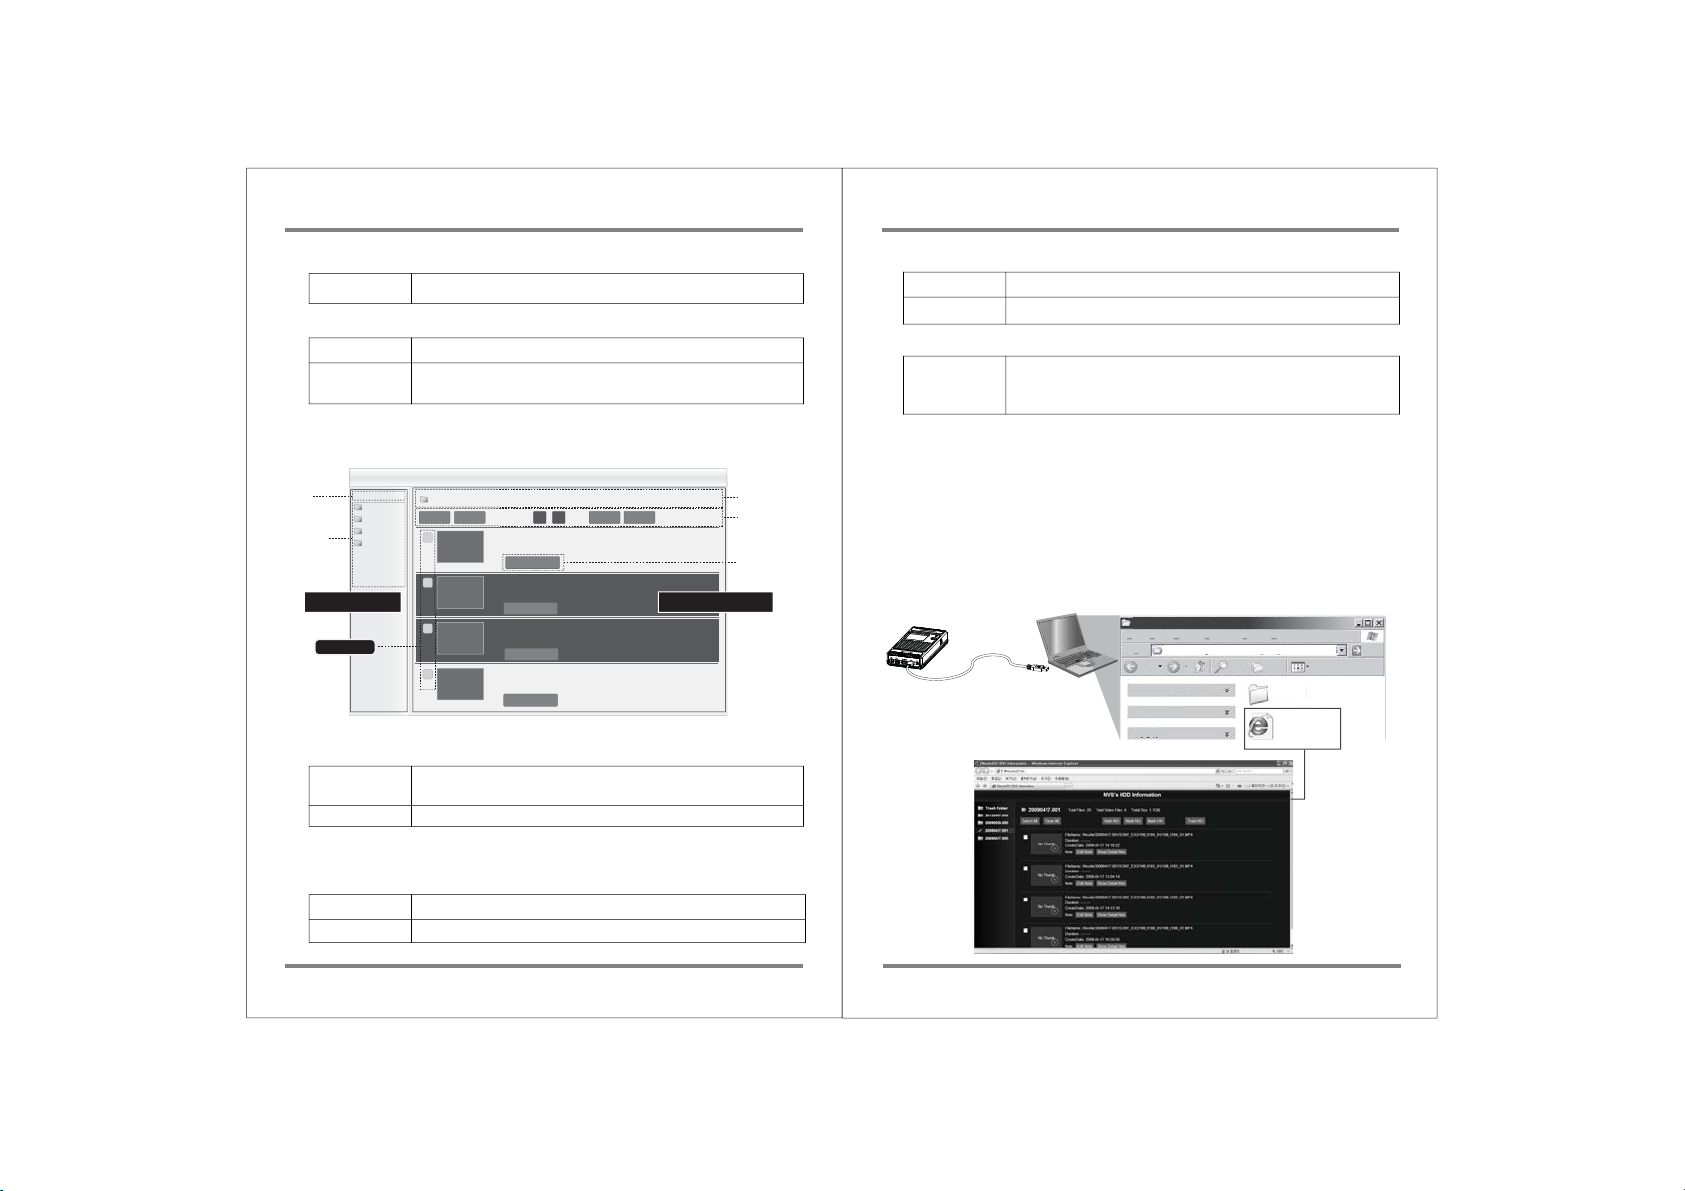
④ Trash NG cut Function
Move the cuts marked “NG” to the Trash FolderTrash NG
2) Functions for each video clip
Add Note
Show Detail
User can write comments for each video clip
Display notes for selected video clips. “NVSPlayer” App user
can also check the Mark In-Out information.
(3) Move a video clip from the trash folder to the backup folder or
delete clip completely
Toggle for
Trash↔Back up
folder
Folder List
Trash Folder
20121123.000
Select All Clear All NG OK Hide NG Trach NG
20121123.000
20121123.000
20121123.000
① Menu Frame
Checkboxes
[Fig. 6] Sample Trash Folder screen
(A) Menu Frame
Trash/Back up
Folder Toggle
Folder List
Switching between Trash & Backup Folders
Folder list which is created at each back up
NVS’s HDD Information
20121123.000 [Trash Folder]
FileName: /NVSAir/20121107.000/NTSC_HQ 720_30P/905_0124_01.MP4
Duration: 00:11:50
CreateDate: 2012-11-09 13:59:28
Note:
Show Detail Note
FileName: /NVSAir/20121107.000/NTSC_HQ 720_30P/905_0124_01.MP4
Duration: 00:11:50
CreateDate: 2012-11-09 13:59:28
Note:
Show Detail Note
FileName: /NVSAir/20121107.000/NTSC_HQ 720_30P/905_0124_01.MP4
Duration: 00:11:50
CreateDate: 2012-11-09 13:59:28
Note:
Show Detail Note
FileName: /NVSAir/20121107.000/NTSC_HQ 720_30P/905_0124_01.MP4
Duration: 00:11:50
CreateDate: 2012-11-09 13:59:28
Note:
Show Detail Note
Folder
Information
Functions for
each folder
Functions for
each video clip
② Contents Frame
② Restore the NG cut to the Backup folder/ Empty NG Function
Restore NG
Destroy NG
Restore everything in the trash folder to the original folder(s)
Delete all the NG cuts in the Trash Folder (Empty NG)
③ Function for each video clip
Display the contents of notes for each selected video clip
Show Detail
“NVSPlayer” App user can also check on the Mark In-Out
information.
19.5. Accessing the index file via a computer
The index file is in HTML format and can be accessed via a computer using the
web browser. The HTML file (nextoid2.htm) is stored in the root directory of
the NVS2825.
To access a video file, simply connect the NVS2825 to a computer and double-click
on the nextoid2.htm file in the root directory. For more details about computer
connection, see Chapter 10.
E:\
File Edit View Facorites Tools Help
Adddress
System Tasks
Other Places
Details
E:\
Back
Search
Folders
NvsAir
nextoid2.htm
HTML Document
1KB
Go
nextoid2.htm
2) Contents Frame
A) Functions for each folder
① Check Boxes: Selecting a Function
Select All
Clear All
57
PRE-EDITING THROUGH A WI-FI CONNECTION PRE-EDITING THROUGH A WI-FI CONNECTION
Select all check boxes
Clear all selected Check Boxes
58
Page 33
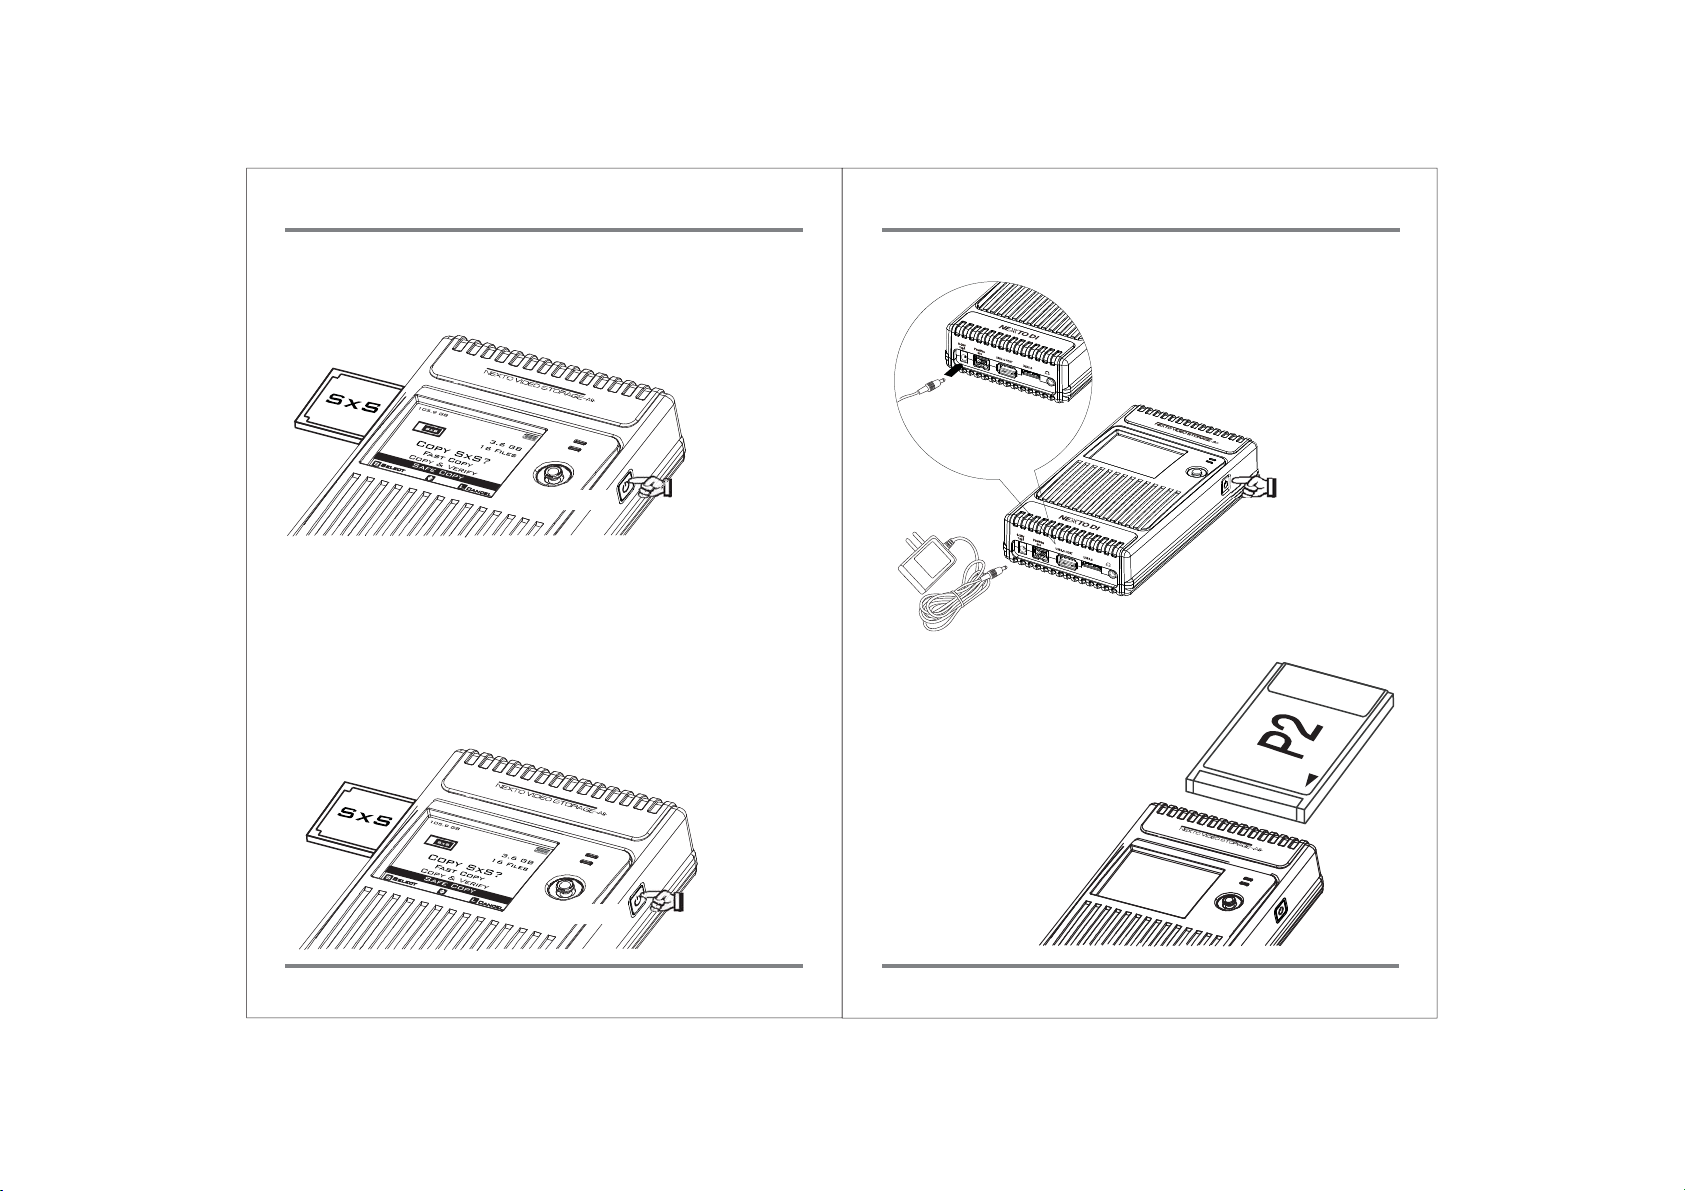
20. Troubleshooting Tips
IF THE POWER ON THE NVS2825 CANNOT BE TURNED OFF :
The On/Off Button can be used as a reset key. In the event of a hardware or software
malfunction, press the reset button for at least 7 seconds. This will turn the power off
safely so that the data stored in the hard drive will not be lost or altered.
Control Button
Press and hold
the key for more
than 7 seconds
IF THE CONTROL KEY IS NOT RESPONDING :
If you are unable to select an operation that involves the pressing of the control key in
an up/down/left/right direction, you can still perform the [COPY] or [VERIFY] functions of
the NVS2825 by using the power (on/off) button.
First, turn on your NVS2825 by pressing the power button for over two seconds. Next,
place your memory card into the appropriate slot. When the LCD screen shows [SAFE COPY],
briefly press the power button to begin copying. Please note that you will be initiating the
“Safe Copy” function— which is slower, but is the most reliable method of backup.
When the copying is done, remove your memory card. Now re-insert the memory card and
wait until your NVS2825 asks [VERIFY?] A brief press of the power button will begin the
“Verify” process.
IF THE POWER CANNOT BE TURNED ON :
The NVS2825 has an internal rechargeable battery.
If you cannot turn on the NVS2825 with the On/Off
button, it may be that the internal battery has been
discharged. Connect the power adapter to the
NVS2825 and push the power button for several
seconds to turn the NVS2825 on.
Press once and
release
immediately
INSERT THE MEMORY CARD :
Insert the memory card carefully as shown below.
The pins may bend if you insert the memory card
incorrectly.
Control Button
59
TROUBLESHOOTING TIPS TROUBLESHOOTING TIPS
Press once and
release
immediately
60
Page 34
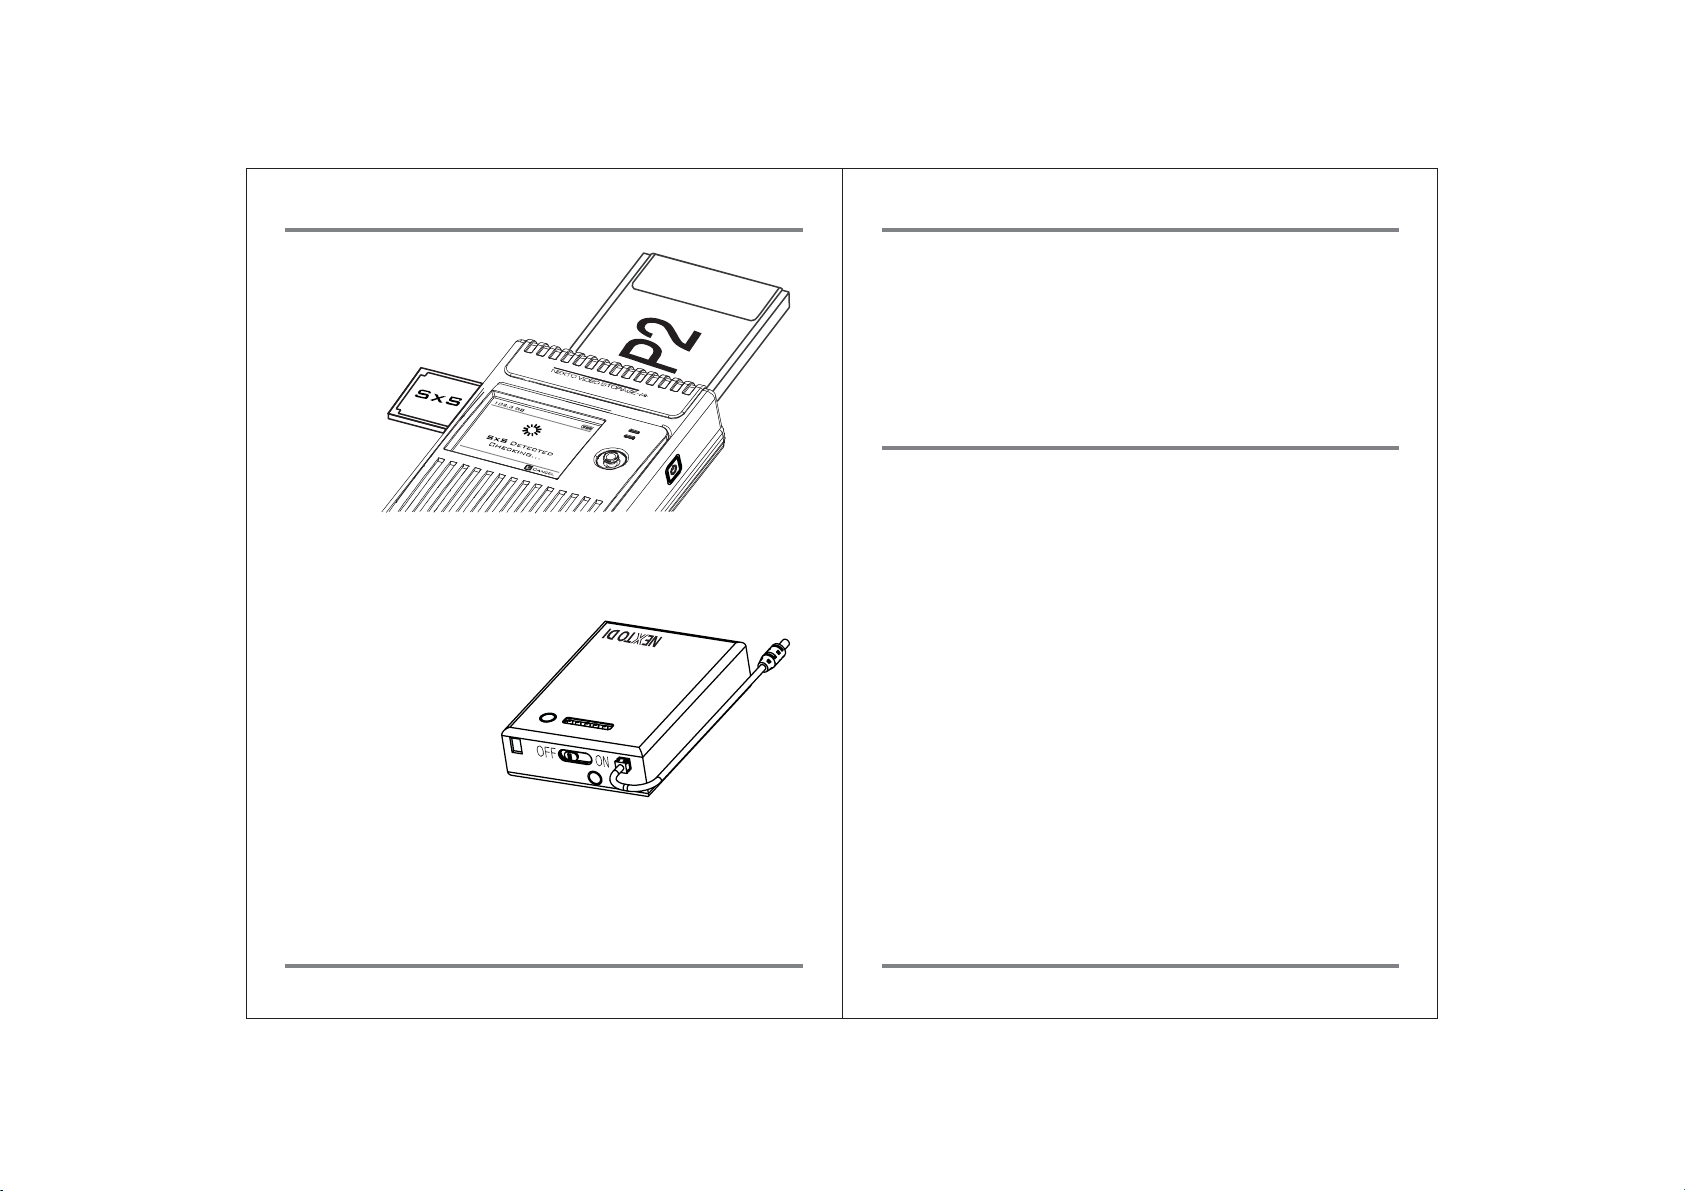
21. Battery Disposal
CAUTION: DO NOT INSERT SEVERAL MEMORY
CARDS AT THE SAME TIME :
Do not connect more than one memory
card to the NVS2825. Only the first
one will be detected.
RECHARGEABLE EXTERNAL BATTERY :
Even when the NVS2825 is turned off, the rechargeable external battery—if connected to
the NVS2825—continues to consume power. If you leave the battery connected, it will use
all the stored power. Then when you try to use
the NVS2825, it will not turn on.
Please disconnect the rechargeable external
battery when the NVS2825 is not in use.
IF A BACKUP ERROR OCCURS TO A COMPUTER :
When a video file stored in the NVS2825 cannot be copied or edited on a computer, the
problem may be a bad sector on the hard drive of the NVS2825.
If an error is detected, consult your authorized NEXTODI dealer or proper restoration
company.
Batteries/rechargeable batteries containing harmful substances are marked with the
following symbols: Cd=cadmium, Hg=mercury, Pb=lead. You can return batteries/
rechargeable batteries to any authorized disposal station in your area or to most other
stores where batteries/rechargeable batteries are sold. Do not dispose of used batteries in
the household trash.
The Li-Poly rechargeable battery integrated into the NVS Air must be removed from the
housing prior to disposal. Please see your authorized NVS Air dealer for this service.
FCC Rules and Regulations – Part 15
Note: This equipment has been tested and found to comply with the limits for a Class B
digital device, pursuant to part 15 of the FCC Rules. These limits are designed to provide
reasonable protection against harmful interference when the equipment is operated in a
commercial environment. This equipment generates, uses, and can radiate radio frequency
energy and, if not installed and used in accordance with the instruction manual, may cause
harmful interference to radio communications. Operation of this equipment in a residential
area is likely to cause harmful interference in which case the user will be required to correct
the interference at his own expense.
Modifications not expressly approved by the manufacturer could void the user's authority to
operate the equipment under FCC rules.
61
TROUBLESHOOTING TIPS
BATTERY DISPOSAL
62
Page 35
Technical Specifications
Device
Model Number
Video Preview
Audio
Supported
Memory Card
External Hard
drive Support
Battery
AC power adapter
Bus power
operation
Computer Interface
File system format
OS Compatibility
Wi-Fi connection
Dimensions
Contents
NEXTO VIDEO STORAGE-Air (NVS-Air)
NVS2825
2.4" Color TFT LCD : 320*240, 64K colorLCD
CODEC: MPEG2 / AVC / H.264 / PRORES / DNxHD / DV
File: MP4 / MOV / MXF / AVI / DV / (MTS)
Head Phone jack. Support playing PCM Audio in Video file
SxS
CardBus
Memory Card
CF (Adapter)
SD (Adapter)
ExpressCard/34 Compatible, Follows SxS Spec.
Supports CardBus Memory Card
(including P2/P2E Card)
Through CF to ExpressCard Adapter
Through SD to ExpressCard Adapter
SD / SDHC / SDXC
High speed UHS-1 compatible
USB 3.0 : 5Gbit/sec
Internal : 3.7V 4400mAH rechargeable Li-Poly battery (120 min)
* Rechargeable by AC adapter, USB cable, FireWire800 cable
(9-9pin), and Car charger
External : 3.7V 6600mAH rechargeable Li-Ion battery (180min)
* Rechargeable by AC adapter
Input : 100-240VAC Output : 12V/2A DC
Operates with USB bus power or FireWire800 cable power
USB3.0: 5Gbit/sec, IEEE1394b(FireWire800): 800 Mbit/sec
Hard drive : exFAT
Memory cards : FAT32, exFAT, UDF
Windows 7 / VISTA / XP SP2 or later
MAC OS 10.6.5 or above
802.11b/g/n 54Mbps. Pre-editing through App./
Web Browser
154mm * 91mm * 33mm / 430g (with Hard drive)
NVS2825 Main unit / CF adapter / SD adapter / Manual /
AC power adapter / USB3.0 cable / FireWire800 cable (IEEE1394b,
9-9pin) / Leather case / Shock protection rubber jacket /
Li-Ion external battery
 Loading...