

Page 1
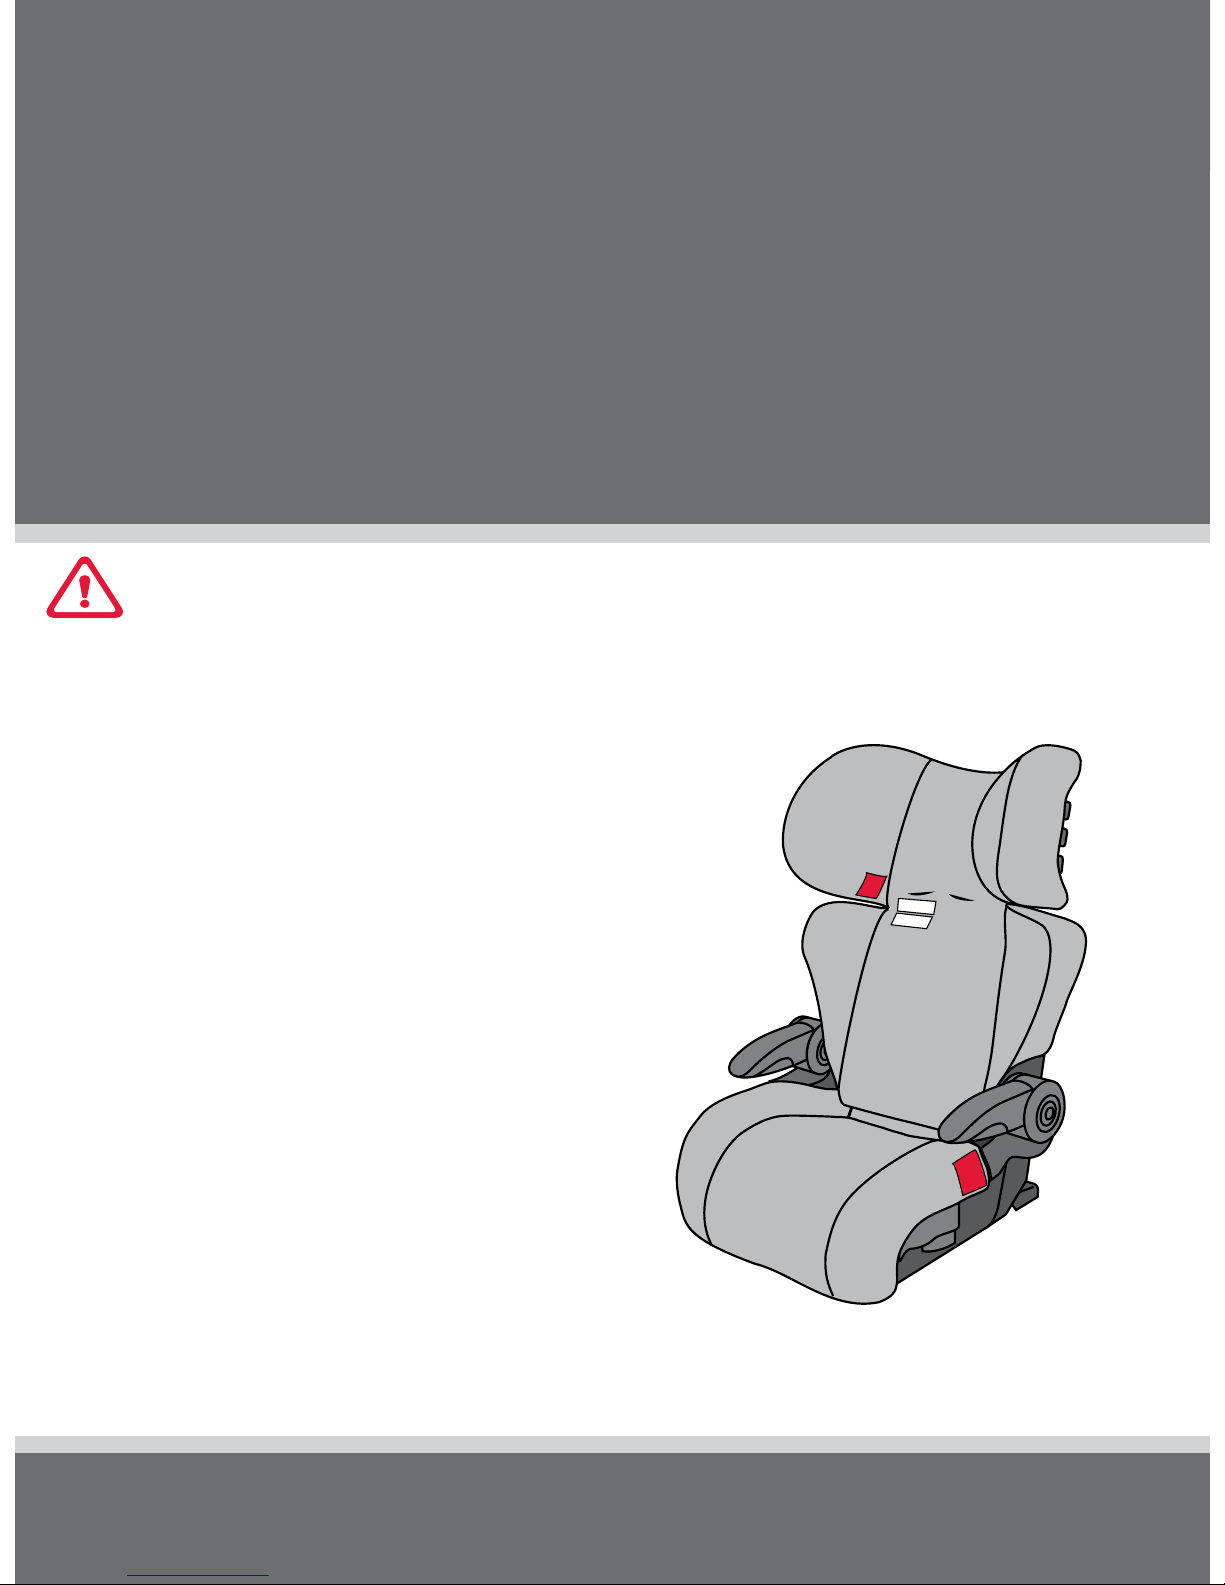
To be used with either a lap-sash seat belt or
an add-on accessory child harness by children
whose shoulders are above the lower shoulder
height marker with head restraint in lowest
position (approximately 4 years of age) until
child's shoulders reach the upper shoulder
height marker with head restraint in highest
position (approximately 6 to 8 years of age).
Suitable for use only with the Safe-n-Sound™
Protecta PLUS™ Harness Series 220/2010 or
Babylove™EzyGo Harness™Series BL220/2010.
IMPORTANT:
KEEP THIS BOOK IN THE PLACE PROVIDED ON THE CHILD RESTRAINT
BOOSTER SEAT
FOR VEHICLE USE
Instructions for Installation & Use
Series No. 20/B/2010
Page 2
INTRODUCTION
2
INDEX
3
This Booster Seat is designed for use by children from approximately 4 years of age up to
approximately 6 to 8 years of age in vehicles using a lap-sash seat belt or with a seat belt and
Child Safety Harness. It must not be used with just a lap only seat belt as the upper body of the
child is not protected. It must be used with a lap-sash seat belt.
This Booster Seat is tted with the
VERSATETHERTM
catch that allows it to be used with a
compatible child harness. Only the Safe-n-Sound™Protecta PLUS™harness Series 220/2010
or Babylove™EzyGo Harness™Series BL220/2010 child harnesses are suitable for use with
this product. No other Child Harness is suitable with this booster seat unless advised by Next
Generation Nursery Products Pty Ltd. The Booster Seat with Child Harness can be used with
either a lap or lap-sash seat belt.
A child that is not tall enough to reach the lowest shoulder height marker in their seat with
in-built harness will be too small for this booster seat. This booster seat should be used until
the child no longer ts in the seat or the child can sit in the car's seat with their lower leg able
to hang over the seat cushion.
CAREFULLY READ ALL THE INSTRUCTIONS FOR INSTALLATION.
IN THE EVENT OF DOUBT ABOUT THE METHOD OF INSTALLATION, CONSULT NEXT GENERATION
NURSERY PRODUCTS PTY LTD OR A CHILD RESTRAINT FITTING STATION AUTHORIZED BY A
RELEVANT TRANSPORT AUTHORITY. IN NEW ZEALAND, CONTACT THE AGENT FOR THE VEHICLE.
THIS BOOSTER SEAT MAY ONLY BE SUITABLE FOR USE WITH A CHILD HARNESS IN THE UPRIGHT
POSITION. IN THE RECLINE POSITION, THE CAR'S SEATBELT MAY NOT BE LONG ENOUGH.
No child restraint can guarantee absolute protection from injury in every crash. However, to
ensure that your child gets all the protection designed into the restraint PLEASE READ AND
FOLLOW THESE INSTRUCTIONS EXACTLY.
THIS RESTRAINT MUST BE ATTACHED TO A CHILD RESTRAINT ANCHORAGE POINT IN THE CAR.
REFER TO CAR OWNER'S HANDBOOK FOR LOCATION OF ANCHORAGE POINTS. REFER TO A
CHILD RESTRAINT FITTING STATION IF NO ANCHORAGE POINTS ARE IN THE MOTOR CAR.
THIS RESTRAINT IS NOT SUITABLE FOR USE WHERE THE ANCHORAGE STRAP MAY FALL INTO A
SPLIT IN THE SEAT BACK. (E.G. HATCHBACK OR WAGON).
THIS RESTRAINT MUST BE USED IN CARS WITH FORWARD FACING SEATS WITH A LAP-SASH
SEAT BELT OR WITH A SEAT BELT AND CHILD HARNESS.
Always store the instruction book in the place provided under the base for future reference.
Page
3 IntroductIon
4 WarnIngs
6 shoulder heIght markers and a groWIng chIld
8 Features
10 suItable For use / WarnIngs
11 hoW to setup
14 hoW to Install
15 hoW to use - WIth seat belt
20 hoW to use - WIth chIld harness
30 care and maIntenance
31 hoW to clean
32 accessorIes & Features
34 pre-InstallatIon anchor FIttIng
38 precautIons
39 In case oF crash
Page 3
4 5
DO NOT LEAVE CHILDREN UNATTENDED IN THE VEHICLE.
• Use the restraint exactly as shown in the instructions.
• Supervision of children is needed because they may be able to undo buckles and adjusters.
• DO NOT LEAVE CHILDREN UNATTENDED IN THE CAR.
• Do not alter or modify this restraint, use only recommended parts and accessories.
• Repairs must only be done by the manufacturer or agent.
• Do not allow the restraint to come into contact with polishes, oils, bleach and other
chemicals.
• Destroy the restraint if it has been in a severe crash, even if no damage is visible.
• DO NOT USE WITH JUST A LAP BELT. You must use with lap-sash seat belt, or with a seat
belt and child harness.
• The lap part of the seat belt must be rmly across the thighs and sash straps tted
diagonally across the chest and on the shoulder.
• If used with a child harness, the lap strap of the seatbelt must be adjusted rmly rst,
and then the harness, so that the lap-strap is not lifted off the child's lap when the
harness is adjusted.
• DO NOT USE THIS RESTRAINT WITHOUT THE COVER.
• IF AN AIRBAG IS FITTED IN THE SEATING POSITION WHERE THE CHILD RESTRAINT IS TO
BE FITTED, FOLLOW THE VEHICLE MANUFACTURER'S WARNINGS AND INSTRUCTIONS.
• Regularly check the restraint components, straps and other tments for correct
function, cracking & condition. Seek prompt repair.
• Straps may be damaged by unsecured cargo in a collision. Secure or remove hazardous
cargo before using this strap. Hatch-back or wagon: Do not use the child restraint where
this strap may fall into a split in the seat back. Always attach hook and remove slack.
• Securely stow all heavy objects that could become missiles during an accident and cause
injury to any occupant.
• The restraint should not be purchased or sold as a second hand item. It is recommended
not to use child restraints older than 10 years as the protection in an accident may be
reduced.
• Do not lift the seat by the headrest.
• Do not store in areas that may get hot, like in car boots, roof space, beside shed walls
which get hot in summer. Do not place heavy items on top of the seat as this may distort
the plastic.
:
Page 4
SHOULDER HEIGHT MARKERS
AND A GROWING CHILD
6
7
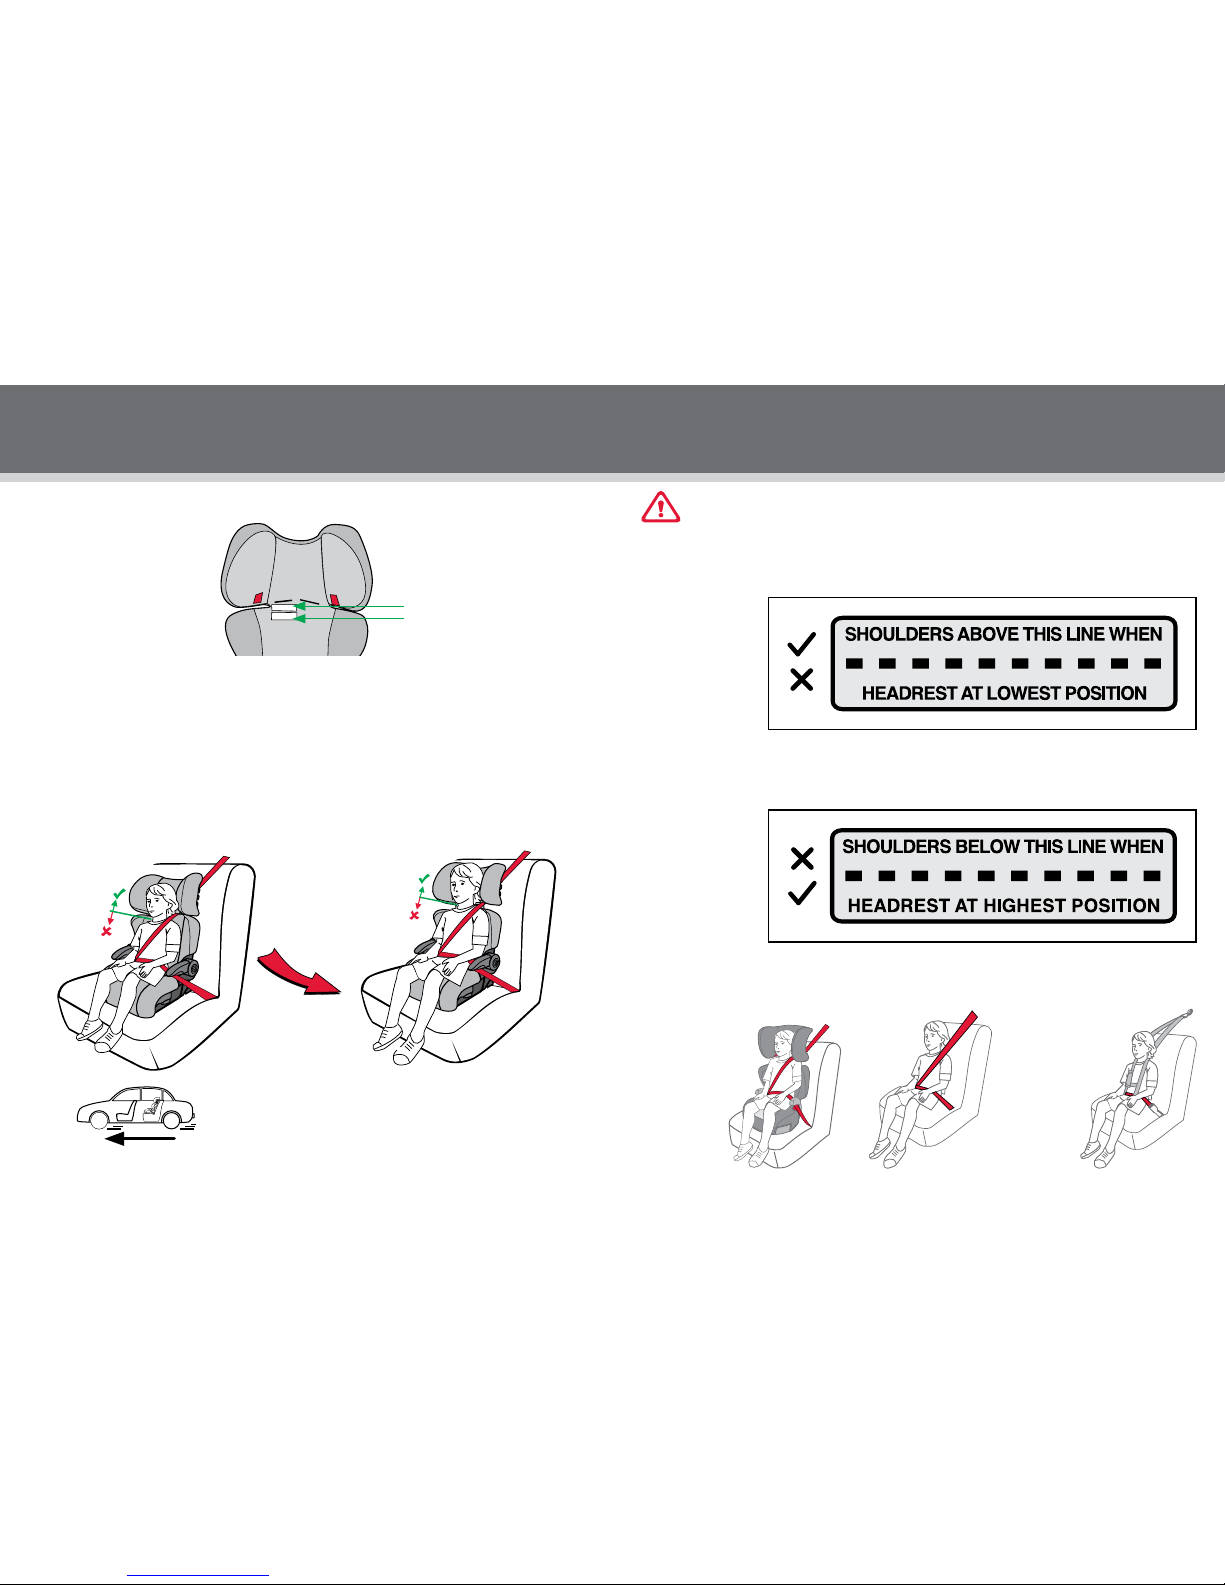
Height label will be behind the child's neck.
Marker A Smaller Child - Lower Marker
When moving from a child restraint with in-built harness the child's shoulders will be in line or
above the lowest marker (A) with the headrest in the lowest position, if the child's shoulders
are below this
marker the child
needs to be in a
child seat with an
in-built harnesstheir current child
restraint.
Marker B Larger Child - Upper Marker
The seat can be used until the child's shoulders reaches the top marker (B) with the headrest
fully raised. Usually the shoulder will contact the bottom of the headrest, it is then time to
move to the next
form of restraint
(see below).
For maximum safety
continue to use this
seat as long as the
child ts in it.
SHOULDER HEIGHT MARKERS
AND A GROWING CHILD
IMPORTANT: Follow this advice.
Front of vehicle
Or you can use
a Child Harness
and lap seat belt.
Lap seat belts
can be dangerous
without a Child
Harness*.
Or just the car's
lap-sash
seatbelt*.
Next type of restraint that can be used in the car for your child.
When your child has outgrown the seat, you can then either use:
Bottom Marker A
Marker A
Marker B
A narrow booster
seat suitable for
children up to
8-10 years of
age. An accessory
Child Harness
may be used.
SMALLER CHILD
Shoulders must not be below the Lower
Shoulder Height Marker when the headrest
is the lowest position.
From approximately 4 years of age.
TALLER CHILD
Shoulders must not be above the Upper
Shoulder Height Marker when the headrest is
in the highest position.
To approximately 6 to 8 years of age.
Note:
These heights also apply if you are using
a Child Harness with the booster seat.
Upper Marker B
* Legs need to hang over the seat.
Page 5
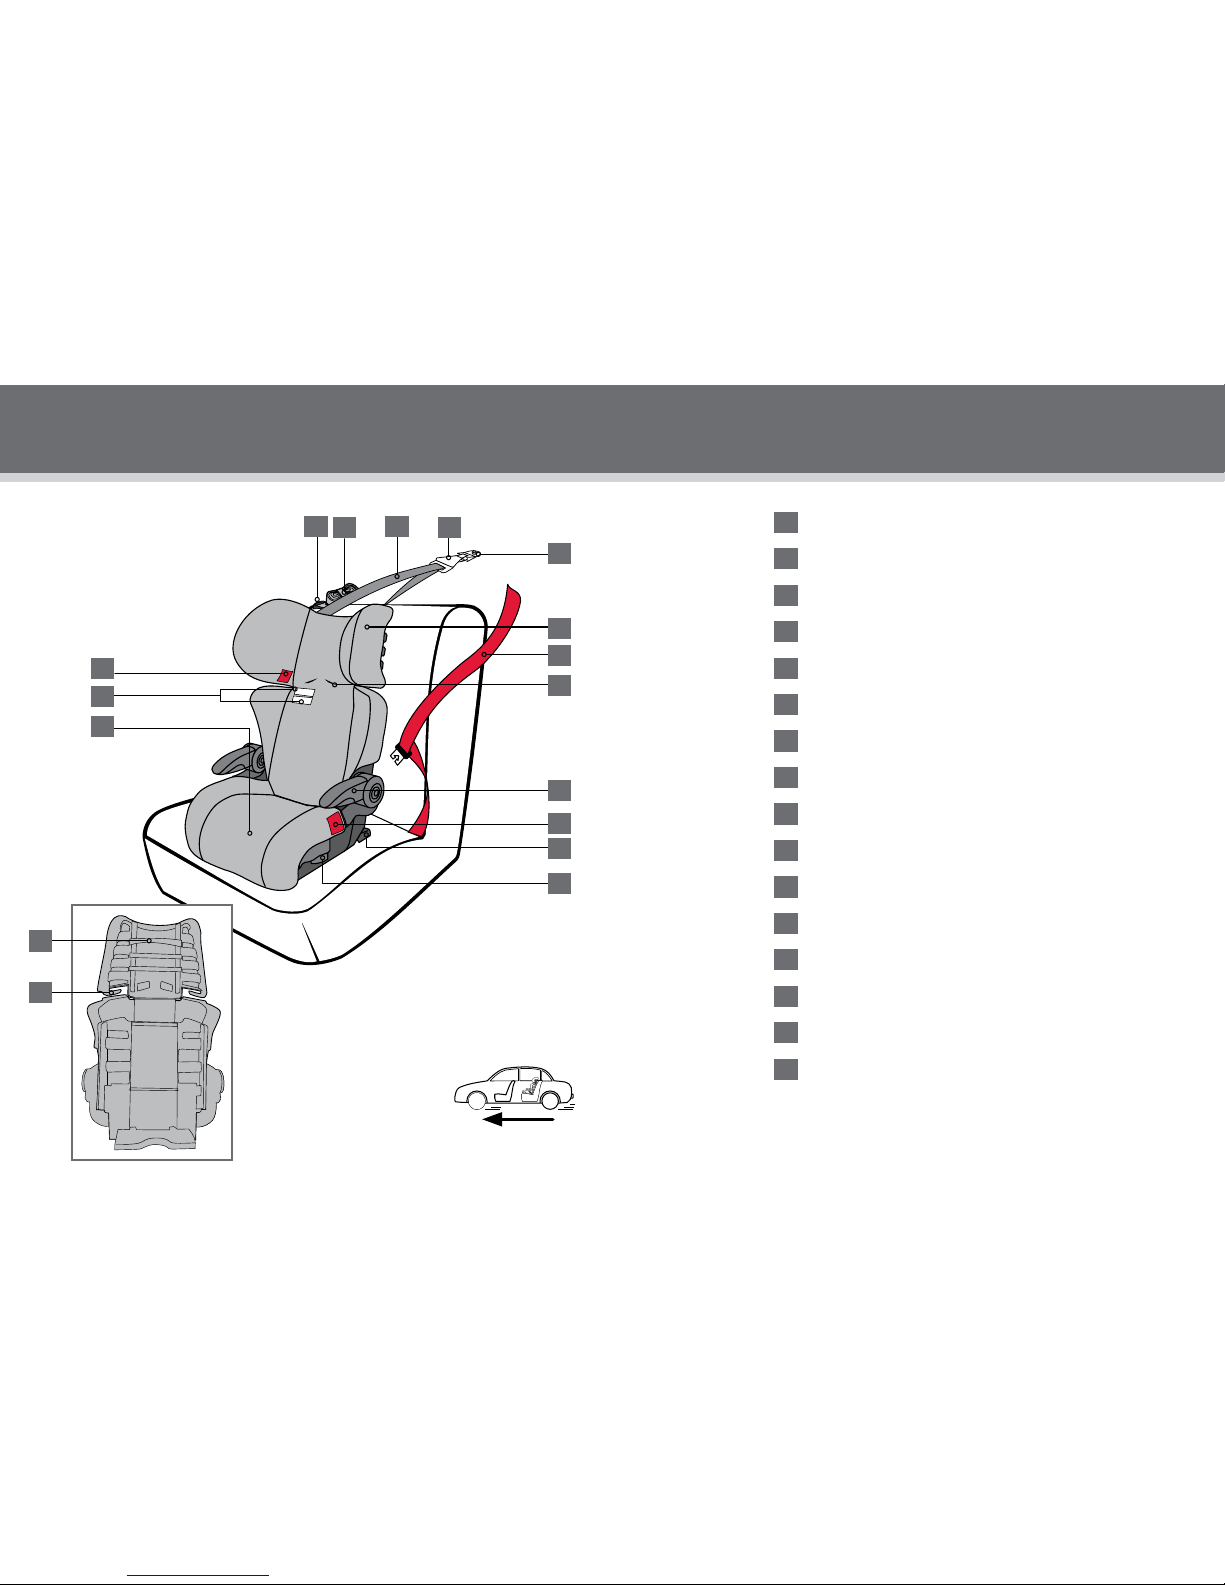
8 9
Car's Anchor Fitting
Adjustable Height Headrest / Backrest
Car's Seat Belt
Shoulder Slots for Child Harness
Armrests
Seat Belt Path Marker (each side- lap and sash positions)
Recline Foot
Cup Holder (shown stored)
Sash Guide (each side of headrest)
Headrest Latch
Cover for Comfort
Shoulder Height Markers
Upper Anchorage Strap Adjuster
Storage Band for excess Upper Anchorage Strap
Adjustable Upper Anchorage Strap
Attachment Clip
FEATURESFEATURES
Front of vehicle
5
2
6
6
3
7
8
11
12
13
14
15
16
1
4
1
2
3
4
5
6
7
8
9
10
11
12
13
14
15
16
10
9
Page 6
1110
To be used with either a lap-sash seatbelt or an add-on accessory child harness by children
whose shoulders are above the lower shoulder height marker with head restraint in the
lowest position (approximately 4 years of age) until their shoulders reach the upper shoulder
height marker with head restraint in highest position (approximately 6 to 8 years of age).
Continue to use this child restraint until the child reaches this limit. Children are safest in
a booster seat until their shoulders reach the upper shoulder height marker of the booster
seat. Do not use this restraint until child’s shoulders are above the lower shoulder height
marker with the head restraint in the lowest position.
THIS RESTRAINT MUST BE USED IN CARS WITH FORWARD-FACING SEATS WITH A LAP-SASH
SEAT BELT OR WITH A SEAT BELT AND CHILD HARNESS.
• If your vehicle is not tted with an anchor point, please contact a Safety Restraint Fitting
Station authorised by the relevant State Government Body for correct tment of the
restraint. In New Zealand contact the agent for the vehicle. The upper anchorage strap
must be attached to an anchorage point using an extension strap if necessary.
• DO NOT USE WITH JUST A LAP BELT. You must use with lap-sash seat belt, or with a
seat belt and Child Harness.
• Do not use the restraint without the Upper Anchorage Strap attached.
• Do not use in a front seat, unless it has a child restraint anchorage point and your child
is over 4 years of age or in accordance with the applicable Road Rules in your region.
• Do not use on any vehicle seat which faces sideways or rearwards.
• Only use covers approved by Next Generation Nursery Products Pty Ltd for this Booster
Seat to ensure all safety information is provided.
SUITABLE FOR USE
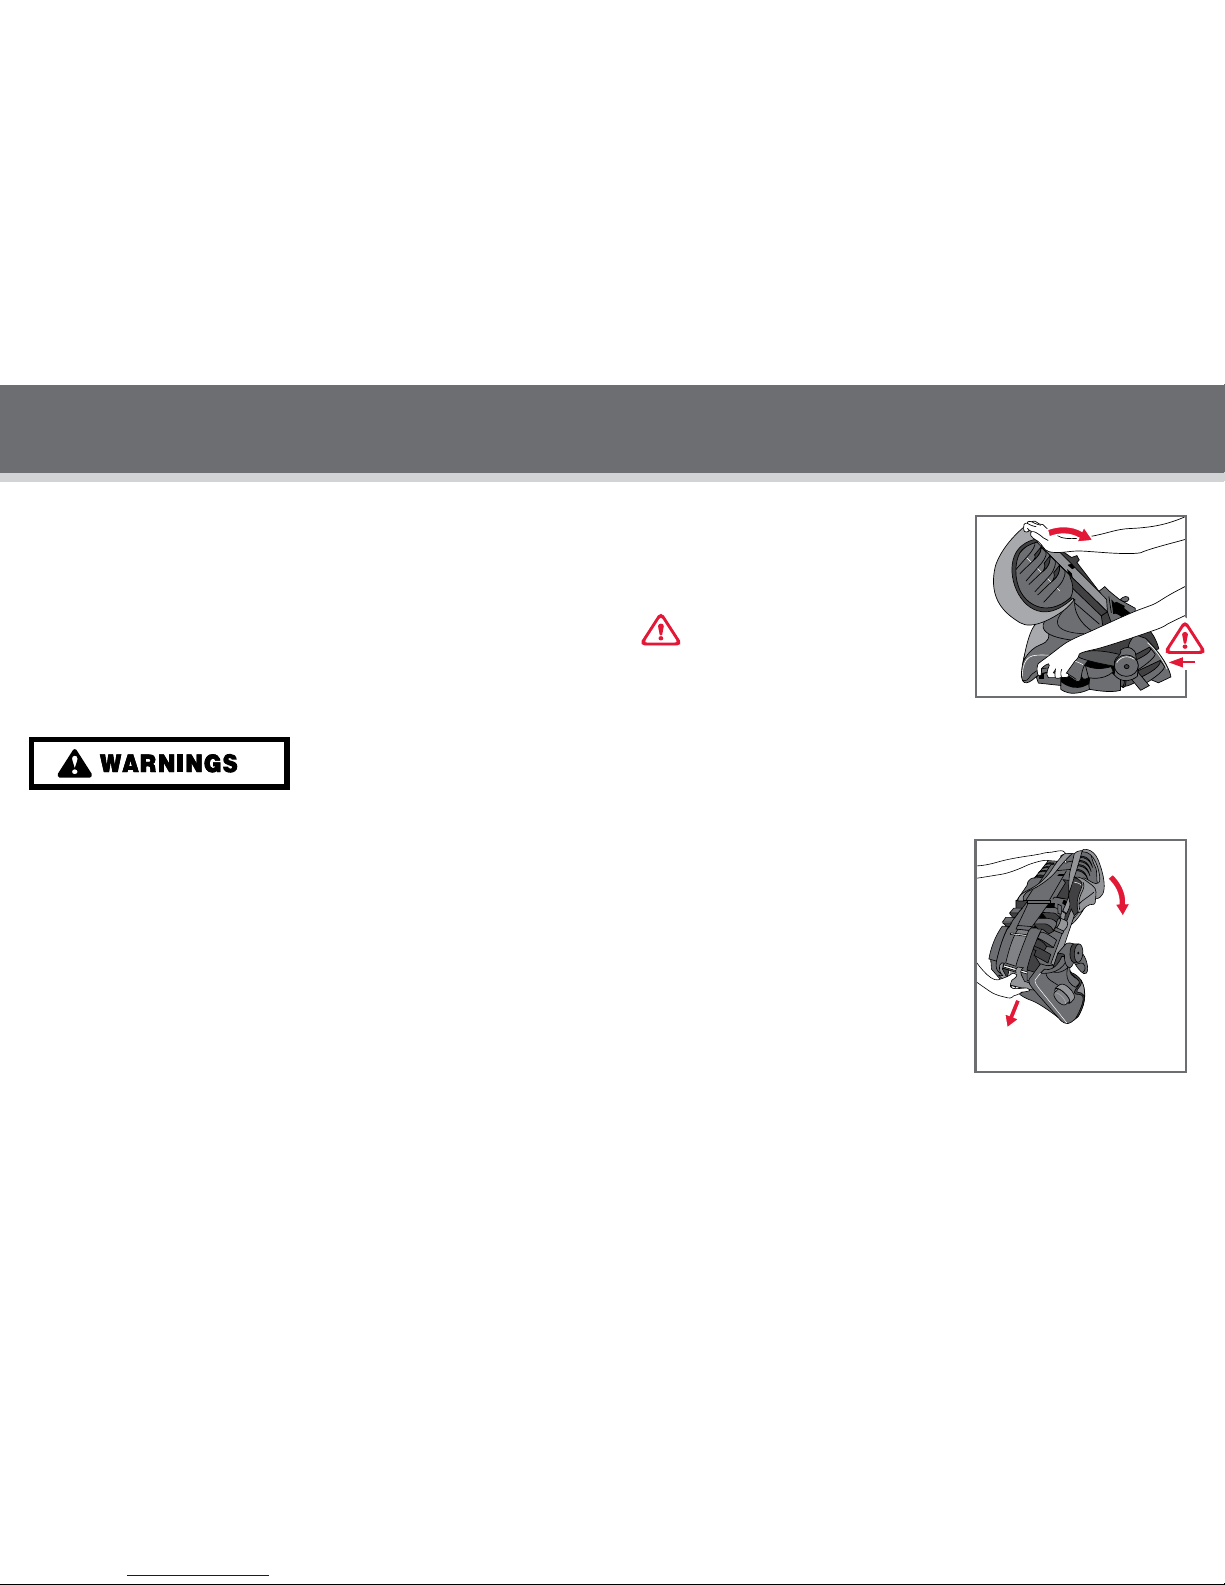
UNFOLDING THE SEAT
If the seat is in a folded position, grip the seat back and
seat base and unfold till you hear it lock into position.
Check that the seat has locked into position.
HOW TO SETUP
FOLDING THE SEAT
To store the seat, fully extend the headrest. Then
grasp and pull down on the ‘recline foot’ to release
the seat lock. Push to fold the seat forward.
Pull recline foot down to
unlock back rest.
Fold forward
to store.
CAUTION:
DO NOT PLACE FINGERS IN BETWEEN SEAT BACK
& SEAT BASE WHEN FOLDING OR UNFOLDING.
Page 7
12 13
HOW TO SETUP
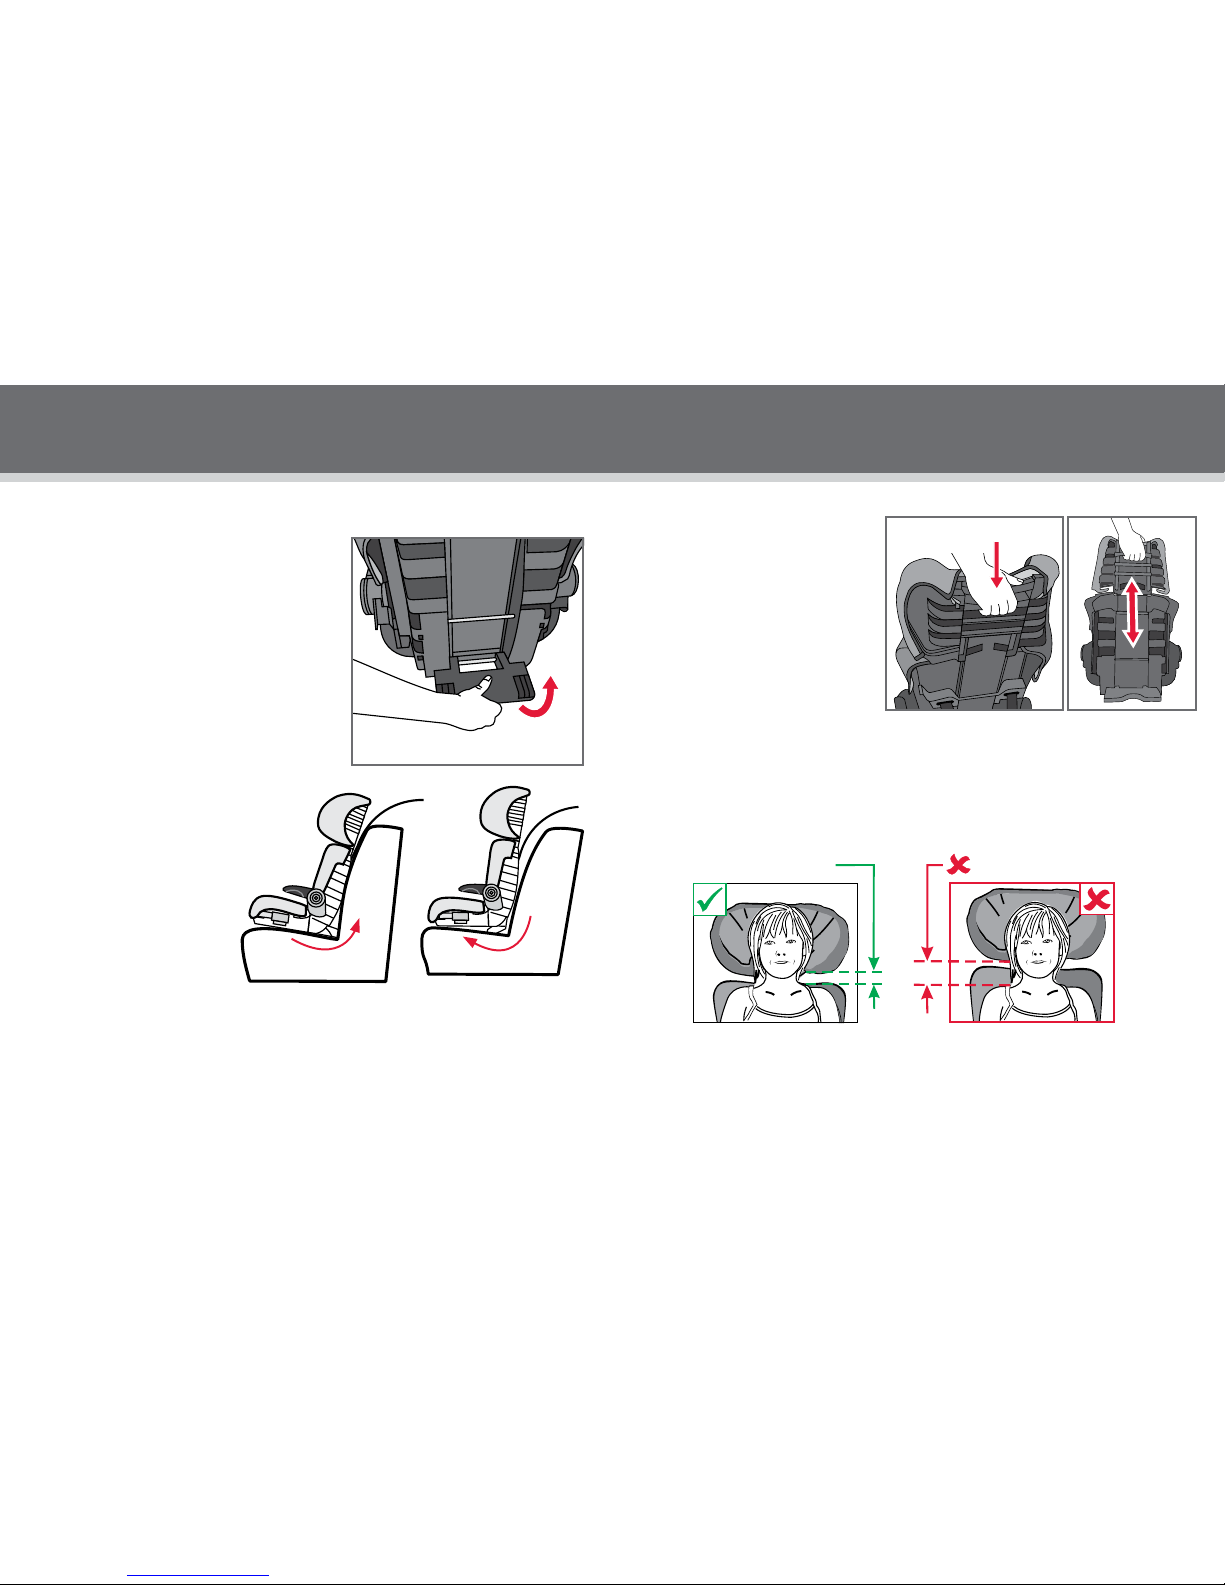
ADJUSTING THE HEADREST
A. The headrest can be adjusted to
lock into different height locations.
This can be done with the child in
the seat.
B. Squeeze the headrest latch at the
back of the headrest, to move the
headrest up or down.
C. Adjust the headrest height so that the bottom of the sash guide is level with or just above
your child’s shoulder. (But not more than 30mm above).
D. When the headrest is in the correct position let go of the headrest adjustment handle and
ensure it has locked into place.
The headrest position will need to be checked with the child sitting in the seat. If not correct
adjust to the next position and recheck the t on the child. This will need to be repeated as the
child grows.
Note: Where a Child Harness is tted, you may need to adjust the harness shoulder straps
length in order to t the child correctly and to ensure the lap belt is not lifted off the child's
thighs.
Less than 30mm
Not Greater than 30mm
Squeeze
Squeeze
TO RECLINE BOOSTER SEAT
For recline mode, rotate the recline foot
backwards until it clicks into place.
For upright mode, reverse the above ie.
Rotate foot forwards until it clicks into place.
NOTE: THIS BOOSTER SEAT MAY ONLY BE
SUITABLE FOR USE WITH A CHILD HARNESS
IN THE UPRIGHT POSITION. IN THE RECLINE
POSITION, THE CAR'S SEATBELT MAY NOT BE
LONG ENOUGH.
UPRIGHT OR RECLINE
Rotate
foot
Reclined
Upright
HOW TO SETUP
Page 8
15
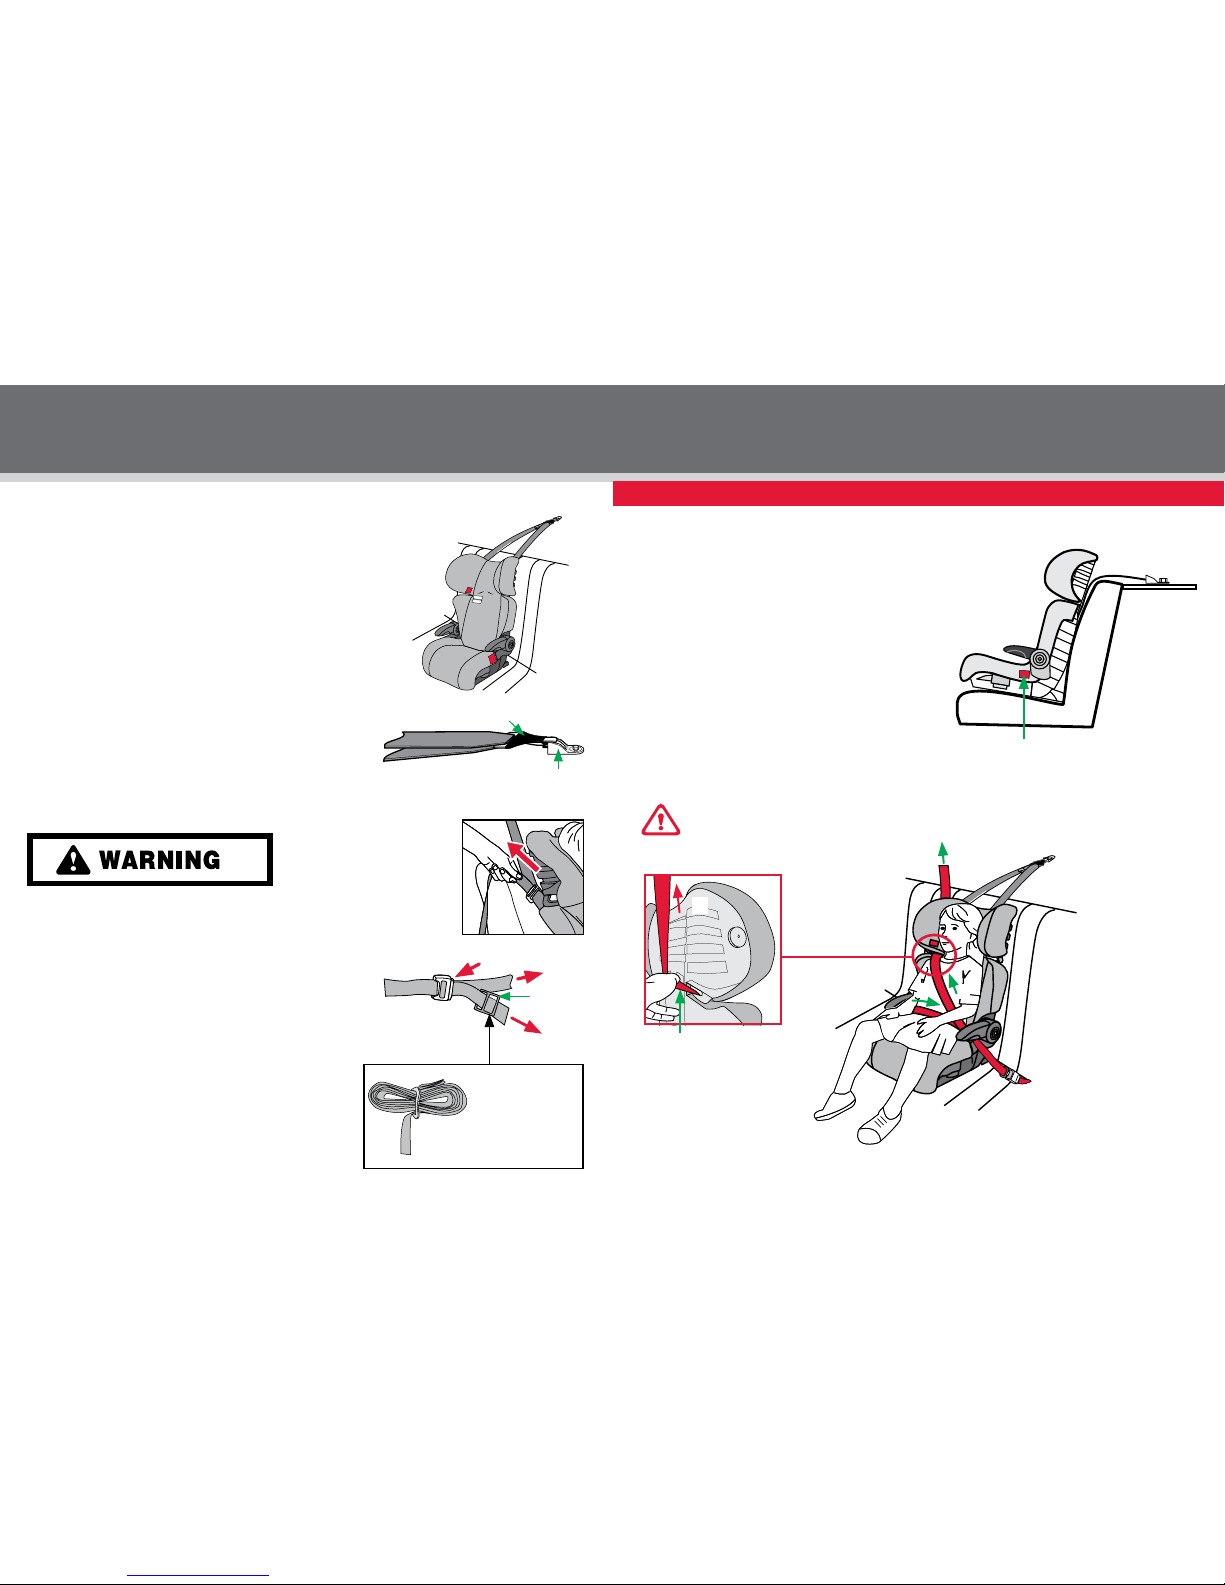
INSTALLING INTO VEHICLE
Locate the child restraint anchorage tting in the car that is
directly behind seat location in the rear seats. Refer to the
car Owners Manual for the location of the car's child restraint
anchorage tting. If there is no anchorage tting then refer to
pages 34 to 37 for assistance in adding an anchor tting.
Adjust the headrest to the correct height for your child (refer
to page 13).
Position the booster seat in the car facing forward in the
chosen seating position.
Hook the Attachment Clip of the Upper anchorage Strap
to the anchor tting in the vehicle. Make sure to remove
multiple twists from the upper anchorage strap. THIS
UPPER ANCHORAGE STRAP MUST ALWAYS BE FITTED
WHEN THE CHILD RESTRAINT IS USED IN A VEHICLE.
Always attach hook and remove slack.
Pull the Upper Anchorage Adjustment Strap (B) to just
remove slack. Do not tighten causing the booster seat
base to lift off the vehicle seat.
ALWAYS roll up excess strap tightly and use storage
band to store behind the seat and away from child’s
reach.
Note: In some car's, the car's headrest may need to be
raised or even removed to allow the booster seat to sit
correctly, the vehicle headrest may also interfere with
the routing of the upper anchorage strap. If removed,
store the vehicle headrest in a safe place but ALWAYS
ret once the booster seat is no longer used.
Attachment Clip
Car's Anchor Fitting
14
HOW TO USE
HOW TO INSTALL
Sash guide
Engage buckle
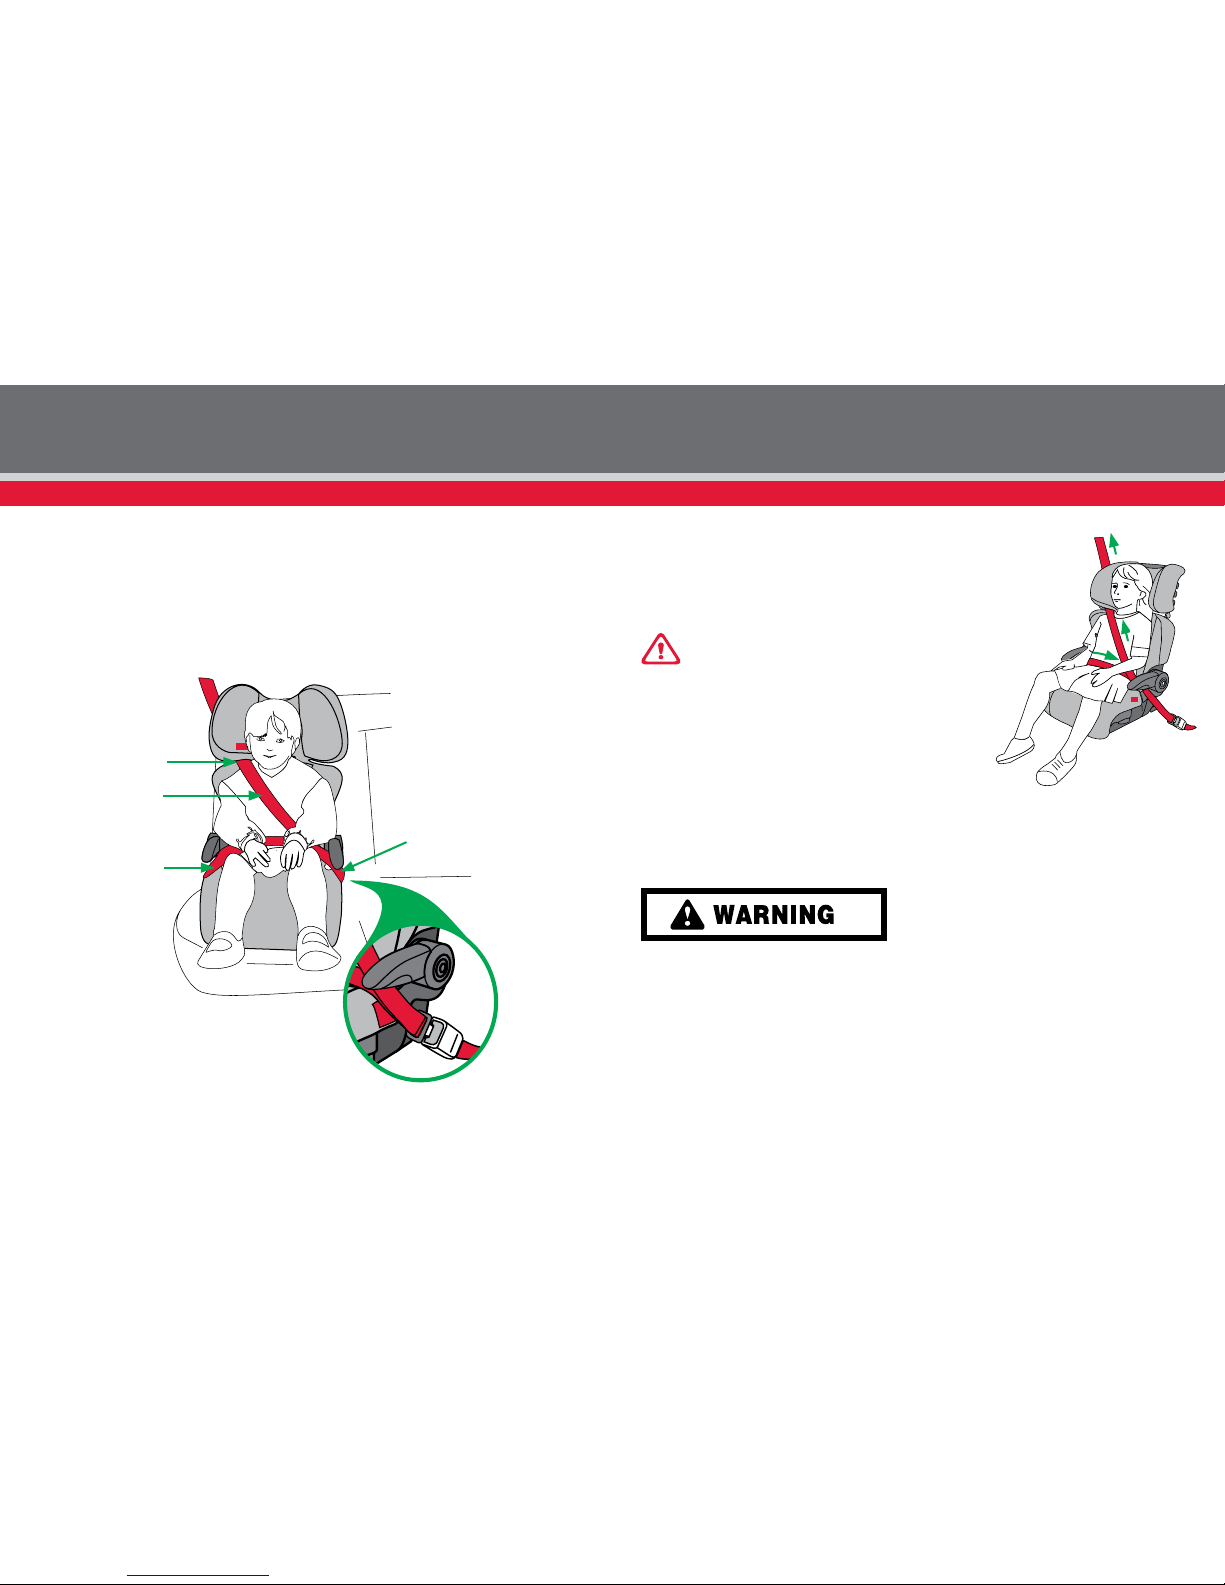
PLACING CHILD IN THE RESTRAINT USING LAP-SASH SEAT BELT
(WITHOUT CHILD SAFETY HARNESS)
A. With the Booster Seat positioned in the vehicle,
sit your child on the seat.
Ensure the headrest is set to the correct height
for your child (See page 13).
B. Position the lap-sash belt over the child ensuring
the lap portion is positioned over the lap belt
guides and under the armrests on both sides.
Fit the sash portion of the belt through the sash
guide on the headrest as shown.
IMPORTANT: ALWAYS USE THIS SASH GUIDE.
Red BOOSTER
SEATBELT PATH Label
use WIth seat belt
Roll up excess
strap tightly so it
is thick enough to
be held rmly in
the storage band
Pull Adjustment
Strap to remove
slack (B)
Storage
Band
1
2
3
Pull to
remove
slack
3
3
2
1
Page 9
16 17
HOW TO USE
C. Engage seat belt buckle and tongue ensuring there are no twists in the belt. If the seat belt
buckle is adjustable, adjust the buckle as low as possible away from the child.
Note: In some vehicles, the vehicle headrest may need to be raised or even removed to allow
the booster seat to sit correctly, the vehicle headrest may also interfere with the routing of
the upper anchorage strap. If removed, store the vehicle headrest in a safe place and ensure it
is replaced once the booster seat is removed
Ensure both lap
and sash belts
are under the
armrest on
buckle side
Ensure lap
portion under
armrest
Sash-belt
across the
chest
D. Adjust lap and sash portion of seat belt rmly but comfortably
across the child’s lap and chest.
E. If using an Inertia Reel Retractor seat belt, adjust the lap portion
of the seat belt rmly around the child and restraint, then let the
slack sash portion retract up into the sash retractor.
IMPORTANT:
Always ensure the seat belt is rmly tted to the
hips and thighs and the sash belt is diagonally
across the chest.
A loose or poorly positioned lap belt can allow the
child to slump and the lap belt to ride up into the
abdomen and can cause serious injuries in a crash.
Do not place seat belt sash under the arm or
behind the back.
HOW TO USE
Sash-belt
through the
sash guide
DO NOT LEAVE CHILDREN UNATTENDED IN THE CAR
use WIth seat beltuse WIth seat belt
3
2
1
Page 10
1918
HOW TO USE
NOTE: Seat belt
extenders should not
be used if the seat belt
is not long enough to
t around the child. If
a seat belt extender is
used then the seat belt
buckle must not be in
contact with the child.
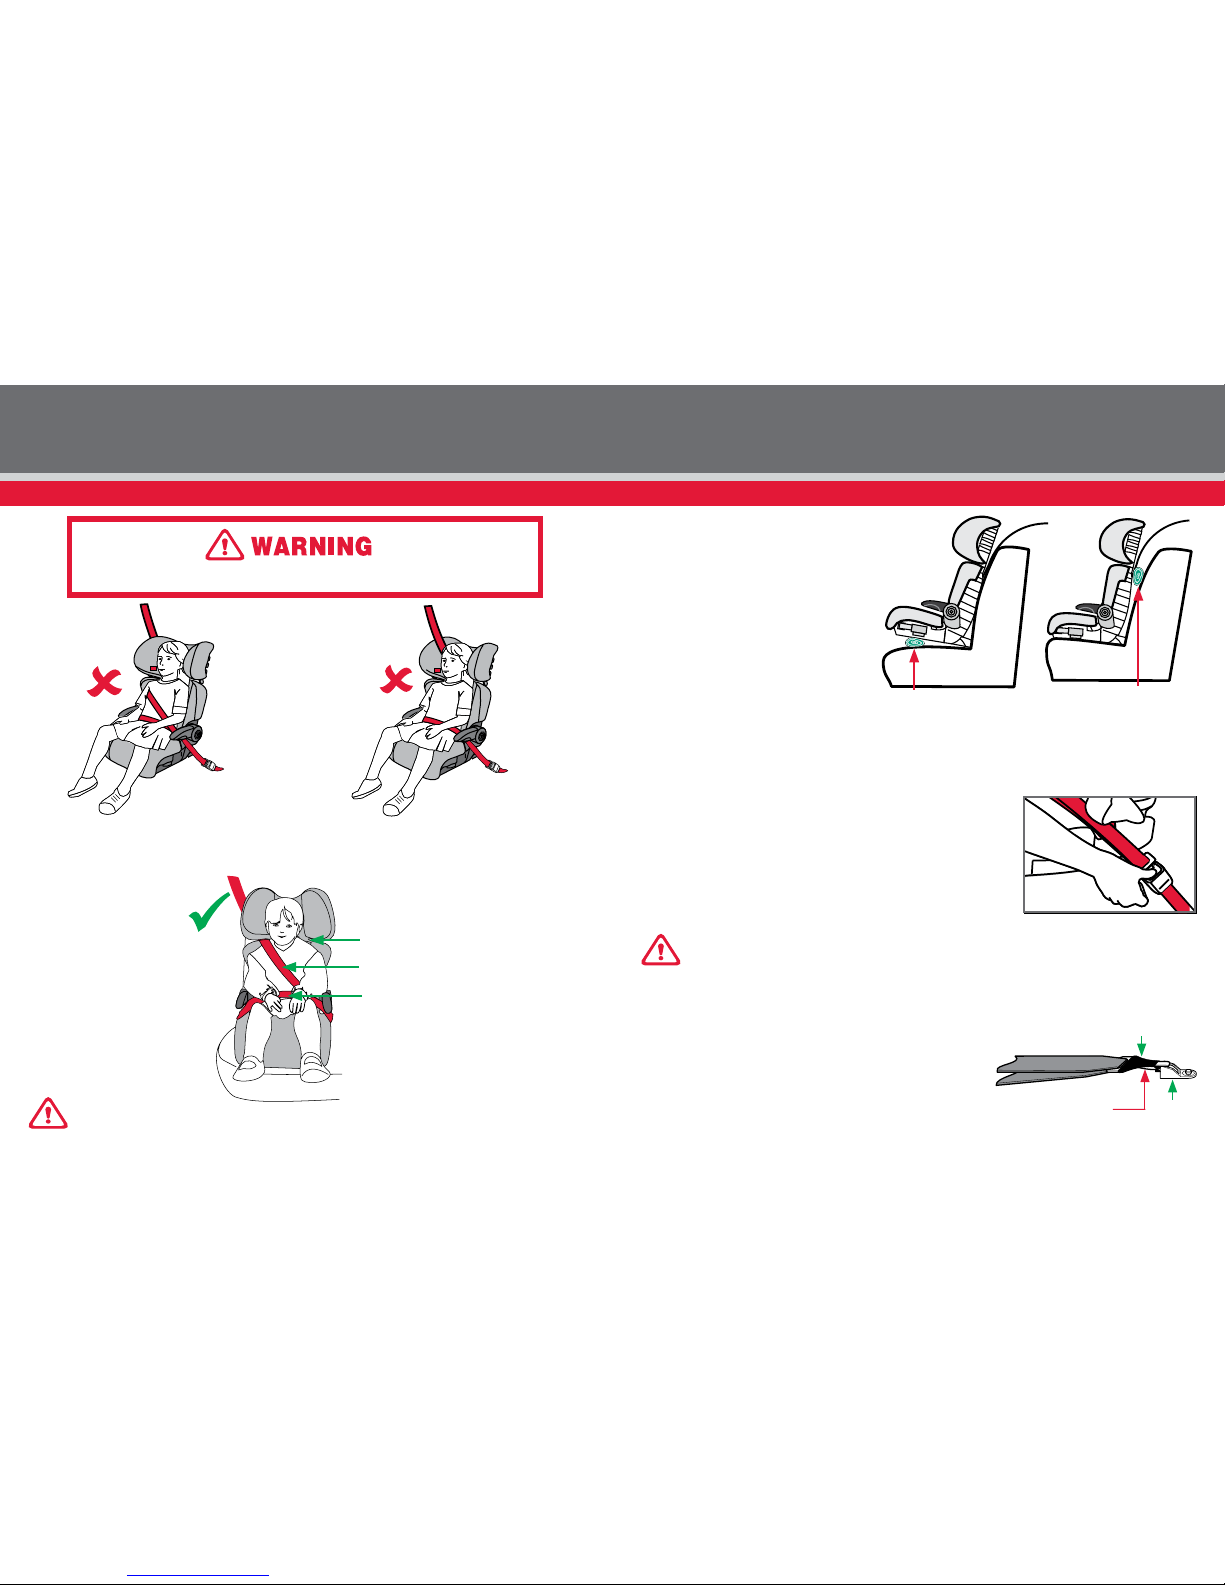
Seat belt across the chest.
Lower edge of the Headrest adjusted
so it is close to the shoulders.
Lap belt must always be rm on
the thighs. Child must not slump
or slouch.
Some vehicle seats have more
rearward slope than others. If the
seat contours and/or angle of the
seat causes the base of the child
restraint to lift off the vehicle seat,
use a rm packing under the base
of the child restraint, or at the back
of the restraint (as shown below).
Packing can be a rmly rolled up
towel or nappy.
Rolled up towel
at the back
Rolled up towel
under the base
TO REMOVE CHILD
Disengage seat belt tongue and buckle and remove belt
from child. When Booster is not being used, secure in
position, by engaging seat belt over the booster seat or
store in a safe place.
IMPORTANT: Use seat belt to hold the
booster seat when not in use.
TO REMOVE SEAT
Disconnect the attachment clip from the car's anchor
tting.
HOW TO USE
A sash belt under the arm or behind the back is dangerous.
SEAT BELT UNDER THE ARM IS DANGEROUS
If a child continues to not use seatbelt correctly, then use of a child harness may be benecial.
SEAT BELT BEHIND THE BACK IS DANGEROUS
:
Attachment Clip
Car's
Anchor
Fitting
use WIth seat beltuse WIth seat belt
IMPORTANT: Always ensure that the set belt is rmly tted to the child's
hips and thighs and the sash belt is diagonally across the chest. The lap
belt must not be on the stomach - it is dangerous.
Press
spring to
release
Page 11
20
USING WITH CHILD HARNESS (purchased separately)
This booster seat is only suitable for use with either Safe-n-Sound™Protecta PLUS™Harness
Series 220/2010 or Babylove EzyGo Harness™ Series BL220/2010 child harnesses. Refer to
the instruction book supplied with the Child Harness for full details of using and installing the
Child Harness. When installing the Child Harness into the vehicle and booster seat, connect the
upper anchorage strap to the
VERSATETHERTM Catch on the Booster Seat’s upper tether strap
(as shown below).
If required, use the extension strap supplied with the child harness for all other instances to
attach the harness to anchor points in the luggage area such as the vehicle oor or ceiling. Not
suitable for most other styles of child safety harnesses.
INSTALLING INTO VEHICLE WITHOUT EXTENSION STRAP
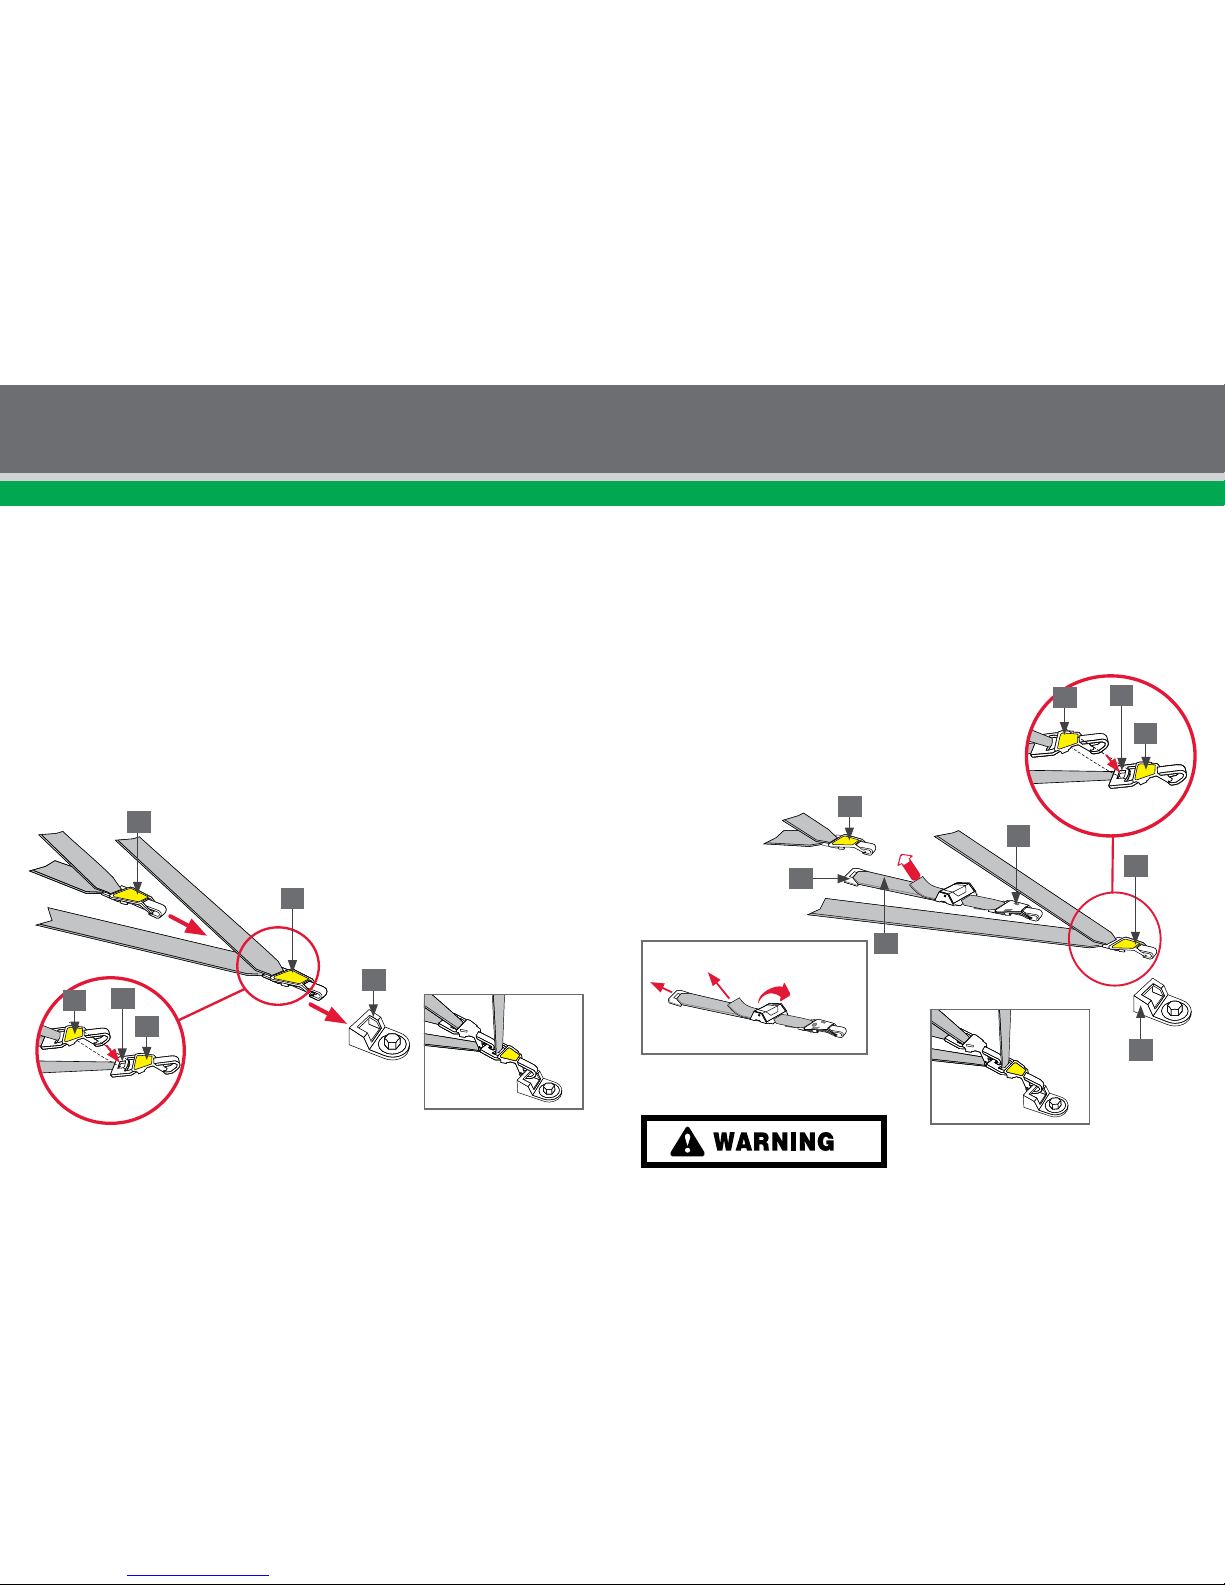
Hook the Child Harness attachment clip (1) onto
VERSATETHERTM Catch (2). Then hook
attachment clip (3) onto anchor tting. Ensure that none of the straps are twisted and not
passing over any sharp edges.
NOTE: Do not use the
VERSATETHER
TM
catch on the Child Harness Clip
(1).
VERSATETHER
TM
catch (2) is only for use with a Child Harness.
1. Attachment Clip from Child Harness.
2.
VERSATETHERTM Catch.
3. Booster seat Attachment Clip.
4. Anchor Fitting in the car.
Child Harness Attachment Clip
attaches to the
VERSATETHER
TM
Catch
4
2
1
3
1
Always attach the hook and remove the slack.
INSTALLING HARNESS WITH EXTENSION STRAP INTO VEHICLE
An adjustable extension strap is supplied with the Child Harness. Hook the Child Harness
clip rst onto the extension strap catch, then hook the extension strap hook onto the
VERSATETHERTM Catch on the Booster Seat’s upper anchorage strap as shown below. Ensure
that none of the straps are twisted or catching on sharp edges. Tighten the Booster Seat’s
upper anchorage strap (refer to page 14) then remove excess slack from the extension strap
by pulling the adjuster strap as illustrated below.
1. Attachment clip from the Child Harness
2.
VERSATETHERTM Catch
3. Booster Seat Attachment Clip
4. Anchor Fitting in the Car
5. Adjustable Extension Strap
6. Extension Strap Catch
7. Extension Strap Attachment Clip
To lengthen the Adjustable Extension strap
rotate the adjuster and pull the main strap.
Pull to remove
slack
Pull to
lengthen
Rotate the
Adjuster to
lengthen
2
Pull to
remove
slack
Attachment Clip
attaches to the
VERSATETHER
TM
Catch
5
6
3
7
1
4
7
21
3
3
HOW TO USE HOW TO USE
use WIth chIld harnessuse WIth chIld harness
Page 12
22
23
Choosing Method of Installation
The Harness can be installed using either of the following methods.
METHOD 1 : Using a lap sash seat belt in conjunction with Gated Slide (provided with the Child
Safety Harness) to convert to lap belt.
METHOD 2 : Using lap seat belt.
Before installing the Harness determine which method of installation is required and follow
instructions carefully.
REFER TO THE CHILD SAFETY HARNESS INSTRUCTIONS FOR FULL DETAILS ON HOW TO USE
AND INSTALL THE CHILD SAFETY HARNESS
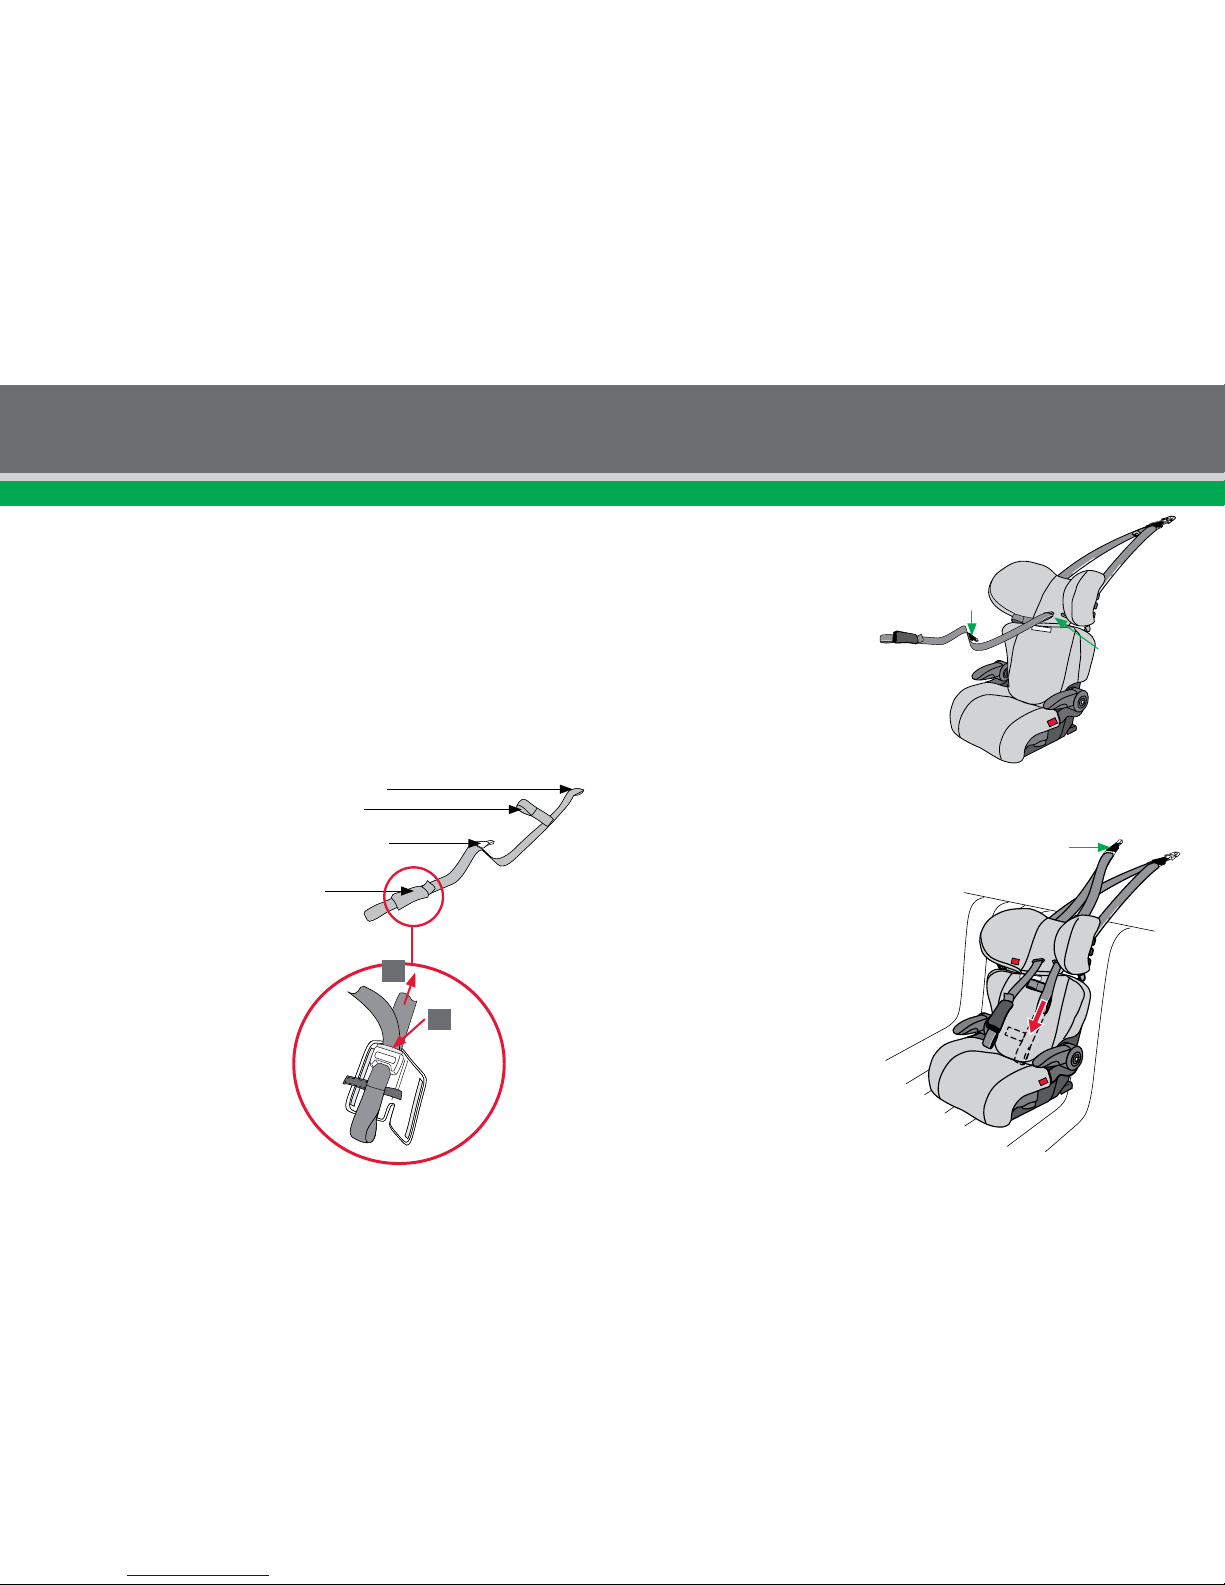
Feed left hand
Harness Strap &
Attachment Clip
through right
hand slot.
INSTALLING CHILD SAFETY
HARNESS INTO SEAT
A. Fit the Booster Seat to the vehicle
and attach to the car's child restraint
anchor tting as described on page 14.
B. Ensure the headrest is set to the
correct height for your child. (See
page 13).
C. Lengthen the Child Harness using
the adjuster under the cover (see
the Child Harness instructions on
the adjustment method). Press the
Adjuster button (1) on the adjuster
and pull the shoulder strap (2).
Left hand Strap
Adjuster under
cover
Attachment Clip
Cross Strap
1
2
D. Feed the left hand Harness Strap
Cross Strap and Attachment Clip
through the left hand shoulder slot.
Make sure that the Attachment Clip
also feeds through to the back of the
restraint.
E. Then feed the left hand harness strap
back through the left hand slot in the
booster seat, keeping the Attachment
Clip at the back of the restraint.
F. Hook the Attachment Clip from the
harness onto the
VERSATETHERTM Catch.
Note: The shoulder straps must be in
slots which are nearest to the child’s
shoulder’s but not lower than the child’s
shoulders.
HOW TO USE HOW TO USE
use WIth chIld harnessuse WIth chIld harness
Attachment Clip
Attachment Clip
Page 13
2524
Gated Slide
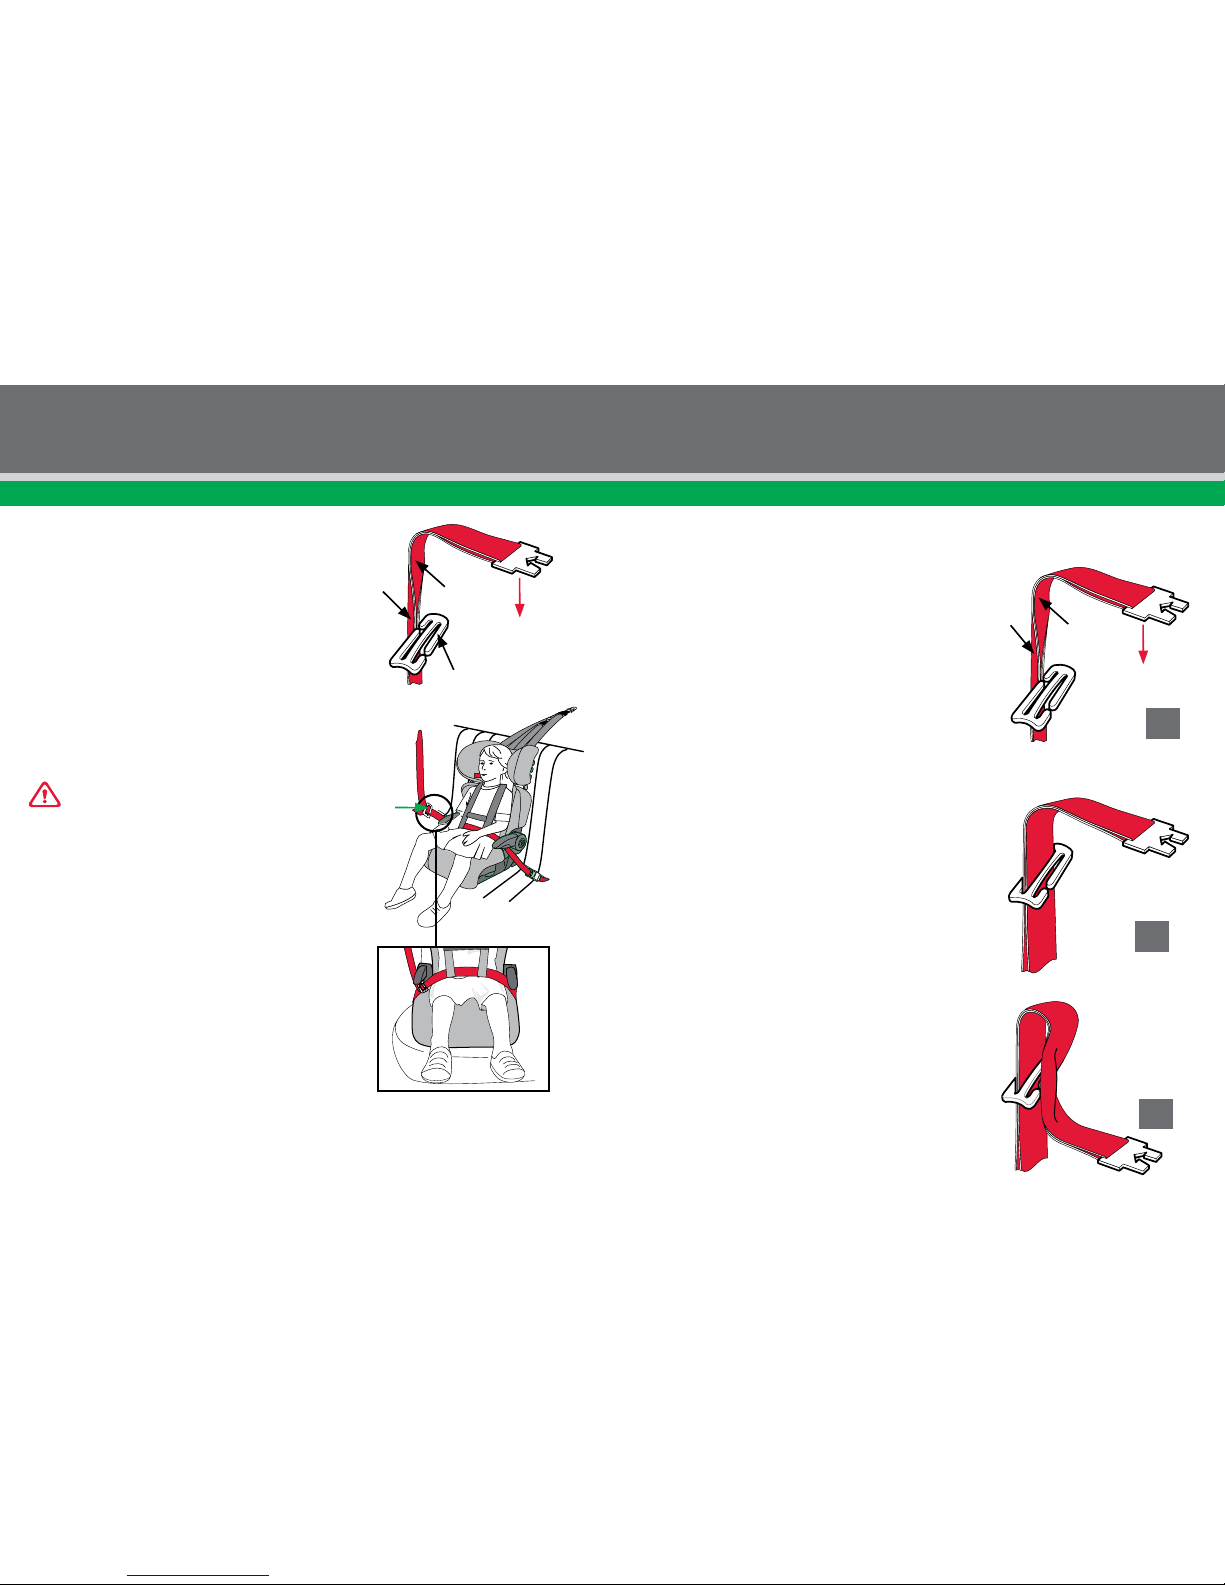
METHOD 1: USING LAP-SASH
SEAT BELT WITH CHILD SAFETY
HARNESS.
Refer to the Harness instructions for tting
the gated slide to the lap-sash seat belt. Once
tted, position the gated slide near to the child
(under the armrest) but not touching the child.
Thread the converted lap-sash seat belt through
the harness strap loops as shown left. Ensure
there are no twists in the harness, cross strap
and seat belt.
Some vehicle seat belts may be short and
you may experience some difculty tting the
converted lap-sash around your child. If so,
adjust the gated slide nearer to your child,
(ensure the slide does not touch your child).
This may provide more belt length to t your
child, but if the belt still will not t, try another
location in the vehicle, e.g. side seat. If the
vehicle seatbelts are still too short, then
contact the vehicle manufacturer for advice on
longer seat belts.
Faces towards
child.
Outer
strap.
Inner
strap.
Position the
Gated Slide
near the child
(under the
armrest) but
not touching
the child.
FITTING THE GATED SLIDE TO THE LAP-SASH SEAT BELT
B. The two straps should slide freely in the Gated Slide slot.
Faces towards
child.
Outer
strap.
Inner
strap.
A. Hold the lap and sash straps together and fold as
shown right. Slide the inner strap into the Gated
Slide followed by the outer strap.
C. Repeat previous step A for the other slot in the Gated Slide.
B
C
A
HOW TO USE HOW TO USE
use WIth chIld harnessuse WIth chIld harness
IMPORTANT:
Page 14
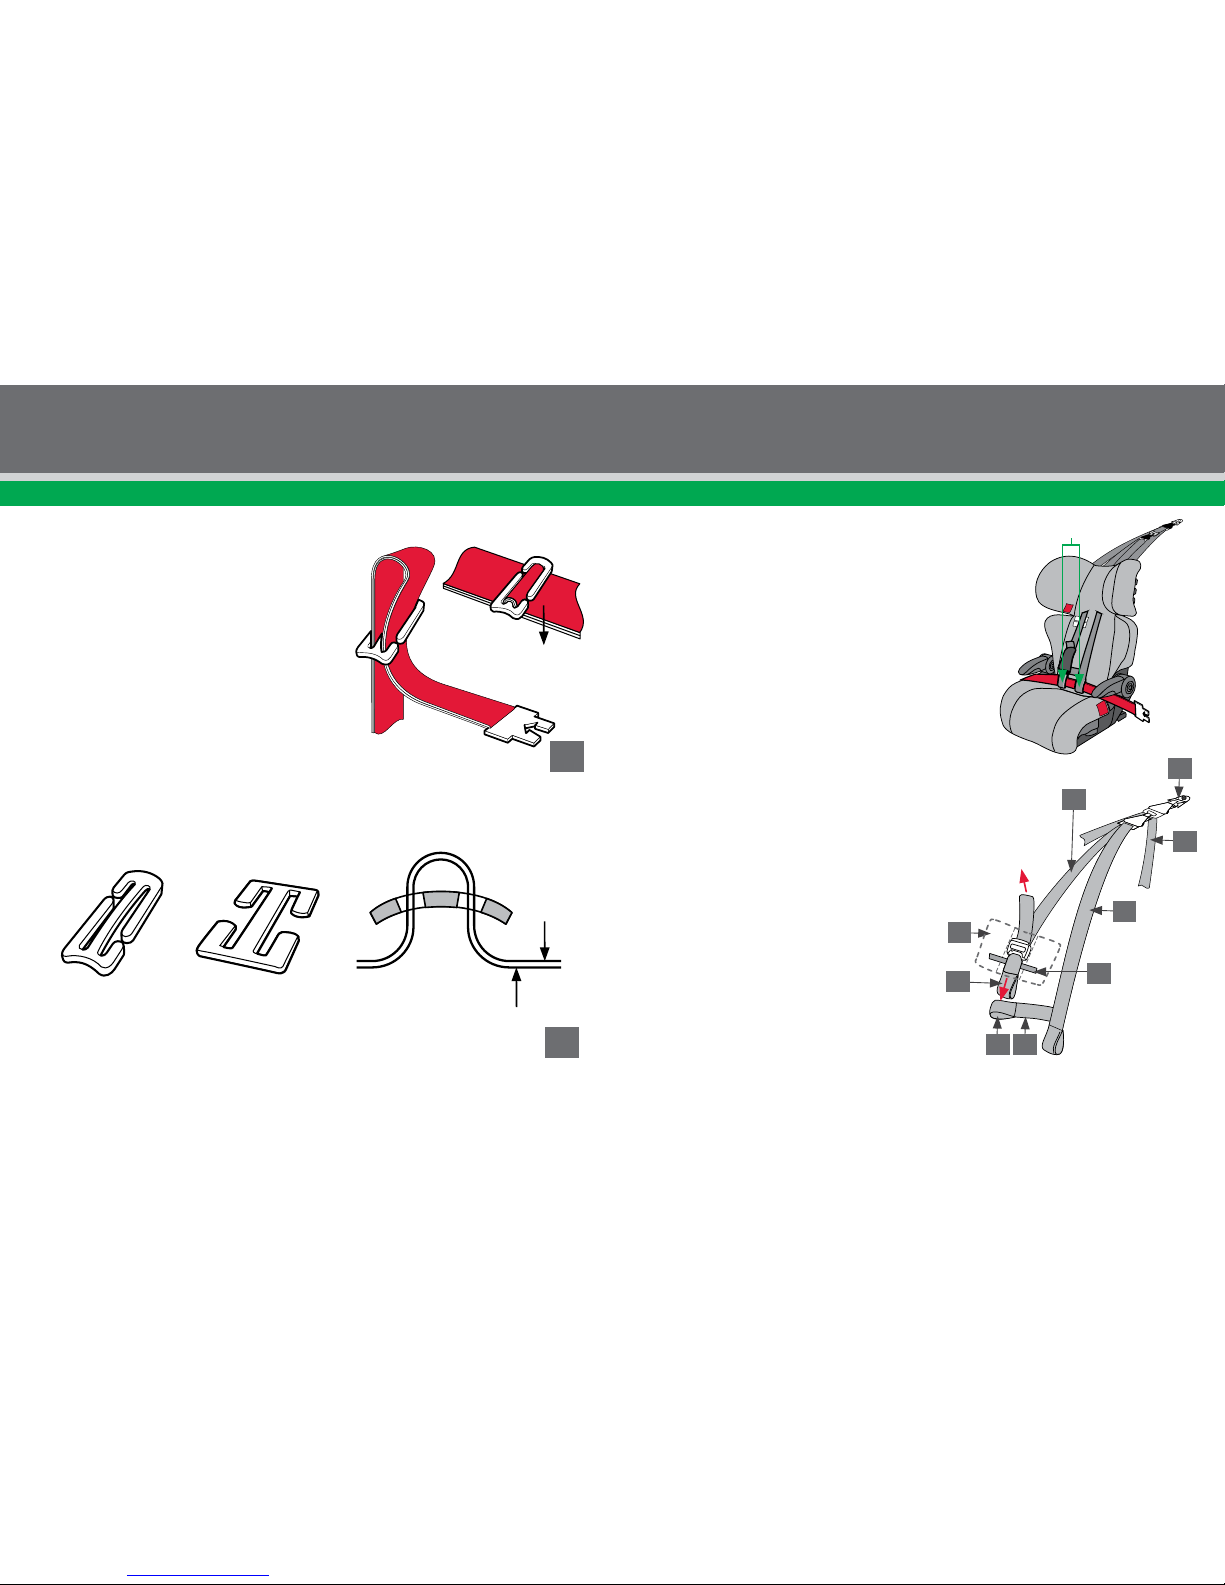
D. Feed the straps through the Gated Slide to remove any slack.
Hollow side
towards child.
Sash belt
portion
Lap belt
portion
E. There may be two types of Gated Slides available, Curved and Flat.
Curved
Flat
When tting the Curved Gated Slide, the seat belt route can only go one way, as shown above.
D
E
Harness strap loops
METHOD 2: USING LAP SEAT BELT
WITH CHILD HARNESS.
Adjust the headrest to align with the top shoulder
slots of the restraint. Fit the Child Harness as
shown above. Then connect the cross strap as
shown below. Thread the lap seat belt through
the harness strap loops as shown right.
NOTE: Seat belt extenders should not be used
if the seat belt is not long enough to t around
the child. If a seat belt extender is used then
the seat belt buckle must not be in contact with
the child.
Connect the Child Harness to the
VERSATETHERTM
Catch as detailed on page 20 or 21.
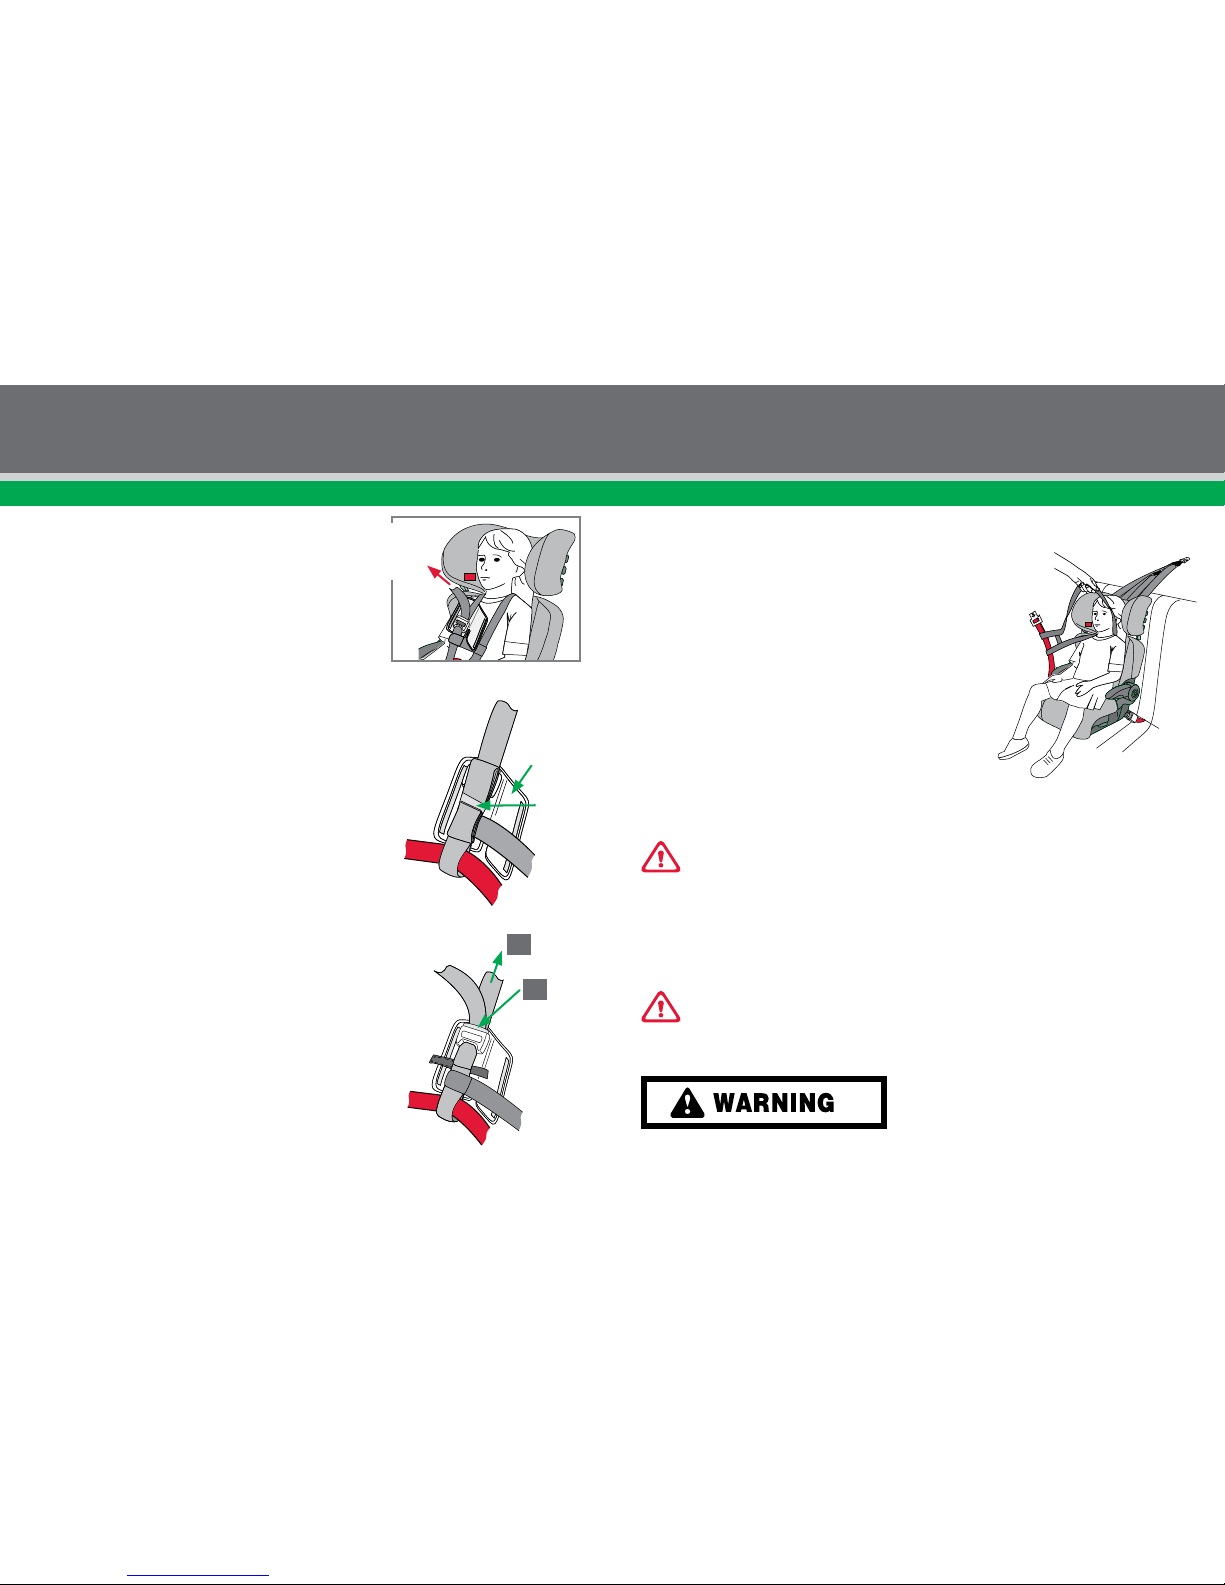
A. With the child seated, place each of the
harness straps over each shoulder.
B. Feed the Right hand strap (loop end) into the
cross strap loop to connect the two sides.
C. Feed the adult belt (lap belt or converted lap/
sash) through the harness loops, ensuring
that the cross strap loop does not disconnect.
Also ensure there are no twists in the
harness, cross strap and seat belt
1. Left Hand Harness Strap
2. Right Hand Harness Strap
3. Storage strap
4. Cover Pad
5. Right Hand Harness Strap Loop
26
27
Pull to
remove slack
4
9
8
1
2
5
6
7
3
6. Cross Strap Loop
7. Cross Strap
8. Booster Seat Upper Anchorage Strap.
9. Car's Anchor Fitting
HOW TO USE HOW TO USE
use WIth chIld harnessuse WIth chIld harness
Page 15
28
29
D. Engage the seat belt tongue to the buckle
and adjust the seat belt to sit rmly but
comfortably around the child's pelvis. The seat
belt buckle should be located as low as possible
below the child's hip.
E. With the lap belt (or converted lap/sash)
adjusted to be a rm t on the child's thighs,
then adjust the Child Harness to remove all
slack in the shoulder straps. Once adjusted,
further adjustments are necessary only to the
upper extension straps and to accommodate
the growth of the child.
F. Roll up the free end of the adjuster strap,
secure using the storage strap, place it into
the top of the adjuster cover as shown right
and close the adjuster cover.
G. To lengthen the harness at any time, by fully
pressing the Adjuster Button (1) whilst pulling
the shoulder strap (2) upwards.
NOTE: The shoulder straps must be in the slots
which are nearest to the child’s shoulders but no
lower than the child’s shoulders. This is achieved
with the headrest above the child’s shoulders.
Pull adjuster
strap to
remove slack
TO REMOVE CHILD
Disengage seat belt tongue and buckle and remove
harness and belt from child. When Booster Seat is not
being used, secure in position, by engaging seat belt over
the booster seat or store in a safe place.
When not in use, the harness may be ipped onto the
parcel shelf or disconnected from the anchor tting and
stored.
NOTE: It maybe easier to unthread the car seat belt out
of the loops before lifting the harness over the child's
head.
Once the child is too large for the booster seat, the child
harness can still be used and is a signicant safety device
for children in a lap only seat belt.
Refer to the child harness instruction book.
IMPORTANT:
Use seat belt to hold the booster seat when not in use.
Lift harness strap
over child’s head.
IMPORTANT: The Gated Slide must be removed from the seat belt if
the booster seat and child harness are no longer used in the car to allow other
users to use the seatbelt as a lap-sash seatbelt.
TO REMOVE THE BOOSTER SEAT
Disconnect the attachment clip from the car's anchor tting.
DO NOT LEAVE CHILDREN UNATTENDED IN THE CAR.
HOW TO USE HOW TO USE
use WIth chIld harnessuse WIth chIld harness
Fold the
adjuster strap
and secure with
Storage Strap.
Adjuster
Cover
Storage
Strap
1
2
Page 16
30
31
CARE AND MAINTENANCE
REGULAR CARE OF THIS RESTRAINT:
Please check the following items regularly to ensure the safety of your child:
A. Check the webbing for fraying.
B. Ensure there are no cracks in moulding or the plastic moulding.
C. If any part of the restraint is cracked or broken, seek repair immediately or replace the
child restraint.
D. Clean plastic and metal part with mild soap and water and dry with a cloth. Do not use
harsh cleaners, polishes, oils, bleach or other chemicals.
HOW TO CLEAN THE COVER
The booster seat has a ame retardant cover which is removable for cleaning. Washing and
care instructions are on the care label attached to the cover. Refer to the next page for
instructions on how to remove and replace the cover.
HOW TO CLEAN
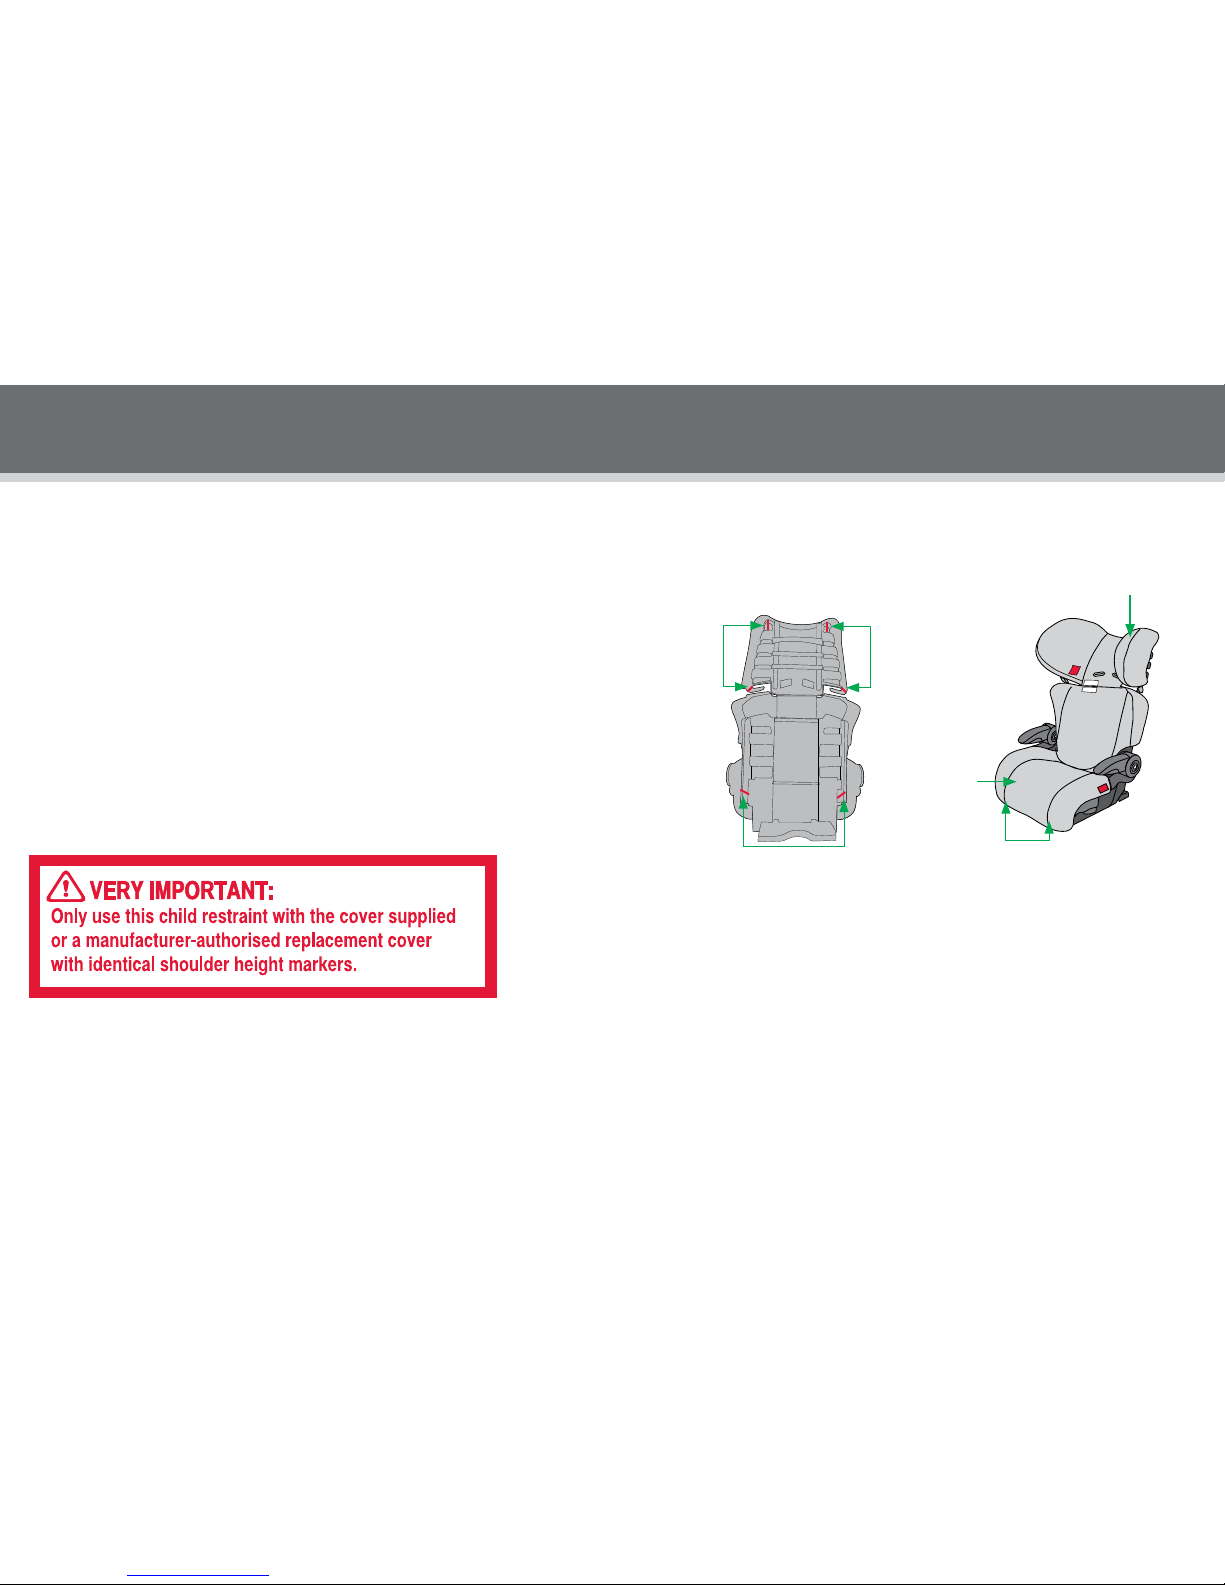
TO REMOVE COVER
Follow the sequence below A to E to remove the cover.
If speakers are tted, pull the cable out of the clips.
TO REPLACE COVER
Wash the cover according to the washing label on the back of the main cover.
1. Align and t bottom cover over base of restraint.
2. Re-attach elastic loops B and plastic clips C for bottom cover.
3. Align and t top cover over restraint backing.
4. Re-attach elastic loops A for headrest cover.
5. Ensure loops and clips are fastened on both Left and Right sides of seat.
6. If speakers are tted, ret the speaker cable as shown on page 33.
7. You will need to t the Booster Seat back in the car and attach the upper anchorage
strap. Adjust the headrest height.
8. Ret the child harness if it is was in use.
B. Unhook Elastic Loops
on both sides of seat.
A. Unhook Elastic
Loops on both
sides of seat.
A. Unhook
Elastic
Loops on
both sides
of seat.
D. Peel top cover
away from shell.
E. Peel bottom
cover away
from shell.
C. Undo Plastic
Clips
Page 17
3332
ACCESSORIES & FEATURES
CUP HOLDERS
The Booster Seat has a cup holder on either side of the seat.
Swing the cup holder out from the seat to use. Fold away
when not in use.
Ensure the cup holder and its contents cannot be crushed
by the car door. Use the cup holder on the opposite side as
required.
CAUTION:
Do not use cup holder for hot drink or liquids.
ARMREST
The armrest can be raised to make it easier to place the
child in the seat and can be in the down position when the
child is seated.
ACCESSORIES & FEATURES
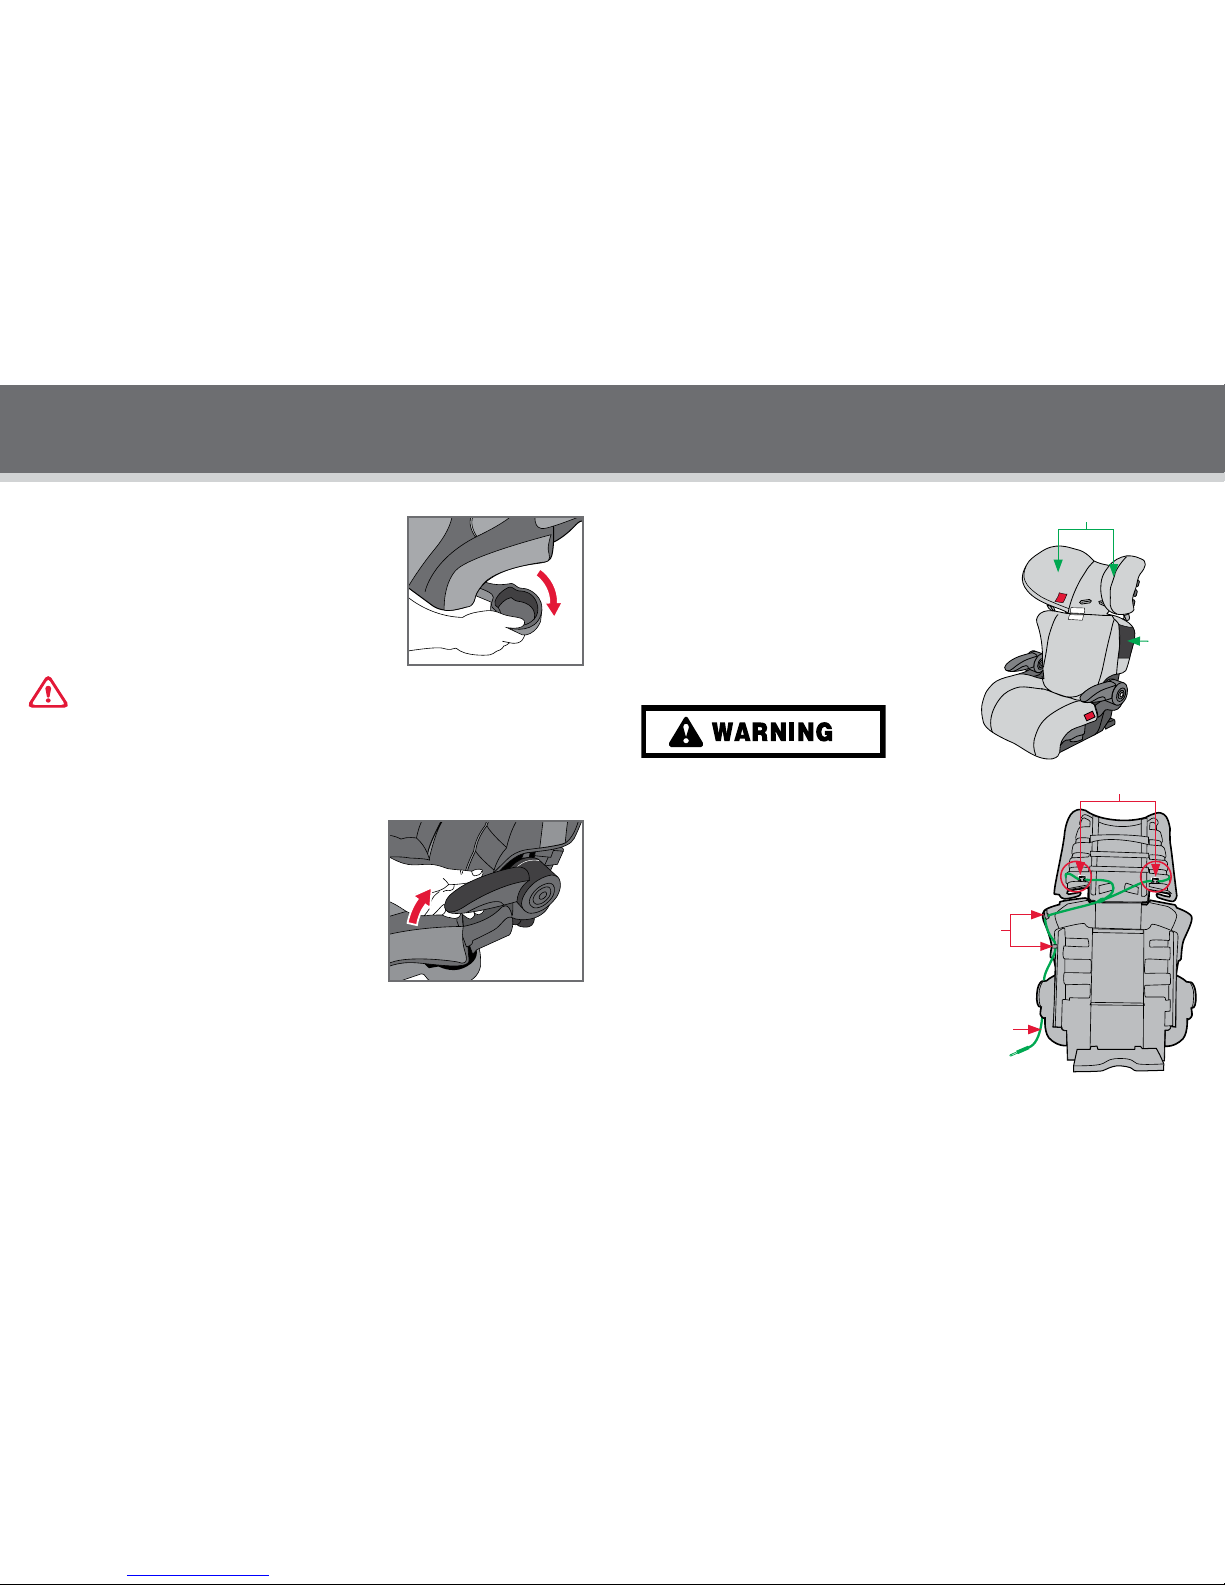
Speaker cable must always be stored using
the plastic clips on either side of trim and out
of reach of children. The cable has potential to
cause strangulation.
The music player must be stored safely as any
loose items have the potential to cause injury in
an accident.
Music player volume should be turned to low or
off before connecting speaker cable.
Hearing experts advise against constant use of
personal stereo played at high volume. Constant
high volume can lead to hearing loss.
Ensure the volume adjustment does not cause
discomfort to your child. The volume may be
louder for your child than you think.
Discontinue use if any part of the speaker, cable
and/or connections are damaged in any way.
Always ret the cable through the loops
as shown. Long length of cable may cause
strangulation of the occupant.
STEREO SPEAKERS (IF SUPPLIED)
Speakers have been supplied to provide enjoyment for your
child. The speakers compatible with Mp3 players (not included)
are recommended for use with these speakers that accept the
stereo plug provided. Recommended storage locations for the
music player are in the storage pocket. The cable is tted to
the headrest and through loops on the seat.
Technical Details
Speaker System : Stereo-32 ohm
Retainer clip
(both sides of
headrest) for
cable to feed
through
Speakers
Storage
pocket
on side
of trim
Speaker
Cable
Clip
Thread
through
loops
Page 18
34 35
PRE-INSTALLATION ANCHOR FITTINGPRE-INSTALLATION ANCHOR FITTING
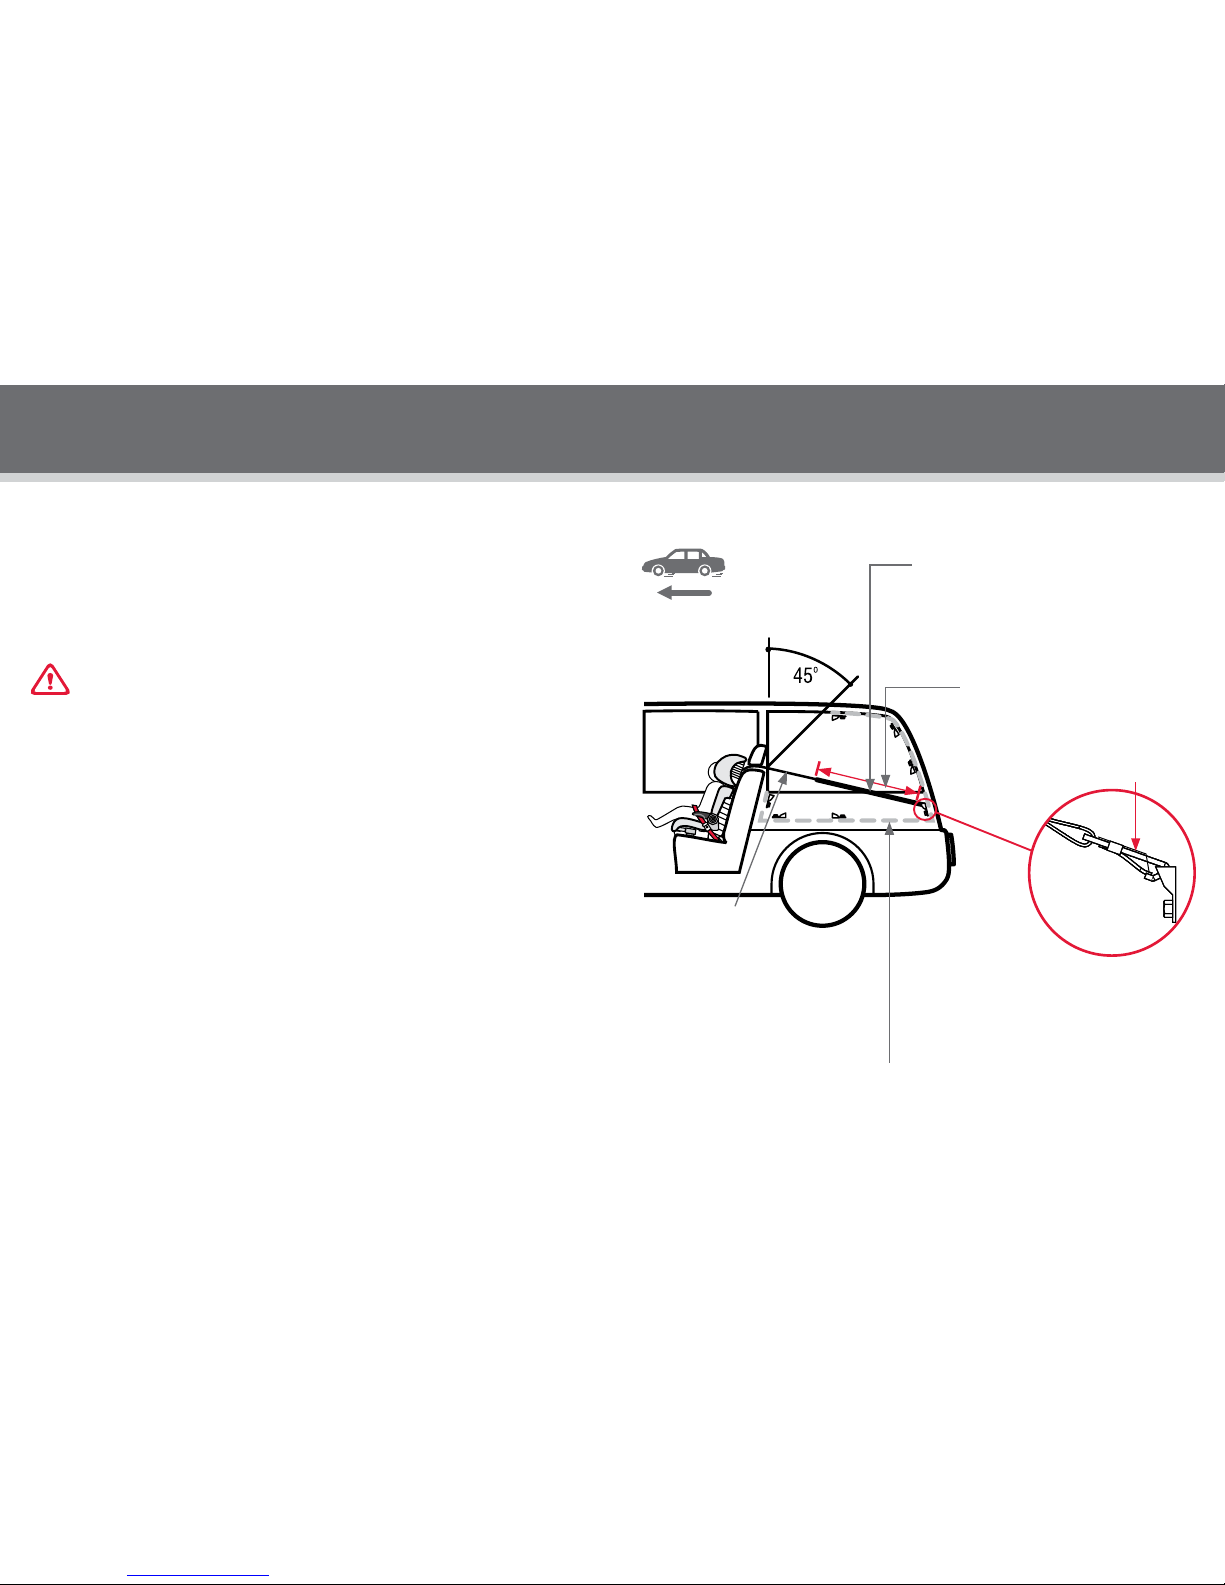
Consult the vehicle owner's handbook for location of anchorage ttings or anchorage points
and the possible use of spacers. Some vehicles may have an anchor tting tted by the vehicle
manufacturer. If anchorage points cannot be found refer to car manufacturer or local child
restraint tting station or trafc authority for optimum position of anchorage point and the use
of spacers.
UPPER ANCHORAGE STRAP
IMPORTANT:
THE ATTACHMENT CLIP COVER MUST ALWAYS BE USED AS IT PREVENTS THE RISK OF
INCORRECT FITMENT OF THE ATTACHMENT CLIP TO THE ANCHOR FITTING. ALWAYS ENSURE
THAT THE ATTACHMENT CLIP IS CORRECTLY ENGAGED TO THE ANCHOR FITTING AND NOT
HOOKED OR FITTED TO ANY OTHER OBJECT BEFORE EACH USE OF THE RESTRAINT. THIS IS
ESPECIALLY IMPORTANT IN VEHICLES SUCH AS STATION WAGONS, VANS, HATCH BACKS OR
VEHICLES WITHOUT A FIXED PARCEL SHELF, SINCE THE ANCHOR POINT IS USUALLY NOT VISIBLE.
IMPORTANT INSTALLATION NOTE:
In some vehicles the anchor tting in the rear vertical panel can only be installed in one way.
Please refer to vehicle owner's handbook or a child restraint tting station for correct method.
Anchorage Clip Cover
The shaded areas of this diagram illustrate the possible locations of the anchor tting. Within
each shaded area is an anchor tting showing the correct way to install the tting. Ensure the
anchor tting is aligned as illustrated unless stated otherwise in the vehicle owner’s handbook.
DISTANCE TO MEASURE TO
THE ANCHOR POINT
Correct engagement of attachment
clip to anchor tting.
Adjustable Upper
Anchorage Strap
Front of Vehicle
Extension Strap distance to be measured.
Length 300mm (Use Safe-n-Sound part 0035)
Length 600mm (Use Safe-n-Sound part 0036)
Available from all major child restraint retailers.
Page 19
36 37
PRE-INSTALLATION ANCHOR FITTING
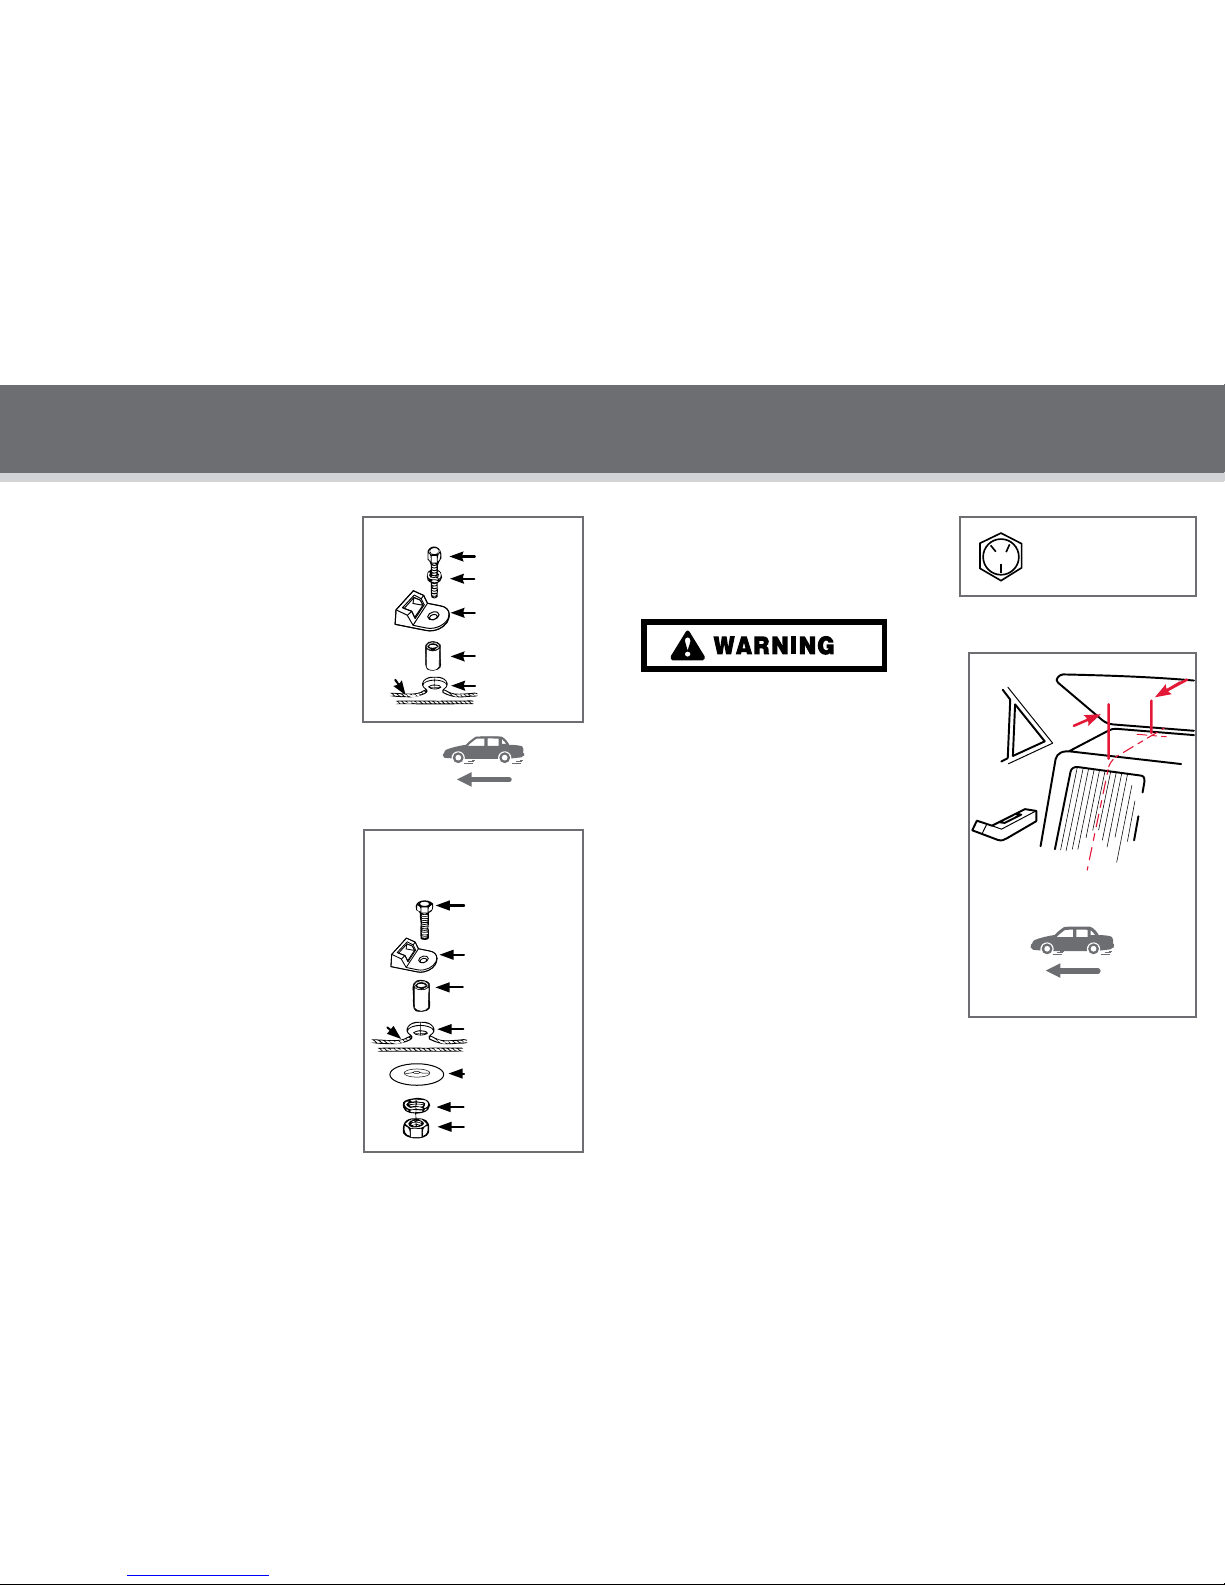
IF THE CAR IS FITTED WITH CHILD RESTRAINT
ANCHORAGE POINT
Locate the anchorage point behind the rear seating
position. (consult the car owners handbook for the
location of the anchorage point). The anchorage point
should be directly behind and central to the restraint.
Remove thread plug from the parcel shelf/oor/roof,
etc. and install anchor bolt and tting as shown in Fig.1.
CAUTION: DO NOT OVERTIGHTEN ANCHOR BOLT.
OVERTIGHTENING MAY FRACTURE OR BREAK BOLT.
MAXIMUM TORQUE IS 20 N.m. (14.75 ft.lb.)
Note: Minimum of ve full turns of anchor bolt is
required before tightening force is applied.
IF THE CAR IS NOT FITTED WITH CHILD RESTRAINT
ANCHORAGE POINTS
For Sedans only - Drill 9mm diameter hole in the parcel
shelf on the centre line of the seating position as shown
in Fig.3. Before drilling the hole, check the underside for
accessibility. Install the anchor bolt as shown in Fig.2.
For vehicles other than Sedans - In Australia, consult
your nearest child restraint tting station or trafc
authority for vehicle inspection to nd the best,
correct position for the placement of the anchorage
point, and for the correct attachment bolt length and
use of spacers. In New Zealand, consult the agent for
the vehicle.
Note to Queensland purchasers: The installation of
anchorage points must be approved by authorised
ofcers appointed by Queensland Transport. Authorised
ofcers can be sourced from all Queensland Transport
Customer Service and Queensland Ambulance Service
Centres.
Attachment
Bolt
Anchor tting
Spacer(s) if
required
Vehicle metal
structure
Reinforcing washer
(cone downwards)
Lock washer
Secure nut
UPPER ANCHORAGE FITTINGS
FOR SEDANS ONLY
Vehicle
trim
Fig.2.
Front of Vehicle
UPPER ANCHORAGE FITTING
Attachment Bolt
Lock washer
Anchor tting
Spacer(s) if
required
Vehicle metal
structure
Vehicle
trim
Fig.1.
PRE-INSTALLATION ANCHOR FITTING
CHILD RESTRAINTS MUST NOT BE ATTACHED TO
UNSOUND METAL OR TO WOOD, OR SYNTHETIC
STRUCTURES. WHEN DRILLING 9 MM HOLE DO
NOT DRILL THROUGH FUEL LINES, FUEL TANKS,
ELECTRICAL WIRING, OR RADIO SPEAKERS.
WEBBING STRAPS MUST BE PROTECTED FROM
SHARP CORNERS AND EDGES. THE ANCHOR
FITTING MUST BE USED ONLY AS DESCRIBED
ABOVE. IT MUST NOT BE HOOKED ONTO ANY
OTHER OBJECT.
ONLY USE A 5/16 UNC GRADE 5 BOLT. IF THE
BOLT IS NOT THE CORRECT LENGTH THE CAR
MANUFACTURER’S HAND BOOK CAN PROVIDE
ADVICE ON THE CORRECT LENGTH BOLT.
VEHICLE INSTALLATION ACCESSORIES
(Available from major restraint retailers
EXTRA ANCHOR KITS: Are available if using the
restraint in additional vehicles.
Re-order number: 0038
EXTENSION STRAPS: May be required for vehicles
without a xed parcel shelf.
Re-order number: 0035 (Length 300mm) or 0036 (Length 600mm)
Note: Marking on
the top of a Grade 5 Bolt.
Centre line of seating position
200mm
min
Fig.3.
Front of Vehicle
Page 20
38 39
Precautions to prevent reducing the safety
offered by this booster seat.
1. Ensure the seatbelt is used and tted correctly. The lap belt must be on thighs and
not the abdomen and the sash belt must always be across the chest.
2. Always thread the sash belt through sash guide.
3. Ensure the child does not slouch or slump where the sash belt is across the abdomen.
This is dangerous.
4. Do not place the seatbelt behind the back or under the arm pit. It is dangerous.
5. Do not use the seat belt in any other way other than following the red BOOSTER
SEATBELT PATH seat belt path labels.
6. Ensure that if you are using a child harness that the lap belt is rm on the child’s
thighs and not on the abdomen. Do not tighten the child harness tether strap, just
remove slack.
7. Ensure you advise the child not to undo the seat belt buckle unless told to do so.
PRECAUTIONS IN CASE OF CRASH
If your restraint has been involved in a severe crash, you should destroy the restraint even
if no damage is obvious. Some insurance companies offer vehicle insurance which covers or
partially covers the replacement of your child restraint. Contact your insurance company for
further details.
Your insurance company may require you to keep the child restraint for assessment, but do
not use the child restraint after a severe crash.
Page 21
Hipod trademark is the property of Next Generation Nursery Products Pty. Ltd.
Safe-n-Sound and VERSATETHER trademarks are the property of Britax Childcare Pty Ltd.
VERSATETHER Trademark is used by permission of Britax Childcare Pty Ltd.
This product is covered by Australian and overseas patents and applications. Patents pending.
© 2005-2011 Next Generation Nursery Products Pty Ltd.
P/No. 2200439/A
 Loading...