

Page 1

Nextel
®
iDEN
Digital Multi-Service Data-Capable Phone
®
i60c P h on e User ’s Guide
@NNTN4296A@
NNTN4296-A
Page 2

nextel.com
Page 3

Table of Contents
IMPORTANT!
Read “Nextel Terms and Conditi ons of Service ” on
page 166 and “Safety and Gene ral Information” on
page 171 before using your i60c phone.
Introduction..........................................................................................1
Welcome to Nextel®.......................................................................................1
Customer Care.................................................................................................2
Ordering Informat ion .............. ...................... .... ... ...................... .... ... ..............2
Driving Safety Tips .........................................................................................3
Getting Started......................................................................................5
i60c Phone Features .......................................................................................6
i60c Phone Menu Tree....................................................................................7
i60c Icon Glossary...........................................................................................8
Battery.............................................................................................................9
Turning Your i60c Phone On/Off ................................................................12
Enabling Over-the-Air-Ra dio -Serv ic e Soft ware (OARS S) Security............14
Receiving OARSS Programming..................................................................14
SIM Card.......................................................................................................15
Status of Your i60c Phone ............................................................................23
My Information.............................................................................................23
Using T9® Text Input...................................................................................24
Display Essentials...............................................................................31
Display Screen...............................................................................................31
Status Icons....................................................................................................32
Text Display Area .........................................................................................34
Call Information Icons...................................................................................34
Menu Icon......................................................................................................35
i
Page 4

Table of Contents
IMPORTANT!
Read “Nextel Terms and Conditi ons of Service ” on
page 166 and “Safety and Gene ral Information” on
page 171 before using your i60c phone.
Display Options.............................................................................................35
Navigating Menus and Lists..........................................................................35
Main Menu Options.......................................................................................36
Phonebook...........................................................................................39
Phonebook Entries and Speed Dial Numbers................................................ 40
Phonebook Icons ...........................................................................................40
Accessing Your Phonebook ..........................................................................41
About Phonebook Entries..............................................................................41
Pause Digit Entry...........................................................................................50
Plus Dialing...................................................................................................51
Address Book.................................. ... .... ...................... ... ...................... .... ... .52
Digital Cellular....................................................................................53
Making Phone Calls ......................................................................................54
Emergency Calling........................................................................................58
Special Dialing Code s........................ .... ...................... ... .... ...................... ... .59
Receiving a Phone Call .................................................................................59
Ending a Phone Call............................................. .... .... ..................... .... ........60
Recent Calls...................................................................................................61
Missed Calls.............. ... ...................... .... .... ..................... .... .... ..................... .64
Call Timers....................................................................................................64
Hands-Free Speak erp h one (Optional).......................... ... .... ...................... ... .65
Mute...............................................................................................................66
Call Waiting ..................................................................................................66
ii
Page 5

Table of Contents
IMPORTANT!
Read “Nextel Terms and Conditi ons of Service ” on
page 166 and “Safety and Gene ral Information” on
page 171 before using your i60c phone.
Call Hold .......................................................................................................69
Three-Way Calling........................................................................................70
Call Forwarding.............................................................................................71
Caller ID........................................................................................................75
Alternate Line Service...................................................................................76
Call Restrictions ............................................................................................77
Nextel 411.....................................................................................................77
Nextel Voice Mail................................................................................81
Setting Up Your Voice Mail Box..................................................................81
Logging Into Voice Mail...............................................................................82
Using Voice Mail ..........................................................................................83
Advanced Voice Mail Features.....................................................................87
Nextel Voice Mail Tree.................................................................................95
Messaging Services...................... ................................. ...... ................97
Receiving Messages ......................................................................................97
Message Center .............................................................................................99
Voice Mail Messages ..................................................................................100
Text and Numeric Messaging......................................................................101
Nextel Two-Way Messaging .......................................................................104
Direct Connect..................................................................................105
Nextel Direct Connect®..............................................................................105
Private Call..................................................................................................105
iii
Page 6

Table of Contents
IMPORTANT!
Read “Nextel Terms and Conditi ons of Service ” on
page 166 and “Safety and Gene ral Information” on
page 171 before using your i60c phone.
Call Alerts....................................................................................................108
Group Call.................... .... .... ...................... ... .... ...................... ... .... .............112
Memo.................................................................................................117
Adding a New Memo .................................................................................. 117
Viewing a Memo.........................................................................................117
Editing a Memo............ .... .... ...................... ... .... ...................... ... .... .............118
Deleting a Memo.........................................................................................118
Nextel Wireless Web.........................................................................119
Wireless Web Navigation Keys ..................................................................119
Starting the Microbrowser...........................................................................120
Using Your Phone as a Modem................................................................... 121
Customizing th e i60c Phone ............................. ...... ..... ....................123
Settings........................................................................................................123
Accessories.........................................................................................139
Batteries.......................................................................................................139
Chargers.......................................................................................................140
Universal Serial Bus (USB) ........................................................................ 142
Other Important Information................................ .........................143
Nextel Customer Care .................................................................................143
Understanding Status Messages.................................................................. 144
iv
Page 7

Nextel Terms and Conditions of Service ....................................................146
Safety and General Information.....................................................151
RF Operational Characte ristic s ......................... ... .... ...................... ... .... ......151
PORTABLE RADIO PRODUCT OPERATION AND EME EXPOSURE.....
151
Electro Magnetic Interference/Compatibility..............................................154
Medical Devices...................... .... .... ..................... .... ...................... ... .... ......154
Operational Warnin gs....... .... ... ...................... .... ... ...................... .... .............156
Operational Cautio ns.................................. ... .... ...................... ... .................157
Limited Warranty Motorola Communication Products...............................161
Patent and Trademark Information..............................................................167
v
Page 8

vi
nextel.com
Page 9

Introduction
Welcome to Nextel
®
Thank y ou for choo sing N extel as yo ur wi reless com munica tions prov ider. Your
i60c phone enables you to enjoy clear conn ections through Nextel ’s All-Digital
SM
National Network. In addition, with Nextel iTraveler
Service, you can use
your i60c phone to roam internationally in select countries using other iDEN®
networks. Countries in which iTraveler service can be used are Argentina,
Brazil, Canada, Philippines, Israel, Mexico, and Peru.
NOTE: Contact Nextel Customer Care to obtain iTraveler service.
Nextel gives yo u more ways than an yone to communicate with everyone.
SM
Your i60c phone offers many innovative features:
• Phonebook – Your consolidated Phonebook holds up to 250 entries and
allows you to store mu ltip le co nt act nu m be rs for e ach person , offering you
various ways to communicate with your business and personal contacts.
• Subscriber Identity Module (SIM) Card – Your pho ne ’s SIM c a rd ho lds
all entries store d in yo ur Phon ebo ok. In addit ion, yo u ha ve a P IN (Per so nal
Identification Number) to keep your information safe and secure.
• Messages – The Message Center allows you to manage and access your
Voice Mail, Text Messages, and Two-Way Messages all from the same
inbox.
• Nextel Direct Connect
®
– With Nextel Direct Connect, you can use your
phone as a digi tal two-way ra dio to communicate directly with business
and personal contacts at a fraction of the cost of cellular call s .
• Nextel Wireless W eb – Using the Net feature with the built-in
microbrowser, you can access Nextel’s wireless Internet. It offers a suite of
Nextel wireless data product s a nd Internet applications to quickly access
the informa tio n yo u ne e d to get bus in e s s do ne.
• Closed Cover Features – The external control buttons enable you to
access several functio ns of your i60c phone with out opening the cover.
• Customization – Use the Settin gs feat ure to custo m ize you r i60c phone to
meet your indi vidual needs.
• Speakerphone – With this optional feature, you can enjoy hands-free
communication at the touch of a button. And Speakerphone is especially
great for conference calls.
For more information on these and other features of the i60c phone, review this
User’s Guide.
Enjoy using yo ur i60c phone!
1
Page 10

Customer Care
For domestic customer care issues, including billing issues, general service
needs, or to order additio nal services, contact Nextel Customer Care.
Visit nextel.com for a variety of Customer Care services:
• Browse for information on phones, coverage, rates, and other Nextel
services. View and download user’s guides, try out our interactive virtual
products and service demos, find answe rs to frequently asked questi ons,
order accessories, l ocate service and repair centers, upgrade phon e
software, send a message, and more.
• For self-service on your Nextel account, cli ck on My Account to view
your account, pay your bill, add phones to your account, reset your Voice
Mail password, and more.
• For onlin e assista nce, click on Contact Us to send us an email request. Our
representativ es are committed to assisting yo u. Every e ffort wil l be made to
address your questions or co ncerns within 24 hours. Contact us to add
Wireless Web and other services, change rate plans, inquire on your bill,
and more.
Or, call us at 1- 800-639-6111 or dial 611 fr om your Nextel phone.
To complement the i60c phone and Nextel Worldwide Service, Nextel has also
launched International Roaming Customer Care support. When traveling
outside of the U.S. and Canada, call +1 (360) 662-5202 for your Customer Care
Service needs. This Customer Care number will be toll-free from your Nextel
handset both domestically and internationally.
For more information about Nextel or to view this guide on our Web site, visit
us on nextel.com.
International and domestic cover age, rates, and other infor m ation are also
available on nextel.com.
Ordering Information
Nextel Busi ness Networ ks® allows you to c ommunicate with individu als outside
as well as inside your company. These Networks l i nk Nextel customers in
similar in dustries or geographies. So, if you n eed to reach a clie nt, vendor , or
contractor instantly, work smarter by joining the Nextel Business Networks.
Call 1-888- N EX TEL2 (1-888-639-8352).
2
nextel.com
Page 11

Driving Safety Tips
Various accessories are available for use with your i60c phone, including a
Leather Carry Case, Vehicle Battery Charger, extra batteries , a variety of
Hands-Free accessories, and more. To order accessories or an accessories
catalog, go to nextel.com or call Nextel Nextday
SM
Accessories at
1-800-914- 3240. You can also contact your Nextel Authorized Sa les
Representative or stop by any Nextel Store. For information on retail stor e
location s , go to nextel.com.
Contact Nextel Customer Care to order any of the services discussed in this
guide, including Nextel Wireless Web, additional phone services, Voice Mail,
Nextel Mobile Messaging and much more!
For information on Direct ProtectSM insurance protection for your i60c phone,
call 1-888-352-9182 or contact your Nextel Authorized Representative.
Visit us at nextel.com to learn more about Nextel products and services!
Driving Safety Tips
NOTE: For safety and legal rea sons (in many countries), do not use your phone while
driving.
Check and follow the local laws regarding the use of mobile phones while
driving.
Your wireless phone is a great safety tool. You can instantly call for help in
emergencies or alert your next appointment that you’re running late. Please
follow these tips for using your wireless phone when you’re behind the wheel.
1. Give driving your full attention. Don’t let anything interfere with your
concentration.
2. Assess road conditions before making or taking a call.
3. Let voice mail pick up when its inconvenient or unsafe to answer the
phone.
4. Program your most frequently dialed numbers into your phone for
speed dialing. When dialin g m an u ally with ou t th e Turbo Dial ® one-touc h
dialing feature, dial only when your vehicl e is stopped — or ha ve a
passenger di al for you.
5. Position your phone where it is easy to see and reach.
6. Keep your eyes on the road. Never take notes while driving.
7. Consider using a hands-free speakerphone or hands-free accessory
which allows you to keep both hands on the wheel whe n speaking.
8. Use your phone’s Internet capabilities before you drive. Wireless Web
Services are not designed to be used while drivin g.
3
Page 12

9.Be a Good Samaritan. Dial 9-1-1 in emergencies to
report accidents, impaired or aggressive drivers, crimes
or fires. It’s a free call. Know your phone number so
emergency services personnel can call you back if
necessary.
4
nextel.com
Page 13

Getting Started
This section will h e lp yo u get started using yo ur p h one. It co n tains d e ta ils ab ou t
some of the features and functions described i n t he Getting Started Guide.
This section includes:
i60c Phone Features Page 6
i60c Menu Tree Page 7
i60c Icon Glossary Page 8
Battery Page 9
Turning Your i60c Phone On/Off Page 12
Enabling Over-the-Air-Radio-Service Software
(OARSS) Securi ty
Receiving OARSS Progra mmin g Pa ge 14
SIM Card Page 15
Status of Your i60c Phone Page 23
My Information Page 23
Using T9® Text Input Page 24
Page 14
5
Page 14

i
60c Phone Features
COVER CLOSED
Speaker Key
Volume
Control
Buttons
Nextel Direct
Connect®
Push-To-Talk
(PTT) Button
Cover
Accessory and Data
Cable Connector
SmartKey
Headset Jack
Option Key
4-Way
Navigation
Key
Antenna
Status Light
COVER OPEN
Earpiece
Cover
Display Screen
Status Light
Menu Key
Option Key
Audio Jack
Speaker Key
6
TOP VIEW
SmartKey
End/Home
Key
Punctuation
Key
Back/Pause
Dialing Key
Microphone
Power On/Off
Antenna
nextel.com
Send Key
Photosensor
Next Word/
International
Plus Dialing Key
AlphaNumeric
Keypad
Accessory and Data
Cable Connector
BOTTOM VIEW
Page 15

i60c Phone Menu Tree
i
60c Phone Menu Tree
You can access the main me nu options by pressing q from the idle screen. Use to
navigate through the menus and submenus. Press
the desired phone func ti on
.
C under the display options to perform
7
Page 16

i
60c Icon Glossary
You may see these icons while using your i60c phone:
Voice Mail
Text Message
Miscellaneous
y
R
Net
Settings
Main Menu
7
m
Mobile IP
Signal Strength
Status
s
]
Line1Active
Line2 Active
1
0
Line and CallInfo Info
Net Alert
R
Messages
Phonebook
b
R
Battery Strength
6
Line1 Forward
G
Word
T9
MessageRead
#
Q
Memo
Call Forward
;
O
Packet Activity
Packet Data
Z
Y
Line2 Forward
Incoming Call
E
K
T9 Alpha
w
Call Timers
z
Phone In Use
c
Outgoing Call
X
Symbols
T9 Numeric
T9
,
!
Info
My
RecentCalls
U
j
Private In Use
Talkgroup In Use
i
%
Connected
Missed Call
S
D
T9CapsLock
T9Uppercase
$
CallAlert
:
VibrateAll
Speaker Off
-
u
On Hold
V
x
End Call
?
Locked
SecureData
M
{
VibrateThenRing
Vibrate On
[
\
CheckMark
<
Silent On
*
Phonebook
Navigation
8
Mobile
T
PickerUp
g
Work
Private ID
h
+
Picker Left
Picker Down
e
d
nextel.com
Main
N
Picker Right
f
Home
C
Menu
P
Pager
a
Up Down Arrows
2
Fax
A
Other
W
IP
TalkgroupID
%
|
Page 17

Battery
The icon of the main menu feature in use displays in the top left of the status
icon rows. For a list of the main menu options, see “Main Menu Options” on
page 36.
Battery
Your i60c phone comes with a Lithium Ion battery and charger. After attaching
the battery, you must charge it before you use it for the first time. See
“Batteries” on page 139 for the charging times for your phone’s battery. The
first time you charge your phone’s batte r y, charge for 30 minutes more than t he
time shown on page 139. After the initia l charging , the battery ca n be charged in
the time shown on page 139.
Remove the battery from the protective plastic safety tray provided in the
original packa g ing . Whe n the batt er y is not atta che d to the ph on e, store it in the
original tray.
NOTE: Use only the batteries approved for this product.
9
Page 18
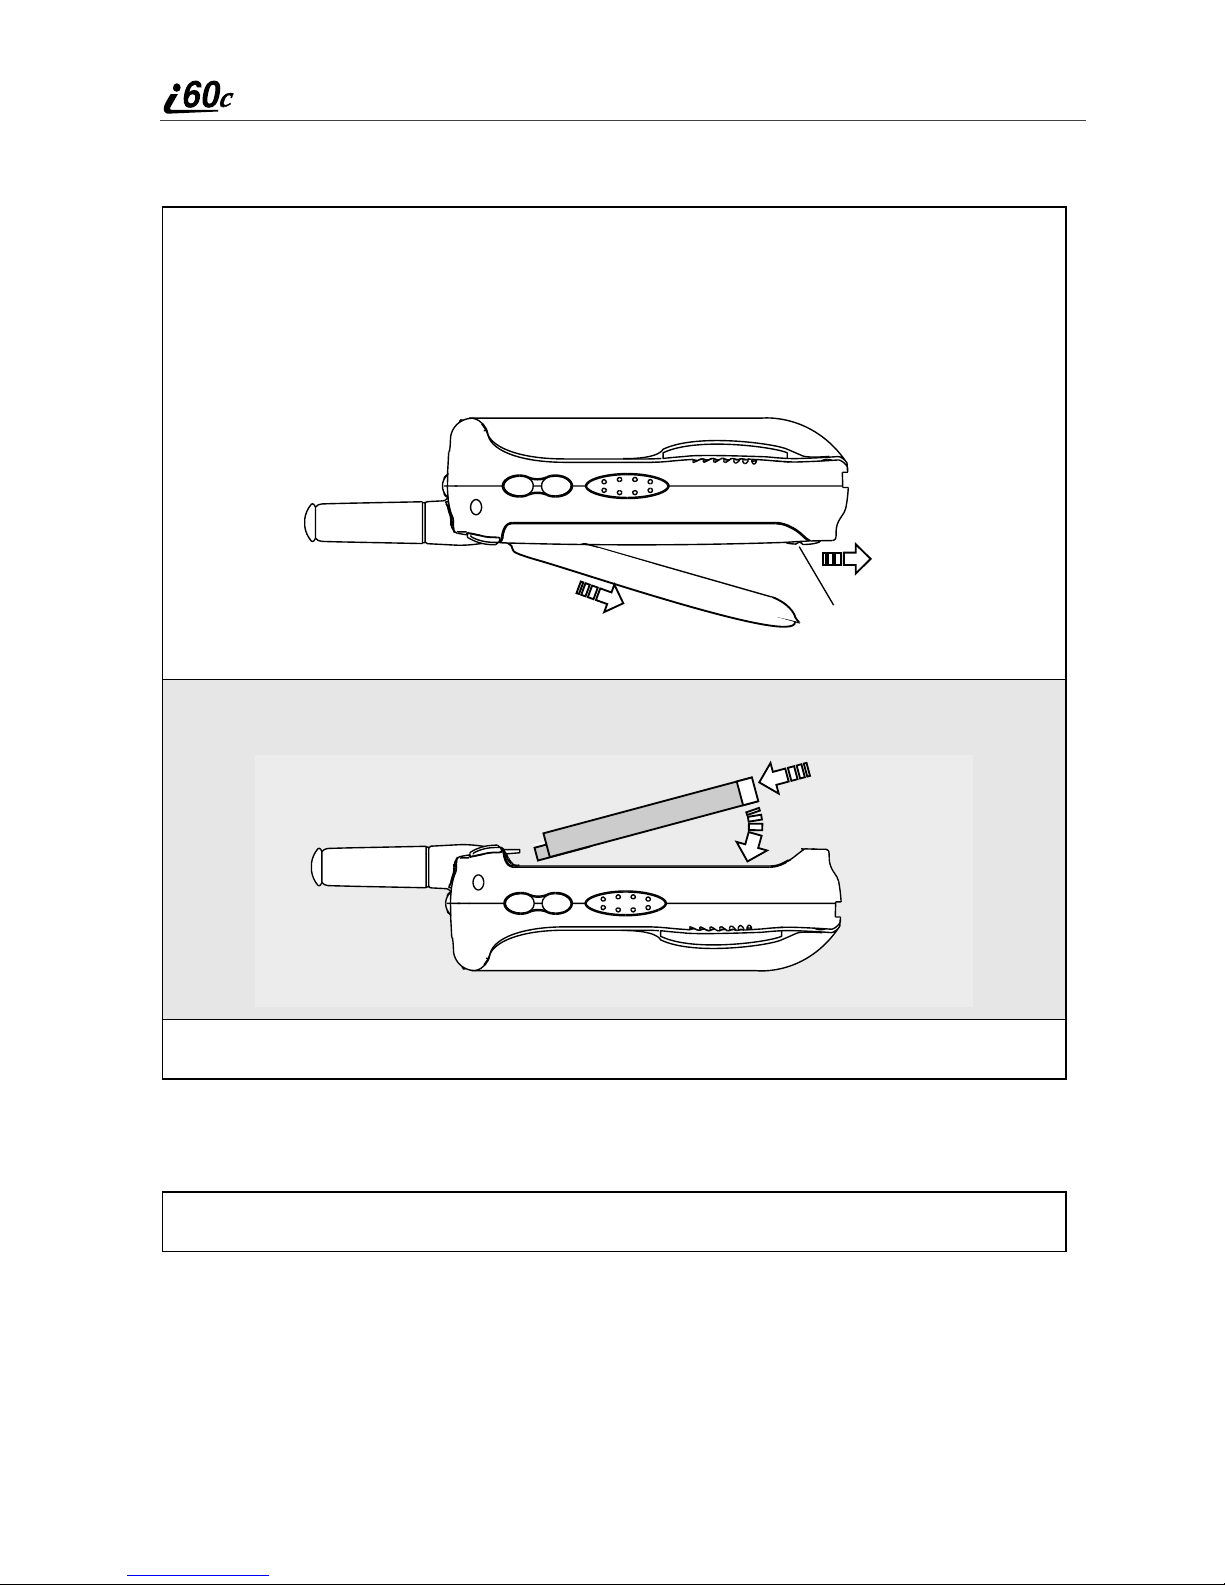
Attaching the Battery
1
Slide the battery cover release button, located on the bottom of the
phone, away from the battery cover and remove the battery cover from
the back of the phone.
TIP: Holding the battery cover downward allows it to fall
easily from the back of the phone without being pulled.
2
Insert the top of t he batte ry into the battery area. P ress the b ottom of the
battery to secure it.
Battery cover
release button
3
Replace the b attery cover and press it gentl y until you hear a click.
Detaching the Battery
1
Ensure the phone is powered off be fore attemptin g to detach the battery.
10
nextel.com
Page 19

2
Slide the battery cover release button, located on the bottom of the
phone, away from the battery cover and remove the battery cover from
the back of th e phone.
3
Remove the battery by pushing the battery toward the antenna and
lifting it out of the phone.
Battery
Charging the Battery
NOTE: The battery c an be char ge d with the phone either turned on or
off. For best results, charge it with the phone turned off.
1
With your phone’s display screen fa cin g up, plug
the charger’s accessory connector into t he left side
of the accessory connector on the bottom of the
phone.
Accessory Button
NOTE: To reduce damage to the phone’s bottom
connector, the cable or accessory button
should always be used to remove the
charger.
2
If the charger has folding electrical prongs, flip open the prongs.
3
Plug the charger into an electrical out l et.
11
Page 20

Battery Chargin g Status
The battery strength indicator icon found on your phone’s display screen shows
the amount of power in the battery.
When Using Phone
Icon
abcd
Display
Battery
Strength
Low
Battery
11% to
40%
41% to
70%
Fully
Charged
A short, chirp-like sound indicates a low battery. The icon flashes to indicate
that you have approximately five minutes of talk time r e maining.
When Charging Battery
Icon
Display
Battery
Strength
efgd
1 flashing bar 1 flashing bar,
1 continuous bar
Low
Battery
31% to
60%
1 flashing bar,
2 continuous bars
61% to
90%
3 continuous bars
Fully
Charged
Turning Your i60c Phone On/Off
NOTE: To register for the first time on the Nextel National Network, you
must turn on your
To power the phone on:
1
Open the phone cover.
2
For optimal signal strength, extend the antenna.
3
Press and hold p on the keypad until the status light glows red, a tone
briefly sounds, and Powering On displays.
12
i
60c phone in your home market.
nextel.com
Page 21

Turning Your i60c Phone On/Off
4
If you have enabled your SIM PIN security feature (see “Enabling/
Disabling the PIN Security Feature” on page 15), the Enter SIM PIN
Code screen disp lays. Enter your SIM PIN (see “Ent er ing the SIM
PIN” on page 17).
Press C under OK.
5
As your phone connects to the Nextel
National Network, you will see Welcome
To Nextel and a connecting me s sa g e.
When the idle screen appears on the
display as shown here, you are ready to
use your i60c phone!
O
If your disp la y r eads No Service or doesn’t change to the idle screen when you
turn on your phone, and you know you are in a Nextel coverage area, contact
Nextel Customer Care. For details on Nextel co verage areas, go t o nextel.com.
To power the phone off:
1
Press and hold p on the keypad until a tone briefly sounds and
Powering Off displays.
2
Close th e ph one cover.
3
Push down the antenna.
13
Page 22

Enabling Over-the-Air-Radio-Service Software
(OARSS) Secu rity
To receive OARSS programming, you must enable OARSS security the first
time you power on your phone or within 20 days of first acti vation of your
phone. See “R eceiving OARS S Programming” on page 14.
1
When you power on your phone for the first time, after the idle screen
appears, you will be prompted to select OK to update your browser info.
NOTE: If you press C under LATER, you will be prompte d to ena ble
security each time you power on your phone until you press
C under OK. It is recommended that you do not choose
LATER.
2
Press A under OK.
3
You are prompted to enable security. Press C under YES.
A series of screens display. If you subscribe to a Nextel Online
Service plan, your home page displays.
SM
4
Press * to return to the idle screen.
Receiving OARSS Programming
If you have been set up to receive OARSS programmi ng, you will r eceive your
Private ID and Talkgroup lists for Direct Connect use, your Personal Telephone
Number, and the Nextel Cust omer Care number via a Net Alert message.
In order to receive your programming, you must have enabled OARSS security
(see “Enabling Over-the-Air-Radio-Service Software (OARSS) Security” on
page 14). Within 24 hours of enabling OARSS security, you will receive a Net
Alert message cont aining your lis ts.
Accepting Your Phone’s Programming
1
You will receive a Net Alert with the message New Browser Message –
Receive Programming Info .
2
Press A under GOTO.
3
You are prompted to accept changes to your phonebook. Press A
under OK.
4
A confirmation screen displays. Press A under OK.
14
nextel.com
Page 23

SIM Card
5
You are prompted again to accept changes to your phonebook. Press A
under OK.
6
A confirmation screen displays. Press A under OK.
7
Press * to return to the idle screen.
NOTE: Closing the phone cover does not terminate Over-The-Air
Programming in progress.
SIM Card
Your phone com es wi th a b u ilt-in le v el of sec uri ty pro te ct ion th roug h th e u se of
the SIM card. The SIM card stores all your Phonebook i nformation an d your
Nextel account identification information. Since this information is stored on
the SIM card, not in your phone itself, you can remove the information by
removing the SIM card.
NOTE: Except for making emergency calls, your phone will not
function without the SIM card.
The SIM card is located in the SIM card holder on the back of the phone,
underneath the battery. You can verify the SIM card is in place by removing the
battery and viewing th e SIM card through the SIM card cover.
See “Insertin g/Rem ovin g the SI M Card ” on page 19 for in forma tion o n locatin g
the SIM card. If there is no SI M card in your p hone, notify your Nextel
Authorized Representative.
SIM Card Personal Identification Number (PIN)
To prevent unauthorized use of your account, you can protect your SIM card by
enabling the SIM PIN security feature. With the SIM PIN enabled, you must
enter your PIN each time the phone is powered on. You can change or disable
your PIN if desired.
NOTE: It is recommended that you enable the SIM PIN security feature
to prevent fraudulent use of the SIM card, your
your account.
i60c
phone, and
Enabling/Di sa bli ng the PIN Secur i ty Feature
Once the PIN securi t y feat ure is enabled, you are prompted to enter you r PIN
each time you turn on your phone. Unt il a valid PIN is e ntered, you c an use the
phone only to make emergency calls.
15
Page 24

After the PIN is accepted, the phone registers on the network and the idle screen
C
displays.
When the PIN security feature is disabled, the phone can be used without
entering a PIN.
IMPORTANT: It is recommende d that you enable the PIN security
feature to pro tect personal data on y our SIM card. This
prevents anyone from using your phone and accessing
your personal data.
1
At the idle screen, press q and then
press R to scroll to Settings.
B
2
Press C under SELECT. The Settings screen displays.
3
Press R to scroll to Security. Press C
under SELECT to access the Security
screen.
4
At the Security screen, press R to scroll to SIM PIN. Press C under
SELECT to access the SIM PIN screen.
5
Press R to scroll to On or Off. On enables the SIM PIN security
feature; Off disables the SIM PIN security feature. Press C under
SELECT.
6
At the Verify SIM PIN Code screen, enter the curre nt SIM PIN and
press C under OK.
NOTE: The default SIM PIN is 0000.
16
nextel.com
Page 25

SIM Card
Once you have enabled the SIM PIN security feature, it is recommended that
you change your PIN to a number known only to you ( s ee “Changing the PIN”
on page 17).
Entering the SIM PIN
IMPORTANT: Incorrectly entering your PIN three times causes the SIM
card to be blocked. To unblock your SIM card, you must
contact Nextel Customer Care. For more information,
see “U nblocking t he PIN” on page 19.
1
From the Enter SIM PIN Code screen,
enter your 4- to 8-d i gi t PIN. An asterisk
appears for each character entered. The
default SIM PIN is 0000.
NOTE: Other than emergency dialing,
you will be unable to use any of
the phone functions, including
receiving phone calls, until you
enter the PIN.
P
2
Press C under OK.
If you enter an incorrect PIN, the message SIM PIN incorrect: Try again
appears on your phon e’s screen. After three consecutive incorrect attempts, the
SIM card is blocked. Once bl ocked, the phone will not allow yo u to enter your
PIN again, even after po wering the phone off and back on. If this happens, see
“Unblocking the PIN” on page 19.
Changing the PIN
NOTE: In order to change the PIN, the SIM PIN security feature must be
set to On. See “Enabling/Disabling the PIN Security Feature” on
page 15.
17
Page 26

1
From the idle screen, press q and then
press R to scroll to Settings.
B
2
Press C under SELECT. The Settings screen displays.
3
Press R to scroll to Security. Press C
under SELECT to access the Security
screen.
C
4
At the Security screen, press R to scroll to New Passwords. Press C
under SELECT to access the New Passwords screen.
5
At the New Passwords screen, press R to scroll to SIM PIN and press
C under SELECT.
6
At the Enter Old SIM PIN Code screen, enter the curren t SIM PIN
and press C under OK.
NOTE: The default SIM PIN is 0000.
7
At the Enter New SIM PIN Code screen, enter a new 4- to 8-digit SIM
PIN and press C under OK.
8
At the Re-enter New SIM PIN Code screen, re-enter the new SIM PIN
to confirm, an d pr e ss C under OK.
NOTE: The default SIM PIN is 0000.
nextel.com
18
Page 27

SIM Card
Unblo cking the PIN
If you forget your PIN and unsuccessfully enter it three times, access to your
phone will be blocked.
NOTE: Before you begin, obtain the PIN Unblocking Key (PUK) code
from Nextel Customer Care, then read and understand the PIN
unblocking sequence. When entering the key press sequence,
each key press must occur within 5 seconds of the prior key
press.
IMPORTANT: If you unsuccessful ly enter the PUK code ten times, the
SIM card is permanently blocked and must be replaced.
If this ha ppens, al l da ta wi ll be lost. You will get a
message to contact your service provider. Contact
Nextel Customer Care for assistance. If the SIM card is
i60c
blocked, the
Emergency calls.
To unblock t he PIN:
phone only allows outgoing
1
Press * * 0 5s.
2
Enter the 8-digit PUK code.
3
Press s.
4
Enter a new 4- to 8-digit SIM PIN and press s.
5
Re-enter your SIM PIN and press s.
If you entered the codes properly, the SIM Unlocked screen displays.
Inserting/Removing the SIM Card
IMPORTANT: If you remove your SIM card and insert another SIM card into your
phone, so me inform at i on do es not dis pl a y when you us e th e ph one with
the new SIM card. All Phonebook information remains sto red on your
original SIM card. The following information does not display:
• Recent Calls list • Call Forwarding settings
• Net Alert notifications • Information stored in Memo
• Browser Bookmarks
IMPORTANT: Do not touch the gold-colored areas of the SIM card.
To avoid loss or damage, do not remove your SIM card from your phone
unless absolutely necessary.
19
Page 28

Inserting SIM Card
1
With the phone powered off, remove the ba ttery cover and battery. See
“Detaching the Battery” on page 10.
2
With the antenna facing away from you
and the back of the phone exposed and
facing up, locate th e SIM card holder.
SIM card
holder
3
Hold the SIM card with the gold contact
side facing down and the cut corner in the
lower left. Do not touch the gold-colored
areas of the SIM card.
cut corner
20
nextel.com
Page 29

4
Carefully slide the SIM card to the right and into
the phone, until it lies flat in the SIM card holder.
SIM Card
Removing SIM Card
NOTE: To remove your SIM card, you will need a ballpoint pen.
1
With the phone powered off, remove the ba ttery cover and battery. See
“Detaching the Battery” on page 10.
2
With th e antenna facing away from you
and the back of the phone exposed and
facing up, insert the tip of a ballpoint pen
into the slot to the right of the SIM card,
along the right edge of the SIM card.
slot
21
Page 30

3
With your other hand, gently press the
PUSH tab to the left of the SIM card. Hold
this tab down.
tab
4
While holding the tab down, slide the SIM card to the left by moving
the ballpoint pen to the left within the slot.
5
When the ballpoint pen has moved the SIM card to the left as far as
possible, very carefully lift the SIM card out of the phone. Do not touch
the gold-colored areas of the SIM card.
NOTE: Protect the SIM card as you would any delicate object. When
the SIM card is not in the phone, you should store it in
something protective, such as a mailing envelope.
22
nextel.com
Page 31

Status of Your i60c Phone
Status of Your i60c Phone
Your i60c phone’s statu s light is located on the top r ight side of the phone, near
the cover hinge. The stat us light indicates the status of your conn ection.
S t at u s L ight
Indicator
Flashing Red Signing on to the network. Please wait.
Solid Red No service or out of coverage ar ea.
Flashing
Green
Solid Green In use.
i60c Phone Status
If you are in a coverage area, keep your phone
on and it will a ttempt to co nnect to the net work
every two min utes. If the phone does not
connect after 15 min ut es, contact Nextel
Customer Care.
In service/Ready to use.
NOTE: Nextel Direct Connect is only
available in your home calling area.
My Information
You can select My Info from the main menu to display or edit the following:
• Name — enter your name in this field.
• Private ID — your Private ID is displayed in this fiel d. Yo ur Private I D is
your Nextel Direct Connect number and is composed of three parts: Area
ID*NetworkID*Member ID. For example: 999*999*9999.
NOTE: The asterisks are part of your Private ID.
• Phone Nu mbers of Lines 1 and 2 — your phone’s numbers are displayed
in these fields. Your phone number is automati cally entered when you
receive your first phone call.
• Carrier IP - This fiel d displays your phone’s carrier assigned IP ad dr ess.
• IP Addresses — these fields display the IP addresses you use to access the
Internet with your phone.
23
Page 32

• Circuit Data Number (Ckt) — you can enter your circuit data number in
this field if you plan to use your phone as a modem.
Viewing/Editing My Information
1
From the idle screen, press q and #.
Or,
Press q and us e th e S to scroll to My Info.
2
Press Q to scroll to My Info. Press C under SELECT. The My
Information screen displays.
3
Use S to scroll through the fields.
4
To edit the displayed inf or mation, press C under CHANGE. Edit
information as desired, and press C under OK to save the changes.
To return to the idle screen, press C under EXIT.
Using T9® Text Input
Your i60c phone has embedded softwar e, called T9® Text Input, that makes
typing on a phone keypad m uch like typing on a computer keyboard : it
eliminates the traditional “multi-tap” method of text entry. As you type, you
press only one key per le tter. T9 Text Input matc hes your keystrok es to words in
its linguist ic database of approximately 60,000 words and proper names. You
may also store additional word s you fre qu ently use in yo ur own user databa se,
which is incorporated into the T9 database.
T9 Text Input is availa ble when yo u are typing in formatio n into your pho ne (for
example, in the Phonebook or Da te bo ok ) an d while us in g N exte l Wire le s s Web
services.
T9 Text Input Entry Modes
Four text entry modes are available in T9 Text Input: Alpha, Word, Symbols,
and Numer ic . Wh e n yo u are us in g T9 Te xt Input, an icon in th e to p r i gh t corner
24
nextel.com
Page 33

Using T9® Text Input
of your phone’s displa y screen (next to the battery strength indicator icon)
indicates the T9 Text Input entr y mode you are using:
Icon* T9 Entry Mo de
Used For...
Name
w
Alpha Standard “multi-tap” keypad
text entry.
# Word Entering words and
punctuation with one keypress per character.
! Symbols Entering punctuation and
symbols such as “@” o r “?”.
, Numeric Enterin g ke yp a d nu mbers.
NOTE: * T9 icons do not display while you are using Nextel Wireless
Web services.
Choosing a Text Entry Mode on Wireless Web
When you are using Nextel Wireless Web services, T9 Text Input becomes
available whenever you access a screen that requires you to enter text. The right
display option on your the phone’s screen indicates your current T9 Text Input
text entry mode:
• ALPHA and alpha for Alpha mode
• WORD or word for Word mode
• SYM1, SYM2, SYM3, or SYM4 for Symbols mode
• NUM for Numeric mode
To change text entry modes, press the C under text entry mode until the desired
mode displays.
NOTE: The rest of t he in stru cti ons for usi ng T9 Text Input apply only to
entering text in applications other than Nextel Wireless Web
applications (for example, Phonebook). See the
Web User’s Guide
using T9 Text Input for Nextel Wireless Web services.
available on nextel.com, for instructions on
Nextel Wireless
25
Page 34

Choosing a Text Entry Mode
You can select your text entry mode from a menu available whenever the phone
is displaying a screen that requires you to enter text (for example, the Name
screen or Title screen).
To choose a text en tr y mod e:
1
From any screen that requires text input, press q to access the Entry
Method menu.
A check mark appears next to the current text entry mode. When y ou
access a screen that requires text input, the default text entry mode i s
Alpha.
2
Press S to scroll to the desired text entry mode.
3
Press C under SELECT.
The phone returns to the text entry screen. The icon displays indicating
the active text entry mode.
Choosing a Language
To change the language of the T9 Text In put database:
1
From any screen that requires text input, press q to access the Entry
Method menu.
2
Press S to scroll to Languages.
3
Press C under SELECT.
4
Press S to scroll to the language you want T9 Text Input to use.
5
Press C under SELECT.
NOTE: This feature is not available when using T9 Text Input with
Nextel Wireless Web services.
26
nextel.com
Page 35

Using T9® Text Input
Using Alpha Mode
To enter text (letters and numbers) while in Alpha text entry mode:
• Press any key on the alphan um e ric keyp a d to en ter the le tters an d n umb ers
on that key. For example, to enter the letter Y, press 9 three times.
• Type a letter then p re ss Q t o ac tiv ate Caps Loc k or type a letter then press
R to deactivate Caps Lock .
• Pause briefly to leave th e currently displayed character in place and move
on to the next place in the text entry field.
• Press P to create a space in the text ent ry field.
• Press C under DELETE to delete one character. Press and hold C under
DELETE to delete an entire entry.
Using Word Mode
T9 Text Input software replaces conventional multi-tap text entry, enabling
users to compose text messages with only one key press per letter. S ince each
key on a telephone keypad has more than one letter, pressing the number 5 could
represent “J,” “K,” or “L.” T 9 automatically compares users’ key presses to a
linguistic database to determine the correct word. For example, entering the
word “call” into a wireless phone takes just four key presses with T9, compared
to ten using conventional multi-tap entry.
Special Key Functions
Some of your phone’s keys assume different functions while in T9 Text Input
Word mode.
Backspace and Erase
Space
Next Word in Database If the displayed word is not the word you want
Press
or to erase a single character. Press and hold
C under DELETE once to backspace
C under DELETE to erase the entire text
entry field.
Press R once to accept a word and insert a
space when entering text.
to enter, you can display other words. Press
0 to display more words in the database
that match the keystroke sequence you
entered.
27
Page 36

Shift and Caps Lock
Punctuation In Word mode, T9 Text Input uses Smart
Press # to make the next letter typed
uppercase (Shift), to make all subsequent
letters types uppercase (Caps Lock), or to go
back to lowercase letters.
These icons appear in the top row of your
display screen:
$ for Shift to uppercase
•
x for Caps Lo ck
•
When neither of these icons appear, letters
typed are lowercase.
Punctuation to quickly apply basic rules of
grammar to insert the correct punctuation
within a word and at the end of a sentence.
• Press 1 to insert punctuation. One of
eight basic punctuation symbols will be
inserted (., -’ @:?;).
• Press 0 to change the inserted
punctuation symbol to another of the
eight basic punctuation symbols.
• Press R to accept the punctuation and
continue typing.
NOTE: Additional punctuation symbols are available in Symbols mode.
Entering a Word
To enter a word using Word mode:
1
Choose Word a s your text entry mode.
2
Type a word by using one key press per desired letter.
For example, to type “t est ” press 8 3 7 8.
NOTE: The displayed word may change as you type it. Do not try to
correct the word as you go. Type to the end of the word
before e diting.
28
nextel.com
Page 37

3
After you have finished typing the word, if the word that appears is not
the desired word, press 0 to change the word on the displa y to the
next most likely word in the database.
Repeat until the desired word appears.
If the desir ed word does not appear, you can add it to the data base of
words by deleting the displayed word and using the following
instructions in “Adding Words to the User Database” on page 29.
Adding Words to the User Database
To add words to the T9 database:
1
Change from Word text entry mode t o Alpha text entr y mode (see
“Choosing a Text Entry Mode” on page 26).
Using T9® Text Input
2
Type the word using Alpha t e xt entry mode.
3
Return to Word text entry mode.
4
Press R to add a space.
The word you typed in Alpha text entry mode is now in the database.
NOTE: Y ou can not store alphanumeric combinations, such as Y2K.
Using Symbols Mode
To use Symbols text entry mode:
1
Choose Symbols as your text entry mod e.
A row of 32 symbols appears along the bottom of your phone’s display
screen, jus t above the disp lay op tions a nd menu icon . (Pres s T to vie w
the complete row.)
2
Press T to highlight the symb ol you want to enter into th e text entry
field.
3
Press C under SELECT to enter the symbol.
29
Page 38

Using Numeric Mode
To use Numeric text entry mode, choose Numeric as your text entry mode and
press the number buttons on your keypad to enter numbers.
30
nextel.com
Page 39

Display Essentials
Your i60c phone’s display screen tells you what you need to know as you use
your phone.
This section includes:
Display Screen Page 31
Status Icons Page 32
Text Display Area Page 34
Call Information Icons Page 34
Menu Icon Page 35
Display Options Page 35
Navigatin g Menus and Lists Page 35
Main Menu Options Page 36
Display Scre en
Any time your phone is powered on, the display screen provides you with
information and options.
When your phone cover is open, the dis play screen provides detailed
information about all of yo ur phone’s funct ions.
Opening and Closing Phone Cover
If you are viewing information on the display screen, closing the phon e cover
terminates any activity your phone is engaged in — except power ing up or
transferring data through a cable.
31
Page 40

Display Screen
icon
rows
The display scre en consists of:
• status icon rows — the top two rows
display stat us. See “Status Icons” on
page 32.
• text display a rea — displays up to five
lines of text and icons.
• menu icon — see “Menu Icon” on
page 35.
• display options — see “Display Options” on page 35.
NOTE:There are instances where truncation
of words occur in some of the menu
i60c
items on the
allow you to fully view the current
menu selection. You can press
under CHANGE to see the field in
more detail.
The Idle Screen
phone that do not
O
C
W
Text
display
area
Menu
icon
Display
options
The illustration of the display screen shows the idle screen. The idle screen
displays NEXTEL and the time and date.
The idle screen displays any time the phone is powered on, but not engaged in
some activity. You must start at the idle screen to access many of your phone’s
features and functio ns. You can always access the idle screen by pressing r.
USER TIP: When your phone c over is open, cl osing and re -openin g the
phone cover accesses the idle screen.
Status Icons
Status icons appear in the two rows at the top of the display screen. Some appear
at all times. Others appear only when your phone is engaged in certain activities
or when you ha ve activated certain features.
Icon Indicates...
abcd
efgd
Battery Strength — remaining battery
charge. More bars on the battery indicate a
greater charge. See “Battery Cha rging
Status” on page 12.
32
nextel.com
Page 41

Status Icons
opqrs Signal S tr ength — strength of the network
signal. More bars next to the antenna
indicate a stronger signal. Four bars is the
maximum.
01
GHI
JKL
c Phone In Use — phone is connected on an
h Private In Use — num ber b eing c alled is a
% Talkgr o up I n Use — phone is active on a
Y Packet Data Ready — phone is ready to
Z Packet Data Activity — phone is
Activ e Li ne — currently activ e phone lin e;
0 indicates Line 1 is active; 1 indicates
Line 2 is active.
Call Forward — phone is set to forwar d
calls. See “Call Forwardi ng” on page 71.
active call.
Private ID.
Group Cal l.
receive data through a data cable.
transmitting data.
] Mobile IP — phone is ready to access the
Internet.
{ Secure Data — phone is accessing the
Internet using a secure connection.
. Text Message — you have one or more
unread Text Messages or Net A l ert
messages.
y Voice Mail — you have one or mor e
unheard Voice Mail messages.
u Speaker Off — phone’s speaker is off.
33
Page 42

-[\* Ring/Vibe — you have customized the
way in which the ph on e is set to no tify yo u
when you receive cal ls an d other types of
messages. See “Ring Style and Notification
Type” on page 125.
w#,!
$x
`
The icon of the main men u feature in use always appears in the top left of the
status icon rows. For a list of the main menu ic ons, see “Main Menu Optio ns” on
page 36.
T9 Text Input — you are using T9 Text
Input to enter text. See “Using T9® Text
Input” on page 24.
TTY— your phone supports TTY devices
and communications
Text Display Area
The display screen’s text display area di splays menu options, messages, names,
phone numbers , and other information.
Call Information Icons
Each of the following icons appears on the left side of the text display area of the
display scre en, provi ding you with information about your calls.
Icon Indicates...
D In Call - phone is on an active call.
E Incoming Call - phone is receiving an
incoming call.
X Outgoing Call - phone is placing an
outgoing call.
V On Hold - phone has a call on hold.
? End Call - phone has ended the active call.
nextel.com
34
Page 43

Menu Icon
Menu Icon
The menu icon S appears on any screen from whi ch a menu can be accessed.
To access a menu, press q on your keypad.
Menus are context sensitive. The menu that appears depends on the screen you
access it from, and the items on the menu apply to the task you are currently
performing.
Press q from the idle screen to access the main menu.
Display Options
On the display screen, two display options appear at the bottom of most screens.
These options enable you to perform a wide variety of actio ns, including
changing, saving and view ing informat ion, runnin g pr ograms, and canceling
previous actions. You activate a display option by pressing C below it.
NOTE: Throughout this
be represented by
The idle screen di splay options pr ovide qu ick acces s to two main menu featu res.
By default, the Phonebook (PHBK) and Messages (MESG) display options
appear on the idle screen.
The display options on screens other than the idle screen cannot be customized.
User’s Guide
C.
, the option keys A and B will
Navigating Menus and Lists
The i60c phone is menu driven. By n avigating menus, you access submenus
which lead to all of th e func tions an d featu res tha t are b uilt into you r phone . Use
the menus to store calls, ma nage your Phonebook, change you r phone settings,
browse the Internet, and more.
Some featur es include list s of names, numbers, or other information. These list
items can be accessed th e same way menu option s are.
To access the items in a menu or list, scroll using the four-way navigation key at
the top of your keypad. Scroll down by pressing the lower portion of the
navigation key R. Scroll up by pre ssing the upper po rtion of the na vigatio n key
Q. Holding down the appropriate part of the navigation key speeds up
scrolling.
35
Page 44

If more items appear in a menu or list than can be displayed in th e text area, a
down arrow or up arrow appears in the left si de of the screen indicating that
more options may be accessed by scrolling up or down.
Down arrow Up arrow
B
Main Menu Options
By default, the main menu options appear in the order shown in this table.
To access the main menu, press q from the idle screen:
Menu Item Use to ...
7 Net
m Settings Customize your phone: Ring/Vibe, Phone
b Phonebo o k Store and retrieve a li st of stored e ntries for
Browse the Nextel Wireless Web.
Setup, In Call Se tup, Security, Initial Setup,
Voice Volume, and Talkgroup Settings.
calling, editing, viewing, and deleting.
S
R Messages Receive, store, access, and manage Voice
; Call Forward Settings for forwarding calls in various
O Memo Input and store numbers to access later.
z Call Timers Display the duration of ph one calls, Private
36
Mail, Text Messages, and Net Alert.
situations.
or Group Calls, circuit data use, and
Kilobytes s ent and received.
nextel.com
Page 45

Main Menu Opt ions
j Recent Calls Access a list of the last 20 sent, received, or
missed calls. Calls can be made from this
list.
U My Info V iew the name, Private ID, phone numbers
for lines 1 and 2, IP address , and circuit
data number of your phone.
: Call Alert Store received Nextel Direct Connect Call
Alerts to respond to at your convenience.
To choose the highlighted main menu selection, press C under SELECT. To
exit the main me nu and return to the id le scree n, pr ess C under EXIT, press r,
or close the phon e cover.
37
Page 46

38
nextel.com
Page 47

Phonebook
The Phoneboo k allows you to store up to 250 frequently used names and
numbers.
When you store information in your Phonebook, it is saved on your SIM card. If
you move your SIM card to another Nextel SIM-based phone, you can access
informati on in your Phoneb ook from that phone.
NOTE:If you use a different SIM card in your phone, some information
stored in the phone will be unavailable. See “Inserting/
Removing the SIM Card” on page 19.
This section includes:
Phonebook Entries and Speed Dial Numbers Page 40
Phonebook Icons Page 40
Accessing Your Phon ebook Page 41
About Phonebook Entries Page 41
Viewing Phonebook Entries Page 42
Sorting Phonebo ok Entries Page 42
Adding Phonebook Entries Page 44
Editing Phonebo ok Entries Page 49
Deleting Phonebook Entries Page 50
Pause Digit Entry Page 50
Plus Dialing Page 51
Address Book Page 52
39
Page 48

Phonebook Entries and Speed Dial Numbers
Your Phonebook can store multiple nu mbers to a single name. Fo r example, yo u
can ente r som eon e’s n ame in to yo ur Phon eboo k on ce a nd th en ad d tha t per so n’s
home, office, mobile phone and fax numbers to the name. You can store up to
seven phone numbers, a Private ID, and an IP address.
Each number stored in your Phonebook is automatically assign ed a Speed Dial
number tha t c o r re sp o nd s to its location in your Phonebo ok . Ea c h ph on e nu m be r
uses one Speed Dial l ocation, even if it is a ssi gned to the same name as other
phone numbers. The phone number sto r ed in location 1 is as sig ned Speed Dial
number 1, the phone number stored in location 2 is assigned Speed Dial number
2, and so forth, to location 250.
NOTE:Private IDs and Talkgroup numbers do not have associated
Speed Dial numbers.
Phonebook Icons
Icons that appear to the right of entries in your Phonebook convey information
about those entries.
When you enter a number in you r Phonebo ok, you can designate the number’s
type using an y of the following icons:
W Mobile
h Private ID
q Work
Q Main
L Home
b Pager
K Fax
Z Other
n Talkgroup
IP Address
40
nextel.com
Page 49

Accessing Your Phonebook
NOTE:The Mobile icon automatically appears to the right of the first
number assigned to a name unless you choose another icon.
For more information on entering numbers into your Phonebook, see “Adding
Phonebook Entries” on page 44.
The “picker” arrows appearing around the number type icon indicates multiple
number s stored under on e na m e:
ef pickers
Accessing Your Phonebook
If PHBK is one of your displ a y options:
From the idle screen, press C under PHBK.
If PHBK is not one of your disp lay options:
1
From the idle screen, press q.
2
Press R to scroll to Phonebook.
3
Press C under SELECT.
USER TIP:You can also access the Phonebook while you are on an
active call. Press
Phonebook and press
q and then press R to scroll to
C under SELECT.
This brings you to the Phonebook screen. From this screen, you can view, sort,
add, edit, and delete Phonebo ok entries, check Phonebook cap acity, or make
calls.
About Phonebook Entries
Each Phonebook entry may contain the following information:
• The name associated with the entry: Typ i call y, this is the name of the
person whose number you are storin g in the Phonebook.
41
Page 50

• The type of number to be stored: Mobile, Private, Work, Main, Home,
Pager, IP, Fax, Other, or T alkgroup. If you don’t choose a type, the number
is assigned type Mobile, unless a Mobile number has already been assigned
to the name.
• The number to be stored: Every Phonebook entry must co ntain a number.
This number may be any type of phone number, Private ID or Talkgroup
number, or an IP address.
• A Speed Dial number: You may accep t the default Speed Dial number or
assign a different one.
Viewing Phonebook Entries
Names with more than one number assigned to them appear with ef
surrounding the icon to the right of the name. For example, if you had stored a
home and work number for Joe Smith, the entry for Joe Smith’s home phone
number would look like this:
Joe Smith eLf
When the name is highlighted, press T to scroll to the icons representing each
of the numbers assigned to that name.
To view any of the numbers assi gned to a name:
1
From the Phonebook screen, press S to scroll to the name associated
with the number you want to see.
2
Press T to view the icons representing the numbers assigned to that
name.
3
When the icon re pr es en tin g the number you want to view is disp laye d,
press C under VIEW.
Or,
If there is a Private ID or a Talkgroup number stored for the entry, press
q. Then press R to scroll to View and press C under SELE CT.
4
Press S to view the other numbers stored fo r this name.
Sorting Phonebook Entries
You can sort your Phonebook entries by:
• Name — the nam e you en te r e d for the en tr y.
• Speed No. — the Speed Dial location of the entry.
42
nextel.com
Page 51

NOTE:Private IDs and Talkgroup numbers cannot be accessed from
the Phonebook when sorted by Speed Dial location.
To sort your Phonebook list:
1
From the Phonebook screen, press q to
view the Ph onebook Men u screen.
2
Press R to scroll to Sort By.
3
Press C under SELECT.
About Phonebook Entries
}
4
Press R to scroll to the desired sorting method: Name or Speed #.
5
Press C under SELECT.
Checking Phonebook Capacity
Your Phonebook can store up to 25 0 separate numbers. To see how many
entries are stored in your Phonebook:
1
From the Phonebook screen, press q to view the Phoneb oo k Me nu
screen.
2
Press R to scroll to Capacity.
3
Press C under SELECT.
The Capacity screen shows how many storage spa ces in your
Phonebook are in use and how many are empty.
43
Page 52

Adding Phonebook Entries
Using the following instructions, you will enter the information in the order the
items appear on the Phonebook Entry Details screen. However, you can ent e r
this information in any order by pressing S to scroll through the items on the
Entry Details screen.
You can leave items blank or unchanged by pressing S to scroll past it on the
Entry Details screen.
NOTE:Number and type are required for a valid Phonebook entry.
To cancel a Phonebook entry at any tim e, press r to return to the idle screen.
To add a Phonebook entry:
1
To access the Entry Details screen:
From the Phonebook screen, with [New
Entry] highligh te d, pres s C under
SELECT.
Or,
From the Phonebook screen, press q.
Then press R to scroll to New and press
C under SELECT.
2
If you want to assign a name to your
Phonebook entry:
W ith the Name field highlighted, press C
under CHANGE.
From the Name screen, enter the name
using the alphanumeric keypad.
H
I
See “Using T9 ® Text Input” on page 24
for information about entering text into this field.
When you are fi nis h e d, pr e s s C under OK.
The Entry Details screen returns with the Type field highlighte d.
44
nextel.com
Page 53

3
With the Type field highlighted, press C
under CHANGE.
From the Type Editor screen, press R to
scroll to the type of number you want to
assign to the Phonebook entry.
About Phonebook Entries
Press C under SELECT.
J
The Entry Details screen returns with the
# field highlighted.
4
Assign a number to your Phonebook entry:
W ith the # field highlighted, press C under CHANGE.
Type the number using the alphanumeric keypad. For phone numbers,
use the 10-digit format. For Private IDs, use
Area ID * Network ID * Member ID (the aste r isks must be included as
part of the Private ID).
To delete a digit, press C under DELETE.
See “Pause Digit Entry” on page 50 and
“Plus Dialing” on page 51 for information
on using these features when storing
phone number s in your Phoneb ook.
NOTE:The num ber can be up to 20
characters long.
When you are fi nis h e d, pr e s s C under
OK.
The Entry Details screen returns with the Speed # field hig hlighted.
K
45
Page 54

5
The default Speed Dial number assigned to the phone number is
displayed in the Speed # field. This is always the next available Speed
Dial location.
NOTE:Private IDs and Talkgroup
numbers do not have associated
Speed Dial numbers.
To accept the default Speed Dial location,
go to step 6.
If you want to assign the phone number to
a diff e r ent Speed Di al location :
L
W ith the Speed # field highlighted, press
C under CHANGE.
Press C under DELETE to delete the current Speed Dial number.
Type the new Speed Di al number using the alphan umeric keypad.
When you are fi nis h e d, pr e s s C under OK.
NOTE:If you change the Speed Dial number to one already in use,
you will be prompted to overwrite the entry that is currently
in that location. Pressing
existing entry from your Phonebook.
6
If you want to store more numbers to the
name associated with this Phonebook
entry:
Press R to scroll to TYPE and then press
C under CHANGE.
A new Type field appears for the
additional number.
Enter the information for the additional numbers using step 3 through
step 7.
NOTE:Each name in your Phonebook may have up to seven phone
numbers, one Private ID and one IP address associated with
it.
C under YES will delete the
l
46
nextel.com
Page 55

About Phonebook Entries
7
When you have entered all the
information for this Phonebook entry,
press C under DONE.
N
Storing Numbers and Private IDs Fast
Your phone gives you two ways to store numbers quickly: from the idle screen
and from the Recent Calls list.
To store a number from the idle screen:
1
From the idle screen, use the alph anumeric keypad to enter the number
you want to sto re. For phone numbers, use the 10-digit format. For
Private IDs, use Area ID*Network ID*Member ID.
2
Press q to access the Dialing Menu screen.
3
With Store Number highlighted, press C under SELECT.
This displays the Store To screen with [New Entry] highlighted.
4
To store to a new entry, press C under SELECT. The Entry Details
screen will display with the number entered in the field.
Or,
To sto re to an existi ng entry, press R to scroll the list of names in
your Phonebook. Or press the first letter of the entry to jump to the
entry. Once the desired entry is highlighted, press C under SELEC T.
The Phonebook information for t hat entry displays with the number
entered in the # field and the Type field highlighted.
5
Press C under CHANGE. Press R to scroll to the type of number you
want to assign to the Phonebook entry. Press C under SELE CT.
47
Page 56

6
If you want to ad d more information to the Ph on e book en try, follow the
applicable instructions in “Adding Phonebook Entries” on page 44.
7
Press C under DONE.
To store a phone number from the Recent Calls list:
1
From the Recent Calls screen, press R to scroll to the 10-digit
telephone number you want to store.
2
Press C under STORE. Thi s displays the Store To screen with [New
Entry] highlight e d.
3
To store a new entry, press C under SELECT. The Ent ry Details
screen displays with the number entered in the # field and the Name
field highlighted. Ent er th e na me u si ng the alphanu me ric ke ypad. Press
C under OK.
Or,
To sto re to an existi ng entry, press R to scroll the list of names in
your Phonebook. Or press the first letter of the entry to jump to the
entry. Once the desired entry is highlighted, press C under SELEC T.
The Phonebook information for t hat entry displays with the number
entered in the # field and the Type field highlighted.
4
With Type highlighted, press C under CHANGE. Press R to scroll to
the type of number you want to assign to the Phonebook entry . Press C
under SELECT.
5
If you want to ad d more information to the Ph on e book en try, follow the
applicable instructions in “Adding Phonebook Entries” on page 44.
6
Press C under DONE.
48
nextel.com
Page 57

To store a Private ID from the Recent Cal l s list:
1
Press R to scroll to the Private ID number you want to store.
NOTE:The Store option for Private ID numbers (e.g., 123*123*1234),
will not display in the Recent Calls list.
2
W ith the Private ID highlighted, press q to access the Rece nt Calls
Menu. Press R to scroll to Store. Press C under SELECT. This
displays the Store To screen with [New Entry] high lighted.
3
To store to a new entry, press C under SELECT. The Entry Details
screen displays with the P r iv ate ID icon entered in the Type field, the
Private ID number entered in the # field, and the Name field
highlighte d. With the Name field hig hlighted, press C under
CHANGE. Enter the name using the alphanumeric keypad. Press C
under OK.
About Phonebook Entries
Or
To sto re to an existi ng entry, press R to scroll the list of names in
your Phonebook. Once the desir ed entry is high lighted, press C under
SELECT. The Entry Details screen displays with the Private ID icon
entered in the Type field, the Private ID number entered in the # field,
and the Name field highlight e d.
4
Press C under DONE.
Editing Phonebook Entries
1
From the Phonebook screen, press R to scroll to the entry you want to
edit.
2
Press q to view the Phonebook Men u.
3
Press R to scroll to Edit.
49
Page 58
4
Press C under SELECT. The Entry Details screen displays.
5
Follow the applicable instructions in “Adding Phonebook Entries” on
page 44 to edit the various fields.
NOTE:To add additional numbers to an existing entry, press R to
scroll to MORE. Press
applicable instructions in “Adding Phonebook Entr ies” on
page 44.
Deleting Phonebook Entries
1
From the Phonebook screen, press R to scroll to the entry you want to
delete.
2
Press q to view the Phonebook Men u.
3
Press R to scroll to Delete Contact or Delete Number.
C under SELECT. Follow the
Delete Contact deletes the name and all numbers associated with that
name.
Delete Number deletes the number associated with the icon that is
currently displayed in the Phonebook list for the name. The name and
all the other numbers will remain.
4
Press C under SELECT. A warning screen displays requiring you to
confirm the deletion.
Pause Digit Entry
When storing a number, you can program your phone so it will not only dial a
number but also pause before entering another series of numbers such as a
personal identification number (PIN) or password. This feature is particularly
useful for accessing automated services such as voice mail and banking systems
from your i60c phone.
Example: Let’s say you have a company voice mail account that you frequently
check while traveling. And, to access that account you must do the following:
• dial your work number
50
nextel.com
Page 59

Plus Dialing
• press # while the voice mail greeting is being played
• enter your PIN to access your messages
You can program your phone to enter all of the above in formation for you by
separating each entry with a pause. The stored data would look like this:
170355512 34P#P1234. In this exa m ple, the first eleven digits r epresent the
number that must be dialed to access your voice mail. The P represents a 3
second pause. The # interrupts your greeting. The second P represents another 3
second paus e . The last fou r digits represent your PIN .
To create a three-second pause, follow the steps belo w:
Press and hold * for two seconds. The pause symbol (P) will appear
on the display screen.
NOTE:You can enter up to 20 characters in a single entry, stored or
dialed. You can program your phone to pause for more than 3
seconds. Performing the above step twice will program two
pauses and cause your phone to wait 6 seconds bef ore entering
the next set of numbers.
Plus Dialing
Use Plus Dialing for all Phonebook entri es if you plan to travel outside the
United States. This feature enables you to place an international call from most
countries—without entering the local international access code. You can enter
phone numbers into your Phonebook using either Plus Dialing and Storing
Numbers Fast or Adding Phoneboo k Entries and Plus Dialing.
To add a phone number using Plus Dial ing and Storing Numbers Fast:
1
Press and hold 0 for two seconds. A “0” appears, then ch anges to a
“+”.
NOTE: The network translates the “+” into the appropriate international access
code needed to place the call.
2
Enter the country code, city code, or ar ea code, and phone number.
3
Continue by fo llowing the re maining inst ructions for “S torin g Number s
and Private IDs Fast” on page 47.
51
Page 60

To add a phone number using Adding Phone Book Entries and Plus
Dialing:
1
Begin by following the instructions for “Adding Phonebook Entries” on
page 44. Before you type the number to be stored, foll ow the rest of
these instructions for using Plus Dialing.
2
Press and hold 0 for two seconds. A “0” appears, then ch anges to a
“+”.
NOTE: The network translates the “+” into the appropriate international access
code needed to place the call.
3
Enter the country code, city code, or ar ea code, and phone number.
Continue with the Phonebook entry, following the remaining
instructions for “Adding Phonebook Entries” on page 44.
Address Book
Manage your contact inform ation with Address Book. Address Book provides
easy maintenance and entry of contact in formation and access t o t hat
information from your i60c phone or nextel.com. Address Book is a Nextel
Wireless Web service and requires the activation of a Nextel Online
SM
Service
Plan. To order, contact Nextel Customer Care.
For instructions on how to use this application, see “Address Book” in the
Nextel Wireless Web User’s Guide available on nextel.com
52
nextel.com
Page 61

Digital Cellular
The i60c phone utilizes Nextel’s All-Digital National Network for digital
cellular service. You can also use this phone to roam internationally on other
iDEN networks using Nextel W or ldwide Servi ce. See nextel.com for coverage.
This section includes:
Making Phone Calls Page 54
Emergency Calling Page 58
Special Dialing Codes Page 59
Receiving a Phone Call Page 59
Ending a Phone Call Page 60
Recent Calls Page 61
Call Timers Page 64
Hands-Free Speakerphone (Optional) Page 65
Mute Page 66
Call Waiting Page 66
Call Hold Page 69
Three-Way Calling Page 70
Call Forwarding Page 71
Caller ID Page 75
Alternate Line Service Page 76
Call Restrictions Page 77
Nextel 411 Page 77
53
Page 62

Making Phone Calls
Your i60c phone provides the following features for making phone calls:
• Direct Dial
• Phonebook
• Recent Calls
• Most Recent Call
• Speed Dial
•Turbo Dial
• Last Number Redial
• TTY — your phone supports T TY devices and communications.
Using Direct Dial
1
From the idle screen , use the ke ypad to enter the 10 -digit p hone numb er
you want to call.
®
2
Press s to place the call.
3
Press r or close p hone cover to end the call.
NOTE:See “Plus Dialing” on page 51 for information on making
international calls.
If you make a mistake :
• To clear one digi t, press C under DELETE.
• To clear all digits, press and hold C under DELETE.
• To insert a digit, press T to move the cursor.
• To cancel, press r.
Making Calls from the Phonebook
After you hav e entered phone numbers into your Phonebook, you can use these
numbers to ma ke phone calls. For infor mation on ent e ring numbers into your
Phonebook , see “Adding Phonebook Entri es” on page 44.
54
nextel.com
Page 63

To make calls from the Phonebook:
1
From the idle screen, if PHBK is one of your display options, press C
under PHBK.
Or,
From the idle screen, press q, then press R to scroll to Phonebook.
Press C under SELECT.
2
Press S to scroll through the names in your Phonebook.
Or,
Use the alphanumeric keypad to enter the first letter of the name and
press R to scroll through the names beginning with that letter.
Stop when the name of the person you want to call i s highlighted.
Making Phone Calls
3
If more than one number is stored for the person you want to call, ef
appears around the icon to t he right of the person’s name.
Press T to scroll through the icons representing the numbers stored for
that pers on.
Or,
Press C under VIEW to view all the numbers stored for this person.
Then press R to scroll to the number you want to call.
Or,
If there is a Private ID stored for this person , press q. When the
Phonebo ok Menu appears, press R to scroll to View and press C
under SELECT. Then press R to scroll to the number you want to call.
For more information on assigni ng multiple numbe rs to one person, see
“Adding Phonebook Entries” on page 44.
4
Press s to place the call.
5
Press r or close phone cover to end the call.
55
Page 64

Making Calls from the Recent Calls List
Your phone stores the numbers of the last 20 calls you received or sent in the
Recent Calls list.
1
From the idle screen, press R.
Or,
From the idle screen, press q. Press S to scroll to Recent Calls.
Press C under SELECT.
2
Press S to scroll through the list of received or sent recent calls until
you reach the desi red call.
3
To view additional information about the call:
Press C under VIEW.
Or,
Press q to access the Rec. Calls Menu. Then press R to scroll to
View and press C under SELECT.
4
Press s to place the call.
5
Press r or close phone cover to end the call.
Using Speed Dial
Each phone number stored in your Phonebook is assigned a Speed Dial number.
You can use the Spee d Dial number to quickly place a call.
1
From the idle scre en, enter the Speed Dial number assigned to the
phone number you want to call.
2
Press #. The number’s Phonebook entry information will display.
3
Press s to place the call.
4
Press r or close phone cover to end the call.
56
nextel.com
Page 65

Making Phone Calls
Using Turbo Dial
Turbo Dial allows you to call the numbers in you r Phonebook associat ed with
Speed Dial numbers 1 through 9 by pressing and holding the corr esponding
numeric key on the keypad.
Press and hold a number key (1 t hrough 9).
NOTE:Tu rbo Dial cannot be accessed while the browser is active, nor
while Keypad Lock or SIM Lock is active.
Last Number Redial
Press and hold s to redial the last number you cal led.
NOTE:If you receive “System Busy, Try Later,” press s to redial the
number automatically. You will hear a ring-back tone when the
call is successfully placed.
Making TTY Calls
NOTE:TTY may not be available in all
areas.
You can use your phone to make calls using a
TTY device.
When you make a TTY call, the call be g ins in th e
TTY mode you last selected. You can change the
TTY mode during a call. For more information on
choosing a TTY mode, see “Setting TTY Mod e”
on page 134.
To make a call using a TTY device:
1
Connect one end of a 2.5mm cable into the jack on the phone. (T o locate
the jack, see page 6.) Connect the other end of the cord into you r TT Y
device.
Q
2
Enter the phone number you wish to call and press s.
57
Page 66

Placing International Phone Calls
When making an international call, you can either enter the international access
code directly (for example, 011 in t he Uni ted States) or use Plus Dialing.
You can make int e rnational calls from your Phonebook if you have stored the
numbers with Plus Dialing. See “Adding Phonebook Entries” on page 44 and
“Plus Dialing” on page 51 for more information.
NOTE:Y our service default is “International Calls Restricted.”
Contact Nextel Customer Care to obtain international dialing
access.
To make an international call using Plus Dialing:
1
Press and hold 0 for two seconds. A “0” appears, then changes to a
“+”.
NOTE:The network translates the “+” into the appro p riate
international access code needed to place the call.
2
Enter the country code, city code, or area code (as needed), and phone
number.
3
Press s to place the call.
4
Press r or close ph one cover to end the call.
Emergency Calling
Your phone supports emergency calling. Emergency calls can be made even
when the SIM card is blocked or not in the phone.
To plac e a ca l l in an emergency, press 911s. You will be connected to
the nearest emergency dispatch center. If you are on an active call, you must end
it before calling 911.
NOTE:If you have enabled the Keypad Lock feature, you must unlock
the phone’s keypad before any calls can be made, including 91 1
emergency calls.
58
nextel.com
Page 67

Special Dialing Codes
Special Dialing Codes
Non-Emergency Numbers
Nextel sup ports ma ny “non -emergenc y” numb ers (su ch as #77 , 311, ...) pr ovided
by local and state governments. These numbers are used to report
non-emergen cy incidents. If t he si tuation inclu des imminent danger or loss of
life, you should dial 911.
Telecommunications Relay Service
Nextel supports services for communicating with speech and/or hearing
impaired individuals. You can press 711 to reach a local
Telecommunications Relay Center. You will then be connected to your
destination number. Relay service works through a Communications Assistant
who reads messages typ ed into a TDD/TTY device by a speech or hearing
impaired individual to you. The Communications Assistant then types your
spoken messages to th e hearing or speech impair ed individual.
Telecommunications Relay Ser vice is available 24 hours a day, seven days a
week, and every cal l is st rictly confidentia l.
NOTE:Using 711 to reach Telecommunications Relay Service may not
be available in all areas.
Receiving a Phone Call
Incoming calls are indicated by a ring, vibration, or backlight illumination.
When the cover is open, the screen will display:
• the caller’s name if stored in yo ur Phonebook, or
• the 10-digit phone number if Caller ID information is available.
Otherwise, the screen will display Incoming Call.
Cover Open
Press s or any key o n the keypad, or pr ess C under YES to answer
the call.
59
Page 68

Cover Closed
Press t on the top of your phone.
The call will be activated with speakerphone on. See “Hands-Free
Speakerphone (Opt ional)” on page 65.
Or,
Open the phone cover to use the earpiece.
USER TIP:You can turn down the ringer volume by pressing the
volume but tons on the si de of your pho ne w hile the phone is
ringing.
Sending Unanswered Calls to Voice Mail
Cover Open
Press r or press C under NO while your phone is ringing or close the
phone cover to transfer incoming calls directly to Voice Mail.
Cover Closed
Press . on the top of your phone, while your phone is ringing, to
transfer incoming calls directly to Voice Mail.
Ending a Phone Call
Cover Open
Press r or close the phon e cov er.
NOTE: If the setting for Flip Activation is set to OFF, closing the cover will not end
the call.
60
nextel.com
Page 69

Recent Calls
Cover Closed
Press . on the top of your phone.
Recent Calls
The Recent Calls feature stores the numbers of the 20 most recent calls you have
made and received, including Private and Group Calls. You can also vi ew your
most recent call on the one- line display screen without opening you r phone
cover.
With the pho ne cover open, you can access Rec ent Calls list to:
• view your rec e nt calls
• store numbers to the Phonebook
• delete recent calls
• call numbers on the Recent Calls list
NOTE:The Recent Calls list displays briefly on the display screen after
you end a call.
Recent Calls Icons
For Private Calls, Group Calls, and phone numbers stored in your Phonebook,
an icon appears to the right of the name or number indicating the Phonebook
type of the number used in the call. See “Phonebook Icons” on page 40 for more
information about Phonebook types.
For phone calls, an icon appears to the left of the name or number indicating the
type of call:
• N indicates an incoming call
• a indicates an outgoing call
• V indicates a missed call. (Missed calls
appear on your Recent Calls l ist only if
you have Cal ler ID.)
For Nextel Direct Connect ca lls, an icon
appears to the left of the nam e or nu mbe r
indicating the type of call:
• h indicates a Priva t e C a l l
• n indica t es a G roup Call
T
61
Page 70

Viewing Recent Calls
If the number of the recent call is stored in your Phonebook, the name associated
with the number displays.
To view your Recent Calls li s t:
1
From the idle screen, press R.
Or,
From the idle screen, press q. Press S to scroll to Recent Calls.
Press C under SELECT.
2
Press S to scroll the list of recent calls .
Getting Detailed Information About Recent Calls
To get more information about a recent call:
1
From the Recent Calls screen, press S to scroll to the call you want
more information on.
2
Press C under VIEW.
Or,
Press q to access the Recent Calls Menu. Then press R to scroll to
View and press C under SELECT.
The screen that appea rs displays informati on such as the name assoc iated with
the number of the recent call, the number, the dat e, time, and duration of the
call.
62
nextel.com
Page 71

Storing a Recent Call Number to the Phonebook
To store a number from the Recent Calls list to the Pho nebook:
1
From the Recent Calls screen, press S to scroll to the number you
want to store.
2
Press C under STORE.
Or,
Press q to access the Recent Calls Menu. Press R to scroll to
Store. Press C under SELECT.
This displays the Phonebook Entry Details screen with the No. fie ld
filled in with the numbe r of the recent call .
3
If you want to ad d more information to the Ph on e book en try, follow the
applicable instructions in “Adding Phonebook Entries” on page 44.
Recent Calls
Calling From the Recent Calls List
See “Making Calls from the Recent Calls List” on page 56.
Deleting Recent Calls
To delete a recent call:
1
From the Recent Calls screen, press S to scroll to the call you want to
delete.
2
Press q to access the Recent Calls Menu.
3
Press R to scroll to Delete.
4
Press C under SELECT.
5
Press C under YES to confirm the deletion.
63
Page 72
To delete all calls on the Recent Calls list:
1
From the Recent Calls screen, press q to access the Recent Calls
Menu.
2
Press R to scroll to Delete All.
3
Press C under SELECT.
4
Press C under YES to confirm the deletion.
Missed Calls
If you miss a call, open th e cover a nd the scree n displays the missed c all icon V
and text indicating the number of calls you have missed. Pr ess C under VIEW
to display the Recent Calls list.
If you do not ope n the cover, pressing . dismisses the missed ca ll message.
Call Timers
Call Timers measure the duration of your phone ca lls, Private or Group Calls,
and circuit data use, as well as the number of Kilobytes sent and received by
your phone.
The Call Timers menu displays the following options:
• Last Call — displays the duration of your most recent phone call.
• Phone Reset — kee ps a r unnin g tot al of yo ur phon e cal l m inute s, unt il y ou
reset it.
• Phone Lifetime — displays the total minutes of all your phone calls.
• Prvt/Grp Reset — keeps a running tot al of all of your Private and Group
Call minutes, until you reset it.
• Prvt/Grp Lifetime — displays the total minutes of all your Private and
Groups Calls.
• Circuit Reset — keeps a running total of all of your circuit data use, until
you reset it.
• Circuit Lifetime — displays the total minutes of all of your circu it data
use.
• Kbytes Reset — keeps a running total of the numb er of Kilo bytes sent and
received by your phone, until you reset it.
64
nextel.com
Page 73

Hands-Free Speakerph one (Opt iona l)
To view the Call Timers menu:
1
From the idle screen, press q.
2
Press R to scroll to Call Timers.
3
Press C under SELECT.
To view or reset a Call Timers option:
1
From the Call Timers menu, press S to scroll to the Call Timers
option yo u want to view or reset.
2
Press C under SELECT.
3
If the feature does not include an option to reset or you do not wish to
reset the option, press C under DONE when you are finished viewing.
To reset a feature, press C under RESET. When the confirmation
screen appears, press C under YES to confirm the reset.
NOTE:The values displayed by Call Timers are not intended for billing
purposes.
Hands-Free Speakerphone (Optional)
The i60c phone provides the convenience of a hands-free speakerphone for
holding impromptu me etings or placi ng safer phone calls.
NOTE:To obtain the Hands-Free Speakerphone option, contact Nextel
Customer Care or visit nextel.com.
NOTE:During speakerphone operation, you may either speak or listen,
but you cannot do both at the same time.
Cover Open
The speakerphone option (SPEAKER) is av ailable whenever you are on an
active call with the phone cover open.
65
Page 74
To turn the speakerphone on:
While on an active call, press C under SPEAKER.
While spea kerphone is on, Spkrphone On appears in the text display area.
To turn the speakerphone off:
Press C under SPEAKER.
Cover Closed
Speakerphone is always on when you are on an active call with the cover closed
(unless you are using an audio accessory). If you open the cover, sp eakerphone
is turned off and the call will be heard through the earpiece.
Mute
Use the Mute feature to listen to incoming audio without allowing sound from
your phone’s microphone to be transmitted over the phone line. The mute option
(MUTE) is only available when you are on an active call with the phone cover
open.
To turn mute on:
While on an active call, press C under MUTE .
While mute i s on, UNMUTE appe ars as a display option.
To turn mute off:
Press C under UNMUTE.
Call Waiting
Call Waiting allows you to receive a second call while you are talking on the
phone. You can swi tch between ca lls so you never hav e to miss a call. By
default, Call Waiting is always on unless you turn it off for a specific call.
If you’re on a call and you receive a second call, you will:
66
nextel.com
Page 75

Call Waiting
•hear a tone
• see a message on your display informing you of another incoming call
Cover Open
If you have your phone cover open when you receive a second call, the screen
will display the calle r’s name (if stor ed in you r Phone book), the caller’s numbe r
(if Caller ID information is available), or Incoming Call:
e
Accepting Calls
Press C under YES. The first call is placed on hold.
To end the active call and accept the s econd call:
Press r. Then press s or press C under YES.
Switching Between Calls
When you accept a second call while talking on the phone, your display shows
the name or number of each cal l. An icon appears to the left of each name or
number indicating that the call is on hold V or active D:
67
Page 76

Press C under SWITCH to switch between calls.
Declining Calls
Cover Open
Press C under NO. If you subscribe to Voice Mail, the call will be
forwarded to your Voice Mail box.
Cover Closed
Press . on the top of your phone. If you subscribe to Voice Mail, the
call will be forwarded to your Voice Mai l box.
[
Ending the Active Call
Press r or close the phon e cov er.
NOTE:If you have an active call and another call waiting, closing the
phone cover ends both calls.
68
nextel.com
Page 77

Call Hold
Turning Off Call Waiting
If you do not want to be interrupted during a call, you can turn Call Waiting off
prior to making/r eceiving a call.
1
From the idle screen, press q. Press R to scroll to Settings, and
press C under SELECT.
2
Press R to scroll to In Call Setup and press C under SELECT.
3
Press R to scroll to Call Waiting and press C under CHANGE.
4
Press R to scroll to Off and press C under SELE CT.
Call Waiting is now disabled for the ne xt call. It will automatically reset
to On when you end the call.
Call Hold
When you are on an act ive call, you can pl ace the call on hold an d make a
second call.
To place an active call on hold:
1
Press q to access the Call Menu.
2
Press R to scroll to Hold.
3
Press C under SELECT.
4
If you have not placed a second call, you can res ume this call by
pressing C under RESUME.
To place a second call while the first call is on hold:
1
Enter the second phone number you want to call.
Or, select the number from your Phonebook by pressing q and
selecting Phonebook.
2
Press s to place the se cond call.
69
Page 78
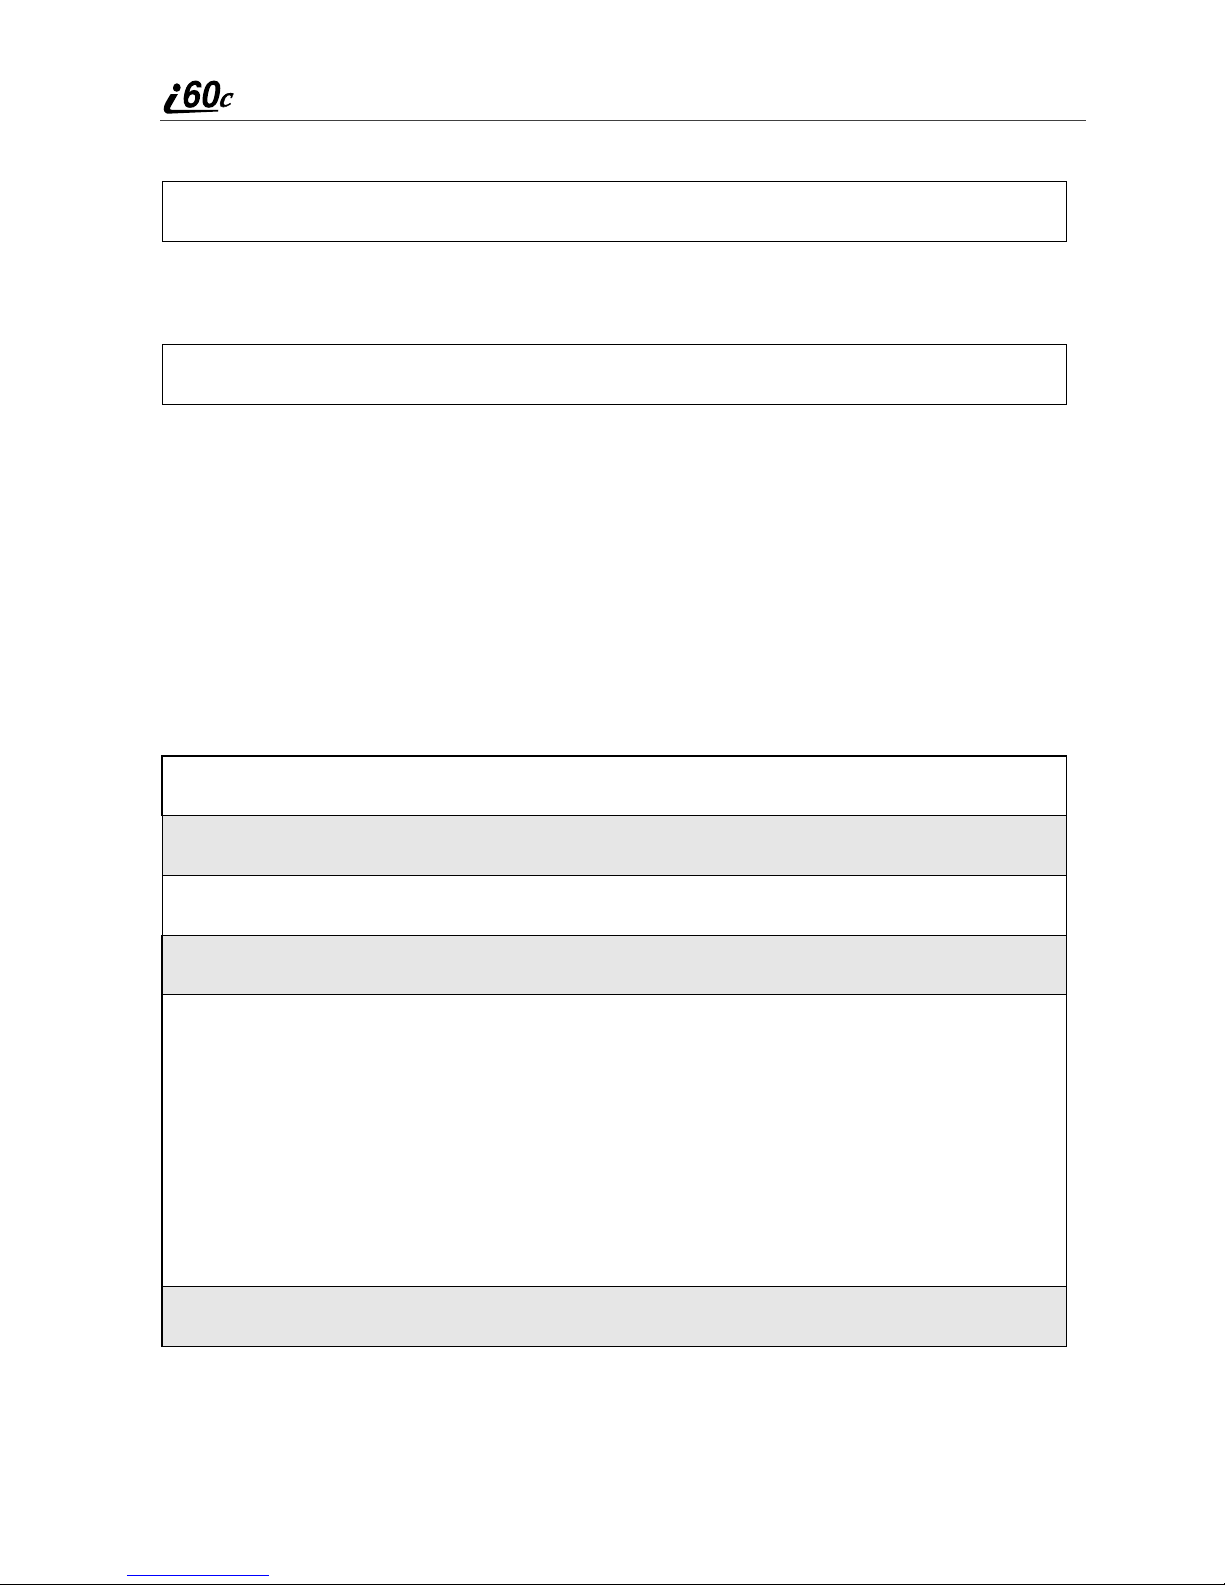
To toggle between the two calls:
Press C under SWIT CH.
To end the active call:
Press r. The call on hold becomes ac tive.
NOTE:Closing the phone cover ends both the active call and the call
on hold.
Three-Way Calling
Using Three-Way Calling, you can combine two ongoing phone calls into one
conversation. While on an active call, you can make a second call and combine
the two calls.
To make a three-way call:
1
Place or receive a phone call.
2
While on the call, press q to access the Call Menu.
3
Press R to scroll to 3 Way.
4
Press C under SELECT. The first call will be placed on hold.
5
Enter the secon d phone number and pr ess s to place the second call.
Or, access the number from your Phonebook:
Press q and then press R to scroll to Phonebook.
Press C under SELECT.
To place the call, see “Making Calls from th e Phonebook” on page 54.
6
After you reach the second individual, press q.
70
nextel.com
Page 79

Call Forwarding
7
Press S to scroll to 3 Way.
8
Press C under SELECT.
Both calls will appear on your display.
Call Forwarding
Nextel’s Call Forwarding features forward calls to the number you designate.
The following Call Forwarding options are available:
• All Calls — When this option is turned on, all calls will be sent
automatically to a number you specify. When this option is turned off,
your Detailed options will be activated.
• Detailed — Choosing this option enables you to forward calls you missed
to Voice Mail, or other numbers, depending on why you missed each call:
• Busy — your phone is engaged in other activities.
• No Answer — you do not answer. The phone will ring 4 tim es be fore
forwarding the call.
• Unreachable — your phone is out of cov erage or powered off.
NOTE:For you to receive Voice Mail messages, the All Calls option
must be set to Off and the Detailed options must be set to your
Voice Mail access number. This is the default setting. Your Voice
Mail access number is the first six digits of your 10-digit Nextel
phone number followed by 6245.
For example, if the Nextel number is 703-555-1234, the Voi ce
Mail access number is 703-555-6245.
You can forw ard Line 1 and Line 2 independent ly. For more information on
using two lines, see “Alternate Line Se rvice” on page 76.
When your ph o ne is set to fo rward Al l Ca lls, on e of the fo llo wing ico ns ap pe ar s
on the top row of your display screen to indicate the call forwarding option you
have chosen:
Icon Indicates...
G Line 1 is active; calls from Line 1 are being
forwarded.
71
Page 80

H Line 1 is active; calls from Line 2 are being
W
forwarded.
I Line 1 is active; calls from Line 1 and Li ne
2 are being for w arded.
J Line 2 is active; calls from Line 1 are being
forwarded.
K Line 2 is active; calls from Line 2 are being
forwarded.
L Line 2 is active; calls from Line 1 and Li ne
2 are being for w arded.
Tur ning On Call Forwarding
1
Press q then press R to scroll to Call Forward.
2
Press C under SELECT.
3
At the Call Forward screen, the
Forward field is highlighted. Press C
under CHANGE.
4
Press S to scroll to All Calls.
5
Press C under SELECT.
6
Press R to scroll to the To field and pr e s s C under CHANGE.
72
nextel.com
Page 81

Call Forwarding
7
To activate a call forwarding number:
If you have nev e r used Call Forwarding before, the Forward screen
appears. To enter a call forwarding number, type the number on yo ur
phone’s keypad or press C under SEARCH to select from numbers
stored in yo ur phone. Press C under OK.
Or,
If you have used Call Forwardi ng before, the call forwarding number
you last used is displayed. Press C under CHANGE to access the
Forward screen.
To forward your calls to this number, press C under OK.
To forward yo ur ca lls to a different numb er, press and hold C under
DELETE to erase the displayed number. Type the new number on your
phone’s keypad or press C under SEARCH to select from numbers
stored in yo ur phone. Press C under OK.
Your calls will now be forwarded to the number that you selected.
Turning Off Call Forwarding
1
Press q then press R to scroll to Call Forward.
2
Press C under SELECT.
The Call Forward screen displays with the Forward field highlighted.
3
Press R to scroll to the To field and pr e s s C under CHANGE.
4
Press S to scroll to Off and press C under SELE CT.
You will now re ceive all calls on your phone. When you are unavailable, your
calls will be forwa rded accordin g to your Detailed Call Forwarding settings. By
default, the Detailed option is set to forward your calls to Voice Mail.
73
Page 82

Setting Call Forwarding to Voice Mail
In most cases, turning off Call Forwarding restores your ability to receive Voice
Mail messages when you are unavailable (see “Turni ng Off Call Forwarding”
on page 73). If you have co mple ted tho s e steps but are still not able to rece iv e
Voice Mail messages, you can reset Call Forwarding to Voice Mail.
For you to receive Voice M ai l messages, Call Forwarding must be set to
Detailed with your Voice Mail access number:
1
Press q then press R to scroll to Call Forward.
2
Press C under SELECT.
The Call Forward screen displays with the Forward field set to
Detailed.
3
Press R to scroll to the If Busy field and press C under CHANGE.
4
The call forward ing number you last used is displaye d. Press C under
CHANGE. If this is your Voice Mail access number (the first six digits
of your 10-digit phone number followed by 6245), go to step 7.
5
Press and hold C under DELETE to erase the displayed number.
6
Enter your Voice Mail access number.
Your Voice Mail access number is the first six digits of your 10-digit
phone number, followed by 6245. (For example 7035556245.)
7
Press C under OK.
8
Repeat step 3 through step 7 for the If No Answer field and the If
Unreachable field.
9
When finished, press C under EXIT.
NOTE:You can use the Detailed setting to forward calls to other
numbers if desired. However, it is recommended that you leave
Detailed set to the Voice Mail access number and use the All
Calls setting if you wish to forward your calls to another
number.
74
nextel.com
Page 83

Caller ID
Additional Phone Features
In addition to the standard features that are inclu ded for all Nextel Digital
Cellular subscribers, ther e are al so several features available for an additional
monthly or per-use fee. See the following sections for more information on
these services. Contact Nextel Custo mer Care for additiona l in fo rmation .
NOTE:Some services are not available outside the continental United
States.
Caller ID
If you subscribe to Caller ID, your phone automatically displays the phone
number or name (if the 10- digit phon e number is stored in your Ph onebook) of
the person c alling (unle ss block ed by the caller), enabl ing y ou to dec ide whe ther
to take the call or forward it to Voice Mail.
NOTE:When caller ID information is not available, “Incoming Call” will
be displayed.
Displaying the Caller’s Name
A caller’s name is displayed if you hav e entered the person’s number into your
Phonebook (see “Adding Phonebook Entries” on page 44). Otherwise, the
caller’s phone number will be displayed.
Maintaining Your Privacy with Per-Call and Per-Line
Blocking
Nextel prov ides two meth ods to pre vent those y ou c all from seein g yo ur n umber
on their own Caller ID displays.
NOTE:Y our Nextel phone number cannot be blocked from calls made
to 911, 800, 855, 866, 877, 888, or other toll-free phone numbers.
Per- Call Blocking
You can block delivery of your phone number to other Caller ID units for a
single phon e call .
To set:
Press * 6 7 before dialing the call.
75
Page 84

Per-Line Bloc king
You can permanently block delivery of your phone number on every call you
make. You must order this feature by contacting Nextel Customer Care.
To disable on a per-call basis:
Press * 8 2 before the call.
Alternate Line Service
As an Alternate Line customer, you will be given a separate phone number for
each line. With alte rnate lines you can separate business and p ersonal calls, or
desi gn ate one as a prior it y line.
Nextel Mobile Messaging and Ne xtel Wireless Web services use the Line 1
phone number. You only need to subscribe to Caller ID or Voice Mail once —
these services will be available on both lines. Forwarding Line 2 to Line 1 will
send Line 2 incoming calls directly to Voice Mail without ringing.
The following settings are independent for each phone line. When you enable
one of these settings, it applies only to the active line:
• Call Forwarding
• Ring/Vibe
• In Call Setup
• Call T imers
•Auto Answer
76
nextel.com
Page 85

Selecting the Alternate Line
B
From the idle screen:
1
Press q, then press R to scroll to
Settings. Press C under SELECT.
2
Press R to scroll to Phon e Se tup. Press C under SELECT.
3
W ith the curre nt lin e highl igh te d, press C under CHANGE.
Call Restrictions
Line2
4
Press R to scroll to the desired line and press C under SELECT.
Receiving Calls on Your Alternate Line
You can receive calls on either line, regardless of the active line setting. The
screen di spla ys Line 1 or Line 2 to i ndicate wh ich line the call is be ing rec eived
on (if Caller ID information is not available).
Call Restrictions
You can prevent your phone from making or receiving specific types of calls.
Nextel currently offers three types of Call Restrictions:
• no long distance calls allowed
• no incoming calls
• no outgoing calls (except 911)
Contact Customer Care for more information.
Nextel 411
Nextel 411 provides detailed information services. Simply press 4 1 1 s
from your Nex tel phone anywhere within the continental United States a nd
Hawaii. Nextel 411 services include:
77
Page 86

White Page Listings
You can request a telephone number for any person, business, or government
agency in the continental United States and Hawaii. Operators can also provide
address information if available.
Yellow Page Listings
You can request a telephone number for a business or you can ask the operator
to perform a search by categor y if the specific business name is unknown. For
example, yo u can request information for the nearest c opy center to your hotel
while on business travel.
Nationwide Call Completion
Nextel 411 operators can connect you to any listing in the continental United
States and Hawaii. If requested, the operator will stay on the line while
connecting to the number.
Driving Directions
Nextel 411 operators are able to provide directions to reach a specific
destination. Operators will work with you to determine your starting point and
provide clear directions to the destination.
Restaurant Reservations
Nextel 411 op e r ators can assist in fi nd in g a r est a u r an t an d the n coo r dinate
reservations. A Nextel 411 operator will confirm your reservation information
through a return phone call. For your convenience, the reservation will be in
your name.
NOTE:Reservation service may not be available for all restaurants.
Movie Listings and Showtimes
Nextel 411 operators have access to movie listings at most theaters in the
continental United States and Hawaii. You only need to ask for a specific movie
or movie theater to get current movi es, loc a tions or showtimes. Additional
information such as running time, synopsis, and ratings are also available.
Showtimes and listings are avai lab le 24-48 hours in adva n c e.
78
nextel.com
Page 87

Nextel 411
Local Event Information
You can request information on local events such as sporting events, concerts,
state and county fairs, and other current even ts. Nextel 411 operators can
provide dates, times, and locations for these events.
79
Page 88

80
nextel.com
Page 89

Nextel Voice Mail
Nextel Voice Mail is a flexible, easy-to-use system that takes messages when
you’re not available — so you never miss an important call.
This section includes:
Setting Up Your Voice Mail Box Page 81
Logging Into Voice Mail Page 82
Using Voice Mail Page 83
Advanced Voice Mail Feat ure s Page 87
Nextel Voice Mail T re e Page 95
This section covers the most commonly used Voice Mail features. Once you log
into Voice Mail, there are a number of innovative features you can access. They
are also covered in this section. After you access Voi ce Mail, an automated
system tells you each menu option and which button to press to make a menu
selection. See “Nextel Voice Mail Tree” on page 95.
Setting Up Your Voice Mail Box
You must se t up your Vo ic e Mail bo x be fore you can listen to message s . The
following steps will tell you how to setup your mailbox. Before getting started,
see “Recording Your Active Greeting” on page 86 f or informat ion you may
want to incl ud e in yo ur gr e e tin g.
81
Page 90

1
Using your i60c phone, dial your 10 -digit Nexte l Personal Telephone
Number (PTN). For examp le: 7035557777.
If you are calling from a phone other than your i60c phone, di al your
10-digit Nextel Personal T elephone Number (PTN). When you hear the
greeting, press * to access your Voice Mail box.
2
The system will prompt you to Enter your password. Enter the last
seven digits of your Nextel Personal Telephone Number. For example:
5557777. Thi s is your tempor ary password.
3
Follow the system instructions to:
• Create a new four- to s even-digit pa ssword (see “Chang ing Your
Password” on page 85).
• Record your name (see “Re cording Your Name” on page 86) .
• Record a gre eting (see “Re co rding Your Active Gree tin g” on pa ge
86).
4
When the system says Enjoy using Nextel Voice Mail, your mailbox is
set up.
Logging Into Voice Mail
To log into Voice Mail, you must first access the Message Center on your
phone.
If MESG is one of your display options:
From the idle screen, press C under MESG.
If MESG is not one of your dis p la y op tio ns :
1
From the idle screen, press q.
2
Press R to scroll to Messages.
3
Press C under SELECT.
82
nextel.com
Page 91

Using Voice Mail
The Message Center screen displays numbers of new and total Voice Mail
messages.
g
From the Message Center screen, log into Voice Mail:
1
Press S to scroll to Voice Mail. The numbers of new and total Voice
Mail messages display.
2
Press C under CALL to log into Next el Voice Mail. Calling displays
as you are connected to the network.
NOTE: If your hear a message that says, “Enter the phone number
of the subscriber you are trying to reach,” enter your own
10-digit Nextel Personal Telephone Number. When the
greeting plays, press
3
When prom pte d , enter your password .
NOTE: You must receive a message before you can access Voice Mail
for the first time from your i60c phone. (Tip: You can leave
yourself a message.)
* to receive a password prompt.
Using Voice M ail
The follow in g se c tio ns e x pla in how to use Voice Mail after you h a ve lo gged in.
For information on re cei ving notificatio n of Voice Mail messages, transferring
calls to Voice Mail, and accessing messages, see “Messaging Services” on page
97.
Main Voice Mail Menu
You are at the main Voice Mail menu when y ou hear the options lis ted below.
• To play your messages, press 1
or saved messages.)
. (This option plays only if you have new
83
Page 92

• To record a message, press 2.
• To change your greeting, press 3.
• To access your personal options press 4.
If you pres s * while you are in a sub-menu, yo u will go to the pre vious menu.
If you pre s s **, you will go to the main Voice Mail menu.
From the main Vo ice Ma il menu , p ress # to exit Voic e Ma il. At any tim e , yo u
may end the call by pressing r or closing the phone cover.
Playing Messages
When you receive a new Voice Mail message, you can either listen to it
immediately or later. Press C under CALL to listen now or press C under
EXIT to listen later.
Options available while listening to your messages:
Replay previous six seconds. Press 1
Rewind to beginning of message. Press 1 1
Pause/continue th e current mess a ge . Press 2
Fast forward 6 seconds. Press 3
Fast forwa r d to en d of mes s a ge . Press 3 3
Play the date and time stamp. Press 5 5
Options available while a message is playing or after it has played:
Copy the message to another subscriber . (See
Press 6
“Recording, Copying and Re plying to
Messages” on page 89.)
Delete the message. Press 7
Reply to a message. Press 8
Save the message. Press 9
Skip to the next message. Press #
84
nextel.com
Page 93

Using Voice Mail
Saving and Deleting Messages
While a message is playing or after you have finished listening to it, you can
save it or dele te it. To sa v e a m essage, pre ss 9. To delete a message, press 7.
To have message s a ut omatically save d, see “Automatic Playback” on page 88.
Message s that a re no t saved or dele ted re main in y our m ailbox as ne w mess ages.
All messages are automatically deleted after 30 days.
Recovering Deleted Messages
To retrieve deleted messages, press * 3. This option only applies to the
current Voice Mail s ession. If you end the call, th e messages will be
permanent ly deleted.
IMPORTANT:
After exiting the Voice Mail session, you
cannot recover deleted messages.
Changing Your Password
To change your current password:
1
From the main Voice Mail menu, press 4 to access Personal Options.
2
Press 4 to access Personal Preferences.
3
Press 1 to modify password.
4
Enter your new password. This password must be all numbers. It must
be 4 to 7 digits long.
5
Press ** to return to the main menu.
NOTE: If you forget your password, contact Customer Care.
IMPORTANT:
For security purposes, it is recommended that
you do not choose sequential or repeated digits
like 1-2-3-4 or 5-5-5-5 for your password.
85
Page 94

Recording Your Name
When you send, reply to, or copy a message, your name response preced es th e
message. To record or re-record your name at any time:
1
From the main Voice Mail menu, press 4 to access Personal Options.
2
Press 4 to access Personal Preferences.
3
Press 3 to access the Record Your Name option.
4
Press 2 to record your name.
5
Press ** to return to the main menu.
Recording Your Active Greeting
Through Nextel Voice Mail service, there are a number of ways in which people
can reach you. You may want to include one or all of the following options in
your greeting so that callers will know they are available.
• Press 1 to send a numeric message.
• Press 2 to send an operator assisted message. (This option is available only
if you are a subscriber of Operat or Assisted Messaging. Contact Nextel
Customer Care for more information.)
• Press # to skip the gree ting and record a message immediately.
To record or alter your greeting at any time:
1
From the main Voice Mail menu, press 3 t o change your greeting.
2
Press 1 to play, press 2 to record or re-record, or press 3 to delete
your active greeting.
3
Record your greeting and press # when you have finished.
4
Press ** to return to the main menu.
86
nextel.com
Page 95

Advanced Voice Mail Features
Advanced Voice Mail Features
Multiple Greetings
Nextel Voice Mail serv ice allo ws you to have up to five differe nt greet ings. Y ou
can designa te wh ic h g re eting will be your active gre etin g a t a n y g iv en tim e. Fo r
example, inst ead of your reg ular greeting, you may wish to activate a different
greeting for days when you are out of the office or on vacation.
The greeting that was recorded during your initial Voice Mail box setup is
Greeting 1. This is your default active greeting.
Recording Additional Greetings
To record additional greetings:
1
From the main Voice Mail menu, press 3 to access the Greetings
menu.
2
Press 4 to modify greetings.
3
Enter the gre e ting number yo u wish to create or modify.
4
Press 2 to record a greeting.
5
Record your greeting and press # when you have finished.
6
Press ** to return to the main menu.
Selecting Your Active Greeting
To select your active greeting:
1
From the main Voice Mail menu, press 3 to access the Greetings
menu.
2
Press 3 to select another greeting to be active.
3
Enter the number of the greeting that you would like to be active.
4
The system will confirm your active greeting number.
87
Page 96
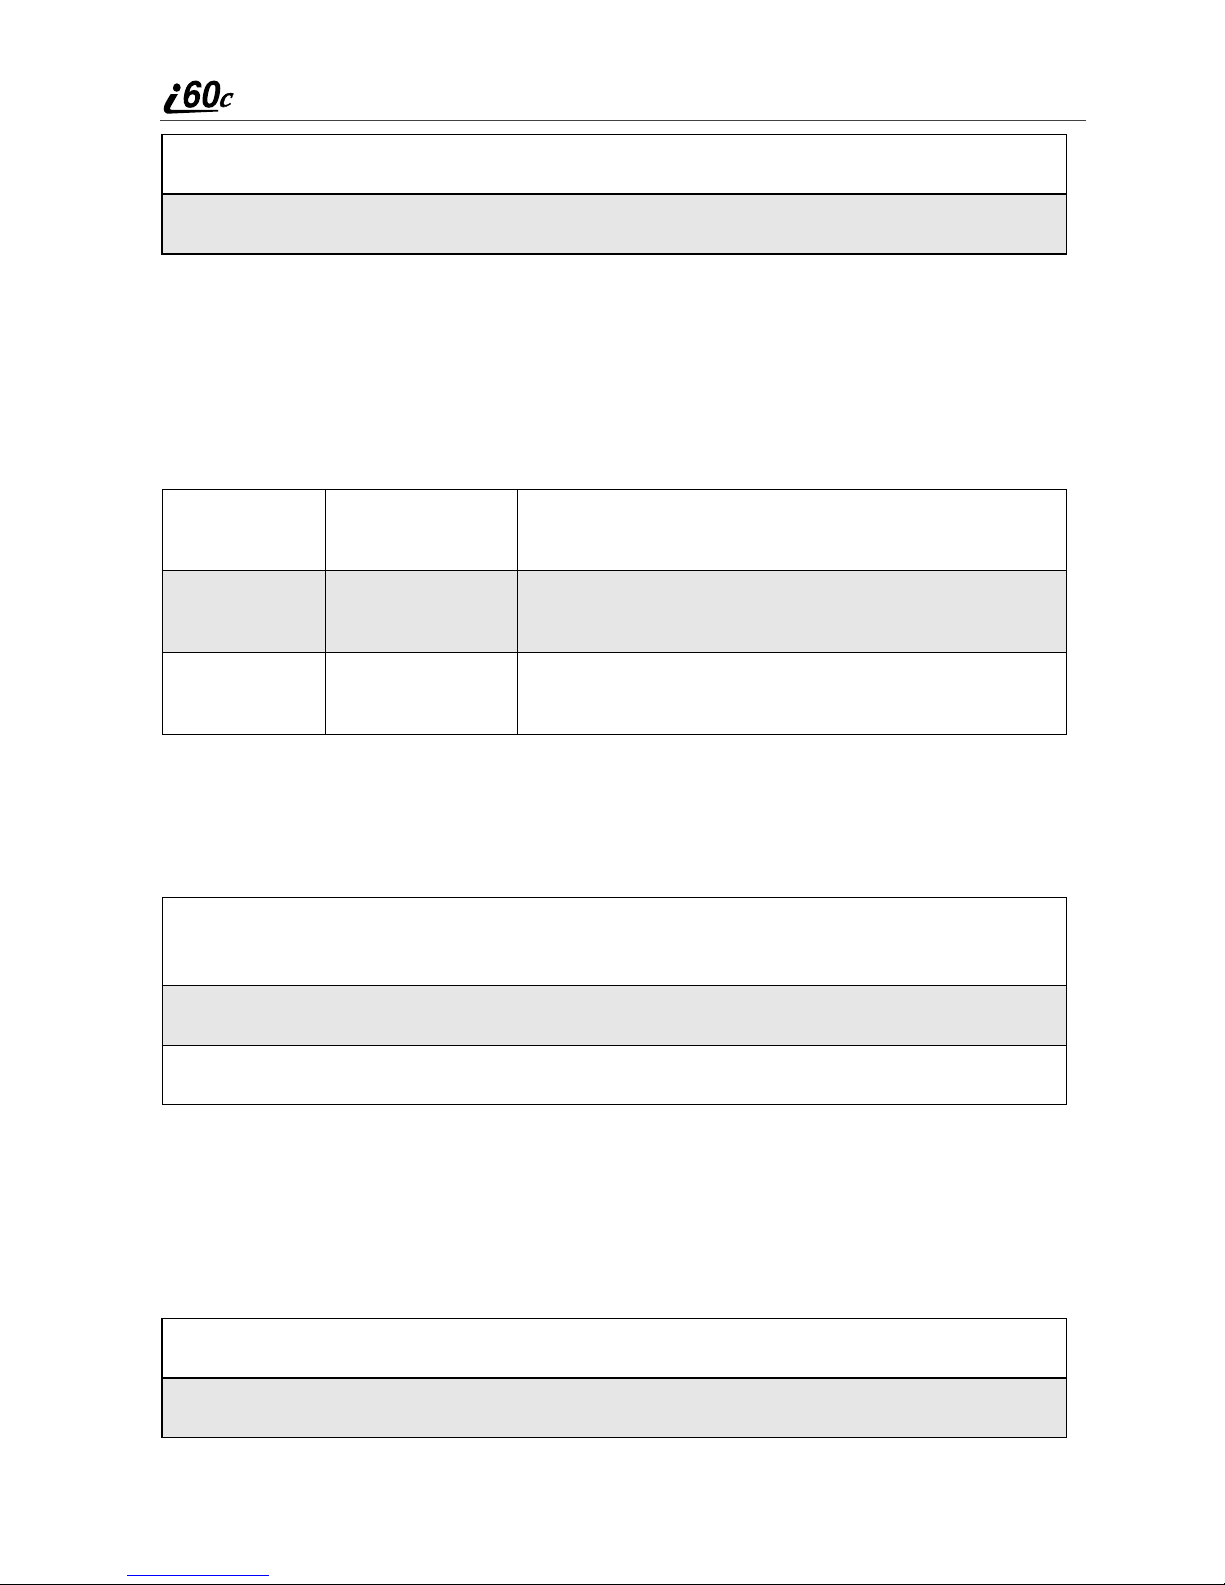
5
Press 1 to play your active greeting.
6
Press ** to return to the main menu.
Greetings Schedule
You can choose t o have your greetings autom atically activated based on a predetermined time schedule. By activating the Greeting Schedule, Greetings 1, 2
and 3 will automaticall y play acc o rdin g to the ti me sch edu le listed be lo w.
Greeting 1
Greeting 2
Greeting 3
Evenings and
Weekends
Weekday
Mornings
Weekday
Afternoons
5:00 pm --7:59 am, Monday -- Friday
24-hours, Saturday and Sunday
8:00 am -- 11:59 am
Monday -- Friday
Noon -- 4:59 pm
Monday -- Friday
Activating Your Greeting Schedule
To activate the greeting schedule:
1
From the main Voice Mail menu, press 3 to access the Greetings
menu.
2
Press 9 to activate your greeting schedule.
3
Press ** to return to the main menu.
Automatic Playback
By default, the playback mode of your Voice Mail service is set to Norm al.
Nextel’s Automatic Playback feature automatically plays and saves new
messages when you log in. To activate Automati c Playback:
1
From the main Voice Mail menu, press 4 to access Personal Options.
2
Press 4 to access Personal Preferences.
88
nextel.com
Page 97

Advanced Voice Mail Features
3
Press 2 to access Playback Preferences.
4
Press 2 to switc h bet w een Automatic and Normal Playback.
5
Press ** to return to the main menu.
Changing the Playback Order of Messages
With Nextel Voice Mail service, you can select the order in which you want
unheard messages to be played. You may listen to the last received message
first, or you may listen to the first received message first. To sel ect the order in
which new messages should be played:
1
From the main Voice Mail menu, press 4 to access Personal Options.
2
Press 4 to access Personal Preferences.
3
Press 2 to access Playback Preferences.
4
Press 1 to switch between the playback orders.
5
Press ** to return to the main menu.
Recording, Copying and Replying to Messages
These functions allow you to record and send, reply to, or copy a message to an
assigne d de s tin ation address or G roup List number.
If you record a complete or partial message, but do not send it, Nextel Voice
Mail service will refer to this message as an “in preparat ion” message. Before
sending messages you may want to see “Delivery Options” on page 90.
To record and send a messa ge:
1
From the main Voice Mail menu, press 2 to access Record a
Message.
2
Record your message and press # to end the message.
3
Press 9 at the prompt to indicate that you want to send the message or
press 5 for Delivery Options.
89
Page 98

4
Enter the mailbox number and/or group list number(s). (A mailbox
number is the 10-digit Nextel Personal Telephone Number of a Nextel
customer. The name of the recipient plays if it is recorded.)
5
Press # to s end.
6
Press ** to return to the main menu.
NOTE: You can only send messages using this method to Nextel
customers in your home market.
Delivery Options
After you have create d a message, you can assign th e message to a category
before you send it. Below is a list of the options that can be applied to a
message:
Urgent
Private
Notification of NonDelivery
Future Delivery
Recipient will hear this message before other
messages.
Recipient cannot copy the message to another
mailbox or phone number.
You will be notified if the recipient has not listened
to your mess a ge by a ce rt a in date and time.
You can specify a time and date (up to three months
in advance ) for the message to b e delivered. (Se e
“Time and Date Charts” on pa ge 94.)
Important : Once a message has been sent for future
delivery, it cannot be retrieved or deleted.
90
nextel.com
Page 99

To set a special delivery option:
1
After recording your message but before sending it, press 5 for
Delivery Options.
2
Press the number that correspond s with the desired de liv e ry op tio n:
• Press 1 for Urgent.
• Press 2 for Private.
• Press 3 for Notification of Non-Delive r y. At prompt, specify
time and date.
• Press 4 for Future Delivery of Messages. At prompt, specify
time and date.
• Press 9 to send th e message immediately.
3
The list of options will be presented again. Select an additional option
or press 9 to send the message.
Advanced Voice Mail Features
4
Enter the dest ination mailbox or Group List n umber of the recipient(s).
5
Press # to s end.
6
Press ** to return to the main menu.
Working With Group Lists
The Group List feature en ables you to create a lis t an d assign it a unique name.
Then you can add mailbox nu mbers, group lists , or indi viduals — by nam e — to
the list. Once you create a list you can send a voice message to everyone on the
list by simply entering the group list number. You can have up to 40 group lists.
Each list can hold up to 50 addresses.
Creating Group Lists
To set up a Group List:
1
From the main Voice Mail menu, press 4 to access Personal Options.
2
Press 2 to access your Group Lists.
3
Press 2 to create a Group List.
91
Page 100

4
Enter the one- or two-digit group list number and press #.
5
Record a name for the list and press #.
6
Select group members by mailbox number, Group List, or name.
7
Press # to save all entries added to the list.
8
Press ** to return to the main menu.
Modifying a Group List
1
From the main Voice Mail menu, press 4 to access Personal Options.
2
Press 2 to access Group Lists.
3
Press 4 to modify a Grou p Lis t.
4
Enter the number of the Group List you want to modify.
5
Press 1 to ad d a new recipient.
6
Press # to save your changes.
7
Press ** to return to the main menu.
Deleting a Group List
1
From the main Voice Mail menu, press 4 to access Personal Options.
2
Press 2 to access Group Lists.
3
Press 3 to delete a Group List.
4
Enter the numbe r of the Gro up List y o u want to delete. The system will
play the name of the Group List.
92
nextel.com
 Loading...