

Page 1

Nextel
®
iDEN
Digital Multi-Service Data-Capable Phone
®
i60c Phone User’s Guide
@NNTN4296A@
NNTN4296-A
Page 2

nextel.com
Page 3

Table of Contents
IMPORTANT!
Read “NextelTermsandConditions of Service” on
page 172 and “ Safety a nd General Information” on
page 177 before us ing youri60c phone.
Introduction .......................................................................................... 1
Welcome to Nextel®.......................................................................................1
Customer Care.................................................................................................2
Ordering Information ......................................................................................2
Driving Safety Tips.........................................................................................3
Getting Started......................................................................................5
i60c Phone Features .......................................................................................6
i60c Phone Menu Tree ....................................................................................7
i60c Icon Glossary...........................................................................................8
Battery.............................................................................................................9
Turning Your i60c Phone On/Off ................................................................12
Enabling Over-the-Air-Radio-Service Software (OARSS) Security............14
Receiving OARSS Programming..................................................................14
SIM Card.......................................................................................................15
Status of Your i60c Phone ............................................................................23
My Information .............................................................................................23
Using T9® Text Input ...................................................................................24
Display Essentials ............................................................................... 31
Display Screen...............................................................................................31
Status Icons....................................................................................................32
Text Display Area .........................................................................................34
Call Information Icons...................................................................................34
Menu Icon......................................................................................................35
i
Page 4

Display Options.............................................................................................35
Navigating Menus and Lists..........................................................................35
Main Menu Options.......................................................................................36
Phonebook...........................................................................................39
Phonebook Entries and Speed Dial Numbers................................................40
Phonebook Icons ...........................................................................................40
Accessing Your Phonebook ..........................................................................41
About PhonebookEntries..............................................................................41
Pause Digit Entry...........................................................................................50
Plus Dialing ...................................................................................................51
Address Book................................................................................................52
Digital Cellular....................................................................................53
Making Phone Calls ......................................................................................54
Emergency Calling........................................................................................58
Special Dialing Codes ...................................................................................59
Receiving a Phone Call.................................................................................59
Ending a Phone Call......................................................................................60
Recent Calls...................................................................................................61
Missed Calls ..................................................................................................64
Call Timers....................................................................................................64
Hands-Free Speakerphone.............................................................................65
Mute...............................................................................................................66
Call Waiting ..................................................................................................66
Call Hold .......................................................................................................69
Three-Way Calling ........................................................................................70
Call Forwarding.............................................................................................71
Caller ID........................................................................................................75
Alternate Line Service...................................................................................76
Call Restrictions ............................................................................................77
Nextel 411 .....................................................................................................77
Nextel Voice Mail................................................................................ 81
Setting Up Your Voice Mail Box..................................................................81
nextel.com
ii
Page 5

Logging Into Voice Mail...............................................................................82
Using Voice Mail ..........................................................................................83
Advanced Voice Mail Features .....................................................................87
Nextel Voice Mail Tree.................................................................................95
Messaging Services .............................................................................97
Receiving Messages ......................................................................................97
Message Center .............................................................................................99
Voice Mail Messages ..................................................................................100
Text and Numeric Messaging......................................................................101
Nextel Two-Way Messaging.......................................................................104
Direct Connect .................................................................................. 105
Nextel Direct Connect®..............................................................................105
Private Call..................................................................................................105
Call Alerts....................................................................................................108
Group Call ...................................................................................................112
Memo .................................................................................................117
Adding a New Memo ..................................................................................117
Viewing a Memo.........................................................................................117
Editing a Memo...........................................................................................118
Deleting a Memo.........................................................................................118
Nextel Online®..................................................................................119
Nextel Online Navigation Keys ..................................................................119
Starting the Microbrowser...........................................................................120
Using Your Phone as a Modem...................................................................121
Customizing the i60c Phone ............................................................ 123
Settings........................................................................................................123
Accessories......................................................................................... 139
Batteries.......................................................................................................139
Chargers.......................................................................................................140
iii
Page 6

Universal Serial Bus (USB) ........................................................................142
Other Important Information ......................................................... 143
Nextel Customer Care .................................................................................143
Understanding Status Messages ..................................................................144
Nextel Terms and Conditions of Service ....................................................146
Safety and General Information ..................................................... 151
RF Operational Characteristics ...................................................................151
Electro Magnetic Interference/Compatibility..............................................154
Medical Devices..........................................................................................154
Operational Warnings..................................................................................156
Operational Cautions...................................................................................157
Limited Warranty Motorola Communication Products...............................161
Patent and Trademark Information..............................................................167
Index............................................................................................................169
iv
nextel.com
Page 7

DECLARATION OF CONFORMITY
Per FCC CFR 47 Part 2 Section 2.1077(a)
Responsible Party Name: Motorola, Inc.
Address: 8000 West Sunrise Boulevard, Planta tion, FL 33322 USA
Phone Number: 1 (800) 453-0920
Hereby declares that the product:
Product Name: i660c
Model Number: H599UAH6RR55AN
Conforms to the following regulatio ns:
FCC Part 15, subpart B
Class B Digital Device
Date: May 3rd, 2002
Note: T his e quipment has be en tested and found to comply with the limits for a Class B di gital
device, pur suant to part 15 of the FCC Rules. These limits are designed to pro vide reas onable
protection against harmful interference in a residential installation. This equipment generates,
uses and can radiate rad io frequency energy and, if not installed and us ed in accordance with t he
instructions, may cause harmful interference to radio communications. However, there is no
guarantee that interference will not occ ur in a particular installation.
If this equipment does cause harmful interference to rad io or television reception, which can be
determined by turni ng the equipm ent off and on, the user is encour aged to tr y to correct the
interference by one or more of the f ollowing measures:
--Reorient or relocate the rec eiving antenna.
--Increase the separation bet ween the equipment and receiver.
--Connect the equipment into an outlet on a circuit d ifferent from that to which the receiver is
connected.
--Consult the dealer or an experi enced radio/TV technician for help.
v
Page 8

vi
nextel.com
Page 9

Introduction
Welcome to Nextel
®
Thankyou for choosing Nextelas your wireless communicationsprovider.Your
i60c phone enablesyou toenjoyclear connections through Nextel’s All-Digital
NationalNetwork. In addition, with Nextel iTraveler
SM
Service,you canuse
your i60c phone to roaminternationally in select countries usingother iDEN®
networks. Countries in which iTraveler service can be used are Argentina,
Brazil, Canada, Philippines, Israel, Mexico,and Peru.
NOTE: Contact Nextel Customer Care to obtain and confirm iTraveler availability
and service.
Nextel gives you more ways than anyone to communicate with everyone.
SM
Your i60c phone offers many innovative features:
• Phonebook– Your consolidated Phonebook holdsup to 250 entries and
allows youtostore multiple contact numbersfor each person,offering you
various ways to communicatewith your businessand personal contacts.
• SubscriberIdentity Module (SIM) Card–Your phone’s SIM cardholds
all entries storedin your Phonebook.Inaddition,you have a PIN (Personal
IdentificationNumber) to keepyour information safe and secure.
• Messages – The MessageCenter allows you to manageand access your
Voice Mail, Text Messages, and Two-Way Messages all from the same
inbox.
• Nextel Direct Connect®– With Nextel Direct Connect, you can use your
phone as a digital two-way radio to communicate directly with business
and personalcontacts at a fraction of the cost of cellular calls.
• Nextel Online
®
– Using the Net featurewith the built-in microbrowser,
you can access Nextel’s wireless Internet. It offers a suite of Nextel
wireless data productsand Internet applicationsto quickly access the
information you need to get business done.
• ClosedCover Features– The external control buttons enable you to
access several functions of your i60c phone without opening the cover.
• Customization – Use the Settings feature tocustomize your i60c phone to
meet your individual needs.
For more information on these and other features of the i60c phone, review this
User’s Guide.
Enjoy using youri60c phone!
1
Page 10

Customer Care
For domestic customer care issues, including billing issues, general service
needs, orto order additionalservices, contact Nextel Customer Care.
Visit nextel.com foravarietyofCustomerCareservices:
• Browse for information on phones, coverage, rates, and other Nextel
services. View and download user’s guides,try out our interactive virtual
products and service demos,find answers to frequentlyasked questions,
order accessories,locate service and repair centers,upgrade phone
software, send a message,and more.
• For self-service on your Nextel account, clickon My Account to view
your account, pay your bill, add phones toyouraccount, reset your Voice
Mail password, and more.
• For online assistance, click on Contact Us to send usan email request.Our
representatives are committed to assisting you. Every effort will be made to
addressyourquestions or concerns within 24 hours. Contact us to add
Nextel Online
and more.
Or, call us at 1-800-639-6111 or dial611 fromyour Nextel phone.
To complement the i60c phone and Nextel Worldwide Service, Nextel has also
launchedInternational Roaming CustomerCare support. When traveling
outsideofthe U.S. and Canada,call +1 (360) 662-5202 foryour CustomerCare
Serviceneeds. This CustomerCare number will be toll-free from your Nextel
handset both domestically and internationally.
For more information about Nextelor to view thisguide on our Web site, visit
us on nextel.com.
International and domestic coverage,rates, and other information are also
available on nextel.com.
®
and other services, change rate plans,inquire on yourbill,
Ordering Information
Various accessoriesare available for use with your i60c phone,including a
Leather Carry Case, Vehicle Battery Charger, extra batteries, a variety of
Hands-Free accessories, and more. To order accessories,go to nextel.com or
call NextelNextday
your Nextel Authorized Sales Representativeor stop by any Nextel Store. For
information on retail store locations, go to nextel.com.
Contact Nextel Customer Care to order anyof theservices discussed in this
guide, including Nextel Online, additional phone services, VoiceMail, Nextel
Mobile Messaging and much more!
2
SM
Accessoriesat 1-800-914-3240. You can also contact
nextel.com
Page 11

Driving Safety Tips
For information on Direct ProtectSMinsurance protection for your i60c phone,
call 1-888-352-9182 orcontact your NextelAuthorized Representative.
Visit us at nextel.com to learnmoreabout Nextel products and services!
Driving Safety Tips
NOTE: For safety and legal reasons(in many countries),do not use your phonewhile
driving.
Check andfollow the local lawsregarding the use ofmobile phones while
driving.
Your wireless phone is a great safety tool. You can instantly call for help in
emergencies or alert your next appointment that you’re running late. Please
follow these tips for using your wireless phone when you’rebehind the wheel.
1. Give driving your full attention. Don’t let anythinginterferewithyour
concentration.
2. Assess road conditions before making or taking a call.
3. Let voice mail pick up when its inconvenient or unsafe toanswer the
phone.
4. Program your most frequently dialed numbers intoyour phone for
speed dialing. When dialingm anually without the Turbo Dial ® one-touch
dialingfeature, dial only when yourvehicle is stopped — or have a
passenger dial for you.
5. Positionyour phone where it is easy to see and reach.
6. Keep your eyes on the road. Nevert ake notes while driving.
7. Consider using a hands-free speakerphone or hands-free accessory
which allowsyou to keep both hands on the wheel when speaking.
8. Use your phone’sInternet capabilitiesbefore you drive. Nextel Online
Services are not designed to be used whiledriving.
9. Be a Good Samaritan. Dial 9-1-1 in emergencies to
reportaccidents,impaired oraggressive drivers,crimes
or fires. It’s a free call. Know your phone number so
emergency services personnel can callyoubackif
necessary
.
3
Page 12

nextel.com
4
Page 13

Getting Started
This section will helpyou get started using yourphone. It contains details about
some of the features and functions described inthe Getting Started Guide.
This section includes:
i60c Phone Features Page 6
i60c Menu Tree Page 7
i60c Icon Glossary Page 8
Battery Page 9
Turning Your i60c PhoneOn/Off Page12
Enabling Over-the-Air-Radio-Service Software
(OARSS) Security
ReceivingOARSSProgramming Page 14
SIM Card Page 15
Statusof Your i60c Phone Page 23
My Information Page 23
Using T9® Text Input Page 24
Page 14
5
Page 14
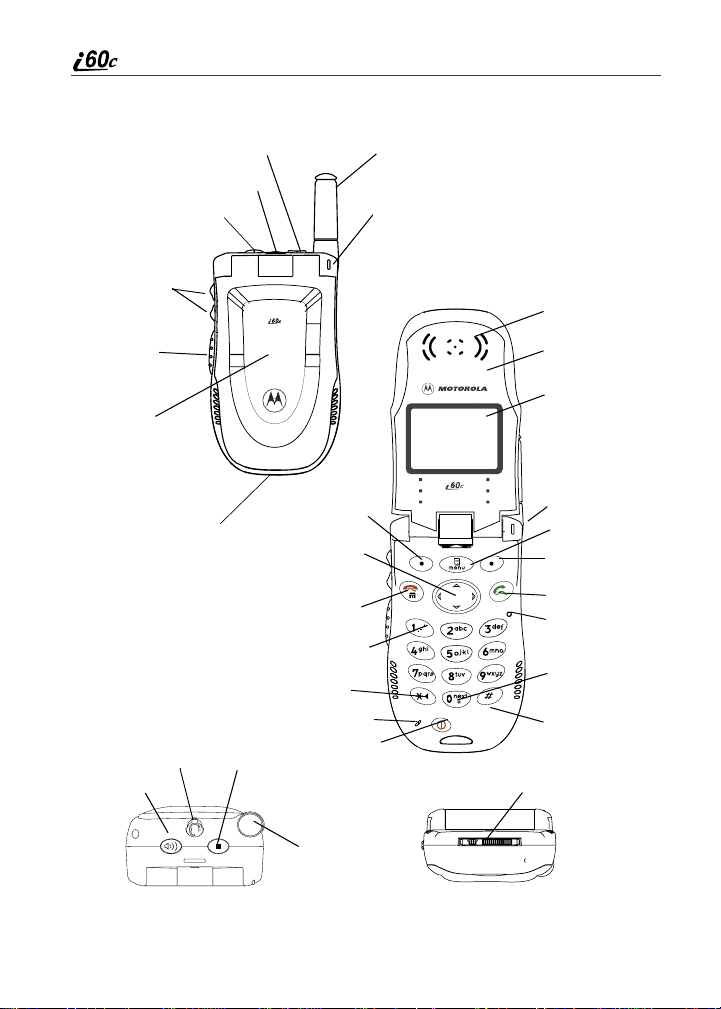
i60c Phone Features
COVER CLOSED
SmartKey
Headset Jack
SpeakerKey
Antenna
Status Light
Volume
Control
Buttons
Nextel Direct
®
Connect
Push-T o-T alk
(PTT) Button
Cover
Accessory and Data
Cable Connector
Audio Jack
SpeakerKey
SmartKey
Option Key
4-Way
Navigation
Key
End/Home
Key
Punctuation
Key
Back/Pause
Dialing Key
Microphone
Power On/Off
COVER OPEN
Earpiece
Cover
Display Screen
StatusLight
Menu Key
OptionKey
Send Key
Photosensor
Next Word/
International
Plus DialingKey
AlphaNumeric
Keypad
Accessory and Data
Cable Connector
Antenna
TOP VIEW
BOTTOM VIEW
nextel.com
6
Page 15

i60c Phone Menu Tree
i60c Phon e Menu Tree
You can access the main menuoptions by pressing q from the idle screen. Use to
navigatethrough the menusand submenus.Press
the desired phonefunction
.
C under thedisplay options toperform
7
Page 16

i60c Icon Glossary
You may see these icons while using your i60c phone:
Voice Mail
TextMessage
Miscellaneous
y
R
Net
Settings
Main Menu
7
m
Mobile IP
Signal Strength
Status
s
]
Line1Active
Line2 Active
1
0
Line and CallInfo Info
Mobile
Private ID
Phonebook
T
h
Net Alert
R
Messages
Phonebook
b
Battery Strength
6
Line1 Forward
G
Work
+
MessageRead
Q
Call Forward
;
R
Packet Data
Y
Line2 Forward
K
Main
N
Word
T9
#
Memo
O
Packet Activity
Z
Incoming Call
E
Home
C
T9 Alpha
w
Call Timers
Phone In Use
Outgoing Call
X
Pager
a
z
c
T9 Numeric
,
Info
My
RecentCalls
U
j
Private In Use
i
Missed Call
S
Fax
A
Symbols
T9
!
:
TalkgroupIn Use
%
Connected
D
Other
W
T9Uppercase
$
CallAlert
VibrateAll
-
On Hold
V
TalkgroupID
%
T9CapsLock
x
Speaker Off
u
End Call
?
IP
Locked
SecureData
M
{
VibrateThenRing
Vibrate On
[
\
CheckMark
<
Silent On
*
Menu
Picker Left
Picker Right
Up Down Arrows
e
2
P
f
Navigation
PickerUp
g
Picker Down
d
nextel.com
8
Page 17

Battery
The icon of the main menu feature in use displays in the top left of the status
icon rows. For a list of themain menu options, see “MainMenuOptions” on
page 36.
Battery
Your i60c phone comes with a Lithium Ion battery and charger. After attaching
the battery, you must charge it before you use it for the first time. See
“Batteries” on page 139 for the charging times for your phone’s battery. The
firsttime you charge your phone’sbattery,charge for 30 minutesmore than the
time shownon page 139. Afterthe initialcharging,the battery can bechargedin
thetimeshownonpage139.
Remove the battery from the protective plastic safety tray provided in the
original packaging. When the battery is not attached to the phone, store it in the
original tray.
NOTE: Use only the batteries approved for this product.
9
Page 18

Attaching the Battery
1
Slide the batterycover release button, located on the bottom of the
phone, awayfrom the battery cover and remove the battery cover from
the back of the phone.
TIP: Holding the battery cover downward allows it to fall
2
Insert the top of the battery into the battery area. Press the bottom of the
easily from the back of the phone without being pulled.
Battery cover
release button
battery to secure it.
3
Replace the battery cover and press it gently until you hear a click.
Detaching the Battery
1
Ensure thephone is powered off before attempting to detach the battery.
10
nextel.com
Page 19

2
Slide the batterycover release button, located on the bottom of the
phone, away from thebattery cover and remove the battery coverfrom
the back of the phone.
3
Remove the batterybypushing the battery toward the antenna and
liftingitout of thephone.
Charging the Battery
NOTE: The battery can be charged with the phone either turned on or
off. For best results, charge it with the phone turned off.
1
With yourphone’s display screen facing up, plug
the charger’s accessory connectorinto the left side
of the accessoryconnector on the bottom of the
phone.
Battery
Accessory Button
NOTE: To reduce damage to thephone’s bottom
connector,the cable or accessory button
should alwaysbe used to remove the
charger.
2
If the chargerhas folding electrical prongs, flip open the prongs.
3
Plug the charger intoanelectrical outlet.
11
Page 20

Battery Charging Status
The battery strength indicator iconfound on your phone’s display screenshows
the amount of power in the battery.
When U sing Phone
Icon
Display
Battery
Strength
A short, chirp-like sound indicates a low battery.Theiconflashes to indicate
that you have approximately fiveminutes of talk time remaining.
abcd
Low
Battery
11% to
40%
41% to
70%
Fully
Charged
When Charging Battery
Icon
Display
Battery
Strength
efgd
1flashingbar 1flashingbar,
Low
Battery
1 continuous bar
31% to
60%
1 flashing bar,
2 continuous bars
61% to
90%
3 continuous bars
Fully
Charged
Turning Your i60c P hone On/Off
NOTE: To register for the first time on the Nextel National Network, you
must turn on your i60c phone in your home market.
To power the phone on:
1
Open the phone cover.
2
For optimal signalstrength, extendthe antenna.
3
Press and holdp on the keypad untilthe status light glows red, a tone
briefly sounds,and PoweringOn displays.
12
nextel.com
Page 21

Turning Your i60c Phone On/Off
4
If you have enabledyour SIM PIN security feature (see “Enabling/
Disablingthe PIN Security Feature” on page 15), the Enter SIM PIN
Code screen displays.Enter your SIM PIN (see “Entering the SIM
PIN” on page 17).
Press C under OK.
5
As your phone connects tothe Nextel
NationalN etwork, you will seeWelcome
To Nextel and a connecting message.
When the idle screen appears on the
display as shown here, you are ready to
use your i60c phone!
O
If your display reads No Service or doesn’t change to the idle screenwhen you
turn on your phone, andyou know you are in a Nextel coverage area, contact
NextelCustomer Care.For details on Nextel coverage areas, go to nextel.com.
To power the phone off:
1
Press and holdp on the keypad until a tone briefly sounds and
Powering Off displays.
2
Close the phone cover.
3
Push down the antenna.
13
Page 22

Enabling Over-the-Air-Ra dio-S ervice Softwar e (OARSS) Secur ity
To receive OARSS programming, you must enable OARSS security the first
time you power on your phone orwithin 20 days of first activation of your
phone. See “Receiving OARSS Programming” on page 14.
1
When you power on your phone for the first time, after the idle screen
appears, you willbe prompted to selectOK to update yourbrowser info.
NOTE: If you press C under LATER, you will be prompted to enable
security each time you power on your phone until you press
C under OK. It is recommended that you do not choose
LATER.
2
Press A under OK.
3
You are prompted to enable security. Press C under YES.
A series of screens display. If you subscribe to a Nextel Online service
plan, your home page displays.
4
Press * to return to the idle screen.
Receiving OARSS Programming
If you have been set up to receive OARSS programming, you will receive your
PrivateIDandTalkgroup lists forDirect Connectuse, your Personal Telephone
Number,andtheNextelCustomerCarenumberviaaNetAlertmessage.
In order to receiveyour programming, you must have enabledOARSSsecurity
(see “Enabling Over-the-Air-Radio-Service Software (OARSS) Security” on
page 14). Within 24 hours of enabling OARSSsecurity, you will receive a Net
Alert message containingyour lists.
Accepting Your Phone’s Programming
1
Youwill receivea Net Alertwiththe messageNew Browser Message –
Receive Programming Info.
2
Press A under GOTO.
3
You are prompted to accept changes to your phonebook. Press A
under OK.
4
A confirmation screen displays. Press A under OK.
nextel.com
14
Page 23

SIM Card
5
Youare promptedagain toaccept changesto your phonebook. PressA
under OK.
6
A confirmation screen displays. Press A under OK.
7
Press * to return to the idle screen.
NOTE: Closing the phone cover does not terminate Over-The-Air
Programming in progress.
SIM Card
Your phonecomes with a built-in level ofsecurityprotectionthrough the use of
the SIM card. The SIM card stores all your Phonebookinformationand your
Nextel account identification information. Since thisinformation is stored on
the SIM card, notin your phoneitself,you canremove the information by
removing the SIM card.
NOTE: Exceptformaking emergency calls, yourphone will not
functionwithout the SIM card.
The SIM card is located in the SIM card holder on the backof thephone,
underneath the battery. You canverify the SIMc ard is in place byremoving the
batteryand viewing the SIM card through the SIM card cover.
See “Inserting/Removing the SIMCard” on page 19 forinformation on locating
the SIM card. Ifthereis no SIM card in your phone, notify your Nextel
Authorized Representative.
SIM Card Personal Identification Number (PIN)
To preventunauthorized use of your account, you can protect your SIM cardby
enabling the SIM PIN security feature.With the SIM PIN enabled,you must
enter your PIN eachtime the phone is poweredon.Youcan change or disable
your PIN if desired.
NOTE: It is recommendedt hat you enable the SIM PIN security feature
to preventfraudulentuse of theSIM card, youri60c phone, and
your account.
Enabling/Disabling the PIN Security Feature
Once the PIN security featureis enabled, you are prompted to enter your PIN
each time you turnon yourphone. Until a valid PIN is entered, you can use the
phone only to make emergency calls.
15
Page 24

Afterthe PIN is accepted, thephone registerson the networkand the idle screen
displays.
When the PIN security featureis disabled,the phonecan be used without
entering a PIN.
IMPORTANT: It is recommended that you enable the PIN security
1
At the idle screen, press q and then
press R to scroll to Settings.
feature to protectpersonal data onyour SIMcard. This
prevents anyone from using your phoneand accessing
your personal data.
B
2
Press C under SELECT. The Settingsscreen displays.
3
Press R to scrollto Security.PressC
under SELECT to accessthe Security
screen.
C
4
At the Security screen, press R to scroll to SIM PIN.PressC under
SELECT to access the SIM PIN screen.
5
Press R to scrollto On or Off. On enables the SIM PIN security
feature; Off disables the SIM PIN security feature. Press C under
SELECT.
6
At the Verify SIM PIN Code screen,enter the currentSIM PIN and
press C under OK.
NOTE: The default SIM PIN is 0000.
nextel.com
16
Page 25

SIM Card
Once you have enabled the SIM PIN security feature, itisrecommended that
you change your PIN to a number knownonly to you (see “Changing the PIN”
on page 17).
Entering the SIM PIN
IMPORTANT: Incorrectlyentering your PIN three timescauses the SIM
1
From the Enter SIM PIN Code screen,
enter your 4- to 8-digit PIN. An asterisk
appears for eachcharacter entered. The
default SIM PIN is 0000.
NOTE: Other than emergency dialing,
2
Press C under OK.
If you enter an incorrect PIN, the message SIM PIN incorrect: Try again
appearsonyour phone’s screen. Afterthree consecutive incorrect attempts,the
SIM card is blocked. Once blocked, the phone willnot allow you to enter your
PIN again, evenafter powering the phone off and back on.If this happens, see
“Unblocking the PIN” on page 19.
cardto be blocked.To unblockyour SIM card, you must
contact N ex tel Custome r Care. For more inf or mat ion,
see “Unblocking the P IN” on page 19.
you will be unable to use any of
the phone functions, including
receiving phone calls, until you
enter thePIN.
P
Changing the PIN
NOTE: In order to change the PIN, the SIM PIN sec urity feature must be
set to On. See “Enabling/Disabling the PIN Security Feature” on
page 15.
17
Page 26

1
From the idle screen, press q and then
press R to scroll to Settings.
B
2
Press C under SELECT. The Settingsscreen displays.
3
Press R to scrollto Security. Press C
under SELECT to accessthe Security
screen.
C
4
At the Securityscreen, press R to scroll to New Passwords.PressC
under SELECT to accessthe New Passwords screen.
5
At the NewPasswordsscreen,press R toscrollto SIM PIN and press
C under SELECT.
6
At the Enter Old SIM PIN Code screen, enter the current SIM PIN
and press C under OK.
NOTE: The default SIM PIN is 0000.
7
At the EnterNewSIM PIN Code screen,enter anew 4- to8-digit SIM
PIN and press C under OK.
8
At the Re-enter New SIM PIN Codescreen, re-enter the new SIM PIN
to confirm, and press C under OK.
NOTE: The default SIM PIN is 0000.
nextel.com
18
Page 27

SIM Card
Unblockingthe PIN
If you forgetyourPINand unsuccessfully enter it three times, accesstoyour
phone will be blocked.
NOTE: Before you begin, obtain the PIN Unblocking Key (PUK) code
from Nextel Customer Care, then read and understand the PIN
unblocking sequence. When entering the key press sequence,
each key press must occur within 5 seconds of the prior key
press.
IMPORTANT: If you unsuccessfully enter thePUKcode ten times, the
To unblock the PIN:
1
Press **05s.
2
Enter the 8-digitPUKcode.
3
Press s.
4
Enter a new 4- to 8-digit SIM PIN and press s.
5
Re-enter your SIM PINandpress s.
If you entered thecodes properly, the SIM Unlocked screen displays.
SIM cardis permanently blocked and mustbe replaced.
If this happens, all data will be lost. You will get a
message to contact your service provider. Contact
Nextel Customer Care for assistance. If the SIM card is
blocked, the i60c phone only allows outgoing
Emergency calls.
Inserting/Removing the SIM Card
IMPORTANT: If you remove yourSIM card and insertanother SIM card into your
IMPORTANT: Do not touch thegold-colored areas ofthe SIM card.
phone, someinformation does not display wheny ou use the phonewith
the new SIM card. All Phonebook information remains stored on your
original SIM card. The following information does not display:
• Recent Calls list • Call Forwarding settings
• Net Alert notifications • Information stored in Memo
• Browser Bookmarks
To avoid loss or damage, do not remove your SIMcard from your phone
unless absolutely necessary.
19
Page 28
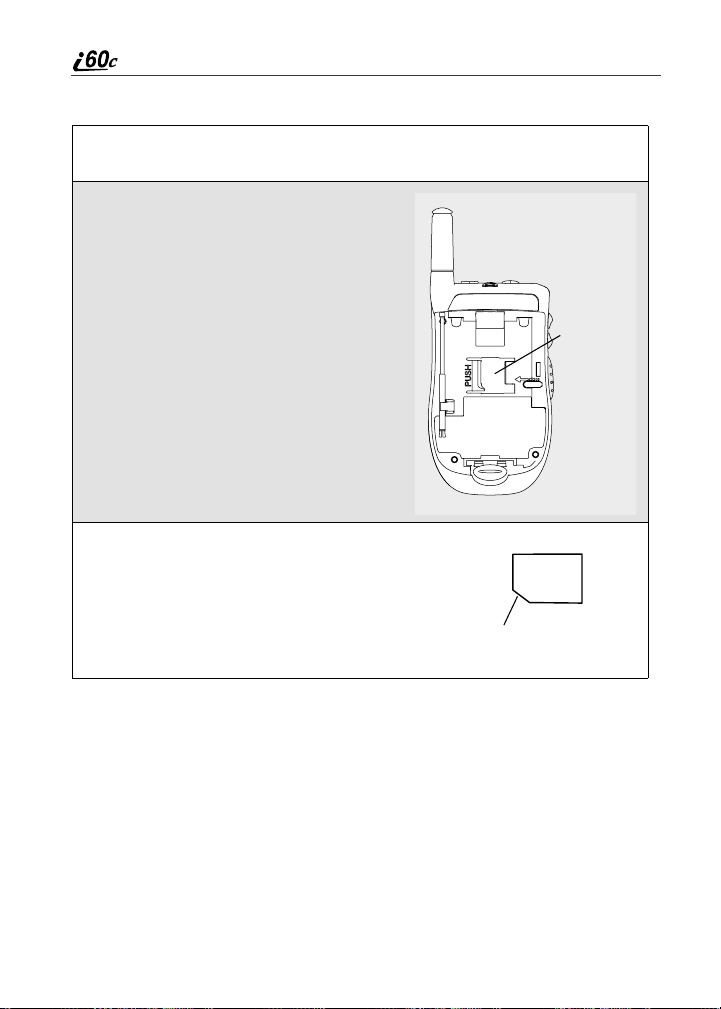
Inserting SIM Card
1
With the phone powered off, remove the battery cover and battery. See
“Detachingthe Battery” on page 10.
2
With theantenna facingaway fromyou
and the back of the phoneexposed and
facing up, locate the SIM card holder.
3
Hold the SIM card with the gold contact
side facing down and the cut corner in the
lower left. Do not touch the gold-colored
areas of the SIM card.
cut corner
SIM Card
SIM card
holder
20
nextel.com
Page 29

4
Carefully slide the SIM card to the rightand into
the phone, until it lies flat in the SIM cardholder.
Removing SIM Card
NOTE: To remove your SIM card, you will need a ballpoint pen.
1
With the phone powered off, remove the battery cover and battery. See
“Detachingthe Battery” on page 10.
2
With the antenna facing away from you
and the back of the phone exposed and
facing up, insert the tip of a ballpoint pen
into the slottothe right of the SIM card,
along theright edge of the SIM card.
SIM Card
slot
21
Page 30

3
With your other hand, gently press the
PUSH tab to the left of the SIM card.Hold
this tab down.
tab
4
While holding the tab down, slide the SIM cardto the left by moving
the ballpointpento the left within the slot.
5
When the ballpoint pen has moved theSIM cardto theleft as far as
possible, very carefully lift the SIM cardoutof the phone. Do not touch
the gold-colored areas of the SIM card.
NOTE: Protect the SIM card as you would any delicate object. When
the SIM card is not in the phone, you should store it in
something protective,such as a mailing envelope.
22
nextel.com
Page 31

Status of Your i60c Phone
Status of Your i60c Phone
Your i60c phone’s statuslight is located on the topright side of the phone, near
the cover hinge.The status lightindicates thestatus of your connection.
Status Light
Indicator
Flashing Red Signing on to the network. Please wait.
Solid Red No service or outof coverage area.
Flashing
Green
Solid Green In use.
i60c Phone Status
If you are in a coverage area, keep your phone
on anditwillattempt toconnect tothe network
every two minutes. If the phone does not
connect after 15 minutes, contactNextel
Customer Care.
Inservice/Readytouse.
NOTE: Nextel Direct Connect is only
available in your home calling area.
My Information
You can select My Info from the main menu to display or edit the following:
• Name — enter your name in this field.
• Private ID — your Private ID is displayed in this field.Your Private ID is
your Nextel DirectConnect number and is composed of threeparts: Area
ID*NetworkID*Member ID. For example: 999*999*9999.
NOTE: The asterisks are part of your Private ID.
• Phone Numbers of Lines1and 2 — your phone’snumbers are displayed
in these fields. Your phone numberis automatically entered when you
receiveyour first phone call.
• Carrier IP - this field displaysyour phone’s carrier assigned IP address.
• IP Addresses — these fields display the IPaddresses you useto access the
Internetwith your phone.
23
Page 32

• Circuit DataNumber (Ckt) — you can enter yourcircuit data number in
this fieldifyouplan to use your phone as a modem.
Viewing/Editing My Information
1
From the idle screen, press q and #.
Or,
Press q and use the S to scrollto My Info.
2
Press Q to scrollto My Info.PressC under SELECT.The My
Information screen displays.
3
Use S to scroll throughthe fields.
4
Toedit the displayed information, pressC under CHANGE. Edit
information as desired, and press C under OK to save the changes.
To return to the idle screen, press C under EXIT.
Using T 9®Text Input
Your i60c phone has embedded software, called T9®Text Input, that makes
typing on a phone keypadmuchlike typing on a computer keyboard: it
eliminates the traditional “multi-tap” method of text entry. As you type, you
pressonly onekeyper letter. T9Text Inputmatches yourkeystrokes towords in
its linguistic databaseof approximately 60,000 words and proper names. You
may also store additional wordsyou frequently use in your own user database,
which is incorporated intothe T9 database.
T9 Text Input is available when youare typinginformationinto your phone(for
example,in thePhonebook or Datebook) and whileusing Nextel Online
services.
T9 Text Input Entry Modes
Four text entry modesare available in T9 Text Input: Alpha, Word, Symbols,
and Numeric. When you are using T9 Text Input, an icon in the top right corner
nextel.com
24
Page 33

Using T9® Text Input
of your phone’s display screen (next to the battery strength indicatoricon)
indicates the T9 Text Input entry mode you are using.
Icon* T9 Entry Mode
Used For...
Name
w
Alpha Standard “multi-tap” keypad
text entry.
# Word Entering words and
punctuation with one keypress per character.
! Symbols Entering punctuation and
symbols suchas “@” or “?”.
, Numeric Entering keypad numbers.
NOTE: * T9 icons do not display while you are using Nextel Online
services.
Choosing a Text Entry Mode on Nextel Online
When you are using Nextel Online services, T9 Text Input becomes available
wheneveryou access a screenthatrequires you to enter text. The right display
option on your the phone’s screen indicates your current T9 Text Input text
entry mode:
• ALPHA and alpha for Alpha mode
• WORD or word for Word mode
• SYM1, SYM2, SYM3,orSYM4 for Symbols mode
• NUM for Numeric mode
To changetext entrymodes, press the C under textentry mode until thedesired
mode displays.
NOTE: The rest of the instructions for using T9 Text Input do not apply
to Nextel Online applications (for example, Phonebook). See the
Nextel Online User’s Guide available on nextel.com, for
instructions on using T9 Text Input for Nextel Online services.
25
Page 34

Choosing a Text Entry Mode
You can select your textentry mode from a menu available whenever the phone
is displaying a screen that requires you to enter text (for example, the Name
screen or Title screen).
To choose a text entry mode:
1
From any screen that requires text input,press q to access the Entry
Method menu.
A check mark appears next to the current textentry mode. When you
access a screen that requires text input,thedefault text entry mode is
Alpha.
2
Press S to scroll to the desired text entry mode.
3
Press C under SELECT.
The phone returnstothe text entry screen.The icon displays indicating
theactivetextentrymode.
Choosing a Language
To change the language of the T9 Text Input database:
1
From any screen that requires text input,press q to access the Entry
Method menu.
2
Press S to scroll to Languages.
3
Press C under SELECT.
4
Press S to scroll to the language you want T9 TextInputto use.
5
Press C under SELECT.
NOTE: This feature is not available when using T9 Text Input with
Nextel Online services.
nextel.com
26
Page 35

Using T9® Text Input
Using Alpha Mode
To enter text(letters and numbers) while in Alpha text entrymode:
• Press anykey on the alphanumeric keypad toenter the letters and numbers
on that key. For example, to enter the letter Y,press 9 three times.
• TypealetterthenpressQ to activate Caps Lock or typealetter then press
R to deactivate Caps Lock.
• Pause briefly to leave the currently displayed character in place and move
on to the next place in the text entry field.
• Press P to create a space in the text entry field.
• Press C under DELETE to delete one character. Press and hold C under
DELETE todelete an entire entry.
Using Word Mode
T9 Text Input software replacesconventional multi-tap text entry,enabling
users to compose text messageswith only one key press per letter. Since each
key ona telephonekeypad hasm ore than oneletter, pressing thenumber 5could
represent“J,”“K,” or “L.” T9 automatically compares users’ keypressestoa
linguistic database todetermine the correct word. For example, entering the
word “call” intoa wireless phone takes just four key presseswith T9, compared
to ten using conventional multi-tap entry.
Special Key Functions
Some of your phone’s keys assume different functions while in T9 Text Input
Word mode.
Backspace and Erase
Press
C under DELETE once to backspace
or toerase asinglecharacter. Pressand hold
C under DELETEtoerase the entire text
entry field.
Space
Next Word in Database If the displayed word is not the word you want
Press R once to accept a word and insert a
space when entering text.
to enter, you can display other words. Press
0 to displaymorewords in the database
that match the keystroke sequence you
entered.
27
Page 36

Shift andCapsLock
Press # to makethe nextlettertyped
uppercase (Shift), tomake all subsequent
letters types uppercase (Caps Lock), or to go
back to lowercase letters.
These icons appear in the top row of your
display screen:
$ for Shifttouppercase
•
x for Caps Lock
•
When neither of these icons appear, letters
typed are lowercase.
Punctuation In Word mode, T9 Text Inputuses Smart
Punctuation to quickly apply basic rules of
grammar to insert the correct punctuation
withina word andatthe end of a sentence.
• Press 1 to insert punctuation. One of
eight basic punctuation symbols will be
inserted (., -’ @:?;).
• Press 0 to change the inserted
punctuation symbol to anotherof the
eight basic punctuation symbols.
• Press R to accept the punctuation and
continue typing.
NOTE: Additional punctuation symbols are available in Symbols mode.
EnteringaWord
To enter a word using Word mode:
1
Choose Word as your text entry mode.
2
Type a word by using one key press per desired letter.
For example, to type “test” press 8378.
NOTE: The displayed word may change as you type it. Do not try to
correct the word as you go. Type to the end of the word
before editing.
28
nextel.com
Page 37

Using T9® Text Input
3
After you have finished typing the word,ifthe word that appears is not
the desired word, press 0 to change the word on the display to the
next most likely word in the database.
Repeat until the desiredword appears.
If the desiredword does not appear, you can add it to the database of
words by deleting the displayed word and using the following
instructions in “Adding Words to the User Database” on page 29.
Adding Words to the User Database
To add words to the T9 database:
1
Change from Word text entry mode to Alpha text entry mode (see
“Choosing a Text Entry Mode” on page 26).
2
Type the word using Alphatextentry mode.
3
Return to Word text entry mode.
4
Press R to add a space.
The word you typed in Alphatextentry mode is now in the database.
NOTE: You can not store alphanumeric combinations, such as Y2K.
Using Symbols Mode
To use Symbols text entry mode:
1
Choose Symbolsasyour text entry mode.
A row of 32 symbols appearsalongthe bottom of your phone’sdisplay
screen,just above the display optionsand menu icon. (Press T to view
the complete row.)
2
Press T to highlight the symbol youwantto enter into the text entry
field.
3
Press C under SELECT to enter the symbol.
29
Page 38

Using Numeric Mode
To use Numeric text entry mode, choose Numeric as your text entry mode and
press the numberbuttons on your keypad to enternumbers.
30
nextel.com
Page 39

Display Essentials
Your i60c phone’s display screen tells you what you need to know as you use
your phone.
This section includes:
DisplayScreen Page 31
Status Icons Page 32
Text Display Area Page 34
Call Information Icons Page 34
Menu Icon Page 35
Display Options Page 35
NavigatingMenus andLists Page 35
Main Menu Options Page 36
Display Screen
Any time your phoneis powered on, the displayscreen providesyouwith
information and options.
When your phone coverisopen, the display screen provides detailed
information about all of your phone’s functions.
Opening and Closing Phone Cover
If you are viewing information on the display screen, closing the phone cover
terminates any activityyour phone is engaged in — except poweringupor
transferring data through a cable.
31
Page 40

Display Screen
The display screen consistsof:
• statusicon rows — the top two rows
display status. See “Status Icons” on
page 32.
• textdisplay area— displays up to five
lines of text and icons.
• menu icon — see “Menu Icon” on
page 35.
• displayoptions — see “Display Options” on page 35.
NOTE:Thereare instances where truncation
of words occur in some of the menu
items on the i60c phone that do not
allow you to fully view the current
menu selection. You can press
under CHANGE to see the field in
more detail.
O
C
icon
rows
Text
display
area
Menu
icon
Display
options
The Idle Screen
The illustration of the displayscreen shows the idle screen. The idle screen
displays NEXTEL and the time and date.
The idle screendisplays any time the phoneis powered on, but not engaged in
some activity. You must startat the idle screen to accessmany of your phone’s
featuresand functions. You can always accesstheidle screen by pressing r.
USER TIP: When your phone cover is open, closing and re-opening the
phone cover accessesthe idle screen.
W
Status Icons
Statusicons appear inthe tworows atthe top ofthe displayscreen.Someappear
at all times. Othersappear only when yourphone is engaged in certain activities
or when you haveactivated certain features.
Icon Indicates...
abcd
efgd
32
BatteryStrength — remaining battery
charge.Morebars on the battery indicate a
greater charge. See“Battery Charging
Status” on page 12.
nextel.com
Page 41

Status Icons
opqrs SignalStrength—strength ofthenetwork
01
GHI
JKL
c Phone InUse— phoneisconnectedonan
h PrivateIn Use — numberbeing calledis a
% Talkgroup In Use — phone is active on a
Y Packet Data Ready — phone is ready to
Z Packet Data Activity — phone is
] Mobile IP — phone is ready to access the
{ Secure Data — phoneis accessing the
signal. More barsnext to the antenna
indicatea stronger signal. Fourbars is the
maximum.
Active Line—currently active phoneline;
0 indicates Line 1 is active; 1 indicates
Line 2 is active.
Call Forward — phone is set to forward
calls. See“Call Forwarding” on page 71.
active call.
Private ID.
Group Call.
receive data through a data cable.
transmitting data.
Internet.
Internetusing a secure connection.
. TextMessage— you have one or more
unread Text Messages or Net Alert
messages.
y Voice Mail — you have one or more
unheardVoice Mail messages.
u Speaker Off — phone’s speaker is off.
33
Page 42

-[\* Ring/Vibe — you have customized the
way in which thephone is set to notifyyou
when you receive calls and other types of
messages. See “Ring StyleandNotification
Type” on page 124.
w#,!
$x
`
The icon of the main menu feature in use always appears in the top leftof the
statusicon rows.Fora list ofthe mainmenu icons, see“Main Menu Options” on
page 36.
T9 Text Input — you are using T9 Text
Input to enter text. See “Using T9® Text
Input” on page 24.
TTY— your phone supports TTY devices
and communications
Text Display Area
The display screen’s text display areadisplays menu options, messages,names,
phone numbers, and other information.
Call Information Icons
Each of the following icons appears on the left side of the text display area of the
displayscreen, providing you with information about yourcalls.
Icon Indicates...
D In Call - phone is on an active call.
E Incoming Call - phone is receiving an
X Outgoing Call - phone is placing an
incoming call.
outgoingcall.
34
V On Hold - phone has a call on hold.
? End Call - phone has ended the activecall.
nextel.com
Page 43

Menu Icon
Menu Icon
The menu icon S appears on any screen from which a menu can be accessed.
To access a menu, press q on your keypad.
Menus are context sensitive. The menu that appearsdepends on the screen you
access itfrom, and the items on the menu apply to the task you are currently
performing.
Press q from the idle screento access the main menu.
Display Options
On thedisplay screen, twodisplayoptionsappear atthe bottomofmost screens.
These options enable you to performa wide variety of actions, including
changing, saving and viewing information, running programs, and canceling
previousactions. You activate a display optionby pressing C below it.
NOTE: Throughout this User’s Guide, the option keys A and B will
be represented by
The idle screendisplay optionsprovide quickaccess to twomain menu features.
By default, the Phonebook (PHBK) and Messages (MESG) display options
appear on the idlescreen.
The display options on screens other than the idle screen cannotbe customized.
C.
Navigating Menus and Lists
The i60c phone is menu driven.Bynavigating menus, you access submenus
which lead to allof thefunctions and featuresthat arebuilt intoyour phone.Use
the menus to store calls, manage your Phonebook, change yourphone settings,
browse theInternet, and more.
Some features include lists of names,numbers, or otherinformation. These list
items can be accessed the same way menuoptions are.
To accessthe items in amenu or list,scroll using thefour-way navigation key at
the top of your keypad. Scroll down by pressingthe lower portionof the
navigation key R.Scroll upby pressingthe upper portion of thenavigationkey
Q. Holding down the appropriate part of the navigation key speeds up
scrolling.
35
Page 44

If more items appear in a menu or list than can be displayedin the text area, a
down arrow or up arrow appears in the left side of the screen indicating that
more options may be accessed by scrolling up or down.
Down arrow Up arrow
B
Main Menu Options
By default, the main menu options appear in the order shown in this table.
To access the mainmenu, press q from the idle screen:
Menu Item Use to ...
7 Net
m Settings Customizeyour phone: Ring/Vibe, Phone
b Phonebook Storeand retrieve a list of stored entries for
R Messages Receive, store, access, and manage Voice
; Call Forward Settings for forwarding callsinvarious
O Memo Input and store numbers to accesslater.
z Call Timers Displaytheduration of phonecalls, Private
36
Browse Nextel Online.
Setup,In CallSetup,Security,InitialSetup,
Voice Volume, and TalkgroupSettings.
calling,editing, viewing, and deleting.
Mail, TextMessages, and Net Alerts.
situations.
or Group Calls, circuitdata use, and
Kilobytessent and received.
nextel.com
S
Page 45

Main Menu Options
j Recent Calls Accessa list ofthe last 20sent, received, or
U My Info Viewthe name, Private ID, phonenumbers
: Call Alert Storereceived Nextel Direct Connect Call
To choose the highlighted main menu selection, press C under SELECT. To
exitthe mainmenuand return tothe idle screen, pressC under EXIT,press r,
or close the phone cover.
missedcalls. Calls canbe made from this
list.
for lines 1 and 2, IP address, and circuit
data number of your phone.
Alertsto respond to at your convenience.
37
Page 46

38
nextel.com
Page 47

Phonebook
The Phonebook allows you to store up to 250 frequently used names and
numbers.
When yous tore informationin your Phonebook,it is saved onyour SIM card.If
you move your SIM card to another Nextel SIM-basedphone, you can access
information in your Phonebookfrom that phone.
NOTE:If you use a different SIM card in your phone, some information
stored in the phone will be unavailable. See “Inserting/
Removing the SIM Card” on page 19.
This section includes:
Phonebook Entries and Speed Dial Numbers Page 40
Phonebook Icons Page 40
AccessingYour Phonebook Page 41
About PhonebookEntries Page 41
Viewing PhonebookEntries Page 42
Sorting Phonebook Entries Page 42
Adding Phonebook Entries Page 44
Editing Phonebook Entries Page 49
Deleting Phonebook Entries Page 50
Pause Digit Entry Page 50
Plus Dialing Page 51
Address Book Page 52
39
Page 48

Phonebook Entries and Speed Dial Numbers
Your Phonebook canstore multiple numbers toa single name.For example, you
can enter someone’s name into your Phonebook once andthen add thatperson’s
home, office, mobile phoneand fax numbers to the name.You can store up to
seven phonenumbers, a Private ID, and an IP address.
Each number stored in your Phonebookis automatically assigned a Speed Dial
number thatcorresponds to itslocation in your Phonebook.Each phone number
uses one Speed Diallocation, evenifit is assigned to the same name as other
phone numbers. The phone number stored in location 1 is assigned Speed Dial
number 1,the phone number stored inl ocation 2 is assigned Speed Dialnumber
2, and so forth, to location 250.
NOTE:Private IDs and Talkgroup numbers do not have associated
Speed Dial numbers.
Phonebook Icons
Icons that appear to the right of entriesin your Phonebook convey information
about those entries.
When you enter a number in your Phonebook, you can designate the number’s
type using any of the following icons:
W Mobile
h Private ID
q Work
Q Main
L Home
b Pager
K Fax
Z Other
n Talkgroup
IP Address
40
nextel.com
Page 49

Accessing Your Phonebook
NOTE:The Mobile icon automatically appears to the right of the first
number assigned to a name unless you choose another icon.
For more information on entering numbers into your Phonebook, see“Adding
Phonebook Entries” on page 44.
The “picker” arrowsappearing around the number type icon indicates multiple
numbers stored under one name:
ef pickers
Accessing Your Phonebook
If PHBK is one of your display options:
From the idle screen, pressC under PHBK.
If PHBK is not one of your display options:
1
From the idle screen, pressq.
2
Press R to scroll to Phonebook.
3
Press C under SELECT.
USER TIP:You can also access the Phonebook while you are on an
This bringsyou to thePhonebook screen. From this screen, you can view, sort,
add, edit,and delete Phonebook entries, check Phonebook capacity, or make
calls.
activecall. Press
Phonebook and press
q andthenpressR to scroll to
C under SELECT.
About Phonebook Entries
Each Phonebookentry may contain the following information:
• The name associated with theentry: Typically, this is the name of the
person whose number you are storingin the Phonebook.
41
Page 50

• The type of number to be stored: Mobile, Private, Work, Main, Home,
Pager, IP,Fax,Other, or Talkgroup. If you don’t choose a type, the number
is assigned typeMobile, unlessa Mobile numberhas alreadybeen assigned
to the name.
• The number to be stored:Every Phonebookentrymust containa number.
This numbermay be any typeof phone number,Private ID or Talkgroup
number, or an IP address.
• A Speed Dial number: You may accept the default Speed Dial number or
assign a different one.
Viewing Phonebook Entries
Names with morethan one number assignedtothem appear with ef
surrounding the icon to the right ofthename.For example, if you had stored a
home and work number for JoeSmith, the entry for Joe Smith’s home phone
number would look like this:
Joe Smith eLf
Whenthenameishighlighted,pressT to scroll to the icons representing each
of the numbers assigned to that name.
To view any of the numbersassigned to a name:
1
From the Phonebook screen, press S to scroll to the name associated
with the number youwantt o see.
2
Press T to view the icons representing the numbers assignedto that
name.
3
When the icon representingthenumber you want to view is displayed,
press C under VIEW.
Or,
If thereis a PrivateID or a Talkgroup numberstored for theentry, press
q.ThenpressR to scroll to View and press C under SELECT.
4
Press S to view the other numbers stored for this name.
Sorting Phonebook Entries
You can sortyourPhonebook entriesby:
• Name — thenameyouenteredfortheentry.
• Speed No. — the Speed Dial location of the entry.
nextel.com
42
Page 51

About Phonebook Entries
NOTE:Private IDs and Talkgroup numbers cannot be accessed from
the Phonebook when sorted by Speed Dial location.
To sort your Phonebooklist:
1
From thePhonebook screen, press q to
view the Phonebook Menu screen.
}
2
Press R to scroll to Sort By.
3
Press C under SELECT.
4
Press R to scroll to the desired sorting method: Nameor Speed #.
5
Press C under SELECT.
Checking Phonebook Capacity
Your Phonebookcan store up to 250 separate numbers. To see how many
entriesarestored in your Phonebook:
1
From the Phonebook screen,press q to view the Phonebook Menu
screen.
2
Press R to scroll to Capacity.
3
Press C under SELECT.
The Capacity screen shows how many storage spaces in your
Phonebook are in use and how many are empty.
43
Page 52

Adding Phonebook Entries
Using the following instructions, you will enter theinformationinthe order the
items appearon the PhonebookEntryDetails screen. However, youcan enter
this information in any order by pressing S to scroll through the items on the
Entry Details screen.
You can leaveitems blank or unchanged by pressing S to scroll past it on the
Entry Details screen.
NOTE:Number and type are required for a valid Phonebook entry.
To cancel a Phonebook entry at any time, press r to return to theidle screen.
To add a Phonebook entry:
1
To access the Entry Details screen:
From the Phonebook screen, with [New
Entry] highlighted, press C under
SELECT.
Or,
From the Phonebook screen, pressq.
Then press R to scroll to New and press
C under SELECT.
2
If you want to assign a name to your
Phonebook entry:
With the Name fieldhighlighted,press C
under CHANGE.
H
From the Name screen, enter the name
using the alphanumeric keypad.
See “Using T9® Text Input” on page 24
for information about entering text into this field.
When you are finished, press C under OK.
The Entry Details screen returns with the Type field highlighted.
nextel.com
44
I
Page 53

3
With the Type field highlighted, press C
under CHANGE.
From the Type Editor screen,press R to
scroll to thetype of number you want to
assign to the Phonebook entry.
About Phonebook Entries
Press C under SELECT.
The Entry Details screen returns with the
# field highlighted.
4
Assign a number to your Phonebook entry:
With the # field highlighted, press C under CHANGE.
Type the number using thealphanumeric keypad. For phone numbers,
use the 10-digit format. For PrivateIDs, use
Area ID * Network ID * Member ID (the asterisks must be included as
part of thePrivate ID).
Todeletea digit, press C under DELETE.
See “Pause Digit Entry” on page 50 and
“Plus Dialing” on page 51 forinformation
on using these features when storing
phone numbersin your Phonebook.
NOTE:The number can be up to 20
characters long.
When you are finished, press C under
OK.
The Entry Details screen returns with the Speed # field highlighted.
J
K
45
Page 54

5
The default SpeedDial number assignedto the phone number is
displayedintheSpeed # field. This is always the next available Speed
Dial location.
NOTE:Private IDs and Talkgroup
numbers donot haveassociated
Speed Dial numbers.
Toaccept the default Speed Diallocation,
go to step 6.
If youwant toassign thephone numberto
a different Speed Dial location:
With the Speed # field highlighted, press
C under CHANGE.
Press C under DELETE to delete the currentSpeed Dial number.
Type the new Speed Dial number using the alphanumeric keypad.
When you are finished, press C under OK.
NOTE:If you change theSpeed Dialnumber to one already in use,
you will be prompted to overwrite the entry that is currently
in that location. Pressing
existing entry from your Phonebook.
6
If you want to store morenumbers to the
name associated with this Phonebook
entry:
Press R to scroll to TYPE andthenpress
C under CHANGE.
C under YES will delete the
L
AnewType field appears forthe
additional number.
Enter the information for the additional numbers using step 3 through
step 7.
NOTE:Each name in your Phonebookmay have up to seven phone
numbers, one Private ID and one IP address associated with
it.
nextel.com
46
l
Page 55

About Phonebook Entries
7
When you have entered all the
information for this Phonebook entry,
press C under DONE.
N
Storing Numbers and Private IDs Fast
Your phone gives you two ways to store numbers quickly: from the idle screen
and from the Recent Calls list.
To store a number from the idle screen:
1
From the idle screen,use the alphanumeric keypad to enterthe number
you want to store.Forphone numbers,use the 10-digit format.For
Private IDs, use Area ID*Network ID*Member ID.
2
Press q to access the Dialing Menu screen.
3
With StoreNumberhighlighted, press C under SELECT.
This displays theStore To screen with [New Entry] highlighted.
4
To store to a new entry,pressC under SELECT. The Entry Details
screen willdisplay with the number enteredin thefield.
Or,
To store to an existing entry,pressR to scroll the listof names in
your Phonebook. Or press the first letterof the entry to jump to the
entry. Once the desiredentry is highlighted, press C under SELECT.
The Phonebookinformation forthat entry displayswith the number
enteredinthe# field and the Type field highlighted.
5
Press C underCHA NGE. Press R to scroll to the typeofnumber you
want to assignto the Phonebook entry. Press C under SELECT.
47
Page 56

6
If you wantto add more information to thePhonebook entry, followthe
applicable instructions in “Adding PhonebookEntries” on page 44.
7
Press C under DONE.
To store a phone number from the Recent Calls list:
1
From the Recent Callsscreen, press R to scroll tothe 10-digit
telephonenumber you want to store.
2
Press C under STORE. This displays theStore To screen with [New
Entry] highlighted.
3
To store a new entry,pressC under SELECT.The Entry Details
screen displays with the numberentered in the # field and the Name
fieldhighlighted. Enter the name using thealphanumerickeypad. Press
C under OK.
Or,
To store to an existing entry,pressR to scroll the listof names in
your Phonebook. Or press the first letterof the entry to jump to the
entry. Once the desiredentry is highlighted, press C under SELECT.
The Phonebookinformation forthat entry displayswith the number
enteredinthe# field and the Type field highlighted.
4
With Type highlighted, press C underCHANGE.PressR to scroll to
the typeof numberyou wanttoassign to thePhonebookentry. PressC
under SELECT.
5
If you wantto add more information to thePhonebook entry, followthe
applicable instructions in “Adding PhonebookEntries” on page 44.
6
Press C under DONE.
nextel.com
48
Page 57

About Phonebook Entries
To store a Private ID from the Recent Calls list:
1
Press R to scroll to the Private ID number you want to store.
NOTE:The Store option for Private ID numbers (e.g., 123*123*1234),
will not display in the Recent Calls list.
2
With the Private ID highlighted, press q to access the RecentCalls
Menu.PressR to scroll to Store.PressC under SELECT. This
displays the Store To screen with [New Entry] highlighted.
3
To store to a new entry,pressC under SELECT. The Entry Details
screendisplayswith the Private ID icon entered in the Type field, the
Private ID number entered in the # field, and the Name field
highlighted. WiththeName field highlighted, press C under
CHANGE. Enter the name using the alphanumeric keypad. Press C
under OK.
Or
To store to an existing entry,pressR to scroll the listof names in
your Phonebook. Once the desired entryis highlighted, press C under
SELECT. The Entry Details screen displays with the Private ID icon
enteredintheType field, the Private ID number entered inthe # field,
and the Name field highlighted.
4
Press C under DONE.
Editing Phonebook Entries
1
From the Phonebook screen, press R to scrollto the entryyou want to
edit.
2
Press q to view the Phonebook Menu.
3
Press R to scroll to Edit.
49
Page 58

4
Press C under SELECT. TheEntry Details screen displays.
5
Followthe applicable instructionsin “Adding Phonebook Entries” on
page 44 to edit the various fields.
NOTE:To add additional numbers to an existing entry, press R to
scroll to new Type, #, and speed #. Press
Follow the applicable instructions in “Adding Phonebook
Entries” on page 44.
C under SELECT.
Deleting Phonebook Entries
1
From the Phonebook screen, press R to scrollto the entryyou want to
delete.
2
Press q to view the Phonebook Menu.
3
Press R to scroll to Delete C ontact or Delete Number.
Delete Contact deletes thename and all numbers associated withthat
name.
Delete Number deletes the number associated with the icon thatis
currently displayedin thePhonebook list for thename. The name and
all the other numbers will remain.
4
Press C under SELECT.A warning screen displays requiring you to
confirm the deletion.
Pause Digit Entry
When storinga number, you can program your phoneso it willnot only dial a
number but also pause before entering another series of numbers such as a
personal identification number (PIN)or password. This feature is particularly
useful for accessing automated services from your i60c phone;suchas voice
mail and banking systems from your i60c phone.
Example:Let’ssay youhave a company voicemail account thatyou frequently
check while traveling. And, to access that account youmustdo the following:
• dial your work number
nextel.com
50
Page 59

Plus Dialing
• press # while thevoice mail greeting is being played
• enter yourPIN to access your messages
You can programyour phone to enter all of the above informationforyou by
separating each entrywith a pause. The stored datawould look like this:
17035551234P#P1234. Inthisexample, the firsteleven digits represent the
number thatmust be dialed to access yourvoice mail. The P represents a 3
second pause. The # interrupts yourgreeting.Thesecond P represents another3
second pause. The last four digitsr epresent your PIN.
To create a three-second pause,follow the steps below:
Press and hold * for two seconds.The pause symbol (P) willappear
on the display screen.
NOTE:You canenter up to 20 characters inasingle entry, storedo r
dialed. Y ou can program your phone to pause for more than 3
seconds. Performing the above step twice will program two
pauses and cause your phone to wait 6 seconds before entering
the next set of numbers.
Plus Dialing
Use Plus Dialingforall Phonebook entries if you plan to travel outsidethe
United States. This featureenables you to place aninternational call from most
countries—without entering the local internationalaccess code. You can enter
phone numbersinto your Phonebook using either Plus Dialing and Storing
NumbersFast or Adding PhonebookEntries and Plus Dialing.
To add a phone number using Plus Dialingand Storing Numbers Fast:
1
Press and hold 0 for two seconds.A “0” appears, then changes to a
“+”.
NOTE: The network translates the “+” into the appropriate international access
code needed to place the call.
2
Enter the country code, city code, or area code,and phone number.
3
Continueby following theremaining instructions for“StoringNumbers
and Private IDs Fast” on page 47.
51
Page 60

To add a phone number using Adding Phone Book EntriesandPlus
Dialing:
1
Beginbyfollowing theinstructionsfor “Adding Phonebook Entries” on
page 44. Beforeyou typethenumber to be stored, follow the rest of
these instructions for using Plus Dialing.
2
Press and hold 0 for two seconds.A “0” appears, then changes to a
“+”.
NOTE: The network translates the “+” into the appropriate international access
code needed to place the call.
3
Enter the country code, city code, or area code,and phone number.
Continue with the Phonebook entry, following the remaining
instructions for “A dding Phonebook Entries” on page 44.
Address Book
Manage your contact information with Address Book.Address Book provides
easy maintenance and entryof contact information and accessto that
information from your i60c phone or nextel.com.Address Book is a Nextel
Online service and requires theactivation of a Nextel Online service plan. To
order, call 1-800-NEXTEL6 or contact yourNextel Sales Representative.
For instructions on how to use this application, see “AddressBook” in the
Nextel Online User’s Guideavailable on nextel.com
52
nextel.com
Page 61

Digital Cellular
The i60c phone utilizes Nextel’s All-Digital National Networkfordigital
cellular service. You can also use this phone to roam internationally on other
iDEN networksusing Nextel WorldwideService. See nextel.com for coverage.
This section includes:
Making Phone Calls Page 54
Emergency Calling Page 58
SpecialDialing Codes Page 59
Receiving a Phone Call Page 59
Ending a Phone Call Page 60
Recent Calls Page 61
Call Timers Page 64
Hands-FreeSpeakerphone Page 65
Mute Page 66
Call Waiting Page 66
Call Hold Page 69
Three-WayCalling Page 70
Call Forwarding Page71
Caller ID Page 75
AlternateLine Service Page 76
Call Restrictions Page 77
Nextel 411 Page 77
53
Page 62

Making Phone Cal ls
Your i60c phone provides the following features for making phone calls:
• Direct Dial
• Phonebook
• RecentCalls List
• Most Recent Call
• Speed Dial
• Turbo Dial
• Last Number Redial
• TTY — your phone supports TTY devices andcommunications.
Using Direct Dial
1
From theidle screen,use the keypadtoenter the 10-digit phonenumber
youwanttocall.
2
Press s to place the call.
3
Press r or close phone coverto end thecall.
NOTE:See “Plus Dialing” on page 51 for information on making
If you make a mistake:
• To clear one digit,press C under DELETE.
• To clear all digits, press and hold C under DELETE.
• To insert a digit, press T to move the cursor.
• To cancel, press r.
®
international calls.
Making Calls from the Phonebook
After you have entered phone numbers into your Phonebook,youcan use these
numbers to makephone calls. For information on enteringnumbers into your
Phonebook, see “Adding PhonebookEntries” on page 44.
nextel.com
54
Page 63

Making Phone Calls
To make calls from the Phonebook:
1
From the idle screen,i f PHBK is one of your display options, press C
under PHBK.
Or,
From the idlescreen, press q,thenpressR to scrolltoPhonebook.
Press C under SELECT.
2
Press S to scroll throughthenames in your Phonebook.
Or,
Use the alphanumeric keypad to enterthefirst letter of the nameand
press R to scroll through the names beginning with thatletter.
Stop when the name of the person you want to call is highlighted.
3
If more than onenumber is stored fort he person you want to call, ef
appearsaround the icon to the rightof the person’sname.
Press T to scroll through the icons representing thenumbers stored for
that person.
Or,
Press C under VIEW to view all the numbersstored for this person.
Then press R to scroll to the number you want to call.
Or,
If there is a Private ID stored for this person, press q. When the
PhonebookMenuappears, press R to scroll to View and press C
under SELECT. Then press R to scroll to the number you want to call.
For moreinformation onassigningmultiple numbers to one person, see
“Adding Phonebook Entries” on page 44.
4
Press s to place the call.
5
Press r or close phone coverto end thecall.
55
Page 64

Making Calls from the Recent Calls List
Your phone stores the numbers of the last20 calls you received or sentin the
RecentCalls list.
1
From the idle screen,press R.
Or,
From the idle screen,press q.PressS to scroll to Recent Calls.
Press C under SELECT.
2
Press S to scroll throughthe list of receivedor sent recent calls until
you reach thedesired call.
3
To view additional information about the call:
Press C under VIEW.
Or,
Press q to access the Rec. Calls Menu.ThenpressR to scroll to
View and press C under SELECT.
4
Press s to place the call.
5
Press r or close phone coverto end thecall.
Using Speed Dial
Each phonenumber stored in yourPhonebook is assigned a SpeedDial number.
You can use the Speed Dial number to quickly place a call.
1
From the idle screen,enter the Speed Dial number assignedto the
phone numberyou want to call.
2
Press #. The number’s Phonebook entry information will display.
3
Press s to place the call.
4
Press r or close phone coverto end thecall.
nextel.com
56
Page 65

Making Phone Calls
Using Turbo Dial
Turbo Dialallowsyou to call the numbers in yourPhonebook associated with
Speed Dialnumbers 1 through 9 by pressingand holding the corresponding
numerickeyonthekeypad.
Press and hold a numberkey (1 through9).
NOTE:Turbo Dial cannot be accessed while the browser is active, nor
while Keypad Lock or SIM Lock is active.
Last Number Redial
Press and hold s to redial the last number you called.
NOTE:If you receive “System Busy, Try Later,” press s to redial the
number automatically. You will hear a ring-back tone when the
call is successfully placed.
Making TTY Calls
NOTE:TTY may not be available in all
areas.
You can use your phone to make calls using a
TTY device.
When you make a TTY call, the call begins in the
TTY mode you last selected. You can change the
TTY mode during a call.For more informationon
choosinga TTY mode, see “Setting TTY Mode”
on page 135.
To make a call using a TTY device:
Q
1
Connectone end of a2.5mm cable intothe jack onthe phone.(Tolocate
the jack, seepage 6.) Connect the other endof the cordinto your TTY
device.
2
Enter the phonenumber you wish to call and press s.
57
Page 66

Placing International Phone Calls
When making an international call, you can either enter the international access
code directly (for example, 011 in the United States) or use Plus Dialing.
You can make international calls from your Phonebookifyouhavestored the
numbers with Plus Dialing. See “Adding Phonebook Entries” on page 44 and
“Plus Dialing” on page 51 for more information.
NOTE:Your service default is “International Calls Restricted.”
Contact Nextel Customer Care to obtain international dialing
access.
To make an international callusing Plus Dialing:
1
Press and hold 0 for two seconds.A “0” appears, then changes to a
“+”.
NOTE:The network translates the “+” into the appropriate
international accesscode neededto place the call.
2
Enter the country code, city code, or area code(as needed), and phone
number.
3
Press s to place the call.
4
Press r or close phone coverto end thecall.
Emergency Calling
Your phone supports emergencycalling. Emergency calls can be made even
when the SIM card isblocked or not in the phone.
To place a call in an emergency, press 911s. You will be connected to
the nearest emergencydispatch center. Ifyou areonan active call, youmust end
it before calling 911.
NOTE: If you have enabled the Keypad Lock feature, you must unlock
the phone’s keypad before any calls can be made, including 911
emergency calls.
58
nextel.com
Page 67

Special Dialing Codes
Special Dialing Codes
Non-Emergency Numbers
Nextelsupports many“non-emergency”numbers (such as#77, 311,...) provided
by local and state governments.These numbers are used to report
non-emergency incidents. If the situationincludes imminent danger or loss of
life, you should dial 911.
Telecommunications Relay Service
Nextel supports services for communicating with speech and/or hearing
impaired individuals. You can press 711 to reach a local
Telecommunications Relay Center. Youwill then be connected to your
destination number. Relay service works through a Communications Assistant
who reads messages typed into a TDD/TTY device bya speech orhearing
impairedindividual to you. TheCommunications Assistant thentypes your
spoken messages to the hearing or speech impaired individual.
TelecommunicationsRelay Service is available 24 hours a day, seven days a
week, and every call is strictly confidential.
NOTE:Using 711 to reach Telecommunications Relay Service may not
be available in all areas.
Receiving a Phone Call
Incoming calls are indicated by a ring, vibration, or backlight illumination.
When the cover is open, the screen will display:
• the caller’s nameif stored in your Phonebook, or
• the 10-digit phone number if Caller ID information is available.
Otherwise, the screen will display Incoming Call.
Cover Open
Press s or any key on the keypad, or press C under YES to answer
the call.
59
Page 68

Cover Closed
Press t on the top of your phone.
The call will be activated with speakerphone on. See “Mute” on page
66.
Or,
Open the phone coverto use the earpiece.
USER TIP:Y ou can turn down the ringer volume by pressing the
volume buttons on the side of your phone while the phone is
ringing.
Sending Unanswered Calls to Voice Mail
Cover Open
Press r or pressC underNO while your phone is ringingor close the
phone coverto transfer incoming calls directly to Voice Mail.
Cover Closed
Press . on the top of your phone, while your phone is ringing,to
transfer incoming calls directly to Voice Mail.
Ending a Phone Call
Cover Open
Press r or close the phone cover.
NOTE: If a headset is attached to thephone, closing the cover will note nd the
call.
60
nextel.com
Page 69

Recent Calls
Cover Closed
Press . on the top of your phone.
Recent Calls
The RecentCalls feature storesthe numbersof the 20 mostrecentcalls youhave
made and received,including Private and Group Calls. You can also view your
most recent call on the one-line display screen without opening your phone
cover.
With the phone coveropen, you can access RecentCalls list to:
• view your recent calls
• store numbers to the Phonebook
• deleterecent calls
• call numbers onthe Recent Calls list
NOTE:The Recent Calls list displays briefly on the display screen after
you end a call.
Recent Calls Icons
For Private Calls,Group Calls, and phone numbers stored in your Phonebook,
an icon appearsto the right of the name or number indicating the Phonebook
type oft he number usedinthe call.See “Phonebook Icons” on page 40 for more
information about Phonebook types.
For phone calls, an icon appears to the left of the name or number indicating the
type of call:
• N indicates an incoming call
• a indicates an outgoing call
• V indicates a missed call. (Missed calls
appear on your Recent Calls list only if
you have Caller ID.)
For NextelDirect Connectcalls, an icon
appearsto theleft of the name or number
indicating the type of call:
• h indicates a Private Call
• n indicates a Group Call
T
61
Page 70

Viewing Recent Calls
If thenumber of therecentcall isstored inyour Phonebook,the name associated
with the number displays.
To view your Recent Calls list:
1
From the idle screen,press R.
Or,
From the idle screen,press q.PressS to scroll to Recent Calls.
Press C under SELECT.
2
Press S to scroll the list of recent calls.
Getting Detailed Information About Recent Calls
To get more information about a recent call:
1
From the Recent Callsscreen, press S to scroll to the call you want
more information on.
2
Press C under VIEW.
Or,
Press q to accessthe Recent Calls Menu.ThenpressR to scroll to
View and press C under SELECT.
The screen that appears displays information such as the name associated with
the number of therecent call (if stored in your phonebook),the number, the
date, time, and duration of the call.
nextel.com
62
Page 71

Storing a Recent Call Number to the Phonebook
To store a number from the RecentCalls list to the Phonebook:
1
From the Recent Callsscreen, press S to scroll tothe number you
want to store.
2
Press C under STORE.
Or,
Press q to access the Recent Calls Menu.PressR to scrollto
Store.PressC under SELECT.
This displaysthePhonebook Entry Details screen with the No. field
filled in with the number of the recent call.
3
If you wantto add more information to thePhonebook entry, followthe
applicable instructions in “Adding PhonebookEntries” on page 44.
Calling From the Recent Calls L ist
See “Making Calls from the Recent Calls List” on page 56.
Deleting Recent Calls
To delete a recentcall:
Recent Calls
1
From the RecentCallsscreen,press S to scroll to the call you want to
delete.
2
Press q to access the RecentCallsMenu.
3
Press R to scroll to Delete.
4
Press C under SELECT.
5
Press C under YES to confirm the deletion.
63
Page 72

To deleteall calls on theRecent Callslist:
1
From the Recent Calls screen, press q to access the Recent Calls
Menu.
2
Press R to scroll to Delete All.
3
Press C under SELECT.
4
Press C under YES to confirm the deletion.
Missed Calls
If you miss a call,open the cover and thescreen displays the missed callicon V
and text indicating the number of calls you have missed. PressC under VIEW
to display the Recent Calls list.
If you do not open the cover, pressing . dismisses the missed callmessage.
Call Time rs
Call Timers measure the durationof your phonecalls, Private or GroupCalls,
and circuit data use, as well as the numberof Kilobytes sent and received by
your phone.
The Call Timers menu displays the followingoptions:
• Last Call — displaysthe duration of your most recent phone call.
• PhoneReset— keeps a running totalofyour phone callminutes, untilyou
reset it.
• Phone Lifetime — displaysthe totalminutes of all your phonecalls.
• Prvt/Grp Reset — keeps a running total of all of your Private and Group
Callminutes, until you resetit.
• Prvt/GrpLifetime — displays the total minutes of all your Private and
Groups Calls.
• CircuitReset — keeps a running total of all of your circuit data use, until
you reset it.
• Circuit Lifetime — displays the total minutes of all of your circuit data
use.
• Kbytes Reset — keeps a running totalof the number of Kilobytes sentand
receivedby yourphone, until you reset it.
64
nextel.com
Page 73

Hands-Free Speakerphone
To view the Call Timers menu:
1
From the idle screen,press q.
2
Press R to scroll to Call Timers.
3
Press C under SELECT.
To view or reset a Call Timers option:
1
From the Call Timersmenu, press S to scroll to the Call Timers
option youwanttoview or reset.
2
Press C under SELECT.
3
If the feature does not include an option to reset or you do not wish to
reset the option, press C under DONE when you are finished viewing.
To reset a feature, press C under RESET. When the confirmation
screen appears, press C under YES to confirm the reset.
NOTE:The values displayed by Call Timers are not intended for billing
purposes.
Hands-Free Speakerphone
The i60c phone provides the convenience of a hands-free speakerphonefor
holding impromptu meetings or placing saferphone calls.
NOTE:During speakerphone operation, you may either speak or listen,
but you cannot do both at the same time.
Cover Open
The speakerphone option (SPKR) is available wheneveryou are on an active
call with the phonecover open.
To turn the speakerphone on:
While on an active call, press C under SPKR.
65
Page 74

While speakerphone is on, Spkrphone On appears in the text display area.
To turn the speakerphone off:
Press C under SPEAKER.
Cover Clos ed
Speakerphone isa lways on whenyou areonan active call with thecover closed.
If you open the cover,speakerphoneis turned off and the call willbe heard
through the earpiece.
Mute
Use the Mute feature to listen to incoming audio without allowing sound from
yourphone’s microphone tobe transmittedover thephone line. Themuteoption
(MUTE) is only available when you are on an active call withthe phone cover
open.
To turn mute on:
While on an active call, press C under MUTE.
While mute is on,UNMUTE appears as a display option.
To turn mute off:
Press C under UNMUTE.
Call Waiting
Call Waiting allowsyou to receive a second callwhile you are talking on the
phone. You can switch between callssoyou never have to miss a call. By
default, Call Waiting is always on unless you turn it off for a specific call.
If you’re on a call and you receivea second call, you will:
• hear a tone
• see a message on your display informing youof another incomingcall
nextel.com
66
Page 75

Call Waiting
Cover Open
If you have your phone cover open when you receive a second call, the screen
will display the caller’s name (ifstored in your Phonebook), thecaller’snumber
(if CallerID information is available), or Incoming Call:
e
Accepting Calls
Press C under YES. The first call is placed on hold.
To end the active callandaccept the second call:
Press r.Thenpresss or press C under YES.
Switching Between Calls
When you accepta second call while talking on the phone, your displayshows
the name or number of each call. An icon appears to the left of each name or
number indicating that the call is on hold V or active D:
[
67
Page 76

Press C underSWITCHtoswitchbetweencalls.
Declining Calls
Cover Open
Press C under NO. If you subscribe toVoice Mail, the call will be
forwarded to your Voice Mail box.
Cover Closed
Press . on the top of your phone. If you subscribeto Voice Mail, the
call will be forwarded to your Voice Mail box.
Ending the Active Call
Press r or close the phone cover.
NOTE:If you have an active call and another call waiting, closing the
phone cover ends both calls.
NOTE: If Flip Activation is set to OFF or if a headset is attached to the
phone, closing the cover will not end the call.
Turning Off Call Waiting
If you do not want to be interrupted during a call,you can turn Call Waiting off
prior to making/receiving a call.
1
From the idle screen,press q.PressR to scroll to Settings,and
press C under SELECT.
2
Press R to scroll to In Call Setup and press C under SELECT.
nextel.com
68
Page 77

Call Hold
3
Press R to scroll to Call Waiting and press C under CHANGE.
4
Press R to scroll to Off and press C under SELECT.
Call Waiting is now disabled for the next call. It will automatically reset
to On when you end the call.
Call Ho ld
When you are on an active call, you can place the call on hold and make a
second call.
To place an active callon hold:
1
Press q to access the Call Menu.
2
Press R to scroll to Hol d.
3
Press C under SELECT.
4
If you have not placeda second call, you can resume this call by
pressing C under RESUME.
To place a second call whilethe first call is on hold:
1
Enter the second phonenumber you want to call.
Or, select the number from yourPhonebook by pressingq and
selecting Phonebook.
2
Press s to place the secondcall.
To togglebetween thetwocalls:
Press C under SWITCH.
69
Page 78

To end the activecall:
Press r.Thecall on hold becomes active.
NOTE:If Flip Activation is set to ON, closing the phone cover ends
both the active call and the call on hold.
Three-Way Calling
Using Three-Way Calling, you can combinetwo ongoing phone callsinto one
conversation. While on an active call, you can make a second call and combine
the two calls.
To make a three-way call:
1
Place or receive a phone call.
2
While on the call, press q to access the Call Menu.
3
Press R to scroll to 3Way.
4
Press C under SELECT. Thefirst call will be placed on hold.
5
Enter the second phonenumber and press s to place the secondcall.
Or, access the number from your Phonebook:
Press q andthenpressR to scroll to Phonebook.
Press C under SELECT.
To place the call,see “Making Calls from the Phonebook” on page 54.
6
After you reachthe second individual, press q.
7
Press S to scroll to 3Way.
8
Press C under SELECT.
Both calls will appear on your display.
nextel.com
70
Page 79

Call Forwarding
Call Forwarding
Nextel’s Call Forwarding features forward calls to the number you designate.
The following Call Forwarding options are available:
• All Calls — When this option is turned on, all calls will be sent
automatically to a number you specify. When this option is turned off,
your Detailed options will be activated.
• Detailed — Choosing this option enables you to forward calls you missed
to VoiceMail, or other numbers, depending on why you missedeach call:
• Busy — your phone is engaged in other activities.
• No Answer — you do not answer. The phonewill ring 4 timesbefore
forwarding the call.
• Unreachable — your phone is out of coverage or powered off.
NOTE: For you to receive Voice Mail messages, the All Calls option
must be set to Off and the Detailed options must be set to your
Voice Mailaccess number. This is the default setting. Your Voice
Mail access number is the first six digits of your 10-digit Nextel
phone number followed by 6245.
For example, if the Nextel number is 703-555-1234, the Voice
Mail access number is 703-555-6425.
You can forwardLine 1 and Line 2 independently. For more informationon
using two lines, see “Alternate Line Service” on page 76.
When yourphone is set to forward All Calls,one of the following icons appears
on the top row of your display screen to indicatethe call forwarding option you
have chosen:
Icon Indicates...
G Line1is active;calls fromLine 1 arebeing
forwarded.
H Line1is active;calls fromLine 2 arebeing
forwarded.
I Line 1 is active; calls from Line 1 and Line
2 are being forwarded.
J Line2is active;calls fromLine 1 arebeing
forwarded.
71
Page 80

K Line2is active;calls fromLine 2 arebeing
forwarded.
L Line 2 is active; calls from Line 1 and Line
TurningOnCallForwarding
1
Press q then press R to scroll to Call Forward.
2
Press C under SELECT.
3
At the Call Forward screen, the
Forward field is highlighted. Press C
under CHANGE.
2 are being forwarded.
W
4
Press S to scroll to All Calls.
5
Press C under SELECT.
6
Press R to scroll to the To field and press C under CHANGE.
72
nextel.com
Page 81

Call Forwarding
7
To activate a callforwarding number:
If you have never usedCall Forwarding before, the Forward screen
appears. To entera call forwarding number, type the number on your
phone’skeypadorpressC under SEARCH to select from numbers
stored in yourphone. Press C under OK.
Or,
If you have used Call Forwarding before, the call forwarding number
youlastusedisdisplayed.PressC under CHANGE to access the
Forward screen.
To forward your calls to this number, press C under OK.
To forward yourcalls to a different number,press and hold C under
DELETE to erase the displayed number. Type the new number on your
phone’skeypadorpressC under SEARCH to select from numbers
stored in yourphone. Press C under OK.
Your callswill now be forwarded to thenumber that you selected.
Turning Off Call Forwarding
1
Press q then press R to scroll to Call Forward.
2
Press C under SELECT.
The Call Forward screen displays with the Forwardfield highlighted.
3
Press R to scroll to the To field and press C under CHANGE.
4
Press S to scroll to Off and press C under SELECT.
You will now receiveall calls on your phone.Whenyou areunavailable,your
calls will be forwarded according to your De tailed Call Forwarding settings. By
default, the Detailed option is set to forward your calls to Voice Mail.
73
Page 82

SettingCallForwardingtoVoiceMail
In mostcases, turning offCall Forwarding restores your ability toreceive Voice
Mail messageswhen you are unavailable (see “Turning Off Call Forwarding”
on page 73). If you have completed those steps but are still not able to receive
Voice Mail messages, you can reset Call Forwarding to Voice Mail.
For you to receive Voice Mail messages,Call Forwarding mustbe setto
Detailed with your Voice Mail access number:
1
Press q then press R to scroll to Call Forward.
2
Press C under SELECT.
The Call Forward screen displays with the Forwardfield set to
Detailed.
3
Press R to scroll to the If Busy field and press C under CHANGE.
4
The call forwarding number you lastusedis displayed. Press C under
CHANGE. If this is your Voice Mail access number (the first six digits
of your 10-digit phone number followed by 6245), go to step 7.
5
Press and hold C under DELETE to erasethedisplayed number.
6
Enter your Voice Mail access number.
Your Voice Mail access number is the firstsix digits of your 10-digit
phone number, followedby 6245. (For example 7035556245.)
7
Press C under OK.
8
Repeat step 3 through step 7 for the If No Answer field and the If
Unreachable field.
9
When finished, press C under EXIT.
NOTE:You can use the Detailed setting to forward calls to other
numbers if desired. However, it is recommended that you leave
Detailed set to the Voice Mail access number and use the All
Calls setting if you wish to forward your calls to another
number.
nextel.com
74
Page 83

Caller ID
Additional Phone Features
In addition to the standard features that are included for all Nextel Digital
Cellular subscribers, there arealso severalfeatures available for an additional
monthly or per-use fee. See the following sections for more information on
these services. ContactNextel CustomerCare for additional information.
NOTE: Some services are not available outside the continental United
States.
Caller ID
If you subscribe to Caller ID, your phone automaticallydisplays the phone
number or name (if the10-digit phone number is stored in your Phonebook) of
the person calling (unless blockedbythe caller orundetectable viathe network),
enablingyou todecide whether to take the call or forward it to Voice Mail.
NOTE:When caller ID information is not available, “Incoming Call” will
be displayed.
Displaying the Caller’sName
Acaller’s name is displayed if youhave entered the person’s number into your
Phonebook (see “Adding Phonebook Entries” on page 44). Otherwise, the
caller’s phone number will be displayed.
Maintaining Your Privacy with Per-Call and Per-Line Blocking
Nextelprovidestwo methodsto prevent those youcall fromseeingyournumber
on their own Caller ID displays.
NOTE:Your Nextel phone number cannot be blocked from calls made
to 911, 800, 855, 866, 877,888, or othertoll-free phone numbers.
Per-Call Blocking
You can block delivery of your phone number to other Caller ID units for a
singlephone call.
To set:
Press *67before dialing the call.
75
Page 84

Per-Line Blocking
You can permanently block delivery of your phone numberonevery call you
make. You mustorder this featureby contacting NextelCustomer Care.
To disable on a per-call basis:
Press *82before the call.
Alternate Line Service
As an Alternate Line customer, you will be given a separate phone numberfor
each line. With alternatelines you can separatebusiness and personal calls, or
designate one as a priority line.
Nextel MobileMessaging and Nextel Online services use the Line 1 phone
number. You only need to subscribe to Caller ID or Voice Mail once — these
services will be available on both lines. Forwarding Line 2 to Line 1 will send
Line 2 incoming calls directlyto Voice Mail without ringing.
The following settings are independent for each phone line. When you enable
one of these settings, it applies only to the active line:
• Call Forwarding
• Ring/Vibe
• In Call Setup
• Call Timers
• Auto Answer
76
nextel.com
Page 85

Call Restrictions
B
Selecting the Alternate Line
From the idle screen:
1
Press q,thenpressR to scroll to
Settings.PressC under SELECT.
Line2
2
Press R to scroll to Phone Setup.PressC under SELECT.
3
With the current line highlighted, press C under CHANGE.
4
Press R to scroll to the desired line and press C under SELECT.
Receiving Calls on Your Alternate L ine
You can receive calls on either line, regardless of the active line setting. The
screendisplays Line1orLine 2 to indicatewhich line thecall is being received
on (if CallerID informationis not available).
Call Restrictions
You can prevent yourphone from making or receiving specific types of calls.
Nextel currently offers three types of Call Restrictions:
• no long distance calls allowed
• no incoming calls
• no outgoing calls (except 911)
Contact Customer Care for more information.
Next el 411
Nextel 411provides detailed information services.Simply press 411s
from your Nextel phone anywhere within the continental United States and
Hawaii. Nextel 411 services include:
77
Page 86

WhitePageListings
You can requestatelephone number forany person, business, or government
agency in the continental United States and Hawaii. Operators can also provide
addressinformation if available.
Yellow Page Listings
You can requestatelephone number fora business or you can ask the operator
to performa search by category if the specific businessname is unknown. For
example,youcan request information for the nearest copy center toyour hotel
while on business travel.
Nationwide Call Completion
Nextel 411operators can connectyoutoany listing in the continental United
States and Hawaii. If requested,the operator will stayonthe line while
connecting to the number.
Driving Directions
Nextel 411operators are able to provide directions to reach a specific
destination. Operators will work with you to determine your startingpoint and
provideclear directions tothe destination.
Restaurant Reservations
Nextel 411operators can assistin finding a restaurant and then coordinate
reservations. A Nextel 411 operator will confirm your reservation information
through a return phone call. For your convenience, thereservation willbe in
your name.
NOTE:Reservation service may not be available for all restaurants.
Movie Listings and Showtimes
Nextel 411operators have access to movie listings at most theatersinthe
continental UnitedStates and Hawaii.Youonly need to askfor a specific movie
or movie theatertoget current movies, locations or showtimes. Additional
information such as running time, synopsis,and ratingsarealso available.
Showtimes andlistings are available 24-48 hours in advance.
nextel.com
78
Page 87

Nextel 411
Local Event Information
You can requesti nformation on local eventssuchas sportingevents, concerts,
state and county fairs, and other current events. Nextel 411 operators can
provide dates, times, and locations for these events.
79
Page 88

80
nextel.com
Page 89

Nextel Voice Mail
Nextel VoiceMail is a flexible,easy-to-use system that takesmessages when
you’re not available — so you never miss an important call.
This section includes:
Setting Up Your Voice Mail Box Page 81
Logging Into Voice Mail Page 82
Using Voice Mail Page 83
AdvancedVoice Mail Features Page 87
Nextel Voice Mail Tree Page 95
This section coversthe most commonlyused VoiceMailfeatures. Once you log
into VoiceMail, there are anumber of innovative features you canaccess. They
are also covered in this section. After you accessVoice Mail, an automated
systemtells you each menuoption and the key to press to make a menu option.
See “Nextel Voice Mail Tree” on page 95.
Setting Up Your Voice Mail Box
You must set up your VoiceMailbox before you can listen to messages. The
followingsteps will tell you how to setupyour mailbox. Beforegetting started,
see “Recording Your Active Greeting” on page 86 for information you may
want to include in your greeting.
81
Page 90

1
Using your i60c phone, dial your 10-digit NextelPersonal Telephone
Number (PTN). For example: 7035557777.
If you are callingfromaphone other than your i60c phone, dial your
10-digit Nextel Personal Telephone Number (PTN). When you hear the
greeting, press * to access your Voice Mail box.
The system will prompt you to Enteryourpassword. Enter the last
seven digits of your Nextel Personal Telephone Number. For example:
5557777.This is your temporary password.
2
Follow the system instructionsto:
• Create a new four- to seven-digit password (see “Changing Your
Password” on page 85).
• Record yourname(see “Recording Your Name” on page 86).
• Record a greeting (see “Recording Your Active Greeting” on page
86).
3
When the system says Enjoy usingNextelVoice Mail, yourmailbox is
set up.
Logging Into Voice Mai l
To log into Voice Mail, you must first access the Message Center on your
phone.
1
From the idle screen, if MESG is one of your display options, press C
under MESG.
Otherwise, press q.
2
Press R to scroll to Messages.
3
Press C under SELECT.
82
nextel.com
Page 91

Using Voice Mail
The Message Centerscreen displays numbersof newand total Voice Mail
messages.
g
From the Message Centerscreen, log into Voice Mail:
1
Press S to scroll to Voice Mail. The numbers of new and total Voice
Mail messages display.
2
Press C under CALL to log into Nextel Voice Mail. Calling displays
as you are connected to the network.
NOTE: If yourhear a message that says,“Enter the phone number
of the subscriber you are trying to reach,” enteryourown
10-digit Nextel Personal Telephone Number. When the
greeting plays,press
3
When prompted, enter your password.
NOTE: You mustreceive a message before you can access Voice Mail
for the first time from your i60c phone. (Tip: Youcan leave
yourself a message.)
* to receive a password prompt.
Using Voice Mail
The following sectionsexplain how to use VoiceM ail after you have loggedi n.
For information on receiving notification of Voice Mail messages, transferring
calls to Voice Mail, and accessing messages, see “Messaging Services” onpage
97.
Main Voice Mail Menu
You are at the main VoiceMailmenu when you hear the options listed below.
• To play your messages, press 1
or saved messages.)
. (This option plays only if you have new
83
Page 92

• To record a message, press 2.
• To change your greeting, press 3.
• To access your personal options press 4.
If you press * while you are in a sub-menu, you willgo to the previous menu.
If you press **, you will go to the main Voice Mail menu.
From the main VoiceM ail menu, press # to exit Voice Mail. At any time, you
mayendthecallbypressingr or closing the phonecover.
Playing Messages
When you receive a new Voice Mail message, you can either listen toit
immediately or later.Press C under CALL to listen now or press C under
EXIT to listen later.
Options available while listening to your messages:
Replay previous six seconds. Press 1
Rewind to beginningofmessage. Press 11
Pause/continue the current message. Press 2
Fast forward 6 seconds. Press 3
Fast forward to end of message. Press 33
Playthedateandtimestamp. Press 5 5
Options available while a message is playing or after it hasplayed:
Copy themessage toanother subscriber.(See
“Recording, Copying and Replying to
Messages” on page 89.)
Delete the message. Press 7
Replytoamessage. Press 8
Save the message. Press 9
Skip to the next message. Press #
nextel.com
84
Press 6
Page 93

Using Voice Mail
Saving and Deleting Messages
While a messageis playing or afteryou havefinished listening to it, you can
save it or delete it. To save a message, press 9. To delete amessage, press 7.
To have messages automatically saved, see “Automatic Playback” on page 88.
Messagesthat arenot saved ordeleted remainin your mailbox asnew messages.
All messages are automatically deleted after 30 days.
Recovering Deleted Messages
To retrieve deleted messages, press *3. This option only applies to the
current Voice Mail session. If you end the call, the messages willbe
permanently deleted.
IMPORTANT:
After exiting the Voice Mail session, you
cannot recover deleted messages.
Changing Your Password
To change your currentpassword:
1
From the main Voice Mail menu, press 4 to access Personal Options.
2
Press 4 to access PersonalPreferences.
3
Press 1 to modify password.
4
Enter your new password. This password must be all numbers. It must
be 4 to 7 digits long.
5
Press ** to return to the main menu.
NOTE: If you forget your password, contact Customer Care.
IMPORT ANT:
For security purposes, it is recommended that
you do notchoose sequential or repeated digits
like 1-2-3-4 or 5-5-5-5 for your password.
85
Page 94

Recording Your Nam e
When you send,reply to, or copy a message, your name response precedes the
message.Torecord or re-recordyournameatanytime:
1
From the main Voice Mail menu, press 4 to access Personal Options.
2
Press 4 to access PersonalPreferences.
3
Press 3 to access the Record Your Name option.
4
Press 2 to record your name.
5
Press ** to return to the main menu.
Recording Your Active G reeting
ThroughNextel VoiceMail service, thereare a numberofways in whichpeople
can reach you.You may wantto include one or all of the followingoptions in
your greeting so that callers will knowthey are available.
• Press 1 to send a numeric message.
• Press 2 tosend an operatorassistedmessage. (Thisoption isavailable only
if you are a subscriber of OperatorAssisted Messaging. Contact Nextel
Customer Care for more information.)
• Press # to skip the greeting andrecord a messageimmediately.
To record or alter your greeting at any time:
1
From the main Voice Mail menu, press 3 to change your greeting.
2
Press 1 to play, press 2 to recordor re-record,or press 3 to delete
your activegreeting.
3
Record your greeting and press # when you have finished.
4
Press ** to return to the main menu.
nextel.com
86
Page 95

Advanced Voice Mail Features
Advanced Voice Mail Features
Multiple Greetings
NextelVoice Mailservice allowsyou to haveup to five different greetings.You
can designatewhich greeting willbe your active greeting at any given time. For
example,instead of your regular greeting,you may wishto activate a different
greetingfor days when you are out of the office or on vacation.
The greeting that was recorded during your initialVoice Mail box setup is
Greeting 1. This is your default active greeting.
Recording Additional Greetings
To record additional greetings:
1
From the main Voice Mail menu, press 3 to access the Greetings
menu.
2
Press 4 to modify greetings.
3
Enter the greeting number you wish to create or modify.
4
Press 2 to record a greeting.
5
Record your greeting and press # when you have finished.
6
Press ** to return to the main menu.
Selecting Your Active Greet ing
To select youractive greeting:
1
From the main Voice Mail menu, press 3 to access the Greetings
menu.
2
Press 3 to select another greeting to be active.
3
Enter the numberof the greeting that you would liketobe active.
4
The system willconfirm your active greeting number.
87
Page 96

5
Press 1 to play your active greeting.
6
Press ** to return to the main menu.
Greetings Schedule
You can choose to have your greetings automatically activated based on a predetermined time schedule. By activating the Greeting Schedule, Greetings1,2
and 3 will automaticallyplay accordingto the time schedule listed below.
Greeting 1
Greeting 2
Greeting 3
Evenings and
Weekends
Weekday
Mornings
Weekday
Afternoons
5:00 pm --7:59am,Monday--Friday
24-hours, Saturday andSunday
8:00 am -- 11:59 am
Monday -- Friday
Noon -- 4:59 pm
Monday -- Friday
Activating Your Greeti ng Sc hedule
To activate the greeting schedule:
1
From the main Voice Mail menu, press 3 to access the Greetings
menu.
2
Press 9 to activate your greeting schedule.
3
Press ** to return to the main menu.
Automatic Playback
By default, the playback mode of your Voice Mail service is set to Normal.
Nextel’s Automatic Playback feature automatically plays and saves new
messageswhen you log in. To activate AutomaticPlayback:
1
From the main Voice Mail menu, press 4 to access Personal Options.
2
Press 4 to access PersonalPreferences.
nextel.com
88
Page 97

Advanced Voice Mail Features
3
Press 2 to access Playback Preferences.
4
Press 2 to switch between Automatic and Normal Playback.
5
Press ** to return to the main menu.
Changing the Playback Order of Messages
With Nextel Voice Mail service, you can selectthe order in which you want
unheard messages to be played.Youmaylisten to the last received message
first, or you may listen to the first received message first. To select the order in
which new messages should be played:
1
From the main Voice Mail menu, press 4 to access Personal Options.
2
Press 4 to access PersonalPreferences.
3
Press 2 to access Playback Preferences.
4
Press 1 to switch between the playback orders.
5
Press ** to return to the main menu.
Recording, Copying and Replying to Messages
These functions allowyou torecord and send, reply to, or copy a message to an
assigned destinationaddress or GroupListnumber.
If you record a complete or partial message, but do not send it, NextelVoice
Mail service will refer to this message as an “in preparation” message. Before
sending messages you may want to see “Delivery Options” on page 90.
To record and send a message:
1
From the main Voice Mail menu, press 2 to accessRecord a
Message.
2
Record your messageand press # to end the message.
3
Press 9 at the prompt to indicatethat you want tosend the message or
press 5 for DeliveryOptions.
89
Page 98

4
Enter the mailbox number and/or group list number(s). (A mailbox
numberis the 10-digit Nextel Personal TelephoneNumberof a Nextel
customer. The name of the recipient plays if it is recorded.)
5
Press # to send.
6
Press ** to return to the main menu.
NOTE: You can only send messages usingthis method toNextel
customers in your home market.
Delivery Options
After you have created a message, you can assign the message to a category
before you send it. Below is a list of the options that can be applied to a
message:
Urgent
Private
Notification of NonDelivery
Future Delivery
90
Recipient will hear this message before other
messages.
Recipient cannot copy the message to another
mailbox or phone number.
You will be notified if the recipienthasnot listened
to your message by a certain date and time.
Youcanspecifyatimeanddate(uptothreemonths
in advance) for the message to be delivered. (See
“Time and Date Charts” on page 94.)
Important: Once a messagehas been sent for future
delivery, it cannot be retrieved or deleted.
nextel.com
Page 99

Advanced Voice Mail Features
To set a special delivery option:
1
After recording your messagebutbefore sending it, press 5 for
Delivery Options.
2
Press the numberthat corresponds with the desired delivery option:
• Press 1 for Urgent.
• Press 2 for Private.
• Press 3 for Notification of Non-Delivery. At prompt, specify
time and date.
• Press 4 for Future Delivery of Messages.At prompt, specify
time and date.
• Press 9 to send the messageimmediately.
3
The list of options willbe presented again. Select an additional option
or press 9 to send the message.
4
Enter the destination mailboxor GroupList number of the recipient(s).
5
Press # to send.
6
Press ** to return to the main menu.
Working With Group Lists
The Group List feature enables you to create a list and assign it a unique name.
Then youcan add mailboxnumbers,grouplists, or individuals— by name—to
the list.Onceyou create a list you can send a voice message to everyone on the
listby simply entering the grouplist number.Youcan have up to 40 group lists.
Eachlistcanholdupto50addresses.
Creating Group Lists
TosetupaGroupList:
1
From the main Voice Mail menu, press 4 to accessPersonal Options.
2
Press 2 to access your Group Lists.
3
Press 2 to create a Group List.
91
Page 100

4
Enter the one- or two-digit group list number and press #.
5
Recordanameforthelistandpress#.
6
Select group members by mailbox number, Group List, orname.
7
Press # to save all entries added to the list.
8
Press ** to return to the main menu.
Modifying a Group List
1
From the main Voice Mail menu, press 4 to accessPersonal Options.
2
Press 2 to access Group Lists.
3
Press 4 to modify a Group List.
4
Enter the number of the Group Listyou want to modify.
5
Press 1 to add a new recipient.
6
Press # to save your changes.
7
Press ** to return to the main menu.
Deleting a Group List
1
From the main Voice Mail menu, press 4 to accessPersonal Options.
2
Press 2 to access Group Lists.
3
Press 3 to delete a Group List.
4
Enter the number of the Group List youwant to delete.The system will
play the name of the Group List.
nextel.com
92
 Loading...