

Page 1
Distributed by:
TechBrands by Electus Distribution Pty. Ltd.
320 Victoria Rd, Rydalmer e
NSW 211 6 Australia
Ph: 1300 738 555
Int’l: +61 2 8832 3200
Fax: 13 00 738 500
www.techbrands.com
Made in China
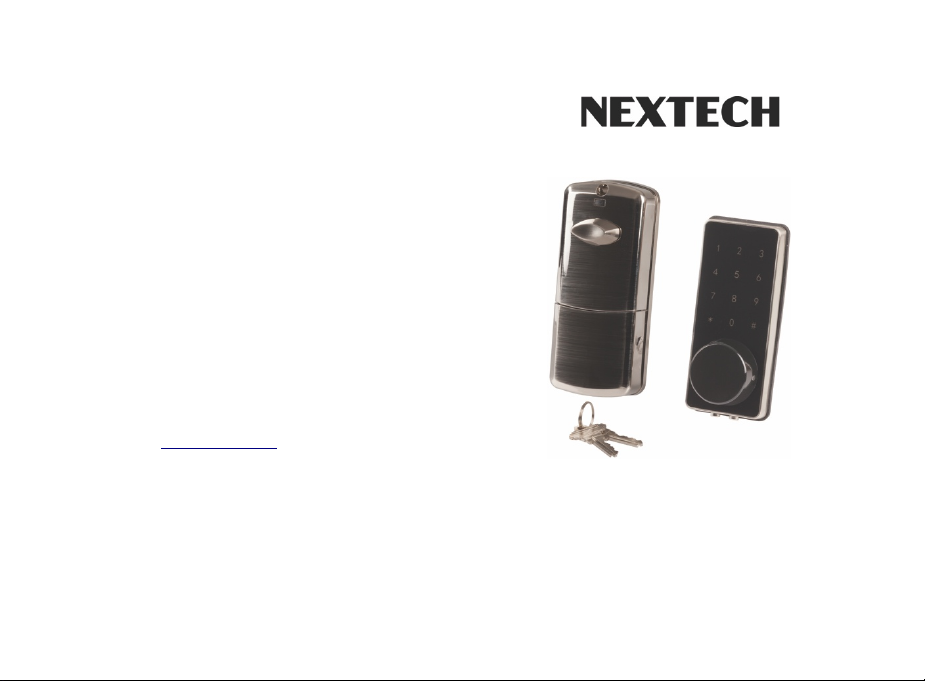
User Manual
LA5095
Smart Lock Deadbolt Kit
With Bluetooth Technology
Please rea d this manual before operat ing your Smart Lock
and keep it for further reference.
Page 2
I. Introductio n
• Thank you for choosing this NEXTECH Smart Lock.
• The new Smart Lock uses the latest te chnology to make
your life easier.
• The user manual enabl es you to operate the product
safely
• Please read the user manual before using this NEXTECH
Smart Lo ck
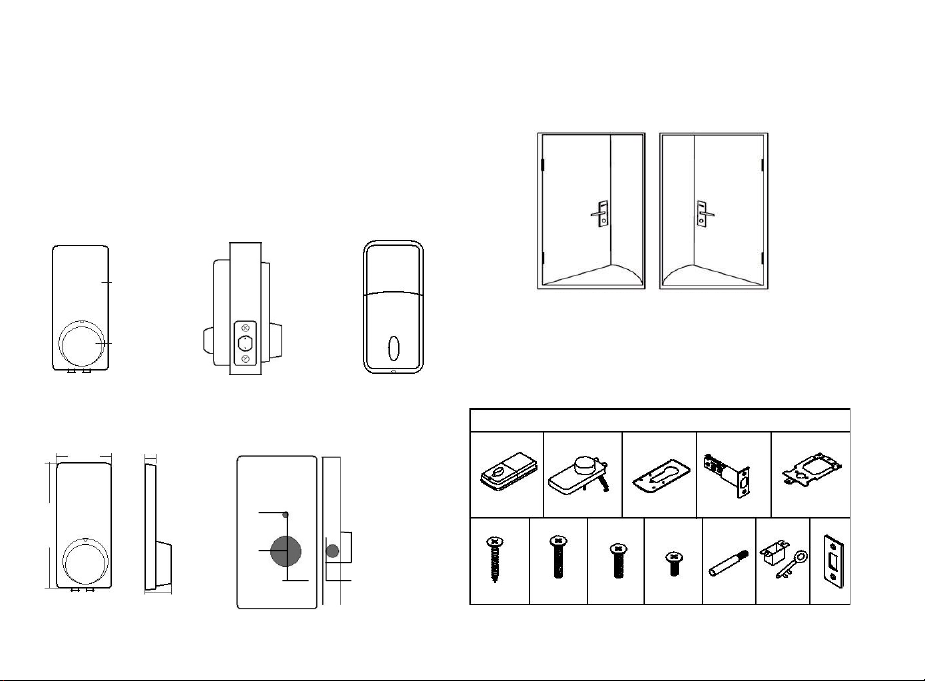
II. Produ ct Profile
2. Dimensions
III. Installation Instructions for Us ers
1. Installation Requirements
2. Unlocking Method
Left-handle
(open into room)
Right-handle
(open into room)
Assembly Instructions
1PC
1PC
1PC
1PC
1PC
4PCS
3PCS
1PC
2PCS
1PC
1PC
1PC
2. Accessories Ins tallation Drawing
Touch Screen
Buttons
Mechanical
Keyhole Cover
Side View
Back Panel
1 2 3
4 5 6
7 8 9
* 0 #
Knob
Inside
60mm
137mm
12mm
29mm
10mm
54mm
24mm
58
27mm
Page 3
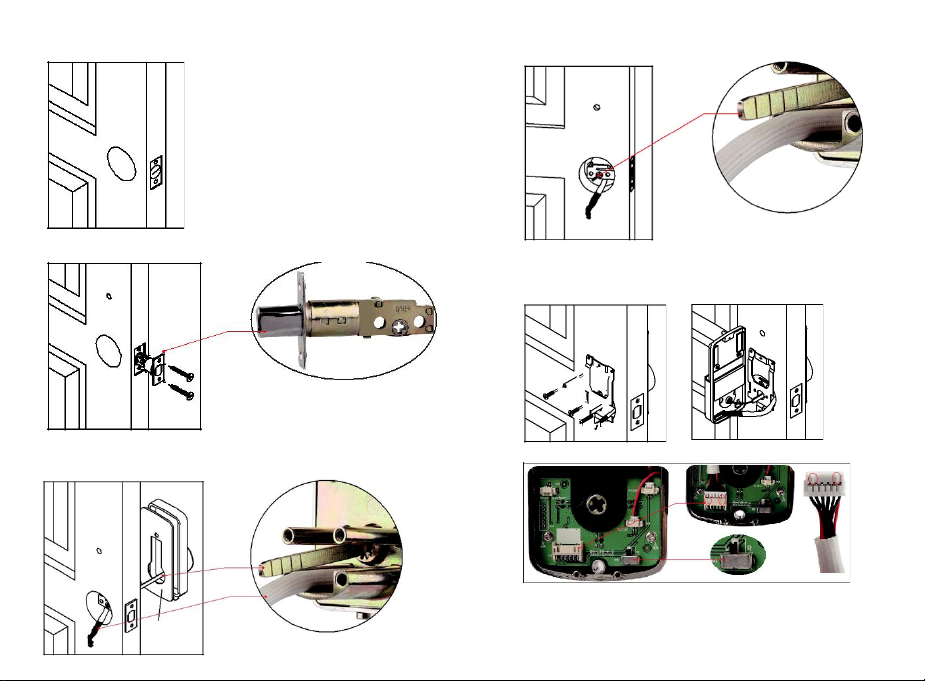
Step 1
Step 2
Note: Pu sh the cylinder out
Before installation.
Step 3
Note: Cab le goes underneath latch.
Step 4
Note: Pu t the lock cylinder
vertically into the hole.
Step 5
Step 6
Note: If it is a left hand door, pleas e turn the s witch to L.
If it is a right hand door, please turn the switch to R.
Page 4

Step 7
Note: Pu t the lock cylinder verticall y
into the hole.
Step 8
Step 9
Step 10
Step 11
3. Installation Precautions
3.1 Doorjam > 110mm.
3.2 Door thickness: more than 32mm and less than 48mm.
3.3 Lock cylinder installation: push the cylinder out before
installation.
3.4 Back panel installation: connect the data cable of the front
panel to the socket of the back panel and insert the redundant
part of the data cable into the door hole of t he lock. If it is a left
hand door, pleas e turn the swit ch on the back panel to L and if it is
a right hand door, please turn it to R. After installation, please
twist the back panel knob to check whethe r the cylinder can be
twisted (otherwise re-install a fter the knob is rotated 90°).
Page 5

IV. APP Operation Guide
1. APP Installation and Registration
1.1 Download the “smartlock” APP from Google play
store or Apple store.
1.2 Install and register an account with your phone
number or email.
Note: Th e APP only supports An droid 4.3 / I OS7.0
version and ab ove. We sugg est family memb ers or
tenants downloading and installing the APP.
2. APP Con nection
2.1 Turn on the Bluetooth on your phone
2.2 Open the APP. Then click “Add Lock” and Lock”.
2.3 Touch the touch screen button of the smart lock, the number
keys indicato r light will be bright and click “Next” on th e APP.
2.4 Find the smart lock name which starts with “xx_xxx” and click
“+”.
2.5 Rename the name of smart lock and click “OK”.
2.6. Click “Finish”.
3. APP Operation Instruction
3.1 Send eKey
eKey is a function for you to au thorise the A dmin rights to other
family membe rs, who has do wnloaded the sa me APP in their o wn
phones. All the people who hold can contr ol the smart lock. eKey is
highly suggested t o be ONLY applied among family members .
Page 6

3.3 eKeys
A file to manage the status and history
of eKeys.
3.4 Passcodes
A file to manage the status and history
of Passcodes.
3.5 Records
View locking and unlocking information
to check when and who used it.
3.6 Setting
3.6.1 Display the Lock ID.
3.6.2 Display the battery power.
3.2 Send Passcode
The passcode receiv er can unlock th e
smart lock by entering the passcode
manually. The passcode can be set as a
different type: The passcode can be set
as different type: Pe rmanent / Timed /
One-time (6 hours) / Erase (24 hours) /
Customis ed / Cyclic. Al l passcodes
generated can be sent to those in need
by mail and chatti ng tools.
3.6.3 Display the name of the Lock.
You can manually change name of the door.
3.6.4 Group: the administrator can add multiple locks for grouping,
which is s uitable for rental housing . It is more convenient for grou p
management of personnel.
3.6.5 Admin passcode: the default passcode is the unlock passcode
of the adminis trator, which can be manually changed to a custom
passcode.
3.6.6 Auto Lock: Auto lock off by default. Open th e app, click
Setting, click Auto lo ck-turn on and set time 5 to 120 seconds you
need to click OK. When the setup is completed, it will be
automatically locked after unlocking (for example, it will be
automatically locked 5 seconds after unlocking if the time is set at
5 seconds).
3.6.7 Lock upgrade: to check whether there is any update version.
3.6.8 Unlocking alert: off-by-default. If turn on it, the
administrator’s phone will receive the unlocking information when
someone who assigned with a key unlocks the door with the APP.
3.6.9 Fault Diagnosis
Page 7

3.7 System Settings
3.7.1 Pattern Passcode: off-by-default, you can manually open it to
set your favourite pattern passcode to unlock the APP.
3.7.2 Touch to Unlock: on-by default, this funct ion is invalid when
the “ttlock” APP is turned off or running on the background of your
phone. When the APP is open and connect withi n 10 meters from
the lock, any family members can unlock the door by pressing the
touch screen button. It is recommended to close the option if you
do not need it.
3.7.3 Manage Groups: the administrator can add multiple locks for
grouping, which is suitable for rental housing. It is more
conveni ent for achie ving group ma nagement of p ersonnel. It can
be modified or deleted if not n eeded.
3.7.4 Security Setting: set and check the verification options.
(Reset lock / S end ekey / Send passcode / Delete Admin ekey /
Change management passcode / Authorise Verification). All
operations mus t be verified by account passcode to ensure t he
security.
3.7.5 My reminders: to receive system information tips.
3.7.6 Transfer locks: This function is used to transfer the
administrator rights. Once transferred, you will not be the
administrator again.
V. Operation Instructions for Different Functions
1. Unlock
1.1 Unlock with APP: Turn on the app and click the lock icon in the
interface to unlo ck it. (The phon e is within 10 meters from the doo r
lock).
1.2 Unlock with administrator passcode: enter the numeric passcode of
the Admin Passcode option in the APP setting and then press the # key
to confirm the unlocking.
1.3 Unlock by touching the keypad: Open the APP, then turn on the
“Touch to Unlock optio n” in the System Settings . Touch the keypad to
unlock the door (T he phone is r equired to be connected to W iFi or
mobile data network and within 10 meters from the door lock).
1.4 Unlock by key: use a pointed object to open the circular keyhole
which is under the touch s creen button then insert th e key to unlock it.
1.5 Unlock manually: manually t wist the knob on the Ba ck panel to
unlock it.
2. Lock
2.1 Lock with APP: Turn on the App, press and hold the lock icon for 5
seconds to lock it. (The phone is within 10 meters from the door lock).
2.2 Auto Lock: When you turn on the “Auto Lock” option in the APP, the
smart lock will be locked automatically after you unlock the door.
2.3 Lock with the #key: press and hol d the #key on the pan el keypad fo r
3 to 5 seconds to lock.
2.4 Lock by key: use a pointed object to open the circular keyhole which
is under the tou ch screen butt on then insert th e key to unlock it.
2.5. Lock manually: manually twist the knob on the Back panel to lock it.
Page 8

3. Modify the Adminsitrator’s Unlocking Passcode
Open the APP click Setting-click Admin Passcode enter the new passcode
with 4-9 numerical digits. Click OK (The phone is required to be connected
to WiFi or mobile data network and within 10 meters from the lock).
4. Switch Administrator
4.1 Delete the Administrator right
Open the APP click Setting-click Delete enter your account password click
OK. Using a new phone to pair the loc k again. A lock ca n only be pa ired with
one administrator phone. Please stand within 10 meters away from the lock
to open and connect the APP.
4.2 Switch through the Transfer locks function
Turn on the APP cli ck System Settings click Transf er Locks, Select Locks, click
Next ente r the recip ients APP ac count and th e verification code. Click Next
Finish (T he phone is r equired to be connect ed to WiFi or mobile data
network and within 10 meters fr om the lock).
5. Remote Authorisation of ekey
Turn on the APP cli ck Send eKey select the ekey type as “Timed” or
“Permanent”. Enter the APP account of the recipient click Send button.
(The phone is r equired to be c onnected to WiFi or mobile data network.
6. Freeze/ Delete/Author ise/Name/Operate Already Sent eKeys by
Administrator Turn on the APP. Click eKe ys, click the eKey that has been
sent, click Name / va lidity / del ete the eKe y info you ne ed, clicking the menu
on the upper right corner to conduct the f reeze / authorisation operation.
(The phone is r equired to be c onnected to WiFi or mobile data network.)
7. Remote Authorisation of Passcode
Turn on the APP cli ck Send passcod e, select the typ e of the passcode
(Permanent/Ti med/One-time/Erase/Customised/Cyclic) clic k Generate.
Then it will create a passcode. You can send the code to others by SMS,
email and other chatting to ols. (The phone is required to be connected to
WiFi or mobile data network.)
8. Delete Already Sent Passcode by Administrator
Turn on the APP cli ck Passcodes select the passcod e that has been s ent,
delete the passcode (The phon e is requi red ot be co nnected to W iFi or
mobile data network and within 10 meters from the lock).
9. Passcode Touch Protection
If you enter the wrong 4-9 digits passcode for 5 times, the touch passcode
key will be a utomatically locked for 5 minutes and cannot b e operated to
prevent others from pressing th e passcode key repeatedly and maliciously.
10. Real-time Monito ring
The administrator can find the unlo cking information who unlocking th e
door with APP or passcode (The p hone is required to be conne cted to WiFi
or mobile data networ k).
11. Anti-theft Alarm
If someone picks the lock, the smart lock will sound a beep alarm when the
lock body got loos e.
12. Low Voltage Alarm
When the battery is low, the smart lock will sound a low battery alarm. It is
recommended to replace the battery as soon as possible. Just turn on the
APP, and you can view the battery percentage in real-time.
Note: the latest batt ery percentage data can only be viewed when the
phone is connected to WiFi or m obile data net work and within 10 meters
from the door lock.
13. Emergency Power Supply
Emergency power s upply interface equipped on the smart loc k: to unlock
the door temporarily by connecting to the emergency power sup ply
interface with a 9V backup batte ry. After unlocking, pleas e replace the
battery inside the lock immediately.
14. System Reset
The restart button is behind the numb er 4 on the tou chpad.
Resetting your smart lock system will restore your lock to factory setti ngs
and delete all smartphones and fobs from the memory.
Page 9

If you wish to perform a system reset, press and hold the Rest button on
the back panel for 10 seconds until the lock beeps and the light ring
flashes red. After a sys tem reset, you will need to re-enroll and you owner
phone. You will still be able to send eKeys at no charge to a nyone who
previously had an a ctive eKey at the time of reset.
VI. FQA
Q: What devices are compatible with the NEXTE CH smart lock.
A: The smart lock is compatible w ith Android and iOS devices.
Q: How can I reset my smart lock app account if I fo rgot my password?
A:
1. Open the smart lock app.
2. Click Forgot password
3. Enter the email address upi registered for your smart lock a ccount.
4. Enter a new password.
5. Check get code. You should re ceive verification code in the email.
6. Enter the verification code to reset your password.
7. Use the new password to sign in the account.
Q: Can I still use the sm art lock when my p hone is lost or tu rn off?
A:
1. Yes. You can still use the traditional physical key or password to
lock/unlock the door.
2. Use a new phone to download the smartlock app. Sign in your
smartlock account with the email and password. Enter the verification
code, then you can use the new phone to unlock the door. Don’t forget to
reset th e door after you unlock i t.
Q: The door won’t lock automatically when I close it.
A:
1. Check if Auto Lock is set. If not, press and hold the # key on the panel
keypad for 3 to 5 sec onds to lock the door.
2. If the door doesn’t lock automatically when Auto Lock is set, then the
lock has been installed incorr ectly.
3. The Auto Lock function is not activated when the batteries ar e
completely discharged. Check if the batteries are discharged.
Q: Lock configu ration failed
A:
1. Remove the mechanical key from the cylinde r.
2. Check that the door was closed properly or if lock operation was
interfered.
Q: The smart lock has started beeping whenever I lock or unlock the door.
A: This is an indication your battery is low; it’s time to change the batteries.
Q: The smart lock app is disconnected from the door unit and /or I can’t find
my lock on the app.
A:
1. Close the app, turn your phone’s Bluetooth. Then turn Bluetooth back on,
and open the app.
2. Refresh the app.
3. Only one phone can connect to “smart lock” at the same time. It’s
possible that another user’s phone is already connected to smart lock. If so,
close th e app on any other user’s phone.
Q: I’m unable to open the door from a distance of 10 meters / yards
A:
1. The app works via a Bluetooth connection, which can b e impacted by the
environm ent.
2. For both security and functionality reasons, try mo ving as close as
possible to the lock.
3. The battery is low, use the emergency power supply for the door.
VIII. Important Safeguards
1. Read all instructions in th eir entirety.
2. Familiarise yourself with all warning and caution statements.
3. Remind all family members of safety precautions.
4. Always have access to your lock’s standard key.
5. If using the Lock with the # key or Auto-Lock featur es, make sure to have
your smartphone, passcode or standa rd key with y ou to prevent locking
yourself out.
6. Replace low batteries immediately.
Preventing inadvertent Unlocking of Your Door.
Page 10

WARNING
Failure to follow thes e safeguards could result in your lock opening
inadvertently.
1. Avoid keeping and storing phones and fobs unnecessarily close
to the lock when inside the home.
2. Restrict access to your NEXTECH smart lock’s back panel and
routinely check your settings to ensure they have not been altered
without you r knowledge.
3. Protect the password to your smart lock app and your account.
4. When sending an eKey, always double-check that you ar e
sending it to the correct recipient.
5. Protect and restrict access to your smartphone so that your app
settings cannot be altered without your knowledge.
7. When sending eKeys, be aware of the difference between an
Admin user and other users in th e system. The Admin user can
send, disable and delete eKeys.
8. If your smartphone is lost or stolen, reset your lock. Resetting
your smart lock system will restore your lock to factory set tings
and delete all smartphones and fobs.
For any inquiries, iss ues or comments conc erning our pr oducts,
please send email t o the address below, and we will respond as
soon as possible.
 Loading...