

Installation Instructions | Roller Shades
Lift Systems: for Premium Cordless
Getting Started
A
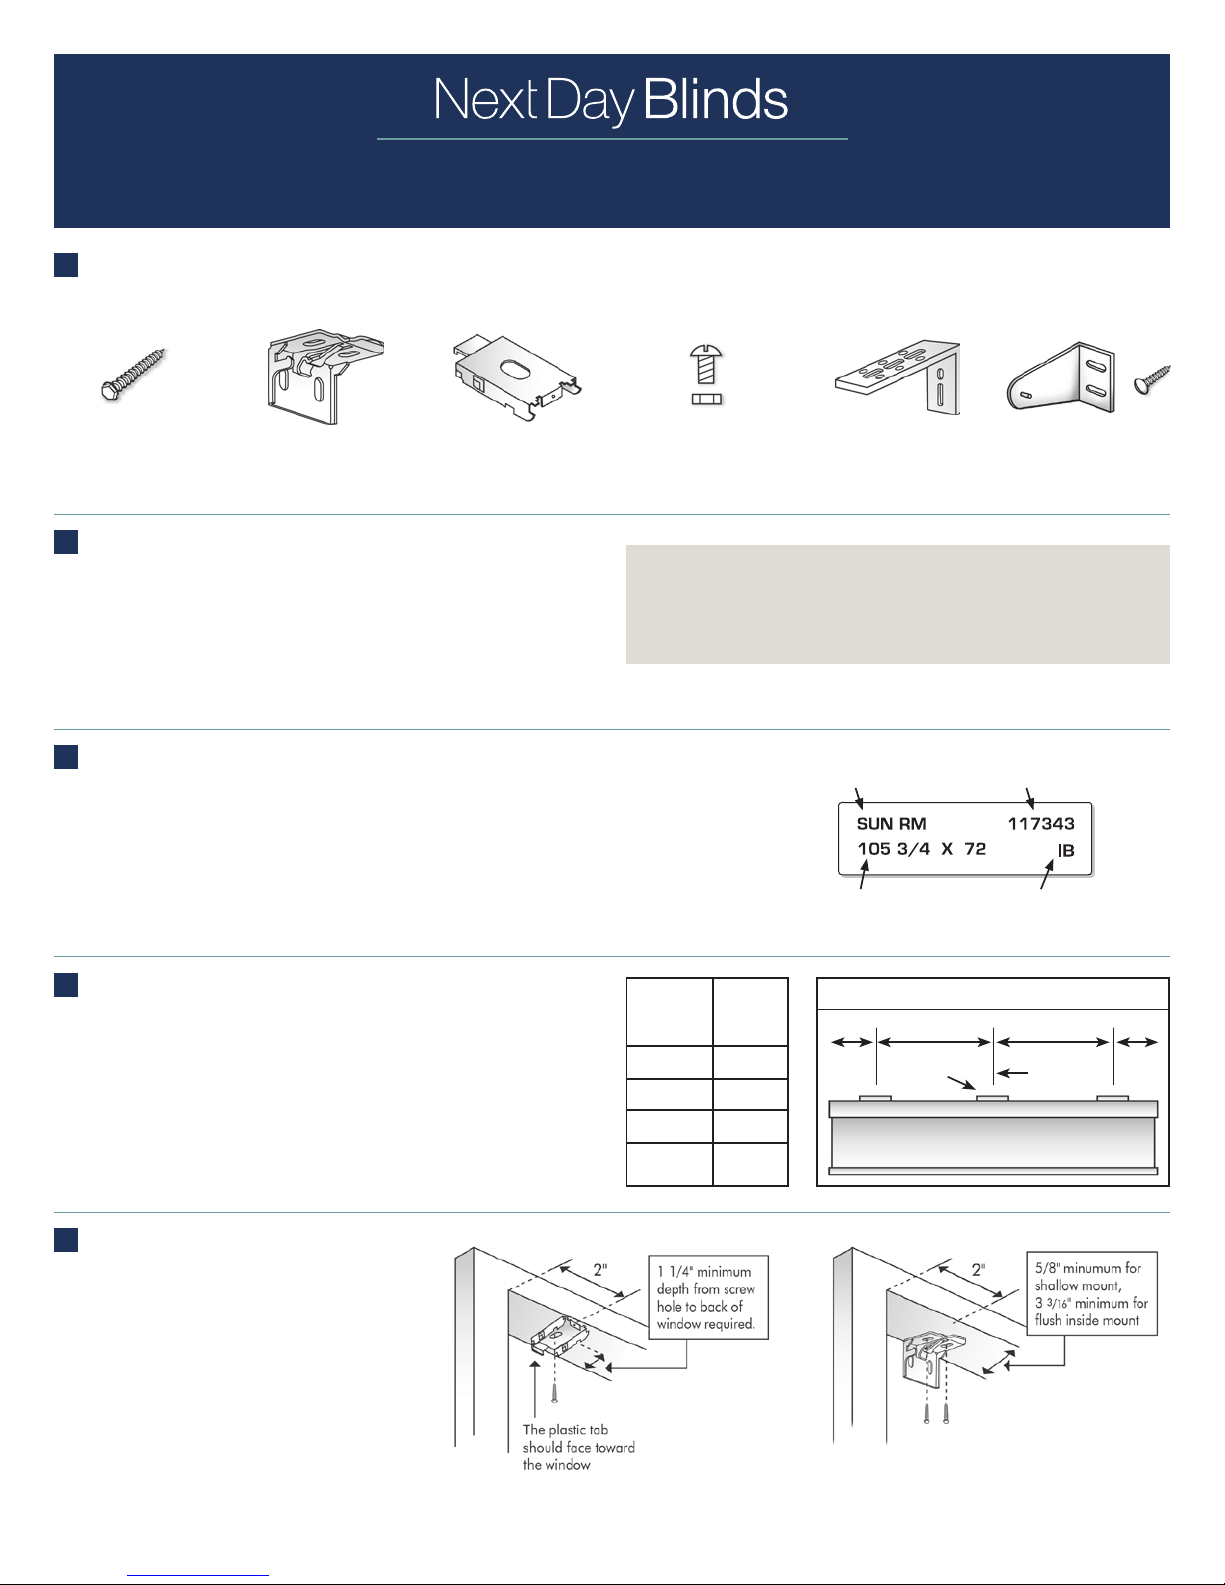
The Parts: Before starting, please remove and identify the following parts required for the installation of your shades:
Hex Head Screws
(1 1/4”)
The Tools
B
To install your Next Day Blinds Roller Shades, you will need a few basic tools:
•
Phillips Head Screwdriver*, or 1/4” nut driver*
•
Measuring tape
•
Pencil
* Power screwdriver or power drill with #2 Phillips attachment or 1/4” nut attachment may be used.
Sorting Your Blinds
C
On top of the headrail of your Next Day Blinds Roller Shade, there is a sorting label.
On this label, you will recognize:
1. Order size of the blind
2. Room location (If not present, info not given at time of order)
3. Whether the shade was ordered for inside mount (IB), outside mount (OB), or side mount (EM)
Bracket Spacing
D
The brackets should be installed where the centerlines are noted in the illustration.
Depending on the width of the roller shade, necessary additional brackets may be
evenly spaced between the two end brackets.
Mounting Brackets
Mounting Bracket
(no headrail)
Bolts and Nuts
(optional)
Important Note: Screws provided are for installation into wooden frames only. For
metal surfaces, use suitable sheet metal screws and pre-drill holes. For concrete,
stone, brick, or tile, use a carbide drill and appropriate anchors and screws. For
wallboard or plaster, use hollow wall anchors and/or longer screws to reach framing or
stud. In all cases, follow the fastener manufacturer’s recommendations.
Shade
Width
To 40”
40” To 72”
72” To 84”
84” To 96”
Number of
Brackets
2
3
4
5
Universal Extension
Brackets (optional)
2. Room Location Work Order Number
1. Order Size of Blind 3. Type of Mount
Hold Down Bracket
& Screw (optional)
Installation Bracket Spacing on Headrail
2 1/4” 2 1/4”Space evenlySpace evenly
Installation
Bracket
Centerline
Bracket Installation
E
Inside Mount (IB)
No Headrail Version: Make sure that the screw head
is fully recessed inside the clear plastic part of the
mounting bracket (Fig. 1).
Headrail Version: Refer to Figure 2 for bracket
installation details.
Figure 1
No Headrail Version
Figure 2
Headrail: Smooth or Fabric Insert

Outside Mount (OB)
Important Note: Make sure your mounting surface is level. If the headrail does not sit level, the fabric will not roll up evenly which could damage the edges of the fabric.
Figure 1
No Headrail Version
Headrail: Smooth or Fabric Insert
Figure 2
Outside Mount (OB) with Extension Brackets (Optional)
Extension Brackets are used to project the back of the shades up to 2 1/2” from the mounting surface (Fig. 1). Attach the Standard Mounting Bracket to the Extension
Bracket with the nut and bolt provided (Fig. 2).
Nut
Figure 1
Extension
Bracket
Figure 2
Bolt
Mounting
Bracket
Side Mount (EM)
Measure from window sill up to desired mounting position on each side of the window frame. Mark position. Mount Side Mount Brackets on each side of window
frame as shown (Fig. 1). Make sure to confirm that headrail will sit perfectly level. Once Side Mount Brackets are installed and properly positioned, attach the Standard
Mounting Brackets using the nuts and bolts provided (Fig. 2).
Extension
Bracket
Nut
Mounting
Bracket
Bolt
Figure 2Figure 1
Installing Your Roller Shades into the Brackets
F
No Headrail Version
Inside Mount or Extension Bracket
Hook the rail onto the front of the bracket, push back on spring and rotate it until the back of the rail securely snaps into place (Fig. 1).
Outside/Wall Mount
Hook the rail onto the top of the bracket, push down on the spring and rotate it until the back of the rail securely snaps into place (Fig. 2).
Figure 1 (Side View) Figure 2 (Side View)
Headrail: Smooth or Fabric Insert
Push the headrail back until it is fully engaged (Fig. 1 and Fig. 2).
Headrail
Push the r ail
back unt il it is
fully engaged
Figure 1
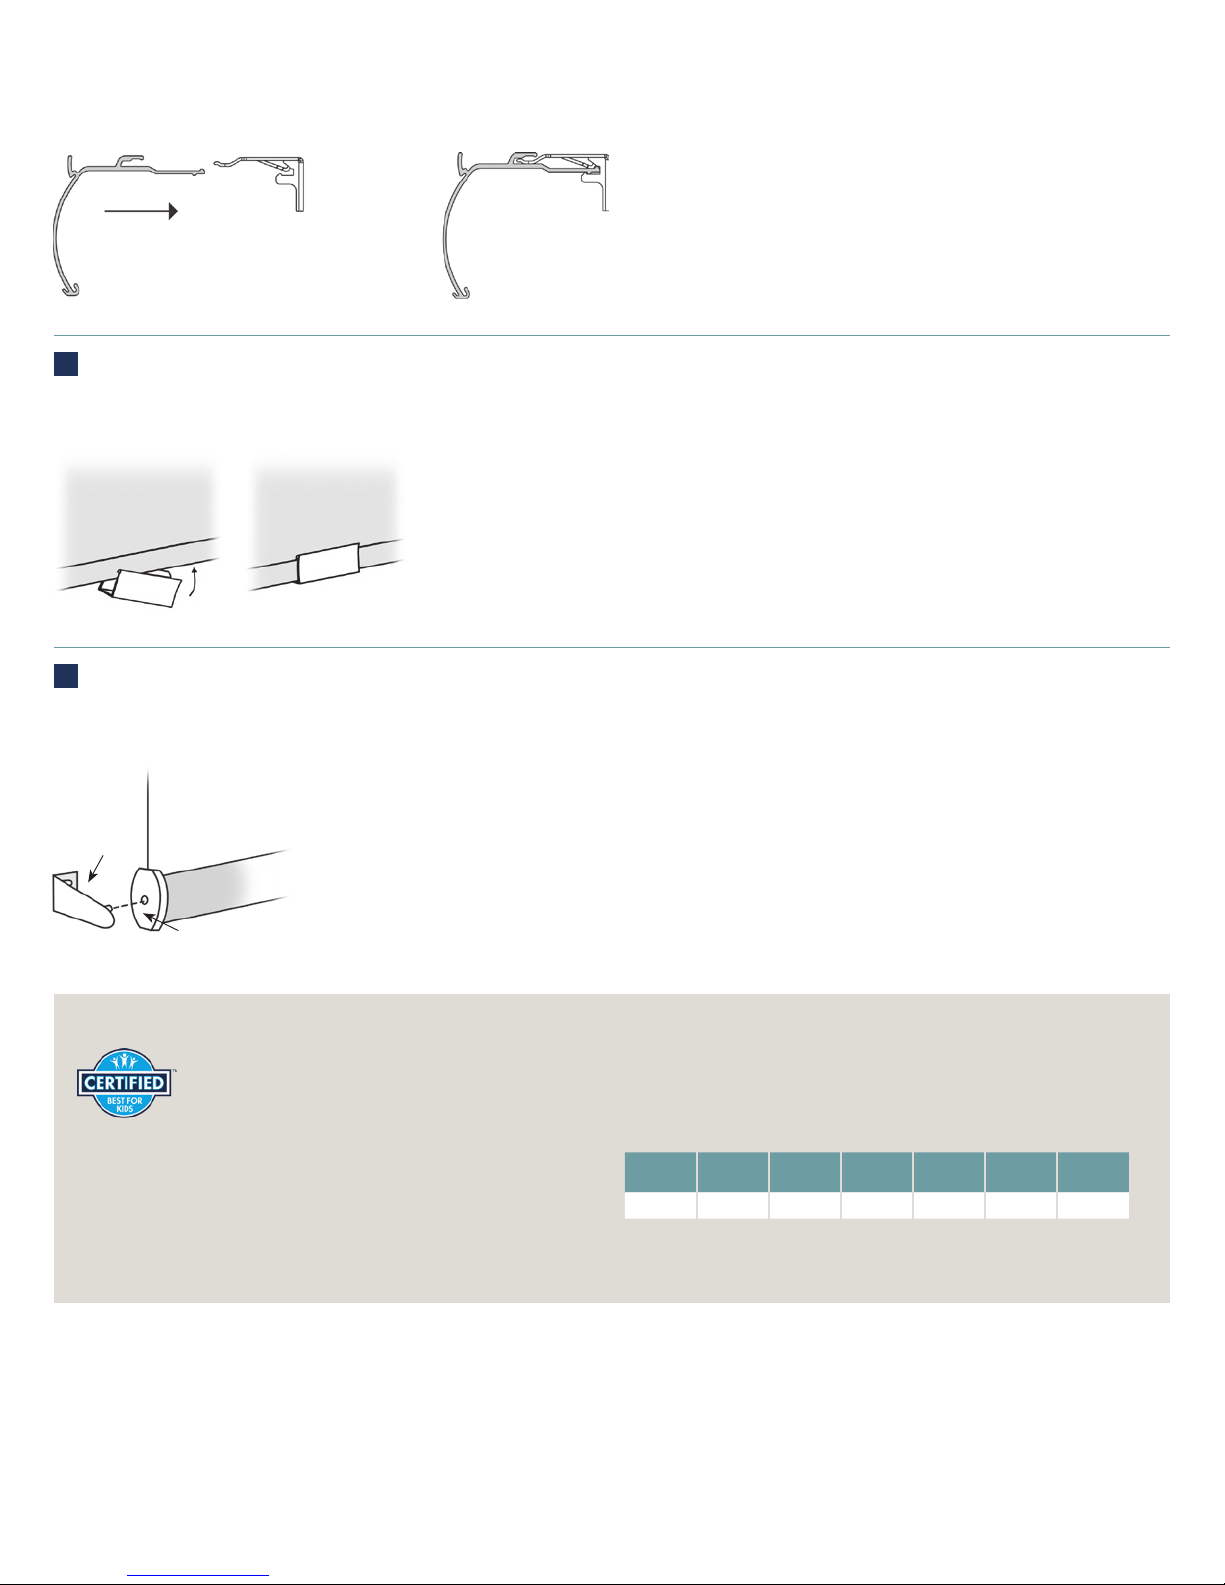
Installing Handles
G
Mounting
Bracket
Fully engaged
Figure 2
Install Grip: Pry open the bottom rail grip with your thumb. Push the grip onto the center of the bottom rail as shown. Raise shade and set the upstop where desired,
making sure the grip does not hit the fabric roll.
Installing Hold Down Bracket (Optional)
H
Hold Down Brackets are mounted with supplied screws. With the shade at its proper drop, place the pin of each Hold Down into the hole in each End Cap and mark the
screw holes. Make sure the pins are level and aligned. Raise the shade, then screw the Hold Down Bracket into the mounting surface.
Hold Dow n
Bracket
End Cap
Child Safety
Next Day Blinds is committed to incorporating the latest and most effective child-safe technologies in our products.
Without any exposed cording this product offers the assurance you need for window coverings in rooms accessed
by young children.
Cleaning and Care
In order to keep your window treatments looking new, follow the
recommended methods for care and maintenance. Regular care will
result in better appearance and performance from your window
coverings.
www.NextDayBlinds.com | 800.963.9832
Dusting Hand-Held
Vacuum
X X X X X
Compressed
Air
Hair
Dryer
Spot
Cleaning
Water
Immersion
Ultrasonic
Cleaning
 Loading...