

Page 1

SDV48-A
SDV48-AM
SDV48-AC
7”, 9” Portable DVD Player
Tragbarer 7- & 9-Zoll DVD-Player
SDV49-A
SDV49-AM
SDV49-AC
Instruction Manual
Bedienungsanleitung
Page 2

Table of Contents
Safety Precautions.....................................................................................................3
Package Contents......................................................................................................4
Primary Controls........................................................................................................5
System Connection....................................................................................................6
In Car Installation..................................................................................................... 11
Remote Control Operation.......................................................................................15
Basic Operation .......................................................................................................17
System Setup ..........................................................................................................28
Specification.............................................................................................................31
Internal Battery ........................................................................................................32
Troubleshooting.......................................................................................................35
This manul covers as the following models:
1) SDV48-A / SDV49-A Single DVD player.
2) SDV48-AM / SDV49-AM Single DVD player + monitor.
3) SDV48-AC / SDV49-AC Twin DVD player.
The model number of your product is clearly marked on the box.
Page 3
ENG 03
Safety Precautions
Thank you for choosing a SDV48/SDV49 portable DVD player. This unit incorporates the latest
state of art electronics and is designed for use at home, in hotels and in offices etc for your
enjoyment. The compact size makes carrying easier, as well as use. Please read this manual
carefully prior to use and keep it for later reference.
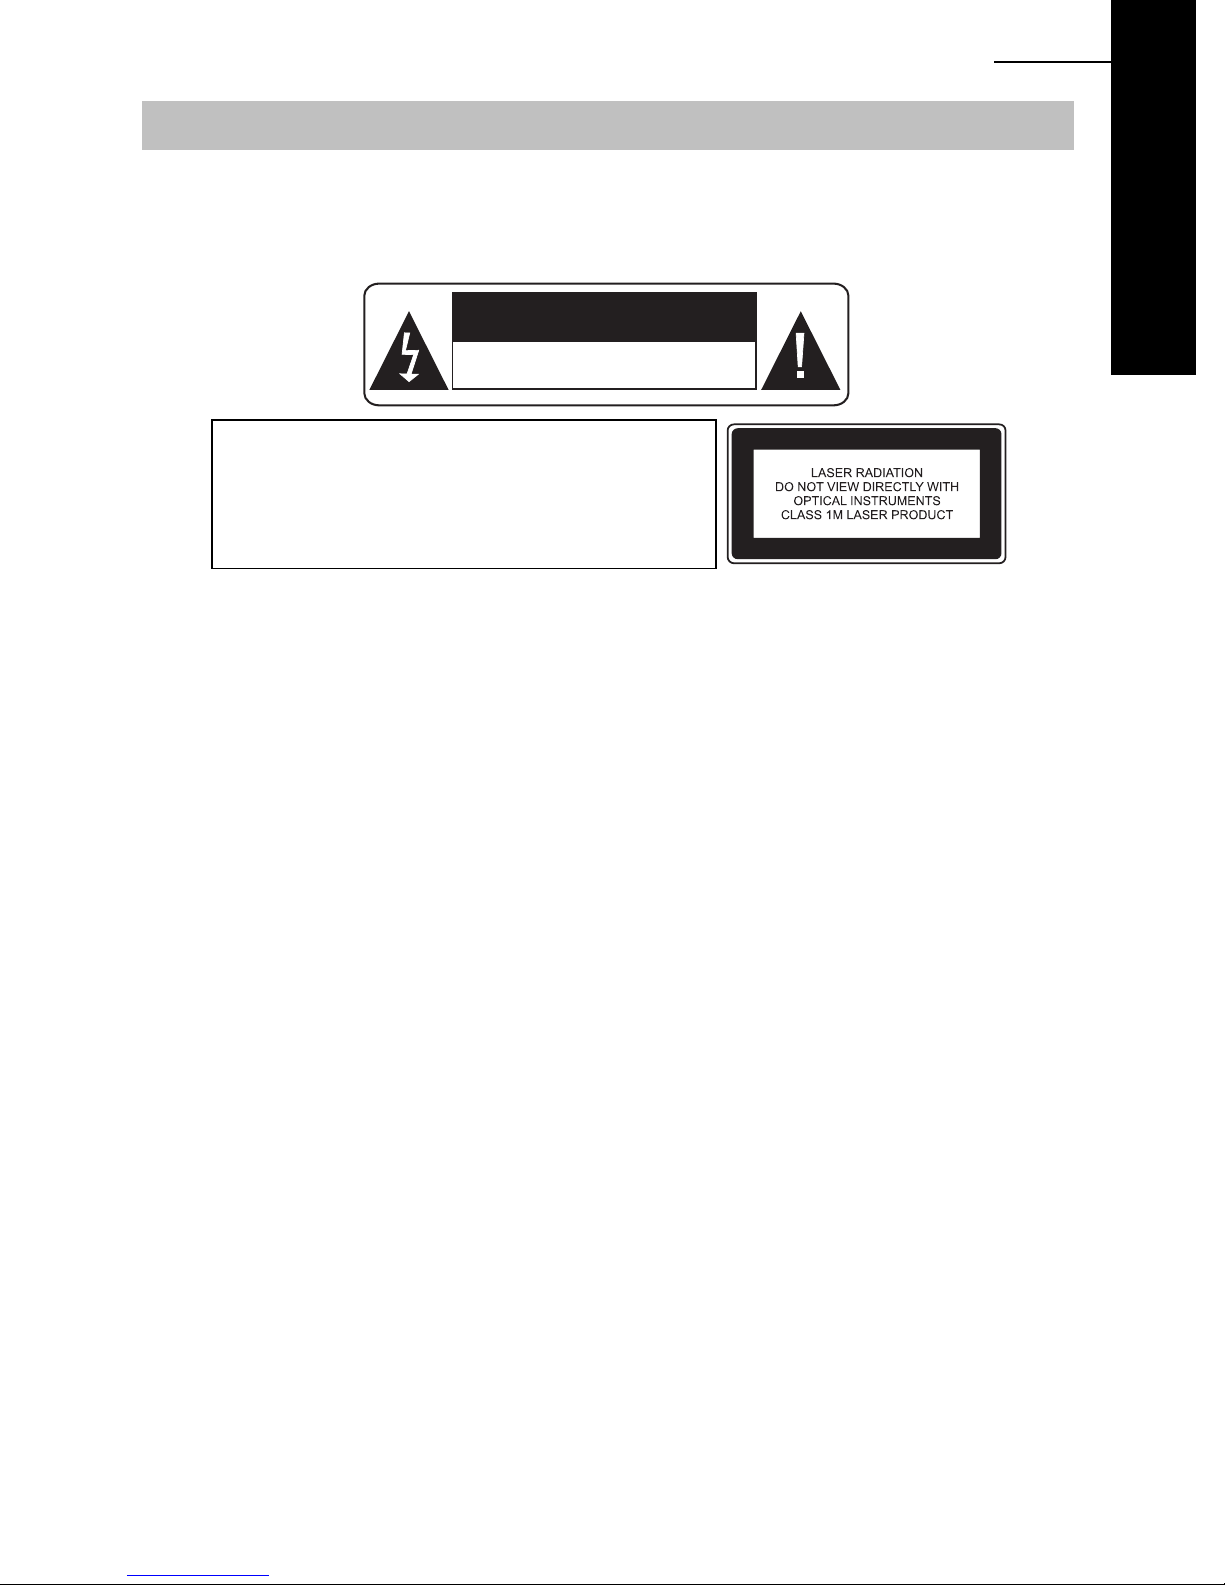
WARNING
RISK OF ELECTRIC
SHOCK. DONOT OPEN
DVD
LASER
Type
Wave length
Output Power
Beam divergence
Warning: To reduce the risk of fire or electric shock, do not expose this player to rain or moisture.
1. Please read this instruction manual carefully and follow all the requirements for safe
operation of the player & accessories.
2. Do not use this player near water. Do not place any container with liquid inside, above the
player.
3. Do not install near any heat sources such as radiators, heat registers, stoves, or other
apparatus (including amplifiers) that produce heat.
4. Unplug this unit during lightning storms or when unused for a long time.
5. Cleaning: Unplug the player, use only dry cloth to clean. Do not use liquid detergent or other
cleaning agents.
6. Only use accessories specified by the manufacturer.
7. Refer all servicing to the Next base Service Centre. Servicing is required when the unit has
been damaged in any way, such as power supply cord or plug is damaged, liquid has been
spilled or objects have fallen on to the unit, exposed to moisture, or does not operate
normally. Don't try to rep air the player by yourself, because of the danger of high voltage and
electric shock.
8. Do not use irregular shaped discs such as heart or star-shaped discs as they may cause the
unit to malfunction.
Semiconductor laser GaAIAs
650 nm/780nm
5mW
60degree
SPECIAL NOTE REGARDING USE OF THE PLAYER IN A VEHICLE
y We strongly advise against the
y Most countries and states h ave laws which prohibit or severely restrict the use of the product
in vehicles while driving, where the
y Do not leave the product in places where the temperature is extremely low (about-10 ºC or
lower) or extremely high (about 60 ºC or higher), such as i nside the p a ssen ger cabin or tru nk
in midsummer. Doi ng so may w arp the outer case or reduce the per formance or quality of the
battery pack.
Always switch the engine on before connecting power to the product.
Always disconnect the power play before switching off the engine.
SPECIAL NOTE REGARDING USE OF THE PLAYER ON AEROPLANES
This product may be allowed to be used on an aero plane at the discretion of the airline.
Always conform t o t he inst ructions given wit h respect to the use of electronic devices whilst
traveling on an aero plane.
driver
driver
of a vehicle using this product, whilst moving.
can see the screen. Please adhere to these laws.
Page 4
04 ENG
DVD
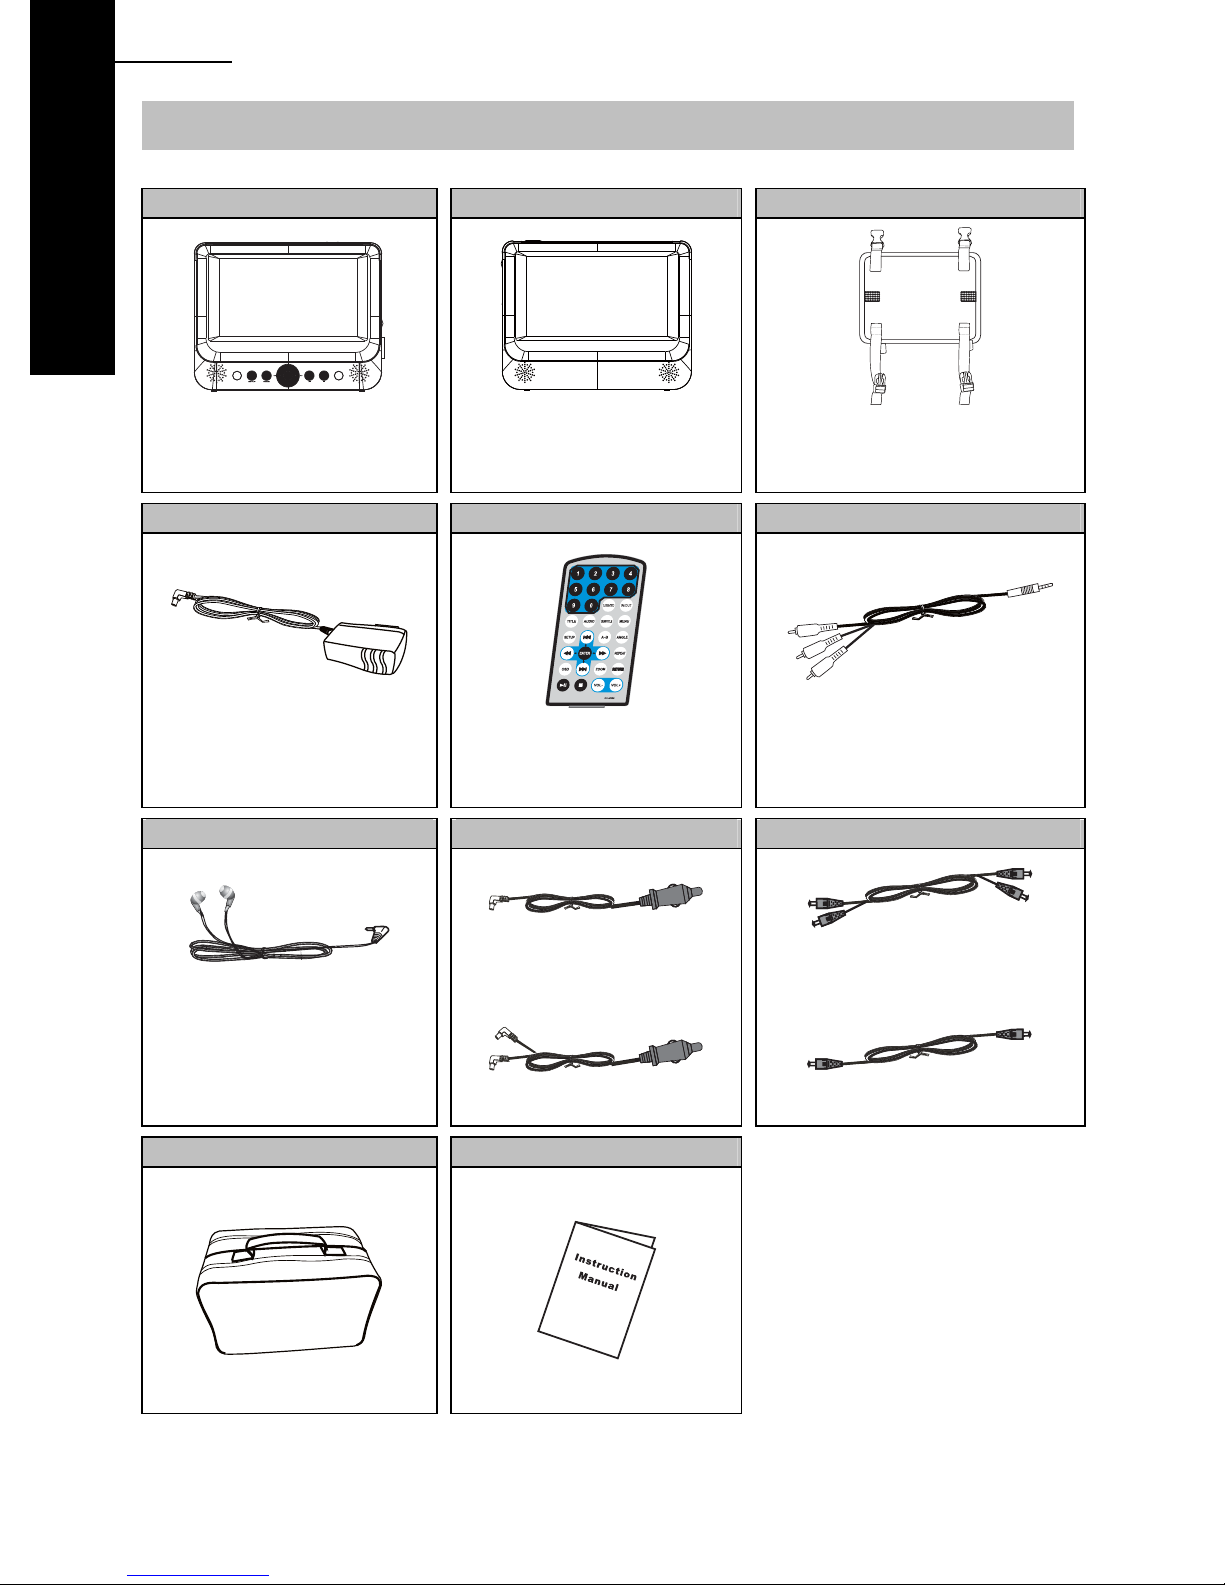
Package Contents
DVD Player Monitor Headrest Mount
SDV48-A / SDV49-A x 1
SDV48-AM / SDV49-AM x 1
SDV48-AC / SDV49-AC x 2
Supplied with SDV48-AM &
SDV49-AM models only
SDV48-A / SDV49-A x 1
SDV48-AM / SDV49-AM x 2
SDV48-AC / SDV49-AC x 2
AC/DC ADAPTOR REMOTE CONTROL AV CABLE
SDV48-A / SDV49-A x 1
SDV48-AM / SDV49-AM x 1
SDV48-AC / SDV49-AC x 2
SDV48-A / SDV49-A x 1
SDV48-AM / SDV49-AM x 1
SDV48-AC / SDV49-AC x 2
SDV48-A / SDV49-A x 1
SDV48-AM / SDV49-AM x 1
SDV48-AC / SDV49-AC x 2
STEREO EARPHON ES CAR POWER CABLE INTERCONNECTION CABLE
SDV48-A & SDV49-A
SDV48-AM & SDV49-AM
SDV48-A & SDV49-A
SDV48-AM & SDV49-AM
SDV48-A / SDV49-A x 1
SDV48-AM / SDV49-AM x 1
SDV48-AC / SDV49-AC x 2
CARRY CASE MANUAL
NOTES: Actual products’ appearance might vary slightly from the pictures shown.
SDV48-AC & SDV49-AC SDV48-AC & SDV49-AC
Page 5
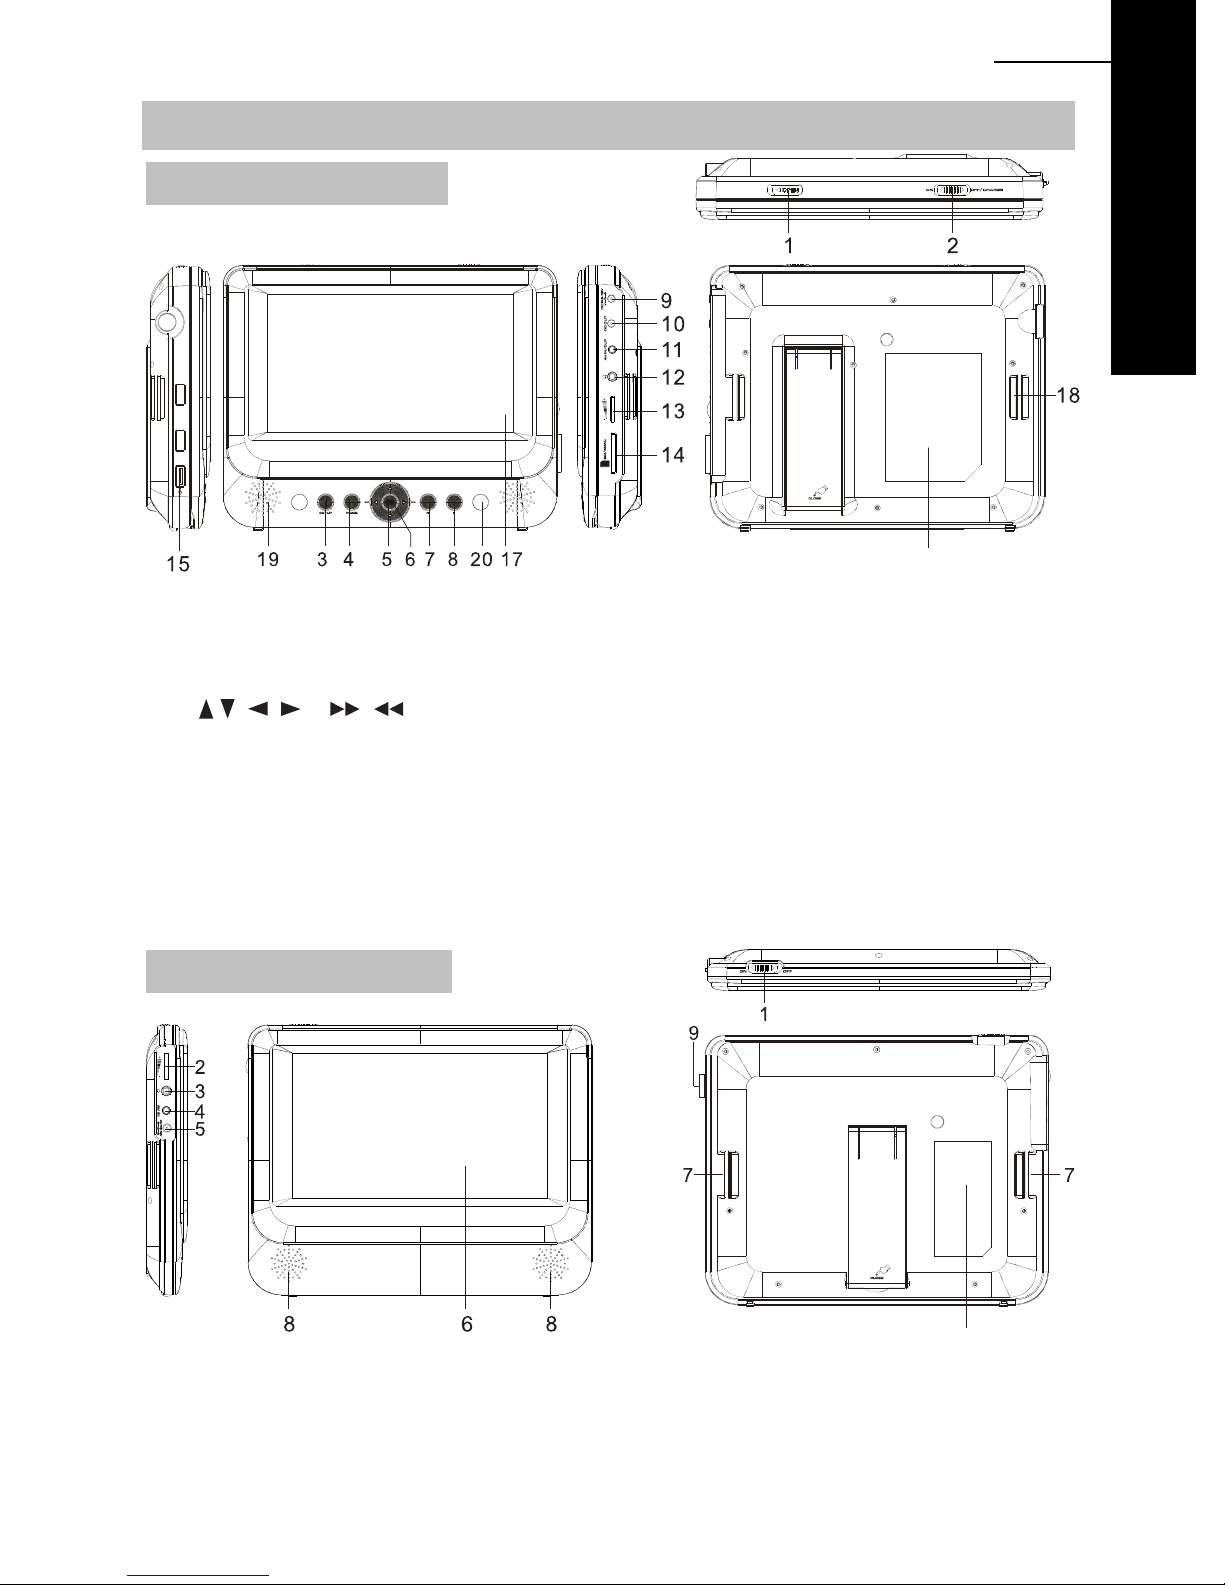
Primary Controls
DVD Player SDV48 series
1. Open Button
2. Power ON-OFF/CHARGE switch
3. SETUP Button
4. MODE Button
5.
6. OK / Enter Button
7. Play/Pause
8. STOP Button
9. DC IN 9-12V
10. DC OUT
(applicable to -AM master only)
ENG 05
21
11. AV/IN OUT
12. Earphone Jack
13. Volume Control
14. SD/MMC Card Slot
15. USB Port (For memory stick only)
16. Stand (Pull out to use and click back to stow)
17. LCD Screen
18. Headrest Mount Strap Guide
19. Speakers
20. Indicator Lights Blue = Power On
Red = Battery Charging
Gree n = Battery Fully Charged
21. Rating Label Position
DVD
Monitor (SDV48-AM Only)
1. Power ON/OFF Switch
2. Volume Control
3. Earphone jack
4. A V IN
5. DC IN 9-12V
10
6. LCD Screen
7. Headrest mount strap guide
8. Speakers
9. Brightness control
10. Rating Label Position
Page 6
06 ENG
DVD
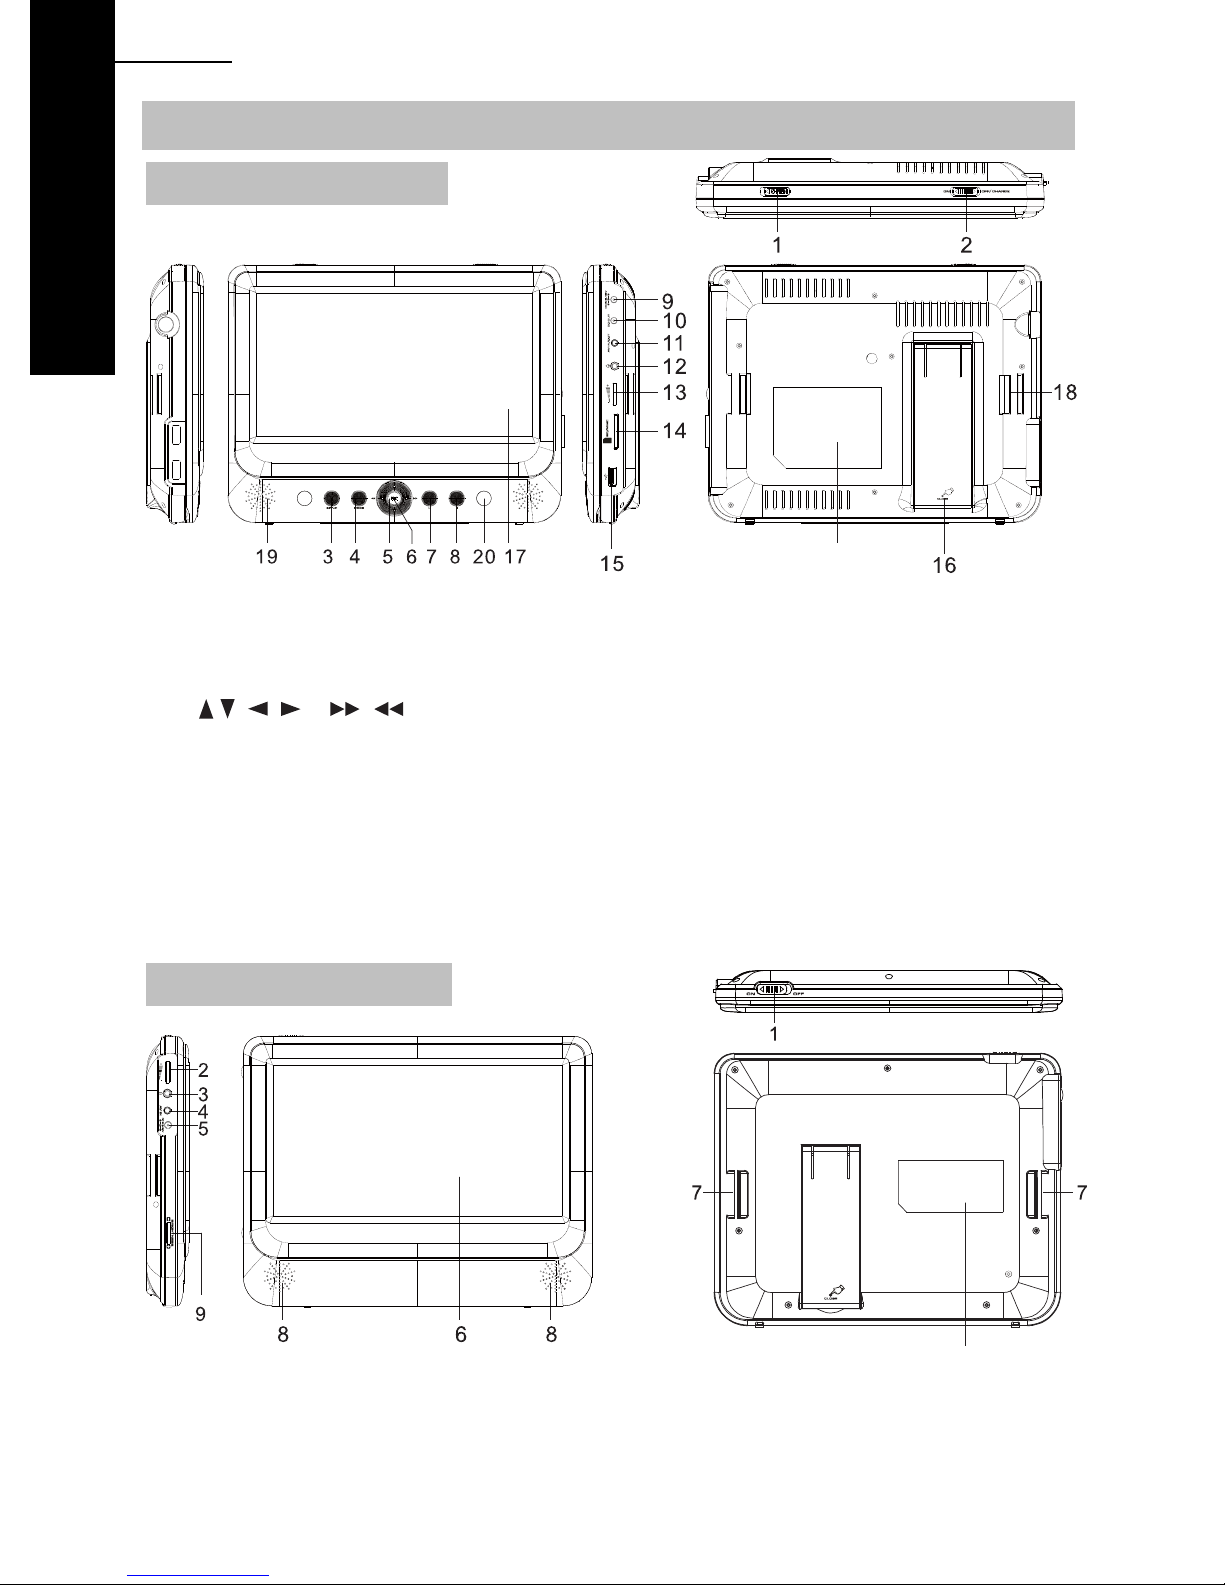
Primary Controls
DVD Player SDV49 series
21
1. Open Button
2. Power ON-OFF/CHARGE switch
3. SETUP Button
4. MODE Button
5.
6. OK / Enter Button
7. Play/Pause
8. STOP Button
9. DC IN 9-12V
10. DC OUT
(applicable to -AM master only)
Monitor (SDV49-AM Only)
11. AV/IN OUT
12. Earphone Jack
13. Volume Control
14. SD/MMC Card Slot
15. USB Port (For memory stick only)
16. Stand (Pull out to use and click back to stow)
17. LCD Screen
18. Headrest Mount Strap Guide
19. Speakers
20. Indicator Lights Blue = Power On
Red = Battery Charging
Gree n = Battery Fully Charged
21. Rating Label Position
1. Power ON/OFF Switch
2. Volume Control
3. Earphone jack
4. A V IN
5. DC IN 9-12V
10
6. LCD Screen
7. Headrest mount strap guide
8. Speakers
9. Brightness control
10. Rating Label Position
Page 7
System Connection
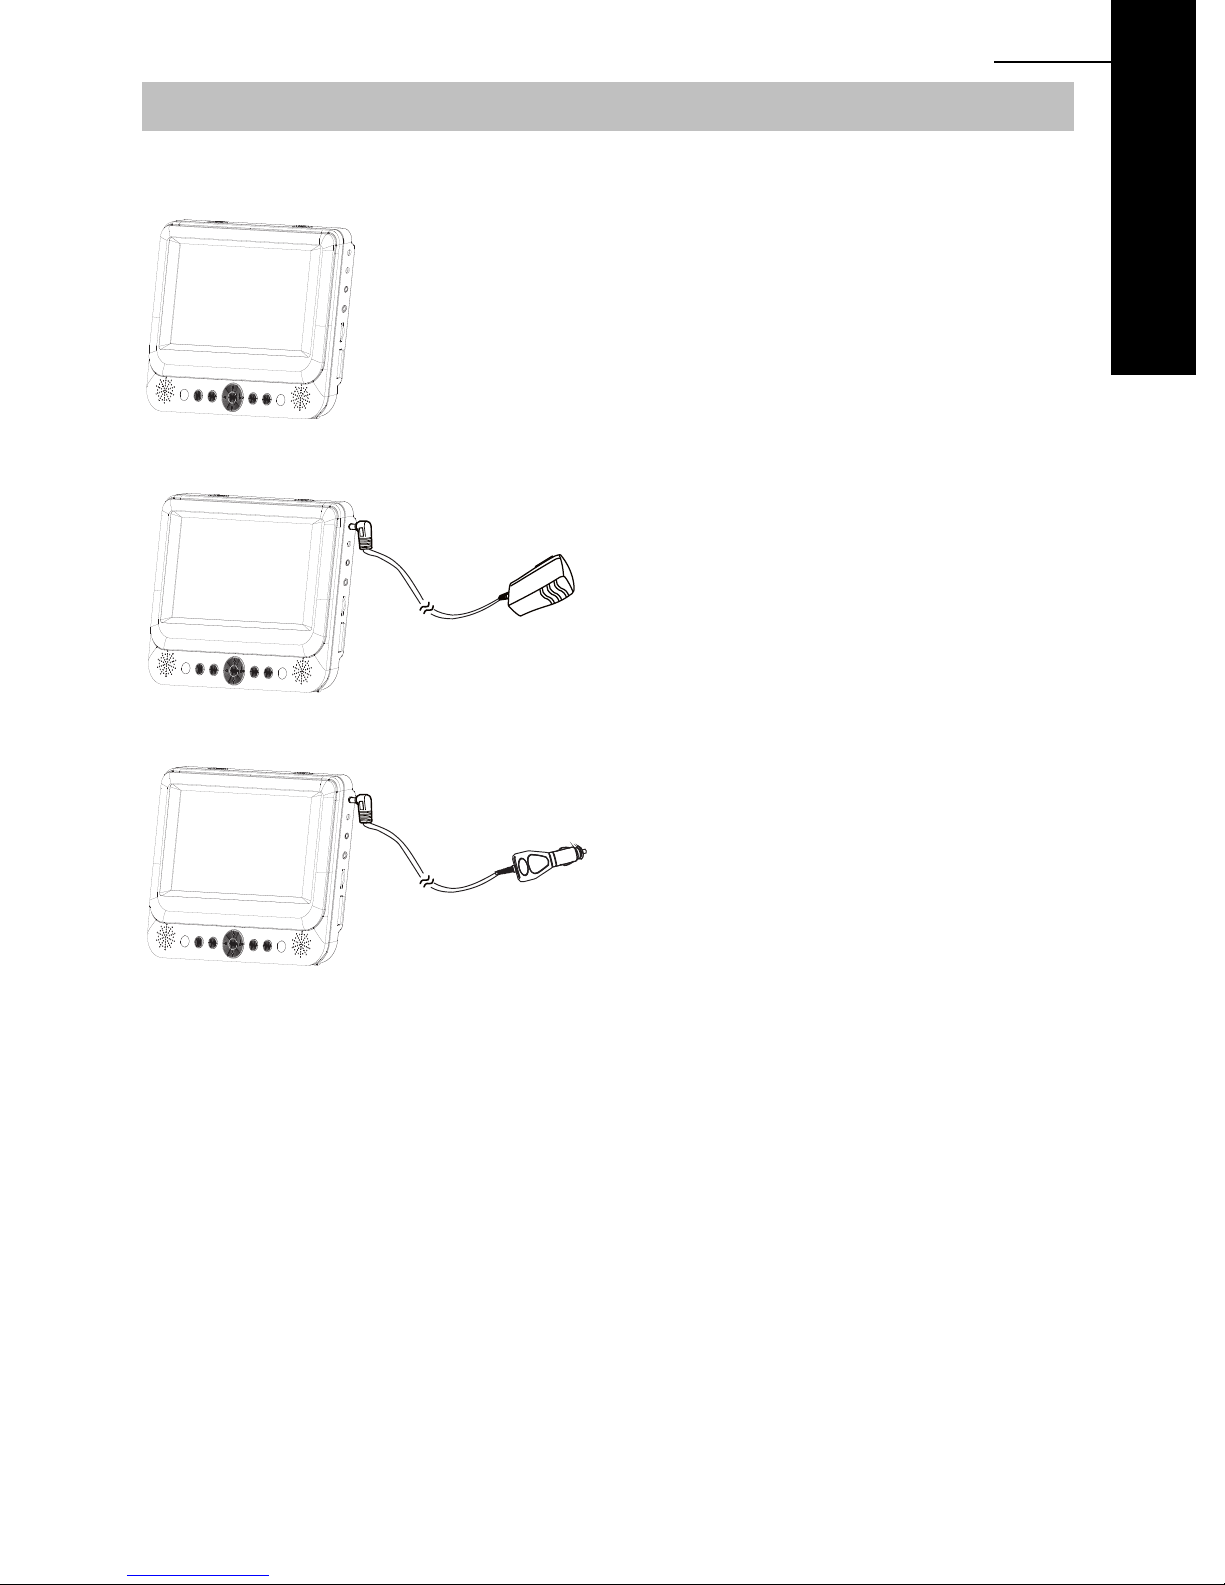
SDV48-A / SDV49-A
Single screen system with one DVD Player
ENG 07
For use whilst traveling or at home, the DVD
player will work from the internal battery by
DVD
switching the power to ON.
For operation from the mains, or to charge
Domestic adaptor
the internal battery, connect the supplied
domestic adaptor to the mains supply and
then the DC plug to the DC-IN socket upon
the player.
Switch ON to operate or OFF/CHARGE to
charge the internal battery.
For operation in a vehicle, or to charge the
Car adaptor
internal battery, connect the supplied car
adaptor to the car cigarette lighter socket and
then the DC plug to the DC-IN socket upon
the player.
Switch ON to operate or OFF/CHARGE to
charge the internal battery.
NOTE:
• For use in 12VDC vehicles only, NOT 24VDC vehicles, or damage will result.
• Always start the vehicle engine before connecting the DVD player to the supply or damage
could result due to electrical surges during engine start.
• To charge the internal battery of the DVD player, connect either power supply method above
and switch to the “OFF/CHARGE” position.
y
The mains plug is used as the disconnected device, the disconnected device should remain
readily operable.
Page 8
08 ENG
DVD
System Connection
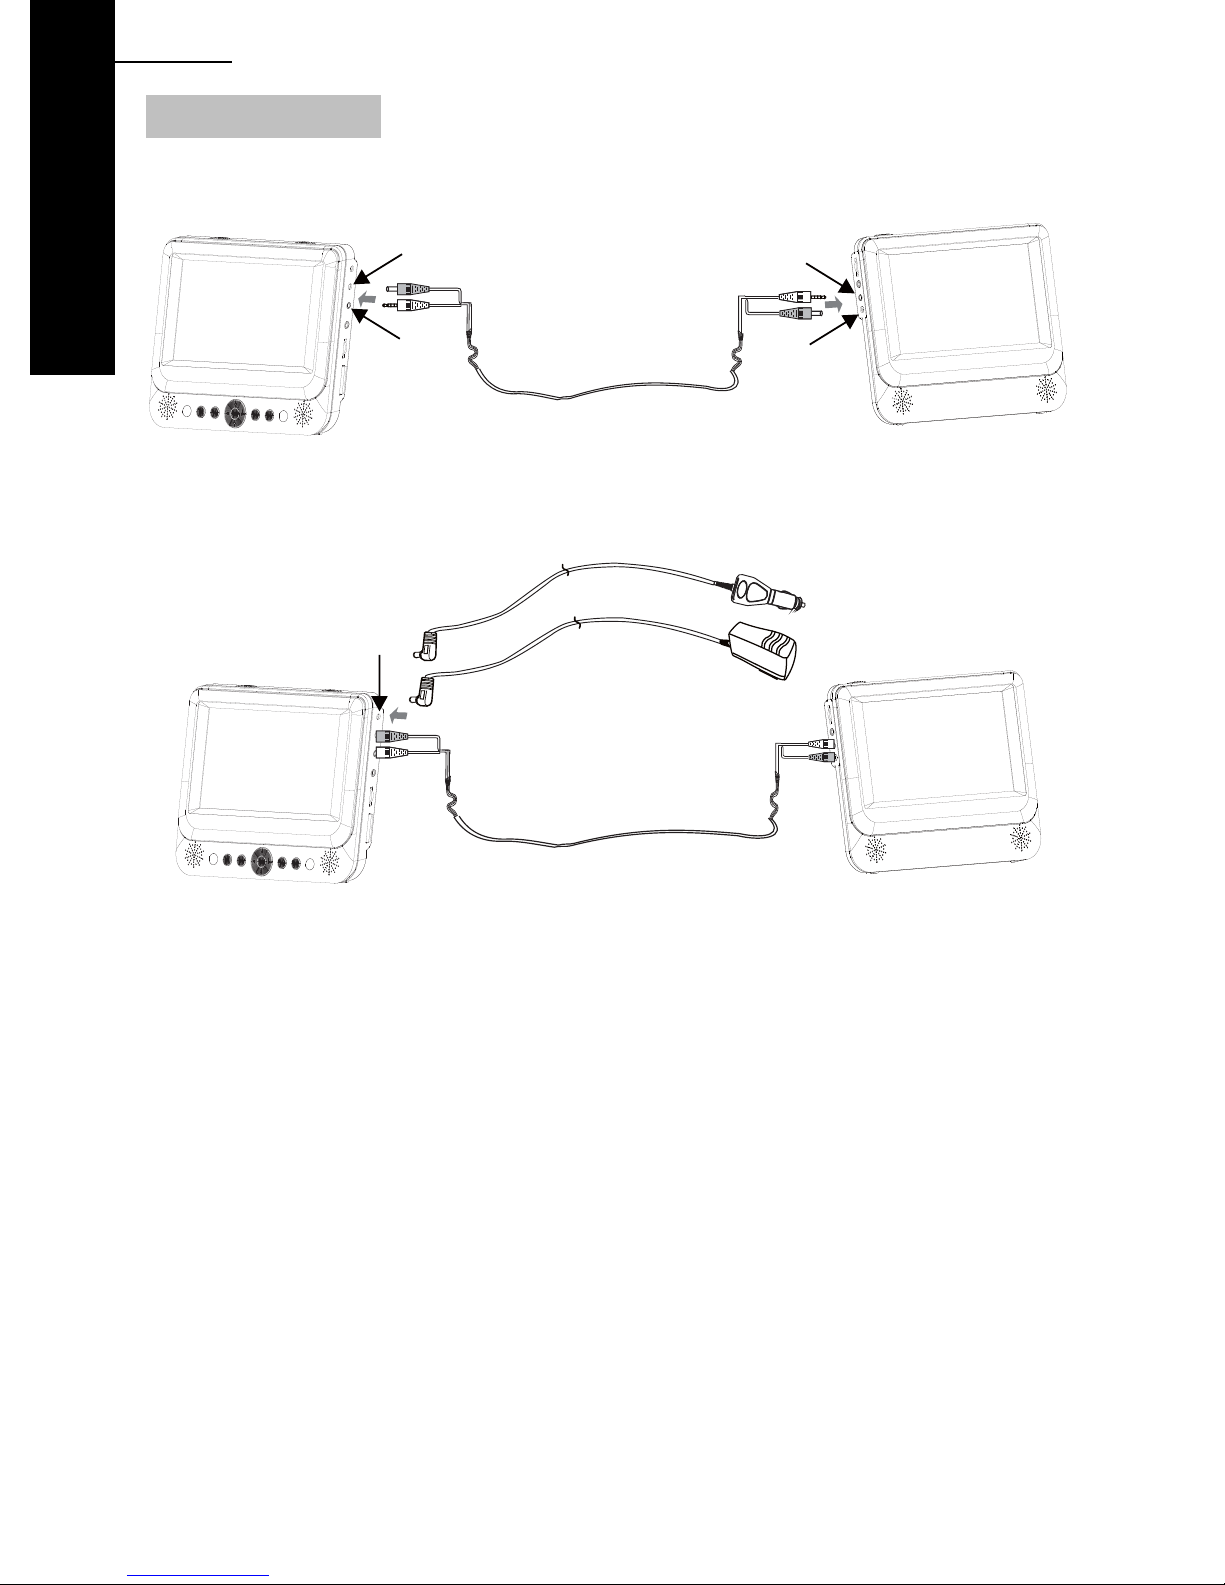
SDV48-AM / SDV49-AM
Twin screen system with one DVD player and one monitor.
DC-OUT
DVD PLAYER MONITOR
AV IN/OUT
AV IN
DC-IN
Connect between the DVD player and the monitor, using the supplied Audio-Video / Power
cable, as shown above.
OR
DC-IN
DVD PLAYER MONITOR
Connect either the domestic mains adaptor or the car adaptor to the master DVD player to
enable both screens to work, as above.
NOTE:
• Whilst the master DVD player can be used from the intern al battery, there is n o battery in the
slave monitor so either the car adaptor or the domestic mains adaptor is required to power
the monitor.
• For use in 12Vdc vehicles only, NOT 24Vdc vehicles, or damage will result.
• Always start the vehicle engine before connecting the DVD player to the supply or damage
could result due to electrical surges during engine start.
• To charge the internal battery of the DVD player, connect either power supply method above
and switch to the “OFF/CHARGE” position.
• Always connect master & monitor before plugging in power supply, failure to do so may lead
to a buzzing sound from the monitor or damage could result.
Page 9
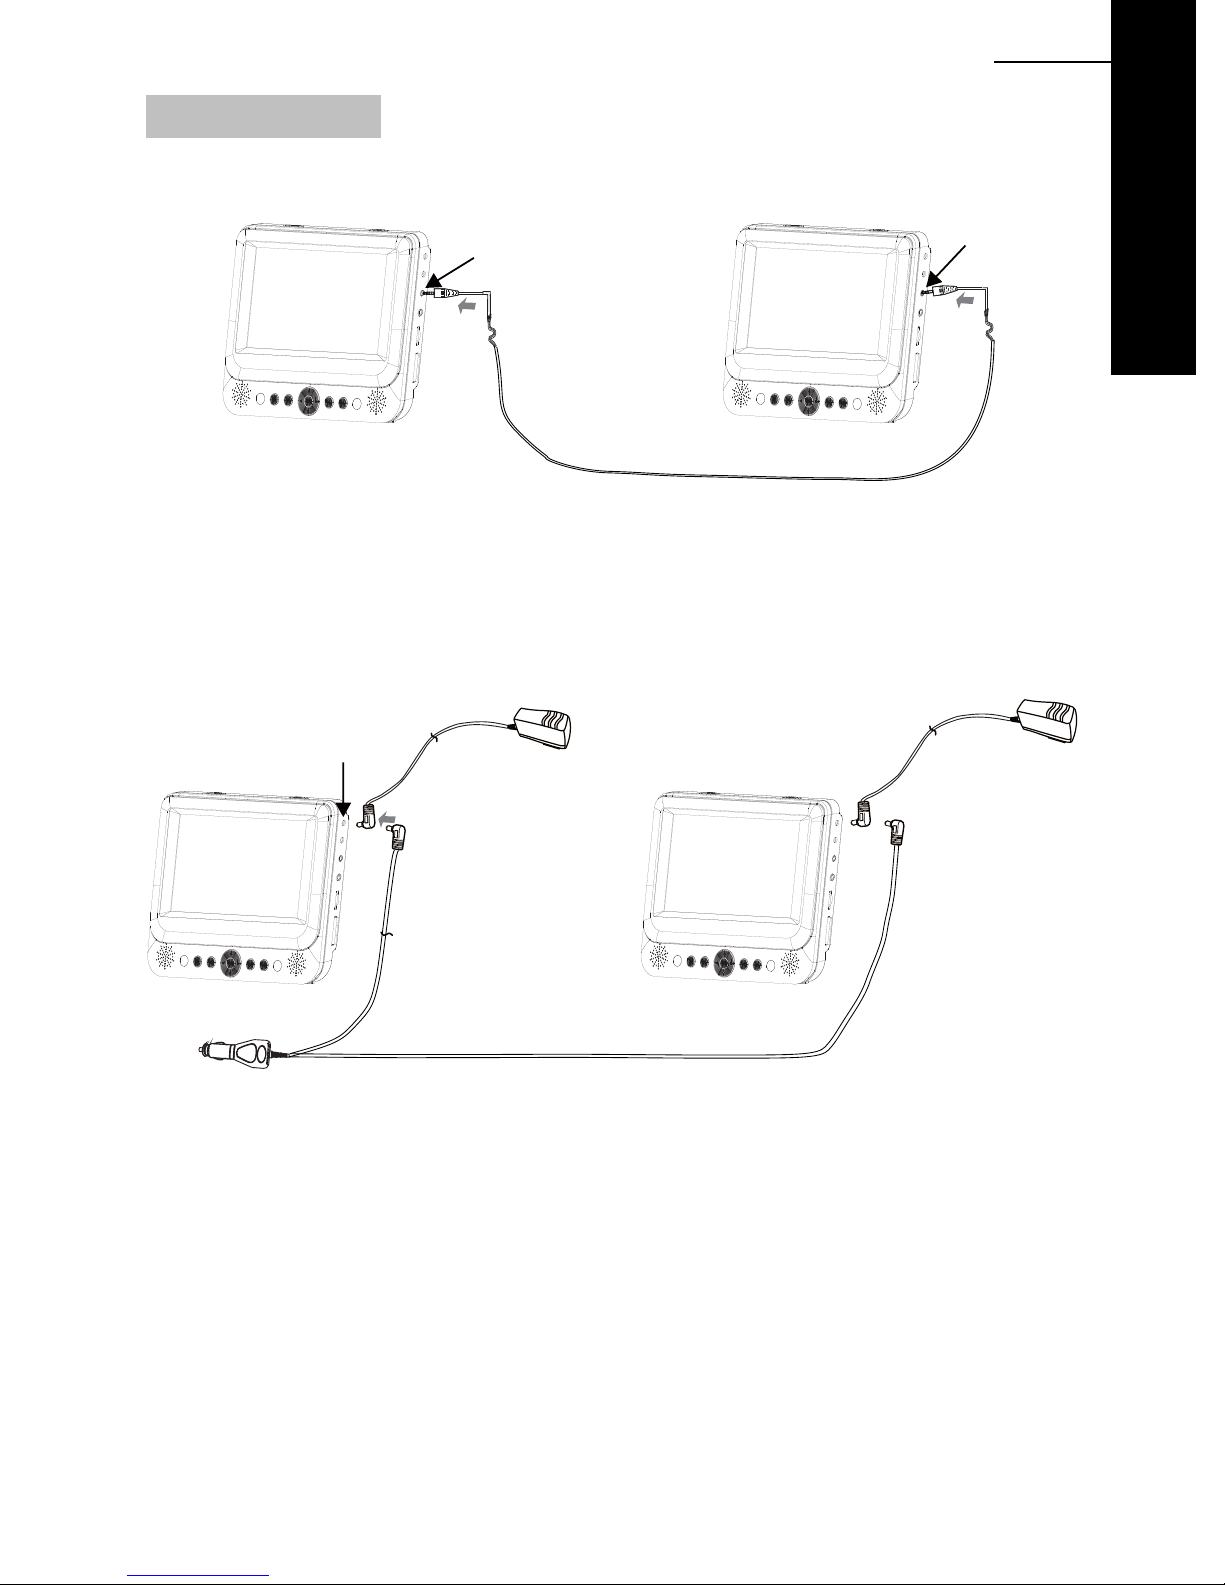
System Connection
SDV48-AC / SDV49-AC
Twin screen system with two DVD players.
ENG 09
AV IN/OUT
AV IN/OUT
DVD PLAYER DVD PLAYER
AUDIO-VIDEO CABLE
Either use the two DVD players independently (no interconnection required), or conne ct them
together as shown above, to share one movie across tw o screen s. After connection, to share
one movie across two screens, insert the DVD disc into one player and start playback. The
second screen (without the playing disc inside) has to be set to AV-IN mode by pressing the
DVD/IN button upon the remote control. Remove the cable if watching different movies.
DC-IN
OR OR
DVD
DVD PLAYER
DVD PLAYER
Both players can operate from their internal batteries, or connect
either
the domestic mai n s
adaptors or the dual car adaptor for continuous use, as above.
NOTE:
• For use in 12VDC vehicles only, NOT 24VDC vehicles, or damage will result.
• Always start the vehicle engine before connecting the DVD players to the supply or damage
could result due to electrical surges during engine start.
• To charge the internal battery of the DVD players, connect either power supply method
above and switch to the “OFF/CHARGE” position.
• Remove the interconnection cable if watching different movies, or sound interference will
occur.
Page 10
10 ENG
DVD
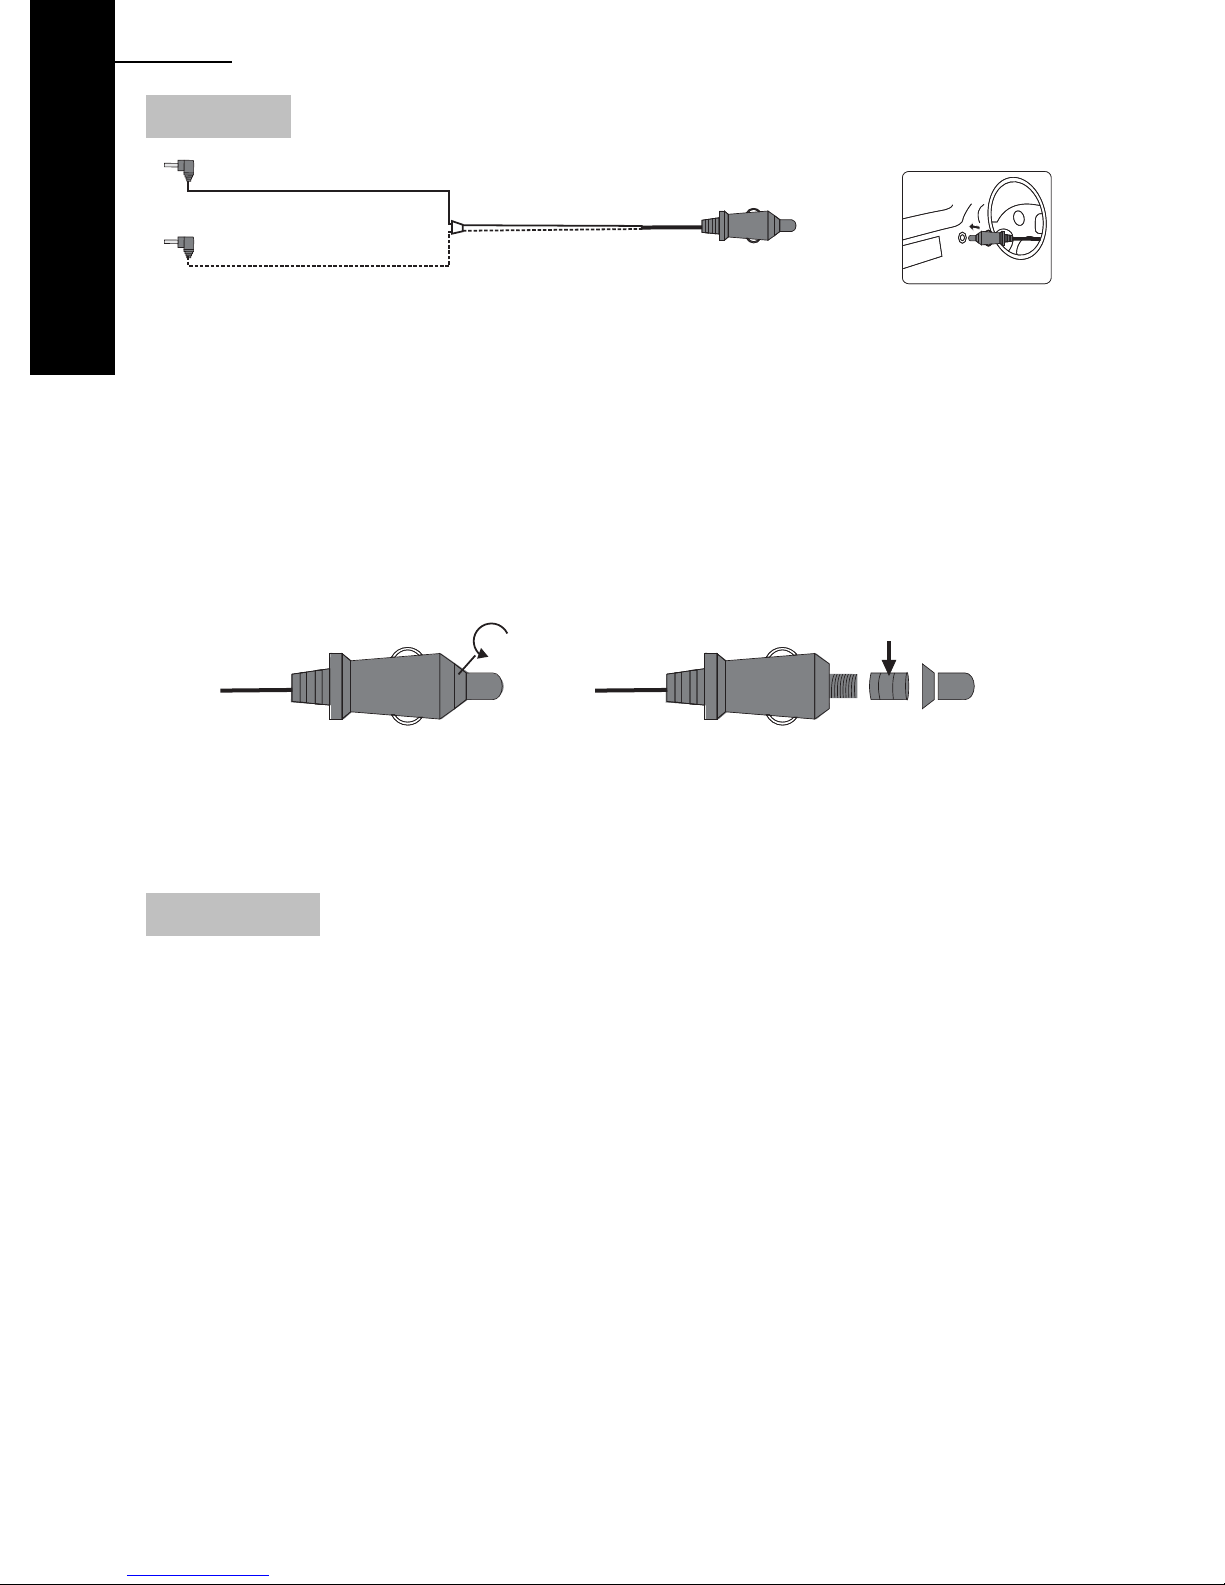
Car Adaptor
DC Plug
The Car Adaptor is fuse d in orde r to p rotect the car and D VD sy stem from damage a s a result o f
voltage / current surges, short circuit, cable damage or product failure.
If the DVD player
then the fuse should be checked, as it may have blown.
If found to be blown, check the player and cables for damage. Replacement fuse details are
shown below.
Cigarette Lighter Plug
SDV48-AC / SDV49-AC models only
work perfectly on the domestic mains adaptor but not on the Car Adaptor,
will
20mm glass fuse
SDV48-A / SDV49-A: 1.5A
SDV48-AM / SDV49-AM: 1.5A
Unscrew
SDV48-AC / SDV49-AC: 2.0A
To remove fuse Exploded view
CAUTION: The fuse, spring, collar and tip are small components and must not be lost, or
re-assembly is impossible.
Mains Adaptor
The mains adaptor (supplied with UK and EU plug tops) is a 100-240VAC 50-60Hz type which
covers most domestic supplies around the world, for your convenience.
Please use whichever plug top suits your needs, either at home or whilst travelling.
Press the release button to remove / insert the desired plug top and ensure that the latch clicks
firmly in place for security.
NOTE: The plug tops can be inserted in either of 2 directions for your convenience.
BOTH orientations are acceptable, safe and functional.
Your local electrical distributor will be able to supply any additional adaptors to convert the pin
configuration to other worldwide travel destination requirements.
Only the supplied adaptor is to be used with the SDV48 & SDV49. Using other adaptors or
supplies may cause irreparable damag e to the play er. The supplied adap tor is labelled to identify
its use for the SDV48 & SDV49 Series accordingly.
Page 11

In Car Installation
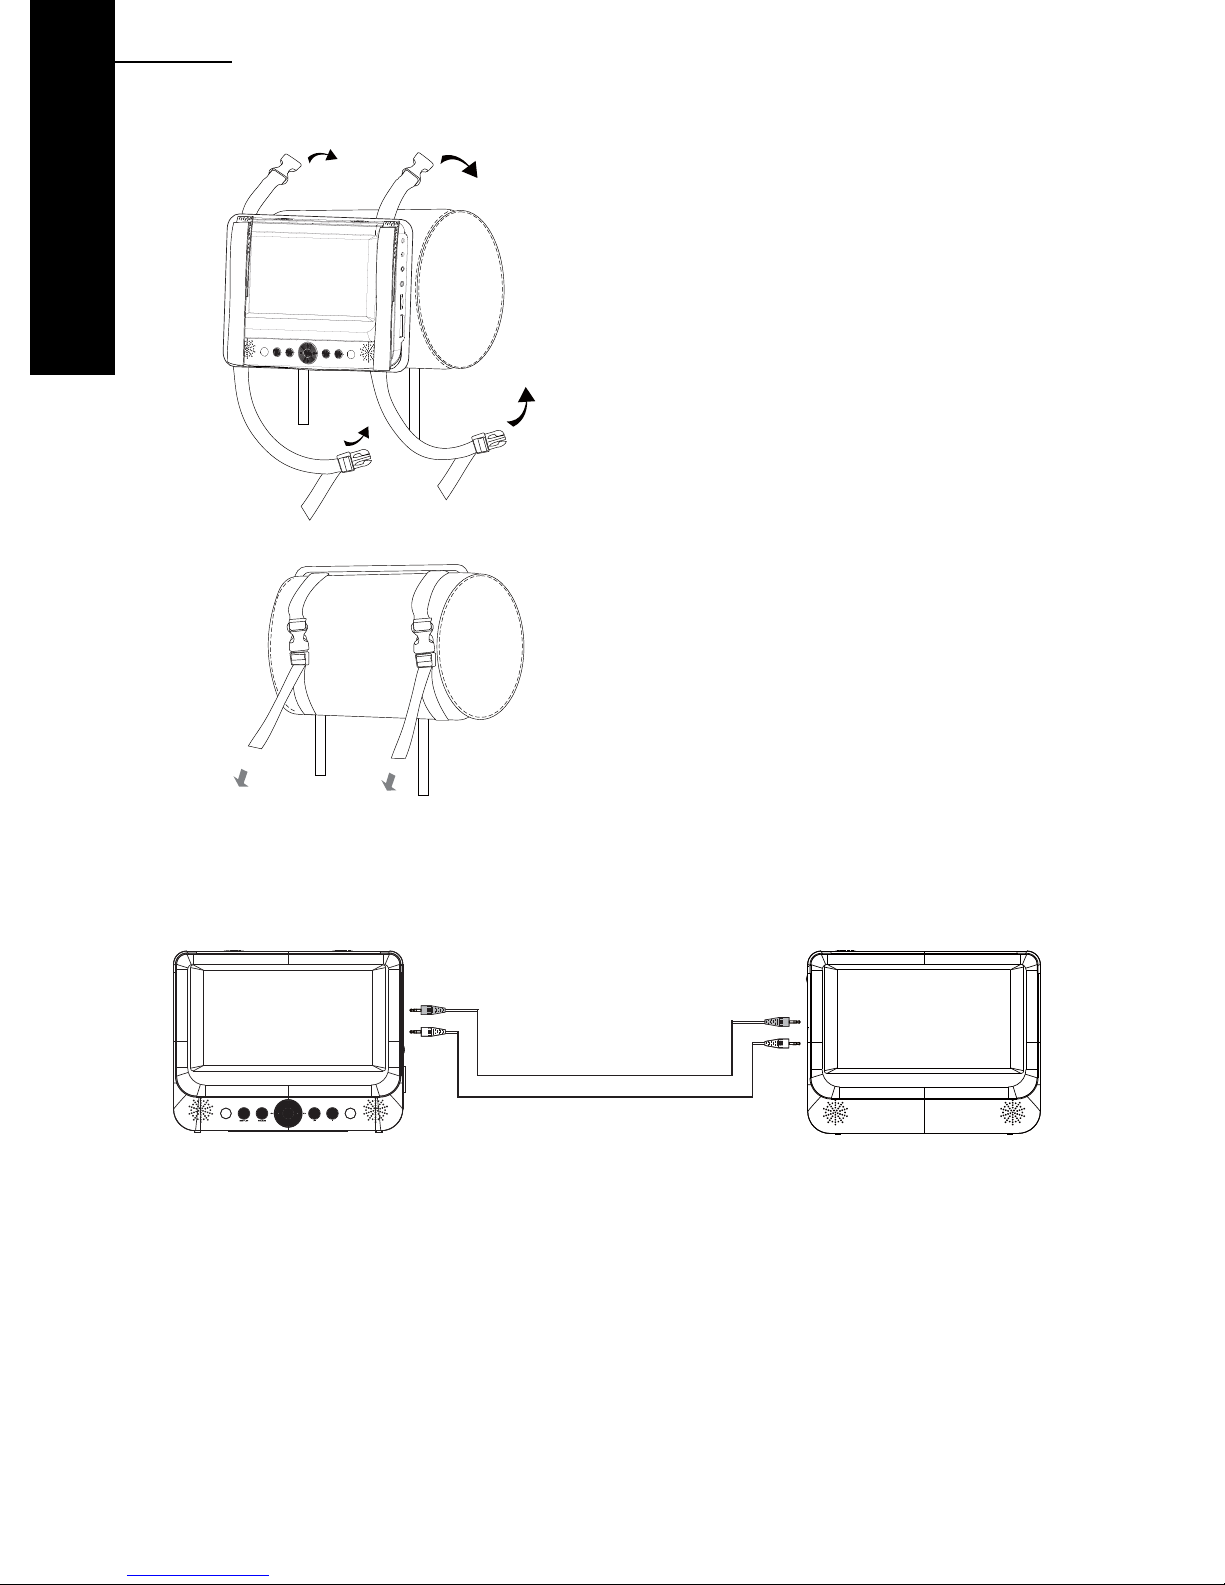
1. Fit the headrest mount to the DVD Player / Monitor as required.
front straps
Once secured correctly, the back of the
player (or monitor) will sit against the front
of the headrest mount.
TOP
ENG211
DVD
fixing strap
front
fixing strap
Turn the headrest mount and player around so the backs are facing you.
fixing point
Slide the fixing strap through the left-hand fixing point on
back
the back of the player or monitor, as shown.
Fold the strap over on to the back of the headrest mount
and secure firmly.
Repeat process for the other strap.
Ensure the DVD player or monitor is mounted centrally.
Turn the headrest and player around so the front is facing you.
NOTE: For SDV48-AM /SDV49-AM products the same design headrest mount is used for both
the player and monitor.
Using the front straps secure the player or monitor as
shown.
Page 12
12 ENG
DVD
2. Fitting the Headrest Mount to the Headrest
Fit the straps around the headrest and
PULL
NOTE:
For SDV48-AM / SDV49-AM installation it is recommended that the DVD Player is on the LEFT
headrest, to ensure a neat cable run to the monitor, as shown below.
PULL
engage the 2 trident clips.
Ensure clips are securely fastened.
Pull the straps tight using the adjustment.
Tuck the loose ends into the strap tidy.
Page 13

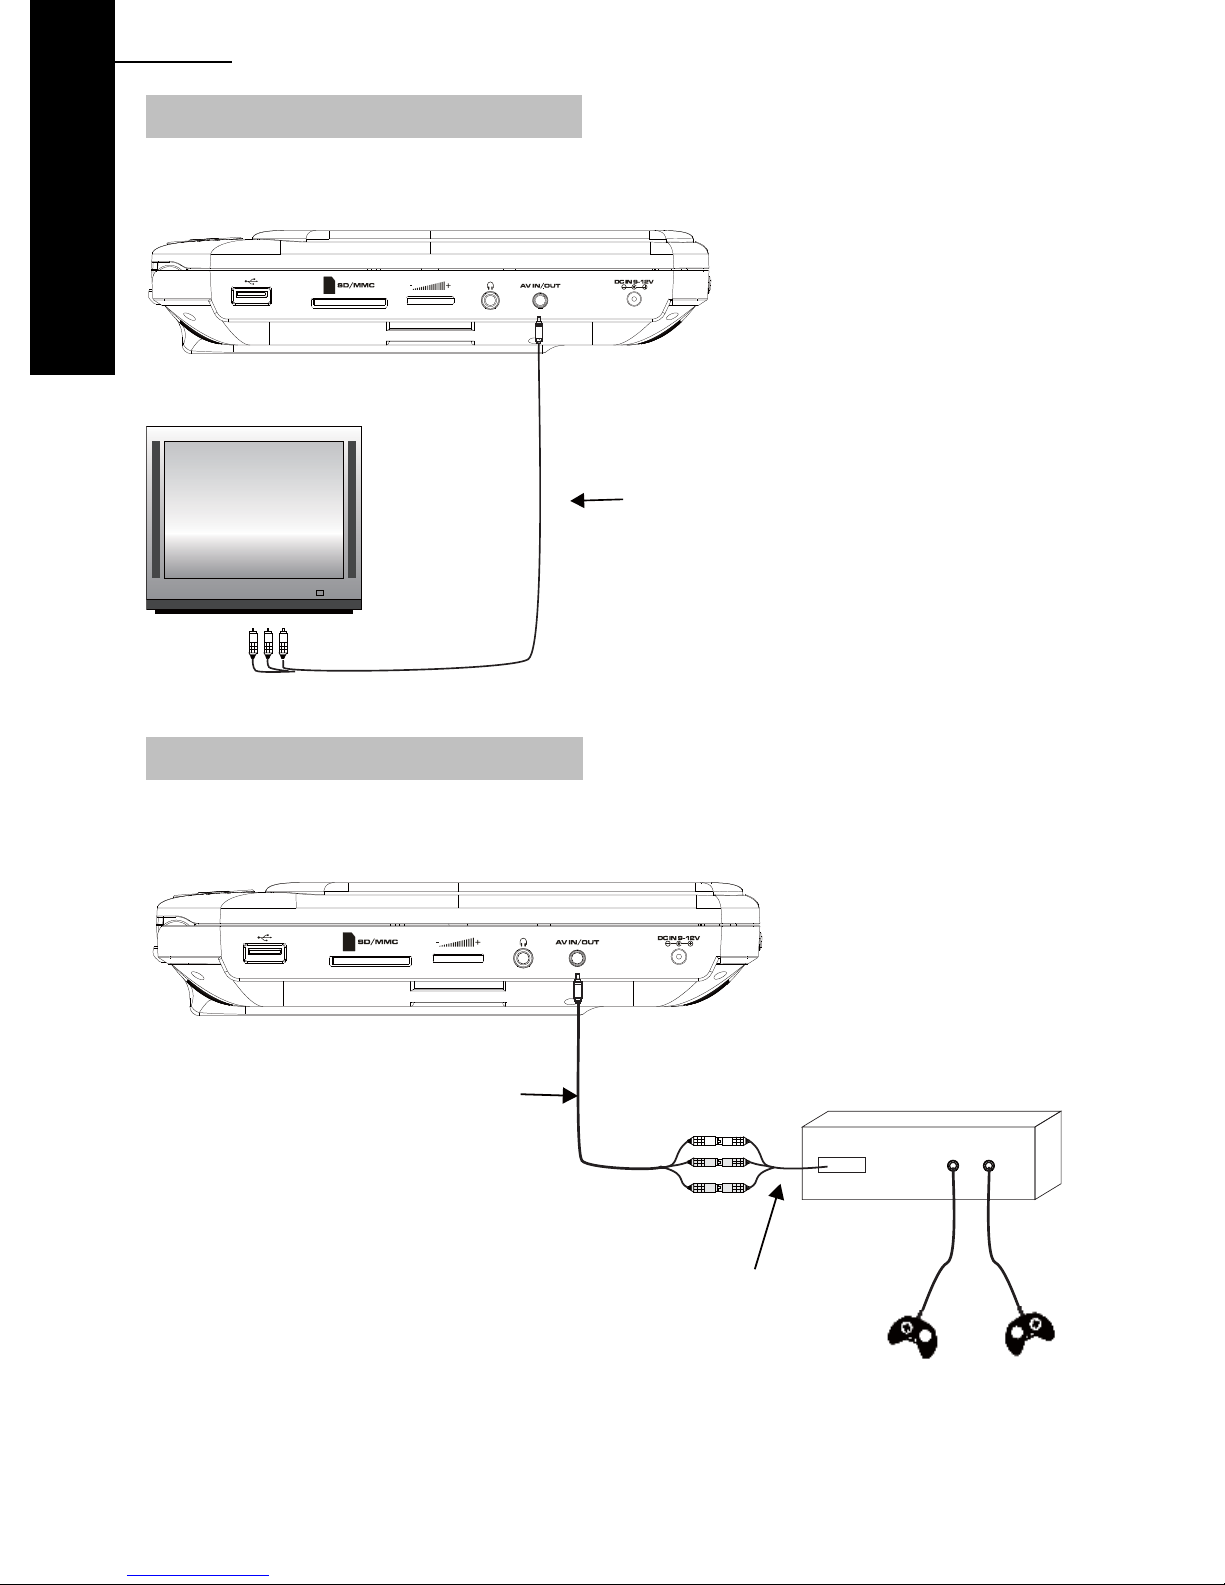
Connecting to an external TV screen
SDV48 series
The unit can be connected to an external TV set. Please see below.
AUDIO-VIDEO CABLE (SUPPLIED)
ENG213
DVD
Yellow = Video
Red = Audio Right
White = Audio Left
Connecting to an external AV source
The unit can be connected to an external AV source, such as a games console. Please see
below.
AUDIO-VIDEO CABLE (SUPPLIED)
Press DVD/IN on the remote control to switch between DVD play back and the AV-IN mode.
Once connected correctly, the image and sound will appear on the player.
GAMES CONSOLE
CONNECTION CABLE
(NOT SUPPLIED)
Page 14
14 ENG
DVD
Connecting to an external TV screen
SDV49 series
The unit can be connected to an external TV set. Please see below.
AUDIO-VIDEO CABLE (SUPPLIED)
Yellow = Video
Red = Audio Right
White = Audio Left
Connecting to an external AV source
The unit can be connected to an external AV source, such as a games console. Please see
below.
AUDIO-VIDEO CABLE (SUPPLIED)
Press DVD/IN on the remote control to switch between DVD play back and the AV-IN mode.
Once connected correctly, the image and sound will appear on the player.
GAMES CONSOLE
CONNECTION CABLE
(NOT SUPPLIED)
Page 15
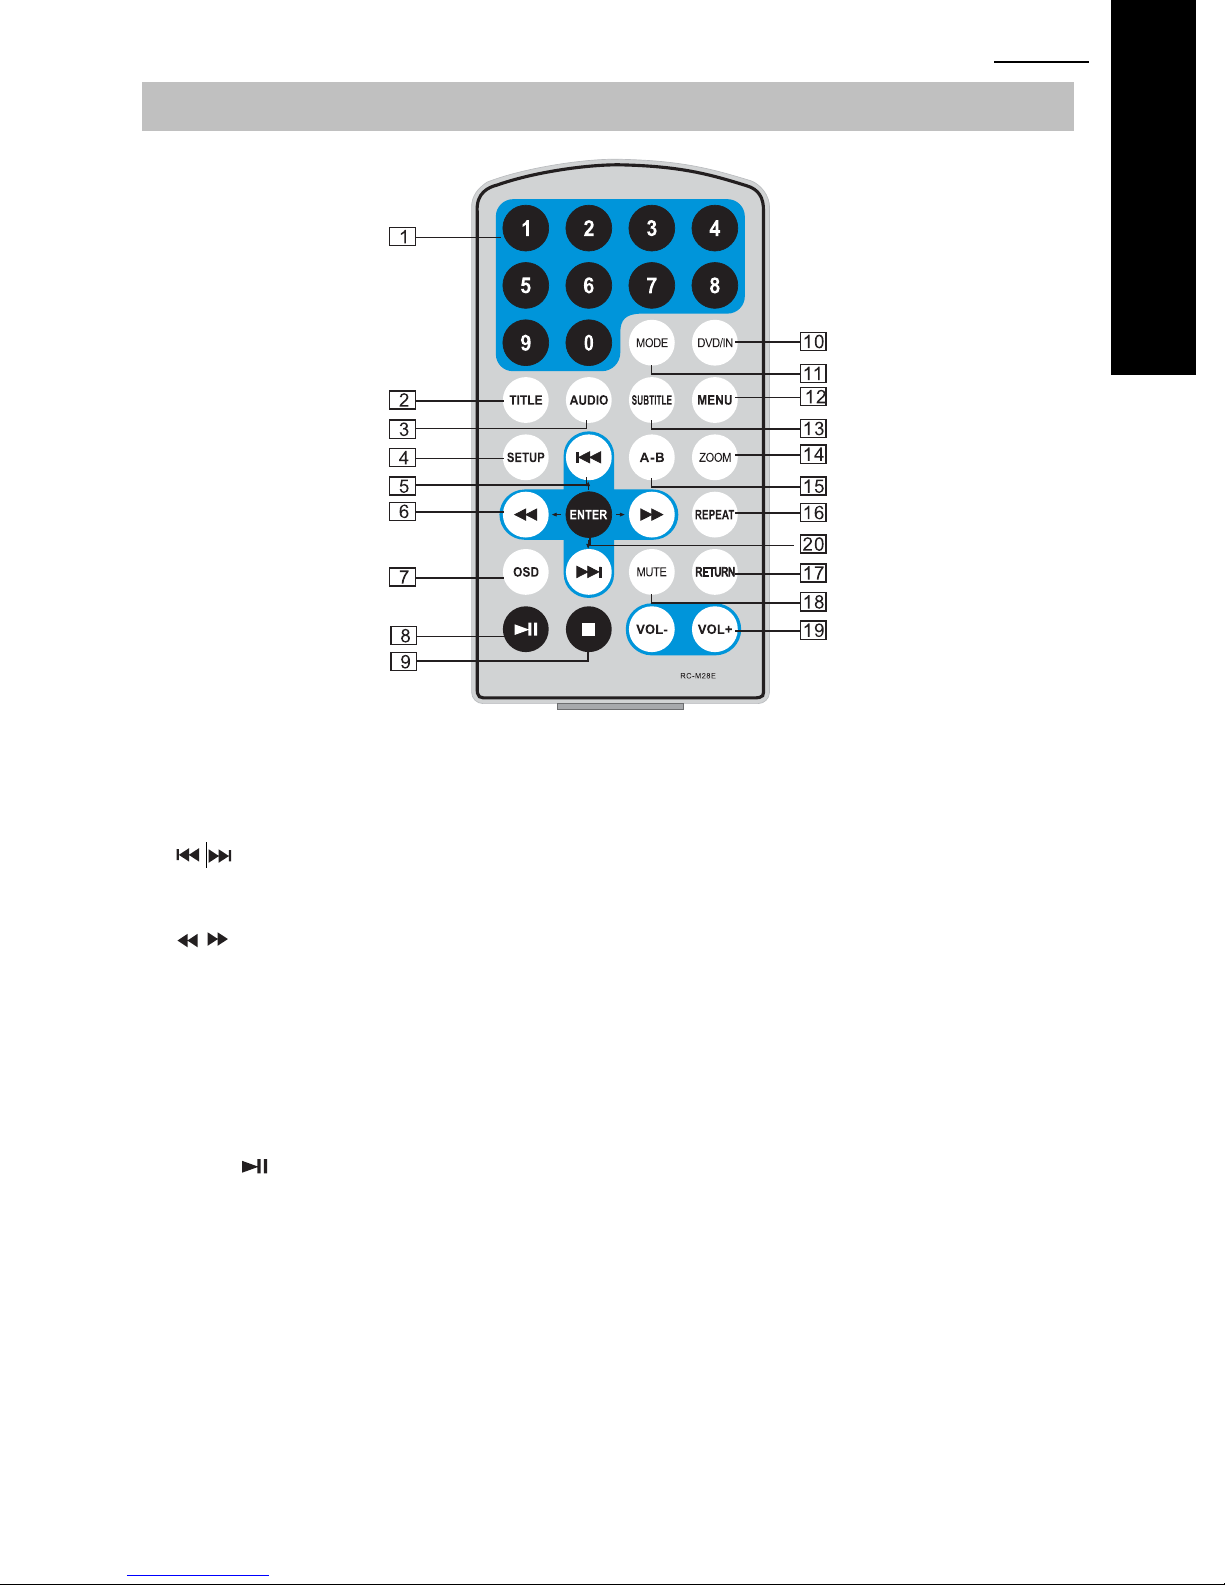
Remote Control Operation
ENG215
DVD
1. Number buttons
2. TITLE (To display title information)
3. AUDIO (To select audio language)
4. SETUP(To go to, or exit setup menu)
5. / buttons (To go to previous or next
chapter / track or scene during playback)
DOWN / UP when navigating menus
6.
/ buttons (To scan forward /backward
at 2,4,8,16 or 32 times speed)
LEFT / RIGHT when navigating menus
7. OSD - On Screen Display.
(To display disc information during playing
such as elapsed and remaining)
8. Play/Pause
9. Stop (Press once to stop playback, then
press
point where you stopped.
Press stop button twice to stop playback
completely.
to resume playback from the
10. DVD / IN (DVD playback or AV input
mode)
1 1. MODE (T o select the source of ei ther DVD
/ SD/MMC / USB)
12. Menu (To enter or exit DVD menu)
13. Subtitle (To select a subtitle language,
when playing a DVD disc)
14. ZOOM (To zoom in/out the image during
playback)
15. A-B (Repeat a specific portion from point
A to B. Press it again to cancel repeat
playback)
16. Repeat (To Repeat playing title, chapte r or
track)
17. Return (To return to the main menu)
18. MUTE (To mute / unmute the sound)
19. VOL+/- (To adjust the volume)
20. Enter (To confirm an entry )
Page 16

16 ENG
DVD
Use of the Remote Control
As supplied, a new battery is already fitted to the remote control. To activate, simply pull out the
isolating tab, where it says PULL.
To replace the battery in the remote control, see illustration below.
1) Push down tab.
2) Pull out tray
3) Insert battery with + to
the back
4) Refit
When using the remote control, make sure the remote is pointed to the infrared receiving
window of the DVD player (NOT the monitor). The distance between player and remote control
must be within 3 meters. Please see below.
Notices
1. Do not drop or step on the remote control or subject it to shock or liquid.
2. Do not expose the DVD player to direct sunlight or this may prevent the remote control from
working normally.
3. If the remote control stops working, replace the battery with a new one, type Cr2025.
4. With an SDV48-AM / SDV49-AM the remote control must be pointed at the DVD player, not
the monitor.
5. With an SDV48-AC / SDV49-AC there are two identi cal remote controls supplied, to simplify
matters. Just point the remote control at the specific DVD player to control it.
Page 17
ENG217
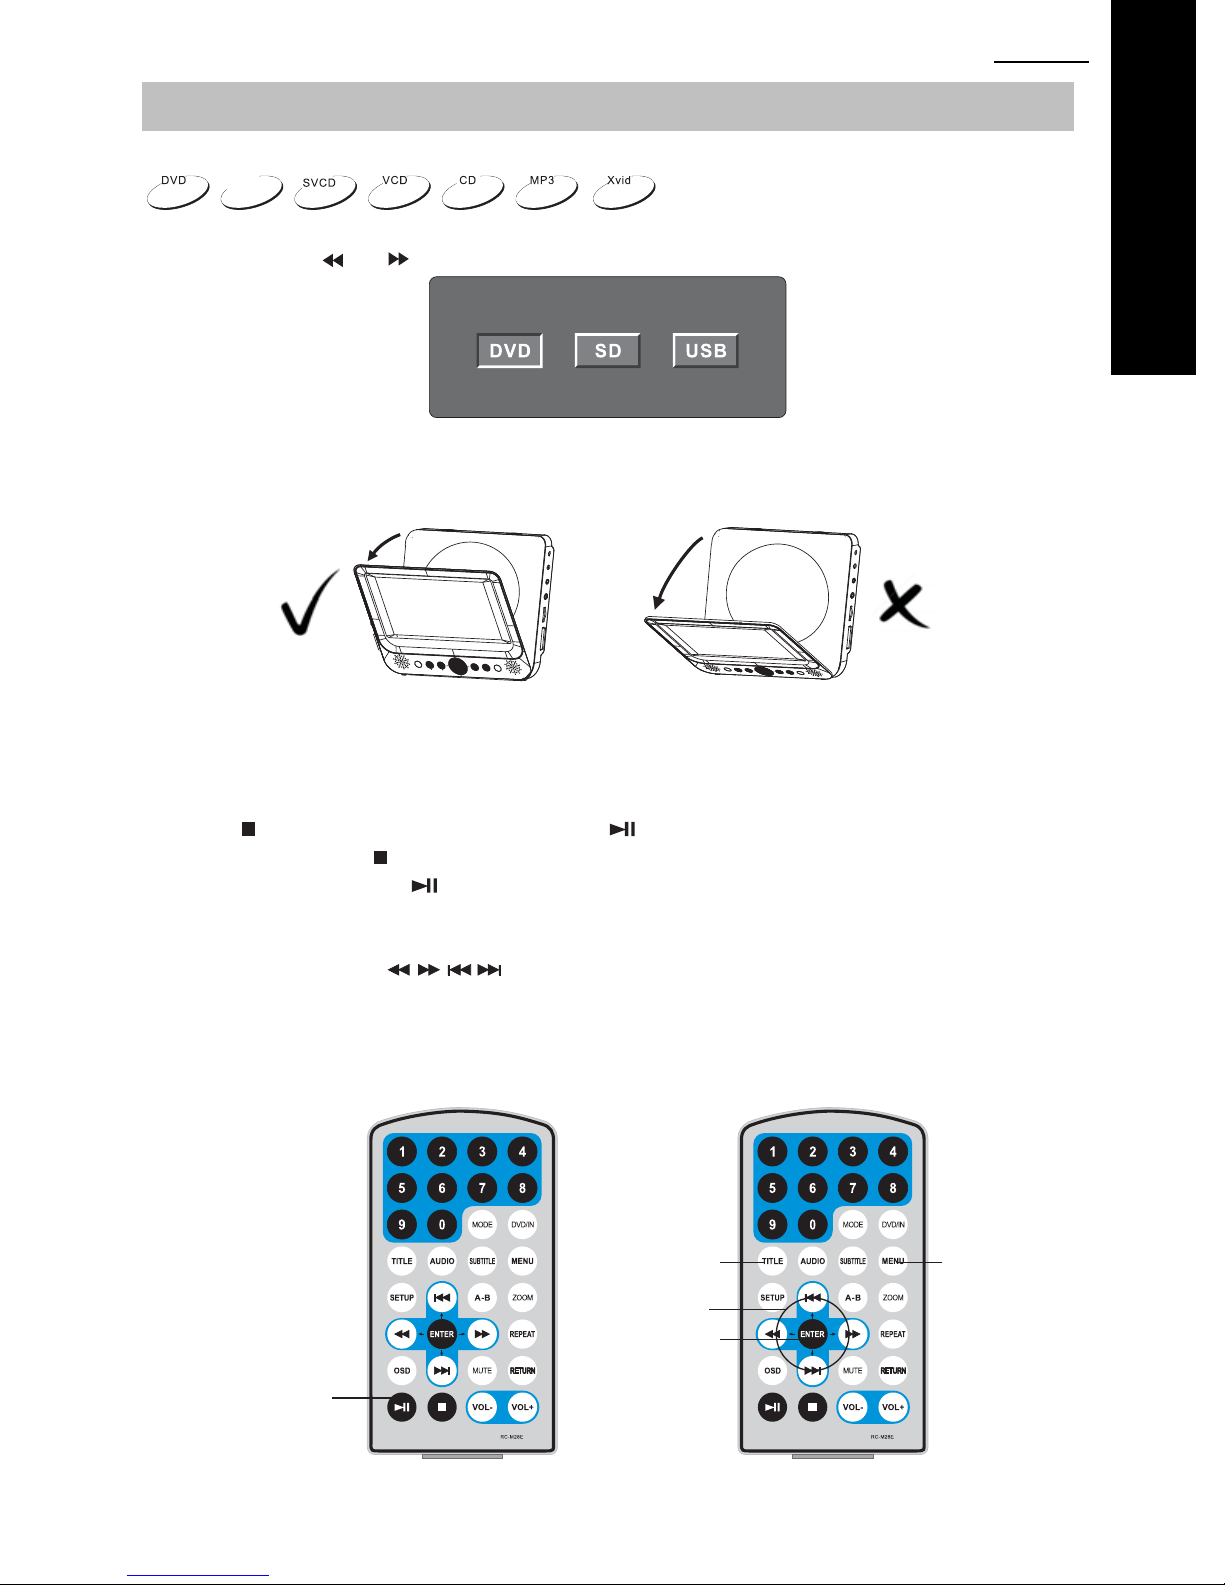
Basic Operation
Playback of Media from disc.
DivX
1. DVD mode is the default after power is switched ON, but can also be selected by pressing
MODE. Press
or to highlight DVD, then press OK.
2. Carefully Open the LCD screen and insert a disc on to the spindle with the label side facing
towards you.
Once the LCD screen is fully open, do not use force to open further
DVD
PLEASE NOTE:
Damage caused to the DVD player by opening the LCD screen beyond the design limit is not
covered under the manufacturers warranty.
3. Close the LCD screen. The player will load the disc and start playing.
4. Press once to stop playback; then press to resume playback from the point where
you stopped. Press
5. During playback, press
twice to stop playback completely.
to pause; press it again to resume playback.
6. When the playing is finished, please turn the power off by sliding the ON/OFF switch to OFF.
7. For some DVD discs with Title or Chapter menus, press the “MENU” button to enter the
menu page, and use
: Please do not disconnect USB devices or unplug SD/MMC cards whilst they are playing.
Note
to select. Press ENTER to confirm.
Functional failure may occur, with the possible loss of data from the USB stick or
SD/MMC card.
Menu
Play / Pause
Title
Navigation buttons
ENTER
Page 18
18 ENG
DVD
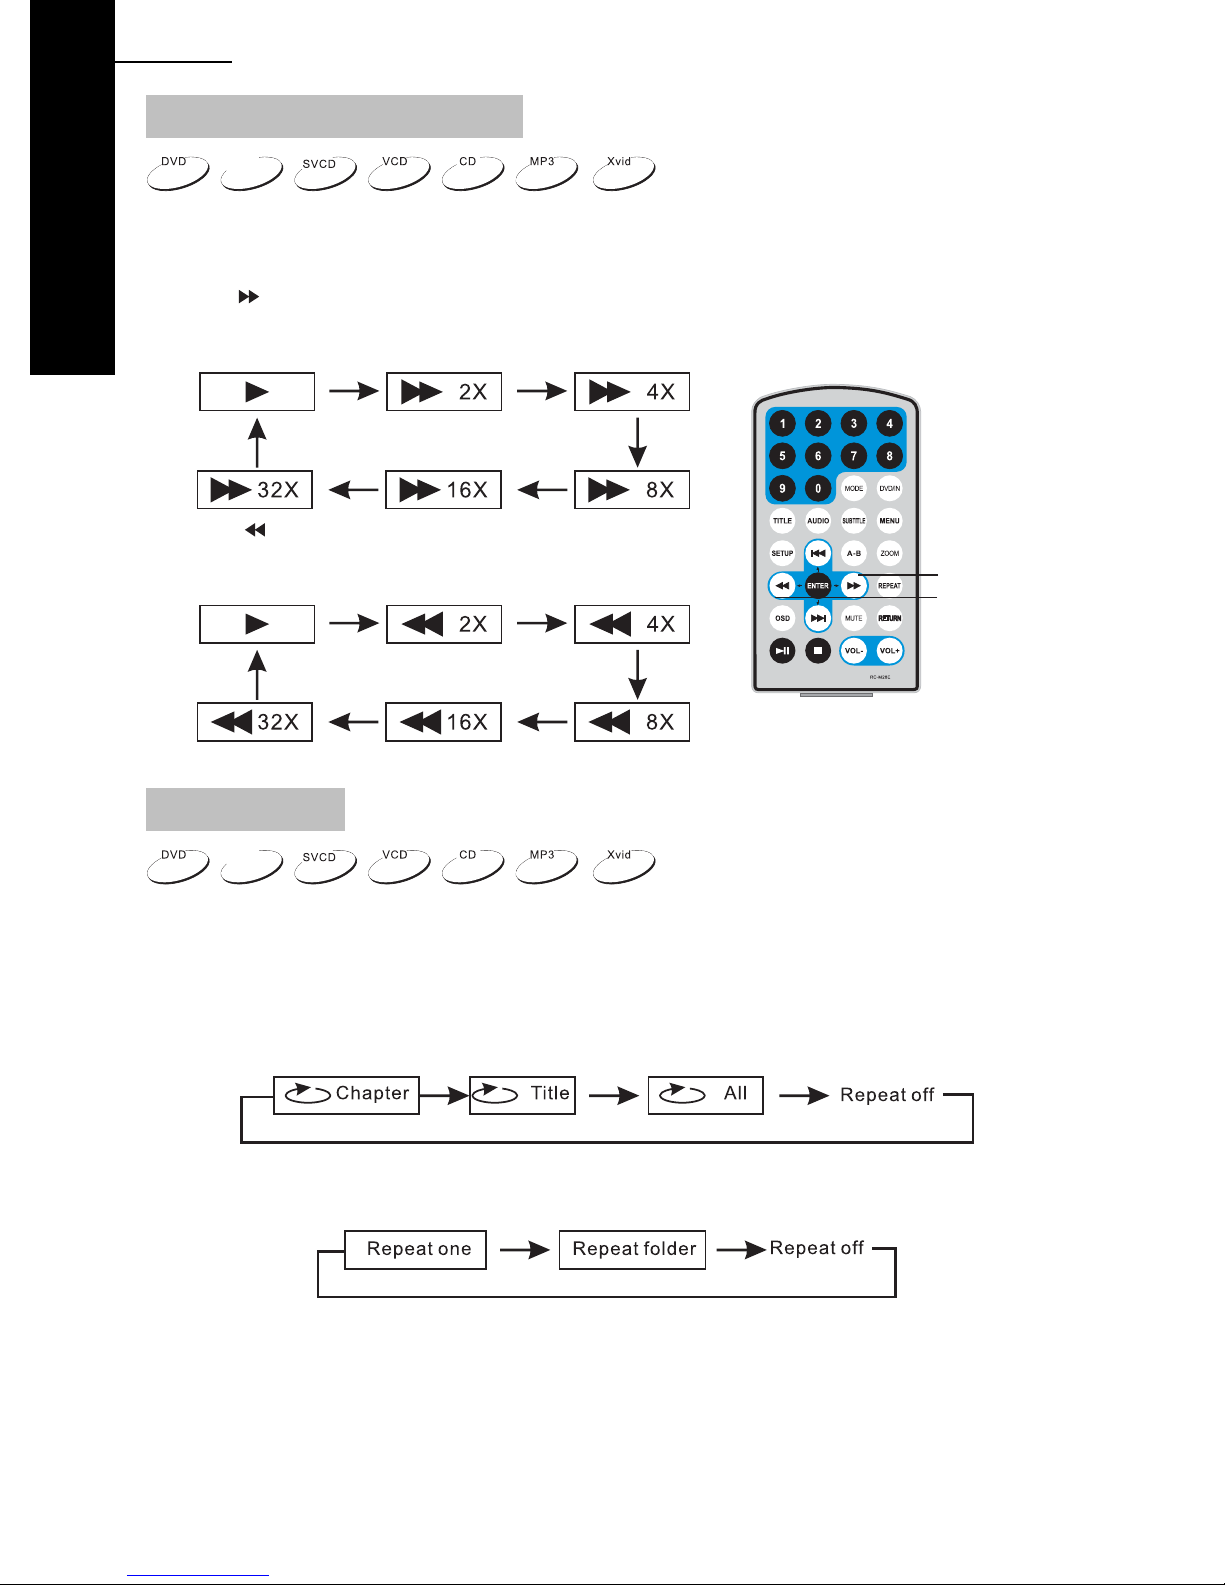
Fast forward and fast backward
DivX
During playback of media, the player can search forward or backwards.
1. Press
, the unit will search forward. Press it repeatedly, the unit will play at 2, 4, 8, 16, or
32 times speed.
2. Press
, the unit will search backward. Press it
repeatedly, the unit will reverse at 2, 4, 8, 16, or 32 times
speed.
Search forward
Search backward
Repeat playback
DivX
During playback of media you can repeat the playback of one chapter, title or the whole disc.
For a DVD disc, press the “REPEAT” button, you can repeat playing one Chapter; press it again
to repeat playing one Title; press it the third time to repeat playing the whole disc. Press it a
forth time to cancel repeat playback.
For MP3 files, press the “REPEAT” button to repeat playing the present file; press it again to
repeat playing the folder; press it the third time to cancel repeat playback.
Page 19
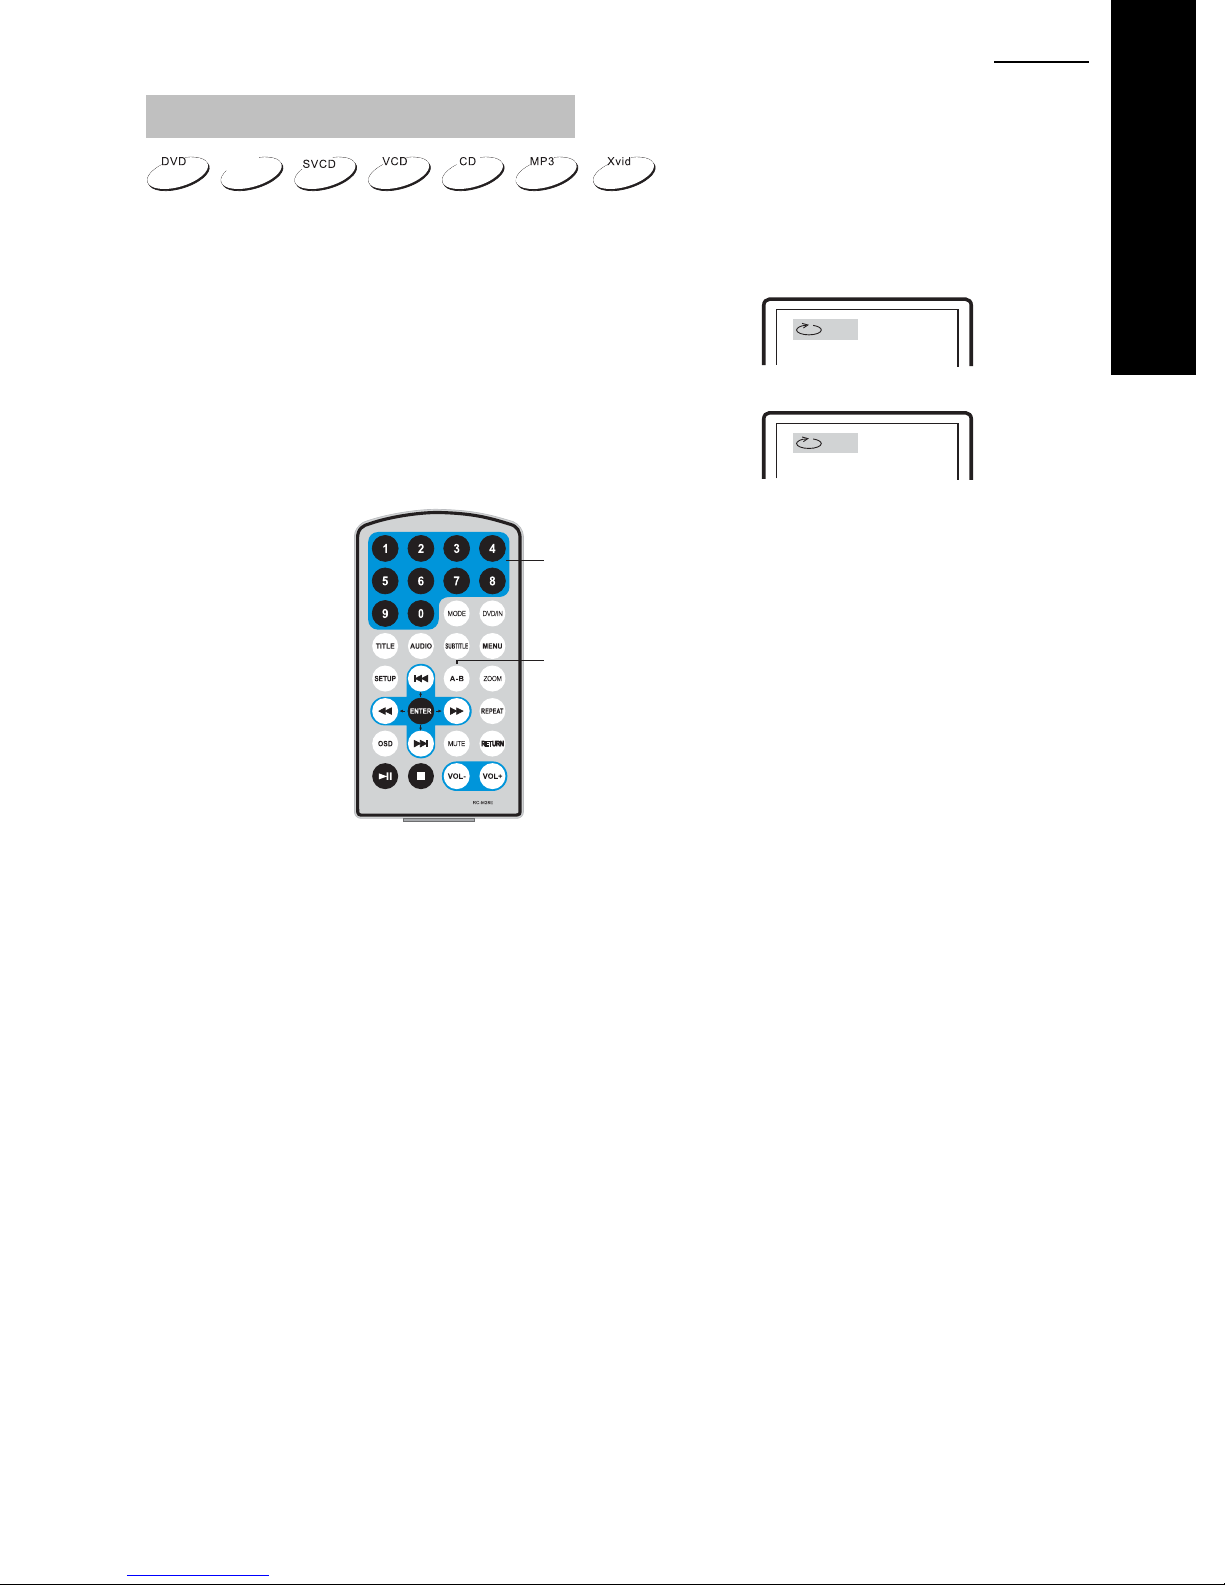
Repeat playback of a specific scene
ENG219
DivX
During playback, you can choose to repeatedly playback a specific section.
During playback, press “A-B” button at point A, the start.
Press “A-B” again at point B, the end point. The player will
A
automatically repeat playback of the part between A-B.
Press “A-B” a third time, the unit will then return to normal
playback.
AB
Number
A-B
DVD
Page 20
20 ENG
DVD
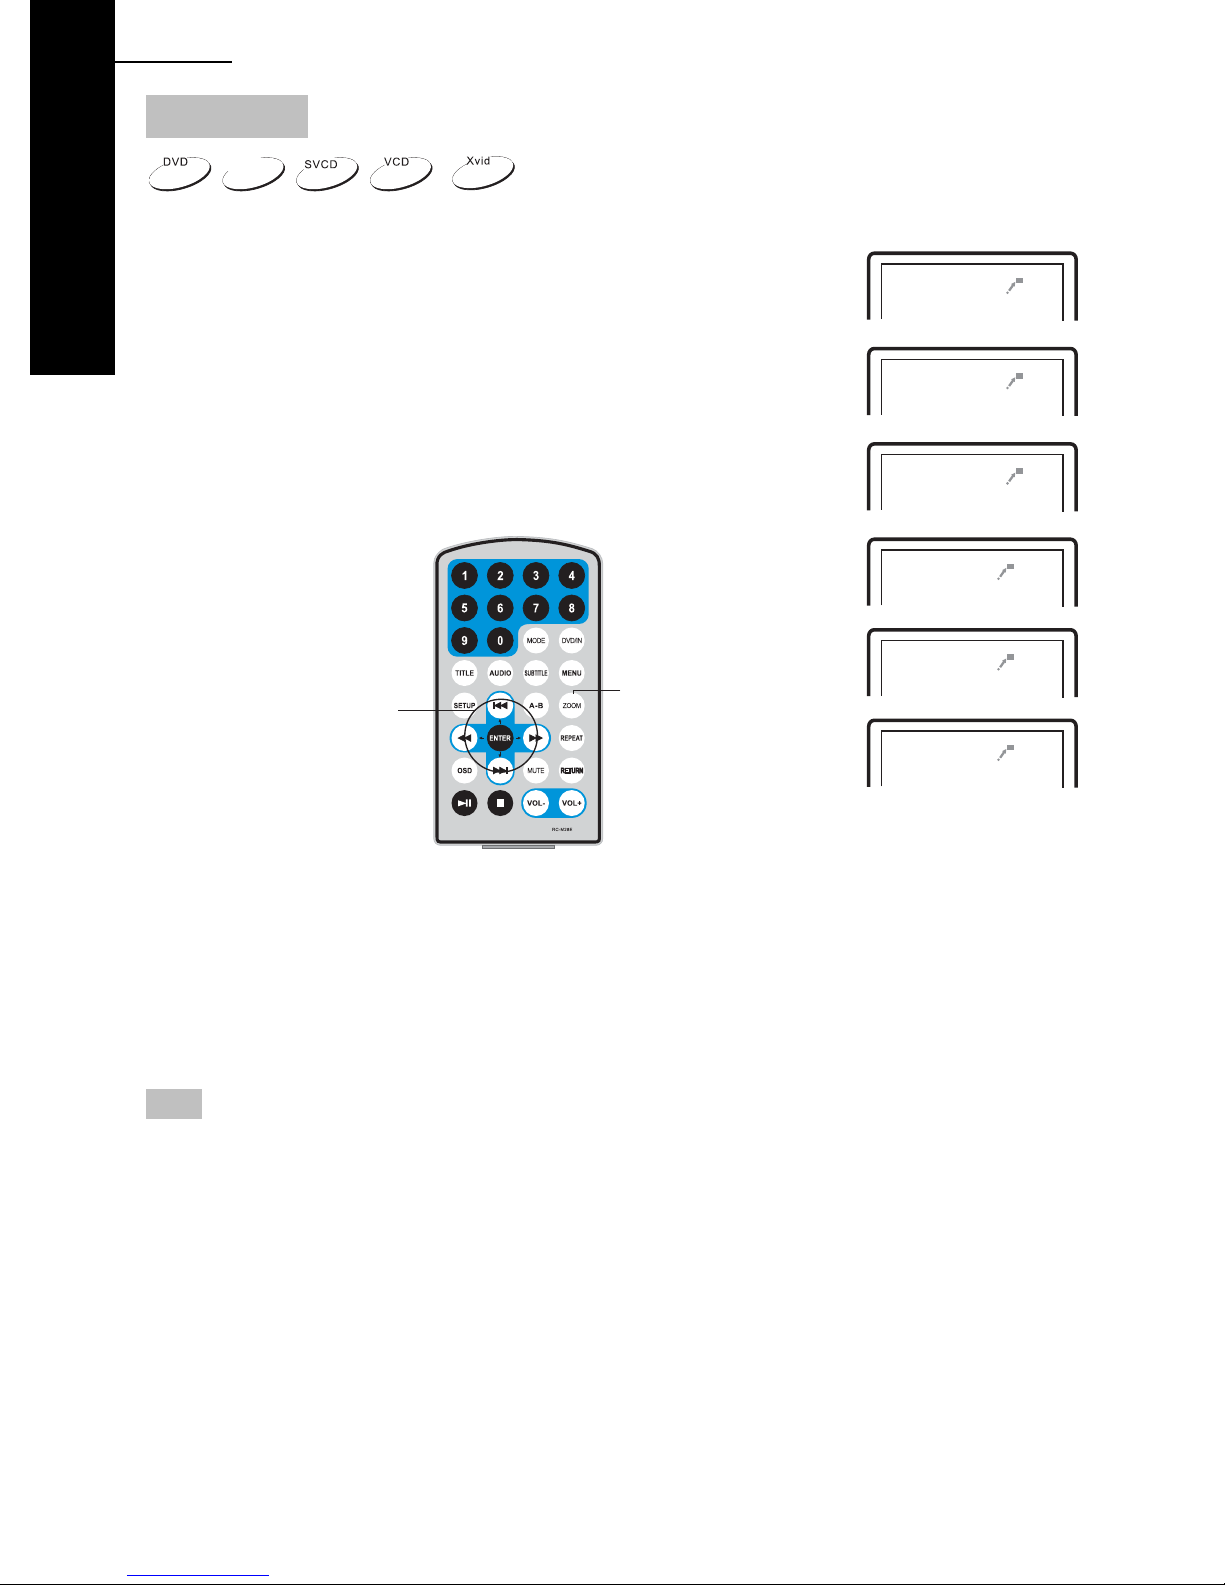
Zoom In / Out
DivX
During playback of movies, you can Zoom In or Zoom Out from the
image.
During playback, press the “Zoom” button, the image will be enlarged;
press it again the image will be enlarged again; press it fourth time, the
image will zoom out, press it repeatedly and the image will return to
normal status.
When the image is enlarged, user can press Up, Down, Left or Right to
move the image.
Up / Down / Left / Right
Navigation buttons
Zoom in / out
2X
3X
4X
1 /2X
1 /3X
1 /4X
ZOOM remains on-screen whenever this function is selected.
This is normal and NOT a defect. During the zoom function, the FFWD, REV, PREV and NEXT
do not work as the direction control is for the Up, Down, Left and Right position of the Zoomed
image. The ZOOM label remains on-screen to remind you of this fact.
Exit the zoom functi on to enable the no rmal FF WD, REV, PREV and NEXT functi on once again .
Note
You can however press the REPEAT button 4 times until “REPEAT OFF” is shown. This
removes the zoom magnification icon and has no other effect. Do not forget to press ZOOM to
restore normal viewing to operate the FFWD, REV, PREV and NEXT functions once again.
Page 21
ENG221
Photo display from disc
1. Place a disc into the player , containing photos in JP G form at. The play er will st art to read and
playback the photographs.
2. Press “MENU” to browse JPG files.
3. Press
Note: You can press MENU to return to the folder list. Press
file selected.
4. To rotate the picture counter-clockwise, press “
To rotate the picture clockwise, press “
5. Press the OSD button when viewing pictures, to select different transitions between photos,
as follows:
a. From top to bottom
b. From bottom to top
c. From left side to right side
d. From right side to left side
e. From left top to right bottom
f. From right top to left bottom
g. From left bottom to right top
h. From right bottom to left top
i. From horizontal center to both sides
j. From vertical center to both sides
k. From top and bottom to center.
l. From right and left to center.
m. From four window’s top side to bottom side.
n. From four window’s left side to right side.
o. From 4 edges to center.
to select a specific JPG file and press “ENTER” button to confirm viewing.
or “ENTER” to preview the
”.
”.
DVD
6. Whilst viewing files, “
During photo playback, these options are unavailable.
7. When viewing JPG files, press “
thumbnail mode, press UP, DOWN, LEFT, RIGHT and then “ENTER" button to select one
picture to view.
” may appear when pressing “Subtitle”, “Audio”, “A-B” or “Title” etc.
”, to stop and then the pictures will be displayed in
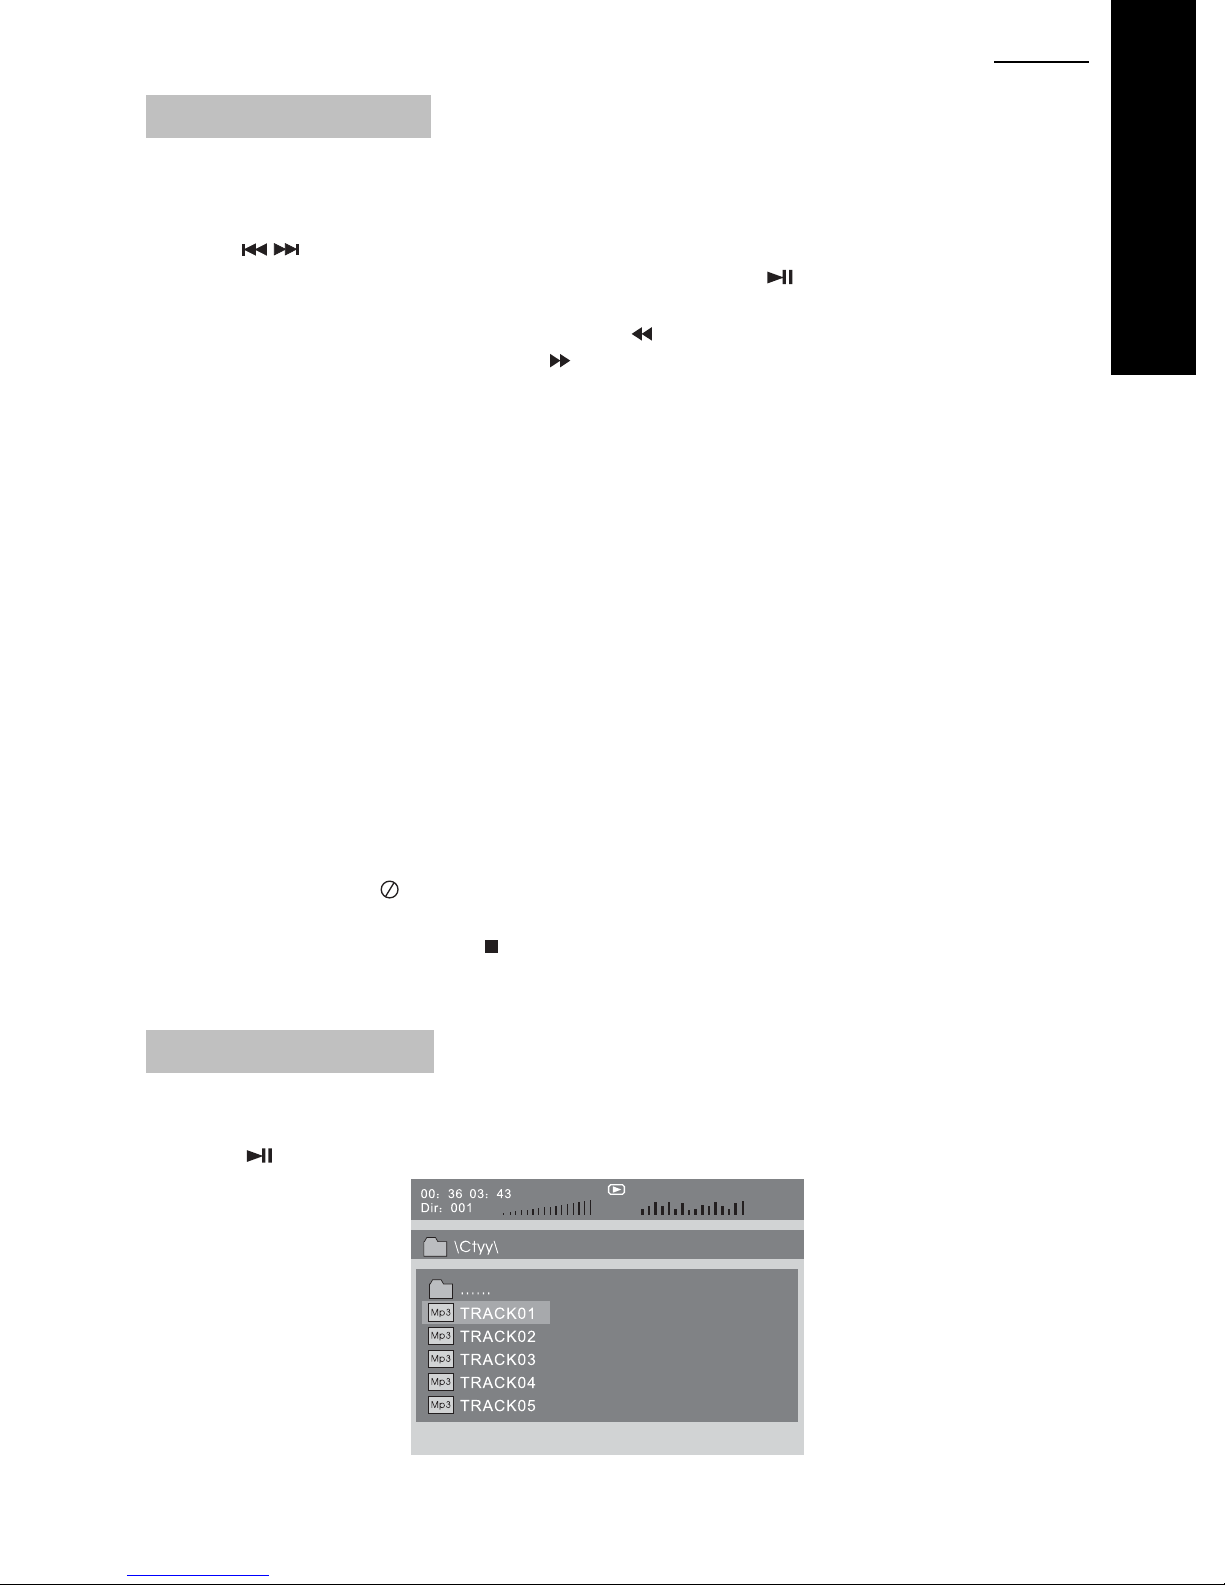
MP3 Playback from disc
1. Place a disc containing MP3 files in to the player.
Press UP, DOWN, LEFT, RIGHT to navigate and then “ENTER” to choose an MP3 file.
Press “
” or the “ENTER” button to play the file selected.
Page 22
22 ENG
DVD
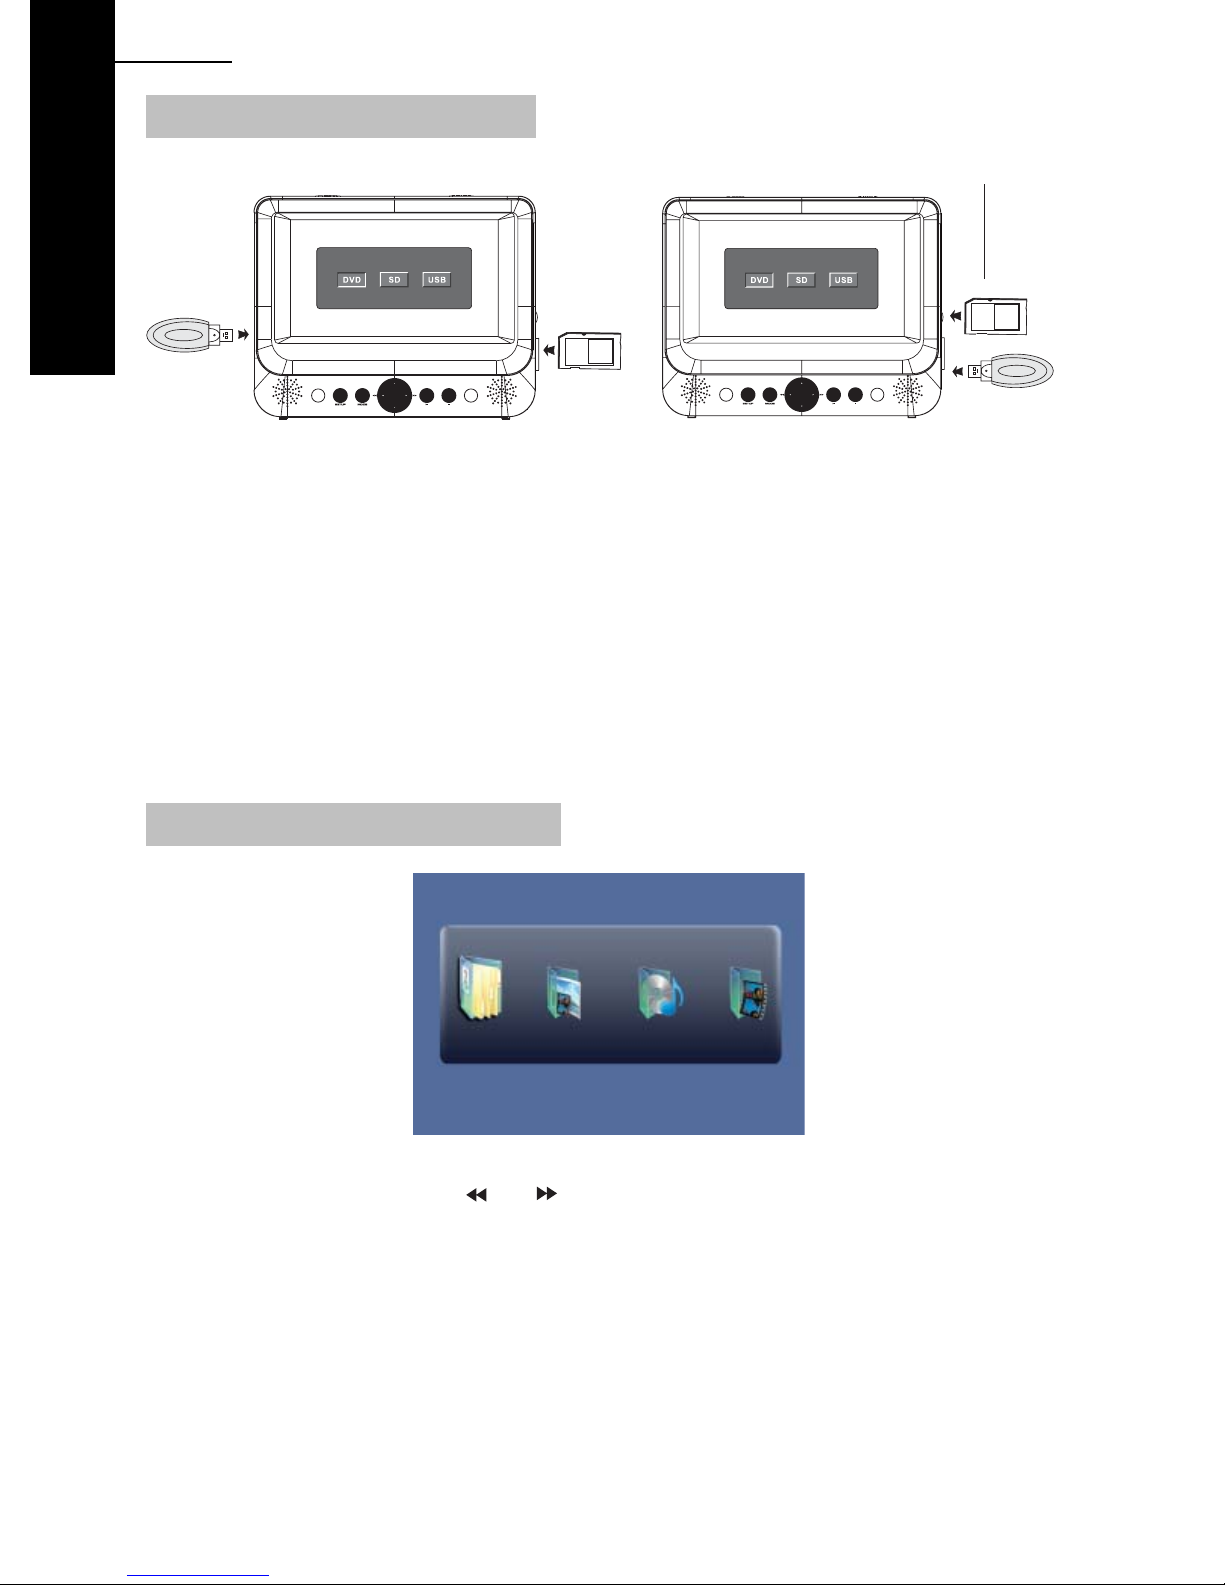
USB and SD/MMC card Playback
PUSH TO LATCH IN.
PUSH TO UNLA TCH.
(DO NOT PULL)
A
USB
SD/MMC
SDV48 series SDV49 series
1. In order to play a movie, show photos or play music tracks from a compatible memory
device, please insert as shown above.
2. Press “MODE” and highlight either SD/MMC or USB by using the Left / Right buttons, then
press “ENTER” to select.
NOTE:
1) The USB connector port is for direct connection of USB flash memory sticks only. It is NOT
for PC connection of for any external Hard Drive / alternative device connection.
2) USB sticks or SD/MMC cards must be formatted in FAT or FAT 32.
3) Whilst labeled SD/MMC for the card reading slot, MMC cards will also function perfectly well
also.
B
SD/MMC
USB
USB and SD/MMC Card Main Menu
After a few seconds, the player will show the Main Menu which includes 4 function icons.
You can select one by pressing “
” or “ ” and then press “ENTER” to confirm.
Page 23
ENG223
Browser Mode
DVD
Photo Mode
Music Mode
Movie Mode
For a detailed explanation of each mode, please see subsequent pages.
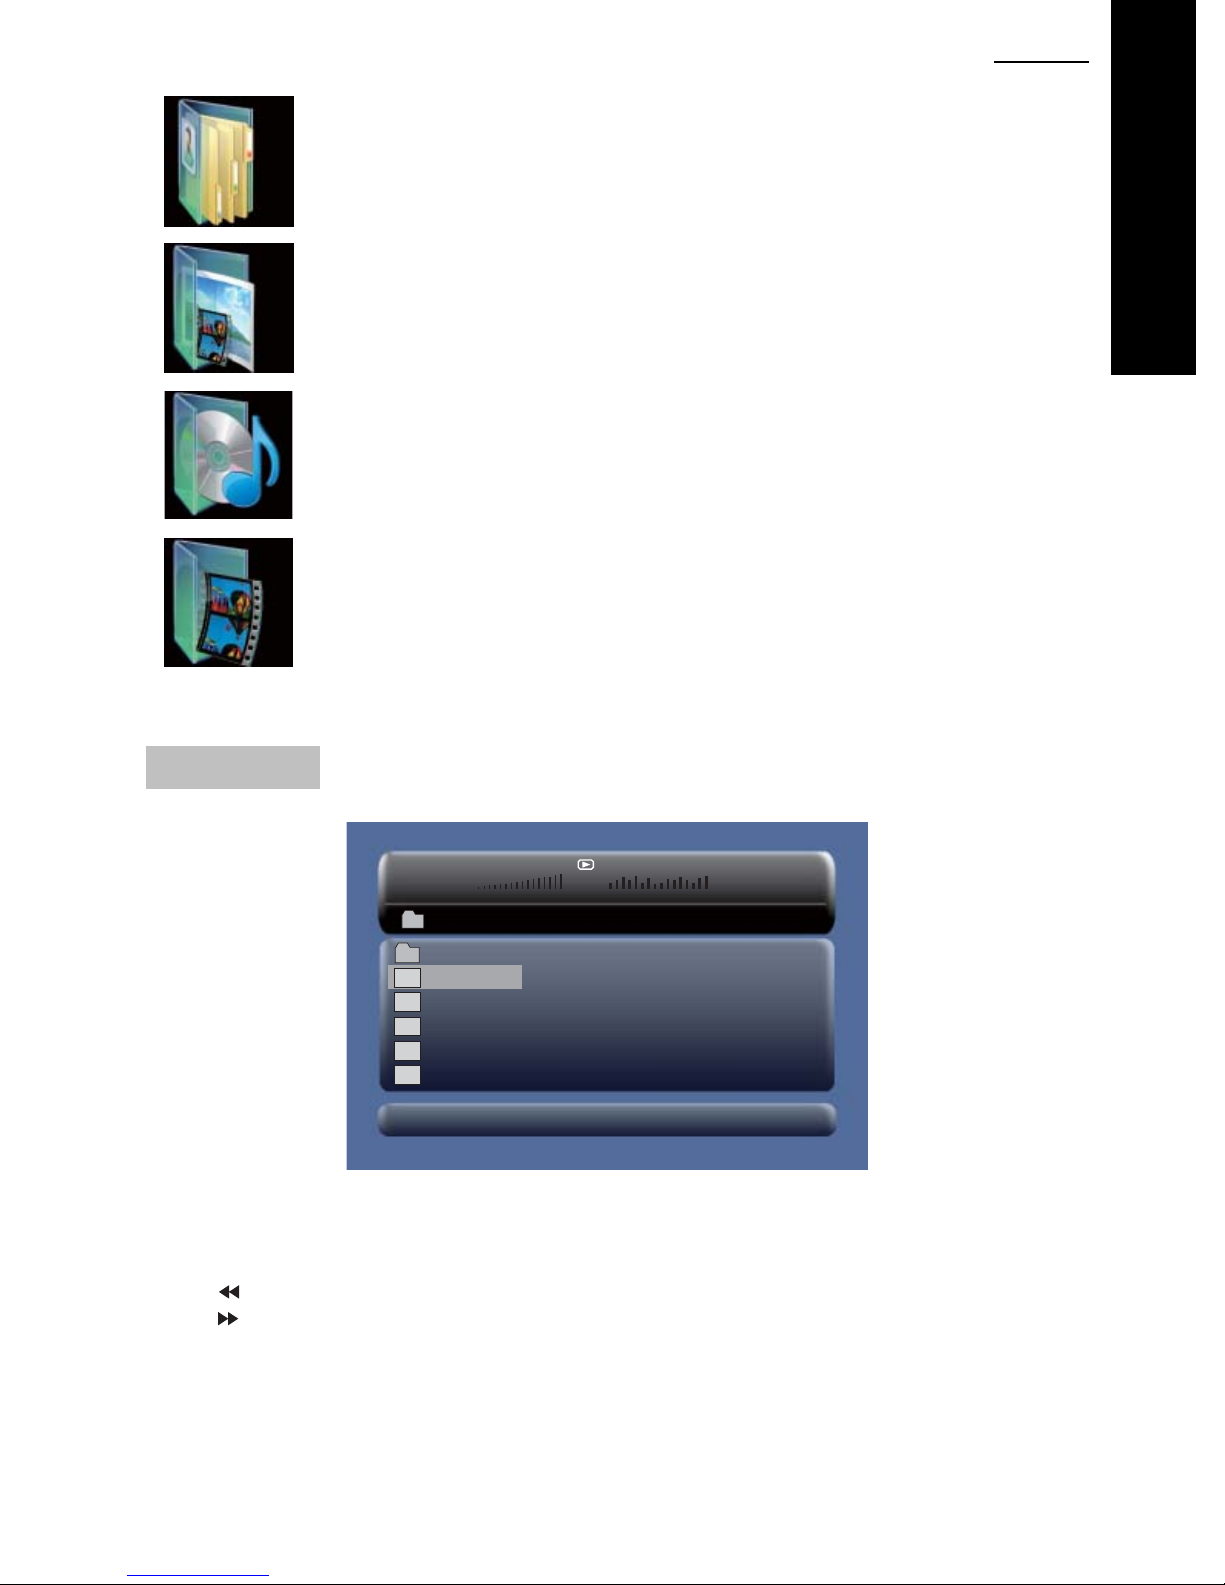
Browser Mode
00£00 03£43
001/008
\Ctyy\
......
Mp3
TRACK01
Mp3
TRACK02
Mp3
TRACK03
Mp3
TRACK04
Mp3
TRACK05
In the Browser Mode, the player will show the list of files and folders on the selected device
(SD/MMC or USB).
Press the Up, Down button to highlight the required file and press “ENTER” to play.
Press “
Press “
” to enter the folder.
” to exit the folder.
Note: If you want to return to the Main Menu, first, the sy stem must be disp laying the Li st of fi les
and folders, and then you can press the "RETURN" KEY to return to the Main Menu.
Page 24

24 ENG
DVD
Photo Mode
Slide Show Menu Prev Next
In the Photo Mode, the player will show the thumbnail view first.
Press Up, Down, Left, Right to select the desired photo then press “ENTER” to start the
slideshow from that point. Press “
From the thumbnail view, you can press Down, to move the cursor to the menu at the bottom of
the screen. This has four options.
Slide Show: Starts the slide show of the thumbnails shown
Menu: Options for the slide show (zoom, rotate etc)
Prev: Previous page of thumbnails
Next: Next page of thumbnails
When viewing the photos, there are a number of options available:
1. To rotate the picture counter-clockwise, press “
To rotate the picture clockwise, press “
2. Press the OSD button when viewing pictures, to select different transitions between photos,
as follows:
a. From top to bottom
b. From bottom to top
c. From left side to right side
d. From right side to left side
e. From left top to right bottom
f. From right top to left bottom
g. From left bottom to right top
h. From right bottom to left top
i. From horizontal center to both sides
j. From vertical center to both sides
k. From top and bottom to center.
l. From right and left to center.
m. From four window’s top side to bottom side.
n. From four window's left side to right side.
o. From 4 edges to center.
” to pause on any one specific photo.
”.
”.
3. Whilst viewing files, “
During photo playback, these options are unavailable.
4. When viewing photo files, press “
: If want to return the Main Menu, you can Press "Return" key in the thumbnail mode.
Note
” may appear when pressing “Subtitle”, “Audio”, “A-B” or “Title” etc.
” or "RETURN" key to return to the thumbnail mode.
Page 25

Music Mode
In Music Mode, the player will show the list of playable music files.
Press Up, Down to select the desired track and "ENTER", to play.
Press “
When stopped, press the Right or Left to highlight the lower menu options, as follows:
P- Page Up
P+ Page Down
/ ” to fast forward /backward the music during playback.
Play
ENG225
DVD
: Press “Return” Key to Return to the Main Menu.
Note
Movie Mode
In the Movie Mode, the player will show a list of playable Movie files, such as MP2, DivX etc.
Press Up, Down to select the desired movie and then “ENTER” to play.
When playing a movie you can press “MENU” or the “RETURN” Key to go back to the list of
playable movie files.
If you want to return to the Main Menu, Please Press the “Return” key when the list of movie
files is displayed.
NOTE:
For details upon playable movie formats and recommendations, see later in this manual.
Page 26

26 ENG
DVD
Movie compression formats
The use of the DivX encoder is recommended in order to compress movies and then play upon
this player . Whilst there are many movie formats and compression software available, most use
MPEG4 algorithms at their heart.
DivX is just one such MPEG4 compressor, but it is the most widely used and recognised by
Sony, Panasonic and other manufacturers.
This device is capable of DivX playback in order to provide a reliable and consistent playback
performance.
When using the official DivX encoder (download from www.DivX.com at a small charge) and
always use the “Home Theatre” option for optimum compression and suitable playback quality
upon the player. Maintain the 16:9 ratio for full screen viewing.
Use of other compression software, or the playback of other format files (such as Quick Time)
may have unreliable or unpredictable results and is not recommended.
Page 27

ENG227
CD Ripping
A basic CD ripping function is available upon the player, but the resultant tracks are simply
labelled.
Whilst playing a CD, you can en ter the CD Ripping fun ctio n, by pressing the “ SUBTITLE” button .
The player will be able to change the CD forma t into MP3 format and then store it in the inse rted
USB or SD/MMC card, in a folder entitled “CDA_RIP”.
After pressing “SUBTITLE”, this menu appears:
DVD
Speed
Bitrate
Device
Exit
Select all
Select none
Start:
During the ripping, you can select
NOTE
: Select the ripping speed: Normal or Fast.
: Select the bitrate. You have 6 choices 96, 112, 128, 192, 256 and 320Kbps
: This item indicates whether USB or SD/MMC is connected to the DVD player.
: Exits to the previous menu.
: Selects all the files on the disc for ripping.
: Deselects all the files on the disc.
Move the cursor to the item and press the “ENTER” button, the ripping starts and
shows the following screen:
CANCEL
: You can select individual tracks to rip to MP3. Use the Up, Down, Left, Right buttons to
highlight those desired tracks and press “ENTER” to select.
Press “START” to initiate the ri pping proces s of those selected tracks.
to stop the process.
Page 28

28 ENG
DVD
System Setup
General Setup Page
Last Memory ON
Press the “Setup” button. The Main Page will be
displayed on the screen.
Navigate using the Up, Down, Left, Right buttons
and press “ENTER” to select.
Press Right to access.
Press Left to exit.
TV display:
User selectable screen display format s
(Normal / PS, Normal / LB, Wide)
Default is “Wide”
Note:
y The function depends on the display ratio in which
the DVD disc is recorded.
y Please choose “Wide(16:9)” when using a16:9
wide screen external TV set
Last Memory ON
Last Memory ON
Last Memory ON
Angle Mark:
Enter this option to set the angle during playback.
Optional setting: ON, OFF
Default is: ON
OSD Language:
In this option you can set the OSD menu language
(English, French, German, Italian).
Default: English
Screen Saver:
Enter this option to set whether to activate the screen
saver function.
Optional setting: ON, OFF.
Default is ON.
Page 29

Video Setup Page
ENG229
AV-OUT Settings
Screen Settings
AV-OUT Settings
Screen Settings
AV-OUT Settings
Screen Settings
TV Type:
Enter this option to select TV type (PAL, NTSC)
The default is PAL.
Set the Video Quality upon the AV OUT or Additional
Monitor in the case of SDV48-AM / SDV49-AM
Settings of Brightness, Contrast, Hue and Saturation.
Set the Video Quality upon the integral screen of the
Master DVD player.
Settings of Brightness, Contrast, Hue and Saturation.
DVD
Preference Setup Page
Audio
:
You can select your preferred audio language for
DVDs.
(English, French, German, Italian)
Default is English
The audio language depends upon the information
available upon each disc.
You can also change the audio language during
playback by pressing the “AUDIO” button.
Subtitle
Select your preferred language to show the subtitles
upon the screen.
(English, French, German, Italian, Off)
The default is OFF
The subtitle languages depends upon the information
available on each disc.
You can also change the subtitle language during
playback by pressing the “SUBTITLE” button.
Page 30

30 ENG
DVD
Disc Menu:
This function allows you to choose the menu
language from the DVD disc.
Default is English.
The disc menu language depends upon the
information available upon each disc.
Parental:
Enter this option to set the parental control level, to
prevent unsuitable disc scenes being watched by
children.
Optional parental control lev els: K ID SAFE, G, PG, PG
13, PGR, R, NC17, ADULT.
The default of this option is ADULT.
The default password: 8888.
Default:
Select this item and press the “ENTER” button to
reset all settings to the original factory settings.
This includes reset of the region setting to
multiregional.
Page 31

Specification
Compatible disc: DVD / VCD / CD / MP3 / DIVX / DVD±R / DVD±RW
Signal system: PAL/NTSC
Panel size: SDV48 series: 7"
SDV49 series: 9"
Panel resolution: SDV48 series: 480 x 234 RGB
SDV49 series: 640 x 234 RGB
Frequency response: 20 Hz to 20 kHz
Video output: 1 Vp-p/75 Ohm, unbalanced (Composite video)
Audio output: 1.4Vrms/10kOhm (Stereo Audio)
Audio S/N: Better than 80 dB
Dynamic range: Better than 85 dB
Laser: Semiconductor Laser, Wave Length: 650 mm/795 mm
Power source: DC 9-12V
Mains adaptor:
Input: 100-240V 50-60Hz
Output: 9VDC 1A
Car adaptor:
Input: 12V (not for use with 24V systems)
Fuse Type: SDV48–A / SDV49-A & SDV48–AM / SDV49-AM
Fuse Ty pe: SDV48-AC / SDV49-AC
Battery:
Type: Lithium Polymer
Capacity: SDV48 series: 850mAh
SDV49 series:1000mAh
Voltage: 7.4V
Power consumption: <10W for all model types
Remote Control Battery:
Type: CR2025
USB stick: Max. size 8GB, formatted FAT or FAT32
SD/MMC card: Max. size 8GB, formatted FAT or FAT32
Operating temperature: 0~40°C
Storage temperature: 0~50°C
Dimensions:
DVD Player: SDV48 Series: 212 x 167 x 40 mm
SDV49 Series: 245 x 190 x 42 mm
Monitor: SDV48 Series: 212 x 167 x 25 mm
SDV49 Series: 245 x 190 x 30 mm
Weight:
DVD Player: SDV48 Series: 0.70Kg
SDV49 Series: 0.91Kg
Monitor: SDV48 Series: 0.35Kg
SDV49 Series: 0.52Kg
ENG231
DVD
Page 32

32 ENG
DVD
Internal Battery
The DVD Player incorporates an integral Lithium Polymer battery for high performance and
optimum playback times. The battery has no memory effect and be charged safely, regardless
of whether the battery is fully or partially discharged.
Playback time is approximately 2 hours after a full battery charge, when used under normal
operating conditions.
Battery Charging
Connect the DVD player to the supplied power supply (either the AC Adaptor or 12V Car
Adaptor) and switch the Player to OFF/CHARGE.
If the player is turned on, then charging stops, but playback will continue from the external
power source and NOT drain the battery.
Always unplug from the AC Adaptor or Car Adaptor once charging is complete.
LED Indicator light
Green / Red flashing = player is checking battery level
Red = charging
Green = fully charged
Blue = Power on
Battery Replacement
The integral battery is not user replaceable once exhausted (approx. 300 charging cycles).
Please contact your NEXTBASE Authorised Service Centre for a replacement battery to be
fitted by a qualified engineer.
Low Battery Warning
A low battery warning will appear on-screen when the battery is nearly exhausted.
Please connect the supplied power source (car power cable or mains adaptor) at this time to
either continue using the player, or recharge the battery.
Caution: Danger of explosion if battery is incorrectly replaced. Replace only with the same or
equivalent type.
battery charge time paragraph
Charge time for a fully discharged battery is approximately:
SDV48 1.25 to 1.75 hours
SDV49 2.15 to 2.30 hours
Page 33

ENG233
Battery Recycling
In accordance with Directive 2006/66/EC of the European Parliament of the of the council of
September 2006 on batteries and accumulators and waste batteries and accumulators:
Disposal of waste batteries (applicable in the European Union and other countries
with separate collection systems).
This symbol on the battery or on the packaging indicates that the battery provided
with this product shall not be treated as household waste.
On certain batteries this symbol might be used in combination with a chemical symbol. The
chemical symbols for mercury (Hg) or lead (Pb) are added if the battery contains more than
0.0005% mercury or 0.004% lead.
By ensuring these batteries are disposed of correctly, you will help prevent potentially negative
consequences for the environment and human health which could otherwise be caused by
inappropriate waste handling of the battery. The recycling of these materials will help converse
natural resources.
In case of products that for safety, performance or data integrity reasons require a permanent
connection with an incorporated battery, this battery should be replaced by qualified service
staff only.
To ensure that the battery will be treated properly, hand over the product at end-of-life to the
applicable collection point for the recycling of electrical and electronic equipment.
For all other batteries, please view the section on how to remove the battery from the product
safely. Hand the battery over to the applicable collection point for recycling of waste batteries.
For more detailed information about recycling of this product or batteries, please contact your
local Civic Office, your household waste disposal service, place of purchase or an Authorized
Nextbase Service Centre.
DVD
Page 34

34 ENG
DVD
Smashed Screen Identification
A Liquid Crystal Display (LCD) Screen is a multilayer component.
Under the tougher outer plastic layer, the glass sandwich beneath holds the LCD crystals in
place, which are themselves suspended in fluid. In the unfortunate event of an accident,
particularly a sharp localized impact, the glass will break. the tough plastic outer sheet on the
surface of the glass keeps all the glass intact underneath preventing the shards from falling out.
This is a specific safety feature particularly implemented for the younger users and also in-car
use.
The broken glass normally show s signs of the impact mark and also cracks radiating away. The
resultant fluid leakage renders the panel inoperable.
Symptoms are often a dark round mark, a white screen without picture and maybe some
multi-coloured lines. Depending on the individual break, an element of the TV picture may
remain for a while but not for long, a s the fl uid leaks aw ay. Some inky black staining may appear
beneath the plastic layer upon the crack lines, as the fluid escapes.
Unfortunately a break of this nature is not covered under the manufacturers warranty as it is
accidental damage to the product. Rather than an original defect from manufacture.
Please see below for some sample images of broken LCD panels for reference.
Replacement panels can however be installed by a qualified NEXTBASE Approved engineer.
A
B
A
B
Pixel Failure Statement
This product incorporates an LCD screen of 480 x 3 x 234 pix els or 640 x 3 x 234 pixels, to ta ling
336,960 pixels or 449,280 pixels in total.
Pixels can fail during normal pro duct life, one pix el equate s to a 0.0003% / 0 .0002% failu re rate .
One pixel failure per year of operation is considered normal and not a cause for concern or
warrantable.
Page 35

ENG235
Troubleshooting
Problem Solution
No sound or distorted sound Turn the volume UP on both the remote control AND the
volume wheel on the side of the player (and monitor).
Ensure that the MUTE key has not been pressed. If using
an SDV48-AC / SDV49-AC make sure that the
interconnection cable is NOT fitted if watching different
movies on the 2 screens.
Can’t advance through a movie You can’t advance through the opening credits and
copyright warnings at the beginning of a movie as the disk
is programmed to prevent this.
The icon appears on screen The requested operation is not allowed or available at this
time.
DVD
The picture is pixelated or distorted The disc may be damaged or dirty.
Clean the disc or change to another one.
The disc will not play The disc may be damaged or dirty.
Clean the disc or change to another one.
Poor playback may be caused by dirt on the la ser lens, u se
a clean, dry cotton bud (add pure alcohol sparingly if
available) and wipe across the lens VERY gently, the lens
is held by spring suspension, so be very gentle.
No sound from the speakers Check the player by using headphones. If these are
working normally then the headphone connector is
damaged and needs repairing.
Remote control doesn’t work Remove the battery isolating tape from original delivery.
Approach player more closely or remove any obstructions.
Replace battery for new. Type CR2025.
No picture Check that the screen is closed firmly.
Check the broken screen identification information.
Lines on the screen Check the broken screen identification page. Any
Check the DV/IN button has the DVD option chosen.
permanent diagonal lines are indication of breakage. The
screen glass does NOT fall out, as this is a safety feature.
Page 36

36 ENG
DVD
USB media will not play Video, Music and Photo’s may not be of the correct format.
SD/MMC Card media will not play Video, Music and Photo’s may not be of the correct format.
DVD player will not work Turn Power switch to ON. Battery may be exhausted.
Problem Solution
Ensure that any video recording is an official DivX type.
(See earlier in manual) Music, MP3 and Photo JPEG
formats.
Use only USB sticks plugged directly to the USB socket
and formatted in FAT 32.
Check media device is not damaged.
Ensure that any video recording is an official DivX type.
(See earlier in manual) Music, MP3 and Photo JPEG
formats.
Check SD/MMC card is inserted correctly and is not
damaged.
Connect the car adaptor or AC adaptor to DC-IN socket.
Check the player LED indicator illuminates to show player
is receiving power. If the player LED indicators do not
illuminate then check cables for damage and correct
connection.
Check the fuse in the car adaptor (see earlier section of the
manual). Re-check by using the domestic mains adaptor.
Monitor will not work Turn Power switch to ON. There is no battery in the
monitor, so ensure that the external 12Vdc supply is
working, by plugging directly to the monitor DC-IN socket.
If working, check power supply cables for damage and
correct connection.
Check the fuse in the car adaptor (see earlier section of the
manual). Re-check by using the domestic mains adaptor.
Monitor shows no audio or video
image
Check the AV connection cable between DVD player and
monitor is connected correctly and plugs are fully inserted.
Check for power to the monitor, see earlier section.
Second screen in a SDV48-AC /
SDV49-AC system does not show
the image from the other DVD
player
Press the DVD / IN button on the remote control to enable
this feature.
Page 37

ENG237
Problem Solution
Battery will not charge Ensure the main power switch is set to OFF / CHARGE
and an external power supply is correctly connected.
Check the GREEN / RED battery indicator on the player
illuminates. If the problem persists then a battery fault may
be present, contact the NEXTBASE Authorised Service
Centre.
DVD
Player runs on battery, but for a
short time only
Player will not play a DVD and
shows “Wrong Region.”
ZOOM remains on-screen
whenever this function is selected.
Fully discharge the battery.
Recharge fully by connection to power supply and setting
power switch to OFF / CHARGE position. Wait until
GREEN charge indicator illuminates.
Battery is exhausted; contact the NEXTBASE Authorised
Service Centre.
The region code of the disc inserted does not match the
authorised region of the player.
Perform a RESET to the default settings, to reset the DVD
player to multiregional. See the SETUP section of this
manual under PREFERENCES and then RESET to the
default settings.
This is normal and NOT a defect. During the zoom
function, the FFWD, REV, PREV and NEXT do not work as
the control is for the Up, Down, Left and Right Position of
the Zoomed image. The ZOOM label remains on-screen to
remind you of this fact. Exit the zoom function to enabl e the
normal FFWD, REV, Prev and NEXT function once again.
Page 38

Page 39

SDV48-A
SDV48-AM
SDV48-AC
SDV49-A
SDV49-AM
SDV49-AC
Tragbarer 7- & 9-Zoll DVD-Player
Bedienungsanleitung
Page 40

Inhalt
Sicherheitshinweise...................................................................................................1
Lieferumfang..............................................................................................................2
Bedienelemente.........................................................................................................3
Systemanschluss.......................................................................................................4
Fahrzeuginstallation...................................................................................................9
Fernbedienung.........................................................................................................12
Allgemeine Bedienungshinweise.............................................................................15
Systemeinstellungen................................................................................................26
Spezifikationen.........................................................................................................29
Integrierter Akku.......................................................................................................30
Störungserkennung..................................................................................................33
Diese Bedienungsanleitung gilt für folgende Modelle:
1) SDV48-A / SDV49-A Einzel-DVD-Player.
2) SDV48-AM / SDV49-AM Einzel-DVD-Player + Monitor.
3) SDV48-AC / SDV49-AC Doppel-DVD-Player.
Die Modellnummer Ihres Produkts ist sichtbar auf der Verpackung verzeichnet.
Page 41

D
E0
1
Sicherheitshinweise
Vielen Dank, dass Sie sich für einen SDV48/SDV49 tragbaren DVD-Player entschieden haben.
Dieses Gerät ist mit der neuesten Elektronik ausgestattet und ist für die Benu tzung zuhause , im
Hotel und Büro ausgelegt. Das komp akte Format erl eicht ert die Mitnahme . B itte le sen Sie diese
Anleitung aufmerksam durch und bewahren Sie sie für späteres Nachschlagen auf.
DVD
LASER
Typ
Wellenlänge
Ausgangsleistung
Strahldivergenz
Warnung: Zur Vermeidung von Feuer und Stromschlag setzen Sie den Player nicht Regen oder
Feuchtigkeit aus.
1. Bitte lesen Sie diese Bedienungsanleitung aufmerksam durch und befolgen Sie alle
Hinweise für einen sicheren Betrieb des Players und seiner Zubehörteile.
2. Benutzen Sie den Player nicht in unmittelbarer Nähe von Wasser. Stellen Sie keine mit
Wasser gefüllten Gegenstände (wie Vasen) auf dem Gerät ab.
3. Stellen Sie das Gerät nicht in unmittelbarer Nähe von Wärmequellen wie Heizungen,
Heizkörpern, Öfen oder sonstigen Wärme abgebenden Geräten (wie Verstärker) auf.
4. Während eines Gewitters und bei längerer Nichtbenutzung ziehen Sie bitte den Netzstecker .
5. Reinigung: Ziehen Sie den Netzstecker und reinigen Sie den Player nur mit einem trockenen
Tuch. Benutzen Sie keine Flüssigreiniger oder sonstigen Reinigungsmittel.
6. Benutzen Sie nur vom Hersteller empfohlenes Zubehör.
7. Wenden Sie sich mit Reparaturen an den NEXTBASE Kundendienst. Eine Wartung ist
notwendig, wenn Gerät, Netzkabel oder Stecker beschädigt sind, Flüssigkeiten oder
Fremdkörper in das Gerät eingedrungen sind, das Gerät Feuchtigkeit ausgesetzt war oder
nicht wie gewöhnlich funktioniert. Bitte versuchen Sie nicht, den Player selbst zu reparieren,
damit setzen Sie sich Hochspannung und Stromschlag aus.
8. Benutzen Sie keine ungewöhnlich geformten Discs (Herz- oder Sternform usw.), das kann zu
Fehlfunktionen führen.
Halbleiter-Laser GaAIAs
650 nm/780 nm
5 mW
60°
BESONDERE HINWEISE ZUR BENUTZUNG DES PLAYERS IM FAHRZEUG
y Der
y Die meisten Länder haben Gesetze, welche die Be nutzung die ses Gerät s w ährend der Fahrt
y Lassen Sie das Produkt nicht bei besonders niedrigen (unter -10 °C) oder hohen
BESONDERE HINWEISE ZUR BENUTZUNG DES PLAYERS IM FLUGZEUG
Die Benutzung des Geräts ist bei vielen Fluggesellschaften erlaubt. Richten Sie sich stets nach
den Anleitungen des Kabinenpersonals.
Fahrer
einschränken, sofern der Bildschirm für den
diese Gesetze.
Temperaturen (über 60 °C) im Fahrzeug. Das kann zur Verformung des Gerätegehäuses
und einem Leistungsabfall des Akkus führen.
Schalten Sie stets den Motor ein, bevor Sie das Gerät anschließen.
Trennen Sie das Gerät stets ab, bevor Sie den Motor ausschalten.
darf das Gerät während der Fahrt nicht benutzen.
Fahrer
sichtbar ist. Bitte halten Sie sich an
Page 42

0
2 D
E
DVD
Lieferumfang
DVD-Player Monitor Halterung Kopfstütze
SDV48-A / SDV49-A x 1
SDV48-AM / SDV49-AM x 1
SDV48-AC / SDV49-AC x 2 SDV48-AC / SDV49-AC x 2
Nur für Modelle SDV48-AM und
SDV49-AM mitgeliefert
SDV48-A / SDV49-A x 1
SDV48-AM / SDV49-AM x 2
NETZTEIL FERNBEDIENUNG AV-KABEL
SDV48-A / SDV49-A x 1
SDV48-AM / SDV49-AM x 1
SDV48-AC / SDV49-AC x 2 SDV48-AC / SDV49-AC x 2 SDV48-AC / SDV49-AC x 2
SDV48-A / SDV49-A x 1
SDV48-AM / SDV49-AM x 1
SDV48-A / SDV49-A x 1
SDV48-AM / SDV49-AM x 1
STEREO-OHRHÖRER FAHRZEUGADAPTER VERBINDUNGSKABEL
SDV48-A und SDV49-A SDV48-A und SDV49-A
SDV48-AM und SDV49-AM SDV48-AM und SDV49-AM
SDV48-A / SDV49-A x 1
SDV48-AM / SDV49-AM x 1
SDV48-AC / SDV49-AC x 2
SDV48-AC und SDV49-AC SDV48-AC und SDV49-AC
TRAGETASCHE BEDIENUNGSANLEITUNG
BITTE BEACHTEN SIE: Die Abbildungen dienen nur als Referenz, leichte Abweichungen sind
möglich.
Page 43

D
E0
3
Bedienelemente
DVD-Player SDV48 Serie
DVD
1. Öffnen
2. Umschalter EIN/AUS und Laden
3. EINSTELLUNGEN
4. MODUS
5.
6. OK / Enter
7. Wiedergabe/Pause
8. STOPP
9. Netzteileingang 9-12 V
10. DC-Ausgang
(nur Modell AM Master)
Monitor (nur SDV48-AM)
11. AV Eingang/Ausgang
12. Ohrhörerbuchse
13. Lautstärke
14. SD/MMC-Kartenleser
15. USB-Port (nur USB-Stick)
16. Aufsteller (ausklappen)
17. LCD-Bildschirm
18. Öse für Kopfstützenhalterung
19. Lautsprecher
20. LED-Anzeige Blau = eingeschaltet
Rot = Akku wird geladen
Grün = Akku voll geladen
21. Typenschild
21
1. EIN/AUS
2. Lautstärke
3. Ohrhörerbuchse
4. A V Eingang
5. DC Eingang 9-12 V
10
6. LCD-Bildschirm
7. Öse für Kopfstützenhalterung
8. Lautsprecher
9. Helligkeit
10. Typenschild
Page 44

0
4 D
E
DVD
Bedienelemente
DVD-Player SDV49 Serie
21
1. Öffnen
2. Umschalter EIN/AUS und Laden
3. EINSTELLUNGEN
4. MODUS
5.
6. OK / Enter
7. Wiedergabe/Pause
8. STOPP
9. Netzteileingang 9-12 V
10. DC-Ausgang
(nur Modell AM Master)
Monitor (nur SDV49-AM)
11. AV Eingang/Ausgang
12. Ohrhörerbuchse
13. Lautstärke
14. SD/MMC-Kartenleser
15. USB-Port (nur USB-Stick)
16. Aufsteller (ausklappen)
17. LCD-Bildschirm
18. Öse für Kopfstützenhalterung
19. Lautsprecher
20. LED-Anzeige Blau = eingeschaltet
Rot = Akku wird geladen
21. Typenschild
Grün = Akku voll geladen
1. EIN/AUS
2. Lautstärke
3. Ohrhörerbuchse
4. A V Eingang
5. DC Eingang 9-12 V
6. LCD-Bildschirm
7. Öse für Kopfstützenhalterung
8. Lautsprecher
9. Helligkeit
10. Typenschild
10
Page 45

D
E0
Systemanschluss
SDV48-A / SDV49-A
DVD-Player mit einem Bildschirm
5
Nach dem Einschalten wird der DVD-Player
Netzteil
Fahrzeugadapter
über den integrierten Akku versorgt, zuhause
oder unterwegs.
Für Netzanschluss oder zum Laden des
integrierten Akkus schließen Sie das Netzteil
am Gerät an, dann stecken Sie es in eine
Steckdose.
Schalten Sie das Gerät mit dem Umschalter
auf ON ein oder laden Sie den Akku in
Schalterstellung OFF/CHARGE.
Zum Betrieb des Geräts im Fahrzeug oder
zum Laden des Akkus schließen Sie den
mitgelieferten Fahrzeugadapter am
Zigarettenanzünder und am Netzteileingang
des Players an.
Schalten Sie das Gerät mit dem Umschalter
auf ON ein oder laden Sie den Akku in
Schalterstellung OFF/CHARGE.
DVD
BITTE BEACHTEN SIE:
• Nur zur Benutzung in Fahrzeugen mit 12 V Versorgung. NICHT für Fahrzeuge mit 24 V, das
führt zu Schäden am Gerät.
• Schalten Sie stets den Motor ein, bevor Sie den DVD-Player anschließen, um Schäden
durch Spannungsspitzen während des Anlassen zu vermeiden.
• Laden Sie den Akku des DVD-Players in Schalterstellung OFF/CHARGE.
y
Der Netzstecker dient dem vollständigen Abtrennen des Geräts vom Stromnetz und muss
jederzeit frei zugänglich sein.
Page 46

0
6 D
E
DVD
Systemanschluss
SDV48-AM / SDV49-AM
System mit einem DVD-Player und einem Monitor.
DC AUSGANG
DVD-PLAYER MONITOR
AV EINGANG/
AUSGANG
AV EINGANG
DC EINGANG
Verbinden Sie DVD-Player und Monitor mit dem mitgelieferten AV/Stromkabel, wie oben
dargestellt.
ODER
DC EINGANG
DVD-PLAYER MONITOR
Schließen Sie entweder das Netzteil oder den Fahrzeug adapter am Master DVD-Player an, um
beide Bildschirme zu versorgen, wie oben dargestellt.
BITTE BEACHTEN SIE:
• Während der Master DVD-Player über den eingebauten Akku versorgt werden kann, muss
der Monitor entweder über den Fahrzeugadapter oder das Netzteil versorgt werden.
• Nur zur Benutzung in Fahrzeugen mit 12 V Versorgung. NICHT für Fahrzeuge mit 24 V, das
führt zu Schäden am Gerät.
• Schalten Sie stets den Motor ein, bevor Sie den DVD-Player anschließen, um Schäden
durch Spannungsspitzen während des Anlassen zu vermeiden.
• Laden Sie den Akku des DVD-Players in Schalterstellung OFF/CHARGE.
• Verbinden Sie stets Master und Monitor, bevor Sie die Spannungsversorgung anschließen,
anderenfalls haben Sie einen Brummton und möglicherweise Fehlfunktionen auf dem
Monitor.
Page 47

D
E0
Systemanschluss
SDV48-AC / SDV49-AC
Twin-System mit zwei DVD-Playern.
AV EINGANG/
AV EINGANG/AUSGANG
DVD-PLAYER DVD-PLAYER
AV- KABEL
Benutzen Sie die beiden DVD-Player entweder unabhängig voneinander (keine Verbindung
notwendig) oder verbinden Sie sie, wie oben dargestellt, um Filme auf beiden Bildschirmen
gleichzeitig anzuzeigen. Nach dem Anschluss legen Sie eine DVD in einen der Player ein und
starten Sie die Wiedergabe. Den zweiten Bildschirm (im Player ohne DVD) stellen Sie mit
Tastendruck auf DVD/IN auf der Fernbedienung auf AV-IN Modus ein. Ziehen Sie das Kabel ab,
wenn Sie unterschiedliche Filme sehen.
AUSGANG
7
DVD
DC EINGANG
ODER ODER
DVD-PLAYER
DVD-PLAYER
Beide Player werden über ihren jeweiligen integrierten Akku versorgt, können über
Netzspannung durch Anschluss
beider
Netzteile oder über zwei Fahrzeugadapter versorgt
werden, wie oben dargestellt.
BITTE BEACHTEN SIE:
• Nur zur Benutzung in Fahrzeugen mit 12 V Versorgung. NICHT für Fahrzeuge mit 24 V, das
führt zu Schäden am Gerät.
• Schalten Sie stets den Motor ein, bevor Sie den DVD-Player anschließen, um Schäden
durch Spannungsspitzen während des Anlassen zu vermeiden.
• Laden Sie den Akku des DVD-Players in Schalterstellung OFF/CHARGE.
• Ziehen Sie das Verbindungskabel ab, wenn Sie unterschiedliche Filme sehen, anderenfalls
kommt es zu Tonstörungen.
Page 48

0
8 D
E
DVD
Fahrzeugadapter
Zigarettenanzünder
DC-Stecker
Der Fahrzeugadapter ist zum Schutz des Fahrzeugs und des DVD-Systems durch
Überspannung, Kurzschluss, Kabel- oder Produktschäden gesichert.
Arbeitet der DVD-Player einwandfrei mit dem Netzteil, nicht jedoch mit dem Fahrzeugadapter,
so überprüfen Sie die Sicherung.
Ist die Sicherung durchgebrannt, so überprüfen Sie Player und Kabel auf Schäden.
Ersatzsicherungen müssen folgende Spezifikationen haben.
Nur Modelle SDV48-AC / SDV49-AC
20 mm Glassicherung
SDV48-A / SDV49-A: 1,5 A
SDV48-AM / SDV49-AM: 1,5 A
SDV48-AC / SDV49-AC: 2,0 A
Abschrauben
Sicherung wechseln Explosionszeichnung
VORSICHT. Sicherung, Feder, Kragen und Spitze sind kleine Komponenten und können leicht
verloren gehen.
Steckernetzteil
Das Steckernetzteil (Lieferung mit UK- und EU-Stecker) ist mit 100-240 V AC, 50/60 Hz für die
meisten Netzspannungen weltweit geeignet.
Bitte tauschen Sie den Stecker entsprechend Ihrem Standort, auch auf Reisen, aus.
Drücken Sie die Verriegelungstaste, um den Stecker zu lösen oder einzusetzen. Achten Sie
darauf, dass er einrastet.
BITTE BEACHTEN SIE: Der Stecker kann in beiden Richtungen in die Steckdose gesteckt
werden.
BEIDE Richtungen sind sicher.
Falls Sie weitere Adapter benötigen, wenden Sie sich bitte an Ihr örtliches Fachgeschäft.
Benutzen Sie nur das mitgelieferte Netzteil für den SDV48 und SDV49. Die Benutzung anderer
Netzteile oder Spannungsversorgungen kann zu Schäden am Player führen. Das mitgelieferte
Netzteil ist zur Benutzung mit SDV48 und SDV49 entsprechend markiert.
Page 49

D
E0
9
Fahrzeuginstallation
1. Montieren Sie die Kopfstützenhalterung am DVD-Player / Monitor.
Vordere Bänder
Nach korrekter Befestigung liegt die
Rückseite des Players (oder des Monitors)
vorn auf der Kopfstützenhalterung an.
OBEN
DVD
Befestigungsband
Vorderseite
Befestigungsband
Drehen Sie Kopfstützenhalterung und Player um, sodass sie auf die Rückseite blicken.
Befestigungspunkt
Führen Sie das Befestigungsband durch den linken
Befestigungspunkt auf der Rückseite von Player oder
Rückseite
Monitor, wie in der Abbildung dargestellt.
Führen Sie das Band auf die Rückseite der
Kopfstützenhalterung und befestigen Sie es.
Wiederholen Sie den Vorgang für das andere Band.
Achten Sie darauf, dass der DVD-Player oder der
Monitor mittig befestigt ist.
Drehen Sie Kopfstützenhalterung und Player um, sodass sie auf die Vorderseite blicken.
BITTE BEACHTEN SIE: Für SDV48-AM / SDV49-AM benutzen Sie die gleiche
Kopfstützenhalterung für Player und Monitor.
Mit den vorderen Bändern befestigen Sie den
DVD-Player oder den Monitor, wie in der Abbildung
dargestellt.
Page 50

10 D
E
DVD
2. Befestigen Sie die Kopfstützenhalterung an der Kopfstütze.
ZIEHEN
BITTE BEACHTEN SIE:
Für die Befestigung von SDV48-AM / SDV49-AM empfehlen wir, den DVD-Player auf der
LINKEN Kopfstütze zu montieren, um eine saubere Kabelführung zum Monitor zu
gewährleisten, wie unten dargestellt.
ZIEHEN
Führen Sie die Bänder um die Kopfstütze
und verhaken Sie die beiden Clips.
Achten Sie darauf, dass die Clips sicher
eingerastet sind.
Ziehen Sie die Bänder straff.
Stecken Sie die losen Enden hinter die
Bänder.
Page 51

D
E
11
Anschluss an einem externen Fernseher
SDV48 Serie
Das Gerät kann an einem externen Fernseher angeschlossen werden, wie nachstehend
dargestellt.
AV-KABEL (MITGELIEFERT)
DVD
Gelb = Video
Rot = Audio rechts
Weiß = Audio links
Anschluss an einer externen AV-Quelle
Das Gerät kann an einer externen AV-Quelle, wie beispielsweise einer Spielkonsole
angeschlossen werden, wie nachstehend dargestellt.
AV-KABEL (MITGELIEFERT)
SPIELKONSOLE
VERBINDUNGSKABEL
(NICHT MITGELIEFERT)
Page 52

12 D
E
DVD
Drücken Sie DVD/IN auf der Fernbedienung, um zwischen DVD-Wiedergabe und AV-IN Modus
umzuschalten. Bei korrektem Anschluss werden Bild und Ton auf den Player übertragen.
Anschluss an einem externen Fernseher
SDV49 Serie
Das Gerät kann an einem externen Fernseher angeschlossen werden, wie nachstehend
dargestellt.
AV-KABEL (MITGELIEFERT)
Gelb = Video
Rot = Audio rechts
Weiß = Audio links
Anschluss an einer externen AV-Quelle
Das Gerät kann an einer externen AV-Quelle, wie beispielsweise einer Spielkonsole
angeschlossen werden, wie nachstehend dargestellt.
AV-KABEL (MITGELIEFERT)
SPIELKONSOLE
VERBINDUNGSKABEL
(NICHT MITGELIEFERT)
Page 53

D
E
13
Drücken Sie DVD/IN auf der Fernbedienung, um zwischen DVD-Wiedergabe und AV-IN Modus
umzuschalten. Bei korrektem Anschluss werden Bild und Ton auf den Player übertragen.
Fernbedienung
DVD
1. Zifferntasten
2. TITLE (Titelinformationen anzeigen)
3. AUDIO (Audiosprache wählen)
4. SETUP (Einstellungsmenü aufrufen oder
verlassen)
5.
/ (Sprung zum vorherigen oder
nächsten Kapitel oder Track während der
Wiedergabe)
ABWÄRTS/AUFWÄRTS in der
Menünavigation
6.
/ (Schneller Rücklauf/Vorlauf mit 2-,
4-, 8-, 16- oder 32-facher Geschwindigkeit)
LINKS/RECHTS in der Menünavigation
7. OSD - Bildschirmanzeige.
(Anzeige von Informationen zur Disc, wie
vergangene und verbleibende Spielzeit)
8. Wiedergabe/Pause
9. Stopp (Drücken Sie einmal, um die
Wiedergabe zu unterbrechen, dann
drücken Sie
fortzusetzen.
Drücken Sie die Stopptaste zweimal, u m die
Wiedergabe zu beenden.
, um die Wiedergabe
10. DVD / IN (Umschalten zwischen
DVD-Wiedergabe und AV-Eingang)
11. MODE (Umschalten der Eingangsquelle
zwischen DVD / SD/MMC / USB)
12. MENU (DVD-Menü aufrufen oder
verlassen)
13. SUBTITLE (In DVD-Wiedergabe
Untertitelsprache wählen)
14. ZOOM (In DVD-Wiedergabe Bild
vergrößern/verkleinern)
15. A-B (Wiederholung eines bestimmten
Abschnitts zwischen den Punkten A und
B; drücken Sie erneut, um die
Wiederholungsfunktion zu verlassen)
16. REPEAT (Titel, Kapitel oder Track
wiederholen)
17. RETURN (Rückkehr in das Hauptmenü)
18. MUTE (Ton stummschalten/
Stummschaltung aufheben)
19. VOL+/- (Lautstärke einstellen)
20. ENTER (Eingabe bestätigen)
Page 54

14 D
E
DVD
Benutzung der Fernbedienung
Bei Lieferung befindet sich bereits eine frische Batterie in der Fernbedienung. Ziehen Sie
einfach den Isolierstreifen am Aufdruck PULL heraus.
Zum Austausche n der Batte rie in der Fer nbedienung folgen Sie bitte der na chstehenden A bbildung .
1) Nase herunterdrücken.
2) Lade herausziehen.
3) Batterie mit + nach hinten
einsetzen.
4) Lade zurücksetzen.
Richten Sie die Fernbedienung auf den IR-Empfänger auf dem DVD-Player (NICHT auf dem Monitor)
aus. Die Reichweite der Fernbedienung beträgt ca. 3 m. Siehe nachstehende Abbildung.
Hinweise
1. Lassen Sie die Fernbedienung nicht fallen, setzen Sie sich nicht darauf u nd schützen Sie sie
vor harten Stößen und Feuchtigkeit.
2. Setzen Sie den DVD-Player nicht direkter Sonneneinstrahlung aus, das kann zu
Fehlfunktionen der Fernbedienung führen.
3. Lässt die Reichweite der Fernbedienung nach, so muss d ie Batterie ausget auscht werden (Cr20 25).
4. Für das Modell SDV48-AM / SDV49-AM muss die Fernbedienung auf den DVD-Player
ausgerichtet werden, nicht auf den Monitor.
5. Für das Modell SDV48-AC / SDV49-AC werden zwei identische Fernbedienungen
mitgeliefert. Richten Sie die Fernbedienung auf den entsprechenden DVD-Player aus.
Page 55

D
E
1
Allgemeine Bedienungshinweise
Wiedergabe einer Disc.
DivX
1. Der DVD-Modus ist die Standardeinstellung, nachdem Sie das Gerät eingeschaltet haben,
mit MODE schalten Sie den Modus um. Drücken Sie
dann drücken Sie OK.
2. Öffnen Sie den LCD-Bildschirm und legen Sie eine Disc mit dem Aufdruck auf Sie
ausgerichtet ein.
Nach dem Öffnen des LCD-Bildschirms öffnen Sie ihn nicht gewaltsam weiter.
oder zur Markierung von DVD,
5
DVD
BITTE BEACHTEN SIE:
Schäden durch Öffnen des DVD-Players weiter als werksmäßig vorgesehen, sind nicht von der
Garantie abgedeckt.
3. Schließen Sie den LCD-Bildschirm. Der Player lädt die Disc und startet die Wiedergabe.
4. Drücken Sie einmal
Wiedergabe von gleicher Stelle aus fortzusetzen. Drücken Sie zweimal
Wiedergabe endgültig zu beenden.
5. Während der Wiedergabe drücken Sie
drücken Sie die Taste erneut, um die Wiedergabe von gleicher Stelle aus fortzusetzen.
6. Nach Beendigung der Wiedergabe schalten Sie den Player aus, indem Sie den
Ein-/Ausschalter auf OFF stellen.
7. Für einige DVDs mit Titel- oder Kapitelmenüs drücken Sie MENU, um das Menü aufzurufen,
mit
Bitte beachten Sie
Wiedergabe ab. Das kann zu Fehlfunktionen und Datenverlust auf USB-Stick oder
SD/MMC-Karte führen.
Wiedergabe / Pause
wählen Sie aus. Drücken Sie ENTER zur Bestätigung.
, um die Wiedergabe zu unterbrechen; drücken Sie , um die
, um die
, um die Wiedergabe zu unterbrechen (Pause);
: Ziehen Sie USB-Speichermedien oder SD/MMC-Karten nicht während der
Titel
Navigationstasten
ENTER
Menü
Page 56

16 D
E
DVD
Schneller Vorlauf und Rücklauf
DivX
Während der Wiedergabe kann der Player schnell vorwärts oder rückwärts durch das Medium
suchen.
1. Drücken Sie
, damit sucht das Gerät vorwärt s. Drü cken Si e die Taste mehrfach, um die 2-,
4-, 8-, 16- oder 32-fache Geschwindigkeit aufzurufen.
2. Drücken Sie
, damit sucht das Gerät rückwärts.
Drücken Sie die Taste mehrfach, um die 2-, 4-, 8-, 16- ode r
32-fache Geschwindigkeit aufzurufen.
Suche vorwärts
Suche rückwärts
Wiederholung
DivX
Während der Wiedergabe können Sie ein Kapitel, einen Titel oder die gesamte Disc
wiederholen.
Für DVDs drücken Sie REPEAT, um ein Kapitel zu wiederholen; drücken Sie erneut, um einen
Titel zu w iederholen; d rücken Sie ein drittes Mal, um die g esamte Di sc zu w iederholen. Drü cken
Sie ein viertes Mal, um die Wiedergabefunktion zu verlassen.
Für MP3-Dateien drücken Sie REPEAT, um die aktuelle Datei zu wiederholen; drücken Sie
erneut, um den aktuellen Ordner zu wiederholen; drücken Sie ein drittes Mal, um die
Wiedergabefunktion zu verlassen.
Page 57

D
E
1
Wiederholung einer bestimmten Szene
7
DivX
Während der Wiedergabe können Sie einen bestimmten Abschnitt wiederholen.
Während der Wiedergabe drücken Sie A-B, um den Startpunkt
A der Wiederholungsschleife festzulegen.
Drücken Sie erneut A-B, um den Endpunkt B festzulegen.
Der Player wiederholt nun automatisch den Abschnitt
zwischen den Punkten A-B.
Drücken Sie A-B ein drittes Mal, um zur Normalwiedergabe
zurückzukehren.
Zifferntasten
A-B
A
AB
DVD
Page 58

18 D
E
DVD
Vergrößern/verkleinern
DivX
Während der Filmwiedergabe können Sie das Bild vergrößern oder
verkleinern.
Während der Wiedergabe drücken Sie ZOOM, um das Bild zu
vergrößern; drücken Sie die Taste erneut, um das Bild weiter zu
vergrößern; ab dem vierten Tastendruck wird das Bild verkleinert.
Drücken Sie wiederholt, um zur Normalwiedergabe zurückzukehren.
Das vergrößerte Bild können Sie mit den Navigationstasten auf dem
Bildschirm verschieben.
Aufwärts/abwärts/links/rechts
Navigationstasten
Vergrößern/verkleinern
2X
3X
4X
1 /2X
1 /3X
1 /4X
ZOOM bleibt auf dem Bildschirm stehen, wenn diese Funktion gewählt wird.
Das ist normal und KEINE Fehlfunktion. Während der Zoomfunktion funktionieren
SCHNELLER VORLAUF, RÜCKLAUF, VORHERIGER und NÄCHSTER nicht als Navigation
aufwärts, abwärts, links und rechts durch das vergrößerte Bild. ZOOM wird angezeigt, um Sie
hieran zu erinnern.
Verlassen Sie die Zoomfunktion, um die Normalfunktionen SCHNELLER VORLAUF,
RÜCKLAUF, VORHERIGER und NÄCHSTER wieder zur Verfügung zu haben.
Hinweis
Sie können jedoch viermal REPEAT drücken, bis „WIEDERHOLUNG AUS“ angezeigt wird.
Hierdurch wird das Zoomsymbol ausgeblendet, es hat jedoch keinen weiteren Effekt. Denken
Sie daran, mit ZOOM den Normalstatus wiederherzustellen, um die Funktionen SCHNELLER
VORLAUF, RÜCKLAUF, VORHERIGER und NÄCHSTER wieder zur Verfügung zu haben.
Page 59

D
E
19
Bilder auf einer Disc anzeigen
1. Legen Sie eine Disc mit Fotos im JPG-Format in den Player. Der Player liest die Bilder ein
und startet die Wiedergabe der Fotos.
2. Drücken Sie MENU, um die JPG-Dateien zu durchsuchen.
3. Drücken Sie
Bestätigung der Wiedergabe.
Bitte beachten Sie: Drücken Sie MENU, um zur Ordnerliste zurückzukehren. Drücken Sie
oder ENTER, um die gewählte Datei anzuzeigen.
4. Zur Bilddrehung im entgegengesetzten Uhrzeigersinn drücken Sie
Zur Bilddrehung im Uhrzeigersinn drücken Sie
5. Drücken Sie während der Bildanzeige OSD, um die Bildübergänge wie folgt zu wählen:
a. Von oben nach unten
b. Von unten nach oben
c. Von links nach rechts
d. Von rechts nach links
e. Von links oben nach rechts unten
f. Von rechts oben nach links unten
g. Von links unten nach rechts oben
h. Von rechts unten nach links oben
i. Horizontal von der Mitte nach beiden Seiten
j. Vertikal von der Mitte nach beiden Seiten
k. Von oben und unten zur Mitte
l. Von links und rechts zur Mitte
m. In vier Fenstern von oben nach unten
n. In vier Fenstern von links nach rechts
o. Von den vier Ecken zur Mitte
, um eine bestimmte JPG-Datei zu wählen und drücken Sie ENTER zur
.
.
DVD
6. Während der Bildanzeige wird
drücken. Diese Funktionen stehen Ihnen während der Fotowiedergabe nicht zur Verfügung.
7. Während der Anzeige von JPG-Dateien drücken Sie
unterbrechen und die Bilder als Miniaturbilder anzuzeigen. Drücken Sie die
Navigationstasten AUFWÄRTS, ABWÄR TS, LINKS oder RECHTS und dann ENTER, um
das entsprechende Bild zu Anzeige zu wählen.
angezeigt, falls Sie SUBTITLE, AUDIO, A-B oder TITLE
, um die Wiedergabe zu
MP3-Wiedergabe von Disc
1. Legen Sie eine Disc mit MP3-Dateien in den Player ein.
Drücken Sie die Navigationstasten AUFWÄRTS, ABWÄRTS, LINKS oder RECHTS und
dann ENTER, um eine MP3-Datei zu wählen.
Drücken Sie
oder ENTER, um die gewählte Datei wiederzugeben.
Page 60

20 D
E
DVD
Wiedergabe von USB-Speichermedium und SD/MMC-Karte
ZUM EINRASTEN EINDRÜCKEN.
ZUM AUSRASTEN EINDRÜCKEN
(NICHT ZIEHEN).
A
USB
SD/MMC
SDV48 Serie SDV49 Serie
1. Zur Wiedergabe von Filmen, Fotos oder Musik von einem kompatiblen Speichermedium
schließen Sie dieses an, wie oben dargestellt.
2. Drücken Sie MODE und markieren Sie entweder SD/MMC oder USB mit den
Navigationstasten LINKS/RECHTS, dann drücken Sie ENTER zur Auswahl.
BITTE BEACHTEN SIE:
1) Der USB-Port dient nur dem Direktanschluss eines USB-Sticks. Er ist NICHT für PC oder
externe Festplatten geeignet.
2) USB-Sticks oder SD/MMC-Karten müssen in FAT oder FAT 32 formatiert sein.
3) MMC-Karten können ebenfalls im SD/MMC-Kartenleser benutzt werden.
B
SD/MMC
USB
Hauptmenü von USB-Speichermedium und SD/MMC-Karte
Nach einigen Sekunden zeigt der Player das Hauptmenü mit 4 Funktionssymbolen an.
Drücken Sie
oder zur Auswahl und dann ENTER zur Bestätigung.
Page 61

D
E
21
Browsermodus
DVD
Fotomodus
Musikmodus
Filmmodus
Die Modi werden auf den nachfolgenden Seiten ausführlich erklärt.
Browsermodus
00£00 03£43
001/008
\Ctyy\
......
Mp3
TRACK01
Mp3
TRACK02
Mp3
TRACK03
Mp3
TRACK04
Mp3
TRACK05
Im Browsermodus zeigt der Player die Liste mit Dateien und Ordnern an, die sich auf dem
gewählten Medium (SD/MMC oder USB) befinden.
Drücken Sie die Navigationstasten AUFWÄRTS/ABWÄRTS, um die gewünschte Datei zu
markieren und drücken Sie ENTER zur Wiedergabe.
Drücken Sie
Drücken Sie
, um den Ordner aufzurufen.
, um den Ordner zu verlassen.
Bitte beachten Sie: Zur Rückkehr in das Hauptmenü muss das System zunächst die Liste der
Dateien und Ordner anzeigen, dann drücken Sie RETURN, um in das Hauptmenü
zurückzukehren.
Page 62

22 D
E
DVD
Fotomodus
Slide Show Menu Prev Next
Im Fotomodus zeigt der Player zunächst die Miniaturbilder an.
Drücken Sie die Navigationstasten AUFWÄRTS/ABWÄRTS/LINKS/RECHTS, um das
gewünschte Foto zu wählen, dann drücken Sie ENTER, um die Diashow ab diesem Punkt zu
starten. Drücken Sie
In der Miniaturbildanzeige drücken Sie die Navigationstaste ABWÄRTS, um in das Menü unten
im Bild zu navigieren. Hier haben Sie vier Optionen.
Diashow: Startet die Diashow der angezeigten Miniaturbilder
Menü: Optionen für die Diashow (vergrößern/verkleinern, Bilddrehung usw.)
Vorheriges: Vorherige Seite Miniaturbilder
Nächstes: Nächste Seite Miniaturbilder
Während der Bildanzeige stehen Ihnen eine Reihe von Optionen zur Verfügung:
1. Zur Bilddrehung im entgegengesetzten Uhrzeigersinn drücken Sie
Zur Bilddrehung im Uhrzeigersinn drücken Sie
2. Drücken Sie während der Bildanzeige OSD, um die Bildübergänge wie folgt zu wählen:
a. Von oben nach unten
b. Von unten nach oben
c. Von links nach rechts
d. Von rechts nach links
e. Von links oben nach rechts unten
f. Von rechts oben nach links unten
g. Von links unten nach rechts oben
h. Von rechts unten nach links oben
i. Horizontal von der Mitte nach beiden Seiten
j. Vertikal von der Mitte nach beiden Seiten
k. Von oben und unten zur Mitte
l. Von links und rechts zur Mitte
m. In vier Fenstern von oben nach unten
n. In vier Fenstern von links nach rechts
o. Von den vier Ecken zur Mitte
an beliebiger Stelle zur Unterbrechung.
.
.
3. Während der Bildanzeige wird
drücken. Diese Funktionen stehen Ihnen während der Fotowiedergabe nicht zur Verfügung.
4. Während der Fotoanzeige drücken Sie
Bilder als Miniaturbilder anzuzeigen.
Bitte beachten Sie
Rückkehr in den Miniaturbildmodus.
: Zur Rückkehr in das Hauptmenü drücken Sie zunächst RETURN zur
angezeigt, falls Sie SUBTITLE, AUDIO, A-B oder TITLE
, um die Wiedergabe zu unterbrechen und die
Page 63

D
E
23
Musikmodus
Im Musikmodus zeigt der Player eine Liste abspielbarer Musikdateien an.
Drücken Sie die Navigationstasten AUFWÄRTS/ABWÄRTS, um den gewünschten Track zu
wählen und dann ENTER zur Wiedergabe.
Drücken Sie
Nach Beendigung der Wiedergabe drücken Sie die Navigationstasten LINKS/RECHTS, um
andere Menüoptionen anzuzeigen:
P- Vorwärts umblättern
P+ Rückwärts umblättern
Wiedergabe
/ während der Wiedergabe, um den schneller Rücklauf/Vorlauf aufzurufen.
DVD
Bitte beachten Sie
: Drücken Sie RETURN, um in das Hauptmenü zurückzukehren.
Filmmodus
Im Filmmodus zeigt der Player eine Liste abspielbarer Filmdateien an, wie MP2, DivX usw.
Drücken Sie die Navigationstasten AUFWÄRTS/ABWÄRTS, um den gewünschten Film zu
wählen und dann ENTER zur Wiedergabe.
Während der Filmwiedergabe drücken Sie MENU oder RETURN, um zur Liste der
abspielbaren Filmdateien zurückzukehren.
Zur Rückkehr in das Hauptmenü drücken Sie RETURN, wenn die Liste der Filmdateien
angezeigt wird.
BITTE BEACHTEN SIE:
Einzelheiten zu abspielbaren Filmformaten und Hinweise finden Sie weiter hinten in dieser
Bedienungsanleitung.
Page 64

24 D
E
DVD
Filmkompressionsformate
Die Benutzung des DivX Encoders wird empfohlen, um Filme zu komprimieren und dann auf
diesem Player wiederzugeben. Während es eine ganze Reihe von Filmformaten und
Kompressionssoftware gibt, benutzen die meisten einen MPEG4-Algorithmsus.
DivX ist ein solcher MPEG4-Kompressor, er ist jedoch der am meisten benutzte und wird von
Sony, Panasonic und anderen Herstellern anerkannt.
Dieses Gerät kann DivX wiedergeben und bietet damit eine zuverlässige und kontinuierliche
Wiedergabe.
Bei Benutzung des offiziellen Div X Encoders (Dow nload bei www.DivX.com gegen eine geringe
Gebühr) benutzen Sie stets die Option „Home Theatre“ für beste Kompression und eine
geeignete Wiedergabequalität auf diesem Player. Behalten Sie das 16:9-Seitenverhältnis für
die Vollbildan zeige bei.
Die Benutzung anderer Kompressionssoftware oder die Wiedergabe anderer Formate (wie
QuickTime) kann zu unzuverlässigen oder unvorhersehbaren Ergebnissen führen und wird
nicht empfohlen.
Page 65

D
E
2
CD-Ripping
Der Player ist mit einer einfachen CD-Rippingfunktion ausgestattet, jedoch sind die
resultierenden Tracks nur einfach benannt.
Während der CD-Wiedergabe kann die CD-Rippingfunktion mit Tastendruck auf SUBTITLE
aufgerufen werden. Der Player ändert das CD-Format in MP3-Format und speichert die
Dateien auf dem angeschlossenen USB- oder SD/MMC-Speichermedium in einem Ordner mit
der Bezeichnung „CDA_RIP“.
Nach dem Drücken von SUBTITLE wird das nachstehende Menü angezeigt:
5
DVD
Geschwindigkeit
Bitrate
Gerät
Verlassen
Alle wählen
Keine wählen
Start:
Während des Rippings können Sie den Vorgang jederzeit mit
BITTE BEACHTEN SIE
Mit den Navigationstasten AUFWÄRTS/ABWÄRTS/LINKS/RECHTS markieren Sie die
gewünschten Tracks, dann drücken Sie ENTER zur Bestätigung.
Drücken Sie START, um das Ripping der gewählten Tracks zu starten.
: Hier wählen Sie die Bitrate. Ihnen stehen 96, 112, 128, 192, 256 und 320
: Hier wird angezeigt, ob ein USB- oder SD/MMC-Speichermedium am
: Rückkehr in das vorherige Menü.
Navigieren Sie zu diesem Punkt und drücken Sie ENTER, das Ripping
: Hier wählen Sie die Aufnahmegeschwindigkeit: Normal oder Schnell.
Kbit/s zur Verfügung.
DVD-Player angeschlossen ist.
: Wählt alle Dateien auf der Disc für das Ripping.
: Wählt keine der Dateien auf der Disc.
beginnt und der folgende Bildschirm wird angezeigt:
ABBRECHEN
: Sie können einzelne Tracks für das Ripping in MP3-Format wählen.
beenden.
Page 66

26 D
E
DVD
Systemeinstellungen
Allgemeine Einstellungen
Last Memory ON
Drücken Sie SETUP. Die Hauptseite wird angezeigt.
Mit den Navigationstasten AUFWÄRTS/ABWÄRTS/
LINKS/RECHTS und ENTER treffen Sie Ihre
Auswahl.
Drücken Sie die Navigationstaste RECHTS zum
Aufrufen.
Drücken Sie die Navigationstaste LINKS zum
Verlassen.
TV-Anzeige:
Die wählbaren Anzeigeformate sind Normal / PS,
Normal / LB, Breitbild.
Standardeinstellung ist Breitbild.
Bitte beachten Sie:
Die Funktion hängt vom Bildseitenverhältnis der
DVD ab.
Wählen Sie Breitbild (16:9), wenn Sie einen 16:9
externen Breitbildfernseher benutzen.
Last Memory ON
Last Memory ON
Last Memory ON
Blickwinkelmarkierung:
Rufen Sie diese Option zur Einstellung des
Kamera-Blickwinkels während der Wiedergabe auf.
Optionen: EIN, AUS.
Standardeinstellung ist EIN.
OSD-Sprache:
In dieser Option stellen Sie die OSD-M enüspra che ein
(Englisch, Französisch, Deutsch, Italienisch).
Standardeinstellung ist Englisch.
Bildschirmschoner:
Rufen Sie diese Option zur Aktivierung des
Bildschirmschoners auf.
Optionen: EIN, AUS.
Standardeinstellung ist EIN.
Page 67

D
E
2
Videoeinstellungen
AV-OUT Settings
Screen Settings
TV-Typ:
Rufen Sie diese Option zur Auswahl des TV-Typs auf
(PAL, NTSC).
Standardeinstellung ist PAL.
7
DVD
AV-OUT Settings
Screen Settings
AV-OUT Settings
Screen Settings
Voreinstellungen
Stellen Sie die Videoqualität auf AV OUT oder dem
Zusatzmonitor für SDV48-AM / SDV49-AM ein.
Einstellung Helligkeit, Kontrast, Farbe und
Farbsättigung.
Stellen Sie die Videoqualität auf dem integrierten
Bildschirm des Master DVD-Players ein.
Einstellung Helligkeit, Kontrast, Farbe und
Farbsättigung.
Audio:
Stellen Sie die gewünschte Filmsprache für DVDs ein
(Englisch, Französisch, Deutsch, Italienisch).
Standardeinstellung ist English
Die Filmsprachen hängen von der Aufnahme der DVD
ab.
Sie können die Filmsprache auch während der
Wiedergabe umstellen, drücken Sie hierzu AUDIO.
Untertitel:
Stellen Sie die gewünschte Untertitelsprache ein
(Englisch, Französisch, Deutsch, Italienisch, Aus).
Standardeinstellung ist AUS.
Die Untertitelsprachen hängen von der Aufnahme der
DVD ab.
Sie können die Untertitelsprache auch während der
Wiedergabe umstellen, drücken Sie hierzu
SUBTITLE.
Page 68

28 D
E
DVD
Discmenü:
Diese Funktion ermöglicht Ihnen die Auswahl der
Menüsprache der DVD.
Standardeinstellung ist Englisch.
Die Discmenüsprachen hängen von der Aufnahme
der DVD ab.
Kindersicherung:
Rufen Sie diese Option zur Einstellung der
Kindersicherung auf, um die Anzeige ungeeigneter
Inhalte zu vermeiden.
Optionen: KINDERSICHER, G, PG, PG 13, PGR, R,
NC17, ERWACHSENE.
Standardeinstellung ist ERWACHSENE.
Das Standard-Passwort lautet 8888.
Rückstellung:
Wählen Sie diesen Menüpunkt und drücken Sie
ENTER, um alle Einstellungen zu den
Werkseinstellungen zurückzustellen.
Hiervon ist auch die Regionaleinstellung auf mehrere
Regionen betroffen.
Page 69

D
E
29
Spezifikationen
Kompatible Discs: DVD / VCD / CD / MP3 / DIVX / DVD±R / DVD±RW
Signalsystem: PAL/NTSC
Bildschirmgröße: SDV48 Serie: 7"
SDV49 Serie: 9"
Auflösung: SDV48 Serie: 480 x 234 RGB
SDV49 Serie: 640 x 234 RGB
Frequenzgang: 20 Hz bis 20 kHz
Videoausgang: 1 Vp-p/75 Ohm, asymmetrisch (Composite Video)
Audioausgang: 1,4 Vrms/10 kOhm (Stereo Audio)
Audio Rauschabstand: Besser als 80 dB
Dynamischer Bereich: Besser als 85 dB
Laser: Halbleiter-Laser, Wellenlänge: 650 nm/795 nm
Spannungsversorgung: DC 9-12V
Steckernetzteil:
Eingang: 100-240 V, 50/60 Hz
Ausgang: 9 V DC, 1 A
Fahrzeugadapter:
Eingang: 12 V (nicht für 24 V Systeme)
Sicherung: SDV48–A / SDV49-A & SDV48–AM / SDV49-AM
Sicherung: SDV48-AC / SDV49-AC
Akku:
Typ: Lithium-Polymer
Kapazität: SDV48 Serie: 850 mAh
SDV49 Serie:1000 mAh
Spannung: 7,4 V
Leistungsaufnahme: <10W für alle Modelle
Fernbedienung Batterie:
Typ: CR2025
USB-Stick: Max. 8 GB, formatiert in FAT oder FAT32
SD/MMC-Karte: Max. 8 GB, formatiert in FAT oder FAT32
Betriebstemperatur: 0~40 °C
Lagertemperatur: 0~50 °C
Abmessungen:
DVD-Player: SDV48 Serie: 212 x 167 x 40 mm
SDV49 Serie: 245 x 190 x 42 mm
Monitor: SDV48 Serie: 212 x 167 x 25 mm
SDV49 Serie: 245 x 190 x 30 mm
Gewicht:
DVD-Player: SDV48 Serie: 0,70 kg
SDV49 Serie: 0,91 kg
Monitor: SDV48 Serie: 0,35 kg
SDV49 Serie: 0,52 kg
DVD
Page 70

30 D
E
DVD
Integrierter Akku
Der DVD-Player ist mit einem integrierten Lithium-Polymer-Akku für hohe Leistung und
maximale Spielzeiten ausgestattet. Der Akku hat keinen Speichereffekt und kann jederzeit
sicher geladen werden, unabhängig von seinem aktuellen Ladezustand.
Die Wiedergabezeit beträgt ca. 2 Stunden unter normalen Betriebsbedingungen.
Akku laden
Schließen Sie den DVD-Player an der mitgelieferten Spannungsversorgung an (entweder
Steckernetzteil oder 12 V Fahrzeugadapter) und stellen Sie ihn auf OFF/CHARGE.
Beim Einschalten wird der Ladevorgang unterbrochen, die Wiedergabe erfolgt jedoch über die
externe Spannungsquelle und der Akku wird NICHT entladen.
Ziehen Sie nach dem Laden stets das Netzteil oder den Fahrzeugadapter ab.
LED-Anzeige
Blinkt grün / rot = Player überprüft die Akkukapazität
Rot = Laden
Grün = Voll geladen
Blau = Eingeschaltet
Akku auswechseln
Der integrierte Akku kann nicht vom Verbraucher ausgetauscht werden, wenn er verbraucht ist
(ca. 300 Ladezyklen).
Bitte wenden Sie sich an Ihren NEXTBASE Kundendienst, um den Akku austauschen zu
lassen.
Warnanzeige A kku nahezu erschöpft
Die entsprechende Warnanzeige erscheint auf dem Bildschirm, wenn der Akku nahezu
erschöpft ist.
Schließen Sie die mitgelieferte Spannungsversorgung an (Fahrzeugadapter oder
Steckernetzteil), um die Player weiter zu benutzen oder zu laden.
Vor sich t : Ex plosionsgefahr bei falsch eingesetztem Akku. Der Akku muss mit einem Akku
gleichen Typs ersetzt werden.
Akku Ladezeiten
Die Ladezeit für einen entladenen Akku beträgt ca.:
SDV48 1,25 bis 1,75 Stunden
SDV49 2,15 bis 2,30 Stunden
Page 71

D
E
31
Akku-Recycling
Entsprechend der Richtlinie 2006/66/EC des Europäischen Parlaments vom September 2006
zu Batterien und Akkus und deren Entsorgung:
Entsorgung von verbrauchten Batterien (in der Europäischen Union und ander en
Ländern mit ähnlichen Sammelsystemen):
Dieses Symbol auf der Batterie oder de r Verpackung zeigt an, dass die in die sem
Produkt mitgelieferte Batterie nicht mit dem Hausmüll entsorgt werden darf.
Auf bestimmten Batterien wird dieses Symbol in Verbindung mit einem chemischen Symbol
benutzt. Die chemischen Symbole für Quecksilber (Hg) oder Blei (Pb) sind auf Batterien
aufgedruckt, die mehr als 0,0005 % Quecksilber oder 0,004 % Blei enthalten.
Helfen Sie bei der ordnungsgemäßen Entsorgung dieser Batterien, um potenziell negative
Auswirklungen auf die Umwelt und die Gesund heit der Menschen zu v ermeiden. Da s Recy cling
dieser Materialien hilft bei der Einsparung natürlicher Ressourcen.
Für den Fall, dass Produkte aus Sicherheits-, Leistungs- oder Datensicherheitsgründen einen
ununterbrochen Anschluss am integrierten Akku benötigen, darf dieser Akku nur durch
qualifiziertes Wartungspersonal ausgetauscht werden.
Zur ordnungsgemäßen Entsorgung des Akkus geben Sie das Produkt am Ende seiner
Nutzungsdauer an einer entsprechenden Sammelstelle für Elektroaltgeräte ab.
Für alle sonstigen Batterien werfen Sie bitte einen Blick auf den Abschnitt zur sicheren
Entfernung der Batterie aus dem Gerät. Geben Sie die Batterie an einer entsprechenden
Sammelstelle für Altbatterien ab.
Für weitere Informationen zum Recycling dieses Produkts oder von Batterien wenden Sie sich
bitte an Ihre örtliche Behörde, das Entsorgungsunternehmen, Ihren Fachhändler oder an den
NEXTBASE Kundendienst.
DVD
Page 72

32 D
E
DVD
Zerbrochener Bildschirm
Eine Flüssigkristallanzeige (LCD) ist eine mehrschichtige Komponente.
Unter der robusteren äußeren Kunststoffschicht hält das darunter liegende Glas-Sandwich die
LCD-Kristalle in ihrer Position, die ihrerseits wiederum in einer Flüssigkeit eingebettet sind. Bei
einem Unfall, insbesondere starkem Anstoßen mit einem spitzen Gegenstand, zerbricht das
Glas. Die Kunststoffschicht hält das darunter liegende Glas jedoch zusammen, sodass keine
Scherben austreten.
Dies ist ein besonderes Sicherheitsmerkmal, insbesondere für jüngere Benutzer, aber auch für
die Benutzung im Fahrzeug.
Das zerbrochene Glas zeigt gewöhnlich die angestoßene Stelle, von der ebenfalls Sprünge
ausgehen. Durch den Austritt der Flüssigkeit wird der Bildschirm unbrauchbar.
Symptome sind häufig dunkle runde Stellen, ein weißer Bildschirm ohne Bild und
möglicherweise einige mehrfarbige Zeile. Abhängig vom Bruch kann das Fernsehbild
möglicherweise noch in bestimmten Be reichen si chtbar se i n, aber nich t für la n ge. Unterhalb der
Kunststoffschicht sehen Sie möglicherweise schwarze Verfärbungen entlan g der Bru chlin ien.
Schäden dieser Art sind nicht durch die Herstellergarantie abgedeckt, da es sich um einen
Unfallschaden handelt, nicht um einen Fertigungs- oder Materialfehler.
Nachstehend sehen Sie Beispiele für beschädigte LCD-Bildschirme.
Es können jedoch Austauschbildschirme von Ihrem NEXTBASE Kundendienst installiert
werden.
A
B
A
B
Pixelausfälle
Dieses Produkt ist mit einem LCD-Bildschirm mit 480 x 3 x 234 Pix eln oder 640 x 3 x 234 Pix eln
ausgestattet, insgesamt 336.960 bzw. 449.280 Pixel.
Pixel können während der normalen Lebensdauer des Geräts ausfallen, ein Pixel entspricht
einer Ausfallrate von 0,0003 % / 0,0002 %.
Ein Pixelausfall pro Jahr gilt als normal und fällt nicht unter die Garantie.
Page 73

D
E
33
Störungserkennung
Problem Lösungsvorschlag
Kein Ton oder verzerrter
Ton.
Kein Vorw ärtsspringen
durch den Film möglich.
wird angezeigt. Die Tastenfunktion steht nicht zur Verfügung oder der
Das Bild ist verpixelt oder
verzerrt.
Die Disc kann nicht
wiedergegeben werden.
Erhöhen Sie die Lautstärke auf der Fernbedienung UND dem
Lautstärkeregler auf der Seite des Players (und des Monitors).
Vergewissern Sie sich, dass die Stummschalttaste MUTE nicht
gedrückt wurde. Beim Modell SDV48-AC / SDV49-AC
vergewissern Sie sich, dass das Verbindungskabel NICHT
angeschlossen ist, falls Sie auf 2 Bildschirmen verschiedene
Filme sehen.
Ein schneller Vorlauf durch den Vorspann und die
Copyright-Warnungen ist nicht möglich, das ist entsprechend
programmiert.
Tastendruck ist unzulässig.
Die Disc ist beschädigt oder verschmutzt.
Reinigen Sie die Disc oder benutzen Sie eine andere Disc.
Die Disc ist beschädigt oder verschmutzt.
Reinigen Sie die Disc oder benutzen Sie eine andere Disc.
DVD
Eine schlechte Wiedergabequalität kann durch Schmutz auf der
Laserlinse verursacht werden; benutzen Sie ein trockenes
Wattestäbchen (und etwas reinen Alkohol, falls vorhanden) und
wischen Sie die Linse SEHR vorsichtig ab. Die Linse wird von
Federn gehalten, daher ist äußerste Vorsicht geboten.
Kein Ton aus den
Lautsprechern.
Fernbedienung funktioniert
nicht.
Kein Bild. Vergewissern Sie sich, dass der Bildschirm fest geschlossen ist.
Überprüfen Sie den Player mit Ohrhörern. Arbeiten diese normal,
dann ist die Ohrhörerbuchse beschädigt und muss repariert
werden.
Nehmen Sie den Isolierstreifen der Batterie nach Lieferung
heraus.
Gehen Sie dichter an den Player heran oder nehmen Sie
Hindernisse aus dem Weg.
Tauschen Sie die Batterie (CR2025) aus.
Vergewissern Sie sich, dass der Bildschirm nicht zerbrochen ist.
Vergewissern Sie sich, dass mit DV/IN die DVD-Option gewählt
wurde.
Page 74

34 D
E
DVD
Problem Lösungsvorschlag
Streifen auf dem
Bildschirm.
USB-Medien werden nicht
wiedergegeben.
SD/MMC-Kartenmedien
werden nicht
wiedergegeben.
Vergewissern Sie sich, dass der Bildschirm nicht zerbrochen ist.
Permanente diagonale Streifen sind ein Hinweis auf Bruch. Das
Glas des Bildschirms fällt NICHT heraus, dies ist ein
Sicherheitsmerkmal.
Video, Musik und Fotos sind möglicherweise nicht im korrekten
Format.
Vergewissern Sie sich, dass es sich bei dem Video um offizielle
DivX (siehe Erläuterungen in dieser Bedienungsanlei tung) Musik,
MP3 und Foto JPEG-Formate handelt.
Schließen Sie USB-Sticks, die in FAT 32 formatiert sind, nur
direkt am USB-Port an.
Vergewissern Sie sich, dass das Speichermedium nicht
beschädigt ist.
Video, Musik und Fotos sind möglicherweise nicht im korrekten
Format.
Vergewissern Sie sich, dass es sich bei dem Video um offizielle
DivX (siehe Erläuterungen in dieser Bedienungsanlei tung) Musik,
MP3 und Foto JPEG-Formate handelt.
Vergewissern Sie sich, dass die SD/MMC-Karte korrekt
eingesteckt und nicht beschädigt ist.
DVD-Player funktioniert
nicht.
Monitor funktioniert nicht. Stellen Sie den Einschalter auf ON. Es befindet sich kein Akku im
Stellen Sie den Einschalter auf ON. Der Akku ist möglicherweise
erschöpft. Schließen Sie den Fahrzeugadapter oder das Netzteil
an Eingang DC-IN an. Vergewissern Sie sich, dass die
LED-Statusanzeige des Players leuchtet. Leuchtet die
LED-Statusanzeige des Players nicht, so überprüfen Sie Kabel
und Anschlüsse auf Schäden und korrekten Sitz.
Überprüfen Sie die Sicherung des Fahrzeugadapters (siehe
Erläuterungen in dieser Bedienungsanleitung). Überprüfen Sie
erneut mit dem Steckernetzteil.
Monitor, daher vergewissern Sie sich, dass die externe 12 V
Versorgung funktioniert, indem Sie sie direkt am Eingang DC-IN
des Monitors anschließen. Funktioniert dies, so überprüfen Sie
Kabel und Anschlüsse auf Schäden und korrekten Sitz.
Überprüfen Sie die Sicherung des Fahrzeugadapters (siehe
Erläuterungen in dieser Bedienungsanleitung). Überprüfen Sie
erneut mit dem Steckernetzteil.
Page 75

D
E 3
Problem Lösungsvorschlag
5
Monitor hat keinen Ton und
kein Bild.
Zweiter Bildschirm in einem
SDV48-AC / SDV49-AC
System zeigt nicht das Bild
vom anderen DVD-Player.
Akku wird nicht geladen. Vergewissern Sie sich, dass der der Hauptschalter auf OFF /
Der Player läuft mit dem
Überprüfen Sie das AV-Verbindungskabel zwischen DVD-Player
und Monitor auf korrekten Anschluss.
Vergewissern Sie sich, dass der Monitor stromversorgt ist, siehe
Abschnitte weiter vorn.
Drücken Sie DVD / IN auf der Fernbedienung, um diese Funktion
zu aktivieren.
CHARGE steht und dass die externe Spannungsversorgung
korrekt angeschlossen ist.
Vergewissern Sie sich, dass die GRÜNE / ROTE Akkuanzeige
auf dem Player leuchtet. Besteht das Problem weiterhin, dann ist
möglicherweise der Akku schadhaft. Wenden Sie si ch an den
NEXTBASE Kundendienst.
Entladen Sie den Akku vollständig.
DVD
Akku, aber nur für kurze
Zeit.
DVD wird nicht
wiedergegeben und
„Falsche Region“ wird
angezeigt.
ZOOM wird auf dem
Bildschirm angezeigt,
sofern diese Funktion
gewählt ist.
Laden Sie den Akku über das Netzteil und stellen Sie den
Schalter auf OFF / CHARGE. Warten Sie ab, bis die GRÜNE
Ladeanzeige leuchtet.
Der Akku ist verbraucht. Wenden Sie sich an den NEXTBASE
Kundendienst.
Der Regionalcode der Disc entspricht nicht der Region des
Players.
Stellen Sie zu den Werkseinstellungen zurück, um die Region zu
allen Regionen zurückzustellen. Siehe Abschnitt
EINSTELLUNGEN in dieser Bedienungsanleitung unter
VOREINSTELLUNGEN.
Das ist völlig normal und KEINE Fehlfunktion. Während der
Zoomfunktion funktionieren SCHNELLER VORLAUF,
RÜCKLAUF, VORHERIGER und NÄCHSTER nicht als
Navigation aufwärts, abwärts, links und rechts durch das
vergrößerte Bild. ZOOM wird angezeigt, um Sie hieran zu
erinnern. Verlassen Sie die Zoomfunktion, um die
Normalfunktionen SCHNELLER VORLAUF, RÜCKLAUF,
VORHERIGER und NÄCHSTER wieder zur V er fügung zu haben.
Page 76

SDV48_49 SERIES-NB ENG MANUAL A2
SDV48_49 SERIE NB DE BEDIENUNGSANLEITUNG A2
 Loading...