

Page 1
Instruction Manual
Page 2

Page 3

INTRODUCTION TO USING YOUR BIKECAM
The Nextbase range of cameras have been designed specifically with ease of use in mind, it is
recommended NOT to change the default settings, which have been carefully selected to give the
best performance for day to day use.
Basic operation.
The BikeCam is set to record video continuously, in files of just 3 minutes in length. There is no
gap between each video file. This means that each video file is a manageable size should you need
to download and send to your insurance company etc. Eventually your MicroSD card will fill up with
video files but don't worry, the camera automatically deletes the oldest file to make space for new
recordings. This way you never run out of space and have plenty of riding historical evidence saved.
Typically a 16Gb card will store the last 2 hours of riding footage.
The Time and Date are automatically set upon the camera from satellite data, however it will always
set Greenwich Mean Time (GMT). For summer months where the clocks are brought forward or for
driving in other countries, adjust the time in the General Settings Menu (Time Zoneone / DST) to
account for the time difference from GMT by adding or subtracting 1 hour etc, if required.
There are 3 modes of camera operation. Press the MODE button to select accordingly.
Video. The default mode when the camera is turned on, for video recording.
Photo. Allows you to take still photographs.
Playback. Allows you to view recorded video or photographs upon the cameras LCD screen.
Automatic Start / Stop Technology. The BikeCam senses power supplied to the cigarette power
socket as soon as the vehicle ignition is turned on and will start to record automatically.
When the ignition is turned off, the BikeCam will perform an automatic shutdown process.
1. Tips for capturing best video footage:
1.1 Reduce the amount of sky in the picture, by angling the view of the camera towards the road.
Too much sky will make the road appear darker due to the automatic exposure compensation.
2. Tips for stable memory card performance:
2.1 Periodically reformat the memory card. Every 2-3 weeks we recommend that you reformat
the memory card. This will wipe any files from the card and set it up afresh for continued use
with your BikeCam.
Of course, you should only do this AFTER you've downloaded any files from the card that you
may want to keep, as formatting the card will remove all content. Press MENU twice and
choose the Format Card option. Follow the on-screen instructions accordingly.
2.2 Switch off the BikeCam before removing the SD memory card, to prevent the chance
of damage being caused to the memory card or the files stored upon it, turn OFF the
BikeCam before removing or inserting the memory card.
3. Tips for using the playback software:
3.1 Copy files from the memory card to your PC and view the files from your PC directly, using
the supplied playback software.
3.2 Connect to the BikeCam using the free FinalCam application and view the recorded video files
upon your smartphone or tablet.
03
Page 4

TABLE OF CONTENTS
INTRODUCTION TO USING YOUR BIKECAM
TABLE OF CONTENTS
PRECAUTIONS
CAUTIONS ON USING THIS PRODUCT
PRODUCT SPECIFICATION
PACKAGE CONTENTS
PRODUCT FEATURES
PARTS & CONTROLS
INSTALLATION
VIDEO MODE
PHOTO MODE
PLAYBACK MODE
GENERAL SETTINGS MENU
FINALCAM (Wi-Fi) APP FOR ANDROID
FINALCAM (Wi-Fi) APP FOR iOS
.............................................................................................................
..............................................................................................................
................................................................................................................
..............................................................................................................
.................................................................................................
......................................................................
.........................................................................................
.................................................................................................
.................................................................................................
...................................................................................................
........................................................................................................
.......................................................................................
........................................................................
..................................................................................
................................................................
03
04
05
05
06
07
07
08
10
18
21
23
25
27
37
MASS STORAGE & PC CAMERA
PLAYBACK SOFTWARE FOR WINDOWS
PLAYBACK SOFTWARE FOR MAC
TROUBLING SHOOTING
..............................................................................................
................................................................................
..............................................................................
...................................................................
04
47
48
56
62
Page 5

PRECAUTIONS
Please read this manual carefully before operation and keep it for future reference. It will be helpful
should you encounter any operational problem.
CAUTION:
LCD:
WEEE:
To reduce the risk of electric shock, do not perform any servicing other than that
contained in the instruction manual unless you are qualified to do so.
Have the unit serviced by a qualified service technician if;
The unit does not seem to operate normally.
The unit exhibits a marked change in performance.
A Liquid Crystal Display (LCD) screen is a multilayer complex component, containing
345,600 pixels. Pixels can however fail during normal product life. 1 pixel = 0.0003%
failure rate, and one pixel failure per year of operation is considered normal and not
a cause for concern.
Disposal of Waste Electrical and Electronic Equipment and/or Battery by users
in private households in the European Union.
This symbol on the product or on the packaging indicates that this can not be disposed
of as household waste. You must dispose of your waste equipment and/or battery by
handing it over to the applicable take-back scheme for the recycling of electronic
equipment and/or batteries. For more information please contact your local household
waste disposal office.
CAUTIONS ON USING THIS PRODUCT
1. Do not obscure the view of the road ahead or impede the deployment of any airbags in the event
of an accident.
2. When not in use, please disconnect the power supply from both the 12Vdc outlet of your bike and
the device itself. If this not practical, then turn off the BikeCam.
3. Only clean the device with a soft dry cloth, for tough dirt, apply some neutral detergent diluted in
5 to 6 parts water to a soft cloth.
Note that alcohol, thinner, benzene etc could cause damage to the paint or coatings.
4. Avoid making contact with the lenses as damage may be caused.
5. If required clean the glass lens carefully using spectacle lens cleaning fluid on a soft cloth only.
6. The video recordings made by this Digital Video Recorder are intended for personal use only.
7. Publication of the recordings on Youtube, the internet or other methods are subject to the
Data Protection Act and the requirements thereof must be adhered to.
If the Digital Video Recorder is to be used within a commercial environment, i.e. bike courier use,
then the CCTV regulation apply also, in addition to the Data Protection Act regulations. This
includes labelling to identify the use of CCTV is taking place, the omission of Audio recording and
informing the relevant authorities of who controls the data.
8. Video playback upon the device which is visible to the rider is prohibited or restricted in some
countries or States. Please adhere to these laws.
9. Whilst riding, do not adjust the controls of your device as this is a distraction to riding.
05
Page 6

PRODUCT SPECIFICATION
Model Number / Name
Power Requirements
Power Supply
Sensor Resolution
Wide Angle Lens (front) Type / Angle / Aperture
Recording Resolution (Max.)
Screen Size
Screen Resolution
Screen Ratio
Card Reader
SD Card
(Recommended Type)
SD Card Recorded File
Capacity
(based on default settings)
Recording Format
WiFi
Internal Battery
Unit Dimensions
Unit Weight
NBDVR-RIDE / NEXTBASE RIDE BIKECAM
5V / 1.5A
12-24Vdc power cable:
Fuse Type: 20mm / 2A
Output: 5Vdc
Hard-wire cable:
Fuse Type: 20mm / 2A
Output: 5Vdc
14M Pixel (14,000,000 Pixel)
6G / 110° / F2.0
1920 x 1080 @ 30fps
1.5"
480 (W) X 240 (H) pixels x RGB
4:3
MicroSD, Class 6-10, upto 32GB
8-32GB, Class 10 (30mb/s), for best results use a recognized
brand
8GB Micro SD = 60mins of recording
16GB Micro SD = 120mins of recording
32GB Micro SD = 240mins of recording
MOV
802.11b/g/n
Lithium-ion 3.7V / 750mAh (approx. 50mins recording time)
Battery design allows the 'Auto Power Off' feature to function in
event of power loss upon the bike. It is not intended as an
alternative power source to replace the supplied cigarette power
adaptor or hard-wire kit.
110 x 52 x 57mm
168g
06
Page 7
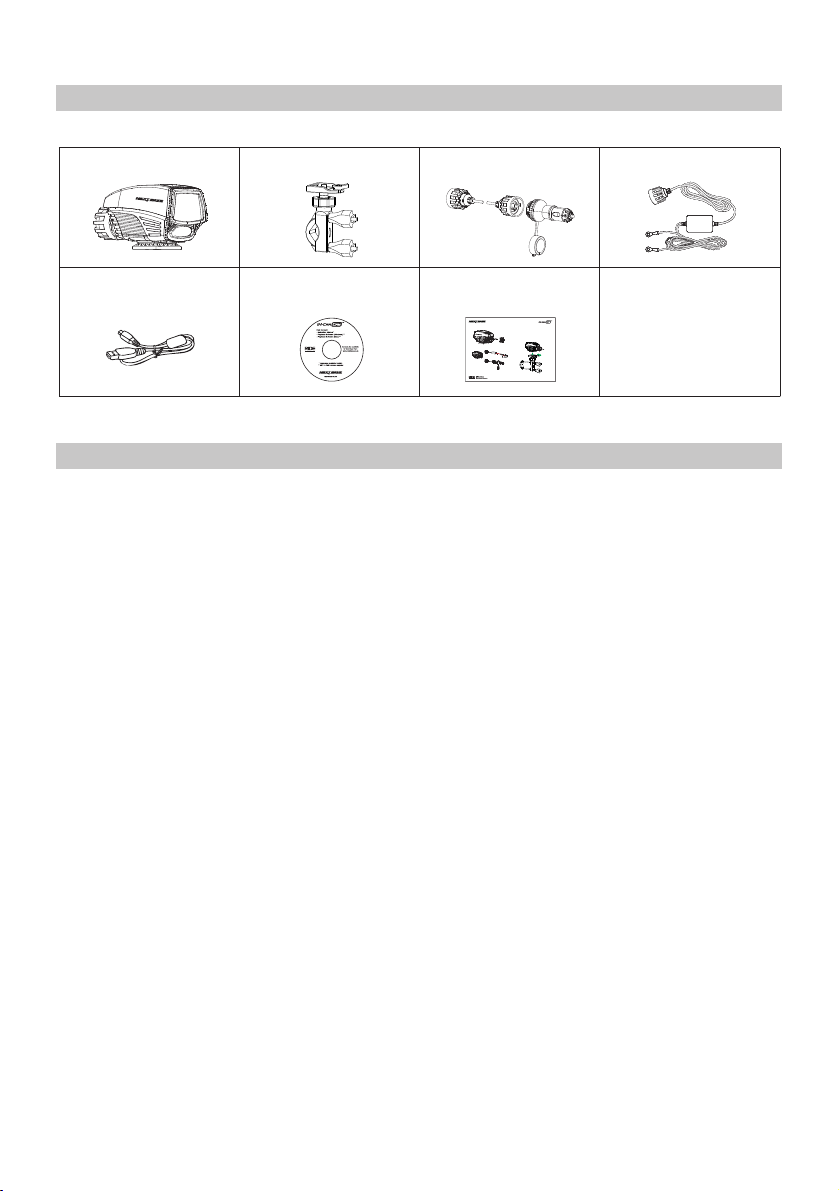
PACKAGE CONTENTS
Please check the contents of your BikeCam product.
BikeCam
Bar Mount
Power Cable
Hard-wire Cable
USB Cable
Manuals & Software
Disk
Quick Start
Guide
Quick Start Guide
3. Mounting
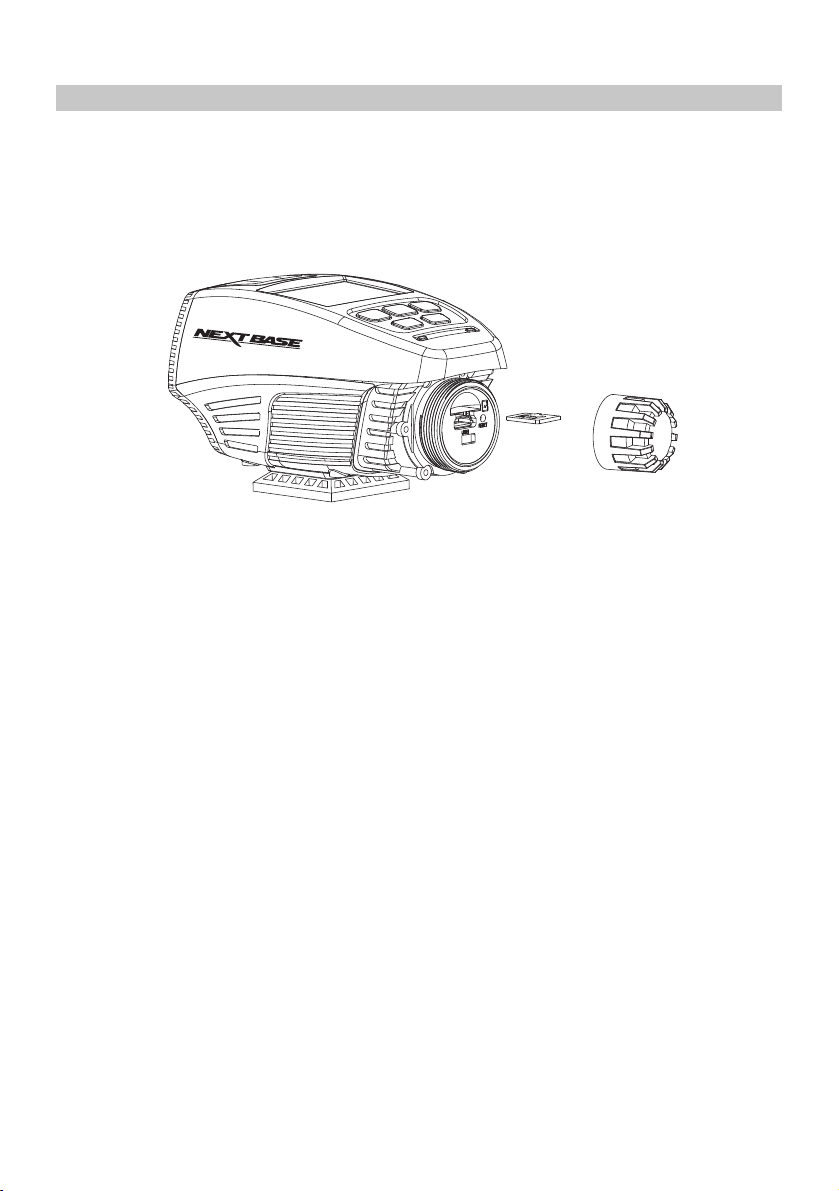
1. Insert memory card
Fit the bar mount and install the BikeCam.
Remove the waterproof cover and insert MicroSD card, 8-32Gb Class10.
A) Release the U Bolt clamp, locate mount and re-tighten thumb screws.
B) Gently open the sprung clip 90 degrees and lower the BikeCam onto
the mount, ensuring that is it engaged fully.
Pull the clip back through 90 degrees (to the end stop) making sure
the BikeCam is securely attached to the mount.
C) Release the locking ring in order to adjust the final position of the
BikeCam, tighten the locking ring to fix position.
2. Connect power
Choose the preferred power cable option (hard-wired or standard) and fit to
the BikeCam.
Note:
- When using the hard-wired cable please follow the detailed instructions
within the manual, or damage to the BikeCam can result.
B
OR
C
A
Product appearance may differ slightly to that shown above.
PRODUCT FEATURES
Thank you for purchasing this NEXTBASE product, in this section we will outline some of the key
features that are available with this device.
Wi-Fi Connectivity
Connect the BikeCam to your smartphone, allowing you to control the basic functions of your
BikeCam and for viewing recordings on your smartphone or tablet.
‘FinalCam’ application is required, available for free download from Google Play (Android) and the
App Store (iOS).
GPS Logger
GPS co-ordinates, date and time are recorded, the journey can then be viewed on a map using the
supplied Windows / Mac playback software.
G Sensor / File Protection
In the event of an impact the device will automatically 'protect' the recording, stopping the file from
being over-written.
Individual files can also be 'protected' when viewed within playback mode.
Waterproof (IPx6)
The BikeCam is designed to withstand heavy splashing and rainfall. However, pro-longed exposure
is not recommended.
Automatic Start / Stop Technology
The BikeCam senses power supplied to the cigarette power socket as soon as the bike’s ignition
is turned on and will start to record automatically.
When the ignition is turned off, the BikeCam will perform an automatic shutdown process.
Note:
- Not available if the hard-wire kit is used directly with the battery.
Windows is a registered trademark of Microsoft Corporation in the U.S. and other countries.
Apple, iPhone, iTunes, Mac and iOS are trademarks of Apple Inc., registered in the U.S. and other countries.
Google, Google Maps, Google Play and Android are trademarks or registered trademarks of Google Inc.
‘FinalCam’ software is created and distributed by Yu Xiping in association with TioTech Company Ltd.,
Yu Xiping remains the copyright owner.
07
Page 8
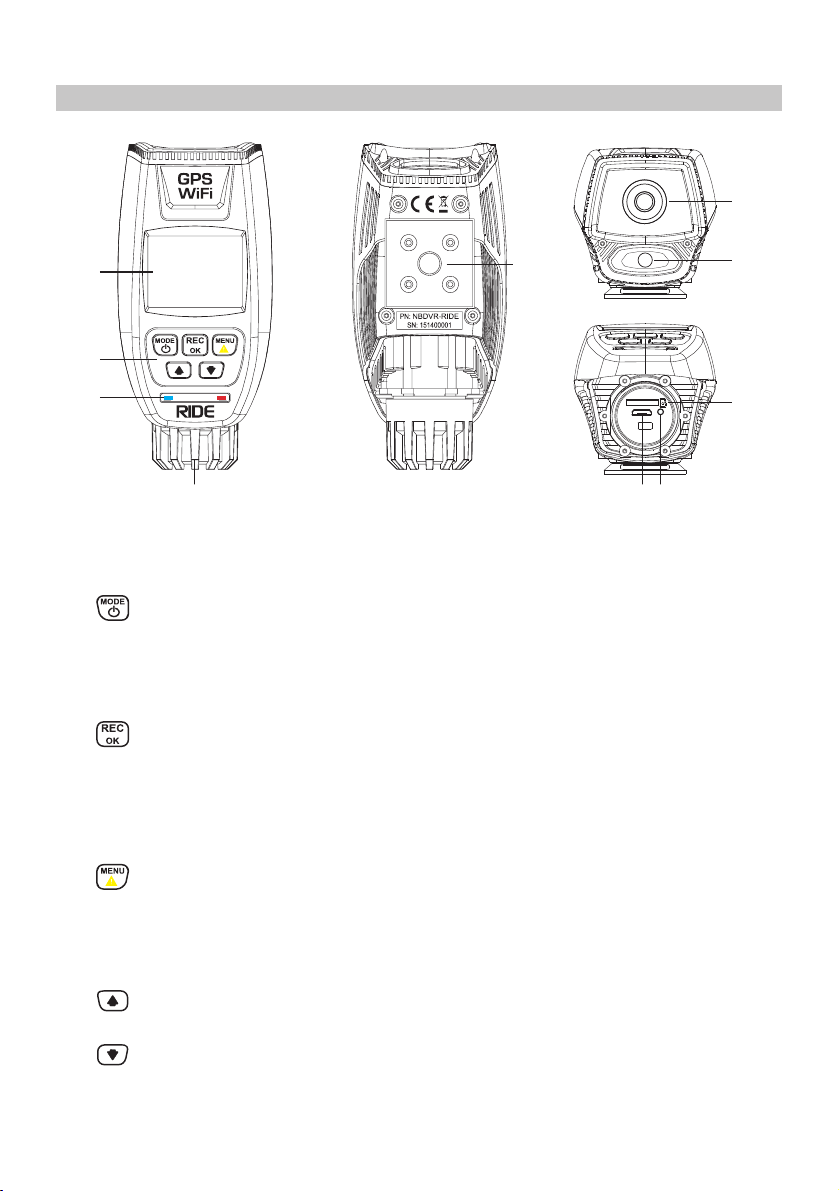
PARTS & CONTROLS
10
1
5
9
2
3
4
RESET
USB
6
7
8
1. BikeCam screen
2. BikeCam controls
Mode / Power
Mode:
Press to change between video, photo or playback modes.
Power:
Press and hold for 2 seconds to turn on and off the BikeCam.
Record / OK
Record:
Press to start or stop a recording when in video mode, or take a photo when in photo
mode.
OK:
Press to confirm selection when in menus.
Menu / File Protect
Menu:
Press to open the menu within current mode, press twice to open the general settings.
File Protect:
Press whilst recording to protect the current file in event of an emergency situation.
UP
Press to navigate up within menus and to move to the previous file when in playback mode.
DOWN
Press to navigate down within menus and to move to the next file when in playback
mode.
08
Page 9
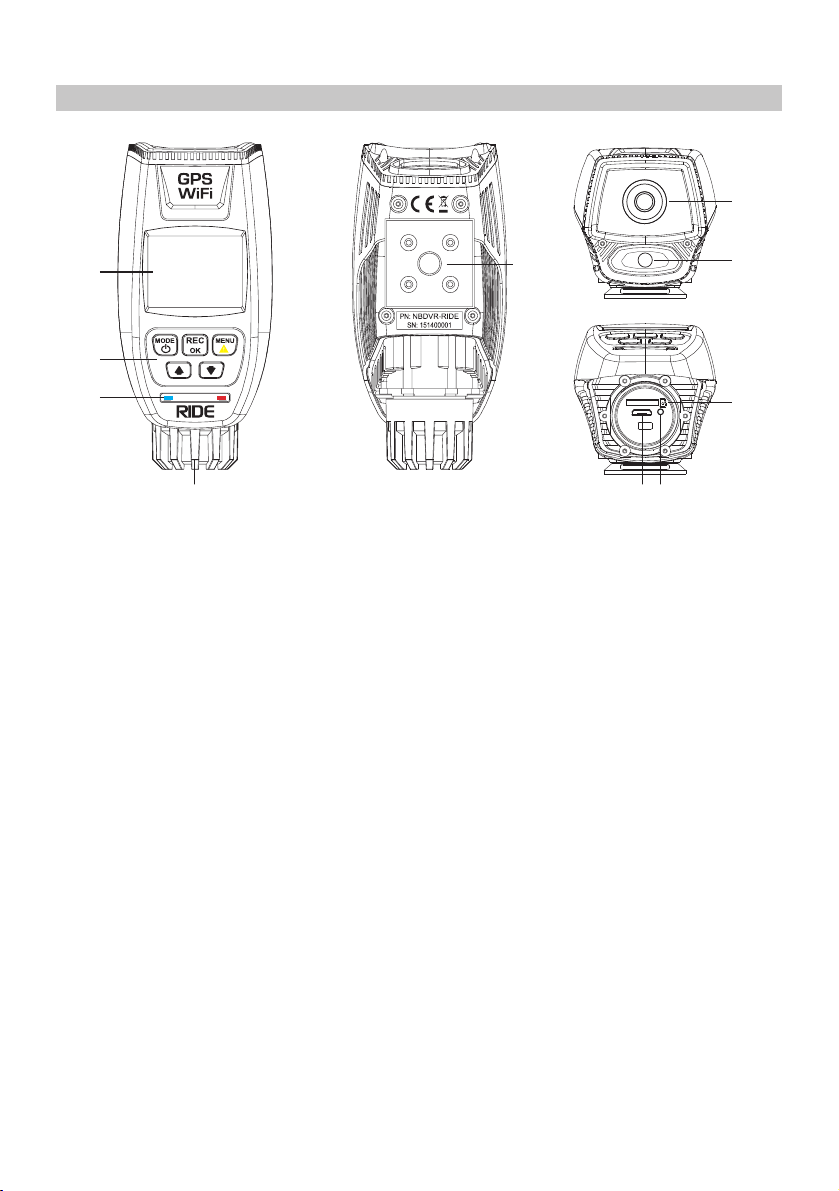
PARTS & CONTROLS (CONTD.)
10
1
5
2
3
4
RESET
USB
6
7
3. LED indicators
Blue = charging / Red = power on / Red flashing = recording
4. End cap
Remove to gain access to the MicroSD slot, Micro USB 2.0 socket and RESET button.
5. Base plate
Used to secure the BikeCam to the supplied Bar Mount, see page 15 for details.
The base plate also has a threaded insert (1/4" UNC type) that can be used to mount the
BikeCam with a variety of camera or professional RAM mounts, see page 16 for details.
6. Micro USB 2.0 socket
Connect the supplied 5Vdc power cable or hard-wire cable here.
Note:
- Pull back the sleeve from the power cable connector so you can ensure the MicroSD
connector is correctly located BEFORE tightening the power cable to the BikeCam.
- Do not over tighten, or damage may result.
9
8
7. RESET button
In the unlikely event the BikeCam becomes unresponsive press the RESET button to restart.
8. MicroSD card slot
9. LED torch
10. Camera lens
09
Page 10
INSTALLATION
Please read the information contained within this manual to ensure the installation of the BikeCam is
carried out correctly and safely.
1. Insert memory card
Remove the end cap from the rear of the BikeCam and insert a MicroSD card (8-32Gb Class10).
Take care to ensure that the MicroSD card is the correct way round (gold contacts facing down).
Push the memory card until it clicks into place. Use the edge of a small coin (or similar object) to
push the memory card in place if required, a second push inwards will release the memory card.
Note:
- Do not remove or insert the memory card when the BikeCam is turned on, doing so may
damage the memory card and corrupt any files within.
10
Page 11
INSTALLATION (CONTD.)
2. Power the BikeCam
The BikeCam is supplied with two types of power cable, a standard 12Vdc power cable (cigarette
plug) and a 12Vdc hard-wire cable. Both convert 12Vdc down to the required 5Vdc to operate your
BikeCam correctly.
Choose the preferred power cable to best suit your needs.
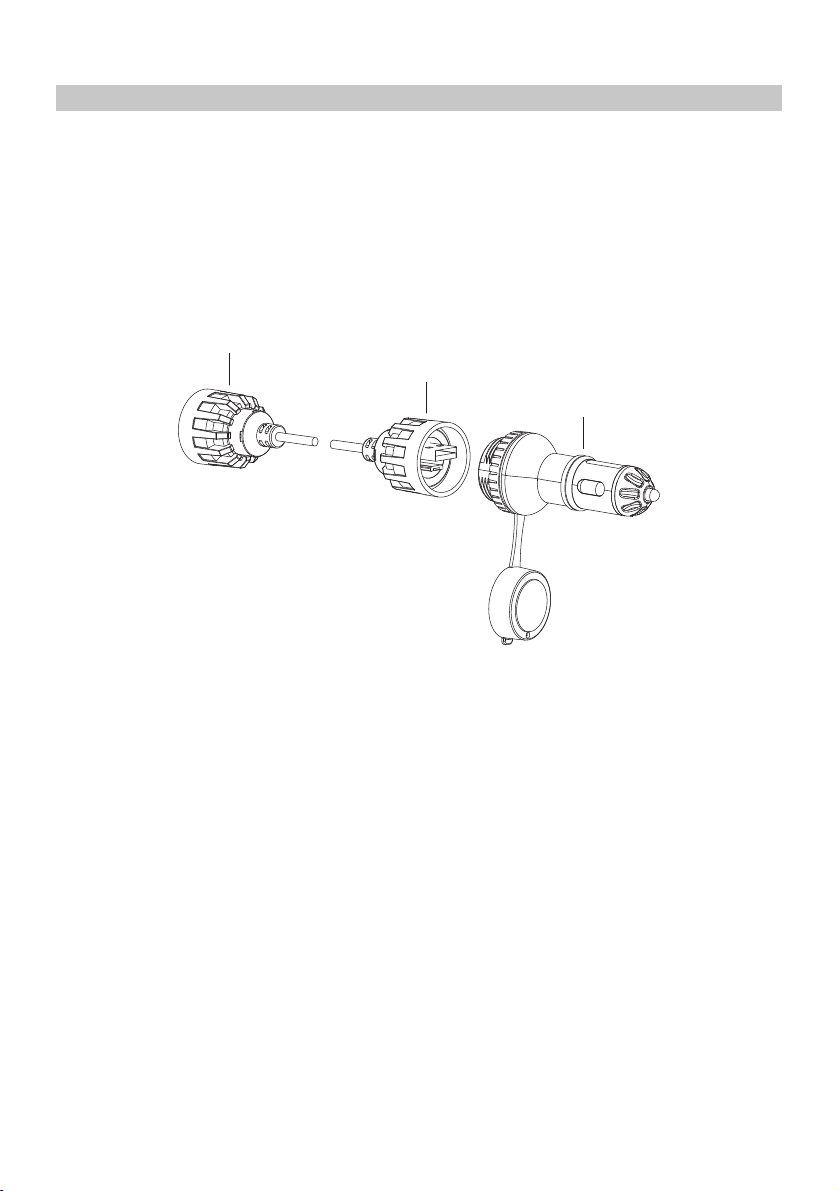
Standard power cable:
For use with a 12-24Vdc outlet typically found in vehicles and some motorbikes.
1
2
3
1. Waterproof connector for BikeCam
Before connecting the power cable to the BikeCam, pull back the adaptor threaded housing to
expose the Mini-USB connector and locating lug. Make sure these are both correctly aligned with
the BikeCam sockets and then insert, re-locate the adaptor threaded housing and tighten, finger
tight only.
2. Waterproof connecter for the suppled car adaptor
Remove the dust-cover and then follow same procedure as described above.
3. 12-24V cigarette plug adaptor for use with vehicle’s 12-24Vdc output.
The adaptor uses a ‘rubber grommet’ to ensure a water-tight fit between the adaptor and socket.
There are two alternatively sized grommets supplied with the BikeCam, if required remove the
original grommet and replace, to ensure a moisture proof and secure fitting.
Note:
- The cigarette plug adaptor is fitted with fuse (2A 20mm) in order to protect the BikeCam and
power source from damage as a result of voltage / current surges, short circuit, cable damage
or product failure.
The fuse is user-replaceable by unscrewing the end-cap, take care when removing the
end-cap as there is a spring within the assembly. Replace the fuse and re-assemble.
11
Page 12
INSTALLATION (CONTD.)
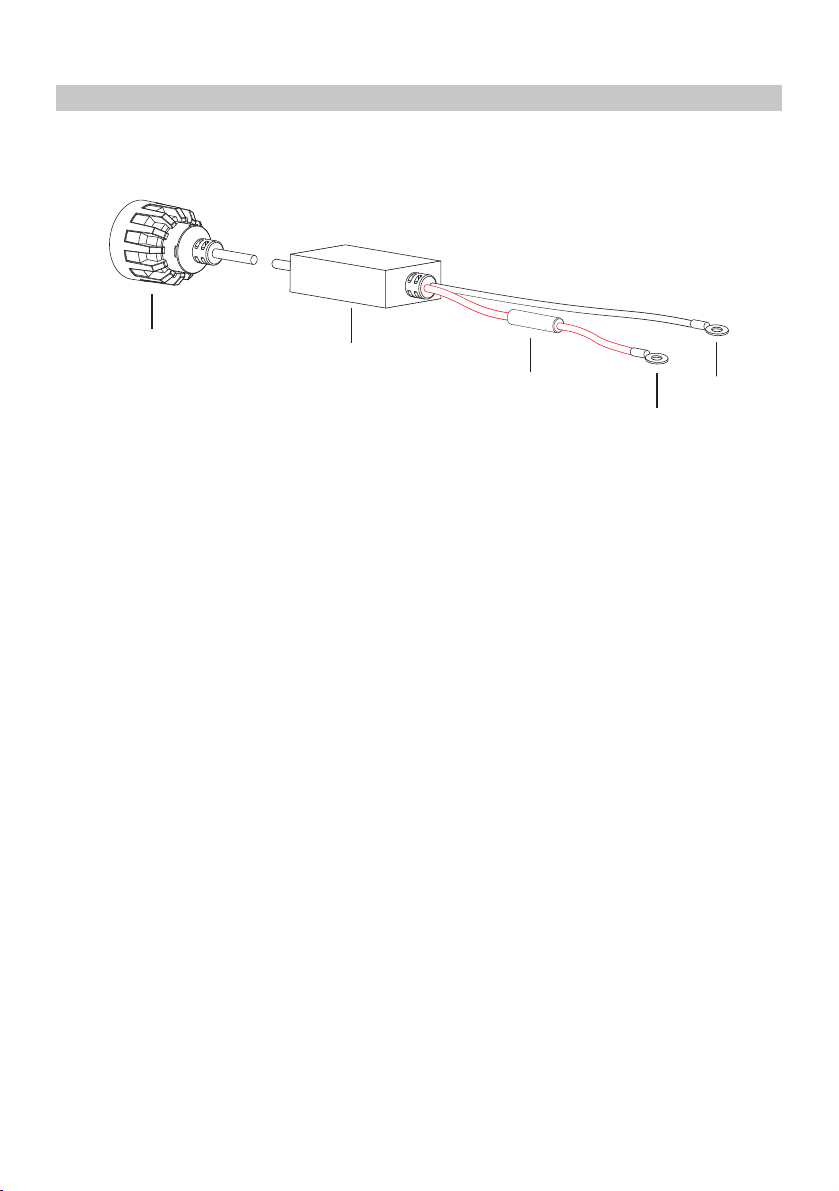
Hard-wire power cable:
For use when a 12-24Vdc outlet is not available, or when a permanent installation is required.
1
1. Waterproof connector for BikeCam
Before connecting the power cable to the BikeCam, pull back the adaptor threaded housing to
expose the Mini-USB connector and locating lug. Make sure these are both correctly aligned with
the BikeCam sockets and then insert, re-locate the adaptor threaded housing and tighten, finger
tight only.
2. 12-24Vdc to 5Vdc convertor
The converter changes the 12-24Vdc power supply into 5Vdc output, as required by the
BikeCam.
It also has the function of protecting both the BikeCam and power source (motorbike) from
over-voltage, over-current, over-temperature and short-circuit.
3. In-line fuse holder
The hard-wire cable is fused to protect the BikeCam and power source from damage as a result
of voltage / current surges, short circuit, cable damage or product failure.
The fuse (2Amp 20mm) is user-replaceable, unscrew the housing, replace the fuse and
re-assemble.
4. Positive (+) ring terminal on red cable
Positive ring terminal (6mm inner diameter), for connection to the positive pole on the battery.
5. Negative (-) ring terminal on black cable
Negative ring terminal (6mm inner diameter), for connection to the negative battery pole or
motorbike chassis to ground the hard-wire cable.
2
3
5
4
Note:
- The hard-wire power cable is fitted with fuse (2A 20mm) to protect the BikeCam and power
source from damage as a result of voltage / current surges, short circuit, cable damage or
product failure.
The fuse is user-replaceable by unscrewing in-line fuse housing, replace the fuse and
re-assemble.
See next page for hard-wire kit installation instructions.
12
Page 13
INSTALLATION (CONTD.)
Hard-wire power cable installation:
These instructions provide the necessary information to install the hard-wire cable properly and
safely. Before beginning the installation process, please read these instructions carefully.
The hard-wire cable has been supplied with ring terminals to allow quick and easy connection directly
to the motorbikes battery.
Planning for the 2.5m long cable is important, the cabling has sufficient length to allow the black
box (12-24Vdc to 5Vdc converter) to be placed in an area which is NOT exposed to rain directly
i.e. under the seat, under cowlings or in the headlight.
Switch off the ignition and ensure the motorbike is stable, before work commences upon it.
If in any doubt, please contact a vehicle technician prior to starting installation.
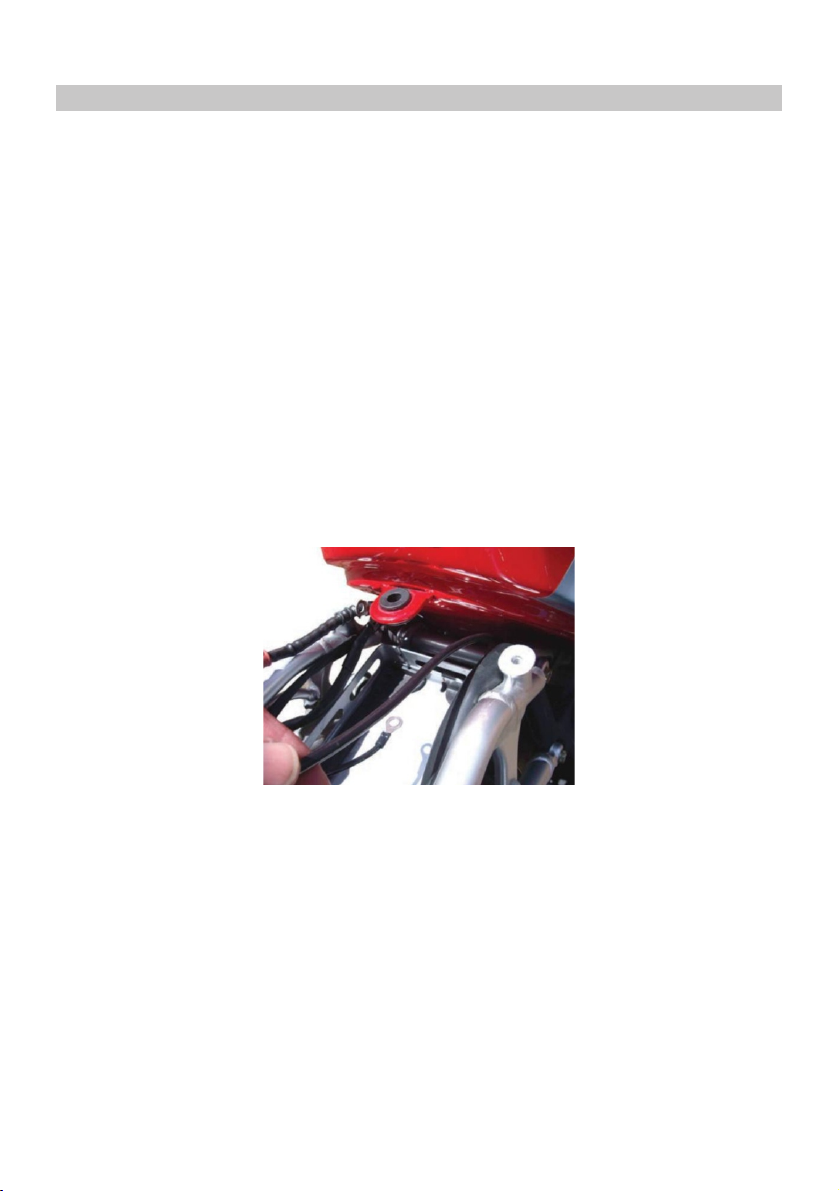
Step 1: Running the hard-wire cable from the BikeCam to the battery
1.1 Starting from the BikeCam connector route the cable towards the battery. Making
sure there is sufficient cable to connect and or adjust the BikeCam, once installation
is complete.
Image for illustration purposes only.
1.2 Tidy any excess cable using cable clips and secure the cable to a convenient
location to prevent rattles.
13
Page 14
BIKE INSTALLATION (CONTD.)
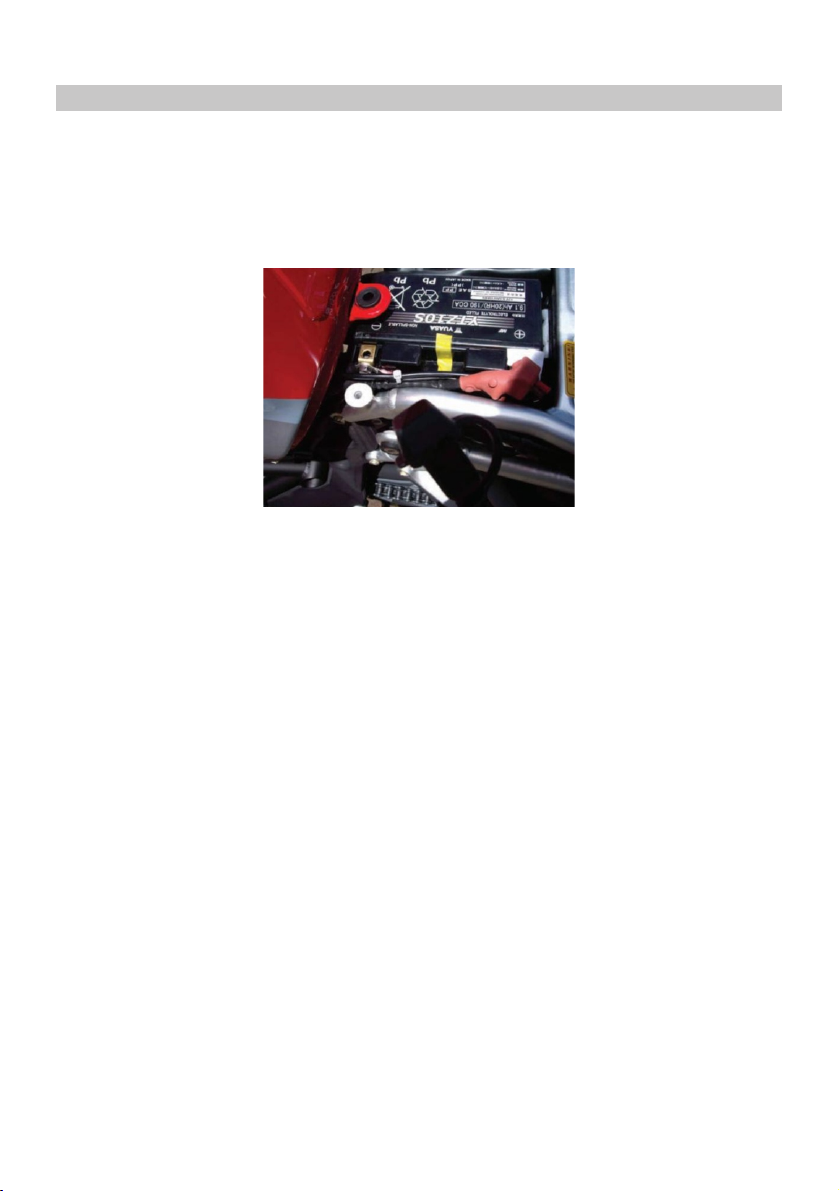
Step 2: Connecting the hard-wire cable to the battery
2.1 Connect the positive (red) ring terminal to the positive (+) pole of the battery.
2.2 Connect the negative (black) ring terminal to the negative (-) battery pole or to the
motorbike chassis to ground the hard-wire cable.
Image for illustration purposes only.
Warnings:
- Protect yourself from an electric shock:
When connecting the hard-wire kit to the battery, use a screwdriver or spanner with an insulated
handle.
Handle any cables connected to the battery by their insulated areas only.
- Danger of explosion:
Ensure that the positive terminal connection cable does not come into contact with a fuel line
(e.g. petrol line).
- Danger of chemical burns:
Protect your eyes and skin against chemical burns caused by acid (sulphuric acid) upon contact
with the battery.
Wear acid-resistant glasses, clothing and gloves
If your eyes or skin come into contact with sulphuric acid, rinse the affected part of the body with
plenty of clear running water and seek immediate medical assistance!
- Failure to follow these safety precautions and instructions could result in damage to the
product or vehicle, which will not be covered under the manufacturers warranty.:
- Do not bypass the in-line 2A fuse.
- Fit the Hard-wire cable away from any excess heat, e.g. the engine or exhaust.
- Failure to use the supplied installation parts and/or hardware will void the product warranty.
- Failure to connect the product as instructed, may result in discharge of the vehicle battery.
Should you experience any difficulties during installation please do not hesitate
to contact our technical support team: support@nextbase.co.uk
14
Page 15

INSTALLATION (CONTD.)
Mounting
The BikeCam is supplied with a bar mount, this is designed to allow the quick and easy installation
of the BikeCam without the need for any tools or technical knowledge.
The BikeCam also has a threaded insert (1/4" UNC type) in the base plate, this can be used to mount
the BikeCam with a variety of camera or professional RAM mounts that are readily available.
Bar Mount:
The bar mount is easy and quick to install, simply follow the instructions given below.
A) Release the U Bolt clamp, locate mount upon a suitably size bar and re-tighten thumb screws.
B) Gently open the sprung clip 90 degrees and lower the BikeCam onto the mount, ensuring
that it is engaged fully.
Push the clip back through 90 degrees (to the end stop), making sure the BikeCam is
securely attached to the mount.
C) Release the locking ring in order to adjust the final position of the BikeCam, tighten the
locking ring to fix position.
A
B
C
15
Page 16
INSTALLATION (CONTD.)
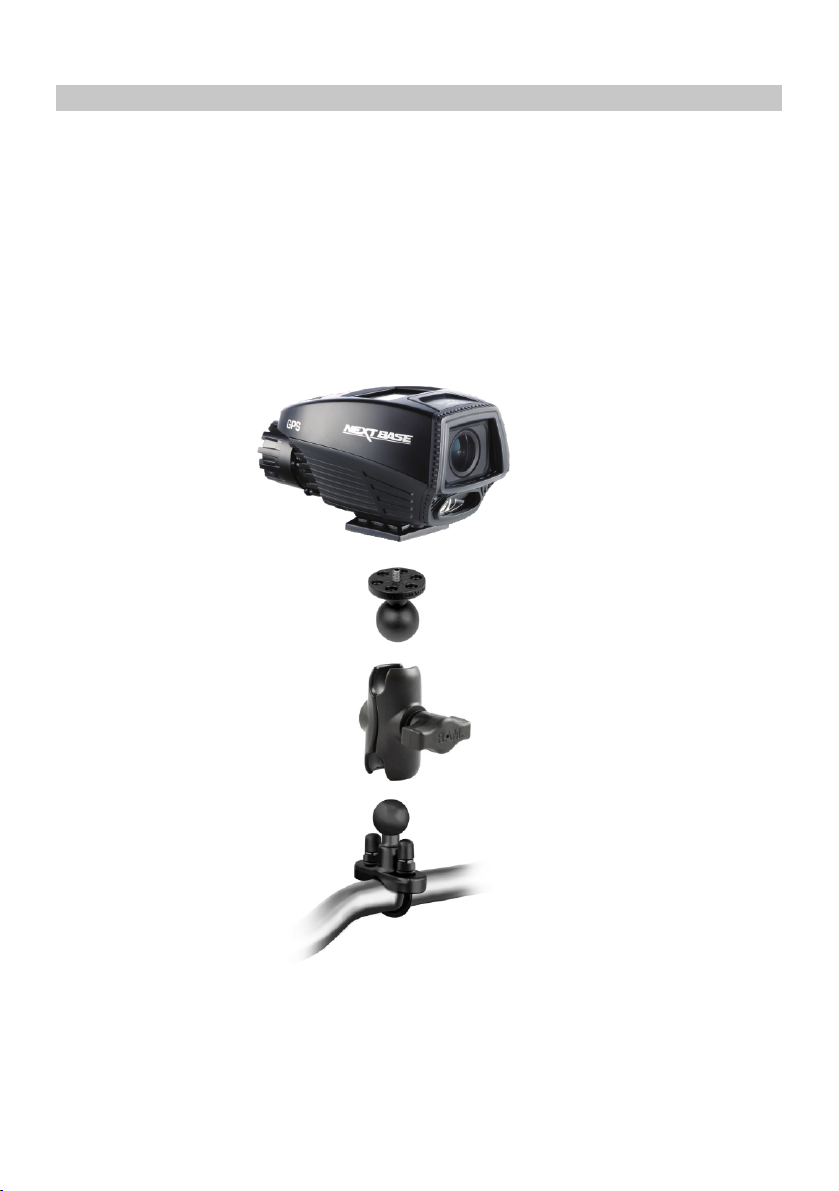
Advanced RAM mounting system:
When using the BikeCam with a motorbike, it is recommended to use a professional RAM mounting
system. The system is readily available to buy online, simply enter the given part numbers into your
search engine.
The base plate of the BikeCam has a threaded insert to attach the RAM fitting (PN: B-366U).
Follow the instructions supplied with the RAM fittings to complete the installation to ensure the best
results.
The recommended RAM mount system comprises of three parts, as shown below.
®
PN: B-366U
PN: B-201A
PN: B-231ZU
Notes:
- When using RAM mount PN: B-366U above, please use a 1/8” hex key to lower the protruding
thread to a minimum amount, in order to avoid damage to the base of the camera.
- To ensure a secure fitting between the BikeCam and the RAM ball fitting (PN: B-366U) a suitably
sized ‘star washer’ is required. This will prevent loosening of the fitting due to vibration.
16
Page 17
INSTALLATION (CONTD.)
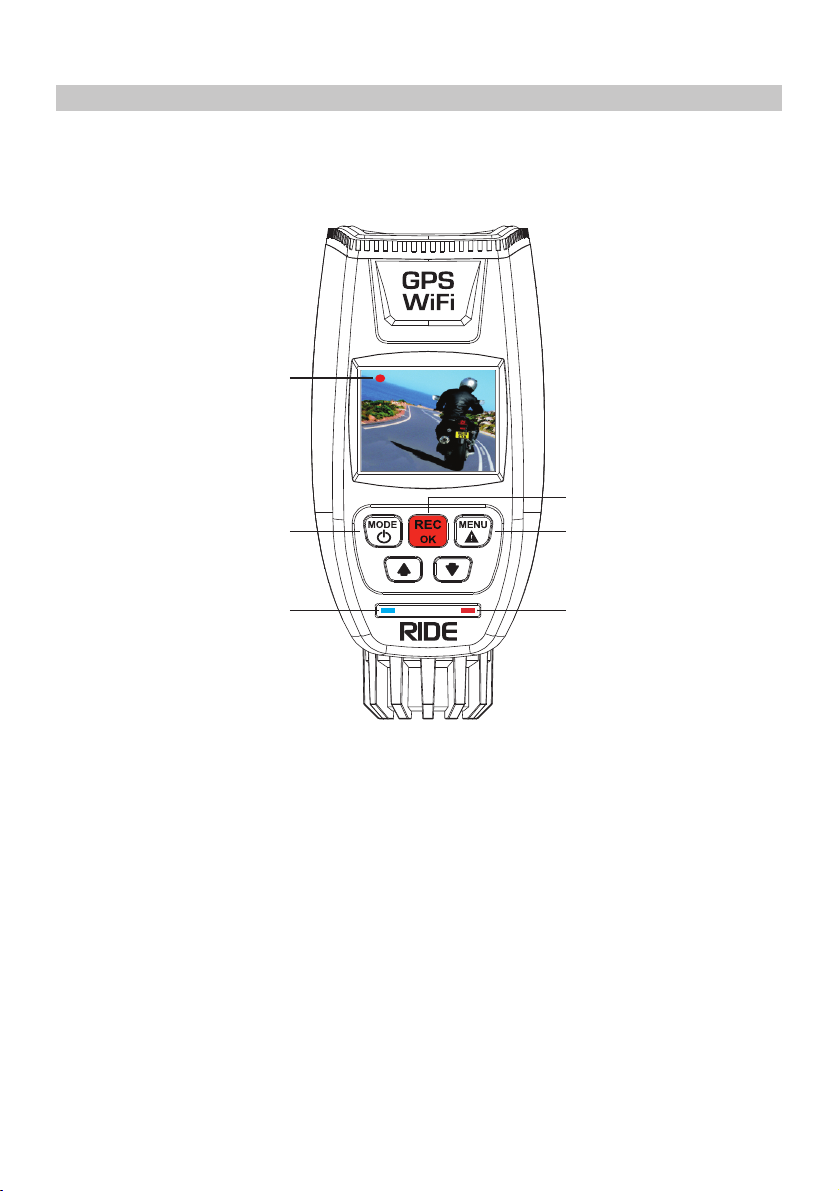
5. Using the BikeCam
Please see below for a guide to the basic operation of your BikeCam.
Recording
Indicator
(flashing)
On / Off
Record
Menu
Battery
LED
On / Off button
Press and hold for 2 seconds to turn the BikeCam on and off.
Record / OK Button
Press to start or stop a recording.
Menu
Press to open the Video menu, press twice to open the General Settings menu.
Battery LED
Indicates when the BikeCam is charging.
Power LED
Indicates when the BikeCam is powered on, flashes when BikeCam is recording.
Recording Indicator
Appears in the top left corner of BikeCam screen, when a recording is in progress
Power
LED
17
Page 18
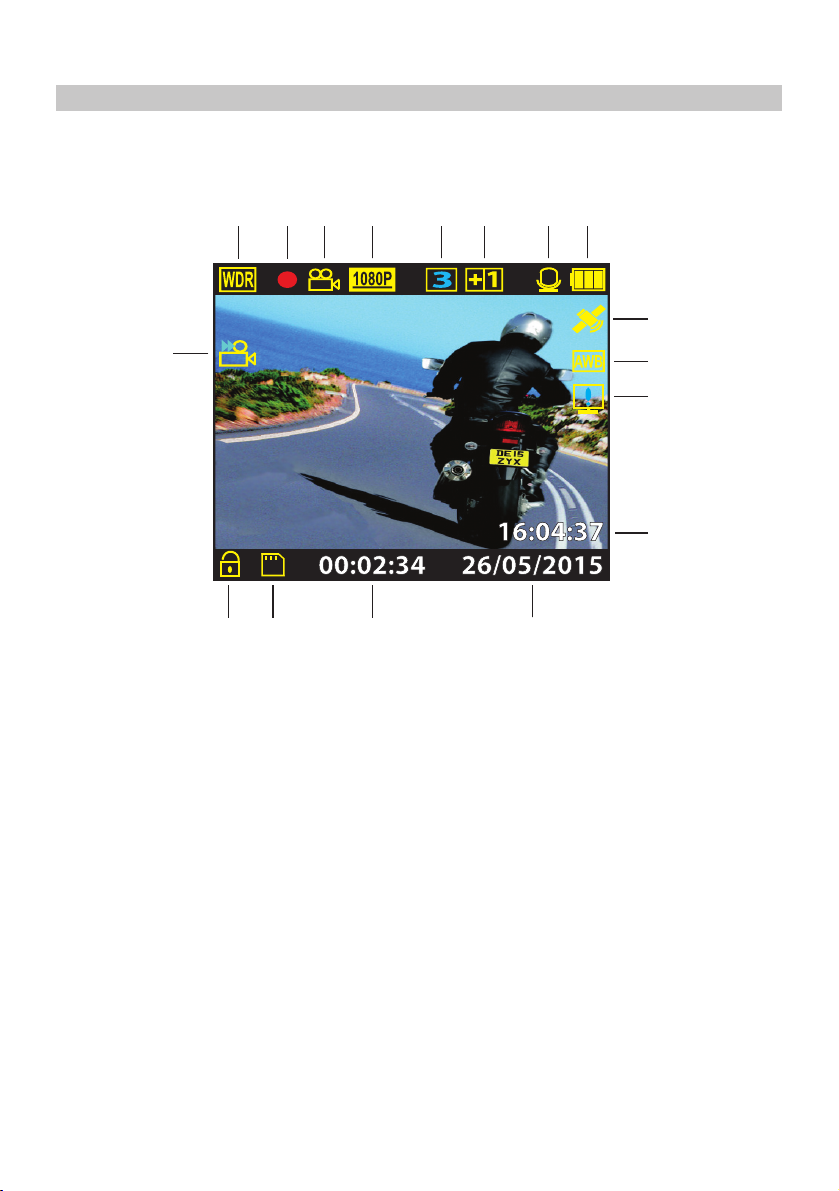
VIDEO MODE
The information given below explains the various items that are displayed on the screen when your
BikeCam is in Video mode, some items will only be displayed once the relevant function has been
selected within the Video menu, as described below.
3
2
5
4
6
7
8
9
10
1
200MS
1
1
12
13
16
17
1. Time Lapse: displays the time lapse setting.
2. WDR: remains on screen permanently as the BikeCam utilises WDR technology.
3. Recording: appears on screen and flashes red when a recording is in progress.
4. Mode: indicates the BikeCam is in Video mode.
5. Resolution: displays the current resolution.
6. Video Length: displays the length of the individual recordings (minutes).
7. Exposure: displays the exposure level.
8. Microphone: Indicates whether audio recording is on or off.
9. Power: displays power source being used (external or battery).
10. GPS: the icon will flash whilst the BikeCam locates satellites. Once a stable signal is
received, the icon will stop flashing and remain on screen.
11. White Balance: displays the white balance setting.
12. HUD Speed & Compass icon: Shown on screen when function has been turned on
13. Time: current time.
14. Date: current date.
15. Recording Duration: displays the length of the current recording.
16. Memory Card: indicates whether a memory card is present.
17. Protected File: shown on screen when a video file has been protected by activation of
the internal G Sensor or by pressing the file protect button.
15
14
See the next page for full details of the options available within Video mode.
18
Page 19

VIDEO MODE (CONTD.)
Video settings menu
The Video settings menu is accessed by pressing the MENU button whilst in Video mode. Use the
UP and DOWN buttons to highlight setting and press the OK button to enter the options screen.
Select the required option and press OK to confirm, press MENU again to return to video mode.
Note:
- Menus are not accessible during recording. Stop recording firstly to access the menu.
1. Resolution
Select recording resolution, this will increase or decrease the quality of the recorded video.
Default Setting: 1080P
2. Exposure
Select exposure, used to adjust exposure level for different light conditions.
Default Setting: 0
3. White Balance
Adjust the white balance for different light conditions.
Default Setting: Auto
4. Record Audio
Turn On / Off audio recording.
Default Setting: On
5. Date Stamp
Turn On / Off the date stamp shown on recorded files.
Default Setting: On
6. Speed Stamp
Turn On / Off the Speed Stamp shown on recorded files.
Default Setting: On
7. NEXTBASE Stamp
Turn On / Off the NEXTBASE Stamp shown on recorded files.
Default Setting: On
8. Video Length
Select duration of recording length for the individual video files, the BikeCam will fill the
SD Card then loop back to the beginning, overwriting the oldest files (unless protected).
Default Setting: 3 Minutes
9. G Sensor
Turn Off or adjust the sensitivity of the G Sensor, it is the G Sensor that detects forces
which will automatically protect the current recording in event of a collision.
Default Setting: Middle
19
Page 20

VIDEO MODE (CONTD.)
Video settings menu continued.
10. GPS Stamp
Turn On / Off both the GPS co-ordinates and speed stamp that are shown on recorded files.
When a recording is viewed using the Driving Recorder Player the GPS co-ordinates, speed
information and map location remain available.
Default Setting: On
11. HUD Speed & Compass
When turned on, the screen will display current speed and a compass after the selected period
of time, press any button to return to normal viewing, this function is only available when a GPS
connection is present.
Default Setting: Off
11. Speed Units
Select whether to record and display speed in KMH or MPH.
Default Setting: MPH
12. Time Lapse
Turn on the Time Lapse function, frames will then be recorded at a lower rate than real time.
When replayed the time appears to be moving faster.
Default Setting: Off
13. Number Plate
Enter the registration number for your bike, this will then be shown on the video file.
The default settings have been carefully selected to allow you to use the BikeCam without the need
to change any settings.
Note:
- Within the SETUP menu which is accessed by pressing the MENU button twice, there is a
‘Default Settings’ option to allow you to reset the BikeCam to the factory defaults, if required.
20
Page 21
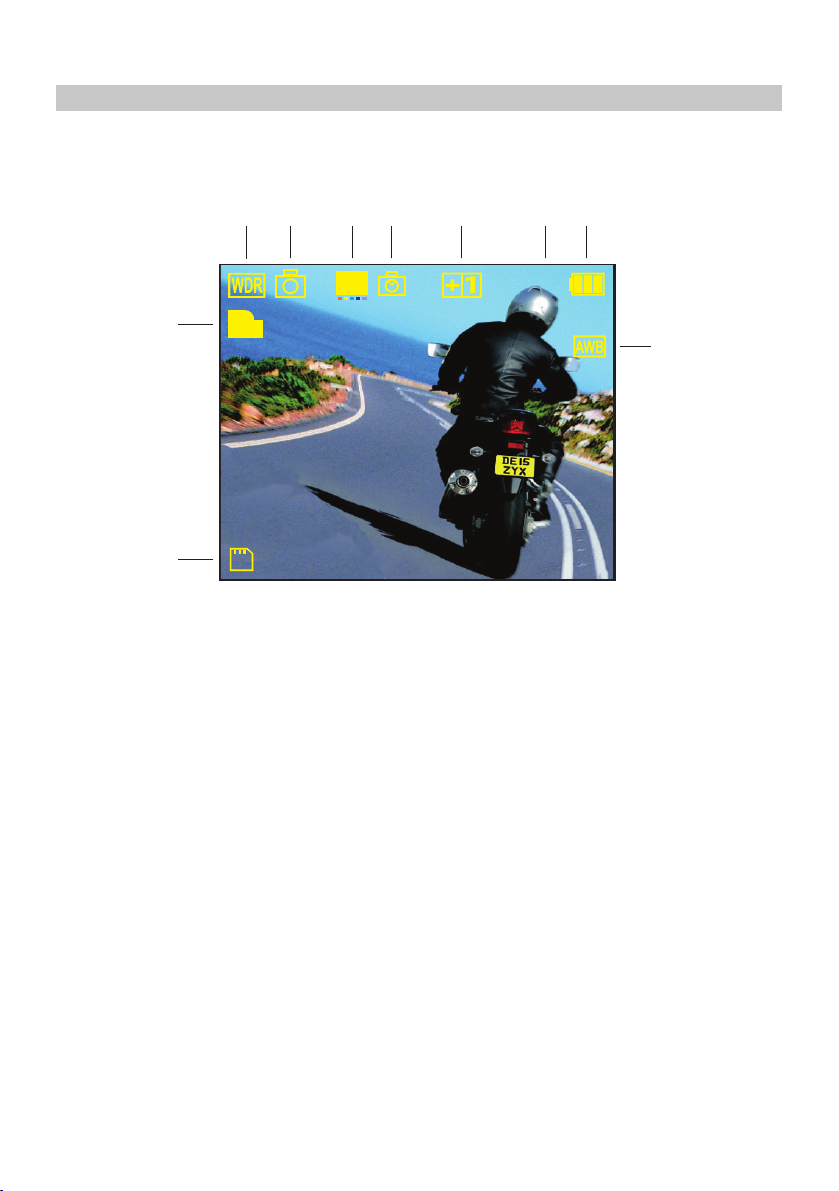
PHOTO MODE
The information given below explains the various items that are displayed on the screen when your
BikeCam is in Photo mode, some items will only be displayed once the relevant function has been
selected within the Photo menu, as described below.
3
4
2
M
5
5M
6
2
7
819
ISO
AUTO
10
1. Memory Card: indicates whether a memory card is present.
2. Quality: displays the current image quality.
3. WDR: remains on screen permanently as the BikeCam utilises WDR technology.
4. Mode: indicates the BikeCam is in Photo mode.
5. Resolution: displays the current resolution.
6. Timer: displayed on screen when self-timer is selected from within the Capture Mode options.
7. Exposure: displays the exposure level.
8. ISO: displays the current ISO setting.
9. Power: displays power source being used (external or battery).
10. White Balance: displays the white balance setting.
See the next page for full details of the options available within Photo mode.
21
Page 22

PHOTO MODE (CONTD.)
Photo settings menu
The Photo settings menu is accessed by pressing the MENU button whilst in Photo mode. Use the UP
and DOWN buttons to highlight setting and press the OK button to enter the options screen.
Select the required option and press OK to confirm, press MENU again to return to photo mode.
1. Image Size
Select image size, this will increase or decrease the size of the photographic image
Default Setting: 8M
2. Colour
Adjust the colour effect of the photographic image.
Default Setting: Normal
3. Capture Mode
Turn On / Off the timer function, when this feature has been turned on, the BikeCam will
take a photo the selected period of time after the OK button has been pressed.
Default Setting: Single
4. White Balance
Adjust the white balance for different light conditions.
Default Setting: Auto
5. ISO
Adjust the ISO setting, the brighter the conditions the lower the ISO required.
Default Setting: Auto
6. Exposure
Select exposure, used to adjust exposure level for different light conditions.
Default Setting: 0
7. Date Stamp
Turn Off the date & time stamp shown on photographs taken. Can also change to date only.
Default Setting: Date & Time
8. Image Quality
Increase or decrease the quality of the photographic image.
Default Setting: High
The default settings have been carefully selected to allow you to use the BikeCam without the need
to change any settings.
Note:
- Within the SETUP menu which is accessed by pressing the MENU button twice, there is a
‘Default Settings’ option to allow you to reset the BikeCam to the factory defaults, if required.
22
Page 23

PLAYBACK MODE
The information given below explains the various items that are displayed on the screen when your
BikeCam is in Playback mode.
Video Playback
1
2
15_0530_180233_006
1080P
30/05/15
18:02
/
II
OK:
MODE:
:PREV :NEXT
8
1. Video: indicates the BikeCam is displaying a video.
2. Protected File: indicates that the video file is protected.
3. File Number: displays current file number.
4. Resolution: displays the resolution that current video was recorded in.
5. Date: displays date of recording.
6. Time: displays start time current file was recorded.
7. Power: displays power source being used (external or battery).
8. Playback controls: use the BikeCam buttons as described below:
Press the OK button to play / pause.
3
4
5
6
7
Press the MODE button to stop playback.
Use UP button to select the previous file and to rewind during playback.
Use DOWN button to select the next file and to fast forward during playback.
Recommended PC playback software, required for Windows when an internet connection is
unavailable: VLC Media Player (free download from )www.videolan.org/vlc
See the next page for details of the options available within Playback mode.
23
Page 24

PLAYBACK MODE (CONTD.)
The information given below explains the various items that are displayed on the screen when your
BikeCam is in Playback mode.
Photo Playback
1
2
15_0530_180233_006
3264 x 2448
30/05/15
18:02
3
4
5
6
7
1. Photo: indicates the BikeCam is displaying a photo.
2. Protected File: indicates that the photo file is protected.
3. File Number: displays current file number.
4. Resolution: displays the resolution that current photo was recorded in.
5. Date: displays date photograph was taken.
6. Time: displays time photograph was taken.
7. Power: displays power source being used (external or battery).
Playback options menu
The options menu is accessed by pressing the MENU button whilst in Playback mode. Use the UP
and DOWN buttons to highlight option and press the OK button to enter the sub-menu.
Select the required option and press OK to confirm, press MENU again to return to playback mode.
1. Delete Files
Used to delete the current file, also available is the option of deleting all files.
2. Protect Files
Used to lock or unlock the current file, also available is the option of locking / unlocking all
the files.
3. Slide Show
Used to start a slide show of images stored on the SD card, press the Menu button to exit
the slide show.
24
Page 25

GENERAL SETTINGS MENU
The General settings menu is accessed by pressing the MENU button twice. Use the UP and DOWN
buttons to highlight setting and press the OK button to enter the options screen.
Select the required option and press OK to confirm, press MENU again to return to the original
starting mode.
1. Wifi
The Wi-Fi function allows you to view videos whilst recording, adjust the settings, control the
basic functions (record, play, pause, etc.) and playback videos directly to your smartphone or
tablet.
Default Setting: Off
See pages 27 for instructions
2. Format SD Card
Format the inserted memory card, this will delete all content.
A good practice fortnightly to ensure your SD card performs to it’s full potential.
3. Language
Select preferred language, options available are as follows English, Français, Español, Nederlands, Norsk, Suomi, Svenska, Dansk
Default Setting: English
4. Date / Time
Adjust the date / time as required using the OK button to toggle through fields, use the UP
and DOWN buttons to set variables.
Note:
- The time will automatically update once a GPS satellite signal is received, so remember to
adjust for location or summer time, as below.
5. Time Zone / DST
The Time and Date is automatically set from the satellite signal, but can be adjusted
dependant upon your Time Zone (country) or whether Daylight Savings Time (DST) is
operational.
Default Setting: GMT
6. LED Torch
Turn on the LED light for use as a torch, if required.
7. Beep Sound
Turn Off / On the beep sound, note if Beep is turned off the audible low-battery warning will
also be disabled.
Default Setting: On
8. Screen Standby
Turn on the Screen Saver function, this will shut down the screen after a period of inactivity.
Press any button to re-activate the display.
Default Setting: Off
9. Version
Display the version number of your device’s software.
25
Page 26

GENERAL SETTINGS MENU (CONTD.)
Continued from previous page.
10. Default Settings
Reset the device to the default settings.
11. Auto Power Off
Adjust the timing of the Auto Power Off function, this can be used to continue recording in
event of loss of power within in the vehicle.
Default Setting: 10 Seconds
The default settings have been carefully selected to allow you to use the BikeCam without the need
to change any settings.
26
Page 27

FINALCAM (Wi-Fi) APP FOR ANDRIOD
The Wi-Fi function allows you to use your smartphone to view videos during recording, adjust the
BikeCam settings, control the basic functions (record, play, pause, etc.) and playback videos directly
to your smartphone or tablet.
The FinalCam App is available for free download from Google Play for Android smartphones.
Installing the App on an Android smartphone:
Open Google Play on your Android smartphone and search for the 'FinalCam' App, tap on 'Install' and
then 'Accept'.
Once installed, the FinalCam App will now be available on your home screen of your phone.
27
Page 28
FINALCAM (Wi-Fi) APP FOR ANDRIOD (CONTD.)
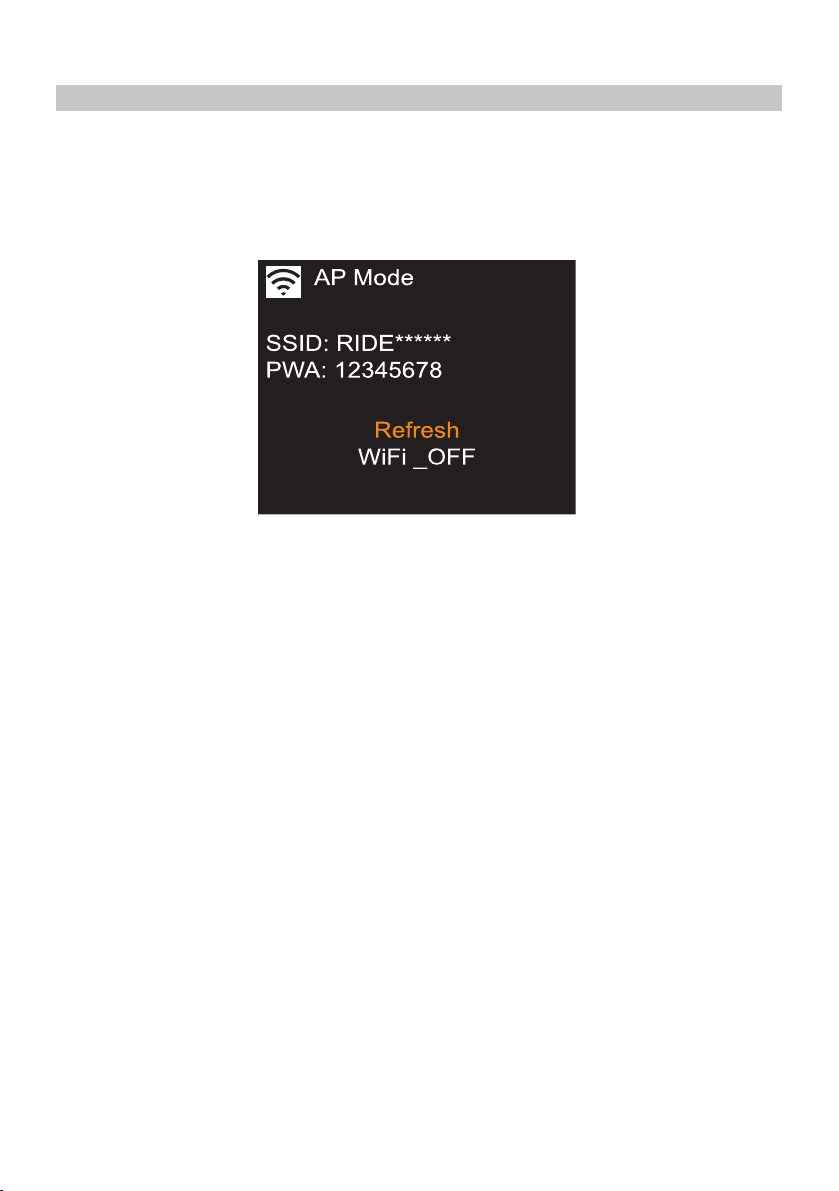
Turn on the BikeCam Wi-Fi
To turn on the Wi-Fi function on the BikeCam, go to the General Settings menu (press menu twice),
select 'Wi-Fi' and press OK. The 'On' option will be highlighted, press the OK button to confirm.
The menu window will close and the 'AP Mode' (Access Point Mode) window will open, as shown
below.
This screen gives the name of the BikeCam SSID (network name): 'RIDE******* and also the
password: 12345678.
Note:
- Both the network name and password can be changed using the FinalCam App,
see page 32 for details.
The BikeCam can now be seen as a Wi-Fi network by your phone as 'RIDE******'.
To exit WiFi mode and resume normal BikeCam use, simply use the down button on the BikeCam
to highlight 'Wi-Fi_OFF' and press OK.
28
Page 29

FINALCAM (Wi-Fi) APP FOR ANDRIOD (CONTD.)
Connect your phone to the BikeCam
To connect your phone to the BikeCam open the Wi-Fi connections menu on your phone, the
BikeCam will be shown in Wi-Fi networks list as 'RIDE*******'.
Tap on the 'RIDE******' and when prompted enter the password '12345678'. Once successfully
connected the 'WiFi Connected' window will appear on the BikeCam screen, as shown below.
29
Page 30

FINALCAM (Wi-Fi) APP FOR ANDRIOD (CONTD.)
Using the FinalCam App
Open the App by tapping on the FinalCam button on your phone, the first time the App is opened
the 'Please click “+” to add camera' screen will appear, see image below.
SettingsPictures
Tap on the '+' button, select 'RIDE******' from the available networks, as shown below.
Enter the password '12345678' and tap ‘Add’, the live video screen will appear. Press back on your
smartphone to go to the FinalCam home screen, as shown on next page.
30
Page 31

FINALCAM (Wi-Fi) APP FOR ANDRIOD (CONTD.)
The key below describes the various information, functions and features available within the FinalCam
home screen.
SettingsPictures
1. Camera name
2. Open camera
Tap here to control the BikeCam.
3. Remove camera
Tap here to remove the BikeCam from the FinalCam App.
4. Recordings
Tap here to view the video files currently stored on the BikeCam's memory card. To playback
a recording on your phone you will need to download the video file from the BikeCam, to do this
simply tap on the preview window. The download will start immediately to your smartphone.
Multiple files can also be downloaded, tick the files for download and then tap the download icon
in the bottom left of the screen. However this is not recommended as transfer time would be long.
Note:
- Downloading files to the FinalCam App will remove the files from the BikeCam, so they can be
viewed on your smartphone directly thereafter.
31
Page 32

FINALCAM (Wi-Fi) APP FOR ANDRIOD (CONTD.)
Continued from previous page.
5. Camera Settings:
Camera Name (SSID) –
Change the SSID from the default setting of 'RIDE*******' and press the save icon.
Password –
Change the Password from the default setting of '12345678' and press the save icon.
Note:
- Changing the SSID or Password will disconnect the BikeCam from your phone, simply
re-connect using the new details.
- Using the 'Default Settings' option to return the BikeCam to the default settings will NOT
reset the SSID or Password.
Auto Recording –
This function is unavailable, as the BikeCam manages the recording mode.
Video Quality –
Adjust the video quality settings used by the BikeCam.
Format –
Format the inserted memory card within the BikeCam, this will delete all content.
Advanced Settings –
G-Sensor sensitivity:
Turn Off or adjust the sensitivity of the G Sensor used by the BikeCam to protect files.
TV Mode:
Adjust the video output when using a television to view content from your phone.
Recording file interval:
Select duration of recording length for the individual video files, the BikeCam will fill the
SD Card then loop back to the beginning, overwriting the oldest files (unless protected).
Note:
The Off and 10 Minute functions listed within the FinalCam settings are unavailable and are
not to be selected.
Factory Reset
Reset the device to the default settings.
Camera Info –
Displays the SW version of the BikeCam.
32
Page 33

FINALCAM (Wi-Fi) APP FOR ANDRIOD (CONTD.)
Continued from previous page.
6. FinalCam settings
Storage Management Manage the storage capacity of files downloaded from the BikeCam to the Final Cam App.
Language –
Select language used within the FinalCam App.
About –
FinalCam version, with option to check whether there is an update available.
7. FinalCam home screen
Tap here to return to the home screen from the FinalCam settings or Downloads screens.
8. Downloads
Files that have been downloaded from the BikeCam can be viewed here.
See page 36 for information on the playback of video recordings.
33
Page 34

FINALCAM (Wi-Fi) APP FOR ANDRIOD (CONTD.)
Basic operation
Tap the 'Open camera' button on the home screen to start using the BikeCam.
Please see below for a guide to the functions and features available when using the FinalCam App.
Note:
- Tap on the live image screen to bring up the menu selection as shown below.
1. FinalCam resolution
Adjust the viewing resolution of the FinalCam App.
Note:
- Options available depend on the recording resolution setting of the BikeCam itself.
2. Image resolution
This function is unavailable, as the BikeCam manages the resolution used for still images.
3. WDR
This function is unavailable, as the BikeCam utilizes WDR technology permanently to optimise
the image quality of the recorded files.
4. Recording length
This function is unavailable, as the BikeCam manages the recording lengths of the video files.
5. Anti-shake
This function is unavailable, as the BikeCam utilizes Anti-Shake technology permanently to
optimise the image quality of the recorded files.
6. Back / Preview button
Tap here to return to the previous screen / menu.
7. Downloads directory
Tap here to open the downloads directory to view downloaded recordings or images.
34
Page 35

FINALCAM (Wi-Fi) APP FOR ANDRIOD (CONTD.)
Continued from previous page.
8. File List
Tap to open the file list, this will list recordings or image that are stored on the memory card
and have yet to be downloaded to your phone.
9. Camera Settings
Tap here to open The Camera Settings menu (described earlier).
10. Volume
Adjust the volume level of your phone.
11. Microphone
This function is unavailable, as the BikeCam manages the microphone on or off settings.
12. Record
Tap to start / stop recording.
13. Take a photo
Tap to take a still image, the image file will be saved to both the BikeCam and downloaded
to your smartphone immediately.
14. Brightness
Adjust the brightness of your phones screen.
35
Page 36

FINALCAM (Wi-Fi) APP FOR ANDRIOD (CONTD.)
Playback of video files
Once a recording has been downloaded from the BikeCam to you phone you can use the FinalCam
App to playback the recording.
2
1
3
4
5
78
6
1. Filename
The filename of the recording being viewed.
2. Back button
Tap here to return to the previous screen / menu.
3. Favourites
Tap to download the current file to the 'Favourites' folder within the File List directory.
4. Repeat
Tap to toggle through the repeat options.
5. Delete
Tap here to delete current file.
6. Volume
Adjust the volume level of your phone.
7. Play / Pause
Tap here play / pause
8. Brightness
Adjust the brightness of your phones screen.
Notes:
- When connected to the BikeCam your mobile device will not have access to the internet.
- Should your BikeCam become unresponsive (e.g. no function or no button response) whilst using
the FinalCam App please use the RESET button on the rear of the BikeCam to restart the BikeCam.
- Only a single BikeCam can be connected to the App at any one time.
36
Page 37

FINALCAM (Wi-Fi) APP FOR iOS
The Wi-Fi function allows you to use your smartphone to view videos during recording, adjust the
BikeCam settings, control the basic functions (record, play, pause, etc.) and playback videos directly
to your smartphone.
The FinalCam App is available for free download from the App Store for Apple smartphones.
Installing the App on an iOS smartphone:
Open the App Store on your iOS smartphone and search for the 'FinalCam' App, tap on 'Get' to
install.
Once installed, the FinalCam App will now be available on your home screen of your phone.
37
Page 38

FINALCAM (Wi-Fi) APP FOR iOS (CONTD.)
Turn on the BikeCam Wi-Fi
To turn on the Wi-Fi function on the BikeCam, go to the General Settings menu, select 'Wi-Fi' and
press OK. The 'On' option will be highlighted, press the OK button to confirm.
The menu window will close and the 'AP Mode' window will open, as shown below.
This screen gives the name of the BikeCam SSID (network name): 'RIDE******* and also the
password: 12345678.
Note:
- Both the network name and password can be changed using the FinalCam App,
see page 42 for details.
The BikeCam can now be seen as a Wi-Fi network by your phone as 'RIDE******'.
To exit WiFi mode and resume normal BikeCam use, simply use the down button on the BikeCam
to highlight 'Wi-Fi_OFF' and press OK.
38
Page 39

FINALCAM (Wi-Fi) APP FOR iOS (CONTD.)
Connect your phone to the BikeCam
To connect your phone to the BikeCam open the Wi-Fi connections menu on your phone, the
BikeCam will be shown in Wi-Fi networks list as 'RIDE*******'.
Tap on the 'RIDE******' and when prompted enter the password '12345678', once successfully
connected the 'WiFi Connected' window will appear on the BikeCam screen, as shown below.
39
Page 40

FINALCAM (Wi-Fi) APP FOR iOS (CONTD.)
Using the FinalCam App
Open the App by tapping on the FinalCam button on your phone, the first time the App is opened the
'Please add a camera' screen will appear, see image below.
Pictures
Settings
Tap on the '+' button, the 'Camera is connecting…' and then the 'Add device successful' screens
will appear, as shown below.
Pictures
Settings
Pictures
Settings
Enter the password '12345678' and tap ‘Add’, the live video screen will appear. Press back on your
smartphone to go to the FinalCam home screen, as shown on next page.
40
Page 41

FINALCAM (Wi-Fi) APP FOR iOS (CONTD.)
The key below describes the various information, functions and features available within the FinalCam
home screen.
Pictures
Settings
1. Camera name
2. Open camera
Tap here to control the BikeCam.
3. Remove camera
Tap here to remove the BikeCam from the FinalCam App.
4. Recordings
Tap here to view the video files currently stored on the BikeCam's memory card. To playback
a recording on your phone you will need to download the video file from the BikeCam, to do this
simply tap on the preview window. Download to your smartphone will start immediately.
Multiple files can also be downloaded, tick the files for download and then tap the download icon
in the bottom left of the screen. However this is not recommended as transfer time would be long.
Note:
- Downloading files to the FinalCam App will remove the files from the BikeCam, so they can be
viewed on your smartphone directly thereafter.
41
Page 42

FINALCAM (Wi-Fi) APP FOR iOS (CONTD.)
Continued from previous page.
5. Camera Settings:
Camera Name (SSID) –
Change the SSID from the default setting of 'RIDE*******'.
Password –
Change the Password from the default setting of '12345678'.
Note:
- Changing the SSID or Password will disconnect the BikeCam from your phone, simply
re-connect using the new details.
- Using the 'Default Settings' option to return the BikeCam to the default settings will NOT
reset the SSID or Password.
Auto Recording –
This function is unavailable, as the BikeCam manages the recording mode.
Video Quality –
Adjust the video quality settings used by the BikeCam.
Format –
Format the inserted memory card within the BikeCam, this will delete all content.
Advanced Settings –
G-Sensor sensitivity:
Turn Off or adjust the sensitivity of the G Sensor used by the BikeCam to protect files.
Recording file interval:
Select duration of recording length for the individual video files, the BikeCam will fill the
SD Card then loop back to the beginning, overwriting the oldest files (unless protected).
Note:
The Off and 10 Minute functions listed within the FinalCam settings are unavailable and are
not to be selected.
Factory Reset
Reset the device to the default settings.
Camera Info –
Displays the SW version of the BikeCam.
42
Page 43

FINALCAM (Wi-Fi) APP FOR iOS (CONTD.)
Continued from previous page.
6. FinalCam settings
Storage Management Manage the storage capacity of files downloaded from the BikeCam to the Final Cam App.
General –
Turn on / off the 'Save to Album' option, when turned On images that are downloaded from the
BikeCam will be saved in both the FinalCam directory and also your 'Camera Roll' album.
Language –
Select language used within the FinalCam App.
About –
FinalCam version, with option to check whether there is an update available.
7. FinalCam home screen
Tap here to return to the home screen from the FinalCam settings or Downloads screens.
8. Pictures
Files that have been downloaded from the BikeCam can be viewed here.
See page 46 for information on the playback of video recordings.
43
Page 44

FINALCAM (Wi-Fi) APP FOR iOS (CONTD.)
Basic operation
Tap the 'Open camera' button on the home screen to start using the BikeCam.
Please see below for a guide to the functions and features available when using the FinalCam App.
Note:
- Tap on the live image screen to bring up the menu selection as below.
1. FinalCam resolution
Adjust the viewing resolution of the FinalCam App.
Note:
- Options available depend on the recording resolution setting of the BikeCam itself.
2. Image resolution
This function is unavailable, as the BikeCam manages the resolution used for still images.
3. WDR
This function is unavailable, as the BikeCam utilizes WDR technology permanently to optimise
the image quality of the recorded files.
4. Recording length
This function is unavailable, as the BikeCam manages the recording lengths of the video files.
5. Anti-shake
This function is unavailable, as the BikeCam utilizes Anti-Shake technology permanently to
optimise the image quality of the recorded files.
6. Back / Preview button
Tap here to return to the previous screen / menu.
7. Downloads directory
Tap here to open the downloads directory to view downloaded recordings or images.
44
Page 45

FINALCAM (Wi-Fi) APP FOR iOS (CONTD.)
Continued from previous page.
8. File List
Tap to open the file list, this will list recordings or image that are stored on the memory card
and have yet to be downloaded to your phone.
9. Camera Settings
Tap here to open The Camera Settings menu (described earlier).
10. Volume
Adjust the volume level of your phone.
11. Microphone
This function is unavailable, as the BikeCam manages the microphone on or off settings.
12. Record
Tap to start / stop recording.
13. Take a photo
Tap to take a still image, the image file will be saved to both the BikeCam and download
to your smartphone immediately.
14. Brightness
Adjust the brightness of your phones screen.
45
Page 46

FINALCAM (Wi-Fi) APP FOR iOS (CONTD.)
Playback of video files
Once a recording has been downloaded from the BikeCam to you phone you can use the FinalCam
App to playback the recording.
1. Back button
Tap here to return to the previous screen / menu.
2. Favourites
Tap to download the current file to the 'Favourites' folder within the File List directory.
3. Repeat
Tap to toggle through the repeat options.
4. Delete
Tap here to delete current file.
5. Volume
Adjust the volume level of your phone.
6. Next
Tap here to move to the next recording.
7. Play / Pause
Tap here play / pause
8. Previous
Tap here to move to the previous recording.
9. Brightness
Adjust the brightness of your phones screen.
Notes:
- When connected to the BikeCam your mobile device will not have access to the internet.
- Should your BikeCam become unresponsive (e.g. no function or no button response) whilst using
the FinalCam App please use the RESET button on the rear of the BikeCam to restart the BikeCam.
- Only a single BikeCam can be connected to the App at any one time.
46
Page 47

MASS STORAGE & PC CAMERA
Use the supplied USB cable to connect the BikeCam to your PC, doing so will power on the camera
with two functions available, as described below.
Use the UP and DOWN buttons to select required function and press OK to confirm selection.
- Mass Storage
- PC Camera
Using the BikeCam with a Windows PC:
Mass Storage
When Mass Storage is selected, the BikeCam screen will show the words ‘Mass Storage’ and then
take the function of an SD Card reader for your PC.
An extra drive will appear, for example ‘Removable Disk (D:)’ and you will be able to view / manage
the stored files upon the MicroSD card within the BikeCam, from your computer.
PC Camera
When PC Camera is selected, the BikeCam screen will show the words ‘PC Camera’ and then
take the function of a webcam (no audio) for your PC.
Start the normal application upon your PC that uses a webcam (e.g. Skype) and select the BikeCam
which is entitled ‘CARDV’.
Note:
- Turn Off the BikeCam before disconnecting from PC.
Using the BikeCam with a MAC:
Mass Storage
When this option is selected, the BikeCam will function as a card reader for your MAC. The
‘NEXTBASE’ external USB disk icon will appear on your MAC and you will be able to view / manage
stored files upon the MicroSD card within the BikeCam, from your Mac.
Eject the disk as you would do normally before removing the cable or turning off the BikeCam.
PC Camera
When this option is selected, the BikeCam will function as a webcam (no audio) for your Mac. Start the
normal application upon your PC that uses a webcam (e.g. Skype) and select the BikeCam which is
entitled ‘CARDV’.
Note:
- When Mass Storage or PC Camera modes are selected the BikeCam screen will blank.
- When using PC Camera or Mass Storage functions turn Off the BikeCam before disconnecting
the USB cable from your MAC.
47
Page 48

DRIVING RECORDER PLAYER FOR WINDOWS
This section will guide you through the installation of the Driving Recorder Player software, designed
to enable the viewing of recorded files as well as checking journey route / GPS data (location and
speed) and G Sensor information.
MINIMUM SYSTEM REQUIREMENTS:
Operating System: Windows XP, Vista, Windows 7, Windows 8, Windows 10
Processor (CPU): Pentium III 500 MHz or Celeron at 800 MHz
Memory: 1 GB RAM
Storage: 100Mb Internal hard drive space
CD-ROM Drive: Tray / Slot Loader
Monitor/Display: 1280 x 1024
Windows Driving Recorder Player:
Insert the supplied Driving Recorder Player disk in to the CD drive, navigate and display the
contents upon the disk:
- NBDVR-RIDE Instruction Manual (English)
- NBDVR-RIDE Driving Recorder Player for Windows
- NBDVR-RIDE Driving Recorder Player for Mac
Note:
- The instruction manual and installation files are all available for download from the Nextbase
website: www.nextbase.co.uk, if required.
Should you experience any difficulties during installation please do not hesitate to
call our English speaking technical support team on +44 (0)2920 866429,
lines are open during normal business operating hours: 09:00-17:30hrs.
48
Page 49

DRIVING RECORDER PLAYER FOR WINDOWS (CONTD.)
INSTALLATION:
Open the ‘NBDVR-RIDE Driving Recorder Player for Windows' folder and then open the folder with
required version based upon your preferred speed units (MPH or KMH).
Run the ‘setup.exe’, for some operating systems a security warning may appear, click ‘RUN’ to
proceed.
To install this application software you need to have 'Microsoft.NET Framework 4.0 Client' installed
upon your PC. Should this not already be installed, a window will open prompting you to confirm the
automatic installation from Microsoft, as shown below.
This is normal and enables the Driving Recorder Player software to run.
Please press 'Install' to proceed, this installation process can take some time. After installation of
'Microsoft.NET Framework 4.0 Client', you may be asked to reboot your PC in order to continue the
Driving Player Recorder software installation.
On completion of the Microsoft.NET Framework installation, the Driving Recorder Player
installation will begin.
49
Page 50

DRIVING RECORDER PLAYER FOR WINDOWS (CONTD.)
If your PC already had 'Microsoft.NET Framework 4.0 Client' installed then the
'Welcome to the InstallShield ….' window will open, as shown below.
Press 'Next' to continue, the 'License Agreement' window will open, as shown below.
Check the 'Accept' button and press 'Next' to proceed.
50
Page 51

DRIVING RECORDER PLAYER FOR WINDOWS (CONTD.)
The 'Destination Folder window will open, ’ as shown below.
Choose a destination folder should you not want files saved to the default folder within the
Program Files directory.
Press 'Next' to proceed, the 'Ready to Install the Program' window will open, as shown below.
Click ‘Install’ to begin the installation.
51
Page 52

DRIVING RECORDER PLAYER FOR WINDOWS (CONTD.)
The 'Installing Driving Recorder Player' window will open. During installation the status window will be
on screen, as shown below.
Once installation is complete the 'InstallShield Wizard Completed' window will open, as shown
below.
Installation now is complete, press 'Finish' to close the InstallShield Wizard window.
The Driving Recorder Player icon will now be available on your desktop.
Note:
- For some operating systems additional / different steps may be required.
- Some anti-virus software may consider the installation of this software as a threat, this is
normal and not a cause for concern, please toggle off the anti-virus software, or choose to
allow the installation to continue.
52
Page 53

DRIVING RECORDER PLAYER FOR WINDOWS (CONTD.)
USING THE DRIVING RECORDER PLAYER:
Connect the BikeCam to your PC using the supplied USB cable and select Mass Storage by
pressing ‘OK’ on your BikeCam.
Alternatively remove the MicroSD Card from your BikeCam and using a suitable MicroSD adaptor
insert it directly to the card reader on your PC.
Close any pop up messages and/or any media players which may automatically open when video or
photo files stored upon a memory card are detected. Open the Driving Recorder Player software
using the shortcut on your desktop.
To add videos for viewing with the Driving Recorder Player click on the ‘+ ADD’ button located in the
bottom right hand corner of the main Driving Recorder Player window, this will open a new window
allowing you to locate the required video files, see image below.
‘ADD’
button
Once you have located and highlighted the required folder, for example:
Removable Disk (D:) - RIDE - 10141114, then highlight the required video clip recordings and click
‘Open’, this will add the selected files to the Driving Recorder Player file list.
It is the same principal whether connecting the BikeCam via the USB cable (see page 47) or by
placing the memory card directly into your PC’s card reader.
The only difference being is that the memory card would be shown as: SD (D:) within the directory list.
Playback:
Click on a file within the file list window to start playback, during playback use the player controls to:
pause/play, forward, reverse as required.
Note:
- Playback via the USB Cable may result in playback jumping / freezing due to the transfer rate of
data, it is recommended that the files are viewed directly from your PC’s card reader - if you do not
have a card reader available, please copy files from the BikeCam to your PC and use these for
playback.
- Early Windows operating systems may require installation of video codec software to enable video
playback.
Please visit http://www.nextbase.co.uk to download the 'PC Codec Pack (PC version)', installation
instructions are also available within the downloaded file.
53
Page 54

DRIVING RECORDER PLAYER FOR WINDOWS (CONTD.)
FEATURES & CONTROLS
The key below explains the various information displayed within the Driving Recorder Player when
using a Windows platform.
1
2
3
13/08/2013 14:08:44 NBDVR-RIDE AB12 3456 29MPH N 51 35 32.72 W 3 58 16.93
4
5
6
X: -0.03
Y: -1.06
Z: 0.16-
7 8 9 10 11
1. Player settings
File: Browse for files, change settings for units of speed and language.
View: Open / close map window.
Help: Player version information.
Map
16
15
N
W
14
13
12
2. Playback window of selected video file
View current video, to make full screen double-click on the top of the window.
3. Date / Time / Model / Vehicle Registration / Speed / GPS Co-ordinates Stamp
Data saved to the recorded file, this content will vary depending upon the BikeCam settings and
availability of GPS signal during recording.
4. Volume
Adjust playback volume.
5. Video playback control buttons
Play / Pause, fast forward and rewind current file, this function is not available on Windows XP.
6. Speed display
Displays current speed.
7. G Force display
Displays direction of G Force on the vehicle.
8. G Sensor data
Displays data recorded by the G Sensor across the three axis.
X = left/right, Y = up/down and Z = acceleration & deceleration.
9. Journey statistics
Displays maximum speed, average speed and total distance travelled.
54
Page 55

DRIVING RECORDER PLAYER FOR WINDOWS (CONTD.)
10. Driving Recorder Player controls
Screen Capture, this will create a still image for each frame of the image seen within the
playback window.
Open screen capture folder.
Browse for files stored on your computer.
Open settings window, adjust language and unit of speed.
Open / Close the Map window.
11. Add / Remove files
Used to add and remove selected videos to the file list.
12. File list
Displays videos currently within the file list.
13. Display all or protected files
Select whether to display all files or protected files only.
14. GPS co-ordinates
Displays current GPS co-ordinates, only available when the video files are recorded when a
satellite connection was present.
15. Map
Displays route travelled on map, only available when the video was recorded when a satellite
connection was present.
16. Compass
Displays current direction, only available when the video was recorded when a satellite
connection was present.
Note:
- The driving recorder player will only open when an internet connection is available, due to the
Google Map function within Windows, should you want to view recorded files please open with
another video playback program, e.g. QuickTime or VLC.
- Functions and operation of the driving Recorder Player may vary dependant on your PC’s
operating system.
- GPS data will only be displayed when a GPS signal was present during the recording.
55
Page 56

DRIVING RECORDER PLAYER FOR MAC
This section will guide you through the installation of the Driving Recorder Player software, designed
to enable the viewing of recorded files as well as checking journey route / GPS data (location and
speed) and G Sensor information.
MINIMUM SYSTEM REQUIREMENTS:
OS X 10.7 and above
Mac Driving Recorder Player:
- NBDVR-RIDE Instruction Manual (English)
- NBDVR-RIDE Driving Recorder Player for Windows
- NBDVR-RIDE Driving Recorder Player for Mac
Note:
- The instruction manual and installation files are all available for download from the Nextbase
website: www.nextbase.co.uk, if required.
Should you experience any difficulties during installation please do not hesitate to
call our English speaking technical support team on +44 (0)2920 866429,
lines are open during normal business operating hours: 09:00-17:30hrs.
56
Page 57

DRIVING RECORDER PLAYER FOR MAC (CONTD.)
INSTALLATION
Open the 'NBDVR-RIDE Driving Recorder Player for Mac' folder and then open the folder with required
version based upon your preferred speed units (MPH or KMH).
Run the 'Driving Recorder Player for MAC' .dmg file, this will place the 'Driving Recorder Player' volume
on your desktop, as shown below.
Alternatively, once the required Driving Recorder Player software has been downloaded from the
Nextbase website open the 'Downloads' folder on your Mac. The software is saved in a compressed
(.zip) folder, free de- compression applications are readily available, for example 'The Unarchiver'
available from the Mac Appstore. Once the .zip folder has been uncompressed the full folder will appear
in your downloads folder. Open the folder and run the 'Driving Recorder Player for MAC' .dmg file.
Open the volume on your desktop by either double-clicking or right-click, select open and right click
once more. This will open the volume window, as shown below.
Drag the Driving Recorder Player into the Applications folder, a sound will be heard to
confirm application has been installed.
57
Page 58

DRIVING RECORDER PLAYER FOR MAC (CONTD.)
The Driving Recorder Player 'volume' can now be ejected, right-click, select Eject 'Driving Recorder
Player” and right-click once more, see image below.
The 'Driving Recorder Player' can also be found within the Applications List, see below.
At this point may also want to drag a copy onto your desktop, this can then be used
as a desktop shortcut or placed on your Dock.
58
Page 59

DRIVING RECORDER PLAYER FOR MAC (CONTD.)
USING THE DRIVING RECORDER PLAYER:
Connect the BikeCam to your Mac using the supplied USB cable and select Mass Storage by
pressing ‘OK’ on your BikeCam.
Alternatively remove the MicroSD Card from your BikeCam and using a suitable MicroSD adaptor
insert it directly to the card reader on your mac.
Close any pop up messages and/or any media players which may automatically open when video or
photo files stored upon a memory card are detected. Open the Driving Recorder Player software using
the shortcut on your desktop.
To add videos for viewing with the Driving Recorder Player click on the ‘+ ADD’ button located in the
bottom right hand corner of the main Driving Recorder Player window, this will open a new window
allowing you to locate the required video files, see image below.
‘ADD’
button
Once you have located and highlighted the required folder, for example:
VOLUME1 - RIDE - 10130102, then highlight the required video clip recordings and click ‘Open’,
this will add the selected files to the Driving Recorder Player file list.
It is the same principal whether connecting the BikeCam via the USB cable (see Mass Storage
page 47) or by placing the memory card (using a suitable MicroSD adaptor) directly into your Mac’s
card reader.
Playback:
Click on a file within the file list window to start playback, during playback use the player controls to:
pause/play, forward, reverse as required.
Note:
- Playback via the USB Cable may result in playback jumping / freezing due to the transfer rate of
data, it is recommended that the files are viewed directly from your Mac’s card reader - if you do not
have a card reader available, please copy files from the BikeCam to your PC and use these for
playback.
59
Page 60

DRIVING RECORDER PLAYER FOR MAC (CONTD.)
FEATURES & CONTROLS
The key below explains the various information displayed within the Driving Recorder Player when
using a Mac platform.
Driving Recorder Player Version 1.0
14
1
13
12
1
10
13/08/2013 14:08:44 NBDVR-RIDE AB12 3456 29MPH N 51 35 32.72 W 3 58 16.93
2
3
4
5
FILE INFO
Locked: No
Date: 2013-08-06 17:18:14
Location: /Users/David/Desktop/402G - videos/17150019.MOV
‘
51 35 32.72
‘
3 58 16.93
FILE LIST
ADD REMOVE
x
+
N
W
1
6
7 8 9
1. Playback window of selected video file
View current video.
2. Date / Time / Model / Vehicle Registration / Speed / GPS Co-ordinates Stamp
Data saved to the recorded file, this content will vary depending BikeCam settings and availability
of GPS signal during recording.
3. Volume
Adjust playback volume.
4. Video playback control buttons
Play / Pause, fast forward and rewind current file.
5. Speed display
Displays current speed.
6. G Force display
Displays direction of G Force on the vehicle.
7. G Sensor data
Displays data recorded by the G Sensor across the three axis.
X = left/right, Y = up/down and Z = acceleration & deceleration.
8. File Info
Displays current file information.
9. Add / Remove files
Browse for files stored on your computer, add / remove selected videos to and from the file list.
60
Page 61

DRIVING RECORDER PLAYER FOR MAC (CONTD.)
Driving Recorder Player Version 1.0
1
51 35 32.72
3 58 16.93
FILE LIST
13/08/2013 14:08:44 NBDVR402G AB12 3456 29MPH N 51 35 32.72 W 3 58 16.93
2
3
4
5
FILE INFO
Locked: No
Date: 2013-08-06 17:18:14
Location: /Users/David/Desktop/402G - videos/17150019.MOV
ADD REMOVE
+
14
‘
N
‘
W
13
12
1
1
10
x
6
7 8 9
10. Screen Capture
Screen Capture, this will create a still image for each frame of image within the playback
window.
Open screen capture folder to view images.
11. File List
Displays videos currently within the file list.
12. GPS co-ordinates
Displays current GPS co-ordinates, only available when the video files were recorded when
satellite connection was present.
13. Map
Displays route travelled on map, only available when the video was recorded when a satellite
connection was present.
14. Compass
Displays current direction, only available when the video was recorded when a satellite
connection was present.
Note:
- The driving recorder player will only open display an active map when an internet connection is
available.
- Functions and operation of the driving Recorder Player may vary dependant on your PC’s
operating system.
- GPS data will only be displayed when a GPS signal was present during the recording.
61
Page 62

TROUBLE SHOOTING
PROBLEM SOLUTION
Video Image is blurred.
I can not insert the
Micro SD card.
I can not remove the
Micro SD card.
Video files can not be played.
Video file playback is jumpy.
Playback upon the Driver
Recorder Player is jumpy.
The sound is not synchronised
with video during playback.
Video has no sound.
Photograph is blurred.
I can only record a few
minutes of video on my
Micro SD card.
Mass Storage or PC Camera
function does not work.
My BikeCam shuts down
by itself after a while.
The Driving Recorder Player
will not open.
Remove the protective lens cover, clean the lens, clean the
wind deflector screen!
Micro SD card are very small and require delicate use. Align the
card with the diagram shown upon the device and insert the card
until you feel a slight spring resistance. You now need to push the
card, using your finger nail, until you hear and feel a small latch.
Release pressure and the card will stay retained within the device.
Use the edge of a small coin if you have difficulty.
With the card previously installed, you now need to push the card
further inwards slightly, using your finger nail, until you hear and
feel a small latch.
Use the edge of a small coin if you have difficulty.
Release pressure and the card will spring out sufficiently for you to
take hold of it.
The video files from the BikeCam are in MOV format and may
not be compatible with your PC if suitable playback software is not
installed.
Install the supplied Driver Recorder Player software and the
additional Codecs if necessary.
Remove the SD card and reformat to remove non-contiguous files.
For best recording use a branded class 10 type (30MB/s) SD card
of 8 to 32GB recommended size. Recommended video playback
software is the supplied Driver Recorder Player Playback.
PC may not be sufficient for the playback task, try an different PC.
Copy video files onto the PC / Mac for playback.
It is not recommended to use the BikeCam as a card reader
via the USB Cable for playback purposes.
The Codecs upon your PC may not be compatible or the latest
standard.
Download the latest Codecs from: http://www.nextbase.co.uk
The Codecs upon your PC may not be compatible or the latest
standard.
Download the latest Codecs from: http://www.nextbase.co.uk
Ensure that “Record Audio” setting is turned ON within the
Video Menu.
Note: Audio will be quiet on BikeCam.
Hold the camera still whilst taking the photo. Please be aware the
photo is taken around 1 second after the shutter noise is heard.
Change the video length to a smaller size.
Increase the size of the MicroSD card. Max 32GB.
Format the SD card on the BkeCam.
The Mass Storage and PC Camara functions work on both
Windows and Mac. Restart the PC, as this may be required for the
necessary driver to be loaded correctly. Disconnect and reconnect
the BikeCam.
Contact NEXTBASE for the required driver.
Either the battery has gone flat, or there is no power to the
BikeCam and the AutoPower Off period (which is in the General
Settings Menu) has been triggered.
For Windows operating systems the player requires an internet
connection to open, if this is not available please view files using
alternative playback software, i.e. QuickTime or VLC.
62
Page 63

TROUBLE SHOOTING (CONTD.)
PROBLEM SOLUTION
No power to my BikeCam,
but it works upon my PC.
The SD card in my
BikeCam can not be read.
I can't delete files on my
SD card within the
BikeCam.
The screen blanks after a few
minutes upon my
BikeCam.
I get the message “Cluster
size wrong. Please format
SD card” on screen.
The BikeCam can not
lock onto satellite.
The battery only last 30
seconds.
The battery only lasts 6
minutes.
I get the message “Card Error”
on screen.
When I press the MENU
button nothing happens.
Downloading files from
www.nextbase.co.uk
using Google Chrome results
in a Malicious Software
message.
The date & time on my
BikeCam do not adjust for
Daylight Savings time.
Wi-Fi App
Wi-Fi App
The cigarette power cable or hard-wire cable is not working.
Inspect the fuse in the Car Power plug / hard-wire.
Replacement fuse = 2A 20mm type. If the fuse is found to be
blown, inspect the power cable for damage which may have
caused the fuse blow.
Use a good quality branded SD card between 4GB and 32GB and
format the card from with in the SETUP menu of the BikeCam.
Check to see if these files are 'protected', if so please follow
instructions to 'un-protect'.
The screen saver is set to ON. Change settings to OFF if required.
Default setting is off.
The SD card has been formatted in another device and the
Cluster Size is not compatible. Simply use the MENU, SETUP
option to re-format the SD card from within the BikeCam.
After power on and with the device mounted with clear view of the
sky it can take up to 10 minutes to find the three satellites required
to achieve a stable signal. Reception can also be affected by
atmospheric conditions and the proximity of buildings / trees
obscuring the sky.
Please connect the Hard-wire cable, Cigarette Power Cable or
USB Cable to a PC to apply power to your BikeCam.
Charging takes approximately 8 hours and a full charge is
indicated when the Blue LED goes out.
This is normal, the battery design allows the 'Auto Power Off'
feature to function in event of power loss within the vehicle. It is
not intended as an alternative power source to replace the
supplied Cigarette Power cable / Hard-wire cable.
The SD card has become unuseable by the BikeCam.
Remove useful files using your PC and then perform a “FORMAT”
upon the SD card from within the BikeCam SETUP menu.
This is normal during recording. Stop the recording before
pressing the MENU button.
This is not a cause for concern, simply go to the settings within
Google Chrome and turn off the malicious software protection
temporarily to download and install the software.
Reinstate previous Google Chrome settings thereafter.
Correct. The BikeCam will pick up GMT from the satellite signal.
Adjust for Timezone location and Summer Time in the General
Settings Menu.
2 devices can not connect to the BikeCam to review videos.
Correct this is normal.
The second device will become disconnected automatically.
I have changed my BikeCam SSID and password then lost them.
How can I reset ?
No need, when you turn the Wi-Fi on within the BikeCam the new
SSID and password are shown on screen.
63
Page 64

TROUBLE SHOOTING (CONTD.)
PROBLEM SOLUTION
The LCD screen on my
BikeCam gets condensation
inside.
Not a serious issue. This is due to a combination of warm air inside
the BikeCam and the cold air outside, especially whilst riding with
the wind chill.
Leaving the BikeCam indoors overnight with the SD card slot
uncovered in a dry environment will reduce the moisture inside
the BikeCam.
64
Page 65

NOTES
65
Page 66

NOTES
66
Page 67

Page 68

www.nextbase.co.uk
NBDVR-RIDE-IM-ENG-R01
 Loading...