

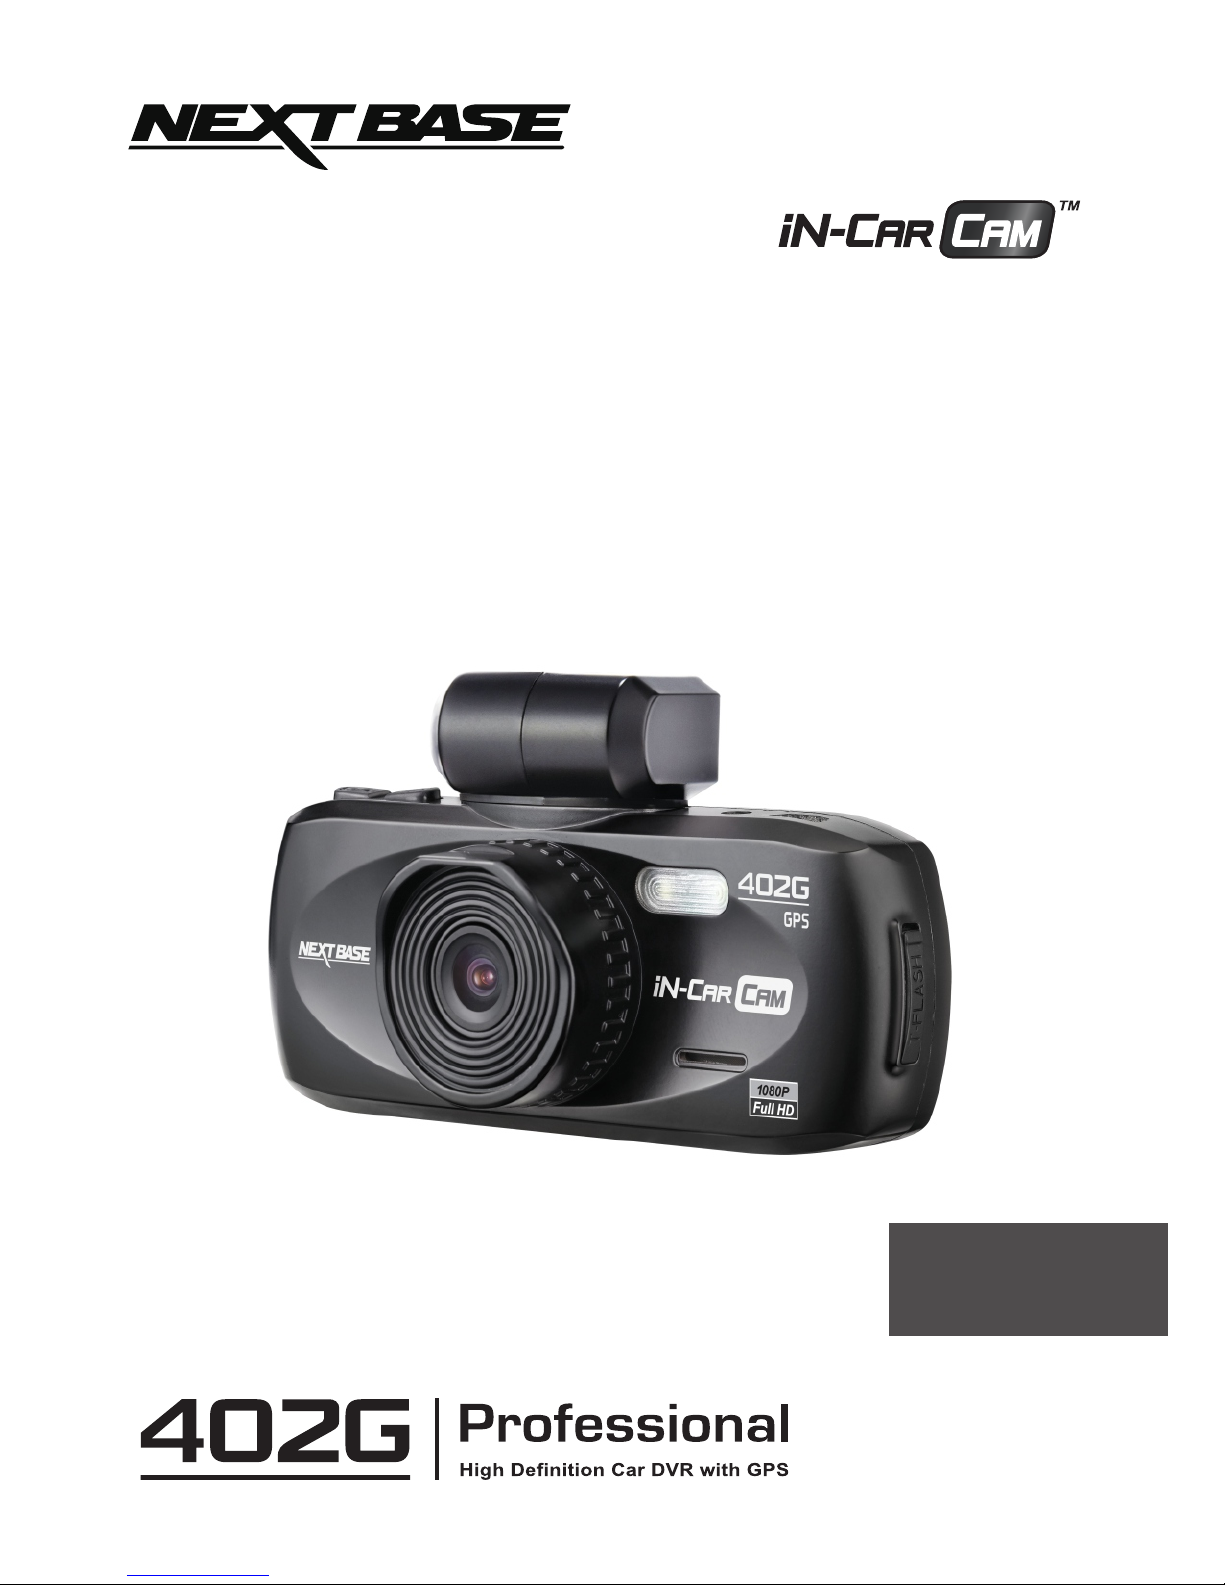
Page 1
English
Deutsch
Instruction Manual
Bedienungsanleitung
Page 2

Page 3

TABLE OF CONTENTS
PRECAUTIONS
CAUTIONS ON USING THIS PRODUCT
PRODUCT SPECIFICATION
PACKAGE CONTENTS
PRODUCT FEATURES
CONTROLS
INSTALLATION
VIDEO MODE
PHOTO MODE
PLAYBACK MODE
VIDEO PLAYBACK
PHOTO PLAYBACK
DRIVING RECORDER PLAYER INSTALLATION
INSTALLATION FOR WINDOWS
INSTALLATION FOR MAC
DRIVING RECORDER PLAYER FOR WINDOWS
DRIVING RECORDER PLAYER FOR MAC
MENUS AND SETTINGS
VIDEO MODE
PHOTO MODE
PLAYBACK MODE
SETUP MENU
PC CONNECTION
MAC CONNECTION
VIDEO & AUDIO OUTPUT
HIGH DEFINITION OUTPUT
STANDARD DEFINITION OUTPUT
TROUBLING SHOOTING
........................................................................................................................
.................................................................................
....................................................................................................
............................................................................................................
............................................................................................................
..............................................................................................................................
.........................................................................................................................
...........................................................................................................................
.........................................................................................................................
...............................................................................................................
.............................................................................................................
.........................................................................................
...................................................................................................
...................................................................
.............................................................................
.......................................................................................................................
.....................................................................................................................
...............................................................................................................
.......................................................................................................................
....................................................................................................................
.................................................................................................................
.................................................................................................
......................................................................................
.........................................................................................................
01
02
02
03
03
04
05
06
07
08
08
09
09
10
12
13
14
14
15
16
16
16
16
17
PRECAUTIONS
CAUTION:
LCD:
DO NOT ATTEMPT TO SERVICE THE UNIT BY YOURSELF!
WEEE:
Disposal of Waste Electrical and Electronic Equipment and/or Battery by users in
private households in the European Union.
This symbol on the product or on the packaging indicates that this can not be dispose of as household
waste. You must dispose of your waste equipment and/or battery by handing it over to the applicable
take-back scheme for the recycling of electronic equipment and/or battery. For more information please
contact your local household waste disposal office.
A Liquid Crystal Display (LCD) screen is a multilayer complex component, containing 691,200 pixels.
Pixels can however fail during normal product life. 1 pixel = 0.00014% failure rate, and one pixel
failures per year of operation is considered normal and not a cause for concern.
To reduce the risk of electric shock, do not perform and servicing other than that contained in the
instruction manual unless you are qualified to do so.
Have the unit serviced by a qualified service technician if;
The Unit has been exposed to rain or water.
The unit does not seem to operate normally.
The unit exhibits a marked changes in performance.
WARNING:
Do not expose this product to rain, moisture or water under any circumstances, doing so may result in
the risk of electric shock of fire.
Please read this manual carefully before operation and keep it for future reference. It will be helpful should you
encounter any operational problem.
English
01
Page 4
PRODUCT SPECIFICATION
Model Number / Name
Power Requirements
Power Supply
Sensor Resolution
Lens Type
Lens Angle
Aperature
Recording Resolution (Max.)
Screen Size
Screen Resolution
Screen Ratio
Card Reader
SD Card (Recommended Type)
Recording Format
Video Out
Internal Battery
Unit Dimensions
Unit Weight
NBDVR402G / NEXTBASE iN-CAR CAM 402G PROFESSIONAL
5V / 600mA
12-24Vdc Car Power Cable (supplied)
Fuse Type: 20mm Glass Fast Blow 2A
3M Pixel (3,000,000 Pixel)
6G
F1.6
2.7"
16:9
8-32GB Class 10 (30mb/s) branded (not supplied)
MOV
Lithium-ion 3.7V / 200mAh (approx. 6mins recording time)
Battery design allows the 'Auto Power Off' feature to function in event of
power loss within the vehicle. It is not intended as an alternative power source
to replace the supplied car adaptor.
140°
1920 x 1080 @ 30fps
960 (W) X 240 (H) pixels x RGB
MicroSD, Class 6-10, <=32GB
High Definition: Mini Socket (Video / Audio)
Standard Definition: 3.5mm Jack (Video / Audio)
107 x 61.5 x 37.5mm
100g
CAUTIONS ON USING THIS PRODUCT
Ensure that the windscreen is free of dirt or grease before placing mount upon it.
Do not obscure the view of the road ahead or impede the deployment of any airbags in the event of an accident.
When not in use, please disconnect the car adaptor from both the 12/24Vdc outlet in your vehicle and the device
itself.
Only clean the device with a soft dry cloth, for tough dirt, apply some neutral detergent diluted in 5 to 6 parts water
to a soft cloth.
Note that alcohol, thinner, benzene etc could cause damage to the paint or coatings.
Avoid making contact with the lens as damage be caused.
If required clean the glass lens carefully using spectacle lens cleaning fluid on a soft cloth only.
The video recordings made by this Digital Video Recorder are intended for personal use only.
Publication of the recordings on Youtube, the internet or other methods are subject to the Data Protection Act and
the requirements thereof must be adhered to.
If the Digital Video Recorder is to be used within a commercial environment, i.e. truck use, then the CCTV
regulation apply also, in addition to the Data Protection Act regulations. This includes labelling to identify the use
of CCTV is taking place, the omission of Audio recording and informing the relevant authorities of who controls the
data.
Video playback upon the device which is visible to the driver is prohibited or restricted in some countries or States.
Please adhere to these laws.
Whilst driving, do not adjust the controls of your device as this is a distraction to driving.
1.
2.
3.
4.
5.
6.
7.
8.
9.
10.
English
02
Page 5
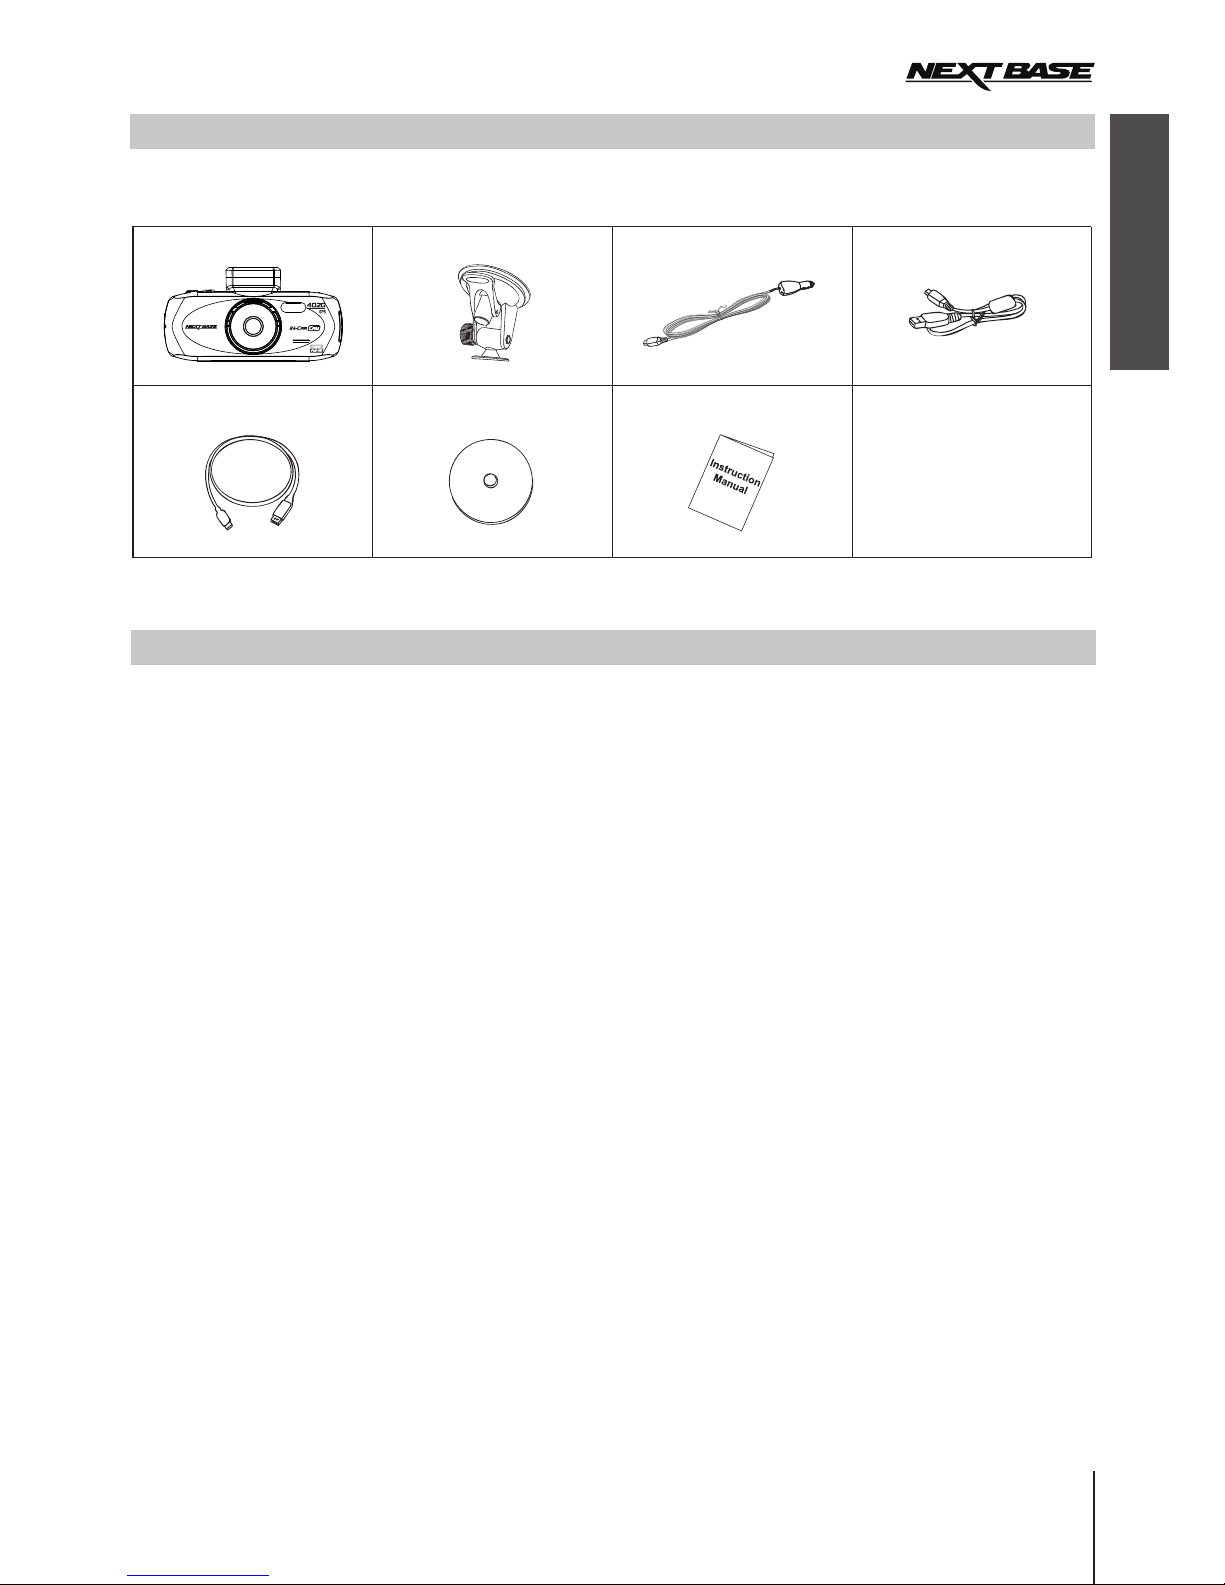
PACKAGE CONTENTS
Please check the contents of your iN-CAR CAM product package. The actual products might appear slightly different
from the pictures shown below.
iN-CAR CAM
HD Cable
Mount
Car Power Cable
USB Cable
PRODUCT FEATURES
Thank you for purchasing this NEXTBASE iN-CAR CAM product, in this section we will outline some of the features
available with this device.
2.7" 16:9 LCD Colour Screen
Large screen for ease of use and viewing the playback of both videos and photos.
3.0M PIXEL CMOS Sensor
Provides high quality recording up to 1920 x 1080P Full HD.
140° Wide Angle Lens
Wide angle lens to allow best possible recording of the vista ahead.
GPS Logger
GPS co-ordinates, date and time are recorded, the journey can then be viewed on map using the supplied PC / MAC
playback software.
G Sensor / File Protection
In the event of an impact the device will automatically 'protect' the recording stopping the file from being over-written.
Individual files can also be 'protected' when viewed within playback mode.
Still Camera
Take still images with a variety of options / settings available.
Auto Shutdown Timer
Select how long you would like the device to continue recording once power has been removed.
Built-in Microphone & Speaker
Record audio to compliment the video recordings.
Motion Detection
The device will detect motion and start recording automatically, useful for car park surveillance.
Note: iN-CAR CAM needs a permanently live power source for this feature to function
High Definition Output
View files directly from your device via a High Definition cable to an external screen.
Windows is a registered trademark of Microsoft Corporation in the United States and other countries.
Mac is a trademark of Apple Inc
2012 Google Inc. All rights reserved. Google Maps™ is a trademark of Google Inc..
Installation Disk Instruction Manual
English
03
Page 6
CONTROLS
1 5
6
2
4
3
8
7
10
9
1
13
14
15
12
1
16 17
18
19 20
1.
Insert MicroSD memory card here.
2. LENS
3. LED LAMPS
Turn on/off within Setup menu to enable
enhanced night time recording.
4. SPEAKER
5. HD OUT SOCKET (located under dust cover)
For use with High Definition Cable.
6. RESET
Press to reset the iN-CAR CAM.
7. LED INDICATOR
Car adaptor connected and iN-CAR CAM switched on::
PURPLE = Battery charging
RED = Battery charged
PURPLE & BLUE FLASHING = Battery charging & recording
RED FLASHING = Recording
Note:
The LED will appear BLUE for a short period on shut-down,
battery charge during does not occur during this period.
The battery will only charge when the iN-CAR CAM is
connected to power source and switched on.
Car adaptor dis-connected:
RED = Power On
RED FLASHING = Recording
8. UP
Press to navigate up within menus and to move
to the next file when in playback mode
MEMORY CARD SLOT (located under dust cover)
‘One touch button’ to protect current file in event
an emergency situation.
10. MICROPHONE
11. DOWN
Press to navigate down within menus and to move
to the previous file when in playback mode.
12. SCREEN
13. MENU
Press to open the Menu within current mode.
Press twice to open the Setup menu.
14. EXPOSURE (EV)
Press to toggle through exposure settings.
15. MODE
Press to select: Video / Photo / Playback modes.
16. MINI USB 2.0 SOCKET
Connect car power cable / USB cable here.
17. AV OUT SOCKET (located under dust cover)
For use with AV Cable (sold separately)
18. MOUNTING POINT
Attached supplied windscreen mount here.
19. POWER
Press and to turn on / off the iN-CAR CAM.
20. START / STOP & OK
Press start, stop a recording or to confirm selection.
9. SOS FILE PROTECTION
English
04
HD OUT
Page 7
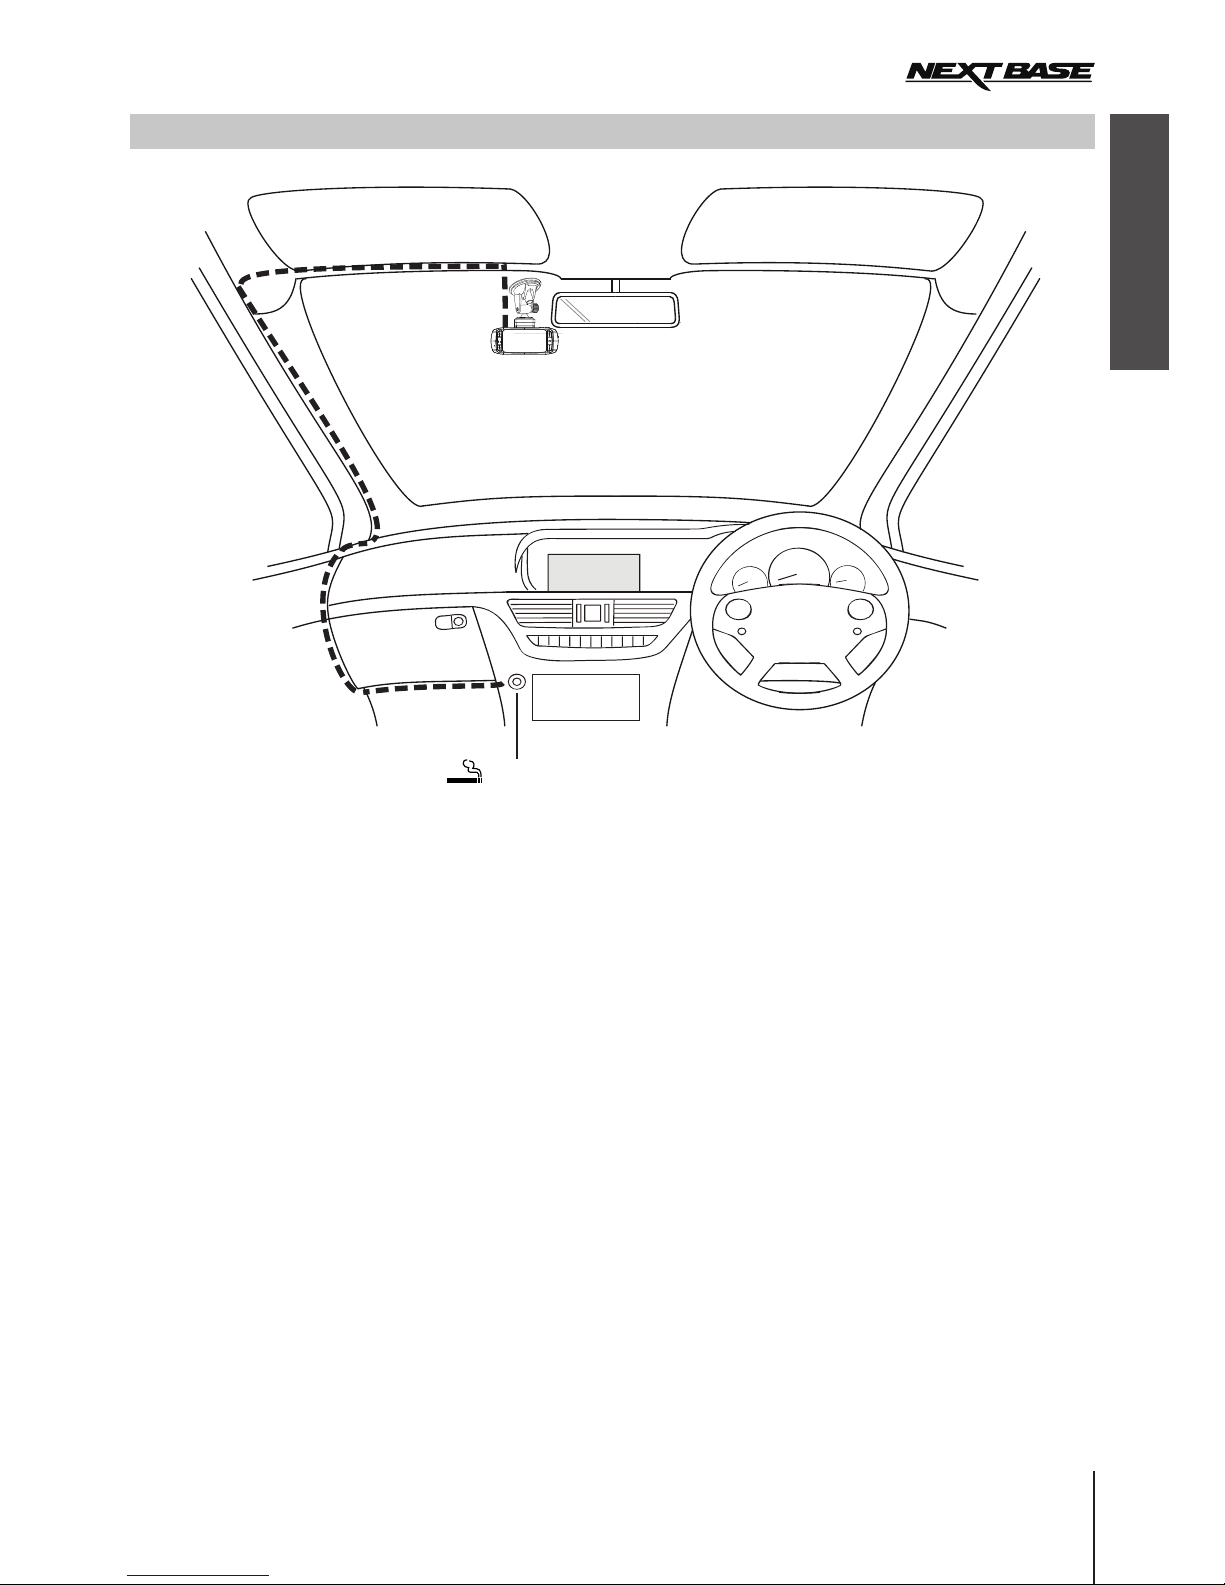
INSTALLATION
1. Open dust cover and i
(gold contacts facing the back of the device). Push the memory card until it clicks into place and close dust cover.
2. Attach the device to the supplied windscreen mount, taking care the locking tab has ‘clicked’ firmly into place.
3. Remove the protective plastic film from the suction pad. Select required position for the windscreen mount and clean
windscreen with a dry / clean cloth to achieve good contact between the glass and mount. While holding the suction
cup onto the glass push the locking lever upwards to secure the mount to the windscreen.
Please ensure that once mounted the iN-CAR CAM is located within the area of the vehicles windscreen wipers to
maintain a clear view during rainfall.
4. The angle and position of the iN-CAR CAM can be adjusted by loosening the locking clamp and moving as required,
remembering to re-tighten the clamp.
5. Connect the car adaptor to mini-USB socket of the iN-CAR CAM and then plug the supplied car adaptor into the
12-24Vdc outlet of your vehicle. The device will automatically power on and start recording once power is available.
In some vehicles this will be when connections are made, for others the device will power on once the ignition has
been turned on.
NOTE:
· Do not place the iN-CAR CAM in such a way that may impede the driver's vision of the road ahead, interfere
with the deployment of air bags or other safety equipment.
· Do not operate the unit while driving.
· To reduce the risk of theft, remove the unit and the mount from your vehicle, or position out of sight, before
leaving your vehicle unattended.
· Do not remove or insert the memory card when the iN-CAR CAM is turned on. This may damage the memory card.
· In vehicles where the 12V / 24V output remains on when ignition is turned off please disconnect the device when
not in use.
· The supplied car adaptor has a 4m long cable to allow cable to placed neatly within the vehicle.
· First time use of the device will require the Time and Date to be set. See Page 10 for details.
nsert a suitable memory card in to the device, taking care to follow correct orientation markings
The above illustration depicts recommended installation.
12-24V DC
English
05
Page 8
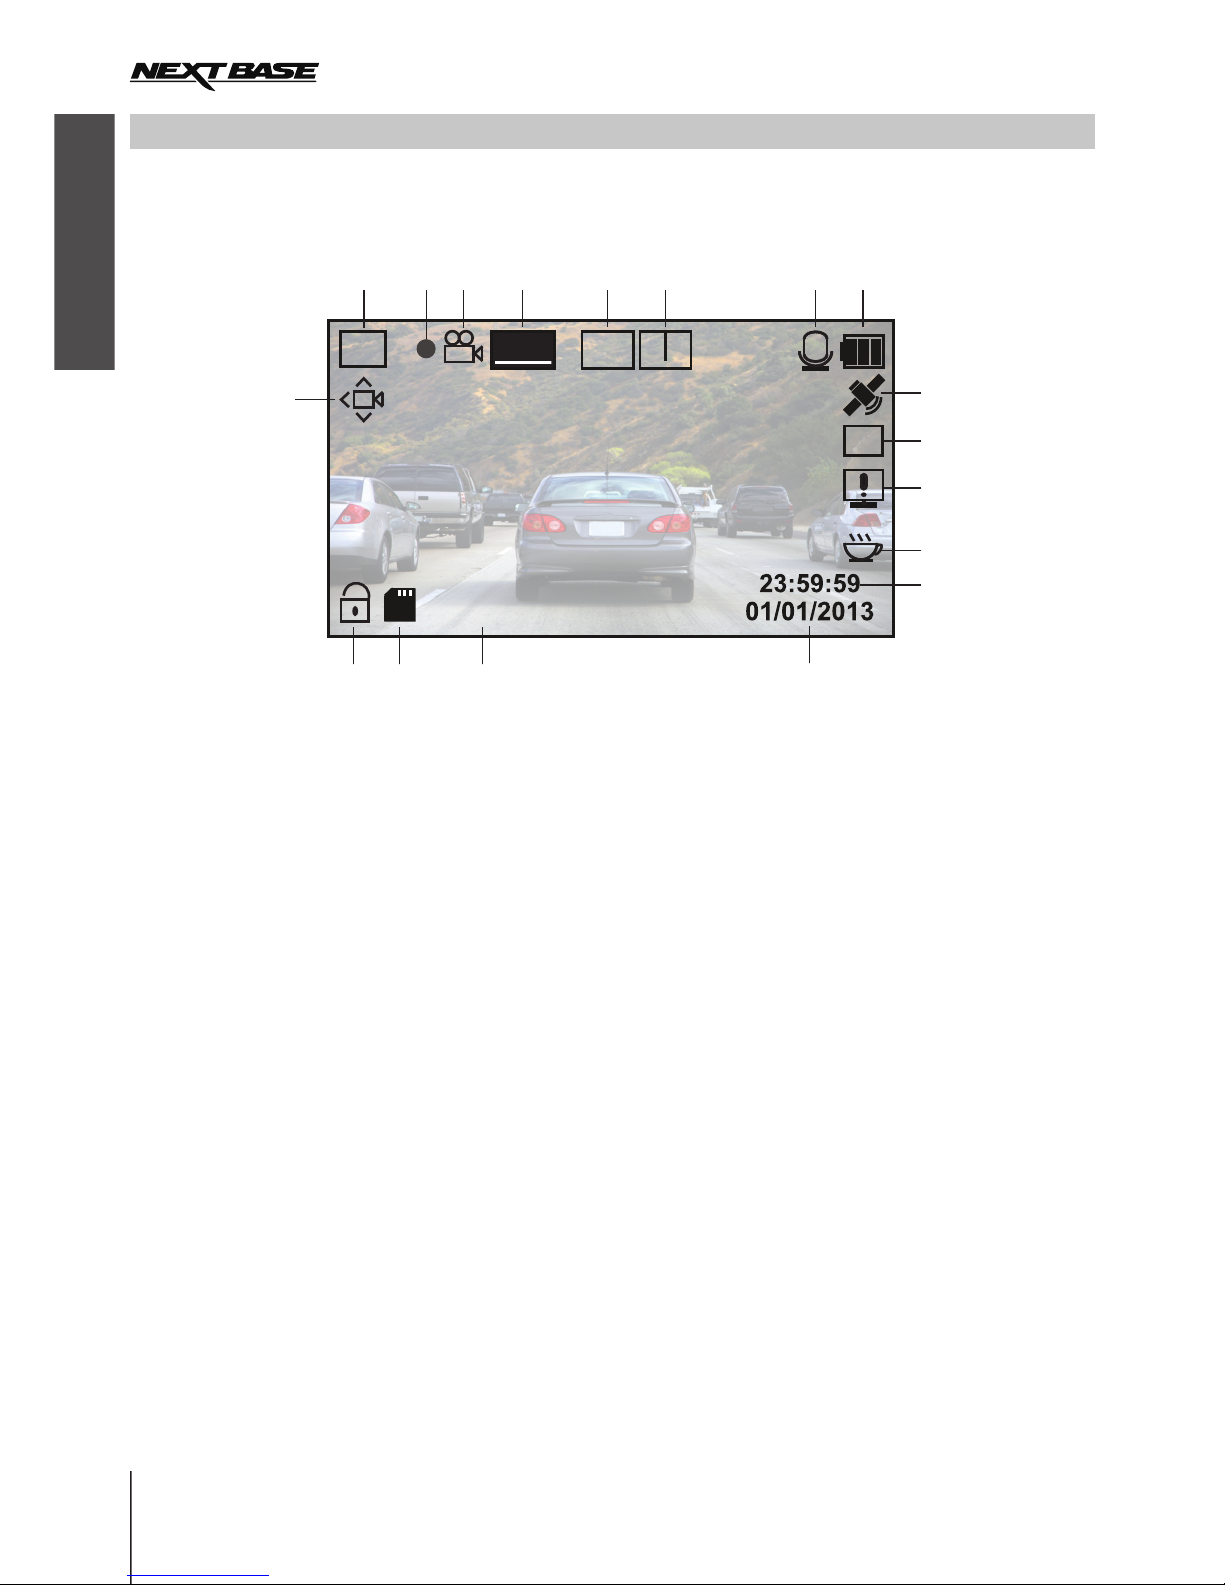
VIDEO MODE
The Video menu is accessed by using the MENU button located on the rear of the use the UP and
DOWN buttons to navigate through the Menu and press the OK button to enter the options screen. Select the
required setting press OK to confirm, press MENU once more to exit the Video Menu.
The default settings within the iN-CAR CAM have been set to allow you to use the iN-CAR CAM without the need to
change any settings, however it is recommended that you explore these settings to familiarise yourself with the
product and it’s capabilities.
Note:
Within the SETUP menu which is accessed from within any mode by pressing the MENU button twice, there is
a ‘Default Setting’ option to allow you to reset the iN-CAR CAM to the factory defaults if required.
iN-CAR CAM,
The key below explains the various information displayed on the screen when your iN-CAR CAM is in Video mode,
some icons will only be displayed once the relevant function has been selected within the Video menu, as described
further down this page.
WDR Icon: Remains on screen as iN-CAR CAM utilises WDR technology.
Recording Indicator: Flashes red when a recording is in progress.
Video Mode Icon: Indicates the iN-CAR CAM is in Video mode.
Resolution: Displays the current resolution as selected from within the Video menu.
Loop Recording Icon: Displays current recording chunk time setting as selected from within the Video menu.
Exposure Icon: Displays current exposure setting as selected from within the Video menu.
Microphone Icon: Displayed on screen when Audio Recording is selected from within the Video menu.
Battery Indicator: Displays battery level, it is recommended to keep the car adaptor plugged in during use.
GPS Icon: The icon will flash while the iN-CAR CAM locates satellites. Once a stable signal is received, the
icon will stop flashing and remain on screen.
White Balance Icon: Displays White Balance setting as selected from within the Video menu.
Compass / Speed Display Icon: Shown on screen when function has been turned on within the Video menu.
Driver Fatigue Icon: Shown on screen when function has been turned on within the Video menu.
Time: Displays current time as set within the Setup menu.
Date: Displays current date as set within the Setup menu.
Recording Time: Displays the length of current recording.
Memory Card Icon: Icon will be marked with a red cross when there is no memory card inserted.
Protected File Icon: Displayed when a video file has been protected by activation of the internal G Sensor.
Motion Detection Icon: This icon appears if motion detection is switched on from within the Video menu.
1.
2.
3.
4.
5.
6.
7.
8.
9.
10.
11.
12.
13.
14.
15.
16.
17.
18.
WDR
1080P
AWB
3
+
1
00:00:00
17
6
3
15
2
4
5
7
8
9
16
10
11
13
1
14
18
12
English
06
Page 9
PHOTO MODE
The key below explains the various information displayed on the screen when your iN-CAR CAM is in Photo mode,
some icons will only be displayed once the relevant function has been selected within the Video menu, as described
further down this page.
The Photo menu is accessed by using the MENU button located on the rear of the iN-CAR CAM, use the UP and
DOWN buttons to navigate through the Menu and press the OK button to enter the options screen. Select the
required setting press OK to confirm, press MENU once more to exit the Photo Menu.
The default settings within the iN-CAR CAM have been set to allow you to use the iN-CAR CAM without the need
to change any settings, however it is recommended that you explore these settings to familiarise yourself with the
product and it’s capabilities.
Note:
Within the SETUP menu which is accessed from within any mode by pressing the MENU button twice, there is
a ‘Default Setting’ option to allow you to reset the iN-CAR CAM to the factory defaults if required.
WDR
AWB
+
1
ISO
AUTO
5M
M
2
6
3
4
5
7
8
9
11
1
2
10
Memory Card Icon: Icon will be marked with a red cross when there is no memory card inserted.
WDR Icon: Remains on screen as iN-CAR CAM utilises WDR technology.
Photo Mode Icon: Indicates the iN-CAR CAM is in Photo mode.
Resolution: Displays the current resolution as set within the Photo menu.
Capture Mode Icon:
Anti-Shaking Icon: Displayed on screen when Anti-Shaking is active, when function is Off the icon will be
marked with red stop sign.
Exposure Icon: Displays current exposure setting as selected from within the Photo menu.
ISO Icon: Displays the current ISO setting as selected within the Photo menu.
Battery Indicator: Displays battery level, it is recommended to keep the car adaptor plugged in during use.
White Balance Icon: Displays the current White Balance setting as selected within the Photo menu.
Quality: Displays the current image quality as set within the Photo menu.
Displayed on screen when Capture Mode (timer) is selected from within the Photo menu.
1.
2.
3.
4.
5.
6.
7.
8.
9.
10.
11.
English
07
Page 10

3
2
1
4
5
6
01/01/13
12:34
100-0001
2592x1944
PLAYBACK MODE
PHOTO PLAYBACK
Photo Playback Icon: Indicates the iN-CAR CAM is displaying a photo in the Playback mode.
Protected File Icon: Displayed when a photo file has been protected by selecting ‘Protect’ from within the
playback menu.
File Number: Displays current file number.
Resolution: Displays the size of current photo.
File Date: Displays date current file was recorded.
File Time: Displays start time current file was recorded.
1.
2.
3.
4.
5.
6.
Recommended PC playback software, required for Windows when no internet connection is available:
QuickTime (free download from www.apple.com/uk/quicktime/download)
VLC Media Player (free download from www.videolan.org/vlc)
When a photo is detected upon the SD Card, then the screen below is shown.
The key below explains the various information displayed on the screen, during photo playback.
Note:
To view the NEXT or PREVIOUS item stored upon the SD Card press the or button respectively.
The iN-CAR CAM can display both Videos and Photos stored upon the SD card when in Playback Mode. As the
displays are slightly different please refer to the two sections below.
VIDEO PLAYBACK
When a video is detected upon the SD Card, the screen below is shown.
The key below explains the various information displayed on the screen, during video playback and how to use
the control buttons.
4
1
3
2
5
6
7
01/01/13
12:34
100-0001
2592x1944
/
II
OK:
MODE:
:PREV :NEXT
I
I
Control Buttons: To scroll through the saved files use the and buttons, to view a chosen video press the
OK button which then acts as a play / pause button. During video playback, the and buttons will serve as
rewind and fast forward respectively, once the video is paused press the MODE button to continue scrolling
through the saved files.
Video Playback Icon: Indicates the iN-CAR CAM is displaying a video in the Playback mode.
Protected File Icon: Displayed when a video file has been protected by activation of the internal G Sensor
during recording or by selecting ‘Protect’ from within the playback menu.
File Number:
Resolution: Displays the resolution that current video was recorded in.
File Date: Displays date current file was recorded.
File Time: Displays start time current file was recorded.
Displays current file number.
1.
2.
3.
4.
5.
6.
7.
I
I
I
I
I
I
English
08
Page 11

DRIVING RECORDER PLAYER INSTALLATION
System Minimum Requirements:
Pentium III 500 MHz or Celeron at 800 MHz.
1 Gb RAM.
100 Mb hard drive space.
CD-ROM Drive (tray loader only)
1280 x 1024 monitor display
How to install:
With disk inserted in to the CD drive, navigate to the disk using windows explorer and display the disk contents.
· Driving Recorder Player for Windows
· Driving Recorder Player for Mac
· NBDVR402G Driving Recorder Player Installation Guide (English Version)
· NBDVR402G Driving Recorder Player Installation Guide (German Version)
· NBDVR402G Instruction Manual (English & German Version)
Should your PC not have a CD Drive, please download the Driving Recorder Player software and installation
instructions from our website:
Open the ‘Driving Recorder Player for Windows’ folder, run the 'setup.exe' file and follow the on-screen instructions.
Please refer to the ‘NBDVR402G Driving Recorder Player Installation Guide’ supplied with the software for further
information.
Windows XP, Vista, Windows 7, Windows 8
http://www.nextbase.co.uk/categories/InCarCam/downloads
Note:
· Do NOT insert disk into you PC if it uses a ‘slot loader’, this will cause damage to your PC not covered
under the iN-CAR CAM manufacturers warranty.
· For some operating systems the installation process may vary.
· Player will only open with Windows operating systems when an internet connection is present.
INSTALLATION FOR MAC
System Minimum Requirements:
Mac OS X 10.7
How to install:
With disk inserted in to the CD drive, navigate to the disk using windows explorer and display the disk contents.
· Driving Recorder Player for Windows
· Driving Recorder Player for Mac
· NBDVR402G Driving Recorder Player Installation Guide (English Version)
· NBDVR402G Driving Recorder Player Installation Guide (German Version)
· NBDVR402G Instruction Manual (English & German Version)
Should your PC not have a CD Drive, please download the Driving Recorder Player software and installation
instructions from our website:
Open the selected folder and run the 'Driving Recorder Player for MAC' .dmg file, this will place the 'Driving Recorder
Player' volume on your desktop.
Alternatively, once the required Driving Recorder Player software has been downloaded from given website open the
'Downloads' folder on your Mac. The software is saved in a compressed (.zip) folder, free de-compression applications
are readily available, for example 'The Unarchiver' available from the Mac App Store.
Please refer to the ‘NBDVR402G Driving Recorder Player Installation Guide’ supplied with the software for further
information.
http://www.nextbase.co.uk/categories/InCarCam/downloads
INSTALLATION FOR WINDOWS
This section will guide you through the installation of the Driving Recorder Player software, designed to enable the
viewing of recorded files as well as checking journey route / GPS data (location and speed) and G Sensor information.
Please see following pages for guide on using the Driving Recorder Player.
English
09
Page 12
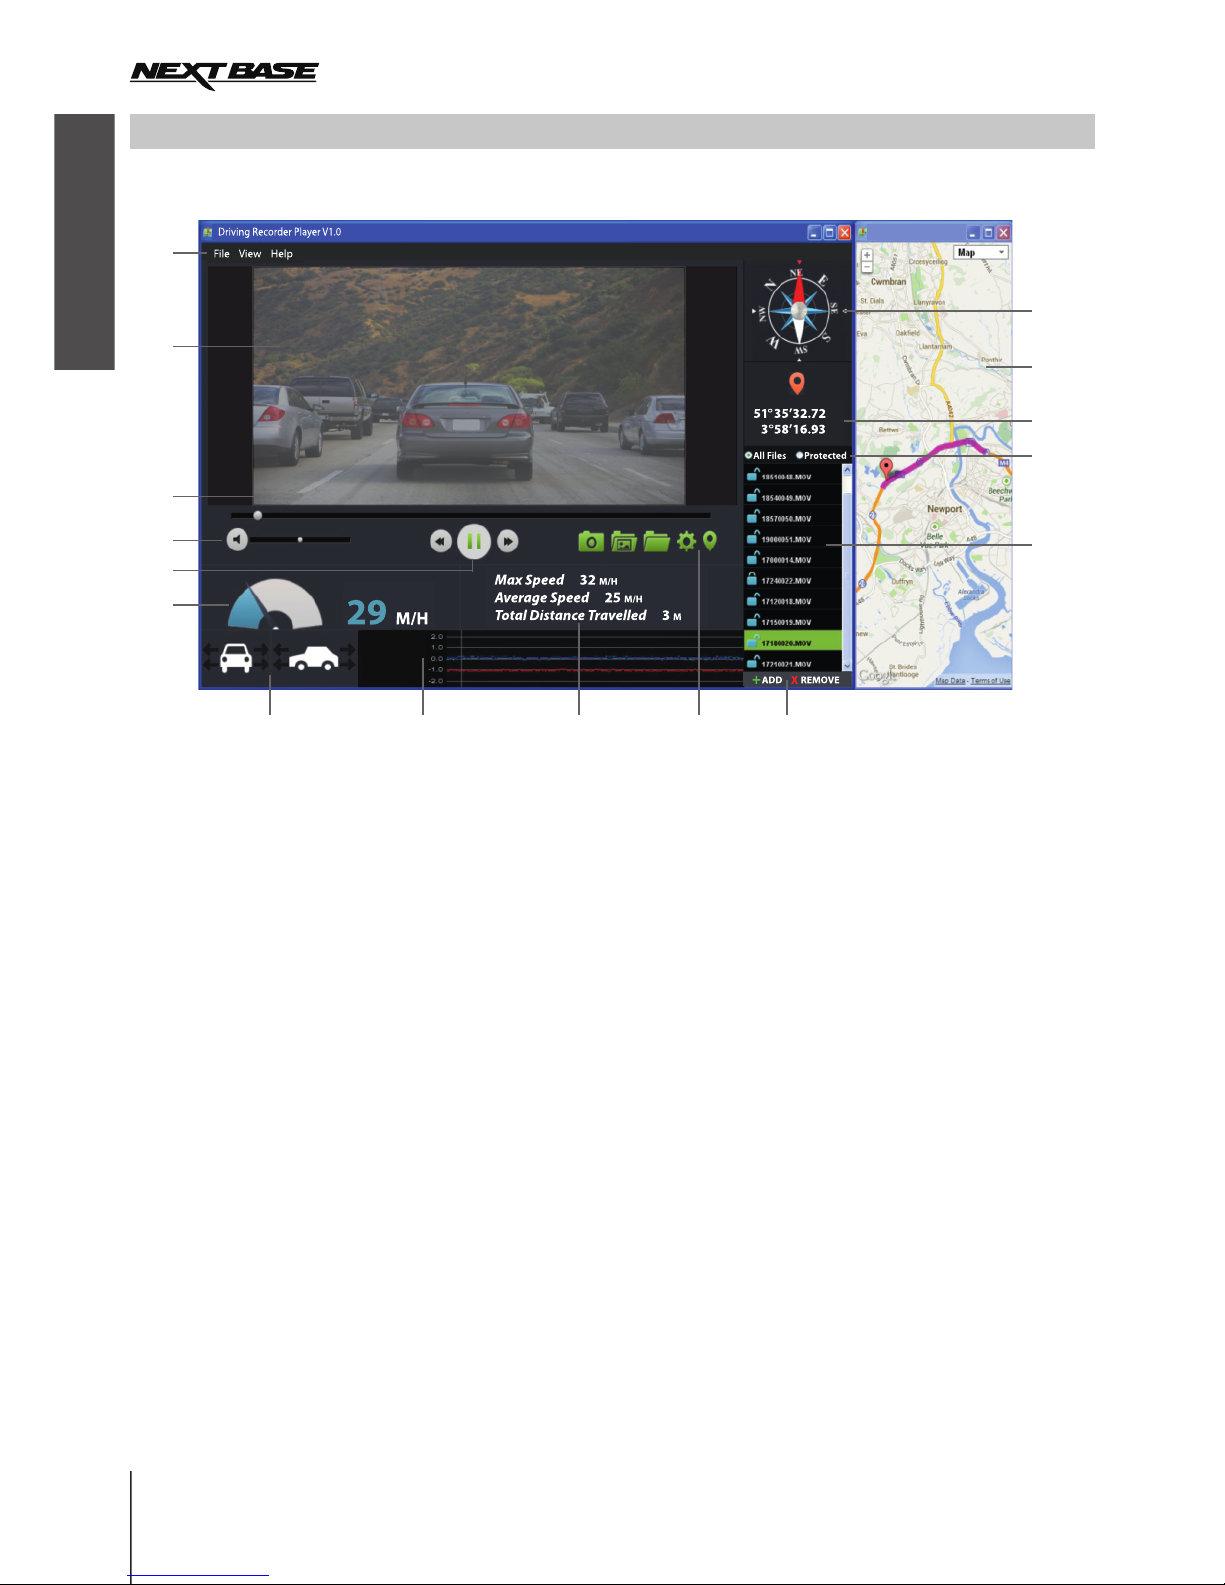
DRIVING RECORDER PLAYER FOR WINDOWS
1.
File: Browse for files, change settings for units of speed and language.
View: Open / close map window.
Help: Player version information.
2. Playback window of selected video file
View current video, to make full screen double-click on the blue bar at the top of the window.
3. Date / Time / Model / Vehicle Registration / Speed / GPS Co-ordinates Stamp
Data saved to the recorded file, this content will vary depending iN-CAR CAM settings and GPS signal.
4. Volume
Adjust playback volume.
5. Video playback control buttons
Play / Pause, fast forward and rewind current file, this function is not available on Windows XP.
6. Speed display
Displays current speed.
7. G Force display
Displays direction of G Force on the vehicle.
8. G Sensor data
Displays data recorded by the G Sensor across the three axis.
X = left/right, Y = up/down and Z = acceleration & deceleration.
9. Journey statistics
Displays maximum speed, average speed and total distance travelled.
Player settings
The key below explains the various information displayed within the Driving Recorder Player when using a Windows
platform
X: -0.03
Y: -1.06
Z: 0.16-
Map
13/08/2013 14:08:44 NBDVR402G AB12 3456 29MPH N 51 35 32.72 W 3 58 16.93
3
4
6
5
2
7 8 9 10 11
12
14
15
16
W
N
13
1
English
10
Page 13

DRIVING RECORDER PLAYER WINDOWS (CONTD.)
10. Driving Recorder Player controls
Screen Capture, this will create a still image for each frame of image seen within the playback window.
Open screen capture folder.
Browse for files stored on your computer.
Open settings window, adjust language and unit of speed.
Open / Close the Map window.
11. Add / Remove files
Used to add and remove selected videos to the file list.
12. File list
Displays videos currently within the file list.
13. Display all or protected files
Select whether to display all files or protected files only.
14. GPS co-ordinates
Displays current GPS co-ordinates, only available when the video files was recorded when satellite
connection was present.
15. Map
Displays route travelled on map, only available when the video files was recorded when satellite
connection was present.
16. Compass
Displays current direction, only available when the video files was recorded when satellite
connection was present.
Using the Driving Recorder Player
Insert the SD card directly to the card reader on your PC, or connect the iN-CAR CAM as described
on Page 16 (Mass Storage).
Using the player controls (10 or 11) browse to the SD card and then to the folder which contains the video files you
have recorded. Press OK.
The recorded video files upon the SD card will then appear in the File List window (12).
Choose a video file to play, by double clicking upon it.
Once the file is playing, you can use the player controls (8) for pause, forward, reverse as required.
Note:
The driving recorder player will only open when an internet connection is available, due to the Google Map fucntion.
Should you want to view recorded files at any other time, please open with another video playback program,
e.g. QuickTime or VLC.
The driving recorder players features / functions may vary between different operating systems.
English
11
Page 14

DRIVING RECORDER PLAYER FOR MAC
The key below explains the various information displayed within the Driving Recorder Player when using a MAC
platform.
FILE INFO
Locked: No
Date: 2013-08-06 17:18:14
Location: /Users/David/Desktop/402G - videos/17150019.MOV
Driving Recorder Player Version 1.0
51 35 32.72
3 58 16.93
N
W
‘
‘
ADD REMOVE
+
x
FILE LIST
2
3
1
6
1
12
13
14
5
4
7 8 9
1.
View current video.
2. Date / Time / Model / Vehicle Registration / Speed / GPS Co-ordinates Stamp
Data saved to the recorded file, this content will vary depending iN-CAR CAM settings and GPS signal.
3. Volume
Adjust playback volume.
4. Video playback control buttons
Play / Pause, fast forward and rewind current file.
5. Speed display
Displays current speed.
6. G Force display
Displays direction of G Force on the vehicle.
7. G Sensor data
Displays data recorded by the G Sensor across the three axis.
X = left/right, Y = up/down and Z = acceleration & deceleration.
8. File Info
Displays current file information.
9. Add / Remove files
Browse for files stored on your computer, add / remove selected videos to and from the file list
10. File List
Displays videos currently within the file list.
11. Screen Capture
Screen Capture, this will create a still image for each frame of image within the playback window.
Open screen capture folder to view images.
12. GPS co-ordinates
Displays current GPS co-ordinates, only available when the video files was recorded when satellite
connection was present.
13. Map
Displays route travelled on map, only available when the video files was recorded when satellite
connection was present.
14. Compass
Displays current direction, only available when the video files was recorded when satellite
connection was present.
Playback window of selected video file
13/08/2013 14:08:44 NBDVR402G AB12 3456 29MPH N 51 35 32.72 W 3 58 16.93
10
1
English
12
Page 15

MENUS AND SETTINGS
Each mode (Video, Photo and Playback) has a menu used to access the various options and settings, press the
MENU button on the rear of the device to access the menu, specific to the current mode selected.
Use the UP, DOWN buttons to select chosen option and press the OK button to confirm.
1.
1.1 Resolution
Select recording resolution, this will increase or decrease the quality of the recorded video.
Default Setting:
1.2 Exposure
Select exposure, used to adjust exposure level for different light conditions.
Default Setting:
1.3 White Balance
Adjust the white balance for different light conditions.
Default Setting: Auto
1.4 Record Audio
Turn On / Off audio recording.
Default Setting: On
1.5 Date Stamp
Turn On / Off the date stamp shown on recorded files.
Default Setting: On
1.6 Loop Recording
Select duration of recording length for the individual video files, the iN-CAR CAM will fill the SD Card then loop
back to the beginning, overwriting the saved files (unless protected).
Default Setting:
1.7 G Sensor
Turn Off or adjust the sensitivity of the G Sensor, it is the G Sensor that detects forces which will automatically
protect the current recording in event of a collision.
Default Setting: Middle
1.8 Motion Detection
Turn On / Off the motion detection function, the device will need to remain on and will start a 10 second
recording when a change to the viewed scene is detected.
Default Setting: Off
1.9 Number Plate
Enter the registration number for your vehicle, this will then be shown on the video file.
Default Setting: ********
1.10 Driver Fatigue Warning
Set the timer which will display an image of a hot beverage to serve as a reminder to take sufficient rest
when on a long journey.
Default Setting: Off
1.11 GPS Track
Turn On / Off the GPS co-ordinate stamp shown on recorded files, co-ordinates and map will function as
normal when viewed with the Driving Recorder Player no matter whether this function is set to On or Off.
Default Setting: On
1.12 Compass
When turned on, the screen will display current speed and a compass after the selected period of time,
press any button to return to normal viewing, this function is only available when a GPS connection is present.
Default Setting: Off
1.13 Password Settings
Set a password that will need to be entered to access menus and settings, only basic functions of power
on / off and start / stop remain available.
1.13 Speed Units
Select whether to record and display speed in KMH or MPH.
Default Setting: MPH
1.14 Rotate Display
Rotate the display 180
VIDEO MODE
1080P (1920x1080 @ 30Fps)
0
3 Minutes
°, particularly useful should iN-CAR CAM be mounted on the dashboard, the control
button functions do not rotate.
English
13
Page 16

MENUS AND SETTINGS (CONTD.)
2.1 Image Size
Select image size, this will increase or decrease the size of the recorded image
Default Setting: 5M
2.2 Colour
Adjust the colour effect of the recorded image.
Default Setting: Normal
2.3 Anti-Shaking
Turn On / Off the anti-shaking feature, may help reduce image being blurred under some circumstances.
Default setting:
2.4 Capture Mode:
Turn On / Off the timer function, when this feature has been turned on, the iN-CAR CAM will take a photo
the selected period of time after the OK button has been pressed.
Default Setting:
2.5 White Balance
Adjust the white balance for different light conditions.
Default Setting:
2.6 ISO
Adjust the ISO setting, the brighter the conditions the lower the ISO required.
Default setting: Auto
2.7 Exposure
Select exposure, used to adjust the amount of light received by the sensor.
Default setting:
2.8 Date Stamp
Turn Off the date stamp shown on recorded photographs, can also change to date only.
Default setting: Date / Time
2.9 Quality
Increase or decrease the quality of the recorded image.
Default Setting:
2.10 Sharpness
Adjust the sharpness of the recorded image.
Default Setting:
3. PLAYBACK MODE
The playback menu is the same when viewing either videos or photos.
3.1 Delete
Used to delete the current file, also available is the option of deleting all files.
3.2 Protect
Used to lock or unlock the current file, also available is the option of locking and unlocking all files.
3.3 Slide Show
Used to start a slide show of images stored on the SD card, press the Menu button to exit the slide show.
2. PHOTO MODE
On
Single
Auto
0
Normal
Normal
English
14
Page 17

MENUS AND SETTINGS (CONTD.)
There is also a Setup menu for the general settings, press the MENU button twice on the rear of the device to
access the menu. The options and settings available are described below.
4.1 Format
Format the inserted memory card, this will delete all content.
4.2 Language
Set the language as required.
Default Setting: English
4.3 Date / Time
Adjust the date / time as required using the OK button to toggle through fields, and to set variables.
Note: In event of battery becoming fully dis-charged, the date will reset to 01/01/2013.
4.4 Frequency
Set the Frequency as required.
Default Setting: 50Hz
4.5 LED Light
Turn on the IR LEDs for enhanced nighttime recording.
Default Setting: Off
4.6 Beep Sound
Turn Off / On the beep sound, note if Beep is turned off the audible low-battery warning will also be disabled.
Default Setting: On
4.7 Screen Saver
Turn on the Screen Saver function, shut down the screen after a period of inactivity, press any button to re-open.
Default Setting: Off
4.8 TV Mode
Set the TV Mode as required.
Default Setting: PAL
4.9 Speed Stamp
Turn On / Off the Speed stamp shown on recorded files.
Default Setting: On
4.10 Version
Display the version number of your device’s software.
4.11 Default Setting
Reset the device to the default settings.
4.12 Auto Power Off
Adjust the timing of the Auto Power Off function, this can be used to continue recording in event of loss of
power within in the vehicle, with options of 10 Seconds. 2 Minutes and 5 Minutes.
Default Setting: 10 Seconds
4. SETUP MENU
I
I
English
15
Page 18

PC CONNECTION
Connecting the iN-CAR CAM to a Windows based PC using the supplied USB Cable will automatically trigger the
iN-CAR CAM to display the two options of:
Mass Storage
PC Camera
Use the UP and DOWN buttons to select preferred option and OK to confirm.
Mass Storage
If Mass Storage is selected, the iN-CAR CAM screen will show the words ‘Mass Storage’ and then take the
function of an SD Card reader for your PC. Upon your PC an extra drive will appear (e.g. Drive E:) and you will be
able to navigate through the SD Card and view / manage stored files.
This feature is useful if you do not have an SD Card reader built in to your PC.
PC Camera
If PC Camera is selected, the iN-CAR CAM screen will show the words ‘PC Camera’ and then take the function
of a Webcam (no audio) for your PC. Start the normal application upon your PC that uses a webcam (e.g. Skype)
and select the webcam which is entitled ‘USB Video Device’.
This feature is useful if you do not have a Webcam built in to your PC.
Note:
The iN-CAR CAM is only compatible with the following Windows based operating systems: XP, VISTA and
Windows 7.
VIDEO & AUDIO OUTPUT
Output
As you connect a High Definition Cable between the iN-CAR CAM and your television, the iN-CAR CAM screen will
blank, as all output is now visible upon your television. The external monitor can now be used for playback and as a
larger viewfinder in Photo mode. Recordings can NOT be made in Video mode with HD connected. The controls upon
the iN-CAR CAM operate for the Play / Pause, STOP, Next / Previous and Fwd / Rev functions as shown on screen.
Standard Definition
As you connect an AV Cable (sold separately) between the iN-CAR CAM and your television, the iN-CAR CAM screen
will blank, as all output is now visible upon your television. All elements of the Video, Photo and Playback are available
via the AV output so you can monitor your recordings upon a larger screen instantly (useful for when using your
iN-CAR CAM as a rear facing camera while connected to another device for viewing).
The controls upon the iN-CAR CAM operate normally.
Please contact your local NEXTBASE dealer for accessory purchases.
High Definition
Ouput
·
·
·
·
·
MAC CONNECTION
Connecting the iN-CAR CAM to a MAC using the supplied USB Cable will automatically trigger the iN-CAR CAM to
display the following options:
Mass Storage
Press OK to confirm Mass Storage function is required.
PC Camera
Due to compatibility issues ONLY the Mass Storage function is available when used with MAC operating systems.
Mass Storage
If Mass Storage is selected, the iN-CAR CAM screen will show the words ‘Mass Storage’ and then take the function
of an SD Card reader for your MAC. Upon your MAC the memory card within your iN-CAR CAM will appear on your
desktop labelled ‘NO NAME’ and you will be able to navigate through the SD Card and view / manage stored files.
This feature is useful if you do not have an SD Card reader built in to your MAC.
·
·
·
English
16
Page 19

TROUBLE SHOOTING
Video Image is blurred.
I can not insert the Micro SD card.
I can not remove the Micro SD
card.
Video files can not be played.
Video file playback is jumpy.
Playback upon the Driver
Recorder Player is jumpy.
The sound is not synchronised
with video during playback.
Video has no sound.
Photograph is blurred.
I can only record a few minutes
of video on my SD card.
Mass Storage or PC Camera
function does not work.
The sucker will not stay in place
upon my windscreen.
The AV Out from my iN-CAR CAM
just buzzes on my TV.
I get the message “Card Error”
on screen.
I get the message “Memory error”
on screen.
I get the message “Card Full”
on screen.
Remove the protective lens cover, clean the lens, clean the windscreen!
Micro SD card are very small and require delicate use. Align the card with
the diagram shown upon the device and insert the card until you feel a
slight spring resistance. You now need to push the card, using your finger
nail, until you hear and feel a small latch. Release pressure and the card
will stay retained within the device.
With the card previously installed, you now need to push the card further
inwards slightly, using your finger nail, until you hear and feel a small latch.
Release pressure and the card will spring out sufficiently for you to take
hold of it.
The video files from the iN CAR CAM are in MOV format and may not be
compatible with your PC if suitable playback software is not installed.
Install the supplied Driver Recorder Player software and the additional
Codecs if necessary.
Remove the SD card and reformat to remove non-contiguous files.
For best recording use a branded class 10 type (30MB/s) SD card of
8 to 32GB recommended size. Recommended video playback software
Is the supplied Driver Recorder Player Playback.
PC may not be sufficient for the playback task, try an alternative PC.
The Codecs upon your PC may not be compatible or the latest standard.
Download the latest Codecs from
and install them accordingly.
The Codecs upon your PC may not be compatible or the latest standard.
Download the latest Codecs from
and install them accordingly.
Ensure that “Record Audio” setting is turned ON within the Video Menu.
Hold the camera still whilst taking the photo. Please be aware the photo
is taken around 1 second after the shutter noise is heard.
Change the recording size (Loop recording function) to a smaller size.
Increase the size of the SD card. Max 32GB.
The Mass storage function will work on both Windows and Mac, however
the PC camera is only Windows compatible. . Restart the PC, as this may
be required for the necessary driver to be loaded correctly. Disconnect
and reconnect the In-CAR CAM. Contact NEXTBASE for the required driver.
Moisten the sucker slightly before affixing upon the windscreen. Ensure that
the lever is fully pushed towards the windscreen. Make sure that the glass is
smooth and clean. Do not stick to glass that has any non-smooth effect or
paint whatsoever. Affix to the glass firmly and then push the lever to the full
extent.
Ensure that the AV cable is correct. Use a stereo 3.5mm jack plug where
the tip is the video and the ring is the audio signal.
The SD card has become unuseable by the iN-CAR CAM. Remove useful
files using your PC and then perform a “FORMAT” upon the SD card from
within the SETUP menu.
The SD card has become unuseable by the iN-CAR CAM. Remove useful
files using your PC and then perform a “FORMAT” upon the SD card from
within the SETUP menu.
The SD card has become full as the Loop recording function is set to
OFF. Set the “Loop Recording” function to 3 mins (default) to enable the
cycle recording function and automatic deletion of older files.
http://www.nextbase.co.uk/categories/
InCarCam/downloads
http://www.nextbase.co.uk/categories/
InCarCam/downloads
English
17
Page 20

TROUBLE SHOOTING (CONTD.)
My iN-CAR CAM shuts down by
itself after a while.
No power to my iN-CAR CAM,
but it works upon my PC.
The SD card in my iN-CAR CAM
can not be read.
I can't delete files on my SD card
within the iN-CAR CAM.
The screen blanks after a few
minutes upon my iN-CAR CAM.
I get the message “Cluster Wrong”
on screen.
The Driving Recorder Player will
not open.
The iN-CAR CAM can not lock
onto satellite
I have turned on ‘motion detection’
and now can’t stop the recording.
The battery will not charge.
The battery only last 30 seconds
The battery only lasts 6 minutes.
Either the battery has gone flat, or there is no power to the iN-CAR CAM
and the AutoPower Off period (which is in the SETUP menu) has been
triggered.
The cigarette power cable is not working. Inspect the fuse in the Car Power
plug. Replacement fuse = 2A 20mm type. If the fuse if found to be blown,
inspect the power cable for damage which may have caused the fuse blow.
Use a good quality branded SD card between 4GB and 32GB (suggested)
and format the card from with in the SETUP menu of the iN-CAR CAM.
Check to see if these files are 'protected', if so please follow instructions
to 'un-protect'
The screen saver is set to ON. Change settings to OFF if required.
Default setting is off.
The SD card has been formatted in another device and the Cluster Size is
not compatible. Simply use the MENU, SETUP option to re-format the SD
card from within the iN-CAR CAM.
For Windows operating systems the player requires an internet connection
to open, if this is not available please view files using alternative playback
software, i.e. QuickTime or VLC.
After power on and with the device mounted with clear view of the sky it can
take up to 10 minutes to find the three satellites required to achieve a stable
signal. Reception can also be affected by atmospheric conditions and the
proximity of buildings / trees obscuring the sky.
The iN-CAR CAM will start a recording whenever motion is detected, when
function is to be turned off firstly shutdown the iN-CAR CAM and remove the
SD card, this will avoid recording being activated accidentally. Switch back
on the and within the setting menu and turn off the ‘Motion Detection’.
To protect from over-charging the battery will only charge when the
iN-CAR CAM is turned on.
The battery will only receive charge when the iN-CAR CAM is turned on,
please reconnect car adaptor and leave the iN-CAR CAM turned on.
Charging takes approximately 90 minutes and a full charge is indicated by
a red LED.
This is normal, the battery design allows the 'Auto Power Off' feature to
function in event of power loss within the vehicle. It is not intended as an
alternative power source to replace the supplied car adaptor.
English
18
Page 21

INHALT
SICHERHEITSHINWEIS
HINWEISE ZUR VERWENDUNG DIESES PRODUKTS
PRODUKTSPEZIFIKATION
LIEFERUMFANG
LEISTUNGSMERKMALE
STEUERELEMENTE
INSTALLATION
VIDEOMODUS
FOTOMODUS
WIEDERGABEMODUS
VIDEOWIEDERGABE
WIEDERGABE VON FOTOS
FAHRTENSCHREIBER-PLAYER INSTALLIEREN
FAHRTENSCHREIBER-PLAYER FÜR WINDOWS
INSTALLATION FÜR MAC
FAHRTENSCHREIBER-PLAYER FÜR WINDOWS
FAHRTENSCHREIBER-PLAYER FÜR MAC
MENÜS UND EINSTELLUNGEN
VIDEOMODUS
FOTOMODUS
WIEDERGABEMODUS
EINSTELLUNGSMENÜ
PC VERBINDUNG
MAC ANSCHLIEßEN
VIDEO & AUDIO-AUSGANG
GROß BILDSCHARFE AUSGANG
WERTMESSER BILDSCHARFE AUSGANG
FEHLERBEHEBUNG
...........................................................................................................
..........................................................
......................................................................................................
......................................................................................................................
.........................................................................................................
................................................................................................................
.........................................................................................................................
..........................................................................................................................
...........................................................................................................................
...........................................................................................................
...............................................................................................
................................................................
....................................................................................................
..................................................................
............................................................................
.......................................................................................................................
.......................................................................................................................
........................................................................................................
..........................................................................................................
....................................................................................................................
................................................................................................................
.......................................................................................
........................................................................
................................................................................................................
19
20
20
21
21
22
23
24
25
26
26
27
27
28
30
31
32
32
33
34
34
34
34
35
ACHTUNG:
LCD:
REPARIEREN SIE DAS GERÄT NICHT SELBST!
WEEE:
Entsorgung von Elektro- und Elektronik-Altgeräten und/oder Batterien
durch Benutzer in privaten Haushalten in der Europäischen Union.
Dieses Symbol auf dem Produkt oder der Verpackung weist darauf hin, dass das Produkt nicht mit dem
Hausmüll entsorgt werden darf. Sie müssen Ihrer Altgeräte und/oder Batterien durch Übergabe an das
geltende Rücknahme-System für das Recycling von elektronischen Geräten und/oder Batterien entsorgen.
Für weitere Informationen kontaktieren Sie bitte das Büro Ihres lokalen Entsorgungsunternehmens.
Ein Flüssigkristall-Bildschirm (LCD) ist ein mehrschichtiges kompliziertes Bauteil und enthält 691.200 Pixel.
Pixel können jedoch während des normalen Produktlebenszyklus Fehler aufweisen. 1 Pixel hat eine
Ausfallrate von 0,00014 % und ein Pixelfehler pro Betriebsjahr wird als normal erachtet und stellt keinen
Grund zur Besorgnis dar.
Um die Gefahr eines Stromschlags zu vermeiden, dürfen nur die in dieser Anleitung dargestellten
Pflegearbeiten durchgeführt werden, es sei denn, Sie sind ein Fachmann.
Lassen Sie das Gerät von einem qualifizierten Techniker warten, wenn:
Das Gerät Regen oder Feuchtigkeit ausgesetzt war.
Das Gerät nicht ordnungsgemäß funktioniert.
Das Gerät eine deutliche Änderung in der Leistung aufweist
.
WARNUNG:
Setzen Sie dieses Gerät unter keinen Umständen Regen, Feuchtigkeit oder Wasser aus, es könnte die
Gefahr eines elektrischen Schlags des Feuers entstehen.
Bitte lesen Sie diese Bedienungsanleitung vor dem Gebrauch aufmerksam durch und bewahren Sie sie für zukünftiges
Nachschlagen auf. Sie wird Ihnen hilfreich sein, falls Sie Probleme bezüglich des Gebrauchs haben sollten.
SICHERHEITSHINWEISE
19
Deutsch
Page 22

PRODUKTSPEZIFIKATION
NBDVR402G / NEXTBASE iN-CAR CAM 402G PROFESSIONAL
5V / 600mA
12 - 24 V DC Fahrzeug-Stromkabel (im Lieferumfang enthalten)
Sicherung: 20 mm Flinke 2 A Sicherung
3M Pixel (3,000,000 Pixel)
6G
F1.6
2.7"
16:9
MicroSD, Klasse 6-10, <=32 GB
8-32 GB Klasse 10 (30 mb/s) Markenware (nicht im Lieferumfang enthalten)
MOV
Groß Bildscharfe:
Wertmesser Bildscharfe:
Lithium-Ionen 3,7 V/ 200 mAh (ca. 6 Minuten Aufnahmezeit)
Batterie-Design erlaubt die "Auto Power Off"-Funktion im Falle von
Verlustleistung im Fahrzeug funktionieren. Es wird nicht als alternative
Energiequelle zu den mitgelieferten Autoadapter ersetzen soll.
140°
1920 x 1080 @ 30fps
960 (W) X 240 (H) pixels x RGB
Mini Socket (Video / Audio)
3.5mm Klinke (Video / Audio)
107 x 61.5 x 37.5mm
100g
HINWEISE ZUR VERWENDUNG DIESES PRODUKTS
1. Stellen Sie sicher, dass die Windschutzscheibe frei von Schmutz oder Fett ist, bevor Sie die Halterung darauf
platzieren.
2. Verdecken Sie nicht den Blick auf die Straße oder behindern den Einsatz von Airbags im Falle eines Unfalls.
3. Trennen Sie bei Nichtgebrauch bitte das Kfz-Ladegerät und das Gerät vom 12/24 VDC Ausgang in Ihrem Fahrzeug.
4. Reinigen Sie das Gerät nur mit einem weichen, trockenen Tuch. Für hartnäckigen Schmutz, verdünnen Sie etwas
neutrales Reinigungsmittel in 5 bis 6 Teilen Wasser und geben die Lösung auf ein weiches Tuch.
Beachten Sie bitte, dass Alkohol, Verdünner, Benzol usw., Lackschäden oder Beschädigungen der Beschichtung
verursachen können.
5. Vermeiden Sie Kontakt mit der Linse, da dies Schäden verursachen kann.
6. Bei Bedarf, reinigen Sie das Glas der Linse vorsichtig mit Brillenglas-Reinigungsflüssigkeit auf einem weichen
Tuch.
7. Die Videoaufnahmen, die mit diesem Digitalen Videorecorder gemacht werden, sind für den persönlichen
Gebrauch bestimmt.
8. Veröffentlichung der Aufnahmen auf Youtube, im Internet oder andere Methoden unterliegen dem
Datenschutzgesetz und dessen Anforderungen müssen eingehalten werden. Wenn der Digitale Videorecorder in
einem kommerziellen Umfeld eingesetzt wird, d.h. in einem LKW, dann gilt ebenfalls die CCTV Verordnung,
zusätzlich zu den Vorschriften des Datenschutzgesetzes. Dazu gehören eine Kennzeichnungspflicht zur
Identifizierung wo CCTV verwendet wird, das Unterlassen von Audio-Aufzeichnungen und die Unterrichtung der
zuständigen Behörden, die die Daten kontrolliert.
9. Video-Wiedergabe auf einem Gerät, das für den Fahrer sichtbar ist, ist in einigen Ländern oder Staaten verboten
oder eingeschränkt. Bitte halten Sie sich an diese Gesetze.
10. Nehmen Sie bitte während der Fahrt keine Einstellung an den Reglern des Geräts vor, da dies eine Ablenkung
vom Fahren darstellt.
Modellnummer / Name
Leistungsbedarf
Stromversorgung
Sensorauflösung
Objektivtyp
Objektiv-Winkel
Blende
Aufnahmeauflösung (Max.)
Bildschirmgröße
Bildschirmauflösung
Verhältnis des Bildschirms
Kartenleser
SD-Karte (Empfohlener Typ)
Aufzeichnungsformat
Videoausgang
Integrierter Akku
Geräteabmessungen
Gewicht der Einheit
20
Deutsch
Page 23

LIEFERUMFANG
Bitte überprüfen Sie den Inhalt Ihres iN-CAR CAM Produktpakets. Die Produkte können von den Darstellungen
hier leicht abweichen.
iN-CAR CAM
HD Kabel
Montagehalterung
Fahrzeugadapterkabel
USB-Kabel
LEISTUNGSMERKMALE
Vielen Dank für den Kauf dieses NEXTBASE iN-CAR CAM Produkts. In diesem Abschnitt werden wir einige der
Merkmale dieses Gerätes skizzieren.
2.7" 16:9 LCD Farb-Bildschirm
Großer Bildschirm für einfache Bedienung und Betrachtung der Wiedergabe von Videos und Fotos.
3.0M PIXEL CMOS Sensor
Bietet hochwertige Aufzeichnung von bis zu 1920 x 1080p Full HD.
Weitwinkelobjektiv 140°
Das Weitwinkelobjektiv ermöglicht bestmögliche Aufnahmen des Ausblicks nach vorne.
GPS-Logger
GPS-Koordinaten, Datum und Uhrzeit werden aufgezeichnet, die Reise kann dann mit der mitgelieferten PC/MAC
Wiedergabe-Software auf einer Karte angezeigt werden.
G-Sensor/Dateisicherung
Im Falle eines Aufpralls wird das Gerät automatisch die Aufnahme stoppen und die Datei vor dem Überschrieben schützen.
Einzelne Dateien können auch geschützt werden, wenn sie innerhalb des Wiedergabemodus betrachtet werden.
Fotokamera
Nimmt Fotos mit einer Vielzahl von verfügbaren Optionen/Einstellungen auf.
Timer zur Selbstabschaltung
Sie können vorwählen wie lange das Gerät die Aufnahme fortsetzten soll, nachdem die Stromversorgung unterbrochen
wurde.
Eingebautes Mikrofon und Lautsprecher
Aufzeichnen von Audio, um die Videoaufnahmen zu ergänzen.
Bewegungserkennung
Das Gerät erkennt Bewegung und startet die Aufnahme automatisch, nützlich für die Parkraumüberwachung.
Groß Bildscharfe Ausgang
Anzeige von Dateien direkt vom Gerät über das mitgelieferte Groß Bildscharfe Kabel auf einem externen Bildschirm.
Windows ist eine eingetragene Marke der Microsoft Corporation in den Vereinigten Staaten und anderen Ländern.
Mac ist eine Marke von Apple Inc.
2012 Google Inc. Alle Rechte vorbehalten. Google Maps™ ist eine Marke von Google Inc.
Installations-CD
Bedienungsanleitung
21
Deutsch
Page 24

STEUERELEMENTE
1 5
6
2
4
3
8
7
10
9
1
13
14
15
12
1
16 17
18
19 20
1. SPEICHERKARTENSCHACHT (unter der
Staubschutzkappe)
Setzen Sie hier die microSD-Speicherkarte ein.
2. OBJEKTIV
3. LED-Lampen
Aktivieren/Deaktivieren Sie diese Option im
Einstellungsmenü, um verbesserte Nachtzeitaufnahmen
zu ermöglichen.
4. LAUTSPRECHER
5. HD OUT BUCHSE (befindet sich unter dem
Staubschutz)
Für den Einsatz mit Groß Bildscharfe.
6. RÜCKSTELLUNG
Hier drücken, um die iN-CAR CAM zurückzusetzen.
7. LED-ANZEIGE
Auto adapter verbunden und In-Car-CAM eingeschaltet:
PURPLE = Batterie Lade
ROT = Batterie geladen
PURPLE & BLAU blinkend = Akku wird geladen & Aufzeichnung
ROT blinkend = Recording
Hinweis:
Die LED BLUE für einen kurzen Zeitraum auf Abschaltung,
Batterielade erscheinen ist während dieser Zeit nicht auf.
Die Batterie wird nur aufgeladen, wenn der In-Car-CAM mit
Strom versorgt Source-und eingeschaltet.
Auto adapter Display verbunden:
ROT = Power On
ROT blinkend = Recording
8. AUFWÄRTS
Zur Navigation aufwärts in Menüs und zum Aufrufen der
nächsten Datei im Wiedergabemodus drücken.
10.
11.
12.
13.
14.
.
15.
16.
17.
18.
19.
20.
9. SOS-DATEISCHUTZ
„One-Touch-Taste“ zum Schutz der aktuellen Datei in
einer Notfallsituation.
MIKROFON
ABWÄRTS
Zur Navigation abwärts in Menüs und zum Aufrufen der v
orherigen Datei im Wiedergabemodus drücken.
BILDSCHIRM
MENÜ
Drücken, um das Menü im aktuellen Modus zu öffnen.
Zweimal drücken, um das Einstellungsmenü zu öffnen.
AUFNAHME (EV)
Zum Umschalten zwischen Aufnahmeeinstellungen drücken
MODUS
Zur Auswahl drücken: Video/Foto/Wiedergabe.
MINI USB 2.0 BUCHSE
Schließen Sie das Autonetzkabel/USB hier an.
AV-AUSGANG
Für den Einsatz mit AV-Kabel (separat erhältlich).
MONTAGEPUNKT
Mitgelieferte Montagehalterung hier befestigen.
EIN / AUS
Zum Ein- und Ausschalten der iN-CAR CAM drücken.
START/STOPP und OK
Zum Starten und Beenden einer Aufnahme oder zur
Bestätigung einer Auswahl drücken.
22
Deutsch
HD OUT
Page 25

INSTALLATION
1. Öffnen Sie die Staubschutzabdeckung und setzen Sie eine geeignete Speicherkarte im Gerät ein; achten Sie auf die
Ausrichtung (Kontakte auf Geräterückseite ausgerichtet). Drücken Sie die Speicherkarte an, bis sie einrastet und schließen Sie
die Staubschutzabdeckung wieder.
2. Befestigen Sie das Gerät an der mitgelieferten Halterung, wobei die Verriegelungslasche fest einrasten muss.
3. Wählen Sie die gewünschte Position für die Halterung und reinigen Sie die Scheibe mit einem trockenen, sauberen Tuch, um
einen guten Kontakt zwischen Glas und Halterung zu gewährleisten. Während Sie den Saugnapf auf das Glas drücken, drücken
Sie den Hebel nach oben, um die Halterung auf der Windschutzscheibe zu befestigen.
Bitte stellen Sie sicher, dass Sie bei Regen auch nach der Montage der iN-CAR CAM im Bereich der Scheibenwischer des
Fahrzeuges eine klare Sicht haben.
4. Winkel und Position der iN-CAR CAM können durch Lösen der des Hebels eingestellt werden; denken Sie daran, den Hebel
anschließend wieder anzuziehen.
5. Schließen Sie den Kfz-Adapter an der Mini-USB Buchse der iN-CAR CAM an und stecken Sie den mitgelieferten Kfz-Adapter
in den 12 - 24 V DC Anschluss Ihres Fahrzeugs. Das Gerät schaltet sich automatisch ein und startet die Aufnahme, sobald die
Stromversorgung zur Verfügung steht. Bei manchen Fahrzeugen wird dies sofort geschehen, wenn die Anschlüsse
vorgenommen wurden, bei anderen schaltet sich das Gerät ein, sobald die Zündung eingeschaltet wurde.
HINWEIS:
• Platzieren Sie die iN-CAR CAM nicht so, dass sie die Sicht des Fahrers auf die Straße behindert, oder dass sie die Funktion
der Airbags oder sonstiger Sicherheitsausstattungen beeinträchtigt.
• Betreiben Sie das Gerät nicht während der Fahrt.
• Um das Risiko von Diebstahl zu vermeiden, entfernen Sie das Gerät und die Halterung von Ihrem Fahrzeug, oder positionieren
sie so, dass sie nicht gesehen werden kann, bevor Sie Ihr Fahrzeug unbeaufsichtigt lassen.
• Die Speicherkarte bei eingeschalteter iN-CAR CAM nicht entfernen oder einsetzen. Dadurch kann die Speicherkarte beschädigt
werden.
• In Fahrzeugen, bei denen der 12 V/24 V Ausgang eingeschaltet bleibt, wenn die Zündung ausgeschaltet ist, trennen Sie das
Gerät, wenn es nicht in Gebrauch ist.
• Der mitgelieferte Kfz-Adapter verfügt über ein 4 m langes Kabel, um zu ermöglichen, dass das Kabel ordentlich im Fahrzeug
platziert wird.
• Bei erstmaliger Verwendung des Gerätes muss die Uhrzeit und das Datum eingestellt werden. Siehe Seite 30 für weitere
Einzelheiten.
Die obige Abbildung stellt die empfohlene Installation bildlich dar.
12-24V DC
23
Deutsch
Page 26

Deutsch
VIDEOMODUS
Auf das Videomenü kann mit der MENU-Taste, die sich auf der Rückseite der iN-CAR CAM befindet, zugegriffen werden.
Verwenden Sie die UP- und DOWN-Tasten, um durch das Menü zu navigieren, und drücken Sie die OK-Taste, um die
Optionen aufzurufen. Wählen Sie die gewünschte Einstellung und drücken Sie OK, zur Bestätigung. Drücken Sie erneut
MENU, um das Videomenü zu verlassen.
Die Standard-Einstellungen innerhalb der iN-CAR CAM, ermöglichen die iN-CAR CAM zu verwenden, ohne dass Sie
irgendwelche Einstellungen ändern müssen. Es wird jedoch empfohlen, dass Sie alle diese Einstellungen untersuchen,
um sich selbst mit dem Produkt und seinen Fähigkeiten vertraut zu machen.
Hinweis:
Im SETUP Menü, auf das aus einem beliebigen Modus durch zweimaliges Drücken der Taste MENU zugegriffen
wird, gibt es eine Option „Standard Einstellung“, mit der Sie die iN-CAR CAM, wenn erforderlich auf die
Werkseinstellungen zurücksetzen können.
Der Schlüssel unten erläutert die verschiedenen Informationen auf dem Bildschirm, wenn Ihre iN-CAR CAM sich im
Video-Modus befindet. Einige Symbole werden nur angezeigt, wenn die entsprechenden Funktionen im Videomenü,
wie weiter unten auf dieser Seite beschrieben, ausgewählt wurden.
Bewegungserkennung-Symbol: Dieses Symbol erscheint, wenn die Bewegungserkennung-Funktion aus dem
Videomenü eingeschaltet wurde.
WDR-Symbol: Anzeige auf dem Bildschirm, da die iN-CAR CAM WDR-Technologie nutzt.
Aufnahme-Anzeige: Blinkt rot, wenn eine Aufzeichnung im Gange ist.
Videomodus-Symbol: Zeigt an, dass die iN-CAR CAM im Videomodus ist.
Auflösung: Zeigt die aktuelle Auflösung an, wie sie im Videomenü ausgewählt wurde.
Schleifenaufnahme-Symbol: Zeigt das aktuelle Aufnahmezeit-Teil an, wie es im Videomenü ausgewählt wurde.
Belichtungssymbol: Zeigt die aktuelle Belichtung an, wie sie im Videomenü ausgewählt wurde.
Mikrofon-Symbol: Wird auf dem Bildschirm angezeigt, wenn Audio-Aufnahme aus dem Video-Menü ausgewählt
wurde.
Batterieanzeige: Anzeige der Akkukapazität; wir empfehlen, den Fahrzeugadapter während der Benutzung
anzuschließen.
GPS-Symbol: Das Symbol blinkt, während die iN-CAR CAM Satelliten findet. Sobald ein stabiles Signal
empfangen wird, leuchtet das Symbol auf dem Bildschirm.
Weißabgleich-Symbol: Anzeige der Weißabgleich-Einstellung, die im Videomenü gewählt wurde.
Kompass-/Geschwindigkeits-Symbol: Anzeige auf dem Bildschirm, wenn die Funktion im Videomenü aktiviert wurde.
Übermüdung des Fahrers-Symbol: Anzeige auf dem Bildschirm, wenn die Funktion im Videomenü aktiviert wurde.
Zeit: Zeigt die aktuelle Uhrzeit an, wie sie im Einstellungsmenü eingestellt wurde.
Datum: Zeigt das aktuelle Datum an, wie es im Einstellungsmenü eingestellt wurde.
Aufnahmezeit: Zeigt die Länge der aktuellen Aufnahme.
Symbol Speicherkarte: Das Symbol wird mit einem roten Kreuz markiert wenn keine Speicherkarte eingelegt ist.
Geschützte Datei-Symbol: Wird angezeigt, wenn eine Videodatei durch Aktivierung des internen G-Sensors
geschützt wurde.
WDR
1080P
AWB
3
+
1
00:00:00
17
6
3
15
2
4
5
7
8
9
16
10
11
13
1
14
18
12
1.
2.
3.
4.
5.
6.
7.
8.
9.
10.
11.
12.
13.
14.
15.
16.
17.
18.
24
Deutsch
Page 27

FOTOMODUS
Der Schlüssel unten erläutert die verschiedenen Informationen auf dem Bildschirm, wenn Ihre iN-CAR CAM sich im
Fotomodus befindet. Einige Symbole werden nur angezeigt, wenn die entsprechenden Funktionen im Videomenü,
wie weiter unten auf dieser Seite beschrieben, ausgewählt wurden.
Auf das Fotomenü kann mit der MENU-Taste, die sich auf der Rückseite der iN-CAR CAM befindet, zugegriffen
werden. Verwenden Sie die UP- und DOWN-Tasten, um durch das Menü zu navigieren, und drücken Sie die OK-Taste,
um die Optionen aufzurufen. Wählen Sie die gewünschte Einstellung und drücken Sie OK, zur Bestätigung. Drücken
Sie erneut MENU, um das Fotomenü zu verlassen.
Die Standard-Einstellungen innerhalb der iN-CAR CAM, ermöglichen die iN-CAR CAM zu verwenden, ohne dass Sie
irgendwelche Einstellungen ändern müssen. Es wird jedoch empfohlen, dass Sie alle diese Einstellungen untersuchen,
um sich selbst mit dem Produkt und seinen Fähigkeiten vertraut zu machen.
Hinweis:
Im SETUP Menü, auf das aus einem beliebigen Modus durch zweimaliges Drücken der Taste MENU zugegriffen wird,
gibt es eine Option „Standard Einstellung“, mit der Sie die iN-CAR CAM, wenn erforderlich auf die Werkseinstellungen
zurücksetzen können.
WDR
AWB
+
1
ISO
AUTO
5M
M
2
6
3
4
5
7
8
9
11
1
2
10
Symbol Speicherkarte: Das Symbol wird mit einem roten Kreuz markiert wenn keine Speicherkarte eingelegt ist.
Qualität: Zeigt die aktuelle Bildqualität an, wie sie im Fotomenü ausgewählt wurde.
WDR-Symbol: Anzeige auf dem Bildschirm, da die iN-CAR CAM WDR-Technologie nutzt.
Fotomodus Symbol: Zeigt an, dass die iN-CAR CAM im Fotomodus ist.
Auflösung: Zeigt die aktuelle Auflösung an, wie sie im Fotomenü ausgewählt wurde.
Aufnahmemodus Symbol: Auf dem Bildschirm wird angezeigt, wenn der Aufnahmemodus (Timer) aus dem
Fotomenü ausgewählt ist.
Antirüttel-Symbol: Anzeige auf dem Bildschirm, wenn Anti-Verwacklung aktiviert ist; bei deaktivierter Funktion
ist das Symbol mit einem roten Stoppschild gekennzeichnet.
Belichtungssymbol: Zeigt die aktuelle Belichtungseinstellung an, wie sie im Fotomenü ausgewählt wurde.
ISO-Symbol: Zeigt die aktuelle ISO-Einstellung an, wie sie im Fotomenü ausgewählt wurde.
Batterieanzeige: Anzeige der Akkukapazität; wir empfehlen, den Fahrzeugadapter während der Benutzung
anzuschließen.
Weißabgleich-Symbol: Zeigt die aktuelle Weißabgleich-Einstellung an, wie sie im Fotomenü ausgewählt wurde.
1.
2.
3.
4.
5.
6.
7.
8.
9.
10.
11.
25
Deutsch
Page 28

3
2
1
4
5
6
01/01/13
12:34
100-0001
2592x1944
WIEDERGABEMODUS
Fotowiedergabe Symbol: Zeigt, dass die iN-CAR CAM ein Foto im Wiedergabemodus abspielt.
Geschützte Datei-Symbol: Zeigt an, wenn eine Fotodatei durch Auswählen von „Protect“ aus dem Wiedergabemenü
geschützt wurde.
Dateinummer: Zeigt die aktuelle Dateinummer an.
Auflösung: Zeigt die Größe des aktuellen Fotos an.
Datei-Datum: Anzeige des Aufnahmedatums der aktuellen Datei.
Datei-Zeit: Anzeige der Startzeit der aktuellen Datei.
Empfohlene PC-Wiedergabe-Software, die für Windows benötigt wird, wenn keine Internetverbindung zur
Verfügung steht:
QuickTime (kostenloser Download von www.apple.com/uk/quicktime/download)
VLC Media Player (kostenloser Download von www.videolan.org/vlc)
WIEDERGABE VON FOTOS
Wenn ein Foto auf der SD-Karte erkannt wird, wird der Bildschirm unten angezeigt.
Der Schlüssel unten erläutert, wie die verschiedenen Informationen auf dem Bildschirm während der
Fotowiedergabe angezeigt werden und wie Sie die Steuertasten verwenden..
Hinweis:
Um zum NÄCHSTEN oder VORHERIGEN auf der SD-Karte gespeicherten Titel zu gelangen,
drücken Sie die - oder -Taste.
Die iN-CAR CAM kann im Wiedergabemodus Videos und Fotos anzeigen, die auf der SD-Karte gespeichert sind.
Da sich die Anzeige unterscheidet, siehe die beiden nachstehenden Abschnitte.
VIDEOWIEDERGABE
Wenn ein Video auf der SD-Karte erkannt wird, wird der Bildschirm unten angezeigt.
Der Schlüssel unten erläutert, wie die verschiedenen Informationen auf dem Bildschirm während der
Videowiedergabe angezeigt werden und wie Sie die Steuertasten verwenden.
4
1
3
2
5
6
7
01/01/13
12:34
100-0001
2592x1944
/
II
OK:
MODE:
:PREV :NEXT
I
I
I
I
I
I
Steuertasten: Um durch die gespeicherten Dateien zu blättern, verwenden Sie die - und -Tasten. Damit ein
auserwähltes Video angezeigt wird, drücken Sie die OK-Taste, die als Play/Pause-Taste fungiert. Während der
Videowiedergabe dienen und als Rücklauf bzw. schneller Vorlauf. Drücken Sie im Pausemodus des Videos
MODE, um weiter durch die gespeicherten Dateien zu scrollen.
Videowiedergabe-Symbol: Zeigt, dass die iN-CAR CAM ein Video im Wiedergabemodus abspielt.
Geschützte Datei-Symbol: Wird angezeigt, wenn eine Videodatei durch die Aktivierung des internen G Sensors
während der Aufnahme oder indem Sie „Protect“ aus dem Wiedergabemenü ausgewählt haben, geschützt wird.
Dateinummer: Zeigt die aktuelle Dateinummer an.
Auflösung: Zeigt die Auflösung an, in der das aktuelle Video aufgezeichnet wurde.
Datei-Datum: Anzeige des Aufnahmedatums der aktuellen Datei.
Datei-Zeit: Anzeige der Startzeit der aktuellen Datei.
I
I
1.
2.
3.
4.
5.
6.
7.
1.
2.
3.
4.
5.
6.
26
Deutsch
Page 29

FAHRTENSCHREIBER-PLAYER INSTALLIEREN
Mindest-Systemanforderungen:
freie Kapazität auf der Festplatte
Laufwerk (nur Schublade)
Mit im Laufwerk eingelegter Disc navigieren Sie zu Windows Explorer zur Anzeige der Inhalte.
Fahrtenschreiber-Player für MAC
Fahrtenschreiber-Player für WINDOWS
NBDVR402G Software-Installationsanleitung
Öffnen Sie den Ordner „Driving Recorder Player for WINDOWS“, lassen Sie die Datei „setup.exe“ ablaufen und folgen
Sie den Anleitungen auf dem Bildschirm.
Öffnen Sie den Fahrtenschreiber-Player und zeigen Sie Ihre aufgenommenen Dateien an.
Hat Ihr PC kein CD-Laufwerk, so besuchen Sie bitte unsere Website:
, um eine elektronische Kopie der Installationsanleitung
und Einrichtungsdatei herunterzuladen.
Siehe die „NBDVR402G Software Installationsanleitung“ für weitere Informationen, die mit Ihrer Software mitgeliefert wurde.
Pentium III 500 MHz or Celeron at 800 MHz.
1 Gb RAM.
100 Mb
CD-ROM
1024 x 768 monitor
How to install:
·
·
Windows XP, Vista, Windows 7, Windows 8
·
http://www.nextbase.co.uk/categories/InCarCam/downloads
·
·
·
Hinweis:
Laden Sie die Disc NICHT im PC, falls Sie einen „Schachtlader“ benutzen, dies kann zu Schäden an Ihrem PC
führen, die nicht von der iN-CAR CAM Herstellergarantie abgedeckt sind.
Für einige Betriebssysteme kann die Installation abweichen.
Der Player wird mit Windows Betriebssystemen nur geöffnet, wenn eine Internetverbindung besteht.
INSTALLATION FÜR MAC
How to install:
Mindest-Systemanforderungen:
Mit im Laufwerk eingelegter Disc navigieren Sie zu Windows Explorer zur Anzeige der Inhalte.
Hat Ihr MAC kein CD-Laufwerk, so besuchen Sie bitte unsere Website:
, um eine elektronische Kopie der Datei „setup .dmg“
und der Installationsanleitung herunterzuladen.
Fahrtenschreiber-Player für MAC
Fahrtenschreiber-Player für WINDOWS
NBDVR402G Software-Installationsanleitung
Öffnen Sie den Ordner „Driving Recorder Player for MAC“, öffnen Sie die Datei „Driving Recorder Player for MAC.dmg“,
damit wird das Medium „Fahrtenschreiber-Player“ angezeigt.
Öffnen und ziehen Sie den Fahrtenschreiber-Player in den Anwendungsordner.
An dieser Stelle sollten Sie auch eine Kopie auf Ihren Desktop ziehen, um sie als Verknüpfung zu benutzen oder in Ihr
„Dock“ zu stellen.
Öffnen Sie den Fahrtenschreiber-Player und zeigen Sie Ihre aufgenommenen Dateien an.
Siehe die „NBDVR402 Software Installationsanleitung“ für weitere Informationen, die mit Ihrer Software
mitgeliefert wurde.
Mac OS X 10.7
.
·
·
·
http://www.nextbase.co.uk/categories/InCarCam/downloads
INSTALLATION FÜR WINDOWS
Dieser Abschnitt führt Sie durch die Installation der Fahrtenschreiber-Player-Software, mit der Sie aufgezeichnete
Dateien anzeigen sowie die Fahrtroute/GPS-Daten (Standort und Geschwindigkeit) und G-Sensor-Informationen
überprüfen können.
Siehe folgende Seiten zur Bedienungsanleitung des Fahrtenschreiber-Players.
27
Deutsch
Page 30

FAHRTENSCHREIBER-PLAYER FÜR WINDOWS
1. Player-Einstellungen
Datei: Suche nach Dateien, Änderung von Einstellungen für Geschwindigkeit und Sprache.
Anzeige: Kartenfenster öffnen/schließen.
Hilfe: Player-Versionshinweise.
2. Wiedergabefenster der gewählten Videodatei
Anzeige des aktuellen Videos; für Vollbild auf den blauen Balken oben im Fenster doppelklicken.
3. Datum/Uhrzeit/Modell/Fahrzeugkennzeichen/Geschwindigkeit/GPS-Koordinatenstempel
In der Aufnahmedatei gespeicherte Daten, diese Inhalte hängen von den iN-CAR CAM Einstellungen und
dem GPS-Signal ab.
4. Lautstärke
Wiedergabelautstärke einstellen.
5. Steuertasten zur Videowiedergabe
Wiedergabe/Pause, schneller Vorlauf und Rücklauf durch die aktuelle Datei
(schneller Vorlauf/Rücklauf nicht auf XP verfügbar).
6. Geschwindigkeitsanzeige
Anzeige der aktuellen Geschwindigkeit.
7. Beschleunigungskraftanzeige
Anzeige der Richtung der Beschleunigungskraft des Fahrzeugs.
8. G-Sensordaten
Anzeige der durch den G-Sensor auf drei Achsen aufgezeichneten Daten.
X = horizontal, Y = vertikal und Z = Beschleunigung und Verzögerung.
9. Reisestatistik
Anzeige der Höchstgeschwindigkeit, Durchschnittsgeschwindigkeit und der zurückgelegten Entfernung.
Tder nachstehende Schlüssel erklärt die verschiedenen Informationen, die auf dem Fahrtenschreiber-Player
angezeigt werden, wenn Sie eine Windows-Plattform benutzen.
X: -0.03
Y: -1.06
Z: 0.16-
Map
13/08/2013 14:08:44 NBDVR402G AB12 3456 29MPH N 51 35 32.72 W 3 58 16.93
3
4
6
5
2
7 8 9 10 11
12
14
15
16
W
N
13
1
28
Deutsch
Page 31

FAHRTENSCHREIBER-PLAYER FÜR WINDOWS (FORTSETZUNG)
10.
11.
12.
13.
14.
15.
16.
Steuerungen des Fahrtenschreiber-Player
Bildschirmaufnahme, hiermit wird ein Standbild für jedes Einzelbild im Wiedergabefenster erstellt.
Bildschirmaufnahmeordner öffnen.
Computer nach gespeicherten Dateien durchsuchen.
Einstellungsfenster öffnen, Sprache und Geschwindigkeitseinheit einstellen.
Kartenfenster öffnen/schließen.
Dateien hinzufügen / entfernen
Ausgewählte Videos zur Dateiliste hinzufügen/entfernen.
Dateiliste
Anzeige der aktuell in der Dateiliste enthaltenen Videos.
Anzeige aller oder geschützter Dateien
Auswahl, ob alle oder nur geschützte Dateien angezeigt werden sollen.
GPS-Koordinaten
Anzeige der aktuellen GPS-Koordinaten, nur verfügbar, wenn die Videodatei mit Satellitenverbindung
aufgezeichnet wurde.
Karte
Anzeige der gefahrenen Route auf der Karte, nur verfügbar, wenn die Videodatei mit Satellitenverbindung
aufgezeichnet wurde.
.Kompass
Anzeige der aktuellen Richtung, nur verfügbar, wenn die Videodatei mit Satellitenverbindung aufgezeichnet wurde.
Hinweis:
Der Fahrtenschreiber-Player wird nur geöffnet, wenn eine Internetverbindung besteht. Zur Anzeige aufgenommener
Dateien öffnen Sie bitte mit einem anderen Videowiedergabeprogramm wie QuickTime oder VLC.
Die Funktionen des Fahrtenschreiber-Players können je nach Betriebssystem abweichen.
29
Deutsch
Page 32

FAHRTENSCHREIBER-PLAYER FÜR MAC
Der nachstehende Schlüssel erklärt die verschiedenen Informationen, die auf dem Fahrtenschreiber-Player angezeigt
werden, wenn Sie eine MAC-Plattform benutzen.
FILE INFO
Locked: No
Date: 2013-08-06 17:18:14
Location: /Users/David/Desktop/402G - videos/17150019.MOV
Driving Recorder Player Version 1.0
51 35 32.72
3 58 16.93
N
W
‘
‘
ADD REMOVE
+
x
FILE LIST
2
3
1
6
10
11
12
13
5
4
7 8 9
1. Wiedergabefenster der gewählten Videodatei
Aktuelles Video anzeigen.
2. Datum/Uhrzeit/Modell/Fahrzeugkennzeichen/Geschwindigkeit/GPS-Koordinatenstempel
In der Aufnahmedatei gespeicherte Daten, diese Inhalte hängen von den iN-CAR CAM Einstellungen und dem
GPS-Signal ab.
3. Lautstärke
Wiedergabelautstärke einstellen.
4. Steuertasten zur Videowiedergabe
Wiedergabe/Pause, schneller Vorlauf und Rücklauf durch die aktuelle Datei.
5. Geschwindigkeitsanzeige
Anzeige der aktuellen Geschwindigkeit.
6. Beschleunigungskraftanzeige
Anzeige der Richtung der Beschleunigungskraft des Fahrzeugs.
7. G-Sensordaten
Anzeige der durch den G-Sensor auf drei Achsen aufgezeichneten Daten.
X = horizontal, Y = vertikal und Z = Beschleunigung und Verzögerung.
8. Datei-Info
Anzeige von Informationen zur aktuellen Datei.
9. Dateien hinzufügen/entfernen
Computer nach gespeicherten Dateien durchsuchen, ausgewählte Videos zur Dateiliste hinzufügen/entfernen.
10. Dateiliste
Anzeige der aktuell in der Dateiliste enthaltenen Videos.
11. GPS-Koordinaten
Anzeige der aktuellen GPS-Koordinaten, nur verfügbar, wenn die Videodatei mit Satellitenverbindung
aufgezeichnet wurde.
12. Karte
Anzeige der gefahrenen Route auf der Karte, nur verfügbar, wenn die Videodatei mit Satellitenverbindung
aufgezeichnet wurde.
13. Kompass
Anzeige der aktuellen Richtung, nur verfügbar, wenn die Videodatei mit Satellitenverbindung aufgezeichnet
wurde.
13/08/2013 14:08:44 NBDVR402G AB12 3456 29MPH N 51 35 32.72 W 3 58 16.93
30
Deutsch
Page 33

MENÜS UND EINSTELLUNGEN
Jeder Modus (Video, Foto und Wiedergabe) verfügt über ein Menü, das verwendet wird, um zu den verschiedenen
Optionen und Einstellungen zu gelangen. Drücken Sie die MENU-Taste auf der Rückseite des Gerätes, um auf das
spezifische Menü für den aktuellen Modus zuzugreifen.
Verwenden Sie die UP-, DOWN-Tasten, um die gewählte Option auszuwählen und drücken Sie die OK-Taste zur
Bestätigung.
1.VIDEOMODUS
1.1 Auflösung
Die Auswahl der Auflösung für die Aufnahme wird die Qualität der aufgezeichneten Videos erhöhen oder
verringern.
Standardeinstellung: 1080P (1920x1080 bei 30 Bildern/Sekunde)
1.2 Belichtung
Auswahl der Belichtung, um die Belichtungsstufe für unterschiedliche Lichtverhältnisse anzupassen.
Standardeinstellung: 0
1.3 Weißbalance
Den Weißabgleich für verschiedene Lichtverhältnisse anpassen.
Standardeinstellung: Auto
1.4 Audio aufnehmen
Aktivieren/Deaktivieren der Audio-Aufnahme.
Standardeinstellung: An
1.5 Datumsanzeige
Aktivieren/Deaktivieren der Anzeige des Datumsstempels in aufgenommenen Dateien.
Standardeinstellung: An
1.6 Loop-Aufnahme
Durch die Auswahl der Aufnahmedauer für die einzelnen Videodateien, wird die iN-CAR CAM die SD-Karte
auffüllen und dann zum Anfang zurückschleifen, wobei die gespeicherten Dateien (sofern nicht geschützt)
überschrieben werden.
Standardeinstellung: 3 Min
1.7 G Sensor
Hier kann man den G-Sensor ausschalten oder seine Empfindlichkeit einstellen. Der G-Sensor erkennt Kräfte
die auf das Fahrzeug einwirken und schützt automatisch die aktuelle Aufnahme im Falle einer Kollision.
Standardeinstellung: allgemein
1.8 Bewegungserkennung
Das Aktivieren/Deaktivieren der Bewegungserkennung, lässt das Gerät eingeschaltet und startet eine 10
Sekunden Aufnahme, wenn eine Änderung an der betrachteten Szene erkannt wird.
Standardeinstellung: Aus
1.9 Nummernschild
Geben Sie das Kennzeichen Ihres Fahrzeugs ein, dies wird dann in der Videodatei angezeigt.
Standardeinstellung: ********
1.10 Sicherheitswarnung
Einstellung des Timers, der ein Symbol für ein Heißgetränk zur Erinnerung anzeigt, während einer längeren Reise
ausreichende Pausen einzulegen.
Standardeinstellung: An
1.11 GPS-Spur
GPS Koordinatenstempel aktivieren/deaktivieren, der in aufgenommenen Dateien angezeigt wird; Koordinaten
und Karte funktionieren normal, wenn mit dem Fahrtenschreiber-Player betrachtet, unabhängig davon, ob diese
Funktion aktiviert oder deaktiviert ist.
Standardeinstellung: Aktiviert
1.12 Kompass
Bei Aktivierung zeigt der Bildschirm die aktuelle Geschwindigkeit und einen Kompass an; nach dem gewählten
Zeitraum drücken Sie eine beliebige Taste zur Rückkehr zur Normalansicht; diese Funktion ist nur mit einer
GPS-Verbindung verfügbar.
Standardeinstellung: Aus
31
Deutsch
Page 34

MENÜS UND EINSTELLUNGEN (FORTSETZUNG)
1.12 Passwort
Einstellen eines Passwortes, das zum Zugriff auf Menüs und Einstellungen eingegeben werden muss; nur
grundlegende Funktionen wie Ein- und Ausschalten und Start/Stopp bleiben zugänglich.
1.14 Bilddrehung
Dreht das Display um 180°; besonders hilfreich, wenn die iN-CAR CAM auf dem Armaturenbrett montiert ist;
die Steuertasten drehen sich nicht mit.
FOTOMODUS
2.1 Auflösung
Auswahl der Bildgröße; dies vergrößert oder verkleinert die Größe des aufgezeichneten Bildes
Standardeinstellung: 5M
Farbe
Anpassung der Farbwirkung des aufgenommenen Bildes.
Standardeinstellung: Normal
2.3 Stabilisierung
Aktivieren/Deaktivieren der Anti-Rüttel Funktion, kann unscharfe Bildergebnisse unter Umständen verringern.
Standardeinstellung: An
2.4 Aufnahmemodus
Aktivierung/Deaktivierung der Timerfunktion; bei Aktivierung nimmt die iN-CAR CAM ein Foto innerhalb des
gewählten Zeitraums auf, nachdem OK gedrückt wurde.
Standardeinstellung: Einzein
2.5 Weißbalance
Den Weißabgleich für verschiedene Lichtverhältnisse anpassen.
Standardeinstellung: Auto
2.6 ISO
Anpassung der ISO-Einstellung, je heller die Bedingungen, desto niedriger ist die ISO erforderlich.
Standardeinstellung: Auto
2.8 Datumsanzeige
Deaktivieren der Datum & Zeitstempel auf aufgenommenen Fotos, kann auch auf nur Datum geändert werden.
Standardeinstellung: Datum/Uhrzeit
2.9 Qualität
Erhöhen oder verringern der Qualität des aufgenommenen Bildes.
Standardeinstellung: Normal
2.10 Schärfe
Einstellen der Schärfe des aufgenommenen Bildes.
Standardeinstellung: Normal
WIEDERGABEMODUS
Das Wiedergabemenü ist für Videos und Fotos gleich.
3.1 Löschen
Löschen der aktuellen Datei oder aller Dateien.
3.2 Protect
Sperren oder entsperren der aktuellen Datei oder aller Dateien.
3.3 Diashow
Wird verwendet, um eine Slide Show der Bilder, die auf der SD-Karte gespeichert sind zu starten,
drücken Sie die Menu-Taste, um die Slide Show zu
1.13 Geschwindigkeitseinheit
Wählen Sie, ob in KMH oder MPH aufzeichnen und Anzeigegeschwindigkeit.
Standardeinstellung: MPH
2.
2.2
2.7 Belichtung
Vorwahl der verwendeten Belichtung, um die Menge des Lichtes einzustellen, das durch den Sensor empfangen wird.
Standardeinstellung: 0
3.
32
Deutsch
Page 35

MENÜS UND EINSTELLUNGEN (FORTSETZUNG)
4.
4.1
EINSTELLUNGSMENÜ
Das Gerät hat auch ein Einstellungsmenü für die allgemeinen Einstellungen, drücken Sie zweimal die MENU-Taste
auf der Rückseite des Gerätes, um dieses Menü aufzurufen. Die verfügbaren Optionen und Einstellungen werden
im Folgenden beschrieben.
Format
Formatieren Sie die eingesetzte Speicherkarte, dies wird alle Inhalte löschen.
4.2 Sprache
Stellen Sie die Sprache wie erforderlich ein.
Standardeinstellung: English
4.3 Datum/Uhrzeit
Einstellen von Datum/Uhrzeit mit OK zum Umschalten zwischen den Feldern, und zum Einstellen von
Variablen.
Hinweis: In Falle, dass der Akku vollständig entladen ist, wird das Datum auf den 01.01.2013 zurückgesetzt.
4.4 Frequenz
Stellen Sie die Frequenz wie erforderlich ein.
Standardeinstellung: 50 Hz
4.5 LED Licht
Schalten Sie den IR LEDs für bessere Aufnahmen in der Nacht ein.
Standardeinstellung: AUS
4.6 Akustisches Signal
Deaktivieren/Aktivieren des Signaltons. Dabei ist zu beachten, wenn der Signalton deaktiviert ist, wird das
akustische Warnsignal der Batteriespannung auch deaktiviert.
Standardeinstellung: Aktiviert
4.7 Bildschirmschoner
Ein Einschalten der Bildschirmschoner-Funktion, schaltet den Bildschirm nach einer gewissen Zeit der Inaktivität
ab. Drücken Sie dann eine beliebige Taste, um ihn wieder zu öffnen.
Standardeinstellung: AUS
4.8 TV-Modus
Stellen Sie den TV-Modus wie erforderlich ein.
Standardeinstellung: PAL
4.9 Geschwindigkeitsmartkierung
Anzeige des Geschwindigkeitsstempels auf Aufnahmedateien aktivieren/deaktivieren.
Standardeinstellung: Aktiviert
4.10 Version
Anzeige der Versionsnummer der Software Ihres Geräts.
4.11 Standard Einstell
Setzen Sie das Gerät auf die Standardeinstellungen zurück.
4.12 Auto Aus
Stellen Sie das Timing der automatischen Abschaltung-Funktion ein. Diese kann genutzt werden, damit die
Aufnahme im Falle eines Stromausfalls innerhalb des Fahrzeugs, mit einer Option von 10 Sekunden weiterläuft
2 Minuten und 5 Minuten.
Standardeinstellung: 10 Sek
I
I
33
Deutsch
Page 36

PC VERBINDUNG
Beim Anschließen der iN-CAR CAM an einen Windows-basierten PC mit dem mitgelieferten USB-Kabel, wird die
iN-CAR CAM automatisch die beiden folgenden Optionen anzeigen:
▪ Massenspeicher
▪ PC-Kamera
Verwenden Sie die UP- und DOWN-Tasten, um die bevorzugte Option auszuwählen und drücken Sie die OK-Taste
zur Bestätigung.
▪ Massenspeicher
Wenn Massenspeicher ausgewählt ist, wird der Bildschirm der iN-CAR CAM die Worte „Mass Storage“ zeigen und
dann die Funktion eines SD-Kartenlesers auf Ihren PC übertragen. Auf Ihrem PC wird ein zusätzliches Laufwerk
angezeigt (z.B. Laufwerk E:) und Sie können die SD-Karte navigieren und gespeicherte Dateien anzeigen und v
erwalten.
Diese Funktion ist nützlich, wenn kein SD-Kartenleser in Ihrem PC eingebaut ist.
▪ PC-Kamera
Wenn PC-Kamera ausgewählt ist, wird der Bildschirm der iN-CAR CAM die Worte „PC Camera“ anzeigen und
dann die Funktion einer Webcam (kein Audio) für Ihren PC übernehmen. Starten Sie eine normale Anwendung
auf Ihrem PC, die eine Webcam verwendet (z. B. Skype) und wählen Sie die Webcam, die als „USB Video Device“
bezeichnet ist.
Diese Funktion ist nützlich, wenn keine Webcam in Ihrem PC eingebaut ist.
Hinweis:
Die iN-CAR CAM ist nur kompatibel mit den folgenden Windows-basierten Betriebssystemen: XP, VISTA und Windows 7.
VIDEO & AUDIO-AUSGANG
Wenn Sie ein G Kabel zwischen der iN-CAR CAM und Ihrem Fernsehen anschließen, wird der Bildschirm
der iN-CAR CAM kein Bild mehr zeigen, da dann die gesamte Ausgabe auf Ihrem Fernseher sichtbar ist. Der externe
Monitor kann nun zur Wiedergabe und im Fotomodus als ein größerer Bildsucher benutzt werden. Aufnahmen können
im Videomodus mit angeschlossenem HD Kabel NICHT erstellt werden. Die Bedienelemente auf der iN-CAR CAM
arbeiten für Wiedergabe/Pause, Stopp, Nächste/Vorherige Datei und Vorlauf/Rücklauf, wie auf dem Bildschirm angezeigt.
Wertmesser Bildscharfe Ausgang
Wenn Sie ein AV-Kabel (separat erhältlich) zwischen der iN-CAR CAM und Ihrem Fernsehen anschließen, wird der
Bildschirm der iN-CAR CAM kein Bild mehr zeigen, da dann die gesamte Ausgabe auf Ihrem Fernseher sichtbar ist. Alle
Elemente der Video- und Fotowiedergabe sind über den AV-Ausgang verfügbar, so dass Sie Ihre Aufnahmen auf einem
größeren Bildschirm sofort überwachen können (nützlich, wenn Sie Ihre iN-CAR CAM als nach hinten gerichtete Kamera
benutzen, während ein anderes Gerät für die Anzeige angeschlossen wird).
Die Bedienelemente der iN-CAR CAM arbeiten normal.
Bitte kontaktieren Sie Ihren lokalen NEXTBASE-Händler, um Zubehör einzukaufen.
Groß Bildscharfe Ausgang
roß Bildscharfe
·
MAC ANSCHLIEßEN
Der Anschluss der iN-CAR CAM an einem MAC über das mitgelieferte USB-Kabel veranlasst die iN-CAR CAM
automatisch, folgende Optionen anzuzeigen:
▪ Massenspeicher
▪ PC-Kamera
Aufgrund von Kompatibilitätsproblemen ist NUR die Massenspeicherfunktion bei der Benutzung mit
MAC-Betriebssystemen verfügbar.
Drücken von OK zur Bestätigung der Massenspeicherfunktion ist erforderlich.
▪ Massenspeicher
Wenn Massenspeicher ausgewählt ist, wird der Bildschirm der iN-CAR CAM die Worte „Mass Storage“ zeigen und
dann die Funktion eines SD-Kartenlesers auf Ihren MAC übertragen. Auf Ihrem MAC wird die Speicherkarte in Ihrer
iN-CAR CAM auf dem Desktop als „NO NAME“ angezeigt und Sie können die SD-Karte navigieren und gespeicherte
Dateien anzeigen/verwalten.
Diese Funktion ist nützlich, wenn kein SD-Kartenleser in Ihrem MAC eingebaut ist.
34
Deutsch
Page 37

FEHLERBEHEBUNG
Videobild ist verwackelt.
MicroSD-Karte kann nicht
eingesteckt werden.
MicroSD-Karte kann nicht
abgezogen werden.
Videodateien können nicht
abgespielt werden.
Die Videowiedergabe ist
„abgehackt“.
Die Videowiedergabe auf dem
Fahrtenschreiber-Player ist
„abgehackt“.
Der Ton läuft während der
Wiedergabe nicht mit dem Video
synchron.
Video hat keinen Ton.
Foto ist unscharf.
Ich kann nur ein paar Minuten
Video auf meiner SD-Karte
aufzeichnen.
Massenspeicher oder PC-Kamera
Funktion arbeitet nicht.
.
Entfernen Sie die Objektivabdeckung, reinigen Sie das Objektiv, reinigen
Sie die Windschutzscheibe!
MicroSD-Karten sind sehr klein und müssen vorsichtig behandelt werden.
Richten Sie die Karte aus, wie in der Abbildung auf dem Gerät dargestellt
und drücken Sie sie an, bis Sie einen leichten Widerstand spüren. Drücken
Sie die Karte nun mit dem Fingernagel an, bis sie einrastet. Die Karte sitzt
nun fest im Gerät.
Drücken Sie die Karte etwas an, bis Sie einen kleinen Widerstand
überwinden. Die Karte springt etwas heraus und kann abgezogen werden.
Die Videodateien von der iN CAR CAM sind im MOV-Format und
möglicherweise nicht mit Ihrem PC kompatibel, falls die nötige
Wiedergabe-Software nicht installiert ist. Installieren Sie die mitgelieferte
Fahrtenschreiber-Player-Software und die zusätzlichen Codecs, falls
erforderlich.
Entfernen Sie die SD-Karte formatieren sie, um nicht zusammenhängende
Dateien zu entfernen. Um beste Aufnahmen zu bekommen, verwenden Sie
immer eine Markenprodukt SD-Karte Klasse 10 Typ (30 MB/s), der
empfohlenen Größe 8 bis 32 GB. Die empfohlene Videowiedergabe-Software
ist die mitgelieferte Fahrtenschreiber-Player-Wiedergabe.
Der PC reicht für die Wiedergabe möglicherweise nicht aus, versuchen Sie
es auf einem anderen PC.
Die Codecs auf Ihrem PC sind möglicherweise nicht kompatibel oder auf
dem neuesten Stand.
Laden Sie die neuesten Codecs von
herunter und installieren Sie sie entsprechend.
Die Codecs auf Ihrem PC sind möglicherweise nicht kompatibel oder auf
dem neuesten Stand.
Laden Sie die neuesten Codecs von
herunter und installieren Sie sie entsprechend.
Stellen Sie sicher, dass die „Record Audio“-Einstellung im Videomenü auf
ON geschaltet ist.
Halten Sie die Kamera während der Aufnahme des Fotos ruhig. Bitte
beachten Sie, dass das Foto etwa 1 Sekunde nachdem der Verschluss zu
hören ist, aufgenommen wird.
Ändern Sie die Größe der Aufnahme (Loop-Aufnahme Funktion) auf eine
kleinere Größe. Erhöhen Sie die Größe der SD-Karte. Max. 32 GB.
Die Massenspeicherfunktion arbeitet auf Windows und Mac; die PC-Kamera
ist jedoch nur mit Windows kompatibel. Starten Sie den PC neu, da dies
erforderlich sein kann, damit der notwendige Treiber korrekt geladen wird.
Trennen und verbinden Sie die iN-CAR CAM wieder. Kontaktieren Sie
NEXTBASE für den benötigten Treiber.
http://www.nextbase.co.uk/categories/InCarCam/downloads
http://www.nextbase.co.uk/categories/InCarCam/downloads
35
Deutsch
Page 38

FEHLERBEHEBUNG
Video Image is blurred.
I can not insert the Micro SD card.
I can not remove the Micro SD
card.
Video files can not be played.
Video file playback is jumpy.
Playback upon the Driver
Recorder Player is jumpy.
The sound is not synchronised
with video during playback.
Video has no sound.
Photograph is blurred.
I can only record a few minutes
of video on my SD card.
Mass Storage or PC Camera
function does not work.
The sucker will not stay in place
upon my windscreen.
The AV Out from my iN-CAR CAM
just buzzes on my TV.
I get the message “Card Error”
on screen.
I get the message “Memory error”
on screen.
I get the message “Card Full”
on screen.
Remove the protective lens cover, clean the lens, clean the windscreen!
Micro SD card are very small and require delicate use. Align the card with
the diagram shown upon the device and insert the card until you feel a
slight spring resistance. You now need to push the card, using your finger
nail, until you hear and feel a small latch. Release pressure and the card
will stay retained within the device.
With the card previously installed, you now need to push the card further
inwards slightly, using your finger nail, until you hear and feel a small latch.
Release pressure and the card will spring out sufficiently for you to take
hold of it.
The video files from the iN CAR CAM are in MOV format and may not be
compatible with your PC if suitable playback software is not installed.
Install the supplied Driver Recorder Player software and the additional
Codecs if necessary.
Remove the SD card and reformat to remove non-contiguous files.
For best recording use a branded class 10 type (30MB/s) SD card of
8 to 32GB recommended size. Recommended video playback software
Is the supplied Driver Recorder Player Playback.
PC may not be sufficient for the playback task, try an alternative PC.
The Codecs upon your PC may not be compatible or the latest standard.
Download the latest Codecs from
and install them accordingly.
The Codecs upon your PC may not be compatible or the latest standard.
Download the latest Codecs from
and install them accordingly.
Ensure that “Record Audio” setting is turned ON within the Video Menu.
Hold the camera still whilst taking the photo. Please be aware the photo
is taken around 1 second after the shutter noise is heard.
Change the recording size (Loop recording function) to a smaller size.
Increase the size of the SD card. Max 32GB.
The Mass storage function will work on both Windows and Mac, however
the PC camera is only Windows compatible. . Restart the PC, as this may
be required for the necessary driver to be loaded correctly. Disconnect
and reconnect the In-CAR CAM. Contact NEXTBASE for the required driver.
Moisten the sucker slightly before affixing upon the windscreen. Ensure that
the lever is fully pushed towards the windscreen. Make sure that the glass is
smooth and clean. Do not stick to glass that has any non-smooth effect or
paint whatsoever. Affix to the glass firmly and then push the lever to the full
extent.
Ensure that the AV cable is correct. Use a stereo 3.5mm jack plug where
the tip is the video and the ring is the audio signal.
The SD card has become unuseable by the iN-CAR CAM. Remove useful
files using your PC and then perform a “FORMAT” upon the SD card from
within the SETUP menu.
The SD card has become unuseable by the iN-CAR CAM. Remove useful
files using your PC and then perform a “FORMAT” upon the SD card from
within the SETUP menu.
The SD card has become full as the Loop recording function is set to
OFF. Set the “Loop Recording” function to 3 mins (default) to enable the
cycle recording function and automatic deletion of older files.
http://www.nextbase.co.uk/categories/
InCarCam/downloads
http://www.nextbase.co.uk/categories/
InCarCam/downloads
36
Deutsch
Page 39

FEHLERBEHEBUNG (FORTSETZUNG)
Der Sauger bleibt nicht an Ort und
Stelle auf meiner
Windschutzscheibe.
Der AV-Ausgang von meiner
iN-CAR CAM summt nur auf
meinem TV.
Ich bekomme die Meldung
„Card Error“ auf dem Bildschirm.
Ich bekomme die Meldung
„Memory Error“ auf dem
Bildschirm.
Ich bekomme die Meldung
„Card Full“ auf dem Bildschirm.
Meine iN-CAR CAM fährt nach
einer Weile von selbst herunter.
Keine Stromversorgung zu meiner
iN-CAR CAM, aber sie funktioniert
auf meinem PC.
Die SD-Karte in meiner
iN-CAR CAM kann nicht gelesen
werden.
Ich kann keine Dateien auf meiner
SD-Karte auf der iN-CAR CAM
löschen.
Nach ein paar Minuten
verschwindet die
Bildschirmanzeige auf meiner
iN-CAR CAM.
Ich bekomme die Meldung
„Cluster Wrong“ auf dem
Bildschirm.
Der Fahrtenschreiber-Player
öffnet sich nicht.
Die iN-CAR CAM kann sich nicht
mit dem Satelliten verbinden.
Feuchten Sie den Saugnapf etwas an, bevor Sie ihn an der
Windschutzscheibe anbringen. Achten Sie darauf, dass der Hebel ganz in
Richtung Scheibe umgelegt ist. Stellen Sie sicher, dass das Glas glatt und
sauber ist. Nicht versuchen auf Glas zu heften, das nicht glatt ist oder das
mit Farbe bestrichen ist. Bringen Sie ihn auf dem Glas an und legen Sie den
Hebel vollständig um.
Stellen Sie sicher, dass das AV-Kabel das Richtige ist. Verwenden Sie einen
3,5 mm Stereo-Klinkenstecker, bei dem die Spitze das Video- und der Ring
das Audiosignal ist.
Die SD-Karte ist für die iN-CAR CAM unbrauchbar geworden. Entfernen Sie
nützliche Dateien mit Ihrem PC und führen Sie dann ein „FORMAT“ auf der
SD-Karte durch, aus dem Einstellungsmenü heraus.
Die SD-Karte ist für die iN-CAR CAM unbrauchbar geworden. Entfernen Sie
nützliche Dateien mit Ihrem PC und führen Sie dann ein „FORMAT“ auf der
SD-Karte durch, aus dem Einstellungsmenü heraus.
Die SD-Karte ist voll geworden, während die Schleifen-Aufnahmefunktion
deaktiviert war. Stellen Sie die „Loop Recording“ -Funktion auf 3 Minuten
(Standardeinstellung), um die Zyklusaufnahme-Funktion und die automatische
Löschung von älteren Dateien zu aktivieren.
Entweder ist der Akku leer, oder es liegt keine Strom an der iN-CAR CAM an
und die automatische Abschaltungsperiode (im SETUP Menü) wurde
ausgelöst.
Das Zigarettenanzünder-Kabel funktioniert nicht. Prüfen Sie die Sicherung im
Auto-Netzstecker. Ersatzsicherung 2 A = 20 mm Typ. Wenn festgestellt wird,
dass die Sicherung durchgebrannt ist, überprüfen Sie das Netzkabel auf
Schäden, die das Durchbrennen der Sicherung verursacht haben.
Verwenden Sie eine hochwertige Marken SD-Karte zwischen 4GB und 32GB
(empfohlen), und formatieren Sie die Karte aus dem SETUP Menü der
iN-CAR CAM.
Überprüfen Sie, ob die Dateien „geschützt“ sind; in diesem Fall müssen Sie
den Überschreibschutz zunächst aufheben.
Der Bildschirmschoner ist auf ON gesetzt. Ändern Sie die Einstellungen auf
OFF, wenn erforderlich.
Die Standardeinstellung ist OFF.
Die SD-Karte ist in einem anderen Gerät formatiert worden und die
Cluster-Größe ist nicht kompatibel. Verwenden Sie einfach die MENU-SETUP
Option und formatieren Sie die SD-Karte neu aus der iN-CAR CAM.
Für Windows Betriebssysteme benötigt der Player zum Öffnen eine
Internetverbindung; ist dies nicht möglich, so zeigen Sie die Dateien mit einer
alternativen Wiedergabe-Software an, beispielsweise QuickTime oder VLC.
Nach dem Einschalten und mit dem Gerät mit unverstellter Sicht auf den
Himmel angebracht, kann es bis zu 10 Minuten dauern, um die drei Satelliten
zu finden, die für ein stabiles Signal notwendig sind. Der Empfang kann auch
durch atmosphärische Bedingungen und die unmittelbare Nähe von Gebäuden
oder Bäumen eingeschränkt sein, die den freien Blick auf den Himmel
verdecken.
Page 40

NBDVR402G-IM-EN-DE-A1
 Loading...