

Page 1

9 Duo Professional
Instruction Manual
Page 2

Page 3
Do not throw electronic devices into household
waste, for detailed information contact your
local civic office, household waste center or place
of purchase.
PIXEL FAILURE STATEMENT
The LCD screen contains 1,152,000 pixels, pixels can fail during normal product life.
1 pixel = 0.0003% failure rate. One pixel failure per year or operation is considered
normal and not a cause for concern or warrantable.
Page 4

PRECAUTIONS
PRECAUTIONS
.......................................................1
TABLE OF CONTENTS
CAUTIONS ON USING
THIS PLAYER
DISCS PLAYABLE
PACKAGE CONTENTS
PARTS AND REMOTE
CONTROL
TABLE OF CONTENTS
CAUTIONS ON USING THIS PLAYER
DISCS PLAYABLE ON THIS DVD PLAYER
PLAYABLE FORMATS
PACKAGE CONTENTS
..........................................3
........................5
.................6
.............................................6
............................................7
PLAYER
FRONT
TOP
RIGHT
LEFT
BACK
HOW TO USE THE STAND
...................................................................8
........................................................................8
....................................................................9
.....................................................................10
...................................................................10
.....................................10
MONITOR
FRONT
TOP
RIGHT
LEFT
HOW TO USE THE STAND
.................................................................11
......................................................................11
..................................................................12
....................................................................12
.....................................12
BASIC OPERATIONS
USB & SD PLAYBACK
MULTIMEDIA PLAYBACK
REMOTE CONTROL
.............................................13
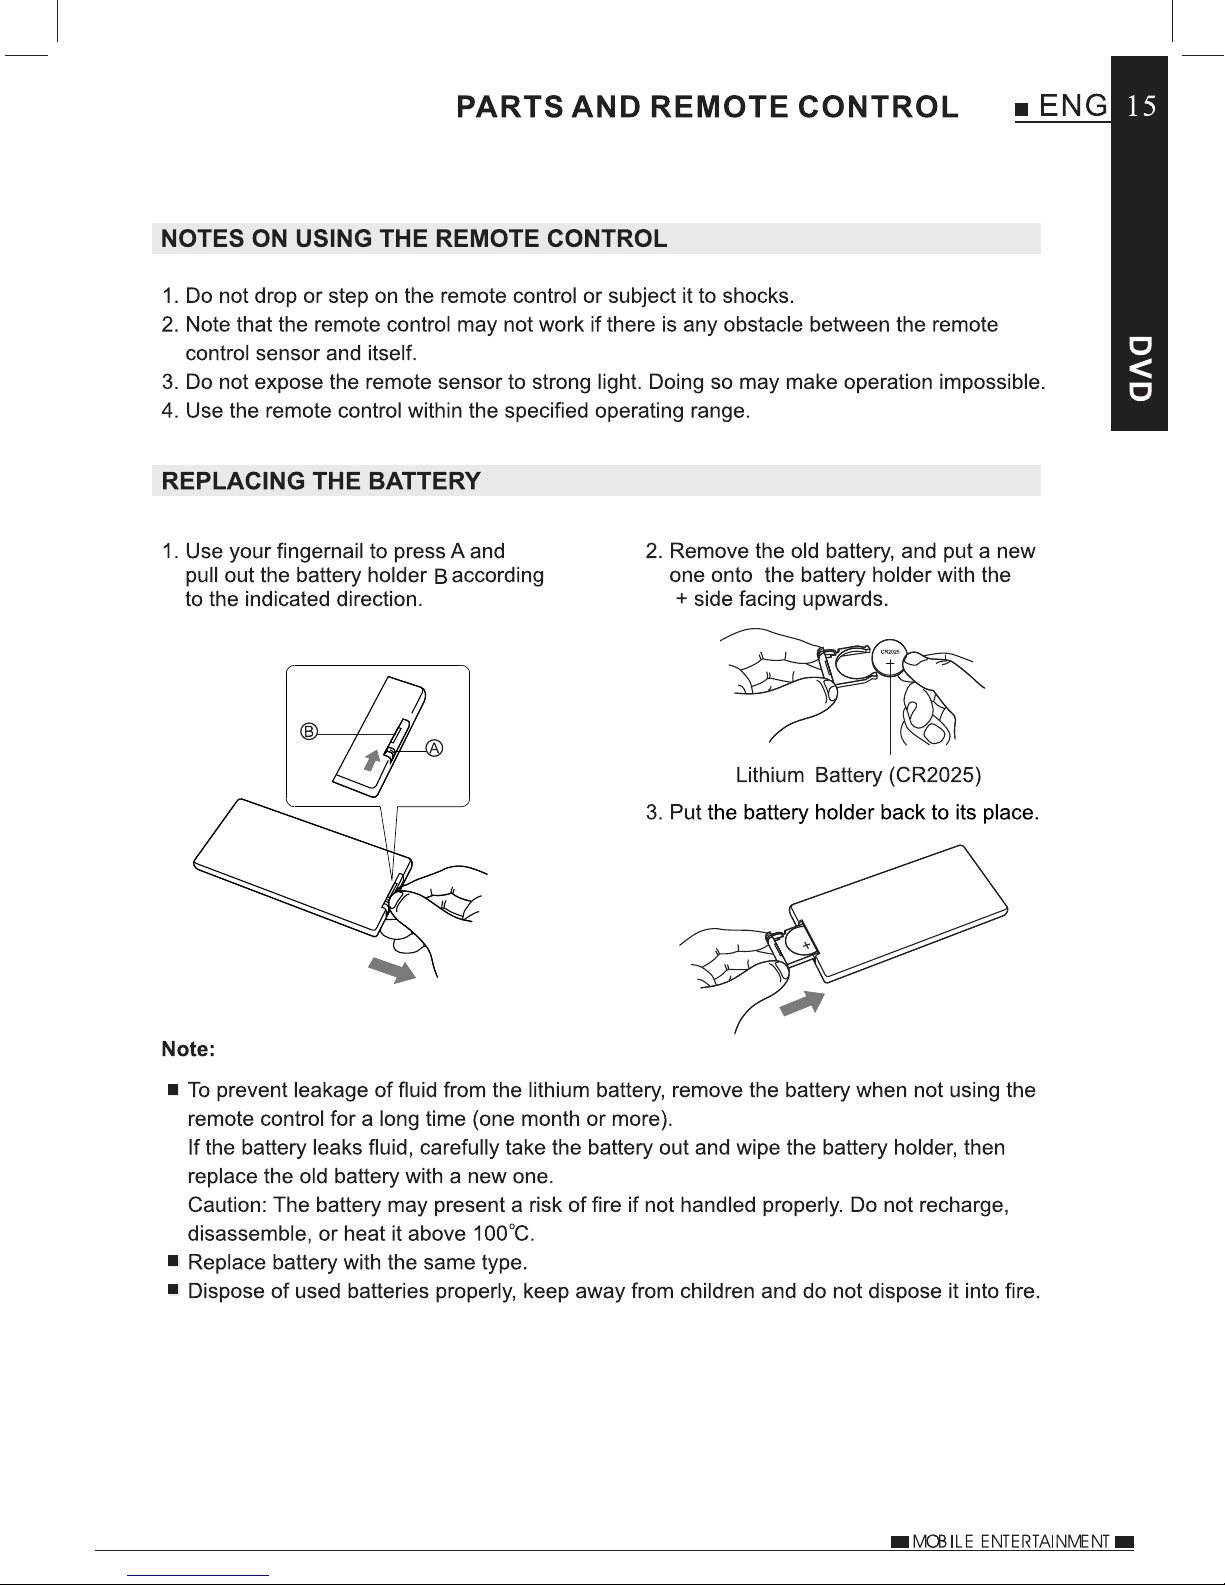
NOTES ON USING THE REMOTE CONTROL
REPLACING THE BATTERY
...................................15
TURNING ON THE PLAYER AND MONITOR
SELECTING A LANGUAGE
....................................16
TURNING OFF THE PLAYER AND MONITOR
LOADING A DISC
PLAYBACK
STOPPING PLAYBACK
PAUSING PLAYBACK
INSERTING A USB STICK
INSERTING A SD CARD
MULTIMEDIA FILE PLAYBACK
PLAYING MUSIC FILES
VIEWING JPEG FILES
PLAYING VIDEO FILES
..................................................17
..........................................................18
.........................................18
............................................18
......................................19
.........................................19
...............................20
.........................................20
..........................................21
.........................................21
..........15
............16
..........17
Page 5
SYSTEM SETUP
OPTION MENU
....................................................24
TURNING ON THE INFRA RED TRANSMITTER
PLAYER DISPLAY
MONITOR DISPLAY
TV SYSTEM
..........................................................26
SCREEN SAVER
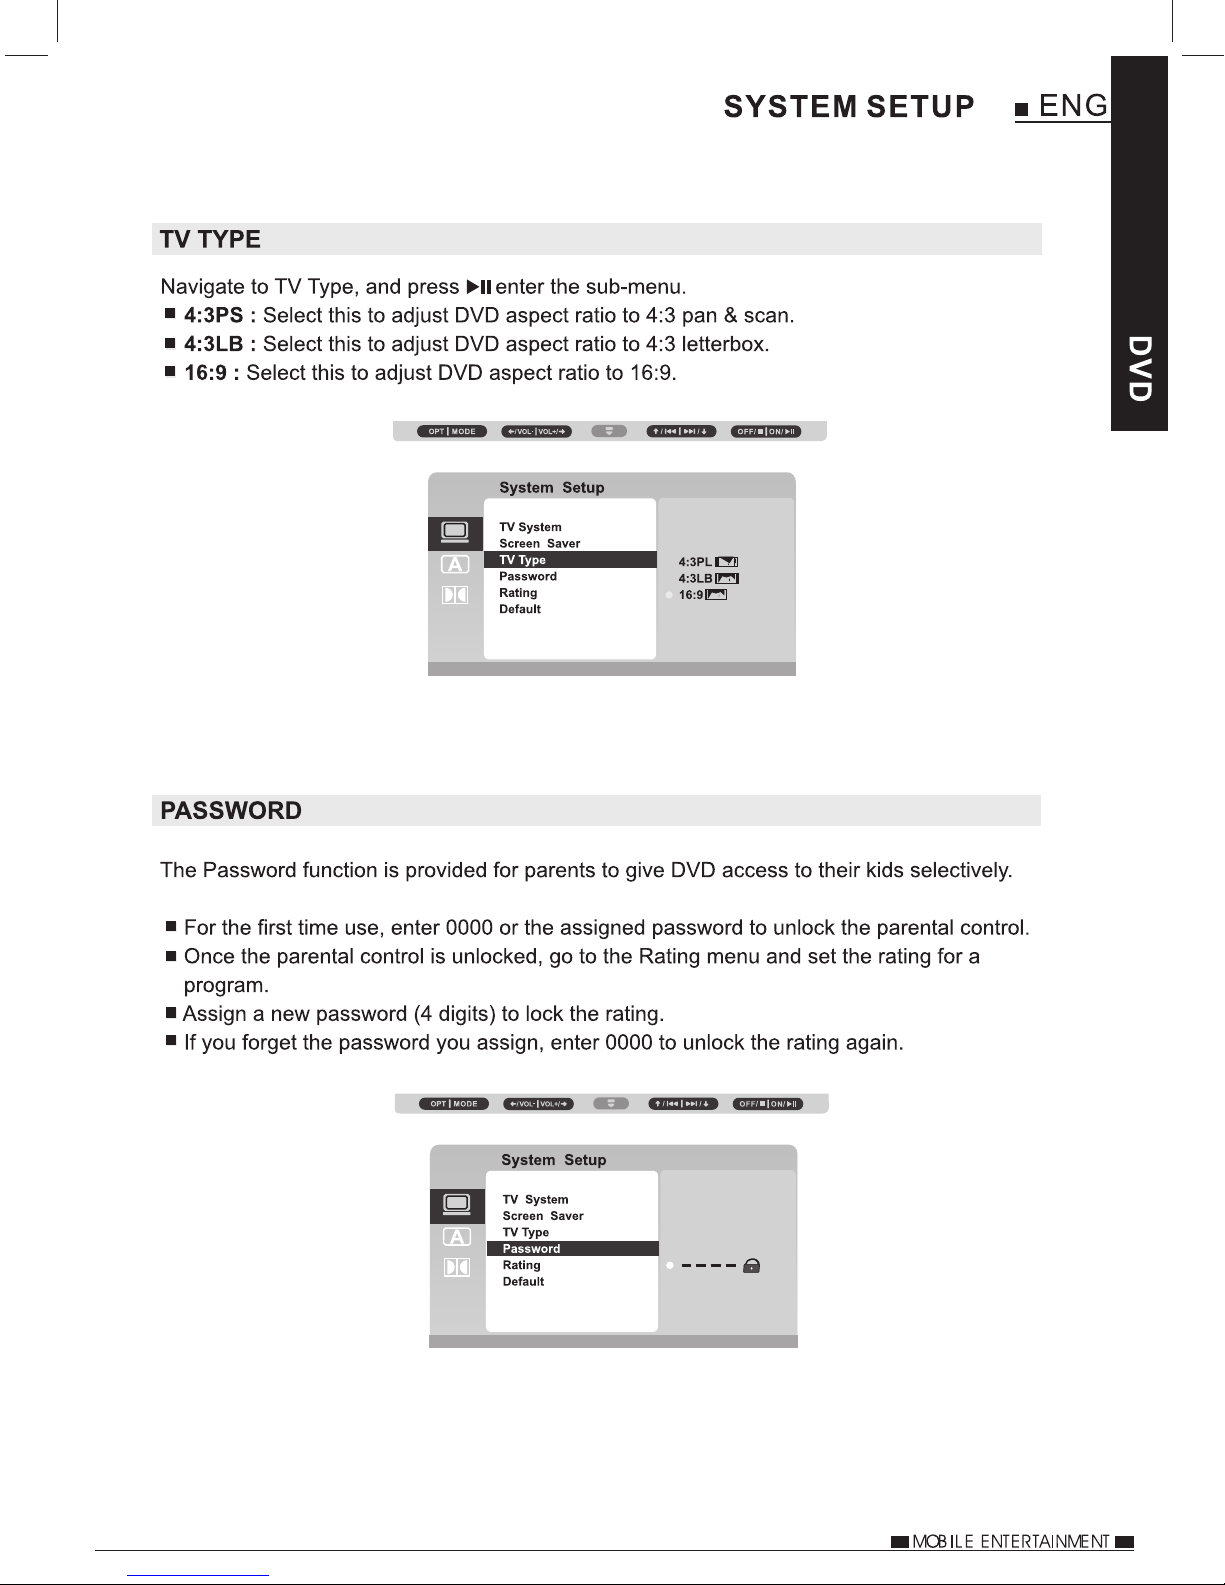
TV TYPE
PASSWORD
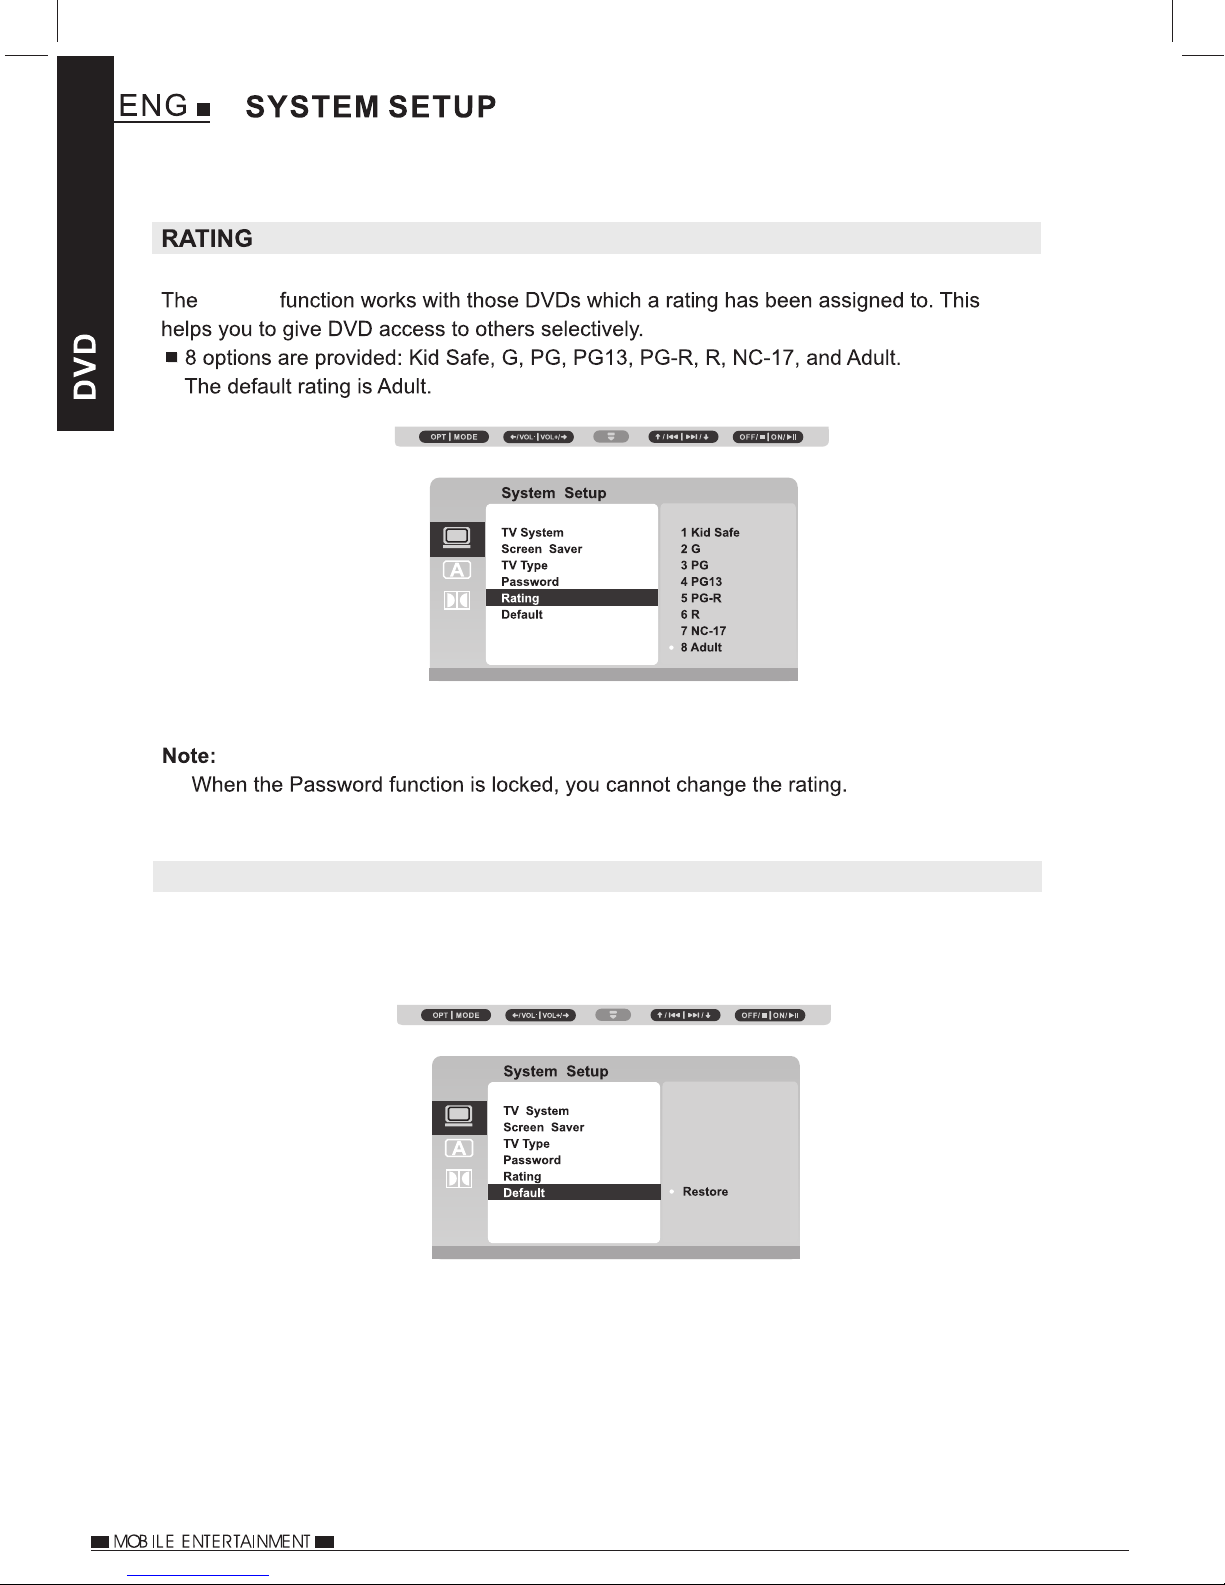
RATING
..............................................................27
..........................................................27
................................................................28
FACTORY RESET
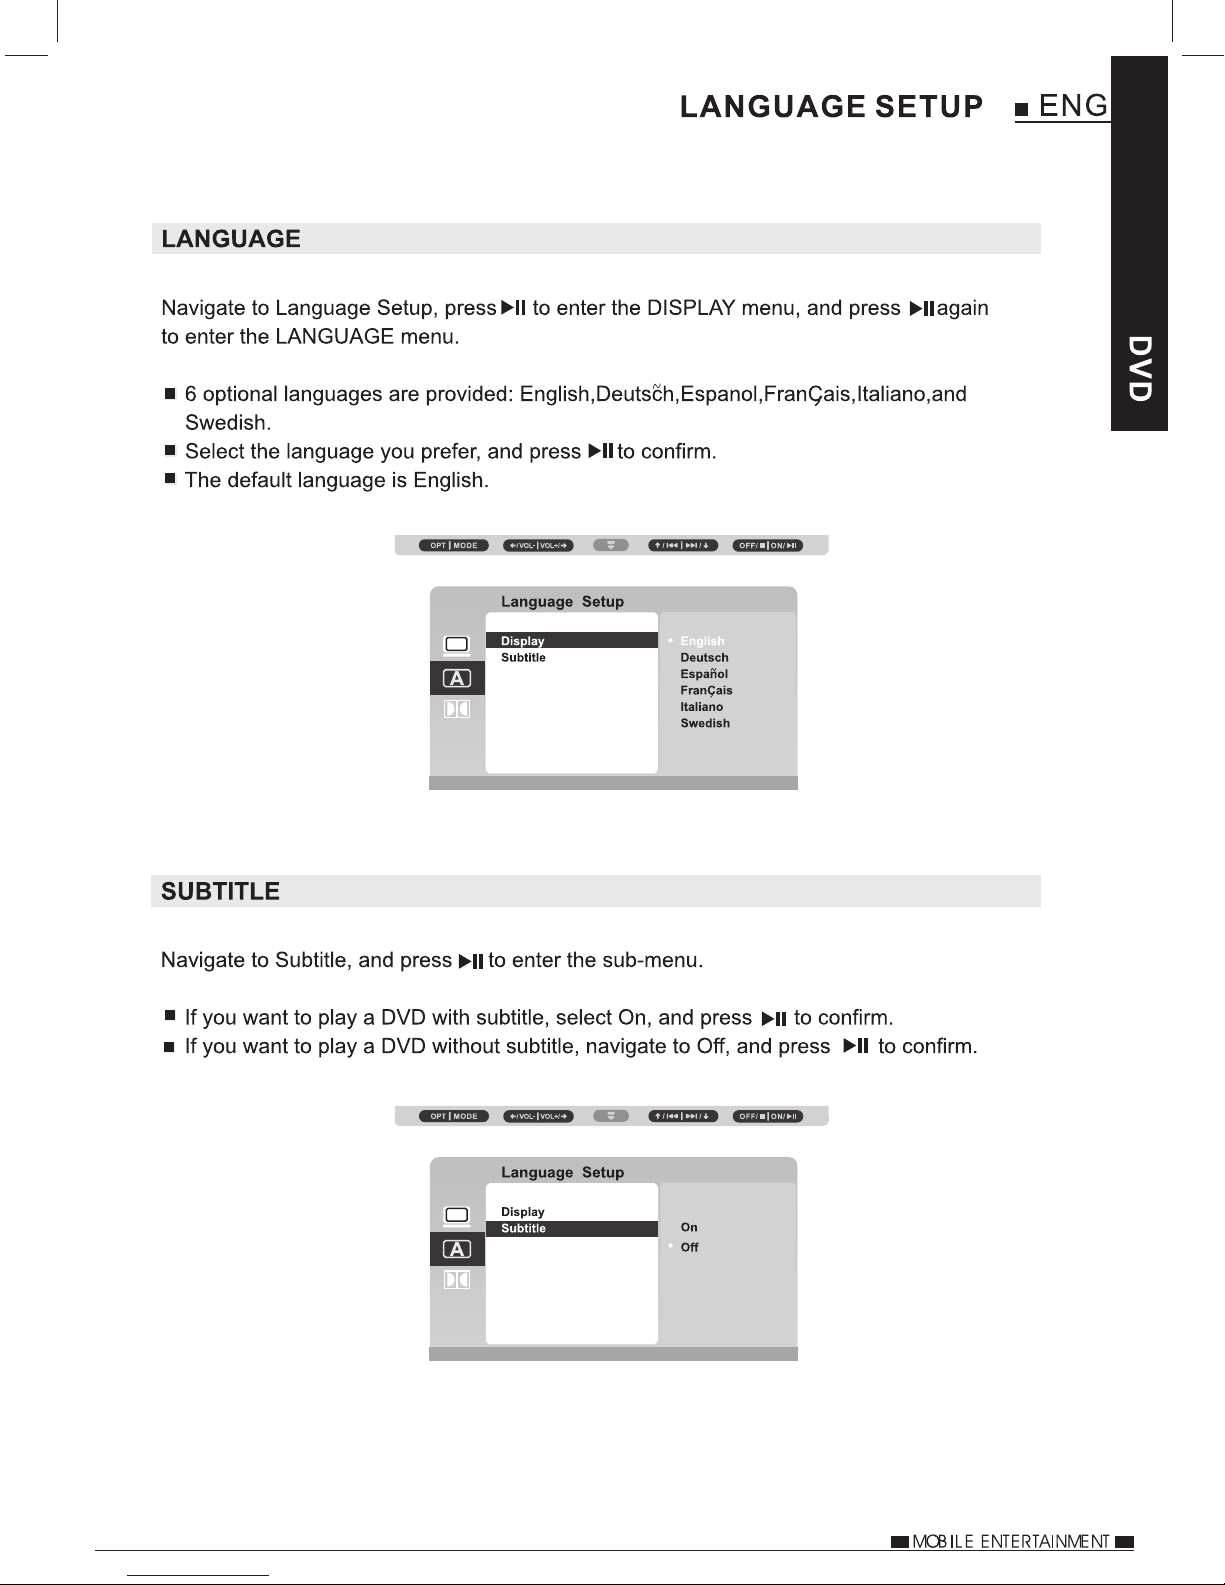
LANGUAGE
SUBTITLE
..........................................................29
............................................................29
.................................................25
...............................................26
...................................................26
..................................................28
.......24
DIGITAL SETUP
DISC SETUP
MODE
FUNCTIONS ON THE
REMOTE CONTROL
INFRA RED
HEADPHONES
OPTIONAL
ACCESSORIES
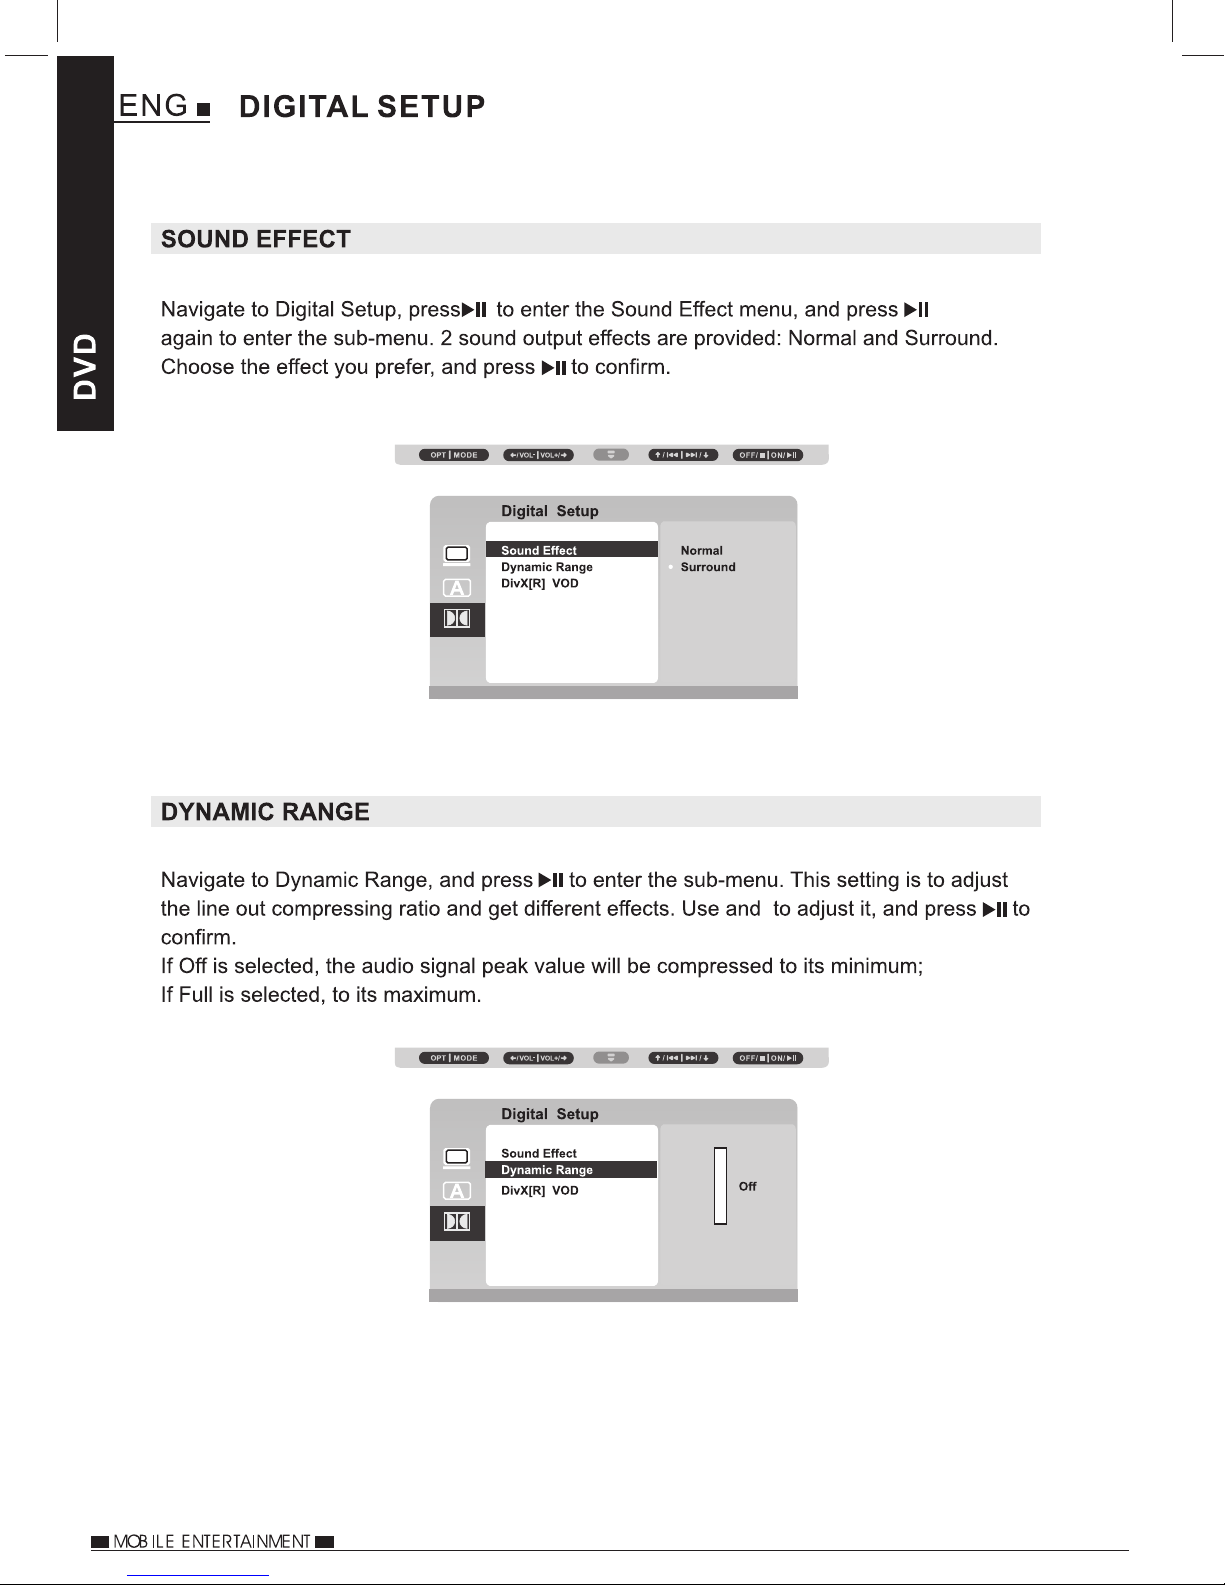
SOUND EFFECT
DYNAMIC RANGE
DIVX® VOD
DISC MENU
INFORMATION
MUTE
AUDIO
SUBTITLE
REPEAT
ZOOM
MODE
...................................................................33
.................................................................34
............................................................35
...............................................................36
..................................................................37
.................................................................38
USB STICK AND SD CARD READING
PLAYING AT FAST SPEED
A-B PLAYBACK
ANGLE
PROGRAM
.................................................................40
............................................................41
...................................................30
.................................................30
..........................................................31
..........................................................32
.....................................................32
.....................39
......................................40
.....................................................40
USING THE INFRA RED HEADPHONES
OPTIONAL ACCESSORIES
....................................44
..................43
INFORMATION
DIMENSION AND PARAMETERS
TROUBLE SHOOTING
...........................................45
............................45
REPLACING THE CAR POWER CABLE FUSE
BROKEN SCREEN IDENTIFICATION
......................47
.........46
Page 6

1. DO NOT MOVE THE PLAYER DURING PLAYBACK
During playback, the disc spins at high speed. Do not lift or move the player. doing
so may damage the disc.
2. TRANSPORTING THE PLAYER
Before transporting the player, please remove the disc, turn off the power, and
disconnect from power source.
3. PLACE IF INSTALLATION
When used outside of a vehicle, select a suitable place to position the player,
for example do not place on top of a TV or colour monitor.
Do not place next to another device that may be effected by magnetic forces.
4. TURN OFF THE POWER WHEN NOT USING THE PLAYE R
If the player is connected to your TV but not in use, switch the power off. it can
cause interference with your normal TV picture.
Noise problems may also be experienced if the player is used near a radio.
5. STORAGE TEMPERATURE OF THE PLAYER
Do not leave the player in places where temperature is extremely low (about -10°C
or lower) or extremely high (about 60°C or higher), such as in the passenger
compartment or trunk in midsummer. Doing so cause damage to the product.
6. WHEN USING IN A VEHICLE
Please turn the engine on prior to connecting power via the car power cable.
7. CLEANING THE PLAYER
Clean the player with a soft dry cloth. for tough dirt, apply some neutral detergent
diluted in 5 to 6 parts water to a soft cloth, and wring out thoroughly. Wipe off the dirt,
then clean the player with a dry clean cloth. note that alcohol, thinner, benzene,
insecticides, etc., may cause the paint or coating to peel off, Also avoid leaving
rubber or plastic products in contact with the player for long periods of time, as this
may damage the cabinet. When using chemically treated cloths, read the cloths
instructions carefully. Always disconnect the product from the power source before
cleaning.
8. NEVER TOUCH THE LASER PICKUP LENS
Do not touch the laser pickup lens. Doing so may cause damage the to the player.
Refer servicing to the qualified personnel.
9. COPYRIGHTS
Unauthorized duplication, broadcast, public performance or rental is prohibited by law.
10. MODEL NUMBER
To find the model number of the player, please remove stand.
Page 7

DISCS PLAYABLE ON THIS DVD PLAYER
Page 8

After unpacking, please check the contents.
Player
IR Headphone x 2
Car Power Cable
Monitor
Carry Case
Quick Start Guide
Remote Control
Stanchion Mounts x 2
Instruction Manual
Optional accessories, available from you local dealer.
Power Pack
(Batter y & AC Adapto r)
Additional
IR Headphones
Page 9

When the power is connected, the LED indicator will be green to show the player is
powered.
Page 10

1. DCIN 12V
Connect the AC Adaptor here, use
the correct adaptor which is supplied
with the ‘Power Pack’ optional accessory.
2. Earphone Jack
Connect earphones or amplifier here.
3. iX (Interface Extend) Port
Connect to other devices here.
Connector / Cable is specific to the player,
contact Technical Support for details.
Page 11

1. Lock
Lock / unlock the player stand / stanchion mount.
Unlock the stand and remove before
mounting onto the stanchion mount.
1. Pull out the support of the stand.
2. Rotate 90degrees.
3. Lean the player back.
Page 12

Page 13

1. DC IN 12V
Connect the AC Adaptor here, use
3. Audio
Connect an audio cable for audio input here.
the correct adaptor which is supplied
with the ‘Power Pack’ optional accessory
4. Video
Connect a video cable for video input here.
2. Earphone Jack
Connect earphones or amplifier here.
1. Lock
Unlock the stand and remove before mounting onto the stanchion mount.
1. Pull out the support of the stand.
2. Rotate 90degrees.
3. Lean the monitor back.
Page 14

Page 15

.language.
Page 16
Page 17

16
TURNING ON THE PLAYER AND MONITOR
1. Install the stanchion mounts, screens and connect the car power cable as shown
in the supplied Quick Start Guide.
2. The player and monitor will turn on automatically once connected to the stanchion
mounts. the ON / OFF buttons are located on the top right-hand side of both the
player ‘ ‘ and the monitor ‘ ‘.
Please Note:
For use in 12Vdc vehicles only.
Page 18

TURNING OFF THE PLAYER AND MONITOR
1. Press OFF / on the unit for about 2 seconds.
2. Disconnect the car power cable from the vehicles 12Vdc socket.
LOADING A DISC
17
Page 19

18
Page 20

USB & SD PLAYBACK
INSERTING A USB STICK
Insert a USB stick as shown below.
NOTE:
Connect the USB stick directly to the player, do NOT use a USB hub,
an external hard-drive or extension cable, etc.
Maximum size is 32Gb and the USB stick must be formatted in FAT or FAT 32.
19
INSERTING A SD CARD
4. Maximum size is 32Gb and the SD Card must be formatted in FAT or FAT 32.
Page 21

20
MULTIMEDIA PLAYBACK
MULTIMEDIA PLAYBACK
When a USB stick or SD card is inserted and there is an MP3 file upon it, the player
will play the file automatically, as shown below.
Press stop (OFF) to exit playback and enter the folder list menu screen
PLAYING MUSIC FILES
NOTE: Music files must be MP3 or WMA format, in order to play.
Page 22

MULTIMEDIA PLAYBACK
21
VIEWING JPEG FILES
Page 23

22
MULTIMEDIA PLAYBACK
PLAYING VIDEO FILES
Page 24

MULTIMEDIA PLAYBACK
23
Page 25

24
OPTION MENU
USING THE INFRA RED TRANSMITTER
The DVD player has an in-built Infra Red Transmitter to allow the use of the supplied
infra red headphones, to get started simply follow the instructions on page 43 of this
manual.
The default setting for the IR transmitter is ‘Channel A’, to change this or turn the IR
transmitter off, press the Option button on top of the DVD player and press to enter
the IR Headphone menu. Navigate to your chosen selection and press to confirm.
The supplied Infra Red headphones have two channels available to receive the
audio transmission, this allows two systems to operate independently (in larger
vehicles) without interference with each other.
For further information on use of the IR headphones, please see page 43.
Page 26

PLAYER DISPLAY
25
Page 27

26
Page 28
27
Page 29
28
Rating
FACTORY RESET
Select this to reset all the settings back to their defaults.
Page 30
29
Page 31
30
Page 32

DIX® VOD
®
31
®
®
.
®
®
®
Page 33

32
Page 34

Mute
33
Page 35

34
Page 36

35
Page 37

36
During playback, if the option Repeat is selected, or the REPEAT button on the remote
control is pressed, the title/chapter of a DVD or the track/entiredisc of a CD will be
played repeatedly.
Page 38

Zoom
37
Zoom
Page 39

38
Select this if you want to watch video clips, listen to music or view photos from
a USB stick. Navigate to , press to load the USB stick, and the menu below will
pop up.
The player can receive AV-IN signals, the correct connection cable
is sold separately.
Page 40

USB STICK AND SD CARD READING
If a storage device is connected to the player whist another storage device is playing,
playback will stop, and the player will play the media from the newly inserted storage
device.
39
Page 41

40
Page 42

41
Page 43

42
Page 44
INFRA RED HEADPHONES
USING THE INFRA RED HEADPHONES
The default setting for the IR transmitter on the DVD player is ‘Channel A’, allowing
the infra headphones to be used, by following the instructions below.
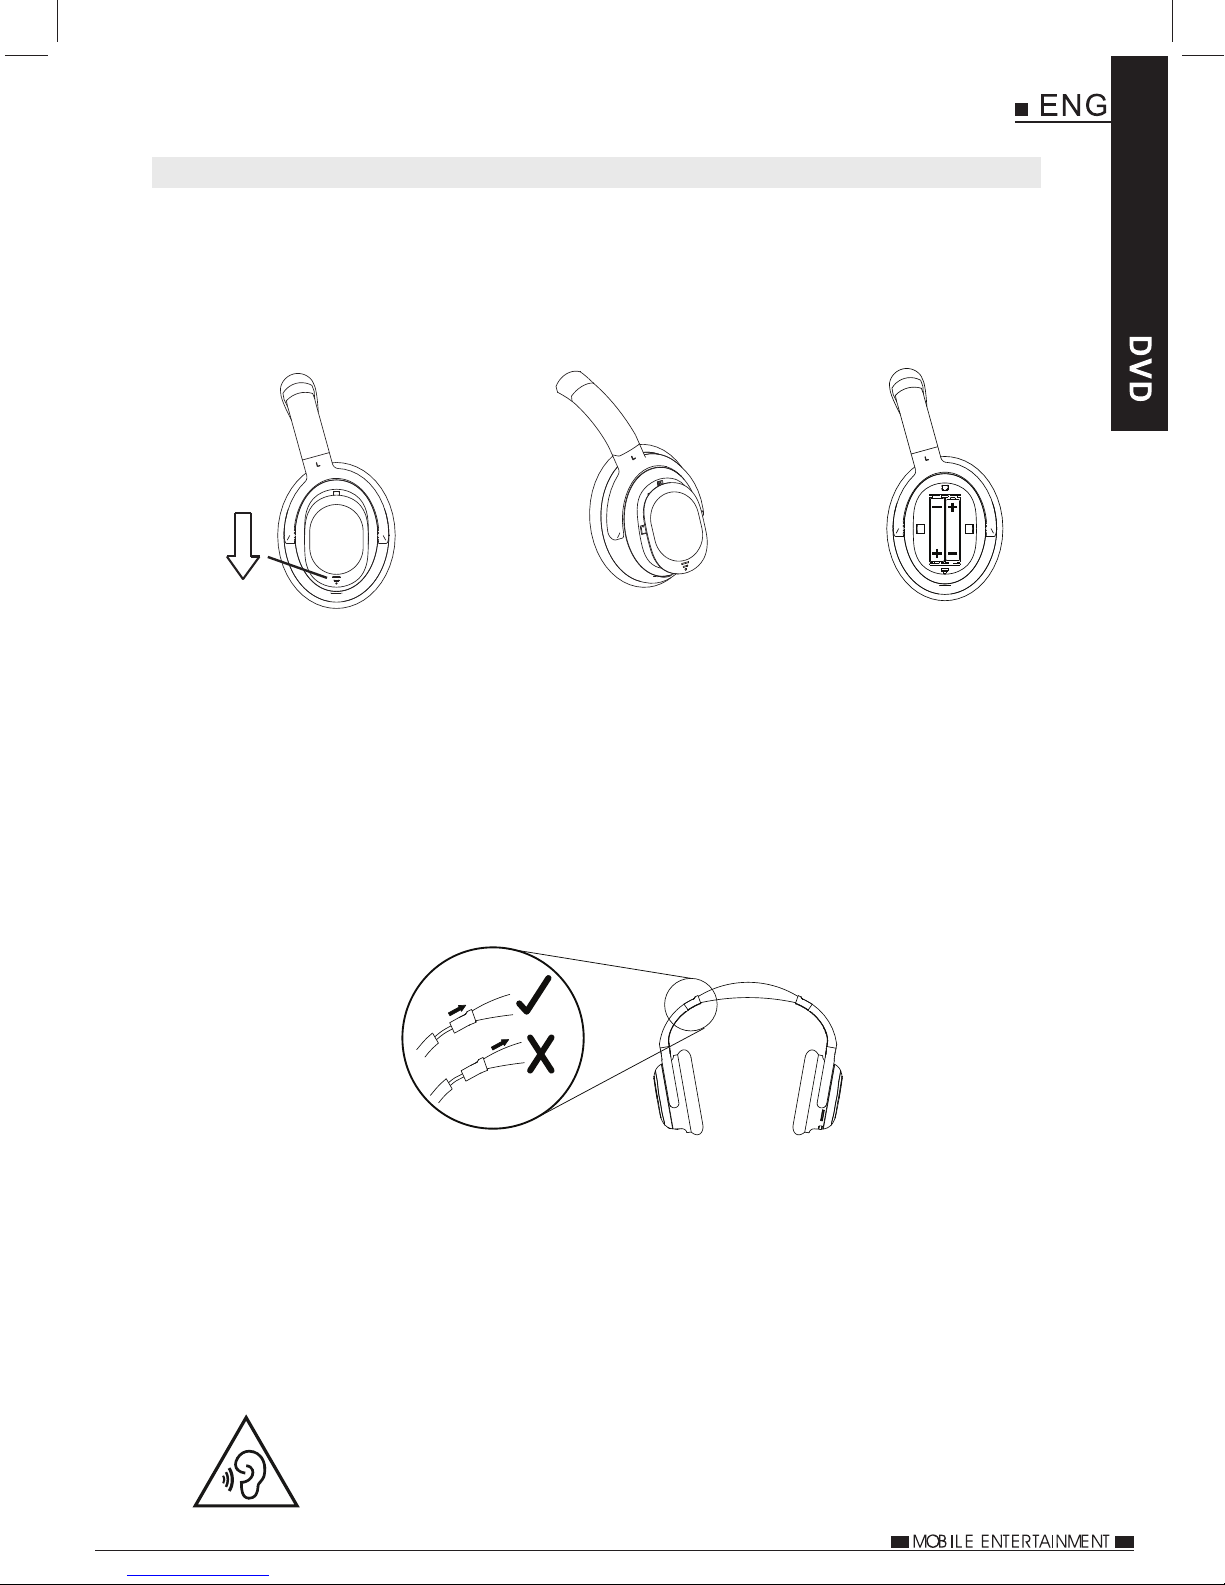
1. Remove the battery cover on the left earpiece and inset the AAA batteries provided
as shown below, take care to match the terminals correctly.
Push
&
Slide
2. Switch on the headphones making sure they are on the same Channel as the DVD
player, it is recommended that for this system the DVD player and headphones
use channel A.
If the LED light is RED = Channel A / Green = Channel B
43
3. Before placing the headphones on check that the volume level is turned down, then
turn the volume wheel up on the right earpiece so the sound can be heard.
4. The headphones are designed to be suitable for adults and children, with the
headband being adjustable as shown below
Adjust the headband by pulling on the plastic grip, not the headband material.
The headphones use two AAA batteries, these will give approximately 36 hours of
continuous use.
Once the batteries are exhausted, replace with a good quality battery and dispose of
the old batteries responsibly.
On the left earpiece is a 3.5mm stereo jack, this can be used to connect the headphones
to the device directly using a 3.5mm stereo jack to jack cable (not supplied).
Additional headphones can be purchased from your local dealer, there is no limit to
the number of headphones that can be used with a single player.
Hearing Safety Guidelines:
Listen at reasonable volumes for reasonable lengths to time.
Do not turn the volume so high that you cannot hear your environment.
Page 45

44
OPTIONAL ACCESSORIES
POWER PACK (available from your local dealer)
The Power Pack is an optional accessory available from your local dealer, containing
a high-capcity Lithium-Polyer (7.4V / 300mAh) rechargeable battery and an AC/DC
adaptor.
The battery gives the option for using the DVD player outside of a vehicle and when
a domestic DC outlet is not available, i.e. airplane, train, camping etc.
Once fully charged the battery will give >2hrs playback and 300+ charging cycles
The mains adaptor is used for charging the battery and also for use to power the DVD
player at home.
1. DC IN 12V. Connect the AC/DC adaptor here for to charge the battery.
2. LED Charging indicator. Red indicates charging and goes out when charged.
3. Battery terminals.
4. Attachment slide.
5. Stand. Pull out and rotate to 90 degrees, as required.
Remove the stand from rear of player and slide the battery on, until a click is heard.
PLEASE NOTE:
The battery is designed for use with a single DVD player only, as it utilizes
the connections on the rear of the player, therefore preventing connection
to the stanchion mount and the second screen.
ONLY use the mains adaptor supplied with the power pack, failure to do so
may result in damage being caused to the DVD player which will not be
covered under the manufacturers warranty.
Page 46

9 Duo Professional
45
No Power
No Power
No image on
the monitor
Black & White
image on the
monitor
The disc does
not play
If LED is n ot li t, ch eck the fuse
Check t hat t he RED LED light
illum ina tes on the car powe r cab le.
Check t hat t he stanchion mo unt i s
conne cte d correctly, as there is no
inter nal b attery in the pla yer
Check t hat t he stanchion mo unt i s
conne cte d correctly and t he ca r
power c abl e is connected co rre ctl y,
this ca ble i s req uired to car ry th e
audio & v ide o signal to the mon ito r.
Check t hat t he stanchion mo unt i s
conne cte d correctly and t he ca r
power c abl e is connected co rre ctl y,
this ca ble i s req uired to car ry th e
audio & v ide o signal to the mon ito r.
Disc is n ot lo aded properly
Disc is s cra tched or dirty.
Wrong regiona l dis c. Use the r igh t regional disc .
fitte d wit hin t he car power cabl e
body an d rep lace as require d.
See nex t pag e for details.
Clean t he co ntacts on the rea r of
the scr een s and mounts. Use a
cotto n bud a nd an alcohol bas ed
fluid t o cle an th e contacts.
Clean t he co ntacts on the rea r of
the scr een s and mounts. Use a
cotto n bud a nd an alcohol bas ed
fluid t o cle an th e contacts.
Clean t he co ntacts on the rea r of
the scr een s and mounts. Use a
cotto n bud a nd an alcohol bas ed
fluid t o cle an th e contacts.
Load di sc la bel side up and fir mly
press o nto t he spindle.
Check d isc f or signs or damag e or
finge rpr ints and clean as r equ ire d.
Page 47

46
TROUBLE SHOOTING continued
File will not play
from USB
No display
No sound
No sound from
IR Headphones
Remote control
does not work
Display has
lines upon
Incom pat ible file forma t or US B sti ck
has err ors u pon.
Car pow er ca ble is disconne cte d,
Wrong setting o r con nection to the
playe r.
Wrong mode sett ing .
Volume i s tur ned down.
Wrong setting o r con nection to the
playe r.
DVD pla yer t ransmitter is n ot tu rne d on.
Incor rec t Channel selec ted .
Batte rie s exhausted.
Batte ry ex hausted.
Any dia gon al lines indica te th at th e
scree n has b een smashed.
See man ual f or further info rma tio n.
Re-fo rma t the USB with FAT32 and verify
media f ile s are correct typ e as de scribed
withi n man ual
Ensur e USB i s less than 32Gb in s ize .
Conne ct ca ble correctly.
Check s ett ing s and connec tio ns ar e all
corre ct.
Check c orr ect mode is selec ted .
Tur n the v olume level on th e pla yer,
monit or or I R headphones up .
Also ch eck I R transmitter a nd he adp hones
Check s ett ing s and connec tio ns ar e all
corre ct.
Tur n on th e IR transmitte r wit hin the DVD
playe r, see p age 24.
Selec t cha nnel A or B upon the headp hon es.
Repla ce th e headphones ba tte rie s.
Repla ce th e battery (CR20 25) , as de tailed
in this m anu al.
Conta ct Technic al Su pport for detai ls of
scree n rep lacement.
Player will not
charge
This is n orm al. Ther e is no internal
batte ry in t he DV D player.
Conne ct th e DVD player to pow er so urc e.
The car adaptor is fused in order to protect the car and DVD system from damage
as a result of voltage / current surges, short circuit, cable damage or product failure.
If the red LED on the car power cable is NOT illuminated, but the DVD system still
works upon a mains adaptor (sold separately), then the fuse should be checked as
it may have blown. It the fuse has blown, check the player and cable for damage.
The fuse is user replaceable, see blow for details.
3.0A 20mm Fuse
Unscrew the collar
CAUTION:
The fuse, spring, collar and tip are small components and take needs to be
taken to avoid losing a part, or reassembly will not be possible.
Page 48

47
Page 49

48
NOTES
Page 50
Click 9 P rof ess ion al IM UK A0
Technical Support: 02920 866429
To download this Instruction Manual in English,
please visit the website detailed below.
Para descargar el manual de instrucciones en Español,
por favor visite la siguiente web.
Om du vill hämta den här bruksanvisningen på Svenska,
besök webbplatsen nedan.
Pour télécharger ce mode d'emploi en Français,
s'il vous plaît visitez le site Web détaillé ci-dessous.
www.dvdmanuals.eu
Per scaricare questo manuale di istruzioni in Italiano,
Si prega di visitare il sito web qui sotto indicato.
Um diese Bedienungsanleitung in deutscher Sprache
herunterzuladen, besuchen Sie bitte die Website unten.
 Loading...