

Page 1
Page 2
1
,
POWER SUPPLY:
Connect the supplied adaptor to the side of the unit in the USB port. Plug the two-prong
end of the power cord to an AC100-240V outlet. If you have difficulty inserting the plug,
turn it over and reinsert it. If the unit is not used for a long time, disconnect the plug from
the outlet.
NOTE:
Before plugging the power cord into an AC outlet, make sure that all the connections
have been made.
CAUTION: These servicing instructions are for use by qualified service personnel only.
To reduce the risk of electric shock, do not perform any servicing other than that
contained in the operating instructions unless you are qualified to do so.
Refer to service manual for servicing instructions. To reduce the risk of fire or electric
shock, do not expose this apparatus to rain or moisture.
CAUTION: TO REDUCE THE RISK OF ELECTRIC SHOCK, DO NOT
REMOVE COVER (OR BACK). NO USE-SERVICEABLE PARTS
INSIDE. REFER SERVICING TO QUALIFIED SERVICE PERSONNEL.
The lightning flash with arrowhead symbol within an equilateral triangle is
intended to alert the user to the presence of uninsulated “dangerous voltage”
within the product’s enclosure that may be of sufficient magnitude to
constitute a risk of electric to persons.
The exclamation point within an equilateral triangle is intended to alert the
user to the presence of important operating and maintenance (servicing)
instructions in the literature accompanying the appliance.
WARNING: TO REDUCE THE RISK OF FIRE OR ELECTRIC SHOCK,
DO NOT EXPOSE THIS APPLIANCE TO RAIN OF MOISTURE.
Important
Saf
ety
Instructions
Page 3

2
NOTES
1) Read these instructions.
2) Keep these instructions.
3) Heed all warnings.
4) Follow all instructions.
5) Do not use this apparatus near water.
6) Clean only with a damp cloth.
7) Do not block any of the ventilation openings. Install in accordance with the
manufacturer's instructions.
8) Do not install near any heat sources such as radiators, heat registers, stoves, or
other apparatus (including amplifiers) that produce heat.
9) Do not defeat the safety purpose of the polarized or grounding-type plug. A
polarized plug has two blades with one wider than the other. A grounding type plug
has two blades and a third grounding prong. The wide blade or the third prong is
provided for your safety. When the provided plug does not fit into your outlet,
consult an electrician for replacement of the obsolete outlet.
10) Protect the power cord from being walked on or pinched, particularly at plugs,
convenience receptacles, and the point where they exit from the apparatus.
11) Only use attachments/accessories specified by the manufacturer.
12) Use only with a cart, stand, tripod, bracket, or table specified by the
manufacturer, or sold with the apparatus. When a cart is used, use
caution when moving the cart/apparatus combination to avoid injury from tip-over.
13) Unplug the unit from the DC car adaptor when not in use.
14) Refer all servicing to qualified service personnel. Servicing is required when the
apparatus has been damaged in any way, such as when the power-supply cord or
plug is damaged, liquid has been spilled or objects have fallen into the apparatus,
the apparatus has been exposed to rain or moisture, does not operate normally, or
has been dropped.
15) Apparatus shall not be exposed to dripping or splashing and no objects filled with
liquids, such as vases, shall be placed on the apparatus.
To prevent the GPS from being damaged, be sure to keep the GPS out of direct
sunlight or heat.
Important
Saf
ety
Instructions
Page 4

3
Warning
Failure to avoid the following potentially hazardous situations may result in injury or
property damage.
The unit is designed to provide you with route suggestions. It does not reflect road
closures or road conditions, traffic congestion, weather conditions, or other factors that
may affect safety or timing while driving.
Use the unit only as a navigational aid. Do not attempt to use the unit for any purpose
requiring precise measurement of direction, distance, location, or topography. This
product should not be used to determine ground proximity for aircraft navigation.
CAUTION:
Danger of explosion if battery is incorrectly replaced. Replace only with the same or
equivalent type.
The batteries (or batteries installed) shall not be exposed to excessive heat such as
sunshine, fire, or the like.
Underwriters Laboratories Inc. (“UL”) has not tested the performance or reliability of the
Global Positioning System (“GPS”) hardware, operating software, or other aspects of
this product. UL has only tested for fire, shock, or casualty hazards as outlined in UL’s
Standard(s) for Safety [Note-Consider referencing specific UL standard].
UL Certification does not cover the performance or reliability of the GPS hardware and
GPS operating software.
UL MAKES NO REPRESENTATIONS, WARRANTIES, OR CERTIFICATIONS
WHATSOEVER REGARDING THE PERFORMANCE OR RELIABILITY OF ANY GPS
RELATED FUNCTION OF THIS PRODUCT.
This device complies with part 15 of the FCC Rules. Operation is subject to the following
two conditions:
(1) This device may not cause harmful interference.
(2) This device must accept any interference received, including interference that may
cause undesired operation.
Important
Saf
ety
Instructions
Page 5

4
Note: This equipment has been tested and found to comply with limits for Class B digital
device, pursuant to part 15 of the FCC Rules. These limits are designed to provide
reasonable protection against harmful interference in a residential installation. This
equipment generates, uses, and can radiate radio frequency energy and, if not installed
and used in accordance with the instructions, may cause harmful interference to radio or
television reception, which can be determined by turning the equipment off and on, the
user is encouraged to try to correct the interference by one or more of the following
measures:
1. Reorient or relocate the receiving antenna.
2. Increase the separation between the equipment and the receiver. Connect the
equipment into an outlet on a circuit different from that to which the receiver is
connected.
3. Consult the dealer or an experienced radio/TV technician for help.
The images in this manual are for reference only an d they may appear
different from the actual items.
Important
Saf
ety
Instructions
Page 6

5
Accessories List
ITEM NAME QTY
Instruction Manual 2
AC Adaptor 1
Car Adaptor 1
Mounting Bracket 1
USB Cable 1
Mounting cradle 1
Stylus 1
Dashboard mount disk 1
SD Card 1
Pouch 1
NOTE
Accessories and their parts numbers are subject to modification without prior notice due
to improvements.
Accessories
Page 7
6
…………………………………..………..1
……………………………….…………...5
……………………………….…………...7
……………………………….……….…..9
…………………………….……….….….10
……………………………….…………..18
…………………………….……………..20
……………………………….…………..23
……………………………….…………..35
……………………………….…………..36
……………………………….…………..37
……………………………….…………..39
Important Safety Instructions
System Connections
Power Supply Preparation
Troubleshooting
Specifications
Accessories
V
iew of Main Uni
t
Use of the Mount Accessories
Playing Music
Bluetooth
General Setup
Contents
Calculator
Photo Viewer
Page 8
7
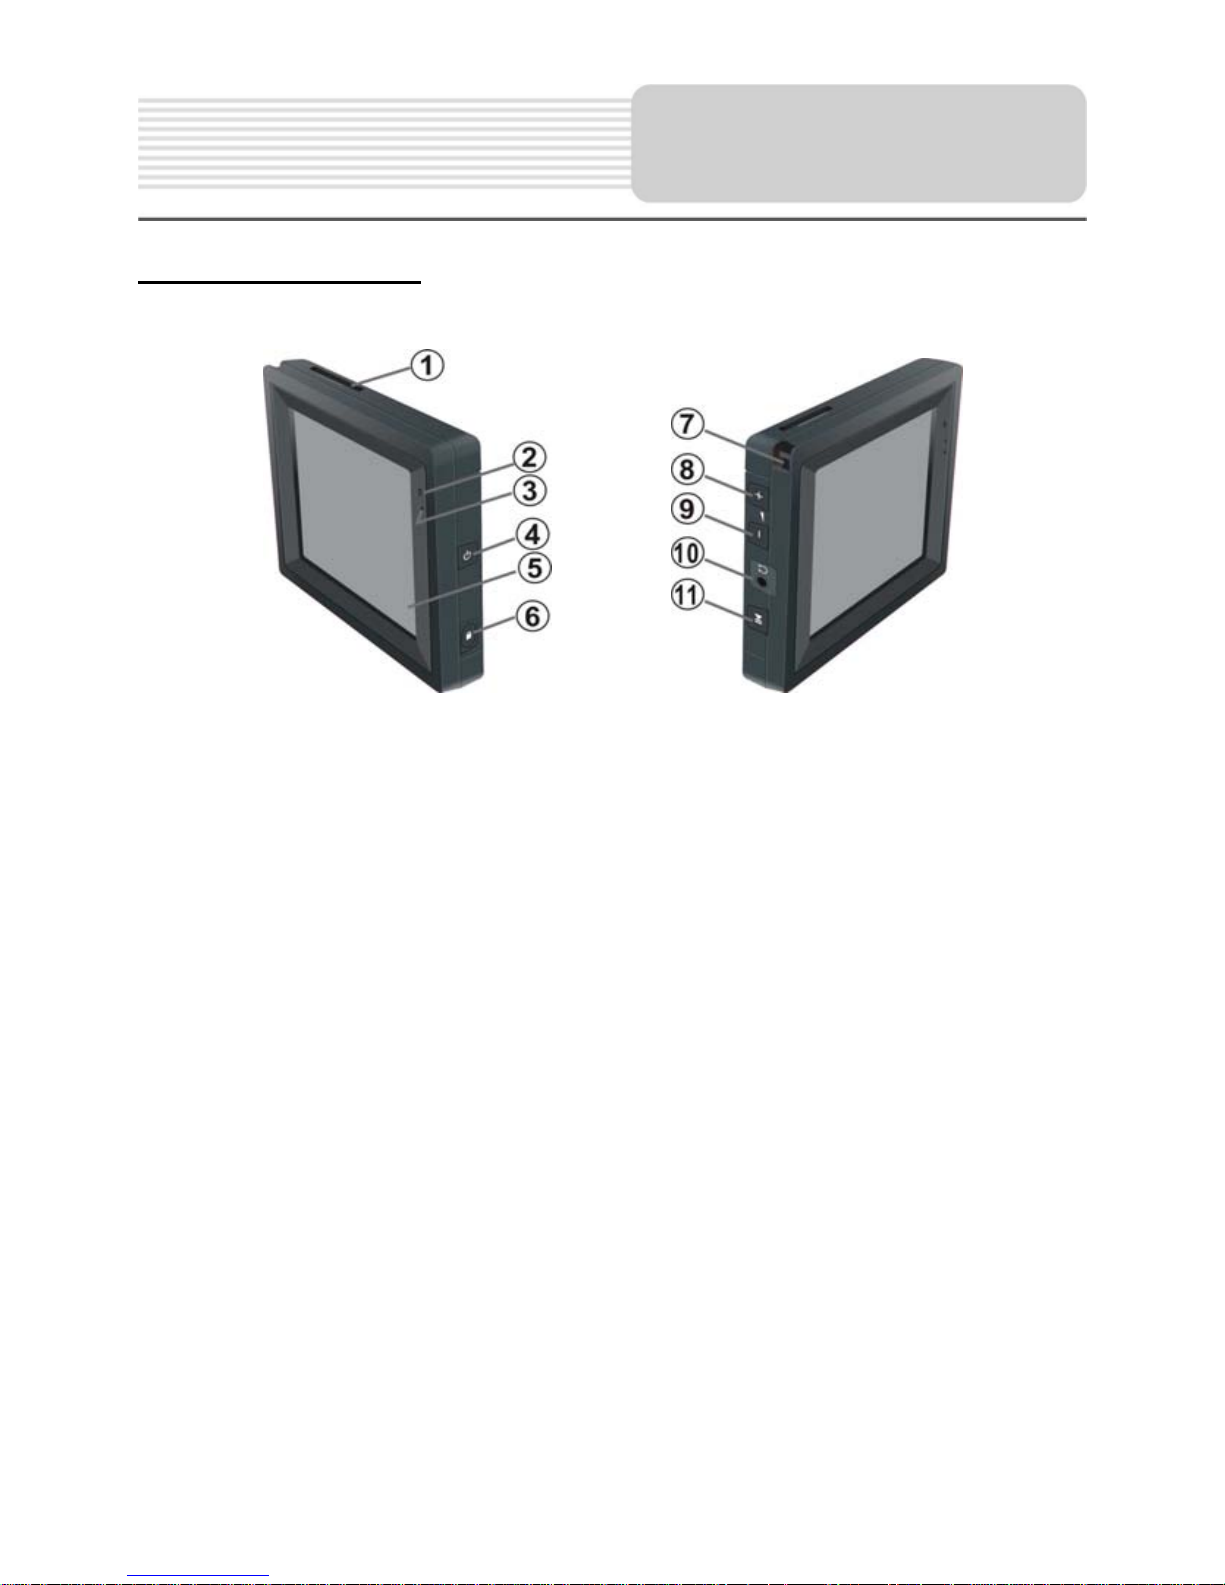
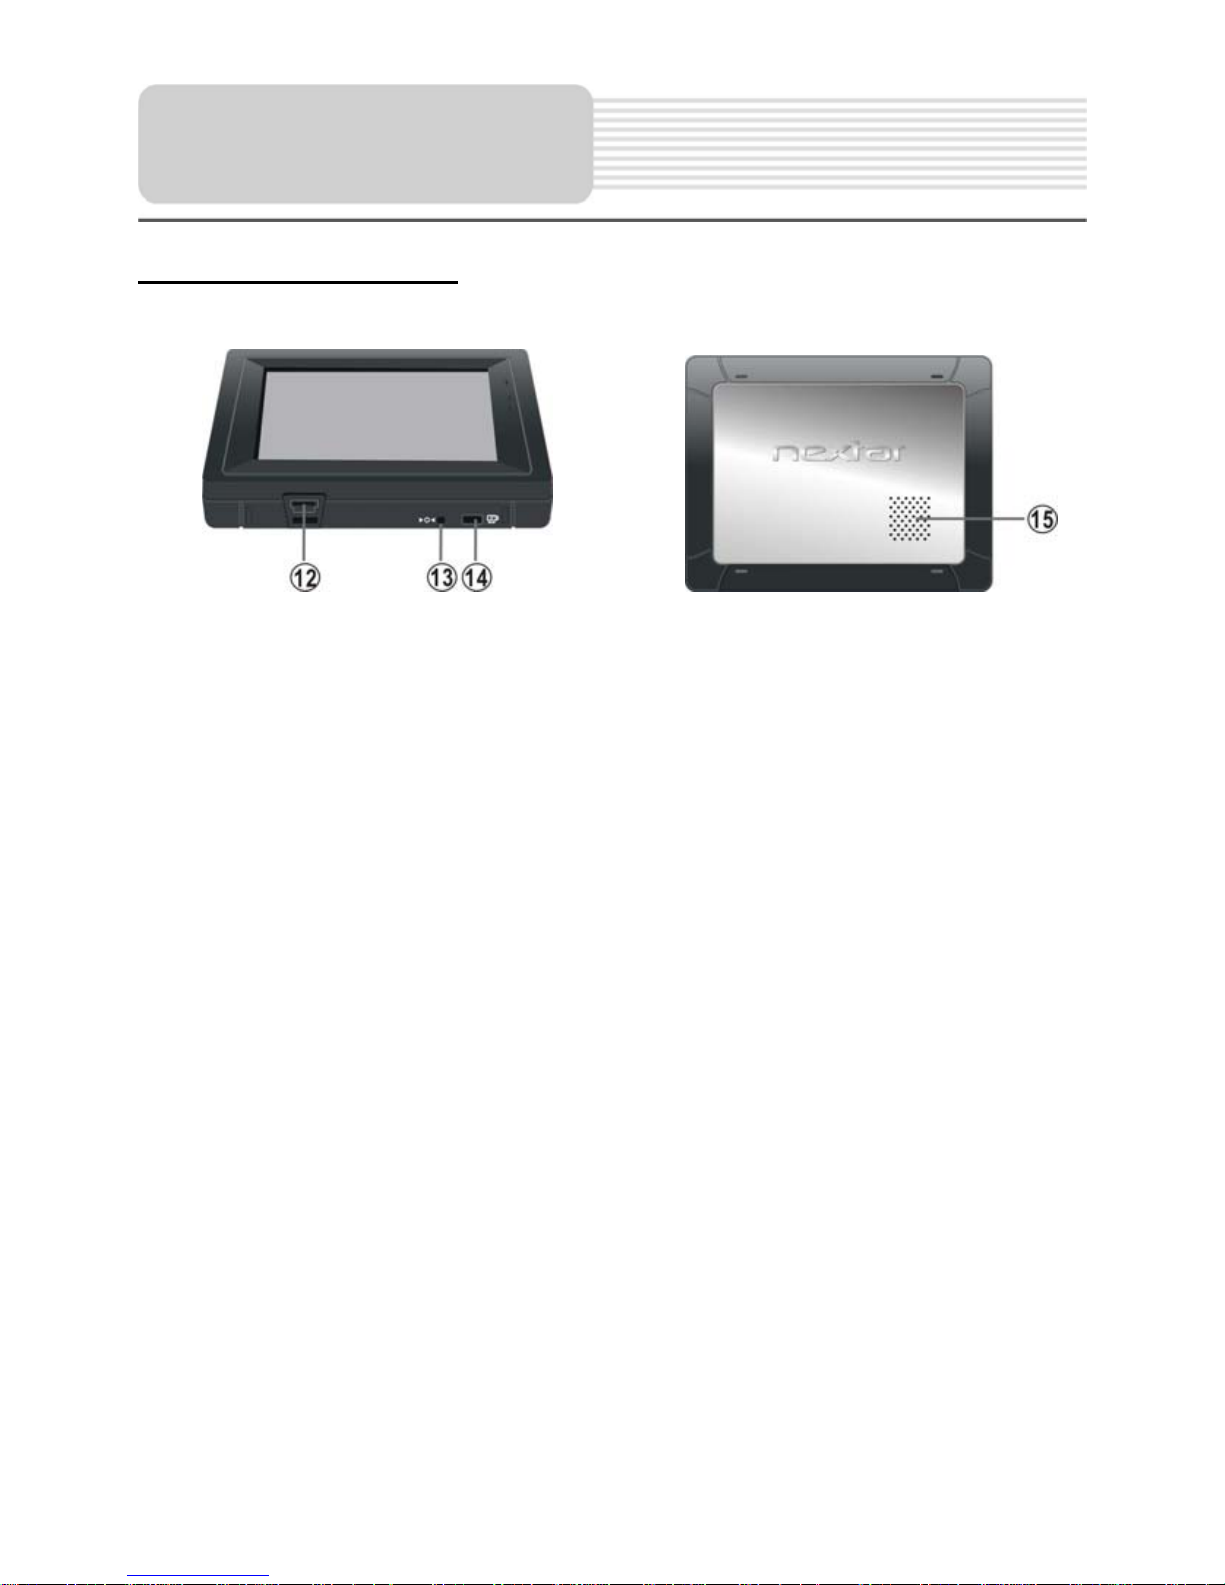
Front and side panels
1. Card Slot
Insert the SD card into the slot.
2. Charge Indicator
When charging the battery, it is red. When fully charged, it turns green.
3. Microphone Hole
4. POWER Button
Press for a longer time to enter or exit the standby mode.
5. LCD Screen
6. Screen Lock
Press this button to lock or unlock the screen. When the screen is locked, it is not
available.
7. Stylus
8. Volume + Button
9. Volume - Button
10. Earphone Jack
Used to connect earphones for private listening. When the earphones are
connected to this jack, the speaker will be turned off automatically.
11. Pause Button
Press this button to pause the playing.
View of Main Unit
Page 9
8
Bottom and rear panels
12. USB Port
Connect with the adaptors for charging.
Used to connect to the USB device.
13. Reset Hole
Used to restart the device with inserting a stick.
14. ON/OFF Switch
Used to switch power on or off.
15. Speaker
View of Main Unit
Page 10
9
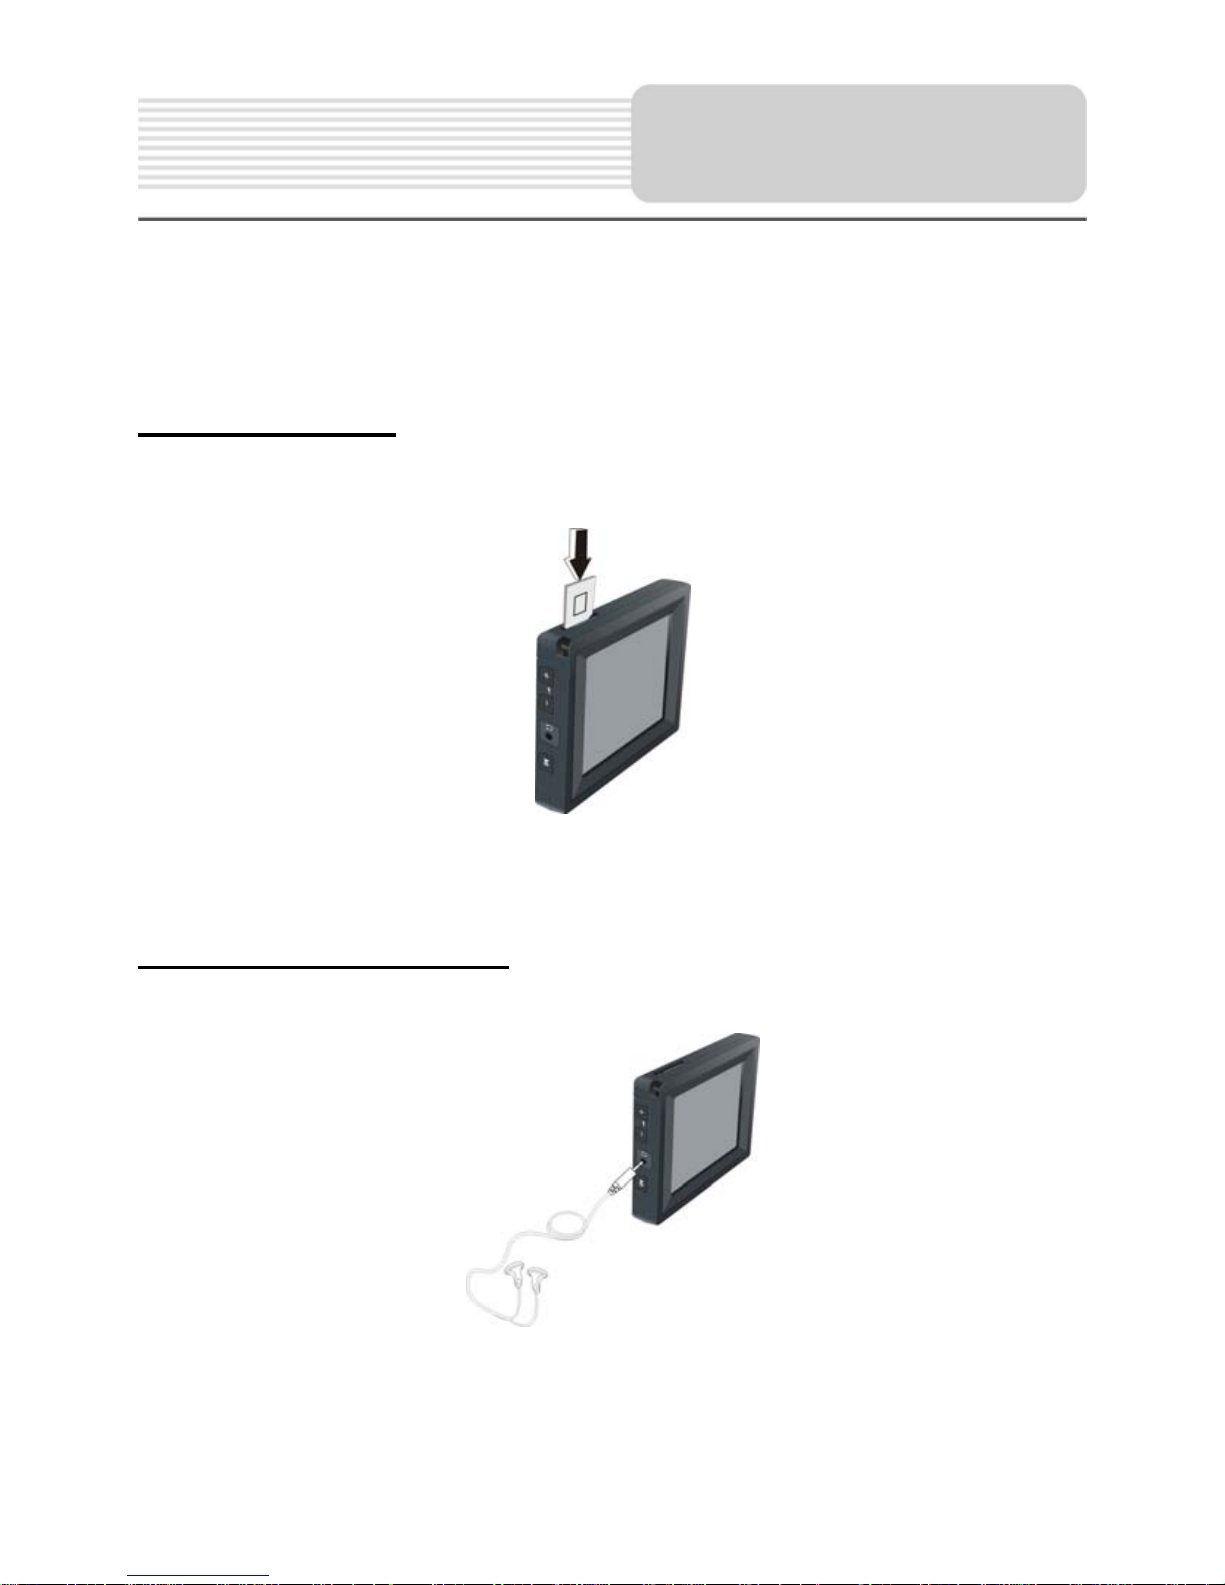
Always ensure that the unit and any other external device connected to the unit are
switched off and unplugged from the power supply before you attempt to connect
the unit to any external device.
Inserting SD Card
The unit is designed with an SD Card slot which allows you to insert the SD card into the
unit as shown below:
To remove the card, gently press the card in with your fingernail. The card unlocks and
protrudes slightly. You can now remove the card.
Connecting to Earphones
Connect the earphones to the right side of the unit for private listening.
When earphone is connected, the speakers will automatically turn off.
Note: Overly loud volume could damage your hearing. So turn down the volume before
you connect the earphones, and then raise the volume to comfortable level.
System
Connections
Page 11
10
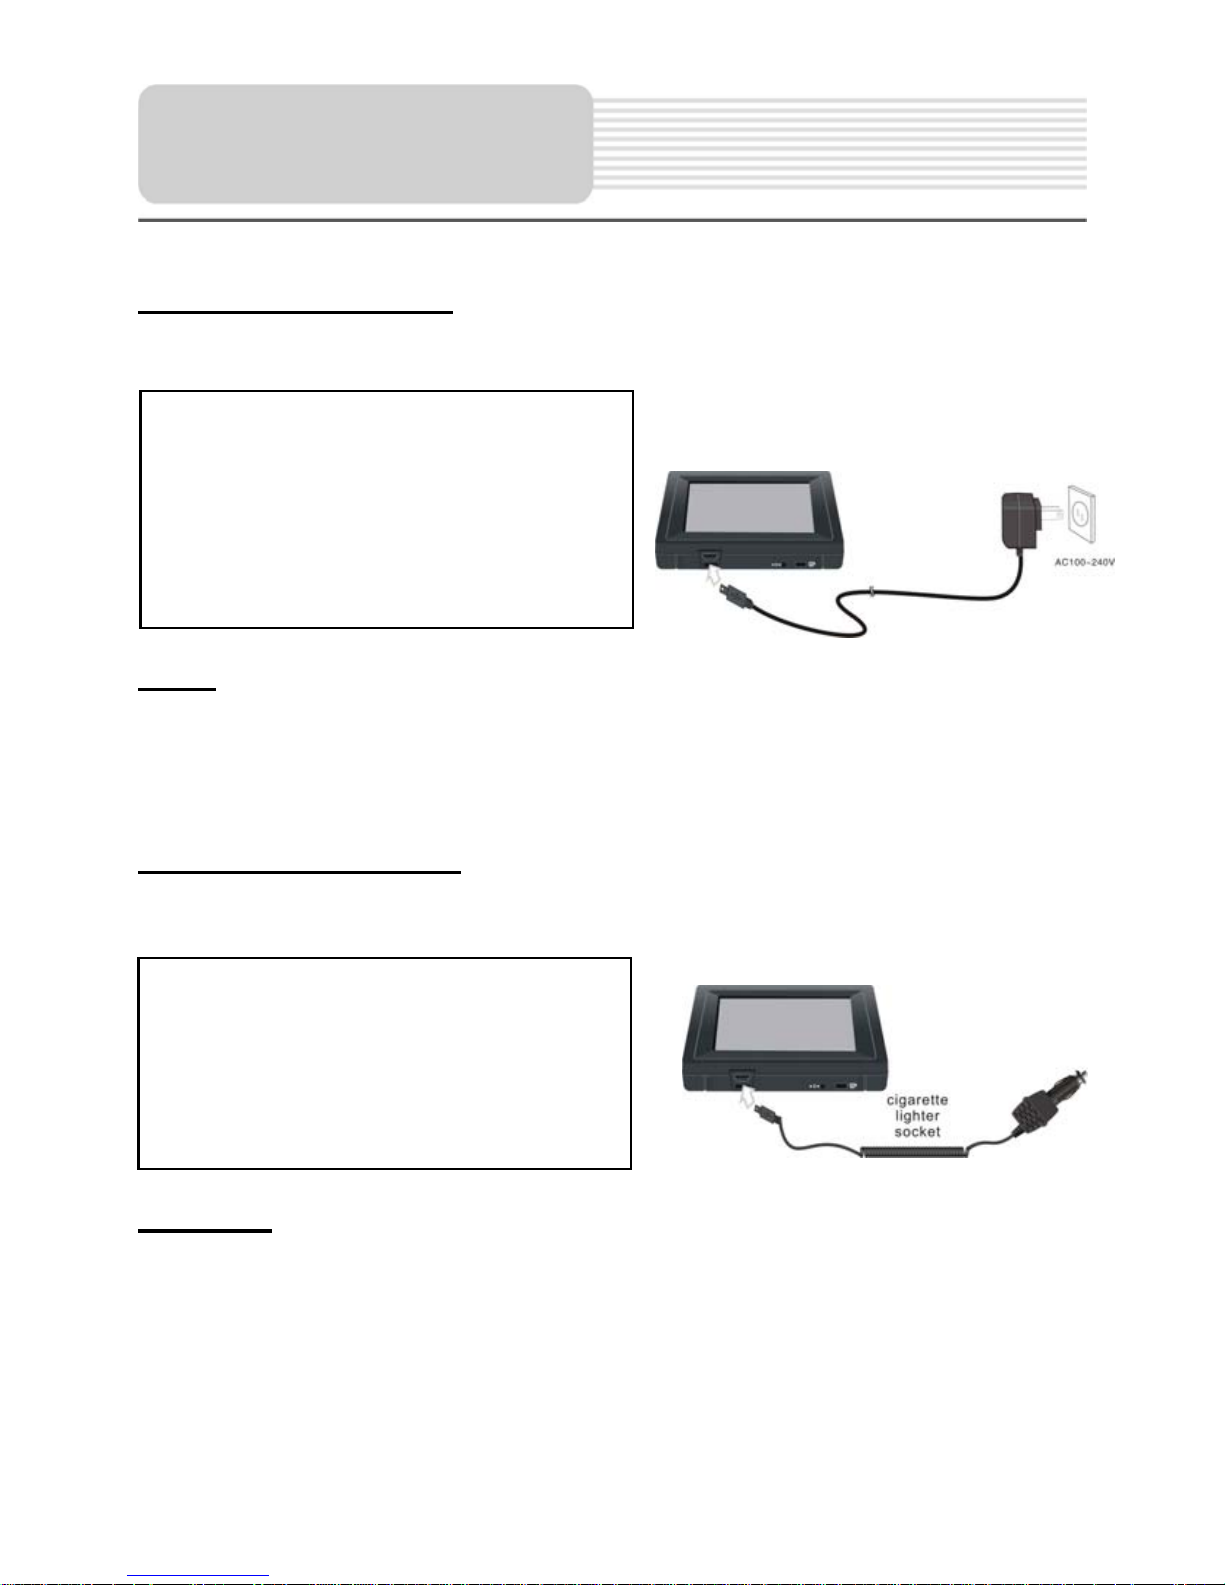
Using the AC Adaptor
The unit is supplied with an AC adaptor for powering and charging its battery.
Note:
Turn unit's power off before unplugging.
When using the adaptor, the LCD screen will be brighter than with the
rechargeable battery.
Using the Car Adaptor
The unit is supplied with a Car Adaptor for powering while in a vehicle.
Attention
Place the unit in a proper position for viewing.
Disconnect the unit from the Car Adaptor when starting the vehicle.
Your portable GPS unit comes with a built-in rechargeable battery. Please see details in
the following segment.
Power Supply
Pre
p
aration
Connect the Car Adaptor Power Plug to
the unit’s USB port and plug the other
end to the vehicle’s 5V accessory/
cigarette socket, as shown on the right
figure.
1. Connect AC adaptor to the right side
of the unit in the USB port, as shown
on the right.
2. Plug the two-prong end of the powe
r
cord into a grounded electrical
outlet.
Page 12

11
Working conditions and precautions for the rechargeable battery
Battery should only be used and charged when temperatures are between
32-100F.
Maintain well-ventilated conditions around the product to avoid overheating. Don’t
put the product on a bed, sofa or anything that may block ventilation to the product.
When the battery is weak, an indication menu will appear on the LCD screen and
the unit will power off automatically after a while.
Charging the Battery Pack
The battery must be charged by using the supplied adaptor.
.
Power Supply
Pre
p
aration
Page 13
12
System Main Menu
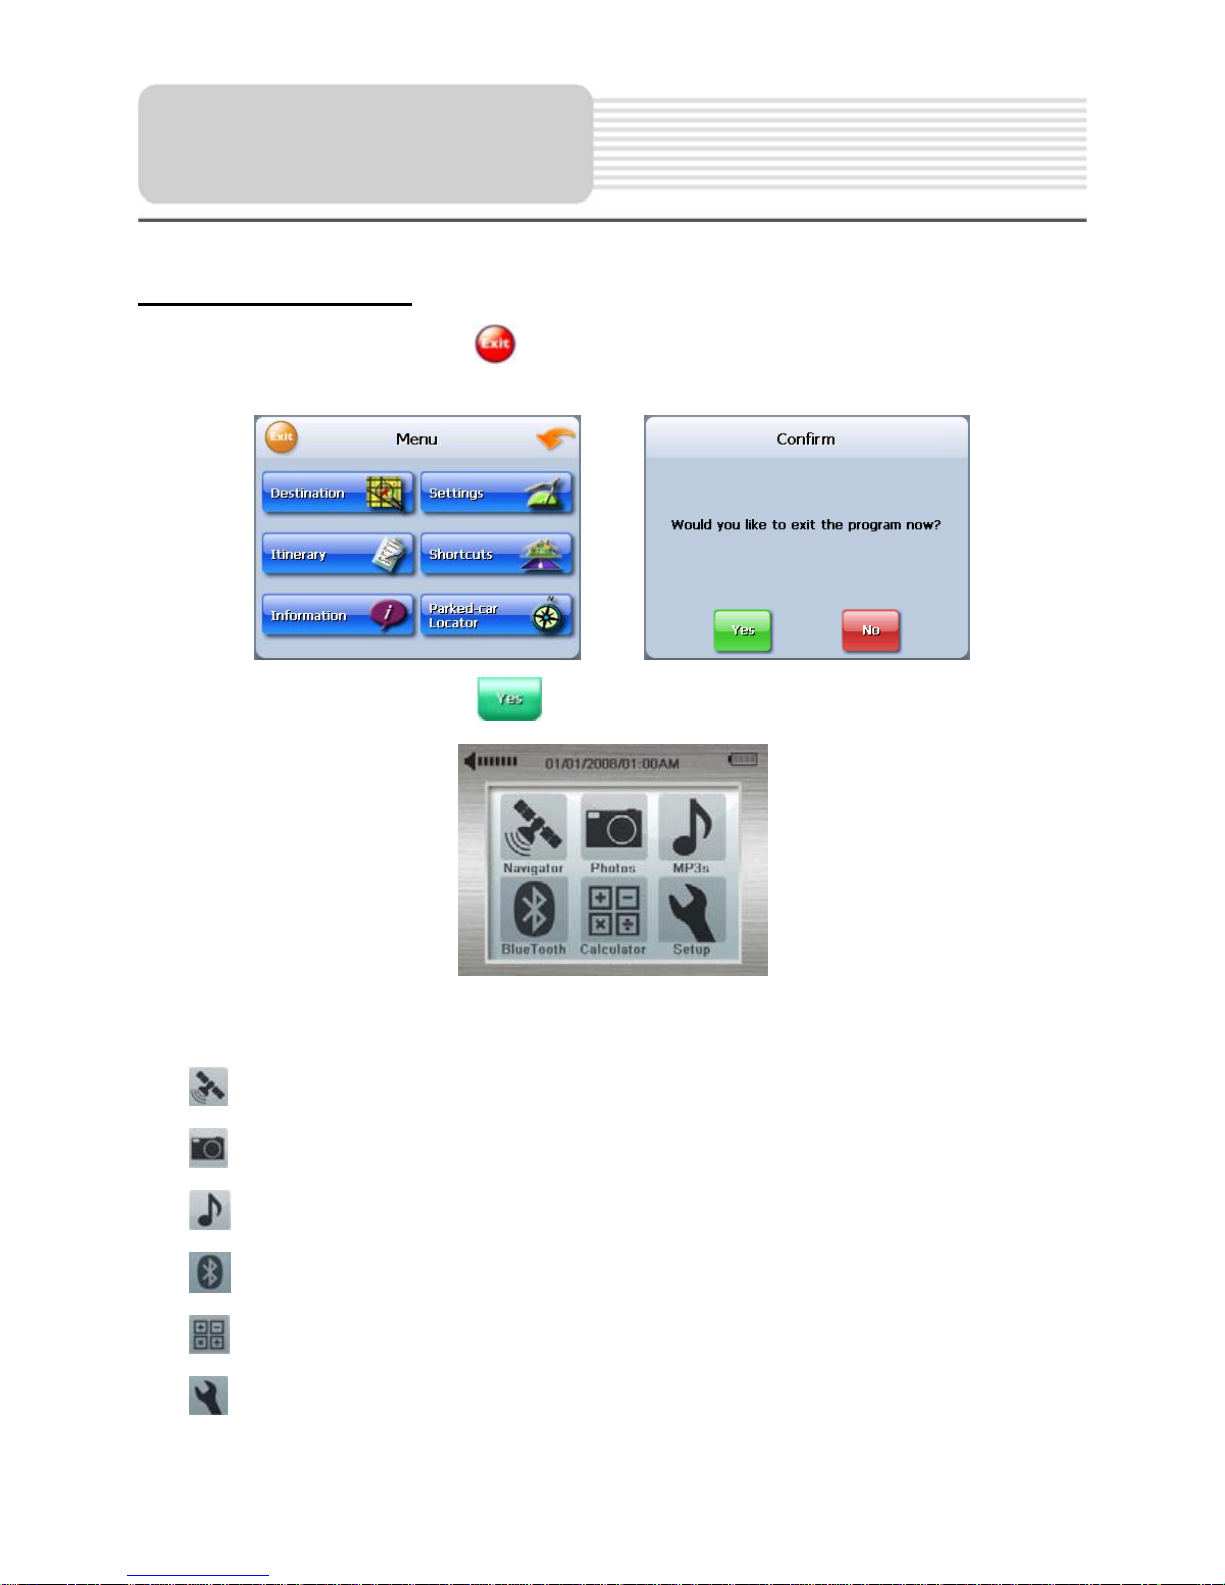
When in navigation mode, tap button in the Menu screen. A confirmation message
appears asking if you want to exit the program now, as shown below.
In the confirmation screen, tap
and the system main menu appears.
In the main menu, there are six items for selecting. Touch the corresponding item to
enter.
Tap
to enter the Navigator.
Tap
to enter the Photo Viewer.
Tap
to enter the MP3 Player.
Tap
to enter the Bluetooth.
Tap
to enter the Calculator.
Tap
to enter the Setup menu.
General Setup
Page 14

13
Setup Menu
In the main menu, tap to enter the Setup menu, the screen will display as below:
In the Setup menu, tap
to return to the main menu.
Clock
Tap in the Setup menu to enter Clock setting menu, as shown below:
In the Clock menu, there are three items which allow you to set proper time zone, date
and time. Tap each item to enter the corresponding setting menu.
1.Time Zone:
In the Time Zone menu, tap , to select the proper time zone.
Tap
to confirm and return.
General Setup
Page 15

14
2.Date
In the Date menu, tap
, to set the Year, Month and Day.
Tap
to confirm and return.
3.Time:
In the Time menu, tap , to set the Hour, Minute, and Second.
Tap
to confirm and return.
Volume
Tap in the Setup menu to enter Volume menu, as shown below:
General Setup
Page 16

15
Tap the screen before the Enable Keytone to turn the key sounds on or off.
Key sounds are audible confirmations of either pressing hardware buttons or tapping the
touch screen.
Tap
, to adjust the volume.
Tap
to confirm and return.
Battery
Tap in the Setup menu to enter Power menu, as shown below:
Battery Status
The Power menu displays the unit’s battery status. The values are between 0% and
100%, where 0% means the battery power has run out completely, and 100% represents
a full battery power. When the battery is being charged, the Battery Status will be
“Charging”.
Display
Tap in the Setup menu to enter Display menu, as shown below:
General Setup
Page 17

16
Idle Time:
You can set the Idle Time to determine how the backlight will behave when the screen
has not been touched for a while.
Never: You can choose to have the lights always on.
15, 30 sec and 1, 2, 5 min: When running on battery the backlight will turn off when the
screen has not been touched for 15 sec, 30 sec, 1 min, 2 min or 5 min. After another few
seconds, the backlight turns on automatically, or you can tap the screen to light it up
again. This helps you maintain a longer battery life.
Brightness:
Tap
, to darken or increase the brightness of the display.
Align Screen:
Tap
in the Display menu to align the screen,
as shown right.
Tap the center of the cross with your finger. When the
cross moves to another position, tap and hold the center
of the new target. Repeat each time to complete the
calibration process. When tapping the screen on the final
step, the new settings will be stored and you are returned
to the Display menu.
Language:
Tap
in the Display menu to select the
language, as shown right.
Tap
, to select the desired language.
Tap
to confirm and return.
General Setup
Page 18

17
System
Tap
in the Setup menu to view the System Information, as shown below:
Tap
to return.
General Setup
Page 19

18
The unit is designed with an SD card slot and supports JPEG format files playback. You
can insert the SD card with JPEG files in the unit for picture view.
Note: Please take care of the mapping SD card if you remove it to use the photo
viewer as the navigation function will not work without it.
The unit lags when reading high-resolution JPEG files in the SD Card. We suggest
low-resolution (within 640*480) pictures playback.
Take the following steps to play:
Loading JPEG format files
1. Insert the SD card with JPEG format files.
2. Turn the unit on.
Playing Picture
In the main menu, tap to enter the Photo Viewer, as shown below:
In the menu, double tap the memory card icon to open it, the pictures stored in the
memory card will be listed on the screen.
Photo Viewer
Page 20

19
If the pictures list consists of more than one screen, tap the up arrow
for the
previous page and the down arrow
for the next page.
Tap
to return to the previous menu.
Tap
to return to the Photo Viewer main menu.
Tap
to play all the pictures in full-screen slide mode.
Tap
to display the edition information.
Tap
to exit the Photo Viewer and return to the main menu.
In the pictures list, double tap a picture to play it on the screen, as shown below.
On the playback screen, the Photo Viewer has following playback features:
Tap
to go back to the previous picture; tap to switch to the next picture.
Tap
, to zoom the picture in or out.
Tap
, to rotate the picture clockwise or counter-clockwise.
Tap
to return to the pictures list.
Photo Viewer
Page 21

20
The unit is designed with SD card slot and supports MP3 and WMA format files playback.
To use the MP3 player, you will need to have an SD card with your MP3 music files
preloaded. Please note that you cannot use the navigation function of the device at the
same time you are using the MP3 player. Remove the mapping software SD card that
comes with the device from the SD card slot on the side of the unit. Then insert your SD
card with your MP3 or WMA music files.
Note: Please take care of the mapping SD card if you remove it to use the MP3
player as the navigation function will not work without it.
Warning: For your own safety, do not use the earphones when driving.
A note regarding the MP3 function:
The unit has the ability to play your favorite MP3 music files. This is accomplished by
using the unit’s SD card slot, located on the right side.
MP3 files should previously reside on the user’s SD card.
MP3 files can be imported to the user’s SD card on a PC, using a variety of
programs, such as Windows Media Player.
This process should be performed independent of the navigation unit.
Do not attempt to use the unit to read and burn MP3 files from an external source.
Playing Music
In the main menu, tap to enter the MP3 Player, as shown below:
In the MP3 player, tap
in the top right corner to exit.
Playing Music
Page 22

21
In the menu, tap
to enter the Library menu, as shown below:
The Library contains one “All Music” folder and four “My Favourite” folders. All songs in
the SD card will be contained in “All Music” folder. Also you can edit your favourite play
lists with the four “My Favourite” folders.
Double tap one folder to start playing songs in it. Also you can tap one folder to enter it
and select one song to play.
On the playback screen, the MP3 player has standard following playback features:
Tap
to pause the playback, and then tap to resume the playback.
Note: On the left panel of the unit, there is also a Pause button. Press it to pause the
playing; then press it again to resume the playing.
Tap
to stop the playback.
Tap
to go back to the previous song; tap to skip to the next song.
Use
, to adjust the volume of the speaker.
Tap
/ toggle buttons to play the songs in the play list in sequence or randomly.
Tap / / toggle buttons to determine how the player will repeat the playback.
: Repeat all the songs in the play list.
: Repeat the current song only.
: Don’t repeat the playback.
Playing Music
Page 23

22
Edit the play list
Add song into My Favourite play list
In the All Music menu, tap
to add the selected song into My Favourite folders.
Edit My Favourite play list.
Tap
to delete the selected song from the play list.
If the play list consists of more than one screen, tap the up arrow
for the previous
page and the down arrow
for the next page.
Tap
to refresh the display on the screen.
Tap
to return to the front menu; tap to close the play list menu and return to the
MP3 Player.
Playing Music
Page 24

23
How to Begin
To begin using the Bluetooth software, you need to pair your cell phone with the GPS
device. Follow these steps to complete the pairing process:
Start Using Phone Menu
Step 1. Click Settings on the Phone menu.
Step 2. Click on Search Phone.
Step 3. Click on the search icon
in the bottom left corner to begin the searching
process.
Note: Please make sure the Bluetooth on your cell phone is enabled before
searching.
Bluetooth
Page 25

24
Step 4. After the searching process is complete, look for the cell phone you'd like to use
and click on it.
Step 5. You can also click on the
previous/next page icons to identify all the
found cell phones.
Step 6. Click Pair
, and then follow the instructions on your cell phone to complete
the pairing process. The default PIN Code is 1234. You can change the PIN Code for
enhanced security. The PIN Code that you input in the PND and Mobile phone need to
be the same code, however.
Step 7. Click OK to p air the PND with your Mobile phone. Once the pairing is successful,
the screen will return to the Phone Menu.
Bluetooth
Page 26

25
Main Menu
On the Phone Menu, you can choose to manage your Phonebook, view your Call History ,
use the Dial Pad, check Messages, manage your Files, set up the hands-free function,
and alter other phone settings.
Click on the item you'd like to operate to open its window;
For more information, check the descriptions in each section.
1. Phonebook
When you click Phonebook on the Phone Menu, the following screen will appear. You
can check your contact list, call log, and answer or dial calls.
Bluetooth
Page 27

26
Go back to the previous level.
Download Phonebook
Phonebook Search
Storage: Phone memory Card
Storage: SIM Card
1. Click
to download the phonebook from the paired cell phone
2. Click
to search the names in phonebook. Input the name then click OK.
1. Select a name to view the details.
Bluetooth
Page 28

27
2. Click on a number to make a call. If there is only one number in the name or the
name you select is saved in SIM card, it will directly make a call when you select the
name.
2. Call History
When you click Call History on the Menu, the following screen will appear. You can
check your call history status and can also make a call.
Call in
Call out
Missed Call
Click the name and it will show the details. You can click
to dial out.
Bluetooth
Page 29

28
3. Dial Pad
Make outgoing calls by dialing the number.
Dial
Go to Call History
Go to Phonebook
4. Message
When you click on Message on the Menu, the following screen will appear.
You can click
to download and read new messages.
Bluetooth
Page 30

29
Message that has been received by the phone
Message that has been sent from the phone
Click import icon
to download text messages.
The default shows incoming messages.
Click the number to view its details, or click
to dial the number.
5. File Transfer
When you click on “File Manager” on the Phone Menu, the following screen will appear.
You can check the media files saved in your cell phone, or download files to your GPS
device.
Refresh
Download file
Bluetooth
Page 31

30
Select a file, and then press
to download file to PND
6. Settings
When you click Settings on the Phone Menu, the following screen will appear. You can
click on the icon to change the phone’s setup.
Search Phone Setup:
If you'd like to use a different phone, click on Search Phone to find, pair, or connect your
handset with the GPS device.
Step 1. Click on Search Phone.
Bluetooth
Page 32

31
Step 2. If the handset you'd like to use is listed on the Paired Devices screen, click on it
first, and then click
to connect your handset to the GPS device.
Click
to delete unwanted handsets from the list.
If you don't see the handset you'd like to use on the list, click the search icon
on
the bottom left corner to search again.
Step 3. Input the pin code, and then click OK if your handset's Bluetooth function is
enabled. If not, enable it first. Please use the same pin code on both GPS device and cell
phone.
File Manager: Click this to change the default path to store downloading
files or change the ringtone of incoming calls.
Bluetooth
Page 33

32
To change the location of transferred files, click
to change the folder
Connect/Disconnect from Settings page: Click this icon to
connect/disconnect the current phone.
Bluetooth On/Off from Setting Page: This function is for users to enable or
disable Bluetooth radio from their phone.
7. Incoming/Outgoing Calls
When there's an incoming call, the following window will appear.
Click to disconnect the call.
Bluetooth
Page 34

33
Click to answer the call.
Hide: Click to hide the Call Status Window.
If you answer the call, the following window will appear
Tools: Switch to another window to use the dial pad and transfer call sound to your
mobile phone.
When you click
during a call, the following window will appear
Switching sound output from mobile phone
Switch sound output from PND device
The default sound will issue from the PND. When you click
, the sound will be
transferred to your mobile phone, and the icon will change to
. When you click
, the sound will be transferred back to the GPS device.
Bluetooth
Page 35

34
Click
to view the dial pad an input an extension number.
Click
back to view the previous window.
During the 3 way call, you can use this icon to switch the activation call
During the 3 way call, you can use this icon to enable meeting call and you will
be able to talk to each other at same time.
Bluetooth
Page 36

35
In the main menu, tap
to enter the Calculator menu, the screen will display as
below:
In the Calculator menu, tap
to exit and return to the main menu.
Explanation of some calculator’s buttons
MC: Delete the deposited data.
MR: Access the deposited data.
M+: Calculate the result and then add the deposited data.
M-: Calculate the result and then subtract the deposited data.
CE: Delete all.
C: Delete the previous input.
←:Backspace key
Calculator
Page 37

36
When using the unit in vehicle, you can use the supplied mount accessories (mount
bracket, mount cradle, and dashboard mount disk) to mount the unit in the vehicle. Take
the following steps to operate:
1. See Fig. 1. Open the two brackets of the mount cradle as shown by the arrows.
2. See Fig. 2. First, follow the arrows 1 to set the bottom edge of the unit onto the
mount cradle. Then push the mount cradle in arrow 2 direction to embed it in the
unit.
3. See Fig. 3. As shown by the arrow 3, slide the mount cradle to fix it to the mount
bracket.
4. See Fig. 4. Lift the suction cup lever and then press the suction cup to the
windshield. Follow direction of arrow 4 to press down the suction cup lever. Then
rotate the knob 5 to adjust the unit to the proper position.
To mount to dashboard, use the included adhesive disk. Choose a clean, dry spot
on your dashboard, peel off the protection liner from the back of the disk, and then
attach the disk to your dashboard.
Warning:
The device must not be mounted so that it impairs the driver’s view of the road. Please
take extra precaution to ensure the airbags are not obstructed by the device.
Fig. 1 Fig. 2 Fig. 3 Fig. 4
Use of the Mount
Accessories
Page 38

37
Take these steps described in the tables below to solve simple problems before
contacting customer service.
If you suspect something wrong with this unit, immediately turn the power off and
disconnect the power connector from the unit. Never try to repair the unit yourself
because it is dangerous to do so.
Troubleshooting
PROBLEM
POSSIBLE CAUSE
POSSIBLE SOLUTION
There is no
sound.
The volume may be turned
down or mute.
Turn up the volume or turn
on the sound output.
User can’t turn
the unit on.
The adaptor is not correctly
connected.
Connect the adaptor
correctly.
The built-in rechargeable
battery is weak.
Use the adaptor to supply
power or charge the
battery.
Dim screen.
The brightness may be
turned down.
A
djust the brightness of the
screen.
Unit will not
activate after
pressing and
holding the stand
by button when
connected to the
adaptor for
charging.
The unit had not been used
for a long time and built-in
battery was overly
discharged
Press Reset button to turn
the unit on.
Page 39

38
Other possibilities:
St atic or other external interference may cause the unit to function abnormally. In order to
recover normal status, please unplug the power supply cord and then plug it into the
outlet again to reset the unit. If the problems still exist, please cut off the power supply
and consult your service center or a qualified technician.
Troubleshooting
Intermittent
reception and/or
unstable
reception.
The built-in rechargeable
battery is weak.
Use the adaptor to supply
power or charge the
batter
y
.
The unit may be obstructed
by something, such as heat
insulation
paper
.
Remove obstruction.
The unit is vibrating too
Secure the unit firmly
PROBLEM
POSSIBLE CAUSE
POSSIBLE SOLUTION
System software of the unit
fails to function after a
chan
g
e.
Turn the unit on again.
The unit can’t
receive satellite
signals or can’t
orient.
The unit may be obstructed
by buildings or metal block.
Make sure to use the unit
out of room.
Page 40

39
DESIGN AND SPECIFICATIONS ARE SUBJECT TO CHANGE WITHOUT NOTICE
TFT screen size 3.5 inches
Frequency Response 20Hz~20kHz
Audio Signal-to-noise Rate ≥65dB
Audio distortion or noise ≤-20dB (1kHz)
Channel Separation ≥70dB (1kHz)
Dynamic Range ≥80dB (1kHz)
Power AC 100-240V ~ 50/60Hz; DC 5V
Power Consumption < 8W
Dimensions 100mmX77.5mmX17mm (L*W*D)
Weight About 0.13kg
Specifications
Page 41

40
No part of this manual may be copied, republished, reproduced, transmitted or
distributed in any way without prior written consent of Nextar, Inc. Any unauthorized
distribution of this manual is expressly forbidden.
Nextar
TM
, a trademark of Nextar (Hong Kong) Limited.
Nextar may find it necessary to modify, amend or otherwise change or update this
manual. We reserve the right to do this at any time, without any prior notice. All
specifications and features are subject to change without notice. All screen shots shown
are simulated and may not represent the actual screen on production unit sold to
consumers.
For Free instruction books, information on this product its operation and accessories,
visit us on the web at:
www.nextar.com
Or write to us at:
© 2008 NEXTAR (HONG KONG) LIMITED
1661 FAIRPLEX DRIVE
LA VERNE, CA 91750 USA
All products distributed by Nextar Inc.
unless otherwise indicated
www.nextar.com
Made in China
© 2008 Nextar (Hong Kong) Limited. Nextar is a trademark and service mark of Nextar
(Hong Kong) Limited. All other brand names, trademarks and service marks are property
of their owners.
SNAP308EH01
 Loading...