

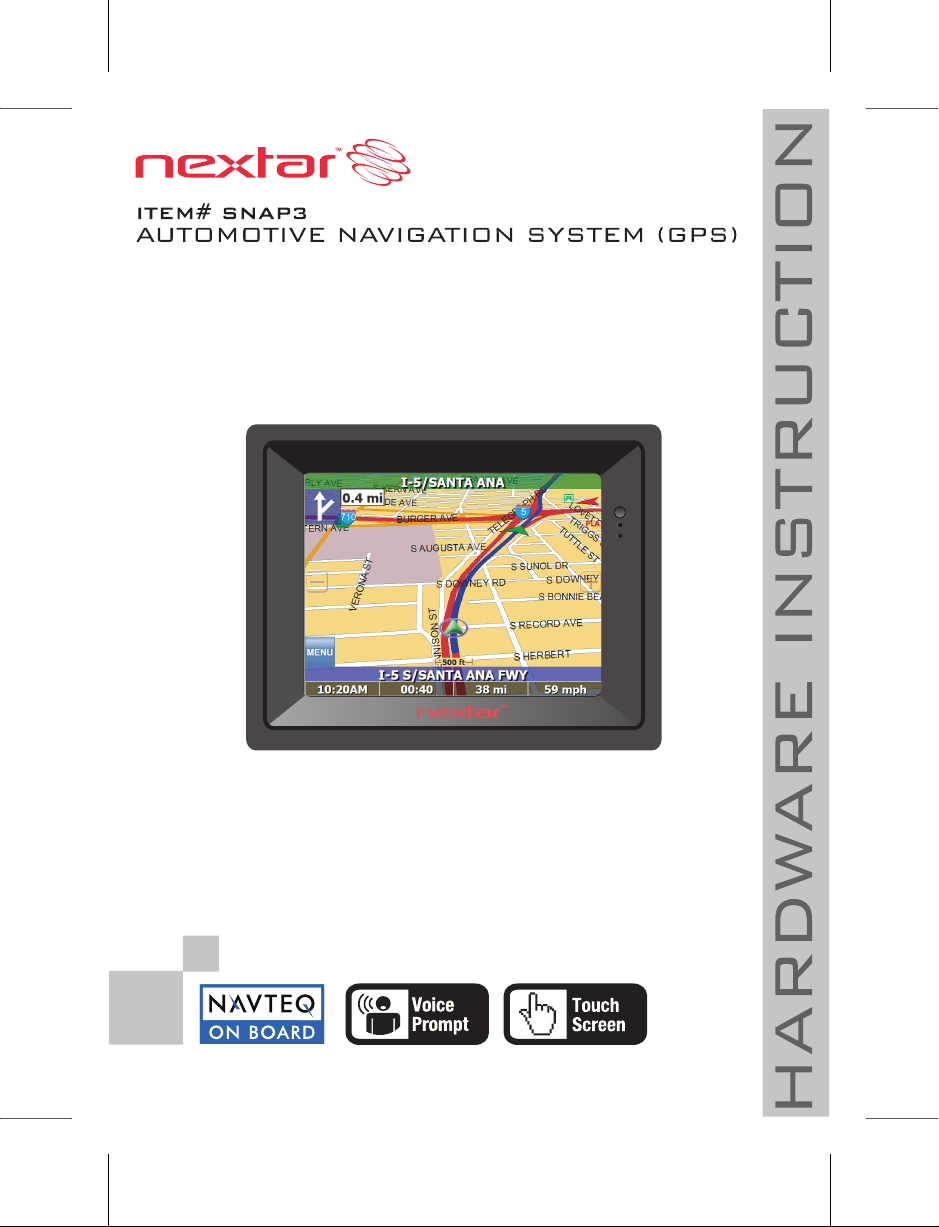
Page 1
Page 2

Page 3

CCooppyyrriigghhtt NNoottiiccee
© 2007 All rights reserved. No part of this document may be reproduced or transmitted in any form or
by any means, electronic or mechanical, for any purpose, without the express written permi ssion of the
seller.
FCCCC
F
DDiissccllaaiimmeerr
Information in this document is subject to change without notice. The statements, configurations,
technical data, and recommendations in this document are believed to be accurate and reliable, but
are presented without express or implied warranty. The seller therefore assumes no responsibility and
shall have no liability of any kind arising from the supply or use of this document or the material
contained herein.
SSttaatteemmeenntt ooff CCoonnddiittiioonnss
In the interest of improving internal design, operational function, and/or reliability, the seller reserves
the right to make changes to the products described in this document without notice.
The seller does not assume any liability that may occur due to the use or application of the product(s)
or circuit layout(s) described herein.
In addition, the program and information contained herein are licensed only pursuant to a license
agreement that contains restrictions on use and disclosure (that may incorporate by reference certain
limitations and notices imposed by third parties).
TTrraaddeemmaarrkkss
All other product or service names mentioned in this document may be trademarks of the companies
with which they are associated.
RooHHSS&&
Askey Computer Corp. recognizes the need to be
a responsible corporate citizen. With respect to
the current EU directives and the equivalent
domestic legislation which implement the
Restriction of Hazardous Substances (RoHS),
Askey is committed to producing products
supplied into the EU that are fully compliant to
the directives on or before their respective
effective dates.
This device complies with Part 15 of the FCC
Rules. Operation is subject to the following two
conditions:
(1) this device mat not cause harmful interference,
and
(2) this device must accept any interference
received, including interference that may cause
undesired operation.
i
Page 4
p
p
SSaaffeettyy aanndd PPrreeccaauuttiioonn
Caution
The lightning flash with arrowhead symbol, within an equilateral triangle, is intended
to alert the user to the presence of un-insulated “dangerous voltage” within the
roduct’s enclosure that may be of sufficient magnitude to constitute a risk of electric
to persons.
The exclamation point within an equilateral triangle is intended to alert the user to the
TO REDUCE THE RISK OF ELECTRIC SHOCK, DO NOT REMOVE
COVER (OR BACK). NO USE-SERVICEABLE PARTS INSIDE. REFER
SERVICING TO QUALIFIED SERVICE PERSONNEL.
presence of important o
literature accompanying the appliance.
WARNING: TO REDUCE THE RISK OF FIRE OR ELECTRIC SHOCK, DO NOT EXPOSE THIS
APPLIANCE TO RAIN OF MOISTURE.
POWER SUPPLY:
Connect one end of the supplied adapter to the miniUSB port of the unit. Plug the two-prong end of the
power cord to an AC 100-240V outlet. If you have difficulty inserting the plug, turn it over and reinsert it.
If the unit will not be used for a long time, disconnect the plug from the outlet.
Note
Caution
Before plugging the power cord into an AC outlet, make sure that all the
connections have been made.
These servicing instructions are for use by qualified service personnel
only. To reduce the risk of electric shock, do not perform any servicing
other than that contained in the operating instructions unless you are
qualified to do so. Refer to service manual for servicing instructions.
erating and maintenance (servicing) instructions in the
ii
Page 5
Before and when using the product, carefully read the following notes.
For your safety, do not operate the product while driving.
Use this product prudently. The product is intended to be used only as a navigation aid. It is
not for precise measurement of direction, distance, location or topography.
The calculated route is given for reference only. It is the your responsibility to follow the traffic
signs and local regulations along the roads.
When you get off the car, do not leave your device on the dashboard that is subject to direct
sunlight. The overheating of the battery might cause malfunction and/or danger.
GPS is operated by the United States government, which is solely responsible for the
performance of GPS. Any change to the GPS system might affect the accuracy of all GPS
equipment.
GPS satellite signals cannot pass through solid materials except glass. When you are inside a
tunnel or building, GPS positioning is not available.
A minimum of 4 GPS satellite signals is needed to determine current GPS position. Signal
reception might be affected in situations, such as bad weather or dense overhead obstacles
(e.g. trees and tall buildings).
Other wireless devices in the vehicle might interfere with the reception of satellite signals and
cause the reception to be unstable.
A car holder is needed when you use the device in a car. Be sure to place the device in an
appropriate place so as not to obstruct the driver’s view, or deploy ment of airbags.
iii
Page 6

iv
Page 7

Contents
Contents
Before You Use.........................................................................................................................................vii
ACKING LIST................................................................................................................VII
P
AVIGATION FUNCTION..................................................................................................VII
N
Chapter 1 Getting Started.............................................................................................................1
ARDWARE FEATURES................................................................................................... 1
H
Front View......................................................................................................... 1
Back View.......................................................................................................... 1
Left And Right Side Views.................................................................................2
Top And Bottom Views...................................................................................... 3
NITIALLY SWITCHING ON THE GPS................................................................................ 3
I
ONNECTING TO AC POWER AND CHARGING THE BATTERY ............................................. 4
C
SING YOUR DEVICE IN A CAR........................................................................................5
U
Installing the Car Holder.................................................................................... 5
Connecting the Car Charger............................................................................. 6
ONNECTING TO A PC.................................................................................................... 7
C
Chapter 2 Basic Operation........................................................................................................... 9
OWER ON AND OFF.................................................................................................... 9
P
PERATING THE DEVICE................................................................................................. 9
O
YSTEM VOLUME CONTROL ......................................................................................... 10
S
OLD KEY ...................................................................................................................10
H
AIN MENU ..................................................................................................................11
M
Setup Submenu............................................................................................... 12
NSERTING A MINISD CARD ..........................................................................................12
I
ONNECTING AN EARPHONE.........................................................................................13
C
Chapter 3 Device Settings..........................................................................................................15
LOCK ........................................................................................................................ 15
C
Time Zone ....................................................................................................... 16
Date.................................................................................................................16
Time................................................................................................................. 17
OLUME ......................................................................................................................17
V
ATTERY..................................................................................................................... 18
B
ISPLAY ...................................................................................................................... 19
D
LUETOOTH................................................................................................................. 20
B
YSTEM....................................................................................................................... 21
S
Chapter 4 Main Menu................................................................................................................. 23
AVIGATOR ..................................................................................................................23
N
HOTO ........................................................................................................................24
P
Viewing Photos................................................................................................25
Using the slideshow........................................................................................ 26
v
Page 8

Global Positioning System
MP3 PLAYER............................................................................................................... 26
Operation on MP3 Player................................................................................28
ARKIT ..................................................................................................................29
BT C
Contact Viewer................................................................................................30
Call History...................................................................................................... 30
Phone Shell..................................................................................................... 31
ALCULATOR ...............................................................................................................31
C
vi
Page 9

Before You Use
Before You Use
Before using the GPS, read the user manual attached in the package and check whether or not spare
parts are attached. Feel free to contact your retailer if you have any question or problem at the time of
operation.
Packing list
Before using the GPS, check all the following items are present and in good condition. If any of the
items is damaged or missing, contact your retailer im mediately.
GPS x 1
AC Power Adapter x 1
Car Adapter x 1
miniUSB Cable x 1
Stylus x 1 (attached to the product)
Car Jacket x 1
Car Mount x 1
Dashboard Mount Disk x 1
Carry Pouch x 1
User Manual x 2 (Hardware User Manual and Software User Manual)
Quick Start Guide x 1
Navigation Function
The unit is designed to provide you with route suggestions. It supports voice navigation.
Other Special Functions
MiniSD Card and miniUSB Input
The unit is designed with a miniSD card slot for file transfer between a card and the product,
and with a miniUSB port for file transfer between the product and a PC.
Power Adapter Switch
Automatically adapting to voltage requirements in U.S and other countries.
Bluetooth Support
Allowing the product to work in Hand-Free Profile mode and A2DP mode
Supporting MP3 Player and Photo Viewer
vii
Page 10

Global Positioning System
Notes and Cautions
Note and Caution in this manual are highlighted with graphics as below to indicate important
information.
Note
Caution
This User’s Manual contains information on how to install and co nfigure you r GPS device. From now on,
we will guide you through the correct configuration steps to implement your device.
Contains information that corresponds to a specific topic.
Represents essential steps, actions, or messages that should not be
ignored.
viii
Page 11
Chapter 1 Getting Started
Hardware Features
Chapter 1: Getting Started
Note
Depending upon the specific model you purchased, the color of your
device may not exactly match that of device shown in this manual.
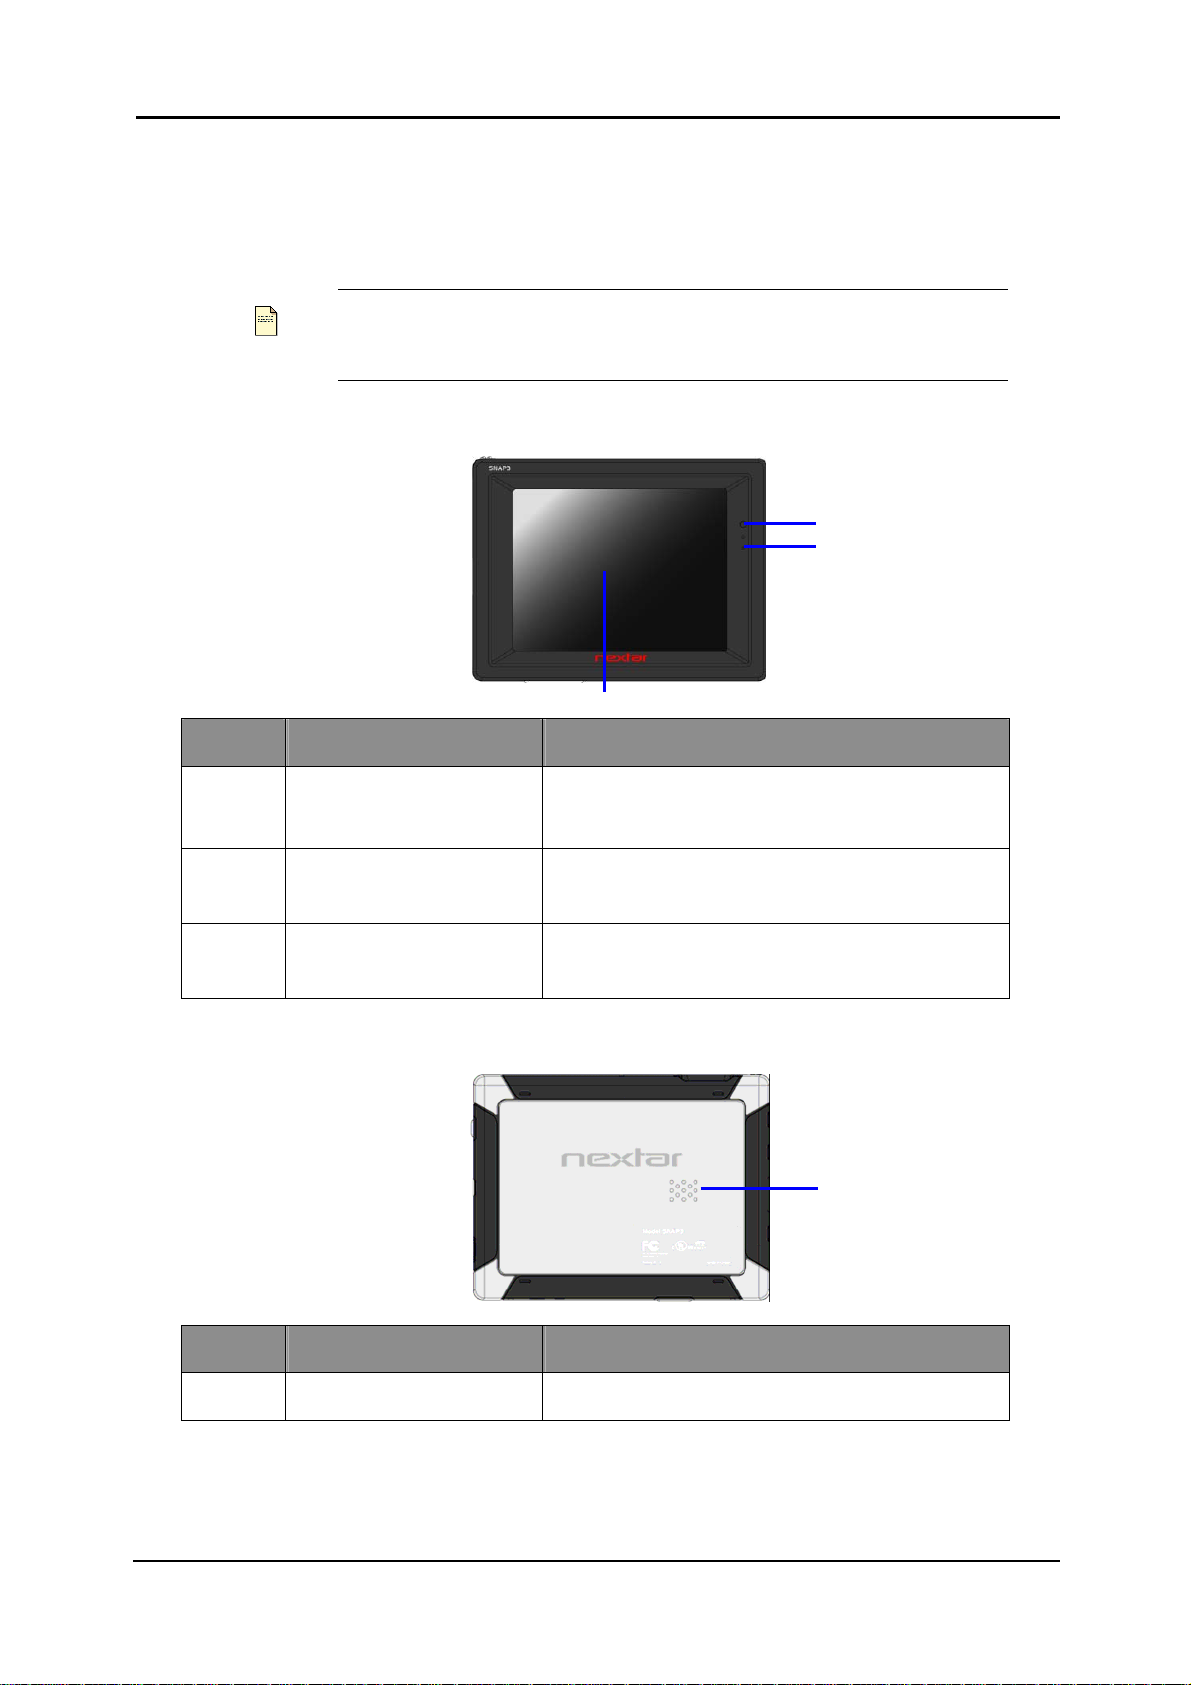
Front View
(3)
Number Component Description
1 Charge Indicator
2 Microphone
When LED is red, the battery is being charged;
when LED is green, the battery is fully charged.
You can speak through the component in the
hand-free profile mode.
(1)
(2)
3 3.5” LCD Panel
Displays the output of your device. Tap the screen
with a fingertip to select a menu or read information.
Back View
Number Component Description
1 Speaker
Sends out music, sounds, and voice.
(1)
1
Page 12
Global Positioning System
(1) (2)
(3)
(4) (5)
(1)
(2)
(3)
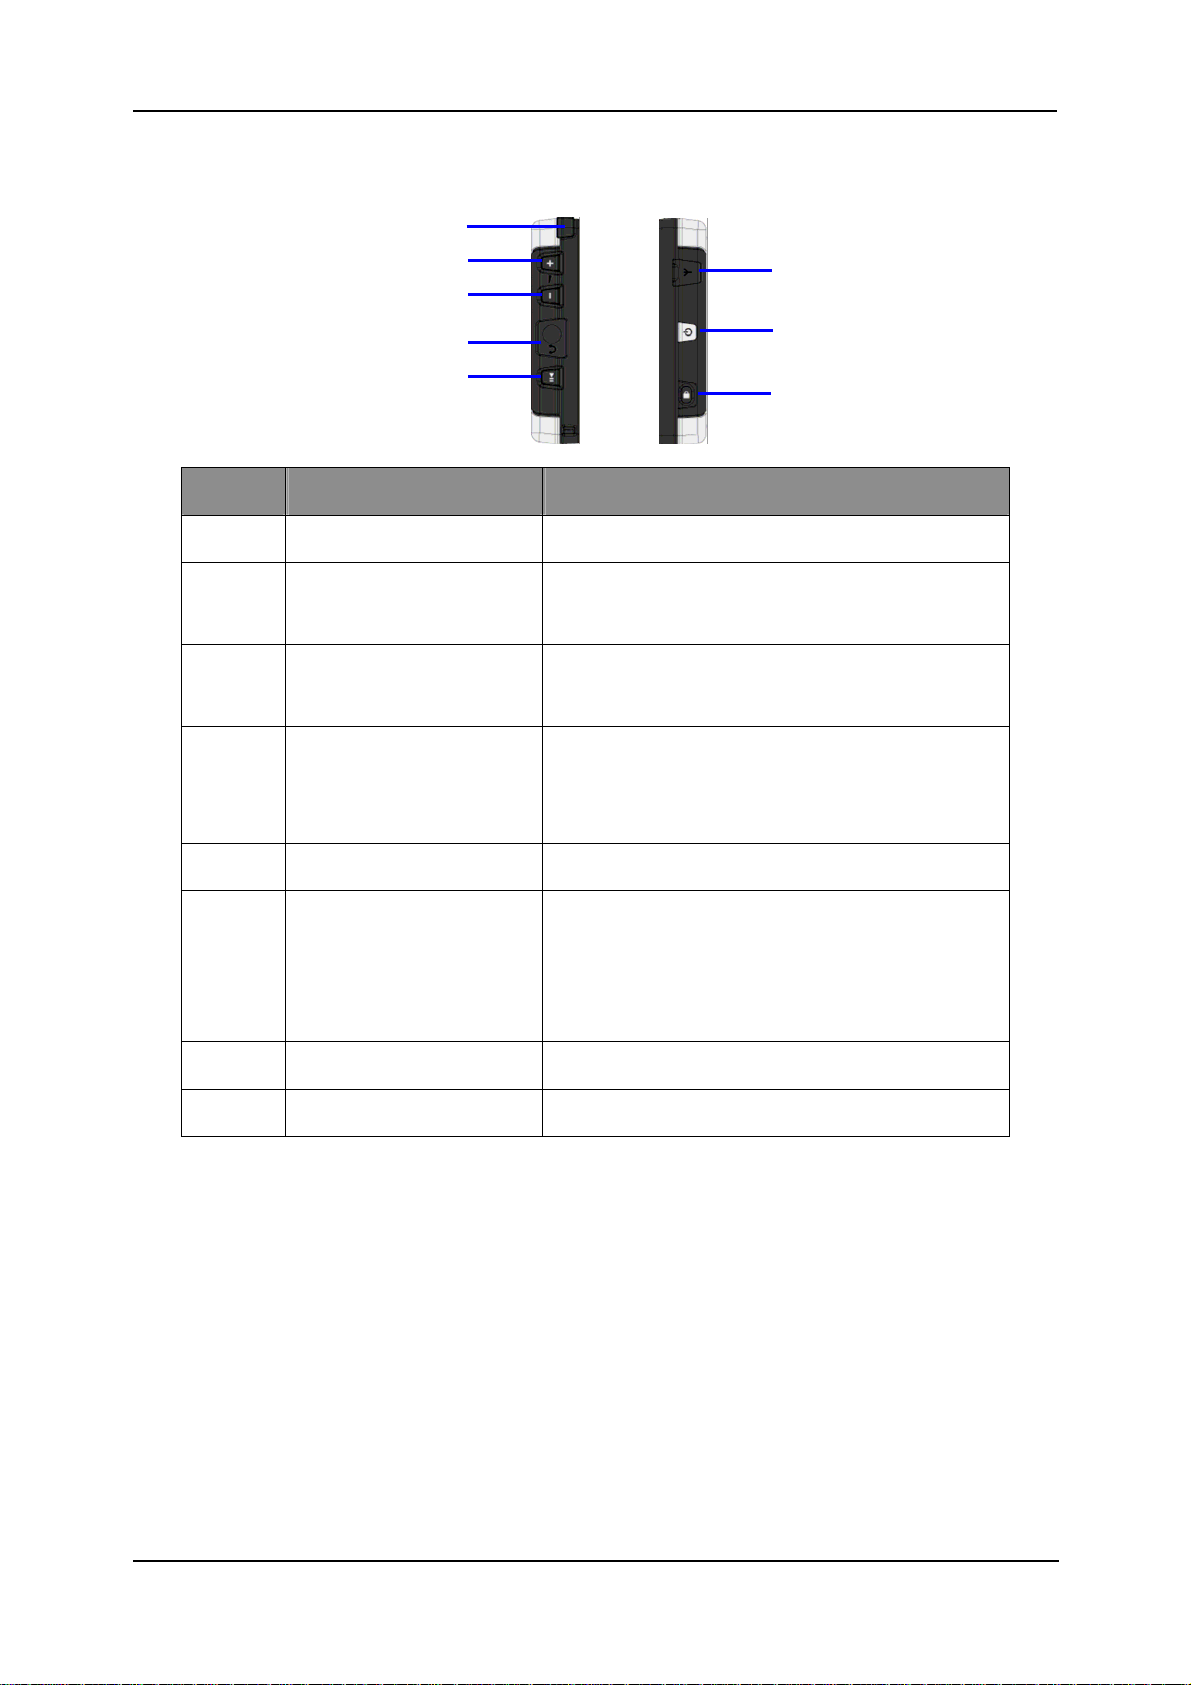
Left And Right Side Views
Number Component Description
1 Stylus
2 Volume Up Key
3 Volume Down Key
4 Headphone Jack
5 Play / Pause Key
External GPS Antenna
6
Connector
7 Power Button
8 Hold Key
You can tap the screen with the stylus.
You can tune up the volume of the headphone or
speaker.
You can tune down the volume of the headphone or
speaker.
Used to connect a headphone for private listening.
When the headphone is connected to this jack, the
speaker will be turned off automatically.
You can use the key to play back or pause music.
This connector (under rubber dust cover) allows use
of an optional external antenna with magnetic
mount, which may be positioned on top of the car for
better signal reception in areas with poor reception.
Turns on and off the device.
Designed to prevent you from operation by mistake.
2
Page 13
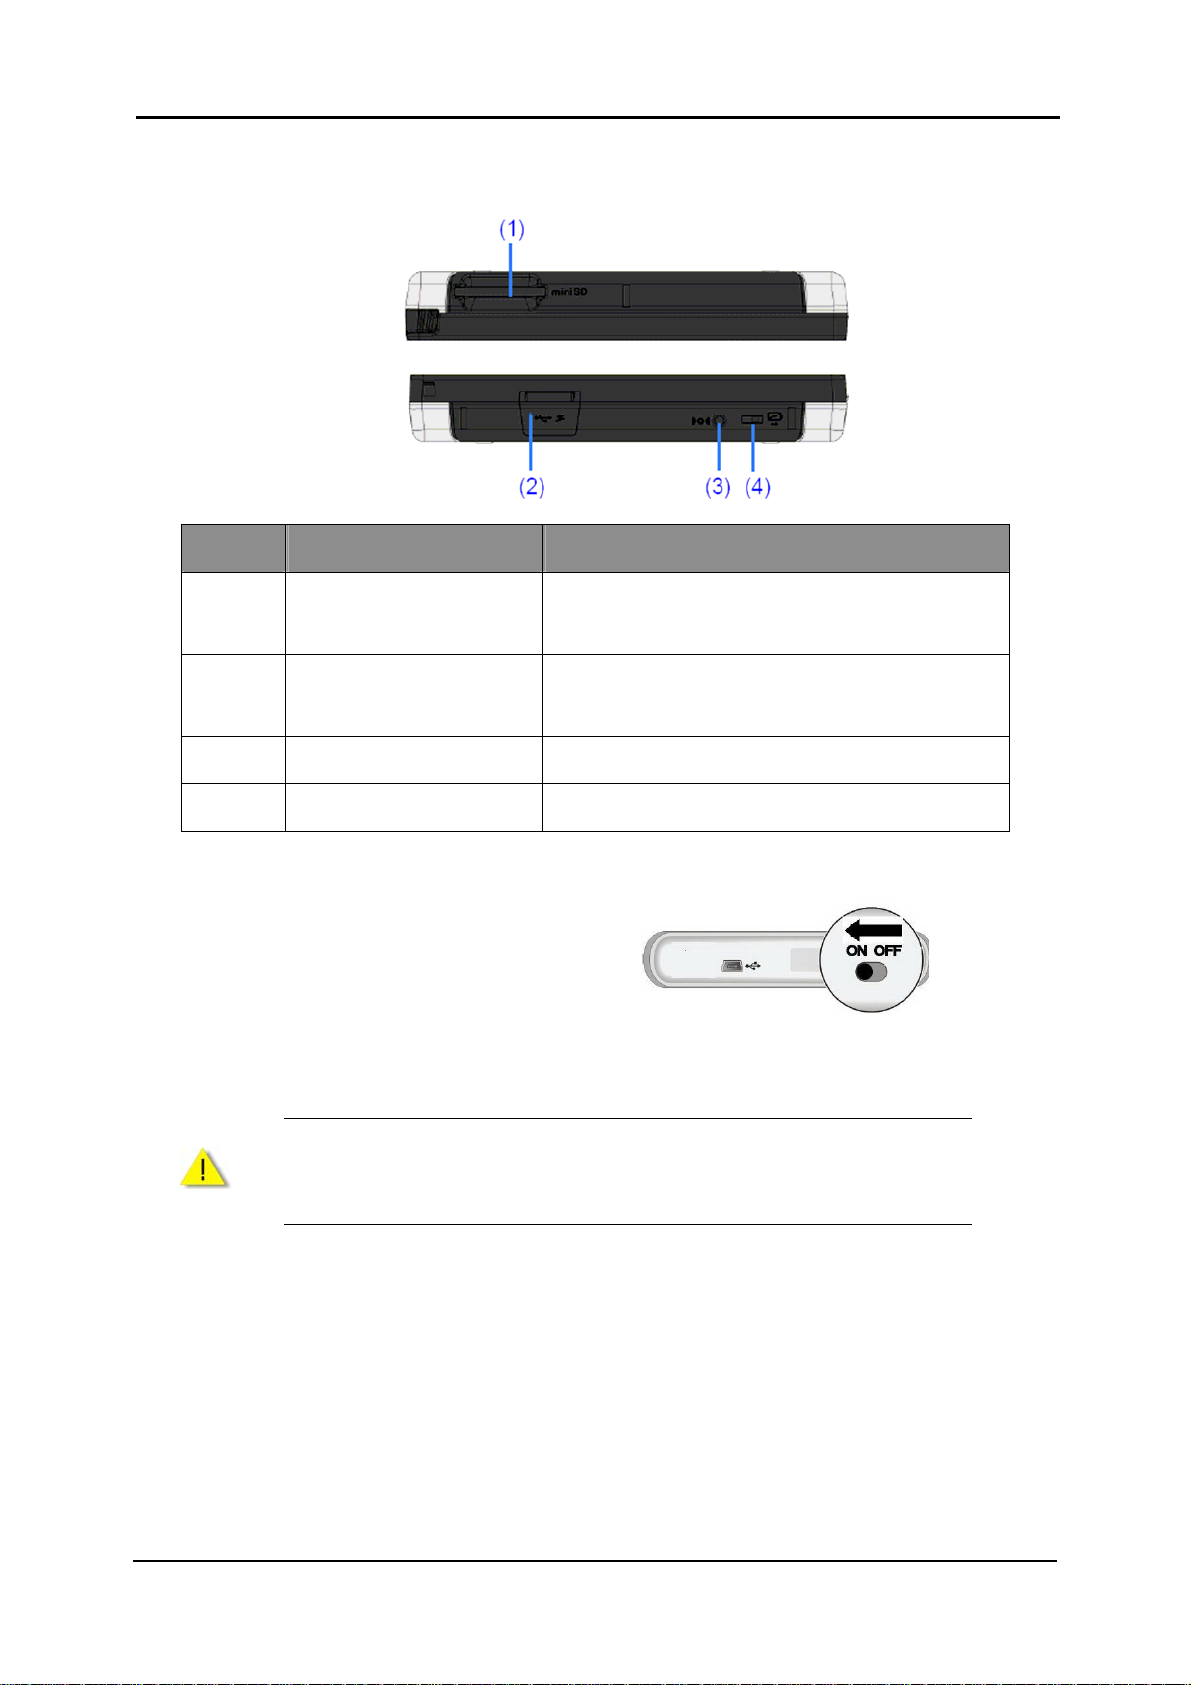
Top and Bottom Views
Number Component Description
Chapter 1: Getting Started
1 MiniSD Card Slot
2 MiniUSB Port
3 Reset Key
4 Battery Switch
Accepts a MiniSD card for accessing data, such as
MP3 music and photos.
Connects through an AC adapter or USB cable to a
PC or a car charger socket.
Restarts your device (soft reset).
The main power/battery cutoff switch.
Initially Switching ON the GPS
Use a stylus to slide the ON/OFF switch to the
ON position.
Then, your product will be turned ON. Connect the AC adapter as described below. Bear in mind to fully
charge the battery before using your product for the first time.
Always keep the ON/OFF switch in the ON position for normal
Caution
operation.
3
Page 14

Global Positioning System
Connecting to AC Power and Charging the Battery
For the first time, you should charge it for at least 8 hours.
Follow the 2 steps below to charge the battery.
1. Connect the AC power adapter to the
miniUSB port.
2. Plug the AC adapter into a wall outlet.
The charge indicator glows red when the battery is being charged. Do not disconnect your device from
AC power until the battery is fully charged and the charge indicator turns green. This will take a couple of
hours.
1. Do not immediately turn on your device after connecting the AC
adapter to charge a power-consumed battery. If you need to turn
ON the device again, wait at least one minute.
Note
Caution
2. Depending on your region of purchase, the connector converter
may not look exactly same as that in the picture shown above.
3. Your device can also be charged when it is connected to a desktop
computer via a USB cable.
For optimal performance of the lithium battery, bear in mind the following
notes:
1. Do not charge the battery when the surrounding temperature is high
(e.g. in direct sunlight).
2. There is no need to fully discharge the battery before charging. You
can charge the battery before it is discharged.
3. If you will not use the product for a long period of time, be sure to fully
charge the battery at least once in two weeks. Over discharge of the
battery can affect the charging performance.
4
Page 15

Using Your Device in a Car
A car holder and a car charger are supplied with your device.
Installing the Car Holder
Chapter 1: Getting Started
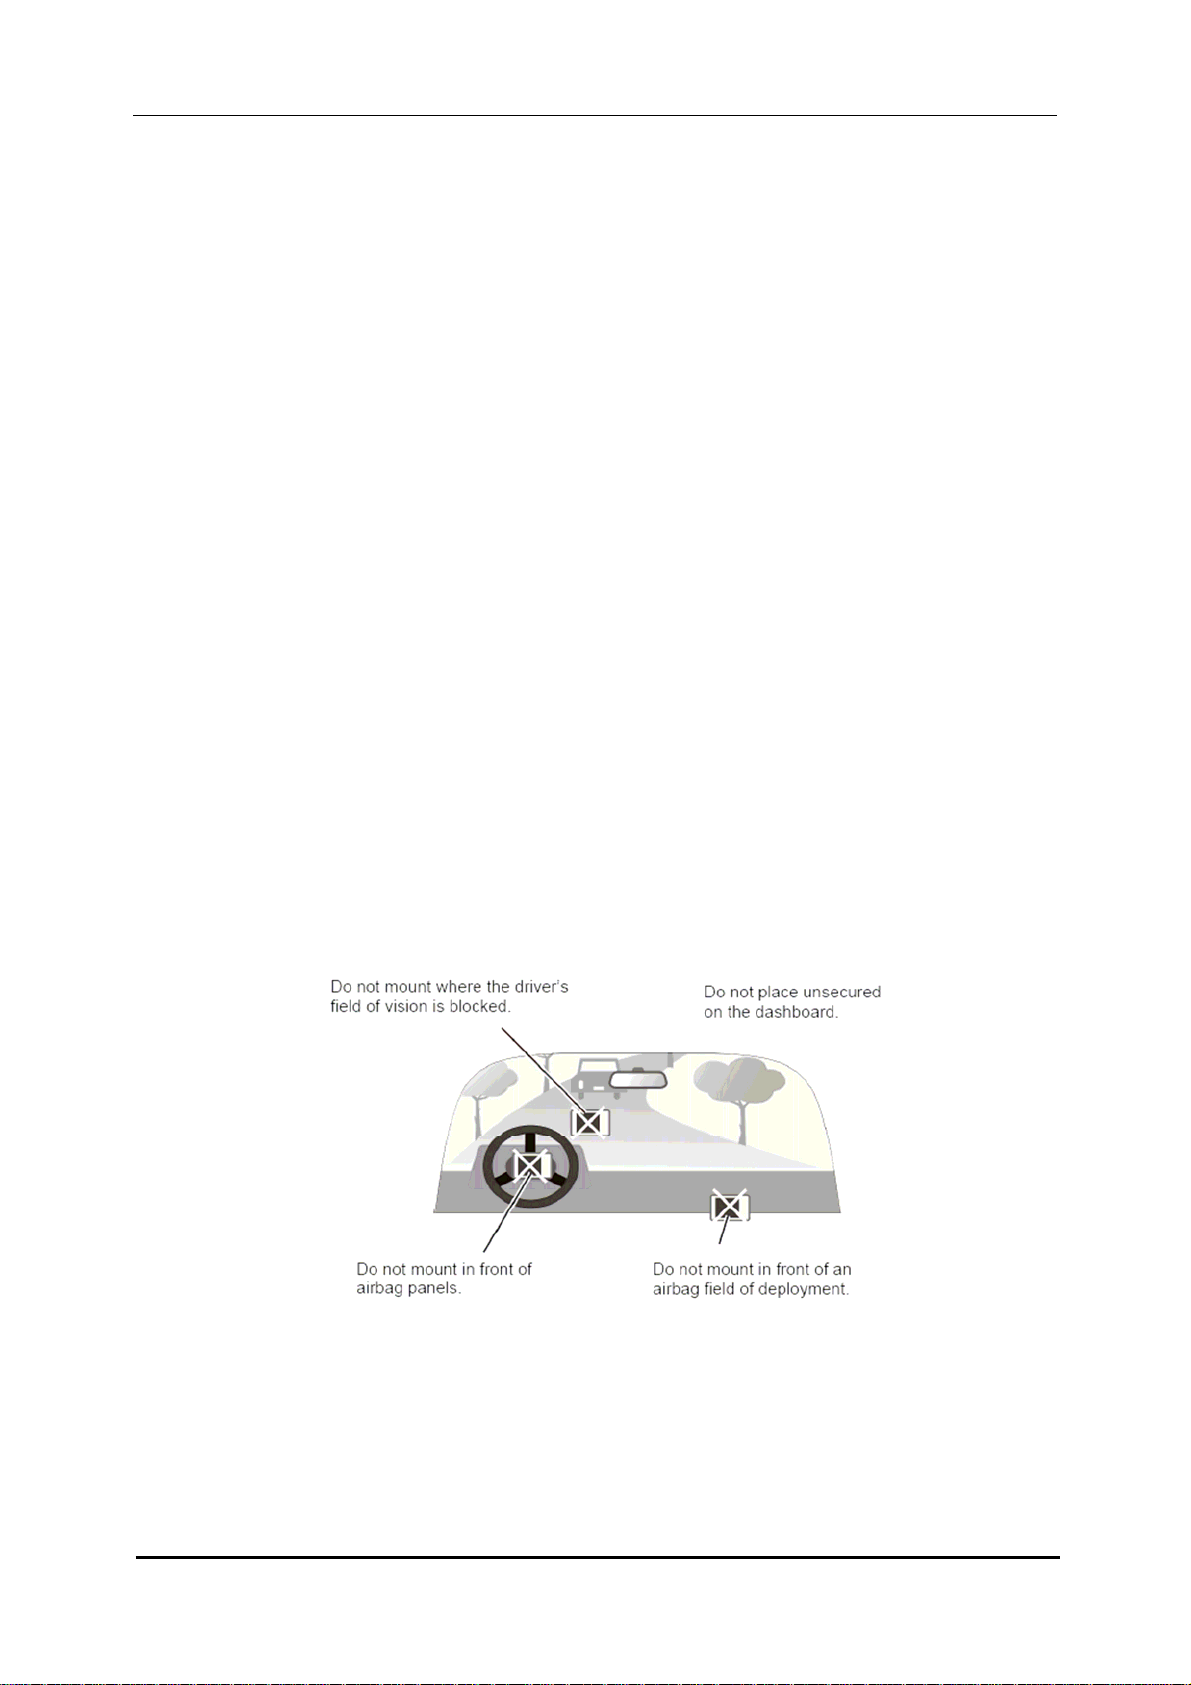
Select an appropriate location for the car holder. Never place the holder
where the driver’s field of vision is blocked. If the car’s windshield is tinted
with a reflective coating, an external antenna (optional) may be needed to
Caution
route to the top of the car through a window. When closing the car window,
be careful not to pinch the antenna cable. (An adequate space may be left, as
needed, for a car with an anti-jamming window design.)
The car holder consists of a car jacket and a car mount. Use the car holder to fix your device in a
vehicle. Make sure that the GPS antenna has a clear view of the space.
For initial positioning, remain at the same spot with a clear view of the space. The GPS may take a
few minutes to find its current location initially.
Please follow the illustrative step-by-step instruction given below to assemble the car holder.
Car Mount
Car Jacket
Step1:
Take a car jacket and a car mount out of the
package box.
Step 2:
Insert 2 lugs formed at one end of the car mount
into 2 wedged slots formed on the car jacket.
Step 3:
Push upward the car mount to tightly wedge the
2 slots formed on the car jacket.
5
Page 16

Global Positioning System
Step 4:
Push the car mount lock towards the sucking
disc to make the disc tightly suck the windshield
of your car.
Step 5:
Set the GPS product downwards and inward at
the degree of 15 towards 2 sides of lower hooks
of the car jacket; then, push the product
backwards to wedge the upper hook of the car
jacket.
Step 6:
The installation of the car holder is completed.
Connecting the Car Charger
The car charger supplies power to your device you are using in a car.
Caution
Follow the instructions below to connect the car charger to the car cigarette socket.
1. Connect one end of the car charger to
the power connector of your device.
2. Connect the other end to the 5V
cigarette lighter in the car to power and
To protect your device against sudden surges in current, connect the car
charger only after the car engine has been started.
charge your device. The indicator on
the car charger lights in green to
indicate that power is being supplied to
your device.
6
Page 17

Connecting to a PC
Always ensure that the GPS device and any other external device
Chapter 1: Getting Started
Note
connected to the GPS device are switched off and unplugged from the
power supply before you attempt to connect the GPS device to any
external device.
The GPS device is designed with a miniUSB port
that allows you to connect the device to a PC for file
transfer and battery charging.
The requirements of the PC are listed below.
Windows 98SE, ME, 2000, or XP (Driver required for Windows 98SE)
Intel Pentium II 233 MHz
64 MB RAM
Hard drive space of 50MB available
USB Port available
256-color display (16 bit color required)
7
Page 18

Global Positioning System
8
Page 19

Chapter 2: Basic Operation
Chapter 2 Basic Operation
Power ON and OFF
Use the power button to power ON and
OFF your device.
When you press the power button to turn off
the product, your device actually enters a
suspend mode and the system stops
operating. Once you power ON the system
again, it resumes.
Operating the Device
To operate your device, touch the screen with a stylus or your fingertip. You can perform the following
actions.
Tap
Touch the screen with the stylus or your fingertip
to open the menu or an item.
Drag
Hold the stylus or your fingertip on the screen and drag up/down/left/right or across the screen to
view photos.
9
Page 20

Global Positioning System
System Volume Control
To Increase or decrease the volume, you can
press the Vo lu m e U p Key
Down Key
Whenever pressing the Volume Up Key
or the Vo lume Do wn Key , you will see the
system volume scale right below on the
screen.
.
or the Volume
Hold Key
To prevent you from operation by mistake, you
can press the hold key
, even before putting
the product in your pocket.
Whenever pressing the hold Key , you will
see the small lock icon on the screen.
10
Page 21

Main Menu
A
A
At the first time which you initialize your
device, the Main Menu appears in about 3~5
seconds. The Main Menu is your starting place
for various tasks. Tap a button to start a task or
open another menu.
Chapter 2: Basic Operation
Date and Time
Note
Button Name Description
Navigator
Photo
Volume Level
Battery Status
To adjust the current time, click Date and Time just above the Photo icon.
Refer to Chapter 3 for the details.
Entering the GPS navigation service
llowing you to view pictures in the formats of BMP, JPG, and
GIF that were stored in a miniSD card
Allowing you to enjoy songs in the formats of MP3 and WMA
MP3
BT Carkit
Calculator
Setup
that were stored in a miniSD card
llowing you to talk on the device by means of Bluetooth
wirelessly connected to your BT mobile phone
Allowing you to do calculation
Entering to customize the device settings, such as backlight,
volume, date and time, as briefly described below
11
Page 22

Global Positioning System
A
A
Setup Submenu
On this setting page, you can customize the
device settings, such as backlight, volume,
date and time. Once you change the
settings, your new settings will remain until
you change them again.
Button Name Description
llowing you to select a Time Zone and set the current date
Clock
and time
Volume
Battery
Display
Bluetooth
System
Allowing you to enable or disable the key tone of touch pad
and adjustment the volume of system
Allowing you to read the battery status and set the system’s
idle time
Allowing you to set the LCD’s idle time and adjust the
backlight of LCD
llowing you to search for a Bluetoooth device around and
pair the Bluetoooth device with your product
Showing the information on the system’s brief specification
Inserting a MiniSD Card
The GPS device is designed with a miniSD Card slot which allows you to insert the miniSD card into the
GPS device.
To use the miniSD card, insert it into the slot of the
device, with the connector pointing to the slot and
its label facing the front of the device.
To remove the card, first make sure that no
application is accessing the card, and then slightly
push the top edge of the card to release and pull it
out of the slot.
1. Make sure that no foreign object enters the miniSD card slot.
Note
12
2. Keep a miniSD card in a well protective box to avoid dust and
humidity when you are not using it.
Page 23

Connecting an Earphone
Connect an earphone to the left side of the device
for private listening.
After the earphone is connected, the speaker of
GPS device will be automatically off.
Chapter 2: Basic Operation
Caution
Excessively loud volume could damage your hearing. So turn down the
volume before you connect the earphone, and then raise the volume to a
comfortable level.
13
Page 24

Global Positioning System
14
Page 25

Chapter 3: Device Settings
Chapter 3 Device Settings
You can customize the device settings, such as brightness, volume, date and time, etc. Once you
change the settings, your new settings will remain until you change them next time.
To open the Setup menu, first tap the Setup icon
on the main menu.
After you tap the Setup icon on the main menu, the
Setup submenu will now appear in the display.
On this submenu you can set:
Clock – Adjusting the time zone, date, a nd time
Volume – Adjusting the system volume and
enabling or disabling key tones
Battery – Displaying current battery status and
adjust the battery idle time
Display – Adjusting the display idle time and
brightness and calibrating the touch screen
Bluetooth – Searching, pairing, connecting a
Bluetooth device
System – Viewing the system information, such as
the information of firmware, CPU and the like
Clock
Tap Clock on the Setup submenu.
15
Page 26

Global Positioning System
The Clock page appears in the display.
Time Zone
Firstly, tap the rectangle area of Time Zone.
To change the time zone, tap the left/right arrow
on the Time Zone bar.
Then, click
page to save the setting and go back to the last
page.
at the upper right corner of the
Date
Firstly, tap the rectangle area of Date.
To change Year, Month, and Day, tap the
left/right arrow on the Date bar .
Then, click
page to save the setting and go back to the last
page.
16
at the upper right corner of the
Page 27

Time
Firstly, tap the rectangle area of Time.
To change Hour, Minute, and Second, tap the
left/right arrow on the Time bar.
Chapter 3: Device Settings
Then, click
page to save the setting and go back to the last
page.
at the upper right corner of the
Volume
Tap Volume on the Setup submenu.
The Volume page appears in the display.
Check the Enable Keytone option if you would like
to hear a clicking sound each time you tap on the
display.
If you are using the earphone, the Enable keytone
option will be disabled automatically.
17
Page 28

Global Positioning System
Tap the + or – symbol to increase or decrease the
volume.
Then, click
to save the setting and go back to the last page.
at the upper right corner of the page
Battery
Tap Battery on the Setup submenu to check the
remaining power of your battery and/or choose the
idle time for power saving.
The Power page appears in the display.
Battery Status indicates the current status of
battery. When the battery of GPS device is being
charged, you see the indication of Battery Status :
Charging; when the battery of GPS device is fully
charged, you see the indication of Battery Status :
100%
Tap the right or left arrow to choose the idle time of
power. You can set a timer to automatically turn off
your device when it is idle for a set period of time.
The options include Never, 1 min, 2 min, 5 min, 10
min, and 15 min.
For power saving, you had better choose the idle
time. If you choose the idle time, the device will be
in the suspend mode at the time you set.
Then, click
to save the setting and go back to the last page.
18
at the upper right corner of the page
Page 29

Display
Tap Display on the Setup submenu.
The Display page appears in the display.
Chapter 3: Device Settings
Tap the right or left arrow to choose the idle time of
display. You can set a timer to automatically turn off
your display when it is idle for a set period of time.
The options include Never, 15 secs, 30 secs, 1
min, 2 min, and 5 min.
For power saving, you had better choose the idle
time. If you choose the idle time, the display will be
turned off at the time you set.
Tap the + or – symbol to increase or decrease the
brightness of display.
You can calibrate the touch screen if it is not
responding accurately to your taps.
Click Align Screen to calibrate the touch screen.
19
Page 30

Global Positioning System
You see a screen in a language you have set to.
Tap and hold the center of the target. When the
target moves to another position, tap and hold the
center of the new target. Repeat each time to
complete the calibration process.
Then, The Display page returns. Tap Language to
choose another UI language.
Tap the right or left arrow to choose another
language. The languages are English, French, and
Spanish.
Then, click
to save the setting and go back to the Display
page.
at the upper right corner of the page
Bluetooth
Tap Bluetooth on the Setup submenu.
The Bluetooth page appears in the display. There
are 2 tabs in the Bluetooth management, one for
Mode and the other for Devices.
Mode – You can turn on/off Bluetooth and make
your device to be discovered by other devices with
Bluetooth.
20
Page 31

Devices – You can manage all searched/paired
devices.
Chapter 3: Device Settings
If you finish in the setting, click
right corner of the page to save the setting and go
back to the last page.
at the upper
System
Tap System on the Setup submenu.
The System Info page appears in the display.
You can read the system information in this page,
such as model name, firmware version, NAND
Flash size, SDRAM size, and CPU type.
Click
back to the last page.
at the upper right corner of the page to go
21
Page 32

Global Positioning System
22
Page 33

A
A
Chapter 4 Main Menu
Whenever switching ON the GPS device, you will
see the main menu of system on the display. This
main menu is the starting point where all of the
functions exist for you to use. You can tap one of
the functional icons to start the function you want.
When the function exits, the system will take to the
main menu of system.
Button Name Description
Navigator Entering the GPS navigation service
Chapter 4: Main Menu
Photo
MP3
BT Carkit
Calculator Allowing you to do calculation
Setup
llowing you to view pictures in the formats of BMP, JPG, and GIF that were stored
in a miniSD card
llowing you to enjoy songs in the formats of MP3 and WMA that were stored in a
miniSD card
Allowing you to talk on the device by means of Bluetooth wirelessly connected to
your BT mobile phone
Entering to customize the device settings, such as backlight, volume, date and
time, as briefly described below
Navigator
Tap Navigator on the main menu of the display.
After tapping the Navigator icon on the main men u,
you enter the Warning page. If you agree on what
is described on this page, click I Agree.
Note
For the detail of Navigator operation, please read the software user manual.
23
Page 34

Global Positioning System
Photo
You can view photos or slideshow on your GPS device.
Tap Photo on the main menu of the display .
After tapping the Photo icon on the main menu, you
enter the Photo page.
Features of Photo Viewer
Codec Engine
Supports BMP, JPEG, and GIF formats
Supports 1 bit, 4 bits, 8 bits, 16 bit s, 24 b its, and 32 bits bitmap images
Supports 8 bits and 24 bits JPEG images
Supports 8 bits interlace and non-interlace static GIF images
Control Functions
Up one level, allowing you to surf the image files in the whole storage card
Home, allowing you to go quickly back to root of storage card
SlideShow
Display
Thumbnail View
Image View
Slideshow View
24
Page 35

Chapter 4: Main Menu
Viewing Photos
If you cannot see photo thumbnails but instead folders (as shown in the figure above), then you can
click one of the folders to access the contents (as shown in the illustration below).
You can also scroll up or down to search up or
down the list of folders or photos.
Further, you can drag one of the photos, with a
stylus, towards every column at the left side and
every two columns at the right side; you can
also drag it up and down.
You will see 4 functional options at the bottom of the screen, which are defined as follows:
Back button to move up to a level
Home button to return to the first level where you enter from the main menu
Slideshow button to show you photos in the slideshow mode
Exit from this page to main menu
Once you can see photos, you can click on one
photo to show it at a full size.
You will see 8 functional options at the bottom of the screen, which are defined as follows:
Viewing a last photo
Viewing a next photo
Zoom in
Zoom out
Viewing a photo at the default rotation angle
25
Page 36

Global Positioning System
Viewing a photo at 90° (clockwise)
View photo at 90° (anticlockwise)
Exiting the screen
Using the slideshow
Make sure that you can see photo thumbnails at
the steps outlined in Viewing Photos.
Press the Slideshow button
slideshow will start.
To stop the slideshow, click everywhere on the
screen.
and the
MP3 Player
This section instructs you how to play MP3 files on your device.
Tap MP3 on the main menu of the display.
After tapping the MP3 icon on the main menu, you
enter the MP3 Player page.
Features of MP3 Player:
Codec Engine
Supports Win CE. NET 5.0 default (WMA and MP3)
Supports sampling frequencies from 8 kHz to 48 kHz
Minimum bit-rate supported 32kbps and Maximum bit-rate supported 320kbps or higher for
layer-3
Supports variable bit rates
26
Page 37

Control Functions
Play List Display
Play/Pause/Stop/Forward/Backward
Volume
Repeat mode
1. Repeat One
2. Repeat All
Shuffle
Display
Displays play time elapsing
Track name ID3 support
Index of current playing title
Chapter 4: Main Menu
Definition of MP3 Player Buttons
The MP3 Player buttons are defined as follows.
27
Page 38

Global Positioning System
Operation on MP3 Player
On the MP3 player, press the Play button to begin listening to music. To pause the music,
press the Pause button
next track, press the Fast forward button
back to the previous track, press the Rewind button
Adjusting the Player Volume
To adjust the volume, press the Increase volume
Changing the order of tracks
To choose between playing tracks in sequential order or random order, press the Select
sequence/random button. The current order is indicated at the upper right corn er of the page.
Note
Repeating tracks
To repeat a track or tracks or not, press the Select linear/repeat button. The current mode is
indicated at the upper right corner of the page.
The appearance of the Select sequence/random button changes with the
current mode.
. To stop listening to the music, press the Stop button . To skip to a
. To go to the beginning of the current track or skip
.
or Decrease volume buttons.
Note
Displaying a play list
Press the Play list
Play list page appears on the display.
The appearance of the Select sequence/random button changes with the
current mode.
button and then the
Note
To update all tracks from the memory card, please press the Update all tracks button. But
MP3 Player will administrate this list automatically.
By default, all tracks in the storage card will be added to the play list.
To add tracks, press the Add track
add. And you can add several songs at the same time. This function is not used in the classified
file.
28
button and then navigate to the track/s you would like to
Page 39

Chapter 4: Main Menu
To delete tracks, press the Delete track button in the My Favorite folder. And you can delete
several songs at the same time.
To return the previous page, press the Return
button.
BT Carkit
With BT Carkit, you can make a phone call or answer a phone call thru the GPS device.
Note
Tap BT Carkit on the main menu of the display.
Before using this function, pair and connect a Bluetooth mobile phone with
the GPS device through Bluetooth.
After tapping the BT Carkit icon on the main menu,
you enter the BT Carkit page.
Features of BT Carkit:
Main Feature
Supports dial pad
Supports contact viewer
Supports call history
Supports phone shell, allowing you to pick up an incoming call
Control Functions
Digit al key pad
Backup
Clear
Dial / call history / contact viewer
Display
Displays phone number you want to dial out
29
Page 40

Global Positioning System
Contact Viewer
Tap the Contact Viewer icon to view the
phone numbers of all your friends.
Features of Contacts Viewer:
Supports Add / Edit / Delete functions
Supports dial out from a list of contacts
Call History
Tap the Call History icon to view all the
call history, including outgoing calls, incoming
calls, and missed calls.
Features of Call History:
Supports the Delete function to delete all history functions
Supports the Save function to save the calls to history for contact
Supports the Quick Dial function, allowing you to very easily dial out from the call
history
30
Page 41

Chapter 4: Main Menu
Phone Shell
The phone shell program allows you to dial out and pick up an incoming call.
Calculator
Tap Calculator on the main menu of the display.
After tapping the Calculator icon on the main
menu, you enter the Calculator page.
The calculator tool turns your device into a calculator. The calculator tool is easy to use, so you can
press every button with your fingertips.
Features of Calculator:
Supports basic calculation, such as addition, subtraction, multiplication, division, square, and
square root
Supports memory function, such as MC, MR, M+ and M-
Supports 12 digits as the maximum calculation result
31
 Loading...