

Page 1

Page 2
Important Safety
Instruction
NOTES
1) Read thes e instructi on s
2) Keep thes e instructi on s
3) Heed all wa rnings
4) Follow al l instructi on s
5)Do not use t his apparat us n ear water
6) Clean onl y with a damp clo th
7) Do not blo ck any of th e venti lation op ening. Install in a ccordance with
the manufa cture's ins tr uctions .
8) Do not install ne ar any heat source s s uch as radiator s. Stoves, or othe r
apparatu s (includin g am plifies )t hat produ ce h eat.
9) Do not de fe at the safety purpose of the polari zed or grounding- type
plug, A polariz ed plu g has two blades and a third grounding pro ng . The
wide blade or t he t hird prong is provided for your safety. When the
provided plug does not fit i nto you r outle t, consul t an e lectricia n for
replacem ent of the obso le te outlet .
10) Protect the power cord from being walke d o n or pinch ed pa rticularl y at
plugs, convenienc e recepta cles, and the point where they exi t from the
apparatu s.
11) On ly use attach ments/acc essories sp ecified by th e ma nufactu re r.
12)Use only with a ca rt, stand, tripod, brac ket, or tabl e spec ified by the
manufact urer, or sol d w ith t he apparatus . Whe n a cart is use d, use
caution when moving the appara tu s com bination to av oid injury from tipover.
13) U nplug this apparatu s du ri ng l ighting storms or when unused for long
periods of t ime.
14)Refer al l servicin g to qualif ie d service p ersonnel. Se rvicing is required
when the apparat us ha s b een d amaged in any way. Such as power-sup pl y
cord or plug is da maged, liquid has be en spi lled o r obje ct have fallen into
the a pparatus, the appar atus h as b een ex posed to r ain or moisture , does
not operat e normally, or has bee n dropped.
15 )Appara tus shall not b e exposed t o dripping or s plashing an d no object s
filled wit h liquids, su ch a s vases ,sh al l be placed o n ap paratus.
CAUTION
RISK OF ELECTRIC SHOCK
DO NOT OPEN
CAUT IO N: TO REDUCE THE RISK OF ELE CTRIC SHOCK, DO N OT
REMOVE COVER(OR BACK). NO USE- SERV ICEABLE PARTS INSIDE.
REFER SERVICIN G TO QUALI FI ED SERVICE PERS ONNEL
The lightni ng flash with ar ro whead symb ol, within an equi lateral
tr ian gle, i s in ten ded t o ale rt the use rs to th e pr e sen ce of
uninsula ted"dange ro us vol tage" within the pro duct's enclosur e that
may be of suffici ent magnitu de to con stitute a risk of ele ctric to
persons.
The e xclamatio n po int wi thin an equilater al t ri angle is intended to
al ert th e us e r to t h e pre senc e o f im p orta n t o p erat i ng an d
maintena nce*servi ci ng) ins tructions in the literat ur e accom panying
the applia nce.
WARNI NG : TO REDUCE THE RISK O F FI RE OR ELECTR C SHOCK.DOI
POWER SUPPLY
Connect the s upplied adapte r to the s ide o f the unit in t he slot mark ed "DC 5V
IN" . Plug the two-pron g end of the po wer cord to an AC 100- 240V ou tlet. If
you ha ve difficul ty insert ing the plug, turn in over a nd rein sert it . If th e unit will
not be used fo r a long time dis co nnect the p lu g from outlet .
NOTE
Before plugging the power cord in to an AC out le t, mak e sure that all the
connecti ons have been m ad e.
CAUTION
These servicing inst ru ction are fo r use by qualifie d ser vi ce pe rsonnel only. To
reduce the ris k o f e lectric sh oc k, do not perfor m a ny servicing ot her than that
containe d in the operat in g instruc ti ons unles s yo u are qualifi ed to do so.
Refer to service manual for ser vi cing instruc ti ons. To reduce the ris k of fire or
electric s hock, do not ex po se this app ar atus to rain or m oisture.
Important Safety
Instruction
Page 3
Access o r i e s
Important Safety
Instruction
War ni ng
Failure to avoid the fol lowing po tentially haza rdous situatio ns may result
in injury or p roperty dam ag e.
The unit is designed to provi de you with route sug gestions. It doe s not
reflect road clos ures or r oad condi tions, tr affi c congest ion, weat her
conditio ns, or other fa ct ors that may effe ct safety or ti mi ng while dr iv ing.
Use the unit only as a navi ga tional aid. Do not att em pt to use the uni t fo r
any purp ose requi ri ng prec is e measu re ment of d irection, dis ta nce,
location , or topograph y. Thi s prod uc t shou ld not be use d to determi ne
ground pro ximity for ai rc raft navi ga tion.
This devic e complies wi th part 15 of t he FCC Rule s. O peratio n is subject to
the follow ing two condi ti ons:
(1) This device ma y not cause har mful interf erence, and
(2 ) This de v ice mus t a ccep t a ny i nte rfer ence recei ved inc ludi ng
interfer ence that may c au se undesi re d operation .
The images in this manual are only for reference and they
may be different from the actual ones.
2
1
1
1
1
1
1
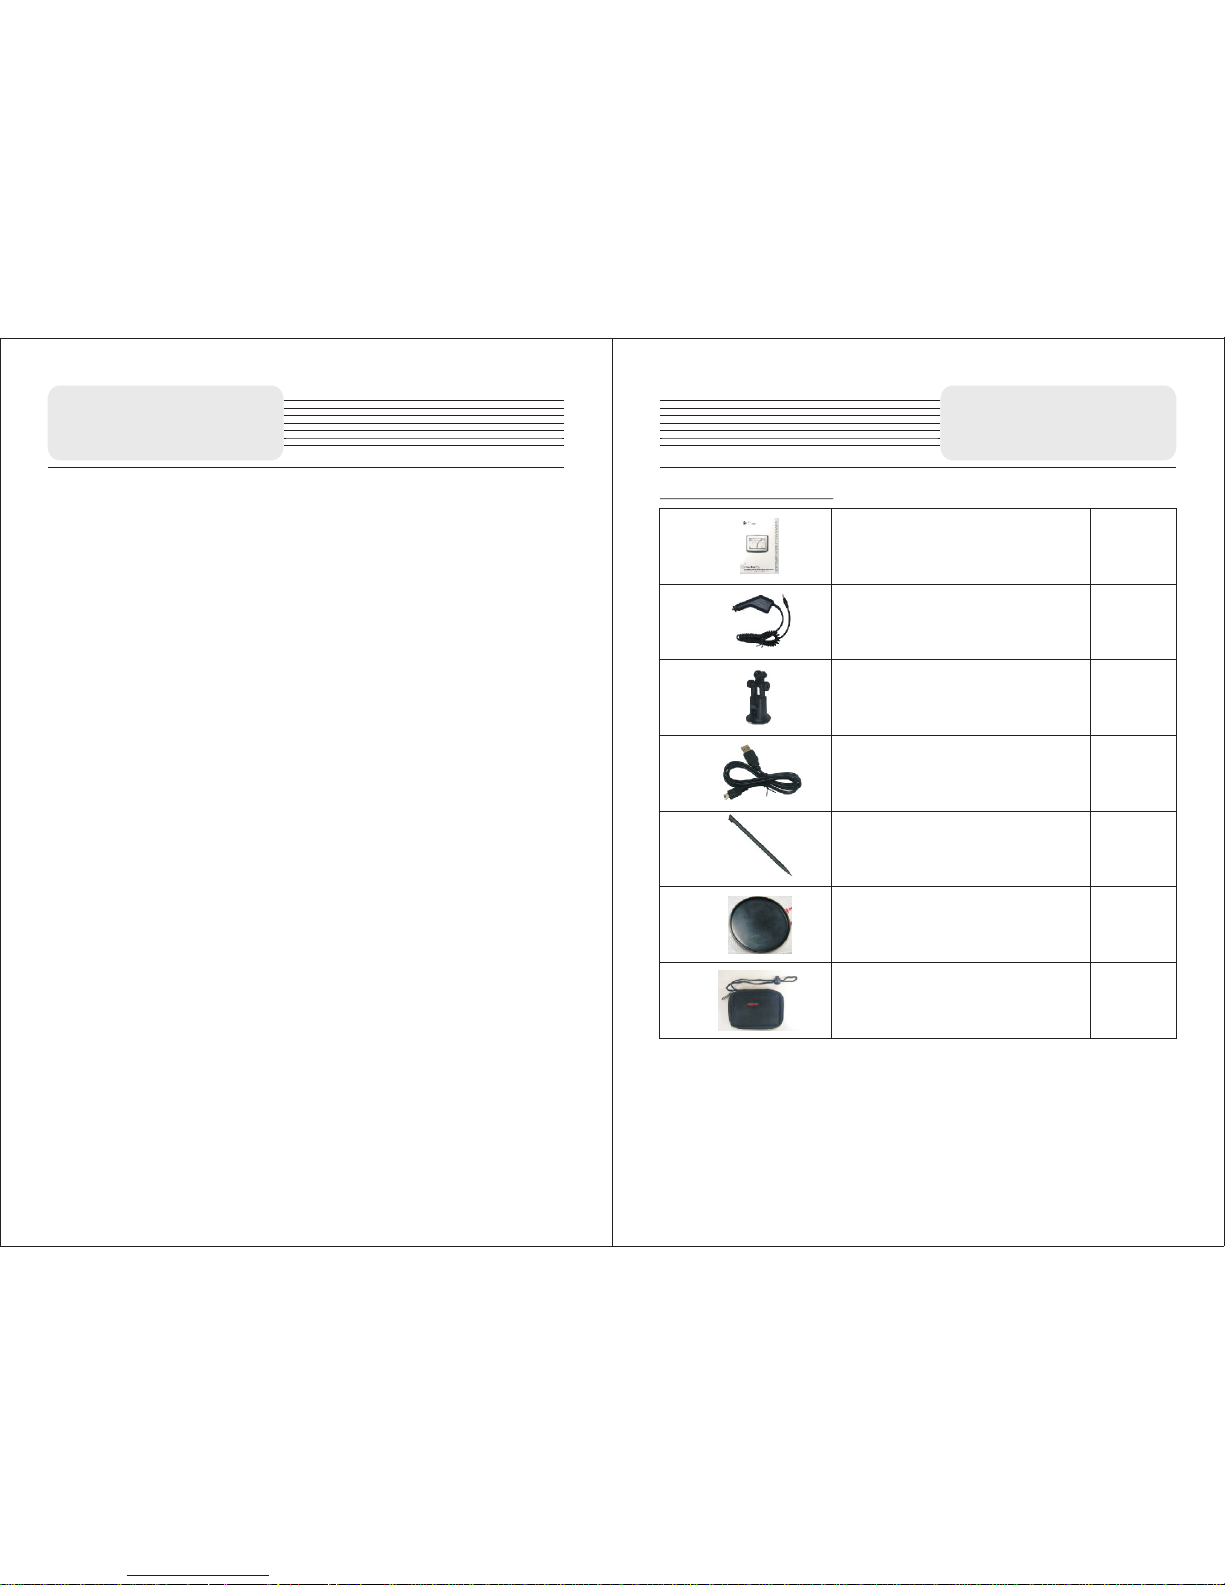
Owner's Manual
Car Adaptor
Mounting Bracket
USB Cable
Touch Pen
Dashboard mount disk
Pouch
Note
Acce ss or ies and t he ir part s nu mbe rs a re subj ec t to modi fi ca tion wi th ou t
prio r no ti ce d ue to i mp ro ve ments .
Accessories list
Page 4
CONTENT S
Chapter I Preparation for use
1.1 Introd uc tions to ap pe arance an d bu ttons
1.2 Charge
1.3 ON/OFF
1.4 Use of tou ch p en
1.5 Commun ication wit h co mputer
Language s election
Chapter II Introduction to use
2.1 Introd uc tion for ma in i nterfac e an d main functi ons
2.2 Mainta in P3 nav igation dev ice
Chapter III Audio Player
3.1 Functi on and Featur es
3.2 Interf ac e and Opera ti on
Chapter IV Setting
4.1 Volume setup
4.2 Power supply se tup
4.3 Backlight set up
4.4 Time and date setu p
4.5
4.6 Ca libration
Chapter V Troubleshooting
Chapter VI Specifications
Chapter Ⅰ
Ch a p t er I P re pari n g t h e P3 f o r U s e
Th is chap ter guid es you to get the P 3 st a rted, and also descri bes the
ba sic o per ati ons o f the n avig ati on de vic e.
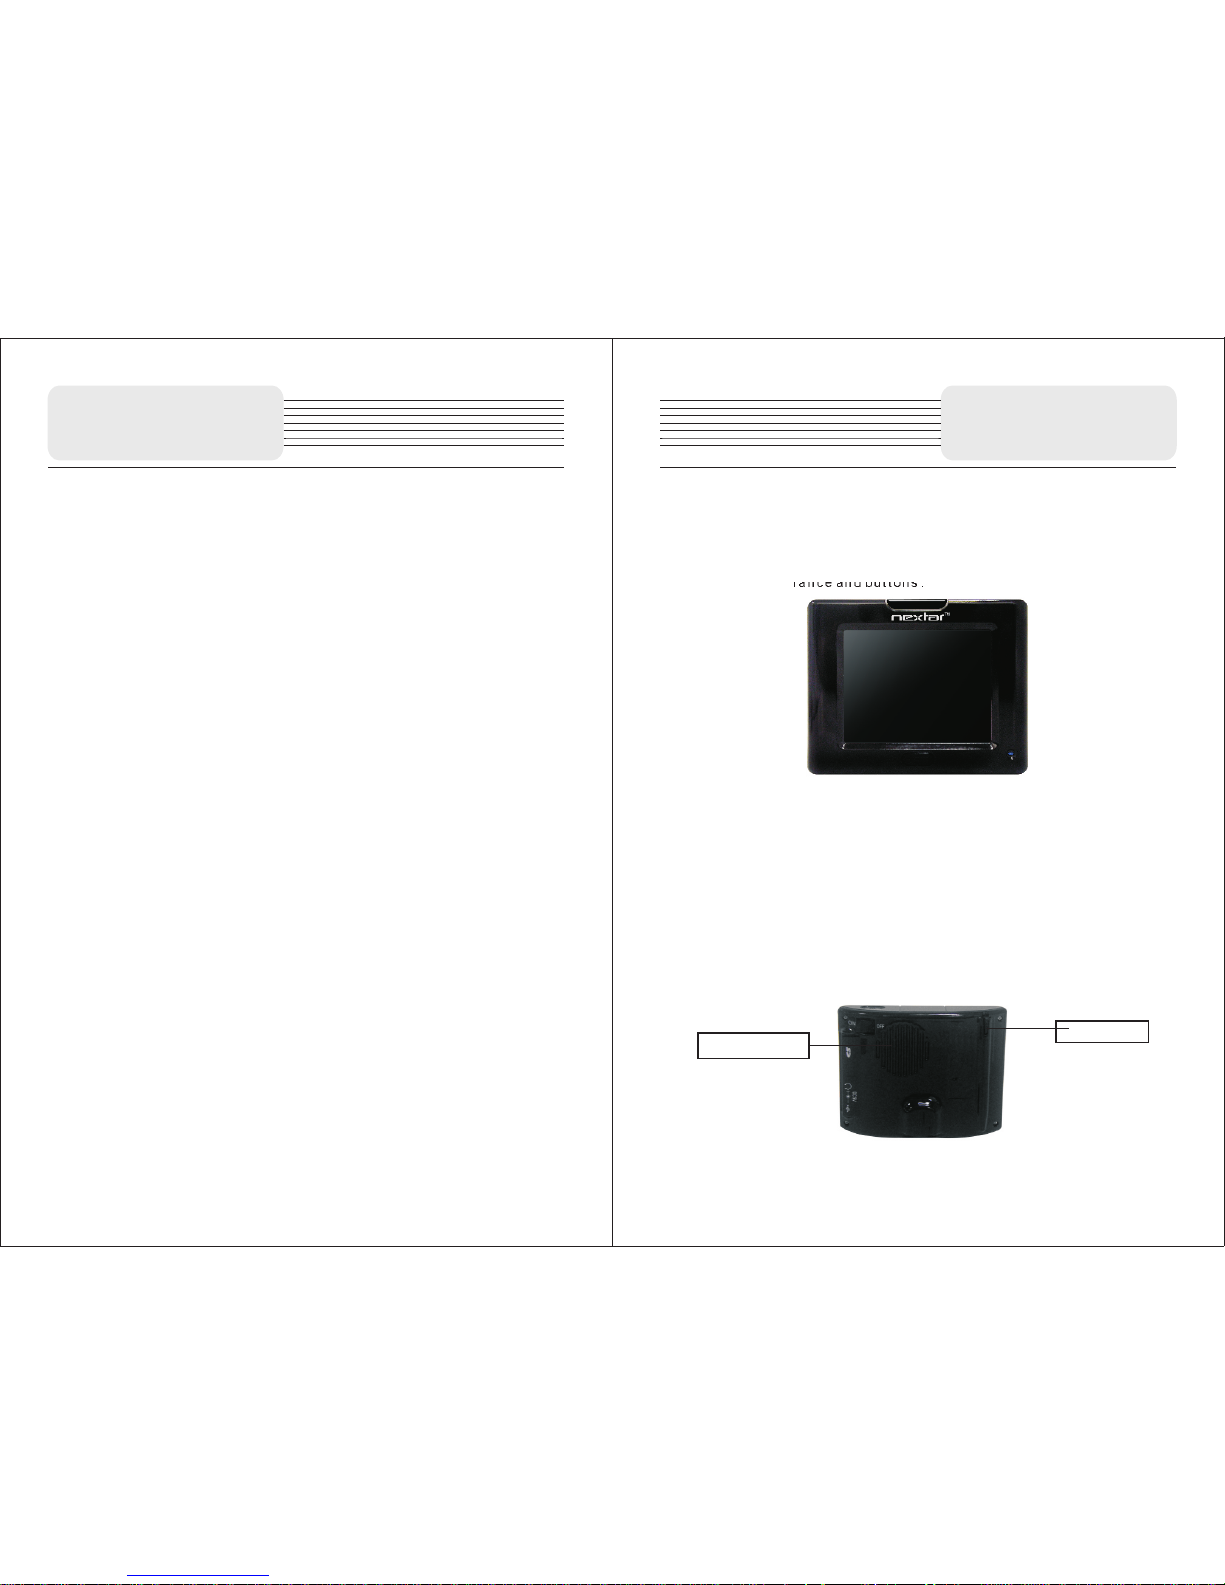
1.1 Introduc t i o n t o a p p e a r a n c e a n d b u t t o n s
1.1.1 Front appearance and bu t t o n s :
【Descripti o n】
1. Charge i ndicator: Blue light indicates the chargi ng state, a nd it goes
out when the chargin g is comple ted; A Red Light indicates that the
current sy st em is opera ti ng.
2. LCD to uch s creen: 320*240 pixe ls tr ue colo r, pro viding you a perf ect
visual exp erience and a s up porting t ou ch functi on ;
3. MENU butt on: If t he cu rrent stat e is ' power on', hold and press the
MENU powe r button. The sy stem wi ll automa tically shut down and
change into ener gy savin g mode. If the curre nt sta te is 'power off'
and the batter y pow er ha s not yet been exhausted, hold and press
the power this butt on and the syst em will start up
1.1. 2 Ba ck a ppear an ce a nd b utt on s:
Lound speaker
STYLUS
Page 5

【Note】The device has a built-in , irrepl aceable lithium battery. To avoid the
risk o f fir e or burni ng, p le ase d o not open , per forate, hit the b attery or di scard it
in fire or wat er. The b attery will b urst, blast o r release dan gerous chem ic als.
When th e char ge ind icator switches on (blue lig ht), it indi cates th at the
navigati on device is i n a charging s tate. Char ging requi re s a few hour s, please
be p atient and do n ot cut o ff powe r unt il th e blu e l ig ht is off. When the charg e is
complete d, remove the a da ptor plug f ro m the mains sup ply.
For later use , w he n the battery pow er decreases or i s e xhausted, ple ase
charge it pr omptly.
1.2. 2 Ch ar gi ng by c ar a da pt er:
1. Plug one end o f the car adapt er into the socke t on the left side of the
device bod y;
2. Plug the o ther end of the car a da pter int o the ignit ion to supp ly power
for P3 while c harging.
【Note】Pleas e plug the a da pter only a fter the vehi cle starts , to avoid dam age
caused by in stant power i mp act on equi pm ent.
1.3 Po we r ON /O FF
ON/OFF is co nt rolled by t he p ower button .
1.3.1 ON:
Please che ck the follow in g:
1.The b attery powe r is adequate , or plugged in to the adapte r,
2.SD card is inserte d int o the SD/M MC sl ot co rrectly, a nd th e ins erted SD
card has the system o perating pr ogram.
Press the po wer button at t he b ack of the mach ine to turn the d evice on.
【Note】Dur ing the fir st orientat ion pleas e choose an o pen space w ith no up pe r
shelter; Pl ease stay a t t he same pla ce, for the or ientation needs a few mi nutes
to complet e, so wait pati en tly.
1.3.2OFF:
Press the po wer button at t he b ack of the mach ine to turn the d evice off.
1.1. 3 Le ft -s ide a pp ea ra nce a nd b ut to ns
【Descript ion】
Power Sock et: DC port is con nected wi th the charge powe r supply; used
when charg ing the navig at ion devic e
1.2 Ch ar gi ng t he de vi ce f or i nitia l us e
1.2. 1 Fo r init ia l u se , pl ea se ch arg e t he ba ttery fu ll y; the st ep s are a s
foll ow s:
1 P lug DC end of cha rg e adapter int o t he power sock et on the left-s id e of
the device ; Pl ug the othe r en d into the ma in 's supply;
The P3 navigat ion device has two po we r supply mode s: ba ttery power
supply and m ain power sup pl y.
When the GPS nav ig ation devic e is n ot connecte d to t he charging
adapter,i t obtains pow er f rom a lithi um p olymer ba tt ery. The ba ttery
consumpt ion sign [ ] is vis ib le on the up le ft c orner of the ma in
system interface . The battery capacity bar [ ] of the
power-se tup interfa ce s hows the cu rr ent residua l battery cap acity.
When the GPS navigati on device is connect ed to the ext ernal charg ing
adapter, it o btains powe r fr om the exte rn al power supp ly.。
【 Att ention】 The Power Adaptor is not incl uded in the acces sories we
off er.
This navigati on device has a built-i n, ir replaceab le lithium polyme r
battery. Under normal conditions (such as low backli ght bright ness), a
fully ch arged b attery ca n conti nu ously w ork for about 10 hours. T he actual
battery s upply ti me varies d epending o n how y ou use the G PS navig ation
device . Cer ta in fu nctions (audio, video , hig h brigh tness bac klight)
consume a lar ge amount of en ergy and may signifi cantly reduce suppl y
time.
Chapter Chapter
ON/OFF but to n
SD ca rd sl ot
Ear phone S ocket
Pow er Sock et
USB S ocket
Chapter Ⅰ
Chapter Ⅰ
Page 6

1.4 Us in g th e to uch p en
The touch pe n (stylus) is y ou r tool to commu nicate with P 3.
1. Click:
Click on a menu o n the scree n with th e tip of touch pen , to open t he menu a nd
use the menu f unctions.
2. Drag:
First click one point on th e map with the pen tip, then move the pen tip, to
move withi n the map and loc at e the map pos it ion you wish.
【N ote】A touch pen with a damaged tip, a ball pen or any other edged and
rough objec t may cau se scrat ches and damage of the LCD scre en. Please
use an undam aged touch pe n. Don't use a br ok en touch pe n
1.5 Co mm un ic ati ng w it h th e compu te r
Connect to the co mputer vi a the MINI USB interfa ce at the right si de of the
GPS naviga tion device b od y. Se e the below fig ure for detai ls:
System req uirements :
-Windows 9 8SE, ME, 2000 0 an d XP(Driv er r equired for W indows 98SE )
-Windows 9 8SE, ME, 2000 0 an d XP(Driv er r equired for W indows 98SE )
-DVD Rom Dri ve(for map up gr ade purpo se s)
-Intel Pen ti umII 233M hz
-64MB RAM
-50MB avai lable hard dr ive space
-256-col or display ad ap ter and mon it or
(16 bit colo r required)
It al lo ws fil es to be co pied b etween the n avigation devic e and the c omputer.
You ca n also back-up files fr om the GPS nav ig ation d evice i o the c omputer t o
restore da ta to the GPS nav ig ation dev ic e when necess ary.
1. Please confir m that the GPS na vi gation device is in workin g conditi on
and MICROS OF T ACT IVESYENC so ftware has be en installe d.
2. Connect t he MINI USB of USB cabl e [ ] to the MI NI USB port on
the left sid e of the GPS body, and the c onnect stan da rd USB port
[ ] to the USB Hos t of c omputer ;
3. After conn ec ting to a compu ter, the devic e automatic ally recogn izes
new hardwa re; the GPS nav ig ation dev ic e suspend s cu rrent runni ng
programs a nd switches i nt o the compu te r communica tion interf ace;
4. After commu nication is completed , remo ve the MINI USB cable. The GP S
navigati on device con ti nues to run t he s uspende d pr ograms.
【 Note】 Dat a Security: Please bac ku p system d ata into e xt ernal sto rage
devices before up grading system data. Our company shall not be held
responsi ble for syste m da ta damage o r lo ss.
【 Note】 Dur in g the conne ction betw een the GPS na vigation device and
computer, t he GPS naviga ti on device w il l suspend o th er operatio ns.
【 Note】 Dur in g the conne ction betw een the GPS na vigation device and
computer, exec uting any of the f ollowing actio ns causes the system to
terminat e commun ication with the computer and result loss of un- transmitt ed
data.:
1. Removing t he MINI USB cab le ;
2. Pressing p ower button t o tu rn off;
3. Using the re set button or b at tery switch t o restart sys tem;
4. Clicking t he close butt on o n the upper r ig ht corner of th e window.
Chapter Ⅰ
Chapter Ⅰ
Page 7

Chapter Ⅱ
Basic Ope ration s
Chapter II B asi c Operations
This ch apter provides a brief introducti on to the main in terface of the
device and also issues basic gui de lines to maintain and prese rve th e
device.
2.1 Main inte rf ac e and its f un ct ions
2.1. 1 Ma in i nt erf ac e of s ys tem :
Function d escriptio n:
In the main menu, there ar e thre e item s for selectin g. Touch th e corr es ponding
item to ente r.
Tap ( )to enter na vi gation mode , tap( ) to enter t he MP3 player,
tap ( ) to enter the s ettings men u.
2.2 Ma in ta in ing t he P 3 na vi gatio n de vi ce
With proper care, the GPS naviga tion de vice ca n be a reliable navigatio n and
recreati on mate. Pleas e comply wit h the inst ructions give n belo w to maintai n
the device a nd ensure lon g- life and er ro r-free us e of t he GPS naviga tion device .
? Prot ect screen: Pressin g the touc h scr een hard will damage screen.
Please use th e touch pen to click and o perate the GPS naviga tion de vice. U se a
soft cloth sprayed wit h a little ind us trial glas s cleanser to clean the scr een.
Avo id directly s praying cle anser onto th e screen.
【N ot e】 You must close the GPS n avigati on device befor e cl eaning the touch
screen.
? Don' t d rop the d ev ice: Dropp ing the dev ice from he ights, a su dd en impac t
and simila r actions may c au se damage t o pr ecision c om ponents lik e the screen.
【Note】 Acc id ental damage is exclud ed from the scope of the maint en ance
contract .
? Avoid using the device in the followin g en vi ronments: Rap id tem perature
change, hi gh temper atures(over ), low tempe ra tures (below ), high
pressure , dusty locati ons, st atic-pr on e loc ations, damp p laces. Avo id co rr osive
liquids that corro de th e n av igation devi ce . Avoid and prev en t imme rsion in a ny
liquid.
? Avoid r adiation interfer ence: Ra diation interfere nce from other electroni c
devices ma y affect th e proper di splay of the GPS n av igation d evice scr een. The
eliminat ion of th e interfer ence sou rce will restore th e normal display of the
screen.
【Note】 In case of air freig ht, we recom mend that the devic e body be kept
within b ag gage and pass X-ray detection s ystem to av oid the m agnetic d et ector
or the ma gnetic stick (han dheld devi ce of secu rity guards ) whe n passi ng the
airport securit y exami na tion ch annel. Th ese dev ices ma y damag e the syst em
data. Our co mp any shall b e no t respons ib le for any data l oss incurre d.
Avo id dire ct intense light: Don't expose the GPS navi ga tion device to dire ct
intense li ght or UV rays to m ax imize its s er vice life.
60° 0°
NAVIG ATION
MUS IC
Chapter Ⅱ
Basic Ope ration s
Set ting
Page 8

Chapter Ⅲ Us ing
the Au dio Player
This chapter explain s how to play your favorite music using P3 aud io player,
and transf orm it into you r po rtable MP 3.
3.1 Fu nc ti on s and f ea tu re s
The audio pla ye r supports WMA9, MP3 and WAV form at audio files ; you can
randomly s et any play seq ue nce.
Before using the aud io play er func tion, p lease c opy you r audio file to any folder
in the stora ge card.
3.2 In te rf ac e and o pe ra ti on
3.2.1. Cli ck the icon in the ma in interfac e of the system t o open up
audio play er; Th e screen depi cted below is d isplayed:
musi c
Chapter Ⅲ Us ing
the Au dio Player
The table be low explain s th e functio ns o f each icon in th e above scree n.
4:50
PL YA
STO P
PREVIOUS
VOLUME
NEXT
PROGRESS
TIME
MUTE/
UNMUTE
RETURN
PLAYING
CIRCULAR LY
ENTER INTO
AUDIO FILES
PLAYING
RANDOMLY
Indi cat es that the song has been
suspende d/stopped .Click to cont inue
playing.
Click to sto p so ng playin g
Play previ ous song
Play next so ng
Use t ouch pe n to dra g but ton left /r ight to a djust
vol ume, le ft to dec rease v olume , and rig ht to
inc rease v olume
Use touc h pen to dr ag th e button left /rig ht to ad just
the process . Move the pen left to r eturn to a c ertai n
poi nt an d con tinue playing , and righ t to for ward to a
cer tain po int and c ontin ue play ing
Displays t he played tim e of a s ong
Returns t o the p revious in terface with
music stil l running
Select to ci rc le random p la y
Vie w your Audio fil es
Selects Or di nal play
MUTE/UN MUTE
Page 9

Chapter Ⅲ Using
the Au dio Player
3.2.2 Inte rface of audi o folder:
The s creen below s hows the Audio f older inter fa ce
Chapter Ⅳ
Settin g
PL YA
The table be low explain s th e icons in th e ab ove scree n
Play previ ous/next so ng
PREVIOUS
NEXT SONG
BACK
PREVIOUS
NEXT PAGE
Del ete the son gs
to pl aying f iles
Tap this butto n to d elete son gs
from the pla ylist
Displays t he content of
previous / next page
Play the son g you select im me diately
Returns to t he p revious i nt erface wi th
music stil l ru nning
Thi s chapter explains the step s to be carri ed out to set up the devi ce for
operatio n.
Click the “Setti ngs” icon to enter the “Setti ngs” menu and set up the
system. T he s et up f unction include s: “Ca librate Setup”, “Powe r Setu p”,
“Backlig ht Setup” , “Date An d Time S etup”, “L anguage Setup” And “Volume
Setup”.
The table be low depict th e ic ons and the ir f unctions
Language
Backligh t
Date and tim e
Power
Calibrat e
informat ion
Volume
Displays system language options and system
outlook op tions.
Adj usts the bac kligh t of the touch scre en; Ena bles the use r to adju st
the int erval time fo r LED- off whe n power is s uppli ed by ba ttery and the
int erval t ime for L ED-of f when po wer is su pplie d by main s
Set s the dat e for the s ystem ; Sets th e ti me f or t he s ys te m;
Ena bles th e user to c hoose t he time -zone f or the sy stem.
Adj usts the volu me of the speak er; The v ol um e of s ta rt /c lo se
ind icati ng tone c an thus b e adjus ted
Examines t he current ba tt ery level .
Calibrat e the sensiti vi ty of the tou ch s creen
Page 10

Chapter Ⅳ
Settin g
4.3 Ba ck li gh t set up
Tap in the set ting menu to en ter Brightn ess for backl ight adjust ing,
as shown bel ow.
4.1 Volume se tu p
Tap in the se tting me nu to e nter Volu me setti ngs menu for vo lume
adjustin g, as shown bel ow.
Tap but to ns to adjus t th e volume. Then ta p v t o confirm
or tap × to canc el .
Chapter Ⅳ
Settin g
Volume
4.2 Po we r se tu p
Tap in t he sett in g menu to e nter Po wer men u for the c urrent ba ttery
status, as s ho wn below.
Powe r
The power me nu will displ ay the curren t ba ttery statu s. Tap v to r eturn.
Bright ness
Tap to ad ju st the back li ght level .
After setti ng u p, tap v to conf irm or tap × to can ce l.
4.4 Time and d at e se tup
Tap in the setting menu to ent er Time an d Date se tting menu for
changing t o the current t im e zone, as be lo w shown:
Time and Date
Tap to select the proper Time Zone. Tap to select the
corresponding date/time to adjust, then tap to change the
correspondings.
Then tap v to confirm or tap × to cancel.
Page 11

4.5 Lang ua ge s el ect io n
Tap in the settin g menu to ent er languag es setting menu for
language s electing, a s be low shown
Tap to select the languages.Then tap v to confirm or
tap × to cancel
Chapter Ⅳ
Settin g
langua ges
4.6 Cali br at e
Tap in t he settings m enu to calibr ate, the scre en will displ ay.
This item is u sed to ca librate the s ensitiv it y of the to uch screen. Tap the c enter
of “+” as i t moves around the sc re en. If you t ou ch the center of “+”every time,
it will disap pear a ft er hav ing mo ve d thro ugh a cycle(ce nter? to p left ? bottom
left? b ottom right ? top righ t) . Tap th e screen to ret ur n to the sett in gs menu.
Note: If “+” doe sn 't disapp ea r, you shoul d ca librate aga in.
cali brate
ENGLISH
Use of M ou nt Acces so ri es
When us in g the u nit in vehicle, you can use th e suppli ed mount accessori es to
mount the un it in the vehic le .
If you want to m ou nt the unit t o th e dashboa rd , you can use the a dhesive dis k:
1) Choose a clea n, dry spot on yo ur d ashboar d;
2) Peel off protecti on liner from t he back of the di sk;
3) Attach the di sk to your dash bo ard;
4) Mount the bra cket to the adh es ive disk.
Chapter Troub le s ho ot ing
Take steps described in the ta bles be lo w to so lve simpl e problem s before
contacti ng customer s er vice.
If you suspect something wrong with this un it, imme di ately turn the powe r off
and disc on nect the power con nector from the unit. Nev er try to repair the un it
yourself b ecause it is da ng erous to do s o.
Ⅴ
Pro blem Po ss ib le c au se Possible Solution
There is no so und
The v olume m ay be tur ned dow n
Turn up the volume
There is no pi cture
The b right ness ma y by turn ed down
Adj ust the b right ness
of th e LCD
Chapter Ⅴ
Othe r po ss ib ili ti es :
Static or othe r exter nal inter ference may caus e the u nit fun ct ion
abnormal ly. In o rd er to recove r normal statu s, ple as e unpl ug the power supply
cord and th en p lu g it into the outlet again to reset the unit. If th e pr ob lems still
exist, pleas e cut off the power supp ly and con sult your service cen ter or the
qualifie d technicia n.
Page 12

Chapter Ⅵ Speci fic ati on
Chapter Ⅵ
TFT Sc reen si ze
Frequenc y Respo nse
Audio Signal-t o-nois e Rate
Audio distoutio n or noise
Channel Separat ion
Dynamic Range
Power
Power Consumpti on
Dimensio ns
Wei ght
3.5 i nches
20Hz 20KHz~
≥80db
<8W
110m m×85mm 25mm(L*W*D)×
About 0.2kg
= - 20db(1K Hz)
≥70db(1K Hz)
≥85db(1K Hz)
AC 100~2 40V,50/60Hz;D C5V
DESI GN A ND SPECIF ICATIONS AR E SUBJECT TO
CHANG E WITH OUT N OTI CE.
 Loading...