

Page 1
Page 2

Note
It may cause damage to the SD/MMC/MS card/USB
device and the unit when any memory card or USB
device is inserted or removed without turning off the
unit.
Safety precaution
1) Use only the supplied adaptor with Input 100-240V,
Output 5V.
2) Turn off power before cleaning. Use only a soft
cloth to clean the unit
Do not use liquid cleaners.
3) Avoid exposing the unit to extreme heat.
4) Do not disassemble the Digital Photo Frame,
otherwise it may result in electric shock and void
your warranty.
Page 3

Content
Note .............................................................................0
Safety precaution.......................................................0
Content........................................................................1
Introduction................................................................2
1、Features..........................................................2
2、Packaging Check List .....................................3
3、Specifications..................................................3
Product Diagram........................................................4
A. Top View...........................................................4
B. Front View ........................................................4
C. Rear View ........................................................5
D. Side View .........................................................5
Using Y our Digit al Photo Frame...............................6
Viewing Modes .....................................................6
File Saving............................................................6
Technical Notes..........................................................7
Question/Troubleshooting Guide.............................7
1
Page 4

Introduction
Your new Digital Photo Frame lets you view digital
pictures from memory cards easily and quickly.
No computer or printer is needed
Includes convenient slide show mode, which starts
automatically when the Frame is turned on.
Supports many popular memory card types.
Easy to take with you to share photos with family and
friends anywhere.
A step beyond the traditional photo frame. View tens or
even hundreds of digital photos without the need to
pay for printing.
1、Features
7 inch TFT LCD
Supports Secure Digital (SD), Multimedia Card (MMC), Memory
Stick (MS) memory card formats and USB JUMP DRIVE
View the pictures from memory cards directly
Resolution: 480X234 pixels
Supports high-resolution photos
Automatic start of slide show
2
Page 5

2、Packaging Check List
Digital Photo Frame
User Manual
Quick Start Guide
AC Adaptor
3、Specifications
Panel Size 7 inches
Resolution 480X234
Brightness 200 CD/M²
Contrast 300:1
View Angle (U/D/L/R) (CR≥10) 40/60/60/60
Response Time 15ms Ton
Screen Size Mode 16:9
File Format Type JPEG
Max. Photo Size 10 mega pixels
Power Requirement 5V DC
Power Consumption <10 W
Operating Temperature
Storage Temperature
14~158℉ (-10~70℃)
-4~176℉(-20~80℃)
3
Page 6
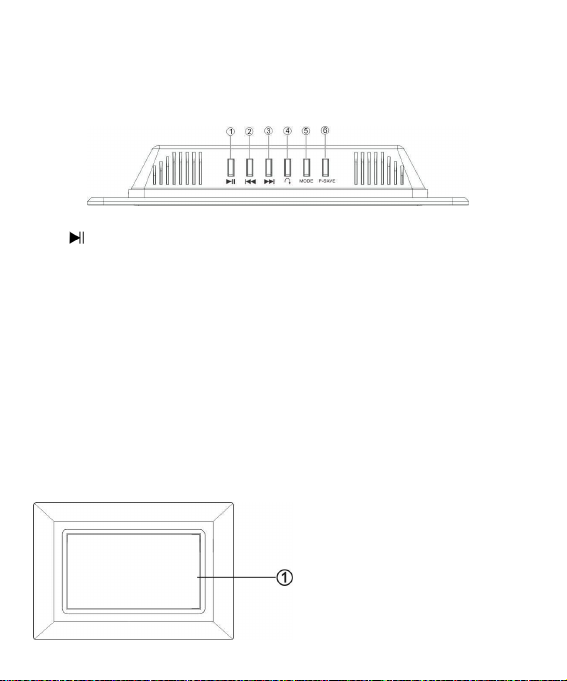
Product Diagram
A. Top View
Button
1.
Pause or resume the playback.
2. Button
Go to the previous picture.
3. Button
Go to the next picture.
4. Rotate Button
Rotate the current picture.
5. MODE Button
Change the display mode
B. Front View
among Pan Scan, Fill, Original
and Auto Fit.
Change the aspect ratio
between 16:9 and 4:3. (Press
and hold for a moment).
6. P-SAVE Button
Enter the power save mode.
Then press it again to exit the
power save mode.
1. LCD Screen
4
Page 7
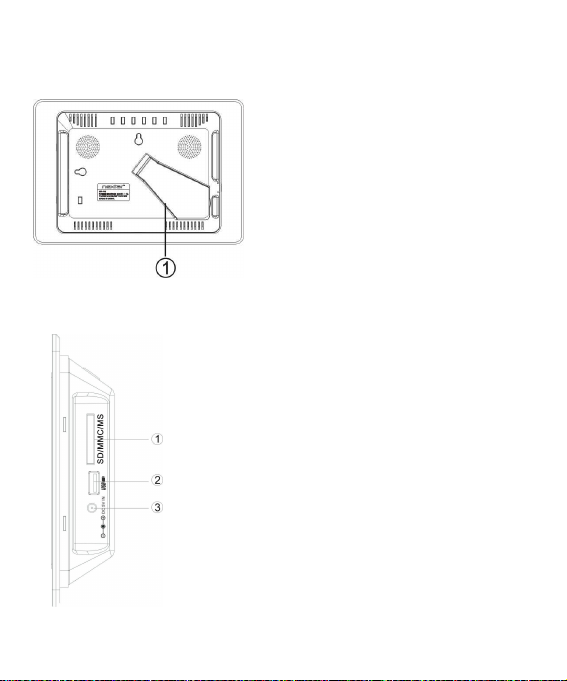
C. Rear View
D. Side View
1. Stand
Support the Digital Photo Frame.
1. SD/MS/MMC Card Port
Insert SD/MS/MMC card into this port.
Or pull out the SD/MMC/MS card from the port.
2. USB Port
Connect USB device, such as USB flash disk.
3. DC 5V IN
Connect the supplied adaptor.
5
Page 8

Using Your Digital Photo Frame
Install the stand for tabletop display. Connect the AC adaptor.
Insert a memory card in the Digital Photo Frame (with the card’s
electrical contacts towards the front of the unit.). A slide show will
begin automatically.
To enter the power save, press the P-SAVE button.
Press the
briefly and the slide show will be stopped. The current photo will
remain on the screen until the button is pressed again, at which time
the slide show will resume.
To display the previous or next picture, press the button.
The Rotate button allows photos to be turned proper viewing. Press
repeatedly to rotate the current picture clockwise:
90°
Viewing Modes
Press the MODE button to select display mode: Pan Scan, Fill,
Original and Auto Fit. Press the MODE button and hold for a moment
to change the aspect ratio between 16:9 and 4:3.
File Saving
Photos must be saved in the JPEG format in order to be viewed on
the Digital Photo Frame. Nearly all digital cameras will save in this
format by default. Photos that have been saved with certain image
editing programs can fail to display properly.
button, the word Pause will appear on the screen
180° 270°.
6
Page 9

Technical Notes
1. Your Digital Photo Frame is a sophisticated electronic device.
Do not drop or subject the unit to jarring or strong vibrations.
2. Avoid placing the Digital Photo Frame in areas of high humidity
or where it might be subjected to splashing.
3. The panel is made of plastic and can be easily damaged. Avoid
sharp objects.
4. Use only a soft dry cloth to clean the screen
Question/Troubleshooting Guide
This chapter presents some troubleshooting problems you may
encounter while using the device. Even if the following guide fails to
solve your problem, please do not disassemble the device, but leave
the problems to professional staff.
1. Question: What kind of photos does this device’s supports?
Answer: The Frame will display digital photos that are stored in the
JPEG format which is the standard format for nearly all digital
cameras. Some cameras allow images to be stored as TIFF or as
RAW files, as well as JPEG. Only the JPEG format is compatible
2. Question: What should I do if the system does not respond
when the power is turned on?
Answer: Make sure the unit is properly connected to a power source.
Then turn it off, reconnect the power and turn it on again.
7
Page 10

3. Question: Why is the memory card not recognized?
Answer: The memory card might be inserted rearwards or is not
pushed in far enough. After inserting the memory card in the right
direction, if the card still cannot be read, please turn off the unit and
then power it again.
8
Page 11

This device complies with part 15 of the FCC Rules. Operation is
subject to the following two conditions:
(1) This device may not cause harmful interference.
(2) This device must accept any interference received, including
interference that may cause undesired operation.
Note: This equipment has been tested and found to comply with
limits for Class B digital device, pursuant to part 15 of the FCC Rules.
These limits are designed to provide reasonable protection against
harmful interference in a residential installation. This equipment
generates, uses and can radiate radio frequency energy and, if not
installed and used in accordance with the instructions, may cause
harmful interference to radio or television reception, which can be
determined by turning the equipment off and on, the user is
encouraged to try to correct the interference by one or more of the
following measures:
1. Reorient or relocate the receiving antenna.
2. Increase the separation between the equipment and the receiver.
Connect the equipment into an outlet on a circuit different from
that to which the receiver is connected.
3. Consult the dealer or an experience radio/TV technician for help.
9
Page 12

Nextar™ a trademark of Nextar (Hong Kong) Limited
Nextar may find it necessary to modify, amend or
otherwise change or update this manual.
We may reserve the right to do this at any time, without
any prior notice.
All specifications and features are subject to change
without notice.
© NEXTAR, INC. AND ITS AFFILIATES
LA VERNE, CA 91750. USA
All products distributed by Nextar, Inc.
Unless otherwise indicated
© 2008 Nextar (Hong kong) Limited. Nextar (Hong Kong) Limited
claims trademark rights in Nextar
product names and trademarks are the property of their
registered owners.
TM
. All other brand names,
1661 FAIRPLEX DRIVE
www.nextar.com
Made in China
10
Page 13

Note
La carte SD/MMC/MS, le dispositif USB et l’appareil
peuvent subir des dommages lorsqu’une carte
mémoire ou qu’un dispositif USB est inséré ou retiré
sans que l’alimentation de l’appareil ne soit
désactivée.
Précautions de sécurité
1) Utiliser uniquement l’adaptateur fourni avec une
entrée 100-240 V, sortie 5 V.
2) Désactiver l’alimentation avant de nettoyer
l’appareil. Utiliser uniquement un chiffon doux pour
le nettoyage. Ne pas utiliser des nettoyants
liquides.
3) Éviter d’exposer l’appareil à une chaleur extrême.
4) Ne pas désassembler le cadre photo numérique,
autrement une décharge électrique et l’annulation
de la garantie pourraient se produire.
1
Page 14

Table des matières
Note .............................................................................0
Précautions de sécurité ............................................1
Table des matières.....................................................2
Introduction................................................................3
1、Caractéristiques.................................................. 3
2、Liste de vérification de l’emballage......................4
3、Spécifications......................................................4
Diagramme du produit...............................................5
A. Vue aérienne
B. Vue frontale............................................................ 6
C. Vue arrière..............................................................6
D. Vue latérale............................................................ 6
Utilisation de votre cadre photo numérique ...........7
Modes de visionnement
Sauvegarde des fichiers ............................................8
Notes techniques.......................................................9
Questions/Guide de dépannage...............................9
..........................................................5
.............................................7
2
Page 15

Introduction
Votre nouveau cadre photo numérique vous permet
d’admirer facilement et rapidement des photographies
numériques provenant de vos cartes mémoire.
Aucun ordinateur ni imprimante n’est requis.
Comprend un mode diaporama commode, lequel
s’amorce automatiquement lorsque l’alimentation du
cadre est activée.
Soutient plusieurs types de cartes mémoire courantes.
Facile à transporter partout avec vous pour partager
des photos avec votre famille et vos amis.
Un avantage certain sur un cadre photo traditionnel.
Visualisez des dizaines et même des centaines de
photos sans avoir à payer pour l’impression.
1、Caractéristiques
Écran TFT ACL de 7 pouces
Soutient les formats de cartes mémoire Secure Digital
(SD), Multimedia Card (MMC), Memory Stick (MS) et la
clé USB
Visualisation des photos directement des cartes
mémoire
Résolution : 480 x 234 pixels
Soutient les photos haute résolution
Amorçage automatique du diaporama
3
Page 16

2、Liste de vérification de l’emballage
Cadre photo numérique
Guide de l’utilisateur
Guide de démarrage rapide
Adaptateur CA
3、Spécifications
Dimension du panneau 7 pouces
Résolution 480 x 234
Luminosité 200 cd/m²
Contraste 300:1
Angle de visionnement
(U/D/L/R) (CR≥10)
Temps de réponse 15 ms Ton
Rapport largeur-hauteur de
l’écran
Format de fichiers JPEG
Dimension maximale des photos 10 mégapixels
Exigence d’alimentation 5 V CC
Consommation d’énergie <10 W
Température de fonctionnement 14 à 158 °F (-10 à 70 °C)
Température d’entreposage -4 à 176 °F (-20 à 80 °C)
40/60/60/60
16:9
4
Page 17

Diagramme du produit
A. Vue aérienne
1. Touche
Enfoncez pour interrompre ou
reprendre la lecture.
2. Touche
Enfoncez pour atteindre la photo
précédente.
3. Touche
Enfoncez pour atteindre la photo
suivante.
4. Touche de rotation
Enfoncez pour faire pivoter la
photo en cours.
5. Touche MODE
Enfoncez pour commuter entre
les modes d’affichage suivants :
recadrage automatique, plein,
original et remplissage
5
automatique.
Modifiez le rapport
largeur-hauteur entre 16:9 et 4:3.
(Maintenez la touche enfoncée
pendant un moment).
6. Touche P-SAVE
Enfoncez pour accéder au mode
d’économie de l’énergie.
Enfoncez-la à nouveau pour
quitter le mode d’économie
d’énergie.
Page 18

B. Vue frontale
C. Vue arrière
D. Vue latérale
1. Port pour carte SD/MS/MMC
Insérez la carte SD/MS/MMC dans ce port.
Ou retirez la carte SD/MMC/MS du port.
2. Port USB
Raccordez le dispositif USB, tel un disque à mémoire
flash USB.
3. Entrée CC 5 V
Raccordez l’adaptateur fourni.
1. Écran ACL
1. Socle
Soutient le cadre photo numérique.
6
Page 19

Utilisation de votre cadre photo
numérique
Installez le socle pour un écran sur table. Raccordez l’adaptateur CA.
Insérez une carte mémoire dans le cadre photo numérique
(avec les contacts électriques de la carte pointant vers l’avant de
l’appareil). Un diaporama s’amorcera automatiquement.
Pour accéder au mode d’économie d’énergie, enfoncez la touche
P-SAVE.
Enfoncez la touche
l’écran et le diaporama sera interrompu. La photo en cours
demeurera à l’écran jusqu’à ce que la touche soit enfoncée à
nouveau, moment où le diaporama recommencera.
Pour afficher la photo précédente ou suivante, enfoncez la touche
.
La touche de rotation permet de faire pivoter les photographies afin
qu’elles soient correctement affichées. Enfoncez de façon répétée
pour faire pivoter la photographie en cours dans le sens des aiguilles
d’une montre : 90°
Modes de visionnement
Enfoncez la touche MODE pour sélectionner le mode d’affichage :
Recadrage automatique, Plein
automatique
. Maintenez la touche MODE enfoncée pendant un
, l’indication Pause apparaîtra brièvement à
180° 270°.
, Original et Remplissage
7
Page 20

moment pour commuter le rapport largeur-hauteur entre 16:9 et 4:3.
Sauvegarde des fichiers
Les photographies doivent être sauvegardées au format JPEG afin de
pouvoir être affichées sur le cadre photo numérique. Pratiquement
tous les appareils photo numériques sauvegarderont par défaut les
photographies dans ce format. Les photographies qui ont été
sauvegardées avec certains logiciels d’édition peuvent ne pas
s’afficher correctement.
8
Page 21

Notes techniques
1. Votre cadre photo numérique est un appareil électronique de
haute technicité. Ne le soumettez pas à des chutes, à des
secousses ou à de fortes vibrations.
2. Évitez de placer votre cadre photo numérique dans des endroits
où le taux d’humidité est élevé et où il peut être sujet à des
éclaboussures.
3. Le panneau est fabriqué de plastique et peut facilement être
endommagé. Évitez les objets pointus.
4. Utilisez uniquement un chiffon sec et doux pour nettoyer l’écran.
Questions/Guide de dépannage
Ce chapitre présente des suggestions pour résoudre les problèmes
que vous pouvez rencontrer en utilisant l’appareil. Même si ce guide
ne parvient pas à résoudre votre problème, veuillez ne pas
désassembler l’appareil – référez plutôt le problème à notre personnel
qualifié.
1. Question : Quelles sortes de photographies sont soutenues
par cet appareil?
Réponse : Le cadre affichera les photogra phie s numér iques q ui
sont sauvegardées au format JPEG, qui est le format standard de
pratiquement tous les appareils photo numériques. Certains appareils
photo permettent de sauvegarder des photographies au format TIFF
ou RAW, ainsi qu’au format JPEG. Toutefois, seul le format JPEG est
compatible avec le présent cadre.
9
Page 22

2. Question : Que dois-je faire si le système ne répond p as
lorsque l’alimentation est activée?
Réponse : Veuillez vous assurer que l’appareil est adéquatement
raccordé à une source d’alimentation. Une fois cela confirmé,
désactivez l’alimentation de l’appareil, rebranchez la source
d’alimentation et activez à nouveau l’alimentation de l’appareil.
3. Question : Pourquoi la carte mémoire n’est-el le p a s recon nue?
Réponse : La carte mémoire n’est peut-être pas insérée correctement
ou pas suffisamment enfoncée. Si la carte est insérée dans la bonne
direction, mais qu’elle n’est toujours pas reconnue, désactivez et
réactivez l’alimentation de l’appareil
.
10
Page 23

Cet appareil satisfait à la partie 15 des règlements de la FCC des
États-Unis. Son fonctionnement est sujet aux deux conditions
suivantes :
(1) Cet appareil ne cause pas d’interférences nuisibles.
(2) Cet appareil doit accepter toute interférence reçue, y compris les
interférences qui peuvent entraîner un fonctionnement indésirable.
Note : Cet appareil a été mis à l’essai et considéré satisfaire aux
limites de la Classe B des appareils numériques, en vertu de la partie
15 des règlements de la FCC des États-Unis. Ces limites sont conçues
pour fournir une protection raisonnable contre les interférences
nuisibles dans une installation résidentielle. Cet appareil génère
utilise et peut émettre une énergie de radiofréquence et
pas installé et utilisé conformément aux instructions, peut causer des
interférences nuisibles à la réception des postes de
téléviseurs, qui peuvent être déterminées en activant et
désactivant l’alimentation de l’appareil. L’utilisateur est encouragé
à tenter de remédier aux problèmes des interférences par l’une ou
plusieurs des méthodes suivantes :
1. Réorienter ou déplacer l’antenne de réception.
2. Augmenter la distance entre l’appareil et le récepteur
l’équipement dans une prise située sur un circuit différent de
celui auquel est raccordé le récepteur.
3. Consulter le détaillant ou un technicien qualifié en postes radio
ou en téléviseurs pour obtenir de l’aide.
, s’il n’est
radio ou des
,
. Brancher
11
Page 24

Nextar™ est une marque de commerce de Nextar (Hong Kong)
Limited
Nextar peut, s’il le juge nécessaire, modifi er, altérer ou d’une façon
quelconque changer ou mettre à jour ce guide.
Nous nous réservons le d ro it de procéder ainsi en tout t emps, et ce,
sans avis préalable.
To utes les spécif ication s et ca ractér istiqu es peuv ent être mod ifiées
sans préavis.
© NEXTAR, INC. ET SES FILIALES. Tous droits réservés.
1661 FAIRPLEX DRIVE
Tous les produits sont distribués par Nextar, Inc.
© 2008 Nextar (Hong kong) Limited. Tous droits réservés.
Nextar (Hong Kong) revendique les droits de marque de
TM
Nextar
. Tous les autres noms de marque, de produit et toutes
les autres marques de commerce sont la propriété des
propriétaires respectifs de la marque déposée.
LA VERNE, CA 91750. ÉTATS-UNIS
à moins d’indication contraire
www.nextar.com
Fabriqué en Chine
12
N720808EF01
 Loading...