

Page 1
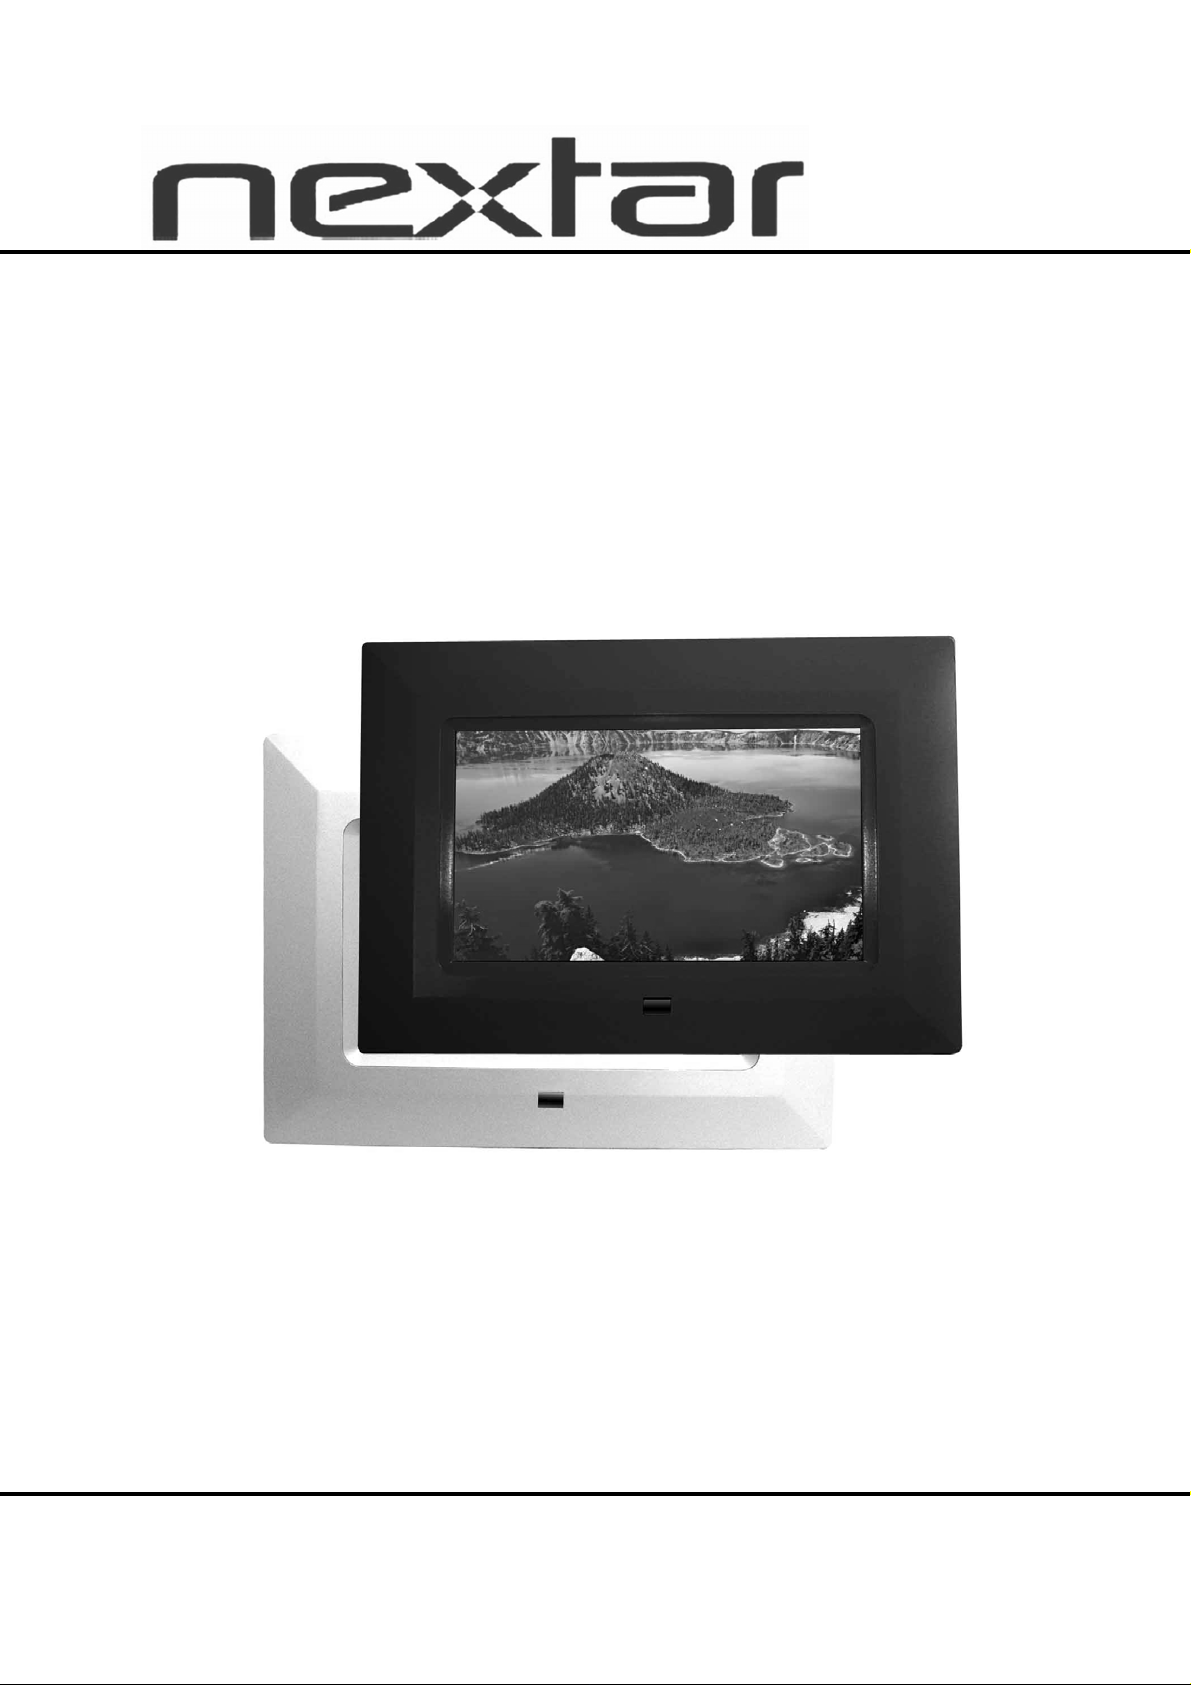
N7-110
User’s Manual
Digital Photo Frame
Page 2

Introduction
Thank you very much for choosing our Digital Photo Frame.
Before you begin using this device, please read this manual thoroughly and keep it
available for future reference. This manual will present you with the exciting features
provided by our Digital Photo Frame.
With our Digital Photo Frame, you can easily and quickly view photos directly from
your digital camera’s memory card. You can even create a slideshow with multiple
transition effects. No computer, digital camera, or Internet connection is required.
Our Digital Photo Frame is compatible with the following memory cards and ports: SD,
MultiMedia Card, Memory Stick, and Memory Stick PRO.
Main Features
★ This device can display digital pictures (JPEG).
★ Compatible with Secure Digital Card (SD), MultiMedia Card (MMC), Memory Stick
and Memory Stick Pro.
★ Handy remote control
★ Automatic slide show with multiple transition effects and clock display.
★ User-friendly on-screen display allows you to access all functions easily.
Safety Precautions and Maintenance
★ For indoor use only.
★ To reduce the risk of fire or electric shock, do not expose this appliance to rain or
moisture.
★ To prevent overheating, never block any vents on the back of the digital photo
frame.
★ Keep your Digital Photo Frame out of direct sunlight. Direct sunlight may cause
damage.
★ Always use the buttons built in to the memory card slots to remove memory cards
from the device.
★ Do not disassemble the Digital Photo Frame, otherwise it may result in electric
shock and void your warranty. No user-serviceable parts inside.
★ Protect the device from condensation, which could damage your Digital Photo
Frame.
1
Page 3
How to Clean LCD Screen
★ Wipe the screen gently. The screen is made of glass and may be easily scratched
or broken.
★ To clean fingerprints and dust from the LCD screen, a soft, non-abrasive cloth
such as a camera lens cleaning cloth is recommended.
★ Do not apply cleaning liquid directly to the LCD screen if using LCD screen
cleaning kits available at retail outlets. Moisten the cleaning cloth with the
cleansing solution, then wipe the LCD screen with the damp cloth.
Screen Saver
★ Without a memory card, or when the appliance is in 「STOP」 or 「PAUSE」 mode,
a screen saver program will automatically start after 10 minutes. Pressing any
buttons will return the appliance to the main screen.
Please STOP the device before you insert or remove any memory card or USB
device. Doing otherwise may cause damage to the card/USB and the device.
WARNING:
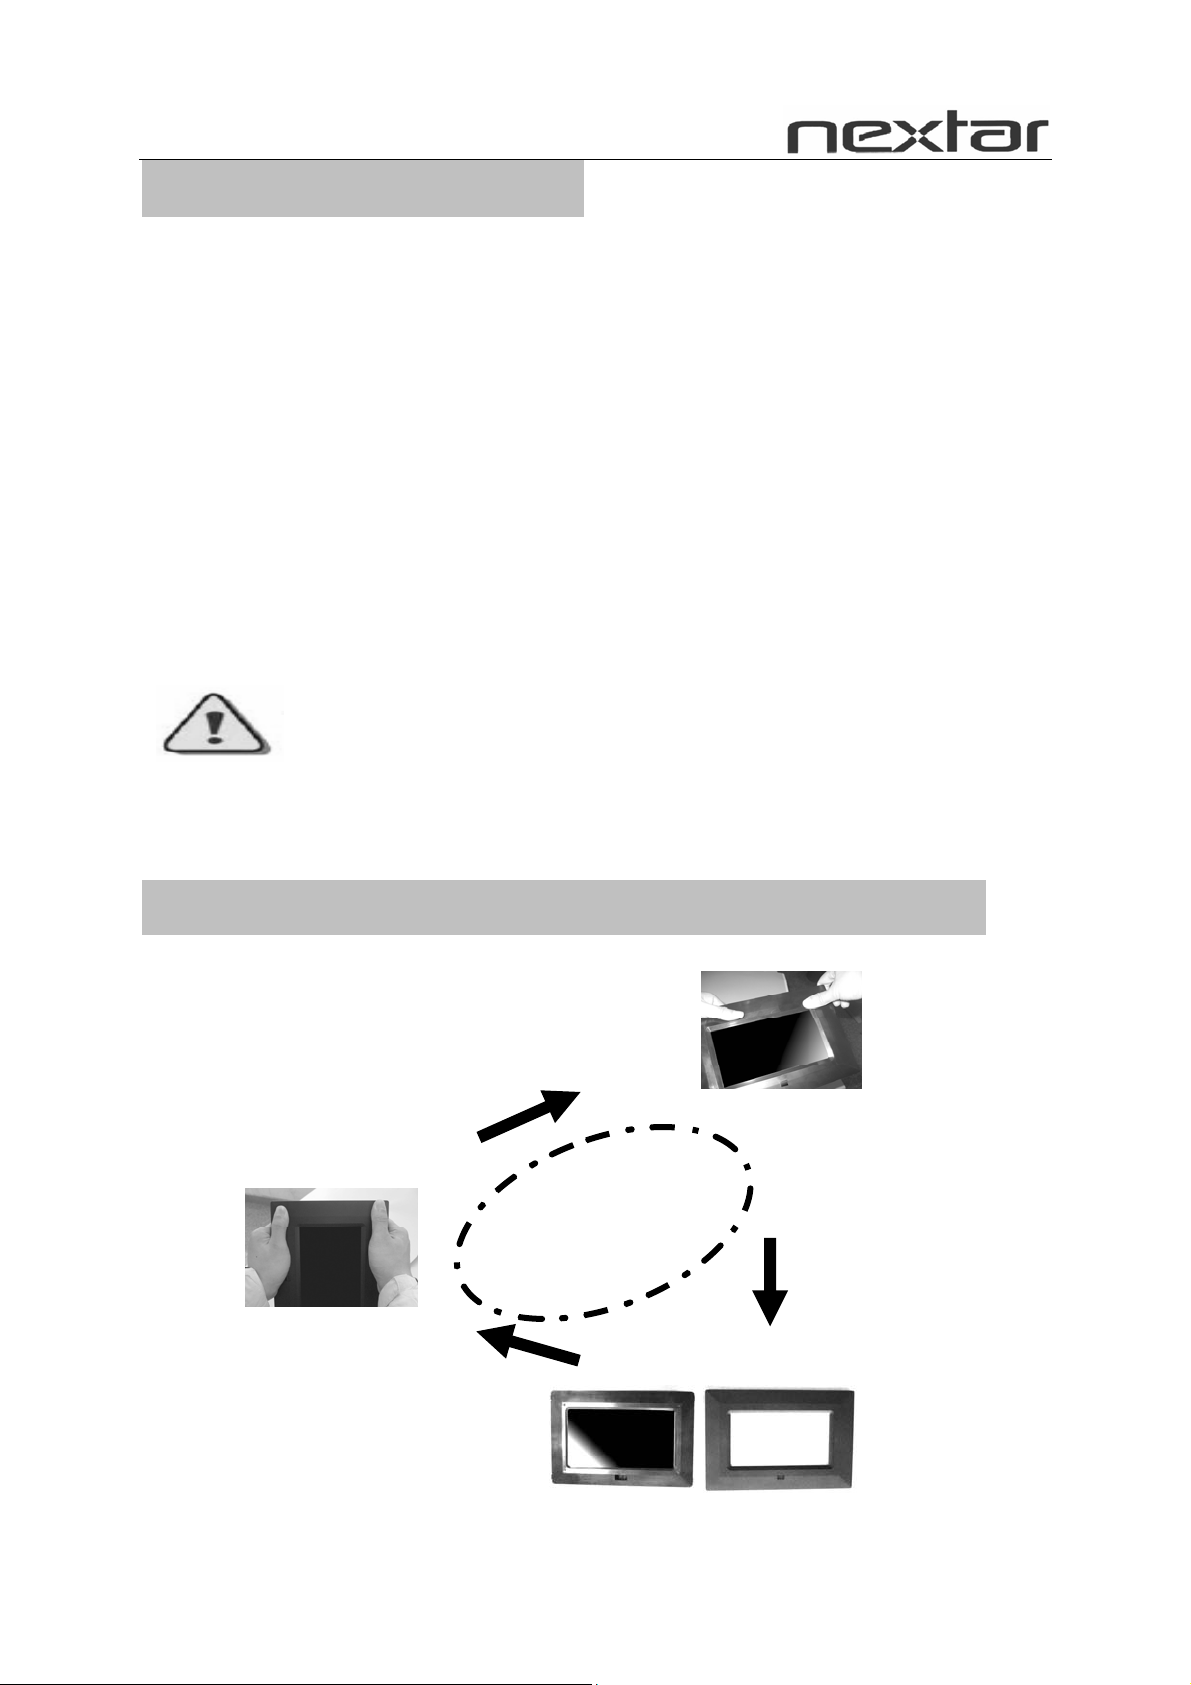
To Remove and Replace the Picture Frame Color Panel:
With both hands on the picture frame panel, place
thumbs on the upper portion of the frame and
index fingers at the corners. Lift the corners with
the index finger.
Photo 1
To change panel, simply place
the panel over the frame and
press down with thumbs and index
fingers.
Photo 3
Photo 2
Frame will lift off.
2
Page 4
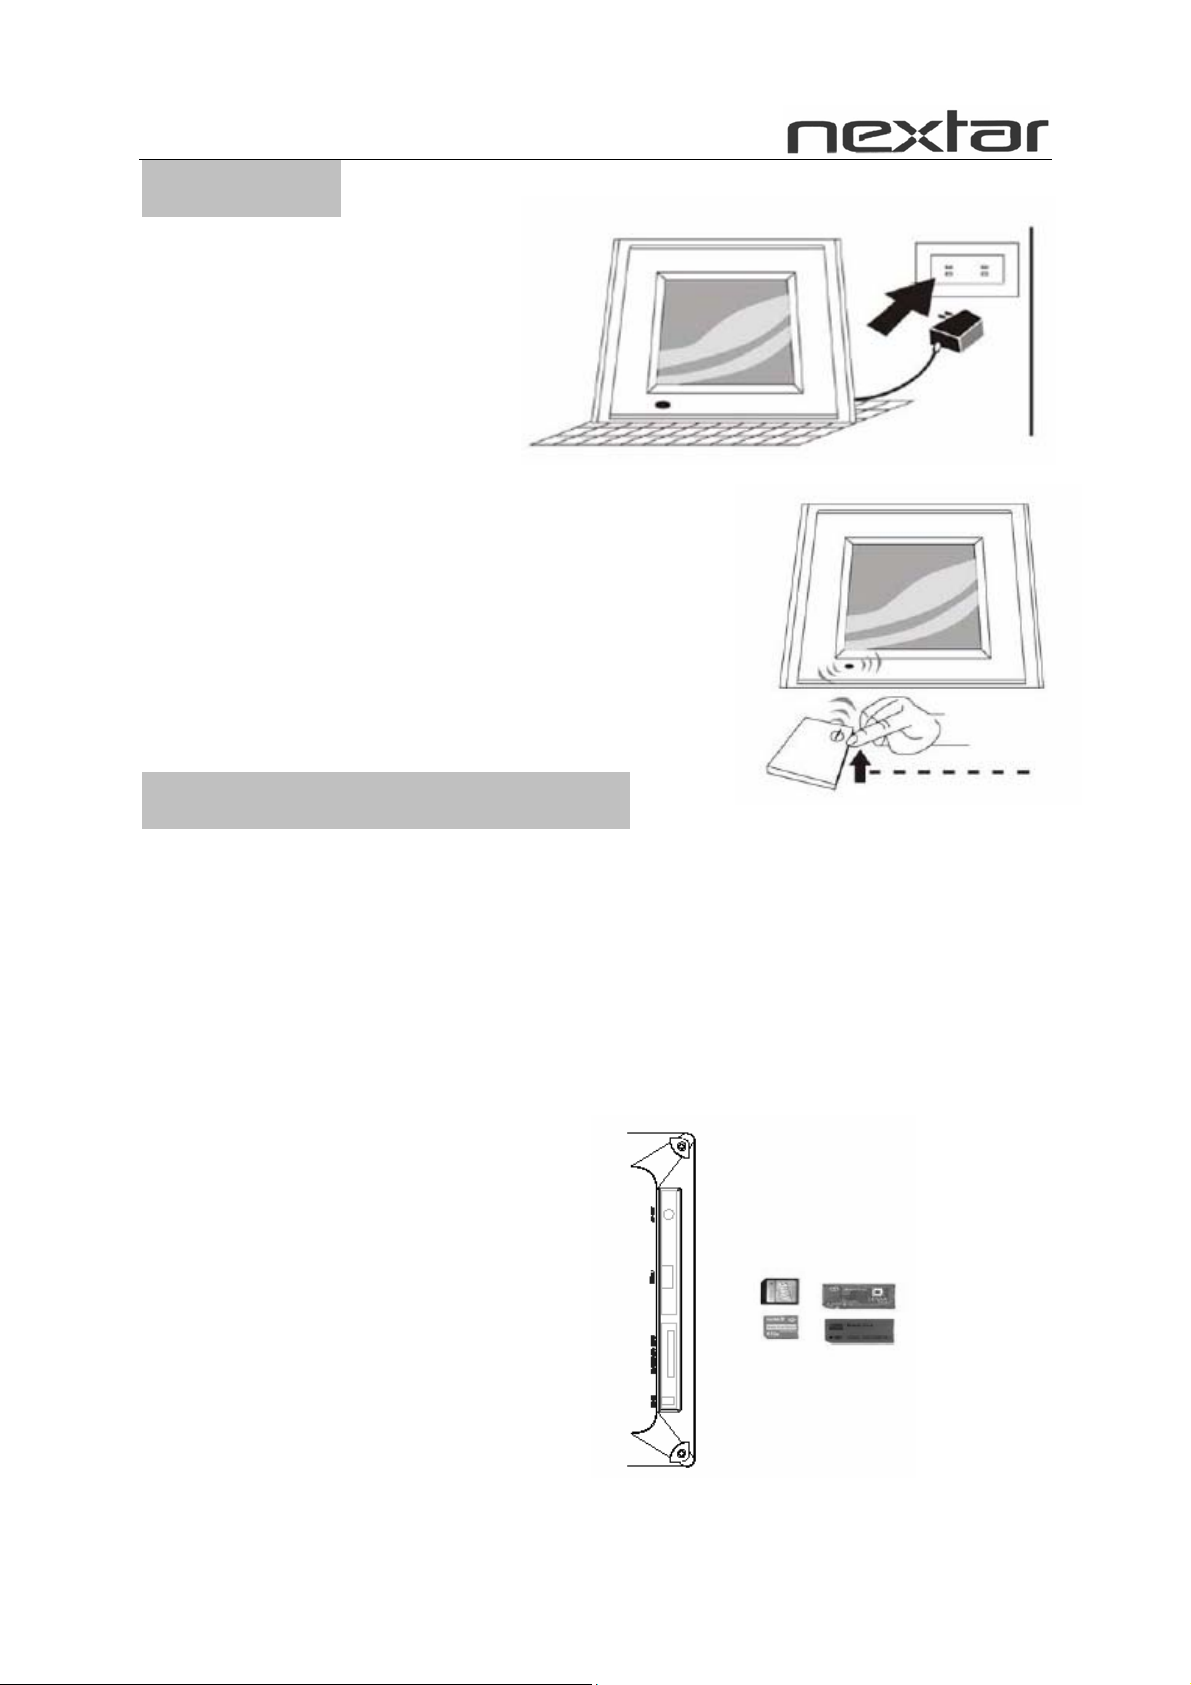
Preparation
1. Install the support bracket for
the device. Plug the Digital
Photo Frame power adaptor
into a working electrical outlet.
2. Turn on the main power using the switch
on the back of the Digital Photo Frame. Then press
the「POWER」 button on the remote control or
on the top of the Digital Photo Frame.
How to Insert Memory Cards
Your Digital Photo Frame is compatible with the following memory cards:
★ Secure Digital Card (SD)
★ Multimedia Card (MMC)
★ Memory Stick and Memory Stick Pro
Insert the memory card with its label facing up. Do not try to force a memory card
into the slot. If it is difficult to insert the card, you may be inserting the card
incorrectly.
Note: Only JPEG-format
digital image files can be read
by the Digital Photo Frame.
The device may fail to read
image files in other for
3
Page 5

Key Features and Remote Control
Key Functions:
1.MENU 2.ENTER
3.LEFT 4.RIGHT
5.UP 6.DOWN
7.DC IN
8.SD/MMC/MS CARD
78
1 23456
Remote Control
Note: before you use the remote
control, please remove all plastic
strips.
POWER: Press this button to turn the device
on/off.
PHOTO: Press this button to enter Slide Show
Mode available on the main menu.
CLOCK: Press this button to set up the time and
the calendar.
SETUP: Press this button to display the device’s
setup menu.
16:9/4:3: Press this button to choose the TFT
LCD aspect ratios between 4:3 and 16:9.
ZOOM: Press this button to enlarge the picture in
increments of 2, 3, 4, 1/2, 1/3, 1/4, OFF.
MENU: Press this button to display the main
menu.
4
Page 6

SLIDE SHOW: Press this button to
view the pictures one by one
automatically.
ROTATE: Press this button to adjust
the viewing angle of the pictures.
select the menu you want.
ENTER: Press “ENTER” for the
settings menu.
How to Install and Replace Remote Control Battery
1. Hold the remote control with the buttons facing downward.
2. Hold the remote control cover with one hand and use the other hand to pull the
3. Put a “CR2025” lithium battery into the battery tray with the positive “+” side
4. Push the battery tray back in.
: Press “ ” buttons to
battery tray out of the remote control cover.
facing up.
: Press this button once to freeze the playback
picture.
: Press this button once to halt playback
(pre-stop). Press the button again to terminate
playback function and return to the main menu.
: Press “ ” to return to the previous
title/chapter/track/picture.
: Press “ ” to skip ahead to the next
title/chapter/track/picture.
Main Menu
The screen will display as follows if the memory card has been correctly inserted.
Make sure you have stored a song, photo, or video file on your memory card.
PHOTO Enter the Photo display
mode directly
SETUP Enter the setup mode directly
CLOCK Enter the clock mode directly
SETUP:
Main menu:
z SYSTEM SETUP Parameter settings
z PHOTO SETUP Picture settings
z CLOCK SETUP Clock settings
5
Page 7

SYSTEM SETUP
Press the Right and Left arrow keys to navigate through the Setup Categories. Press
the Up and Down arrow keys to navigate through setup function items. Press the
Right and Left arrow keys to modify settings, and then press ENTER to confirm the
settings.
Operation:
OSD LANGUAGE: OSD language
settings.
DEFAULT: Restores your Digital Photo
Frame back to the factory default settings.
S/W VERSION: Shows the current version of the software.
PHOTO SETUP:
EFFECT: Allows you to activate or deactivate the photo display effects. Press the
Right or Left arrow keys and the ENTER button to turn OFF or ON (16 effects in
total).
FREQUENCY: Allows you to set the interval frequency with which the display will
change the photos. Press the Right or Left arrow keys and the ENTER button to set
the frame to DEFAULT and the interval: 10SECOND, 30SECOND, 1MINUTE,
30MINUTE, 1HOUR
JPEG INFO:Allows you to adjust
the JPEG photo ON/OFF settings.
Press the Right or Left arrow keys
and the ENTER button to turn
ON or OFF.
PLAY MODE:Allows you to adjust the order the photos will be displayed in. Press the
Right or Left arrow keys and the ENTER button to switch the mode between
NORMAL or RANDOM mode.
6
Page 8

CLOCK SETUP
Function:
DATE SETUP: Press arrow keys
and ENTER button to set the date.
TIME SETUP:Press arrow keys
and ENTER button to set the
time.
POWER ON: Press arrow keys and ENTER to set the time to power on the device.
POWER OFF: Press arrow keys and ENTER to set the time to power off the device.
How to Set the Clock
Set the local time and calendar
Press the Up and Down arrow keys to
select functions.
Press the Right and Left arrow keys to
select desired settings.
Press the ENTER key to confirm settings.
Specifications
Display: 7” TFT LCD 480 X 234 (RGB)
Power: AC Adapter; Input 100-240V; Output 12V 1-1.5A
Environmental Requirements
Operation: 0~35℃, Humidity 0~85%
Storage: -20~60℃, Humidity 10~90%
Accessories:
AV Adapter
Remote Control
Warranty Card
Registration Card
Return Card
Manual
7
 Loading...