

Page 1
N7-108
User’s Manual
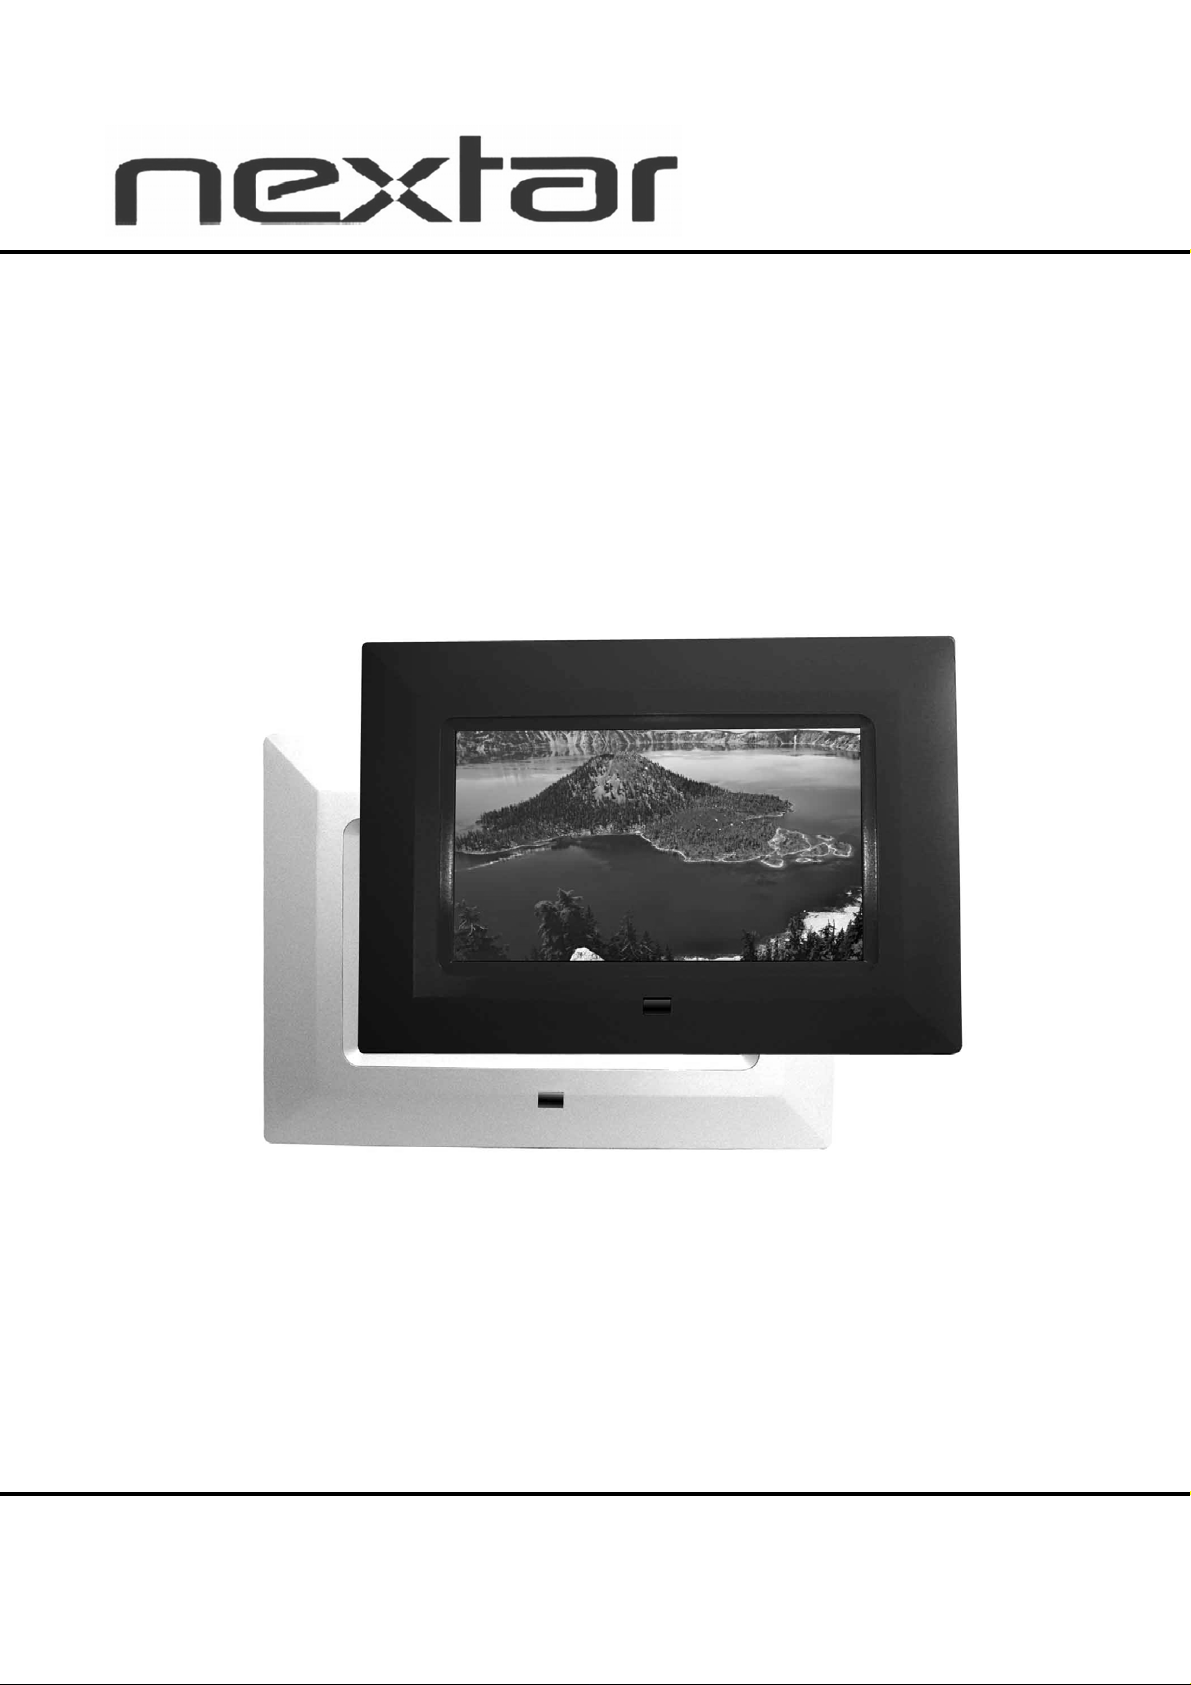
Digital Photo Frame
Page 2

Introduction
Thank you very much for choosing our Digital Photo Frame.
Before you begin to use this device, please read this manual thoroughly and keep it
available for future reference. This manual will present you with the exciting features
provided by our Digital Photo Frame, which allows you to enjoy unbelievably amazing
visual & audio experience.
With our Digital Photo Frame, you can easily and quickly view photos directly from
your digital camera’s memory card. You can even create a slideshow with multiple
transition effects. No computer, digital camera, or Internet connection is required.
Our Digital Photo Frame is compatible with the following memory cards and ports: SD,
MultiMedia Card, Memory Stick, and Memory Stick PRO and USB.
Main Features
★ This device can display digital pictures (JPEG) and play MP3 music or supported
video files without connecting a computer (memory card not included).
★ Compatible with Secure Digital Card (SD), MultiMedia Card (MMC), Memory Stick
and Memory Stick Pro.
★ Compatible with USB 2.0
★ The device can play MP3 files with high-quality integrated speakers.
★ The device can instantly play MEPG-1 and AVI* file(s) stored on supported
memory cards.
★ Handy remote control
★ Automatic slide show with multiple transition effects and display times.
★ The device can play a slide show with MP3 background music.
★ User-friendly on-screen display allows you to access all functions easily.
* Video files may not play properly if stored on a low-speed card.
* Not all AVI format video files will be supported.
1
Page 3

Safety Precautions and Maintenance
★ For indoor use only.
★ To reduce the risk of fire or electric shock, do not expose this appliance to rain or
moisture.
★ To prevent overheating, never block any vents on the back of the digital photo
frame.
★ Keep your Digital Photo Frame out of direct sunlight. Direct sunlight may cause
damage.
★ Always use the buttons built in to the memory card slots to remove memory cards
from the device.
★ Do not disassemble the Digital Photo Frame, otherwise it may result in electric
shock and void your warranty. No user-serviceable parts inside.
★ Protect the device from condensation, otherwise it may result in device damage.
How to Clean LCD Screen
★ Wipe the screen gently. The screen is made of glass and may be easily scratched
or broken.
★ To clean fingerprints and dust from the LCD screen, a soft, non-abrasive cloth
such as camera lens cleaning cloth is recommended.
★ Do not apply cleaning liquid directly to the LCD screen if using LCD screen
cleaning kits, available at retail outlets. Moisten the cleaning cloth with the
cleansing solution, then wipe the LCD screen with the damp cloth.
Screen Saver
★ Without a memory card or USB connection, or when the appliance is in 「STOP」
or 「PAUSE」 mode, a screen saver program will automatically start after 10 minutes.
Pressing any button will return the appliance to main functions.
Please STOP the device before you insert or remove any memory card or USB
device. Otherwise, it may cause damage to the card/USB and the device.
WARNING:
2
Page 4
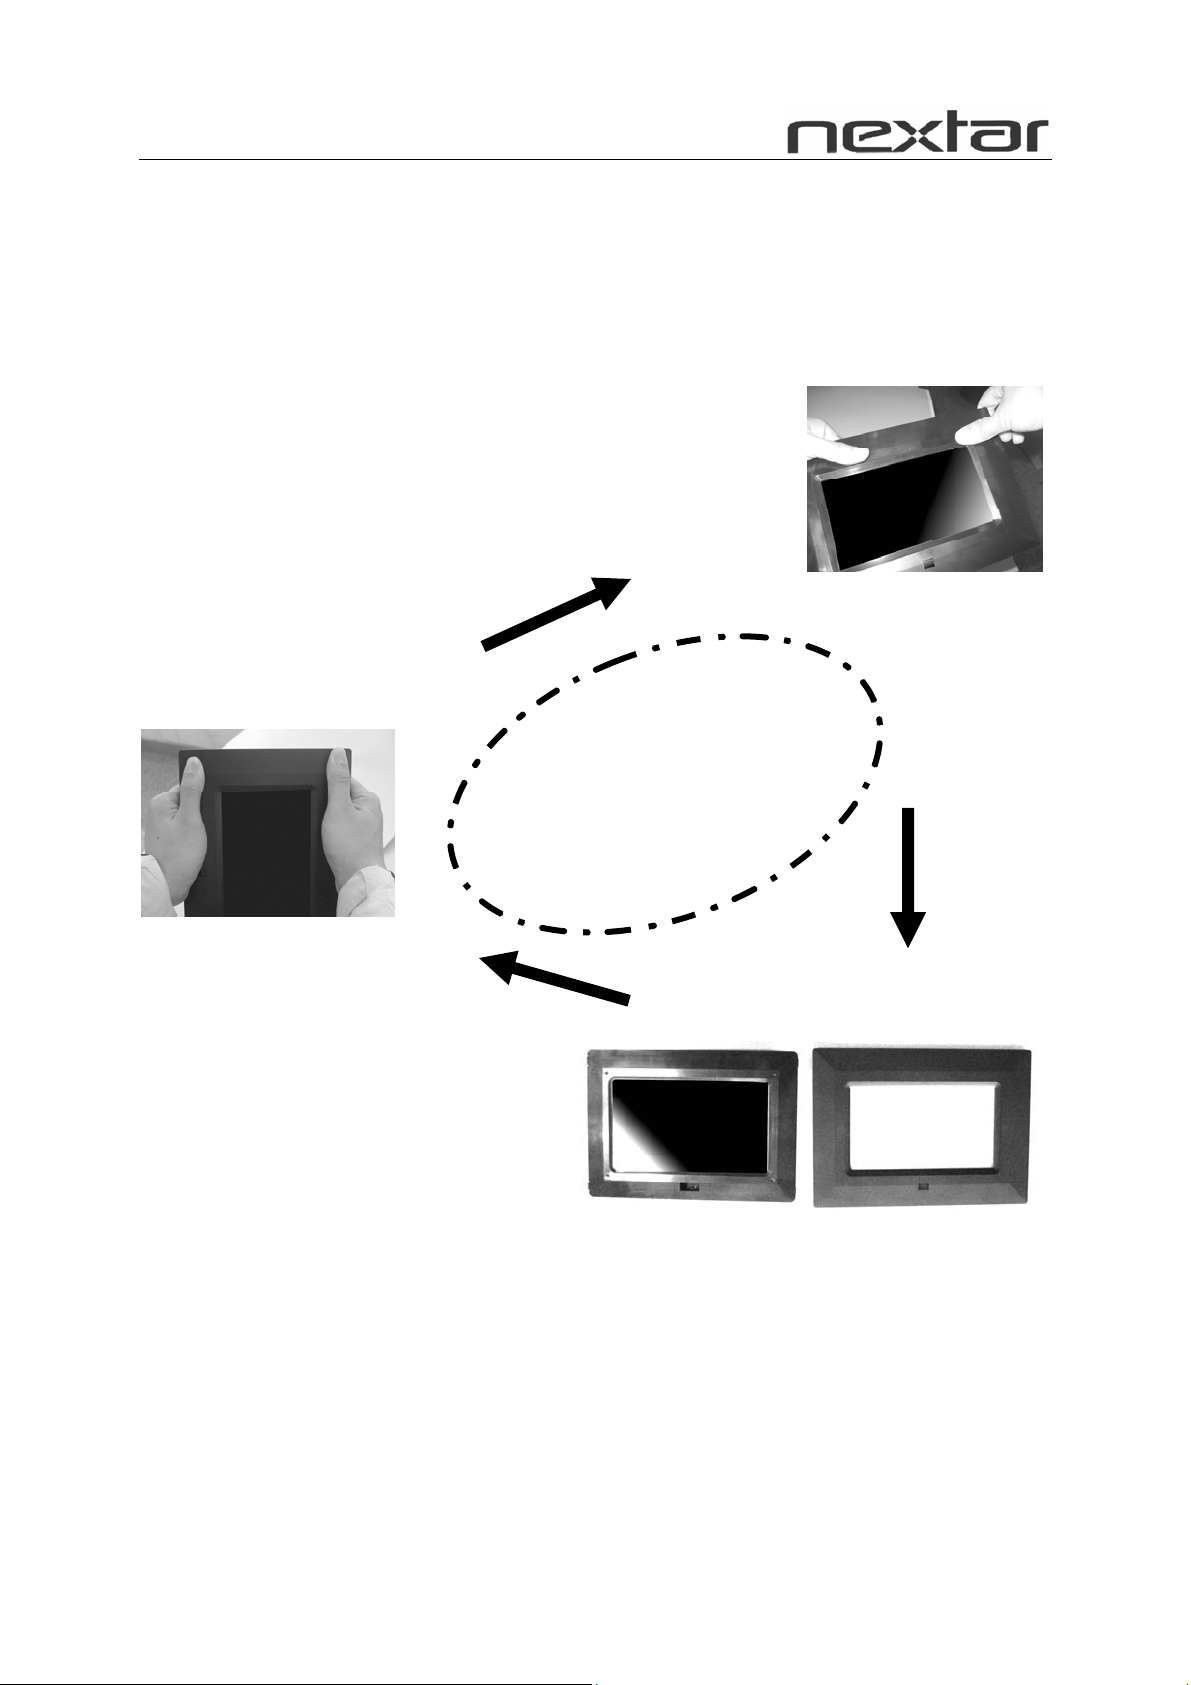
To Remove and Replace the Picture Frame
Color Panel:
Photo 1
With both hands on the picture frame
panel, place thumbs on the upper portion of
the frame and index fingers at the corners.
Lift the corners with the index finger.
Photo 3
To change panel, simply place
the panel over the frame and
press down with thumbs and
index fingers.
Photo 2
Frame will lift off.
3
Page 5
Preparation
1. Install the support bracket for
the device. Plug the Digital
Photo Frame power adaptor
into a working electrical outlet.
2. Turn on the main power using the switch
on the back of the Digital Photo Frame. Then press
the「POWER」 button on the remote control or
on the top of the Digital Photo Frame.
How to Insert Memory Cards
Your Digital Photo Frame is compatible with the following memory cards:
★ Secure Digital Card (SD)
★ Multimedia Card (MMC)
★ Memory Stick and Memory Stick Pro
Insert the memory card with its label facing up. Do not try to force a memory card
into the slot. If it is difficult to insert the card, you may be inserting the card
incorrectly.
Note: Only JPEG-format
digital image files can be read
by the Digital Photo Frame.
The device may fail to read
image files in other formats.
4
Page 6

Key Features and Remote Control
Key Functions:
1. POWER: Turn the device on / off.
2. ENTER: Press this button once to play the selected file. Press the button one
more time, the display will return to the Root Menu.
3. PHOTO: Press this button to select the「PHOTO」 Mode available on the
Main Menu.
4. MOVIE: Press this button to enter the 「VIDEO」Mode.
5. MUSIC: Press this button to enter the 「MUSIC」Mode.
6. USB: USB interface to connect to U disc/MP3 Player.
7. SD/MMC/MS CARD: Slots for SD/MMC/MS card insertion
8. DC IN: DC power Input
9. RESET
5
Page 7
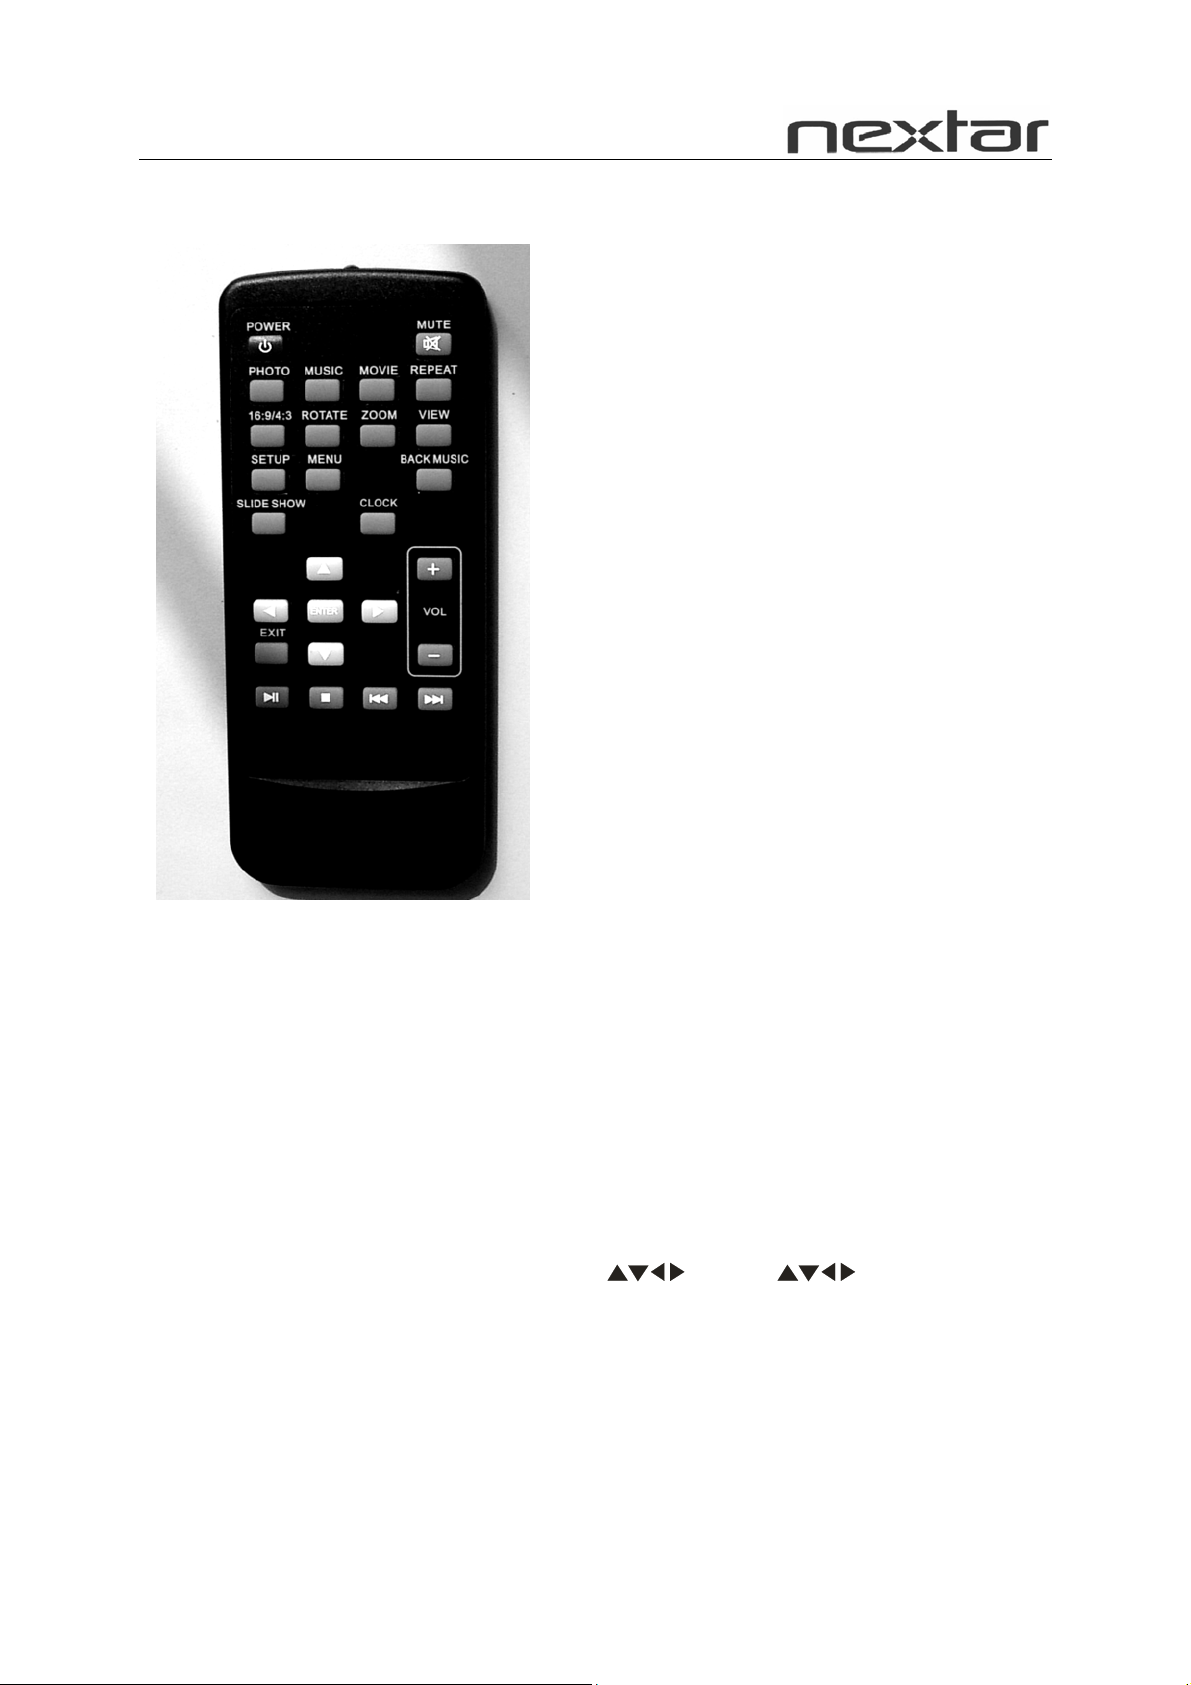
Remote Control
(Note: before you use the remote
MOVIE: Press this button to enter
「VIDEO」Mode.
REPEAT: Press this button to activate all
modes of the Repeat feature (chapter
repeat, title repeat, folder repeat, etc.)
16:9/4:3: Press this button to choose the
TFT LCD aspect ratios between 4:3 and
16:9.
ROTATE: Press this button to adjust the
viewing angle of the pictures.
ZOOM: Press this button to enlarge the
picture in increments of 2, 3, 4, 1/2, 1/3,
1/4, OFF.
VIEW: Press this button to turn on the
6-picture-view function, displaying 6
small pictures for navigation.
SETUP: Press this button to display the
device’s setup menu.
MENU: Press this button to display the
control, please remove all plastic
strips.)
POWER: Press this button to turn
the device on/off.
MUTE: Press this button to turn the
sound on/off.
PHOTO: Press this button to enter
Slide Show Mode available on the
main menu.
MUSIC: Press this button to enter
the Music Playback Mode.
main menu.
BACK MUSIC: Press this button to play
background MP3 music while displaying
slide shows or pictures.
SLIDE SHOW: Press this button to view
the pictures one by one automatically.
CLOCK: Press this button to setup the
time and the calendar.
: Press “ ” buttons to select
the menu you want.
6
Page 8

ENTER: Press “ENTER” for the settings menu.
EXIT: Press ”EXIT” to return to the previous menu.
VOLUME +/-: Press ”VOLUME +/-” to adjust the player’s volume.
: Press this button once to freeze the playback picture.
: Press this button once to halt playback (pre-stop). Press the button again to
terminate playback function and return to the main menu.
: Press “ ” to return to the previous title/chapter/track/picture.
: Press “ ” to skip ahead to the next title/chapter/track/picture.
How to Install and Replace Remote Control Battery
1. Hold the remote control with the buttons facing downward.
2. Hold the remote control cover with one hand and use the other hand to pull the
battery tray out of the remote control cover.
3. Put a “CR2025” lithium battery into the battery tray with the positive “+” side facing
up.
4. Push the battery tray back in.
7
Page 9

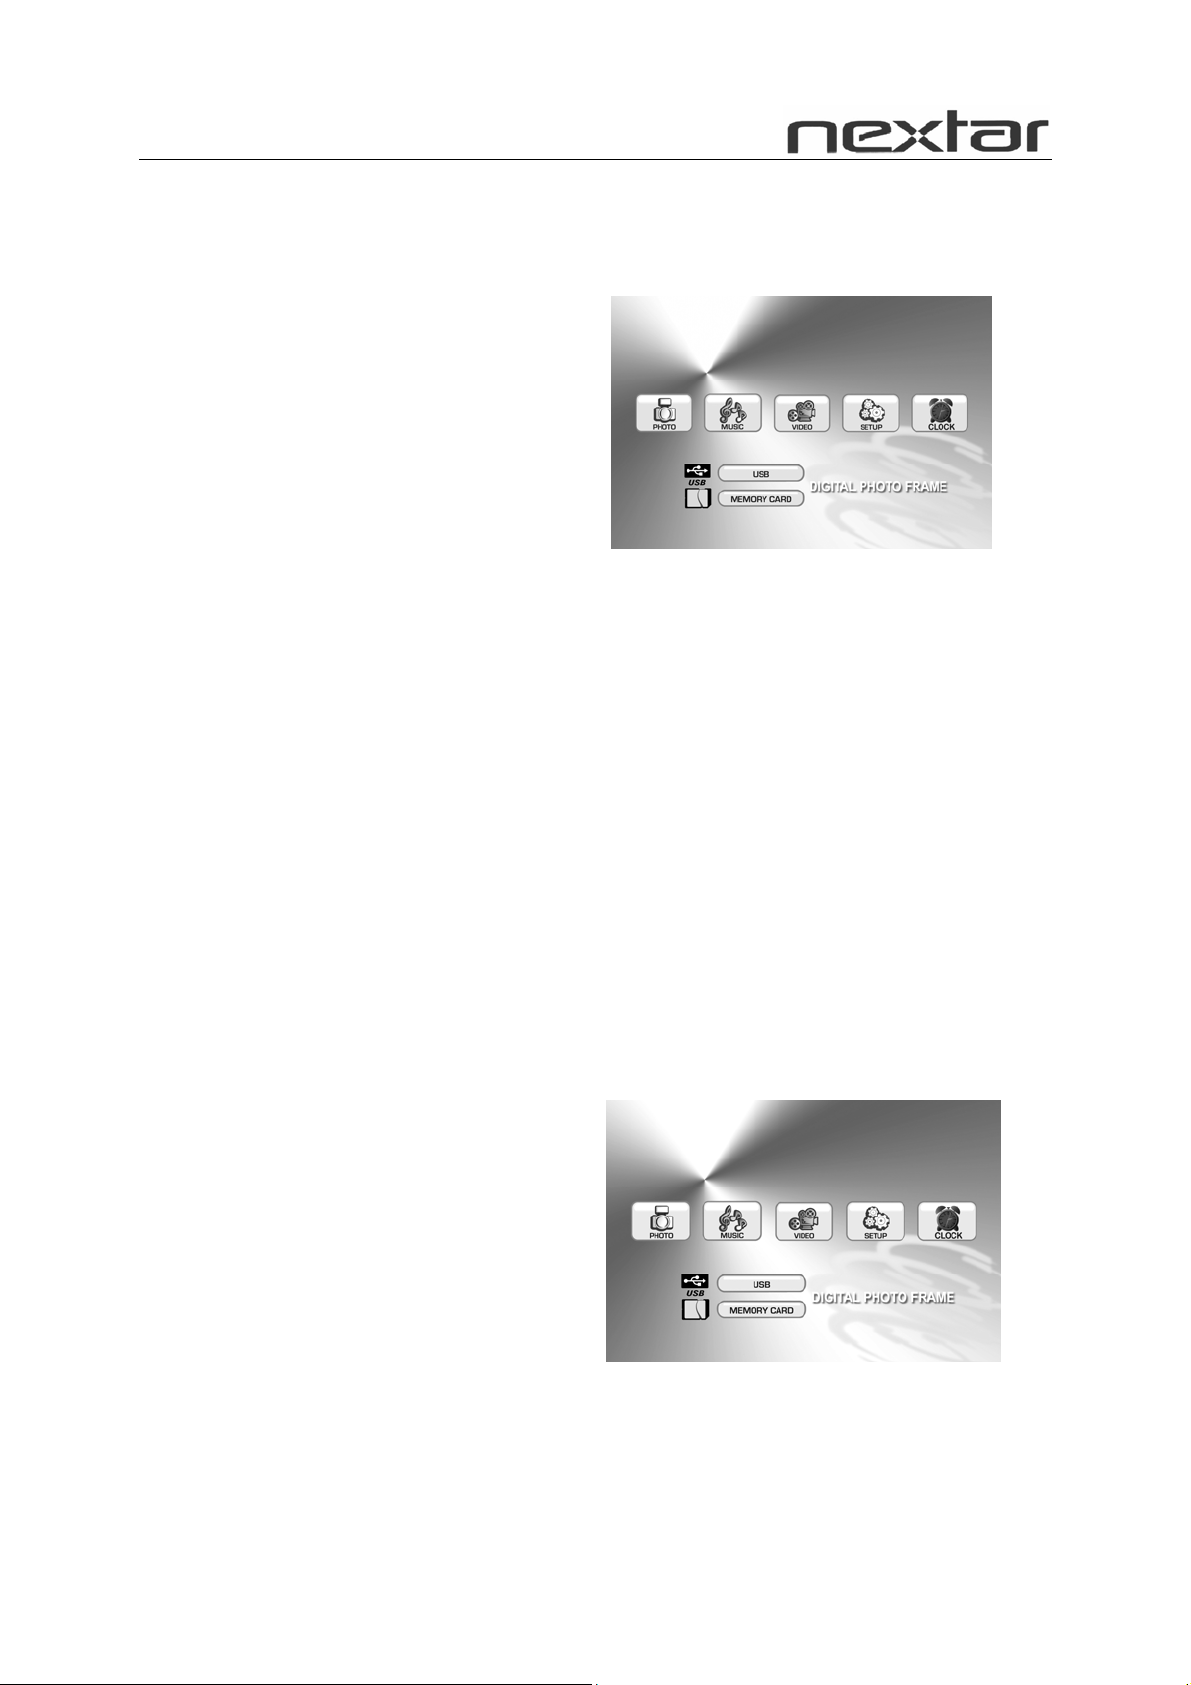
Main Menu
The screen will display as follows if the memory card has been correctly inserted.
Make sure you have stored a song, photo, or video file on your memory card.
PHOTO Enter the Photo display mode directly
MUSIC Enter the music play mode directly
VIDEO Enter the video play mode directly
SETUP Enter the setup mode directly
CLOCK Enter the clock mode directly
Viewing your Pictures
1. Press the buttons either on the remote control or on the screen to operate the
Digital Photo Frame.
2. Press the arrow keys on the remote control to navigate through the menu items
displayed on the screen and select PHOTO. Press the Enter button to confirm the
selection or simply press the PHOTO button to select the function.
3. Place the cursor on one picture and press the ENTER button to view the picture.
4. Press the SLIDE SHOW button on the remote control to enter Slide Show Mode.
5. Press the VIEW button while reviewing the photo list menu to enter a
6-picture-view and use the arrow keys to choose the picture you would like to see
in a full-screen view.
6. Press the MENU button to return to the main menu and select SETUP to enter the
Setup Mode.
7. Move the cursor to “Video Setup” by pressing the Right arrow Key.
8. Press the Down arrow Key and select “Time”. Press the Right arrow to adjust the
time interval for viewing each picture in the Slide Show, and then press the ENTER
button to confirm the setting. Press the SETUP button again to exit the Setup
Menu.
8
Page 10
How to Play MP3 Files
Please ensure that there are MP3 music files on your memory card (please read the
Q&A section for more information).
Note: While pictures are being displayed, press the BACK MUSIC button once to hear
the MP3 files as background music.
1. Press the Right and Left arrow Keys on the remote control to select “Music” and
then press the ENTER or MUSIC button on the remote control.
2. Press the directional keys to select the music file you want. Then press the
ENTER button to confirm your selection.
3. Press the VOL+ or VOL- keys to adjust the volume.
4. Press the FWD and REV keys on the remote control to fast forward or fast reverse
the track.
5. Press the Up arrow key or Down arrow key or PREV/NEXT key to select the
previous or next music file, respectively.
How to Play Video Files
The Digital Photo Frame is compatible with MPEG-1 and A V I*. Make sure these files
are stored in your memory card (please read the Q&A section for more information).
1. Press the Right and Left arrow keys to select "VIDEO", then press the ENTER
button, or simply press the MOVIE button on the remote control to confirm the
selection.
*Not all AVI format video files will be supported.
9
Page 11

2. Press the arrow keys to select the video file you want to play, then press the
ENTER button to confirm your selection.
3. Press the VOL+ or VOL- keys to adjust the volume.
4. Press the FWD and REV keys on the remote control to fast forward or fast reverse
the track.
5. Press the Up arrow key or Down arrow key or PREV/NEXT key to select the
previous or next video file, respectively.
SETUP:
Main menu:
z SYSTEM SETUP Parameter settings
z PHOTO SETUP Picture settings
z VIDEO SETUP Video display settings
z CLOCK SETUP Clock settings
10
Page 12

SYSTEM SETUP
Press the Right and Left arrow keys to navigate through the Setup Categories. Press
the Up and Down arrow keys to navigate through setup function items. Press the
Right and Left arrow keys to modify settings, and then press ENTER to confirm the
settings.
Operation:
OSD LANGUAGE: OSD language settings.
DEFAULT: Restores your Digital Photo Frame back to the factory default settings.
S/W VERSION: Shows the current version of the software.
PHOTO SETUP:
EFFECT: Allows you to activate or deactivate the photo display effects. Press the
Right or Left arrow keys and the ENTER button to turn OFF or ON (16 effects in
total).
FREQUENCY: Allows you to set the interval frequency with which the display will
change the photos. Press the Right or Left arrow keys and the ENTER button to set
the frame to DEFAULT and the interval: 10SECOND, 30SECOND, 1MINUTE,
30MINUTE, 1HOUR.
11
Page 13

MUSIC: Allows you to turn on or off the background music while displaying photos.
Press the Right or Left arrow keys and the ENTER button to turn the music ON or
OFF.
JPEG INFO:
Allows you to adjust the JPEG photo ON/OFF settings. Press the Right or Left arrow
keys and the ENTER button to turn ON or OFF.
PLAY MODE:Allows you to adjust the order the photos will be displayed in. Press the
Right or Left arrow keys and the ENTER button to switch the mode between
NORMAL or RANDOM mode.
VIDEO SETUP
Operation:
Press the Up and Down arrow keys to select functions. Press the Right and Left
arrow keys to adjust the settings. Press the ENTER button to confirm your settings.
Function:
BRIGHTNESS: Level of light
CONTRAST: Color contrast
HUE: Color tone
SATURATION: Color saturation adjust
SHARPNESS: Color sharpness adjust
*Not all AVI format video files will be supported
12
Page 14

CLOCK SETUP
Function:
DATE SETUP: Press arrow keys and ENTER button to setup the date.
TIME SETUP:Press arrow keys and ENTER button to setup the time of clock.
ALARM SETUP: Press arrow keys and ENTER button to setup the time of alarm.
POWER ON: Press arrow keys and ENTER button to setup the time of power on.
POWER OFF: Press arrow keys and ENTER button to setup the time of power off.
How to Setup the Clock
Setup the local time and calendar
Press the Up and Down arrow keys to select functions.
Press the Right and Left arrow keys to select desired settings.
Press the ENTER key to confirm settings.
Q&A
This chapter presents some troubleshooting problems you may encounter while using
the device. Even if the following guide fails to solve your problem, please do not
disassemble the device, but leave the repairs to professional staff.
13
Page 15

Question Answer
The Digital Photo Frame is compatible with
photo, music, and video files in which formats?
What kinds of memory cards are compatible with
the Digital Frame?
How can I get MP3 music files? Use your personal computer and audio editing
Is the Digital Photo Frame equipped with built-in
memory?
Photo: JPEG
Music: MP3
Video: MPEG-1 and AVI*.
Secure Digital Card (SD), Multimedia Card
(MMC), SmartMedia Card, Memory Stick.
software to covert your music to MP3 format.
Transfer the MP3 file to the memory card by
using a Memory Card Reader.
NO. There is no built-in memory in the Digital
Photo Frame. All files must be stored on and
read from the Memory Card or U Disc.
Can I insert several memory cards into the Digital
Photo Frame?
Does it play all types of AVI video files? Not all AVI format video files will be supported.
What is the optimal resolution of the display? 480 X 234 (RGB).
Can the device play MPEG-1 files stored on a
memory card?
Can I rotate the picture displaying on the screen
for better viewing?
Can I adjust the color of the pictures? No. Most color settings are preset by the
No. You can only insert one memory card into
the Digital Photo Frame at a time.
The device can play MPEG-1 video files stored
on a compatible memory card.
Yes, press the arrow keys on the remote control
to rotate a picture to certain angles.
Note: The rotated picture will return to its
original status once you turn off the digital frame
device.
manufacturer. You can only adjust brightness
and contrast.
14
Page 16

Specifications
Display: 7” TFT LCD 480 X 234 (RGB)
Speakers (stereo)
Power: AC Adapter; Input 100-240V; Output 12V 1-1.5A
Environmental Requirements
Operation: 0~35℃, Humidity 0~85%
Storage: -20~60℃, Humidity 10~90%
Accessories:
AC Adapter
Remote Control
Warranty Card
Registration Card
Return Card
USB Cable
Manual
15
Page 17

N7-108
Manuel de l’utilisateur
Cadre photo numérique
Page 18

Introduction
Merci d’avoir choisi notre Cadre photo numérique.
Avant d’utiliser cet appareil, veuillez lire ce manuel attentivement et le garder à
disposition pour toute consultation ultérieure. Ce manuel vous fera découvrir les
nombreuses fonctions offertes par notre Cadre photo numérique, qui vous permet de
profiter d’une incroyable expérience audiovisuelle.
Avec notre Cadre photo numérique, vous pouvez visionner vos photos rapidement et
facilement, en accès direct depuis la carte mémoire de votre appareil photo
numérique. Vous pouvez également créer un diaporama avec de nombreux effets de
transition. Vous n’avez besoin ni d’ordinateur, ni d’appareil photo numérique, ni de
connexion Internet.
Notre Cadre photo numérique accepte les cartes mémoire et ports suivants : cartes
SD, MultiMedia Card, Memory Stick et Memory Stick PRO et port USB.
Principales fonctions
★ Cet appareil permet l’affichage de photos numériques (JPEG) et la lecture de
musique MP3 ou de fichiers vidéo pris en charge sans connexion à un ordinateur
(carte mémoire non incluse).
★ Accepte les cartes Secure Digital Card (SD), MultiMedia Card (MMC), Memory
Stick et Memory Stick Pro.
★ Compatible avec les ports USB 2.0.
★ Cet appareil permet la lecture de fichiers MP3 grâce à ses haut-parleurs de qualité
intégrés.
★ Cet appareil permet la lecture instantanée des fichiers MEPG-1 et AVI* stockés
sur une carte de mémoire prise en charge.
★ Télécommande ergonomique.
★ Diaporama automatique avec divers effets de transition et temps d’affichage.
★ Cet appareil permet la création de diaporamas avec musique de fond au format
MP3.
★ Affichage à l’écran simple d’utilisation permettant un accès facile à toutes les
fonctions.
* Il se peut que les fichiers vidéo ne puissent pas être lus correctement s’ils sont
stockés sur une carte à basse vitesse.
* Tous les formats fichiers vidéo AVI ne sont pas pris en charge.
1
Page 19

Précautions d’emploi et entretien
★ Utilisation en intérieur uniquement.
★ Afin de réduire les risques d’incendie ou de choc électrique, ne pas exposer cet
appareil à la pluie ou à l’humidité.
★ Afin d’éviter la surchauffe, ne jamais obstruer les ventilations situées à l’arrière du
Cadre photo numérique.
★ Laissez votre Cadre photo numérique à l’abri de la lumière directe du soleil ;
celle-ci peut endommager l’appareil.
★ Utilisez toujours les boutons situés aux emplacements réservés aux cartes
mémoire pour retirer la carte mémoire de l’appareil.
★ Ne désassemblez pas le Cadre photo numérique au risque de provoquer un choc
électrique ou sous peine d’annulation de votre garantie. Ne contient pas de
pièces réparables par l’utilisateur.
★ Protégez l’appareil de la condensation pour éviter de l’endommager.
Nettoyage de l’écran LCD
★ Frottez délicatement l’écran. Celui-ci est en verre et risque de se rayer ou de se
casser facilement.
★ Pour enlever les traces de doigts et la poussière de l’écran LCD, utilisez de
préférence un chiffon doux et non abrasif comme ceux utilisés pour nettoyer les
lentilles d’appareil photo.
★ En cas d’utilisation du kit de nettoyage pour écrans LCD disponible en magasins,
n’appliquez pas le liquide directement sur l’écran LCD. Humidifiez le chiffon avec
la solution de nettoyage et frottez l’écran LCD avec le chiffon imbibé.
Économiseur d’écran
★ Lorsqu’il n’y a pas de carte mémoire ou de connexion USB, ou que l’appareil
est en mode「STOP」ou「PAUSE」, un programme d’économiseur d’écran
démarre automatiquement après 10 minutes. Appuyez sur n’importe quelle touche
pour retourner aux fonctions principales.
ARRÊTEZ l’appareil avant l’insertion ou le retrait d’une carte mémoire ou d’une
clé USB afin de ne pas endommager la carte, la clé ou encore l’appareil.
ATTENTION :
2
Page 20

CHANGEMENT ET REMPLACEMENT du Cadre photo
Panneau coloré:
Photo 1
Avec vos deux mains positionnées sur le
panneau du cadre photo, placez vos pouces
sur la partie supérieure du cadre et vos
index sur les coins. Soulevez les coins avec
vos index.
Photo 3
Pour changer de panneau,
placez-le simplement sur le cadre
and appuyez avec vos pouces et
index.
Photo 2
Le cadre se
détachera
3
Page 21

Préparation
1. Installez le support de
l’appareil. Branchez
l’adaptateur du Cadre photo
numérique dans une prise
électrique.
2. Mettez le bouton situé à l’arrière du Cadre photo
numérique en position marche. Puis appuyez sur la
touche 「POWER」 de la télécommande ou située
sur le dessus du Cadre photo numérique.
Insertion d’une carte mémoire
Votre Cadre photo numérique est compatible avec les cartes mémoire suivantes :
★ Secure Digital Card (SD)
★ Multimedia Card (MMC)
★ Cartes Memory Stick et Memory Stick Pro
Insérez la carte mémoire avec son étiquette placée sur le dessus. Ne forcez pas
la carte mémoire dans l’emplacement. S’il s’avère difficile d’insérer la carte, il se
peut que vous ne l’insériez pas correctement.
NB : Seuls les fichiers d’images
numériques au format JPEG peuvent être
lus sur le Cadre photo numérique. Il se
peut que l’appareil ne soit pas en mesure
de lire des fichiers d’images aux autres
formats.
4
Page 22

Fonctions des touches et télécommande
Fonctions des touches :
1. POWER : Met l’appareil sous / hors tension.
2. ENTER : Appuyez sur cette touche une fois pour lire le fichier sélectionné.
Appuyez à nouveau pour que l’affichage retourne au Menu d’accueil.
3. PHOTO : Appuyez sur cette touche pour sélectionner le mode「PHOTO」
disponible dans le Menu principal.
4. MOVIE : Appuyez sur cette touche pour entrer en mode「VIDEO」.
5. MUSIC : Appuyez sur cette touche pour entrer en mode「AUDIO」.
6. USB : Interface USB pour la connexion d’un U disc/lecteur MP3.
7. SD/MMC/MS CARD : Emplacements pour l’insertion de la carte
SD/MMC/MS
8. DC IN : Entrée de mise sous tension CC
9. RESET
10.
5
Page 23

”
Télécommande
MOVIE : Appuyez sur cette touche pour
entrer en mode「VIDEO」.
REPEAT : Appuyez sur cette touche
pour activer tous les modes de la
fonction Repeat (répétition de chapitre,
de titre, de dossier, etc.)
16/9-4/3 : Appuyez sur cette touche pour
sélectionner le format TFT LCD 4/3 ou
16/9.
ROTATE : Appuyez sur cette touche
pour régler l’angle de visualisation des
images.
ZOOM : Appuyez sur cette touche pour
agrandir l’image par augmentations de
2 ; 3 ; 4 ; 1/2 ; 1/3 ; 1/4 ; AUCUN.
VIEW : Appuyez sur cette touche pour
(NB : retirez toutes les protections
plastiques avant d’utiliser votre
télécommande.)
POWER : Appuyez sur cette touche
pour mettre l’appareil sous/hors
tension.
MUTE : Appuyez sur cette touche
pour mettre le son on/off.
PHOTO : Appuyez sur cette touche
pour entrer en mode Diaporama
disponible dans le Menu principal.
MUSIC : Appuyez sur cette touche
pour entrer en mode Lecture de
musique.
activer la fonction 6-photos, qui affiche 6
photos en format réduit pour la
navigation.
SETUP : Appuyez sur cette touche pour
que le menu de configuration s’affiche.
MENU : Appuyez sur cette touche pour
afficher le menu principal.
BACK MUSIC : Appuyez sur cette
touche pour jouer de la musique de fond
en format MP3 pendant le diaporama ou
l’affichage de photos.
SLIDE SHOW : Appuyez sur cette
touche pour faire défiler les photos
automatiquement.
CLOCK: Appuyez sur cette touche pour
régler l’heure et la date.
: Appuyez sur les touches “
pour sélectionner le menu souhaité.
6
Page 24

ENTER: Appuyez sur “ENTER” pour le menu Paramètres.
EXIT: Appuyez sur ”EXIT” pour retourner au menu précédent.
VOLUME +/-: Appuyez sur ”VOLUME +/-” pour régler le volume du lecteur.
: Appuyez une fois sur cette touche pour figer l’image en cours de lecture.
: Appuyez une fois sur cette touche pour arrêter la lecture (pré-arrêt). Appuyez à
nouveau sur la touche pour arrêter la fonction lecture et retourner au Menu principal.
: Appuyez sur “ ” pour retourner au titre/chapitre ou à la piste/photo précédent(e).
: Appuyez sur “ ” pour passer au titre/chapitre ou à la piste/photo suivant(e).
Installation et remplacement de la batterie de la télécommande
1. Maintenez la télécommande touches vers le bas.
2. Maintenez le boîtier de la télécommande dans une main et utilisez votre main
libre pour sortir le plateau de batterie du boîtier de la télécommande.
3. Placez une batterie lithium “CR2025” dans le plateau, signe positif “+” vers le haut.
4. Replacez le plateau à l’intérieur du boîtier.
7
Page 25

Menu principal
Si la carte mémoire a été correctement insérée, l’écran affiche les indications cidessous. Assurez-vous qu’il y ait une chanson, une photo ou un fichier vidéo sur
votre carte mémoire.
PHOTO Entrez directement en mode Affichage photo
MUSIC Entrez directement en mode Lecture audio
VIDEO Entrez directement en mode Lecture vidéo
SETUP Entrez directement en mode Configuration
CLOCK Entrez directement en mode Horloge
Visionnage de photos
1. Appuyez sur les touches de la télécommande ou de l’écran pour faire fonctionner
le Cadre photo numérique.
2. Appuyez sur les touches fléchées de la télécommande pour naviguer dans les
options du menu affichées à l’écran et sélectionnez PHOTO. Appuyez sur la
touche Enter pour confirmer la sélection ou appuyez à nouveau sur la touche
PHOTO pour sélectionner cette fonction.
3. Placez le curseur sur la photo choisie et appuyez sur la touche ENTER pour la
visualiser.
4. Appuyez sur la touche SLIDE SHOW de la télécommande pour entrer en mode
Diaporama.
5. Appuyez sur la touche VIEW lors du défilement du menu présentant la liste de
photos pour afficher 6 photos et choisissez celle à afficher en plein écran à l’aide
des touches fléchées.
6. Appuyez sur la touche MENU pour retourner au menu principal et sélectionnez
SETUP pour entrer en mode Configuration.
7. Déplacez le curseur sur “Video Setup” en pressant la touche Flèche droite.
8. Appuyez sur la touche Flèche bas et sélectionnez “Time”. Appuyez sur la touche
Flèche droite pour régler le temps d’affichage de chacune des photos du
diaporama, puis appuyez sur la touche ENTER pour confirmer ce paramétrage.
Appuyez à nouveau sur la touche SETUP pour sortir du menu Configuration.
8
Page 26

Lecture de fichiers MP3
Assurez-vous qu’il y ait des fichiers audio MP3 sur votre carte mémoire (veuillez lire
la section Q&R pour plus de détails).
NB : Durant l’affichage d’images, appuyez une fois sur la touche BACK MUSIC pour
écouter les fichiers MP3 en musique de fond.
1. Appuyez sur les touches Flèche droite et gauche de la télécommande pour
sélectionner “Music”, puis appuyez sur la touche ENTER ou MUSIC de la
télécommande.
2. Appuyez sur les touches fléchées pour sélectionner le fichier audio souhaité. Puis
appuyez sur la touche ENTER pour confirmer votre choix.
3. Appuyez sur la touche VOL+ ou VOL- pour régler le volume.
4. Appuyez sur les touches FWD et REV de la télécommande pour faire avance
rapide ou retour rapide.
5. Appuyez sur la flèche haut ou la flèche bas ou sur la touche PREV/NEXT pour
sélectionner le fichier audio précédent ou suivant, respectivement.
Lecture de fichiers vidéo
Le Cadre photo numérique est compatible MPEG-1 et AVI*. Assurez-vous qu’il y ait
des fichiers vidéo sur votre carte mémoire (veuillez lire la section Q&R pour plus de
détails).
1. Appuyez sur les flèches droite et gauche pour sélectionner "VIDEO", puis
appuyez sur la touche ENTER, ou appuyez simplement sur la touche MOVIE de
la télécommande pour confirmer votre choix.
* Tous les formats fichiers vidéo AVI ne sont pas pris en charge.
9
Page 27

2. Appuyez sur les flèches pour sélectionner le fichier vidéo souhaité, puis appuyez
sur la touche ENTER pour confirmer votre choix.
3. Appuyez sur la touche VOL+ ou VOL- pour régler le volume.
4. Appuyez sur les touches FWD et REV de la télécommande pour faire avance
rapide ou retour rapide.
5. Appuyez sur la flèche haut ou la flèche bas ou sur la touche PREV/NEXT pour
sélectionner le fichier vidéo précédent ou suivant, respectivement.
Configuration :
Menu principal :
z SYSTEM SETUP Paramétrage système
z PHOTO SETUP Paramétrage de l’affichage photo
z VIDEO SETUP Paramétrage de l’affichage vidéo
z CLOCK SETUP Paramétrage de l’horloge
10
Page 28

PARAMETRAGE SYSTEME
Appuyez sur les flèches droite ou gauche pour naviguer à travers les catégories de
paramétrage. Appuyez sur les flèches haut ou bas pour naviguer à travers les
différentes fonctions de paramétrage. Appuyez sur les flèches droite ou gauche
pour modifier la configuration et appuyez sur la touche ENTER pour confirmer les
changements de configuration.
Opération:
OSD LANGUAGE: Paramétrage
OSD de la langue.
DEFAULT: Restaure la configuration
initiale par défaut de votre
Cadre photo.
S/W VERSION: Affiche la version en
cours du logiciel.
CONFIGURATION DE L’AFFICHAGE PHOTO:
EFFECT: Vous permet d’activer ou de
désactiver les effets de l’affichage
photo. Appuyez sur les flèches
droite ou gauche ainsi que sur
la touche ENTER pour les
ACTIVER ou DESACTIVER
(16 effets au total).
FREQUENCY: Vous permet de
paramétrer la fréquence à laquelle
les photos changeront sur votre écran. Appuyez sur les flèches droite ou gauche
ainsi que sur la touche ENTER pour configurer le cadre par DEFAUT et l’intervalle
de temps: 10 SECONDES, 30 SECONDES, 1 MINUTE, 30 MINUTES, 1 HEURE.
MUSIC: Vous permet d’activer ou de désactiver la musique de fond pendant
l’affichage de photo. Appuyez sur les flèches droite ou gauche ainsi que sur le
bouton ENTER pour ACTIVER ou DESACTIVER la musique.
JPEG INFO:
Vous permet d’ajuster les paramétrages photo JPEG d’activation ou de désactivation.
Appuyez sur les flèches droite ou gauche ainsi que sur le bouton ENTER pour les
ACTIVER ou DESACTIVER.
11
Page 29

PLAY MODE:Vous permet de choisir l’ordre d’affichage des photos. Appuyez sur
les flèches droite ou gauche ainsi que sur le bouton ENTER pour passer du mode
NORMAL au mode RANDOM.
CONFIGURATION DE L’AFFICHAGE VIDEO
Opération:
Appuyer sur les flèches haut ou bas pour sélectionner les fonctions. Appuyez sur les
flèches droite ou gauche pour choisir les paramètres. Appuyez sur le bouton
ENTER pour les valider.
Fonction:
BRIGHTNESS: Intensité de lumière
CONTRAST: Contraste des couleurs
HUE: Teinte
SATURATION: Réglage de la saturation
SHARPNESS: Réglage de la finesse
* Tous les formats fichiers vidéo AVI ne sont pas pris en charge
CONFIGURATION DE L’HORLOGE
Fonction:
DATE SETUP: Appuyez sur les flèches ainsi que sur la touche ENTER pour
configurer la date.
TIME SETUP: Appuyez sur les flèches ainsi que sur la touche ENTER pour
configurer l’heure.
ALARM SETUP: Appuyez sur les flèches ainsi que sur la touche ENTER pour
12
Page 30

configurer l’alarme.
POWER ON: Appuyez sur les flèches ainsi que sur la touche ENTER pour
configurer l’heure de mise sous tension.
POWER OFF: Appuyez sur les flèches ainsi que sur la touche ENTER pour
configurer l’heure de mise hors tension.
Comment configurer l’horloge
Configuration de l’heure et date locales
Appuyez sur les flèches haut ou bas pour sélectionner les fonctions.
Appuyez sur les flèches gauche ou droite pour sélectionner la configuration
souhaitée.
Appuyez sur la touche ENTER pour valider.
FAQ
Ce chapitre présente certains problèmes que vous pourriez rencontrer lors de
l’utilisation de cet appareil. Même si ce guide ne suffisait pas à vous aider, veuillez ne
pas désassembler l’appareil mais laisser une équipe professionnelle effectuer les
réparations.
13
Page 31

Question Réponse
Avec quels formats de fichiers photo, audio et
vidéo le Cadre photo numérique est-il
compatible ?
Quels types de carte mémoire sont compatibles
avec le Cadre photo numérique ?
Comment puis-je obtenir des fichiers audio
MP3 ?
Le Cadre photo numérique est-il équipé d’une
mémoire interne ?
: JPEG
Photo
Audio : MP3
Vidéo : MPEG-1 et AVI*.
Secure Digital Card (SD), Multimedia Card
(MMC), SmartMedia Card, carte Memory Stick.
Convertissez votre musique au format MP3 à
l’aide de votre ordinateur ou d’un logiciel
d’édition audio.
Transférez le fichier MP3 sur votre carte
mémoire en utilisant un Lecteur de carte
mémoire.
NON. Le Cadre photo numérique ne contient
pas de mémoire interne. Tous les fichiers
doivent être stockés et lus depuis une carte
mémoire ou un U Disc.
Puis-je insérer plusieurs cartes mémoire dans le
Cadre photo numérique ?
Le Cadre photo numérique lit-il tous les types de
fichiers vidéo AVI ?
Quelle est la meilleure résolution de l’affichage ? 480 X 234 (RVB).
L’appareil peut-il lire des fichiers MPEG-1
stockés sur une carte mémoire ?
Puis-je faire pivoter l’image affichée sur l’écran
pour une meilleure visualisation ?
Puis-je régler les couleurs des images ? Non. La plupart des options de couleurs sont
Non. Vous ne pouvez insérer dans le Cadre
photo numérique qu’une seule carte mémoire à
la fois.
Tous les fichiers au format vidéo AVI ne sont
pas pris en charge.
L’appareil peut lire des fichiers vidéo MPEG-1
stockés sur une carte mémoire compatible.
Oui, appuyez sur les touches fléchées de la
télécommande pour faire pivoter l’image à
certains angles.
NB : L’image qu’on aura fait pivoter retournera
à son état d’origine à l’arrêt du Cadre photo
numérique.
paramétrées par le fabricant. Vous pouvez
uniquement régler la luminosité et le contraste.
14
Page 32

Fiche technique
Affichage : 7” TFT LCD 480 X 234 (RVB)
Haut-parleurs (stéréo)
Alimentation : Adaptateur CA ; Entrée 100-240 V ; Sortie 9-12 V 1,5 A
Conditions d’utilisation
Appareil en fonctionnement : 0~35 , Humidité 0~85%℃
Appareil stocké : -20~60 , Humidité℃ 10~90%
Accessoires :
Adaptateur AC
Télécommande
Carte de garantie
Carte d’enregistrement
Carte de retour
Câble USB
Manuel
15
 Loading...