

Page 1

Page 2

Table of Contents
Overview of your Digital Photo Display………………………………………………… ……… 1
Feature……………………………………………………………………………………… ………2
Accessory…………………………………………………………………………… ……………
Key Function………………………………………………………………………… ……………
Operation…………………………………………………………………………………… ……
Set the Clock………………………………………………………………………… …………… 8
Set the Alarm……………………………………………………………………………………… 8
Background light…………………………………………………………………… ……………
Select the Temperature Format…………………………………… ……………………………
Specifications………………………………………………………………………………………
Replace Battery for Thermometer………………………………………………………… ……
Software installation………………………………………………………………………………
Picture Download…………………………………………………………………… ………
3
3
4
8
8
9
10
10
11- 16
Page 3
LCD Travel Alarm Clock
And Digital Photo Display
Please read carefully before using this equipment.
Thank you for purchasing this portable digital photo display. It can be used to store 60 photos. It
is quick and easy to download pictures into your photo display. You may view your favorite
pictures stored in this photo display anytime, anywhere.
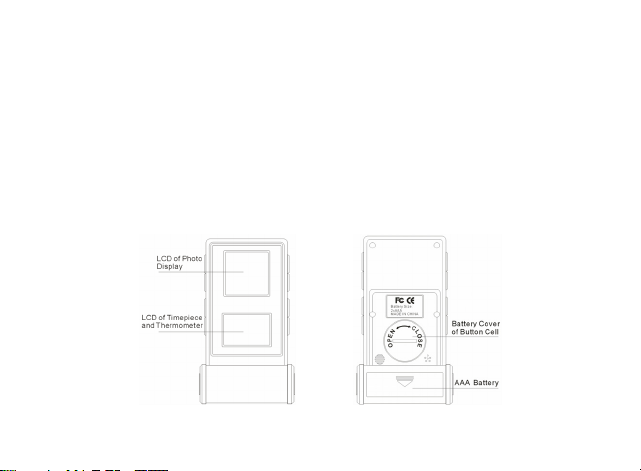
Overview of your Digital Photo Display
- 1 -
Page 4
LCD Display
- 2 -
Page 5

Feature
1. Photo display: JPG,BMP
2. Manual or Auto play mode
3. Time & Date Display
4. Clock & Hourly Call
5. Temperature Display
6. Background light
Accessory
1. Photo Viewer *1
2. 5Pin Mini USB Cable *1
3. Driver CD *1
4. User Manual *1
5. AAA Battery *2
6. 3V (CR2032) battery *1
7. Protective Pouch *1
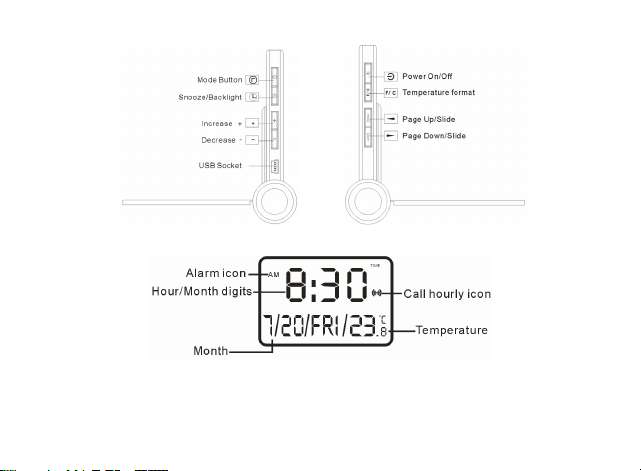
Key Function
Previous
Next
Increase
- 3 -
Page 6

Decrease/Background light
Power ON/OFF
Time Setup
Temp Setup
Operation:
1. Install 2 AAA batteries into the unit. The unit will then start automatically and switch to
slide-show mode. Then you can press
Press
, to go to the main menu, shown below:
or to select your favorite picture.
1) To turn off, press
for 3 seconds to turn on the until.
Remark: To prevent the waste of battery power, the unit is off automatically at 120 seconds by
default.
2) To delete a photo, press
3) To select Automatic or Manual slideshow, press
If you need to change off time, please go to “Auto On/Off” menu.
to confirm:
or to POWER OFF and press to confirm.Press and hold
or to Delete Image and press to confirm.
or to Display Mode and press
- 4 -
Page 7

· Press
interval time is 10 seconds, but you can select from 0~120 seconds):
or to Auto Slide and press to set up the slideshow interval (the default
·Press
4) To set the clock, press
Press
or to Manual Slide and press to confirm. The device will switch into
manual slide mode. Then you can press or to view the pictures.
or to set up the date and time. Press to confirm at each step.
or to Clock Set and press to confirm.
- 5 -
Page 8

5) Press
into clock setup shown below:
·Press
or to select Clock Disp, then press to confirm. The device will enter
or to select Disp Clock Normal, then press to confirm:
6) Press
shown below:
or to Auto ON/OFF, then press , it enters into the Auto ON/OFF setup as
- 6 -
Page 9

·Press
below:
or to select Auto ON, and the device will enter into the time setup shown
- 7 -
·Press
function.
7) Press
2. When in photo display mode, press
·Press
or to select Auto OFF, then press . The device will deactivate the auto off
or to select Exit, then press to confirm. The device will exit the setup
mode. (Note: if you stop pressing buttons for more than 60 seconds while in the setup mode,
the photo viewer will switch into photo viewing mode automatically.)
or to select Del Current, then press again to delete the current photo.
Select Del All to delete all photos, and select Exit to quit delete mode
to enter into delete mode, shown below:
Page 10

3. Set the Clock
Set the Time:
1. Press and hold for 3 seconds until the hour digits flash.
2. Press to set the hour.
3. Press
4. Press
5. Press
6. Press
7. press
8. Press
9. Press
10. Press
11. Pr ess
Note: You can Press
4.Set the Alarm
1. Press
2. Press and hold
3. Press
4. Press
5. Press
6. Press
5.Background light
1. Press
2. Background light off within 5 seconds.automatically
to confirm. The minute digits flash.
to set the minute.
to confirm. The year digits flash.
to set the year.
to fonfirm,The month digits flash.
to set the month.
to confirm. The date digits flash.
to set the date.
to confirm.
to view the date and month at standby mode.
.
for 3 seconds until the alarm icon appears, and the minute digits flash.
to set the minute.
to confirm. The hour digits flash.
to set the hour.
to confirm.
to show Background light
- 8 -
Page 11

6.Select the Temperature Format
1. Press
2. Press
to display the temperature in°C or °F.
to confirm.
Specifications
Picture Formats BMP,JPG,PNG,GIF,TIF
Picture resolution 128*128 dots
LCD 1.5”TFT
Memory Device Built-in 8Mbit flash
Memory Capacity 60 photo
Slide Mode Yes
Automatic Energy Saving 120s
Transmission Interface USB Interface Ver.1.1
Power Supply 2*AAA(3V)Batteries
Working Temperature
Operation System Win 98 SE/ME/2000/XP/Vista
Clock and Thermometer
Time Format 12/24
Temperature
Temperature Accuracy
USB 5V(optional)
0℃-40℃
-5℃-50℃
±2℃
- 9 -
Page 12

Test Period (Temperature) 10 seconds
Back Light 5 seconds
Power Supply 3V(CR2032)
Replace Battery for Thermometer
Your clock and thermometer comes with one CR2032 battery. If it does not work, please take the
following steps to replace the battery.
1. Open the battery cover with a coin.
2. Remove old battery and install the new battery correctly into the compartment.
3. Replace the battery cover.
4. Software installation
Please copy the software to your PC. (Note: this software does not need to install.)
- 10 -
Page 13

5. Picture Download
After you copy the software to your PC, connect the photo viewer to your PC, and the following
dialogue appears:
or to select USB Charge and press to confirm, or don’t press any buttons
Press
for 60 seconds. The device will enter into USB charge mode. During this time, you cannot
download photos into the photo viewer, but you can operate the unit.
or to select USB update and press to confirm. The computer will search
Press
the hardware automatically, then run the software “PhotoViewer.exe”. (Note: If you have
selected USB charge, then please disconnect the USB cable and reconnect it.) The following
dialogue will appear:
- 11 -
Page 14

Select photos from your PC and click to add the selected photo into the right panel:
- 12 -
Page 15

- 13 -
Page 16

You can edit the selected photo by clicking or to rotate, and or to crop the
photo.
Click
to delete the selected photos from the right panel. Then press to download the
selected photos into your photo viewer:
- 14 -
Page 17

- 15 -
Page 18

When the download is finished the following message will appear: “Photo Viewer data
synchronize complete”. Click OK to finish.
(Please connect the PC when you download pictures. If you have open windows, close them
before connecting your PC.)
- 16 -
 Loading...