

Page 1
Portable Keychain Photo Album
N1-101
Instruction Manual
Thank you for purchasing the Nextar N1-101
Portable Keychain Photo Album. Please
read this manual to get the optimum
performance out of this product.
Quickstart Guide
NOTE: YOU MUST INSTALL INCLUDED
SOFTWARE BEFORE ATTACHING YOUR
PHOTO ALBUM TO YOUR PC.
Software Installation:
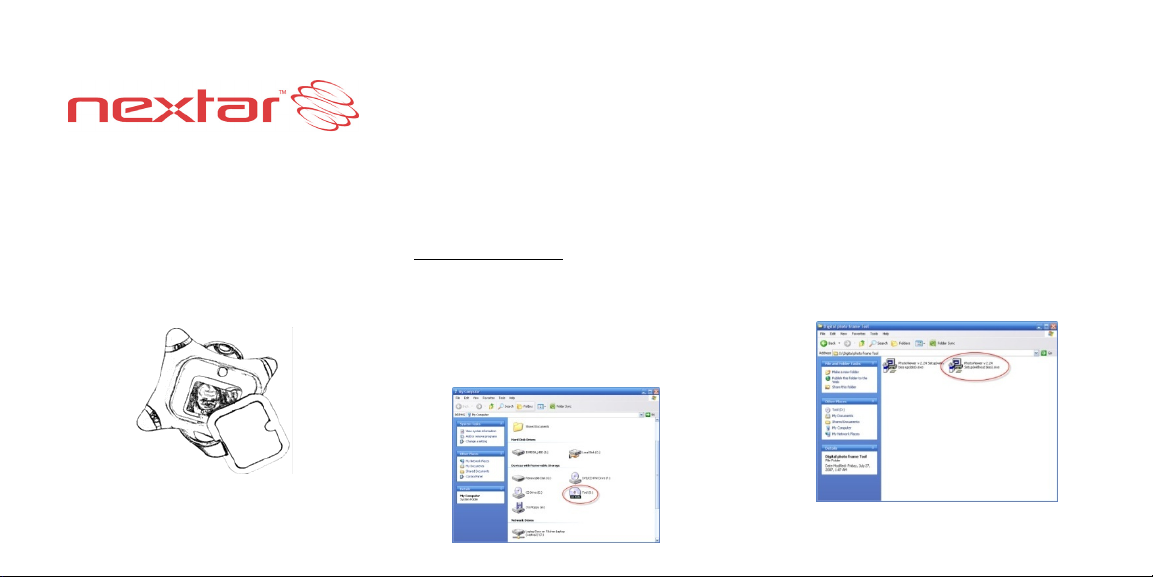
1. Insert the included CD into your PC’s
CDROM drive
2. Open “My Computer” and find the CD
3. Double click the CD drive icon to open
the CD. ** NOTE** THE ACTUAL
DRIVE LETTER (D IN THIS CASE)
COULD BE DIFFERENT ON YOUR
PC. LOOK FOR THE DRIVE THAT IS
THE CDROM ON YOUR
PARTICULAR PC
4. Double click the “Digital Photo Frame
Tool folder icon. Inside that folder,
double click the “PhotoViewer vX.XX
Setup (without bios).exe” icon. NOTE:
THE EXACT REVISION NUMBER OF
THE VERSION ON YOUR CD COULD
BE DIFFERENT THAN IN THE
PHOTO BELOW:
you just inserted. It will appear similar
to the image below:
Page 2
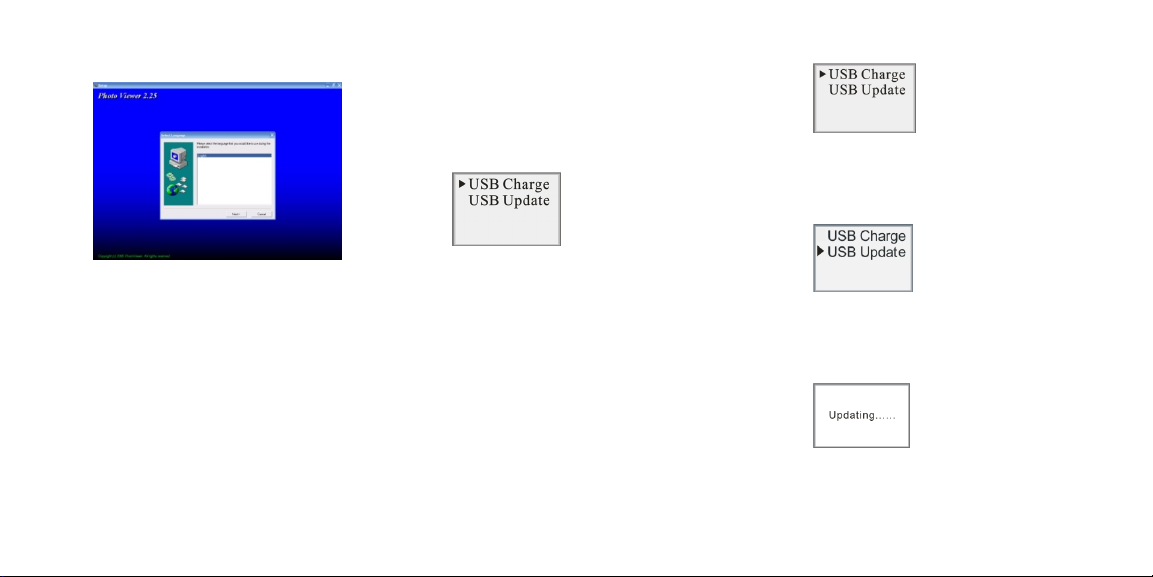
5. After double clicking this icon, the
following screen should appear:
6. Follow the on-screen prompts to install
the software. Accept all the “defaults”
that the program suggests (if you are
experienced in installing software you
can customize your install)
You are now ready to charge your Keychain
Photo Album.
1. Using the included cable, plug the cable
into your PC first, and then into your
Mini Photo Album.
NOTE: YOUR PHOTO ALBUM MUST BE
FULLY CHARGED BEFORE USING IT.
THIS CHARGING TIME IS TYPICALLY 2-3
HOURS
2. When the unit if first plugged in to your
3. Once the unit is fully charged, unplug it
4. With the unit off, plug it back into your
PC, the following screen appears:
There will be blinking battery icon in the
lower left hand corner. This icon will
stop flashing once your unit is fully
charged
from your PC and turn it off using the
ON/OFF switch on the side of the unit.
PC (using the same procedure as #1).
5. You will see the following screen:
Using the DOWN navigation button on the
side of the unit, move the cursor down to the
USB Update position:
Then press the MENU (top) button to select
the Update mode. The following screen will
appear:
You are now ready to transfer images to and
from your unit.
Page 3

6. Once the unit is in the “updating” mode,
go to your START/ALL PROGRAMS
menu and look for the newly installed
program group. It should be called
“Photo Viewer”
7. Go to this new program group and
double click the Photoviewer icon to
open the program
8. Once open, you should see a program
screen similar to the one below:
2
1
This side shows the
navigation of
images on your PC
This side shows images
installed on your Mini
Photo Album
9. To add pictures to your Mini Photo
Album from your PC, navigate to the
image on your PC using the controls on
the left-hand side of the Photoviewer
software
10. Select the photo you want to add by
clicking on it once.
11. Then click the blue arrow (circled on the
image as “1”) to POST the image to the
keychain.
12. Then to finalize the transfer, click the
SYNCHRONIZE button (circled on the
image as “2”) to make the transfer
complete
13. You can delete images on the Photo
Key-Chain by selecting them, pressing
the DELETE button and then the
synchronize button
Once you have completed the transfer of
images to your Keychain Photo Album, exit
the Photoviewer software and remove your
unit from your PC by disconnecting the USB
cable from your Photo Album first and then
from your PC.
To turn on the Photo Album, make sure the
POWER button is in the ON position, and
then press the MENU button for 2 seconds
To flip through images stored on your Photo
Album, use the UP/ DOWN buttons.
Detailed Instructions:
Supported graphic formats
• BMP
• JPG
• GIF
Button Functions
1. Power ON/OFF and MENU
2. Navigate UP
3. Navigate DOWN
4. Power ON/OFF
Page 4

Menu Functions:
Power OFF – This menu selection will
DELETE - This selection will allow
turn the unit off. Using
the up/down
buttons. Press the
MENU button to make
selections
you to manually delete
an image while viewing
it. While in the viewer
mode, select MENU, and
scroll down to DELETE.
Press MENU again. You
will get a confirmation
screen “DELETE ?”.
Press MENU again to
delete the image.
SLIDE SET - This selection allows you
to choose an AUTO or
MANUAL slide show.
Selecting AUTO will
generate an automatic
slide show. You can
adjust the timing of each
slide by using the
up/down buttons.
Selecting MANUAL will
allow you to manually
select images using the
up/down buttons. Press
MENU to exit and return
to the main menu
CLOCK SET –
This selection will allow
you to set the unit’s
clock. Use the MENU
button to select the
date/time/day line, and
the use the up/down
buttons to select the
correct date/time/day.
Press MENU to exit this
function
SHOW CLOCK - This selection displays
the date / time on the
screen
Auto ON/OFF - Selecting “ON” will put
the unit into an auto
power-off mode and if no
buttons are pushed the
unit will shut off after a
predetermined amount of
time. This function
saves battery power
Selecting OFF turns this
feature off and returns to
the main menu.
Page 5

LCD Contrast –
Included In Package:
• Keychain Photo Album
• Software CD
This function allows you
to adjust the contrast of
the screen. Using the
up/down xxxx buttons,
select between 1 and 16.
Press MENU to exit.
EXIT - This selection exits the
menu screen and returns
to the image or clock
display
Specifications:
• Image storage capacity ~ 60 images
• Image formats: BMP, JPG, GIF
• Display size 1.5” CSTN LCD 128x128
65k color resolution
• Power source: 3.7V lithium Ion
• USB cable
• Key chain
• Instruction manual
• Product registration card
• Warranty card
System Requirements:
• Windows 98/2000/ME/XP
• 125MB of available hard drive space
• Color monitor
• CDROM drive
• USB 1.1 or 2.0 port
NOTE: The Keychain Photo Album LCD
screen may have slight variations in contrast
– that is normal. Do not attempt to open the
unit as that will void the warranty. Only use
water and a soft cloth to clean the screen.
Do not store in very hot/cold/humid locations.
Use only included cables and connectors.
rechargeable battery
Nextar may find it necessary to modify, amend or
otherwise change or update this manual.
We reserve the right to do this at any time, without
any prior notice. All specifications and features are
subject to change without notice.
All screen shots shown are simulated and may not
represent the actual screen on production units sold
to consumers.
For instruction manuals, updated drivers or other
information, be sure to visit our website at:
www.Nextar.com
Or write us at:
Nextar
1661 Fairplex Dr.
LaVerne, CA USA 91750
Copyright © 2007
 Loading...