

Page 1

ITEM# MM1007
Motorized 7” Color Display DVD Player
INSTRUCTION MANUAL
Page 2

ITEM# MM1007
TABLE OF CONTENTS
FEATURES
PRECAUTIONS
ACCESSORIES
INSTALLATION
OPERATION
Buttons on the Panel and Remote Control
Screen Panel and Front Panel
Power, Preset Buttons 1 ~ 6
Mute, Mode, Eject, Volume (Select), Open
P.Scan, LOC, Band, Joystick, Enter, Lud, Tilt, In/Out
OSD
Menu
Functions only available with Remote Control Button
Audio, Subtitle, Zoom, Prog, A-B, Numeric Key
DVD Setup
General Setup Page
TV Display, Angle Mark, OSD Lang, Captions, Last Memory
Audio Setup Page
Speaker Setup
SPDIF Setup, Dolby Digital Setup
Channel Delay, Channel Trim, Equalizer, 3D Processing, HDCD
Video Setup Page
Component, Quality
Preference Setup Page
TV Type, PBC, Audio, Subtitle, Disc Menu, Parental,
Country Region, Default
Password Setup Page
Master Password, User Password
MISCELLANEOUS
TROUBLESHOOTING
SPECIFICATION
WIRING DIAGRAM
2
3
4
5
6
7
18
19
19
21
27
29
31
31
34
35
36
1
Page 3

ITEM# MM1007
FEATURES
Monitor Screen
• Motorized Open/Close Monitor Control System
• Tilting Safety System (If the movement of the monitor opening or closing is
hindered by an obstacle, the monitor will stop or returns to its previous position)
• Swivel Adjustment: Monitor is adjustable to the left or right
• 7.0 inch “A” Grade Color TFT LCD Resolution: 1440 (W) x 230 (H) pixels
Backlight : CCFL (life time - 10,000 hours)
• NTSC / PAL Multi Video System
• Mini LCD Display for Frequency and Clock information
Disc Playback
• Slim Size Auto-Loading DVD Mechanism with Electronic Anti-shock protection
• Last Position Memory
• Playback Modes Supported: DVD Video, DVD-R, DVD-RW, SVCD, VCD,
JPEG Picture Disc HDCD, Audio CD, CD-R, CD-RW, MP3 CD, WMA™ CD
Receiver
• AM/FM Tuner with 30 Station Memory Presets
• Optional External TV Tuner Box (TV System supports: NTSC / PAL – I, BG,
DK) with Built-in Diversity Control (Diversity Antenna is not included)
General
• Easy Control 5 - Way Joystick
• Screen Blanking during driving (No display on screen while driving for safety)
• Clock Display (Optional)
• Built-in Cooling Fan
• ISO Mounting
Input Output
• Output Power: 4X40W Max
• 1 Composite Video Ouptut
• 1 set AV inputs: 1 Composite Video Input plus 2 Channel Audio Input
• 1 Optical Output (5.1CH)
• 4CH Line-output with 1 Subwoofer Output
• Full Function IR Remote Control
• CD Changer Control (Sanyo 6 & 10 Disc CD Changer is an optional feature)
2
Page 4

ITEM# MM1007
PRECAUTIONS
• Do not watch video playback while driving. This distraction can be the cause of
significant danger and/or increase the risk of a traffic accident. In addition it
may violate state and local laws and regulations.
• Do not install the unit where it may obstruct or interfere with safe operation of the vehicle.
• Do not open or disassemble the unit if the unit is damaged operating abnormally.
Please consult a local service-center or distributor for proper repair.
• Do not open and close the monitor manually. This may damage the monitor tilt system.
• Do not touch the LCD screen. Doing so may damage or scratch the LCD screen.
• If the back of monitor touches the dashboard or air-conditioner vent, etc. when
fully opened, be sure to return to the Setup TILT level in the Monitor TILT
menu to prevent damage from repeated contact with the obstruction.
• Parking your car in direct sunlight may increase the temperature inside the car
and the unit may not operate properly. Proper operation may not return until the
interior has cooled.
• The power cable fuse is not user-replaceable. Please consult a professional
service center. improper fusing may cause damage to the unit or to your vehicle.
It may also pose a safety hazard from shock or fire.
• Do not use irregularly shaped or damaged discs.
• The IR remote control receiver may be obstructed or blocked by the monitor
when the monitor is opened, interfering with the operation of the remote. In this
case, try adjusting the level of the remote so that it is at a similar level as the
remote control receiver.
• Do not install the unit where the cooling fan may be blocked.
3
Page 5
ITEM# MM1007
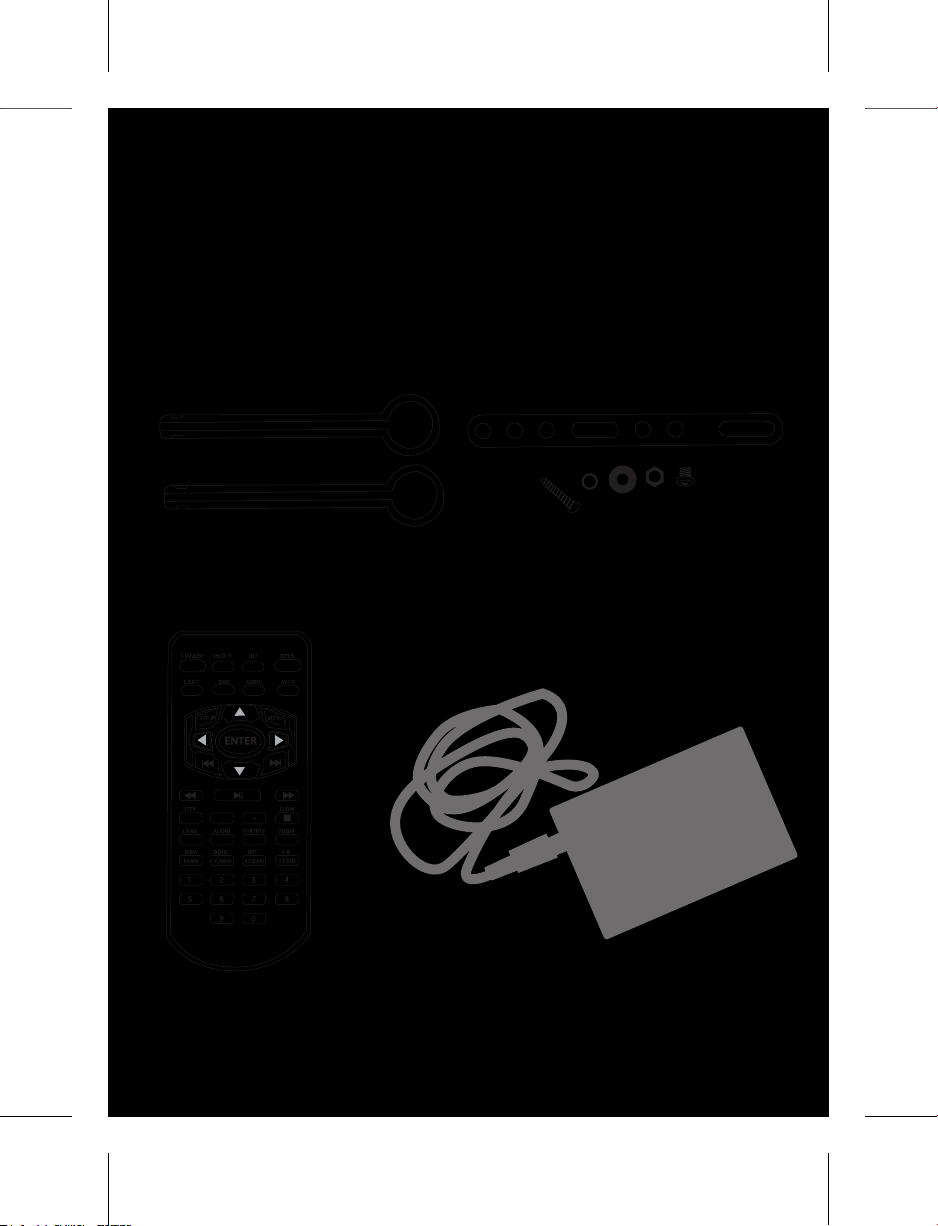
ACCESSORIES
The unit contains the accessories detailed below:
Release Keys
IR Remote Control
Mounting Screw and Bracket
External TV Tuner Box (Optional)
4
Page 6

ITEM# MM1007
INSTALLATION
IMPORTANT NOTES – PLEASE READ FIRST
• Before starting installation of the unit, make sure all wiring is connected properly.
• Use only the parts provided with the unit to ensure proper installation.
• The use of unauthorized parts may cause improper functioning or damage to the unit.
• Install the unit where it does not interfere with the vehicle driver and will not injure
passengers in the case of a sudden stop.
INSTALLATION
Please insert the half-sleeve (the unit
holder) into the dash hole and bend the
mounting tab upward and downward to
fix the half-sleeve.
Then insert the unit into the half-sleeve
hole until the unit engages the side locker
with an audible clicking sound
UN-INSTALLATION
Insert the supplied extraction keys into the unit and pull the unit out with the
extraction keys.
5
Page 7

ITEM# MM1007
OPERATION
[1] Power
[2] Preset 1 / Step Backward
[3] Preset 2 / Step Forward
[4] Preset 3 / Play / Pause
[5] Preset 4 / Stop / Repeat
[6] Preset 5 / Fast Backward / Intro
[7] Preset 6 / Fast Forward / Random
[8] Mute
[9] Mode
[10] Eject
[11] Push Select / Volume
[12] IR Remote Sensor
[13] Open
[14] Preset Scan
[15] Local (DX) Button
[16] Ban d
[17] Joystick Up/Down/Seek Up/Down
[18] Enter / Stereo, Mono Select
[19] Loudness
[20] LCD Display
[21] Disc Loading Slot
[22] Tilt Level Adjustment
[23] In/Out
[24] OSD
[25] Menu
[26] Setup
6
Page 8

ITEM# MM1007
Front Panel And Remote Control Buttons
[1] POWER Button (STANDBY Button on Remote Control)
Press any button to turn on the unit. Press POWER button to turn off the unit.
When the Tilt is set to AUTO and the monitor is opened, power-off will
automatically close the monitor. When the Tilt is set to MANUAL, power–off will
not close the monitor automatically and the monitor will remain opened.
* RESET: In case the unit is malfunctioned or need to reset to factory default
setting, press POWER button about 10 seconds, then the unit will be reset.
[2] ~ [7] Radio Station Preset Buttons, Disc Play-mode Control
MO DE
Ra dio Press key for tuning p re-se t c han n el
TV Mov e to
CD / CD
Ch anger
MP3 CD
[2]
[3] [4] [5] [6] [7]
Press and h old k ey (for at lea st 2 -3 seco n ds) to set key p re se t to
sta tion
Mov e to
eat a ll
eat Off )
ld to
eat on e
eat
lde r)
N.A.
Fas t
ba ckw ard fo r
Aud io disc
an d sl
ow
ba ckw
ard fo r
titl e.
video
(Spe ed m in
2x to ma x
32 x)
Pre ss and
ho
ld for in tro
track mod
Fast
backw ard
for Aud io
disc and
slow
backw ard
for video
title. (S peed
min 2x to
Fas t forw ard f or
Aud io disc a nd
sl
ow forward for
video
(Spe ed m in 2x to
max 32x )
Pre ss and ho ld
dom play
for ran
mo de
e
Fas t forw ard f or
Aud io disc a nd
ow forward for
sl
video
(Spe ed m in 2x to
max 32x )
Ea ch t ime press
an d ho
cha nge fo lder =>
shuf fle mo de
pre vio us
cha nn el
Mov e to
pre viou s
cha pter or
track
Mov e to
pre viou s
cha pter or
track
next
cha nn el
Mov e to n ext
cha pter or
track
Mov e to n ext
cha pter or
track
Pla y,
Pa
Pl
Pau se
use
ay ,
Stop p lay ing.
Pre ss and
ho
ld to sele ct
repeat mode
(repea t one
=> rep
=> rep
Stop p lay ing.
Pre ss and
ho
Se lec t r epeat
mo de (f older
=> rep
=> rep
fo
max 32x )
Pre ss and
ho
ld for in tro
track mod
e
titl e.
titl e.
ld t o
7
Page 9
ITEM# MM1007
[7]
Fast forward for
Audio disc and
sl
ow forward for
video title. (Speed
min 2x to max
32x).P
ress and
hold for random
play mode
[2] ~ [7] Radio Station Preset Buttons, Disc Play-mode Control
MODE
DVD
[2]
Move to
previous
chapter or
track
[3] [4] [5] [6]
Move to next
chapter or
track
Play,
Pause
Fast
backward for
Audio disc
and slow
backward for
video
title.
(Speed min
2x to max
32x).P
ress
and ho
ld for
intro track
mode
[8] MUTE Button
Mute On and OFF.
[9] MODE Button
Change playing mode in a sequence of Radio Tuner _ DVD _ TV Tuner
(Optional) _ CD
changer (Optional) _ AUX
[10] EJECT Button
Eject the disc. If the disc is not removed for within 10 seconds after ejected, the
disc is reinserted automatically and will begin to play.
[11] PUSH SELECT / VOLUME Button
Rotate clockwise to increase volume and counter-clockwise to decrease.
Push the button to select Audio and Video setup mode (Bass _ Treble _ Balance _
Fader _ Brightness _ Contrast _ Color _ Sharpness) and rotate clockwise to
increase the level and counter-clockwise to decrease.
8
Page 10

ITEM# MM1007
• Video relative menu can be set only when monitor is opened.
• When clock (optional feature) is available, push select button long to display clock.
• Time setting sequence is as follow
a) Push SELECT long to display clock.
b) Push and hold ENTER to enter the time setting
c) Control joystick LEFT/RIGHT or rotate VOLUME to set hour.
d) Press ENTER key to complete setting hour
e) Control joystick LEFT/RIGHT or rotate VOLUME to set minute
f) Push ENTER key to complete setting minute
[12] REMOTE SENSOR
IR Remote control signal receiving window.
[13] OPEN (CLOSE) Button
OPEN THE MONITOR
When power is off, press open button and the unit is turned on and the monitor
opens automatically. If movement of the monitor is hindered by an obstacle, it
returns to its original position automatically.
CLOSE THE MONITOR
If there is an obstacle hindering the closing movement of the monitor when
power is on and the monitor is opened, the monitor will stop its movement. Press
again for closing after removing the obstacle. The monitor should be in the center
position when closing, otherwise it will not be closed.
You can select the option of monitor auto closing or manual-closing by pressing
MENU _ SYSTEM _ TILT and joystick to select either AUTO or MANUAL.. If
AUTO is set and monitor is opened, the monitor is automatically closed when
power is off. If MANUAL is set and the monitor is opened, the monitor will not
close when power is shut off.
9
Page 11

ITEM# MM1007
[14] PRESET SCAN (In Radio and TV Mode)
Press and hold to memorize received stations automatically.
Press button and the unit will tune to preset stations set for buttons 1 to 6 .
[15] LOC (Local / DX) Button
Change radio tuning from regional stations to national stations or from national
stations to regional stations The default is Local (regional).
[16] BAND Button
In Radio mode, Change radio band in the sequence of FM1/FM2/FM3/AM1/AM2.
In TV mode, Change band 1 /band 2. Each band shows 20 channel.
[17] 5 WAY JOYSTICK Controller (Up / Down / Left / Right / Enter)
In DVD Movie, Move JOYSTICK key to choose DVD Title Menu and press
ENTER to select chosen menu.
In Video KARAOKE, Move JOYSTICK key to choose the song and press
ENTER to play.
In CD, Move JOYSTICK UP / DOWN key to select track, LEFT / RIGHT key
to show next frame (each frame shows 6 tracks), Press ENTER to play
In CD Changer, Move JOYSTICK LEFT / RIGHT key to change to previous
disc / next disc
In TV mode, Move JOYSTICK LEFT / RIGHT key to seek TV channel upward
or downward and press ENTER to save current channel manually.
In RADIO mode, Press and hold JOYSTICK key to set manual or frequency auto
seek. Move JOYSTICK LEFT / RIGHT key to seek radio frequency up or down
then press and hold ENTER key to select stereo or mono.
In MENU mode, Move JOYSTICK keys to choose intended menu item and press
ENTER key to select.
10
Page 12

ITEM# MM1007
[18] ENTER Button
Same as ENTER key in [17] above.
[19] LUD (Loudness) Button
Activate and deactivate Loudness.
[20] Mini Color LCD Display
[21] DISC LOADING SLOT
[22] TILT Button
Adjust monitor tilt angle. You can set tilt adjustment angle from min 3 level to
max 5 level. To setup tilt level, press MENU and select SYSTEM _ TILT RANGE
using joystick and set 3 level, 4 level, AUTO (5 level).
[23] IN / OUT Button
Monitor moves forward or backward in 3 steps when the monitor is opened.
[24] OSD Button
Configures the general settings of the unit. Press MENU button and move
JOYSTICK keys to
choose intended item and ENTER to select. Below are the details of each menu
and item.
11
Page 13

ITEM# MM1007
FUNCTION
DESCRIPTION
TUNER
Change mode to Radio
DVD
Change mode to DVD (CD)
TV
Change mode to TV (optional feature)
CDC
Change mode to CD Changer (optional feature, when CD Changer is
co
nnected)
AUX
Change mode to AUX Input
FUNCTION
DESCRIPTION
BASS
Support 15 levels. Default level is 0.
TREBLE
Support 15 levels. Default level is 0.
BALANCE
Support 7 levels for each left and right channel. Default is left equal to
right.
FAD
Support 7 levels for each front and rear channel. Default is front equal
to rear.
SUB
Woofer
Sub-woofer on / off
START
VOLUME
Use this menu to setup starting volume level.
Su
pports 50 levels. Default level is 20.
(F
or example: when the start volume is set to 20, the volume level is
automatically set to 20 when the unit is powered on – regardless of
what the volume was when the unit was turned off).
FUNCTION
DESCRIPTION
BRIGHT
Adjusts level of screen brightness. Supports 40 levels. Default level is
20.
CONTRAS
Adjusts level of screen contrast. Supports 40 levels. Default level is 20
COLOR
Adjusts level of screen color. Supports 40 levels. Default level is 20.
SHARP
Adjusts level of screen sharpness. Supports 40 levels. Default level is
20.
SOURCE MENU
AUDIO MENU
VIDEO MENU
12
Page 14

ITEM# MM1007
FUNCTION
DESCRIPTION
PICTURE
Invert the screen picture from normal to upside down
FULL
Change to full screen mode, You can move the screen by joystick key
NORMAL
Return to normal screen mode.
FUNCTION
DESCRIPTION
TILT
Set to auto or manual monitor close (please refer to 22. TILT for more
detail)
IN/OUT FIX
Adjust monitor location of forward, backward position
Level None: Can be moved from position 1 to position 3
Level 1: Fixed 1 position; Level 2: Fixed 2 position; Level 3: Fixed 3
position.
TILT
RA
NGE
Monitor Angle adjust
Au
to: 5 steps can be changed, 3 Level : tilt moving step is 3 steps, 4
Level : tilt moving step is 4 level, 5 Level : tilt moving step is 5 level.
TV
PICTURE
Choose TV video system. It supports NTSC/ PAL / CHINESE
This function is available when TV tuner is connected
TV SOUND
Choose TV sound system. It supports B/G, I, DK system.
SOUND-1 for B/G, SOUND-2 for I, SOUND-3 for D/K.
BACK
LIGHT
Set back-light brightness level
SCREEN MENU
SYSTEM MENU
13
Page 15

ITEM# MM1007
[25] MENU Button
RADIO DISPLAY
(1) Display current Band and current memorized station
(2) Contents of current Band
• Current Tuning memory Position is highlighted with red color
(3) STATUS display
• MEM : Display current memory.
If there is no matching memory exists, display MEM 0
• Play status display
a. AUTO: auto seek mode
b. MANUAL: manual seek mode
c. P.SCAN: preset scanning mode
d. A.SAVE : auto save mode.
• Volume level display
• ST (Stereo) / MONO display
• LOC display (No display when DX)
14
Page 16

ITEM# MM1007
TV MODE DISPLAY
(1) TV mode display
(2) Current Band and current channel display
When there is no matching channel, oscillator freq is displayed in PAL mode.
(3) Contents of current band
• Current channel is red color
(4) TV function status display
• AUTO: auto seek mode
• MANUAL: manual seek mode.
• P.SCAN: preset scanning mode
• A.SAVE: auto save mode.
CD CHANGER MODE DISPLAY
15
Page 17

ITEM# MM1007
(1) Current disc number
(2) Current track number
(3) Current Playing status
• PLAY : playing disc
• PAUSE : pause playing
• STOP : stop playing
• F.FORWARD : current track fast forward
• F.BACKWARD : current track fast backward
• DISC CHANGE : change to next disc
• NORMAL : play all tracks in sequence
• REPEAT ONE : play current track repeatedly
• REPEAT DISC : play all tracks of current disc repeatedly
• INTRO : play each track for several secs.
• DISC INTRO : play the first track of each disc for several seconds
• RANDOM : play each track in irregular sequence
• DISC RANDOM : play each disc in irregular sequence
• No disc: displayed if there is no magazine inserted
(4) Total Disc Status
• Disc No. in white color means the disc is existed in this slot.
• Disc No. in black color means no disc exists
• Disc No. in red color means current disc
16
Page 18

ITEM# MM1007
SYSTEM STATUS DISPLAY
(1) Loudness on/off display
(2) TV channel display
• Current channel number display
• TV function status display
(3) Monitor Error display
• When monitor is turned left or right, monitor close is impossible
(4) Volume level display
(5) Mute indicator
(6) In the DVD, TV, AUX modes, no picture is showed on screen but the warning
message on black screen as above picture
(7) Select menu display
(8) Clock time display (if clock feature is included)
(9) OSD main menu
(10) OSD sub menu
[26] SETUP Button
Enable DVD Title menu.
Please refer to further detail of OPERATION - DVD SETUP
17
Page 19

ITEM# MM1007
AUDIO
Change the language by L/R channel. (available only with
dual language Movie Disc)
SUBTITLE
If the DVD or SVCD has more than one language
caption, press this key to select the caption displaying
option or to hide caption. The caption information
corresponds to the disc currently being viewed.
ZOOM
While in normal operation, press [ZOOM] to enlarge or
contract the screen display. Each press of the ZOOM
function will in turn perform 2X, 3X, 4X, 1/2, 1/3 and
1/4 zoom or contract
Press this key again and the display will return to its
normal screen state.
PROG (Program) and Numeric Key (0 ~ 9)
Available for DVD / VCD / CD discs, Press this button and enter a numeric
value to go directly to a specific time or title, chapter for DVD movie - or enter a
numeric value to go directly to a specific time or track for a VCD movie. Press
again to exit the program mode.
A-B
In DVD / VCD / CD mode, press the [A-B] button once to input starting point
A press again to input ending point B and then press START to play from point A
to point B repeatedly. To cancel A-B play, press this button again.
NUMERIC KEY (0 ~ 9)
In DVD / VCD / CD mode, press to directly move to a particular track. For
example, press 1, 2, to move to track 12. In MP3 CD mode, press to move to
song number. In TV mode, press to change to a TV channel directly.
18
Page 20

ITEM# MM1007
DVD SETUP
General Setup
Use the [SETUP] option to set up system functions. Press [SETUP] to enter into
the setup menu; press right & left keys to move curser and select “General setup”,
“Audio setup”, “Video setup”, “Initial setup page” or “Password setup” options.
The setup page is shown in the following image:
Press [SETUP] to enter into the setup menu. The system then enters into the
“General setup” page. In the “General setup” page you can set up the “TV type”,
“Angle mark”, “Language displayed”, “Hide caption”, “Screen saving” and “Last
memory setup” options.
TV Display
“TV type” option: press [_/_] to pick the “TV type”. Press “PLAY” to access the
setting selection state. Use [_/_] to select “Normal/Fullscreen”,
“Normal/Mailbox” or “Wide screen”, then press “PLAY” to confirm the
selection and press [_/_] to quit the “General setup” page.
Note: While playing wide screen images in the “Normal/mailbox” format, both
the right and left edges will be cut off and the image will be expanded to fill the
entire screen when used with a normal size TV set. When used in “Wide screen”
mode, black bands will appear at the top and bottom of the screen. The “Wide
screen” mode is most suitable for true widescreen TV sets (sometimes called
“letterbox” or 16:9).
19
Page 21

ITEM# MM1007
Angle Mark
Use this option to turn on/off the angle mark. When playing multi-angle-screen
discs, the angle mark will be displayed when this option is “ON” and hidden when
it is “OFF”.
OSD Language
Language displayed: option to select ENGLISH or Chinese for the On Screen
Display (OSD).
Captions
For NTSC-mode TV’s, this option can display or hide caption included on a disc
with CLOSED CAPTION content. The TV set must be able to support this
option; otherwise it will be unavailable.
Last memory
Use this option to memorize the last setting used for recording.
If selected “ON”, the system will memorize the recording settings. When the
system is turned back on it will used the memory settings for recording.
If selecting “OFF”, system will use the default settings each time The unit is
turned on.
20
Page 22

ITEM# MM1007
Audio Setup
In the Audio Setup Menu option users can perform the actions shown in the
following image:
Speaker Setup
In the “Audio Setup Menu”, use the up and down keys to move the cursor
selecting the “Speaker Setup” option. Press “PLAY” key to enter into the “Speaker
Setup Menu” and then the user can make the following selections:
DOWNMIX Mode
In this menu the user can select the “LT/RT”, “Stereo”, “Simulated Circulation”
and “Off ” options. When selecting “LT/RT” you have selected the right & left
audio channels (front) and Lo/Ro signal; “Stereo” means you have selected the
right & left audio channels (front) speaker to simulate a stereo audio effect; and
“Off ” means the 5.1 channel output is selected (ie: no Downmix). After pressing
“PLAY” to ensure the option selection, press the left key to back out of the
“DOWNMIX” mode.
(Note) If the power amplifier is set for 2-channel signal input, it may select the
LT/RT mode to properly play the 2 channel input.
The Front Speaker
Select “Large/Small” for the front speaker.
The Middle Speaker
Under the “DOWNMIX” mode off condition, the user can select “Large / Small
/ Off ” for the middle speaker.
21
Page 23

ITEM# MM1007
The Rear Speaker
Under the “DOWNMIX” mode off condition, the user can select “Large/ Small/
Off ” for the rear speaker.
(Note) “Large” means full-frequency speaker; “Small” means medium-to-highfrequency speaker.
Bass Speaker
”ON/OFF” option for bass speaker. “OPEN” means the bass speaker is initiated.
Tone Test
When the 5.1 audio is active, select “Open” and a test tone will be passed to all 5.1
channels.
Conversation Volume
When selecting “LT/RT stereo” under DOWNMIX mode, user can select the
“conversation volume” in the “Speaker setup” page and adjust the conversation
volume.
(Note) While playing a 5.1 audio-channel disc, user can adjust the speaker volume
through the “Conversation volume” option.
Output Dynamic Compression
Output dynamic compression lowers the highest volume peaks and raises the
lowest volume peaks so that the overall volume is louder without exceeding the
speaker power limitations. The option can be selected as “ON”, “OFF” and
“AUTO”.
22
Page 24

ITEM# MM1007
SPDIF Setup
On “SPDIF” page menu, the available options include “SPDIF output”, “CD”,
“Dolby code”, “DTS”, “MPEG”, “PCM” and “LPCM” channels.
(Note) “SPDIF” means optical output.
SPDIF Output
At the “SPDIF output” option, users can select “SPDIF off ”, “SPDIF source
code” and “SPDIF/PCM” manually.
CD
If selecting manual mode for the “SPDF output” item, users can select “SPDIF
off ”, “SPDIF source code” and “SPDIF/PCM” manually.
Dolby Code
If selecting manual mode for the “SPDIF output” item, users can select “SPDIF
off ”, “SPDIF source code” or “SPDIF/PCM” under the “Dolby code” option.
DTS
If selecting manual mode for the “SPDIF output” item, users can select “SPDIF
off ”, “SPDIF source code” or “SPDIF/PCM” under the “DTS” option.
MPEG
If selecting manual mode for the “SPDIF output” item, users can select “SPDIF
off ”, “SPDIF source code” or “SPDIF/PCM” under the “VCD” option.
(Note) “SPDIF off ” means the encoded signal
inputted to power amplifier is off. “SPDIF source code” means signal inputted to
the power amplifier hasn’t been decoded. “SPDIF/PCM” means to input the PCM
channel signal (decoded) to the power amplifier and the simulated output signal
remains constant.
23
Page 25

ITEM# MM1007
PCM Channel
Select “PCM channel” option in “SPDIF” menu page and select “SPDIF R/L”,
“SPDIF LS/RS” or “SPDIF C/LFE” options. The “SPDIF R/L” means to select
right or left stereo channel; the “SPDIF LS/RS” means to select right or left
circulation channel; and the “SPDIF C/LFE” means to select the medium and
heavy bass channel.
Dolby Digital Setup
Press “PLAY” at “Dolby code setup” option to enter into the menu; user can then
set up the “R+L dynamic range compression”.
R+L
In the “R+L” selection users can select the “Stereo”, “R-sound”, “L-sound” or
“Mix” option. In which “Stereo” means the output is a stereo signal; the “Rsound” means the output is right audio signal; the “Left-sound” means the output
is left audio signal; and the “Mix” option means that system outputs the mean
signal of the Left and Right channels added together..
Dynamic Range Compression
In the “Dolby code setup” option page, select the “Dynamic range compression”
and press “PLAY” to make selections. Use up/down keys to select the compres
sion rate of the dynamic range. The higher compression range will make the
difference between the treble and bass less distinct.
Channel Delay Setup
In the “Delay” setup menu page users can set up the relative signal delay to each
of the speakers
Channel Trim
In the “Tone setup” menu page users can use up/down keys to move the curser
and select the “Balancer setup” option. After pressing “PLAY” users can then
enter the “Balancer setup” page to set up the “Balancer type”.
24
Page 26

ITEM# MM1007
Equalizer
To get a more pleasing sound, users can adjust the equalizer to follow his/her
music style preferences. Users can select rock-and-roll, fashion, field, dance-music,
electronic, classic and light-music options.
3D Processing
In the “Tone setup” menu page users can use
up/down keys to move cursor and select the
“3D processing setup” option to set up “PRO LOGIC” or “MIX”.
PRO LOGIC II
At the “PRO LOGIC II” option page press “PLAY” to enter into the setting
mode. While using up/down keys to operate “ON” and “Auto ON/OFF”. When
AUTO ON/OFF is selected two audio channels will be processed to simulate five
channels and can be played by multi-channel speakers. If “OFF” the processing is
not active.
Mode : the music mode means that all sounds coming from different speakers will
arrive without any delay. The video mode means that under circulated channel it
will delay for 10ms. The PRO LOGIC mode will simulate PRO LOGIC I
processing.
Full screen mode: makes the front stereo sound extend to both sides in order to
create better surround effect.
Dimension control: acts similar to the balancing control between the front and
rear sounds that can gradually move the front, back and side sound fields. There
are seven levels in total that can be adjusted.
Central width: adjusts the center audio channel signal and divides it to both right
and left channels.
25
Page 27

ITEM# MM1007
Mix mode
To experience better field echo effects, users can select various environments. The
options include “Off ”, “Concert”, “Hall”, “Bathroom”, “Cave”, “”Arena” and
“Church”.
HDCD
In the “Tone setup” page user can use up/down keys to move the curser and
select the “HDCD” option to enter into the “HDCD setup” page and set up the
High Definition CD options. “OFF” means to use standard CD format.
26
Page 28

ITEM# MM1007
Video Setup
In the “Video setup” page users can set up the distributed video, TV node and
video quality, as shown in the image below:
Component
“OFF” means system is now outputting compound video, YUV means YUV
signal output and RGB means RGB signal output.
Quality (Video Quality Setup)
On this option page users can set up the “Sharpness”, “Brightness”, “Contrast”,
“GAMMA correction”, “Hue”, “Saturation” and “Luma Delay” options.
Sharpness
Select “High”, “Medium” or “Low” screen sharpness. If users want to make the
display softer, users should select “LOW”; and when the display is too dark the
“High” option should be selected.
Brightness
Users can set up the screen brightness from the background brightness status.
Contrast
Users can set up the screen contrast from background brightness status.
While adjusting the brightness or contrast, press the right key to enter into the
setup mode; then, use up/down keys to make selections and left key to return
back to the setup mode.
27
Page 29

ITEM# MM1007
GAMMA Correction
The GAMMA correction curve can be adjusted to high, medium and low. “OFF”
means no GAMMA correction is to be performed.
Hue
Users can set up the screen color saturation from background brightness status.
Saturation
Users can set up the screen color saturation from background brightness status.
Luma Delay
In the “Luma Delay” option users can set up “0T” or “1T” toward bright delay.
Users can perform “0T” or “1T” setup according to the TV brightness and color.
In normal situations it should set to “1T” for DVD formats and “0T” for other
formats.
28
Page 30

ITEM# MM1007
Preference Setup
Users can perform initial setup when turning on the unit or changing a disc. In the
“Initial setup” page users can set up “TV type”, “PBC”, “Audio”, “Caption”,
“Disc menu language”, “Country/Region” and “Default value”, etc., as displayed
in the image below:
TV type
In “TV type” option users can select “PAL”, “Multi (Auto)” or “NTSC” video systems.
PBC
Select “on”, “off ”.
Audio
Depending on the languages supported by the disc, users can select various
program languages such as English, French, Spanish, Chinese and Japanese, etc.
Subtitle
Depending on the subtitles supported by the disc, users can select captions
displayed in various languages such as English, French, Spanish, Chinese and
Japanese, etc.
Disc Menu (Language)
Before playing the disc, user can select the menu language displayed such as
English, French, Spanish, Chinese and Japanese, etc.
Parental
While the “Password setup” option is off, users can set up the controlled ratings
in the “Age control” option. The ratings under control include those use in U.S.
films or their equivalent.
29
Page 31

ITEM# MM1007
Country Region
Indicates the region code where the disc can be played. Region codes of each
country are shown below:
Region 1 : USA, Canada, East Oceania
Region 2 : Japan, West Europe, Middle East
Region 3 : Taiwan, South Korea, Southeast Asia
Region 4 : Mid and South America, Australia,
New Zealand, South Oceania
Region 5 : Russia, India, Middle Asia, Africa
East Europe
Region 6 : China (Mainland)
Default
System will load factory default settings.
30
Page 32

ITEM# MM1007
Password Setup
Users can set up passwords in the “Password setup” page as shown below:
Master Password : this is default password (code is 136900)
User Password : User can change password code
MISCELLANEOUS
JEPG Format Disc
PLAY : press this key to enter into auto-picture-displaying mode.
MENU : while playing a JPEG disc, press this key to enter into the index
browsing mode. Use the up/down/right/left keys to move curser to the desired
option and press “PLAY” to confirm the selection.
PROGRAM : while playing a JPEG Disc, use this option to change the picture
-
converting method.
NEXT CHAPTER : press this key to play the next picture.
PREV CHAPTER : press this key to play the previous picture.
STOP : press this key to enter into the transparency-browsing mode.
PAUSE : press this key to pause auto-play mode; and press “PLAY” to resume it.
FAST FORWARD : while playing a JPEG format disc, press this key to turn the
picture clockwise 90 degrees.
31
Page 33

ITEM# MM1007
FAST BACKWARD : while playing a JPEG format disc, press this key to turn the
picture counterclockwise 90 degrees.
MP3 / WMA™ Disc
While playing MP3 or WMA™ discs, user can press PROGRAM key to select the
following two playing modes:
Folder Browsing Mode
In this mode, the index is shown on the left side of menu and blank on the right
side.
Press up & down keys to select the
play index
and press “PLAY” or right/left key
to enter into the menu as shown:
To play songs, press “PLAY” Now
the curser is located on <UP DIR>.
Press the right key to enter into the
song menu; use up/down keys to
select the song to be played. This
process is suitable for playing a list
of songs. After all songs contained
in the list are played, the system will
stop playing automatically. The
onscreen display is shown:
32
Page 34

ITEM# MM1007
Playlist Mode
In this mode, the song list is shown on the left side of menu. Use up/down keys
to select the song to be played. After pressing “PLAY” the selected songs then will
be displayed on the right side. Move the curser to the targeted song, press “PLAY”
again and the system will play the songs in the list sequentially. This mode is
convenient for users to edit the song-playing order as shown in the image on
right.
33
Page 35

ITEM# MM1007
Symptom
Cause
Remedy
Power does not
turn on.(No
so
und is
produced.)
Fuse is blown
Replace with fuse of the same
amperage. If the fuse blows again,
co
nsult an authorized reseller or
dealer.
No sound output
when operating
the unit with
amplifiers or
power antenna
attached.
Power antennal lead
is
shorted to ground or
exc
essive current is
required for remote on
the amplifiers or
power antenna.
1. Turn off the unit.
2. Remove all wires attached to the
power antenna lead. Check each
wire for a possible short to ground
us
ing an ohm meter.
1.
Turn on the unit.
2. Reconnect each amplifier remote
wire to the power antenna lead
one by one. If the amplifiers turn
off before all wires are attached,
us
e an external replay to provide
remote-on voltage(excessive
current required).
The microprocessor
has malfunctioned
due to noise, etc.
Turn off the power, Then press the
open button and remove the DCP.
Press the reset button for about 2
sec
onds.
Nothing happens
when buttons are
pressed.
Display is not
Accurate
Panel or main unit
Connectors
are dirty
Wipe the dirt off with a soft cloth
moistened with cleaning alcohol.
Compact disc is dirty
Carefully clean the CD with a soft
cl
oth
Sound is bad
directly after
power is turned
on.
Compact disc is
heavily scratched or
warped
Try another CD without scratches
Sound is bad
directly after
power is turned
on.
Water droplets may
form on the internal
lens when the car is
parked in a humid
place
Let it dry for about 1 hour with the
power on.
TROUBLESHOOTING
34
Page 36

ITEM# MM1007
SPECIFICATIONS
GENERAL
Operation Voltage DC 12V
Operation Voltage Range 10-16.0V DC
Maximum Operation Current 10A
Grounding System Car Battery Negative Pole
Installation Dimension (WxHxD): 178mm x50mm x(165+25)mm
Installation Angle: Vertically 0º ~+ 30º
Horizontally ± 15º
Net Weight: 2.5Kg
FM RECEIVER
Signal Noise Ratio: 60dB
Usable Sensitivity (S/N 30 dB) 10dB
Frequency Response (± 3dB): 40Hz ~ 12.5KHz
Station Seeking Level: 20~30 dBµV
Distortion: 0.5%
Stereo Separation (1KHz): 30dB
Antenna Impedance: 7.5
AM RECEIVER
Usable Sensitivity ( (S/N 20dB) 30dB
Distortion 10dB
DVD PLAYER
Signal / Noise Ratio 90dB
Dynamic Range: 90dB
Distortion (line out): 0.1%
Frequency Range (± 3dB): 20Hz~20KHz
Maximum Output Power: 45W x 4
Loaded Impedance: 4
Region Code: Free
DVD CHARGER INTERFACE
Frequency Response (4.0 ~ +1.0dB): 20Hz ~ 20KHz
AUX IN
Distortion: 0.5%
Frequency Response (± 3dB): 20Hz~20KHz
Audio Input Level: 1 Vrms
AUDIO
Audio Output Impedance: 600
Audio Output Level: ≥2.5 Vrms
(Under normal audio input level at maximum output volume)
VIDEO
Normal Video Input Level: 0±0.2V (CVBS),
700Mv
Video Input Impedance: 75
Video Output Impedance: 75
(under normal video input level)
TFT MONITOR
Screen Diagonal: 7 inch
Usable Display Area: 154.1(W) x 87 (H)
Resolution: 1440(W) x 234(H)
Brightness: 400cd/m
(measure the center brightness after 30 mins)
Contrast: 60 (minimum)
Response Time: Rise: 30ms,
Decline: 50ms
Viewing Angle: From Top: 65º
From Bottom: 40º
LCD Life Cycle: 10,000 hrs (at 25ºC)
ENVIRONMENT
Operation Temperature: 20ºC ~ +60ºC
Storing Temperature: 30ºC ~ +80ºC
Operating Humidity: 45% ~ 80%
Storing Humidity: 30% ~ 90%
35
Page 37

ITEM# MM1007
WIRING DIAGRAM
36
 Loading...