

Page 1

Important Safety Instructions
Notes
1) Read these instructions.
2) Keep these instructions.
3) Heed all warnings.
4) Follow all instructions.
5) Do not use near water.
6) Clean only with dry cloth.
7) Do not block any ventilation openings. Maintain well-ventilated conditions around
the product. Do not put product on bed, sofa or anything that blocks ventilation.
Install in accordance with the manufacturer’s instructions.
8) Do not install near any heat sources such as radiators, heat registers, stoves, or other
apparatus (including amplifiers) that produce heat.
9) This unit is equipped with a pola rized plug. A polarized plug has two blades with one
wider than the other. A g rounding type pl ug has two blades and a third grounding
prong. The wide blade or the third prong is provided for your safety. If the plug
provided doesn’t fit in your outlet, consult an electrician for replacement of the
obsolete outlet. Removal of the polarized plug will diminish the plugs level of safety.
10) Protect the power cord from being walked on or pinched particularly at plugs,
convenience receptacles, and the point where they exit from the apparatus.
11) Only use attachments/accessories specified by the manufacturer.
12) Use only with the cart, stand, tripod, bracket, or table specified by the manufacturer,
or sold with the apparatus. When a cart is used, use caution when moving the
cart/apparatus combination to avoid injury from tip-over.
13) Unplug this apparatus during lightning storms or when unused for long periods of time.
14) Refer all servicing to qualified service personnel. Servicing is required when the
apparatus has been damaged in any way, for example, power-supply cord or plug is
damaged, liquid has been spilled or objects have fallen into the apparatus, the
apparatus has been exposed to rain or moisture, does not operate normally, or has
been dropped.
15) Apparatus shoul d not be exposed to dripping or splashing and no objects filled with
liquids, such as vases, should be placed on the apparatus.
Note: Do not touch the color TFT LCD screen by hand directly.
The lighting flash wi th arrowhead symbol, within a tri angle, alerts the user to
“dangerous voltage” which could cause electric shock.
The exclamation point within a triangle is indicates to the user to read
impor tant o perat ing and maintenance instructions in t he manual.
WARNING: To reduce the risk of fire
or electric shock, DO NOT expose
this product to rain or moisture.
- 1 -
Page 2

Functional Features
This apparatus is the latest PMP player. By using the harddisk as its storage device, this
product is a multi-media player which could play files of MPEG1, MPEG2 and MPEG4
video format, MP3/WMA audio format and JPEG/ BMP/ GIF picture format. It is with 40GB
ultra large capaci ty, and hundreds of MPEG4 films and thousands of MP3 music coul d be
stored on the harddisk. It can be used as the moveable harddisk to connect to PC at any
time via the USB 2.0 port. Possessed with this player, your pastime will be more interesting.
High Resolution:
The horizontal resolution achieves more
than 500 lines, providing clear image.
Special Operation:
Support video playback, music playback,
picture scan and AV recording.
Voice Recording
Support to record voice via the
microphone.
Audio/Video Output:
It could be connec ted with TV, LCD and
slide projector via AV cable.
LCD (Liquid Crystal Display) Screen: 7"
Color LCD screen provide clear image.
Audio/Video Input:
It could be connected with external
Audio/Video signal source to obtain more
A/V signal. It also supports external A/V
signal recording function, recording the
program on the harddisk.
USB Input:
The product is designed with an USB 2.0
OTG port. You can download
multi-media files from the external
memory by USB port.
Supported File Format:
Supports MPG, DAT, VOB and AVI video
format files, MP3/WMA audio format files
and the JPG, BMP, GIF picture format file.
Harddisk Functions:
40GB harddisk capacity. Hundreds of films
of MPEG4 format and thousands of MP3
music can be stored on the harddisk.
Designed with USB 2.0 OTG port, can be
connected to computer at any time as a
moveable harddisk.
SD Card Functions:
Designed with SD card port, can be
connected to SD card.
- 2 -
Page 3

Accessories
Please refer to the following sheet, make sure that all these items are attached to your
player.
Picture Name Number
User’s Manual 1
A/V Cable 1
USB Cable 2
Power Adapter 1
Rechargeable Battery 1
Car Adapter 1
Bracket 1
Earphone 1
NOTE: If you fi nd that the accessories are not in acco rdance with the items listed in the
manual book, please contact the local sales person or the department store.
- 3 -
Page 4

Table Of Contents
Important Safety Instruction----------------------------------------------------------------------------------------Functional Features----------------------------------------------------------------------------------------------------Accessories--------------------------------------------------------------------------------------------------------------Table of Contents--------------------------------------------------------------------------------------------------------
Description- Front Panel ----------------------------------------------------------------------------------------------
Description- Rear Panel ----------------------------------------------------------------------------------------------
About the Rechargeable Battery---------------------------------------------------------------------------------System Connections -------------------- -------------------------------------------------------------------------------
Connecting to the Power Adapter------------------------------------------------------------------------------Connecting to AV Input Device--------------------------------------- -------------------------------------------Connecting to AV Signal Source------------ --------------------------------------------------------------------- Connecting to DC adapter--------------------------------------------------------------------------------------- -Connecting to PC-------------------------------------------------------------------------------------------------------
Connecting to USB-------------------- ----------------------------------------------------------------------------------
Connecting to Earphone--------------------------------------------------------------------------------------------System Setup--------------------------------------------------------------------------------------------------------------
1
2
3
4
5
7
8
11
11
12
13
14
15
15
16
17
Setting Menu------------------------------- -- --------- ---- --- -------- -- --------- ---- --- -------- -- --------- ---- --- -------- -
Movie Setup-------------------------------------------------------------------------------------- ------------------------Music Setup--------------------------------------------------------------------------------------------------------------Photos Setup--------------------------------------------------------- ----------------------------------------------------File Manager----------------------- ---- ------ ----- ---- ------- ---- ------ ----- ---- ------- ---- ------ ----- ---- ------- ---- -----
File Management------------------------------------------------------------------------------------------------------New Folder---------------------------------------------------------------------------------------------------------------Play Mode ----------------------------- ------ ----- ---- ------- ---- ------ ----- ---- ------- ---- ------ ----- ---- ------- ---- -----
Playlist----------------------------------------------------------------------------------------------------------------------Favorites-------------------------------------------------------------------------------------------------------------------Copy------------------------------------------------------------------------------------------------------------------------Delete----------------------------------------------------------------------------------------------------------------------Rename--------------------------------------------------------------------------------------------------------------------
Files Download----------------------------------------------------------------------------------------------------------Audio and Video Recording Function--------------------------------------------------------------------------System Upgrading------------------------------------------------------------------------------------------------------
17
22
23
23
23
24
24
24
25
25
26
26
27
28
30
31
Troubleshooting----------------------------------------------------------------------------------------------------------
Specifications------------------------------------------------------------------------------------------------------------
- 4 -
32
33
Page 5

Description -Front Panel
1. POWER Button/Power Indicator/Charge Indicator
Press and hold for about 2 seconds to turn on/off the power.
The light is green under normal playback status, while red in standby mode.
2. SETUP Button
Under file menu, press this button to enter file arrangement mode.
Under video file playback status, press this button to switch aspect ratio
between16:9 and 4:3. Press and h old the button for a while to enter time searching
mode.
Under audio file playback status, press this button to enter playback mode selecting
menu.
3. VOL – Button
Press this button to decrease the volume level.
4. VOL + Button
Press this button to increase the volume level.
5. REC Button
Under main setup menu, press this button to enter record mode menu, then press
MENU/ STOP button to exit. Under video file playback and recording status, press to
select Brightness, contrast or color adjust mode.
6. PREV Button
Press to skip to the previous chapter or track.
Under setup menu, press this button to select or adjust items.
- 5 -
Page 6

Description -Front Panel
7. NEXT Button
Press to skip to the next chapter or track.
Under setup menu, press this button to select or adjust items.
8. MENU/STOP Button
Press to enter or exit setup menu.
In the playback mode, press this butt on to stop playback.
Under the record mode, press this button to stop recording.
9. ENT Button
Adjust this button to select items in the menu, press this button to confirm your
selection.
In playback status, press to pause or resume playback; press and hold for a while to
select audio mode: L-Mono/R-Mono /Stereo/Mixed Mono/Mute.
10. LCD OFF/NORMAL/LOCK
Switch to LCD OFF, the LCD screen will be turned off to save battery power.
Switch to LOCK to lock the function of the buttons on the panel.
Switch to NORMAL to start normal playback.
11. SD Card Port
Insert SD card into this Port.
12. RESET Hole
Press to reset the player.
13. DC 9.5V IN Jack
Used to connect with 9.5V power adapter.
14. USB Jack
Used for USB connecting.
15. Earphone Jack
Used for connecting with the earphone.
16. AV Out Jack
Used for connecting to external AV input device.
17. AV In Jack
Used for connecting to external AV output signal source.
18. MIC Hole
Used for voice recording.
- 6 -
Page 7

Description- Rear Panel
Rear Panel
1. Rechargeable Battery Switch
Push this switch to detach the battery.
2. Rechargeable Battery contact Port
Used to connect the rechargeable battery.
- 7 -
Page 8

About the Rechargeable Battery
The power supply of the player is via the attached power adapter or the rechargeable
battery.
As a portable multi-media player, this player is equipped with a specific lithium polymeric
rechargeable battery, for using in ou tdoor or traveling.
About rechargeable battery
Charge the battery fully before initial use. Charging time is normally about 5 hours. A fully
charged battery delivers about 3.5 hours of use. If the battery will not be used for a long
period of time, fully charged the battery prior to storage.
Working conditions and precautions for the rechargeable battery
¾ The battery should be fully charged when it is used for the fi rst time, the charging
time is normally about 5 hours. And the charging time should be above 9 hours in
the first 3 times.
¾ Battery should be charged under the 10-30 degree room temperature.
¾ Under room temperature 25 degree, a fully charged battery delivers about 3.5
hours of use. The using time of the battery will be shortened if it is used under an
over heated or over cold circumstance.
¾ When the battery is exhausted, a sign will appear on the screen. The battery will turn
off automatically one minute later.
¾ Detach the battery after fully charged. It is suggested that do not charge the
battery under playback mode.
¾ Detach the battery when it is not in use.
¾ The battery should be stored in a dry, cool and sunless place.
¾ Do not throw the battery into fire or heat it to avoid exploding.
¾ Do not have the rechargeable battery exposed to moisture or fell into water.
¾ Do not connect any metal object to the positive or negative pole of the battery.
¾ Do not open or disassemble the battery.
¾ Do not short the battery terminals.
Warning:
Do not touch any metal objects to the battery connectors, as it will put the battery in
standby mode. To exit the standby mode, connect the player with the battery to AC
power.
- 8 -
Page 9

About the Rechargeable Battery
Attaching The Rechargeable Battery
1. Place the player on a soft and smooth surface with the bottom facing up.
2. Align the plastic ta bs on the i nterface of the rechargeabl e battery wi th the holes on
the player. Then push the b a ttery downward until it is embe dde d i nto the battery slot
at which you will hear a slight click. As shown on the below:
:
Charging The Rechargeable Battery
The battery must be attached to the player to charge it.
1. Attach the battery to the player as shown above.
2. Plug the supplied pow er adapter into the player’s pow er jack marked “DC 9.5V IN”
on the left panel of the player.
3. Plug the other end of the power adapter into a household AC outlet, as shown
below:
You’re suggested to charge the battery when the player is in standby mode.
- 9 -
Page 10

About the Rechargeable Battery
NOTE: The rechargeable battery will discharge gradually when not used for a long period
of time, and it will be exhausted within about one mont h
SPECIAL NOTE: If the player is not to be used for a long period of time, you’d better detach
the battery from the player in order to prolong the life span of the battery. Take the
following steps to detach the battery:
Detaching the battery
Slant the player wi th the bottom downward, push the b attery lock in the di rection of the
arrow, then the battery will fall off automatically. As shown on the below:
NOTE: Do not touch the LCD screen when attaching or detaching the battery.
- 10 -
Page 11
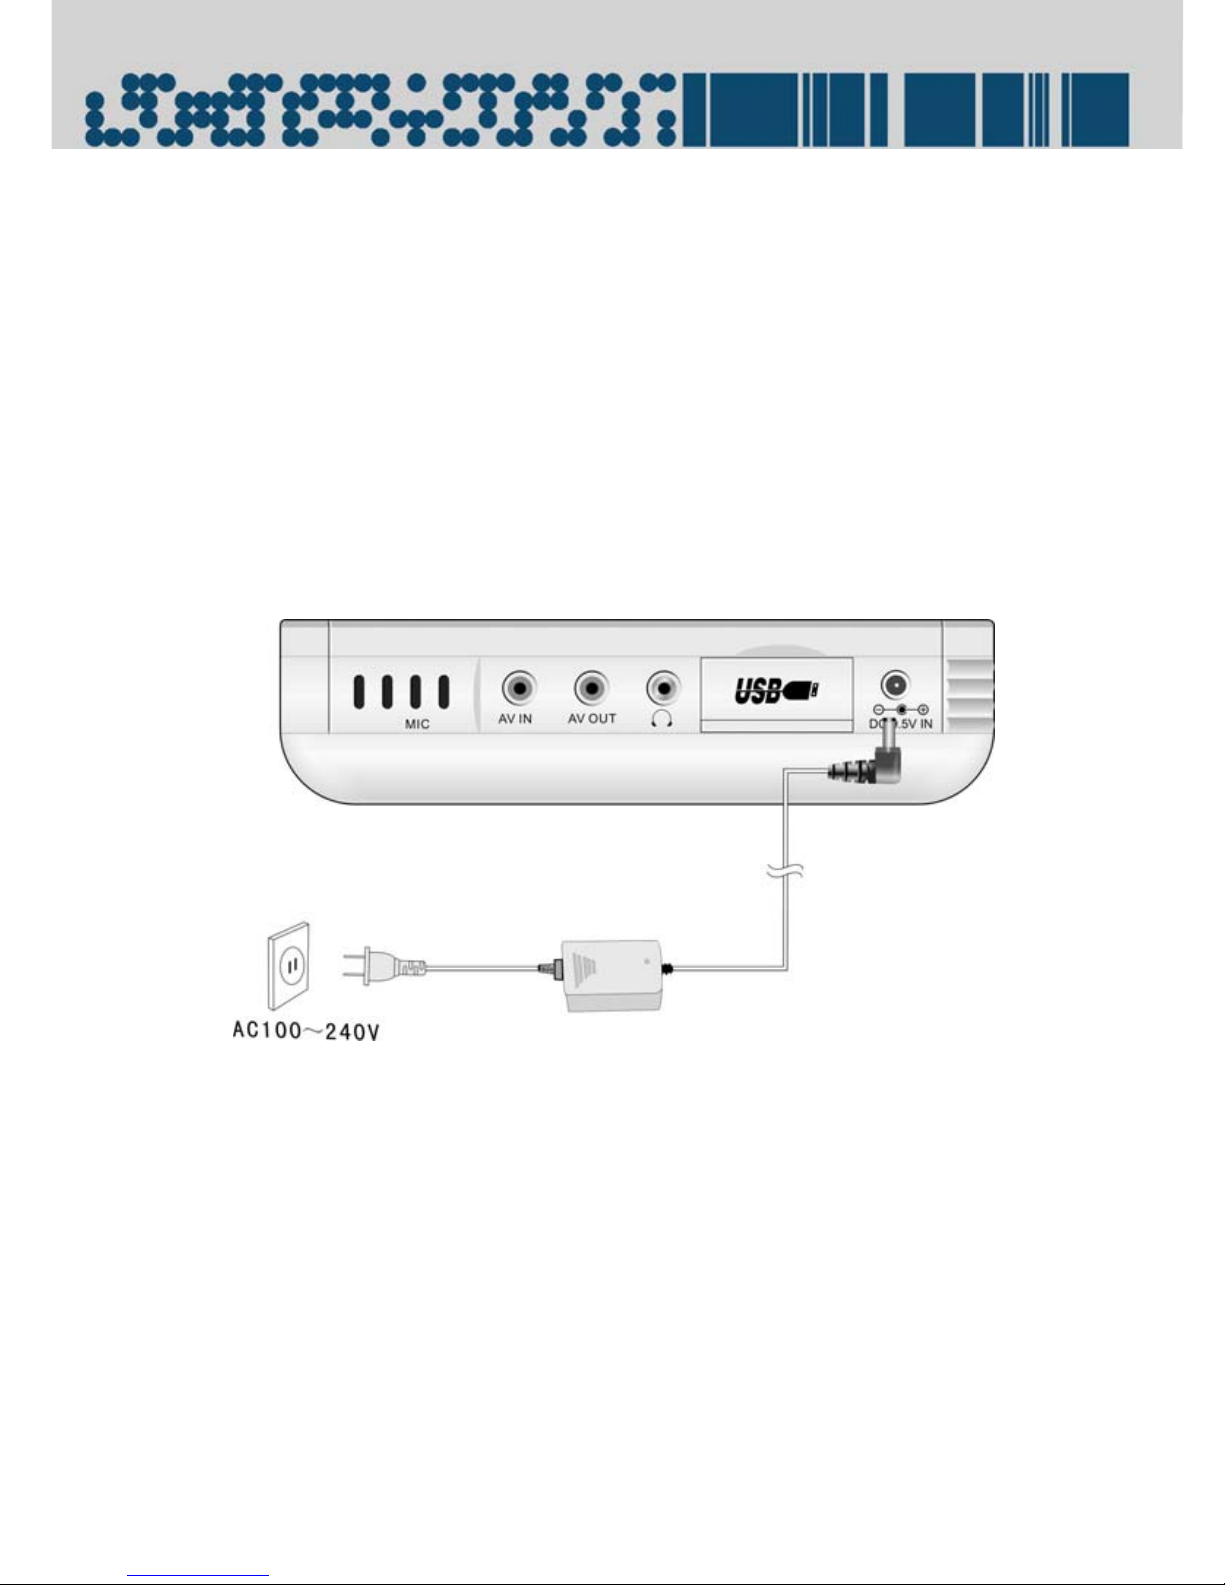
System Connection
NOTE: Before plugging the power cord into an AC outlet, make sure that all other
connections have been made as described below.
Connecting to the Power Adapter
The player is supplied with an AC adapter for powering the unit and charging the battery.
1. Connect AC adapter to the left side of the play er in the jack marked DC 9.5V I N, as
shown on the belo w.
2. Plug the two-prong end of the power cord into a grounded electrical outlet.
Please keep the power adapter far away from the player when using the power adapter.
- 11 -
Page 12
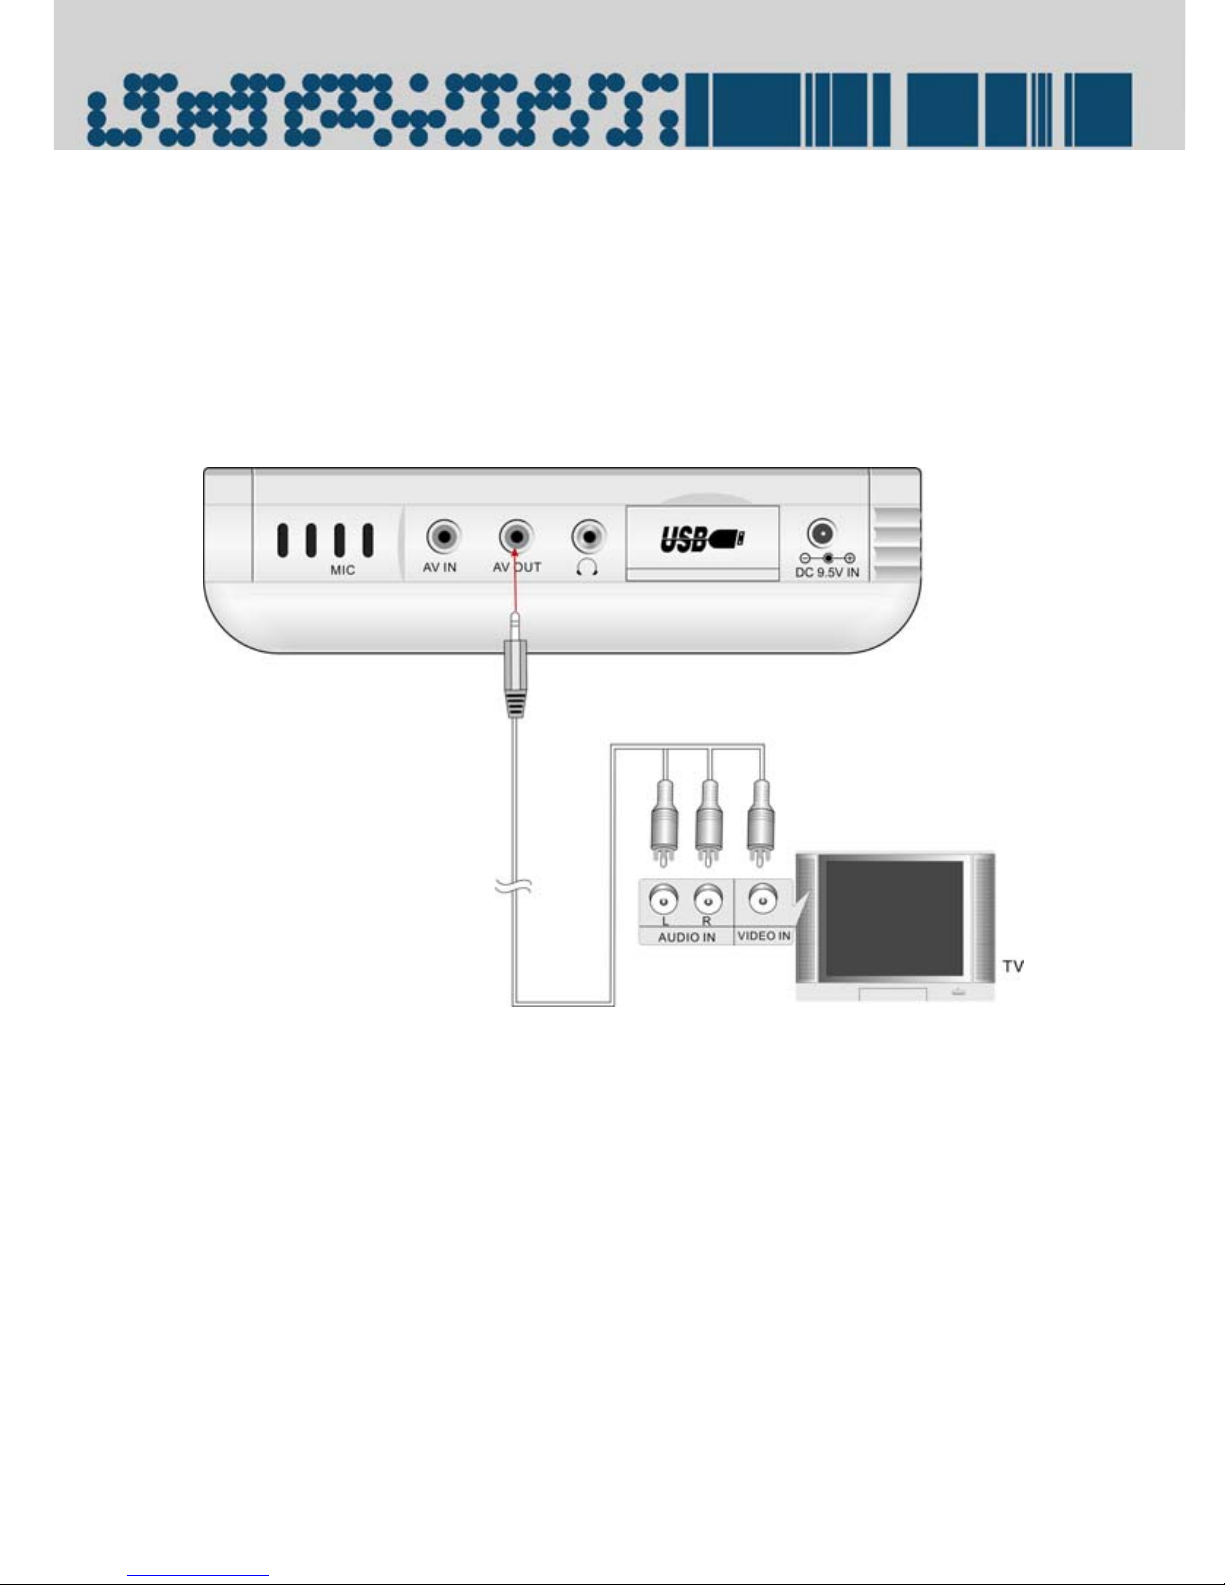
System Connection
Connecting to AV Input Device
This player suppo rts AV output fu nction. Usi ng the suppli ed audio/vi deo cable to connect
the player to the external AV input device, such as a TV.
Plug one end into the AV Out jack on the left panel of the player
Plug the other end into the input jack of the external AV input de vice, such as a TV, as
shown on the below f igure:
- 12 -
Page 13
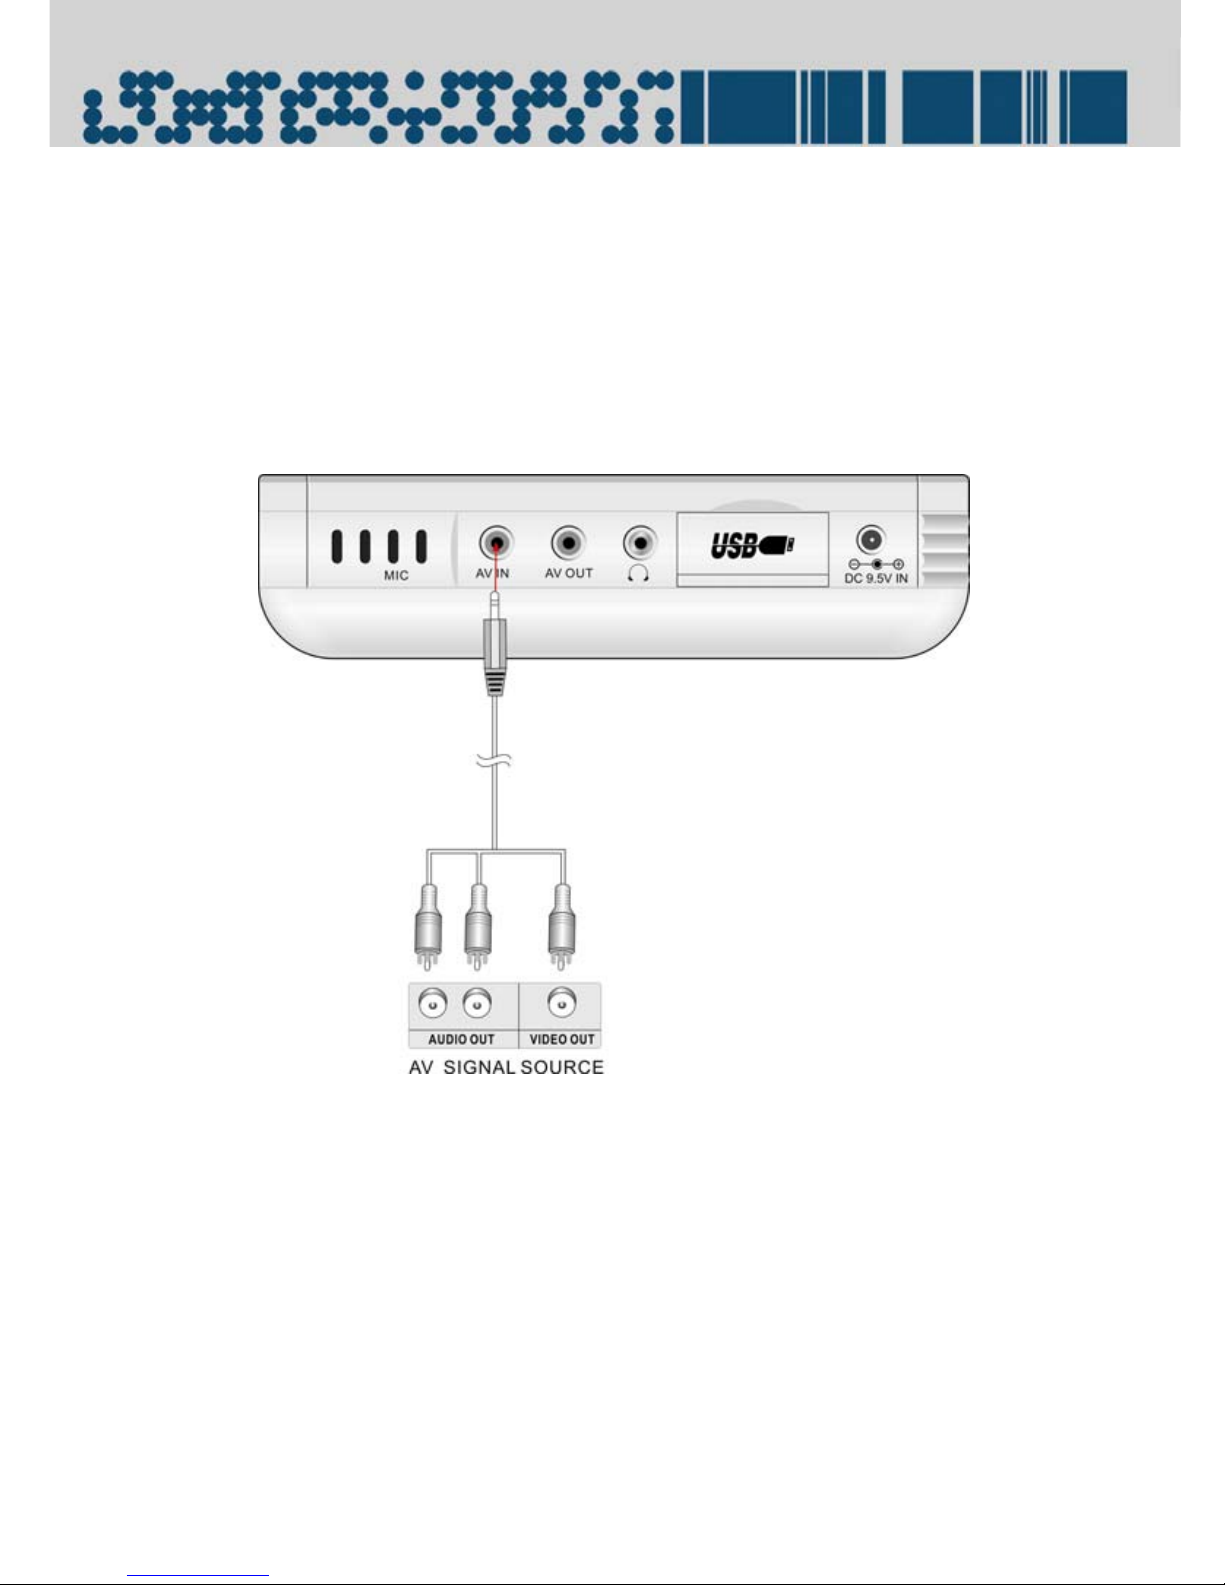
System Connection
Connecting to AV Signal Source
This player supports A V input function. Using the supplie d audio/video cable to connect
the player to the external AV output signal source.
Plug one end into the AV In jack on the left panel of the player
Plug the other end into the o u tp ut j a c k of the e xte rnal AV signal source, such a s a DVD, as
shown on the below f igure:
- 13 -
Page 14
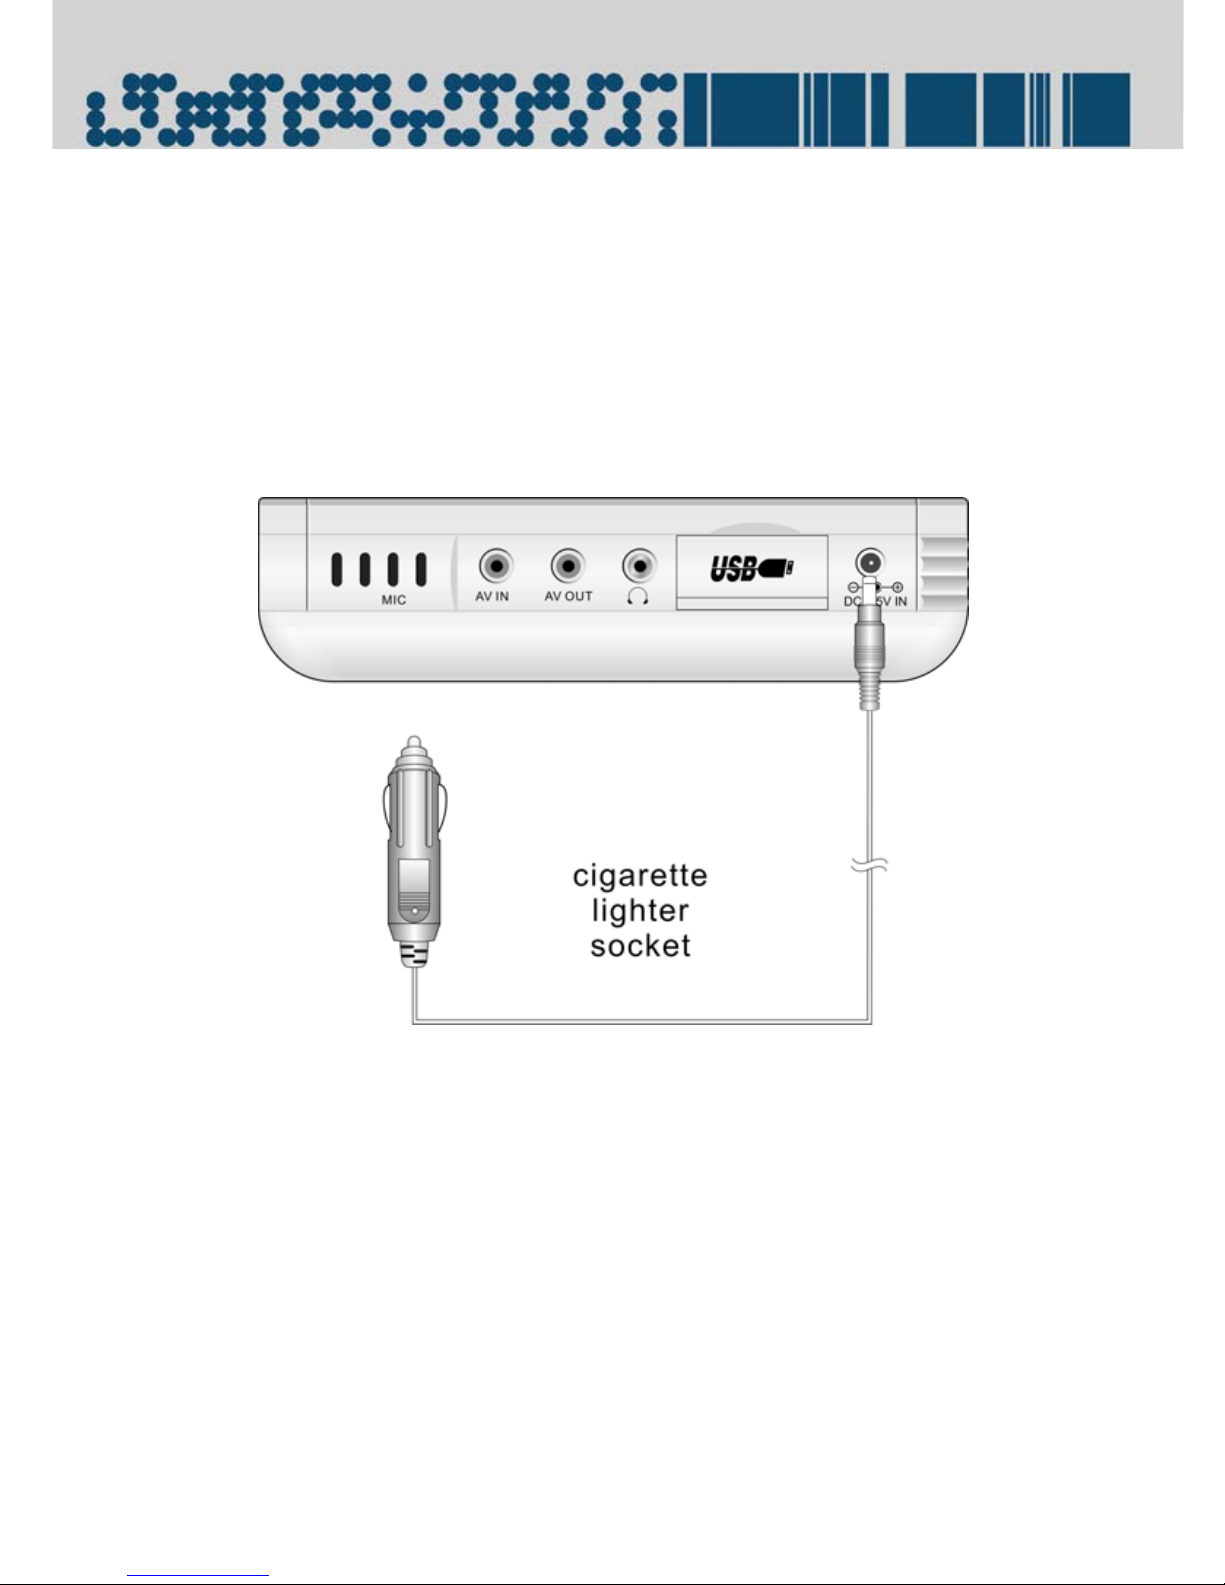
System Connection
Connecting to DC adapter
When used in a vehicle, a specific power adapter should be use to connect the player.
1. Connect the Vehicle Power Plug Adap ter to the ”DC 9.5V IN” jack on the l eft panel
of the player
2. Plug the other end i nto the Vehicle DC Outlet (Cigarette Lighter Soc ket) as shown
below.
Note:
¾ Do not operate the unit or view video software while driving a veh icle.
¾ Place the unit in a proper position for viewing.
¾ Detach battery pack when using the AC or car adapter as power source.
¾ Disconnect the player from the Car Adapter when starting the vehicle.
¾ Do not use the DC adapter to charge the battery.
- 14 -
Page 15
System Connection
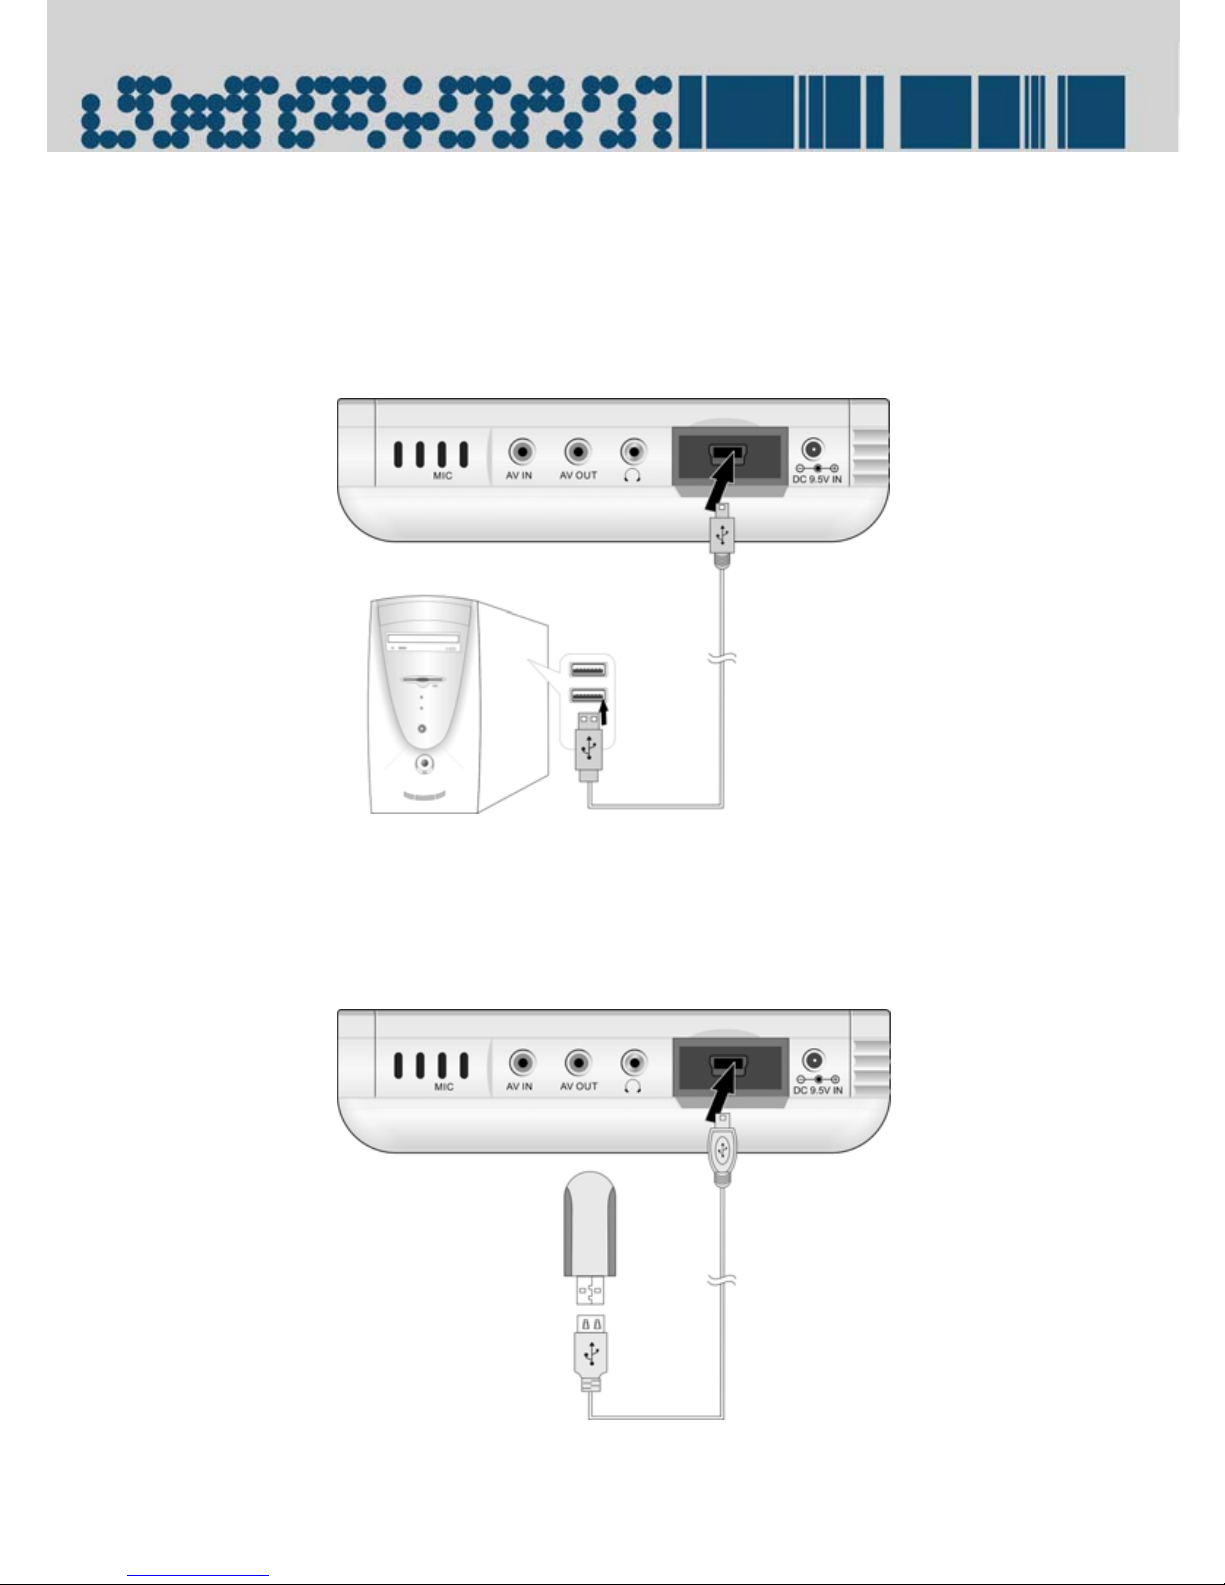
Connecting to PC (Slave-mode)
Use the supplied USB cable to connect the player to the personal computer.
Plug one end into the USB jack on the left panel of the player, and the other end into the
USB jack of the computer. See the below figure.
Connecting to USB(Master ModeⅠ)
Use the supplied USB connecting cable to connect the player to the external storage
device.
Plug one end into the USB jack on the left panel of the player and the other end into the
storage device, such as digital camera, etc. See the below figure.
- 15 -
Page 16
System Connection
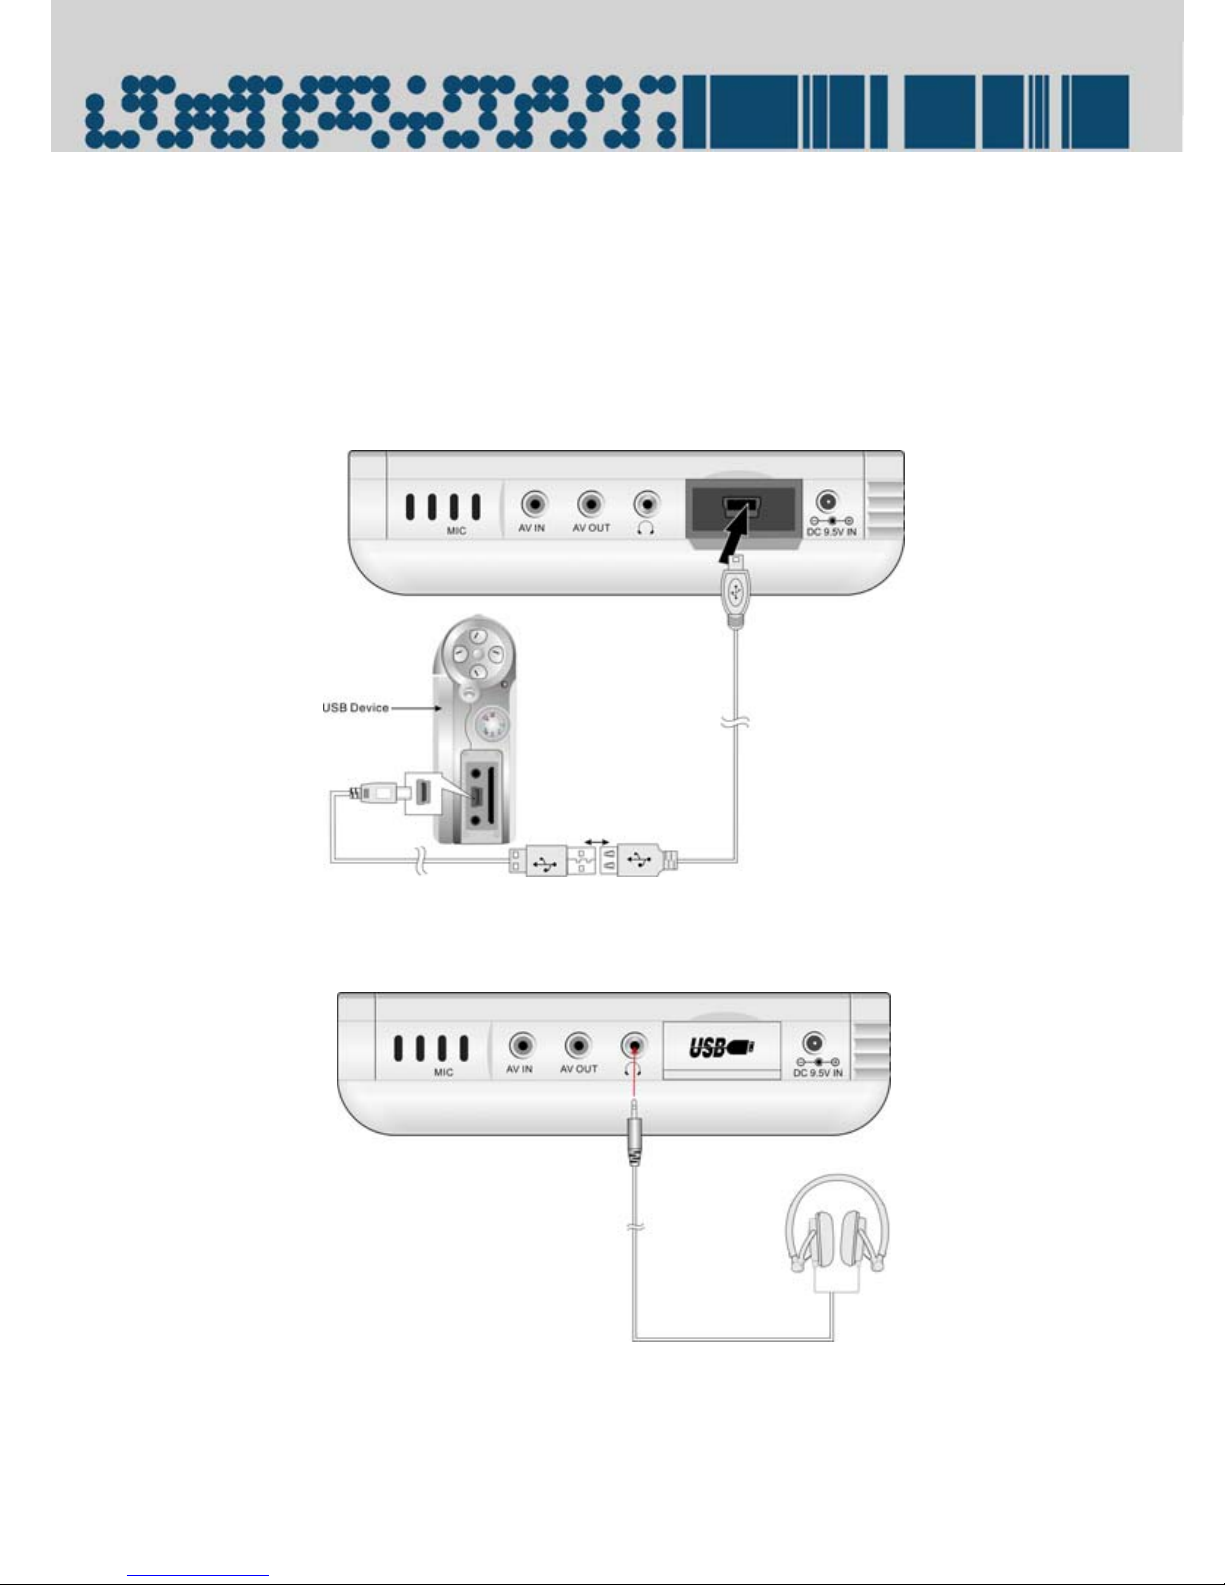
Connecting to USB(Master Mode Ⅱ)
Use one supplied USB cable to connect the player, the other end is connected to the
other USB cable, then connected to the external USB device, such as a digital camera,
see the below figure:
This method is to use the supplied USB cable with one bigger USB cord and one smaller
USB cord to connect the USB device that support MINI USB connecting method.
Connecting to Earphone
Turn down the volume before you connect the ear phones to the earphone jack of the
player.
The speakers will mute automatically when the earphone is connected.
NOTE: Excessively loud volu me woul d dama ge your hearing.
- 16 -
Page 17
System Setup
Pre- Operation
Press the POWER button for 2 seconds to turn on the power.
The main menu will be displayed on the screen.
There are seven optional items in the system root menu: Movie, Music, Photo, PVR, Voice
Recording, File Manager and Settings.
In the system main setup menu, adjust the ENT button to select the desired items, then
press ENT button to enter the selected items.
Settings Menu
Press MENU/STOP button to enter the system main setup menu, adjust the ENT button to
select the “SETTINGS” , then press the ENT bu tton to confirm and enter the set ting menu. It
Includes 8 setup items: Display Setting, Audio, Slideshow, Power, Player Information,
Password Setting, Reset and Format HDD.
In the Setting menu, adjust the ENT button or press the or button on the panel to
select items which you pre fer, then press the ENT button to confirm your selection. In the
setup menu, press the MENU/STOP button to return to the previous menu.
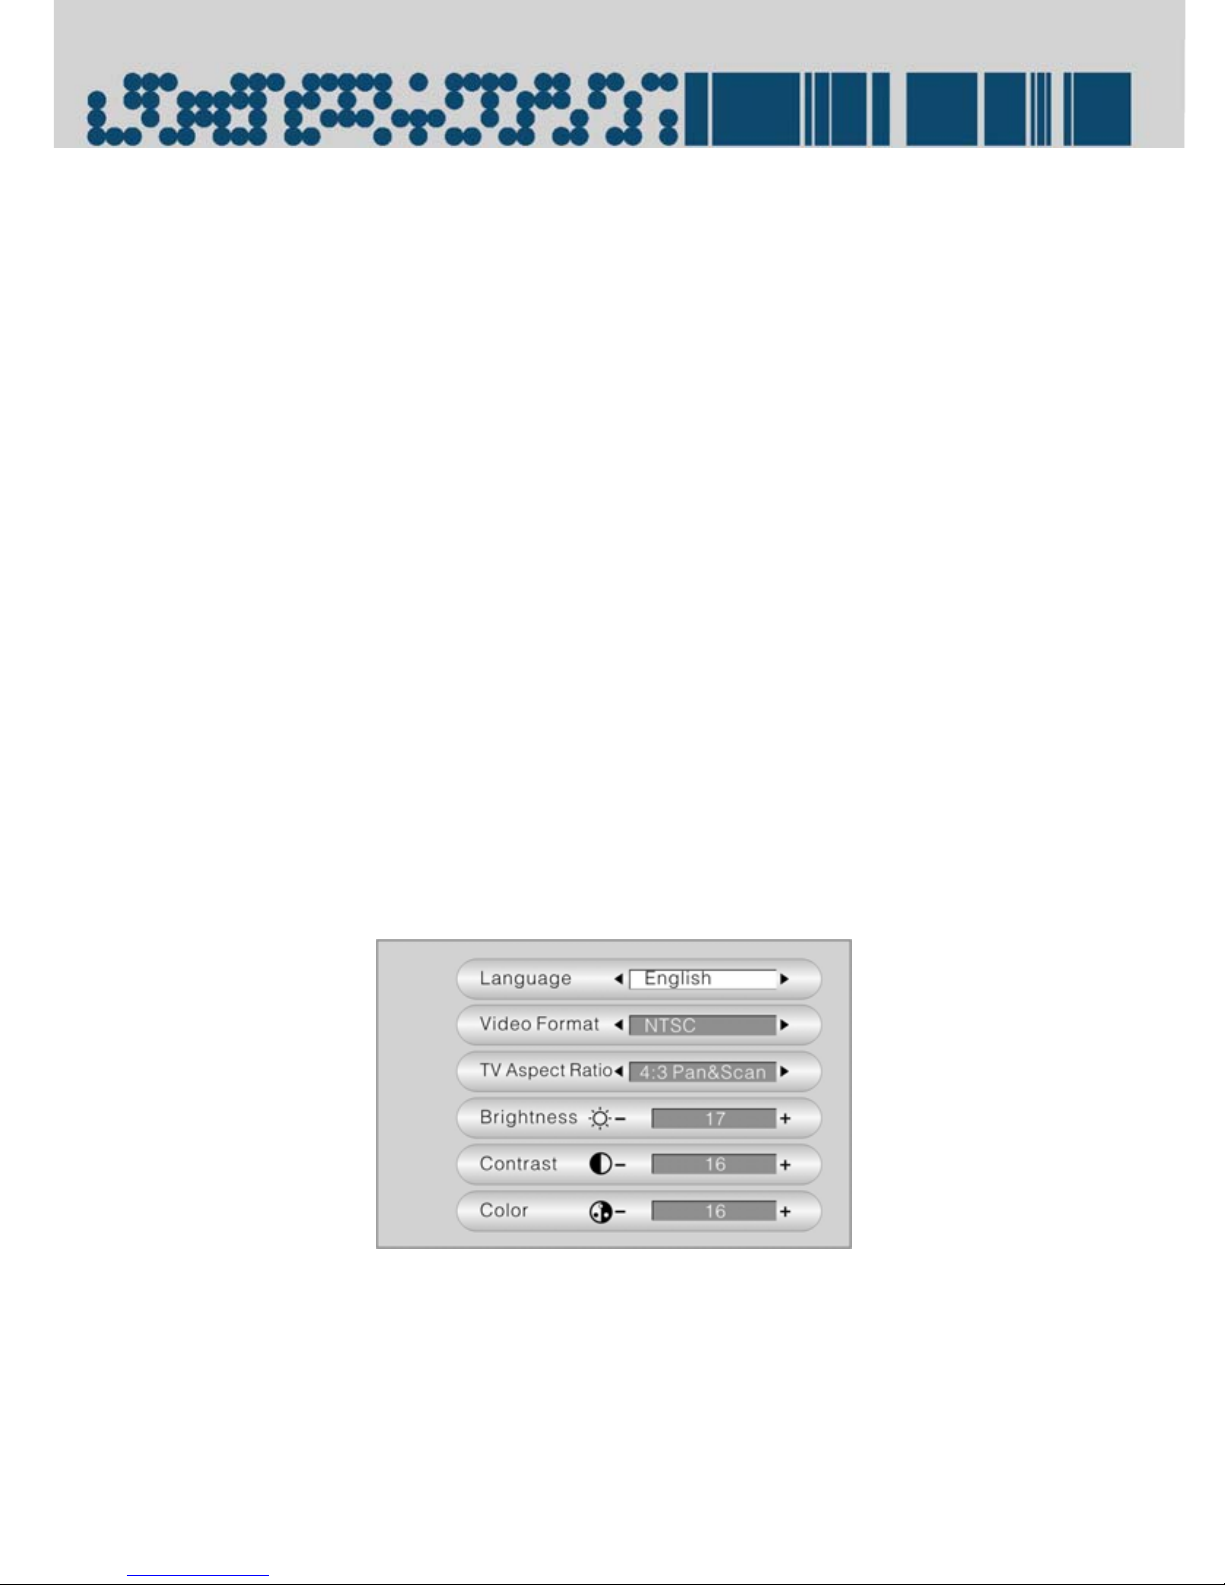
Display Setting
Adjust the ENT button or p ress the or button on the panel to select “Di splay Setting”.
Press the ENT button to enter the display setting menu. There are several items are
included in the display setting menu: Languag e, Video Format, TV Asp e c t R a ti o, Brightness,
Contrast and Color. As shown in the below figure:
Adjust the ENT button to select the items which you prefer, then press the or button to
select or adjust. Press the MENU/STOP button to return to the previous menu.
Language Setup
The default language of the system is English.
- 17 -
Page 18
System Setup
Video Format Setup
Adjust the ENT button to select Video Format, then press the or button to select items:
PAL and NTSC. The LCD screen will turn off automatically when the PAL is selected.
TV Aspect Ratio Setup
Adjust the ENT button to select the TV Aspe c t Ra tio, press the or button to sele c t items:
16:9 Wide, 4:3 Pan Scan or 4:3 Letter Box.
Brightness Setup
Adjust the ENT button to sel ect the Brightness, then press the or button to adjust t he
brightness level.
Contrast Setup
Adjust the ENT button to select the Contrast, then press the or button to a djust the
contrast level.
Color Setup
Adjust the ENT button to sel ect the Colo r, then p ress the or b utton to adj ust the c olo r
level.
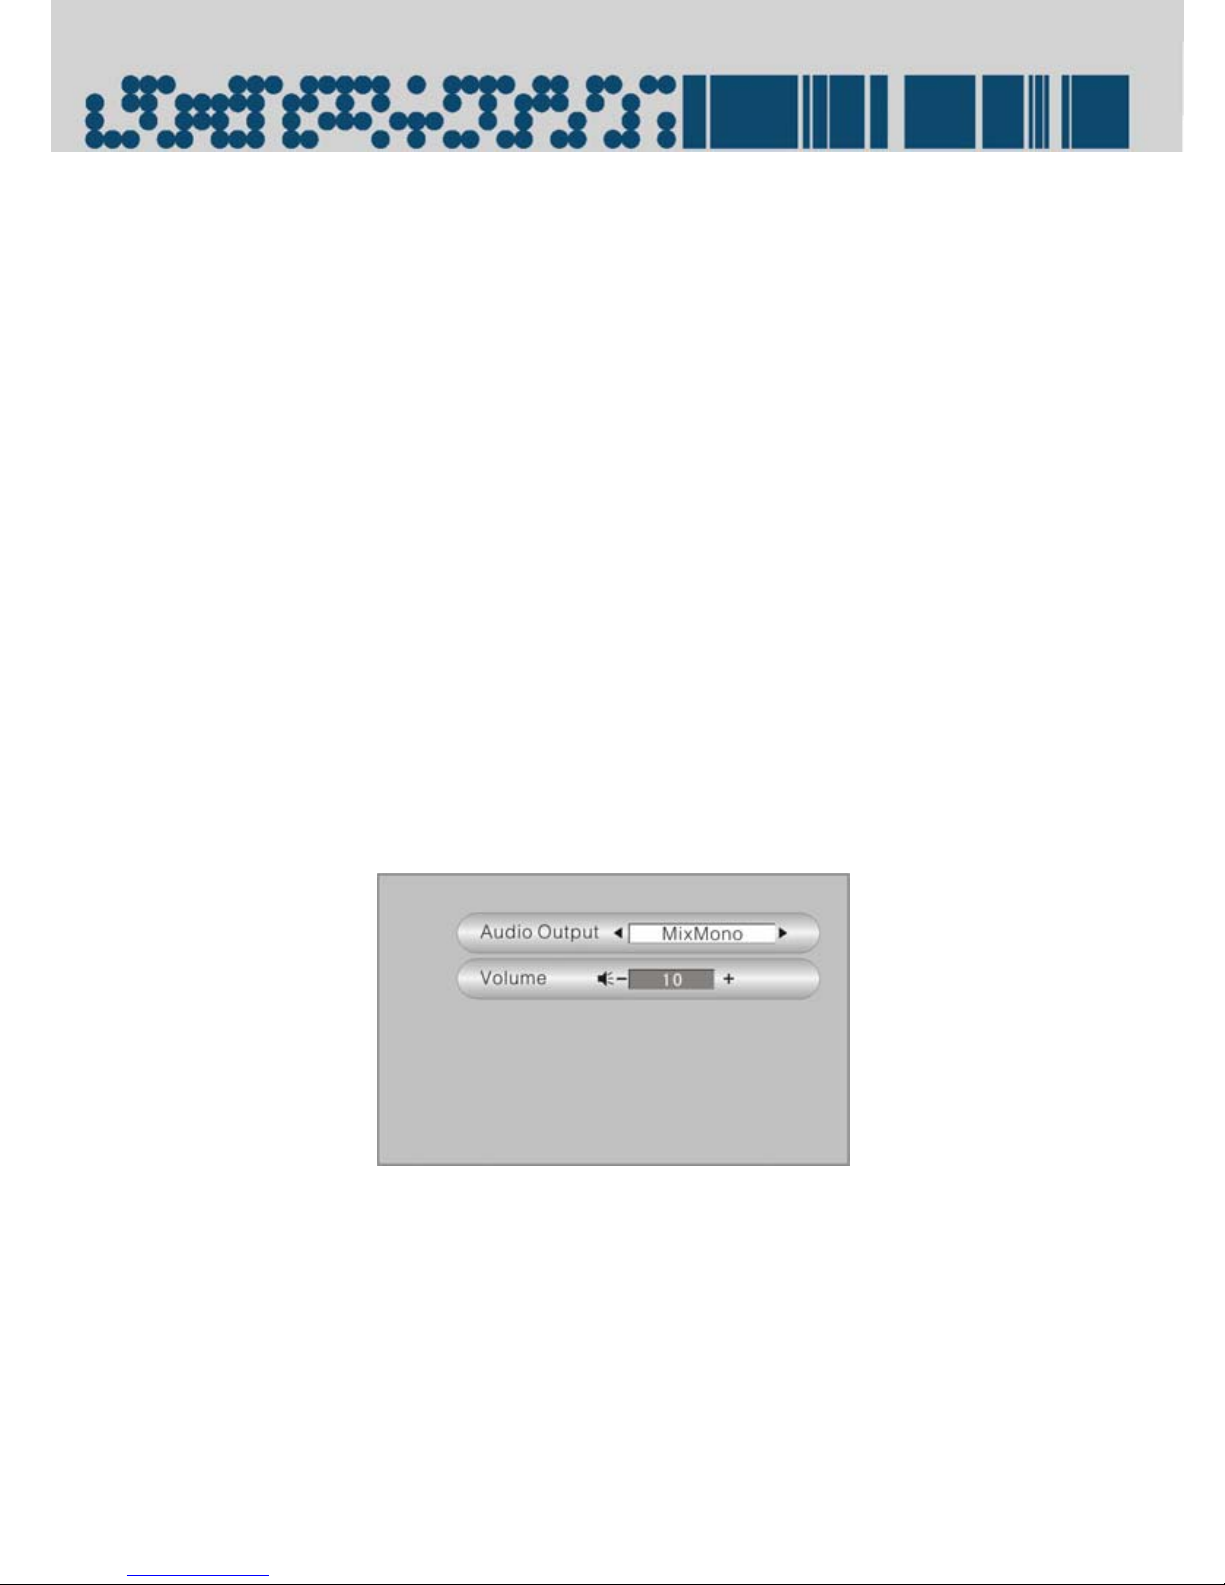
Audio Setup
Adjust the ENT button or p ress the and buttons to sel ect Audio, pre ss the ENT button
to enter the audio setup menu, incl uding audio outp ut and volume setup. T he screen will
display as below:
Adjust the ENT button to select desired setup items in the Audio Setup menu.
Press the and buttons to select and a djust. Press the MENU/STO P button to return to
the previous menu.
Audio output setup
Adjust the ENT button to select Audio Ou tput, press the and buttons to sel ect items:
Stereo ,L-Mono,R-Mono, and MixMono.
Volume Setup
Adjust the ENT button to select volume, press the and buttons to adjust volume level.
- 18 -
Page 19
System Setup
Slideshow Setup
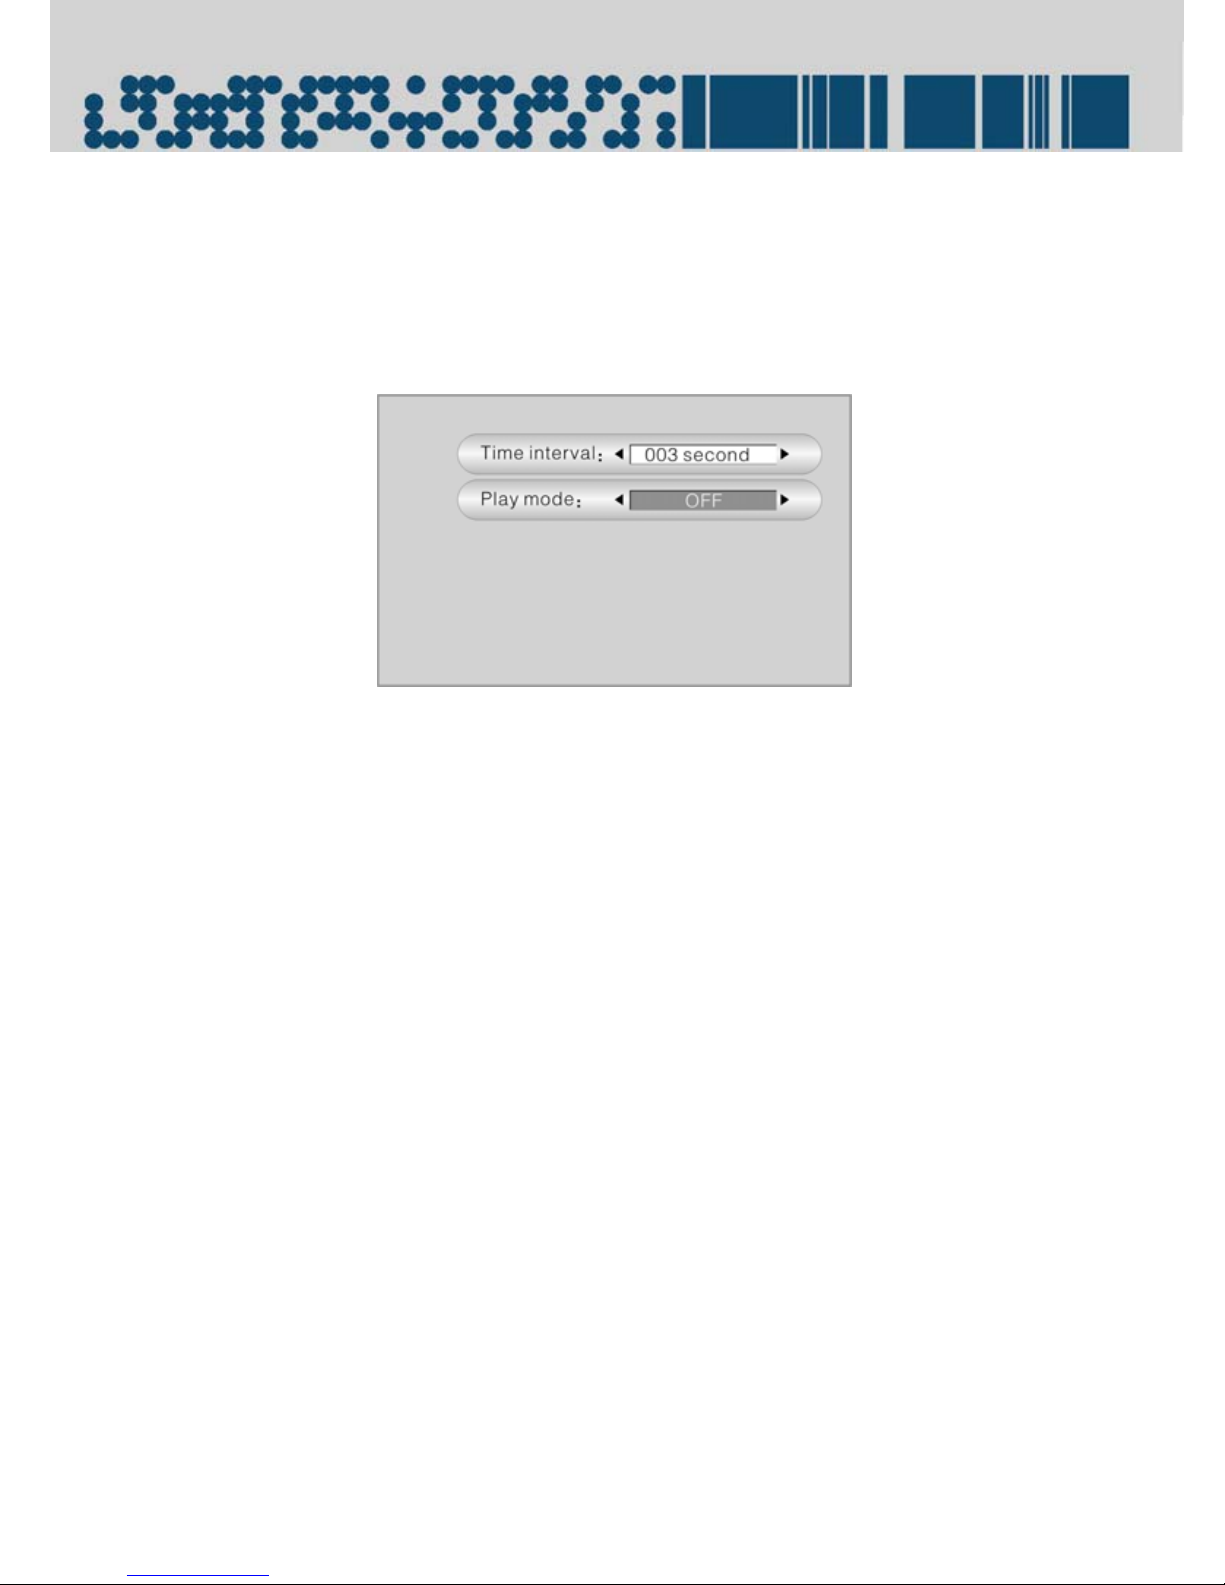
Adjust the ENT button or press the and buttons to select Slideshow, press the ENT
button to enter sli deshow setup m enu, including Time Interv al and Play M ode. The scre en
will display as below:
In the Slideshow setup menu, adj ust the ENT button to sel ect the desired item. Then press
the and buttons to select under the item. Press the MENU/STOP button to return to
the previous menu.
Time Interval
Adjust the ENT bu tton to se l ect the Ti me In terv al , the n p ress the and buttons to selec t
items.
Playback Mode
Adjust the ENT button to select the Pl ay Mode, then press the and butto ns to select
items, incl uding Off, P lay All-One Time, Repeat A ll.
Slideshow with Music
When selecting the playback mode of the Repeat All, the screen will display the slideshow
with music setup item. Adju st the ENT button to choose the “Slideshow with Music”, then
press the ENT button to enter MP3 music file sel ecting m enu, then adjust t he ENT button to
choose the song as background music, press the ENT button to confirm the selection.
Power Setup
Adjust the ENT button or p ress the and buttons to select Power, then press the ENT
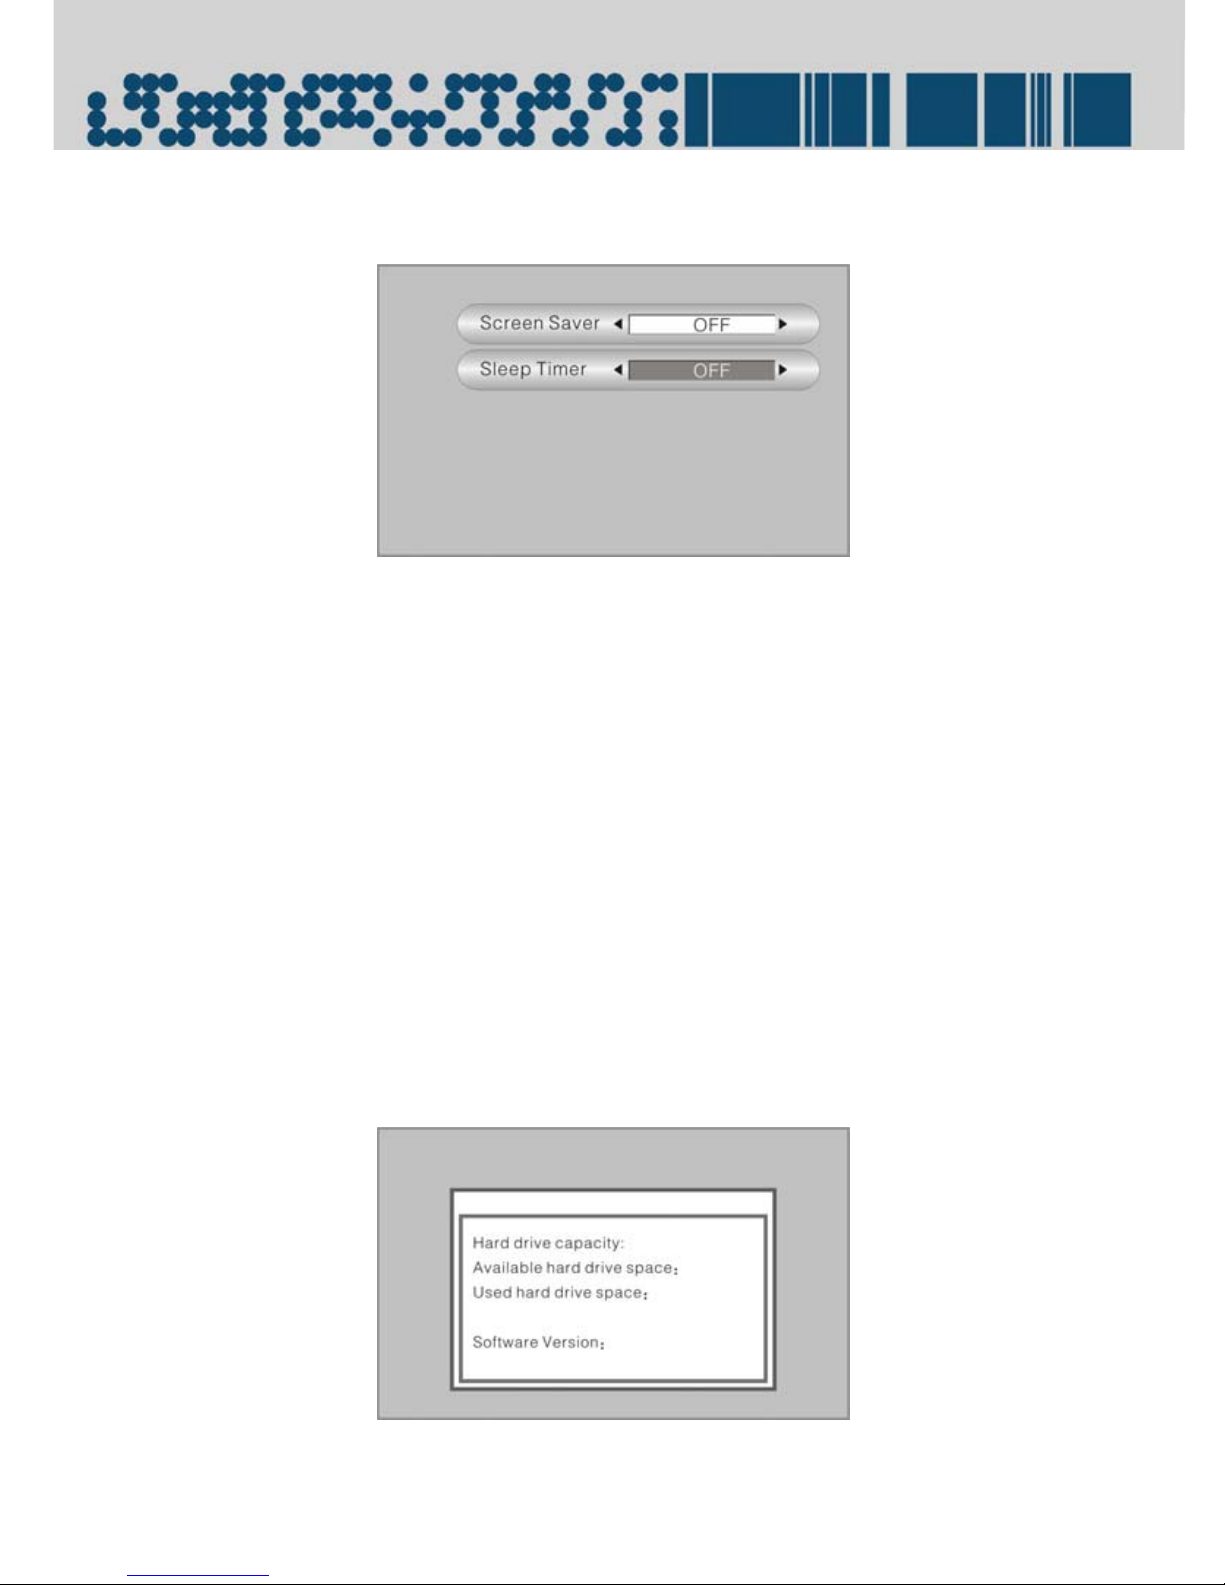
button to enter power setup menu. There are two items: Screen Saver and Sleep Timer.
The screen will display as below:
- 19 -
Page 20
System Setup
In the power setup menu, adju st the EN T button to sel ect the setup i tem, press the and
buttons to select and a djust under the item. Press the MENU/STOP butto n to return to
the previous menu.
Screen Saver Setup
Adjust the ENT button to select Screen Saver, press the and buttons to select the
screen saver time or Off.
Sleep Timer Setup
Adjust the ENT button to select the sleeping cloc k . Press the and bu tto ns to select the
time or Off.
Player Information
Adjust the ENT button or press the and buttons to choose the Player Information, then
press the ENT button to enter. The screen will display the corresponding information on the
player including hard drive capacity, available hard drive space, used hard drive space
and the software version. As below:
Press the MENU/STOP button to return to the previous menu.
- 20 -
Page 21
System Setup
Password Setting
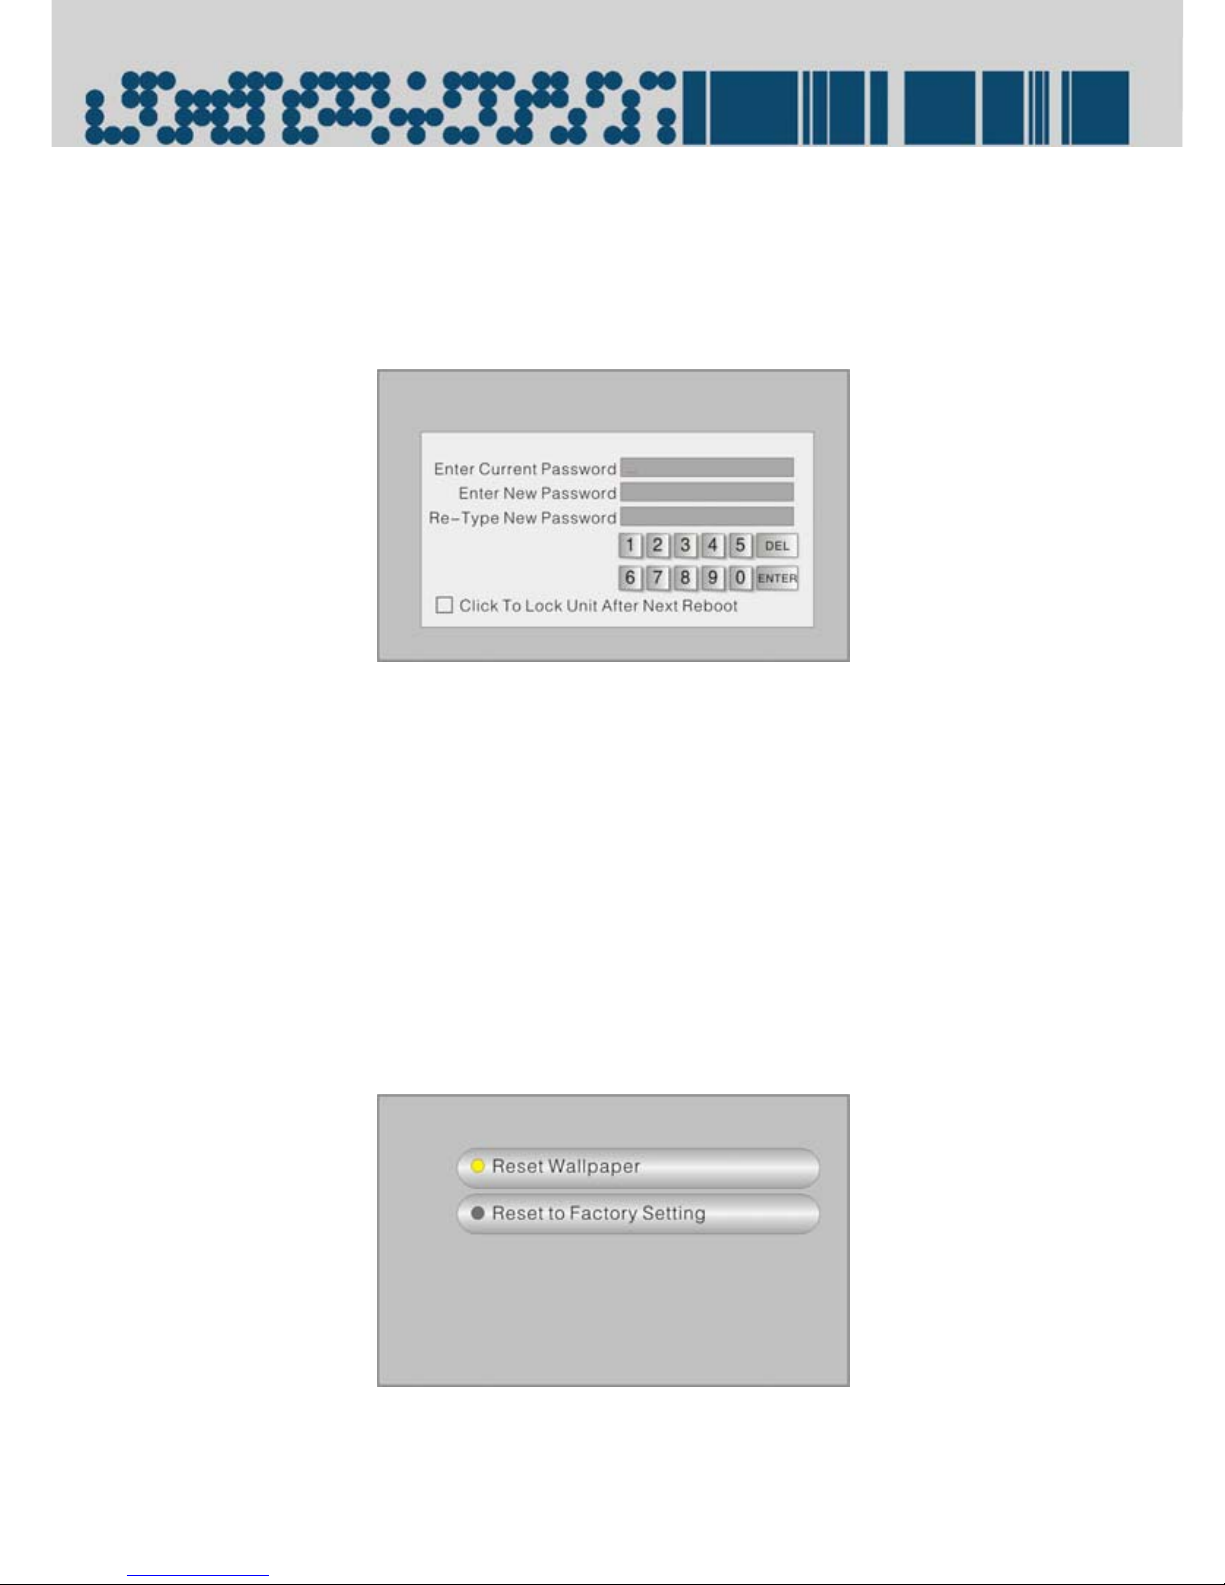
Adjust the ENT button or pre ss the and buttons to choose Password Se tting. Press the
ENT button to enter Password Setting menu. The screen will display as below:
Adjust the ENT button to mov e the cursor up and down, press the and buttons to
move the cursor left and right, then press the ENT button to confirm input. If you input
mistake informa tion, you c an sel ect the DE L and pr ess the E NT b utton to del ete the wrong
input. After finishing input, you can select the ENTER and press ENT button to confirm input.
If you select the “Click To Lock Unit After Next Reboot” column, you should input password
when restart the player.
Press the MENU/STOP button to return to the previous menu.
Note: The super password is 631800.
Reset Setup
Adjust the ENT button or press the and buttons to select Reset, then press the ENT
button to enter Reset se tup menu. I n the Reset setup me nu, there are tw o optional i tems:
Reset Wallpaper and Reset to Factory Setting. The screen will display as below:
In the Reset setup menu, adjust the ENT button to sele ct the desired setup item, press t he
ENT button to confirm. Press the MENU/STOP button to return to the previous menu.
- 21 -
Page 22
System Setup
Reset Wallpaper
Adjust the ENT button to sel ect Reset Wal lpaper, the n press the EN T button to co nfirm and
reset wallpaper.
Reset to Factory Setting
Adjust the ENT button to select Reset to Factory Setting, then press the ENT button to
resume to the default settings.
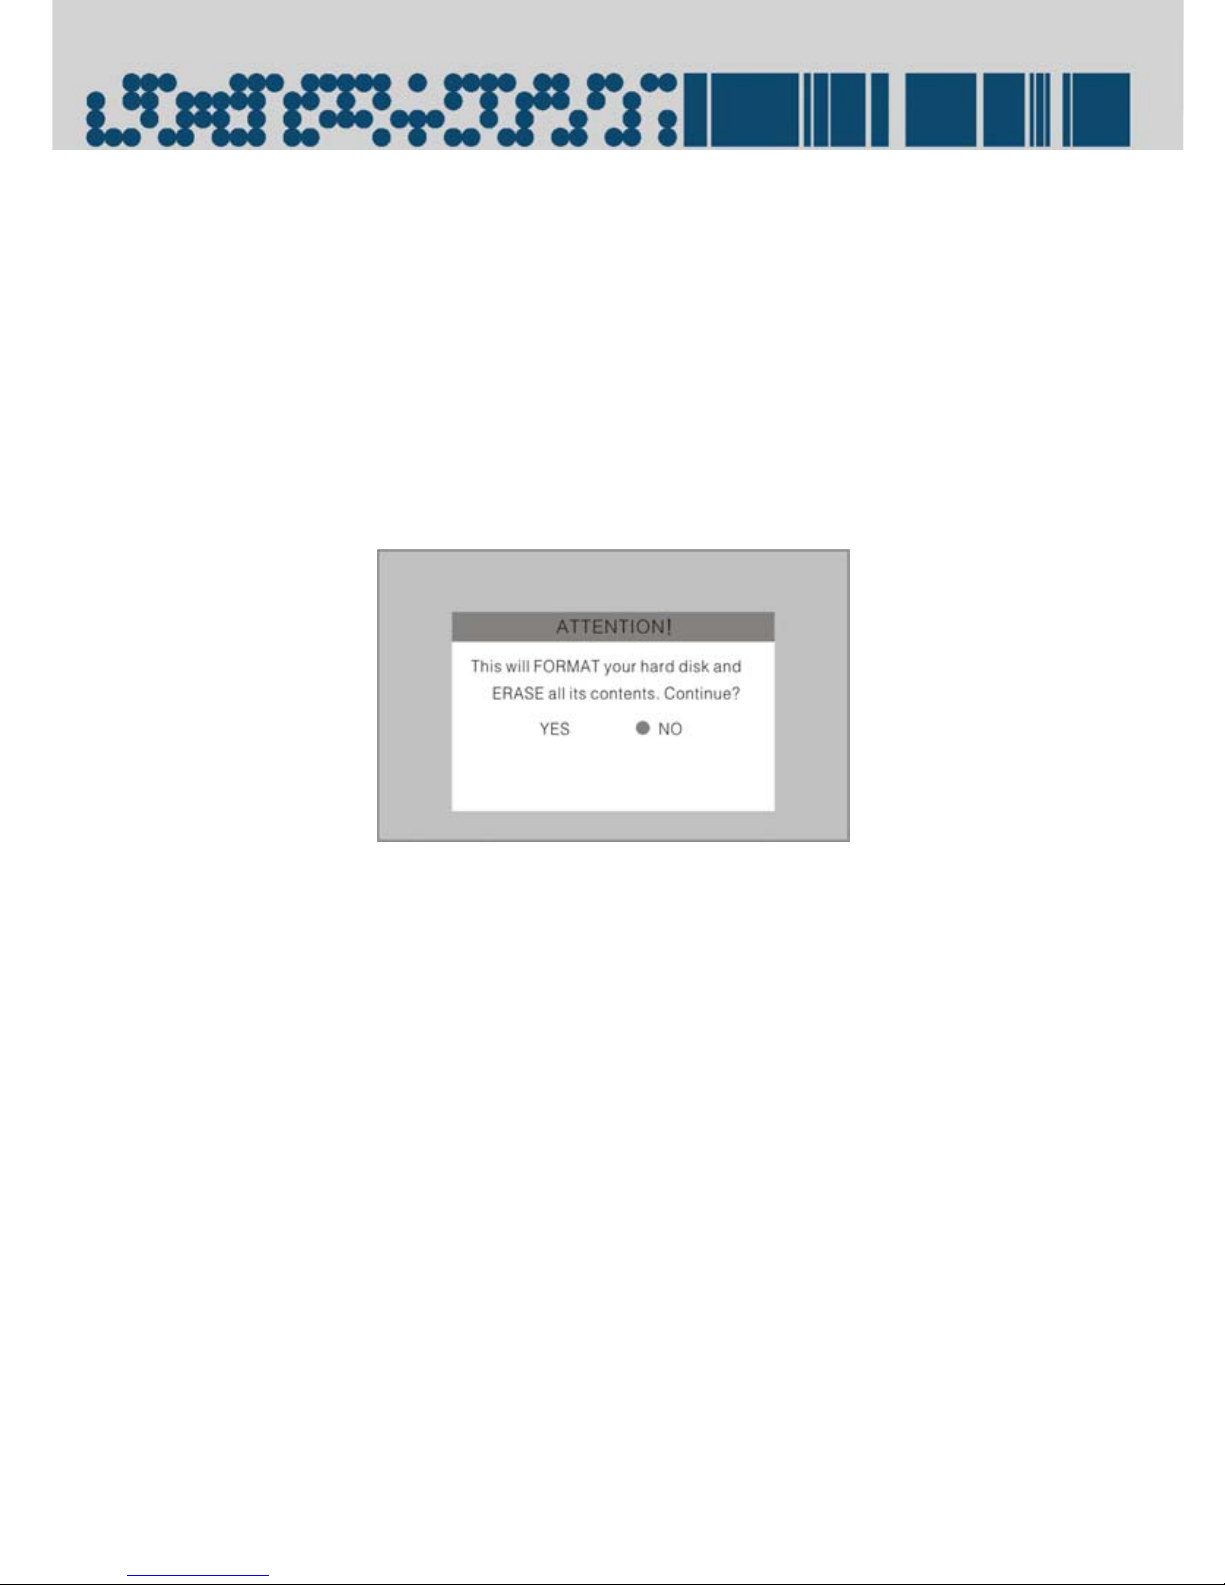
Format HDD Setup
Adjust the ENT button or p ress the and buttons to select Format HD D, then press the
ENT button to enter. An attention will be displayed on the screen, as below:
Press the and buttons to select Yes or No , then press the EN T button to co nfirm. Press
the MENU/STOP button to return to the previous menu.
Note: If you select Yes, it will format the hard drive and all the data on the hard drive will
be lost. Frequently copying and deleting file on the harddisk may affect the playback;
format the harddisk to avoid it.
Movie Setup
Press the MENU/STOP button to enter main setup menu, adjust the ENT button to select
Movie, then press the ENT button t o enter the movie file selectin g menu. In the movi e file
selecting menu, press the and buttons to go to the previous page and the next
page. adjust the ENT b utton to sel ect mov ie fil e, then p ress the ENT b utton to confi rm and
start playback. Press the MENU/STOP button to return to the previous menu
During playback, press the and buttons to select the previous and next movie file,
press the ENT button to pause playback, adjust the ENT button up and down to fast
forward and rewind at the speed of 2x ,4x, 8x normal speed. Press the MENU/STOP button
to stop playback and return to the movie file selecting menu. Press the SETUP
button to switch the scree n asp ect ra ti o b etween 4:3 and16:9. press the SETUP button and
hold it for a while to enter ti me-selecting menu, then adjust the EN T button to select ho ur,
minute or second, press the and buttons to set time. When finishing time setting, press
the ENT button to start playback.
Notes: Some movie files may not support the fast forward/rewind and time searching
functions.
- 22 -
Page 23

System Setup
Music Setup
Press the MENU/STOP button to enter main setup menu, adjust the ENT button to select
Music, Press the ENT button to enter music file selecting menu.
In the music file selecting menu, press the and buttons to go to the previo us page
and the next page, adjust the EN T button to sel ect music file, then pr ess the ENT button to
confirm and start playback. Press the MENU/STOP button to return to the previous menu
During playback, press the and buttons to select the previ ous and next music file,
press the ENT button to pause playback, adjust the ENT button up and down to fast
forward and rewind, press the MENU/STOP button to stop playback and return to the
music file selecting menu. Press the SETUP button to select p layback mode.
Photos Setup
Press the MENU/STOP button to e nt e r m ain setup menu, adjust the ENT bu tto n to se lect the
Photos, then press the ENT button to enter photo file selecting menu.
In the photo file selecting menu, press the and buttons to go to the pr evious page
and the next page, adjust the ENT button to select photo file, press the ENT button to
confirm and start playback. Press the MENU/STOP button to return to the previous menu.
During playback, press the and buttons to rotate photo. A djust the ENT button up
and down to select previ ous or next p hoto. Press the MENU/STOP b utton to sto p play back
and return to the photos file sel ecting menu. Press the SETUP button to switch the screen
aspect ratio between 4:3 and16:9.
File Manager
Press the MENU/STOP button to e nt e r m ain setup menu, adjust the ENT bu tto n to se lect the
File Manager. Press the ENT button to enter folder selecting menu.
In the folder selecting menu, press the and buttons to go to the previous page and
the next page, adjust the ENT butto n to selec t folder, press the ENT butto n to confi rm and
enter. Press the MENU/STOP button to return to the previous menu.
Notes: Playback operations are depended on the file type.
- 23 -
Page 24
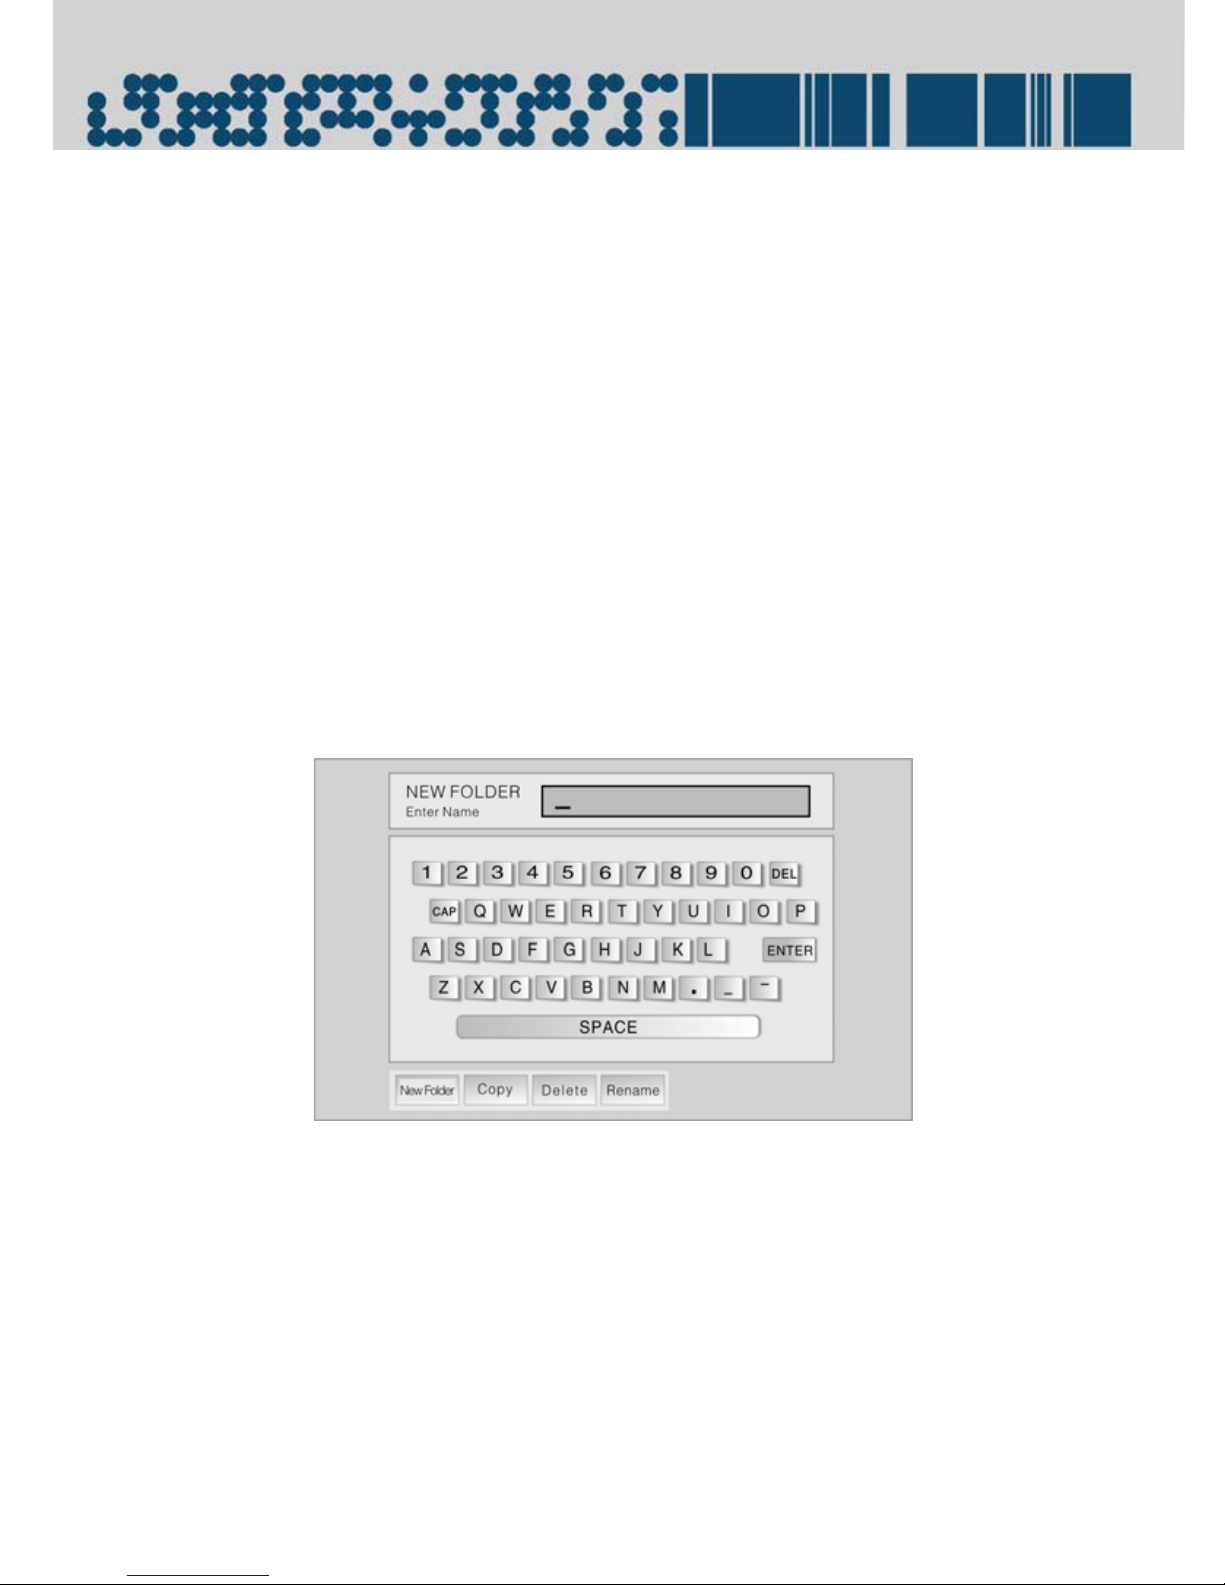
File Management
File Management Menu
1. In the movie or music file selecting menu, press the SETUP button on top panel to set
movie or music file or select items: Play Mode, Playlist, Favorites, Copy, Delete,
Rename .
2. In the file manager setup m enu, press the SETUP button on the top panel to set the
folder or file: New Folder, Copy, Delete or Rename.
3. In the photos file selecting menu, press the setup button to realize various photos
setup: Wallpaper, Playlist, Favorites, Copy, Delete, Rename .
In file manage mode, adj ust the ENT button to choose the operation mo de, press the ENT
button to enter menu. Press the MENU/STOP button to return to the previous menu.
New folder
In the File Manager setup m enu, first press the SETUP butto n, then adjust t he ENT bu tton to
select the New Folder and press the ENT button to confirm, the screen will display as
below:
Adjust the ENT button or press to select the numbers or characters, then press the ENT
button to confirm the i nput. If i nput wrong i nformation, yo u can sel ect the DEL and press
the ENT button to del ete the incorrect i nput; Select ENTER whe n you finish the inp ut, then
press the ENT button to confirm you input. Press the MENU/STOP button to return to the
previous menu.
Play Mode
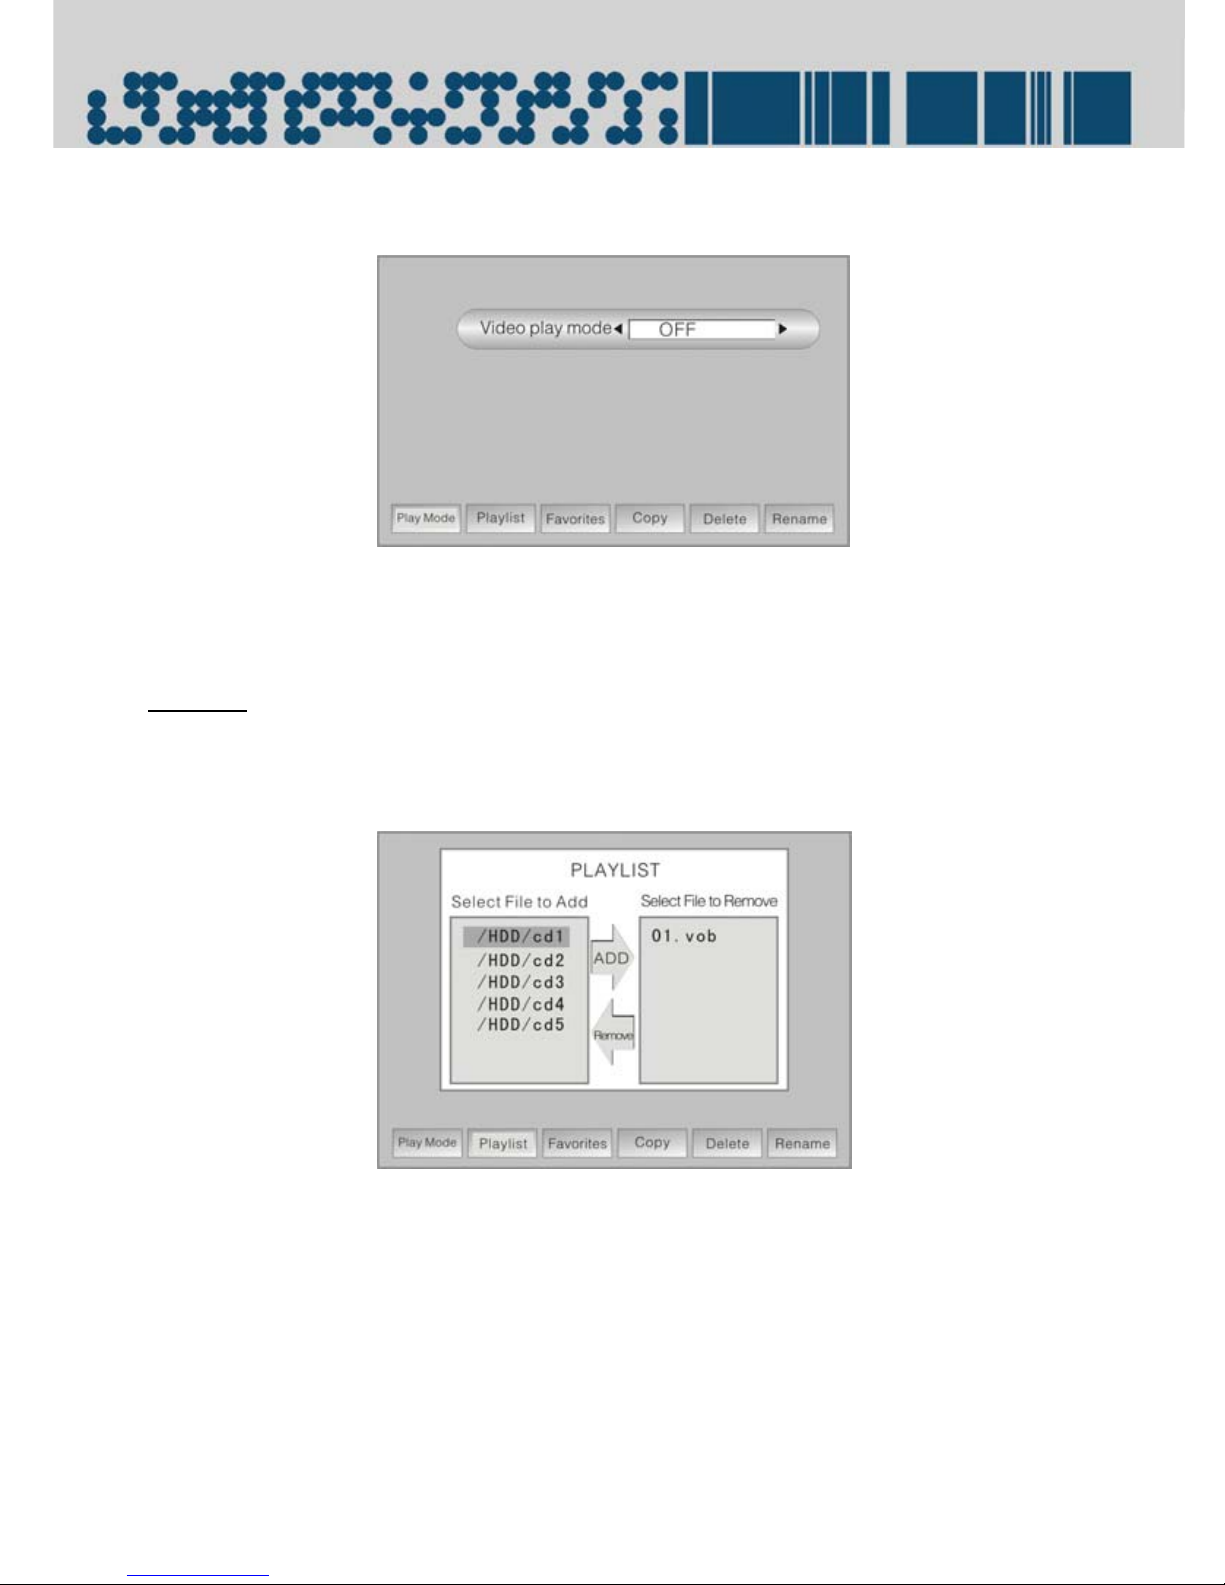
In the movie and music file selecting menu, press the SETUP button first, then adjust ENT
button to select t he Play Mode, press the ENT b utton agai n to ente r the setup . The sc reen
will display as below:
- 24 -
Page 25
File Management
Press the buttons to select the play mode: Off, Normal, Repeat One, Repeat All,
Shuffle.
Press the MENU/STOP button to return to the previous menu.
Playlist
In the movie, music or photo file selecting menu, press the SETUP button first,
then adjust the ENT button to select the Playlist, and press the ENT button again
to enter setup , the screen will display as below:
In the playlist, adju st the EN T b utton to select the file, press the EN T b utto n to m ove the file .
Press buttons to select “Select File to Add” or “Select File to Remove”. Press the
MENU/STOP button to return to the previous menu.
Favorites
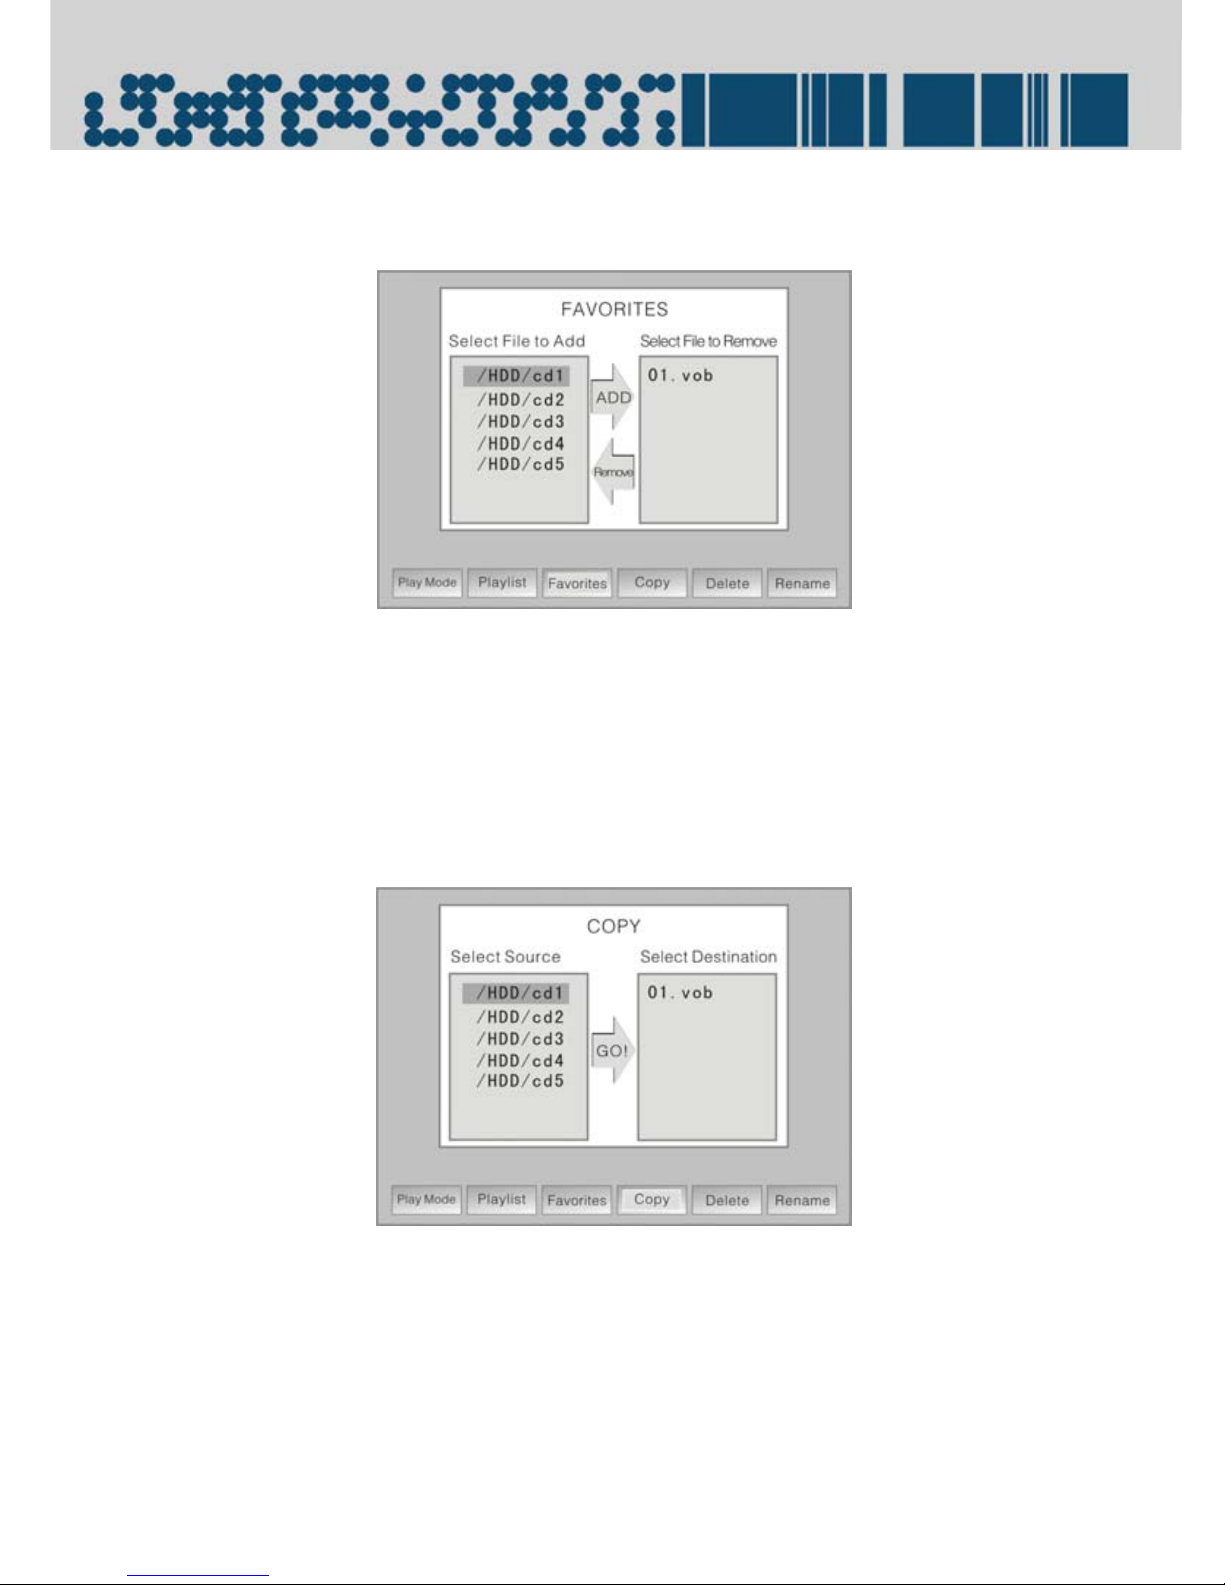
In the movie, music o r photo file selecting menu, press the SETUP button fi rst, then adjust
the ENT button to se lect your favorite file. Press the ENT button again to enter se tup, the
screen will display as below:
- 25 -
Page 26
File Management
In the Favori te menu, adjust the ENT button to select fil e, press the ENT butto n to remove
the file. Press the buttons to select “Select File to Add” or “Select File to Remove”.
Press the MENU/STOP button to return to the previous menu.
Copy
In the movie, music or photo file selecting menu and file manager menu, press the SETUP
button first, and then a djust the ENT butto n to select Copy. Press the ENT button again to
enter setup. The screen will display as below:
In the file Copy menu, adj ust the ENT b utton up and down to sel ect the file , press the ENT
button to confirm selection. Press the buttons to select “Select Source” or “ Select
Destination”. Press the MENU/STOP button to return to the previous menu.
Delete
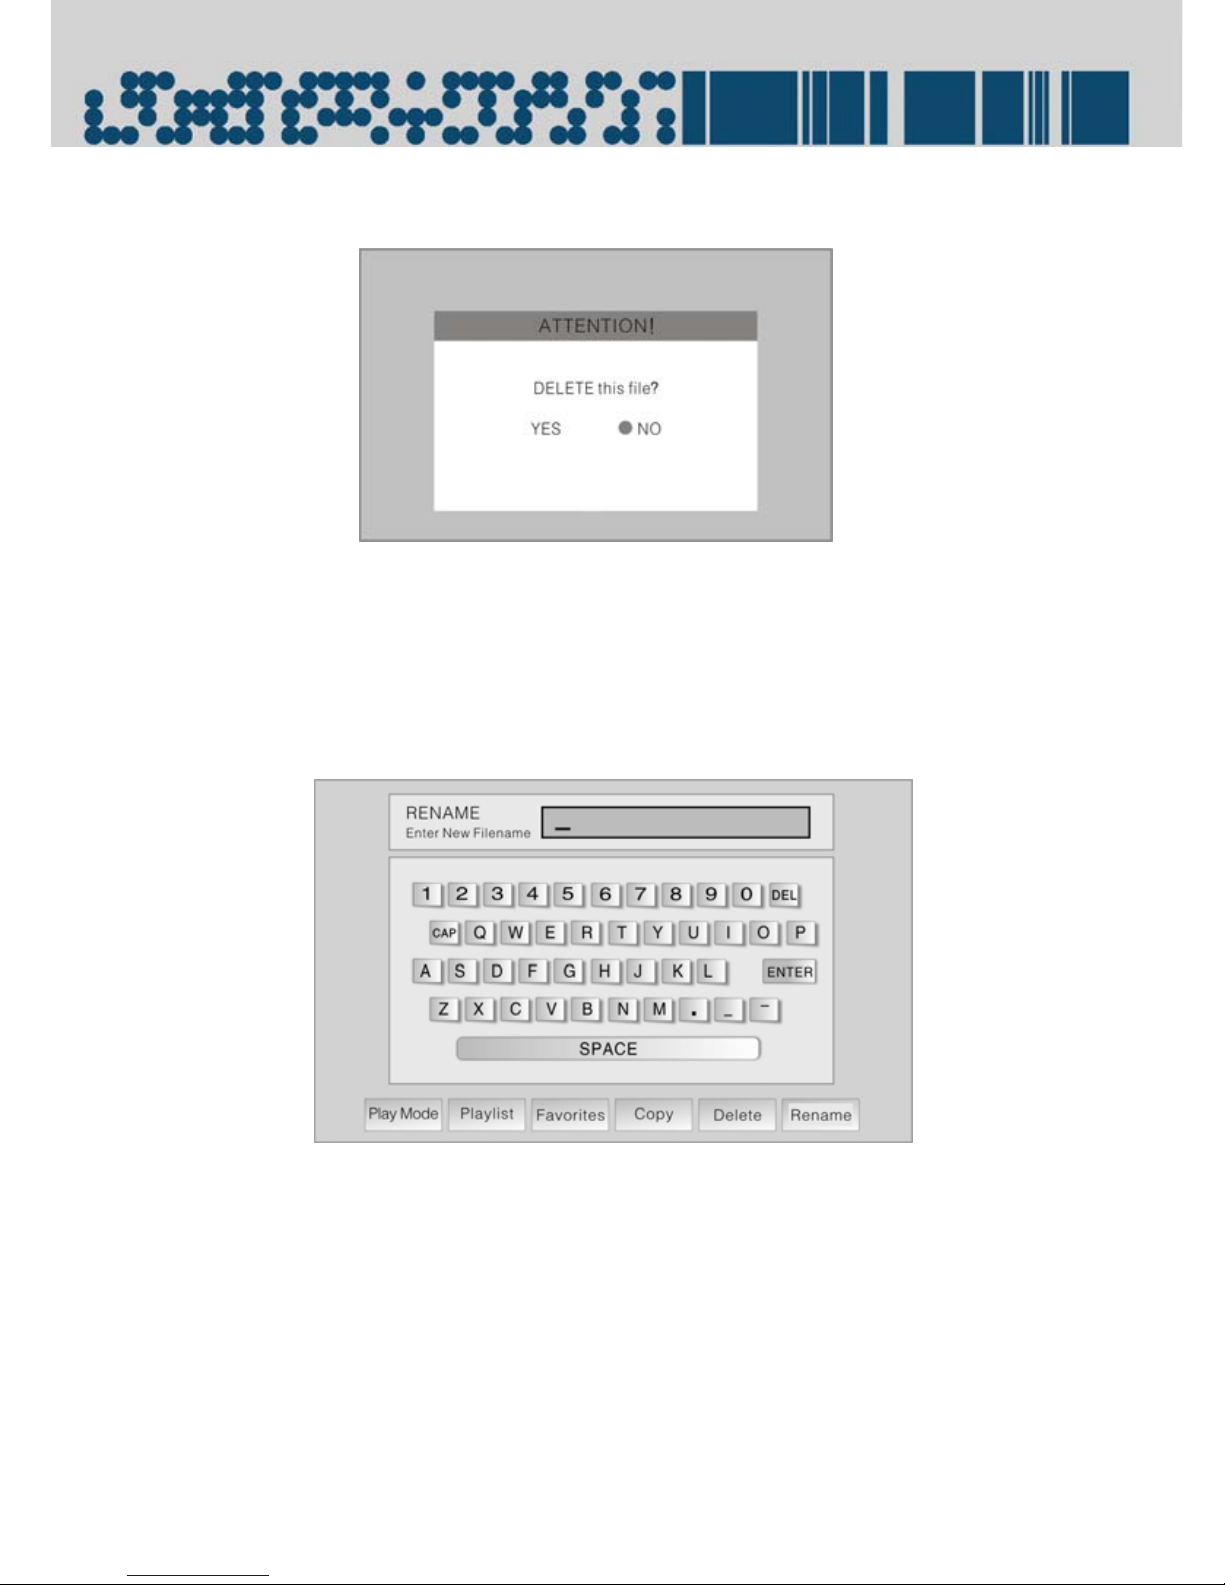
In the movie, music or photo file selecting menu and file manager menu, press the SETUP
button first, then adju st the ENT button up and down to sel ect Delete. Press EN T button to
again to enter the setup. The screen will display as below:
- 26 -
Page 27
File Management
Pressbuttons to select ”Yes” or ”No”. Press ENT button to confirm the selection.
Rename
In the movie, music or photos file selecting menu and file manager menu, press the SETUP
button first, then adj ust the ENT button to select Rename. Press the EN T button again to
enter the setup. The screen will display as below:
Adjust the ENT button or p ress the button to select the numbers or cha racters, and
press ENT button to confirm your input. If input wrong information, select DEL and press the
ENT button to delete the incorrect input. When fi nishing input, select ENTER a nd press the
ENT button to confirm the input. Press the MENU/STOP button to return to the previous
menu.
- 27 -
Page 28

Files Download
This player is equipped with USB 2.0 OTG port, you can download program source from
the computer. Please follow the below steps:
1. Turn power on; connect the player to the computer via USB cable.
2. The LCD will turn off automatic ally after the inf ormatio n about tha t the USB has been
connected is displayed on the screen.
3. The computer explorer will display ”moveable harddisk”, now you can go on with file
deleting, copying, cutting or pasting, and formatting the moveable harddisk as well.
NOTE: If the users’ computer system is WIN-Me/WIN-XP, there is no need to install the drive.
If operation system version is lower than WIN98, you should install the USB drive and restart
the computer at first.
When the computer is connected, the hard drive will display no rmally. Users could copy
file from the computer to the hard drive. In order to have these program sources be
recognized correctly and rapidly, please heed following proceedings:
1. Different folder for different file types .
The vi deo file should be stored in Movie folder, photos in the Picture folder and MP3 files
in the Music folder. The UPGRADE file should be copied on the harddisk directly, without
compressing or copying on other folder. Or else, the system will not be upgraded
normally.
2. Most of the AVI files of MPDG4 format, VOB files of MPEG2 format and most of the DAT
and MPG file of MPEG1 format could be played by video file. JPG file, BMP file, GIF file
can be scanned by photo file; And the WMA file, MP3 file can be played by the music
file. It is suggested that the users should not download files that is not compatible with
this player, for such program source would result in malfunct ion of the play er.
3. The player can be used as moveable harddisk. All the files within the capacity of the
player can be stored through the USB cable. It is suggested that fil es not supported by
the player should be stored in other different folders.
Using USB 2.0 OTG:
1. Plug the supplied USB cable to the player, the other end into the USB device. Or
connect the USB device, which support MINI USB connecting method wi th the player,
via the supplied USB cable that is with one bigger USB port and one smaller USB port.
2. According to the i ndic ation o n the scre en to c opy the fi le to the hard driv e and unpl ug
the USB cable.
3. When unplugging the USB cable, the pl ayer will restart auto matically, and the fi les will
be saved in the folder named as dsk0000, dsk0001……
- 28 -
Page 29

Files Download
USB OTG(USB On The Go)means that any two eligible OTG devices can be connected
with each other without the computer. The only purpose of the USB OTG is to provide a
method for connecting these two USB devices. When these two devices are connected,
one can be used as the host and the other one can be used as the slave.
Using SD CARD
The player is equipped with SD card port; it can be connected to the SD card.
When the SD card is not inserted into the player, the SD card mark will be displayed on the
screen.
When the SD card is inserted into the player, the word “SD CARD” will be displayed in the
SD card mark. Now, the SD card sub-fold will be display in the file manager menu, you
can go on with copying or playback operation.
- 29 -
Page 30

Recording Function
Audio and Video Recording Function
The Player support audio and video recording function, please take the following steps to
operate:
1. According to the system connection, connect the unit with the external AV signal
source.
2. Turn on the power of the unit and the extern AV signal source.
3. In the main setup menu, select PVR, an indication will appear on the LCD screen.
Adjust the ENT button to select YES or NO, p ress the ENT button to enter previewing
status, then press REC button to start recording.
4. During recording, press the ENT button to stop recording and return to previewing
status. Press the ENT button again to start another file recording. Press the
MENU/STOP button to exit the re c ording mode. The new recording file will be stored
in the file named as “record”. The file name will automatically be saved as record
001.avi, record 002.avi etc.
Note: Please remove the SD card before recording,
Voice Recording Function
The player support voice recording function, please take the following steps to operate:
In the main menu, select Voice Record, press the ENT button to start voice recording.
A time information about voice recording will be displayed on the screen. Press the
MENU/STOP button to exi t the reco rdi ng mode. The new recordi ng fil e will be sto red i n the
file named as “record”. The file name will automatically be saved as record 001.pcm,
record 002.pcm etc.
- 30 -
Page 31
System Upgrading
The Player supports system upgrading. Please follow the below steps to operate:
1. Use the USB cable to connect the player to computer, and then turn on the power
of the player and the computer.
2. After the computer recognizes successfully, decompress the upgrading file to get
ROMFS.BIN file, and then copy the file to the root directory on the player and
substitute the original file that with the same name (only in the root directory)
3. Disconnect the USB ca ble di rectly af ter copyi ng, the pl ayer wil l restart a nd go to the
main setup menu. Adjust the ENT button to select SETTING, and press the ENT button
to enter setup menu.
4. Press the SETUP button, the screen will display a selecting menu; adjust the ENT
button to select “Upgrade BIOS”. Press the ENT button, the screen will display an
indication, select the Yes or No and press the ENT button to confirm.
It needs some time to upgrade. Please wait patiently. At the same time, the screen
will appear some indication and information. During upgrading, make sure the
power is continuously supplied to the player.
5. It will return to main setup menu automatically after upgrading.
Notes:
¾ Use the power adapter when upgrading, make sure the power supply is continually
provided.
¾ Upgrading is a dangerous operation. Many interference factors can cause the fail
upgrading and malfunction to the player. Please consult the specialist to upgrade
system.
¾ If the player cannot be restart after upgrading, please refer to the service department
for help.
- 31 -
Page 32
Symptom How To Check
The LCD screen does not
display
Troubleshooting
z Make sure that the power is turned on.
z Make sure the LCD OFF/NORMAL/LOCK switch is
not switched to LCD OFF.
z Make sure that file format is supported by this
player.
The LCD screen is too bright
or too dark
The player does not work
There is no sound in the
speakers
Play a section repeatedly
and can not continue.
There is no function when
pressing buttons
Other possibilities:
Static or other external interference may cause the player to function abnormally. Insert a
stick into the reset hole and press to reset the player so tha t no rm al operation can resume.
If you are still having problems, then disconnect the power to the PMP and consult a
qualified techn ician.
z Adjust the brightness of the image in the Display
Setup menu.
z Make sure that the playing file format is supported
by this player.
z Check if the volume is turned down or the
earphone is connected.
z Make sure that the apparatus is not in standby
mode.
z Check if the compressed audio file format is MP3
or WMA
z Make sure that the file was not damaged.
z Make sure the LCD OFF/NORMAL/LOCK switch is
not switched to LOCK.
Electromagnetic interference may cause error or abnormal to the player, please reset the
player or reinsert the USB cable.
- 32 -
Page 33
Specifications
Capacity of the memory 40GB
Audio Response 20Hz~20kHz ±2.5dB
Audio Signal-to- Noise ≥ 85dB
Audio Distortion + Noise ≤ -70dB(1kHz)
Channel Separation ≥ 70dB (1kHz)
Dynamic Range ≥ 80dB (1kHz)
Audio Out Output Level:1.5V±
Video Out Output Level:1V
Unbalanced Negative
Power AC100~240V, 50/60Hz
Dimension 198mm×121mm×32mm (L*W*D)
Weight 0.75 Kg
LCD Screen Size 7 inches
DESIGN AND SPECIFICATIONS ARE SUBJECT TO CHANGE WITHOUT NOTICE
0.2
, Load:10kΩ
1.0
±0.2, Load:75Ω
P-P
- 33 -
 Loading...