

Page 1

MA99T | Digital MP3 Player
Instruction Manual
Page 2

FCC CERTIFICATION
THIS DEVICE COMPLIES WITH PART 15 OF THE FCC RULES. OPERATION ISSUBJECT TO THE FOLLOWING TWO CONDITIONS : (1) THIS DEVICES MAY NOTCAUSE
HARMFUL INTERFERENCE, AND (2) THIS DEVICE MUST ACCEPT ANYINTERFERENCE, RECEIVED, INCLUDING INTERFERENCE THAT MAY CAUSEUNDESIRED
OPERATION.
NOTE: This equipment has been tested and found to comply with the limits for a ClassB
digital device, pursuant to part 15 of the FCC Rules.These limits are designed to provide
reasonable protection against harmful interference in a residential installation.This equipment generates, uses and can radiate radio frequency energy and, if not installed and
used in accordance with the instructions, may cause harmful interference to radio communications. However, there is no guarantee that interference will not occur in a particular installation. If this equipment does cause harmful interferenceto radio or television reception,
which an be determined by turning the equipment off and on, the user is encouraged to try
to correct the interference by one or more of the following measures:-Reorient or relocate
the receiving antenna.-Increase the separation between the equipment and receiver.-Connect the equipment into an outlet on a circuit different from that to which the receiver is
connected.-Consult the dealer or an experienced radio/TV technician for help.
NOTE: THEMANUFACTURER IS NOT RESPONSIBLEFOR ANY RADIO OR TV INTERFERENCE CAUSED BY UNAUTHORIZED MODIFICATIONS TO THISEQUIPMENT.
SUCH MODIFICATIONS COULD VOID THE USER’S AUTHORITYTO OPERATE THE
EQUIPMENT.
B
Page 3

INTRODUCTION
Thank you for purchasing our MP3 player.
Before using the unit please read this
manual carefully to obtain the best possible
performance from your player. Keep this
manual for future reference
SAFETY INSTRUCTIONS
Never use the player during driving or
operating other vehicles to avoid trafc
accidents. Do not listen at extremely high
volumes to avoid damaging your hearing.
Please insert the earphone prior to turning
on the player, which will not only avoid
damaging the earphones, but also keep the
player in good condition.
Keep the player clean and never store the
player close to a heat source or in dirty,
humid or rainy places and avoid direct
sunlight.
If the player becomes dirty, please clean
with soft cloth. Clean only with water and
never clean with alcohol or other chemical
cleaners.
Never use the player in extremely dry
environments to avoid static.
Never disconnect the player from your PC
abruptly during downloading, uploading and
formatting to avoid program failures or data
loss.
When the player is used as removable disk,
please follow the proper le download and
upload procedures. Nextar cannot assume
responsibility for any le lost due to misuse.
SYSTEM REQUIREMENTS
• Microsoft Windows98/2000/Me/XP
• Pentium 200MHZ or above
• 120MB hard disk space
• USB
• Mouse installed
• CD-ROM drive
1
Page 4

CONTENTS
1. Function summary...............................................................2
2. Getting to know the player...................................................4
- Appearance and controls............................................4
- Display screen............................................................4
3. Basic functions....................................................................4
- Start up/shutdown .....................................................4
- Enter a menu..............................................................4
- Browsing Tracks.........................................................5
- Function Modes..........................................................5
- Adjust volume.............................................................6
- Play Music..................................................................6
4. Operation............................................................................7
- Music mode/Play mode.............................................7
- Record mode.............................................................8
- FM mode...................................................................8
5. Play music ..........................................................................9
- Add and delete les...................................................9
- How to use add DRM music......................................9
- Simple operation.....................................................13
- Equalizer mode.......................................................13
- Display lyrics (Karaoke).........................................14
6. Voice recorder.................................................................15
- Record mode........................................................15
- Choose record type...............................................15
13
- Play recorded les.......................................................16
7. Transfer recorded les to your PC........................................16
8. How to use the FM radio.......................................................17
9. Telephone book.................................................................... 18
10. System Setup......................................................................20
- How to enter setup.......................................................20
- Brief introduction to all options.....................................20
- Detailed operating instructions.....................................20
11. Use as a USB disk...............................................................24
- Creating a new folder....................................................24
12. Upgrading the player...........................................................25
13. Miscellaneous settings........................................................26
14. Important Instructions.........................................................30
15. Denitions...........................................................................31
16. Troubleshooting..................................................................32
17. Specications.....................................................................33
1. FUNCTION SUMMARY
• Digital Audio formats - MP1, MP2,
MP3,WMA, WMV, ASF, WAV (Easy
to work with Windows Media Player)
• Firmware upgrades (Check
periodically) - www.nextar.
2
Page 5

com will provide the latest
software upgrades and functions
........
• Removable Disk - Manipulate les via
the “mobile disk” in “My PC” without
any additional programs on your PC
(drive program needs to be installed for
operating systems prior to WIN2000)
• “Dream-space” disk mode - Enables
you to separate the storage disk via
the “mobile disk” in “My PC” into two
disks using the utilities included on the
accompanying CD and encrypt one of
those disks to hide the disk space. This
encrypted space can then not be read
by others without a password
• Record/Replay - Record your voice
with the microphone and save as WAV
or ACT. You can then choose to replay
that all such recordings or to replay
selected recordings
• Seven preset equalizer - Can be set to
natural, rock, pop, classical, soft, jazz
or heavy bass
• Various play modes - Can be set
to normal, cycle single song, play
directories, cycle directories, cycle all,
shuffle or browse
• Shutdown timer - Sleep mode and
power-save mode to simplify and
extend battery use
• Full-graphics menu - Graphic menus
with corresponding text display
• Built-in FM radio - You can easily listen
to FM stations and set your favorite
stations by using the Auto Preset or
Manual Preset functions. The player
can save 40 (20 for each band) local
stations
• USB connection - Quick connection to
USB port.
3
Page 6
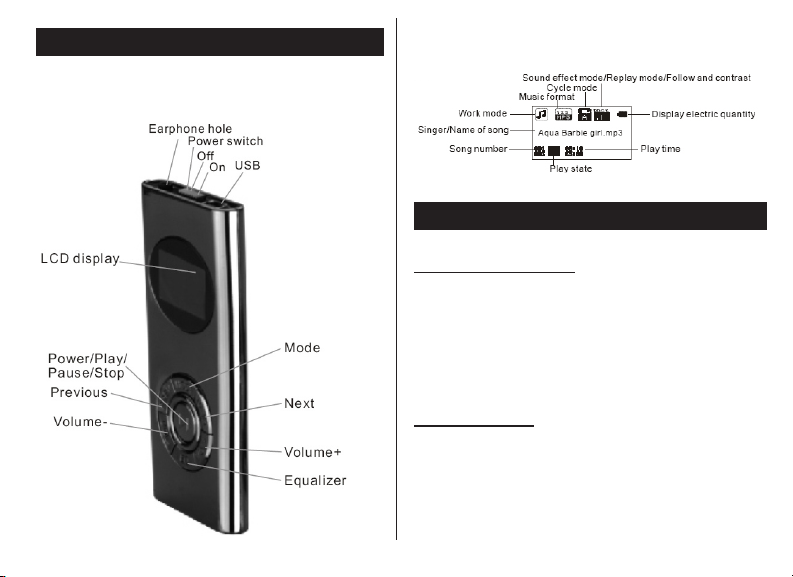
2. GETTING TO KNOW THE PLAYER
Appearance and controls
Display screen
3. BASIC FUNCTIONS
Start up/shutdown
First time, you should dial the Power
switch to the ON position - the player
will start up automatically. To shutdown
player press and hold PLAY or dial the
Power switch to the position of Off.
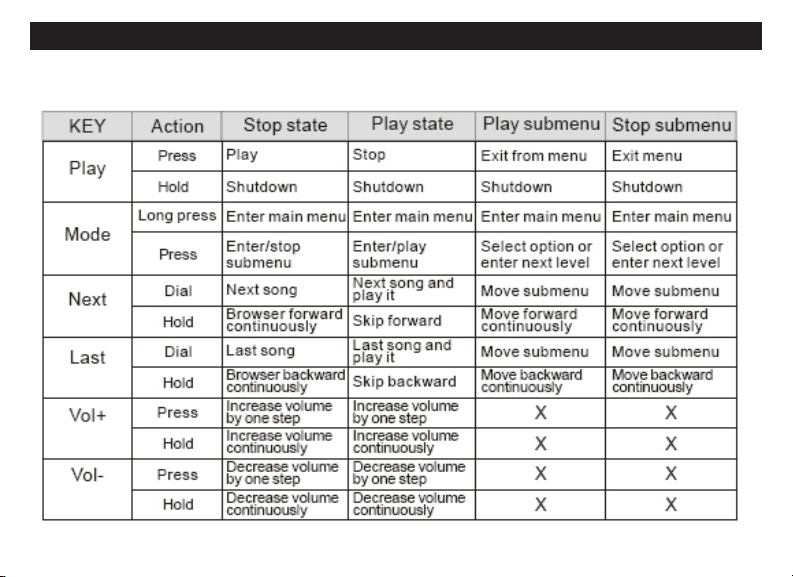
Enter a menu
Menus: Main menu (entered by mo-
mentarily holding Mode key when not
playing), Play submenu (entered by
pressing Mode key while playing), and
Stop submenu (entered by pressing
4
Page 7

Basic functions (cont.)
Browse Tracks
Browse forward by sliding Mode key
clockwise and backward by sliding
Mode key counter-clockwise
Function Modes
Go into different modes from main
menu by sliding Mode key clockwise
or anti-clockwise then pressing Mode
key:
Basic functions (cont.)
5
Page 8

Basic functions (cont.)
Basic functions (cont.)
Adjust volume
Decrease volume by pressing VOL-;
increase volume by pressing VOL+.
PLAY music
Press Play or stop (or pause while
recording); exit from submenu.
Battery recharge
Connect MP3 player to PC via the
USB cable, the battery will recharge
automatically. If the battery icon on
the player screen icker ceaselessly,
that means the batters is recharging,
otherwise means it is full, not need to
recharge.
NOTE:
Please dial the Power switch to the
position of ON before you connect the
MP3 player to PC, otherwise the battery icon on the player screen will not
icker anytime, so you can’t see the
recharge status.
6
Page 9
Music mode / Play mode
4. OPERATION
7
Page 10
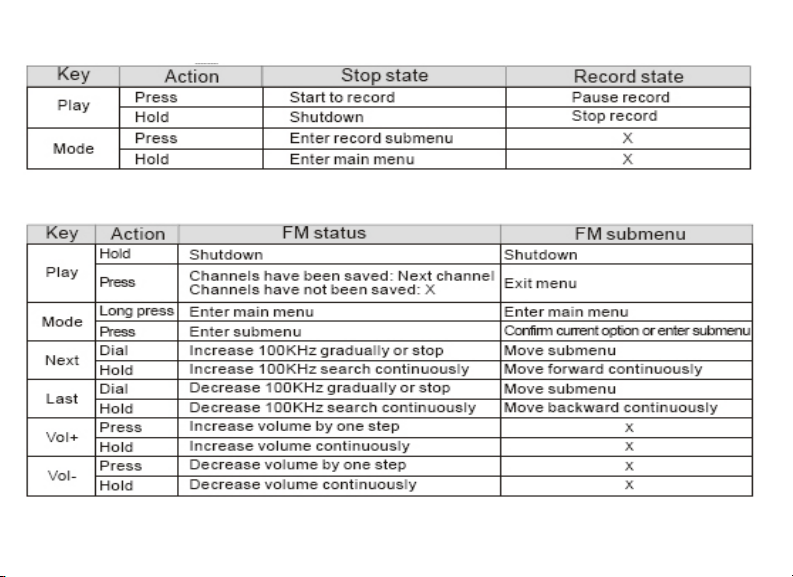
Record mode
FM mode
8
Page 11
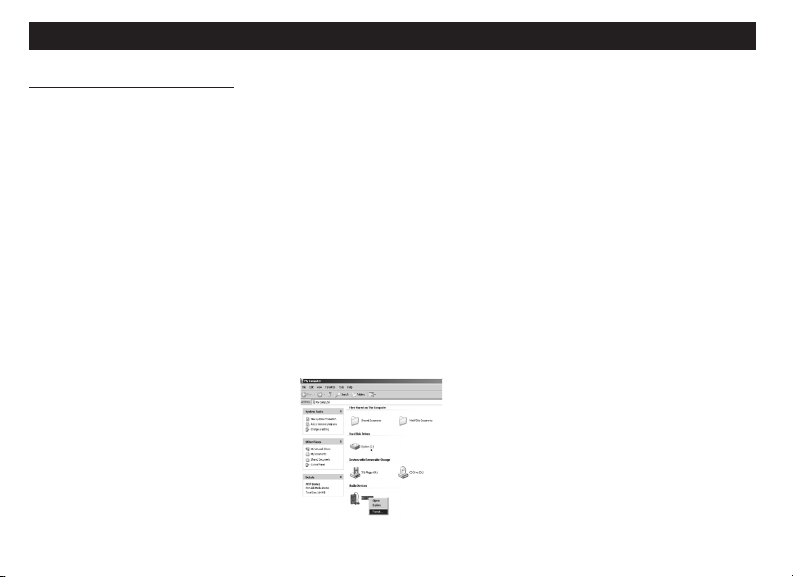
5. PLAYING MUSIC
Adding and Deleting Files
To add or delete music les from your PC or Notebook computer to your MP3 player,
simply connect the unit to the USB port of your PC or Notebook computer, click open the
“Removable Disk” drive then you can add or delete les. Before you disconnect the player,
please follow these steps to avoid possible le loss:
1) Double click the “Safely Remove Hardware icon” in the dialog box.
2) Click stop and the next dialog box appears on the display.
3) Click “OK”, then you can unplug the unit safely.
How to use add DRM music
1). Connect player to PC, after 10 seconds a dialog will be appear, select
"Take no action" or click "Cancel" button to continue.
2). Open "My Computer", clean up the device as the following steps:
9
Page 12
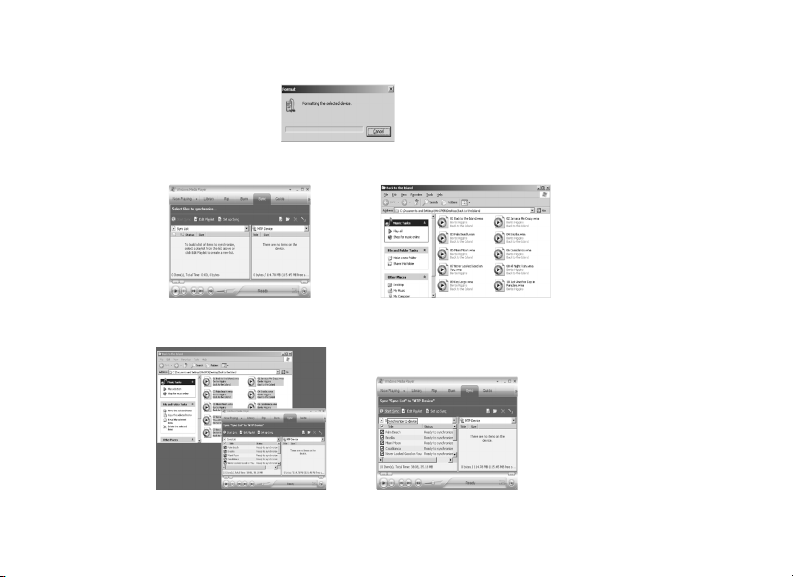
a). Click the MTP device icon use the right button of the mouse, and then select "Format";
b). Waiting for the format processing until nish.
3). Run "WMP10"(Windows Media Player 10), the "MTP" device will be discover
Select "Sync", and then open the local folder where your music les saved.
4). Select all music you want to sync to player, and drag them to the"SyncList"
on the left side of WMP 10, click "Start Sync" to began download:
5). When nish downloading, you can see the music les on the right side of WMP 10.
10
Page 13

Browser "My Computer", you can see the les already downloaded to player.
6). Disconnect the player, it will make ID3 Playlist automatic, this will cost about 8 seconds.
7). Then the player will process DRM licence, it will cost 5~10 seconds.
11
Page 14

How to play
At rst, you must enter into System setup and setup the "DRM Time", set
it to current time, otherwise the DRM music can't play accurately.
After setup "DRM Time", you can go back to music mode to play and listen to music.
Delete le in (stop submenu) mode
F i l e s c a n b e d e l e t e d u n d e r t h e i r r e s p e c t i v e m o d e s :
“Delete all” will delete all les of the current mode under the current directory. (For example, only ....
music les will be deleted if you choose Delete All under the music mode).
12
Page 15

Attention: you must eject player from USB if you delete les on PC, or it will tell
you “the les are not deleted”.
Simple operation
Equalizer mode
13
Page 16

Display synchronized lyrics (Karaoke function)
This player supports “LRC” les. (Search online for “LRC lyrics”, play song and
lyrics simultaneously.)
• How to use lyric les:
Keep the names of lyric le and song the same. For example: Name of ........
song: Jay-Sky.mp3; Name of lyric le: Jay-Sky.lrc
• How to know whether a song has lyrics:
If there is a lyric file matching the song, the icon on the upper left corner of
music mode should change to
• How to display the lyrics:
14
Page 17

6. VOICE RECORDING
NOTE: Make sure batteries have enough energy for recording.
Ninety-nine recorded les can be saved in every directory.
Record mode
If “The space is full” displays, there is no more space for new les; delete other les to open more
space.
If “The directory is full” displays, there are 99 record les in the current directory; delete les or ....
switch to another directory.
Choose record type
15
Page 18

Playing Recorded Files
7. TRANSFERING RECORDED FILES TO PC
Files recorded into the player in ACT format can be changed into WAV format with the
installation program:
1). Run “Sound Converter”, click “open”
2). Choose the ACT les you want to change
3). Click “Transform” to start transforming to WAV les
Besides transforming ACT into WAV, this tool can also play les of WAV and MP3.
16
Page 19

8. USING THE FM RADIO
17
Page 20

9. TELEPHONE BOOK
First time, the user can nd the le
‘Setup_enu_v1.1.exe’ in drive disc CD.
Then install this software on
the PC as following steps
Connect the mp3 with the PC,
pressing the start menu to nd
the Flary Address software:
Select the le menu to choose the
new, and then you will nd the le
‘C:\Program Files\Flary\TelAddbk.
dat’, then copy the le in your mp3
18
Page 21

Select the le menu to choose the Input Data to nd the le (TelAddbk.
dat) in your mp3, and then press the open button.
Fill in team name in the blank and press the Append Grouping button:
Select the team you added, and then key in the Name and the TEL you want to add.
Press the New Card button and you can see the name and Tel No. in the right blank.
Add the whole information as the above steps:
Press the Save button and Quit. Disconnect the mp3 to PC.
Enter the main menu to select Telephone mode and you will nd you added Tel information.
19
Page 22

10. SYSTEM SETUP
This section explains how to set system parameters; each option may change after a
rmware upgrade.
Brief introduction to each option
20
Page 23

Detailed Operating Instructions
Set “Record Time”
Set Backlight Time
21
Page 24

Detailed Operating Instructions
Set Language
Set Power Off
See backlight time set instructions for details
» Power-save mode shuts unit down automatically if during the set time no keys are ........
pressed and the player is stopped
Set Replay Mode
Press Mode to enter interface, Dial to choose:
• “Manual mode” denotes that you set a pause manually;
• “AUTO mode” denotes that it can pause automatically in replay.
22
Page 25

Adjust Contrast
See “Backlight time”, operations are the same.
Online Mode
Operating systems earlier than Windows 2000 Service Pack 4 cannot support two parti-
tions. To display chosen disk after connected to PC, You need to choose which disk you
want to use between “single normal disk” and “single cryptographic disk” after use the
function of “dream space”.
Memory Info
The number denotes capacity of disk, percentage denotes the space used.
Firmware Version
For view the current edition of rmware of player.
Firmware Upgrade
Enter this interface to upgrading your rmware.
Advanced Tip: Exit menus rapidly by pressing Play after setting options. This function
works on any menu.
23
Page 26

11. USING THE USB DISK FUNCTIONS
Using the USB disk function:
This player has a standard USB function, supports Windows98 (a driver needs to be
installed), Windows 2000 and newer (drivers need not to be installed), MacOS X 10.3
or Linux Red Hat 8.0 or newer.This player can be supplied power via USB, and can be
played without batteries. From the main menu, choose the work mode you want and enter
it. (To enter the main menu from Standby, press Mode.)
To connect with PC, plug into USB connector. The player has three display modes:
(1). Standby State (2). Downloading state (3). Uploading Mode
New folders
This machine supports up to ninety-nine one-level folders created by the user.
24
Page 27

12. UPGRADING THE PLAYER
The system rmware of this player can be upgraded with the utility installed on your PC.
7) Run the upgrade tool “MP3 Player Update” on the computer, click the button called ....
“Choose new edition of rmware le”.
8) Choose new rmware from the CD, or download form the homepage of the factory.
9) Click the “begin upgrade” button to start the upgrade.
10) Upgrade should be complete, follow prompts displayed on player:
25
Page 28

Upgrades for rmware are for improvement and optimization of the performance of ...
the player. It could impact normal operation if you fail to upgrade rmware.
Upgrading the rmware could cause the player to function incorrectly if not done .....
properly. Please read the instructions before you begin. This operation is meant for .
people who have some computer experience.
Upgrade software for this player is not suited for other series of players.
13. MISCELLANEOUS SETTINGS
Choosing different directories (stop submenu)
In order to play and manage sorted les, users can put les into directories (directories
need to be created beforehand). This player supports ninety-nine one-level subdirectories
Attention: Directories within a mode are independent of the other modes’ directories. They may be
given the same name and same settings as directories in other modes, but they will not intersect or
otherwise correspond.
26
Page 29

Play mode (play submenu)
You can choose different play modes while playing music or record les.
Play speed (Play submenu)
You can choose different play speeds for MP3 les and record les.
27
Page 30

Attention:The speed setting will apply to all songs until changed.
Replay mode (Play submenu)
Enter by pressing “REC/A-B” directly or from submenu.
A-B replay
NOTE: Under Replay mode, set “Tempo rate” directly by pressing VOL+ or VOL-.
Follow-read (play mode not have this function)
28
Page 31

NOTE: Return to “A-B replay” by dialing Last under this mode.
Contrast function (play mode does not have this function)
NOTE: Dial Last to go back to “Follow-read function”.
Replay times (Play submenu)
The replay times determines how many times it should replay A-B before exiting.
Replay separation (Play submenu)
Replay separation determines the number of seconds between plays.
29
....
Page 32

Function of “Dream space”
In the past, MP3 users who wanted others to see his individual data could only delete their
privacy settings while friends borrowed his MP3. Now, the function of “dream space” solves
that problem. Using the included utilities, users can separate the disk into two partitions
with optional proportions. Two drives will show up on the computer (Windows 2K needs
SP4 or you will nd one disk only). Choose “single normal disk” or “single encrypted disk”
under “system setup/online mode” and encrypt one of the disks to hide the content. This
data can not be viewed without a password. This is “dream space”.
1). Connect player to PC;
2). Run the MP3 player disk tools;
3). Format rst, choose the “encrypt subarea” option, choose appropriate content;
4). Input username at “new username”, input password at “new password”, input the same
password at “conrm password”, click “start” to begin the partitioning;
5). Finish the partition and follow the prompts;
6). PC will ask to restart, press “Yes”;
7). You will nd two disks after rebooting (Win 2K SP3 and earlier will nd one);
8). There are three les in the encrypted, two hidden les and an executable le;
9). Run “RdiskDecrypt.exe”, input username and password in dialogue box;
10). You must input user name and password every time you connect it with a PC.
Attention: Data in disk will be erased if you separate the disk into two
sections, please back up the data on the disk beforehand. Uniting two disks
into one disk will also clean out the data.
Warning: Do not lose your username and password. You can only erase the encrypted
disk by uniting partitions, which will erase the les.
14. IMPORTANT INSTRUCTIONS
30
Page 33

15. DEFINITIONS
WMA
Short for Windows Media Audio, WMA is Microsoft’s digital music format. WMA is probably
the most widely used format, universally supported by almost every online music service
and digital music player (except Apple).WMA comes in both a copy-protected and nonprotected version.
MP3 Short for Moving Pictures Experts Group-1, Layer 3, MP3 is still used as general
terminology for any type of digital music le. In reality, MP3 is not the default format for most
online stores and digital music players. Most online stores automatically convert MP3 les
to their default format (WMA or AAC) before transferring the les to a digital music player.
31
Page 34

16. TROUBLESHOOTING
* Check the digital format. Check the DRM time.
32
Page 35

Note:
“DRM” Stands for “Digital Rights Management”. DRM refers to a collection of systems used
to protect the copyrights of electronic media. These include digital music and movies, as
well as other data that is stored and transferred digitally. For example, the Apple iTunes
Music Store uses a DRM system to limit the number of computers that songs can be played
on. Each audio le downloaded from the iTunes music store includes information about the
owner of the le and how many times the le has been transferred. The protected les will
not play on computers that have not been authorized to play the music.
17. SPECIFICATIONS
Li-ion battery 3.7 V 530mA
32H(ACT, 128M Flash)
33
Page 36

17. SPECIFICATIONS
NOTE: Specications subject to change without notice
34
Page 37

No part of this manual may be copied, republished, reproduced, transmitted or distributed in any way
without prior written consent of Nextar, Inc. Any unauthorized distribution of this manual is
expressly forbidden.
Nextar is a registered trademark of Tofasco, Inc.
Nextar may find it necessary to modify, amend or otherwise change or update this manual. We
reserve the right to do this at any time, without any prior notice. All specifications and features are
subject to change without notice. All screen shots shown are simulated and may not represent the
actual screen on production units sold to consumers.
For instruction manuals, updated drivers or other information, be sure to visit our website at:
www.Nextar.com
Or write us at:
Nextar
1661 Fairplex Dr.
LaVerne, CA USA 91750
Copyright © 2006
35
 Loading...