

Page 1
Page 2

1. FEATURE SUMMARY..... .... ...... ........... .... ....... .... .......... ..... ...... .... ........... .... ...... .... ....... .... ........... .... ...... .... ....... .... .......... ..... ...... .... .......3
2. INTRODUCTION...................................................... ............ ..................... ..................... ....... .... ...... ........... .... ...... .... ........... .... ...... .... ...4
3. GETTING TO KNOW THE PLAYE R...... .... ....... .... ...... .... ... .... .......... ..... ...... .... ...... ..... .......... .... ....... .... ...... ..... .......... .... ....... .... .... ...... ...4
Appearance and Con trol s.............................................................................................................. ...... .... ...... ..... .... ...... .... ....... .... ..........4
LCD Indication.... .... ....... .... .... ....... .... .......... ..... ...... .... ........... .... ...... .... ........... .... ...... ..... .......... .... ... ...... .... .... ....... .... .......... ..... ...... .... ......5
4. BASIC FUNCTIONS....................... ..................... ..................... ..................... ...... ..................... ....... ...... .... ........... .... ...... ..... .......... .... ...5
Usi ng t he Menus.... ..... ...... .... ........... .... ...... ..... .......... .... ....... .... ...... ........... .... ...... .... ........... .... ....... .... ...... .... ........... .... ...... ..... .......... .... ..5
Enter Various Functional Modes........................................................................................................... .... ........... .......... ..... ...... .... ........5
Basic O perations…………………………… .... ..………………………………………………………….. .... ........... .... ...... .... ........... .... ...... ..6
5. MUSIC MODE..... .... ........... .... ....... .... .......... ..... ...... .... ........... .... ...... .... ........... .. .... ........... .... ...... ..... ...... .... ........... .... ...... .... ........... .... .....7
Playing Music......... ..... ...... .... ........... .... ........... .... ...... .... ........... .... ............. .... ...... .... ..... ...... .... ........... ...... .... ........... .... ...... ..... .......... .... ..7
Folder Navigation............ .... ...... ..... .......... .... ....... .... ........... .... ...... .... ........... .... ...... ..... .... ...... .... ............. .... ....... .... .......... ..... ...... .... ........7
Dis play Lyric... .... ....... .... .......... ..... ...... .... ........... .... ...... .... ........... .... ....... .... .......... .... ....... ...... .... ........... .... ...... ..... .......... .... ....... .... ..........7
A-B Repeat... .......... ..... ...... .... .... ....... .... ........... .... ...... .... ....... .... ...... .... ........... .... ...... ..... .......... ........... .... ...... ..... .......... .... ....... .... .......... ..8
Set Play Mode................................................................................................................................. .... .......... ..... .......... .... ....... .... ..........8
Set EQ Mode.......................................................................................................................... .... ....... ...... .... ..... ...... .... ........... .... ...... .... ..9
Set SRS and WOW Sound Effect.. .... ...... .... ....... .... ...... ..... .......... .... ....... .... .......... ..... ...... .... ........... ...... .... ........... .... ...... ..... .......... .... ....9
Delete Track... .... ....... .... ...... .... ........... .... ...... ..... ...... .... ........... .... ...... ..... .......... .... ....... .... .......... ..... .. .... .......... ..... ...... .... ........... .... ...... ....9
6. VOICE RECORDING..... .......... ..... .. .... .......... ..... ...... .... ........... .... ...... ..... .... ...... .... ........... .... ...... ....... .... ........... .... ...... .... ........... .... ...... .10
Record.. .... ...... .... .......... .... ...... .... .......... .... ...... .... .......... .... ...... .... .......... .... .......... .... ............................................................................10
Play Recordings. ........... .... ...... ..... .......... .... ....... .... .......... ..... ...... .... ........... .... ........... .... ...... .... ............. .... ...... ..... ...... .... ........... .... ...... ..10
7. FM Radio…………………………………………………………………………………………………………………………………………11
8. B ROWSE ALL F ILES..... .... ...... ..... .......... .... ....... .... .......... ..... ...... .... ........... .... ...... ..... .... ...... .... ............. .... ....... .... .......... ..... ...... .... ...... .13
9. SYS TEM SETTINGS..... .... ...... ..... .......... ...... ..... .......... .... ....... .... ........... .... ...... .... ........... .... ...... ..... .. .... .... ....... .... .......... ..... ...... .... .......13
10. DOWNLOAD AUDIO FILES........ .... ...... ........... .... ...... .... ........... .... ....... .... .......... ..... ...... .......... ..... ...... .... ........... .... ...... ..... .......... .... ...15
Connect to the PC and download audio files.............................................................................................. .... ........... .... ...... .... .......... 15
Remove the Player s afely from the PC.. ...... .... ........... .... ...... ....... .... .......... ..... .......... .... ....... .... ...... .... ....... .... ........... .... ...... .... ........... .15
11. INSTALL THE BATTERY... ...... ..... .......... .... ....... .... ........... .... ...... ...... ..... .......... .... ........... .... ....... .... ...... .... ....... .... .......... ..... ...... .... .....16
12. T ROUBLES HOOTING. .......... ..... ...... .... ........... .... ...... .... ........... .... ....... .... .......... ..... ...... .... ........... .. .... ........... .......... .... ....... .... .......... .16
13. SPECIFICATIONS....... .... ...... ..... .......... .... ....... .... .......... ..... .......... .... ....... .... ........... .... ...... .... ............. .... ........... .......... ..... ...... .... .......18
14. LIS TENING CAUTIONS....... .... ....... .... ........... .... ...... .... ........... .... ...... ..... .... ...... .... ........... .... ....... ...... .... ...... ..... .......... .... ........... .... ..... 19
15. PRECAUTIONS.. ..... ...... .... ...... ..... .......... .... ....... .... ........... .... ...... .... ..... ...... .... ........... .... ...... .... ....... ...... .... ........... .... ...... ..... .... ...... .... .20
FCC CAUTION................................................................................................................................................................................21
FCC COMPLIANCE............................................................................................................................................................................21
TABLE OF CONTENT
1
Page 3

1. S OMMAIRE DES CARACTÉRISTIQUE S..... ..... ...... .... ........... .......... ..... ...... .... ........... .... ...... .... ........... .... ....... .... .......... ..... ...... .... .... ...23
2. INTRODUCTION…………………………………………………………………………………………………………………………………24
3. SE FAMILIARISER AVEC LE LECTEUR . . ………………………………………………………………………………………………….24
Apparence et c ontrôles ……… …………………… ………………………………………………………………… …………………………..24
Affichage de l’écran ACL……………………………………………………………… ………………………………………… ……………….25
4. FONCTIONS DE BASE……… ………………………… ………… ……………………… ………… ……………… ………… ……………… . 25
Utilisat ion du m enu ………………... .... ...... .... ....... .... .......... ..... ...... .... ........... .... ...... ..... .......... .... ....... .... .......... ....... .... ........... .... ...... .... ...25
Accès aux divers modes de fonctionnement ……… …………………....................................................................................................25
Opérations de base … ………………….... ...... ..... .......... .... ....... .... ........... .... .. .... ...... ..... .......... .... ....... .... ........... .... ...... .... ........... .... .. .... .26
5. MODE M USIQUE …………………….. .... ...... ..... ...... .... ........... .... ...... ..... ...... .... ........... .... ...... .... ........... .... ....... .... .......... ..... ...... .......... .27
Lect ure de musique ………………............ .... ....... .... .......... ..... ...... .... ........... ...... .... ....... .... ...... .... ........... .... ....... .... .......... ..... ...... .... ...... .27
Navigat ion de dossier ………………………….... ...... .... .... ....... .... .......... ..... .. .......... ..... ...... .... ........... .... ...... .... ........... .... ........... .... .. .... ...27
Affichage des paroles …………………….......................................................................................................... .... .......... ..... ...... .......... .28
Répétition A -B ……………………............................................................................................................ .... ........... .... ...... ..... ...... .... ..... 28
Réglage du mode de lecture …………………….. .......... .... ....... .... ...... ........... .... ...... ..... .......... .... ....... .... ........... .... ...... .... ........... ...... .... .29
Réglage du m ode de c orrection…………………... ...... .... ........... .... ...... ....... .... ........... .... ...... .... ........... .... ...... ..... .......... .... ....... .... ...... ... 30
Réglage des effets sonores S RS et WOW…………………................................................................................................. .......... .... ...31
Suppressi on d’ une piste…………………...... ..... .......... .... ....... .... .......... ..... .. .......... ..... ...... .... ........... .... .......... ..... ...... .... ........... .... .. .... ...31
6. E NRE GISTREMENT VOCAL………………...... ...... .... ........... .... ...... ..... ............ .... ..... ...... .... ........... .... ...... ..... .......... .... ....... .... ...........32
Enregistrement ………………………….…..................................................................................................................................32
Lec ture des enregist rements ……………........ .... ...... .... ..... ...... .... ............. .... ........... .... ...... .... ........... .... ........... .... ...... .... ................. .... 32
7. RADIO FM………………….…....... .... ...... .... ........... .... ...... ..... .......... .... ....... ...... .... ........... .... ........... .... ...... .... ........... .... ....... .... ...... .......33
8. NAVIGATION DA NS TOUS LES F ICHIERS……... ...... .... ........... .... ............. .... ...... ..... ...... .... .... ....... .... ........... .... ...... .... ........... ...... .... .35
9. RÉGLAGES DU S YSTÈME…....... .... .......... ..... ...... .... ........... .... ...... .... ....... ...... .... ........... .... ...... ..... .......... .... ....... .... ........... .... ...... .......35
10. CHA RGEMENT DES F ICHIERS AUDIO.. ..... ...... .... ........... .... ...... .... ... .... ...... .... ........... .... ...... ..... .......... .... ....... .... ........... ...... .... .......37
Connexion à un ordinateur et chargement des fichiers audio..................................................................................... .... ........... ..... 37
Retirer s ûrement le lecteur de l’ordinateur... .... ........... .... ...... .... ........... .... .. ..... ...... .... ........... .... ...... .... ........... .... ....... .... ...... .... ....... .... .38
11. INSTALLATION DE LA BATTERIE.. .... ...... ..... .......... .... ....... .... .......... ..... ...... ...... ..... ...... .... ........... .... .......... ..... ...... .... ........... .... ...... ...38
12. D ÉPANNAGE........... .... ...... .... ........... ...... .... ........... .... ....... .... .......... ..... ...... .......... ..... ...... .... .... ....... .... ........... .... ...... .... ........... .... ...... .39
13. SPÉCIFICATIONS . …………………………………………………………………………………………………………………………....42
14. Protection de I'ou
15. PRÉCAUTIONS.. ..... ...... .... ...... ..... .......... .... ....... .... ........... .... ...... .... ........... .... ...... ..... .......... .... ....... ...... .... ........... .... ...... ..... .... ...... .... .44
îe....... .... ...... ..... .......... .... ....... .... ........... .... ...... .... ..... ...... .... ........... .... ...... .... ....... .......... ..... ...... .... ........... .... ...... .... .43
TABLE DES MATIÉRES!
2
Page 4

THANK YOU
Thank you for purchasing our digital MP3 player. This uniquely designed device combines an
MP3 player, voice recorder and removable flash m emory drive all in one unit. You can transfer
files between this player and your computer, and enjoy your M P3 music collection anytime
and anywhere.
1. FEATURE SUMMARY
z High-speed USB2.0 interface
z Multiple audio format support: MP1, MP2, MP3, WMA, WAV
z Folder navigation function
z Driverless removable drive functionali ty
z Voice Recording
z 7 preset equalizer settings: Normal, Rock, Pop, Classic, Soft, Jazz and Bass
z Easy-to-read LCD display
z Multiple play modes: Normal, repeat one, repeat all, folder, repeat folder, Random and
intro
z SRS W OW sound effect setting
z Stereo FM radio
z Auto power off
z Power off timer
z Easy-to-understand graphical menus
z Lyric sync function (Karaoke mode)
3
Page 5
2. INTRODUCTION
Thank you for purchasing our MP3 player. Before using the unit, please read this manual carefully,
to ob tain the best possible performance from your pl ayer. Keep this manual for future reference.
3. GETTING TO KNO W THE PLAYER
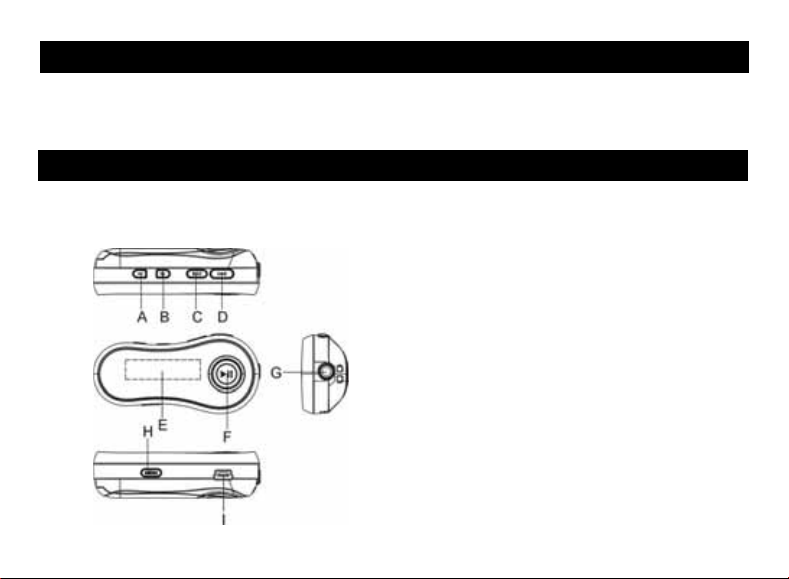
z A ppearance and Controls
A. Volume down
B. Volume up
C. Previous
D. Next
E. LCD display
F. Play/Pause button
G. Earp hone jack
H. MENU butto n
I. USB connector
4
Page 6
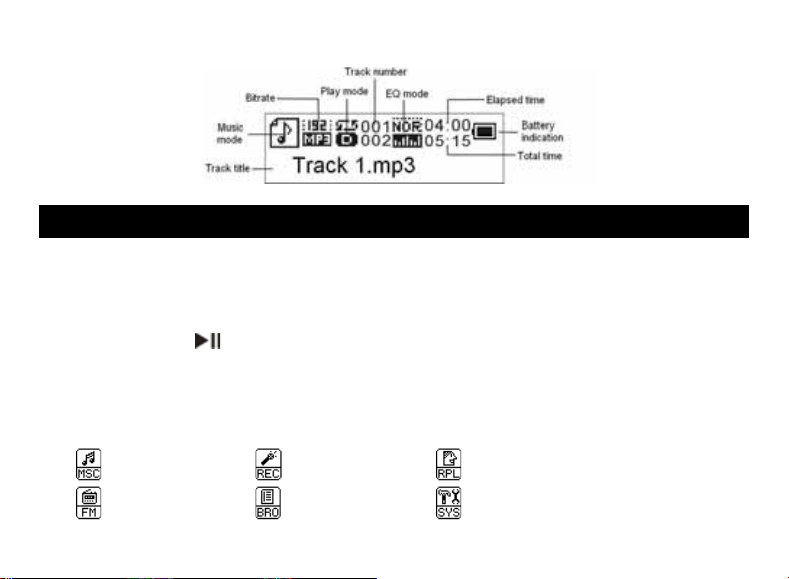
LCD Indication
z
4. BASIC FUNCTIONS
z Using the menu
Press and hold the MENU key to enter the main m enu.
Press the Previous button or Next button to select menu item and press the MENU
key to confirm the selected item.
Press the
a few seconds.
z Enter various work mode
From the m ain menu, you can enter different work modes including MUSIC, VOICE, VOICE
PLAYER, FM RADIO, FILE BROWSE, SYSTEM SETTINGS.
- Music - Record - Voice Player
- FM Radio - File Browse - System Setting
key to return. Or, do not press any key and it will return automatically in
5
Page 7
Basic Operations
z
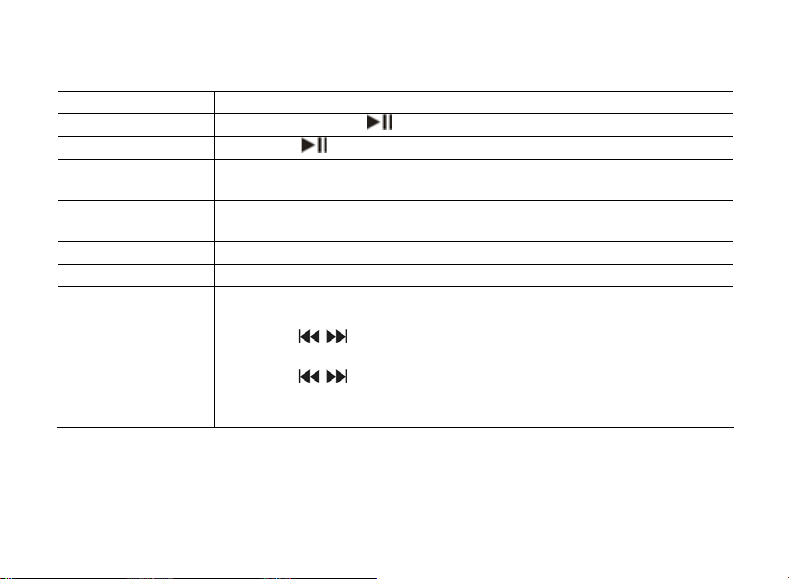
Function Operation
Power On/Off Press and hold the key until you see prompt on the display.
Play/Pause Press the key to play or pause.
Adjust Volu me Press the Volume up or Volume down button to increase or decrease
volume.
Previous/Next Press the Previous button or Next button to play the previous or next
trac k.
Fast F orward Press and hold the Next key t o fast forwards.
Rewind Press and hold Previous button to fast backwards.
Lock/unlock
buttons
(1) On the main menu, select“SYS”and then press the MENU bu tton to
confirm.
(2) Press
to select“KeyHoldTime”and then press the MENU
button to confirm.
(3) Press to set an idle time after which the buttons are locked
automatically.
To unlock buttons, press and hold the MENU button.
6
Page 8

5. MUSIC MODE
Playing m usic
z
On the main menu, select “MSC” menu and press the MENU button to enter the music
mod e.
Briefly press the Play key to start playing.
Press the Previous button or Next button to select the previous or next track.
Press the Volume up or Volume down button to adjust the volume.
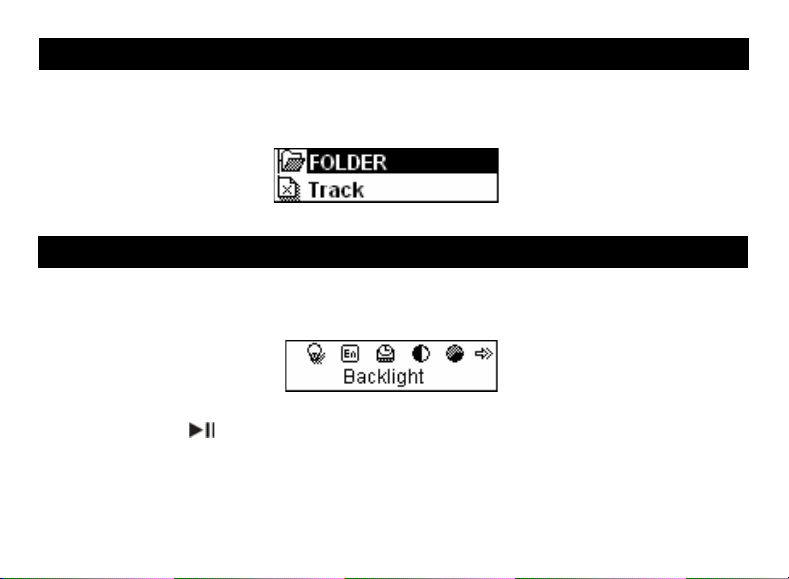
z Folder navigation
W hen the music is being played, shortly press the
Shortly press the Menu key to display submenu.
Select “Folder” and then press the MENU button to confirm.
In the folder m ode, press the Previous button or Next button to select a folder and
then press the MENU button to open it.
In the open folder, press the Previous button or Next buttontobrowsetracks.Toplay
selected t rack, press the MENU button to enter music playing mode and then press
the
key to start playing; to return to a higher folder level, browse to the root of
current directory and then press the MENU button.
z Display lyric
To display the lyric during playback, you need to download a lyric file with the same name as
the current track title to the player. The extension name for the lyric file is “.lrc”; you can
download it from the related website.
Note: The lyric file and the track should be in the same directory.
7
key to pause music.
Page 9

A-B Repeat
z
To repeat specified section of the current track,
W hen the music is being played, shortly press the MENU button to display submenus.
Select “Replay” and t hen press the MENU button to enter A-B repeat mode. At the
same time, the start point of the section is selected.
At your desired end point, press the Next button to confirm end point of the repeat. The
section between the start point and the end point begins to be played repeatedly.
To stop A-B repeat, press the MENU button.
z Set Play Mode
You can switch between the following play modes:
Normal -Play all t racks in order and stop after playing all
Repeat One - Keep repeating the current track
Folder – Play al l tracks in current folder
Repeat folder – Repeat all tracks in current folder.
Repeat All - Play all tracks in order and repeat
Random - Play all t racks randomly
Intro- Play the first 10 seconds of each track
To select play m ode:
W hen the music is being played, shortly press the MENU button to display submenu.
Select "Play Mode" and then press the MENU key to show the provided options.
Press the Previous button or Next button to select the desired repeat mode, and
press the MENU key to confirm or press the
8
key to cancel and return.
Page 10

Set EQ mode
z
You can play the tracks in different sound effect. The device provides 7 preset EQ modes: Natural,
Rock, Pop, Classic, Soft, Jazz, and Bass.
To set the EQ mode:
When the music is being played, shortly press the MENU button to displaysubmenu.
Select " Equalizer" and then press the MENU key to show the provided options.
Press the Previous button or Next button to select the desired mode, and press the MENU
key to confirm or press the
z Set SRS and WOW sound effect
key to cancel and return.
The device provides the vivid sound effect SRS and WOW to enhance your music enjoyment.
These steps can guide you to enable S RS and WOW setting:
When the music is being played, shortly press the MENU button to displaysubmenu.
Select " SRS WOW mode" and then press t he MENU key to show the provided options.
Press the Previous button or Next button to select the desired option,and press the MENU
key to confirm or press the
z Delete Track
key to cancel and return.
You can delete o ne single track following these steps:
Pause the musi c playing first a nd then shortly press the MENU button to display submenu.
Select "Delete file" to delete o ne single track or “Delete All” to delete all tracks. Press the
MENU key to continue.
Press the Previous button or Next button to select “Yes” or “No”, and then press the MENU
key to confirm or press the
key to cancel and return.
9
Page 11
6. VOICE RECORDING
Record
z
Press and hold the MENU button to display t he main menu.
Select “REC” menu and then press the MENU button to enter voice recording mode.
Press the button to start recording.
During recording, you can press the
button to pause or resume recording.
Press and hold the MENU button to stop and save the recording.
CAUTION: DO NOT REMOVE THE BATT ERY DURING RECORDING. THAT WILL CAUSE
CURRENT RECORDING UNSAVED AND LOST.
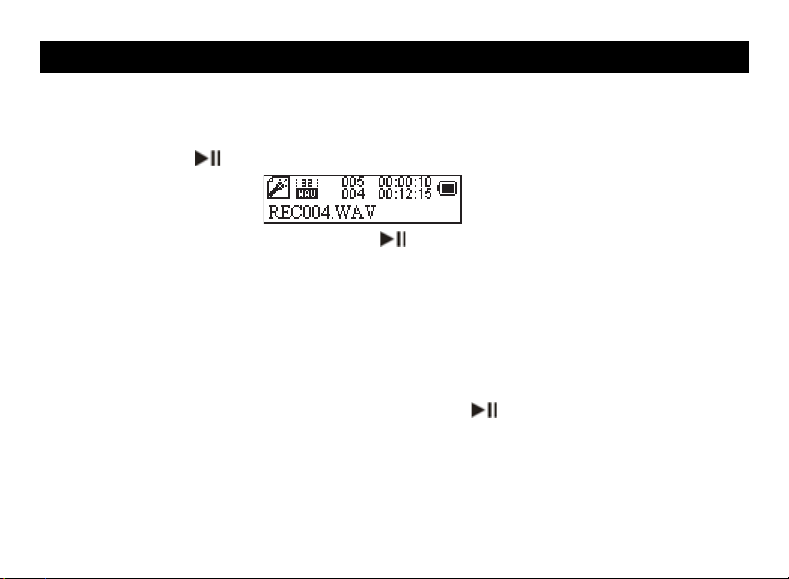
z Play recordings
(1) On the main menu, select the “RPL” item to enter the voice playing mode.
(2) Select the file that you want to play and press the
keytoplayit.
For detail information about playing, refer to the “Basic operations” and “Music Mode”
section.
Alternati vely, you can enter the navigation mode, open the VOICE folder and select the
voicefilethatyouwantplay.
10
Page 12

7. FM RADIO
On the main menu, select “FM” and press the ME N U key to turn on the FM radio. It searches
for stations automatically once you turn on the FM radio.
z Auto-Search Broadcasting Station
(1) Shortly press the MENU key to show the submenus.
(2) Select “Auto Search” and then press the MENU key to continue. The radio automatically
searches for stations with the frequency band. The received stations will be saved as
preset stations automatically.
Note: Please plug in the earphone to the player before scanning radio station.
z Search Broadcasting Station manually
Press “
“
z Listen to Station
Press the “
z Save Broadcasting Station
(1) Tune to the station tha t you want to save.
(2) Press the MENU key shortly to show the submenus.
(3) Select “Save” and press the MENU key to continue.
(4) Press the “
”or“ ” to decrease or increase frequency by 0.1 MHz. O r press and hold the
”or“ ” button to search backwards or forwards quickly.
” button to tune in the saved stations.
”or“ ” button to select “YES” and then press the MENU button to
confirm.
11
Page 13

z Delete broadcasting station
(1) Tune to the preset station that you want to delete.
(2) Press the MENU key shortly to show the submenus.
(3) Select “Delete” (or select “Delete All” to delete all preset stations) and press the MENU
key to continue.
(4) Press the “
”or“ ” button to select “YES” and then press the MENU button to
confirm.
z Set the frequency band
This device provides two frequency bands for your choice: 87.5~108mHz (default) and
79~90mHz. You can select the band which is applicable for your local region.
Shortly press the MENU button to display the submenu. Select “Normal Band” or “Japan
Band”, and then press the MENU button to confirm.
z Encode the FM program
You can record the FM programs broadcasted by the station into WAV file.
(1) When you are listening to the program, shortly press the MENU key to display the
submenu.
(2) Select “ Record” and then press the MENU button to enter the voice recording mode.
(3) Press the
key to start, pause or resume recording.
(4) Press and hold the M enu button to stop recording.
12
Page 14
8. BROWSE ALL FILES
To browse all folders and tracks, on the main menu, select “BRO” and then press the MENU
button to enter the explorer mode. For detail information about how to use the file browser, see the
“Folder navigation” section.
9. SYSTEM SETTINGS
To customize the player settings:
(1) On the main menu, select the “SYS” item and press the MENU key to enter the system setting
mod e.
(2) Press the Previous button or Next button to select setting item and press the MENU key to
confirm or press the
key to cancel/return.
13
Page 15

Item Description
Backlight Set the duration of the backlight after you press any key.
Language Select the language in which the on-screen text is displayed.
Power Set Off time –Set the length of time after which the player is
turned off aut omatically when there is no activity
Sleep time - Set the continuous playback time before the
player is turned off aut omatically.
Contrast Set contrast between background and foreground of the
screen.
KeyHoldT ime Set an idle time after which t he buttons are locked
automatically.
About Display total capacity and used space of the internal memory
Firmware version Display software version number.
Firmware Upgrade Upgrade the firmware
Exit Exit the system setting mode
14
Page 16

10. DOWNLOAD AUDIO FILES
z Connect to the PC and download audio files
This player is plug & play for WIN2000/XP/ ME/Vista OS. You don’t need to install the driver .
But for Windows98/SE, you a re required to install a driver before connection. To connect it
with PC for transferring files:
(1) Plug the attached USB cable to the PC, and connect the other end to the player.
(2) When the “
connection is successful.
(3) When you open “My Com puter”, you will see a removable disk which represents the
player. Now you can use the removable disk as a normal local disk drive, copying
audio files from or to the removable disk.
z Removing the player safely from the PC
For Windows2000/XP/Vista:
Left click the
Click the pop-up mini-window with message of “Stop the USB Mass Storage Device –
Driver (X)”.
W hen you are prompted to remove the device, pull on the player.
For Win98, please make sure the data transfer is completed before unplugging the MP3
player.
” icon appear at the right bottom of the PC screen, it means the
icon at the right hand corner of the taskbar.
15
Page 17

playoth
11. INSTALL THE BATTERY
(1) On the back of the device, press an d slide t he battery cover.
(2) Remove the battery cover and insert one AAA-size battery into the battery
compartment.
(3) Replace the battery cover.
12. TROUBLESHOOTING
Problem Possible Cause Solution
The LCD di splays nothing
when the device is
powered on.
Nosoundwhenplaying
music or voice file.
The pla yer cannot be
connected to the PC.
No battery or battery is too low. Install or replace the battery.
1. The volume i s too low.
2. There are problems with the
audio file.
1. The driver is not installed or
destroyed.
2. The USB interface is not
supported by the PC’s
motherboard.
1. Adjust the volume.
2. Delete the file or
files.
1. Install or reinstall the
Windows 98 driver.
2. Update or replace the
PC’s motherboard.
16
Page 18

The displayed time is
changing constantly.
The PC has error when
youplugandunplugthe
player.
Total memorydisplayed on
the player is not i n
accordance with the
marked amount.
Some of MP3 files cannot
be played properly.
The bit rate of the MP3 file is
changing during playback.
The p layer is disconnected from the
PC abruptly while transferring files.
Part of memory is used to store
programs and displaycharacters.
The MP3 file is compressed by a
standard, such as MPEG I Layer 1
or Layer 2 that the player does not
support.
17
Try to use fixed bit rate to
compress the MP3 file.
Do not disconnect the player
from the P C when transfe rring
files.
1. Delete the unsupported
MP3 files.
2. Use MPEG I Layer 3
standard to compress the
unsupported MP3 files.
Page 19

13. SPECIFICATIONS
Item Parameter
Musi c format MP3, W MA
Bit rate 8kbps ~ 320kbps
Frequency range 20HZ ~ 20kHz
Signal/noise ratio >= 86 dB
Channel separation >=40dB
Frequency response <=3dB (20HZ ~ 20kHz)
Output power to earphones L 4mW, R 4mW
EQ modes Natural, Rock, Pop, Classic, Soft, Jazz, Bass
Display 132 X 32 pixel (black and white color)
Type of ports 2.0-compatible with USB 1.1
Memory media FLAS H
Memory capacity 128MB ~4GB
Output current <=80mA
Power off current <=500uA
Remark: Specifications and appearance are subject to change and improvemen t without
further notice.
18
Page 20

14. LISTENING CAUTIONS
z Do not play your earphones or headphones at a high volume. Hearing experts advise
against continuous extended play.
z If you ex perience a ringing in your ears, reduce volume or discontinue use.
z Do not use while operating a motorized v ehicle. It may create a traffic hazard and is illegal in
many areas.
z Y ou should use extreme caution or tem porarily discontinue use in potentially hazardous
situations.
z Even if your headphones or earphones are the open-air type designed to let you hear
outside sounds, don’t turn up the v olume so high that you can’t hear w hat’s around you.
z Sound can be deceiving. Ov er time your hearing “comfort level” adapts to higher volumes of
sound. So what sounds “normal” can actually be loud and har mful to your hearing. Guard
against this by setting your equipment at a safe level BEFORE your hearing adapts.
To establish a safe level:
a. Start your volume control at a low setting.
b. Slowly increase the sound until you can hear it comfortably and clearly, and w ithout
distortion. Once you have established a comfortable sound level, leave it there.
19
Page 21

15. PRECAUTIONS
1). When not using the player for an extended period of ti me, remove the batteries to avoid damage
due to leakage.
2). Do not use the player in extremely hot , cold, dusty or damp environments.
3). Make sure the keys are unlocked before using the player (otherwise controls will not function).
4). Avoid dropping or striking the unit .This may cause external and internal physical damage to the
player.
5). Replace battery w ith new one if:
a)Thebatterylevelicondisplays
b) The player powers off automatically and off again when restarted.
c) No response when pressing keys w ith keys unlocked and battery installed
6).To prevent damage from static shock, never use the player in very dry conditions.
7). When player is being formatted or transferring a file, do not interrupt the connection. Otherwise,
data may be corrupt of lost.
8). When the player is used as a portable HD, please use only per instructions. O therwise,
permanent data loss could occur.
(An empty battery)
20
Page 22

FCC Caution: this equipment has been tested and found to comply with the limits for Class B digital device,
pursuant to part 15 of the FCC Rules. These limits are designed to provide reasonable protection against harmful
interference in a residential installation. This equipment generates, uses and can radiate radio frequency energy
and, if not installed and used in acc ordance with the ins tructions, may cause harmful interference to radio
communications. However, there is no guarantee that interference will not occur in a particular installation. If this
equipment does c ause harmful interference to radio or television reception, which can be determined by turning the
equipment off and on, the user is encouraged to try to correct the interference by one or more of the following
measures:
·Reorient or reloc ate the receiving antenna.
·Increase the separation between the equipment and receiver.
·Connect the equipment into an outlet on a circuit different from that to W hich the receiver is connected.
·Consult the dealer or an experienced radio/TV tec hnician for help.
FCC Compliance:
·To assure continued compliance, follow the attached installation ins tructions.
·Use only the provided shield interface cables when connecting to computer.
Any unauthoriz ed changes or modifications to this equipment would void the user's authority to operate this device.
This device complies with part 15 subpart B of the FCC Rules. Operation is subjected to the following
conditions:(1)This device may not cause harmful interference, and(2)This device must accept any interference
received, including interference that may cause undesired operation.
This product may receive radio interference caused by mobile telephones or other produc ts during operation. If
such interference is apparent, pleas e increase separation between the product and the mobile telephone or other
product.
Industry Canada Requirem ent:
This Class B apparatus complies with Canadian ICES-003.
Cet appareil numérique de la classe B est conforme á la norme NM B-003 du Canada
Other names of systems and products mentioned in these instructions are usually the registered
21
Page 23

trademarks or trademarks of the manufacturers who developed the s ystem or product concerned. The
TM
and marks are not used to identify registered trademarks and trademarks in these instructions.
This manual was correct and complete at the time of printing. However, specifications and updates can
occur at any time without prior notice. No part of t his manual may be copied, republished, reproduced,
transmitted, or distributed in any way without prior written consent of Nextar, Inc. Any unauthorized
distribution of this manual is expressly forbidden.
TM
Nextar
is a trademark of Nextar (Hong Kong) Li mited.
Nextar may find it necessary to modify, amend or otherwise change or update this manual. We reserve the
right to do this at any time, without any prior notice. All specifications and features are subject to change
without notice. All screen shots shown are simulated and may not represent the actual screen on production
units sold to consumers.
For instruction manuals, updated drivers or other information, be sure to visit our website at:
www. Nextar.com
Or write to u s at:
Nextar
1661 FairplexDr.
LaVerne, CA USA91750
Copyright
2007
22
Page 24

MERCI!
Merci d’avoir choisi notre le cteur numér ique MP3. De conception unique, cet appa reil allie la
fonctionnalité d’un lecteur MP3 avec celle d'un enregistreur vocal et d’une mém oire Flash. Il vous
permet de transférer et de stocker des données entre ordinateurs et d’écouter votre collection
musicale MP3 partout, en tout temps.
1. SOM MAIRE DES CARACTÉRISTIQUES
z USB 2.0 Haute vitesse
z Supporte différents formats audio : MP1, MP2, MP3, WMA, WAV
z Fonction de navigation
z Peut égalem ent servir de disque amovible
z Enregistrement vocal
z Radi o FM stéréo
z 7 préréglages d’égalisation : Normal, Rock, Pop, Classique, Soft, Jazz et Bass
z Écran à cristaux liquides (ACL) à lecture facile
z Multiple modes de lecture : Normal, répétition d’un titre, répétition de tous les titres,
lecture du ficher, répétition du ficher, lecture aléatoire et lecture de l’intro
z Réglage des effets sonores SRS W OW
z Radi o FM stéréo
z Fonction de coupure autom atique
z Minuterie de coupure automatique
z Menus graphiques conviviaux
z Fonction d'affichage des paroles de chansons (Mode Karaoké)
23
Page 25

2. INTRODUCTION
Thank you for purchasing our MP3 player. Before using the unit, please read this manual carefully,
to ob tain the best possible performance from your pl ayer. Keep this manual for future reference.
3. SE FAMILIARISER AVEC LE LECTEUR
z Apparence et contrôles
A. Volume haut
B. Volume bas
C. Précédent
D. Suivant
E. Écran ACL
F. Touche lecture/pause
G. Prise pour oreillettes
H. Touche MENU
I. Port USB
24
Page 26

z Affichage de l’écran ACL
4. FONCTIONS DE BASE
z Utilisation du menu
Appuyez sur la touche Menu et maintenez-la enfoncée pour accéder au menu
principal.
Enfoncez la touche Précédent ou la touche Sui vant pour sélectionner un élément du
menu et appuyez sur la touche Menu pour valider l’élément sélectionné.
Enfoncez la touche
touche et le menu principal sera rétabli automatiquement après quelques secondes.
z Accès aux divers modes de fonctionnement
À partir du menu principal, vous pouvez accéder aux divers modes de fonctionnement
incluant : MU SIQUE, VO IX, LECTEUR VOCAL, RADIO FM, NAVIGAT ION DE DOSSIER,
RÉGLAGES DU SYSTÈME.
- Mode musique - Mode enregistrement - Mode lecteur vocal
pour retourner au menu principal. Ou, n’enfoncez aucune
25
Page 27

- Mode radio FM - Mode navigation de dossier - R égl ages du système
z Opérations de base
Fonction Opération
Marche / Arr êt
Play / Pause
Réglage du
volume
Précédent /
Suivant
Appuyez et maintenez enfoncée la touche enfoncée jusqu’à
que vous voyiez l’écran s’allumer
ce
Appuyez sur la touche pour commencer la lecture ou pour
une pause
faire
Appuyez sur la touche VOL+ ou sur la touche VOL- pour augmenter
ou réduire le volume
Enfoncez la touche Précédent ou Suivant pour effectuer l a lecture
de la piste précédente ou sui vante.
Avance rapide Appuyez sur la touche Suivant et maintenez-la enfoncée vers la
gauche pour effectuer une avance rapide.
Retour rapide Appuyez sur la touche Précédent et maintenez-la enfoncée pour
effectuer un retour rapide.
26
Page 28

Verrouillages des
touches
(1) À partir du menu principal, sélectionnez l’élément « SYS »
et enfoncez ensuite la touche MENU pour valider.
(2) Appuyez sur la touche
l’élément « KeyHoldTime » et enfoncez ensuite la
touche Menu pour valider.
(3) Enfoncez la touche
d’interruption après l equel les touches sont
automatiquement verrouillées.
Pour déverrouiller les touches, enfoncez et maintenez la touche
MENU enfoncée.
pour sélectionner
pour régler le temps
5. MODE MUSIQUE
z Lecture de musique
À partir du menu principal, sélectionnez l’élément « MSC » pour accéder au mode musique.
Enfoncez la t ouche Précédent ou Suivant pour sélectionner une piste à lire, et enfoncez
ensuite la touche
z Navigation de dossier
Lorsque la m usique est en processus de lecture, appuyez brièvemen t sur la touche
pour interrompre la musique (mettre en mode pause).
pour amorcer sa lecture.
27
Page 29

Enfoncez brièvement la touche Menu pour afficher le sous-menu.
Sélectionnez l’élément « Dossier local » et enfoncez ensuite la touche MENU pour
valider.
Dans le mode dossier, appuyez sur la touche Précédent ou sur l a touche Suivant pour
sélectionner un dossier et enfoncez ensuite la t ouche MENU pour l’ouvrir.
Dans le dossier ouvert, enfoncez la touche Précédent ou Suivant pour naviguer parmi
les pistes. Pour lire la piste sélectionnée, appuyez sur la touche M ENU pour accéder au
mode de lecture de musique et enfoncez ensuite la touche
pour amorcer la lecture;
pour retourner à un niveau de dossier plus élevé, naviguez jusqu’à la source du
répertoire en cours et enfoncez ensuite la touche MENU.
z Affichage des paroles
Pour afficher les paroles durant la lecture, vous devez télécharger, dans le lecteur, un fichier
de paroles portant le même nom que le titre de la piste en cours de lecture. Le nom
d’extension pour le fichier de paroles est « .lrc »; vous pouvez le télécharger du site Web
connexe.
Note : Le fichier des paroles et la piste doi vent être dans le m ême répertoire.
z Répétition A-B
Pour répéter une section précise de la piste en cours,
(1) Lorsque la musique est en cours de lecture, enfoncez brièvement la touche M ENU pour
28
Page 30

afficher les sous-menus.
(2) Sélectionnez « Répétition » et appuyez ensuite sur la touche MENU pour accéder au
mode de répétition A-B. Au même moment, le point de départ de la section est
sélectionné.
(3) Au point de fin désiré, enfoncez la touche Suivant pour confirmer le point de fin de la
répétition. La section entre le point de départ et le point de fin comm ence à être lue de
façon répétée.
(4) Pour mettre fin à la répétition A-B, enfoncez la touche MEN U.
z Réglagedumodedelecture
Les modes de lecture suivants peuvent être utilisés :
Normal - Lecture de toutes les pistes dans l ’ordre et arrêt une fois que celles -ci ont toutes
été lues .
Répétition d ’une piste - Répétition de la piste actuelle
Dossier - Lecture de toutes les pistes contenues dans le dossier actuel
Répétition du dossier - R épétition de toutes les pistes contenues dans le dossier actuel
Répétition de toutes les pistes - Lecture de toutes les pistes dans l ’ordre et répéti tion de
cellesci
Aléatoire - Lecture de toutes les pistes de manière aléatoire
Intr o
- Lecture des 10 premières secondes de chaque piste
29
Page 31

Pour sélectionner l e mode de lecture :
(1) Lorsque la musique est en cours de lecture, enfoncez brièvement la touche M ENU pour
afficher le sous-menu.
(2) Sélectionnez « Mode l ecture » [Play Mode] et enfoncez ensuite la t ouche M ENU pour
afficher les options offertes.
(3) Appuyez sur la touche Précédent ou Suivant pour sélectionner le mode de répétition
désiré, et enfoncez ensuite la t ouche M enu pour v alider ou appuyez sur la touche
pour annuler et retourner au menu principal.
z Réglagedumodedecorrection
Vous pouvez effectuer la l ecture des pistes avec différents effets sonores. L’appareil offre 7
modes de correction préréglés : N aturel, Rock, Populaire, Classique, Douce, Jazz, et Grave.
Pour régler le mode de correction :
(1) Lorsque la musique est en cours de lecture, enfoncez brièvement la touche M ENU pour
afficher le sous-menu.
(2) Sélectionnez « Égalisateur » et enfoncez ensuite la touche MENU pour afficher les
options offertes.
(3) Appuyez sur la touche Précédent ou Suivant pour sélectionner le mode désiré, et
enfoncez la touche Menu pour valider ou appuyez sur la touche
pour annuler et
retourner au menu.
30
Page 32

z Réglage des effets sonores SRS et WOW
L’appareil offre les effets sonores intenses SRS et WOW pour rehausser l’écoute de votre
musique. Ces étapes peuvent vous guider pour activer les réglages SRS et WOW :
(1) Lorsque la musique est en cours de lecture, enfoncez brièvement la touche MENU
pour afficher l e sous-menu.
(2) Sélectionnez le « mode SRS W OW » et enfoncez ensuite la touche MENU pour
afficher les options offertes.
(3) Appuyez sur la touche Précédent ou Suivant pour sélectionner le mode désiré, et
enfoncez la touche MENU pour valider ou appuyez sur la touche
pour annul er et
retourner au menu.
z Suppression d’une piste
Vous pouvez supprimer une piste unique en obser vant les étapes suivantes :
Interrompez d’abord la musique en cours de lecture et enfoncez brièvement la touche
MENU pour afficher l e sous-menu.
Sélectionnez « Supprimer fichier » pour supprimer une piste unique ou « Supprimer
tout » pour supprimer toutes les pistes. Enfoncez la touche MENU pour continuer.
Appuyez sur la touche Précédent ou Suivant pour sél ectionner « Oui » ou « Non », et
enfoncez ensuite la touche MENU pour valider ou appuyez sur la touche
annuler et retourner au menu.
31
pour
Page 33

6. ENREGISTREMENT VOCAL
z Enregistrement
(1) Appuyez sur la touche MENU et maintenez-la enfoncée pour afficher le menu principal.
(2) Sélectionnez le menu « Enregistrer » [REC] et enfoncez ensuite la touche MENU pour
accéder au mode d’enregistrement vocal.
(3) Appuyez sur la t ouche
pour amorcer l’enregistrement.
(4) Pendant l’enregistrement, vous pouvez enfoncer la touche
reprendre l’enregistrement.
(5) Appuyez sur la touche MENU et maintenez-la enfoncée pour stopper et sauvegarder
l’enregistrement.
ATTENTION : NE RETIREZ PAS LA PILE PENDANT L’ENREGISTREMENT. CELA
ENTRAÎNERAIT LA PERTE ET LA NON-SAUVEGARDE DE L’ENREGISTREMENT EN
COURS.
z Lecture des enregistrements
(1) À partir du m enu principal, sélectionnez l’élément « RPL » pour accéder au m ode de
lecture vocale.
32
pour interrompre ou
Page 34

(2) Sélectionnez le fichier désiré et enfoncez la touche pour amorcer sa lecture.
Pour de l’information détaillée sur la lecture de fichiers, consultez les sections
« Fonctionnement de base » et « Mode musique ».
Une autre m éthode consiste à accéder au mode navigation, à ouvrir le dossier VOCAL et à
sélectionner le fichier vocal que vous souhaitez lire.
7. RADIO FM
À partir du menu principal, sélectionnez « FM » et enfoncez la touche MENU pour activer l a radio
FM. L’appareil recherche automatiquement des stations radiophoniques une fois la radio FM
activée.
z Recherche automatique de stations radiophoniques
(1) Enfoncez brièvemen t la touche MENU pour afficher les sous- menus.
(2) Sélectionnez « Balayage automatique » et enfoncez ensui te la touche MENU pour
poursui vre. La radio recherche automatiquement les stations si tuées entre les
fréquences 87,5 MHz à 108 MHz. Les stations captées seront sauvegardées
automatiquement à titre de stations préréglées.
Note : Veuillez brancher les orei llettes dans le lecteur avant d’effectuer le balayage des
stations radiophoniques.
z Recherche manuelle de stations radiophoniques
(1) À partir du mode « Préréglé », enfoncez la touche
33
pour commuter au mode
Page 35

« Manuel ».
(2) Appuyez sur la touche ou pour réduire ou augmenter la fréquence de 0,1
MHz. Ou, appuyez sur la touche
ou et maintenez- la enfoncée pour une
recherche rapide vers l’avant ou l’arrière.
z Écoute de stations
Enfoncez la touche
pour syntoniser les stations sau vegardées.
z Sauvegarde de stations radiophoniques
(1) À partir du mode « Préréglé » ou « Manuel », syntonisez la station que vous souhaitez
sauvegarder.
(2) Enfoncez brièvemen t la touche MENU pour afficher les sous- menus.
(3) Sélectionnez « Sauvegarder » et enfoncez la touche MENU pour valider.
z Suppression de stations radiophoniques
(1) À partir du mode « Préréglé », enfoncez la touche
ou pour sélectionner la
station que vous souhaitez supprimer.
(2) Enfoncez brièvemen t la touche MENU pour afficher les sous- menus.
(3) Sélectionnez « Supprimer » et enfoncez la touche MENU pour continuer.
(4) Enfoncez la touche MENU pour confirmer la suppression.
z Enregistrement d’une programmation FM
Vous pouvez enregistrer l es programmations FM syntonisées par la station dans le fichier WAV.
(1) Lorsque vous écoutez la programmation, enfoncez brièvement la touche MENU pour
34
Page 36

afficher les sous-menus.
(2) Sélectionnez « Enregistrer » et enfoncez ensuite la touche MENU pour accéder au
mode d’enregistrement vocal.
(3) Enfoncez la touche
(4) Appuyez sur la t ouche MENU et maintenez-la enfoncée pour stopper l’enregistrement.
pour amorcer, interrompre ou reprendre l’enregistrement.
8. NAVIGATION PARMI TOUS LES FICHIERS
To browse all folders and tracks, on the main menu, select “BRO” and then press the MENU
button to enter the explorer mode. For detail information about how to use the file browser, see the
“Folder navigation” section.
9. RÉGLAGE DU SYSTÈME
Pour personnaliser les réglages du lecteur:
(1) Dans le menu principal, sélectionner l’entrée « SYS » et appuyez sur la touche MENU pour
accéder au mode de réglage du système.
35
Page 37

(2) Appuyez sur la touche Précédent ou Suivant pour sélectionner l’élément de réglage et
enfoncez la touche MENU pour valider ou appuyez sur la touche
pour annuler/retourner
au menu.
Élément Description
Rétro-éclairage Configuration de la durée du rétro-éclairage après que vous
ayez appuyé sur n’importe quelle touche
Langue Sélection de la langue dans laquelle le texte est affiché sur
l’éc ran.
Réglage de puissance Hors tension automatique - Configurat ion de la durée après
laquelle le lecteur s’éteint automatiquement lorsqu’il n’y a pas
d’activité.
Temps de veille - Configuration du temps de lecture
automatique avant que le lecteur se mette hors tension
automatiquement
Contraste Configuration du contraste entre l’arrière-plan et l’avant-plan
de l’écran.
Temps de verrouillage
des touches
Configuration de temps d’inactivité après lequel les touches
sont automatiquement verrouillées.
36
Page 38

À propos Affichage de la capacité totale et de l’espace utilisé dans la
mém oire interne.
Mise à niveau du micro
logiciel
Version du micro
logiciel
Sortie Quitterlemodederéglagedusystème
Mise à niveau du micro logiciel
Affichage du numéro de version du programme
10. CHARGEMENT DE FICHIERS AUDIO
z Connexion à un ordinateur et chargement des fichiers audio
Si l’ordinateur est doté du système d’exploitation Win2000, Win XP, Win ME, ou Win Vista,
aucune installation de pilote n’est requise. Pour Windows98/SE, vous devez installer un pilote
avant le raccordement. Connectez le lecteur à l’ordinateur et chargez les fichiers audio en
suivant les étapes ci-après:
(1) Raccordez le câble USB ci-joint à l’ordinateur, et branchez l’autre extrémité dans le
lecteur.
(2) Lorsque l’icône «
signifie que le branchement a été réussi avec succès.
(3) Lorsque vous ouvrez « Poste de tra vail », vous verrez un disque amovible représentant le
» apparaît dans le coin inférieur droit de l’écran de l’ordinateur, cela
37
Page 39

lecteur. Vous pou vez maintenant utiliser le disque amovible en tant que lecteur de disque
local normal, en copiant les fichiers audio à partir ou vers le disque amovible.
z Retirer sûrement le lecteur de l’ordinateur
Pour Windows 2000 / XP / Vista:
(1) Cliquez l’icône «
des tâches.
(2) Cliquez sur la mini fenêtre émergente contenant le message « Stopper l’unité de
mém oire de grande capacité USB »
(3) Lorsque vous êtes invités à retirer l ’appareil, débranchez le lecteur MP3.
Pour Win 98, veuillez vous assurer que les transmission de données est achevée avec de
débrancher le lecteur MP
» sur le bouton gauche de la souris sur le coin à droite de la barre
11. INSTALLATION DE LA PILE
(1) À l’arrière de l’appareil, enfoncez et glissez le couvercle de la pile.
(2) Retirez le couvercle de la batterie et insérez la batterie de type AAA dans le compartiment
de la batterie.
(3) Remettrelecouvercledelabatterie.
38
Page 40

12. DÉPANNAGE
Problème Cause possible Solution
L’écran ACL n’affiche rien
lorsque l’appareil est
activé.
Aucun son n’est émis lors
de la lecture d’un fichier
musical ou vocal.
Le lecteur ne peut être
raccordé à l’ordinateur.
Le temps affiché change
constamment.
L’ordinateur présente une
erreur lors du branchement
Aucune pile ou pi le trop faible. Installez ou remplacez la pile.
Le volume est trop faible.
Il y a des problèmes avec
le fichier audio.
Le pilote n’est pas installé
ou est corrompu.
L’interface USB n’est pas
soutenue par la carte mère de
l’ordinateur.
Le débit binaire du fichier M P3
change durant la lecture.
Le lecteur est débranché
abruptement de l’ordinateur
39
effectuez la lecture d'autres
fichiers.
pilote pour Windows 98
remplacez la c arte mère de
l’ordinateur.
Tentez d’utiliser un débit
binaire fixe pour comprimer le
fichier MP3.
Ne débranchez pas le lecteur
de l’ordinateur lors du
Réglez le volume.
Supprimez le fichier ou
Installez ou réinstallez le
Mettez à niveau ou
Page 41

et débranchement du
lecteur.
La mémoire totale affichée
sur le lecteur ne
correspond pas à la
quantité indiquée.
Certains des fichiers MP3
ne peuvent être lus
adéquatement.
lors du transfert des fichiers. transfert de fichiers.
Une portion de la mémoire est
utilisée pour emmagasiner l es
programmes et afficher l es
caractères.
Le fichier MP3 est comprimé
par une norme telle MPEGI
couche 1 ou couche 2 que le
lecteur ne soutient pas.
1. Supprimez les fichiers MP3
non soutenus.
2. Utilisez la norme MPEGI
couche 3 pour comprimer
les fichiers MP3 non
soutenus.
40
Page 42

IMPORTANT!
Veuillez lire attentivement ce qui suit :
1. Les pilotes d’installation sur le CD ne fonctionnent que pour Win98.Normalement, vous n'avez
pas besoin d’installer les pilotes si votre ordinateur est équipé de W indows 2000 SP3 ou
supérieure. Si votre ordinateur ne reconnaît pas votre lecteur, installez les pilotes inclus.
2. Si les problèmes persistent, installez le pilote et installez ensui te la mise à jour du micrologiciel.
3. Voici quelques exemples de problèmes de l ogiciel que vous pourriez rencontrer :
a) Si par mégarde, un micrologiciel pour un lecteur différent est installé :
b) Si vous débranchez l e lecteur en transférant des données (copier, coller, etc.)
4. En présence d’un problème d’origine inconnue, commencez par réinstaller les pilotes (si
nécessaire) et lancer la mise à jour du micrologiciel.
5. Lorsque vous mettez le lecteur sous tension et qu'il s'éteint automatiquement, vérifiez que
l'option de coupure automatique n’est pas sélectionnée ou que les piles n’ont pas besoin d’être
remplacées.
6. Veuillez noter que lorsque les piles sont extrêmement faibles, l es données (chansons) peuvent
être incorrectement sauvegardées.
41
Page 43

13. SPÉCIFICATIONS
Spécifications Paramètres
Format musique MP3, WMA, WAV
Débit binaire 8 Kbps ~ 320 Kbps
Bande de fréquence 20Hz – 20KHz
Rapport signal/bruit >= 86 dB
Séparation des canaux >= 40 dB
Réponse en fréquence >= 3 dB (20HZ ~20KHZ)
Sortie du casque d’écoute L 4mW, R 4mW
Modes d'égalisation Normal, Rock, Pop, Classique, Soft, Jazz et Bass
Écran d’affichage 132 X 32 pi xel (black and white color)
Types de port USB 2.0 - Compatibilité avec USB 1.1
Média mémoire FLASH
Capacité mémoire 128 MB - 4 GB
Courant de sortie < = 80 mA
Courant de coupure < = 500 Ua
Remark: Specifications and appearance are subject to change and improvemen t without
further notice.
42
Page 44

14.Protection de I'ouîe
43
Page 45

15. PRÉCAUTIONS
Si vous ne prévoyez pas d’utiliser le lecteur pendant une période prolongée, retirez les piles
pour éviter qu’elles ne fuient et endommagent l’appareil.
N’utilisez pas le lecteur dans un environnement extrêmement chaud, froid, poussiéreux ou
humide.
Évitez d’échapper ou de cogner l’appareil. Il pourrait en résulter des dommages physiques
externes et internes au lecteur.
Remplacez les piles si :
a. L’indicateur de niveau de charge indique (Une pile morte)
b. Le lecteur se met hors tension automatiquement même après l’avoir remis sous
tension.
c. Avec la touche de verrouillage déverrouillée et les piles installées, le lecteur ne répond
pas lorsque les touches sont enfoncées.
Pour prévenir les dommages dus à la statique, n’uti lisez pas le lecteur lorsque l’air
environnant est extrêmement sec.
Lors du formatage du lecteur ou du transfert d'un fichier, veillez à ne pas interrompre la
connexion. Autrement, les données pourraient être corrompues ou perdues.
Lorsque le lecteur est uti lisé comme disque dur portable, veillez à l’utiliser tel que spécifié
44
Page 46

L’information se trouvant à l’intérieur de ce guide était exacte et complète lorsqu'il a été imprimé.
Cependant, certaines modifications peuvent subvenir en tout temps, sans préavis.
45
 Loading...