


P9
P9
P13
P17

1

2

#
*
/
3

0~9
TV/RADIO
*
/
#
PAGE+,PAGE-
FIND
AUDIO
SUB
TXT
L
R
OK
PIP
REC
TV
3D
APPs
4

5

IN
SCART
TV
6
IN
HDMI
TV
7
R L
SPDIF

8

9

10

11

12

13

14

15

16
17
18
19

Contents
Contents
GENERAL INFORMATION
Main Features
For your Safety
Unpacking
General Operation
RCU
INSTALLATION
MAIN MENU
1. Media
2. Games
3. Live TV
4. Apps
5. Surfs
TROUBLE SHOOTING
SPECIFICATION
P1
P1
P2
P3
P3
P4
P6
P8
P8
P9
P9
P16
P17
P18
P19

GENERAL INFORMATION
GENERAL INFORMATION
This Receiver will take you to the new and exciting world. A world of crystal clear wide
screen pictures, digital sound, more information and new services.
To make full use of your new receiver please take the time to familiarize yourself with the
extensive features of the unit detailed in this User Guide.
If you need help in setting up please call your dealer or a customer service adviser.
Main Features
Operating System android/linux
Web Browser Webkit based Android full browser
Application Browser, Media Player, Picture browser, Game, Setting, FileManager,
Youtube, Twitter, Facebook and more
Upgrade Firmware upgrade by network,USB disk
MPEG HD MPEG-2/4(H.264)
Channels Number 20000 channels TV and Radio programmable
Channel Edit Various channel editing functions(favorite, moving, locking,renaming,
deleting and sorting)
OSD Language Multi Language
EPG Fully support to 7 days Electronic Program Guide(EPG)
OSD 3D Graphical User Interface(Support OpenGL ES2.0)
Net Search Support Record Timeshift and Player
DiSEqC DiSEqC 1.0/1.1/1.2/1.3 fully support, 13/18V, 0/22K
PVR Support Record Timeshift and Player
Parental control Parental control for channels
Teletext Teletext support DVB ETS300472 by OSD
Subtitle Subtitle support DVB EN300743 and EBU
USB Disk Support FAT16/FAT32/FAT12 NTFS
HDMI Interface 480i/p, 576i/p, 720p, 1080i 1080p with HDCP copy protection
Container MP4, AVI, MKV, FLV, MPEG TS
Video Codec H.264(MPEG4-AVC, VC-1), MPEG2, DviX3,Xvid
Audio Codec MP3, AAC, OGG, MPEG, MPEG Audio, Dolby digital
Image JPEG, PNG, BMP,GIF
DLNA DLNA 1.5 compliant
Application Market Easy download and installation of applications
IOS, android
Smart Phone RCU
App
1
GENERAL INFORMATION
GENERAL INFORMATION
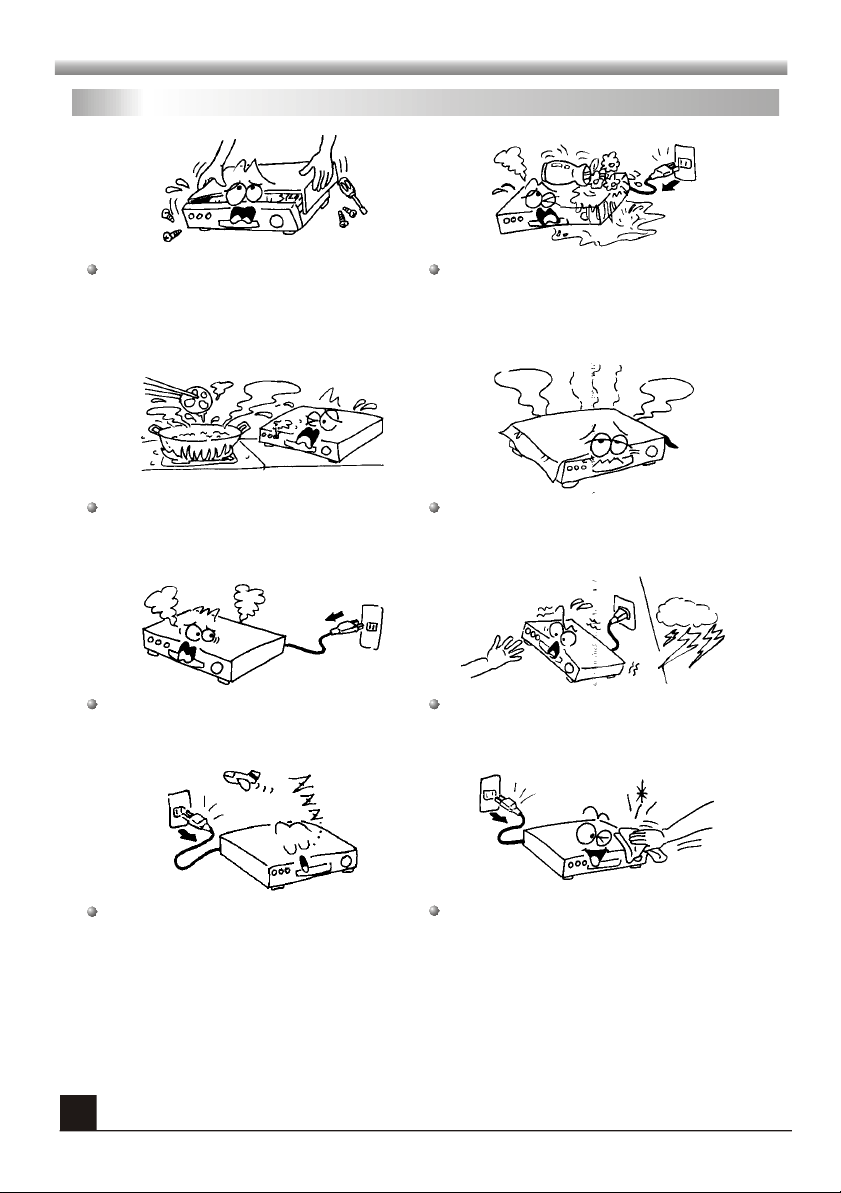
For Your Safety
To avoid electric-shock hazards, do not
open the cabinet, refer servicing to qualified
personnel only.
Do not expose the receiver under the
sunlight. And keep it away from the heat
source.
When the abnormal phenomenon occurs,
you should cut off the power immediately.
Keep the receiver away from flower vases,
tubs, sinks, etc., in order to avoid damaging
the equipment.
Do not block ventilation holes of the
Receiver so that air can circulate freely.
Do not touch receiver during thundering in
case of being electric shocked.
Switch the receiver off whenever it remains
out of service for an extended period.
2
Be sure to turn the Receiver off and
disconnect the AC power cord before
cleaning the Receiver surface. If the
surface is dirty, wipe clean with a cloth
which has been dipped in a weak soap-andwater solution and wrung out thoroughly,
and then wipe again with a dry cloth.

GENERAL INFORMATION
GENERAL INFORMATION
Unpacking(optional)
#
*
/
Remote Control
Batteries
User’s manual
General Operation
Throughout this manual you will notice that the daily operation of the receiver is based on a
series of user friendly on screen display and menus. These menus will guide you through
installation, channel organizing, viewing and many other functions.
All functions can be carried out using the buttons on the RCU, and some of the functions can
also be carried out using the buttons on the front panel.
The receiver is easy to use, always at your command and adaptable for future advances.
Please be aware that new software may change the functionality of the receiver.
Should you experience any difficulties with the operation of your receiver, please
consult the relevant section of this manual, including the Problem Shooting, or
alternatively call your dealer or a customer service adviser.
3

GENERAL INFORMATION
GENERAL INFORMATION
RCU
Key
Standby On/Off
When watching a channel, mute the sound
0~9
TV/RADIO
*
/
#
PAGE+,PAGE-
FIND
AUDIO
SUB
TXT
OK
PIP
REC
TV
3D
APPs
Enter number of the required menu item or
select a channel number to watch
Switches between TV and Radio mode
Return to the previous menu on the menu
screen or escape from the menu
Enter main menu
When watching a channel, change channels or
move to the next higher or lower item in the menu
When watching a channel, adjust the volume or
move to the left or right item in the menu
Back to main menu
Press to pop up the function list
Adjust the volume
Moves up / down a page in the list
Display the Find window
Choose Audio mode
Switch to subtitle mode
Switch to teletext mode
L
Display the Audio window.
R
Executes the selected item in the menu screen
or enters the desired value in any input mode
Delete
Start PIP in watching mode
Record the program
Play or pause
Stop
Press to fast forward or fast backward
Shortcut key for return to DVB watching mode from
anywhere
3D shortcut key
Start Tivibu application
Shortcut key of task manager
Function
4
The picture is only for reference, please make the object as the standard.

GENERAL INFORMATION
GENERAL INFORMATION
Remote Control Operating Instruction
1. Set top box control section: press the key, the RCU will send out the default remote codes.
2. TV section search functions:
a) Press both keys VOL+ and VOL- at the same time, after 3 seconds, it can enter
into the TV search status.
b) Press the VOL+ key send out 3 group of code values and go forward to search. While
the TV appears "volume" symbol, please loosen the key. Press the VOL- key and go
afterward to search.
3.STB manufacturer has tried including most popular more than 130 LED, LCD, Plasma and
CRT TV's remote controller codes. Due to the limitation it is not possible to include whole
models. Function is restricted by On/Off, Volume +/- and Source TV functions. STB
manufacturer will not be responsible for missing some TV model codes, excluding other TV
function keys, end user code teaching performance or ability. This feature has been added to
STB Remote controller as an added value and preventing the necessity of keeping the TV
RCU at near while watching TV with Next brand STB source.
5

INSTALLATION
INSTALLATION
Rear Panel
LNB IN: CONNECT TO SATELLITE ANTENNA
LNB OUT: CONNECT TO THE OTHER RECEIVER
WIFI EQUIPMENT
CONNECT TO
INTERNET
CONNECT TO USB DEVICE
CONNECT TO TV SET HDMI INPUT
DIGITAL AUDIO OUTPUT, CONNECTS VIA COAX CABLE TO AN AUDIO DECODER
DIGITAL AUDIO OUTPUT, CONNECTS VIA OPTICAL CABLE TO AN AUDIO DECODER
CONNECT TO A PC
FOR S/W UPGRADE
CONNECT TO TV
USING A SCART CABLE
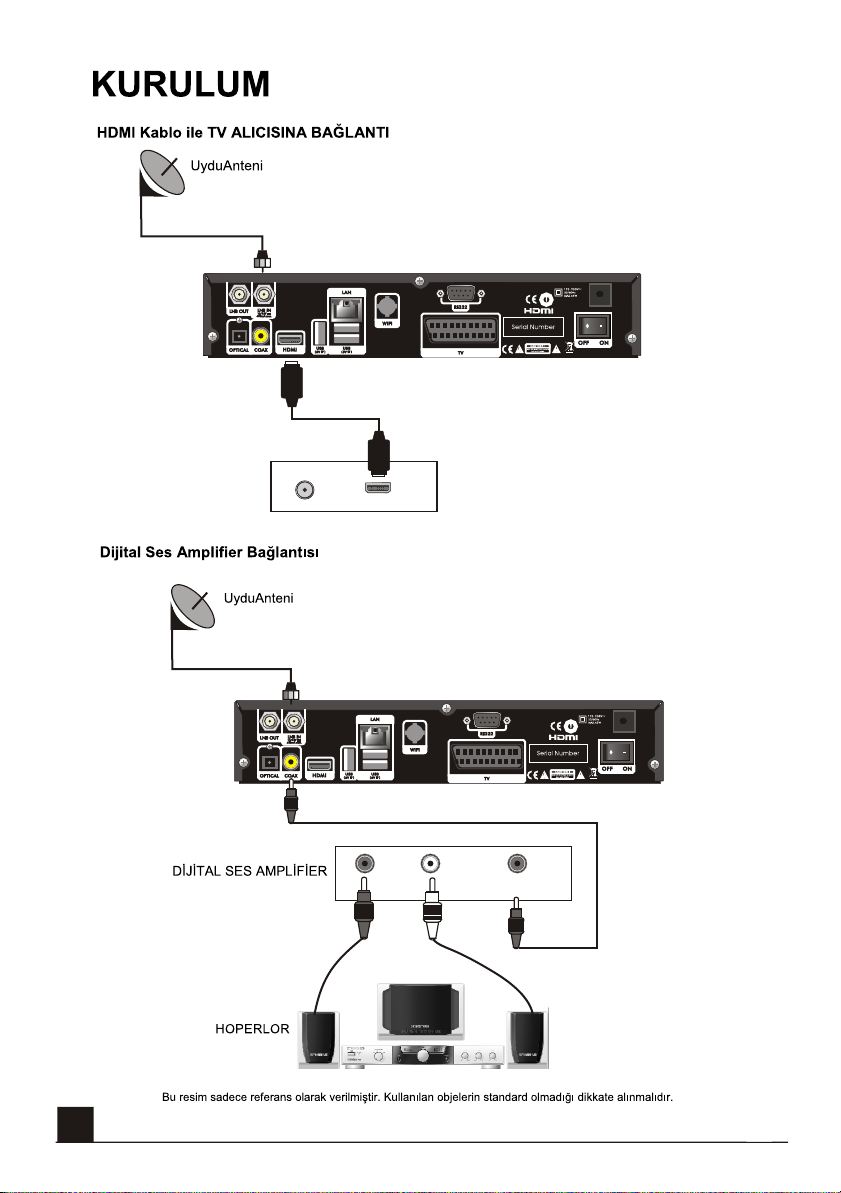
Connecting to TV using SCART support
Satellite
Dish
POWER ON/OFF
6
IN
TV
SCART
The picture is only for reference, please make the object as the standard.

INSTALLATION
INSTALLATION
Connecting to TV using HDMI support
Satellite
Dish
IN
HDMI
Connecting to Digital Amplifier
Satellite
Dish
TV
DIGITAL AUDIO
CONVERTOR OR
AMPLIFIER
SPEAKER
The picture is only for reference, please make the object as the standard.
R L
SPDIF
7

MAIN MENU
MAIN MENU
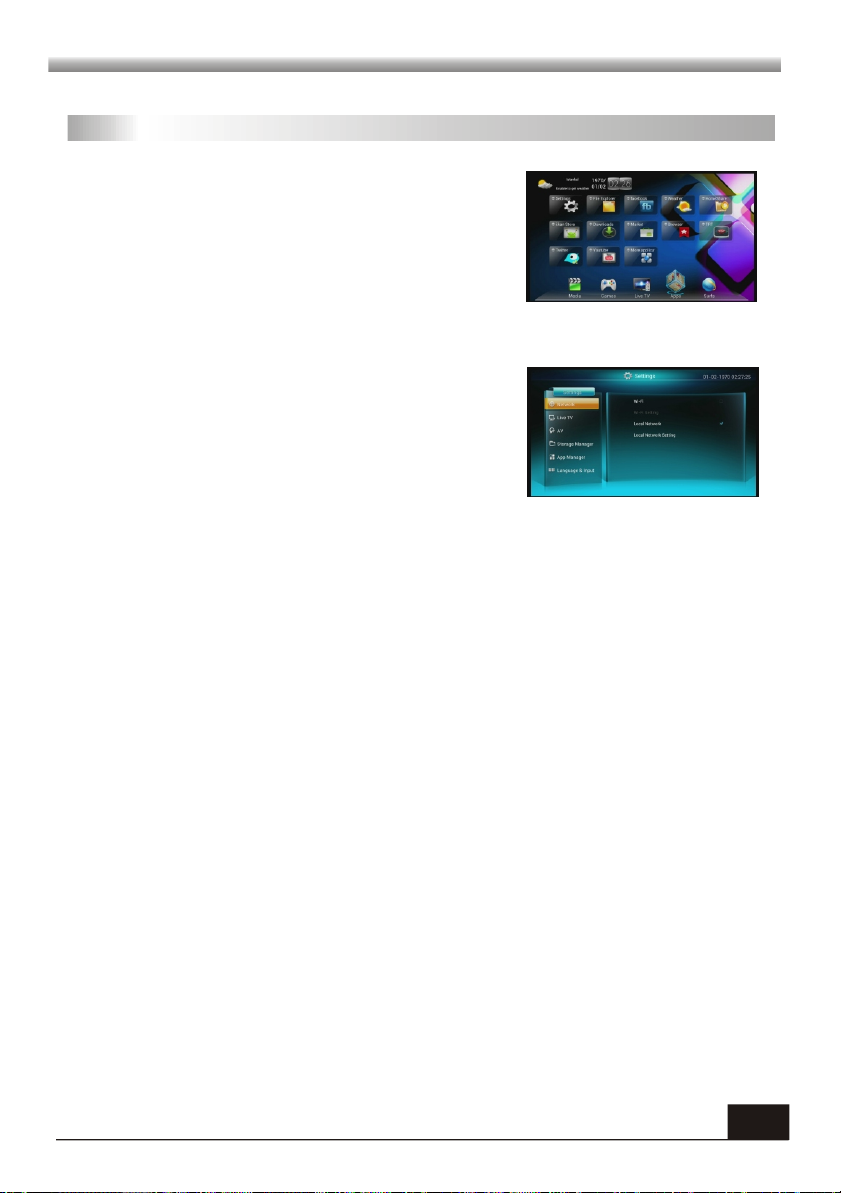
Main Menu.
In main menu you can know the city, weather, date and time on left side.
Main menu consists of 5 major sub-menus as follow:
- Media
- Games
- Live TV
- Apps
- Surfs
You can use to select menu, and use keys to select the sub menu, while using OK
key to enter or key to previous menu.
1. Media
This menu consists of 3 major sub-menus as follows
- Picture
- Music
- Video
1.1 Picture
Before entering this menu, please make sure the Internet is connected. If you don't connect
the Internet please make sure USB storage device is in plugin status.
The home share and flickr contents are provided by the
Network. The local contents are owned by the end user
in USB or hard drive.
Press keys to select the pictures and press OK to
view it in full screen mode, press key to quit.
Press key to pop up a function list, this function list
contents setting and music item. In setting list you can
slides mode and slide anim.
In music list you can play and pause music, select
previous and next music.
8

MAIN MENU
MAIN MENU
1.2 Music
In Music menu, select the music and press OK key to
play.
Press key to pop up a drop list. In this drop list
press keys to select the function keys, you can
add favorite music, delete the music, select the
previous or next music, play and pause, change the
repeat mode and so on.
The Net contents are provided by the operator's partner (content provider). The local contents
are owned by the end user in USB or hard drive.
1.3 Video
In this menu you can see local videos. Press keys
to select among My Videos, Latest Played and My
Favorite sub menu, Select the video and press OK key
to play, press NAVI key to pop up drop list, the
operation is the same as 1.3 Music. Press keys to
switch between local and home share item.
Video in this menu is in your USB/Hard Drive. The video contents are stored in the
USB/Hard Drive owned by the end user.
2. Games
System provide one game in this menu, select the game you and press OK key to play.
3. Live TV
Once you have properly installed and connected the
cables of receiver, you will be able to start enjoying the
various programs and features.
In this menu you can watch TV program, listen to the
radio program and edit program.
If the receiver is in Factory mode or no channel installed, system will lead you to 'Search
Programs' for your first enter into 'Program' sub-menu.
9

MAIN MENU
MAIN MENU
3.1 Program Search
1. Press keys to select the satellite up or down.
Press OK key to select and mark, and you can press
OK key again to cancel the selection and the mark.
2. Press red color key to Add TP.
Use numeric keys to input the frequency and
symbol.
3. Press green colour key to Edit. the same
operation as the above Edit Satellite, here we don't
explain any more.
4. Press yellow key to scan.
5. Press key to delete.
6. Press blue key to Antenna Setting window.
1. Satellite: All selected satellites in the satellite list
are displayed in this item.
Press keys to select the satellite in circle. Or
press OK key to pop up the drop-down list, then
select the desired satellite in the list and press OK
key to confirm.
2. LNB Power: Select between On and Off.
3. LNB Type: Select among standard, universal and WIDE-C.
4. LNB Freq, Transponder, DiSEqC1.0, DiSEqC1.1: The same operation as
satellite.
Press yellow key to scan
Press blue key to enter Motor Setting window
Motor Setting
Satellite: Press keys to select the satellite
in circle. Or press OK key to pop up the drop-down
list, then select the desired satellite in the list and
press OK key to confirm.
Transponder: The same operation as the above.
10
MAIN MENU
MAIN MENU
Position No., & Save: The range is from 0 to 63. "0" delegates the original position.
Position No., & Save: The range is from 0 to 63. "0" delegates the original position.
You can select the proper value when you has rotated the antenna.
You can select the proper value when you has rotated the antenna.
Go to X: Press OK key to pop up the drop-down list, select the proper position
Go to X: Press OK key to pop up the drop-down list, select the proper position
(reference or from 1to 63) to realize the selected position.
(reference or from 1to 63) to realize the selected position.
West <Save> East: Press key to turn west, while press key to turn east.
West <Save> East: Press key to turn west, while press key to turn east.
Press OK key to pop up the dialogue "Are you sure to change this satellite's
Press OK key to pop up the dialogue "Are you sure to change this satellite's
position?". Press OK key at the Yes button to save the current position, or press OK
position?". Press OK key at the Yes button to save the current position, or press OK
key at the No button to cancel the operation.
key at the No button to cancel the operation.
Recalculation: Press OK key to pop up the dialogue "Are you sure to change this
Recalculation: Press OK key to pop up the dialogue "Are you sure to change this
satellite's position?". Press OK key at the Yes button to recalculation.
satellite's position?". Press OK key at the Yes button to recalculation.
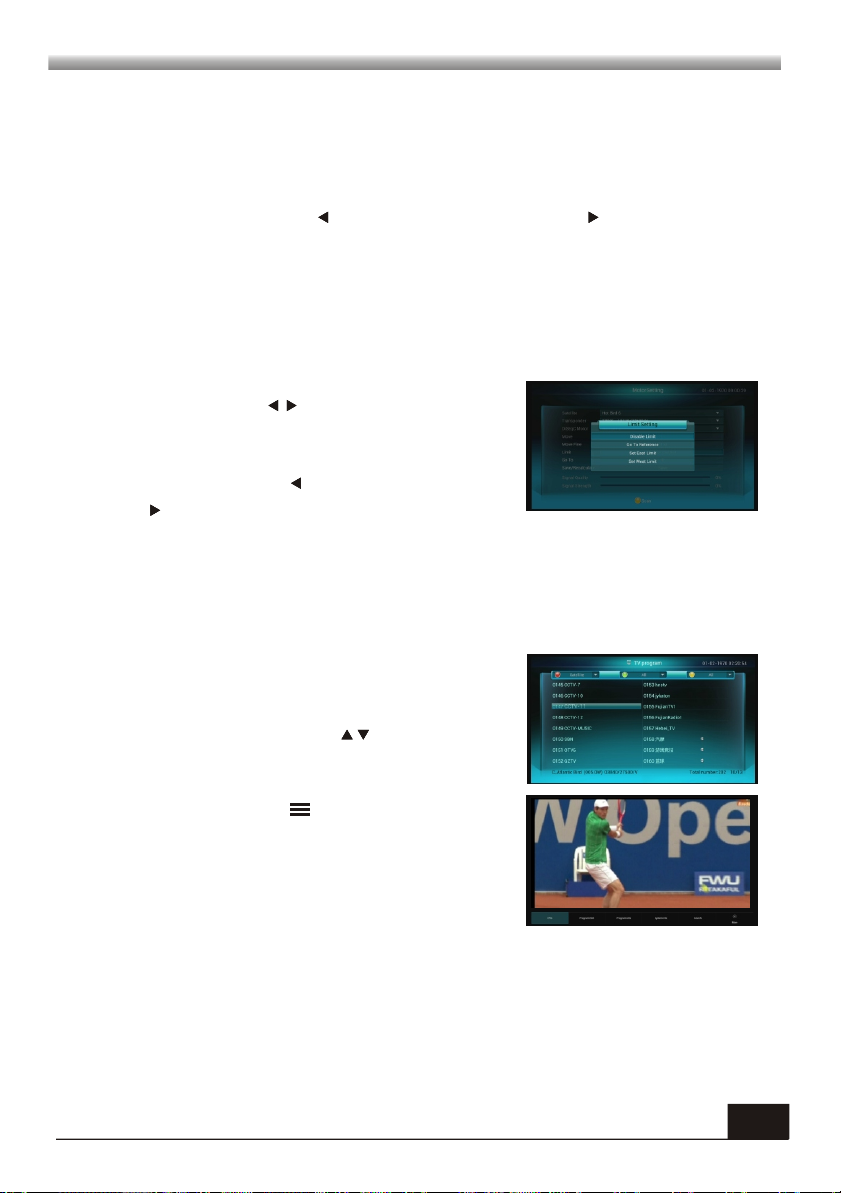
5. Limit : Press OK key to pop up the Limit window.
5. Limit : Press OK key to pop up the Limit window.
Limit Setup: Press keys to switch among
Limit Setup: Press keys to switch among
Disable Limit, East Limit and West Limit.
Disable Limit, East Limit and West Limit.
Limit Setup: Move cursor to the Limit Setup
Limit Setup: Move cursor to the Limit Setup
button. You can press key to turn west , or
button. You can press key to turn west , or
press key to turn east.
press key to turn east.
Go to Reference: Press OK key to go to reference.
Go to Reference: Press OK key to go to reference.
If you select Disable Limit in the above Limit Setup
If you select Disable Limit in the above Limit Setup
item, this button will turn grey.
item, this button will turn grey.
3.2 Program Watching
3.2 Program Watching
Select program item and press OK key to enter into full
Select program item and press OK key to enter into full
screen watching mode, in this mode press OK key to
screen watching mode, in this mode press OK key to
pop up TV program list, Press keys to select
pop up TV program list, Press keys to select
program.
program.
In full screen mode, press key to pop up drop list as
In full screen mode, press key to pop up drop list as
besides. You can select among EPG, Program Edit,
besides. You can select among EPG, Program Edit,
Program info, System info, Search and More.
Program info, System info, Search and More.
11
MAIN MENU
MAIN MENU
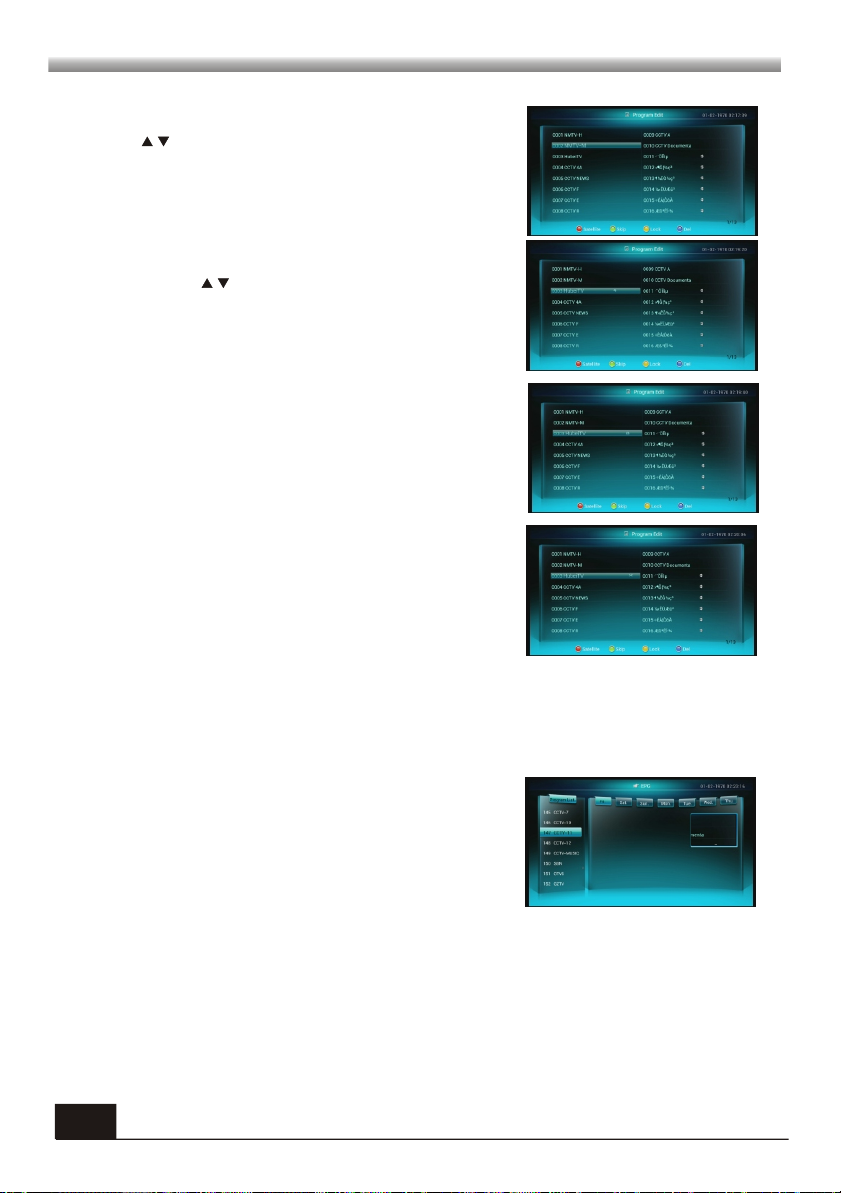
3.3 Program Edit
Press key to select the program you want to edit,
and then press color key to edit program.
Press RED key to pop up delete channels by satellite
window.
Press GREEN key to add the program with the skip
mark. Press keys to move the cursor to the
position where you want to locate and press OK key to
confirm. Press GREEN key again to remove the mark.
If you want to lock or unlock a channel, this also can be
done from this Program Edit window by using YELLOW
key. The locked channel will be marked with a lock icon.
Select the program you want to delete and press BLUE
key to mark the program with a delete icon, press
BLUE key again to remove the delete cion.
3.3 Radio Program
Same operation as TV Program.
3.4 EPG
The receiver provides EPG function for you to get
access to the TV Guide(or Radio Guide if you are
listening to radio channels) which will show the titles
and other information of the current and next programs
on different channels.
The information is only available from the network to which the channel you are watching
belongs. You can see the channel in the PIG screen, program list in the left side and Program
schedule for selected channel will be displayed in the right side.
12
MAIN MENU
MAIN MENU
4. Apps
In Apps we provide many Apps such as Browser,
Weather, Youtube, Twitter, Facebook, Market,
Downloads, Setting and so on. You can download apps,
install and uninstall apps in this menu.
Here we take System and Home Share menu to explain.
4.1 Settings
This menu consists of 12 major sub-menus as follows
- Network
- Live TV
- AV
- Power
- Storage Manager
- App Manager
- Language & input
- Date & Time
- Power
- Net Sharing
- Factory Data Reset
- System Upgrade
- About
4.1.1 Network
You can Set network through wifi, wifi settings, Local network, Local network settings.
4.1.2 Live TV
This menu consists of Program Search, Program Edit, Book Manager, CA setting, Change
channel Type, Record Manager, Password, Auto Update Program Name, Recovery
Database.
a) Program search
Please refer to 3.1 Program searching.
b) Program Edit
Please refer to 3.3 Program Edit.
13

MAIN MENU
MAIN MENU
c) Booking manager
You can manage the program you have booked in this
window. If you don't book any program this list is
empty.
d) Record Manager
1. Timeshift switch: Select Off or On.
2. Timeshift setup : Press OK key to timeshift setup
window, press number to input the record time.
3. Start timeshift play: Select between live and pause.
4. Storage device select: if you have several USB
devices in plugged, you can select the device in this itme.
e) LNB Power
Select between On and Off.
f) Change Channel Type
Select among Freeze, Black and Fade in-out.
g) Password
Firstly press numeric key (0-9) to input the initial
password. The default password is 0000. After that you
can edit program lock, STB lock, Menu lock and
parental control. You can also modify password in this
window, press numeric key(0-9) to input the new
password and input the password again to confirm.
h) Auto Update Program Name
Select between On and Off.
i) Recovery Database
Press OK to pop up a massage:" Are you sure to
recovery program data?" Select OK to recovery data,
select cancel to quit.
14
MAIN MENU
MAIN MENU
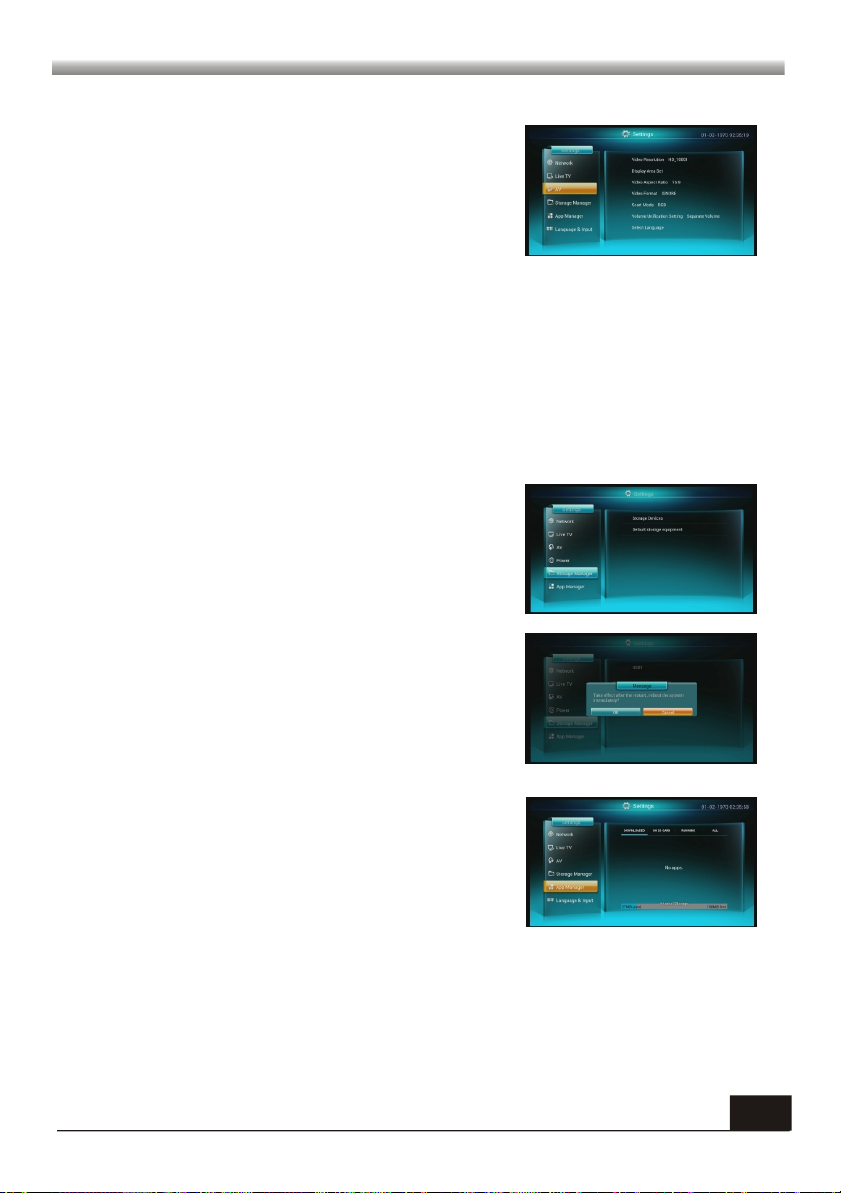
4.1.3 AV
This menu consists of video resolution, video aspect
ratio, adaptive mode, audio mode, scart mode, volume
unification setting and press sounds.
Video Resolution: Select among Auto, PAL, NTSC,
HD_720P, HD_1080I and HD_1080P.
Video Aspect Ratio: Select among Auto, 16:9 and 4:3.
Video Format: Select among PAN_SCAN, LETTER BOX, COMBINED and IGNORE.
Scart Mode: Select between RGB and CVBS.
Volume unification setting: Select between unified volume and separate volume.
Select Language: Press OK key to pop up select language window, you can select OSD
language, audio language, Teletext language and Subtitle language.
Press Sound: Select sound or mute.
4.1.4 Storage Manager
Storage devices: You can know the detail information
of USB device and you can unmount equipment in this
menu.
Default storage equipment: Press OK key to pop up a
dialogue:" Take effect after the restart, reboot the
system immediately?" Select OK to confirm select
cancel to quit.
4.1.5 App manager
You can manage the apps in the receiver in this menu.
you can know all apps, running apps, apps on SD card
and apps downloaded.
15

MAIN MENU
MAIN MENU
4.1.6 Language & input
Select language: Select between Chinese and English.
Keyboard and input methods: Select among default,
android keyboard and Google Pinyin input method.
4.1.7 Date & Time
Time source: Select between TDT Time and NTP time.
Choose Timezone: Press key to select timezone.
Date and Time: Show date and time.
4.1.8 Power
Standby Mode: Select between False and true.
Auto Standby: Select among close , 1 hour, 2 hours and
3 hours.
Auto Startup, Auto Shut down: Select between On and
Off.
Start Up Time, Shut Down Time: If Auto startup item is
not added mark the Auto startup time item will turned
gray, you cannot edit it. When Auto startup is added the
mark you can press numeric key to input the auto startup
time. Shut down time is same as Start Up Time.
Plusing LED: Select among always dark, always bright
and twinkle.
4.1.9 Net sharing
You can sharing your files in internet through Net
sharing menu, In this menu you can open/close net
sharing, use password for protection, select network
group.
4.1.10 Factory Data Reset
Select Reset STB button and press OK key to reset the
data.
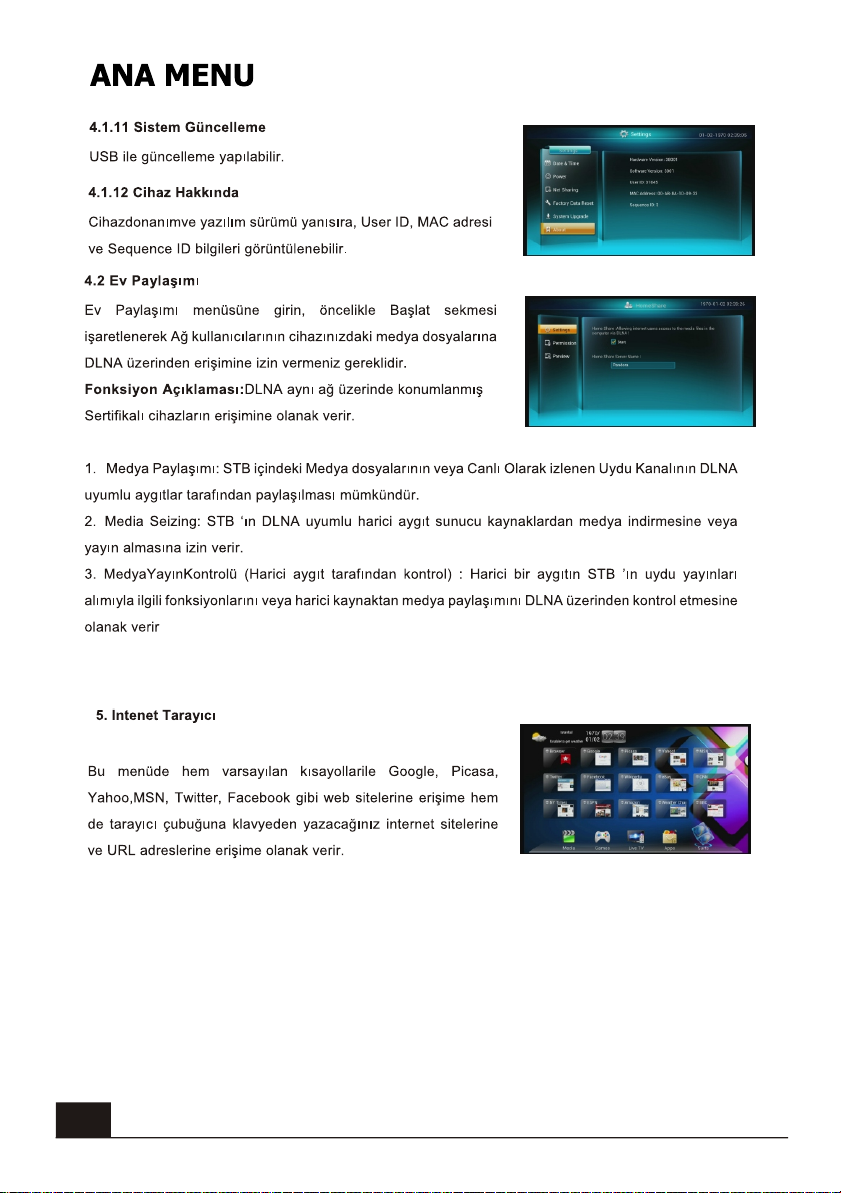
4.1.11 System upgrade
you can upgrade through USB device.
16

MAIN MENU
MAIN MENU
4.1.12 About
In this menu you can know hardware version, software
version, User ID, MAC address and Sequence ID.
4.2 Home share
Enter Home share menu, to initiate Home Share
function with default setting, please enter Home menu
and make sure the Start option selected. It allows
internet users to access to the media files in the
computer via DLNA.
Function Description: DLNA enables these devices located in the same LAN to have
interactional capability.
1. Media Sharing: Allow Media documents in STB or Live stream to share with devices
which have embedded with DLNA.
2. Media Seizing: Allow STB to download or broadcast the resource from external Media
servers which have embedded with DLNA
3. Media Broadcast controlling(Controlled by External devices) : Allow external devices to
control STB's media broadcasting behavior under DLNA when STB is playing resource
shared from external devices.
5. Surfs
System provide so many web pages for you to browse
directly in this menu, such as Google, Picasa, Yahoo,
MSN, Twitter, Facebook and so on. You can also use
Browser to input certain address to browse the web you
like.
17

TROUBLE SHOOTING
TROUBLE SHOOTING
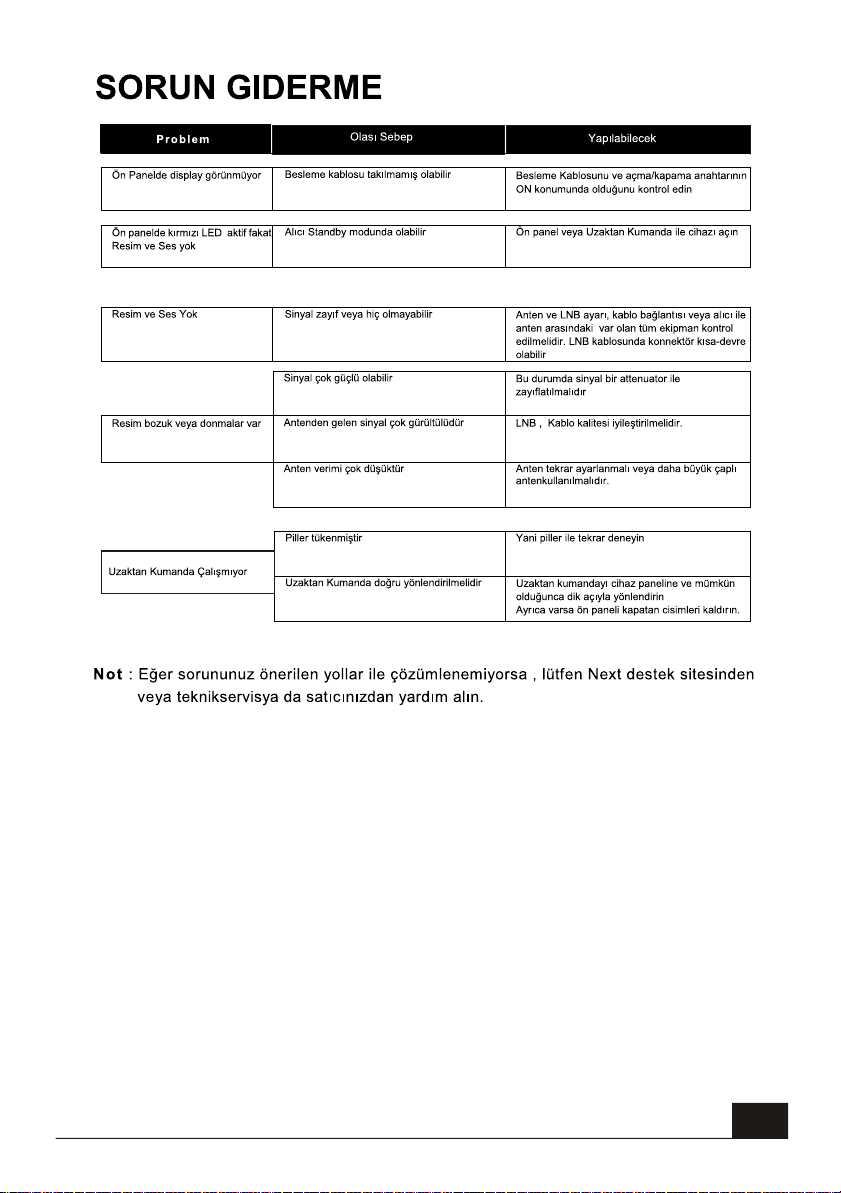
Problem Possible causes What to do
The display on the front
panel does not light up.
Main cable is not connected.
Check that the main cable is plugged into
the power socket.
No sound or picture, but the
front panel shows red light.
No sound or picture.
Bad picture / blocking
error.
The RCU is not working.
The is in standby mode.receiver
No signal or weak signal.
Signal is too strong.
Antenna noise factor too high.
The antenna is faulty. Change the antenna.
Battery exhausted.
RCU is incorrectly aimed.
Press the standby button.
Check the cable connections, antenna
and other equipment connected between
the antenna and the receiver.
Connect a signal attenuator to the
antenna input.
Change to an antenna with lower noise
factor.
Change the batteries.
Aim RCU at the , or check that
nothing blocks the front panel.
receiver
Note : If you failed to solve problems by all the recommended actions above, please contact
your dealer or a customer service adviser.
18

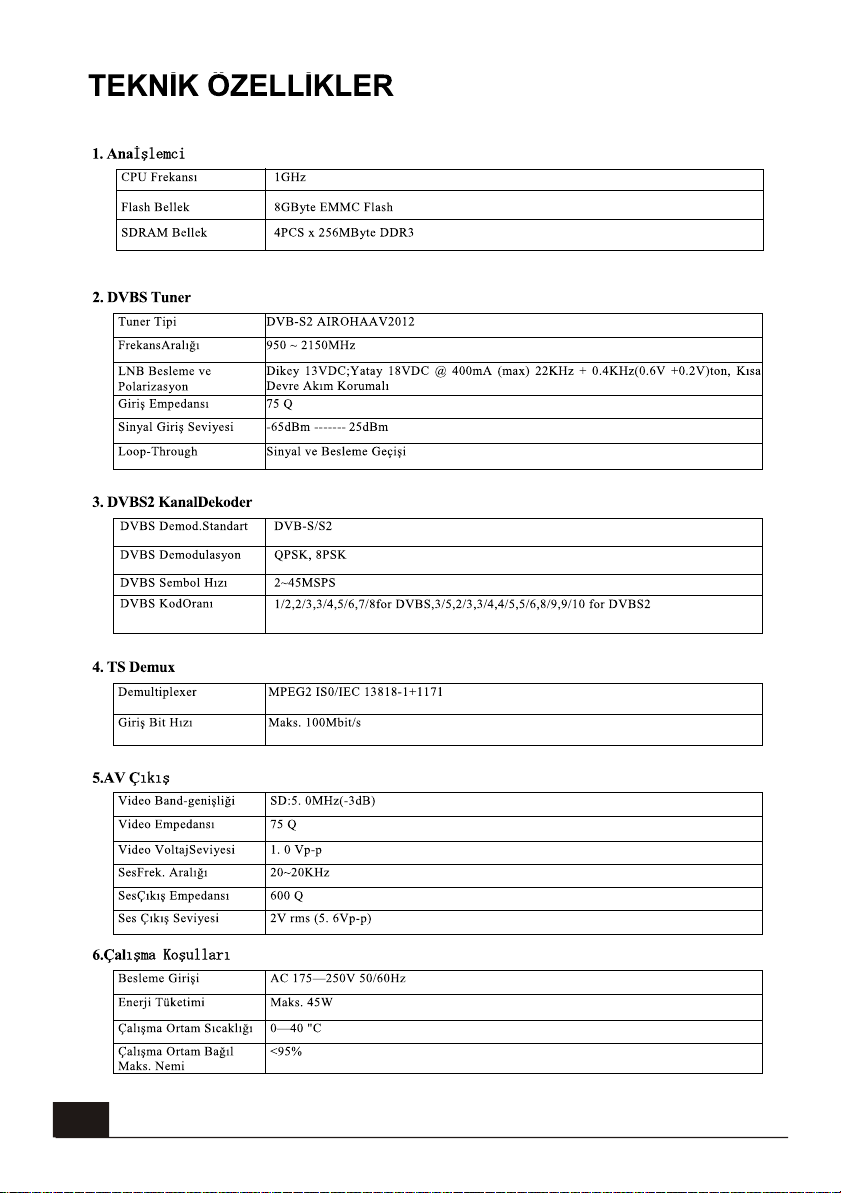
SPECIFICATION
SPECIFICATION
19
 Loading...