

Page 1
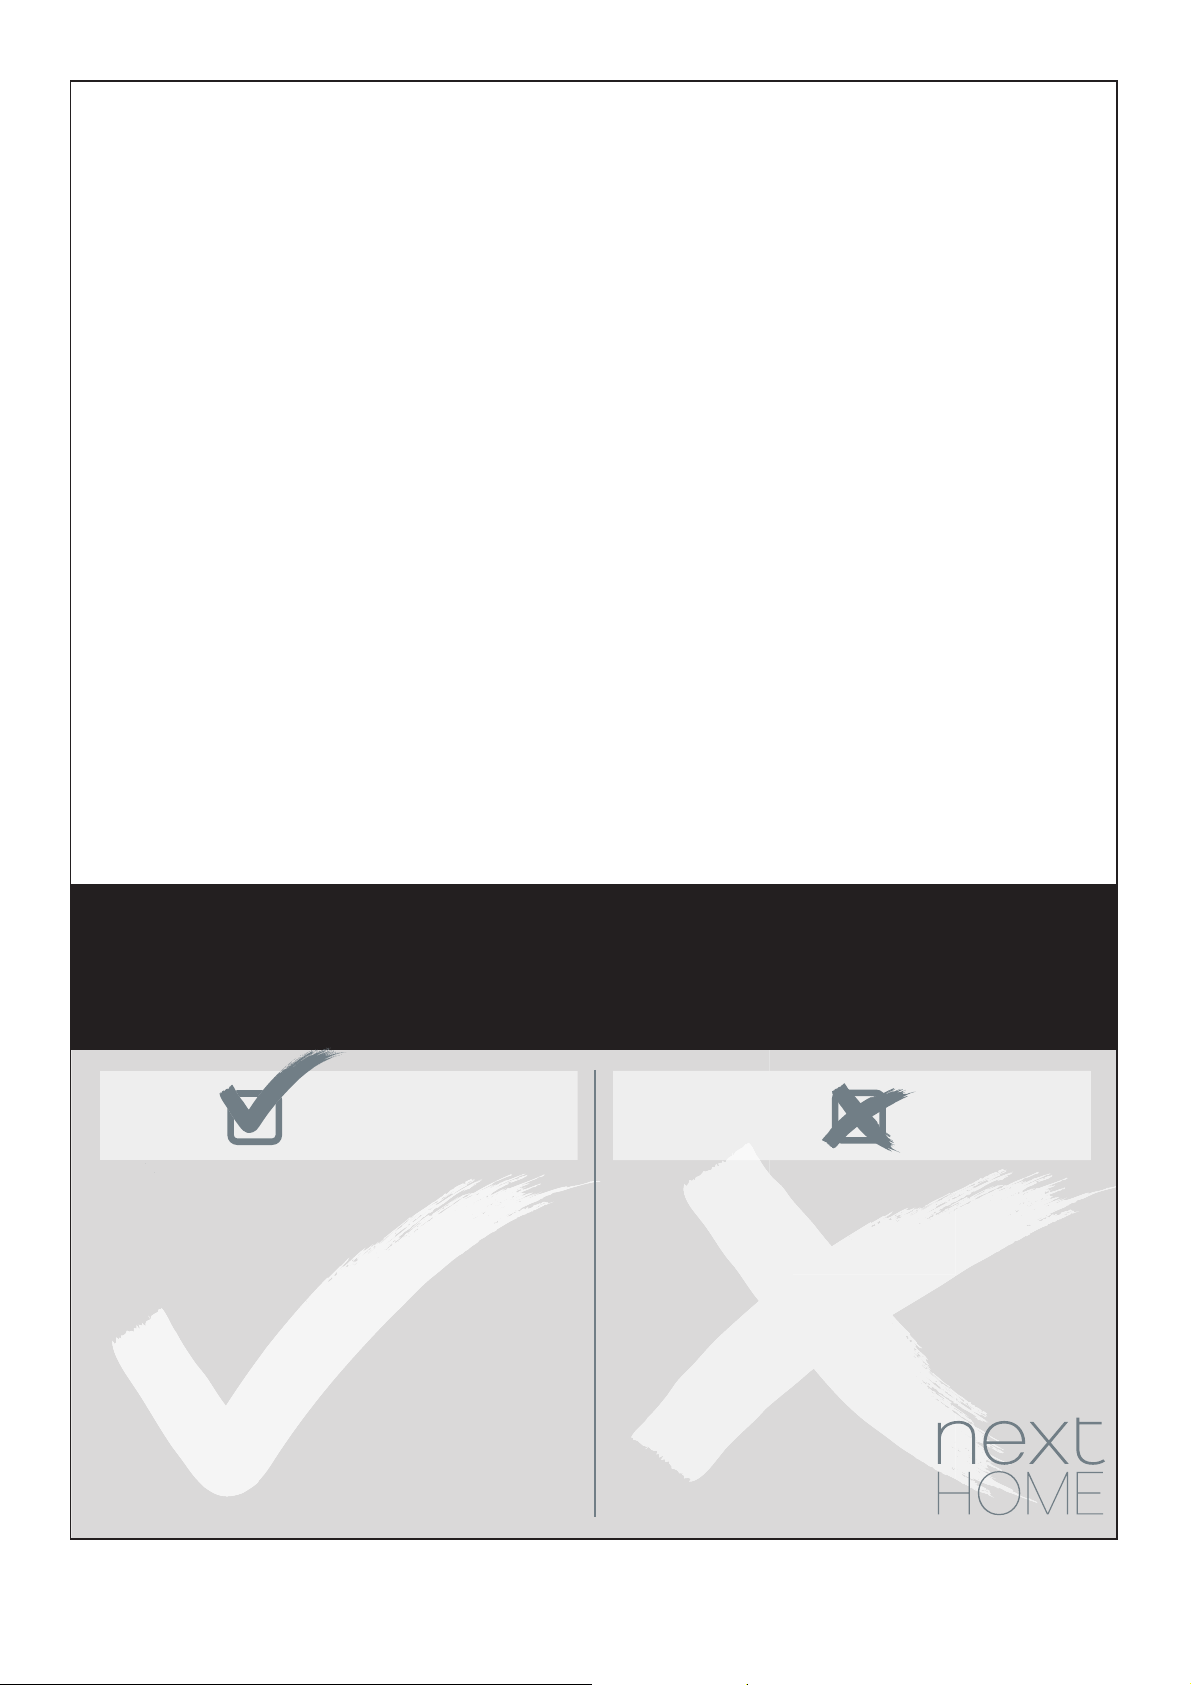
We’re conÎdent you’ll love your gorgeous new Next
furniture. However, it’s worth making absolutely certain
before you put it all together.
So, let’s quickly run through these three steps:
TIPS FOR RETURNS
Not completely happy with the product? No problem.
We just need everything back in the original packaging, so follow the steps below
and this will ensure a super-smooth returns process and no delay to your refund.
1. COLOUR
Make sure you’re happy with the colour
No need to unpack everything, just check the first component.
2. PROTECTIVE PACKAGING
If you’re happy, then it’s time to get opening! Start by laying everything out
on the protective packaging – this will prevent anything getting scratched.
3. PARTS PAGE
Finally, double check you have all the pieces by referencing
the parts page of the instructions.
t Check everything is there (the ‘parts page’
is a handy checklist).
t Pop all the loose fittings and fixtures into
the packaging provided or tie them up in a
plastic bag.
t Wrap all the big components back
up in the original protective packaging.
t Close up the box and seal it securely
(don’t be afraid to use plenty of tape).
DO DON’T
t Leave anything assembled -
all components should be dismantled
and separately packed.
t Put loose fixtures and fittings straight
into the box.
t Throw it back in the box carelessly –
as it may get damaged.
Then just give us a call on 0333 777 8999 and we’ll sort out a pick up time for you.
BEFORE YOU GET
STARTED...
Page 2

Page 3
Need Help?
With:
Assembly instructions
Missing or damaged parts
CALL: 0333 777 8999
IMPORTANT - RETAIN FOR FUTURE REFERENCE
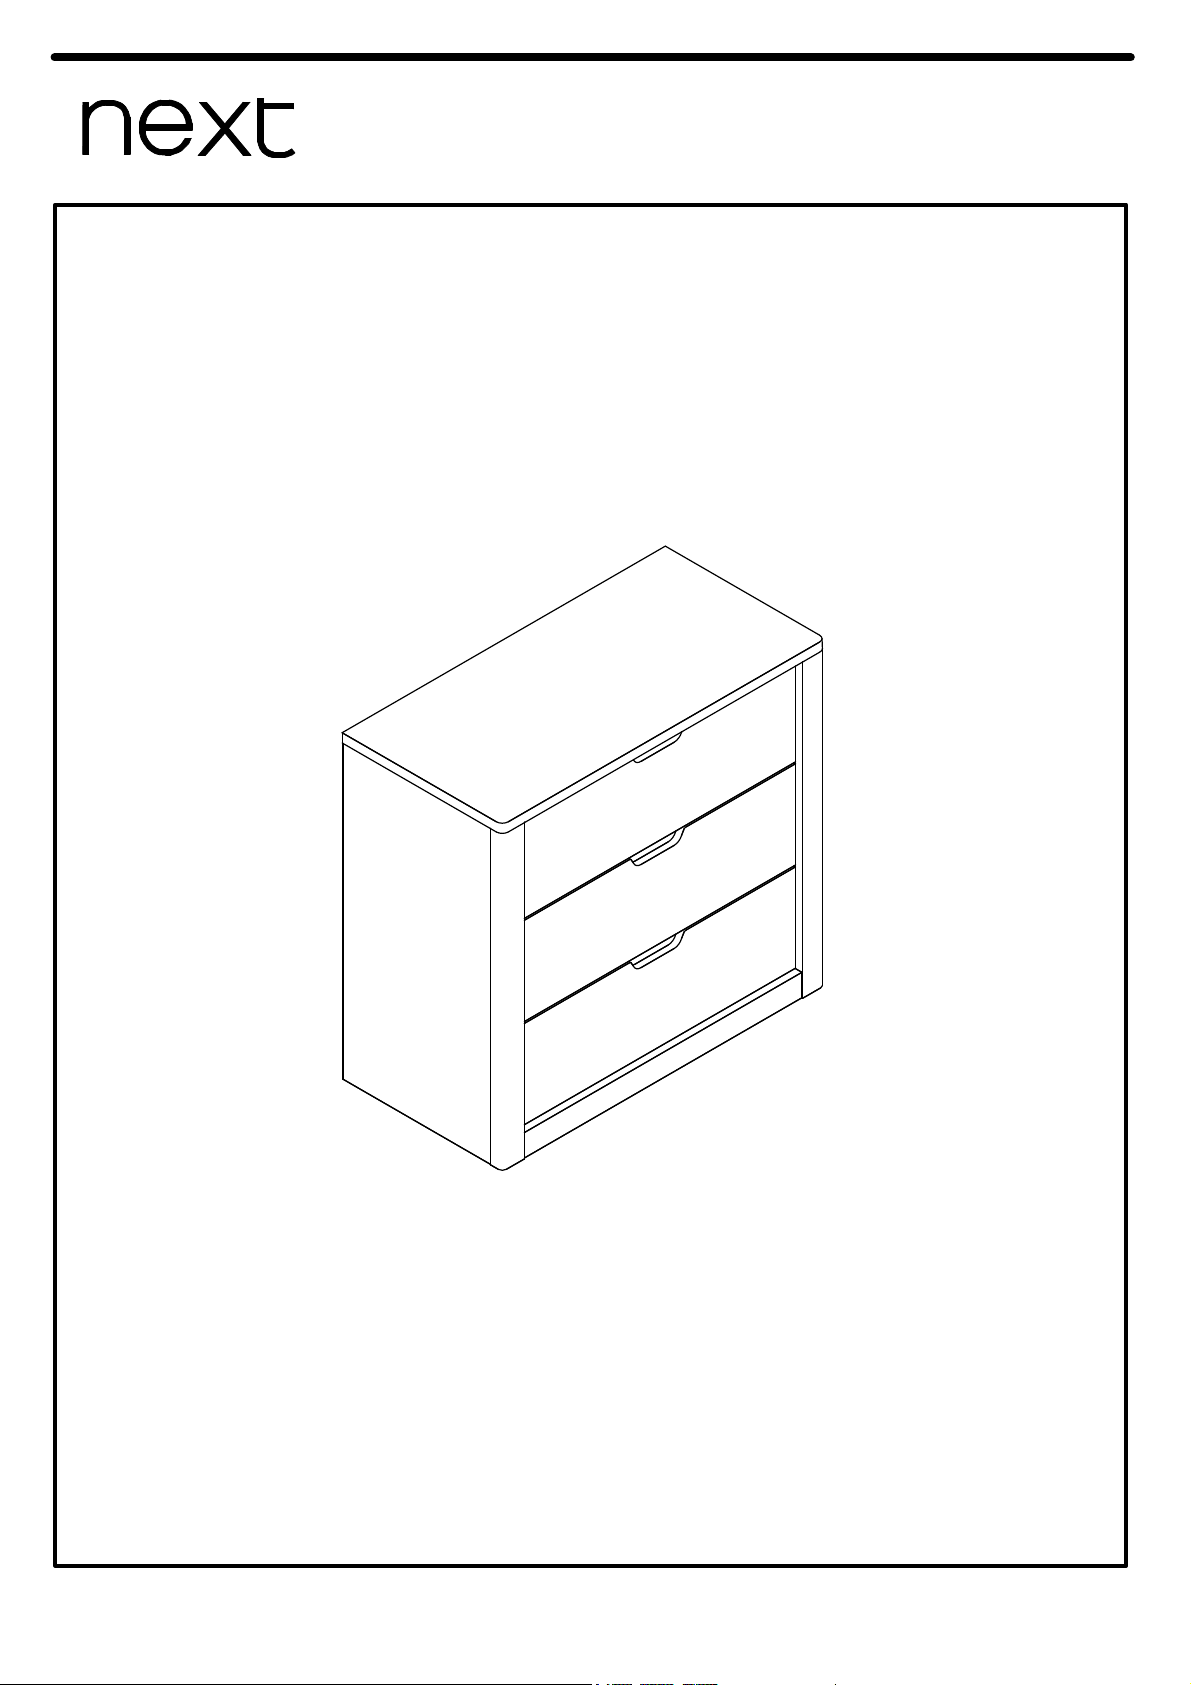
Actual product size
H76 x W81 x D40cm
COMPTON CHEST
Assembly instructions
Produced in Poland for Next Retail Ltd
122325
122325-2015-V1
Page 4
1
COMPTON CHEST
Assembly instructions
Produced in Poland for Next Retail Ltd
122325
122325-2015-V1
BEFORE YOU START
Don’ts
Do not drag or pull your furniture.
Do not use silicone based furniture polish. Silicone in furniture
polishes can break down the finish.
Never allow any kind of liquid to remain on your furniture.
Absorption can cause wood to warp or finishes to de-laminate.
Do not place hot items (e.g. hot drinks) directly on to the wood
surface. Please make sure you use a placement or coaster
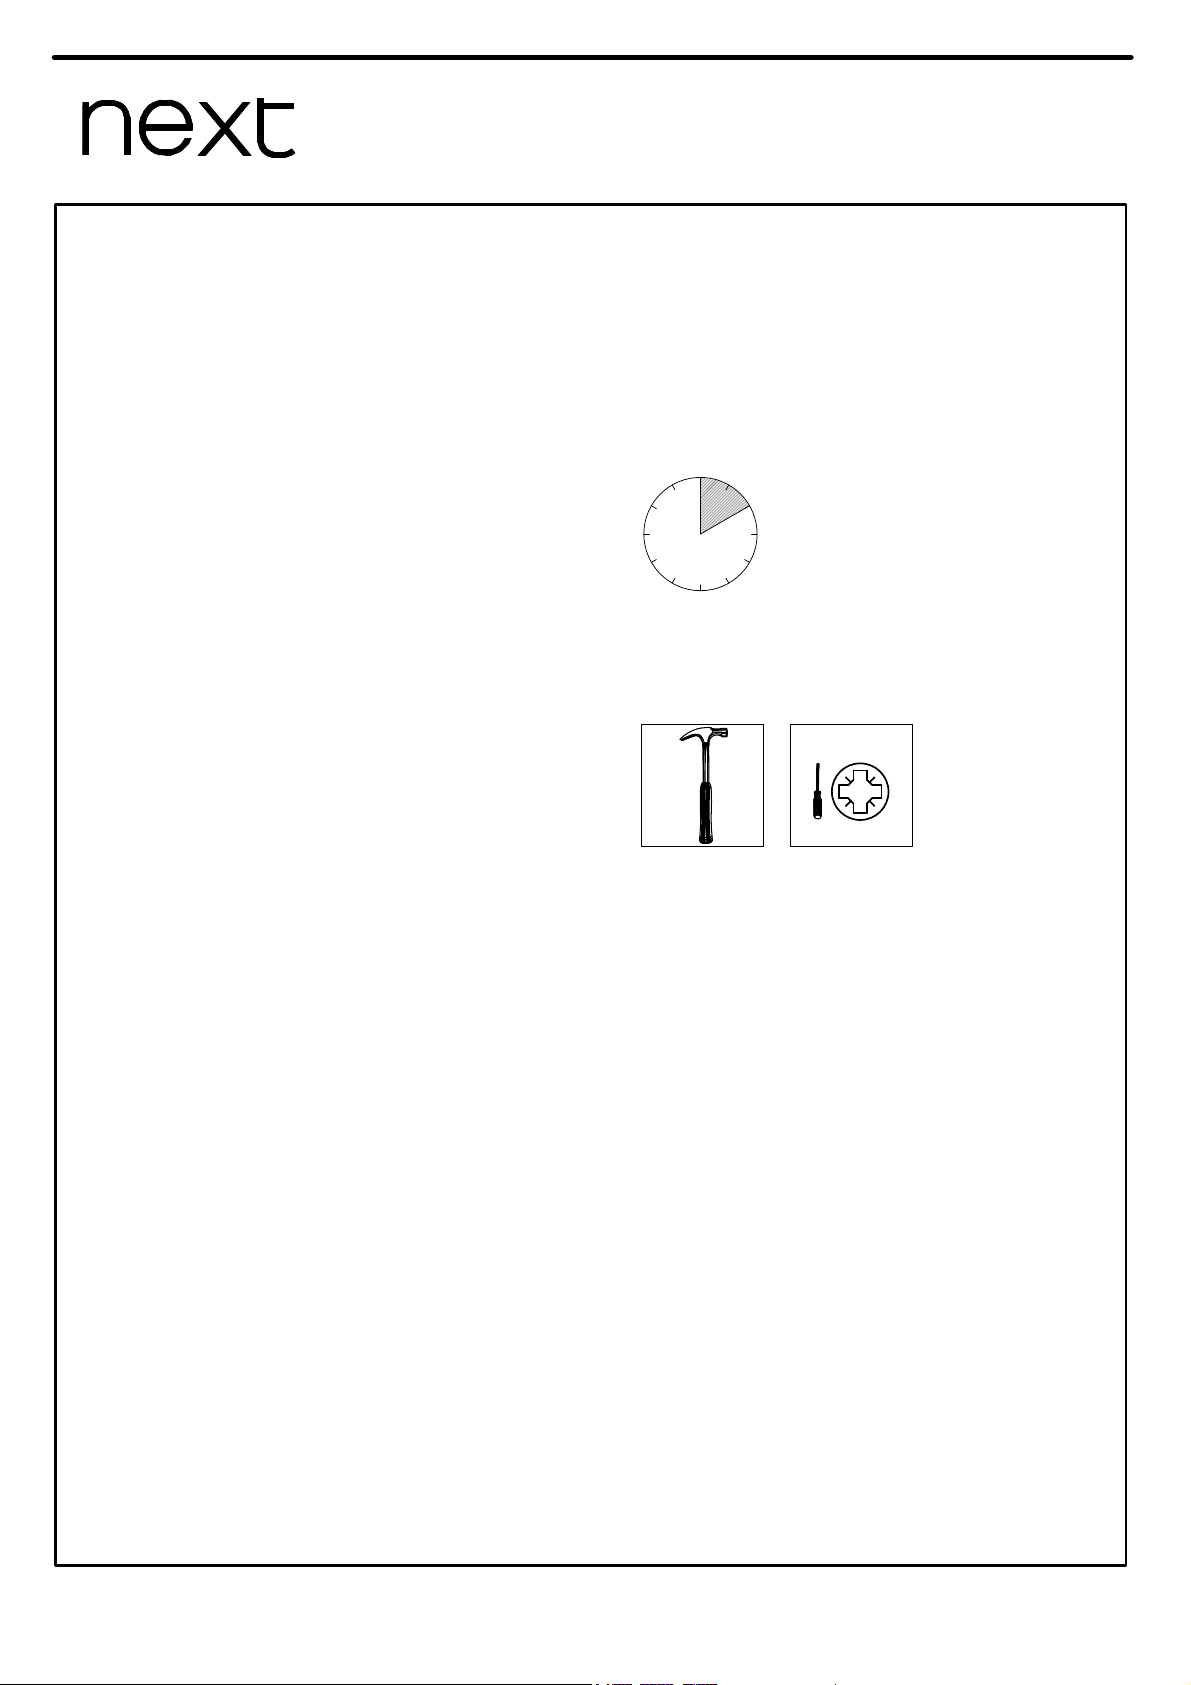
Number of people required to assemble
Two persons are required to assemble this item.
Time to assemble
Tools required
not supplied
Missing parts
If you are missing any fixtures and fittings for your product
please contact our customer service team on 0333 777 8999
and they will be happy to arrange for a replacement to be sent
to you free of charge.
Home service technicians
If you have a fault with your product please contact our
customer service team on 0333 777 8999. If you have had the
product for 28 days or less you may be offered a replacement,
refund or for a fully trained home service technician to visit your
home to assess the fault and repair the product where possible.
If you have had the product for more than 28 days we will send
an independant home service technician to review and repair
the product where possible and recommend further action.
You can write to us at
Home Customer Services
Next Retail Ltd,
Desford Road,
Leicester,
LE19 4AT
To View our full furniture range please visit www.next.co.uk
PH2
not supplied
2 hours
Do’s
We suggest you spend a short time reading through this leaflet
before you start.
right tools and plenty of space.
Unwrap all packaging materials and place the components
on a clean surface to protect them from damage.
We recommend that the packaging is used to protect the
surfaces during assembly.
Carefully check that you have all the parts before beginning
assembly.
Due to the size of the product we recommend that it is
assembled in the room intended for use.
Ensure the product is fully assembled as illustrated and all
fixings are fully tightened before use.
Wipe occasionally with a soft cloth slightly dampened with
water. Then buff with a dry clean soft cloth.
Wood will mellow and change colour over time, we recommend
that ornaments and items placed on the surface are moved
regularly for the first few months to prevent uneven mellowing.
When you are ready to start, make sure that you have the
Warnings
We suggest you retain these instructions for future reference.
Keep fittings out of children’s reach and keep children well
away from the construction area.
This product should only be used on firm, level ground.
Please periodically check all fittings and re-tighten as
necessary.
Please do not sit or stand on your furniture.
Avoid exposing the furniture to excessive heat or direct
sunlight as this can cause deterioration of the colour.
Page 5
GETTING TO KNOW YOUR PRODUCT
COMPTON CHEST
Assembly instructions
Produced in Poland for Next Retail Ltd
122325
122325-2015-V1
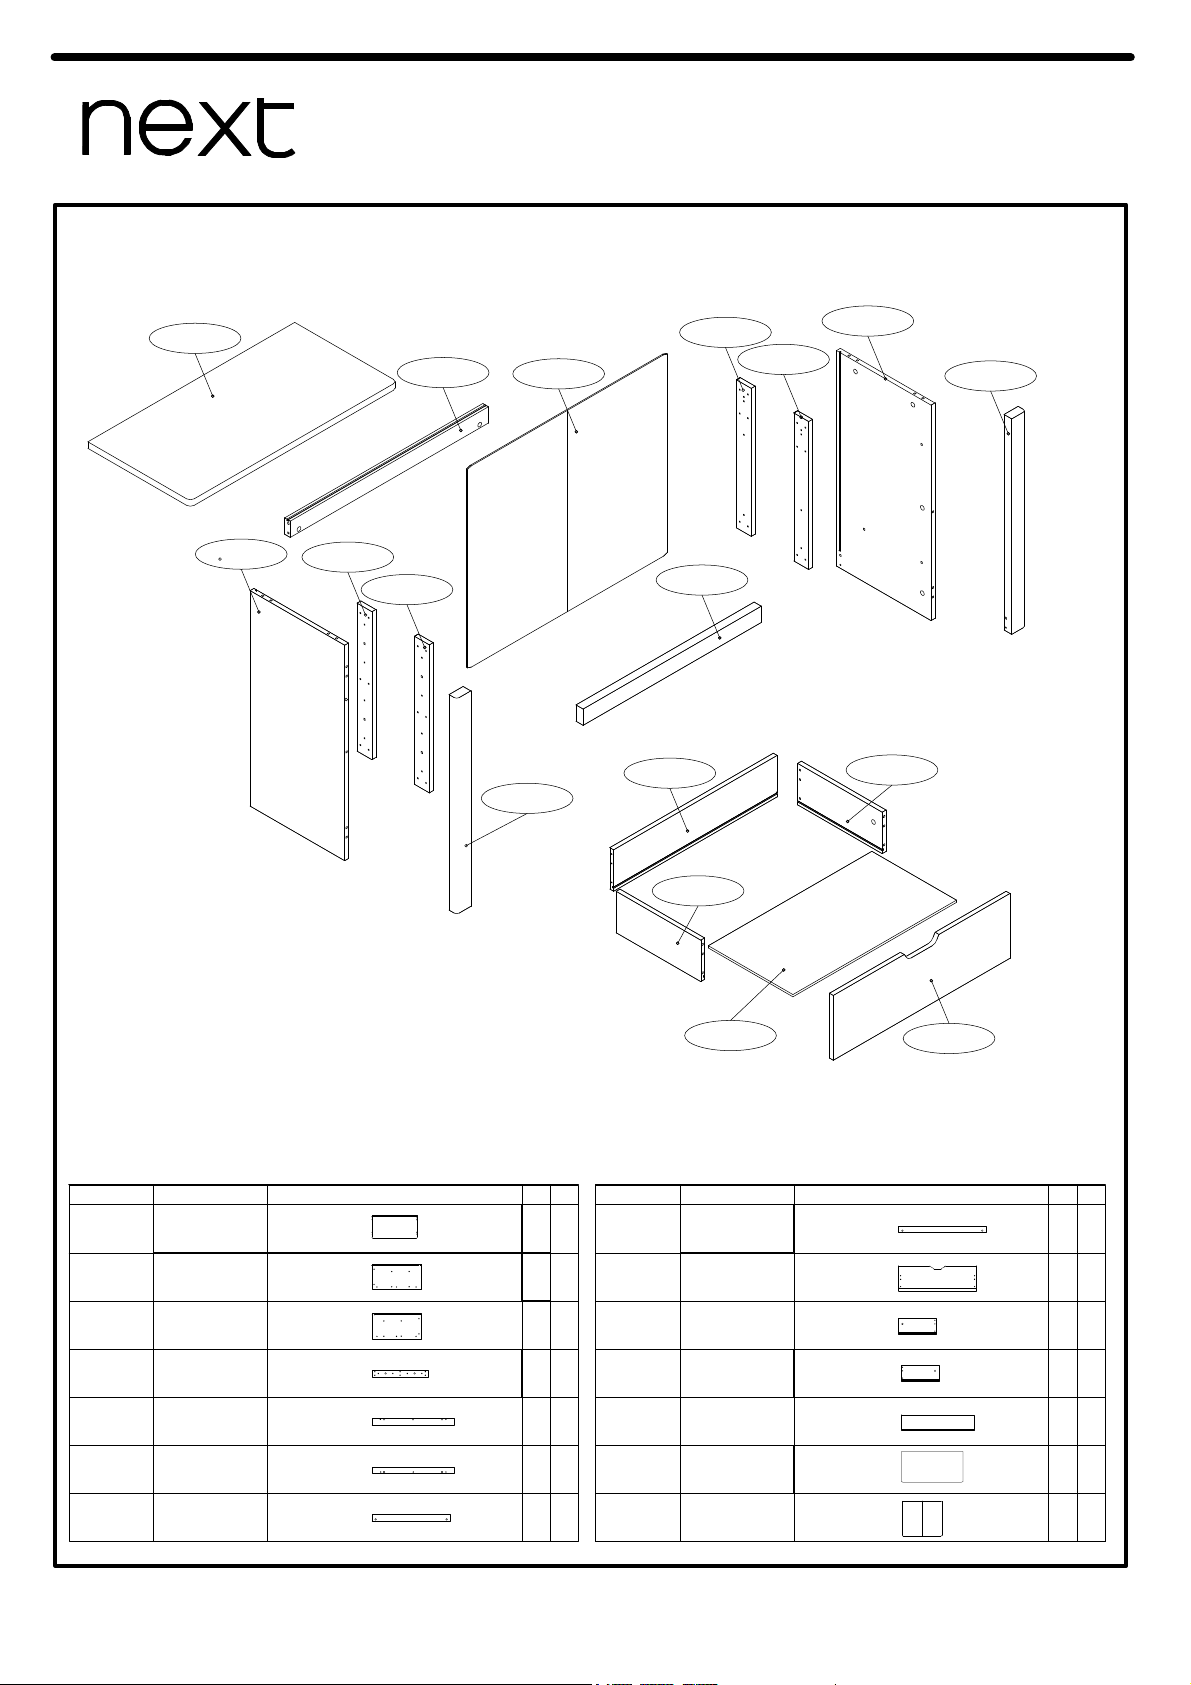
Components supplied. Please use this guide if you require replacement parts.
Ref
Dimensions Visual
QtyCtn
C31-410
81 x 40cm 1 1
73 x 37cm 1 1
73 x 37cm 1 1
50 x 6cm
4
1
73 x 6cm 1 1
73 x 6cm 1 1
70 x 6cm 1 1
78 x 6cm 1 1
69 x 22cm 3 1
Ref
Dimensions Visual
QtyCtn
33 x 14cm 3 1
3 1
68 x 78cm 1 1
64 x 14cm
3 133 x 14cm
65 x 33cm 3 1
C31-110
C31-111
C31-360
C31-353
C31-354
C31-803
C31-804
C31-701
C31-913
C31-914
C31-951
C31-051
C31-010
C31-410
C31-804
C31-010
C31-360
C31-360
C31-360
C31-360
C31-111
C31-110
C31-803
C31-353
C31-354
C31-951
C31-914
C31-913
C31-701
C31-051
x3
2
Page 6
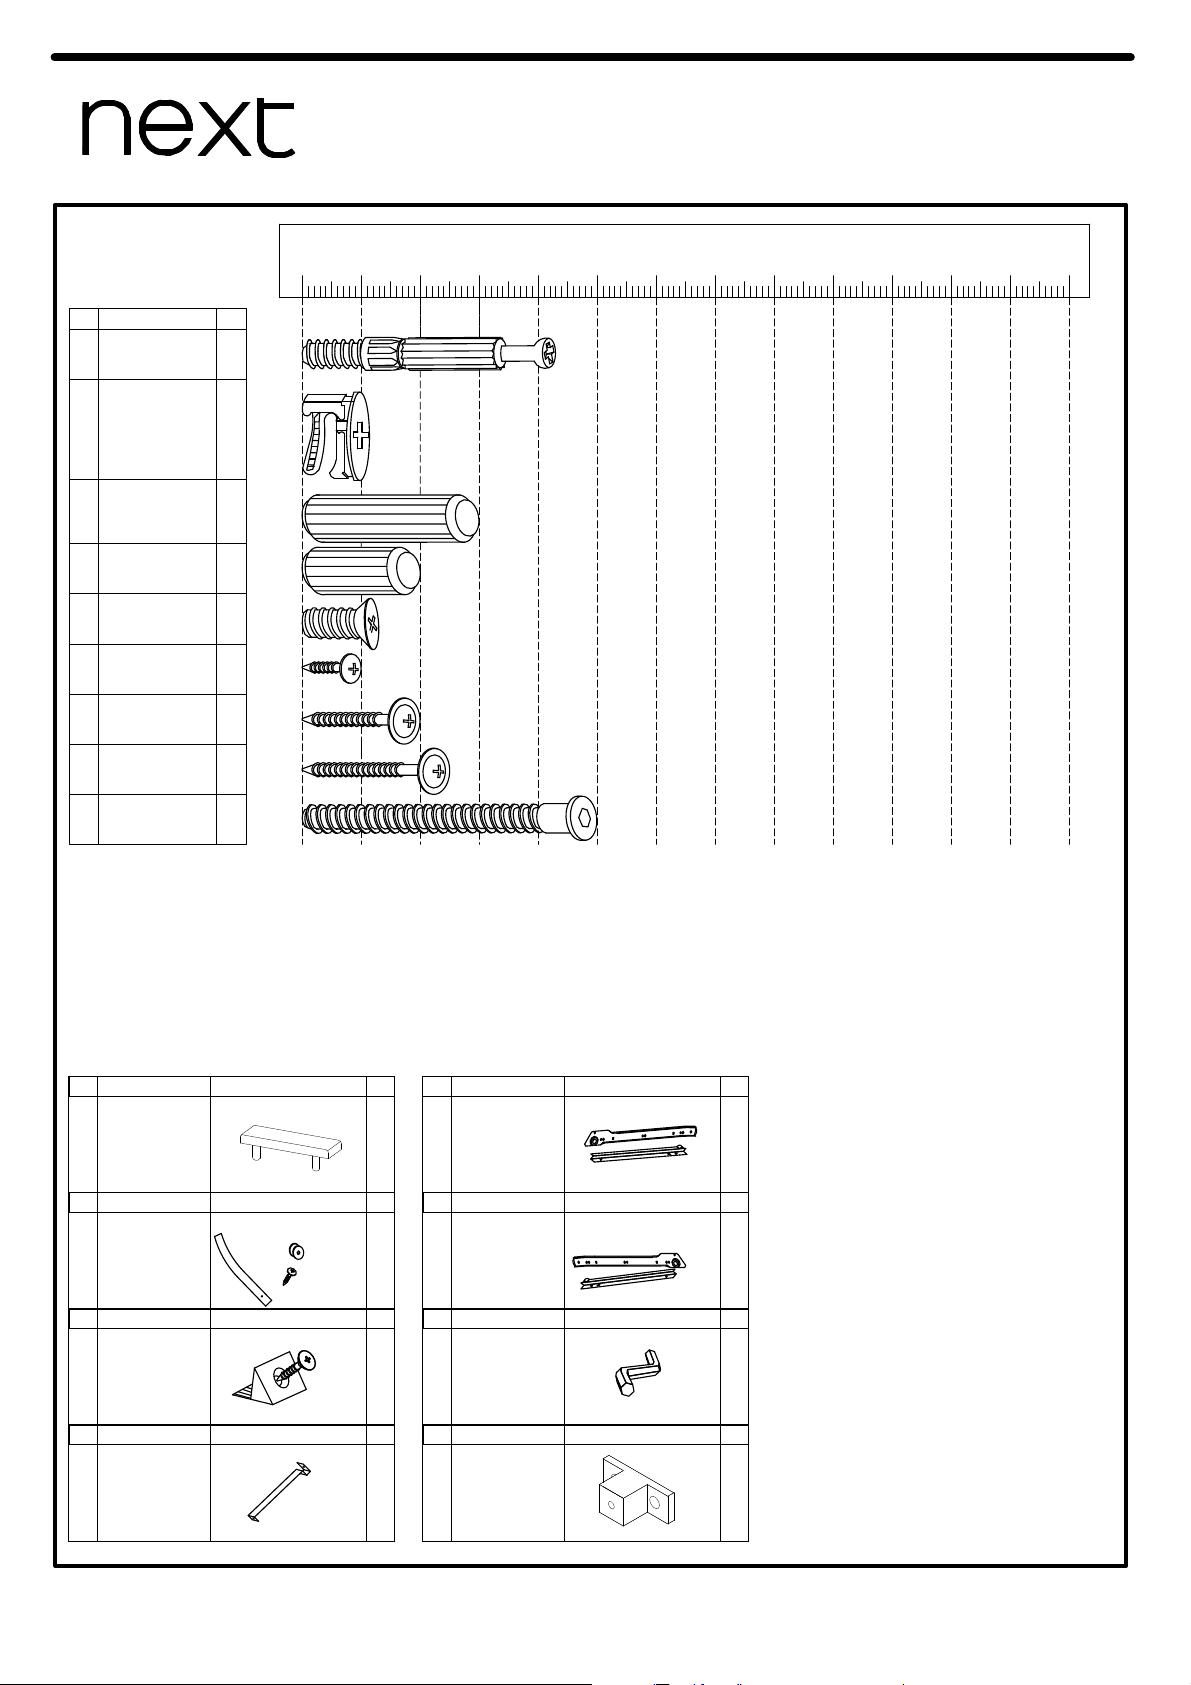
Fixtures and fittings
supplied (actual size)
Ref
Dimensions
Qty
A
B
D
D1
F
6 x 43 mm 20
15 x 11 mm 20
8 x 30 mm 24
8 x 20 mm 8
6.3 x 13 mm 36
P4
123 x 20 mm
mm.
0.
10 10020 30 40 50 60 70 80 90 110 120 130
M1
Q
5 x 50 mm 18
3 x 10 mm 6
Fixtures and fittings supplied (not to scale)
Ref
Dimensions Visual
Qty
Ref
Dimensions Visual
Qty
I1
N/A
1
Ref
Dimensions Visual
Qty
X
N/A
12
Ref
Dimensions Visual
Qty
J
N/A
12
Ref
Dimensions Visual
Qty
V
N/A
1
Ref
Dimensions Visual
Qty
SR
N/A
3
Ref
Dimensions Visual
Qty
J2
N/A
3
P
4 x 25 mm 16
E
N/A
6
Ref
Dimensions Visual
Qty
SL
N/A
3
COMPTON CHEST
Assembly instructions
Produced in Poland for Next Retail Ltd
122325
122325-2015-V1
3
Page 7
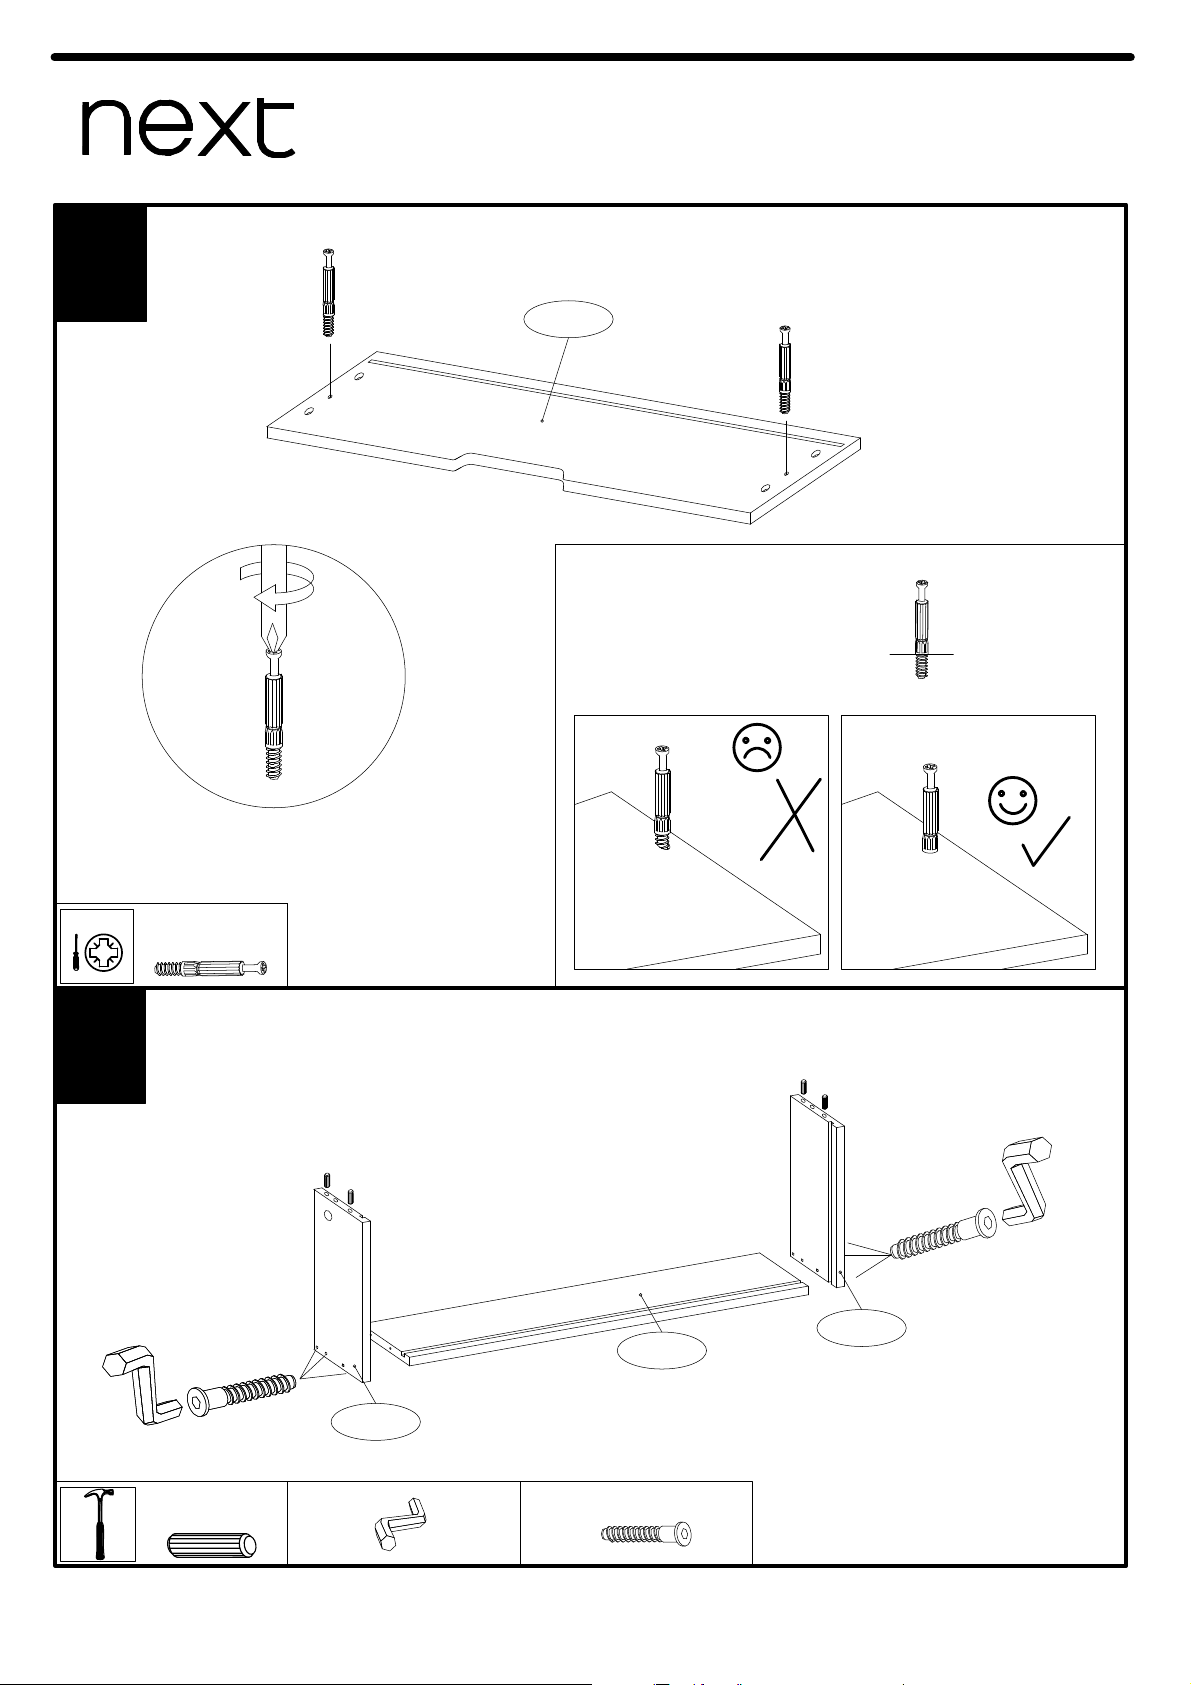
4
COMPTON CHEST
Assembly instructions
Produced in Poland for Next Retail Ltd
122325
122325-2015-V1
1
C31-701
x3
A
A
A
Ax6
PH2
Panel Panel
CAM-LOCK
Tighten until shoulder is flush
with panel. Do not overtighten
or undertighten (see example below)
Shoulder
NO GAP
x3
V
Q
V
Q
Dx12
8x30mm
Vx1
Qx18
5x50mm
C31-951
C31-913
C31-914
D
D
D
D
2
Page 8
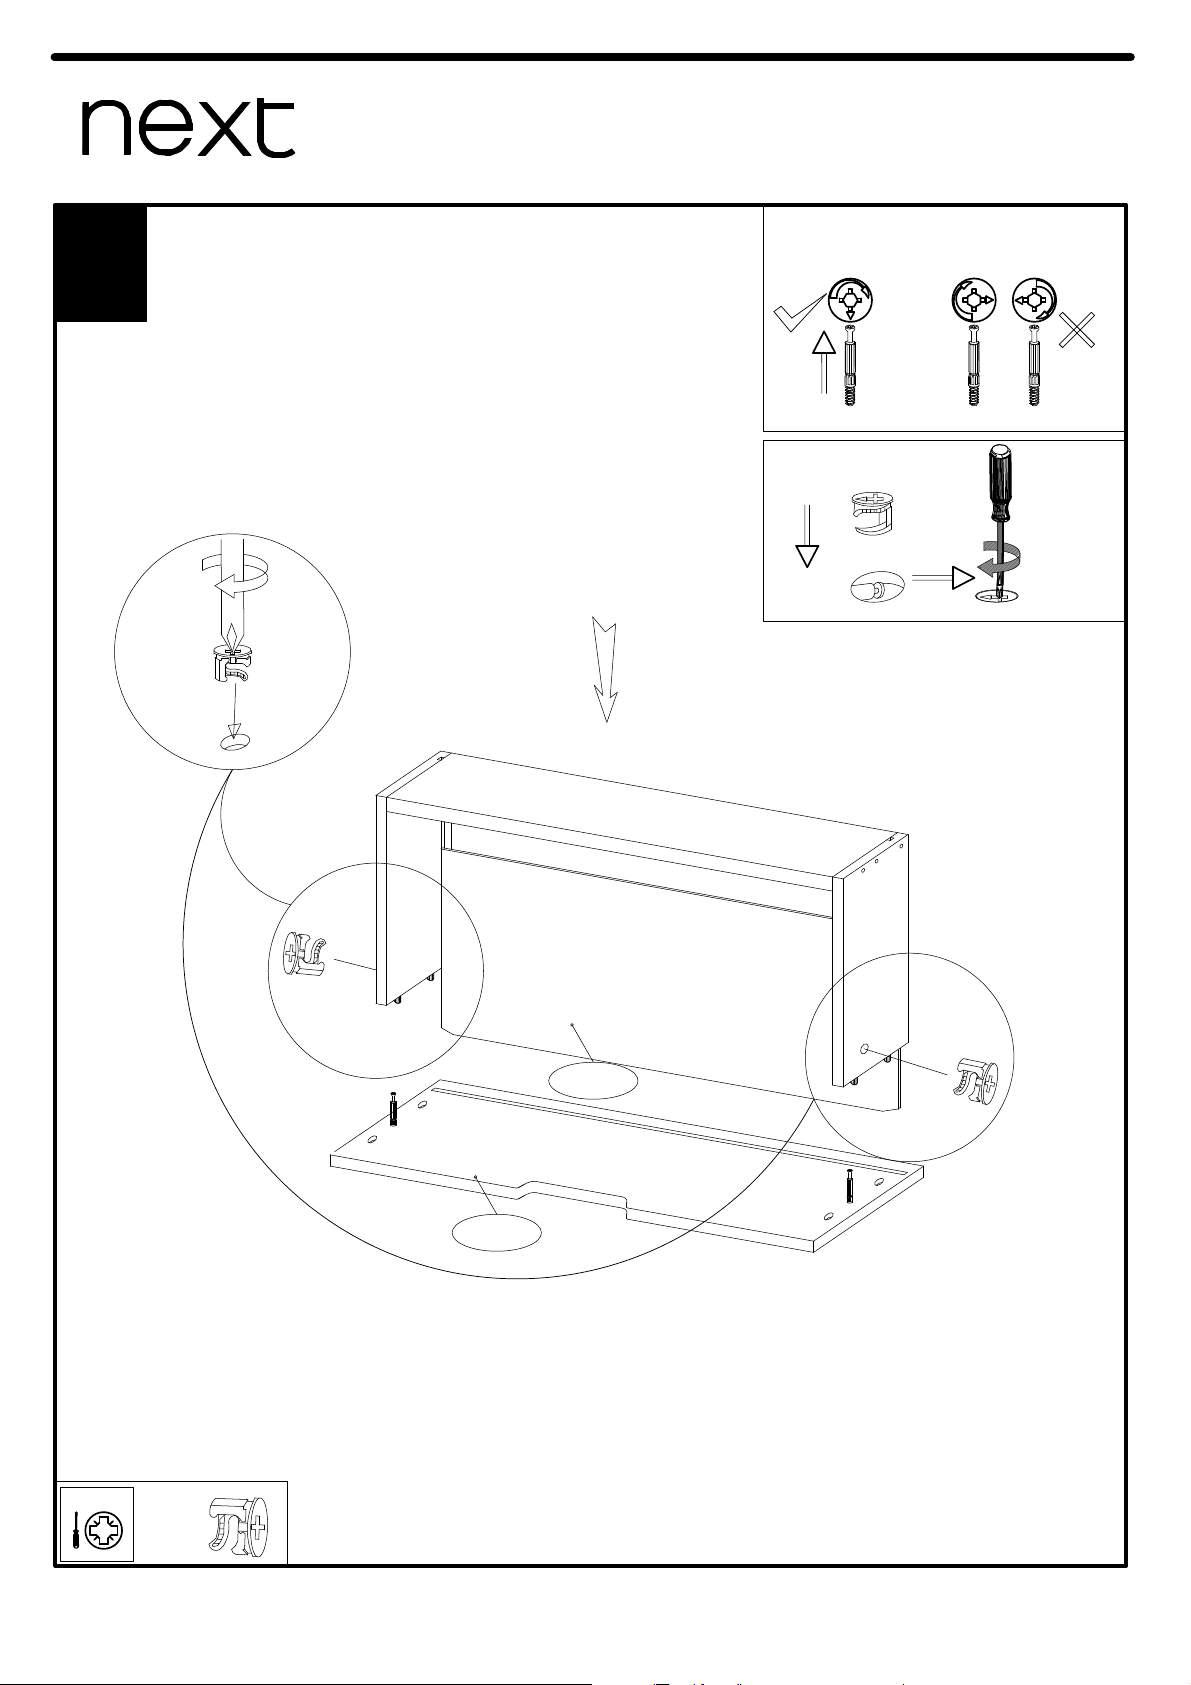
5
COMPTON CHEST
Assembly instructions
Produced in Poland for Next Retail Ltd
122325
122325-2015-V1
3
CORRECT
WRONG
WHEN FITTING CAMS
ENSURE STARTING POSITION IS CORRECT
BEFORE YOU INSERT CONNECTING CAM-PILLAR
TURN CLOCKWISE UNTIL SECURE
C31-701
C31-051
x3
B
B
Bx6
PH2
Page 9
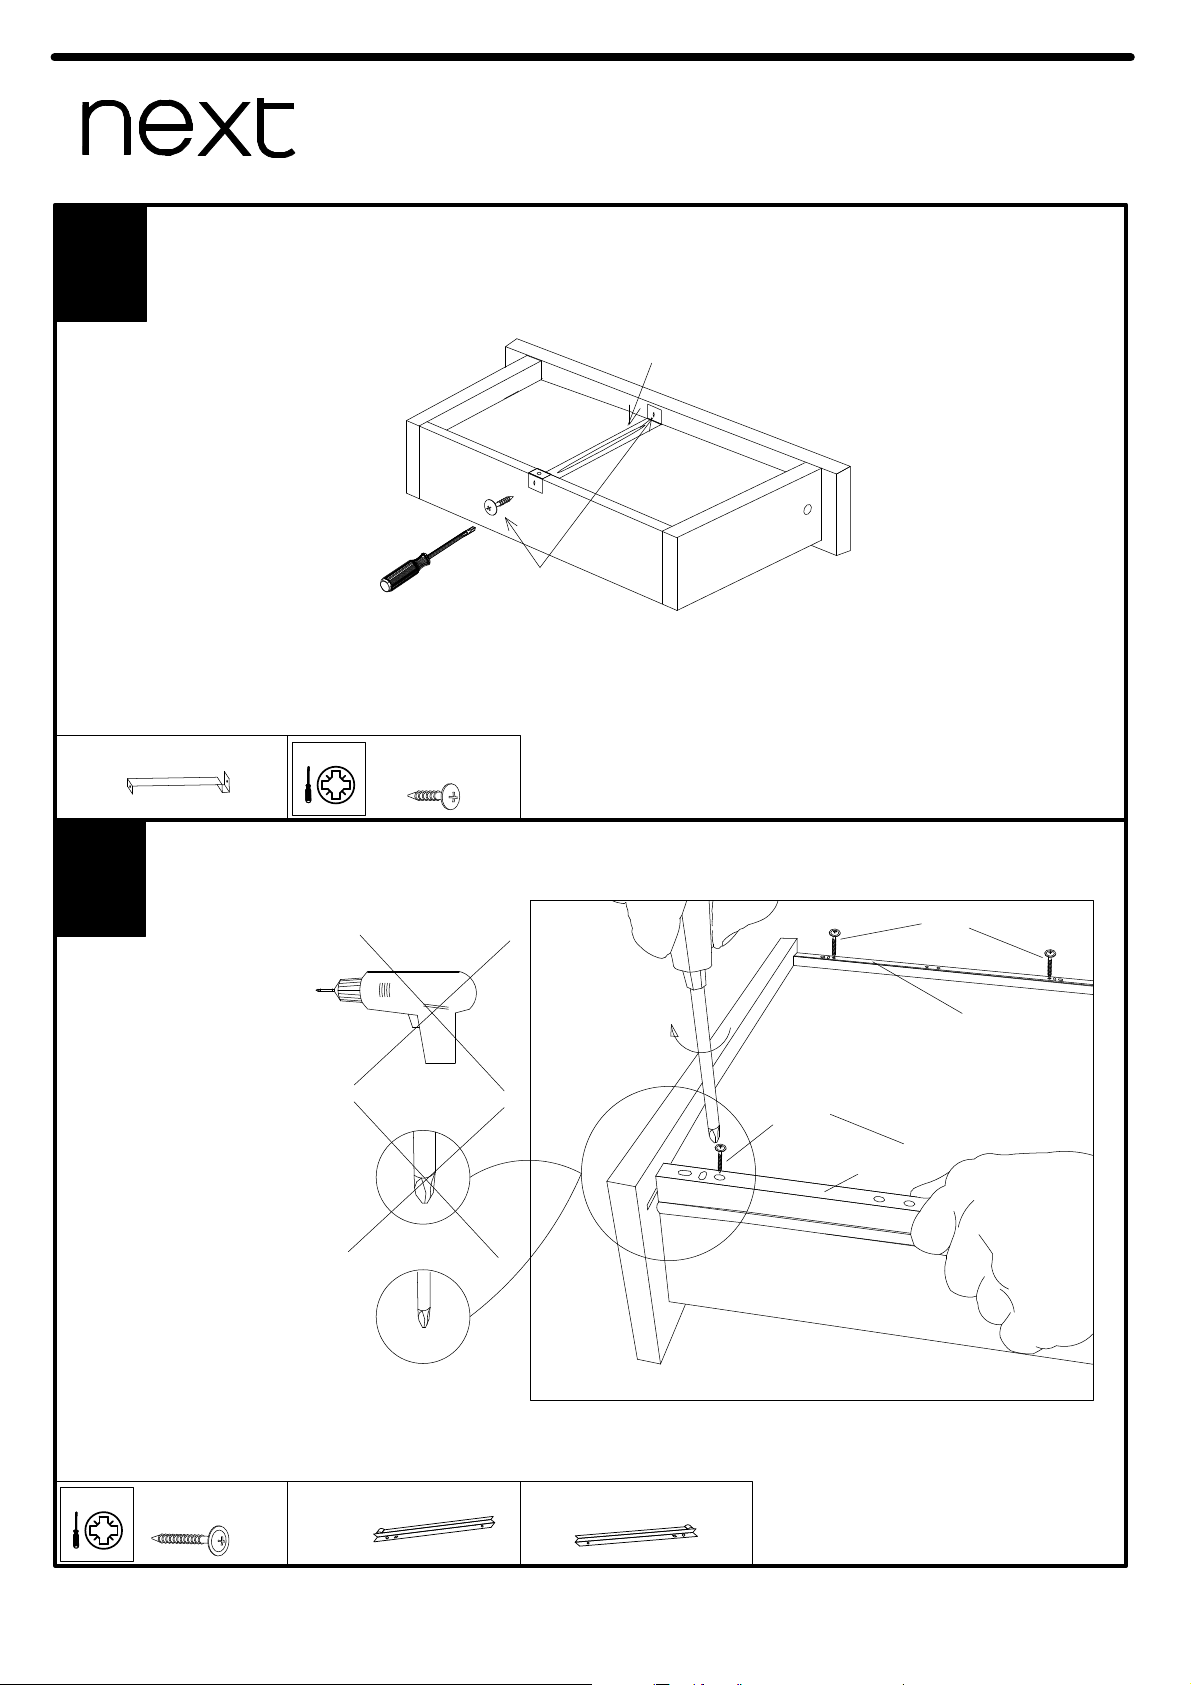
6
COMPTON CHEST
Assembly instructions
Produced in Poland for Next Retail Ltd
122325
122325-2015-V1
4
6
M1
J2
3.0x10
3x10mm
J2x3
M1x6
PH2
x3
x3
P4
P4
SR
SL
P4x12
3x20mm
PH2
SRx3 SLx3
5
Page 10
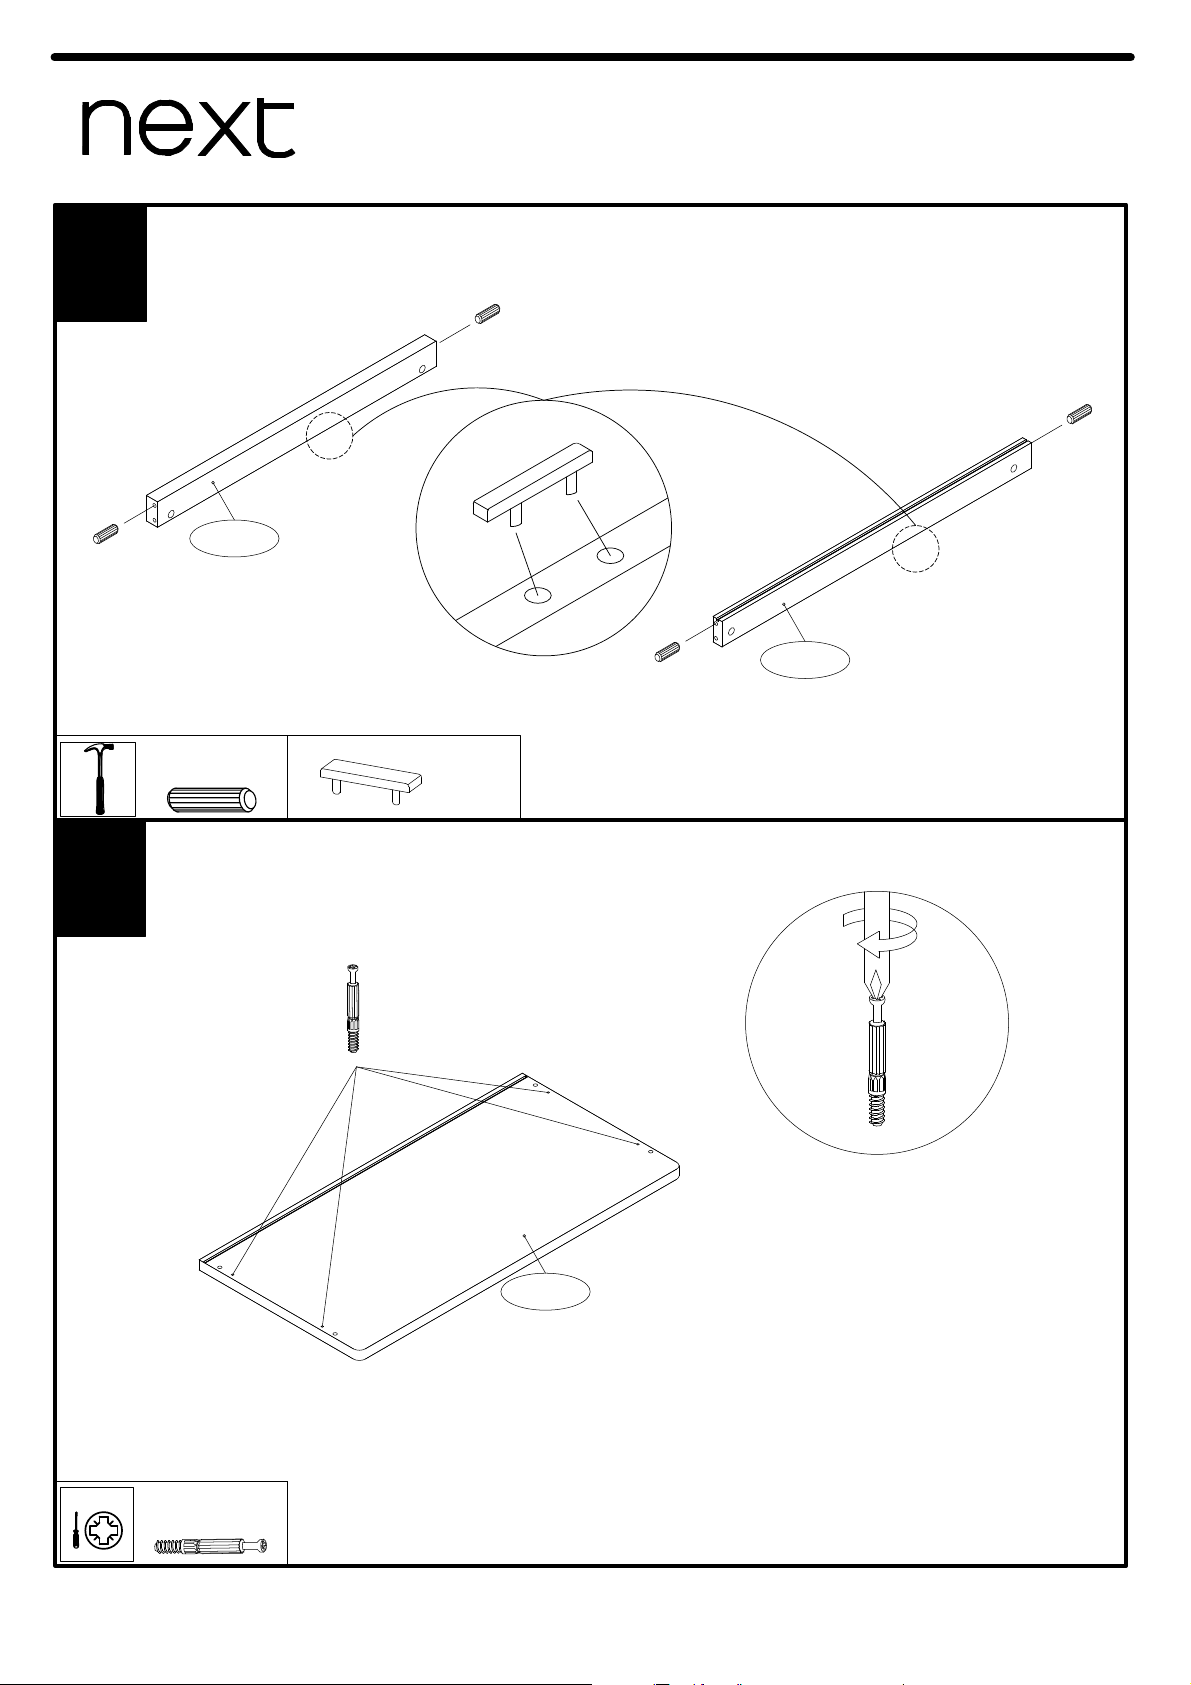
7
COMPTON CHEST
Assembly instructions
Produced in Poland for Next Retail Ltd
122325
122325-2015-V1
6
7
Dx4
8x30mm
Ex2
C31-410
A
Ax4
PH2
A
C31-803
C31-804
D
D
D
D
E
Page 11
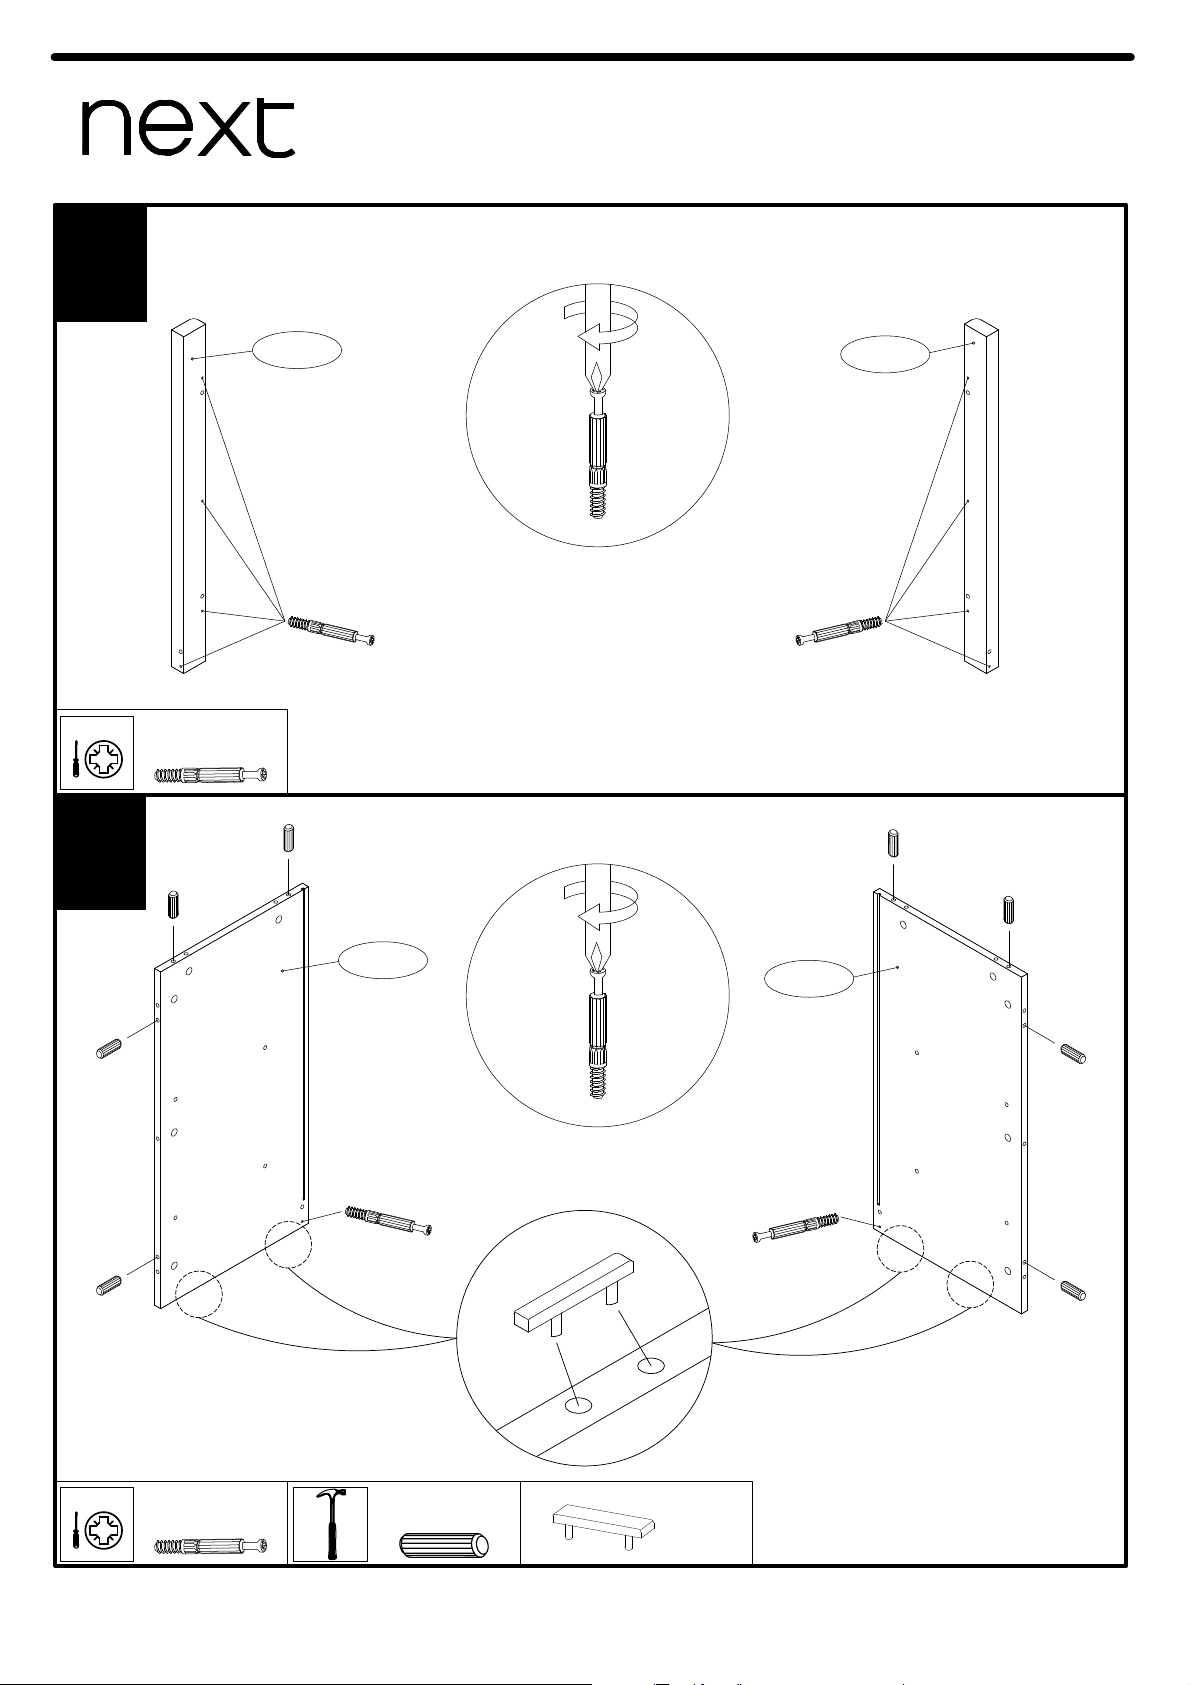
8
COMPTON CHEST
Assembly instructions
Produced in Poland for Next Retail Ltd
122325
122325-2015-V1
8
9
C31-353
C31-354
A A
Ax8
PH2
A
C31-111
C31-110
A
D
D
D
D
A
D
D
D
D
Ax2
PH2
Dx8
8x30mm
Ex4
A
E
Page 12
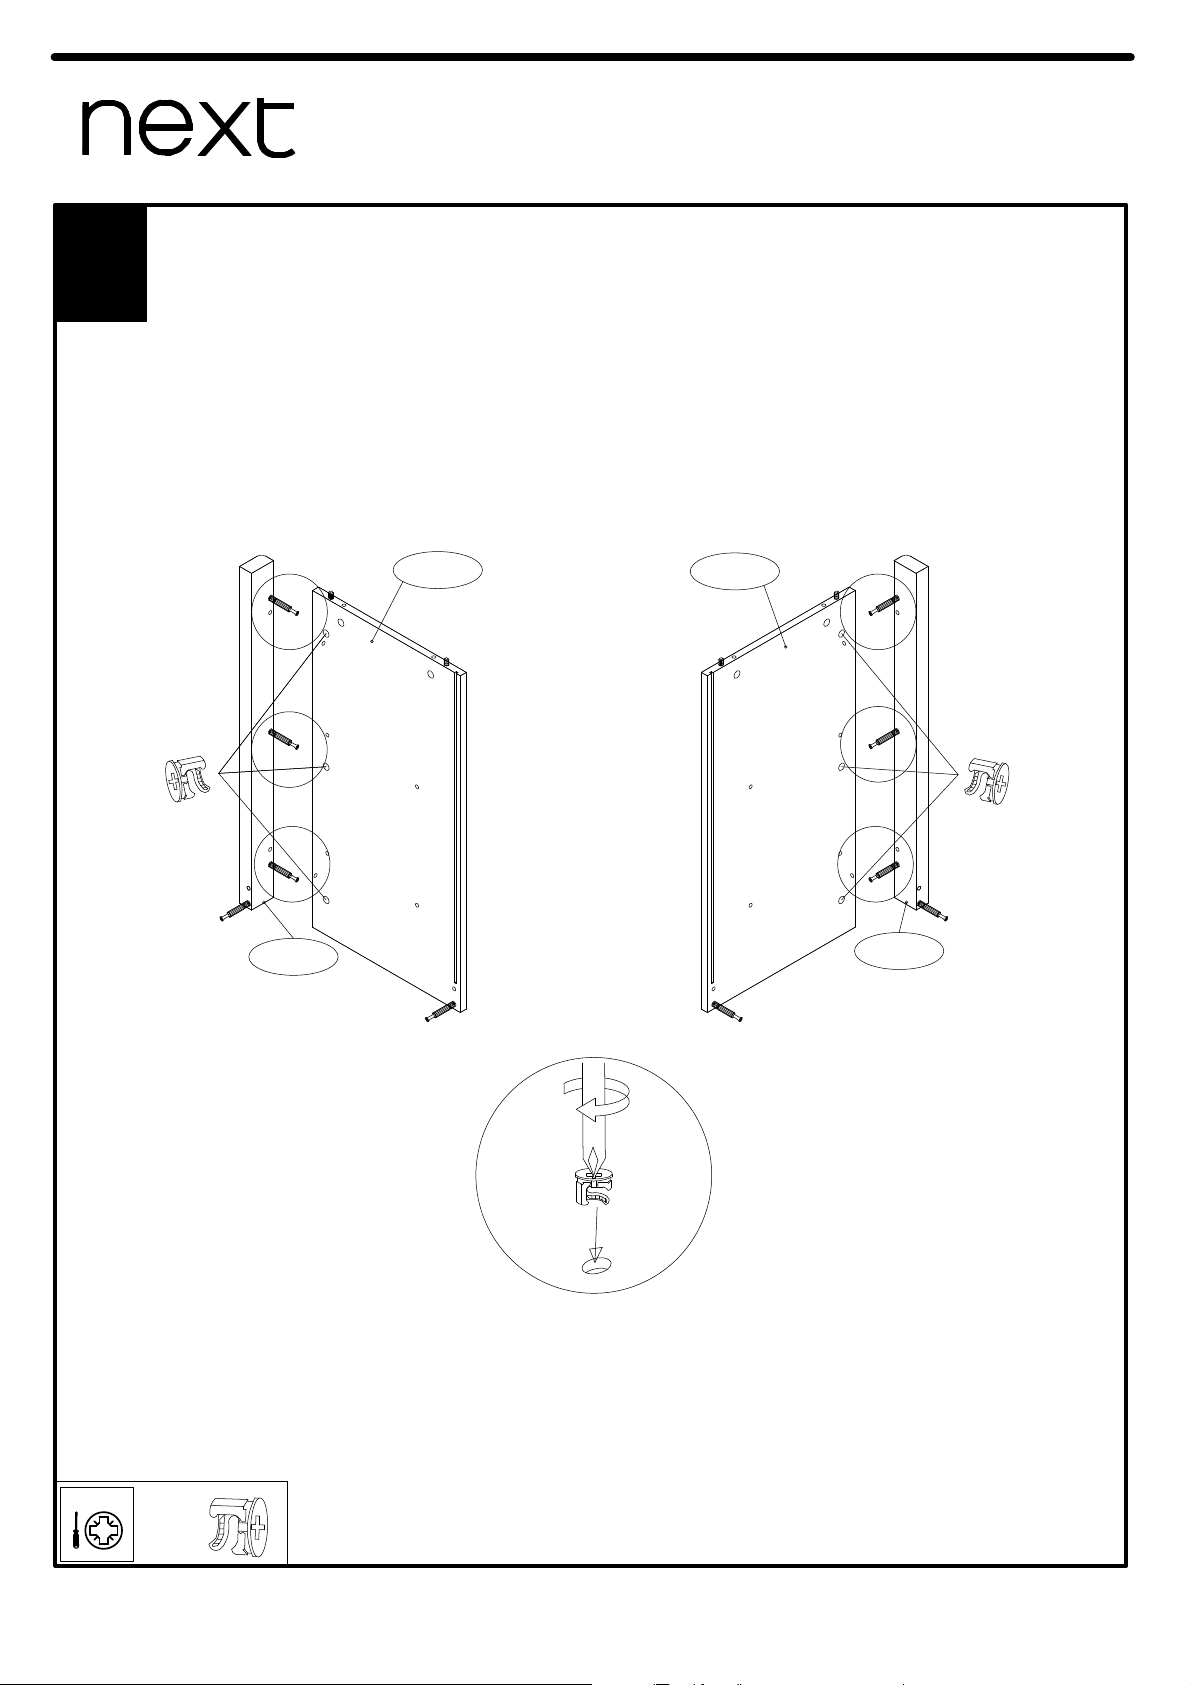
9
COMPTON CHEST
Assembly instructions
Produced in Poland for Next Retail Ltd
122325
122325-2015-V1
10
C31-110
C31-111
C31-353
C31-354
B
B
Bx6
PH2
Page 13
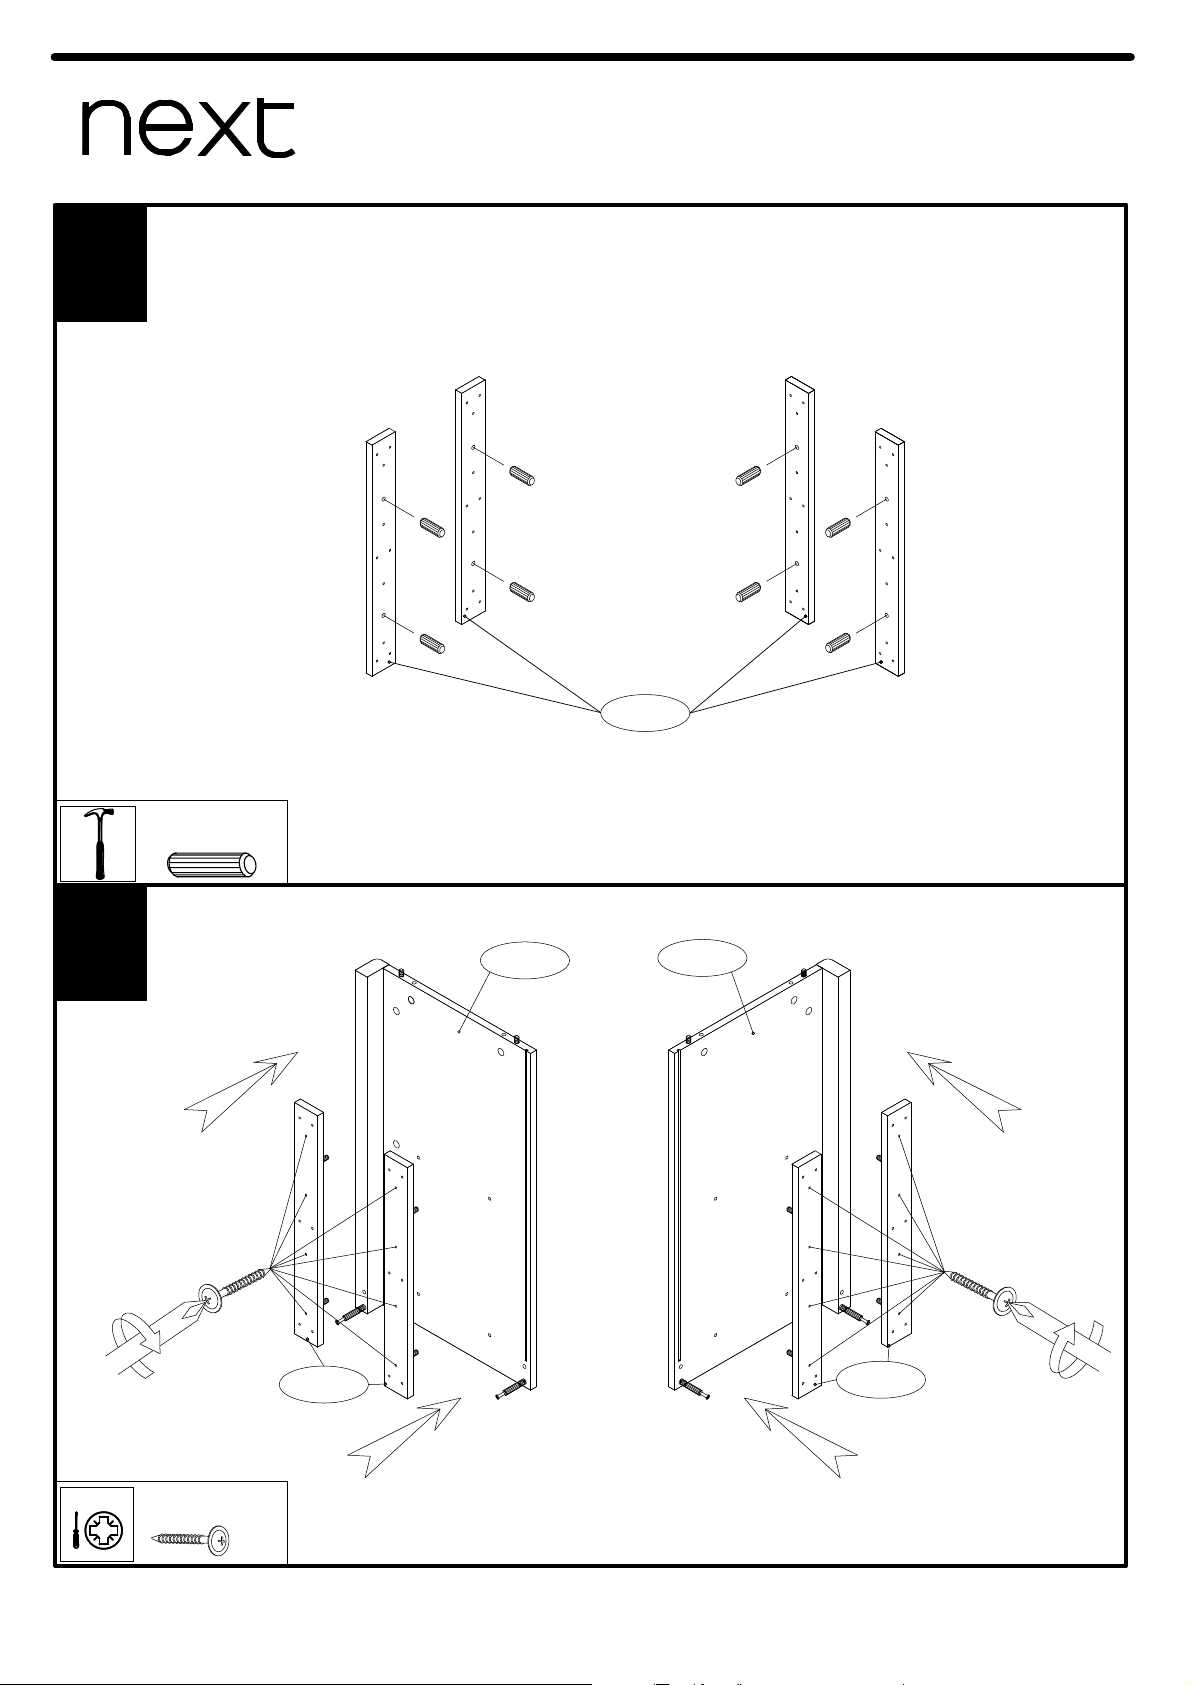
10
COMPTON CHEST
Assembly instructions
Produced in Poland for Next Retail Ltd
122325
122325-2015-V1
11
12
D1x8
8x20mm
PH2
C31-110
C31-111
C31-360
C31-360
P
P
Px16
4x25mm
PH2
C31-360
D1
D1
D1
D1
D1
D1
D1
D1
Page 14
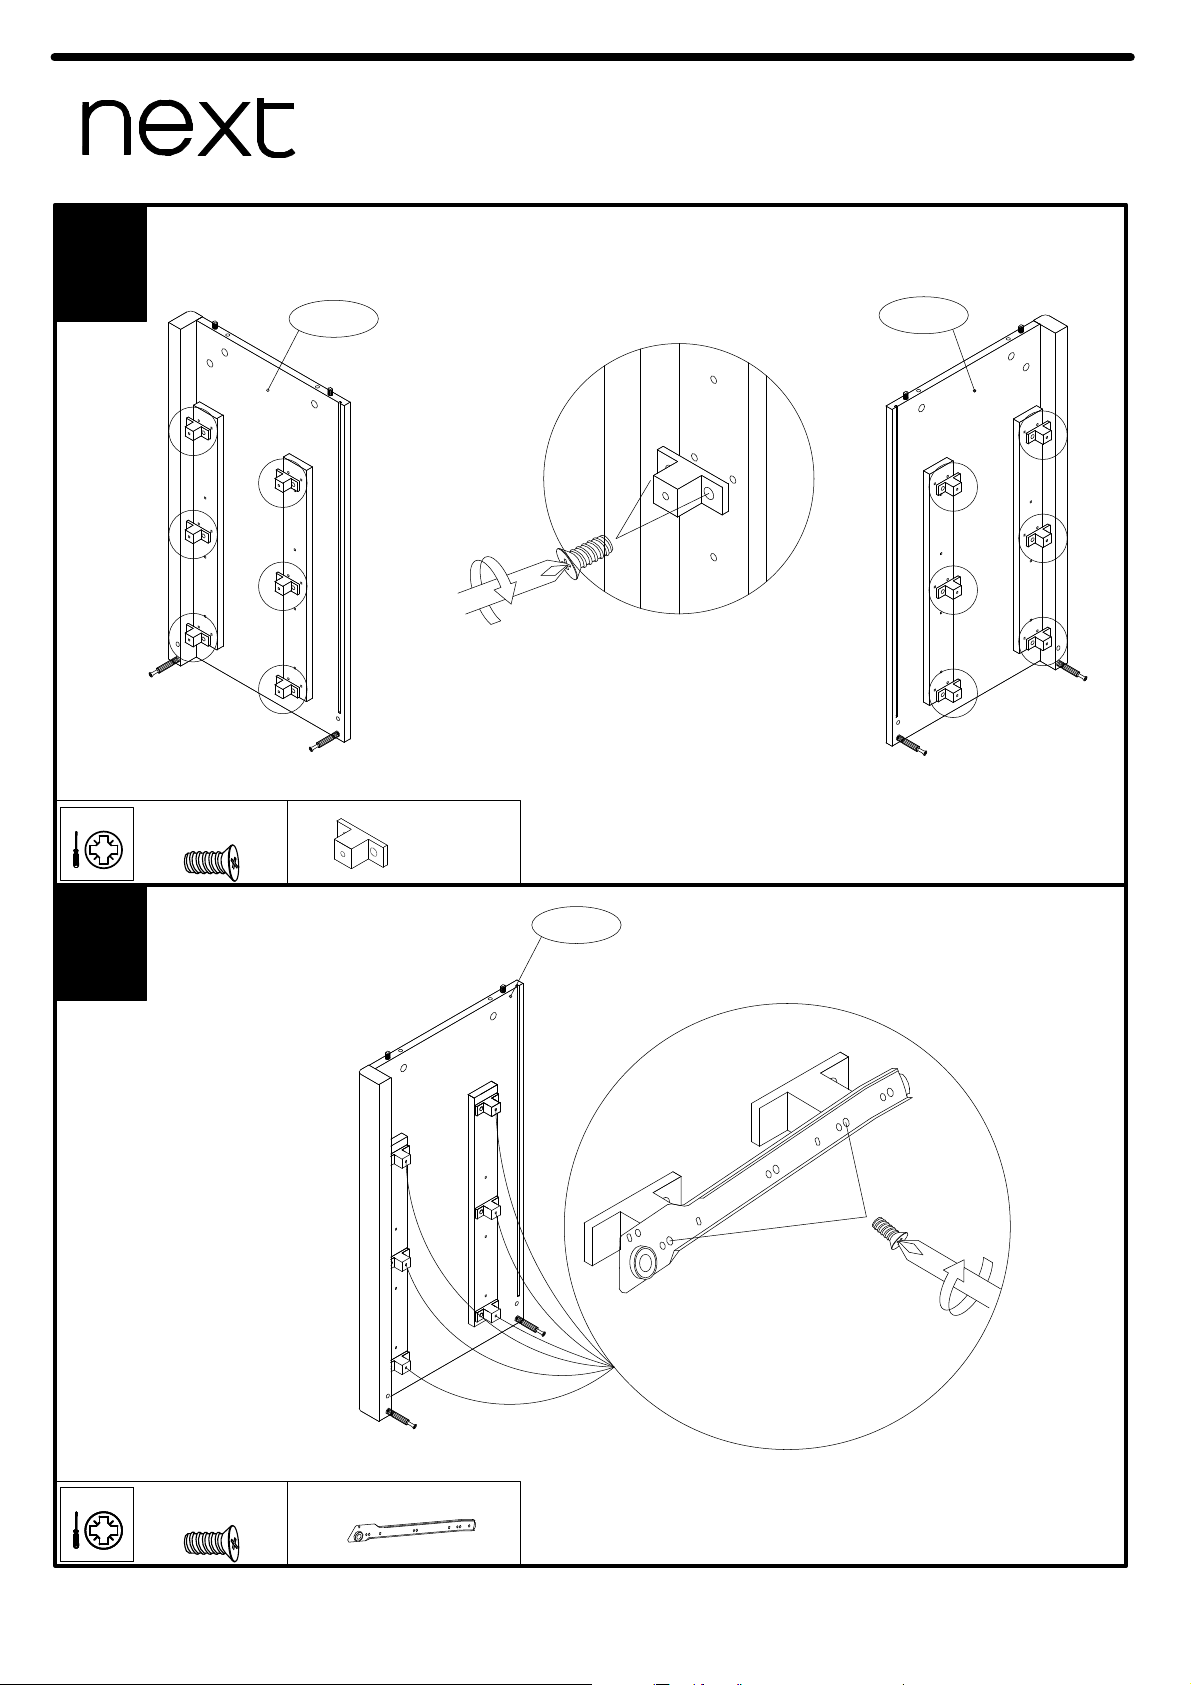
11
COMPTON CHEST
Assembly instructions
Produced in Poland for Next Retail Ltd
122325
122325-2015-V1
13
14
PH2PH2
C31-110
C31-111
X
Fx24
6.3x13mm
PH2
Xx12
C31-110
F
SL
Fx6
6.3x13mm
PH2
SLx3
F
Page 15
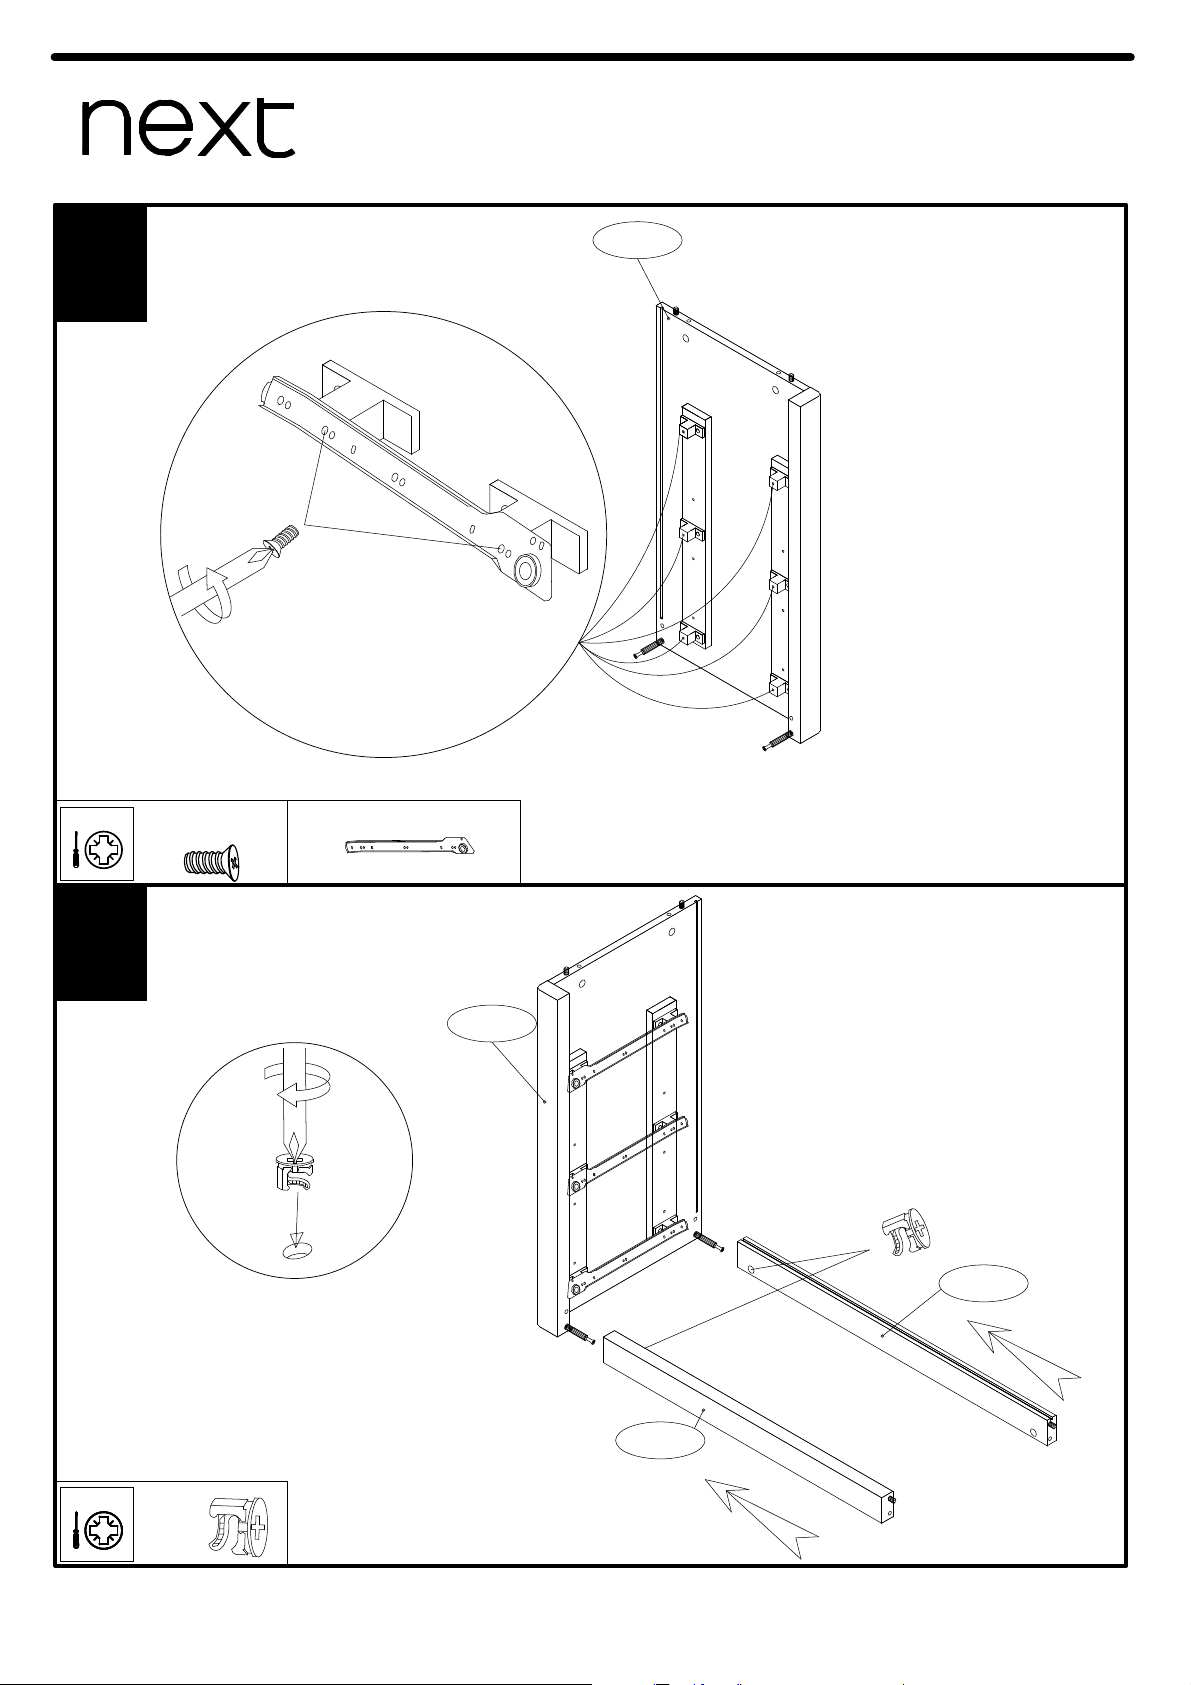
12
COMPTON CHEST
Assembly instructions
Produced in Poland for Next Retail Ltd
122325
122325-2015-V1
15
16
F
SR
C31-111
PH2PH2
Fx6
6.3x13mm
PH2
PH2
B
C31-110
C31-803
C31-804
Bx2
PH2
SRx3
Page 16
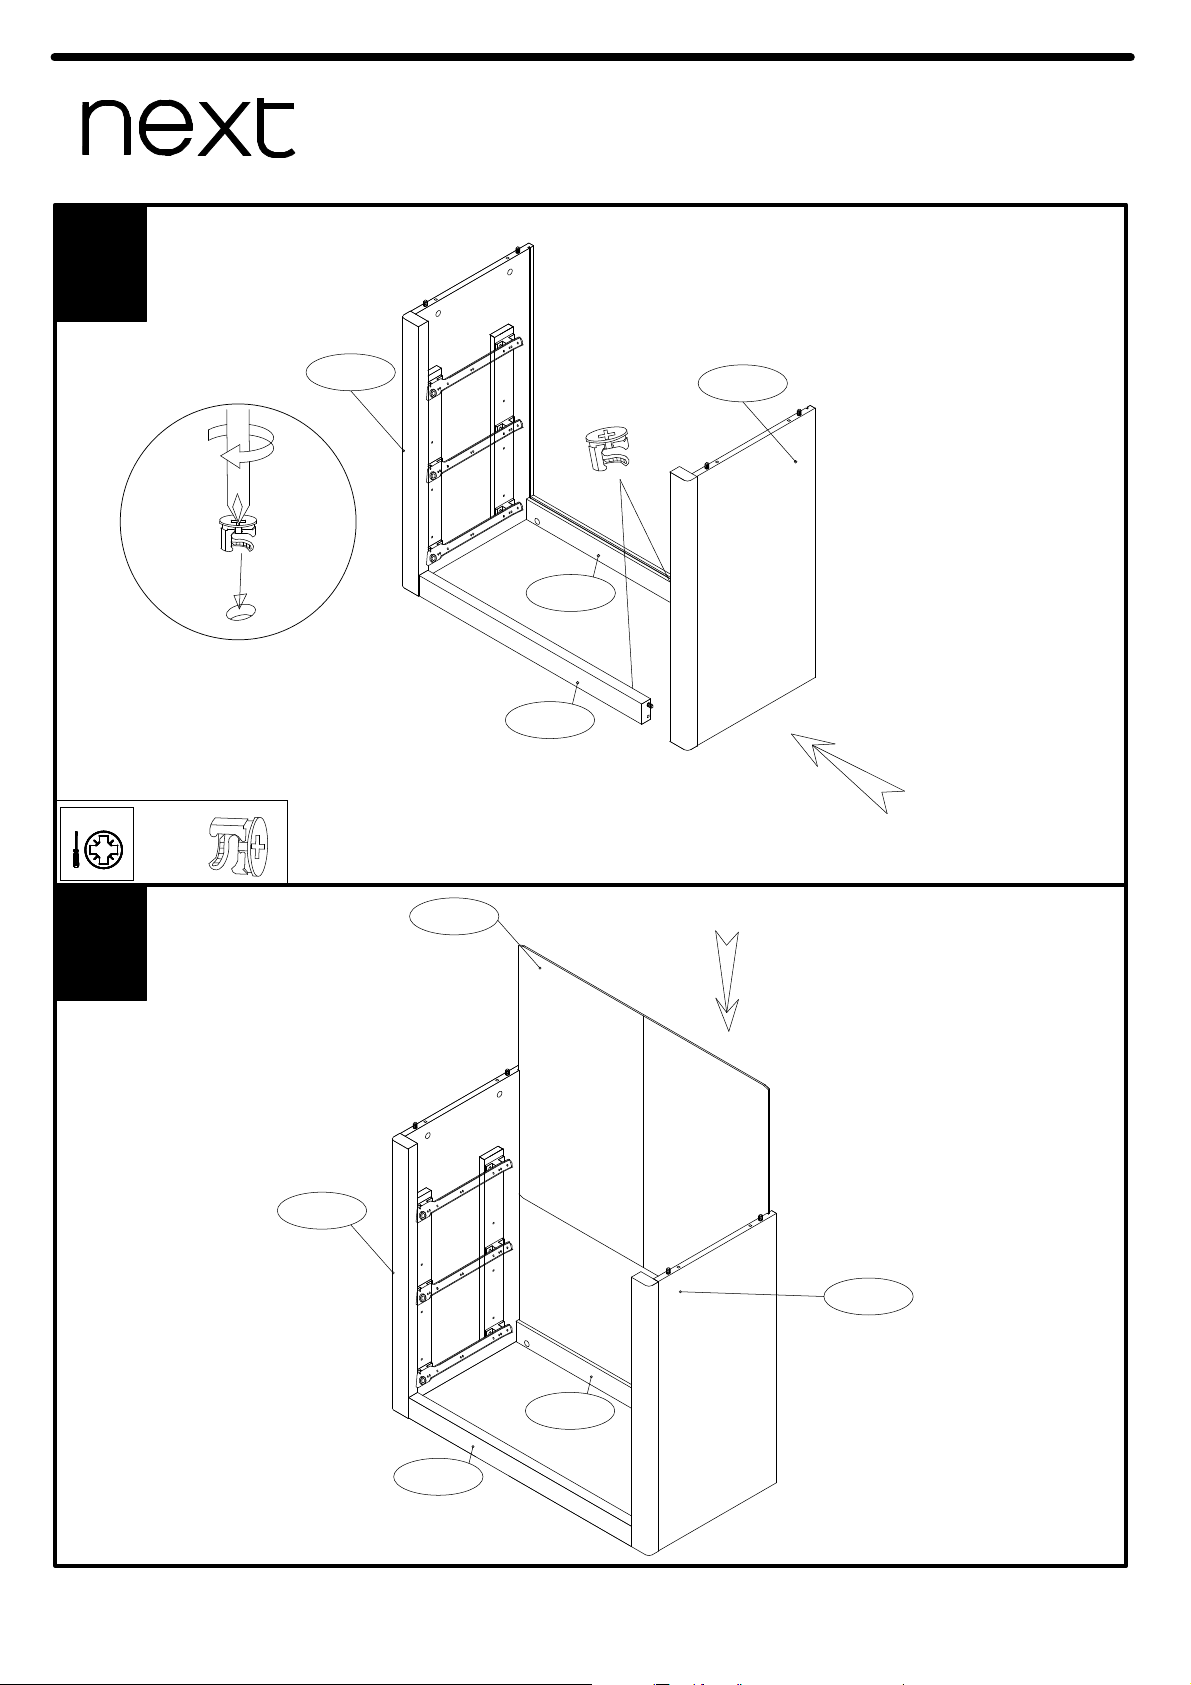
13
COMPTON CHEST
Assembly instructions
Produced in Poland for Next Retail Ltd
122325
122325-2015-V1
17
18
PH2
C31-110
C31-111
B
C31-803
C31-804
PH2PH2PH2
Bx2
PH2
C31-803
C31-804
C31-110
C31-111
C31-010
Page 17
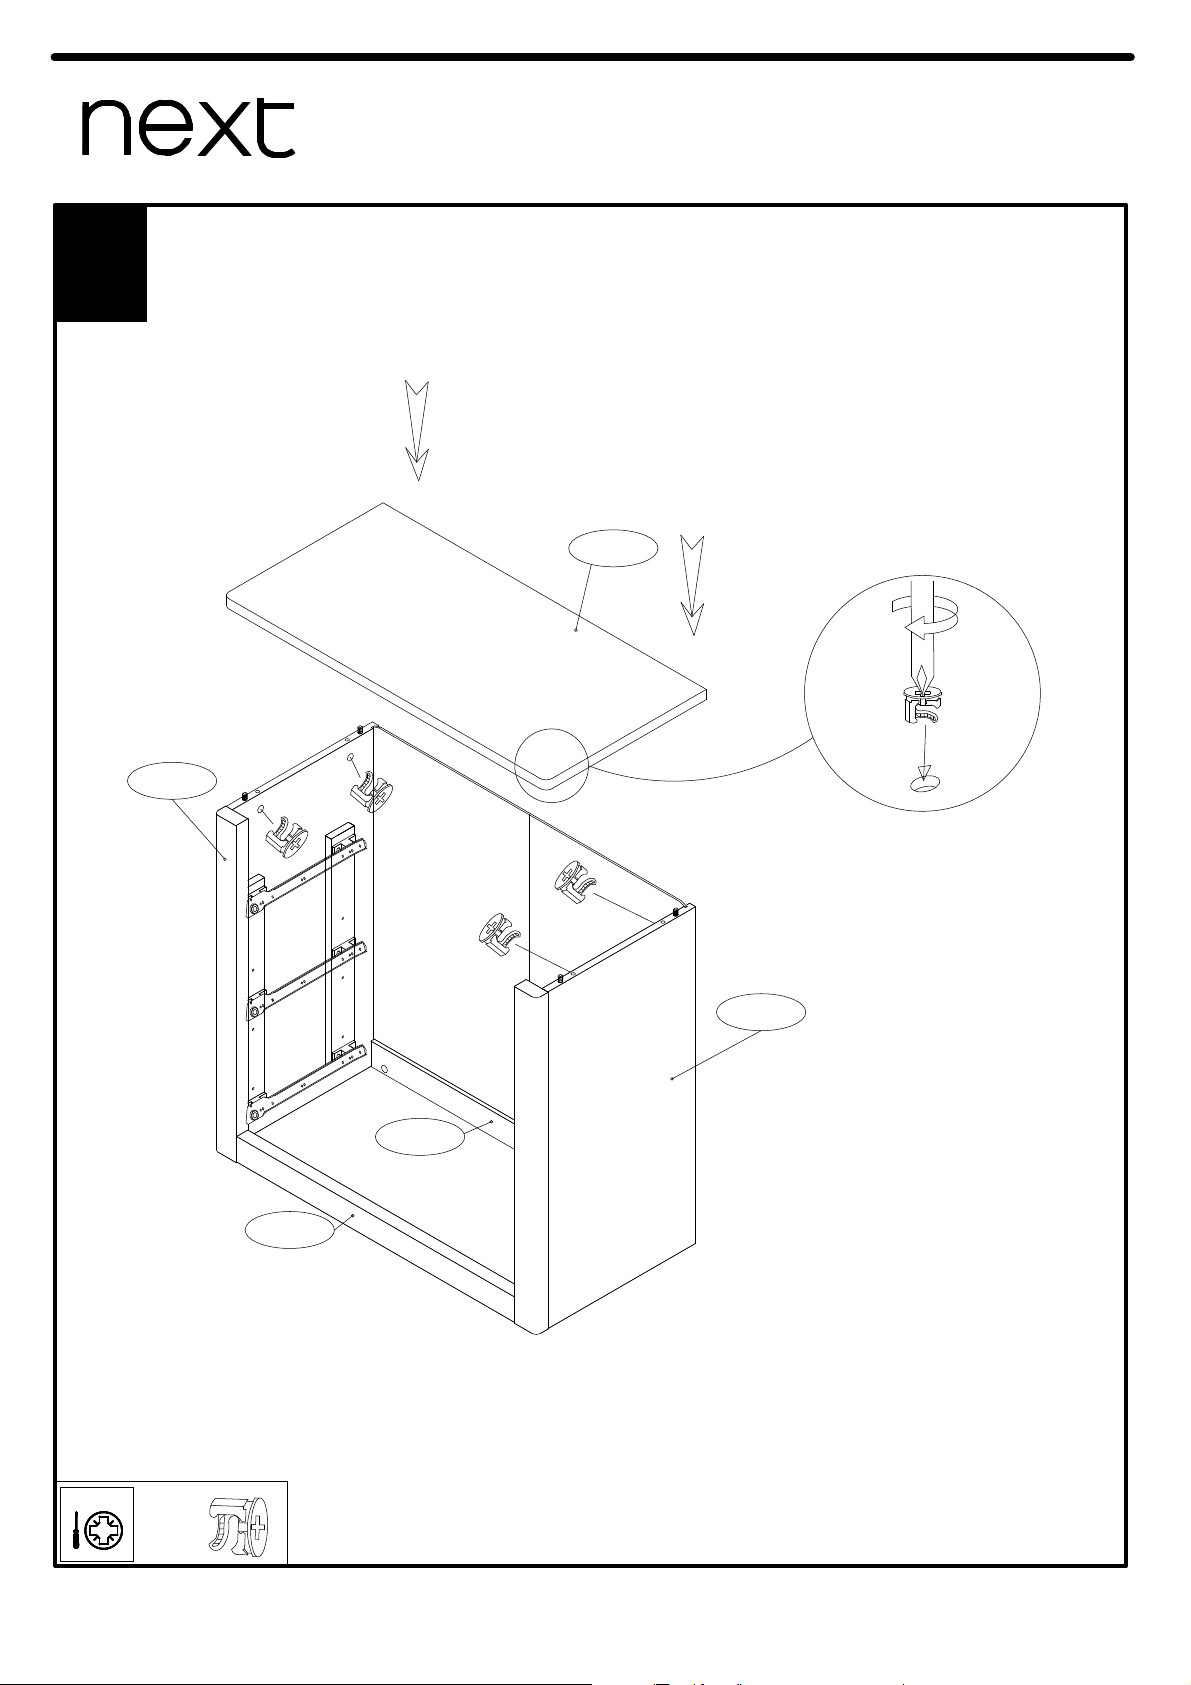
14
COMPTON CHEST
Assembly instructions
Produced in Poland for Next Retail Ltd
122325
122325-2015-V1
19
C31-110
C31-111
C31-804
C31-803
B
B
B
B
C31-410
PH2PH2PH2PH2
Bx4
PH2
Page 18
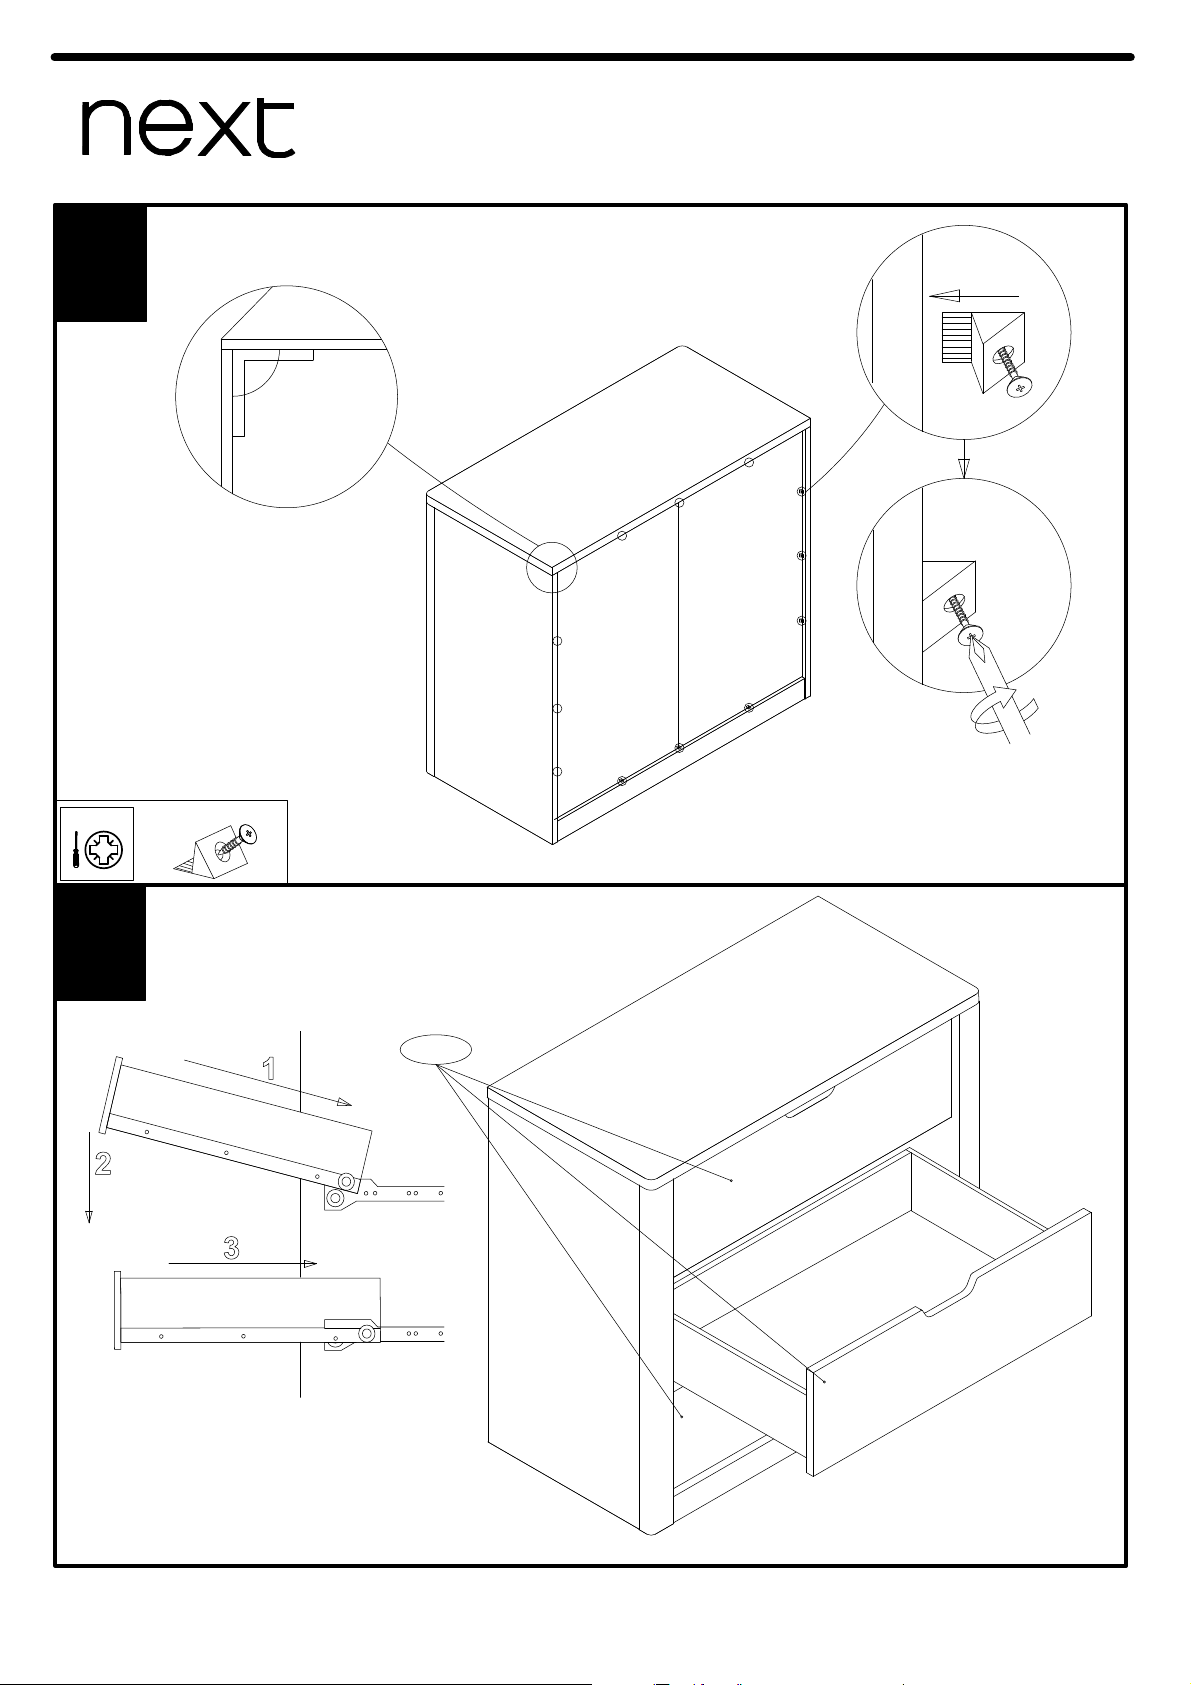
15
o
90
C31-701
J
Jx12
PH2
COMPTON CHEST
Assembly instructions
Produced in Poland for Next Retail Ltd
122325
122325-2015-V1
20
21
Page 19
16
22
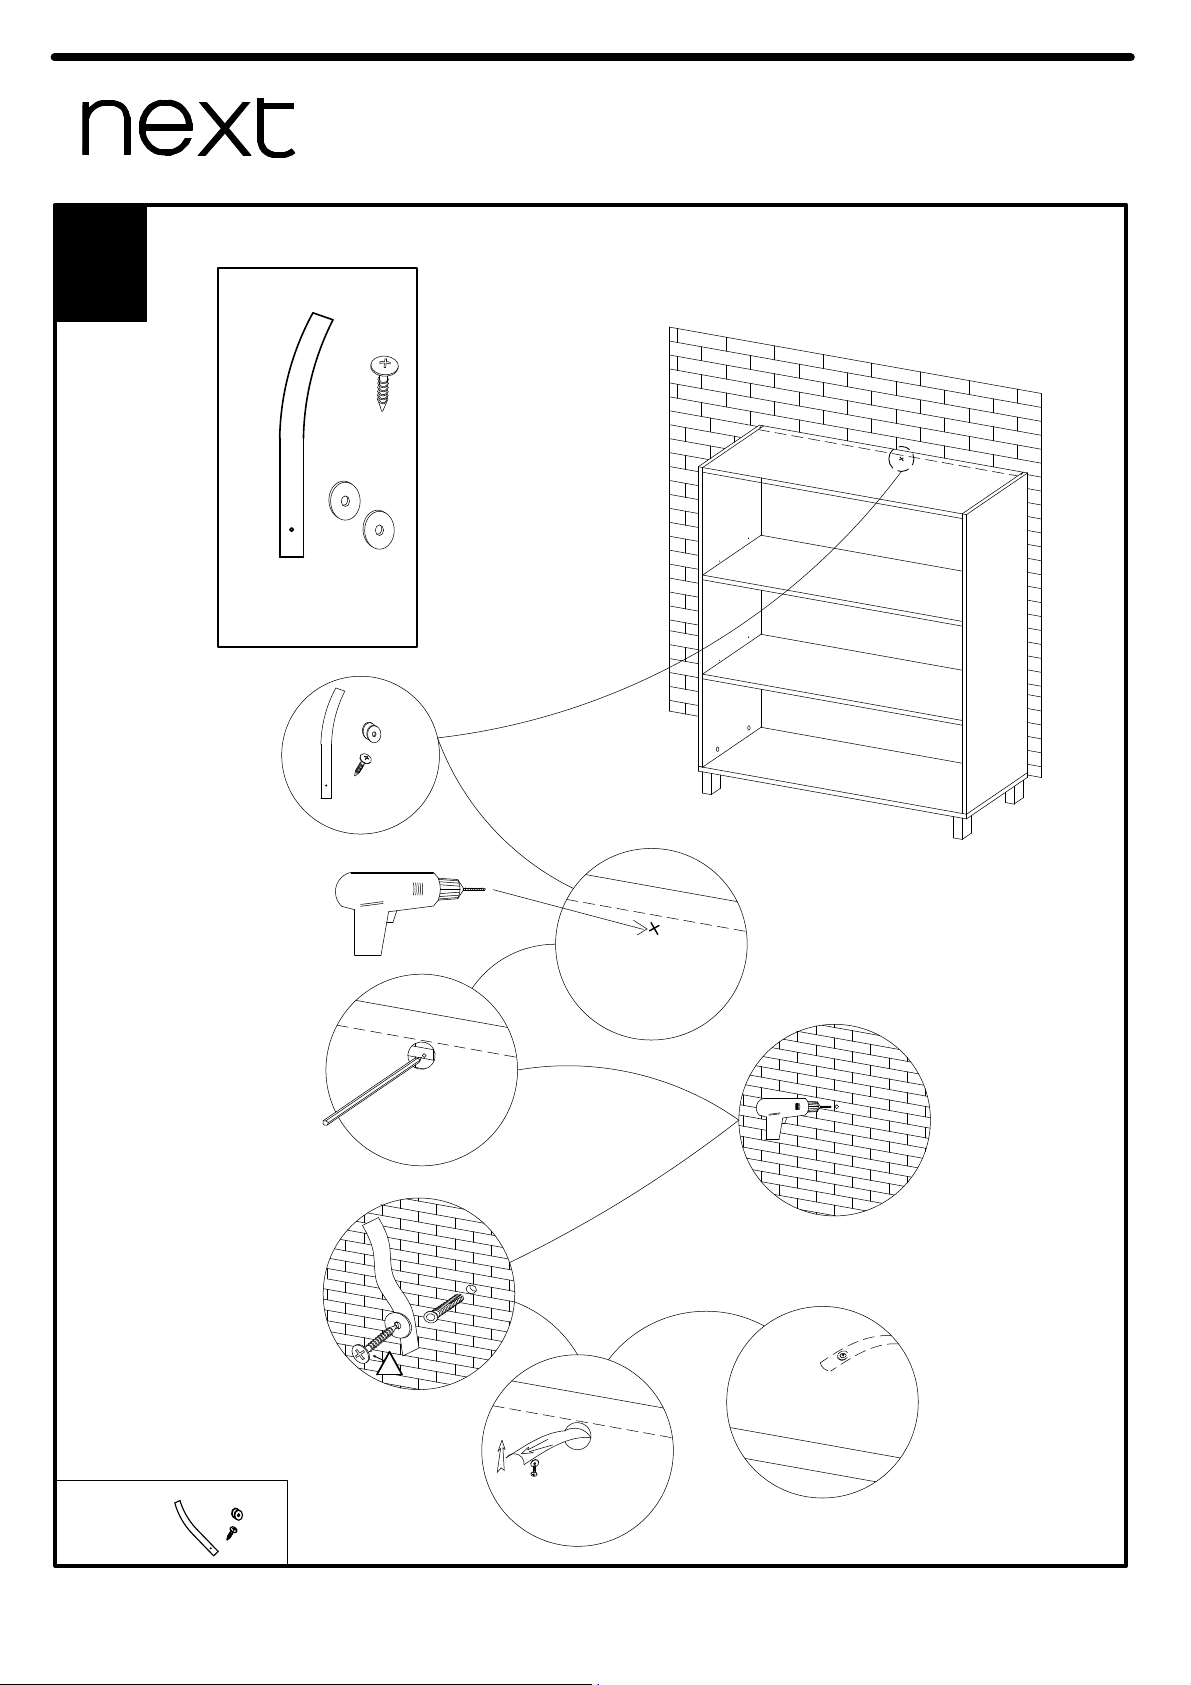
Ø8.0
!
1
2
3
4
5
6
I1x1
The wall fastening serves to prevent tipping - be absolutely sure to mount it!
For certain wall types, a special wall plug may be necessary!
COMPTON CHEST
Assembly instructions
Produced in Poland for Next Retail Ltd
122325
122325-2015-V1
Page 20
17
COMPTON CHEST
Assembly instructions
Produced in Poland for Next Retail Ltd
122325
122325-2015-V1
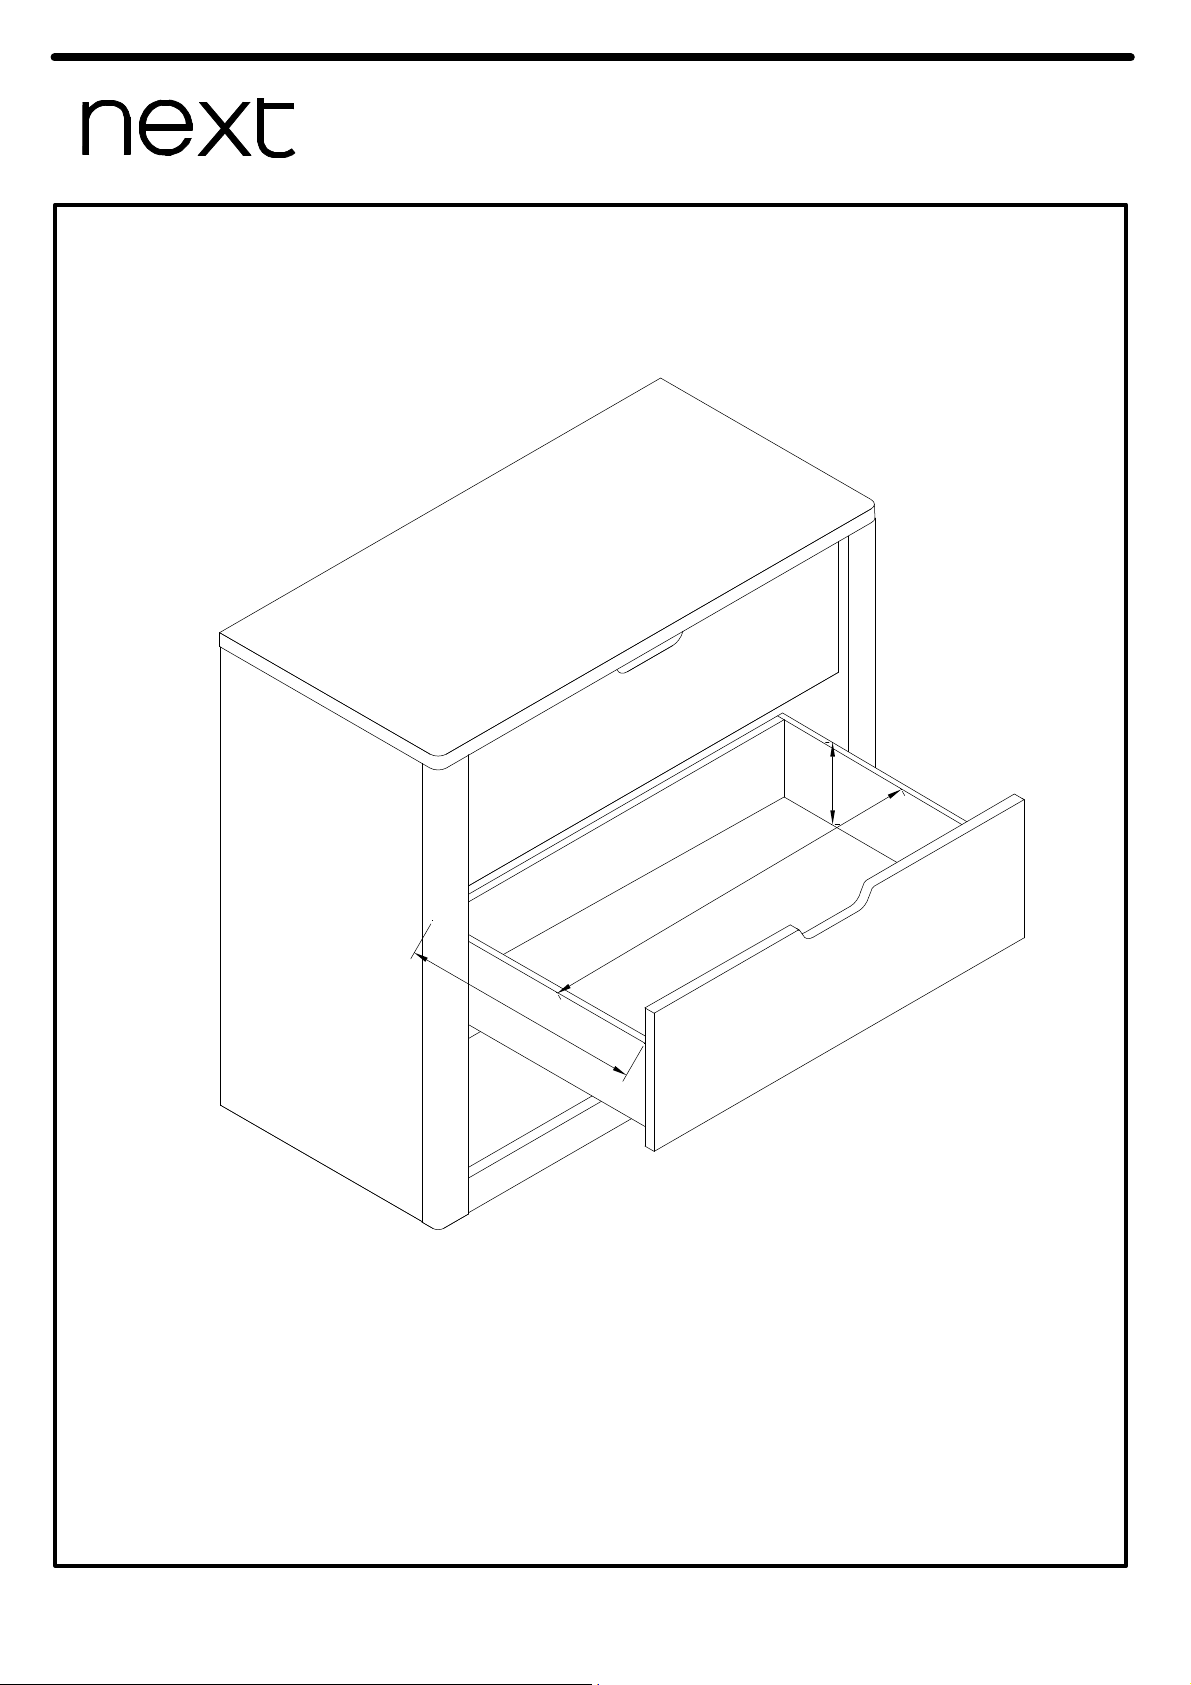
638 mm
3
14 mm
126 mm
Actual product size
H76 x W81 x D40cm
 Loading...