

Page 1
Product Guide
Standard Keypad
Bolt Mechanism
Shared & Assigned Use Functionality
Axis locks with a keypad interface are operated by a 4-digit User Code or by an ADA compliant User Key. Manager Keys provide management
access and external power. Programming is accomplished via a Programming Key unique to the lock system. An optional mobile application
tool simplies lock system management and provides audit trail.
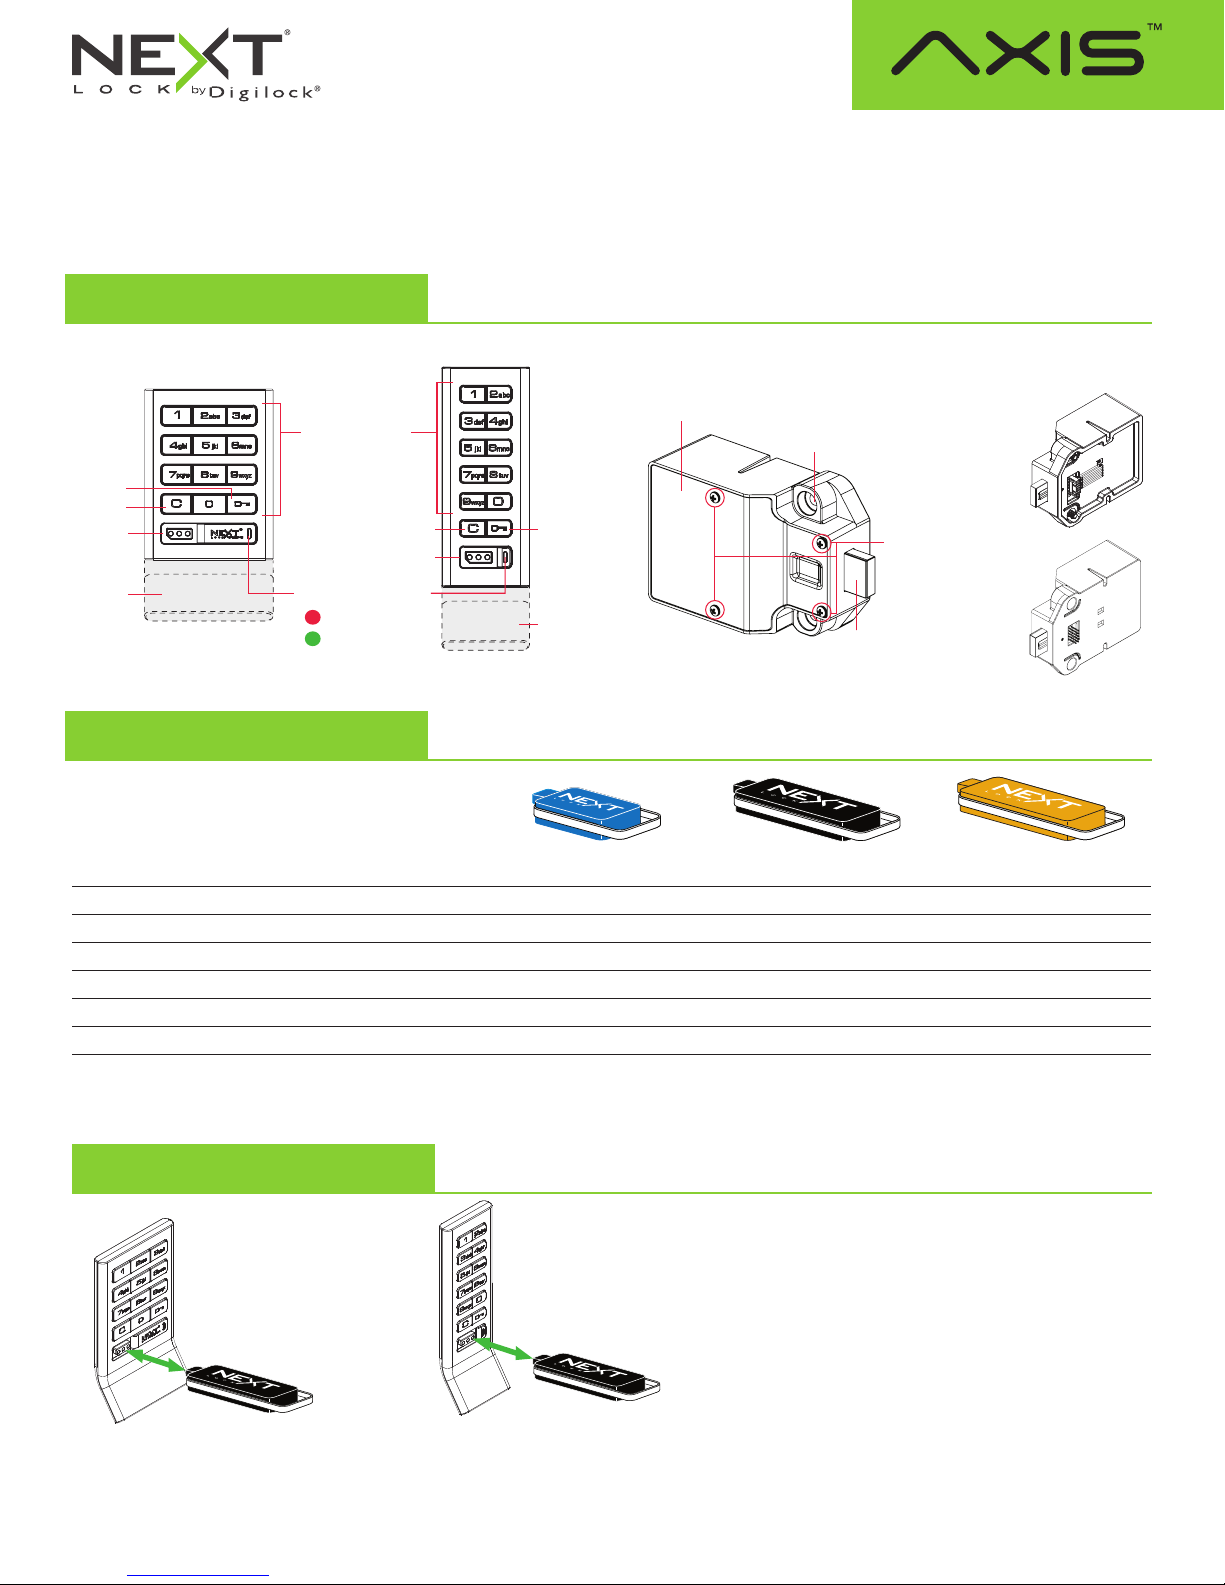
Lock Parts
Front Unit
Key Button
C Button
Key Slot
Pull Handle
Alpha Numeric
Keypad
C Button
Key Slot
LED Usage Indicator
Shared Use
Assigned Use
Key Button
Pull Handle
Rear Unit
Standard Vertical
Keys
User Key Manager Key* Programming Key**
Operates the lock
Overrides user access
Allows management inspection
Provides external power
Registers Manager Keys
Assigns user credential (in assigned use functionality)
Sets lock functionality
*Up to 25 Manager Keys may be registered to each lock **1 Programming Key allowed per lock group
• • •
Cover Plate
Lock Mounting Holes
Cover Plate
Screws
1/2" (12.7 mm)
Deadbolt
• •
• •
• •
•
Connection Options
Cable
Pin
•
•
Key Insertion
Next logo must face up on standard and vertical body locks.
VerticalStandard
1
Page 2
Product Guide
Standard Keypad
Bolt Mechanism
Shared & Assigned Use Functionality
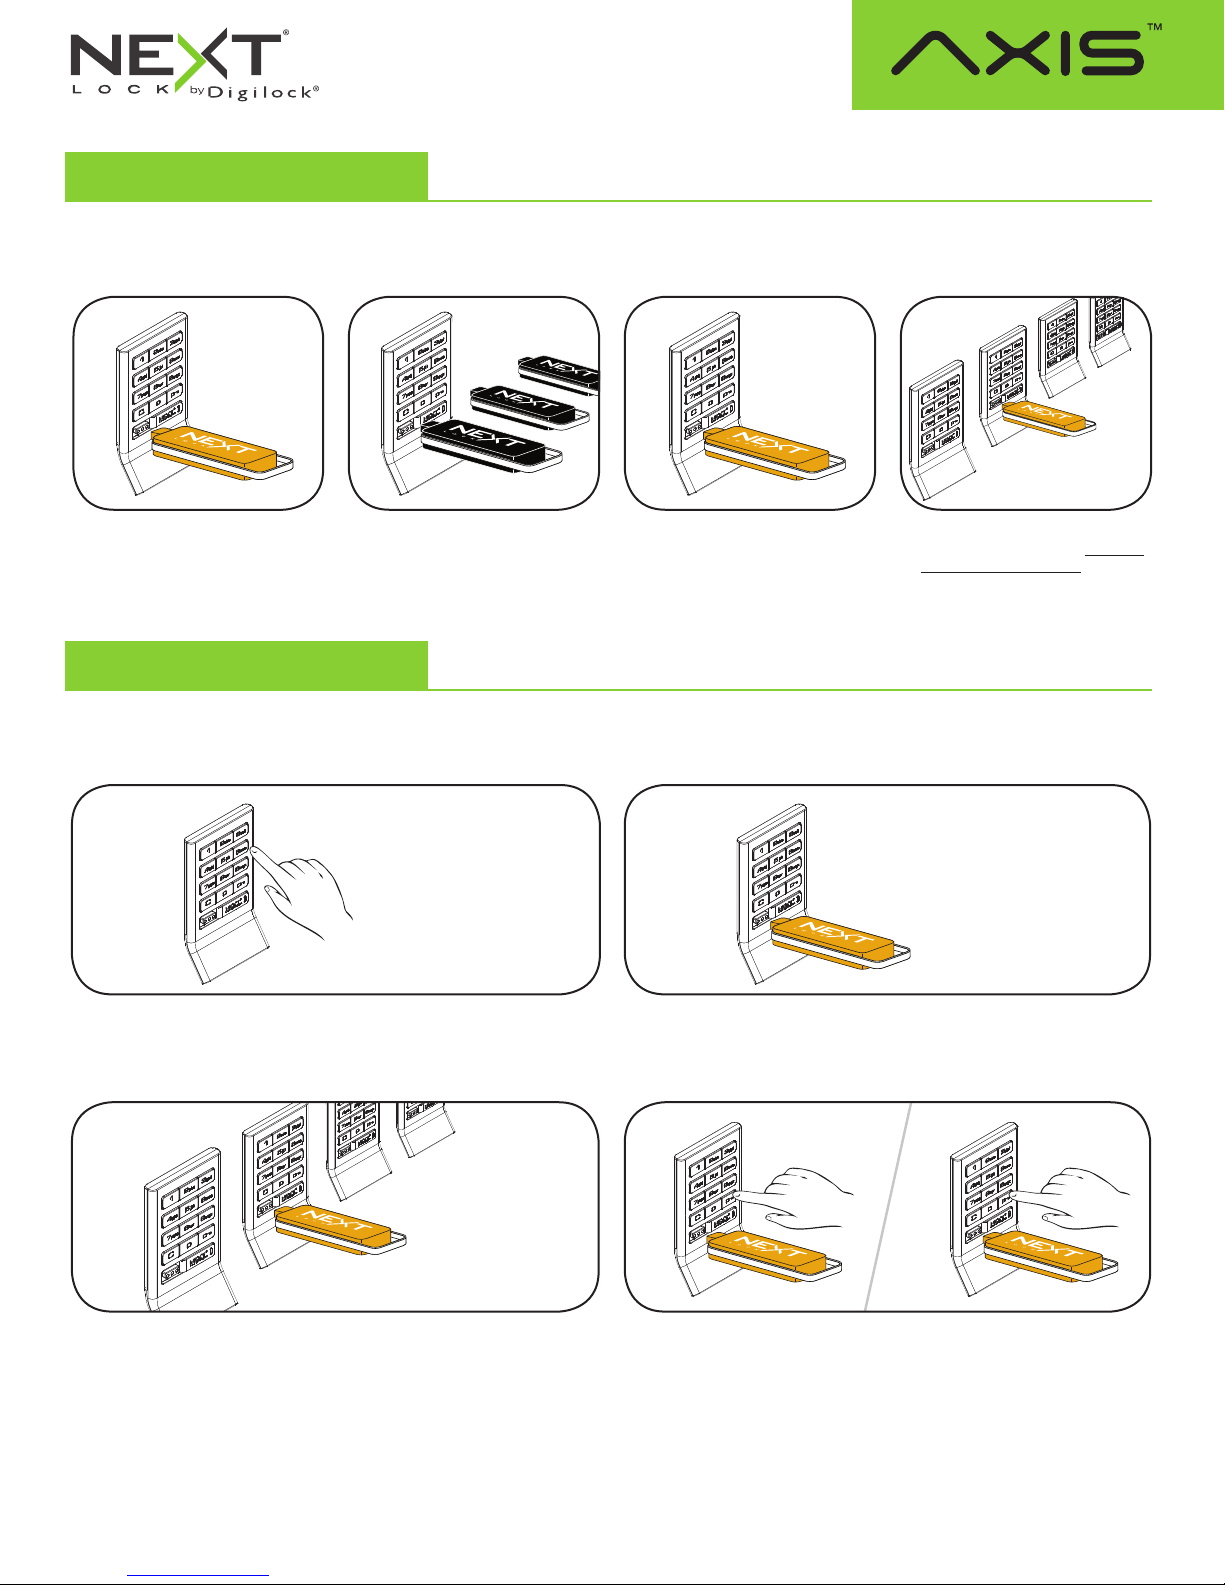
Setup
Locks are shipped with factory default settings (only operates by pressing = `). Setup must be completed to register the Programming
Key and Manager Keys to all the locks.
1 32 4
Insert the Programming Key.
A two-tone beep will be heard
and the LED will turn on.
Insert one Manager Key at a time.
A two-tone beep will be heard for
each Manager Key registered.
Insert the Programming Key.
A two-tone beep will be heard
and the LED will turn o.
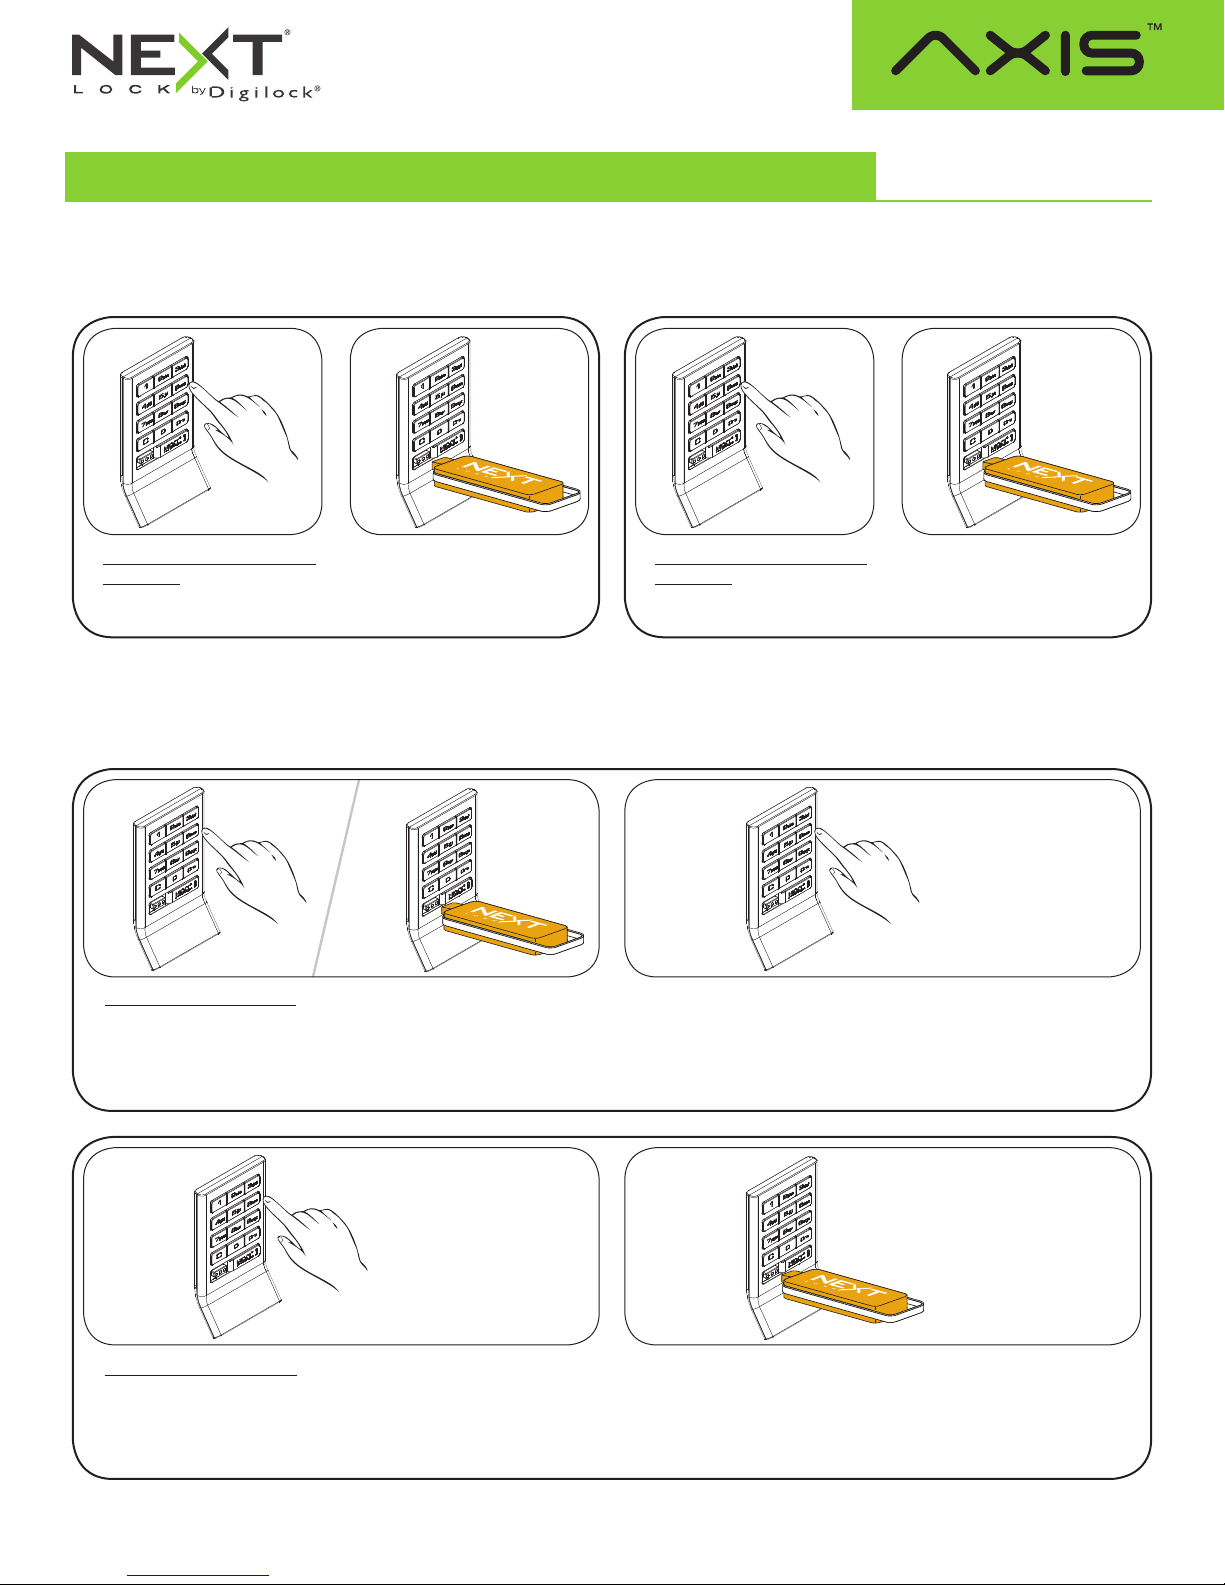
Programming Instructions
Express Register Manager Keys
The Programming Key can quickly register the same Manager Keys to operate multiple locks.
1
Go to the lock already registered to operate with the Manager Keys.
Press
=` 66 `
The LED will turn on.
.
2
Insert the Programming Key.
A two-tone beep will be heard and the LED will turn o.
Repeat above steps for each lock
or follow instructions to Express
Register Manager Keys to setup
all locks.
3
At each lock to be registered, insert the Programming Key.
A two-tone beep will be heard and the LED will ash once to indicate
successful registration.
2
4a 4b
End express registration mode.
Go to any registered lock.
Press
= ` then insert the Programming Key.
Press
= ` then insert the Programming Key again to return the bolt to the
original position.
Page 3
Product Guide
Programming Instructions
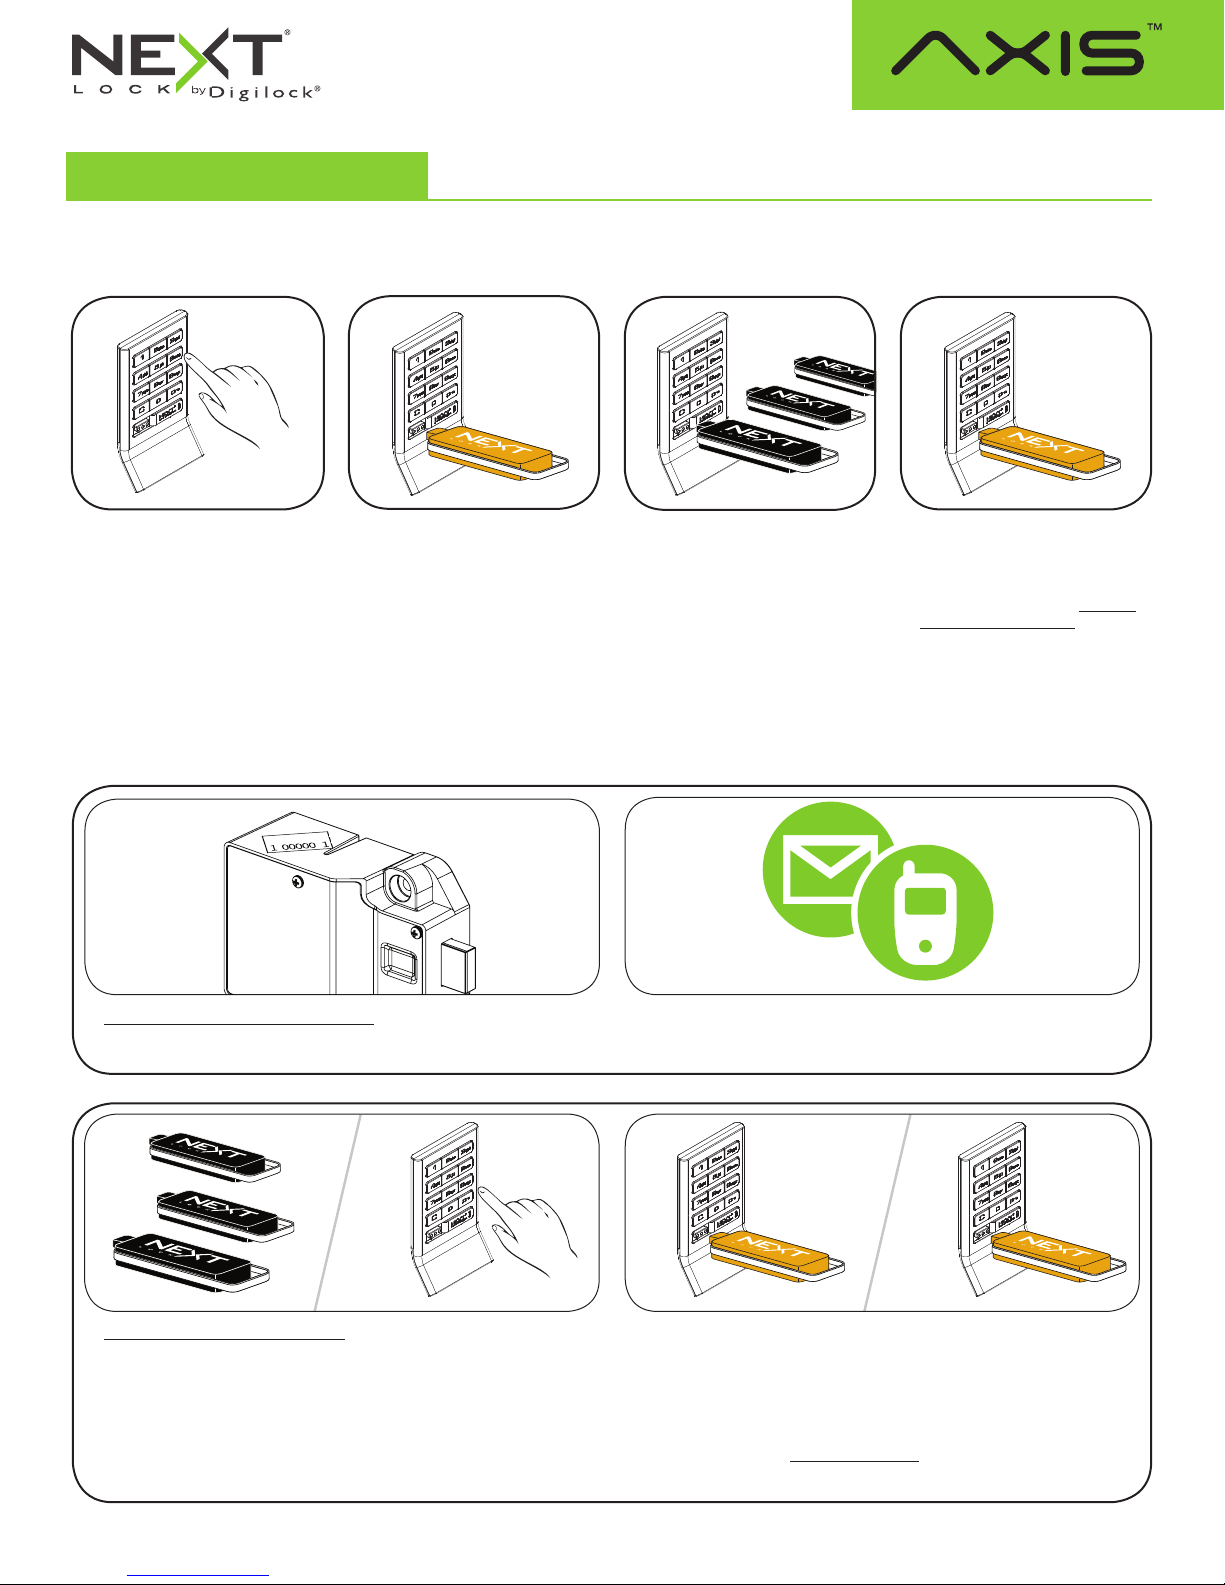
Add Manager Keys
Manager Keys can be registered to the locks at any time.
1 2 43
Standard Keypad
Bolt Mechanism
Shared & Assigned Use Functionality
Go to a lock requiring additional
Manager Keys.
Press =` 55 `.
The LED will turn on.
Insert the Programming Key.
A two-tone beep will be heard.
Insert each additional Manager
Key one at a time.
A two-tone beep will be heard for
each Manager Key registered.
Insert the Programming Key.
A two-tone beep will be heard
and the LED will turn o.
Repeat above steps for each lock
or follow instructions to Express
Register Manager Keys to register
the same Manager Keys to
multiple locks.
Replace Keys
Replacement keys must be purchased and registered to the locks to prevent the lost/stolen keys from operating a lock.
1
To replace the Programming Key:
Note the order number (found on the lock’s rear unit).
2
Contact Digilock Support to purchase a replacement Programming Key.
1a 1b
To replace the Manager Keys:
Collect all remaining Manager Keys.
Go to any lock operated by the Manager Keys.
Press
=` 5 5 `.
2a 2b
Insert the Programming Key.
A two-tone beep will be heard and the LED will turn on.
Insert the Programming Key again.
Three sets of two-tone beeps will be heard and the LED will turn o. All
previously registered Manager Keys are erased.
Follow instructions to Add Manager Keys to register the remaining
Manager Keys to the locks.
3
Page 4
Product Guide
Standard Keypad
Bolt Mechanism
Shared & Assigned Use Functionality
Programming Instructions
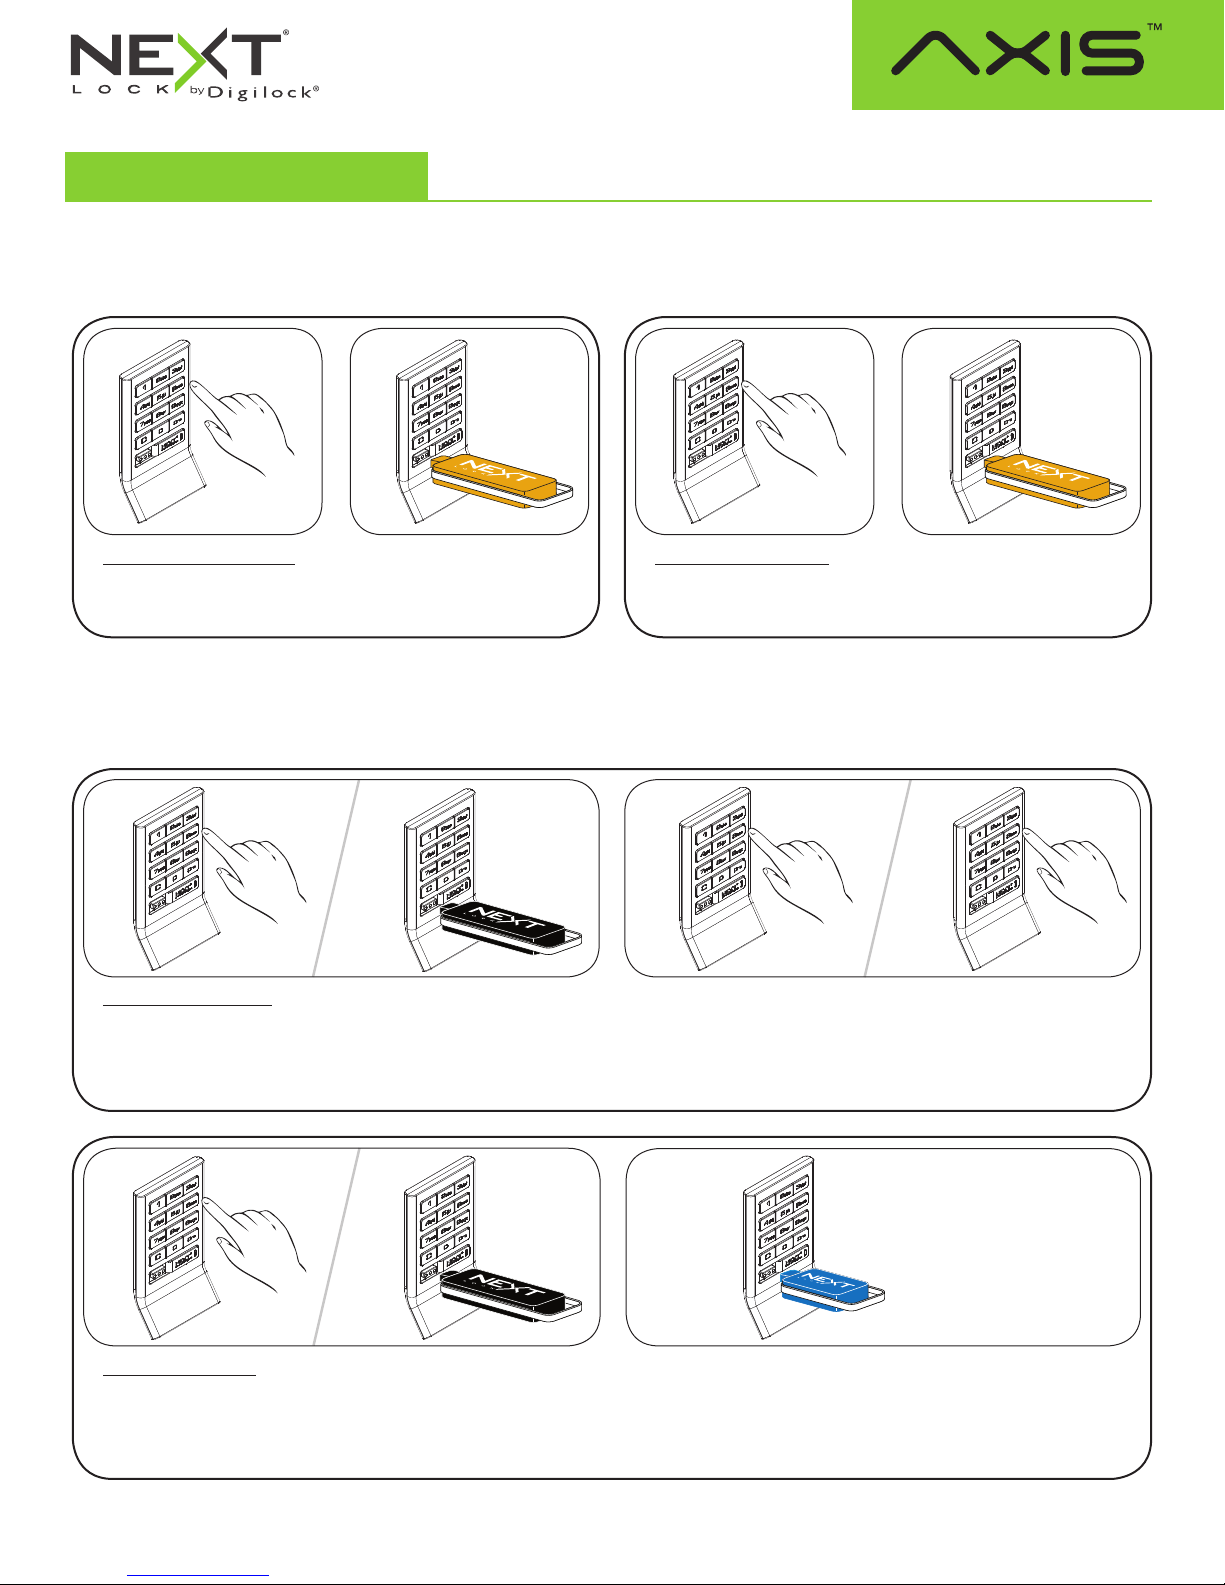
Set Lock Functionality
Each lock can be set for either shared or assigned use functionality. Press = to check functionality. If in shared use, LED is red. If in
assigned use, LED is green.
1
To set for assigned use:
Press =` 65 `.
The LED will turn on.
2
Insert the Programming Key.
A two-tone beep will be heard
and the LED will turn o.
1
To set for shared use:
Press =` 56 `.
The LED will turn on.
2
Insert the Programming Key.
A two-tone beep will be heard
and the LED will turn o.
Assign the User Credential (for assigned use functionality only)
Make sure that the lock is set for assigned use functionality. Once a user credential is assigned, the previously assigned user credential will
no longer operate the lock.
1a
2a
2b1b
Assign a User Code:
Default user code 1 2 3 4
Press = ` then insert a registered Manager Key.
The LED will turn on.
1a
Assign a User Key:
Press = ` then insert a registered Manager Key.
The LED will turn on.
4
1b
Press
= [new 4-digit code] `. A two-tone beep will be heard.
Press
= [the same 4-digit code] `.
Two sets of two-tone beeps will be heard and the LED will turn o.
2
Insert a User Key.
A two-tone beep will be heard and the LED will turn o.
Page 5
Product Guide
Standard Keypad
Bolt Mechanism
Shared & Assigned Use Functionality
Set Additional Lock Features (for shared use functionality only)
LED Usage Indicator
When in shared use functionality, each lock can be programmed to have the LED ash or not ash while the lock is in use. The default
setting is ON (red LED ashes while lock is in use).
1 12 2
To turn o the LED Usage
Indicator:
Press =` 92 `.
The LED will ash.
Insert the Programming Key.
A two-tone beep will be heard
and the LED will turn o.
To turn on the LED Usage
Indicator:
Press =` 91 `.
The LED will ash.
Insert the Programming Key.
A two-tone beep will be heard
and the LED will turn o.
Auto Unlock
When in shared use functionality, each lock can be programmed to auto unlock after a set number of hours. The default setting is OFF (does
not auto unlock).
1a
To turn on Auto Unlock:
Press =` 95 `.
The LED will ash.
Insert the Programming Key.
The LED will turn on.
1b
2
Press the set number of hours from
Two sets of two-tone beeps will be heard and the LED will turn o.
For example: Press 8 ` to set the lock to auto unlock after 8 hours.
1 - 9 9 then press `.
1
To turn o Auto Unlock:
Press =` 94 `.
The LED will ash.
2
Insert the Programming Key.
A two-tone beep will be heard and the LED will turn o.
5
Page 6
Product Guide
Standard Keypad
Bolt Mechanism
Shared & Assigned Use Functionality
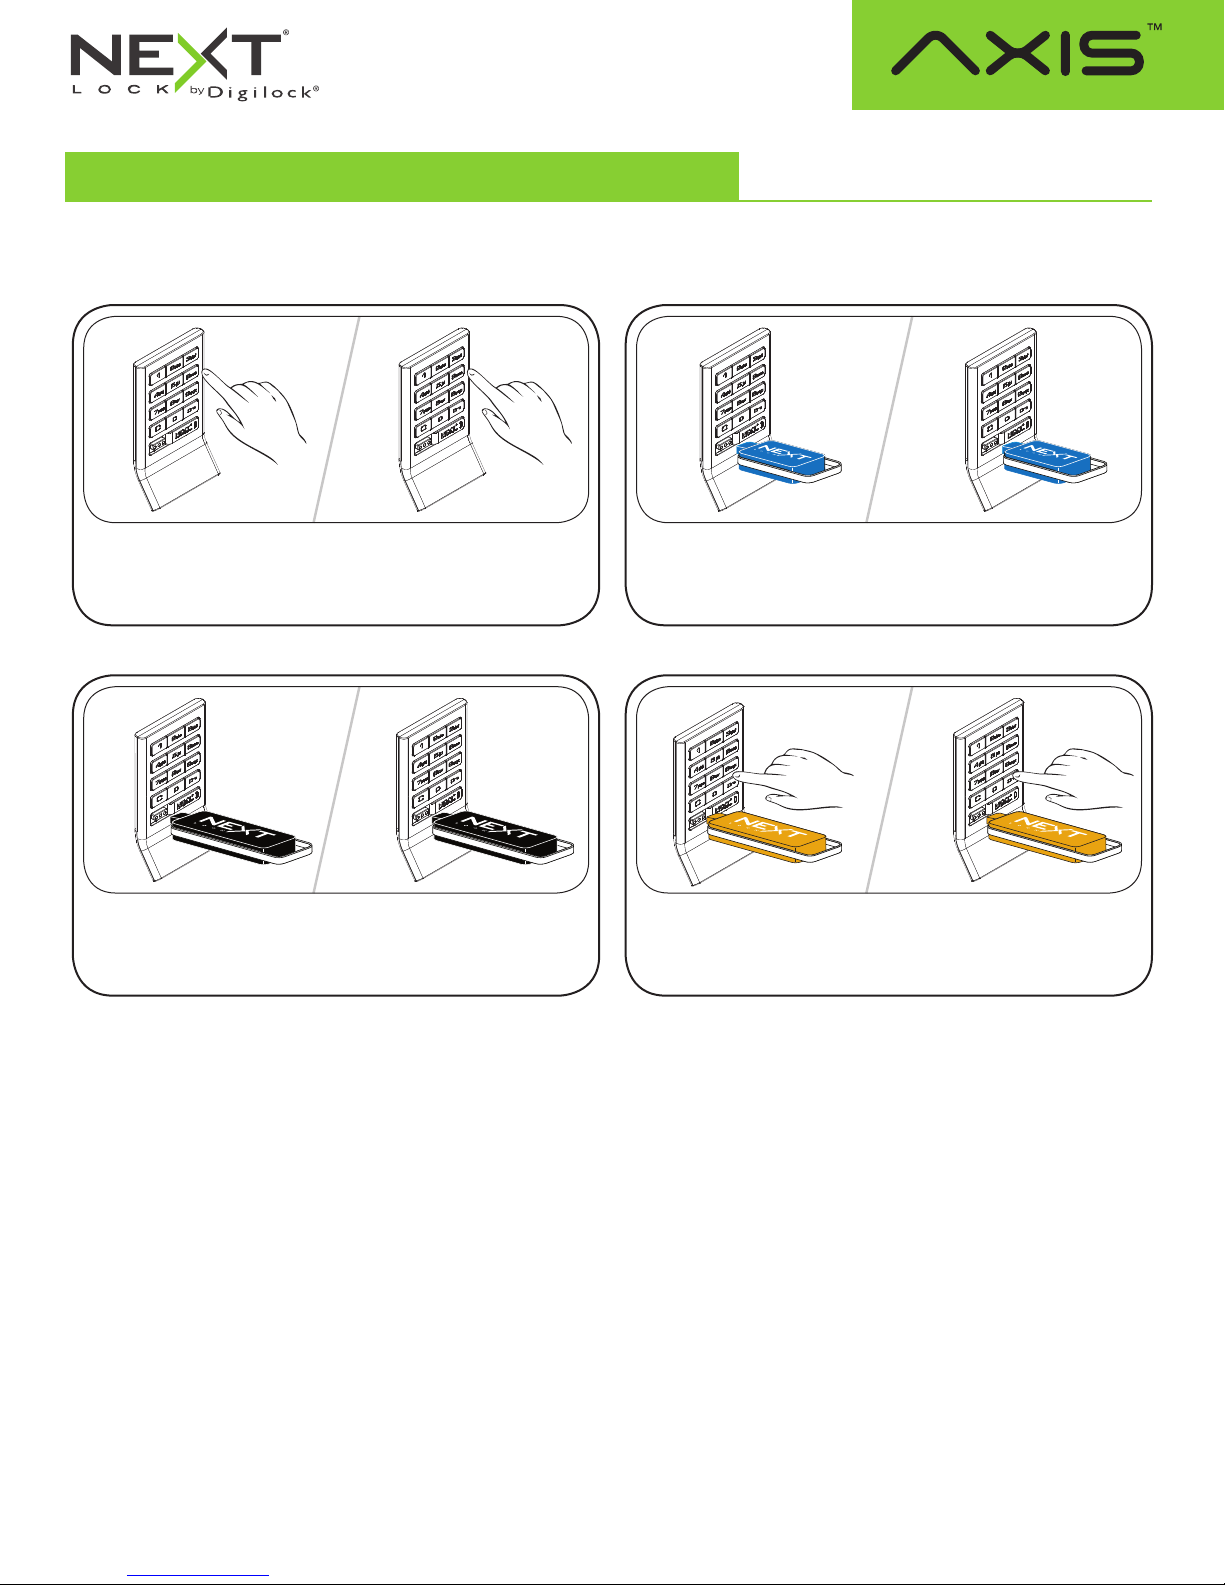
Operating Instructions - In Shared Use Functionality
In shared use functionality, users enter a self-selected 4-digit User Code or insert any User Key to lock and the same User Code or User
Key to unlock. Once unlocked, the locker is available for a dierent user.
1a
Operate with a User Code
To lock: Press = [any 4-digit code] `.
To unlock: Press
= [the same 4-digit code] `.
1a
Operate with a Manager Key
To unlock: Insert a registered Manager Key.
To relock: Insert a registered Manager Key.**
1b
1b
1a
Operate with a User Key
To lock: Insert any User Key.
*
To unlock: Insert the same User Key.
1a
Operate with the Programming Key
To unlock: Press
To relock: Press
= `
then insert the Programming Key.
= `
then insert the Programming Key.**
1b
1b
* After 3 consecutive incorrect user code entries, the keypad will be disabled for 1 minute (Sleep Mode).
** If a registered Manager Key or the Programming Key is used to relock, the previous user credential will
continue to operate the lock.
6
Page 7
Product Guide
Standard Keypad
Bolt Mechanism
Shared & Assigned Use Functionality
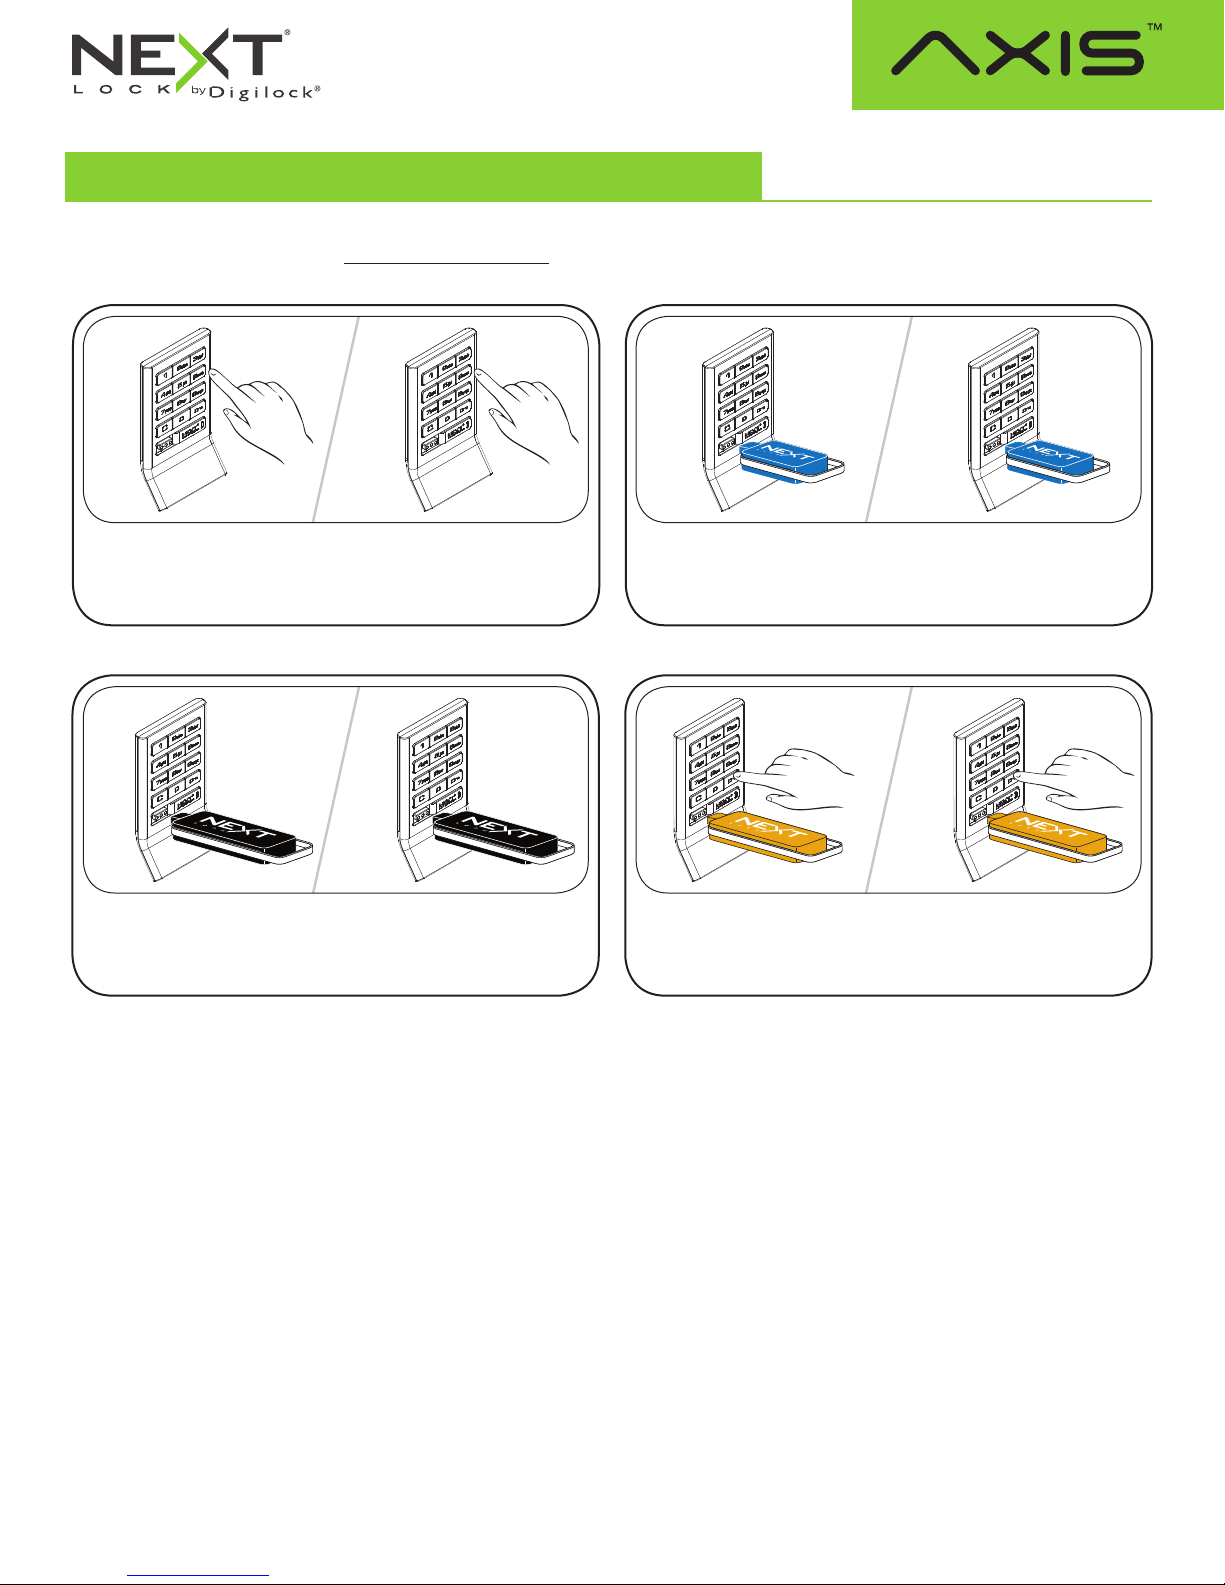
Operating Instructions - In Assigned Use Functionality
In assigned use functionality, users unlock their assigned locker with either their 4-digit User Code or User Key. To reassign a locker to a
dierent user, follow instructions to Assign the User Credential.
1a
Operate with the User Code
To unlock: Press = [assigned 4-digit code] `.
To relock: Press
= ` `
.
1a
Operate with a Manager Key
To unlock: Insert a registered Manager Key.
To relock: Insert a registered Manager Key.
1b
1b
1a
Operate with the User Key
*
To unlock: Insert the assigned User Key.
To relock: Insert the assigned User Key.
1a
Operate with the Programming Key
To unlock: Press
To relock: Press
= `
then insert the Programming Key.
= `
then insert the Programming Key.
1b
1b
*After 3 consecutive incorrect user code entries, the keypad will be disabled for 1 minute (Sleep Mode).
7
Page 8
Product Guide
Standard Keypad
Bolt Mechanism
Shared & Assigned Use Functionality
Support
Sleep Mode
After three consecutive incorrect User Code entries to unlock, the lock will go into “Sleep Mode” for one minute and for an additional minute
for each subsequent incorrect entry. The keypad is disabled while in “Sleep Mode”. A registered Manager Key may be used to unlock while
the lock is in “Sleep Mode”.
Error Condition Indicators
10 rapid beeps:
The lock is binding which means that either door alignment or items in the locker are preventing the lock from operating. Press on the door
while operating the lock. If error condition persists, contact Digilock support for assistance.
2 s ets of three beeps:
The batteries are low. Replace the batteries.
Does not Unlock with the User Code or User Key
The lock does not recognize the User Code or User Key. For immediate access, operate with a registered Manager Key. If in assigned use
functionality, follow instructions to Assign the User Credential to assign a new User Code or User Key to the lock.
Does not Operate with a Manager Key
The lock does not recognize the Manager Key. Follow instructions to Add Manager Keys to register the Manager Key to the lock. For
immediate access, operate with another registered Manager Key or with the Programming Key.
Does not Operate with the Programming Key
The lock does not recognize the Programming Key. If the Programming Key has been replaced, operate with the Replacement
Programming Key. Contact Digilock support for additional assistance.
No Audible Feedback when = is Pressed
▪
The lock may be in “Sleep Mode” or the batteries may need to be replaced. For immediate access, operate with a registered
Manager Key.
▪
The front unit may not be properly connected to the rear unit. Remove the lock from the door and check the connection.
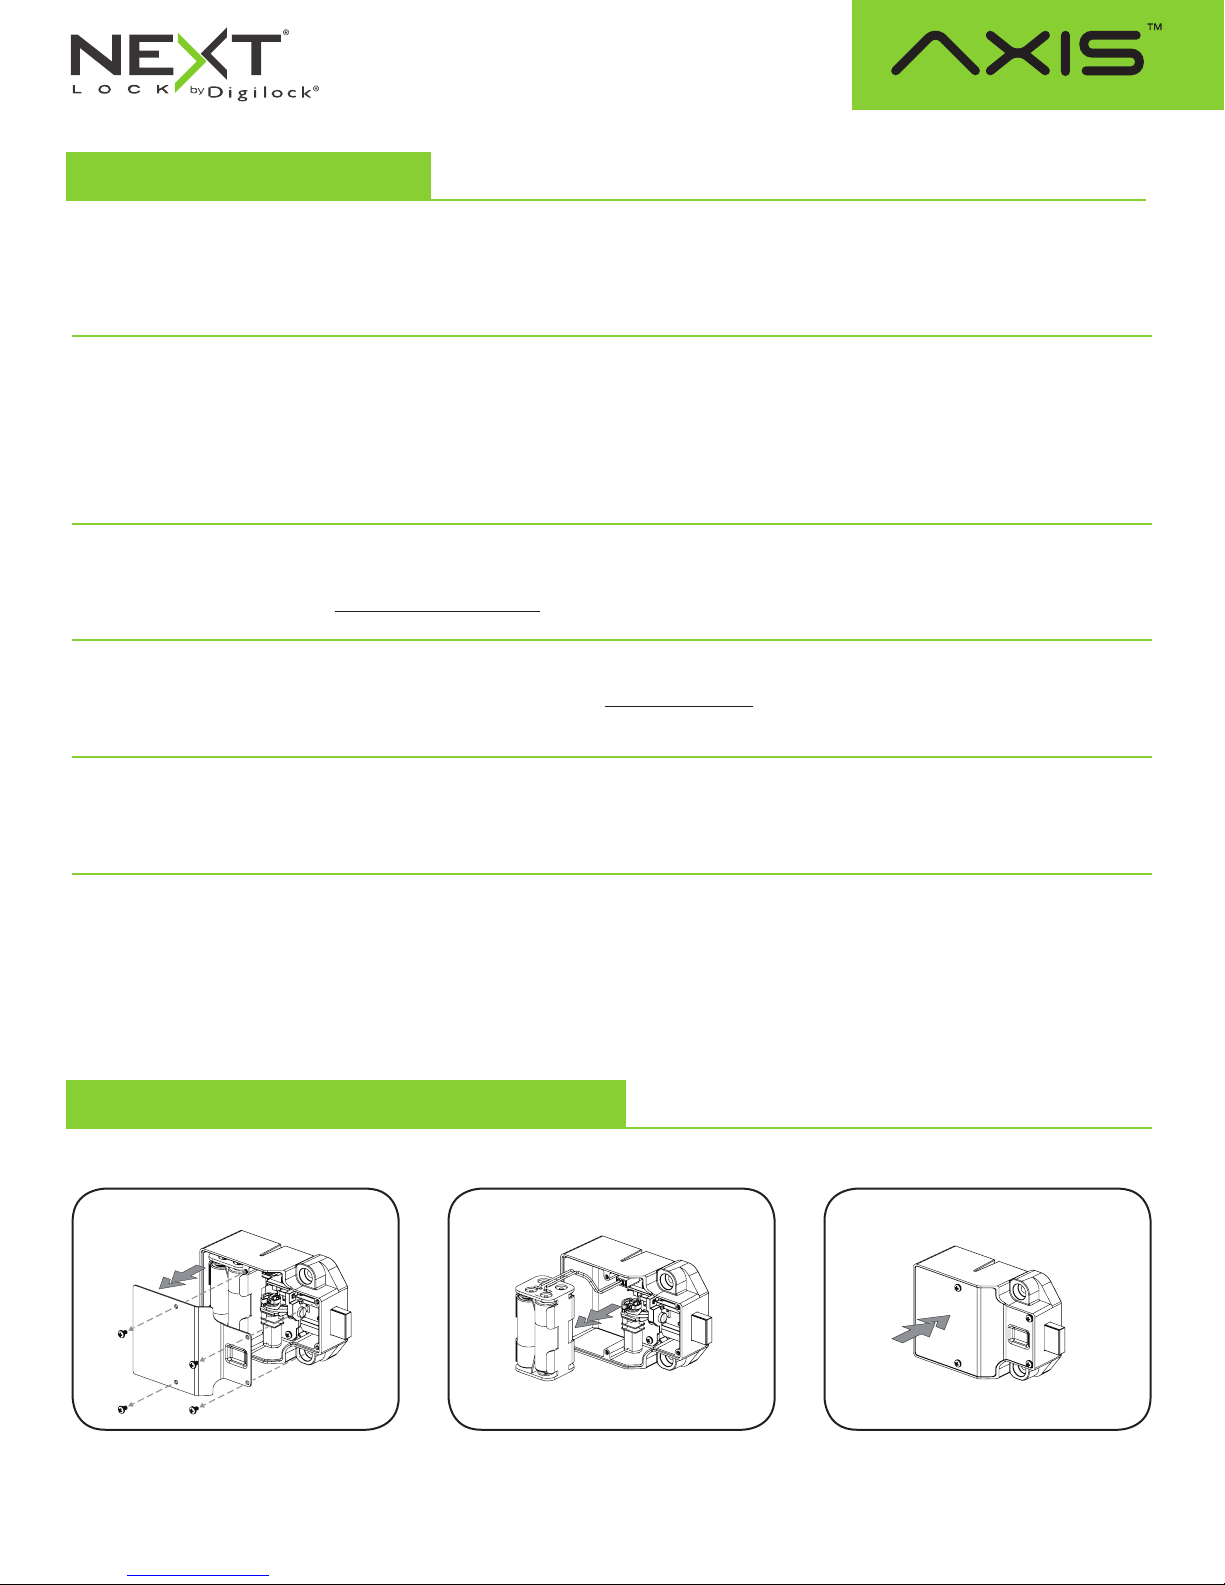
Battery Replacement (shown with cable rear unit)
It is not necessary to uninstall the lock from the door.
1 2 3
Remove the screws and the cover plate. Pull the battery pack from the rear housing.
111716
PG-NLSK-AD-DEN
Replace with four premium alkaline
AA batteries.
Place the battery pack back into the rear
housing and screw cover plate in place.
Phone: 707 766 6000
www.digilock.com | [email protected]
 Loading...