

Page 1
Tools Needed
Helpline
If you have any problems with this product or
require any replacement fittings please contact
Customer Services Tel: 0844 844 8999
• Never drag pieces of furniture across the floor as this will cause damage to the joints.
• All assembly fixings should always be tightened properly and periodically check all fixings and tighten if necessary.
• Carefully check that you have all parts before beginning assembly.
PRODUCT INFORMATION
• For general cleaning, periodically dust with a soft cloth.
• A mattress measuring 90cm x 190cm is intended for use with this child's bed.
• Do not rub or scrub the surface when cleaning.
CARE INSTRUCTIONS
• This child's bed is recommended for use by children aged over 4 years.
• We recommend that the packaging is used to protect the surfaces during assembly.
• WARNING: Do not place this child's bed near heat sources, windows and other furniture.
• Ensure the product is protected with mats and coasters when items are placed on the surfaces, to prevent scratching
or damage.
• Any spills should be removed immediately with a soft clean damp cloth and dried immediately.
ASSEMBLY INSTRUCTIONS.
Regrettably self assembly items cannot be returned once assembly is part or fully completed unless the item is found
to be faulty. Should you need to return the unassembled product, please repack in the original packaging.
IMPORTANT
• A maximum mattress height to be used is 17cm, a mark is present on the bed to show this height.
• WARNING: Children can become trapped between the bed and wall. To avoid risk of serious injury the distance
between the top safety barrier and the wall shall not exceed 75mm or shall be more than 230mm.
• High beds and the upper bed of bunk beds are not suitable for children under six years due to risk of injury from falls.
IMPORTANT - RETAIN FOR FUTURE REFERENCE - READ CAREFULLY.
• We suggest you spend a short time reading through this leaflet and then follow the simple step-by-step instructions.
• A minimum of 2 persons is required to assemble this product.
• Children are likely to play, bounce, jump and climb on beds, therefore the child's bed should not be placed too close
to other furniture, windows, blind cords, curtain pulls or other strings or cords, and should be placed either tight to
• WARNING: Do not use this child's bed if any part is broken, torn or missing.
• All assembly fittings should always be tightened properly and checked periodically.
• Made from Metal with a Powder coating finish.
• Made in China.
• Keep fittings out of children's reach and keep children well away from the construction area.
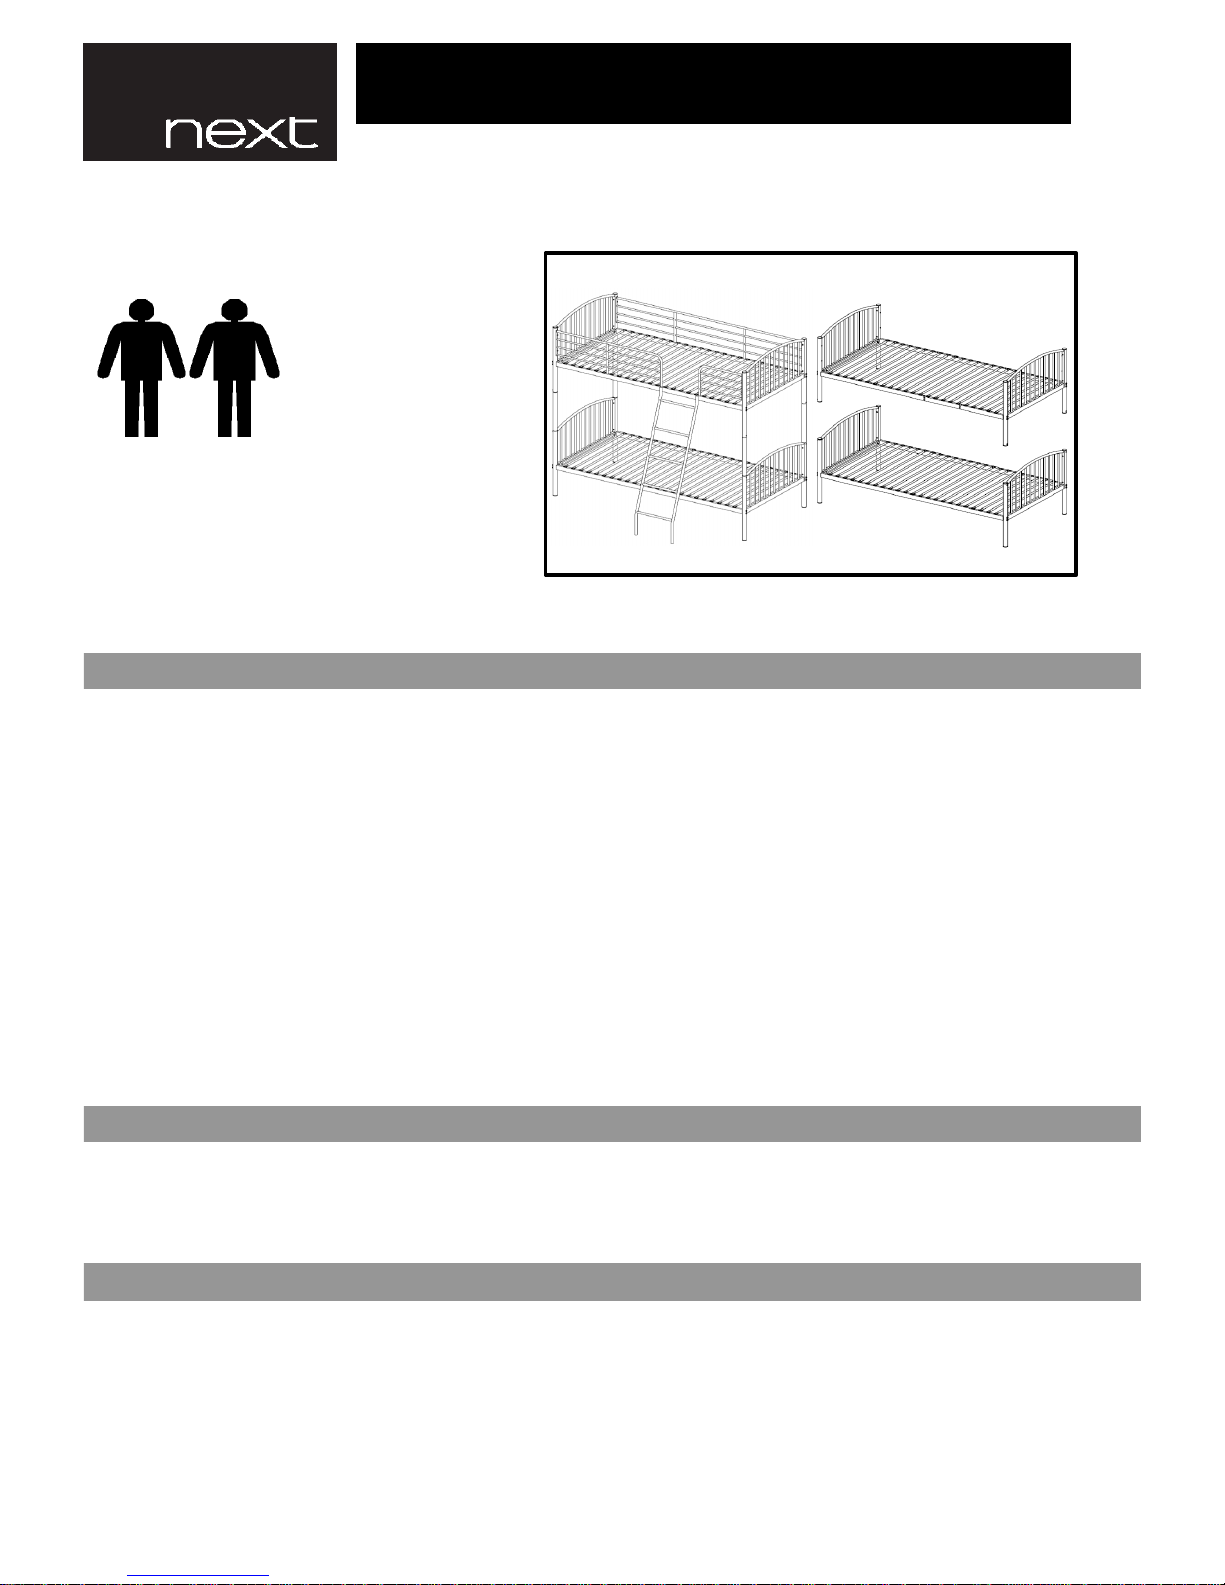
792296 WHITE METAL BUNK
Page 1 of 9
Page 2
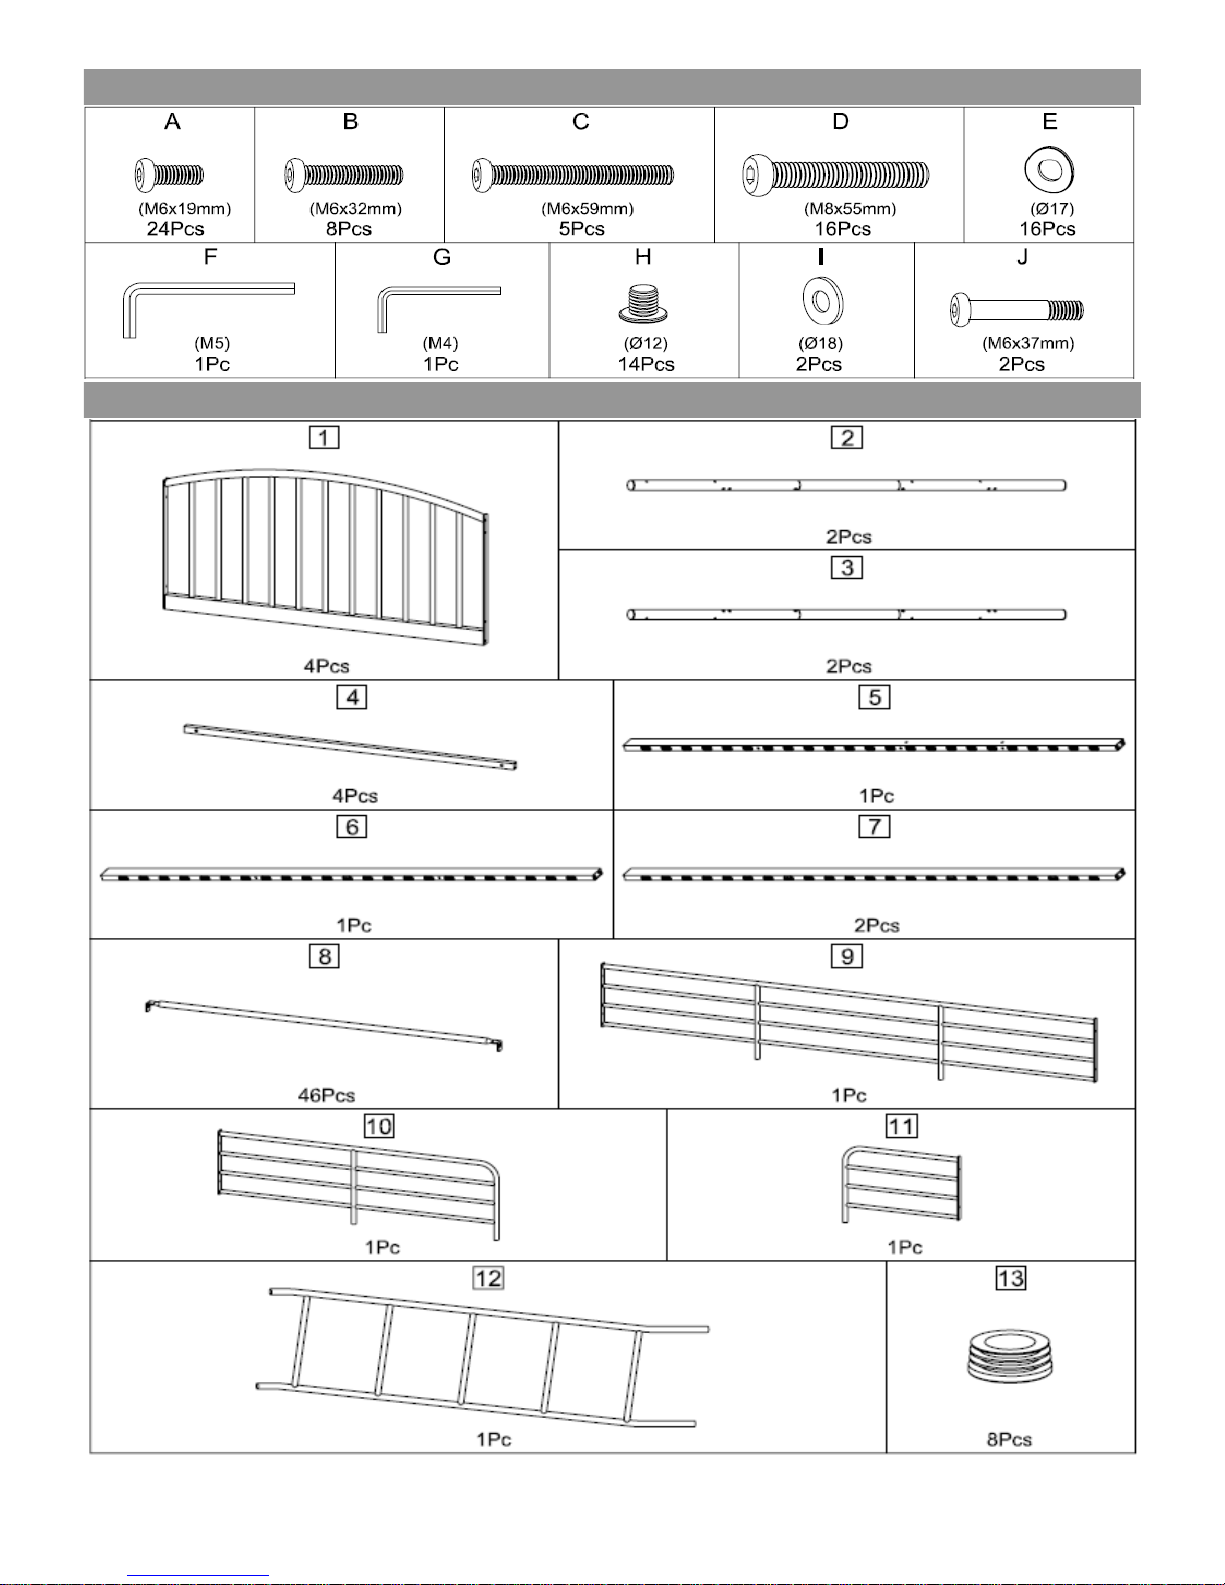
FITTINGS
PARTS
Page 2 of 9
Page 3
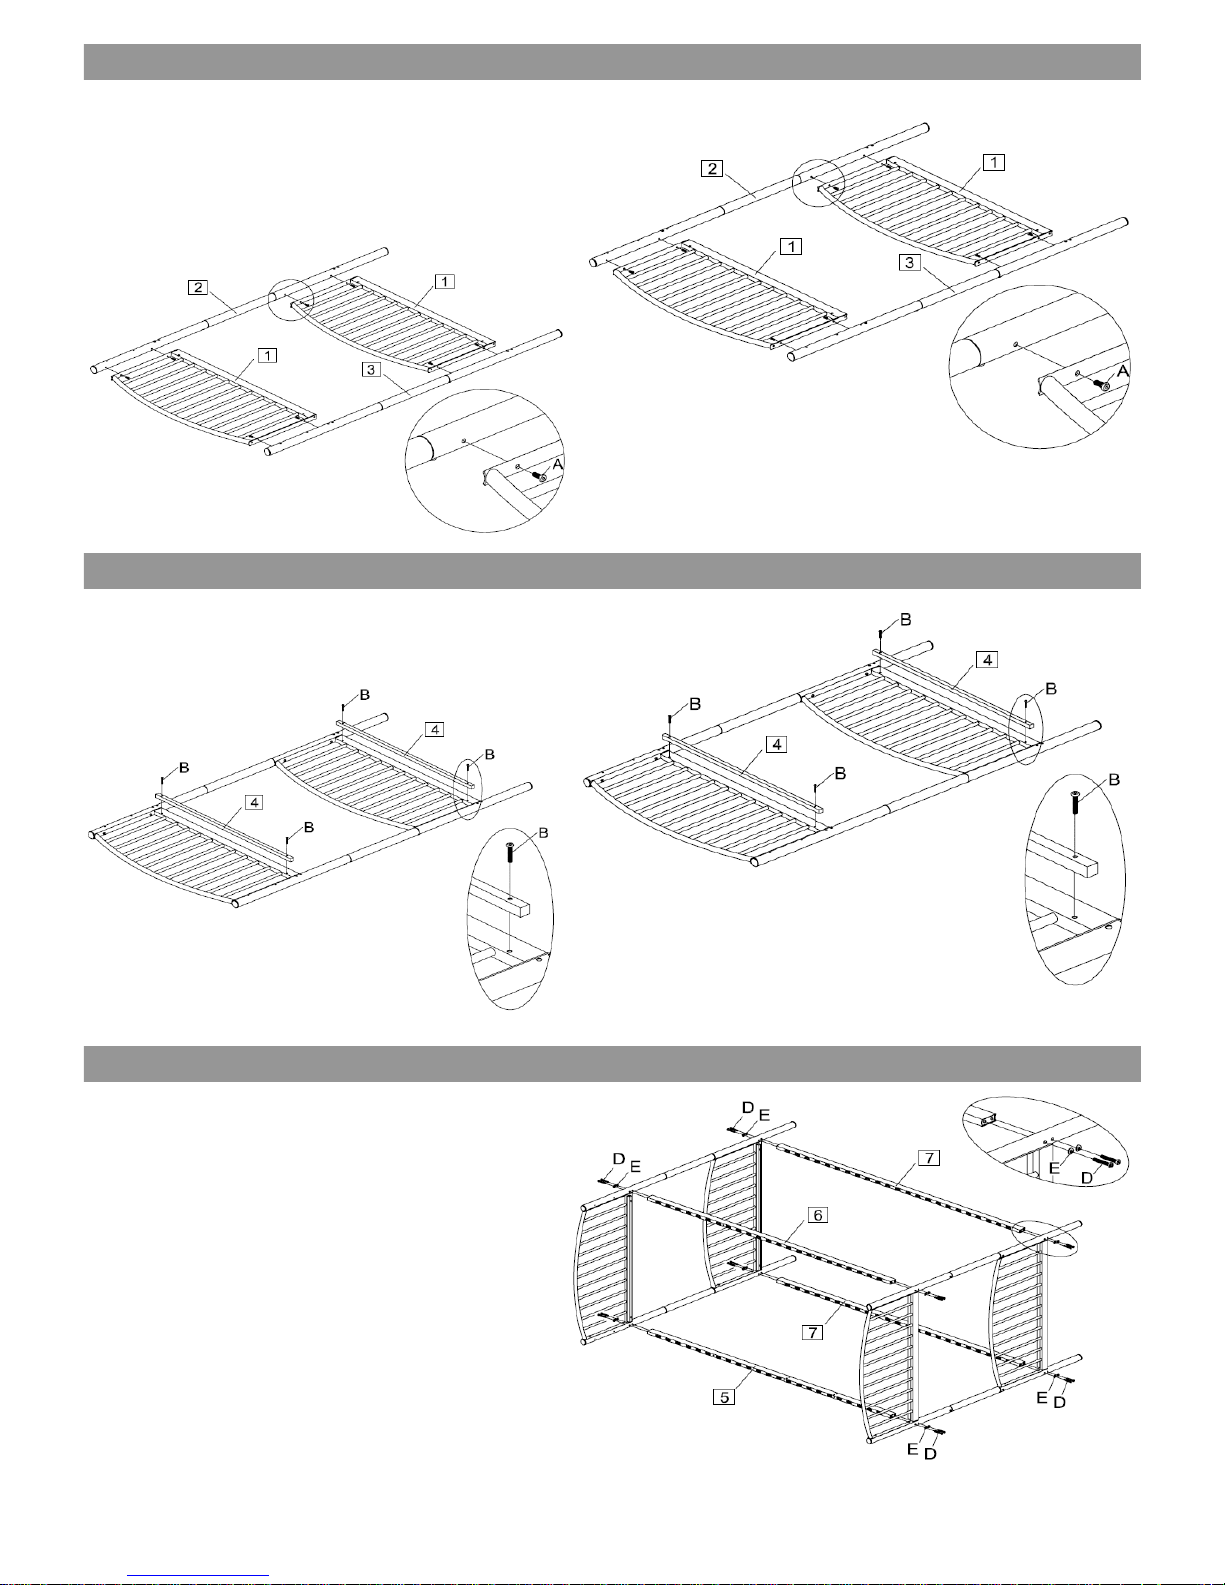
ASSEMBLING THE BUNK
1. Attach frame 1(×4) to pole 2(×2) and
3(x2) with 16 × bolts(A) using allen key (G) to
tighten.
1. Attach 4 × bars 4 to assembled end frame with
8 x bolts(B) and using allen key (G) to tighten.
1. Attach side rail 5,6 and 7(x2) to the assembled
end frame with 16 × bolts(D) and 16 × washers(E)
using allen key(F) to tighten.
STEP TWO
STEP ONE
STEP THREE
Page 3 of 9
Page 4
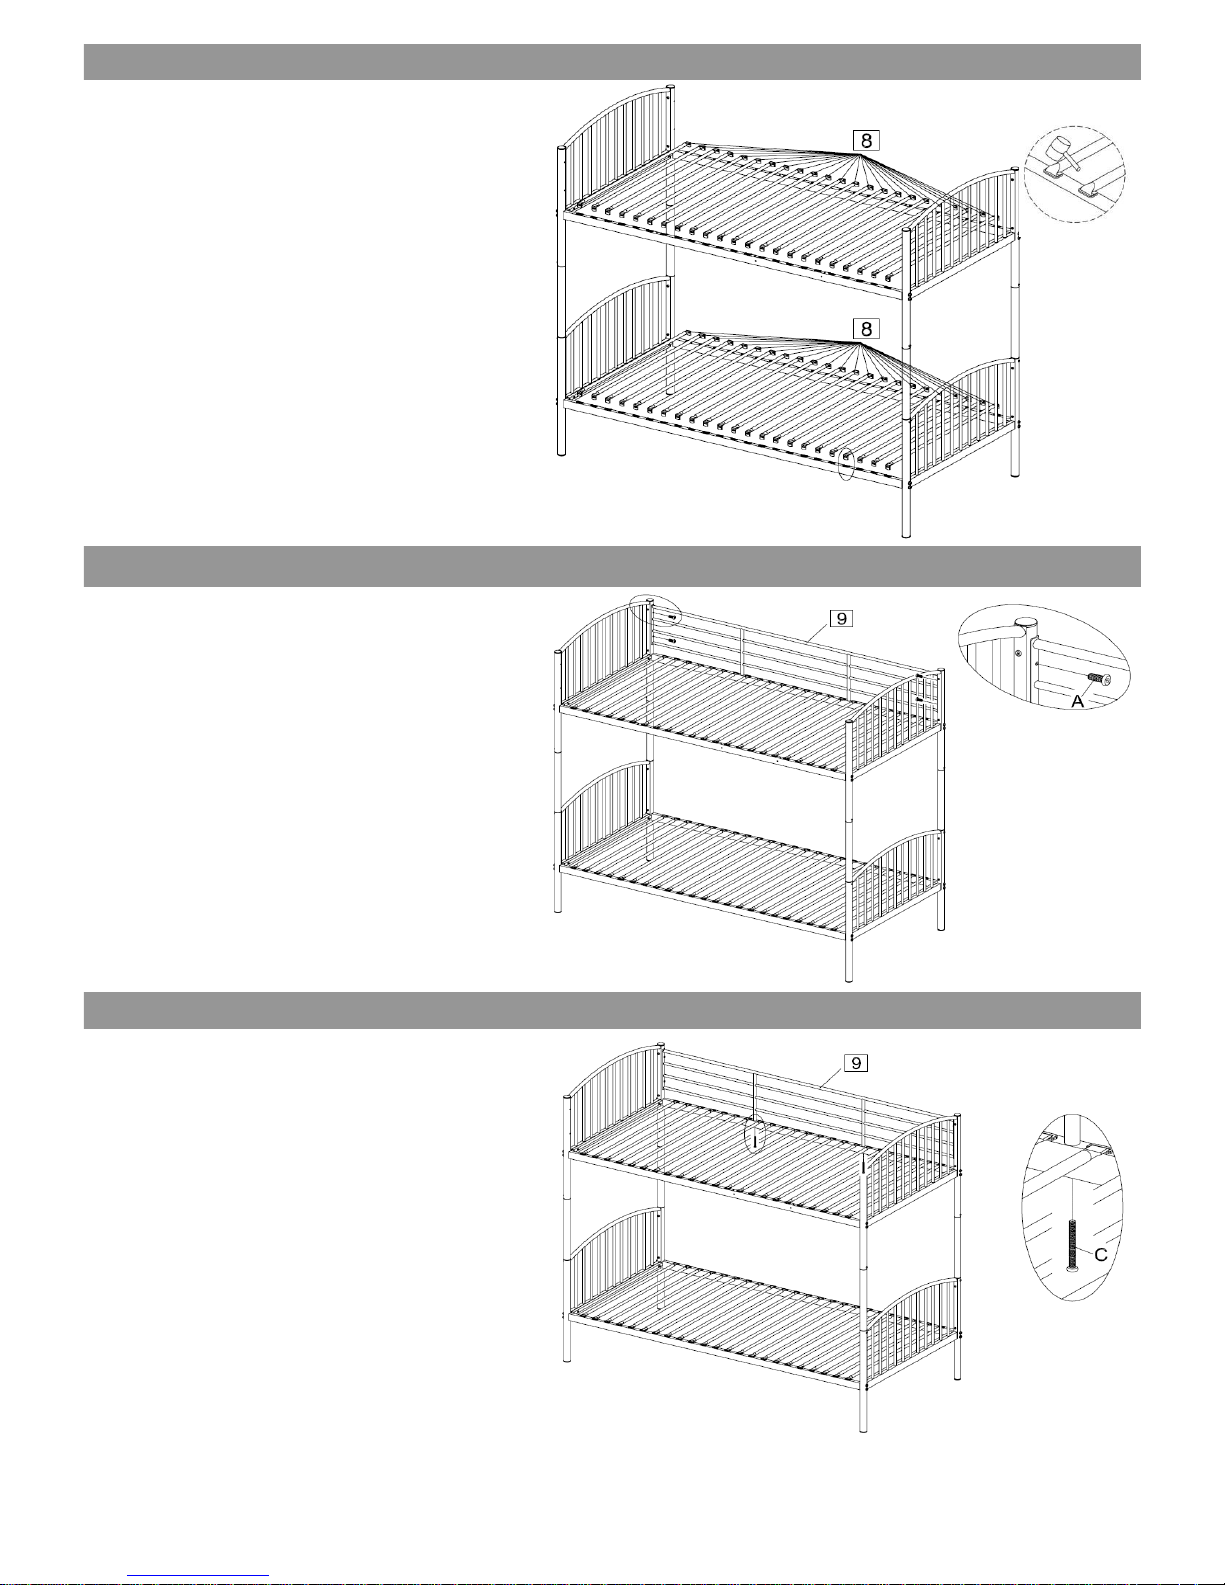
1. Attach slats 8 (×46) to the assembled unit. A
rubber mallets (not supplied) may be required to
gently tap each slat into the slat locks on each side
of the bed rails.
1. Attach barrier 9 to assembled unit with 4 ×
bolts(A) using allen key(G) to tighten.
1. Insert 2 × bolts(C) to assembled unit using allen
key(G) to tighten.
STEP FIVE
STEP SIX
STEP FOUR
Page 4 of 9
Page 5
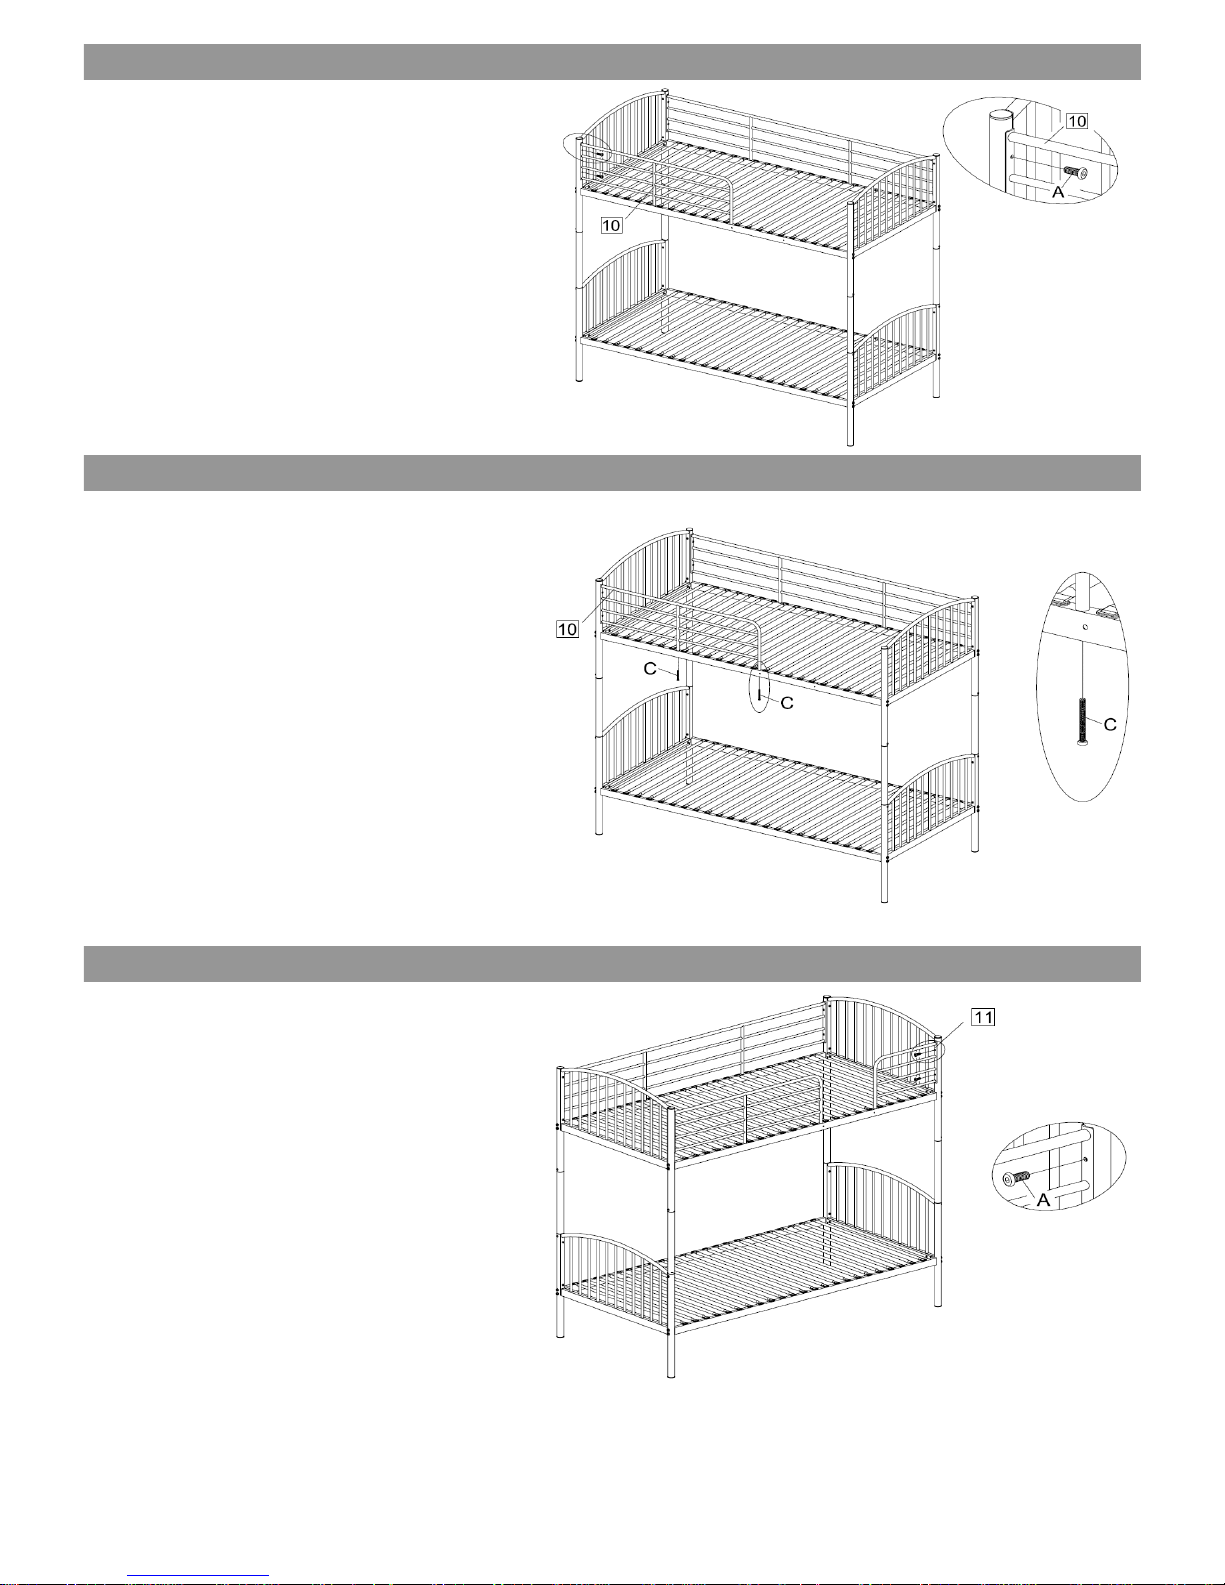
1. Attach barrier 10 to assembled unit with 2 ×
bolts(A) using allen key(G) to tighten.
1. Insert 2 × bolts(C) to assembled unit using allen
key(G) to tighten.
1. Attach barrier 11 to assembled unit with 2 ×
bolt(A) using allen key(G) to tighten.
STEP EIGHT
STEP SEVEN
STEP NINE
Page 5 of 9
Page 6
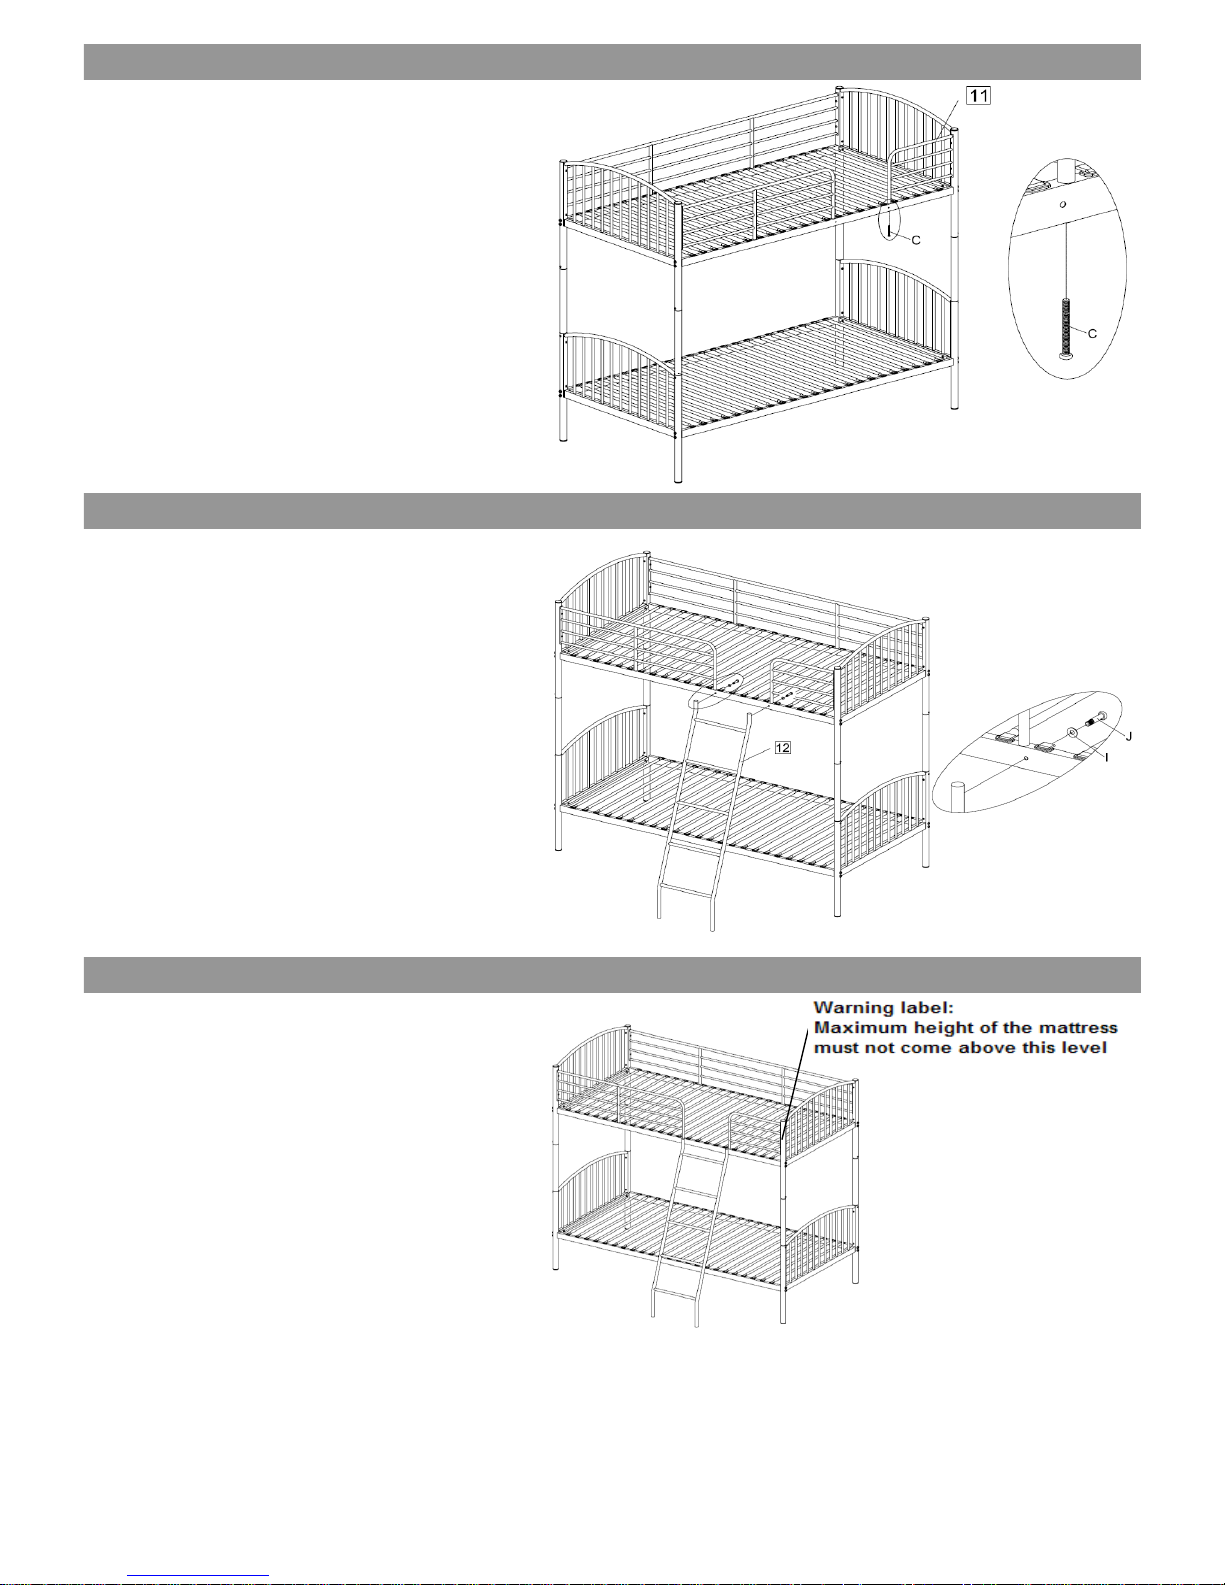
1. Insert 1 × bolts(C) to assembled unit and using
allen key(G) to tighten.
1. Attach ladder 12 to assembled with 2 × bolts(J)
and 2 × washers(I) using allen key(G) to tighten.
1. Ensure all bolts are tight before using the bed.
2. All remaining fixings should be kept in a safe
place.
STEP TWELVE
STEP ELEVEN
STEP TEN
Page 6 of 9
Page 7
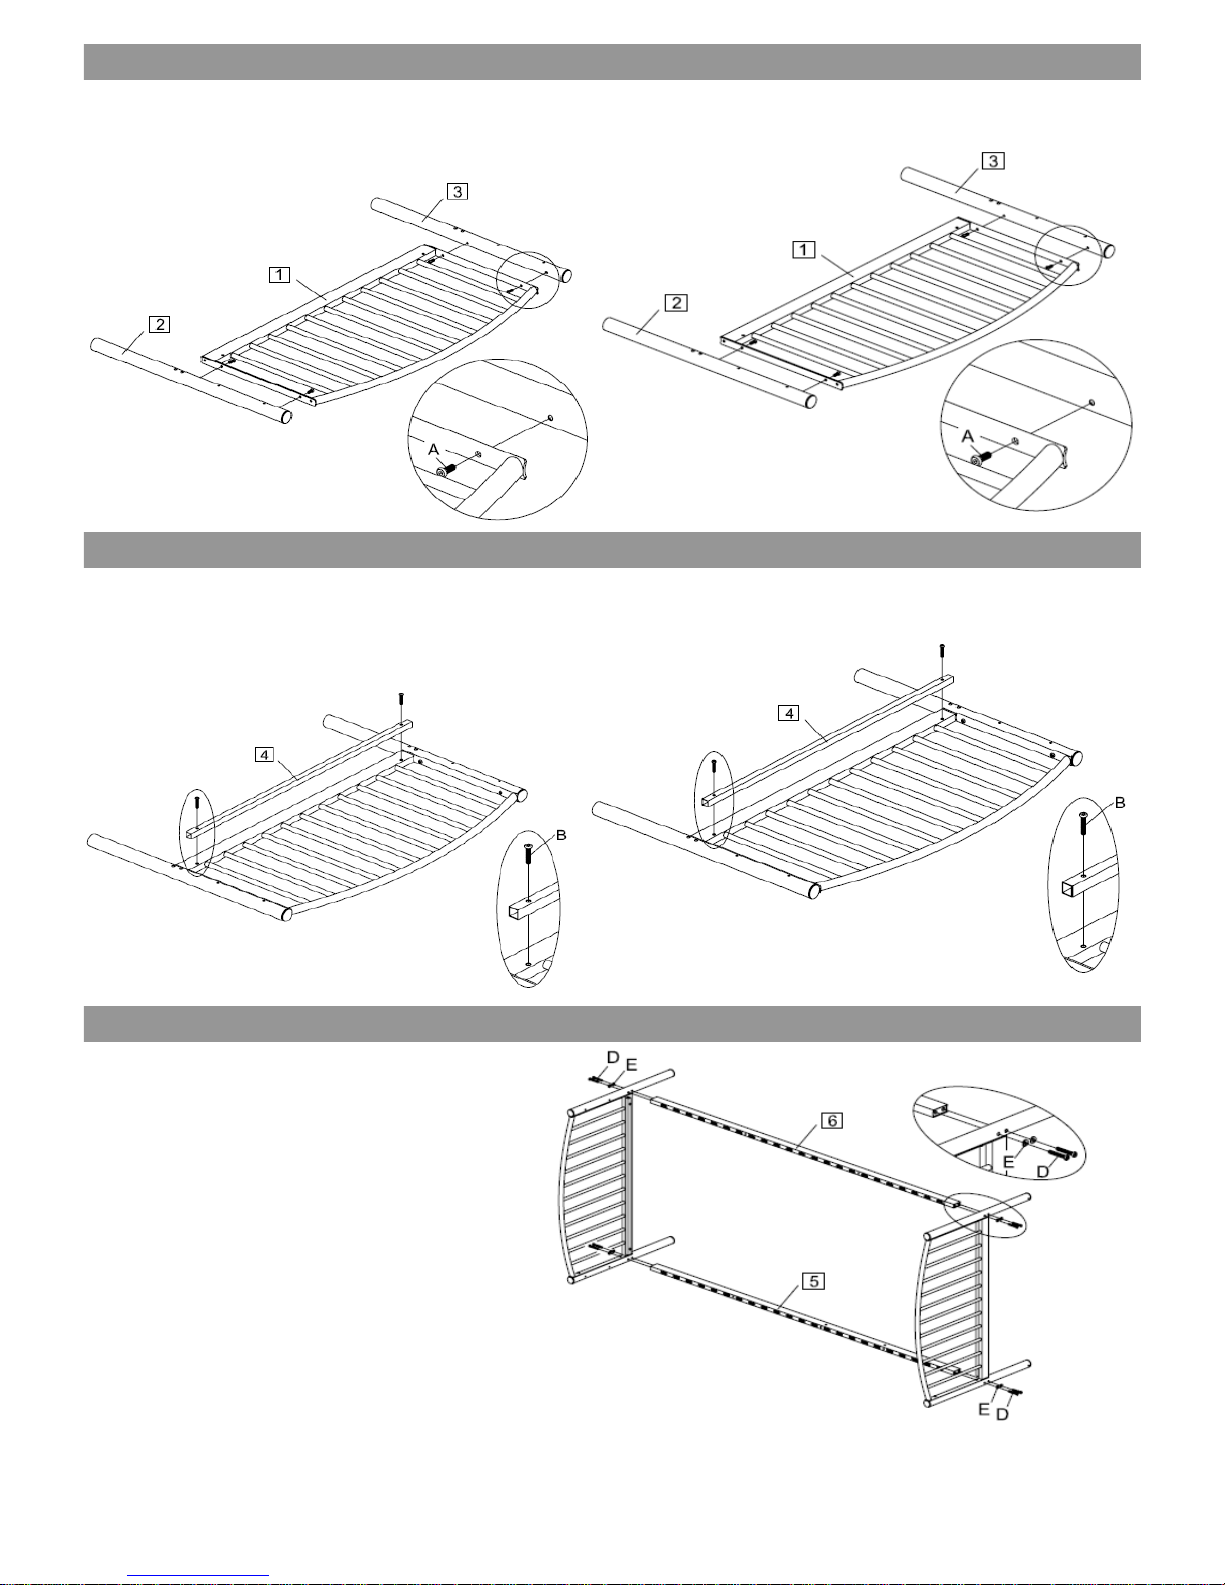
ASSEMBLING AS SINGLE BEDS
1. Attach headboard and footboard 1 (×2) to pole 2
and 3 with 8 × bolts(A) using allen key(G) to tighten.
1. Attach 2 × bars 4 to assembled end frame with 8
x bolts(B) and using allen key(G) to tighten.
STEP FIFTEEN
STEP THIRTEEN
STEP FOURTEEN
1. Attach side rail 5 and 6 to the assembled end
frame with 8 × bolts(D) and 8 × washers(E) using
allen key(F) to tighten.
Page 7 of 9
Page 8
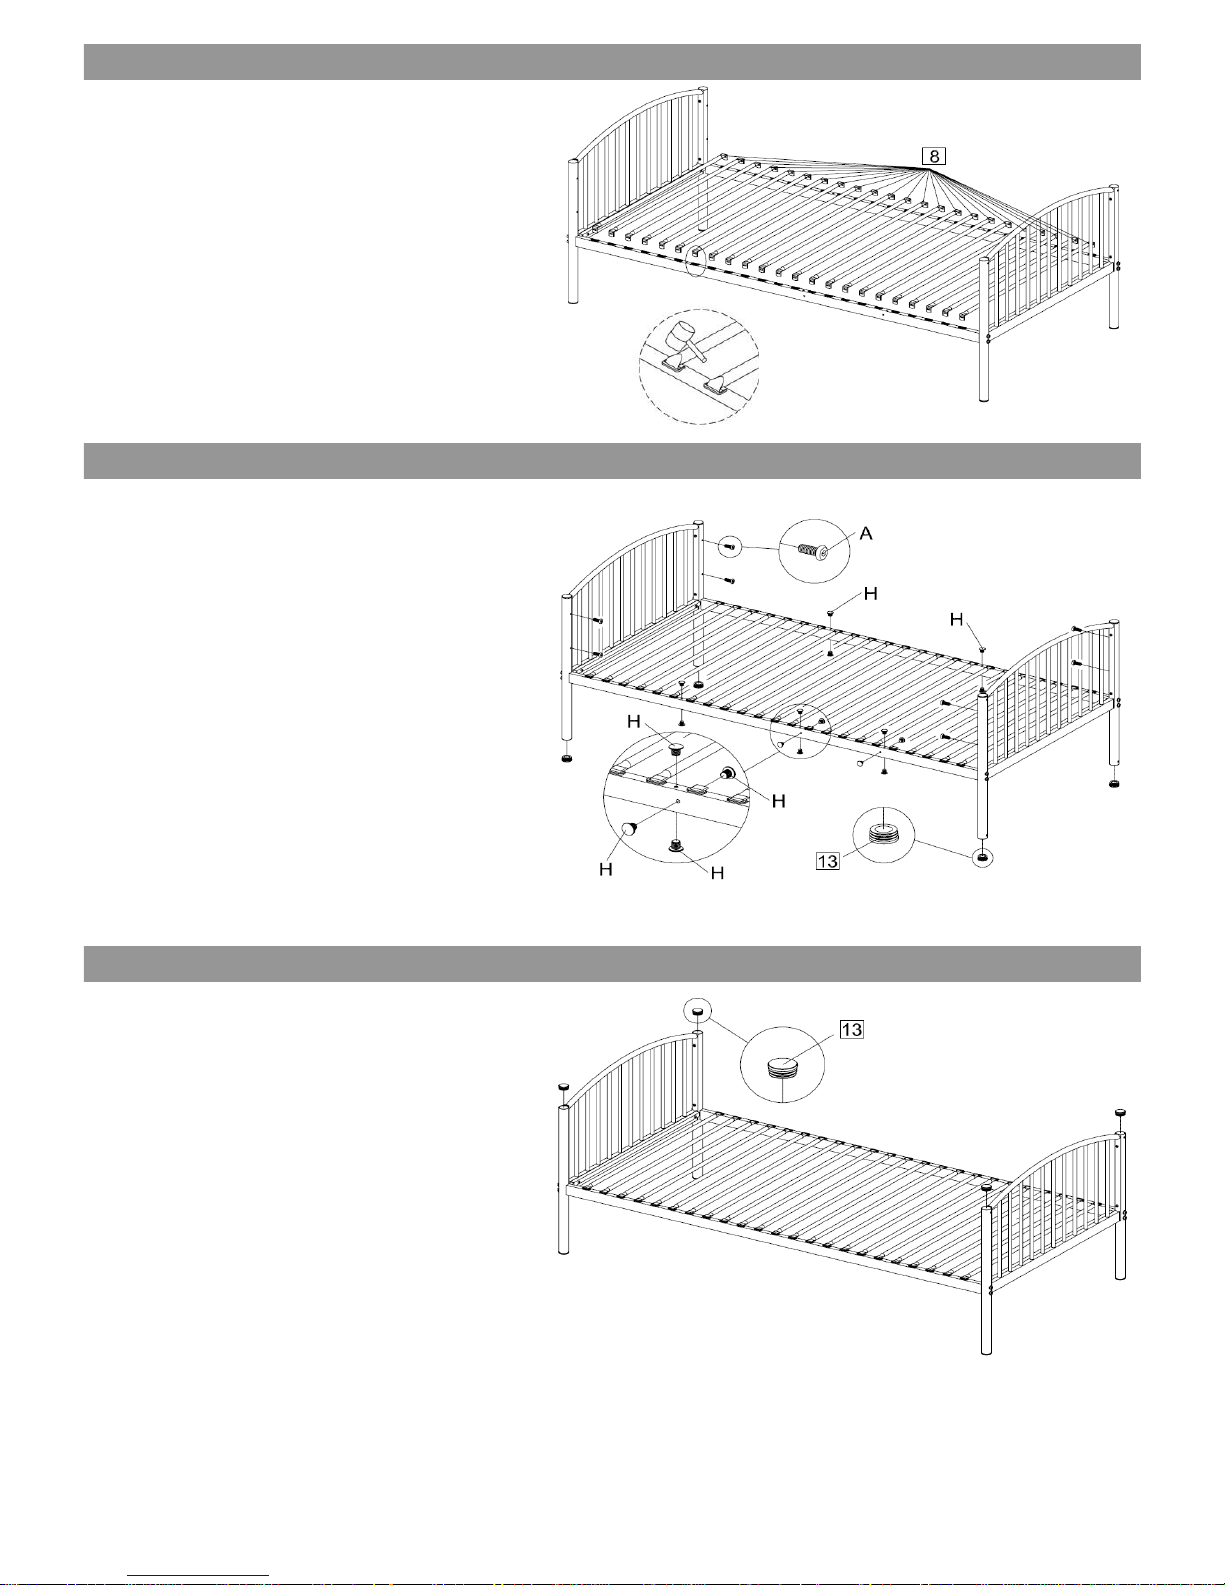
1. Insert 8 × bolts(A) and 14 × plastics caps (H) to
the assembled bed frame and using allen key(G) to
tighten.
2. Insert plastic cover 13 (×4) to the assembled bed
poles.
USE ALL REMAINING PARTS TO ASSEMBLE THE
SECOND SINGLE BED
1. Repeat Step Thirteen to Step Seventeen (Note:
side rail 5 & 6 change to side rails 7 (×2).
2. Insert plastic cover 13 (×4) to the assembled bed
pole.
STEP EIGHTEEN
STEP SIXTEEN
STEP SEVENTEEN
1. Attach slats 8(×23) to the assembled unit. A
rubber mallet (not supplied) may be required to
gently tap each slat into the slat locks on each side
of the bed rails.
Page 8 of 9
Page 9
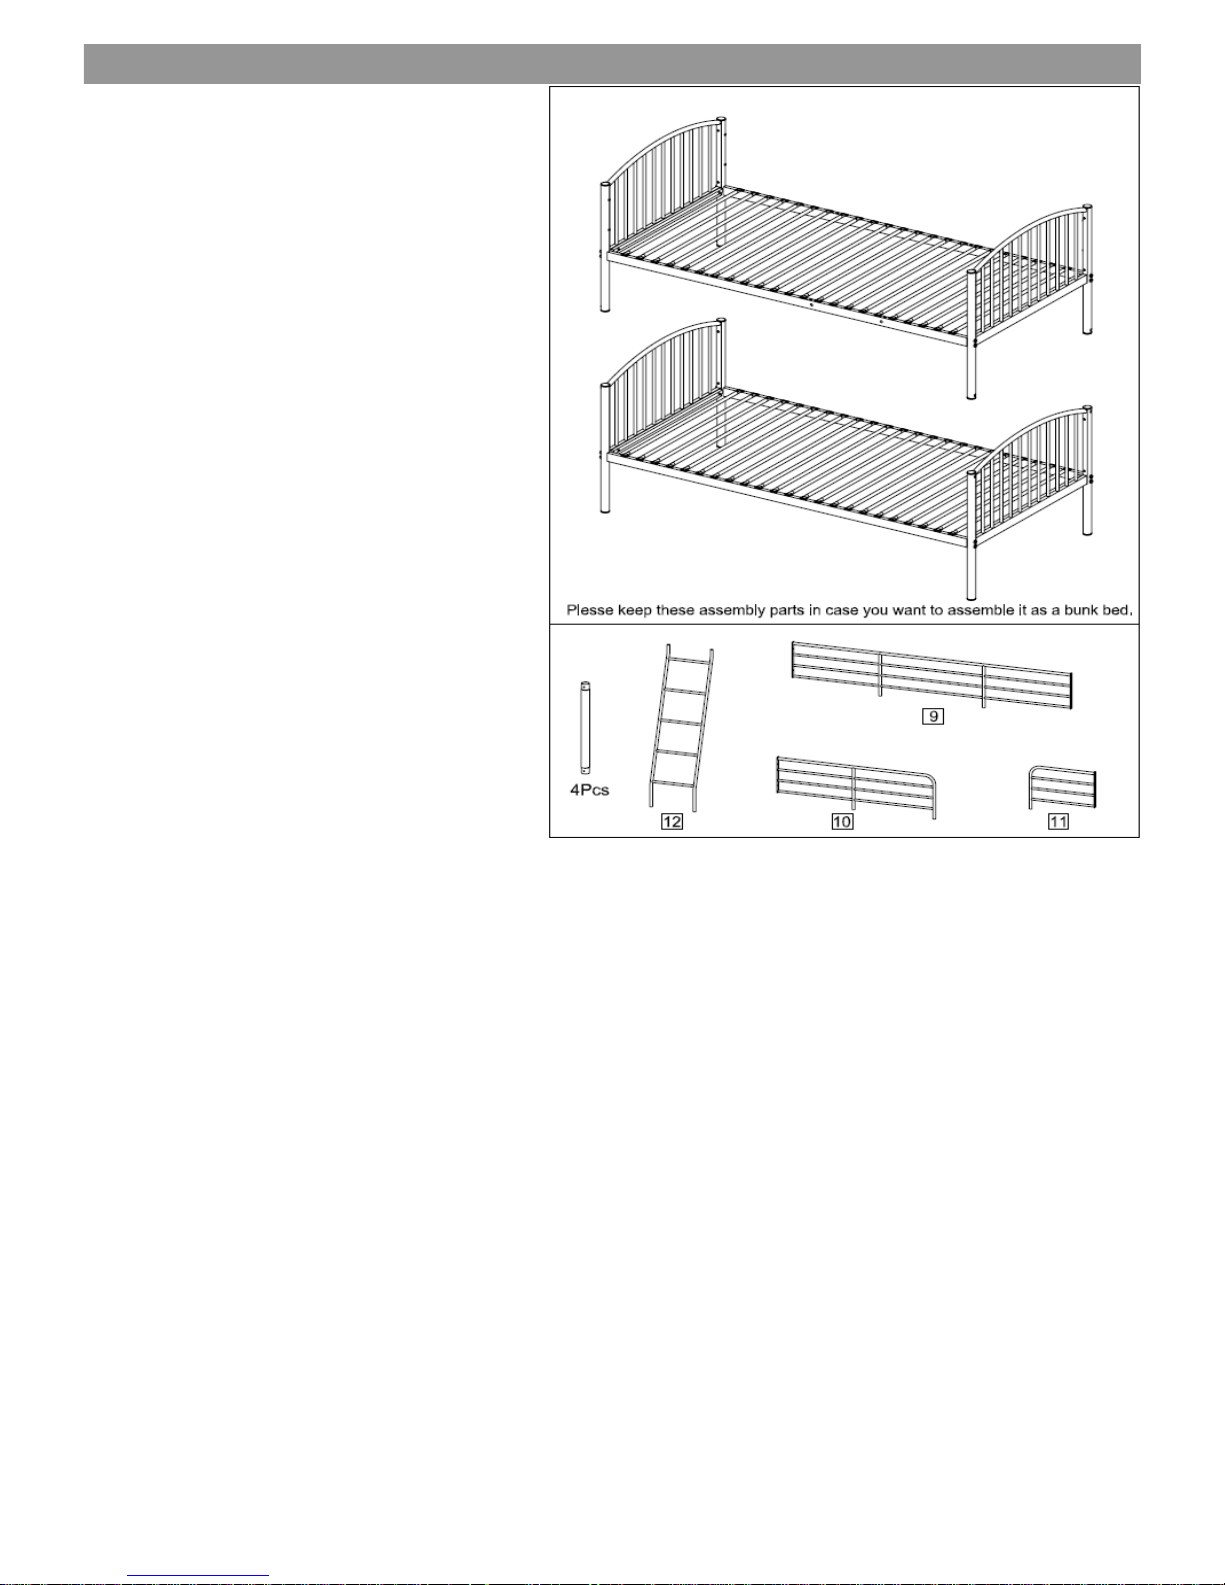
1. Ensure all fittings are tight before use.
2. Please keep these parts safe in case you want to
assemble the item as a bunk bed.
Next Retail Ltd, Desford Road, Leicester, LE 19 4 AT
STEP NINETEEN
Page 9 of 9
 Loading...