

Page 1
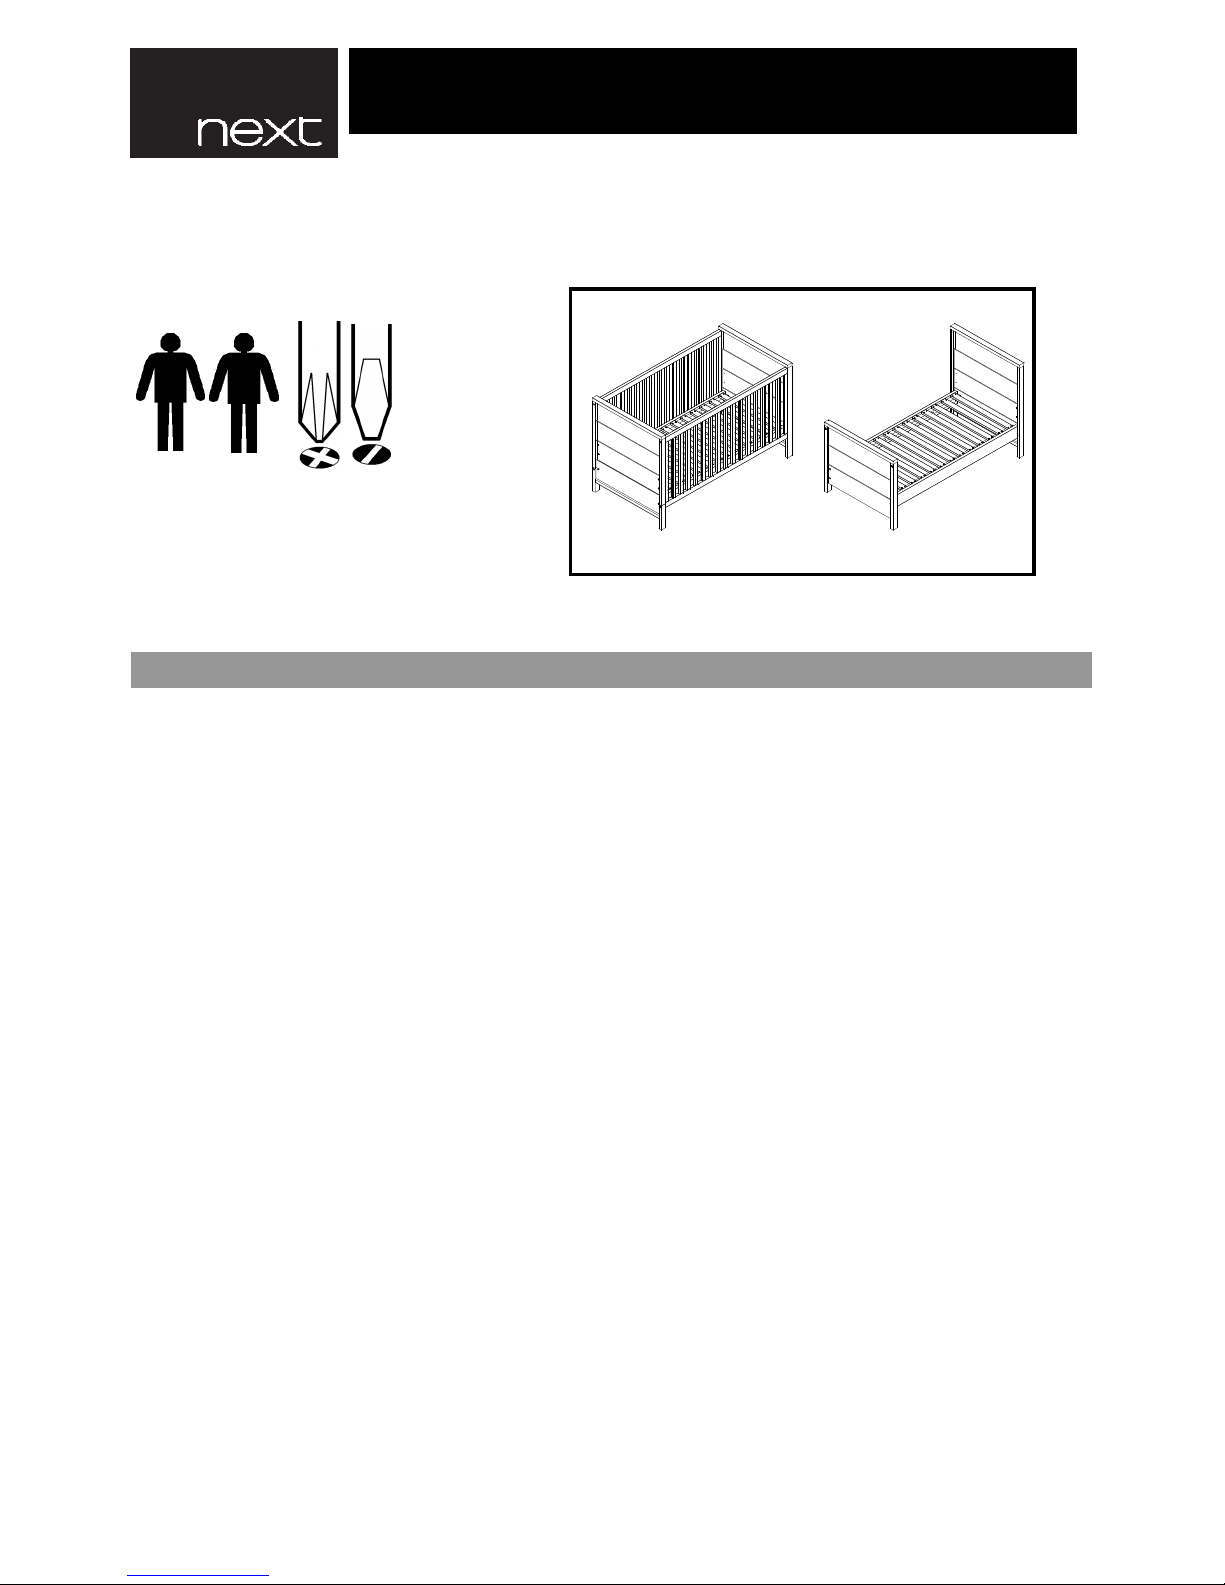
Tools Needed
Helpline
If you have any problems with this product or require
any replacement fittings please contact Customer
Services Tel: 0844 844 8999
• Keep fittings out of children's reach and keep children well away from the construction area.
• WARNING: Do not use more than one mattress in the cot .
• WARNING: Do not use the cot / bed if any part is broken, torn or missing and use only spare parts approved by the
manufacturer.
• WARNING: Do not place this child's bed near heat sources, windows and other furniture
• WARNING: Do not leave anything in the cot or place the cot close to another product, which could provide a foothold
or present a danger of suffocation or strangulation, e.g., strings, blind/curtain cords, etc.
• The line visible on the inside of the cot frame indicates the maximum thickness of the mattress to be used with this
cot.
ASSEMBLY INSTRUCTIONS.
Regrettably self assembly items cannot be returned once assembly is part or fully completed unless the item is found
to be faulty. Should you need to return the unassembled product, please repack in the original packaging.
IMPORTANT
• Carefully check that you have all parts before beginning assembly.
• We suggest you spend a short time reading through this leaflet and then follow the simple step-by-step instructions.
IMPORTANT - RETAIN FOR FUTURE
REFERENCE - READ CAREFULLY.
• All assembly fittings should be tightened properly before use and should be periodically checked and re-tightened if
required
• We recommend that the packaging is used to protect the surfaces during assembly.
• A minimum of two persons is required to assemble this product.
• Children are likely to play, bounce, jump and climb on beds, therefore the child's bed should not be placed too
closeto other furniture or windows, and should be placed either tight to any wall or have a gap of 300mm between the
wall and the side of the bed
• WARNING: Be aware of the risk of open fire and other sources of strong heat, such as electric bar fires, etc. in
nearvicinity of the cot.
• This cot has an adjustable height base. The lowest position is the safest and the base should always be in
thisposition as soon as the baby is old enough to sit up.
• To prevent injury from falls, please ensure that you no longer use this cot for a child when that child it is old
enoughto climb out of the cot.
• The thickness of the mattress you use in this cot must be such that the internal height (surface of the mattress to the
upper edge of the cot frame) is at least 500mm in the lowest position of the cot base and at least 200mm in the
highest position of the cot base.
• When fitted, there must be a maximum gap of 30mm between the mattress sides and ends and the cot sides and
ends.
789873 LITTLE HADBURY COT BED
789873 LITTLE HADBURY COT BED789873 LITTLE HADBURY COT BED
789873 LITTLE HADBURY COT BED
Page 1 of 6
Page 2
• All assembly fixings should always be tightened properly and periodically check all fixings and tighten if necessary.
• Never drag pieces of furniture across the floor as this will cause damage to the joints.
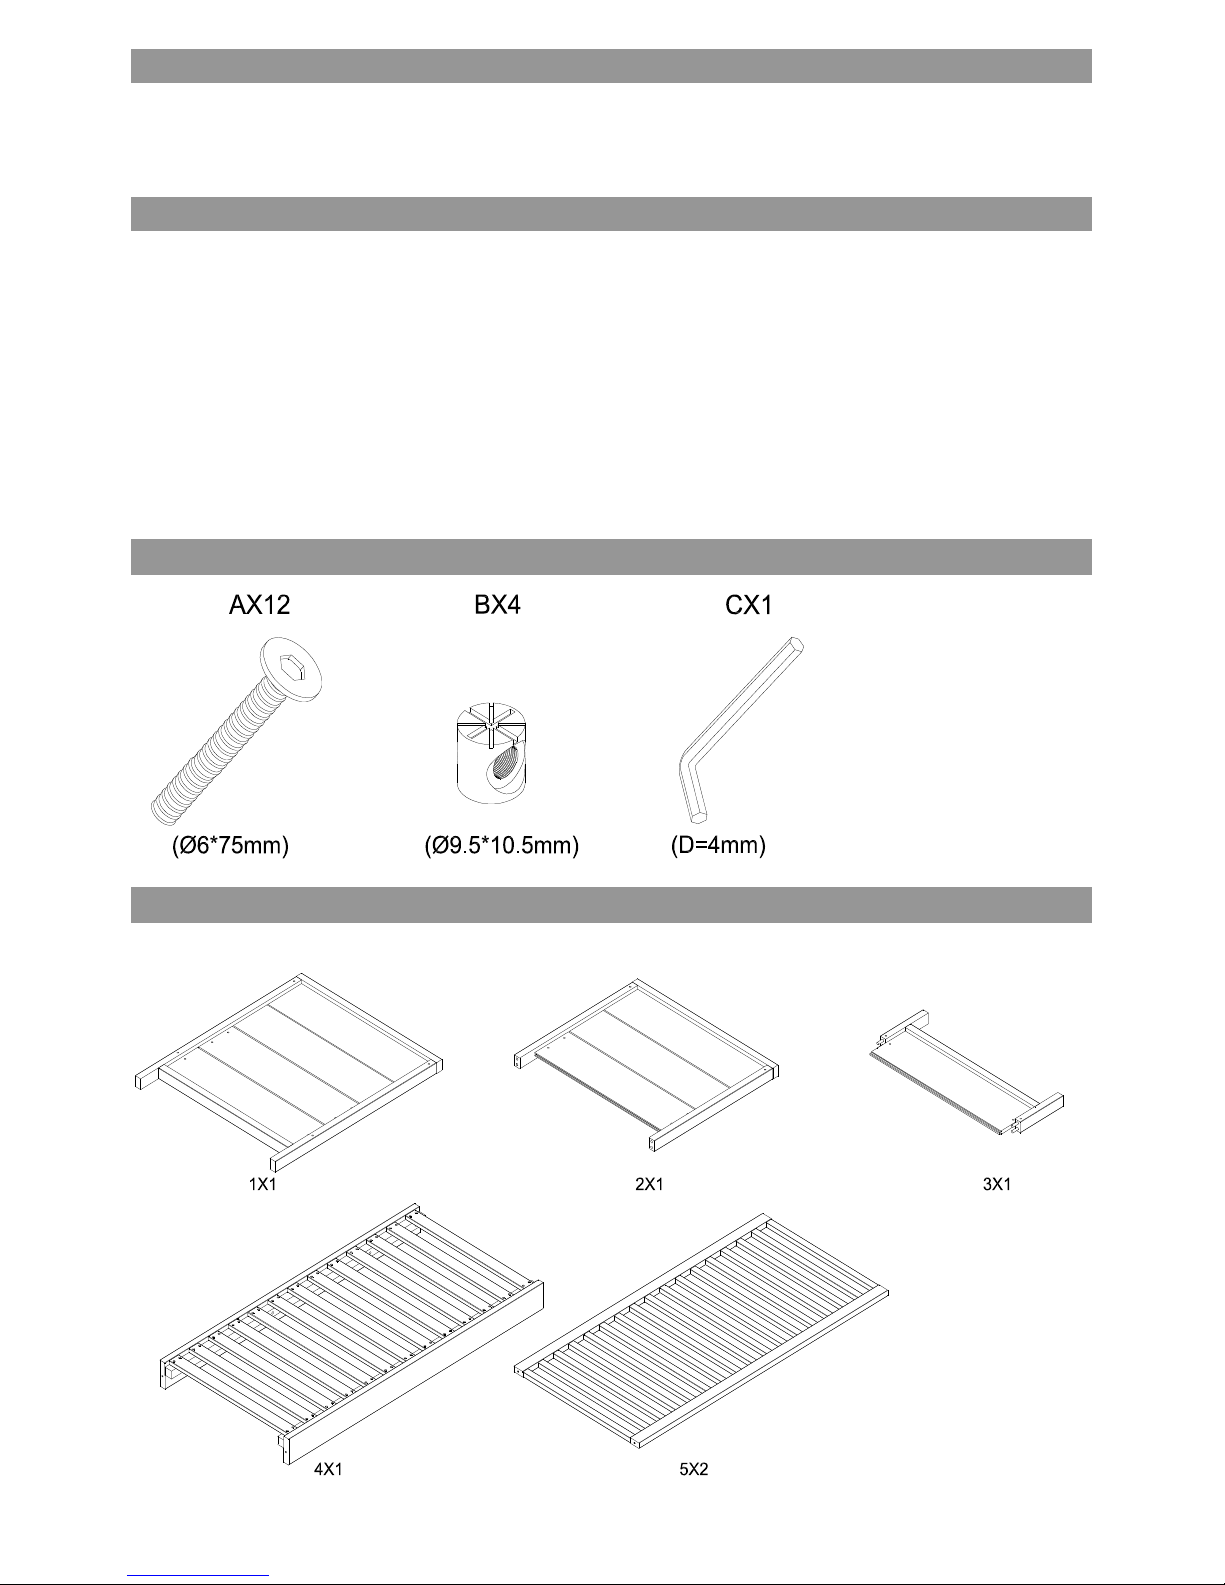
FITTINGS
PARTS
• Please do not apply adhesive substrates for example , sticky tape to the product.
• Avoid keeping furniture in direct sunlight or close to any heat sources as this can cause cracking, discolouration or
warping.
• Any spills should be removed immediately with a soft clean damp cloth and dried immediately.
• Do not put hot dishes directly on the surfaces of the item.
• Ensure the product is protected with mats and coasters when items are placed on the surfaces, to prevent
scratching or damage.
• Do not use furniture polish.
• For general cleaning, periodically dust with a soft cloth.
• Do not rub or scrub the surface when cleaning.
CARE INSTRUCTIONS
PRODUCT INFORMATION
• Made in China.
• A mattress measuring 70cm x 140cm is intended for use with this item .
• Made from honeycomb board,particle board with a wood effect finish.
• When this item is converted to a bed, the age range of the child for which the bed is intended is 18 months to 4
years.
Page 2 of 6
Page 3
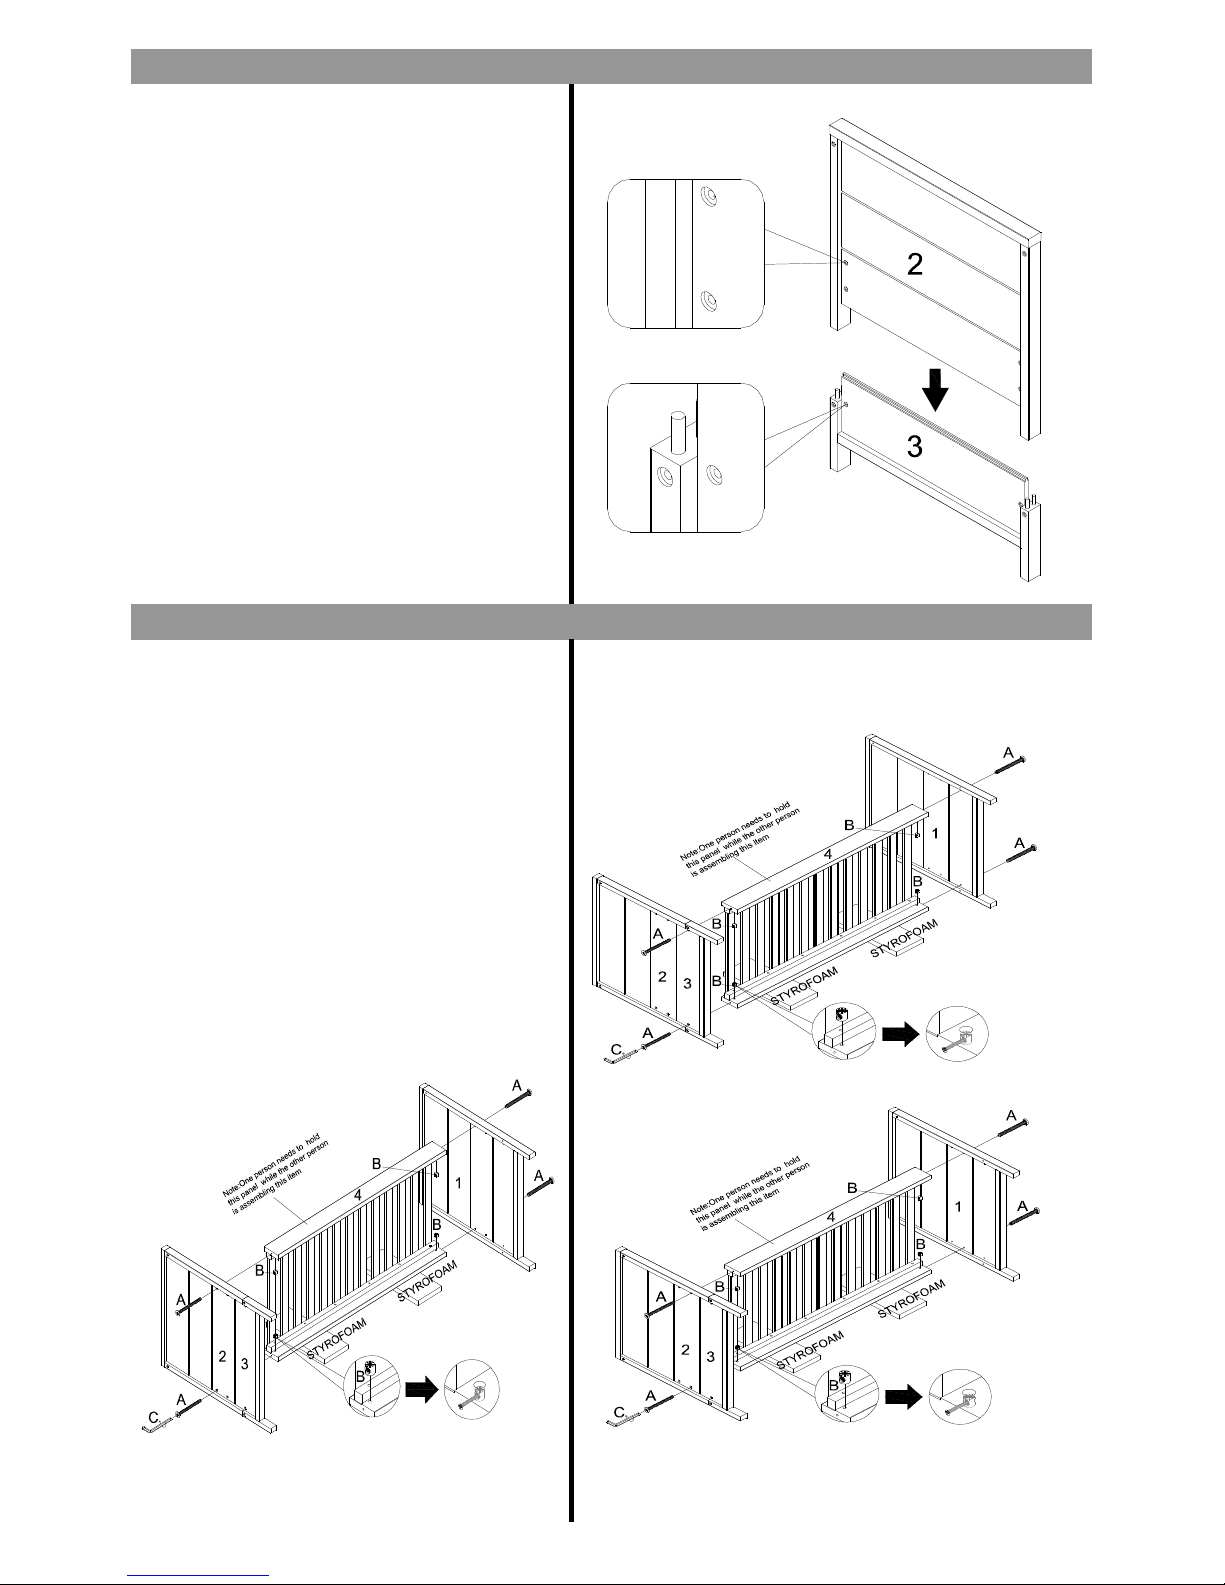
1.Attach panel 2 to panel 3 as shown in diagram
1.Lift the panel 4 using the styrofoam section used as
part of the packaging of the item .
2.Insert 4×nuts (B) into panel 4.
3.Attach the assembled panels 2 & 3, 1 to panel 4
with 4X bolts (A) ,and tighten by an Allen key (C).
Please note :This cot has an adjustable base (
panel 4 ),so choose the three positons of screws
holes on panels 1, 2 & 3,the images as right (
three positions- low, middle & high) .
STEP TWO
STEP ONE
Page 3 of 6
Page 4
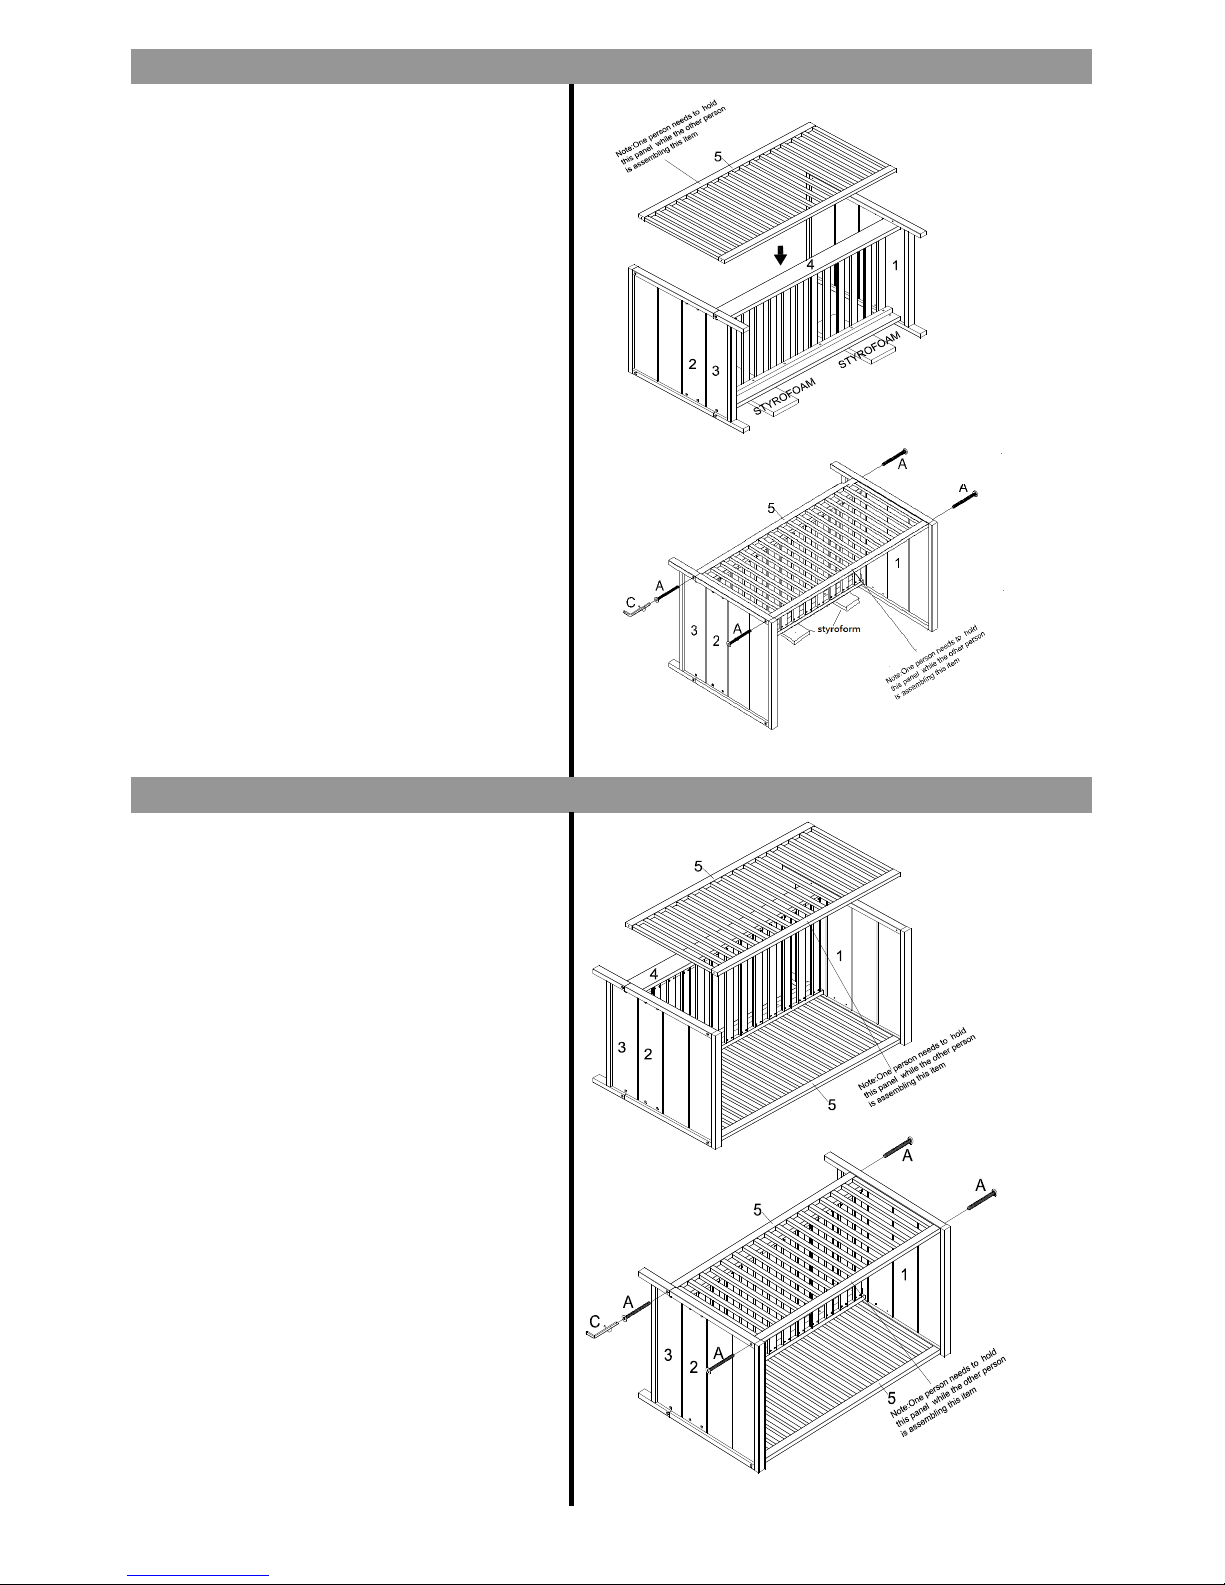
1.Attach panel 5 to panels 1 &3 with 4X bolts (A) and
tighten by an Allen key (C) as shown in diagram.
1. Carefully turn over the unit .
2.Attach panel 5 to panels 1 &3 with 4X bolts (A) and
tighten by an Allen key (C) as shown in diagram.
STEP FOUR
STEP THREE
Page 4 of 6
Page 5
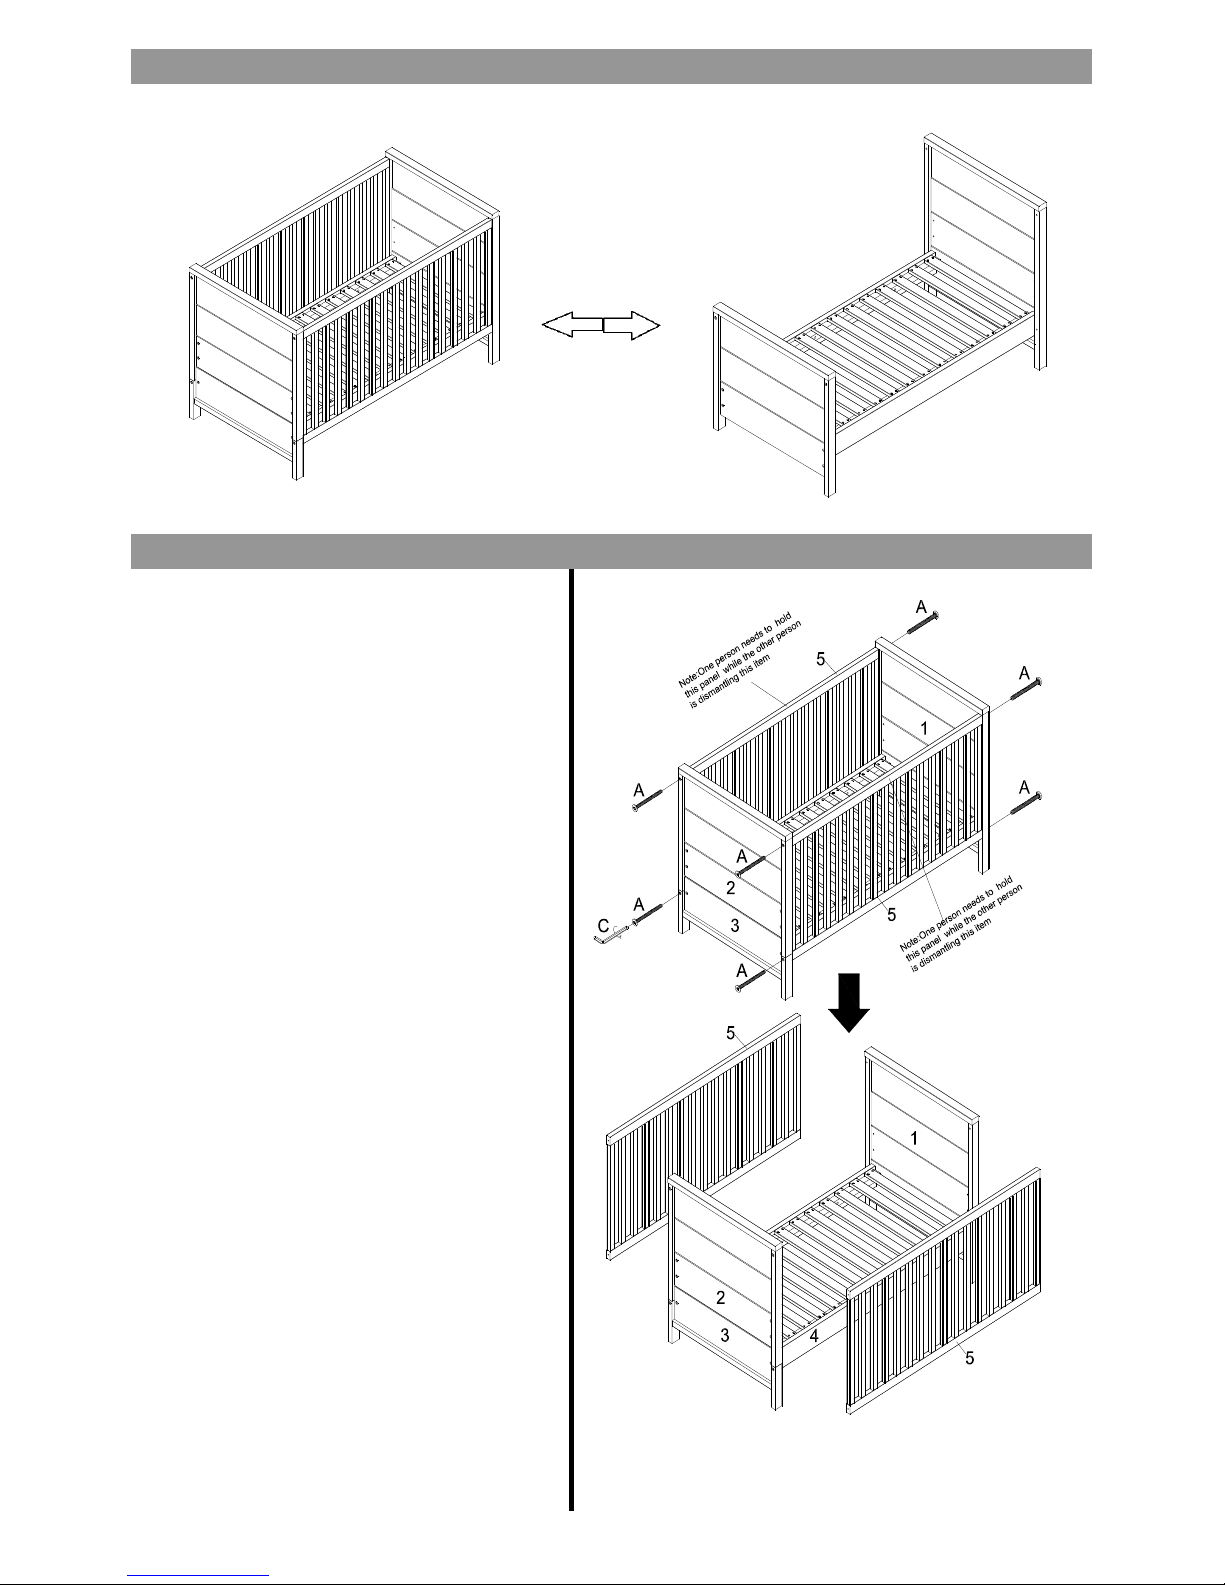
1. Completely dismantle the cot as shown
NOTE: Be sure to save all fittings in case the cot will
be reassembled in the future .
STEP ONE
CONVERTING THE COT TO BED
Page 5 of 6
Page 6
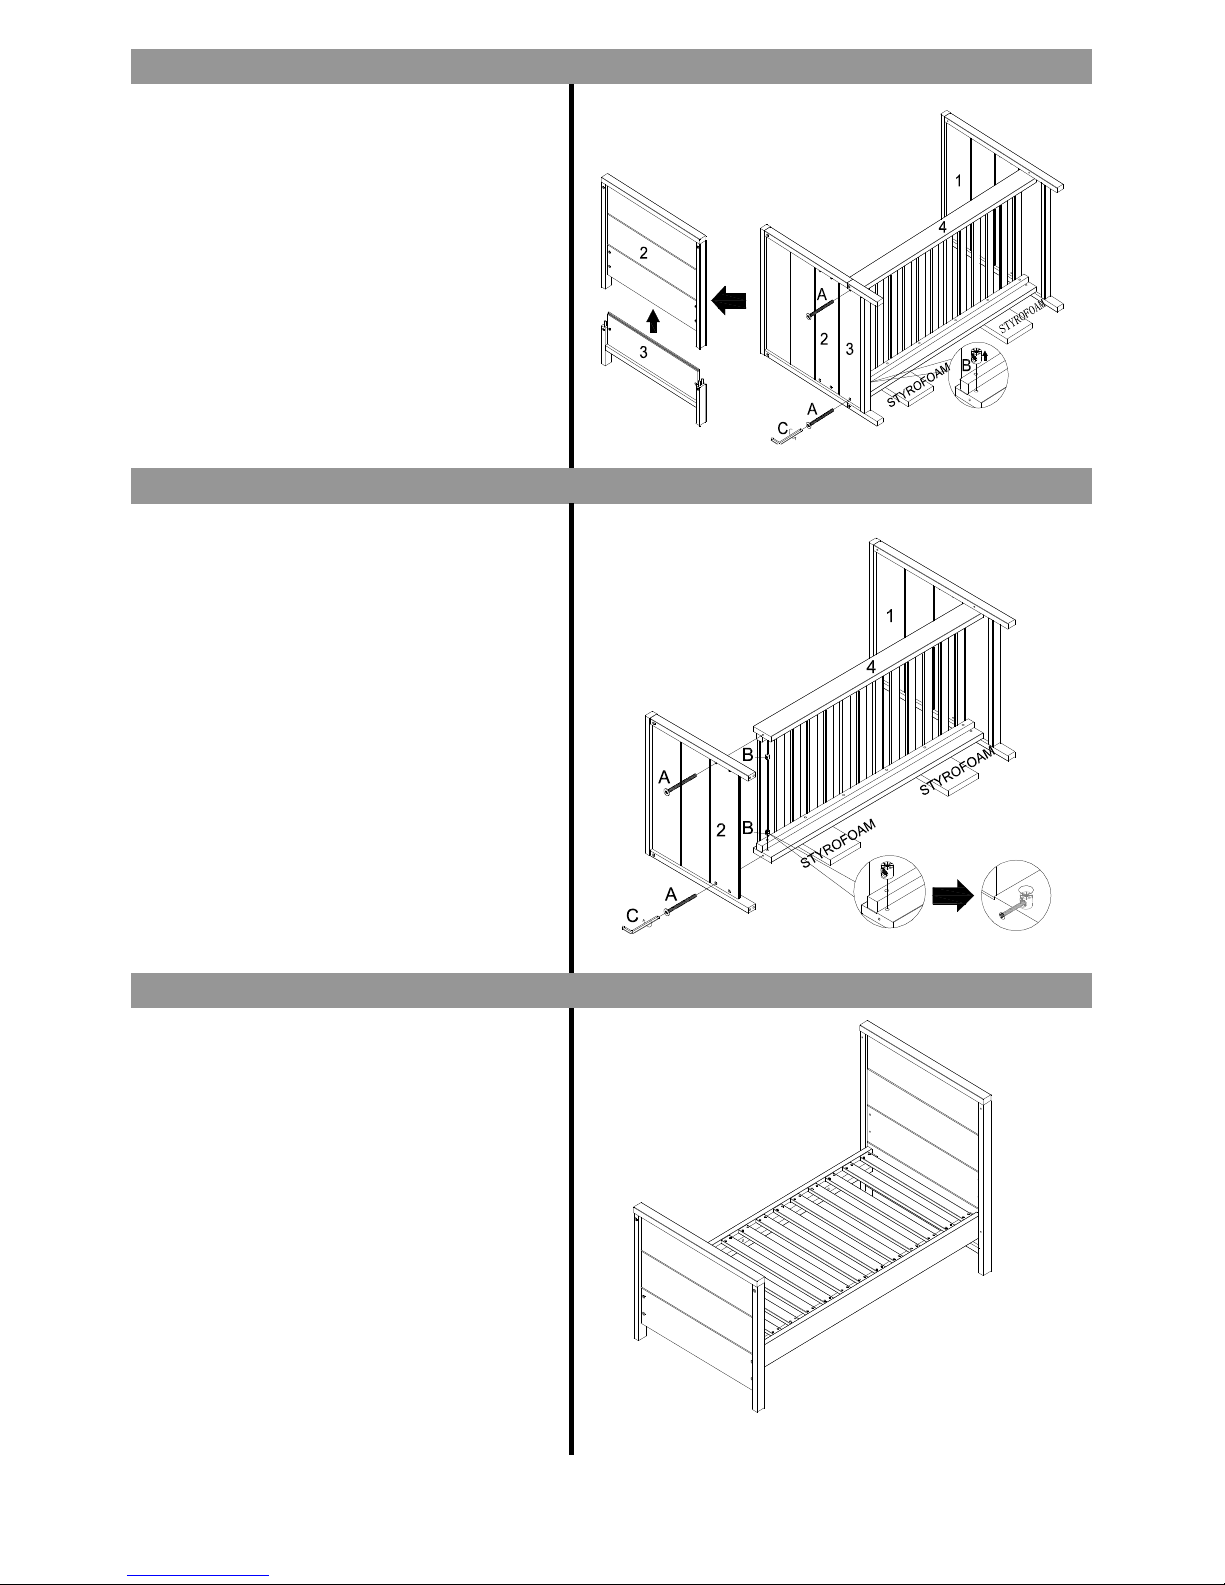
1.Lift the panel 4 using the styrofoam section used as
part of the packaging of the item .
2. Completely dismantle the panels 2 & 3 as shown in
diagram.
1.Insert 2×nuts (B) into panel 4
2.Attach panel 2 to panel 4 with 2X bolts (A) ,and
tighten by an Allen key (C).
1.The assemled product as shown
Next Retail Ltd, Desford Road, Leicester, LE19 4AT
STEP TWO
STEP THREE
STEP ELEVEN
Page 6 of 6
 Loading...