

Page 1
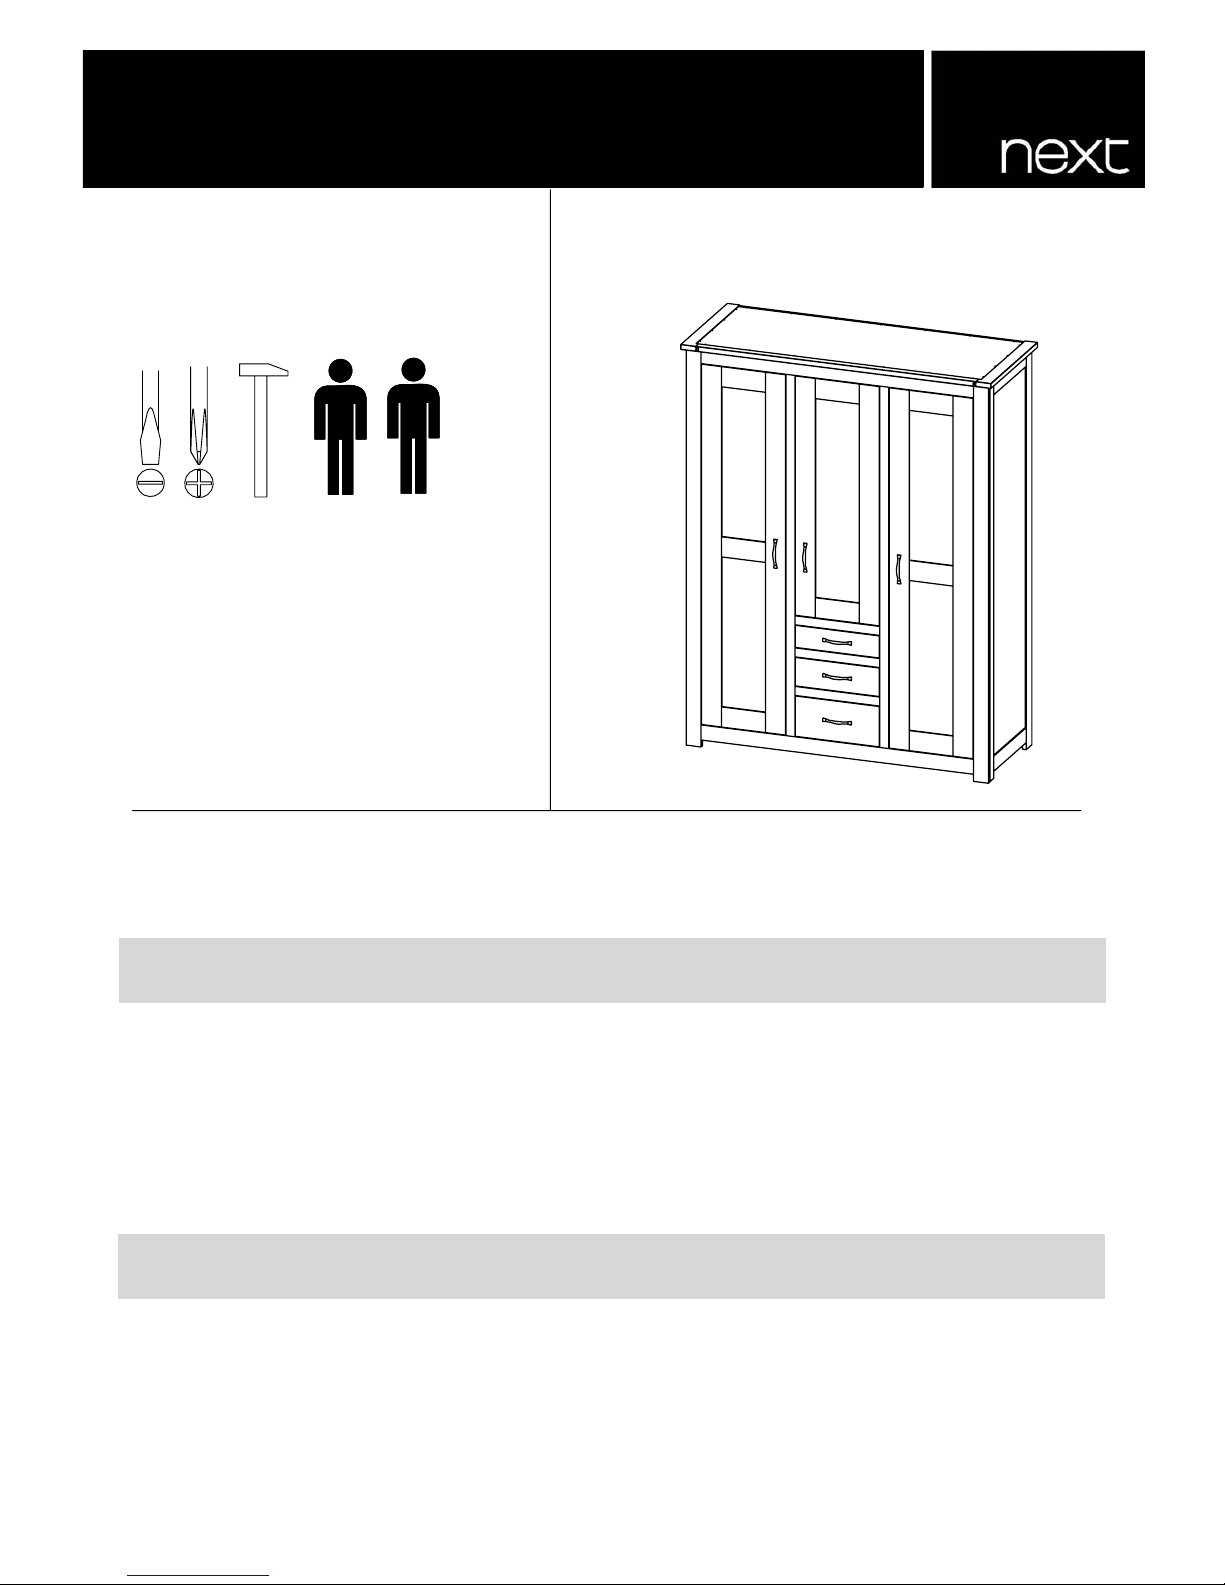
Carefully check that you have all the parts before beginning assembly.
Helpline
Tools Needed
•
We recommend that the packaging is used to protect the surfaces during assembly.
We suggest you retain these instructions for future reference.
• Keep fittings out of children’s reach and keep children well away from construction area.
•
All you need to assemble this piece of
furniture is a flat and crosshead screwdriver
as well as a hammer
If you have any problems with this product or
require any replacement fittings please contact
Customer Services Tel: 0844 844 8999
(Not supplied)
•
•
Assembly Instructions
Please keep these instructions for future reference
Regrettably self assembly items cannot be returned once assembly is part or fully completed unless the items
• A minimum of 2 persons is required to assemble this product.
are found to be faulty. Should you need to return the unassembled product, please repack in its original
packaging.
We suggest you spend a short time reading through this leaflet and then follow the simple step-by-step •
instructions.
Made with solid oak and oak veneer with a clear lacquer finish.•
Natural features ensure that each piece is individual. Every effort is made to ensure colour continuity between •
pieces, however this is a natural product, slight colour variations and natural grain markings may occur.
Oak wood and veneers often have random pale markings in the grain, these are medullary rays which are a •
natural unique feature of this wood
Made in China.
1 of 25
448648 OXFORD TRIPLE ROBE
Important
Product Information
Page 2
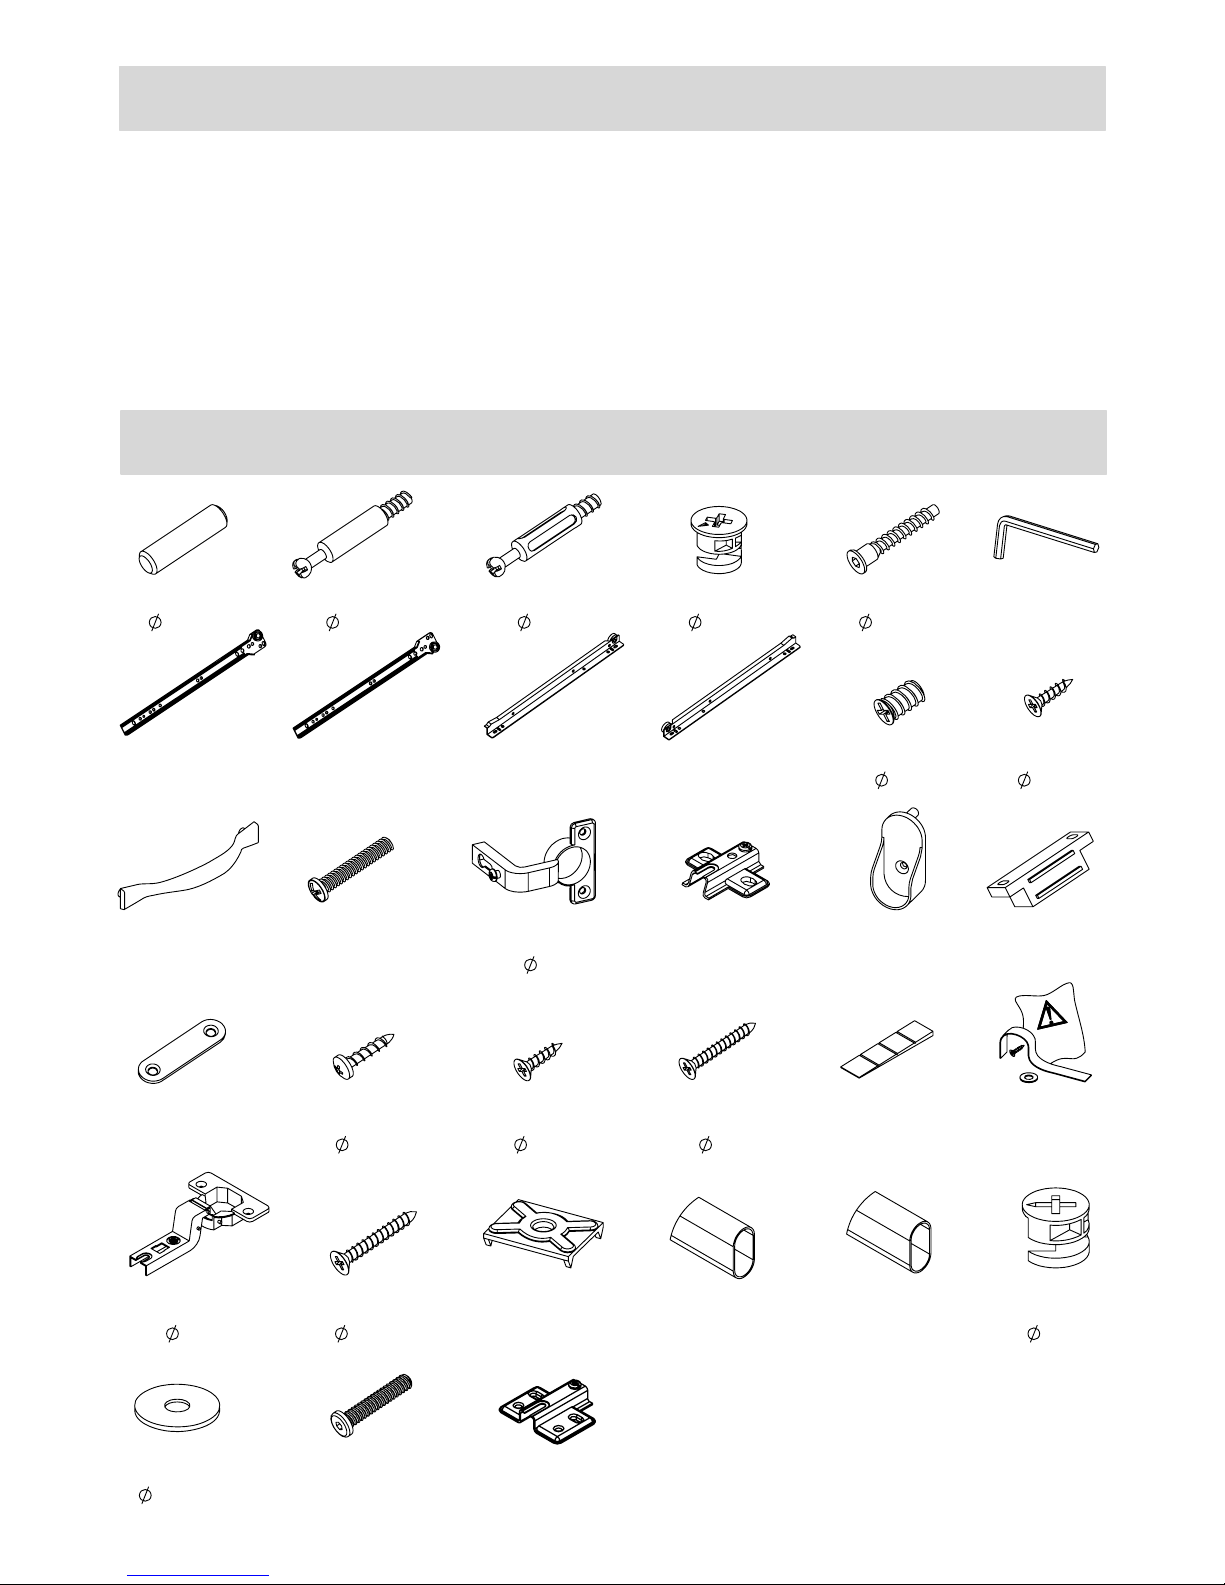
L x 18
Ȍ x 1 @ x 1
A x 40
8x30
B x 19
6x44
C x 68 D x 12
6x41
X x 6
15x12
V x 66
G x 3
35
H x 3 J x 3
3.5x14
K x 3
6x9
20xM8
Z x 1
N x 6
3x12
P x 12
M4x18
4x25
$ x 12 & x 1
L=931
Q x 8 R x 8
M x 66
E x 7
4x30
F x 1
ȍ x 1
3x16
S x 4 T x 6
U x 6 W x 12
L=400 L=400 L=400 L=400
35
Ȉ x 6
M47x50
ĭ x 2
L=490
Y x 2
# x 75
15x12
M6x40
•
Avoid exposing the furniture to excessive heat or direct sunlight as this can cause cracking •
of the wood and deterioration of the colour.
Periodically dust lightly with a soft cloth. •
Any spills should be removed immediately with a damp cloth.•
Do not use silicone based furniture polish. •
Ensure that the product is protected with mats & coasters when items are placed on to its surface. •
Never put hot dishes directly onto wooden or glass surfaces as this may mark the furniture.
Wood will mellow and change colour over time, we recommend that ornaments and items placed on •
the surface are moved regularly for the first few months to prevent uneven mellowing.
Take care when moving the furniture and never drag the pieces across the floor, as this will cause •
damage to the joints.
Periodically check fittings are secure and re-tighten as necessary. •
Please do not apply Adhesive substrates for example, sticky tape to the product.
2 of 25
O x 2
Care Instructions
Fittings
Page 3
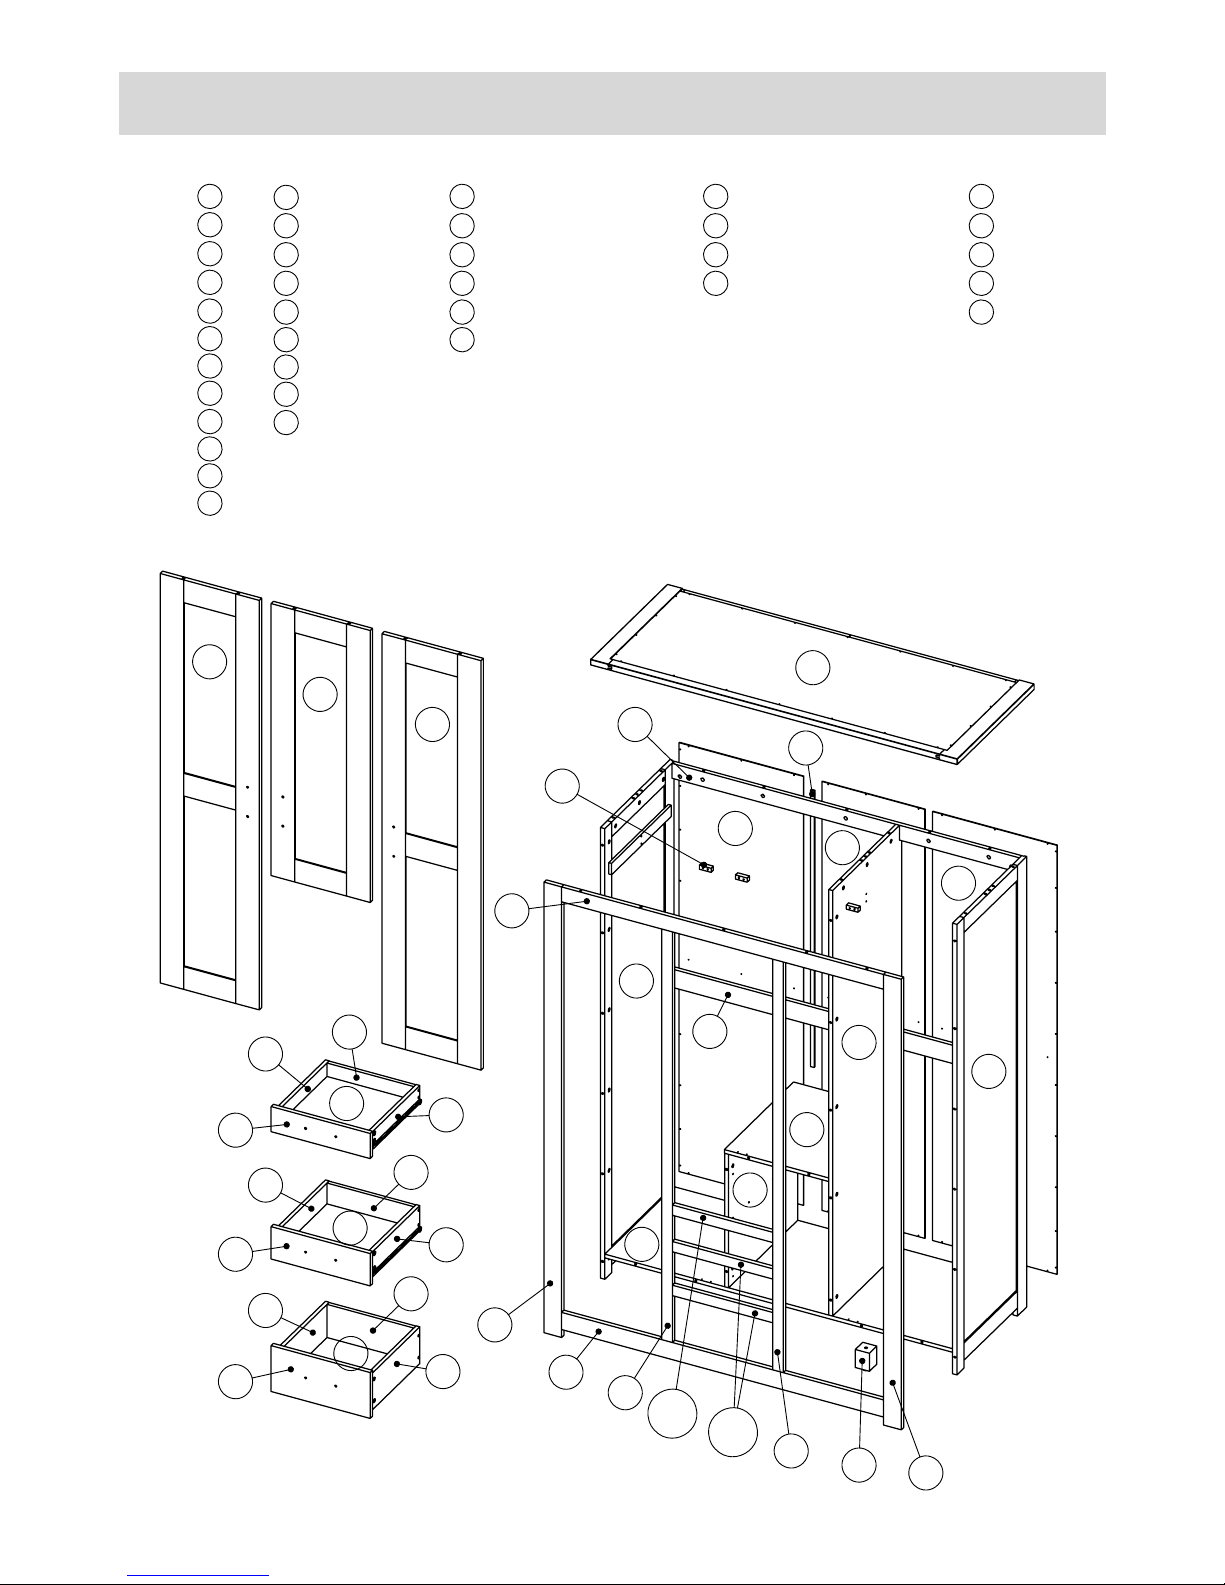
PACK PANELS LIST
1 - 4
1 x 1
PACK PANELS LIST PACK PANELS LIST PACK PANELS LIST
& x 1
4 - 43 - 42 - 4
6
7
10
11
14
16
15
22
23
24
25
27
36
35
34
33
32
31
29
28
x 1
x 1
x 1
x 1
x 3
x 1
x 1
x 1
x 1
x 1
x 3
x 1
x 1
x 1
x 1
x 1
x 1
x 3
x 1
x 1
ȍ x 1
2 x 1
3
8
9
17
18
x 1
x 1
x 1
x 2
x 1
4 x 1
5
12
13
x 1
x 1
x 1
19 x 2
20
21
26
30
x 1
x 1
x 1
x 1
3 of 25
1
8
2
3
4
5
6
7
9
10
11
12
13
15
16
17
17
18
19
20
21
22
23
24
25
25
25
26
27
28
29
30
31
32
33
34 x3
36
35
19
14a
14b
Parts
Page 4
4 of 25
5
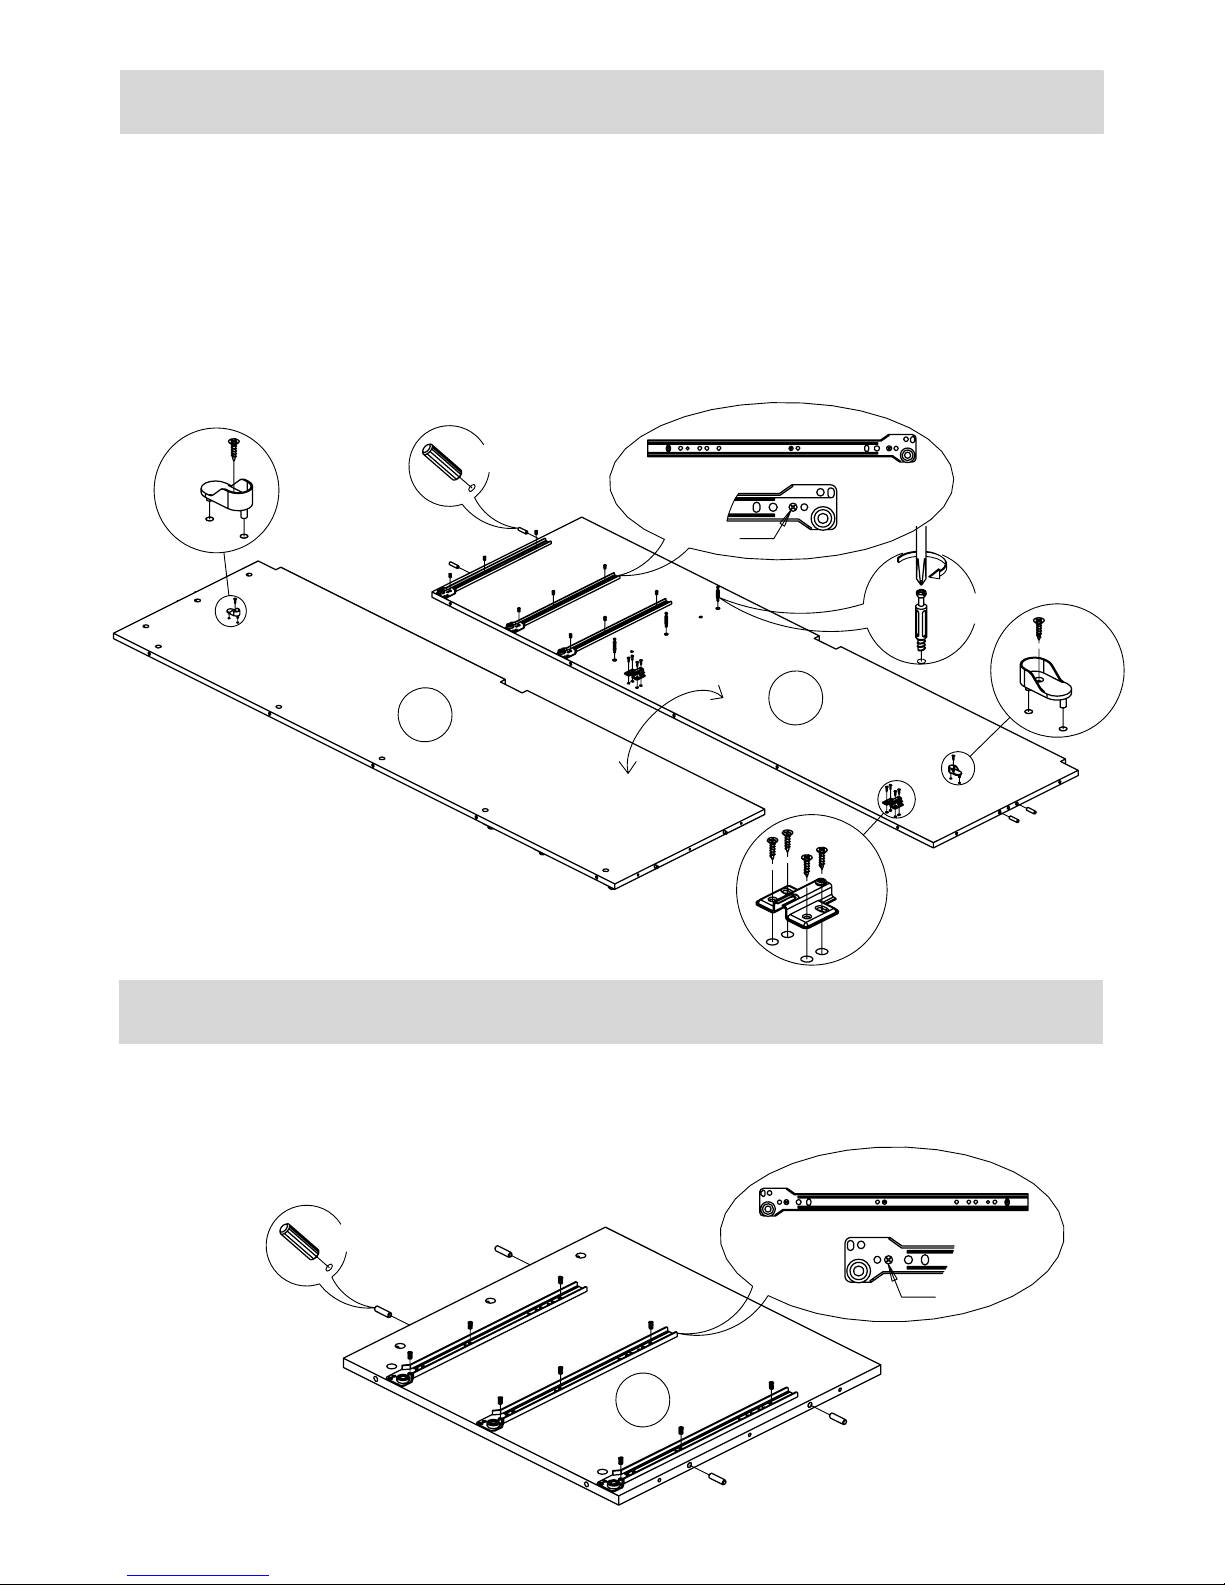
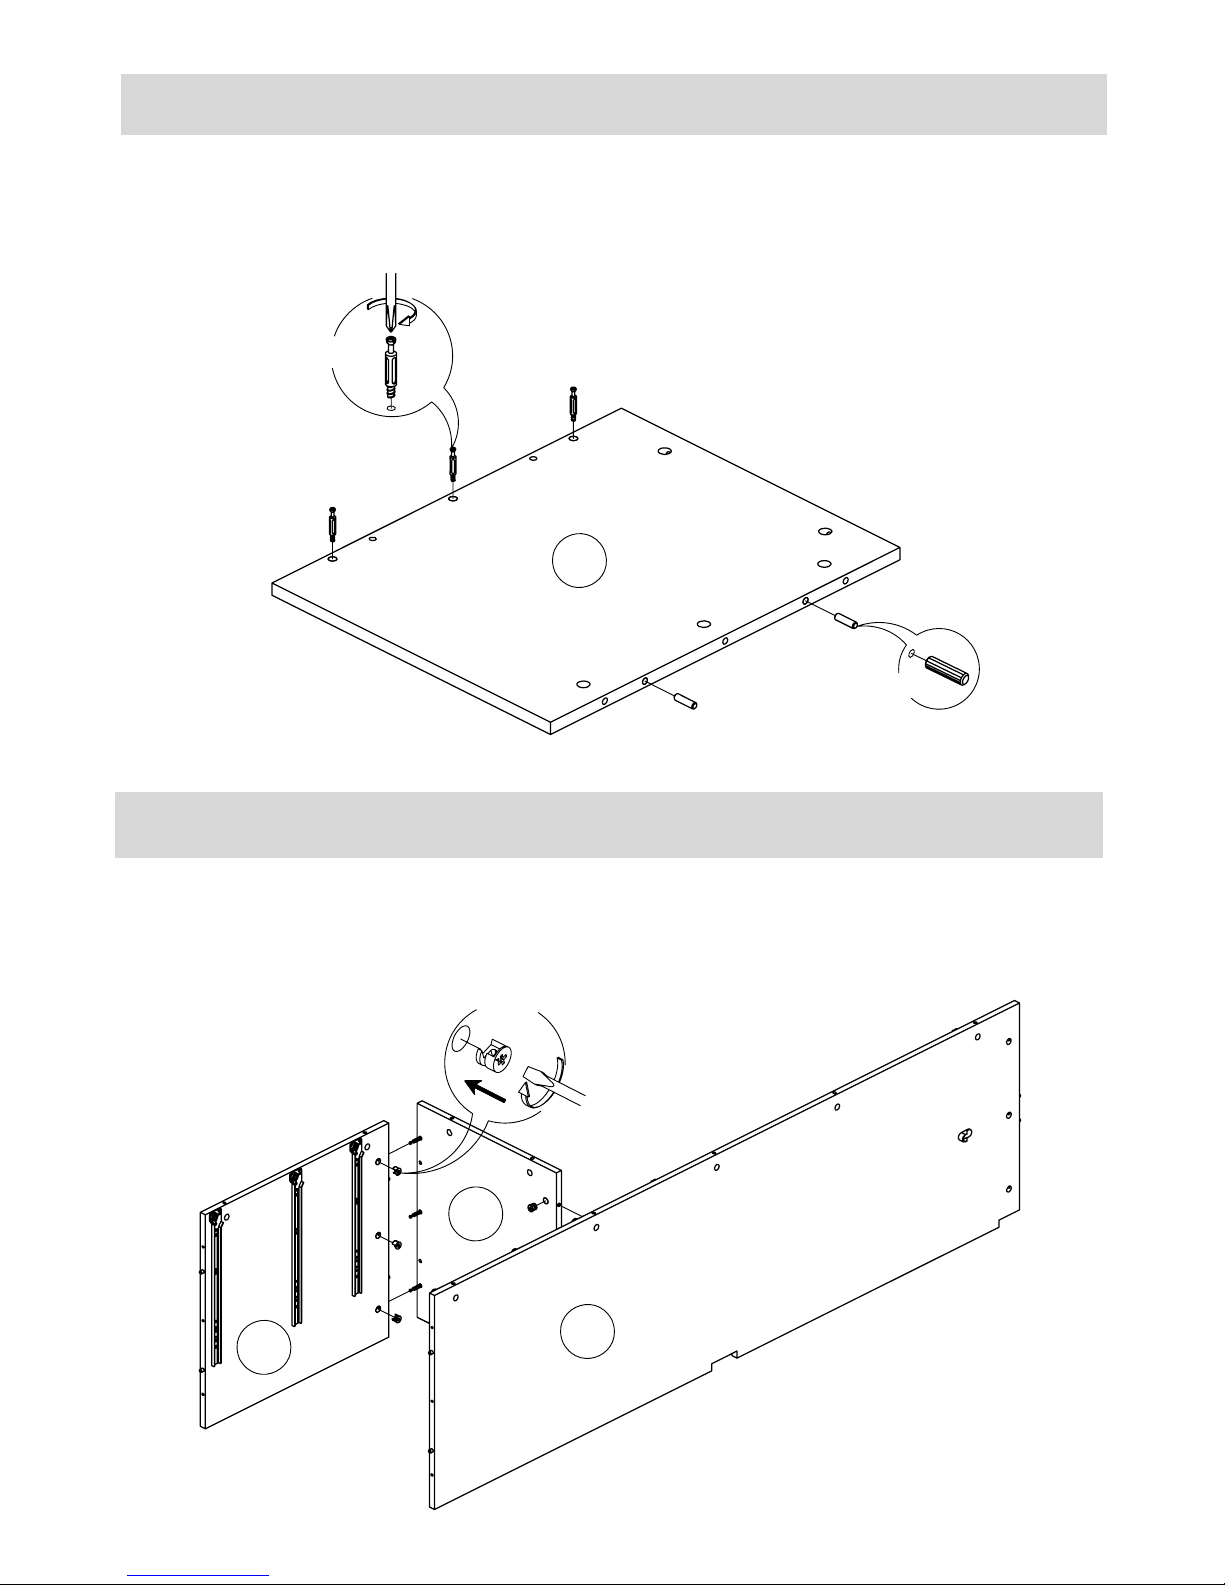
• Insert dowels (A) into panel (6) with a hammer.
Attach hanging rail supports (S) to panel (5) and tighten with screws (M).
•
•
Insert cam bolts (C) into panel (5) tighten with a screwdriver.
•
•
Install runners (H) to panel (5) and tighten with screws (L).
Insert dowels (A) into panel (5) with a hammer.
(Assemble on a flat and even surface)
Install runners (G) to panel (6) and tighten with screws (L).•
Ax4
L
Hx3 Lx9
Ax4
Gx3 Lx9
L
Cx3
Attach hinge plates (O) to panel (5) and tighten with screws (M).•
5
Mx1
Sx1
Mx8
Ox2
G
G
G
6
Mx1
Sx1
Step One
Step Two
Page 5
7
6
5
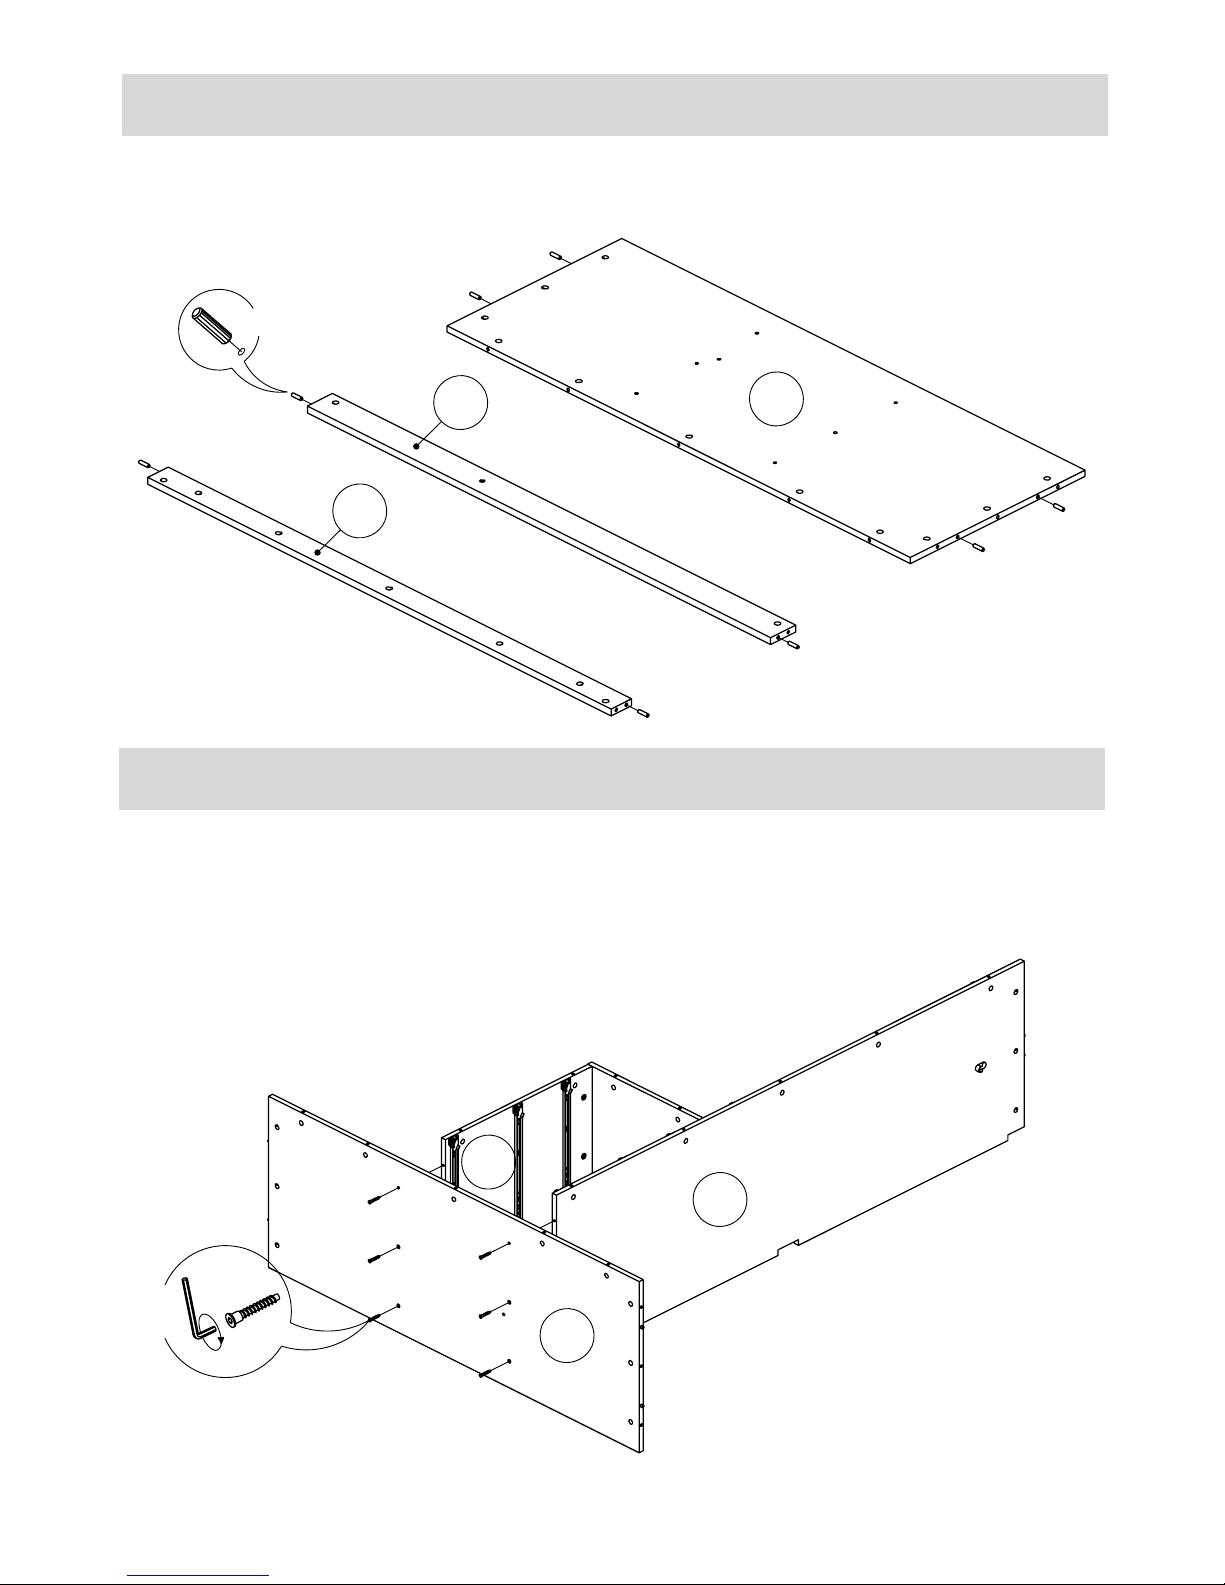
Insert cam bolts (C) into panel (7), tighten with a screwdriver. •
Insert dowels (A) into panel (7) with a hammer.•
Attach panels (5) and (6) to panel (7), insert cam locks (#) to panels (6) and (7) and•
tighten with a screwdriver.
Cx3
Ax2
#x6
5 of 25
7
Step Three
Step Four
Page 6
5
6
4
6 of 25
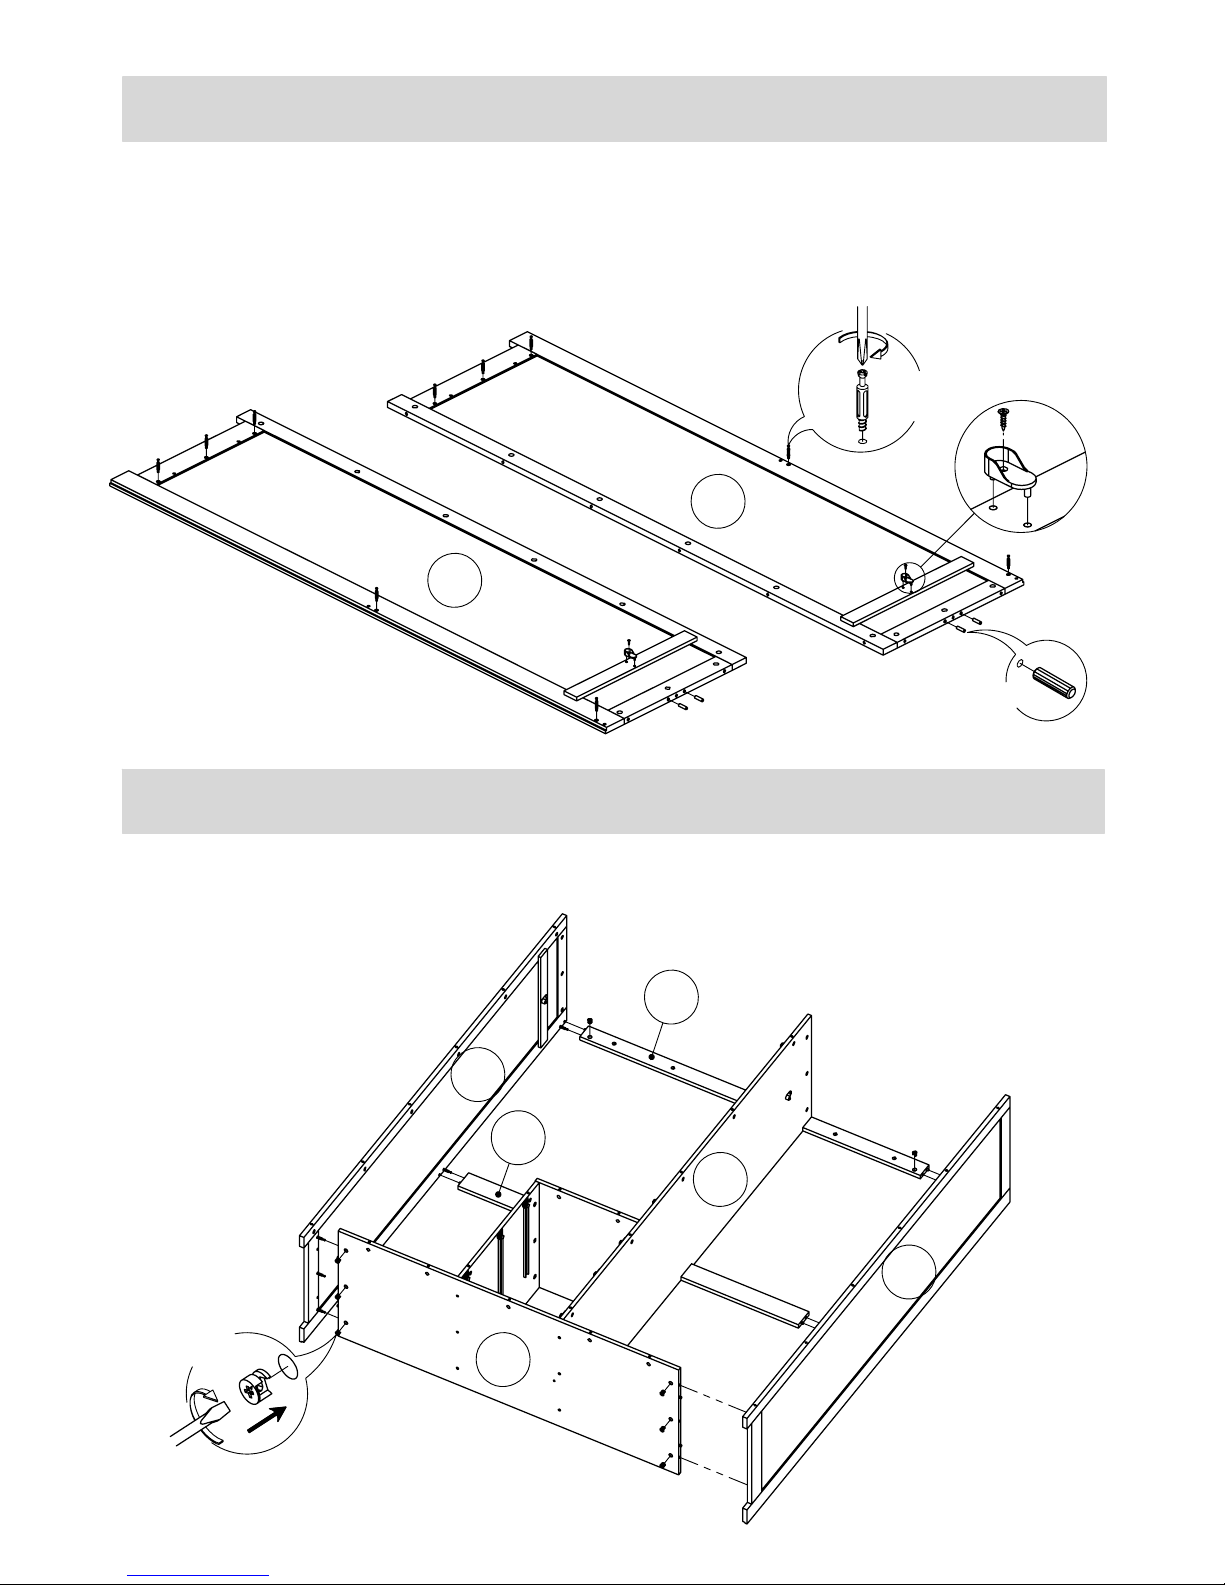
Insert dowels (A) into panels (4), (15) and (16) with a hammer.•
Attach panels (5) and (6) to panel (4), tighten with screws (E) and allen key (F).•
Ax8
Ex6
Fx1
4
16
15
Step Five
Step Six
Page 7
2
3
5
4
15
16
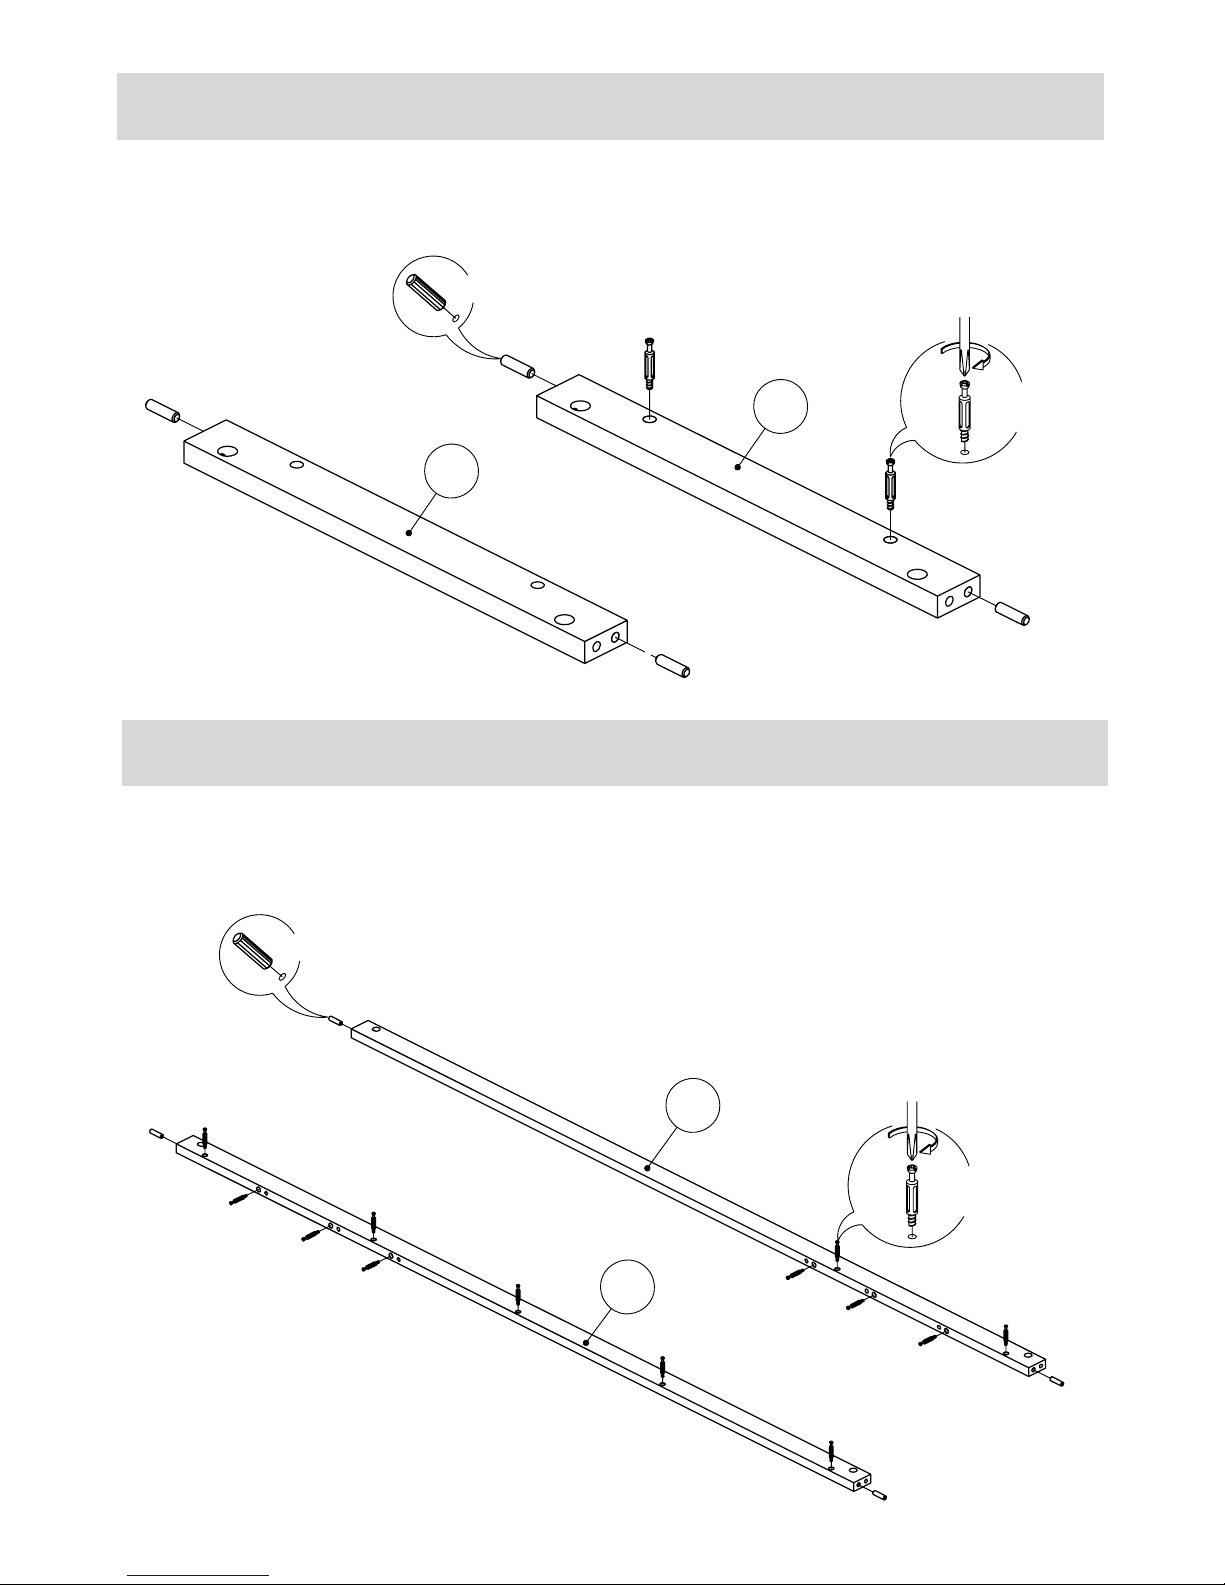
Insert cam bolts (C) into panels (2) and (3), tighten with a screwdriver. •
Attach panels (2) and (3) to panels (4), (15) and (16), insert cam locks (#) to •
panels (4) and (15), tighten with a screwdriver.
Insert dowels (A) into panels (2) and (3) with a hammer.•
Attach hanging rail supports (S) into panels (2) and (3), tighten with screws (M). •
Cx10
Ax4
#x8
7 of 25
2
3
Mx2
Sx2
Step Seven
Step Eight
Page 8
8 of 25
Insert dowels (A) into panels (14a) and (14b) with a hammer.•
Insert cam bolts (C) into panels (14a) tighten with a screwdriver. •
Insert cam bolts (C) into panels (12) and (13), tighten with a screwdriver. •
Insert dowels (A) into panels (12) and (13) with a hammer.•
Ax6
Cx2
Ax4
Cx13
14a
14b x2
12
13
Step Nine
Step Ten
Page 9
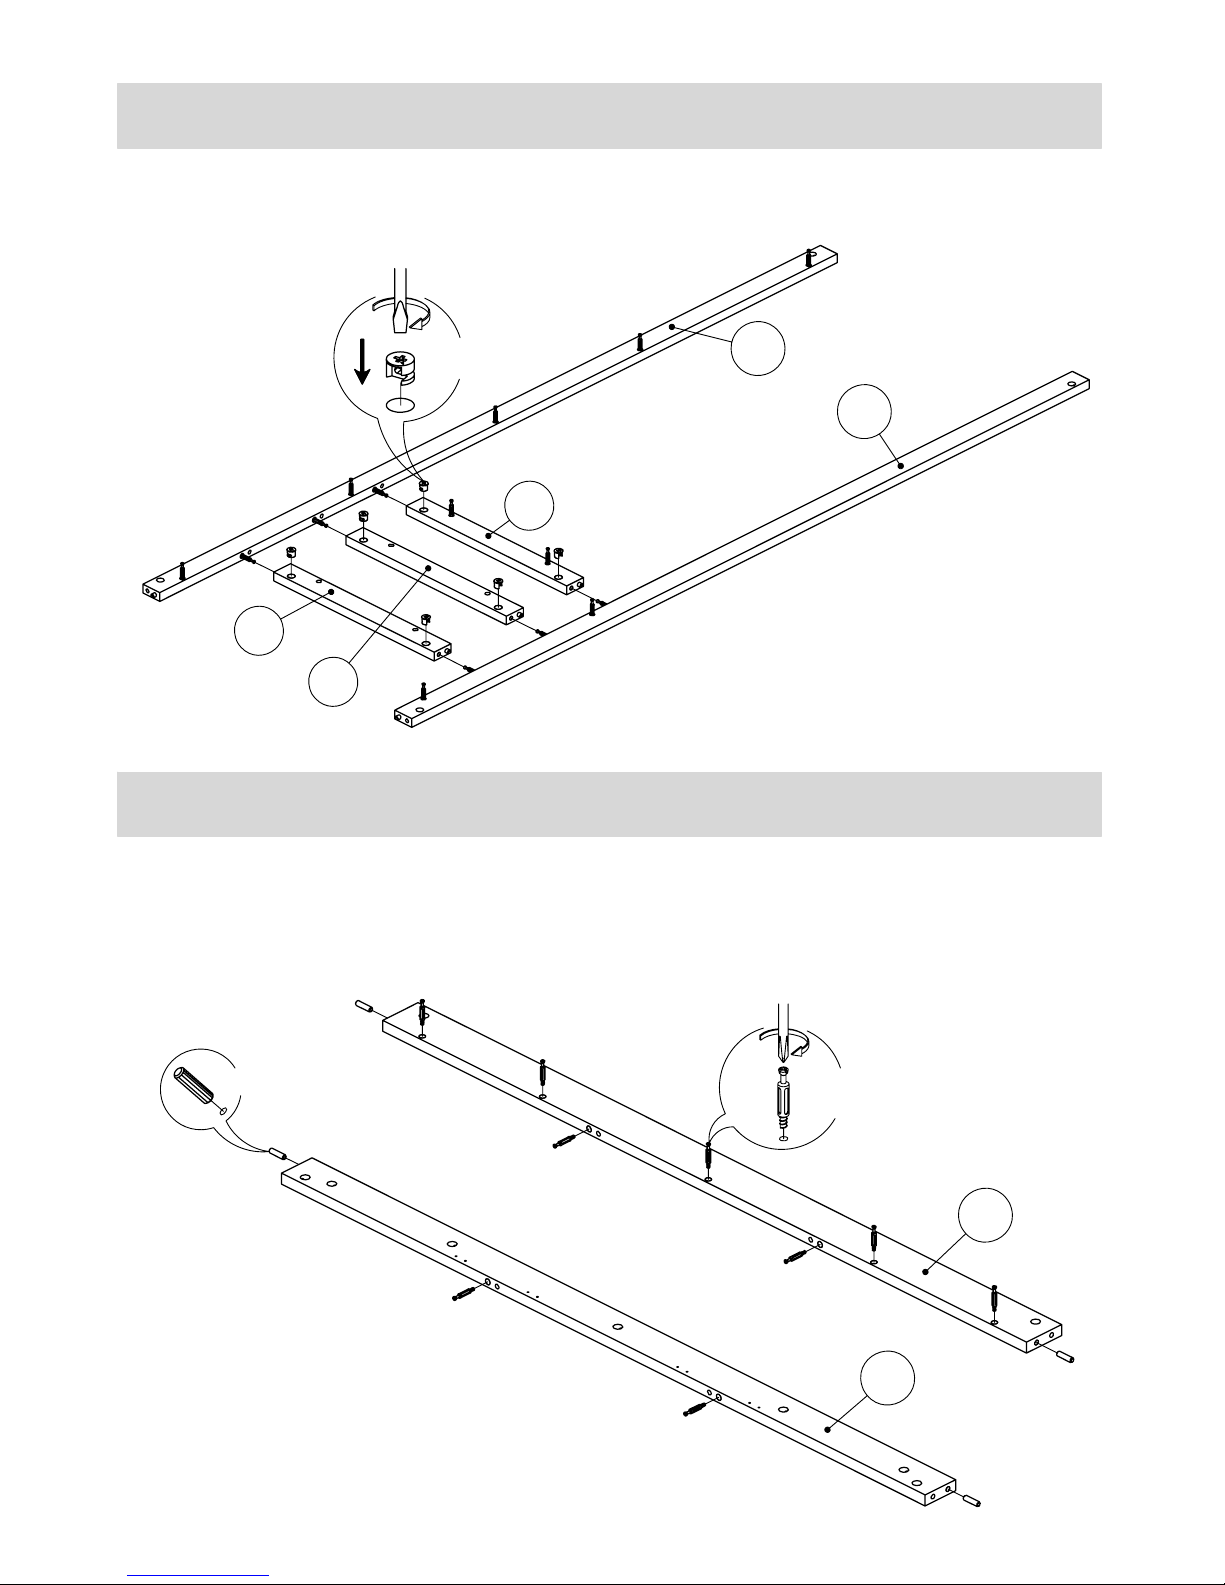
Attach panels (12) and (13) to panels (14a) and (14b), insert cam locks (#) into •
panels (14a) and (14b), tighten with a screwdriver.
Insert dowels (A) into panels (10) and (11) with a hammer.•
Insert cam bolts (C) into panels (10) and (11), tighten with a screwdriver. •
Cx9
Ax4
#x6
9 of 25
11
12
13
14a
14b
14b
10
Step Eleven
Step Twelve
Page 10
10 of 25
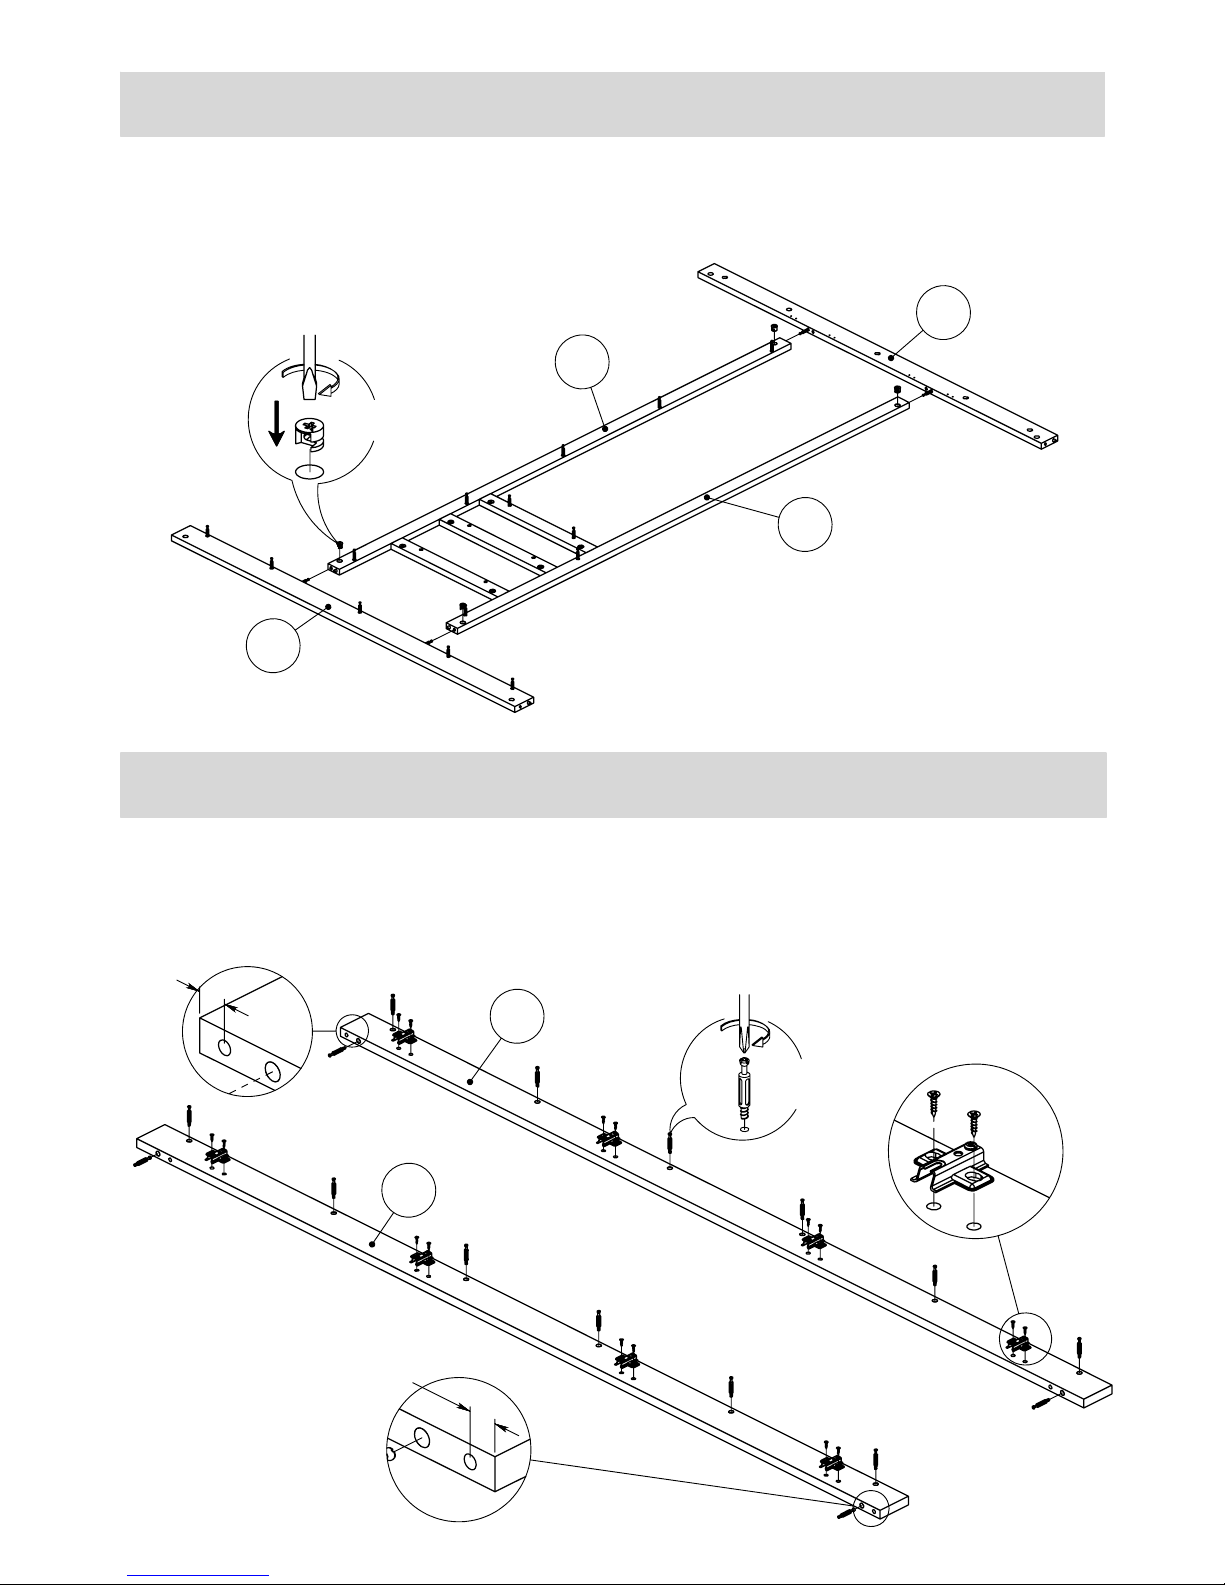
Insert cam bolts (C) into panels (8) and (9), tighten with a screwdriver. •
Attach hinge plates (R) to panels (8) and (9) and tighten with screws (M).•
Attach panels (10) and (11) to panels (12) and (13), insert cam locks (#) to panels •
(12) and (13), tighten with a screwdriver.
Cx16
#x4
10
11
13
12
9
Mx16
Rx8
8
17mm
17mm
Step Thirteen
Step Fourteen
Page 11
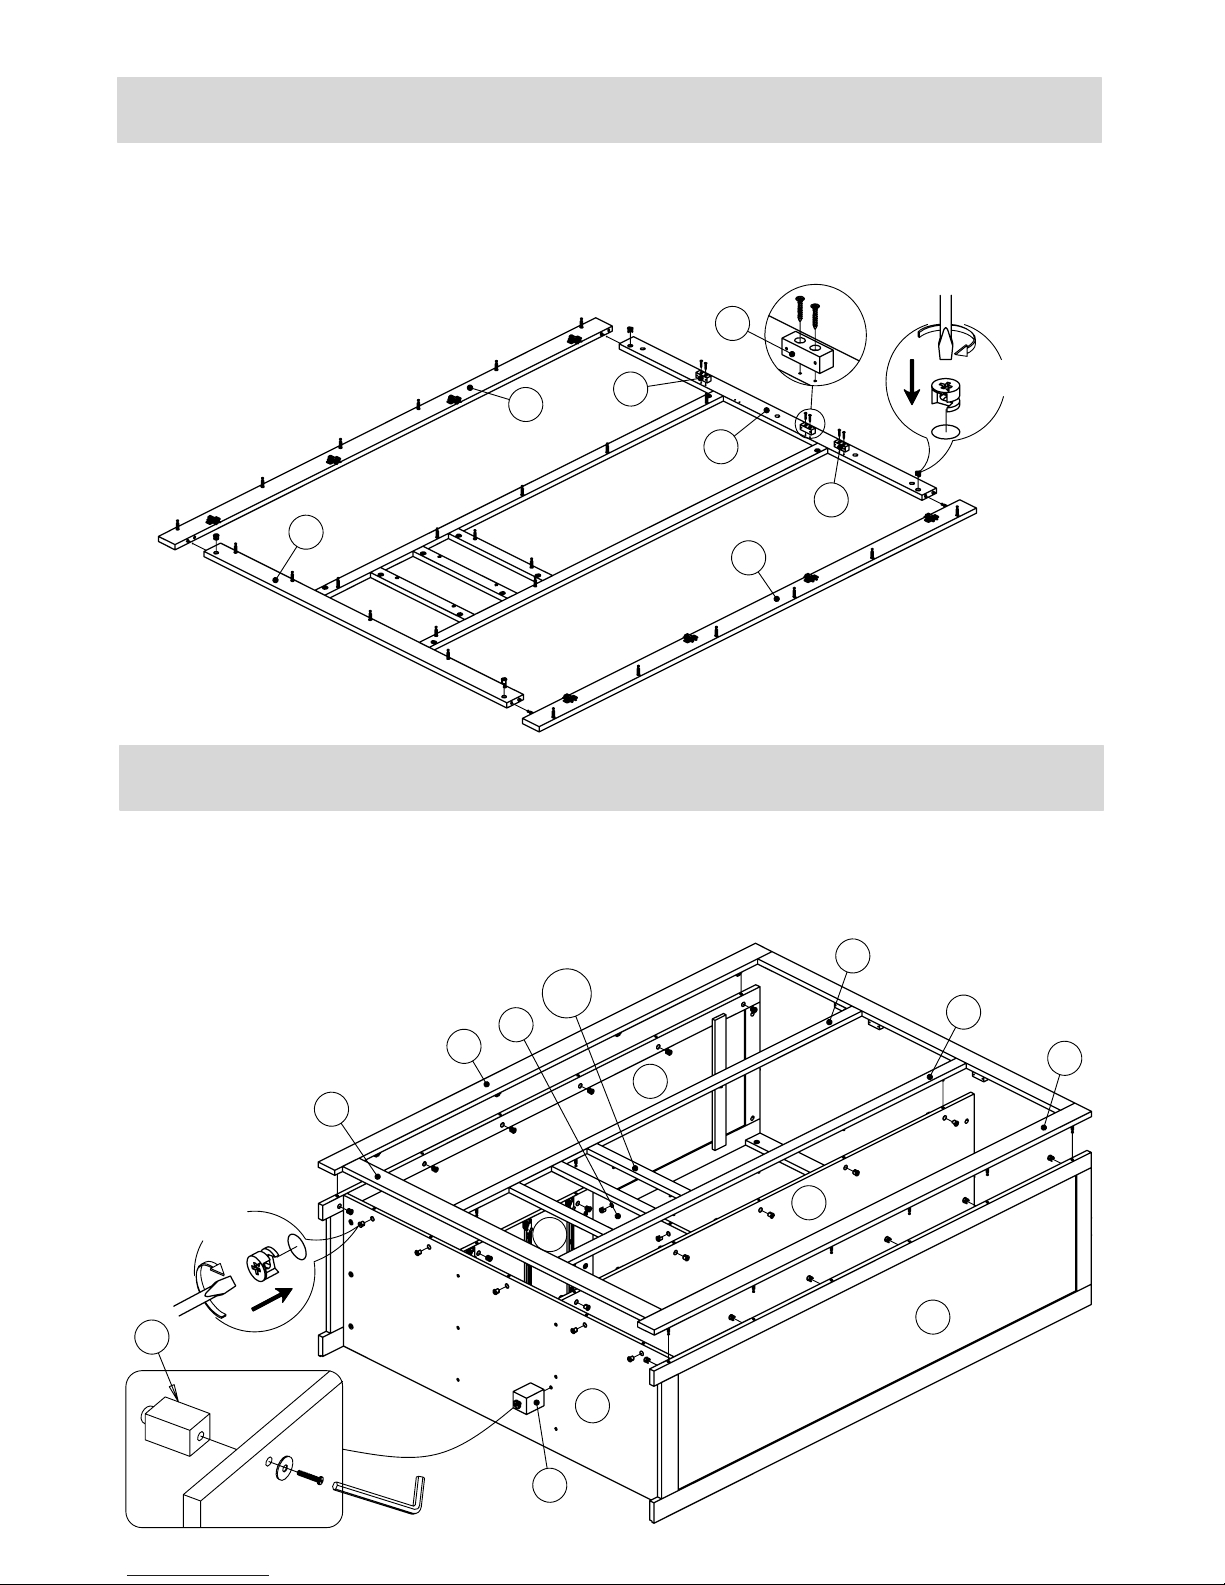
Attach panels (8) and (9) to panels (10) and (11), insert cam locks (#) to panels •
(10) and (11), tighten with a screwdriver.
Attach blocks (34) to panel (10) and tighten with screws (X). •
Attach foot (35) to panel (4) and tighten with washer (Ȍ), bolt (@) and allen key (F). •
Attach front frame to the body of wardrobe, insert cam locks (#) to panels (2), (3), •
(4), (5), (6) and (7), tighten with a screwdriver.
#x4
#x26
35
11 of 25
9
8
10
11
34
34
Xx6
34
8
9
3
2
13
12
11
4
5
6
7
14a
35
@
Ȍ
F
Step Fifteen
Step Sixteen
Page 12
Vx6
Tx3
Tx3
Vx6
12 of 25
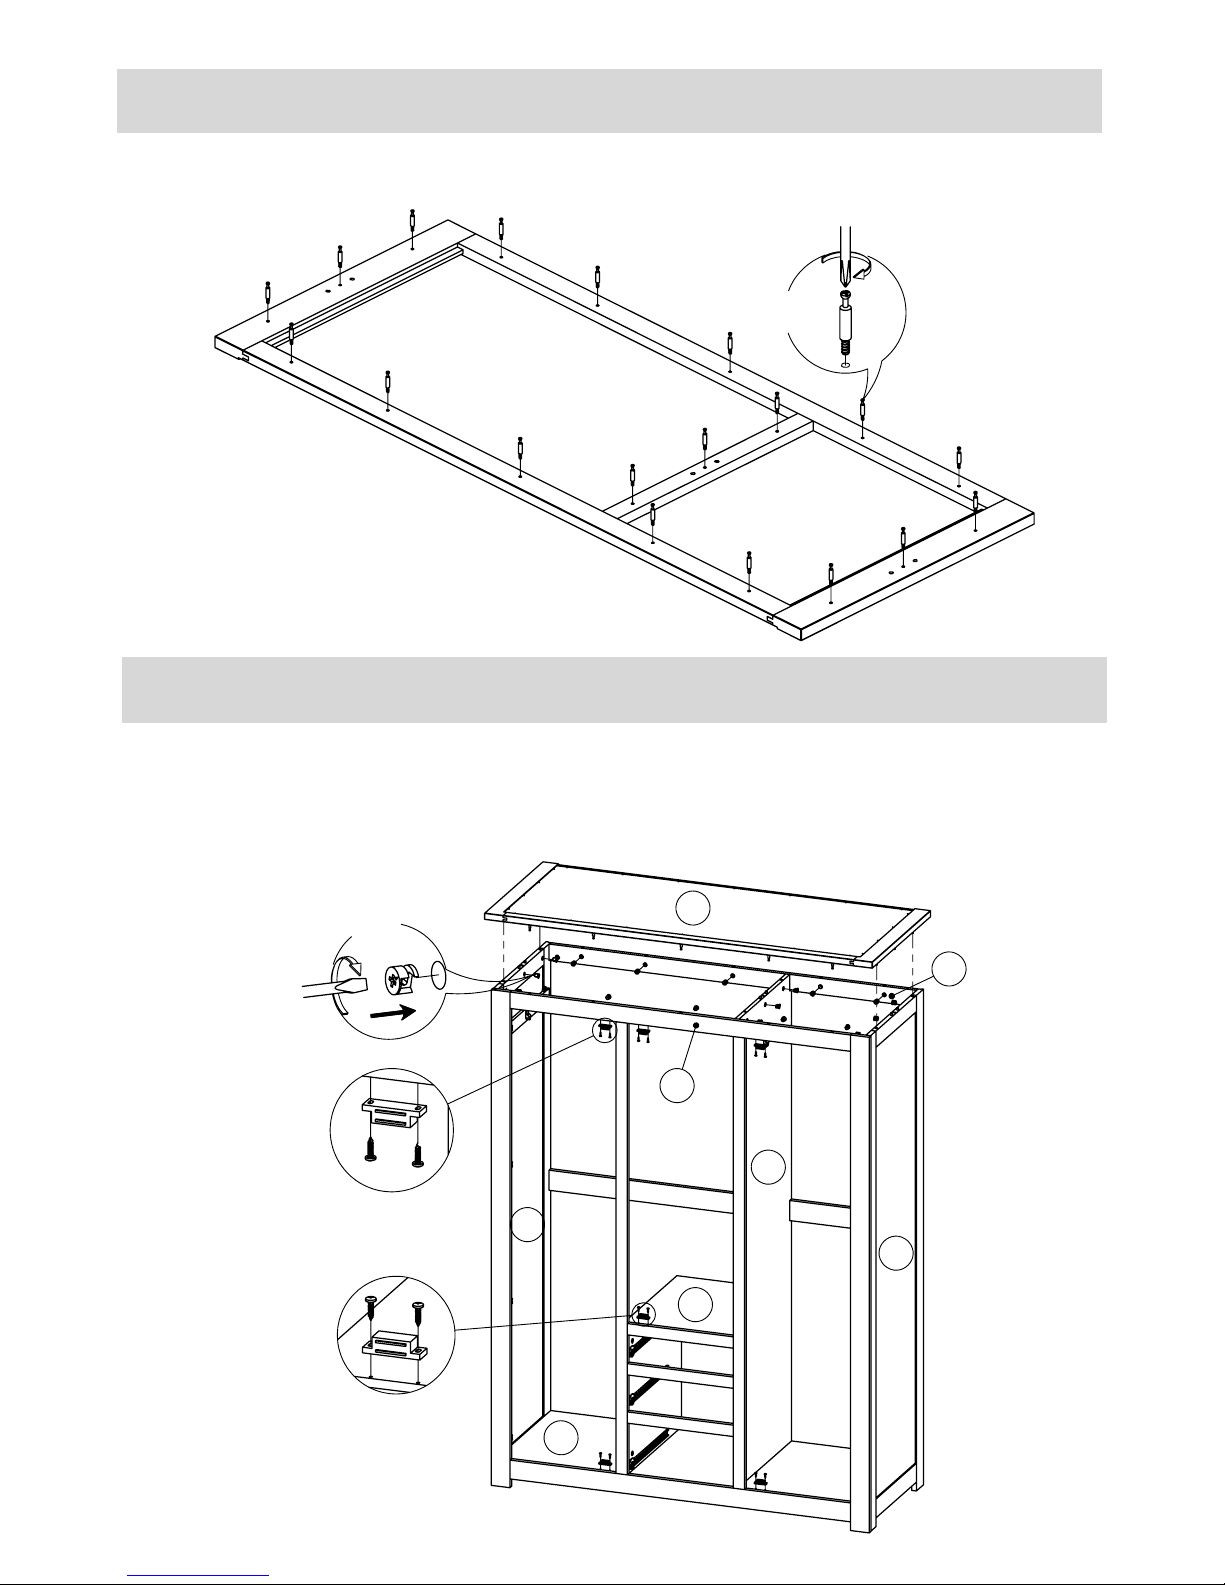
(10) and (15), tighten with screwdriver.
•
• Insert cam bolts (B) into panel (1), tighten with a screwdriver.
Attach panel (1) to the body of wardrobe, insert cam locks (#) to panels (2), (3), (5),
Fix magnets (T) to panels (4), (7) and (35), and tighten with screws (V). •
Bx19
#x19
7
1
4
2
5
15
3
10
Step Seventeen
Step Eighteen
Page 13
3
2
5
16
13 of 25
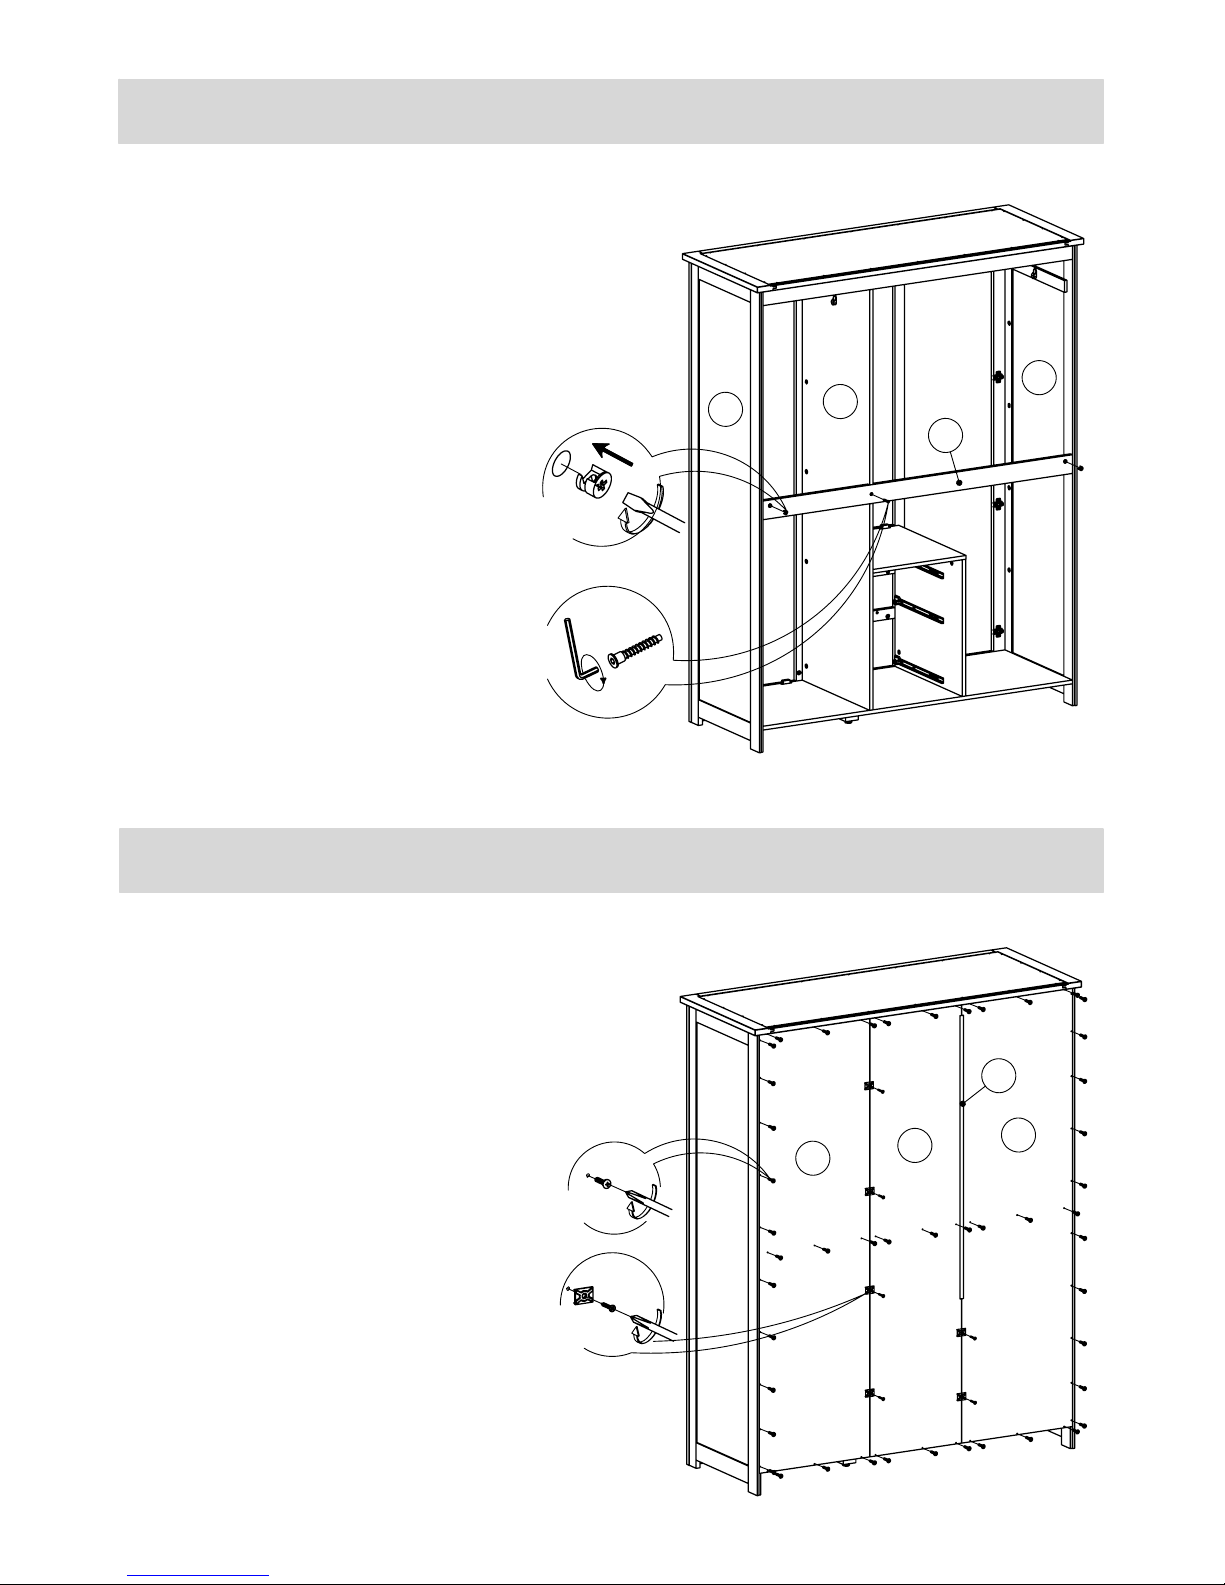
Attach panel (16) to panels (2), (3) and (5), •
insert cam locks (#) to panel (16), tighten
with a screwdriver.
Attach panel (16) to panel (5) using screw•
(E) and tighten with Allen key (F).
Attach back panels (17), (18) •
and "H" plastic rail (36) to the
body of wardrobe, and tighten
with screws (V).
Connect back panels (17) and•
(18) with rear panel hooks (Ȉ),
and tighten with screws (V).
Ex1
Fx1
Ȉx6
Vx6
Vx48
#x2
17
17
18
36
Step Nineteen
Step Twenty
Page 14
ĭ
x8
Mx4
19
x2
Ux6
Wx12
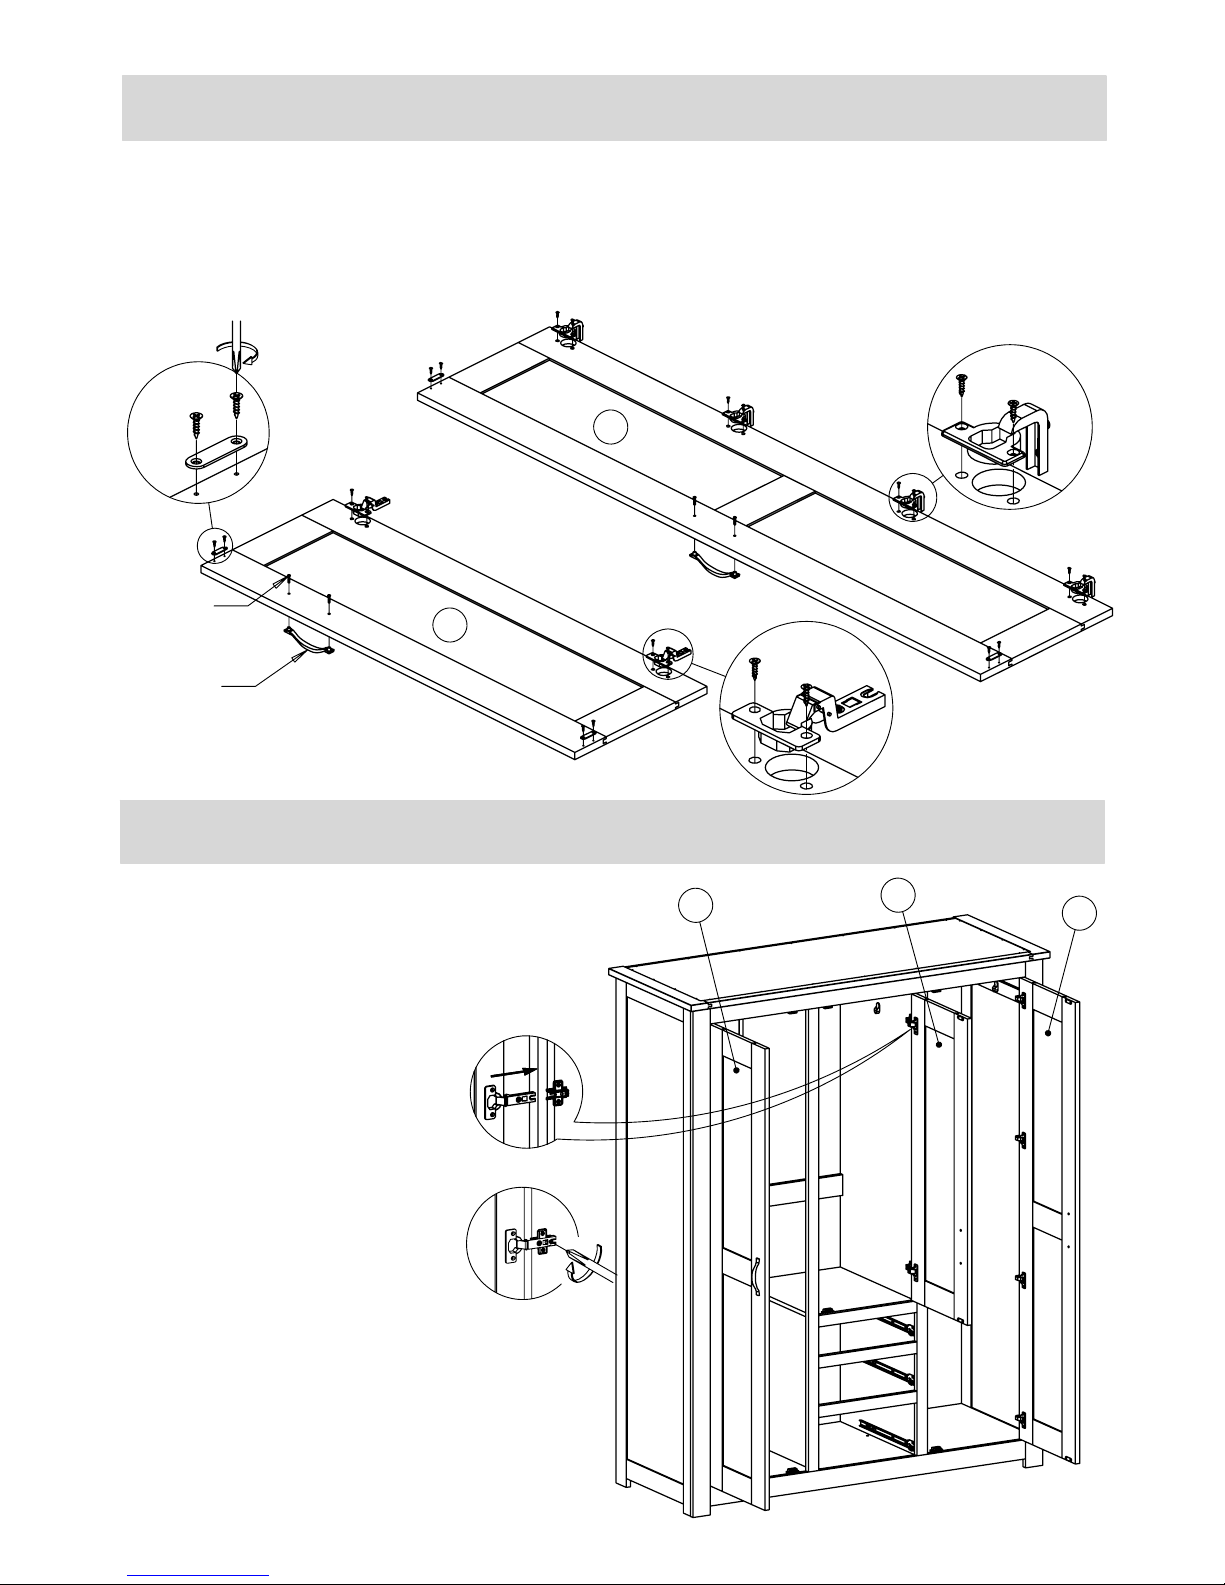
Install handles (N) to doors (19) and (20), tighten with screws (P).•
Fix magnet plates (U) to doors (19) and (20), and tighten with screws (W).•
Attach hinges (Q) to doors (19), attach hinges (ĭ) to door (20) and tighten with •
screws (M).
Fasten doors (19) and (20) to the •
body of wardrobe, attach hinges (Q)
and (ĭ) to hinge plates (R), tighten
with a screwdriver.
Qx8
Mx16
14 of 25
19
19
20
20
Nx3
Px6
Step Twenty-One
Step Twenty-Two
Page 15
21
22
23
15 of 25
21
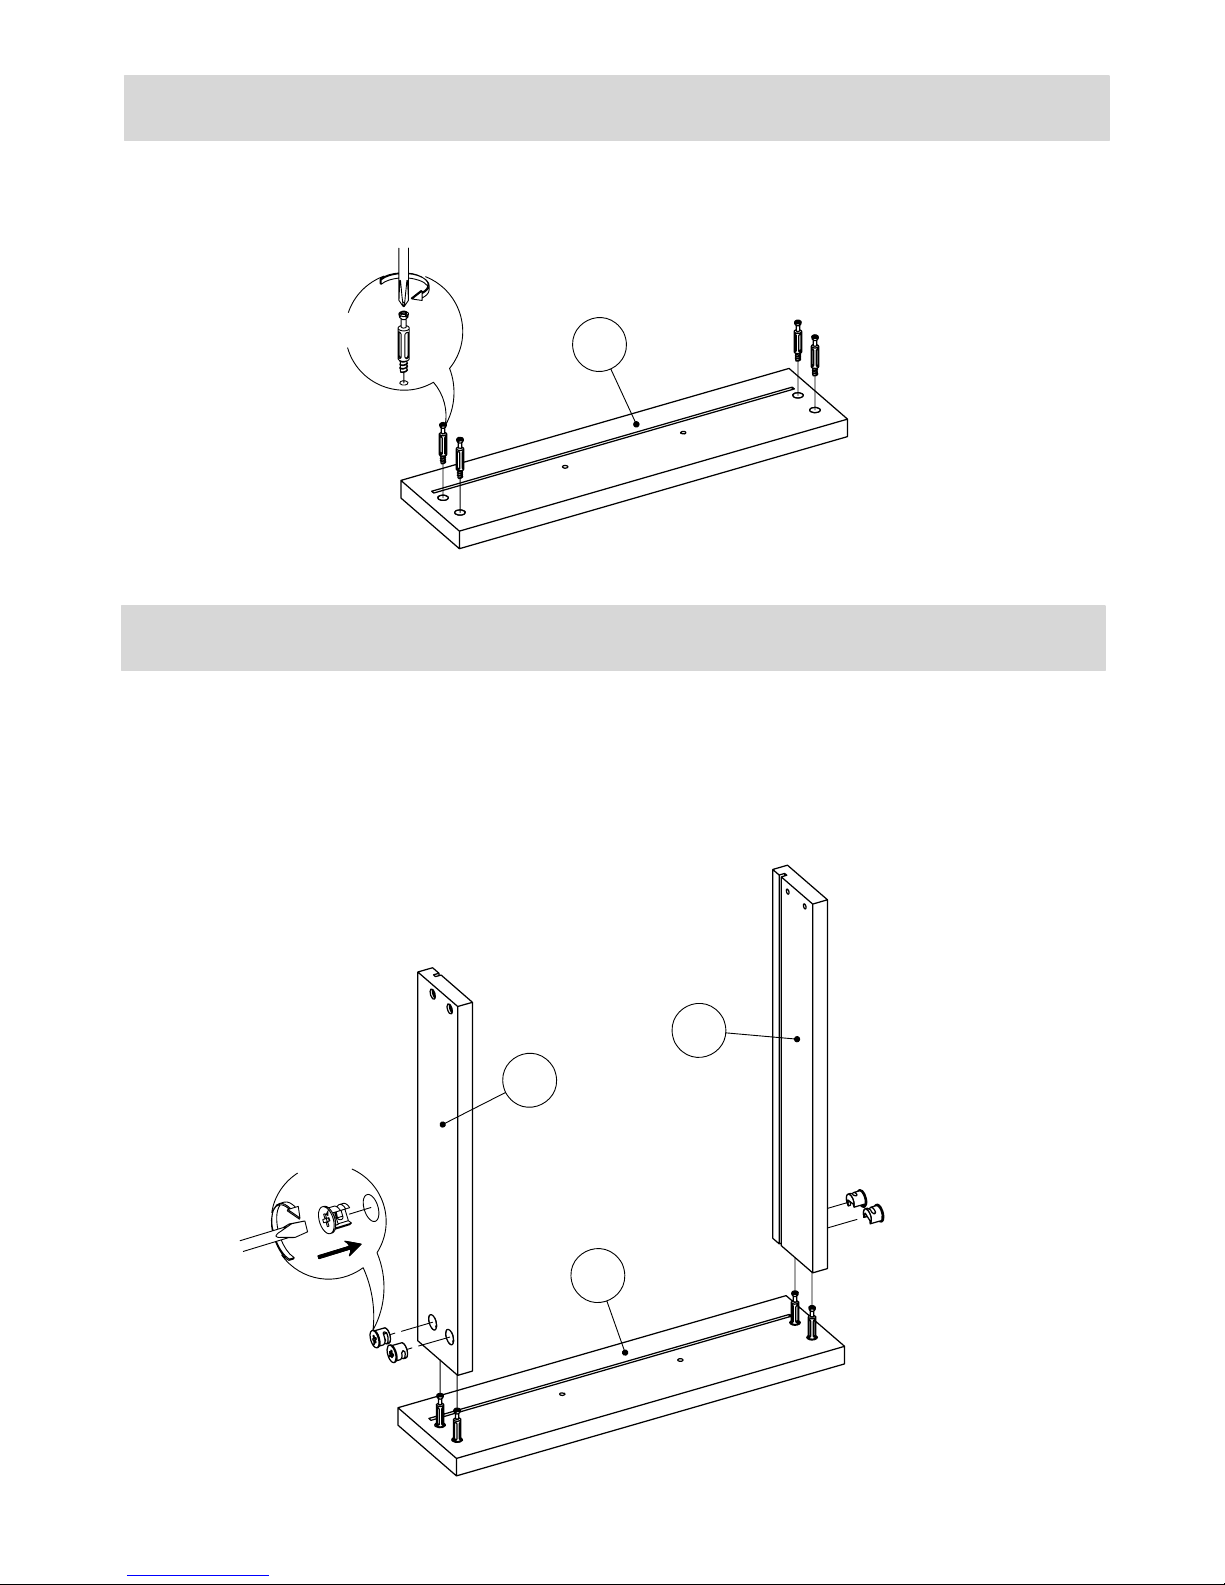
Insert cam bolts (C) into panel (21), tighten with a screwdriver. •
Attach panels (22) and (23) to panel (21), insert cam locks (D) into panels (22) and •
(23), tighten with a screwdriver.
C
x4
Dx4
Step Twenty-Three
Step Twenty-Four
Page 16
22
21
23
24
25
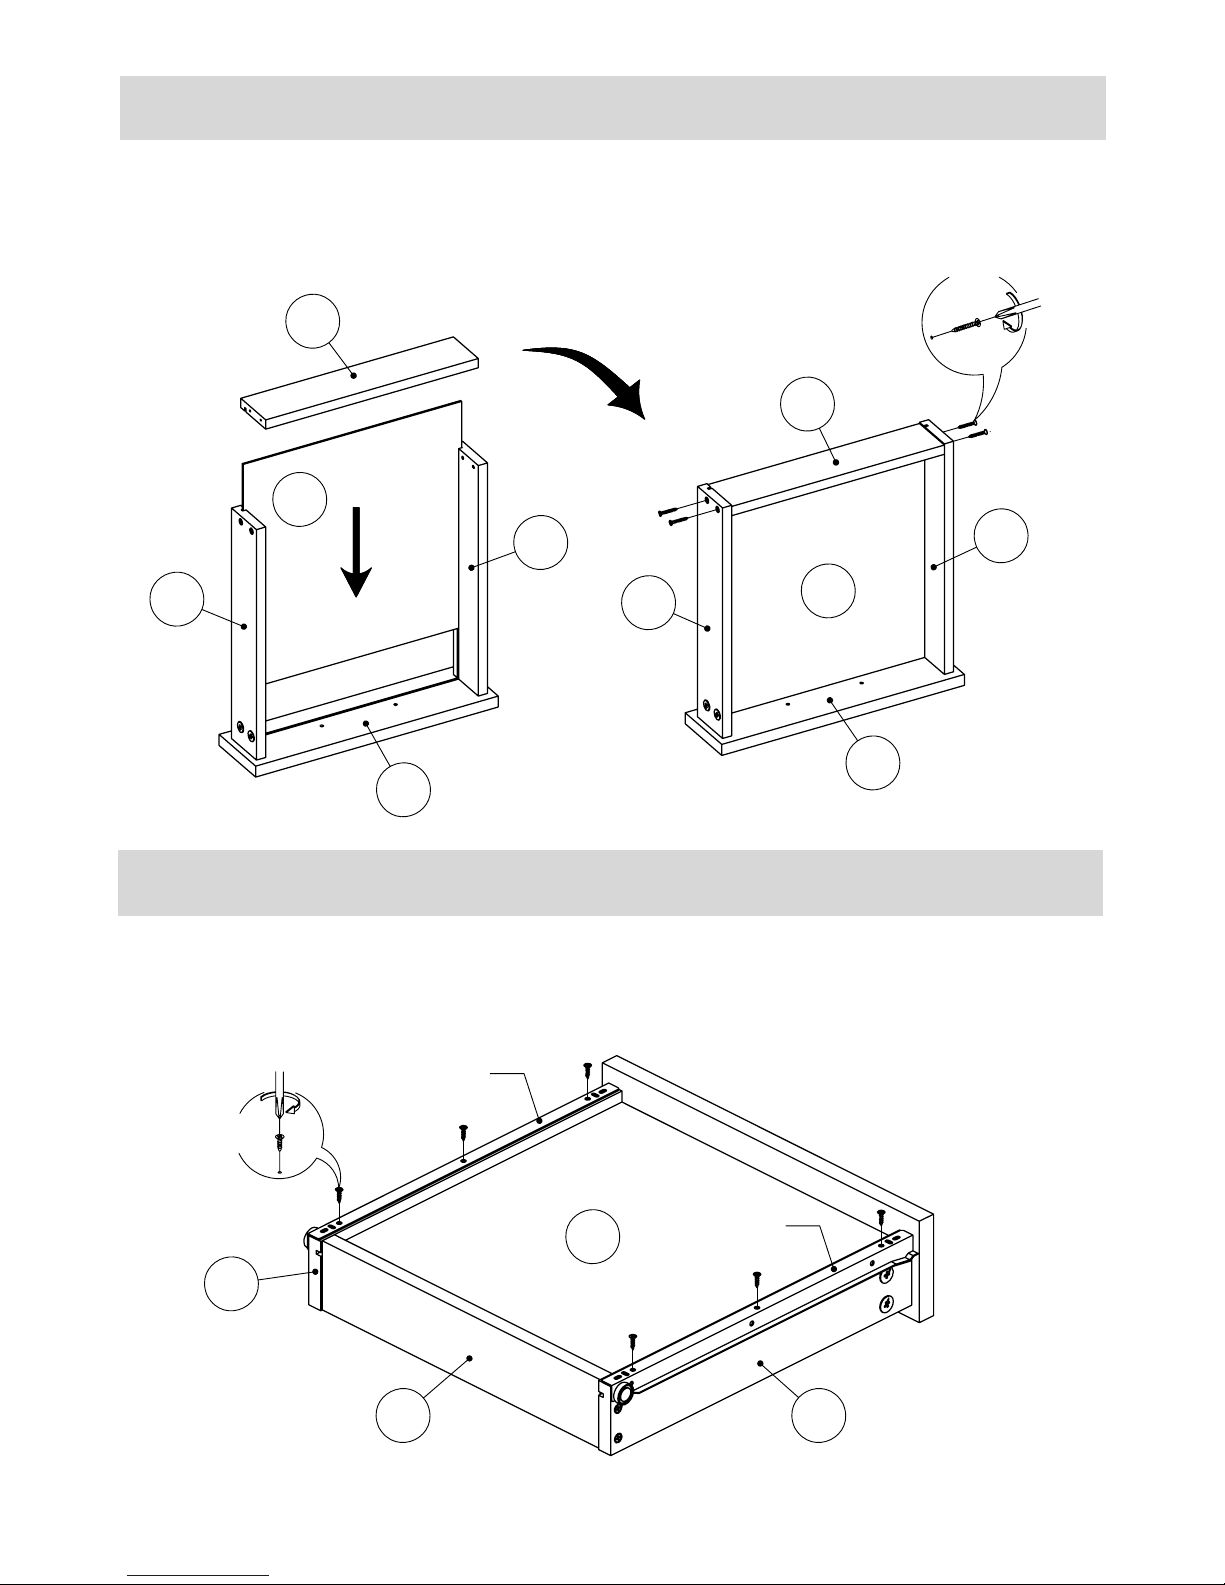
Attach panel (24) to body of drawer, and tighten with screws ($).•
Slide in panel (25) along the grooves into the drawer frame.•
Install metal slides (J) and (K) to the panels (22) and (23), tighten with screws (M). •
$
x4
Mx6
24
22
23
21
25
16 of 25
25
Jx1
Kx1
24 23
22
Step Twenty-Five
Step Twenty-Six
Page 17
24
22
23
21
25
Nx1
17 of 25
26
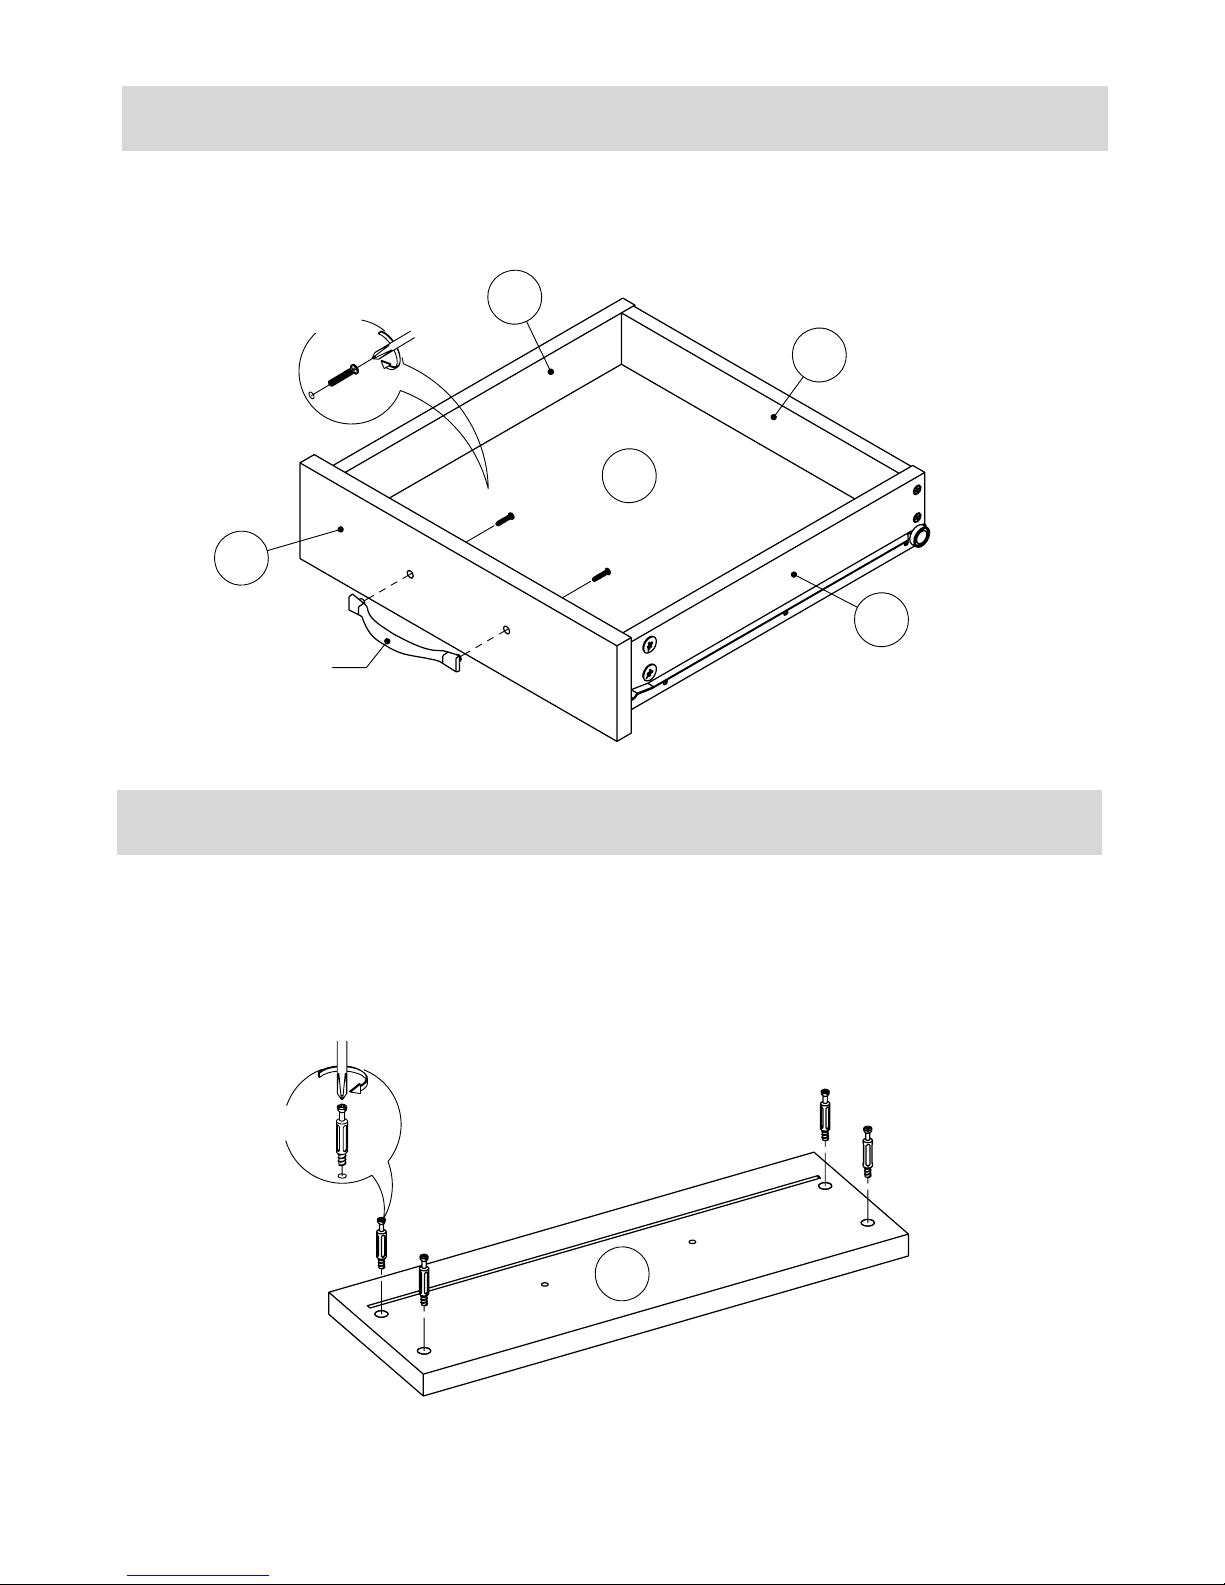
Install handles (N) to the front panel of drawer (21), and tighten with bolts (P). •
Insert cam bolts (C) into panel (26), tighten with a screwdriver. •
Px2
C
x4
Step Twenty-Seven
Step Twenty-Eight
Page 18
27
28
26
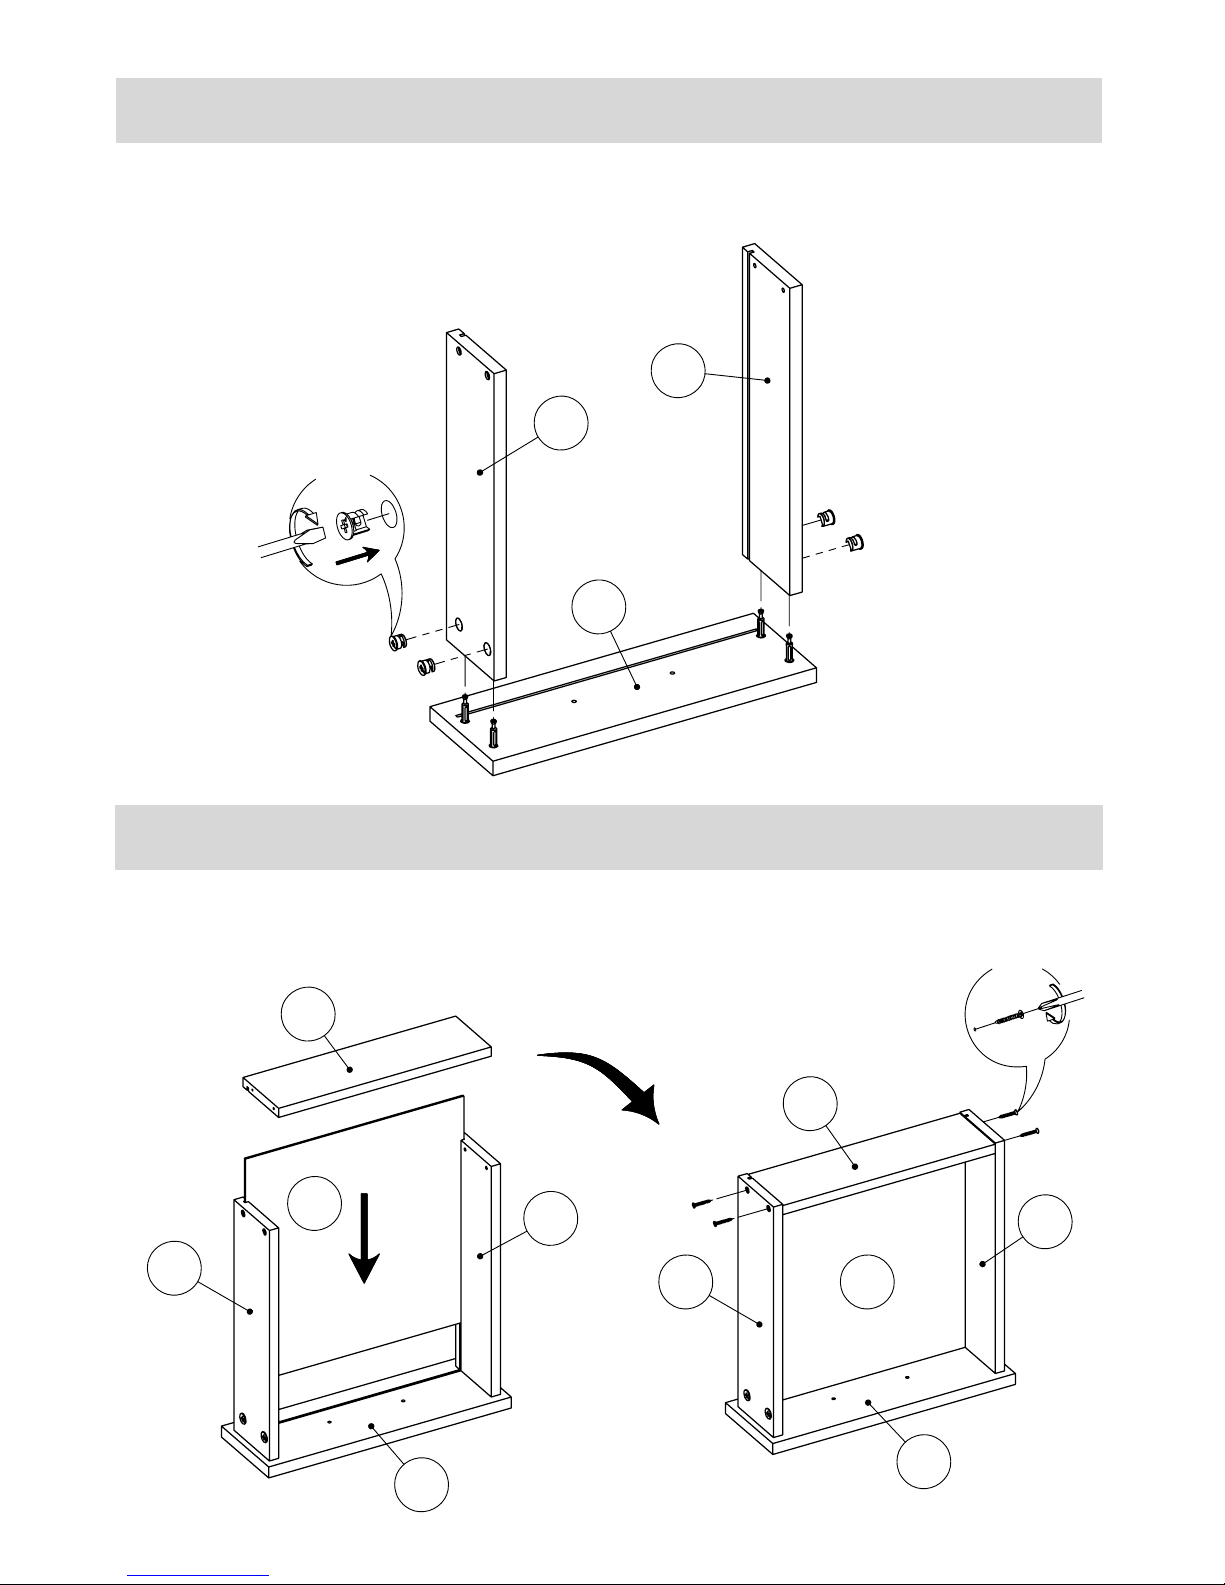
Attach panel (29) to body of drawer, and tighten with screws ($).•
Slide in panel (25) along the grooves into the drawer frame.•
Attach panels (27) and (28) to panel (26), insert cam locks (D) into panels (27) and •
(28), tighten with a screwdriver.
$
x4
Dx4
27
28
29
26
25
18 of 25
29
27
28
26
25
Step Twenty Nine
Step Thirty
Page 19
19 of 25
29
27
28
26
25
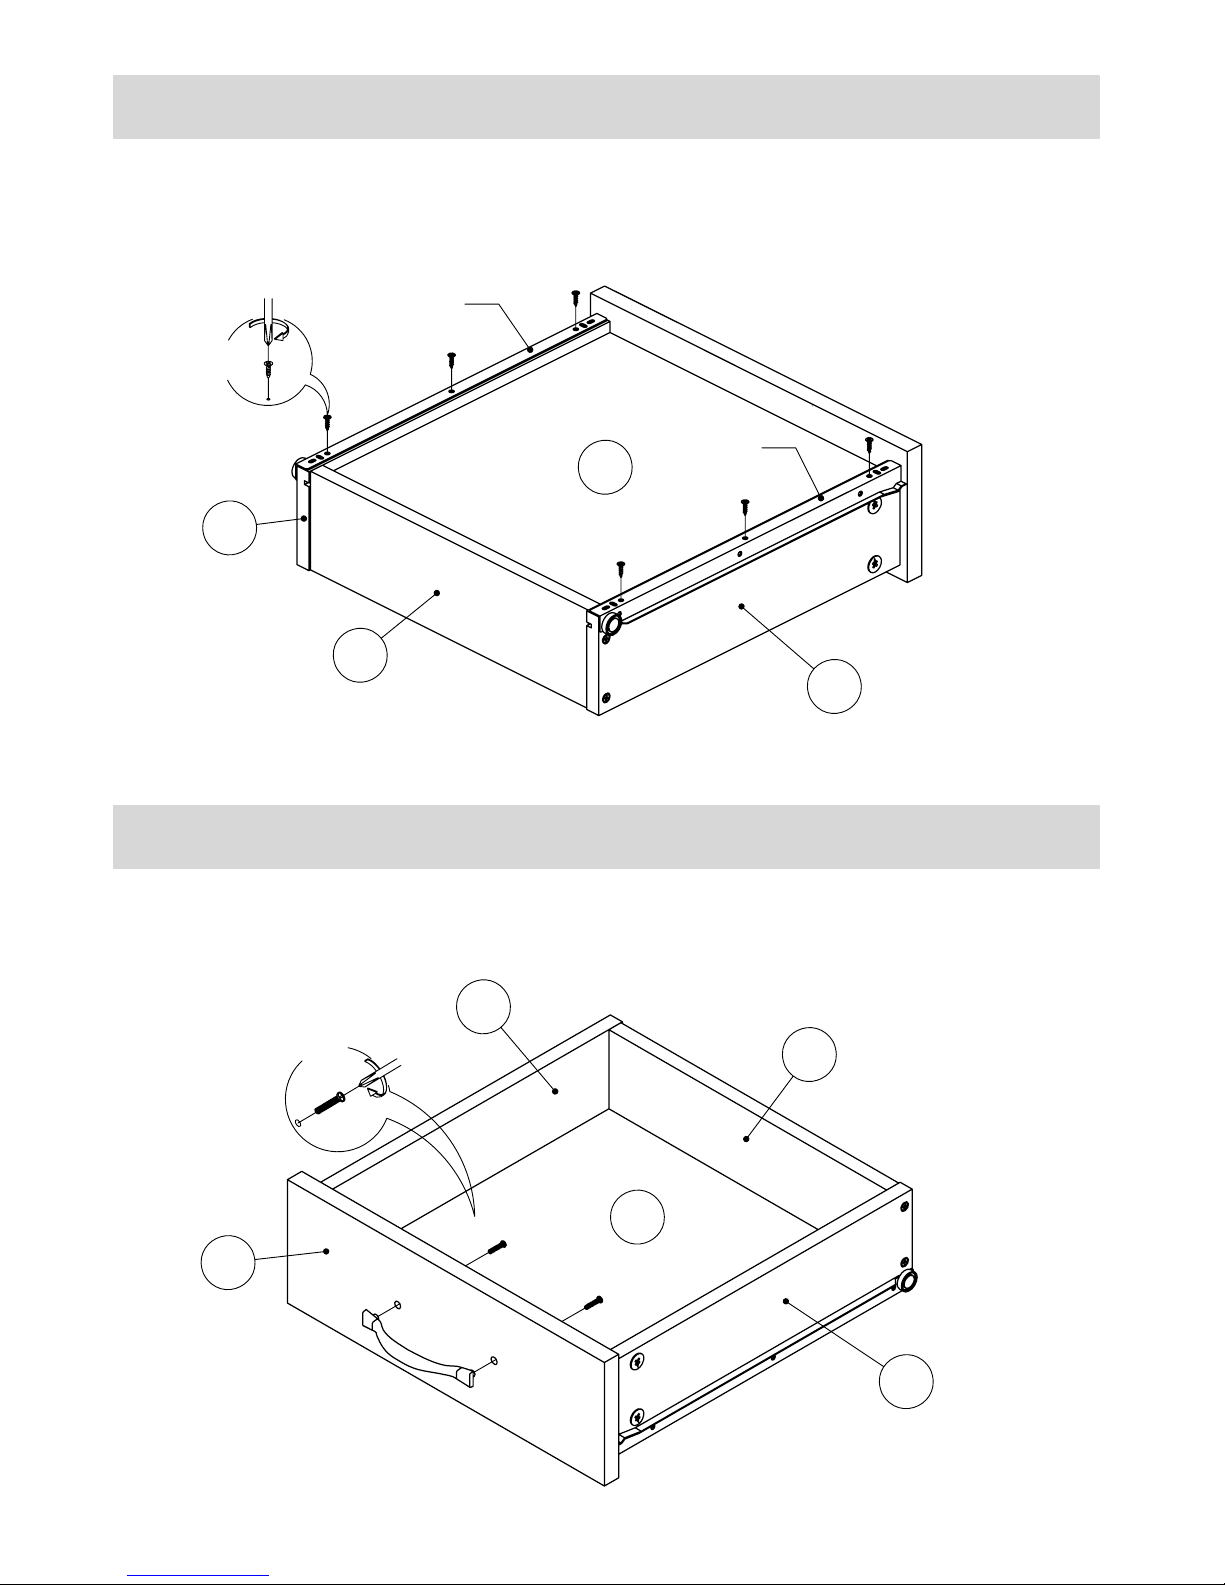
Install metal slides (J) and (K) to the panels (27) and (28), tighten with screws (M). •
Install handles (N) to the front panel of drawer (26), and tighten with bolts (P). •
Mx6
Px2
29
28
25
27
Jx1
Kx1
Step Thirty One
Step Thirty Two
Page 20
30
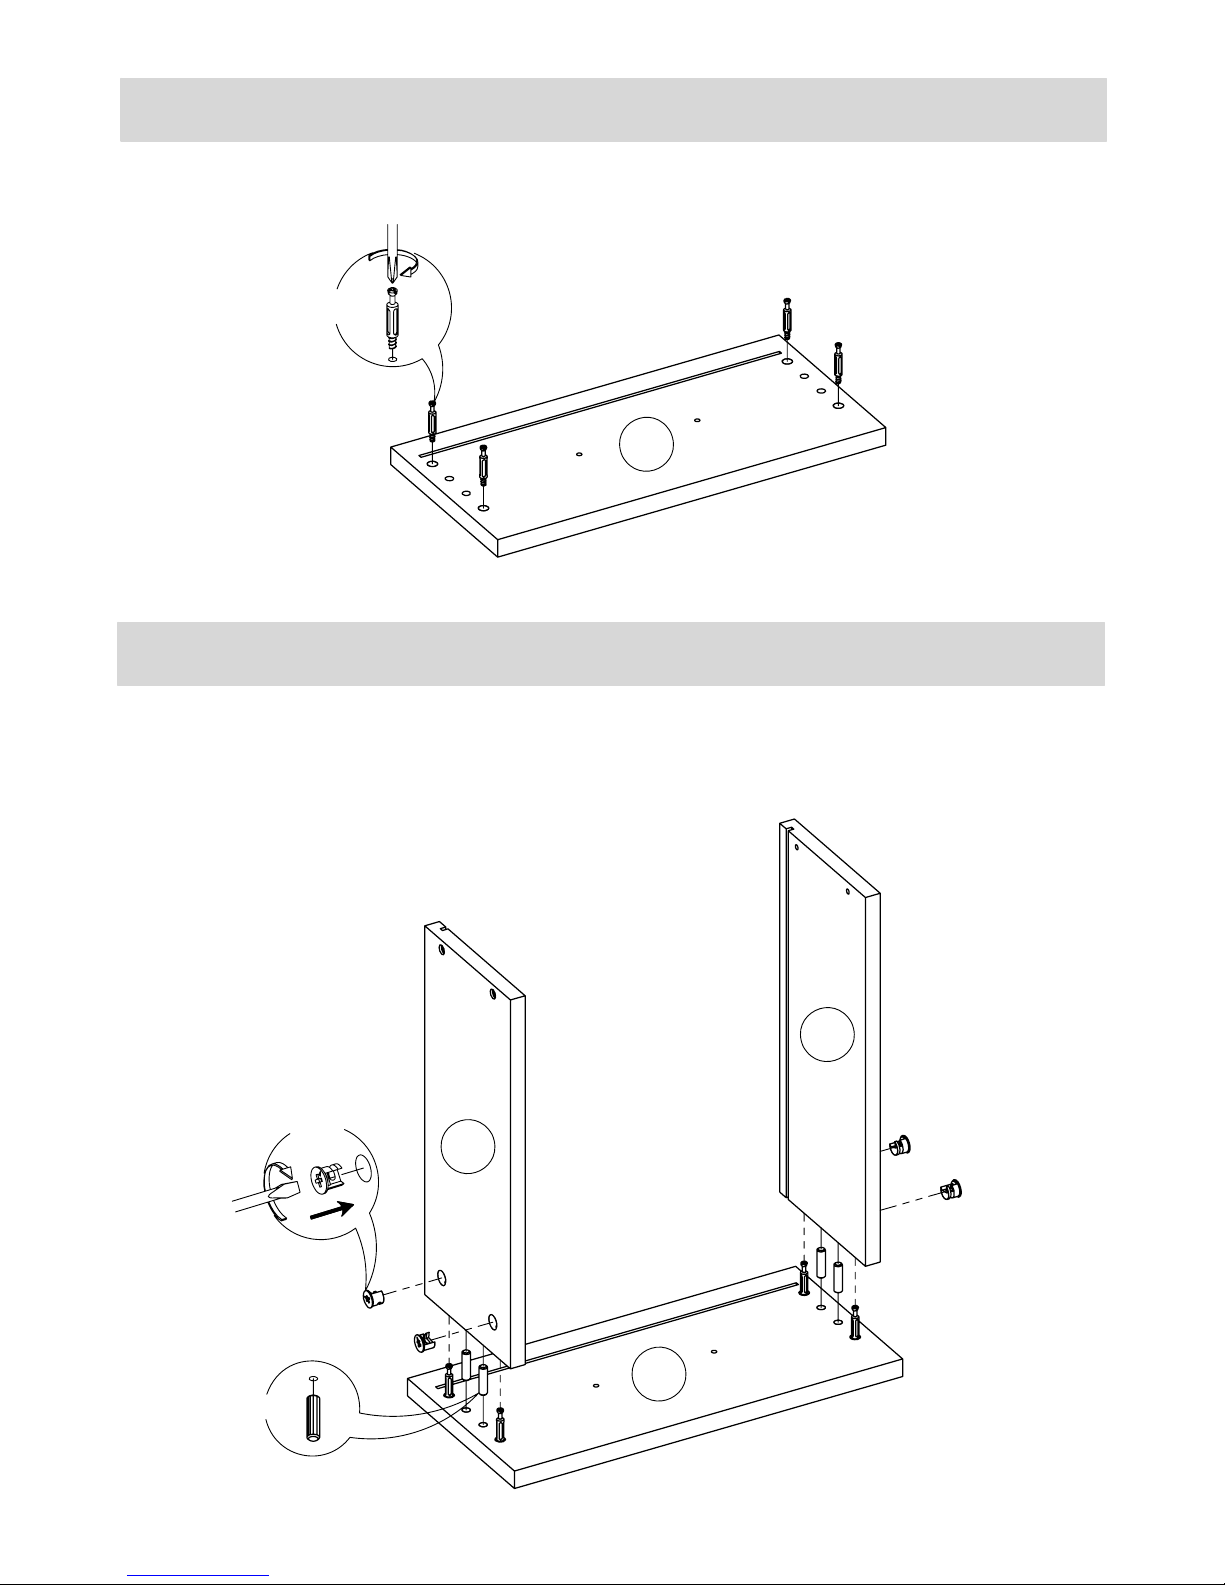
Insert cam bolts (C) into panel (30), tighten with a screwdriver. •
Attach panels (31) and (32) to panel (30), insert cam locks (D) into panels (31) and •
(32), tighten with a screwdriver.
Insert dowels (A) into panels (31) and (32) with a hammer.•
C
x4
Dx4
Ax4
20 of 25
30
31
32
Step Thirty Three
Step Thirty Four
Page 21
33
31
32
25
30
21 of 25
25
33
32
31
Jx1
Kx1
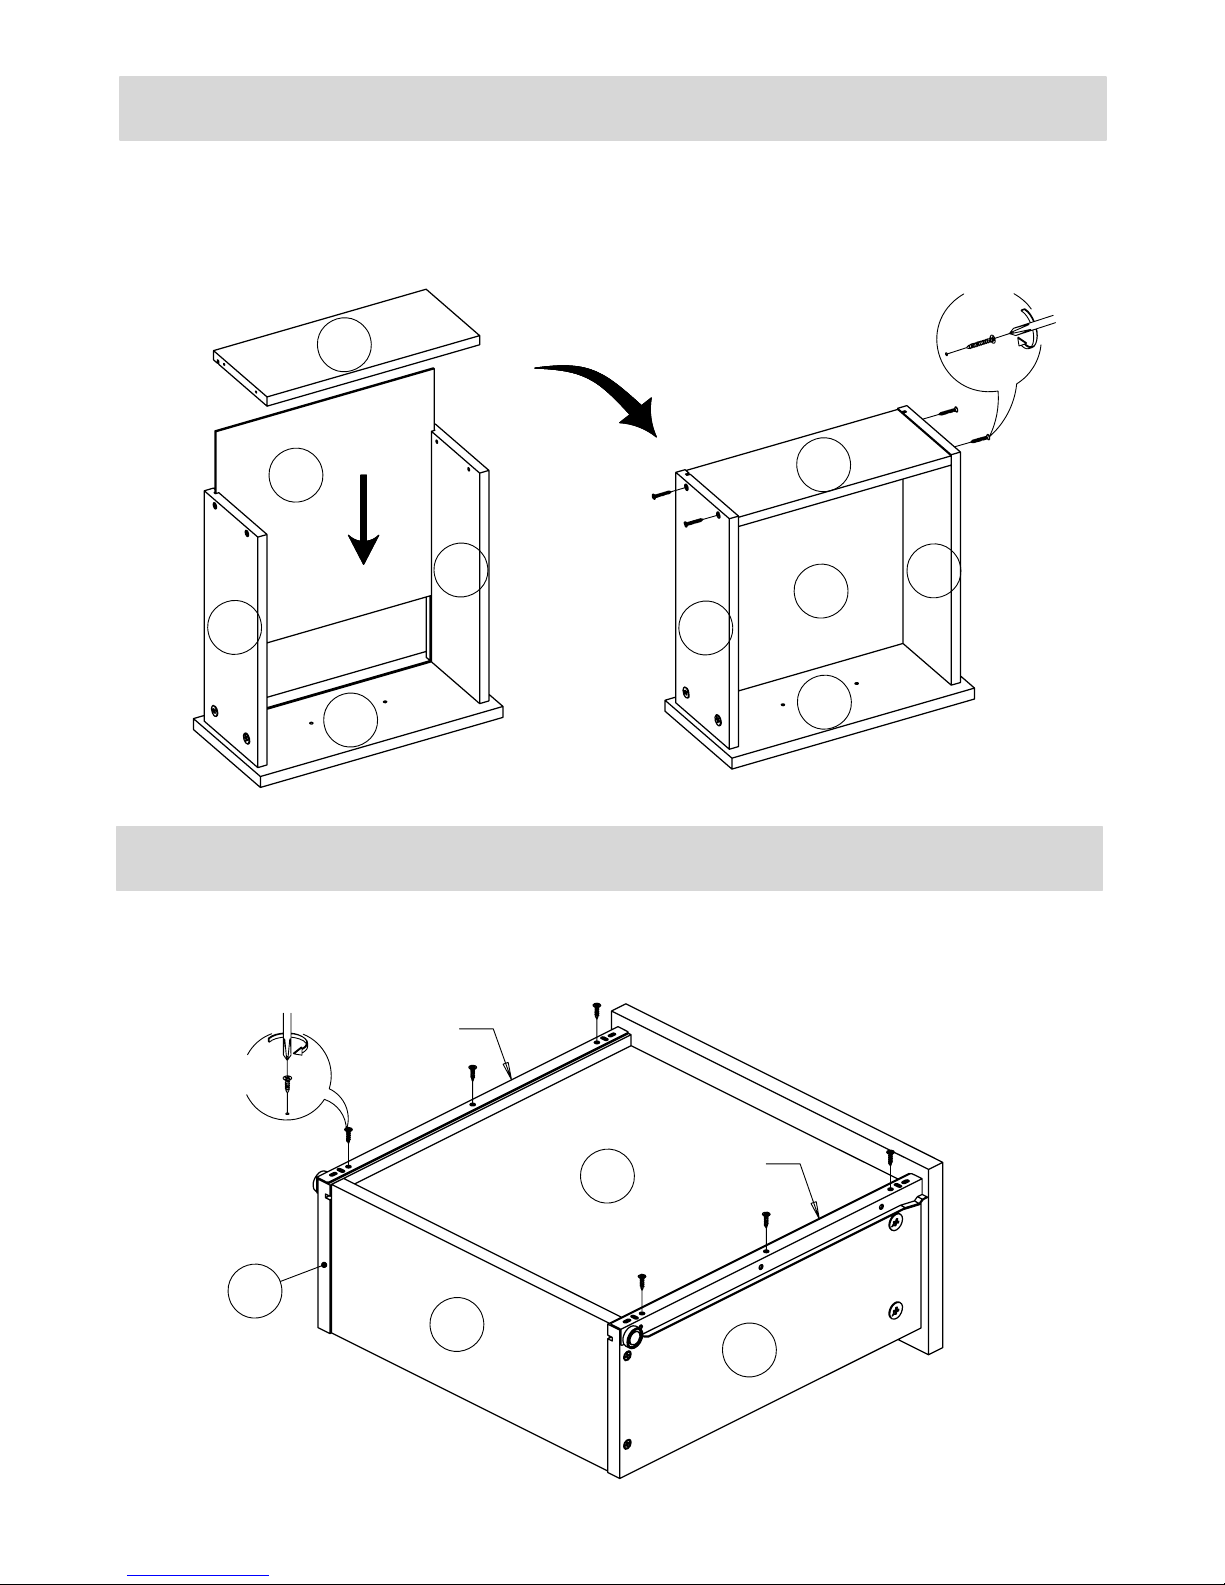
Attach panel (33) to body of drawer, and tighten with screws ($).•
Slide in panel (25) along the grooves into the drawer frame.•
Install metal slides (J) and (K) to the panels (31) and (32), tighten with screws (M). •
$
x4
Mx6
25
33
31
32
30
Step Thirty Five
Step Thirty Six
Page 22
Nx1
30
31
32
25
33
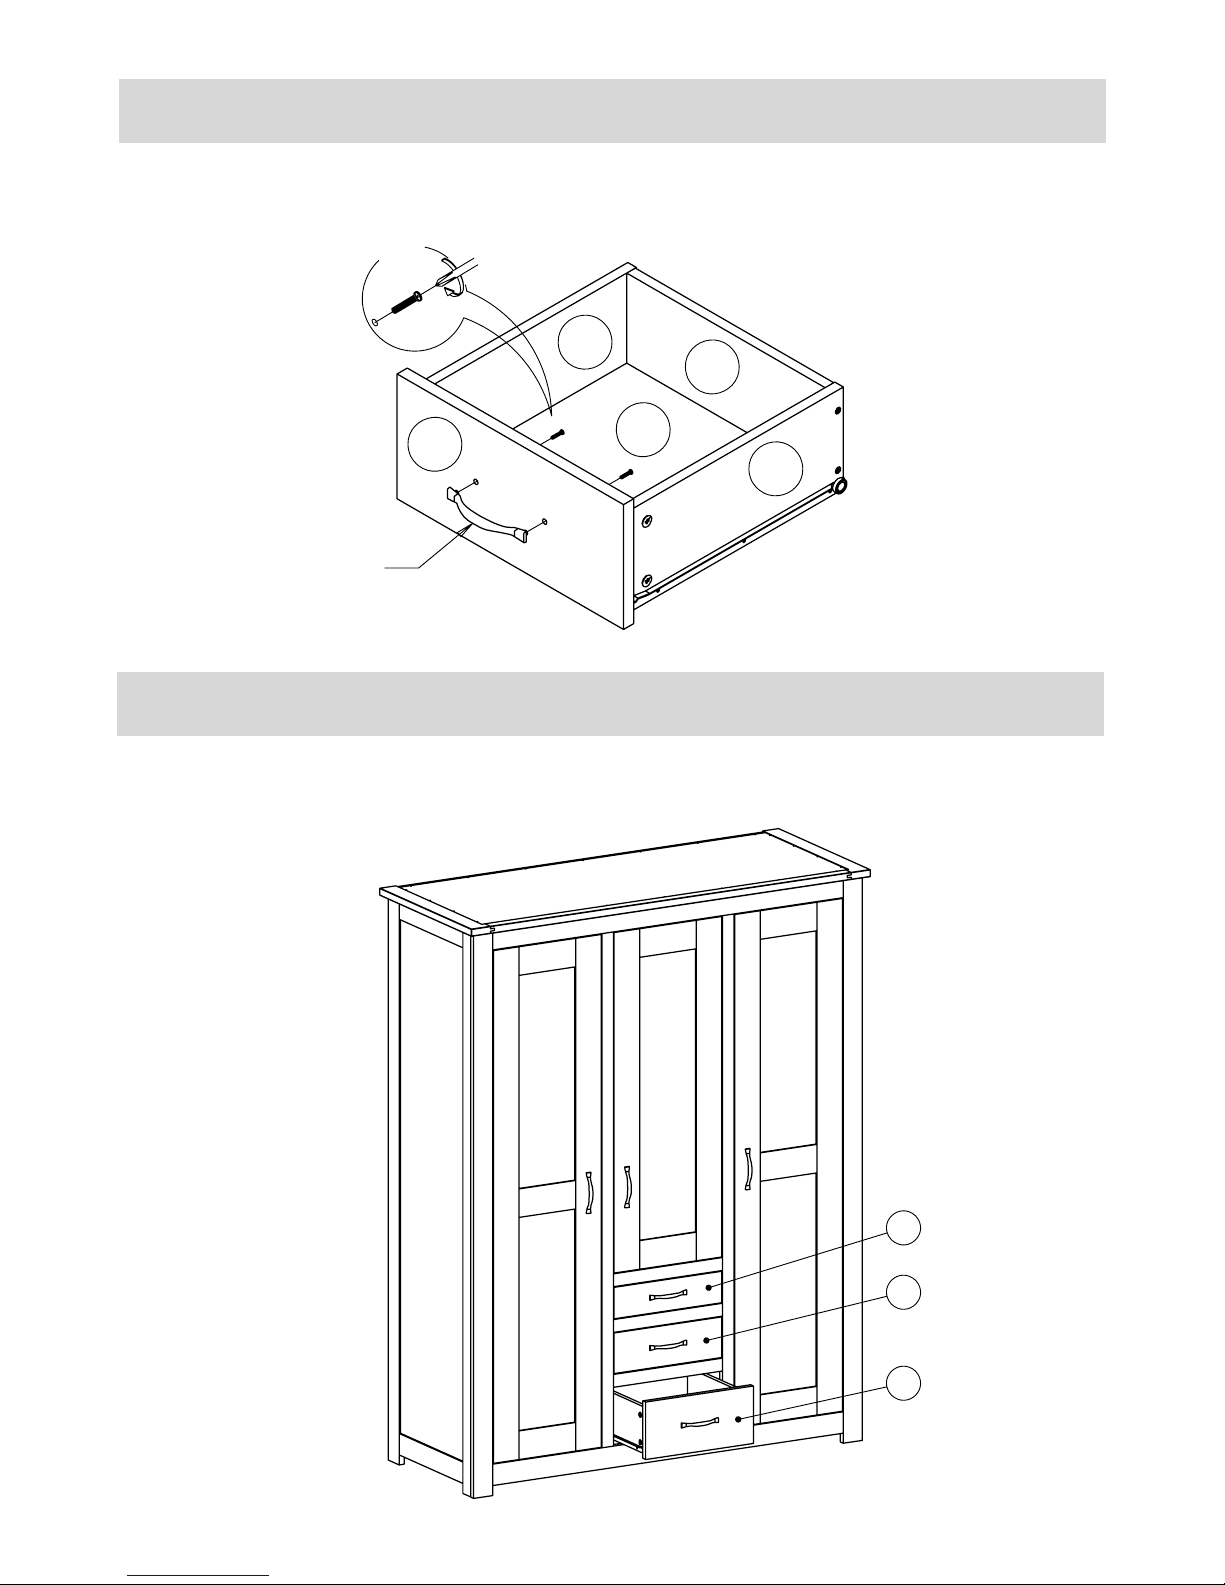
Install handles (N) to the front panel of drawer (30), and tighten with bolts (P). •
Place the drawers into the body of wardrobe . •
Px2
21
26
30
22 of 25
Step Thirty Seven
Step Thirty Eight
Page 23
23 of 25
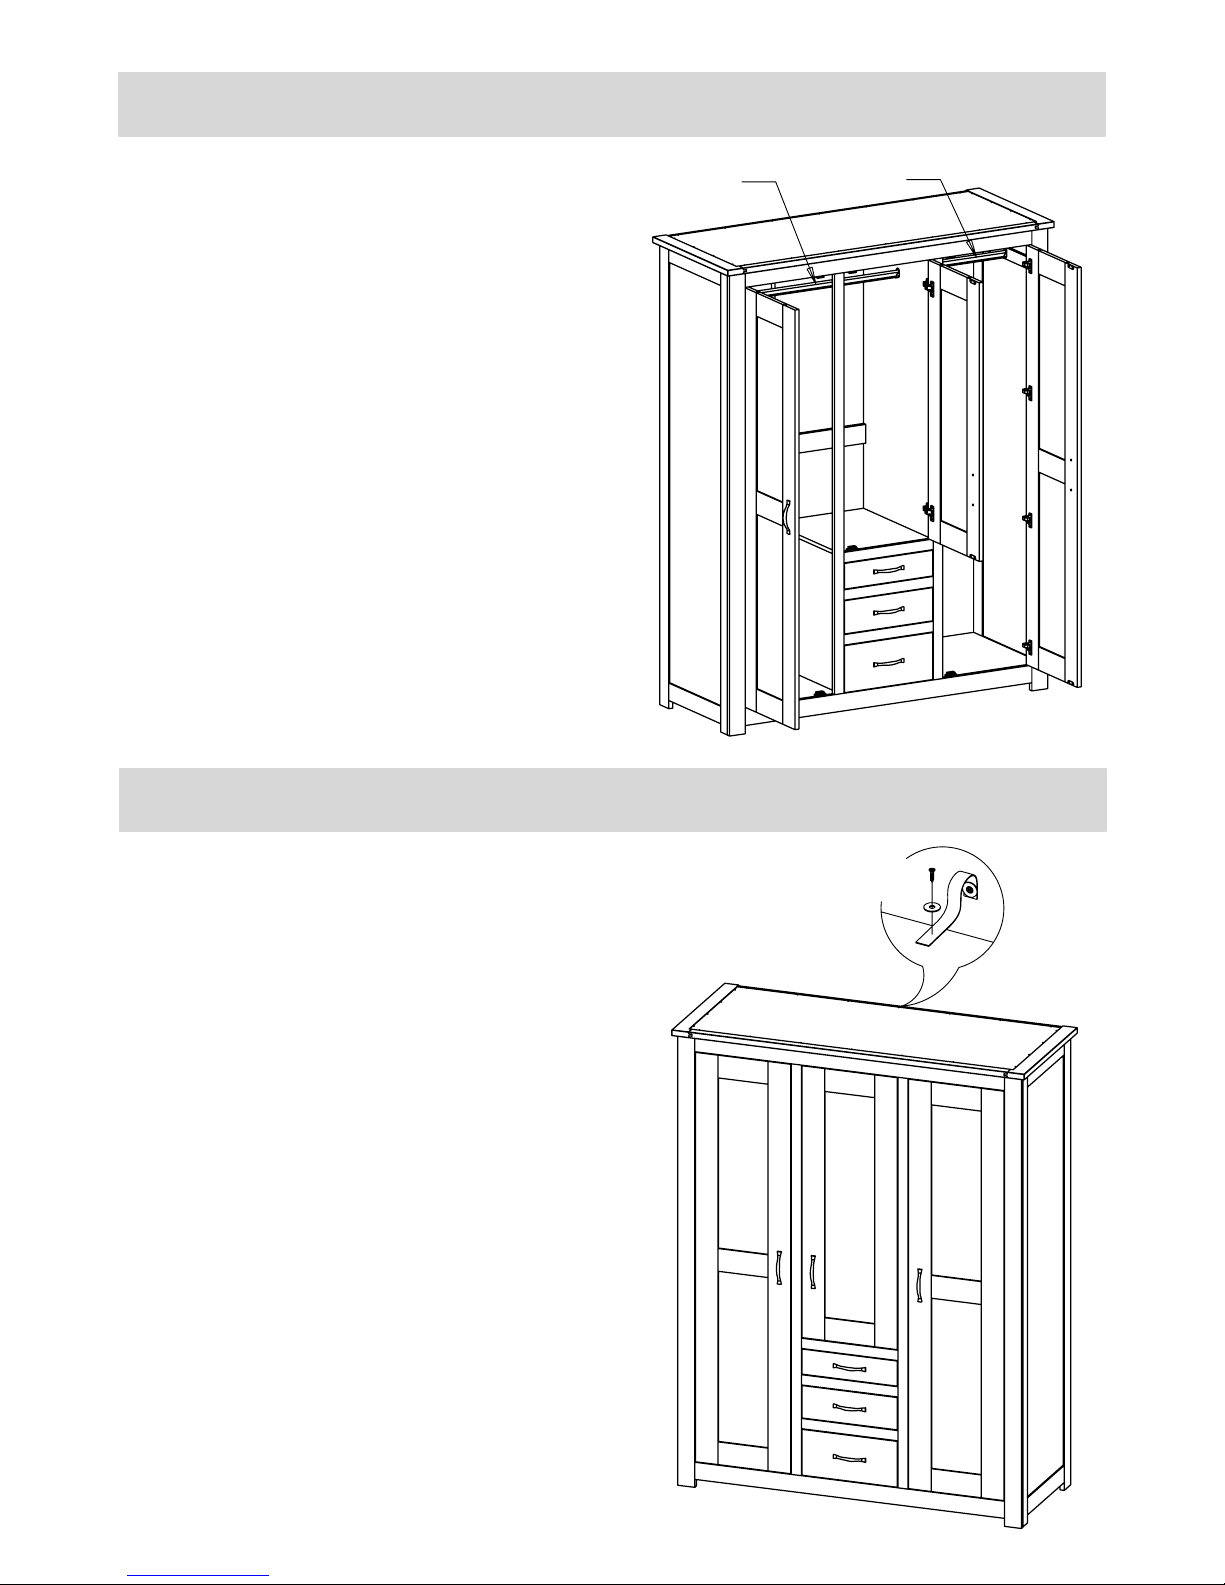
Place the rails (Y) and (ș) into •
the body of wardrobe .
Please read separate instructions contained
with this part (Zx1) on the correct way of
securing this strap.
We recommend the use of the wall
strap provided for safety reasons.
Please follow the instructions included
with the strap. N.B. Wall fixings are not
included please source suitable fixings
for your wall type. If in doubt, please
consult a qualified tradesperson.
WARNING: Always ensure the wall to be
drilled is free from hidden electrical wires,
water and gas pipes.
Zx1
&x1
ȍx1
Step Thirty Nine
Step Forty
Page 24
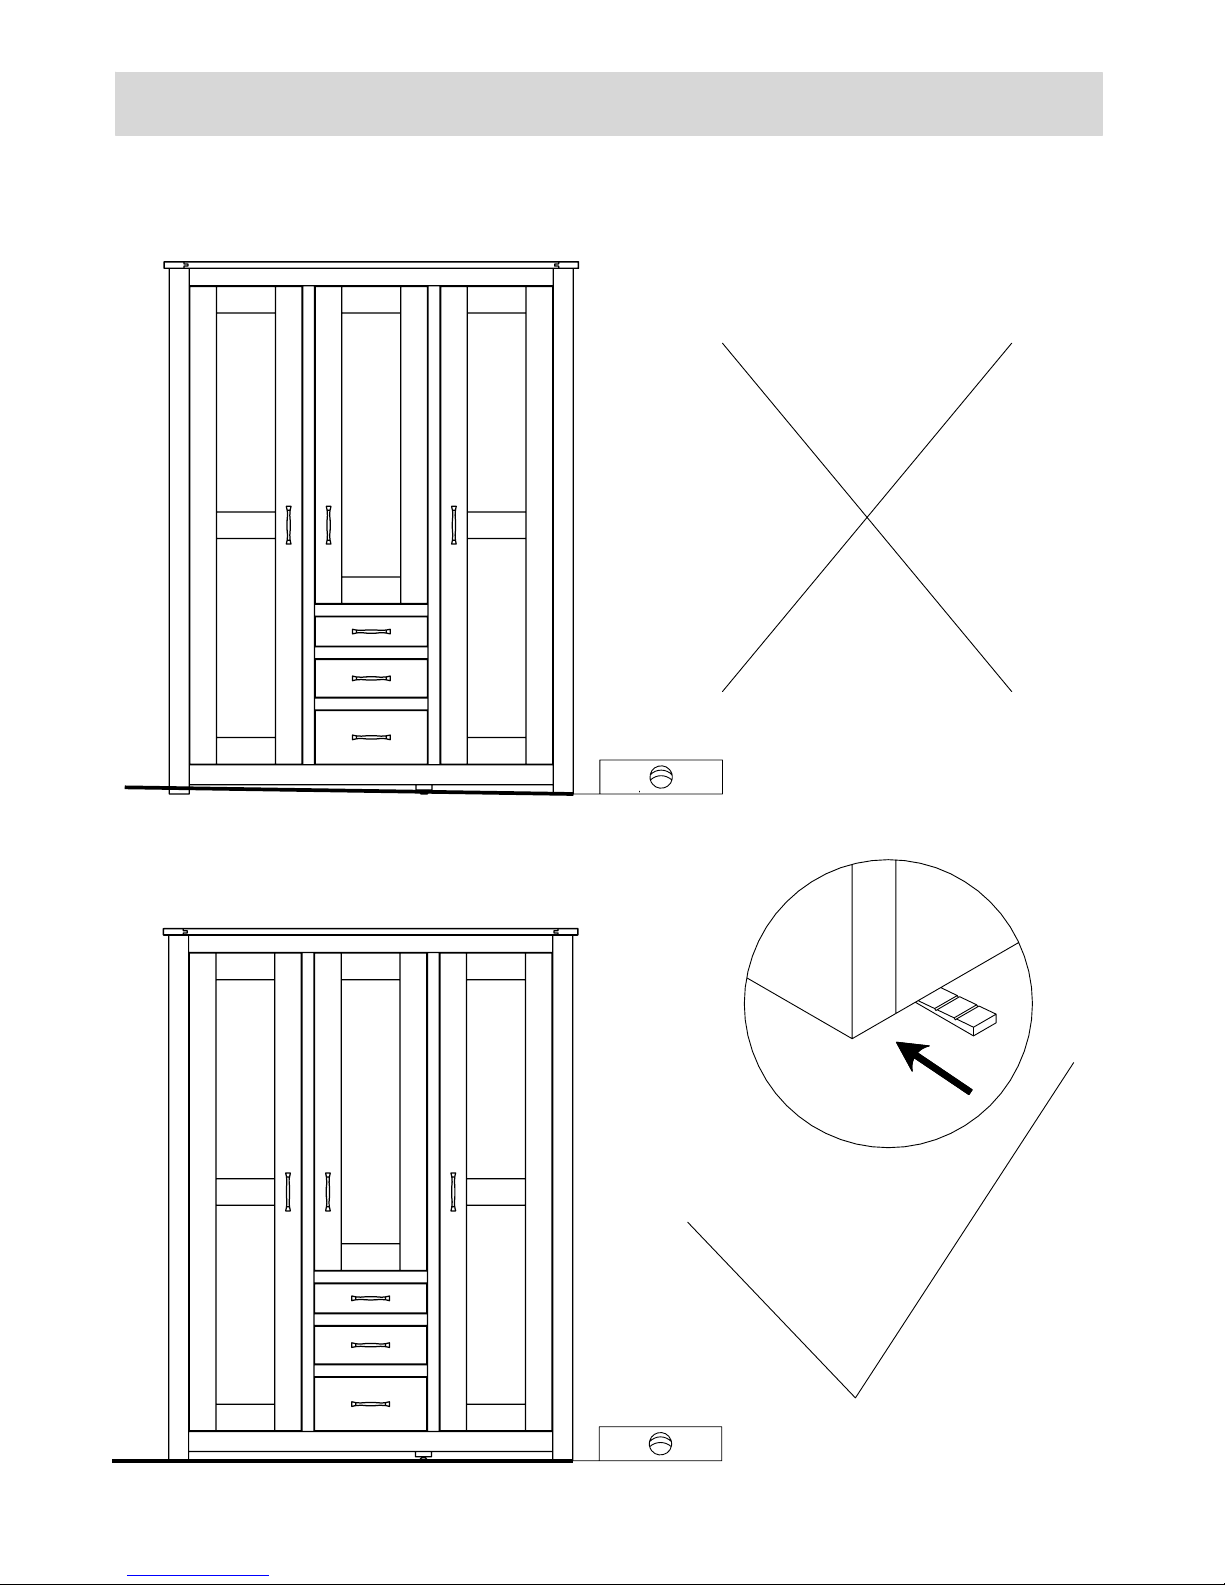
To help level the frame and doors on uneven floors please use the levelling wedges
provided as shown below.
Y
24 of 25
Step Forty One
Page 25
25 of 25
PLEASE KEEP THIS CARE GUIDE FOR FUTURE REFERENCE
Next Retail Ltd, Desford Road, Enderby, Leicester, LE19 4AT.
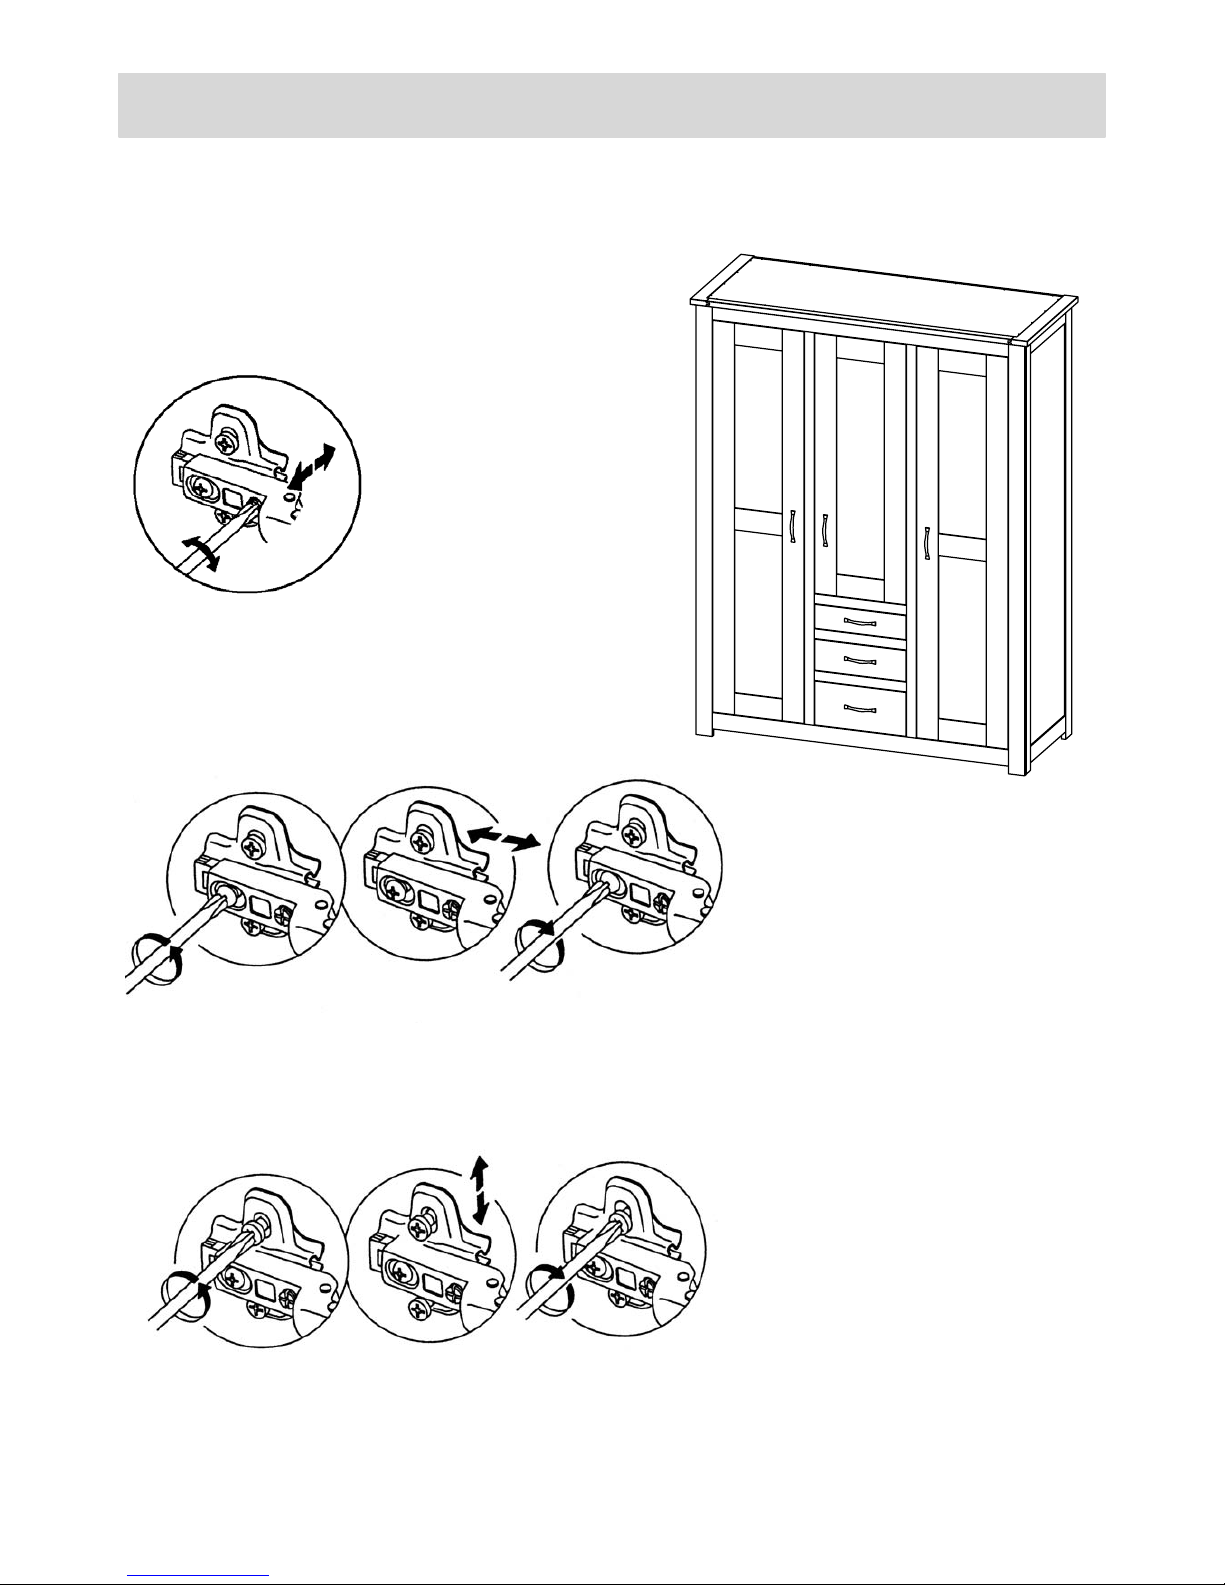
Hinge adjustment:
Once the product is in required position, doors may need to be aligned as follows:
Laterally (side to side)
Front-to-back
Vertically (up and down)
Step Forty Two
 Loading...