

Page 1

User Manual
Information Guide
1
Page 2

Index
1 .Your mobile..................................................................3
2 Text input......................................................................9
3 Phone call.....................................................................9
4 Messaging ..................................................................10
5 People .........................................................................11
6 Email ...........................................................................11
7 Getting connected .....................................................12
8.Managing Applications..............................................14
9.Protecting Your Mobile Phone..................................15
10. Factory data reset...................................................15
11.For your safety.........................................................15
2
Page 3
1 .Your mobile
Model:Wise+
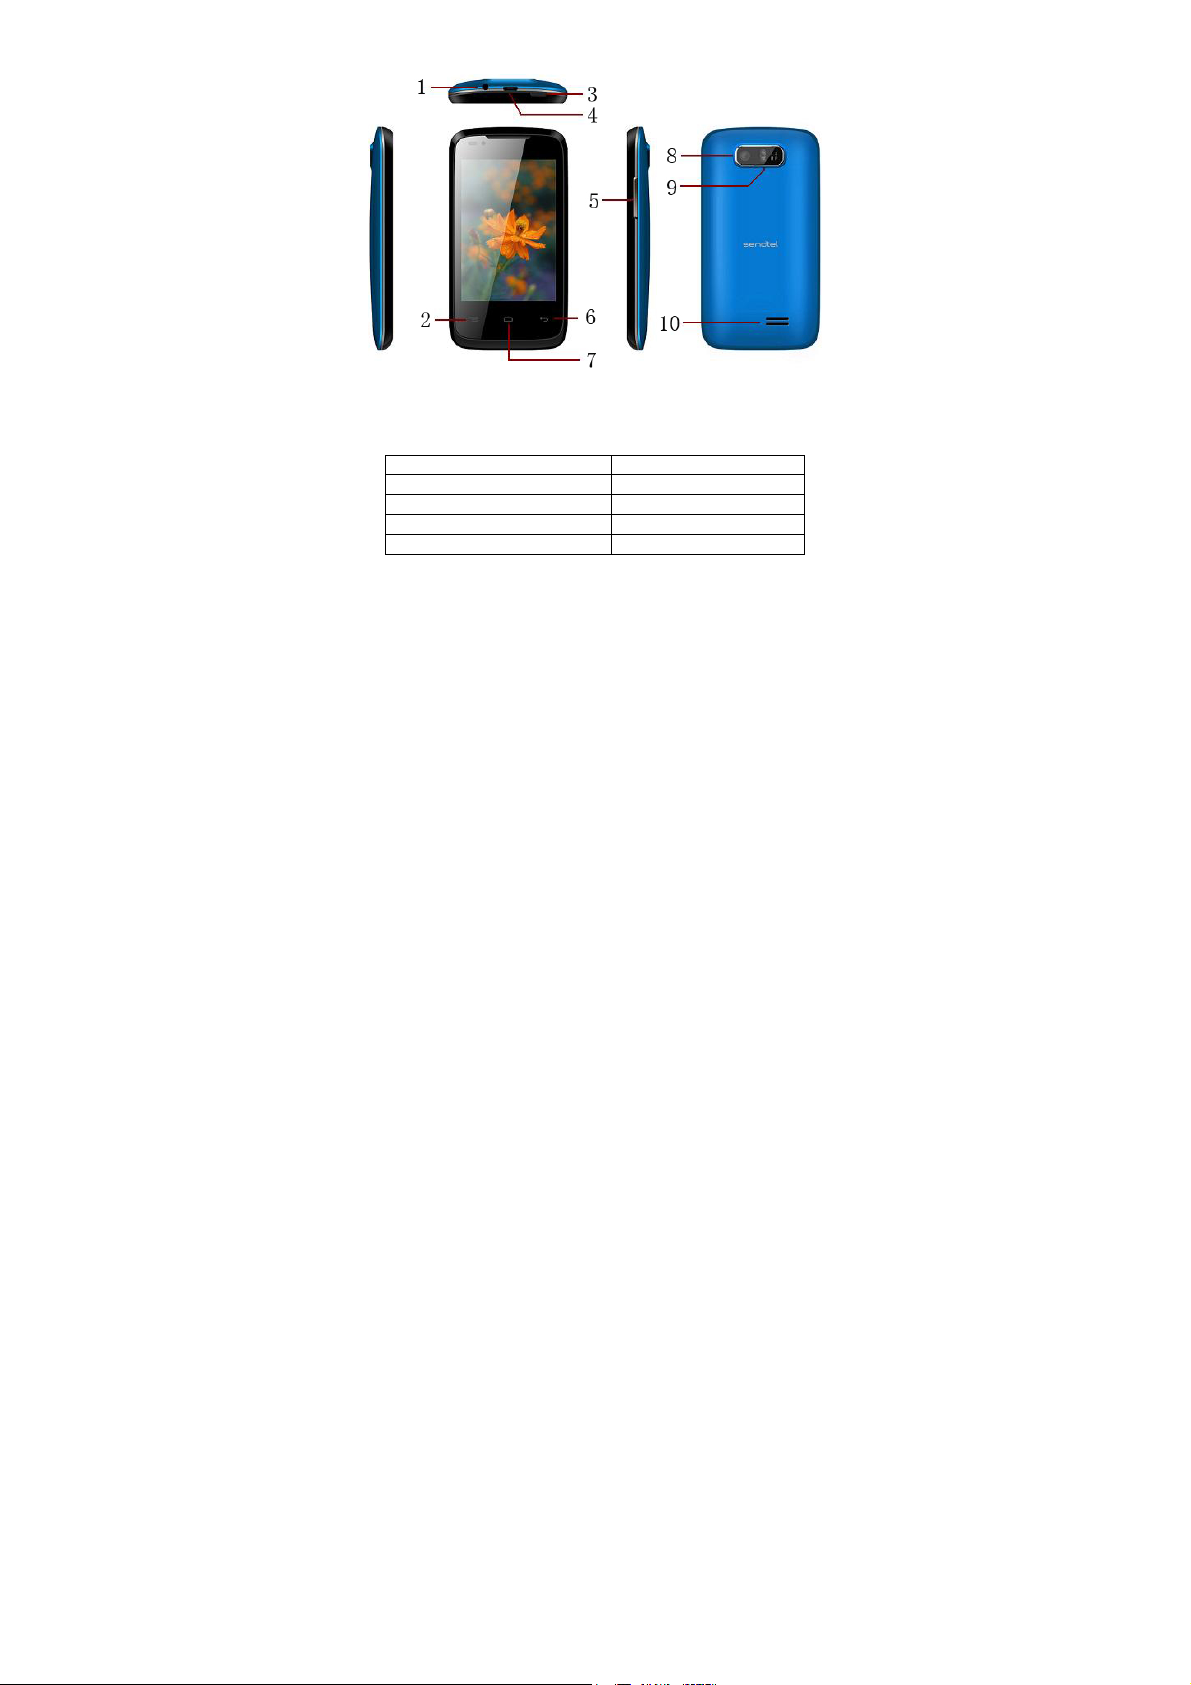
1.1Position of Keys
1. Earphones jack 2. Menu
3. Power key 4. USB port
5. Volu me k ey 6. Back
7. Home 8. Camera
9. Flashlight 10. Loudspeaker
3
Page 4

1.2Keys and connectors
Keys Functions
Power key Press: Lock the screen/Light up the screen
Menu key Press Menu key from home screen, you will see
Home key While on any application or screen, touch to
Back key Touch to go back to the previous screen, or to
Volume
+/-key
Press and hold: Show the pop-up menu to select
from Power off / Reboot / Airplane mode / Profile
mode
Press and hold: Power on
the menus, such as Wallpaper, Manage apps
and System settings.
Other screen, To view the menu list.
return to the Home screen.
Long press to open a list of thumbnail images of
apps you've worked with recently. Touch it to
open an app.
close a dialog box, options menu, the
notification panel, etc.
Adjust the volume
1.3 Status bar
For dual SIM model, status icons referring to either SIM1 or SIM2 will be
identified by a color which you have defined.
When a new notification comes, the corresponding icon will appear on
the status bar, and it won’t disappea r, until you have do ne something
with the notification .
If the status bar is full, some icons will be hidden.
Notification panel
Touch and drag do wn the Status bar to open the notifi cation panel.
4
Page 5

Touch and drag u p to close it. From the Noti fication panel, you can
g
open items and other reminders indicated by notification icons or vie w
wireless service information.
1.4 Getting started
1.4.1Set-up
Removing or installing the b ack co ver
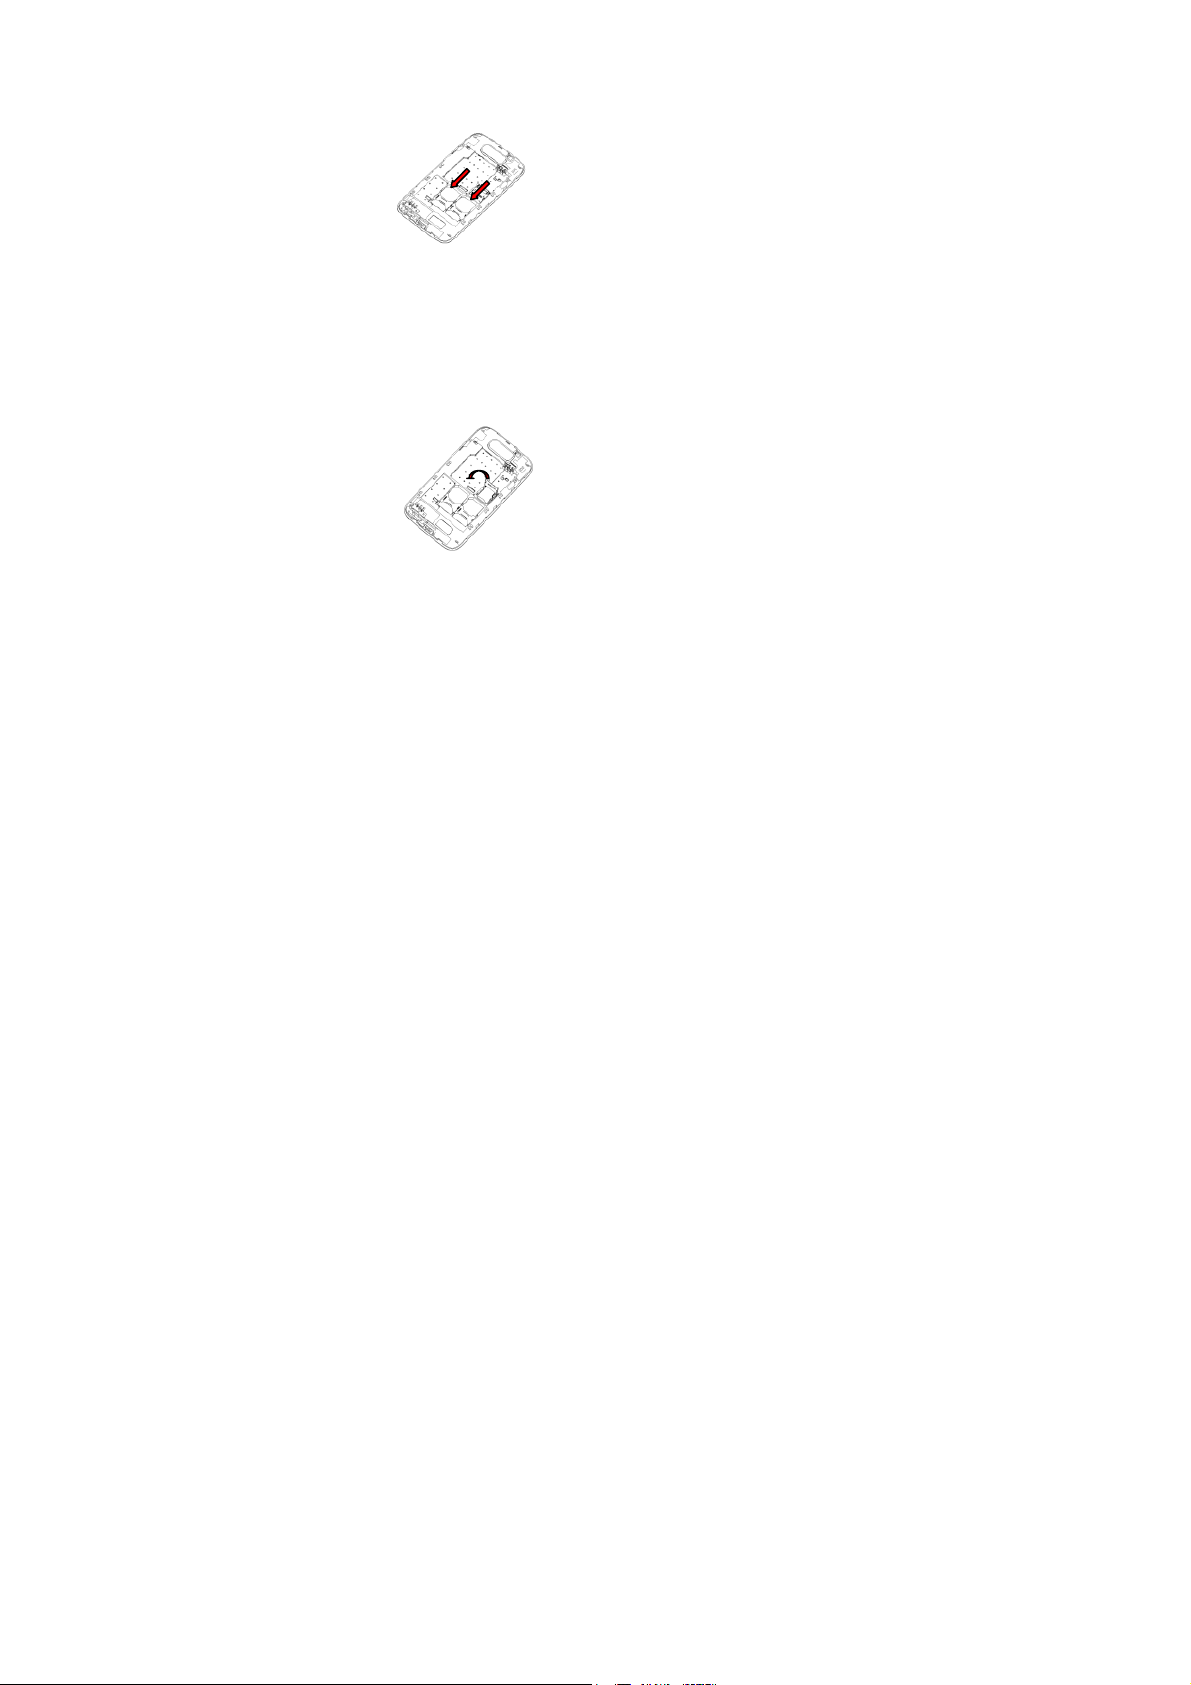
Installing or removing the batt ery
Please power off your phone before removing the battery
Insert and click the battery into place, then close the phone cover.
Unclip the cover, then remove the battery.
Inserting or removing the SIM card
1. You must insert your SIM card to make phone calls. Please power off
the status
Dra
bar down to
open the
Notification
5
Page 6
your phone and remove battery before inserting or removing the SIM
card.
2. To install, place the SIM card with SIM1 and SIM2 chip facing
downwards, and then slide it into its slot. Make sure that it is correctly
inserted. To remove the card, press and slide it out.
For dual SIM model, while the SIM1 and SIM2 slot can only support a 2G
network.
Installing and removing the mi croSD car d
1. Insert the extern al microSD card into the slot with the gold con tact
facing down. To remove the external microSD card, gently press and
slide it out.
2. Before removing the microSD card, you should ensure the phone is off,
to protect it from co rrup tion o r damag e. I n addi tion, r egul arly removi ng
or inserting the SD card may cause the phone to restart.
Charging the battery
6
Page 7

Connect the batter y charger to your pho ne, then the c harge in dicator
at the center of screen will light. The charging status bar will not float if
your battery is extra consumed.
To reduce power consumption and energy waste, when battery is fully
charged, disconnect you charger from the plug; switch off Wi-Fi,
Bluetooth or background-running applications when not in use; reduce
the backlight time, etc.
1.4.2 Power on/off your phone
Power on your phone
Hold down the Power key until the phone powers o n. It will take some
seconds before the screen lights up.
Power off your phone
Hold down the Power key from the Home screen until the Phone
options appear, select Power off, and touch OK to confirm.
1.5 Home screen
You can bring all the items (Folder, Widgets, Shortcuts and Wallpaper)
you love or use most frequently to your Home screen for quick access.
Touch the Home key to switch to Ho m e sc reen.
Home screen is provided in an extended format to allow more space for
adding applications, shortcuts etc. Slide the Home screen horizontally
left and right to ge t a complete vi ew of the Home scr een. Blue line at
the lower left and ri ght of the screen indicate which scree n you are
viewing.
1.5.1 Using the touchscreen
Touch : To access an application, touch it with your finger.
Touch and Hold: Touch and hold the home screen to access the
available options for setting the wallpaper.
Drag :Place your finger on any item to drag it to another location.
Slide/Swipe: Slide the screen to scroll up and do wn the applic ations,
images, web pages at your convenience.
Flick: Similar to swiping, but flicking makes it move quicker.
7
Page 8

Pinch/Spread : Place your fingers of one hand on the screen surfac e
and draw them apart or together to scale an element on the screen.
Rotate: Automatically change the sc reen orientation from portrait to
landscape by turning the phone sideways to have a better view.
1.5.2 Personalize your Home screen
Add
Touch the Main menu icon, touch and hold an application or a widget
to active the Move mode, a nd drag the item to any Home s creen as
you prefer.
Reposition
Touch and hold the item to be repositioned to activate the Move mode,
drag the item to the des ired positio n and then release . You can move
items both on the Home screen and the Favorite tra y. Hold the i con on
the left or right edge of the s creen to drag the item to another Home
screen.
Remove
Touch and hold the i tem to be removed to acti vate the Move mode ,
drag the item up to the top of Remove icon, and release after the item
turns red.
Create folders
To improve the organization of items (shortcuts or applications) on the
Home screen and the Favori te tray, you can add them to a fol der by
stacking one item on top of another. To rename a folder, open it, touch
the folder’s title bar to input the new name.
Wallpaper customization
Touch and hold an emp ty area then touch the p rompt on the Home
screen to customize wallpaper.
1.5.3 Main menu icon
Touch Main menu icon from the Home screen to enter applications list.
To return to the Home screen, tou ch t he Home key.
Consult recently-used applications : To consult recently-used
8
Page 9

applications, you can touch and hold the Home key. Touch a thumbnail
in the window to open the related application.
1.5.4 Applications and widgets list
The list contains all pre-embedded and newly installed applications and
widgets. To access the li s t, to uc h WIDGETS tab from the Main menu.
2 Text input
2.1 Using Onscreen Keyboard
On screen Keyboard settings
Touch Menu icon from the home screen, select Settings \ Language &
input touch the S ettings ico n on the right of An droid keyboard, a series
of settings are available for your selection.
2.2 Text editing
You can edit the text you have entered. Touch and hold or double-tap
within the text you would like to edit.
• Touch the text, Select word / Select all to select text , Drag the tap to
change the high-lighted selection. Touch Cut / Copy to cut or copy the
selected text then touch Paste.
•touch the blank to go back wi tho u t a ny action.
3 Phone call
3.1 Placing a call
You can easily launch a call using Phone. Touch Main menu icon from
the Home screen and select Phone.
Enter the desired number f rom the keyboard directly (If you make a
mistake, you can delete the incorrect digits by touching
a contact from Contacts or Call log by touching People to touch or
9
or select
Page 10

sliding the list upp er of the keyb oard, then Touch Dial key to place the
call.
To end the call by touching End icon.
3.2 Answering or rejecting a call
When you receive a call, If you want to answer the call, slip the middle
icon to right, otherwise , to left.
4 Messaging
You can create, edit and receive SMS and MMS with this phone. To
access this feature, touch Main menu icon from the Home screen then
select Messaging. All messages you receive or send out can be saved in
phone memory.
Write message
On message list screen, touch the new message icon to write
text/multimedia messages.
Sending a text message
Enter the mobile phone number of the recipient or touch to add
recipients, touch Type text message bar to enter the text of the message.
When finished, touch to send the text message.
You have to choose a SIM card if two cards are inserted.
A SMS of more than 160 characters will be charged as several SMS.
Sending a multimedia messag e
MMS enables you to send pictures, videos, audio, slideshow, contact
and calendar to other compatible phones and e-mail addresses. A SMS
will be converted to MMS automatically when media files (pictures,
videos, audio, etc.) are attached or Subject or email addresses added.
Specific letters (accent) will also increase the size of the SMS, this may
cause multiple SMS to be sent to your recipient.
10
Page 11

5 People
You can view and create contacts on your phone and synchronize
these with your Ema il contacts or othe r applications on the web or on
your phone.
5.1 Adding a contact
Touch Main menu icon on the Home screen, select People app, then
touch the icon
in the contact list to create a new contact.
5.2 Importing , exporting and sharing contacts
From Contacts screen, tou ch Menu key to open options menu, tou ch
Import/export. The phone can interchange contacts am ong SIM cards,
phone and SD card. You can share a contact or a series of contacts via
Bluetooth, Email and so on.
5.3 Synchronizing contacts in multiple accounts
Contacts, data or other information can be synchronized from multiple
accounts, depending on the applications installed on your phone.
6 Email
Besides your Email account, you can also set-up external POP3, IMAP or
Exchange email accounts in your phone. To access this function, touch
Main menu icon from Home screen, then select Email.
will guide you through the steps to set-up an email account.
• Enter th e email address and passwo rd of the account you wan t to
set-up.
• Touch Next. If the account you entered is not provided by your service
provider in the phone, you will be prompted to go to the email account
settings screen to enter settings manually.
• Enter the account name and display name in outgoing emails.
• To add another email account, you can touch Menu key / Settings /
ADD ACCOUNT.
11
An email wizard
Page 12

To create and send emails
• Touch Compose icon from Inbox screen.
• Enter recipient(s) email address(es) in To field. If necessary, touch Menu
key and touch Add Cc/Bcc to add a copy or a blind copy to the
message.
• Enter the subject and the content of the message.
• Touch Menu key, touch Attach file to add a attachment.
• Finally, touch to send
• I f you do not wa nt to send the ma il right away , you can touch Save
draft or touch Back key to save a copy.
7 Getting connected
To connect to the In ternet with th is phone, yo u can use WCD MA/GPRS
networks or WLAN, whichever is most convenient.
7.1 Connecting to the Internet
7.1.1 GPRS/EDGE
The first time you turn on your phone with SIM card inserted, it will
automatically configure network service: WCDMA or GPRS. If the
network is not connected, you can press and hold on notification panel.
To check the network connection you are using, touch Main menu icon
on the Home screen, then touch Settings\More\Mobile networks
\Access Point Names or Network operators.
7.1.2 WLAN
Using WLAN, you can connec t to the In ternet when you r phon e is with in
range of a wireless network. WLAN can be used on the phone even
without a SIM card inserted.
To turn WLAN on and connect to a wireless network
.Touch on notification panel to get to settings.
.Touch the switch beside WLAN to turn on/off WLAN。
.
Touch Wi-Fi, detailed information of all detected WLAN networks is
12
Page 13

displayed in the WLAN networks section.
.Touch a WLAN network to connect to it. If the network you selected is
secured, you are required to enter a password or other credentials
(contact network operator for details). When finished, touch Connect.
7.1.3 Bluetooth
If you are using Bluetooth, remember to stay within 10 meters (33 feet) of
other Bluetooth devices. Be aware that obstacles like walls or other
electronic equipment may interfere with your Bluetooth connection.
Turning On Bluetooth
1. Touch Settings, and then select the Bluetooth check box to turn on
Bluetooth. When Bluetooth is turned on, the Bluetooth icon appears in
the notification bar.
2. Touch device’s name, make your mobile phone visible to other
Bluetooth devices.
Pairing and Connecting a Bluetooth Device
1. Touch Settings > Bluetooth. Your mobile phone will scan for Bluetooth
devices in range (or touch SEARCH FOR DEVICES to scan for Bluetooth
devices).
2. Touch the device you want to pair with your mobile pho ne.
Sending Files via Bluetooth With Bluetooth
1. Touch and hold the file to be sent. The active options menu is
displayed.
2. Touch Share, and then touch Bluetooth to select a paired device.
Disconnecting or Unpairing a Bluetooth Device
1. Touch Settings > Bluetooth.
2. Tap the icon of right side of the Bluetooth devices, select Unpair to
disconnect the device.
7.2 Browser
Using Browser, you can enjoy surfing the Web. To access this function,
touch Main menu icon from Home screen, then touch Browser.
To go to a web page
On Browser screen touch the URL box at the top, enter th e address of
the web page, then confirm. Some websites will hide the URL box
13
Page 14

automatically, yo u can scroll down the web page to let it be displayed.
7.3 Connecting to a computer
With the USB cable, you can transfer media files and other files between
your SD card and computer.
To connect/disconnect your ph one to/fro m the comput er:
To connect your phone and your computer:
Use the USB cable t hat c ame with you r ph one to con nec t th e p hon e to
a USB port on your computer. You will receive a notification that the USB
is connected.
If you use mass storage, open the Notification panel and touch USB
connected, then check USB connected in the dialog.
Unmount the SD card on your computer:
Open the Notification panel and uncheck USB connected.
SD card:
Touch Main menu icon from the Home screen to open the applications
list.
Touch File Manager. All data you have downloaded is stored in File
Manager, where you can view media files (videos, photos, music and
others), rename files, install applications into your phone, etc.
8.Managing Applications
Viewing an Installed Application
1. On the Settings screen, touch Apps.
2. In the applications list, do any of the following:
• Press Menu and then touch Sort by size. Then touch an application to
view its details.
Removing an Installed Application
1. On the Settings screen, touch Apps.
2. Touch an application, and then touch Uninstall to remove the
application from your mobile phone.
14
Page 15

9.Protecting Your Mobile Phone
Screen unlock
To enter the idle screen, you must pass the screen lock, if you enable the
screen lock
On the Settings screen, touch Security > Screen lock. There are Pattern,
PIN and Password to select
SIM Card lock
You must input the correct password every time, when the mobile
phone power on
1. On the Settings screen, touch Security > Set up SIM card lock.
2. Select the Lock SIM card check box.
You can dial emergency numbers any time from your mobile phone.
10. Factory data reset
To activate factory data reset:
Touch Main menu icon from the Home screen then select Settings
\Backup & reset.
. Touch Factory data reset
Phone reset will erase all of your personal data from internal phone
storage, including information about your Email Account, any other
accounts, your system and application settings, and any downloaded
applications. Resetting the phone does not erase any system software
updates you have downloaded or any files on your SD card, such as
music or photos. If you reset the phone in this way, you are prompted to
re-enter the same kind of information as when you first started Android.
11.For your safety
Read these simple guideline. Not following them may be dangerous or
illegal. Read the complete user manual for further information.
15
Page 16

Do not switch your phone on when the use of
Follow relevant rules or regulations in hospitals and
Switch your phon e off in aircraf t. The radio si gnal
Switch your phone off near high-precision
Do not attempt to dis assemble your phone or its
Do not place magnetic storage media near your
Do not put your phone in a high-temperature pla c e
Keep your phone and its accessories away
Observe any laws or regulations on the use of
wireless devices is prohibited or when the wireless
device may cause interference or danger.
Do not use your phone while driving.
health care facilities. Switch your phone off near
medical devices.
from it may cause interference in signals of the
aircraft.
electronic devices. It may affect the
performance of these devi ces.
accessories. Only qualified perso nnel may service or
repair the phone.
Do not place your phone and its accessories in
containers with strong electromagnetic field.
phone. Radiation from the phone may erase the
information st ored on them.
or use it in a place with flammable gas such as a
petrol pumps.
from child ren. Do not allow children to use your
phone without guidance.
phone. Respect others' privacy and legal rights
when using your phone.
16
Page 17

Warning
Specific Absorption Rate (SAR) information SAR tests are
conducted using standard operating positions accepted
by the FCC with the phone tra n smitting at its highest
certified power level in all tested frequency bands,
although the SAR is determined at the highest certified
power level, the actual SAR lev el of the phone while
operating can be well below the maximum value, in
general, the closer you are to a wireless base station
antenna, the lower the power output. Before a new model
phone is a available for sale to the public, it must be tested
and certified to the FCC that it does not exceed the
exposure limit establish ed by the FCC, Tests for each
phone are performed in positions and locations (e.g. at
the ear and worn on the body)as req uired
by the FCC. For body worn operation, this model phone
has been tested and meets the FCC RF exposure
guidelines when used with an accessory designated for
17
Page 18

this product or when used with an accessory that contains
no metal and that positions the handset a minimum of 1.5
cm from the body.
This device complies with part 15 of the FCC Rules.
Operation is subject to the following two conditions: (1)
This device may not cause harmful interference, and (2)
this device must accept any interference received,
including interference that may cause undesired
operation.
Any Changes or modifications not expressly approved by
the party responsible for compliance could void the user’s
authority to operate the equipment.
Note: This equipment has been tested and found to
comply with the limits for a Class B digital device, pursuant
to part 15 of the FCC Rules . These limits are designed to
provide reasonable protection against harmful
interference in a residential installation. This equipment
18
Page 19

generates uses and can radiate radio frequency energy
and, if not installed and used in accordance with the
instructions, may cause harmful interference to radio
communications. However, there is no guarantee that
interference will not occur in a particular installation. If this
equipment does cause harmful interference to radio or
television reception, which can be determined by turning
the equipment off and on, the user is encou r a g e d to tr y to
correct the interference by one or more of the following
measures:
‐‐Reorient or relocate the receiving antenna.
‐‐Increase the separation bet ween the eq uip men t and
receiver.
‐‐Connect the equipment into an outlet on a circuit
different from that to which the receiver is connected.
‐‐Consult the dealer or an experienced radio/TV
technician for help.
19
 Loading...