

Page 1

Fixed Wireless Phone
CDMA Cellular Wireless Phone
LC-160S User Manual
1 User Manual
Page 2

Fixed Wireless Phone
Table of Contents
1 PHONE OVERVIEW ............................................................................................ 5
BASIC FUNCTIONS ................................................................................................... 6
2 BASIC OPERATIONS .......................................................................................... 7
2.1 POWER ON/OFF........................................................................................................................... 7
2.1.1 Power On .......................................................................................................................... 7
2.1.2 Power Off .......................................................................................................................... 7
2.2 MAKE A CALL ............................................................................................................................. 7
2.3 RECEIVE A CALL ......................................................................................................................... 7
2.4 END A CALL ................................................................................................................................ 7
2.5 SPEED DIAL ................................................................................................................................ 7
2.6 BATTERY USING NOTES .............................................................................................................. 7
3 IDLE SCREEN....................................................................................................... 8
4 PHONE MENU ...................................................................................................... 8
4.1 MAIN MENU ............................................................................................................................... 8
4.2 CONTACTS (PHONEBOOK) ........................................................................................................... 9
4.3 MESSAGES ................................................................................................................................ 10
4.4 CALL LOG ................................................................................................................................. 11
4.5 TOOLS ....................................................................................................................................... 12
4.6 SETTINGS .................................................................................................................................. 12
5 TECHNICAL SPECIFICATIONS .................................................................... 14
6 QUICK TROUBLESHOOTING GUIDE ......................................................... 15
2 User Manual
Page 3

Fixed Wireless Phone
where Phone has been purchased.
Introduction
Congratulations on your purchase of the CDMA Fixed Wireless Phone (Hereinafter referred to as
Phone). The Phone has been designed to operate with the latest digital communication technology Code Division Multiple Access (CDMA). The CDMA technology has many advanced features and
provides excellent voice quality.
The Phone has advanced features as follows:
Large, easy to read, backlight LCD with status icons
Choice of 13 ring tones a n d power On/Off music
Two-way SMS, voice mail and caller ID
User friendly Keypad
Long battery stand-by and talk time
Menu driven interface for easy operation and configuration
Last number redial
Adjustable ring and voice volume
AC power supply
Indoor antenna (and optional outdoor antenna)
Speaker Phone for hand-free operation
Call privacy is also supported by CDMA technology
Easy service and repair
Subscriber call charge meter
This user guide provides information on the use and
operation of your Phone. Kindly read all the information
contained in this user guide carefully prior to using the
Phone. This will help you in getting the best performance
and shall prevent any unintended damage to the Phone.
Check the contents of the box as per the packing list and
report any discrepancies immediately to the store from
Do’s & Don’ts
Do not clean the Phone while in operation. Bef ore attempting to clean the Phone, turn the
Phone off, disconnect the external power adapter and take out the battery. Use a Damp cloth
for cleaning. Do not use liquid or aerosol cleaners.
Do not hold the antenna. This may affect call quality and cause Phone to operate at
unintended power levels.
Keep the antenna free from obstructions and position the antenna straight up. This will
ensure best call quality.
Do not use a damaged antenna. Have this replaced through a qualified technician. Use only
antenna approved by the manufacturer. Unapproved antenna may impair the call quality as
well as cause damage to the Phone.
Only use the battery and the power adapter provided with the Instrument. The instrument
might get damaged if any other accessories are used. This will also void the warranty.
It is highly recommended to fully charge the battery before initial use. The battery might
have been discharged during storage and deli ve ry.
Do not use with car battery. It may lead to electric shock or damage to Phone.
3 User Manual
Page 4

Fixed Wireless Phone
Do not throw battery. Batteries are not to be disposed off by pu tting them in fire. It may
explode or catch fire.
Do not attempt to change the security codes or components. User is responsible for any
consequences arising out of such attempt.
Avoid shock or impact. Rough handling can cause damage to the Phone bod y and internal
circuits.
Do not paint.
During lightening do not touch power plug or Phone line. This can cause Electric shock,
even death. Do not touch the external antenna.
Your Phone is to work with 100-265V AC. Check the voltage before connecting.
Do not plug many power cords in the outlet.
Do not touch the plug with wet hands. Always grasp and pull the plug, not the cord. Do not
put heavy things on the power cord or bend it too much.
Do not take out the backup battery while Phone is on.
If the Phone is not working for any reason, do not attempt to repair it. The Phone should be
serviced by qualified service personnel only.
Place the Phone and the power supply in a properly ventilated place.
Do not place the Phone near high temperature objects, under direct sunlight, near source of
water, near fire or near inflammable and explosive materials.
Do not place any articles over the Phone.
Place the Phone in a dry place and do not expose to moisture.
Place the Phone away from other electronic devices like TV and Radio to avoid interference.
For a better reception, do not place the Instrument in a building with iron or metal roof.
Hospitals or health care facilities may use equipment which is sensitive to Radio Frequencies.
Please ensure that your Phone is turned “OFF” while in the vicinity of such facilities.
Do not use the Phone in designated “No Fixed Phone Use” area.
4 User Manual
Page 5
Fixed Wireless Phone
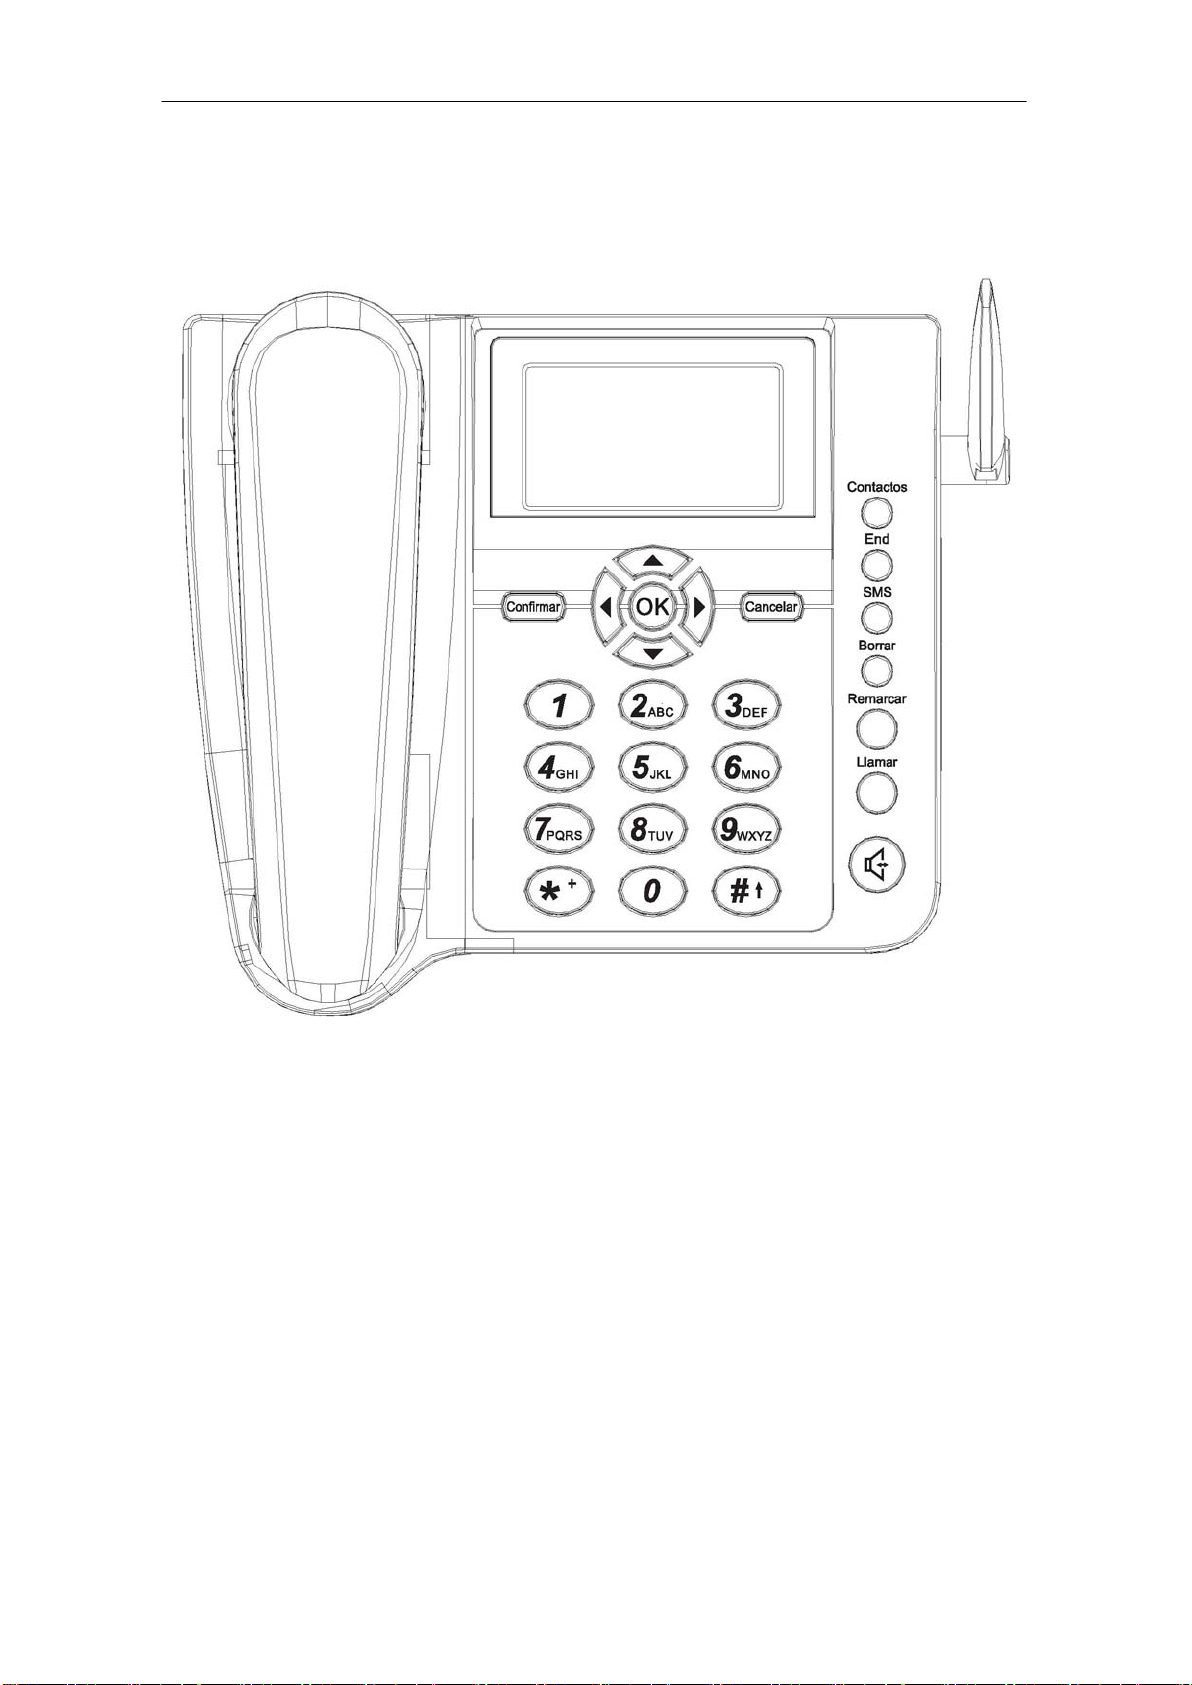
1 Phone Overview
Figure1 depicts the keypad scheme of the phone, shows the top side of the
phone.
Figure 1 Phone
1. Left Key
2. Up Key
3. OK Key
4. Down Key
5. Right Key
6. Confirm Key
7. Cancel Key
9. END Key
10. SMS Key
11. Delete Key
12. Redial Key
13. Send key
14. Speaker key
15. Numerical Keys
8. Contacts Key
只把数字标出来,没有和键盘上的键对应起来。各个文字描述应和话机对应标
出来。
5 User Manual
Page 6

Fixed Wireless Phone
Basic Functions
The following table lists the basic functions supports.
Table 1 List of Basic Functions
Functions Remark
Voice Calls Support caller ID for incoming calls
Call Barring Outgoing calls/Incoming calls
Contact Store up to 200 entries in Phone memory
Recent Calls
Phone Setting
Tools Schedule, Alarm Clock, Calculator
Phone Status Software Versions etc
Message Sending/Receiving SMS 200 entries in the Phone
Battery Management Battery Charging, Battery Capacity Indication
AT Commands Standard
Records for incoming calls, outgoing calls, and missed
calls (total 30 entries)
Sounds, Display, Security, Language, Call Forward,
Call Waiting
6 User Manual
Page 7

Fixed Wireless Phone
2 Basic Operations
2.1 Power On/Off
2.1.1 Power On
Hook up handset to your Phone and put the handset to hang up position,
then connect DC power supply to the “DC IN” port at the rear of the Phone or
insert the battery to the battery chamber. Switch the “Power” switch (on the rear
of the Phone) to ON, your Phone should go to idle screen and is ready to use.
2.1.2 Power Off
You can turn the Phone off directly by switching the “Power ON/OFF”
switch (on the rear of the Phone) to OFF position. If the Phone will not be used
for long time, please turn this switch to OFF.
2.2 Make a Call
While your Phone is on and at idle screen, enter a destination number you
wish to call, then press “SEND” Key. (Note: To modify digits you enter, you
can press “Delete” Key to delete wrong digits first and then enter new digits).
Once the call is connected, the Phone’s screen will display the number you
have dialed, and the time duration the call has lasted.
The Phone also has a speaker. To use the speaker to make a call, press
“SPK” Key, enter a phone number, and press “SEND” Key.
2.3 Receive a Call
When there is an incoming call, the Phone will ring and display the Phone
number of the incoming call (if the number is availa ble). You can pick up the
handset or press “SPK” Key to take the incoming call. The ring tone and ringtone volume can be changed in the setting menu.
2.4 End a Call
You can always end call by pressing “END” Key. If you are using the
handset for a Phone call, hanging up the handset will end the call automatically.
2.5 Speed Dial
User can set the speed dial for quick phone calls
Save the Phone number in the contacts of Phone ;
Set the speed dial number (2~9) under the menu “Main
menu/contacts/speed dial”;
Choose the Phone number from contacts ,and Press “SELECT” ,then save;
When use speed dial number, enter speed dial number (2~9) followed by #,
then press “CALL/REDIAL” Key .
2.6 Battery Using Notes
When using Phone, rechargeable batteries should be inserted LI Battery!
7 User Manual
Page 8

Fixed Wireless Phone
Please switch off the Phone by power switch on the rear side, when not to
use the phone for long time.
The battery can be automatically charged when the power switch is ON and
charger is plugged in.
Please DO NOT switch on/off the phone frequently when phone is in use.
It is recommended to keep the charger plugged even the battery is fully
charged.
3 Idle Screen
After powered up and phone acquired the network signal, the Phone will
display the following idle screen:
4 Phone Menu
The idle screen displays: received CDMA signal strength, battery level,
Local date and time from CDMA network, your CDMA operator name,
programmable banner, and some other useful information: for example, if you
have unread SMS, the message icon would appear
4.1 Main Menu
At the bottom of the display (see Figure 4), there is an area called soft Key
area, in which there are two soft Keys: Menu and Contact. Pressing Left Key
will take you to the main menu. The main menu contains the following submenu items:
1) Contacts (Phonebook)
2) Messages
3) Call Log
4) Tools
5) Settings
The following diagram depicts menu tree:
8 User Manual
Page 9

Fixed Wireless Phone
4.2 Contacts (Phonebook)
Phonebook can be used to store contact’s name and contact’s Phone
numbers. You can store up 200 Phonebook entries to Phone memory.
Phonebook menu is depicted in the following diagrams:
Phonebook: Menu –1 Phonebook: Menu –2
9 User Manual
Page 10

Fixed Wireless Phone
Phonebook: Menu –3 Phonebook: Menu –4
Phonebook: Menu –5
1) View: You can use this menu item to browse all Phonebook entries stored.
For each selected Phonebook entries, you can edit, erase the contact, send
message and make phone calls.
2) Add New: You can use this menu item to add a ne w Phonebook entry to the
Phonebook:
3) Search Name: Using this menu item, you can search a Phonebook entry by
entering the name of the contact you want to find.
4) Groups: You can use this menu item to group Phonebook entries into five
different groups: family, friends, colleagues, business and classmates. you
can also add new groups, edit group ringer and delete group.
5) Delete All: Using this menu item, you can delete all Phonebook entries fro m
Phone memory:
6) Speed Dial: This feature is used to set up speed dial. You can edit the
NO.02-09 speed dial number, remove or remove all speed dial numbers.
• Select a contact from phonebook to speed dial list
• in standby screen, enter number 2~9 and #. Then press redial to make a
call
7) Memory Status: This menu can display the memory usage of the Phone
4.3 Messages
The Message menu can be used to create messages, send messages, view
received messages, delete stored messages, extract and store Phone numbers
from messages, reply and forward messages. You can store up to 200 messages
to Phone memory .
Messages’ main menu and menu tree Message are shown as below:
11 11
Message: Menu-1 Message: Menu-2
10 User Manual
Page 11

Fixed Wireless Phone
Messages
5 Voice Mail
6 Template Messages
Select Back
Call Log
5 Delete Record
Select Back
Message: Menu-3 Message: Menu-4
Message: Menu-5 Message: Menu-6
1) Create: You can use this menu item to create new messages and send out
messages. You can also send a message to multiple contacts (up to 10
contacts).And you can save messages as templates; insert template message
and contacts to message editor when you send a message.
2) Inbox: You can use this menu item to view all of the messages you have
received. For each message, you can delete, reply and forward the messages.
You can also store the sender’s Phone number and make a call to the sender.
3) Outbox: Outbox stores all of the messages you have sent out so far. Each
message inside the outbox, you can erase and forward.
4) Draft: When you create a message ,you can save it in Draft.
5) Voice Mail:You can use this menu item to access your voice mail box
(Note: please contact your service provider for voice mail services).
6) Template Messages: You can create 5 messages as template messages. And
you can send out template messages quickly without input.
7) Delete Messages: You can erase messages from Inbox, Outbox ,draft or
erase All.
8) Memory Status: This menu can display the memory state of Phone for SMS
storage.
9) Message Settings: User can edit the Send mode.
4.4 Call Log
The “Call log” records information for all calls including incoming calls,
outgoing calls, and missed calls.
Call Log: Menu-1 Call Log: Menu-2
Call Log: Menu-3 Call Log: Menu-4
11 User Manual
Page 12

Fixed Wireless Phone
Tools
3 Calculator
Select Back
Tools
1 Schedule
2 Alarm
Select Back
1) Missed Calls: This menu records all of the incoming calls you missed. For
each missed call, the following information gets saved: the Phone number of
the missed call, the time when the call arrived.
2) Received Calls: All received calls information can be viewed through this
menu. For each incoming call entry, you can perform the following
operations: save phone number, erase the record, and send SMS to the phone
number.
3) Dialed Calls: The information of the calls you have made can be viewed
through this menu. For each outgoing call, you can perform the following
operations: store receiver’s phone number, erase the record, and send SMS
to the receiver.
4) Call Time.: This menu stores time record for all incoming calls and
outgoing calls. The record includes the total number of calls and calling time.
5) Delete Record: You can erase incoming calls, outgoing calls, missed calls
and erase all :
4.5 Tools
The Phone provides you with the following tools:
Tools: Menu-1 Tools: Menu-2
Tools: Menu-3
1) Schedule: You can add your schedule items into the phone
2) Alarm: The function of this tool is the same as that of regular alarm clock.
3) Calculator: “*” Key to enter a decimal point and the “#”Key for a negative
sign. Then select the operation by pressing UP/DOWN direction keys.
4.6 Settings
You can use Setting menu to customize your Phone’s setup. The Setting
menu is shown below:
Setting: Menu-1 Setting: Menu-2
12 User Manual
Page 13

Fixed Wireless Phone
Setting: Menu-3 Setti ng: Menu-4
1. Tones:
• Ring Tone: You can select your preferred ring tone.
• Volume: You can change the volume of ring tone, Key beep tone, handset
receiver, hand-free speaker.
• Alert: You can set the alert tones on or off for service changes, minute
beep(reminding you minute during a call). , call connect, and power on/off .
2. Display
• Banner: editing the banner for display on idle screen.
• Backlight: setting backlight’s duration and brightness.
• Contrast: setting LCD’s contrast.
• Language: setting Phone’s language .
• Hyphen: setting hyphen enable or disable
• Time and Date: setting time format(24-hour,12-hour)and date format
(MM/DD,DD/MM).
3. Security
Before entering security menu, you will be prompted to input a valid
password. The default password is set to “1234”. You can change this
password once you enter the security menu successfully. Please remember
your password if you change it. Forgetting the password may require you to
contact the service provider.
Security: Men u-1 Security: Menu-2
Security: Menu-3
a) Lock Phone: You can choose Unlock or Lock the phone.
b) Incoming Call Setting :You can enter up to 10 phone numbers for
restricted incoming calls.
c) Outgoing Call Setting: You can enter up to 10 phone numbers for
restricted outgoing calls. In this menu, you can also set dial delay time.
d) Change Password: You can change your security password through this
menu. Remember the password after changing it.
e) Restore Factory Setting: This menu lets you reset your Phone with the
default setting same as the default manufacture setting. This is very
13 User Manual
Page 14

Fixed Wireless Phone
important feature. For the case that when you think that your Phone is
not working the way as you expected, you can always use “Restore
Factory Setting” to reset your Phone to its default setting.
4. Call Settings: This menu allows you to set call answer mode, which includes:
• Auto Answer: Allows you to answer incoming calls automatically.
• Voice Privacy: Turning on “Voice Privacy” can enhance the security of
the call by voice encryption.
• Dial delay time: you can set dial delay time.
• REDIAL: you can Enable /Disable Redial function。
5. Network Service :
• Call Forward: You can forward incoming calls to a designated phone
number. You can forward incoming call under the following situations:
FWD If Busy : if there is an incoming call during conversation, the
call will divert to another number
FWD If No Answer : if ther e is an incoming call, you don’t re ceive it
then the call will divert to another number
FWD All Calls : if there is an incoming call, but your phone is off or
under no signal place, the call will divert to another number
• Call Waiting: You can Activate/Cancel call waiting function through this
menu.
if an incoming call is received during the conversation
hold the first telephone call and press dial key to receive the new
incoming call,
select send key to switch the first phone and the second call.
6. Phone Info
• Phone Number: Your phone number can be entered and stored by
using this menu.
• SW Version: This menu can display the software version of the Phone.
• PRI Version: This menu can display the PRI version of the Phone.
• PRL Version: This menu can display the PRL version of the Phone.
•
.
5 Technical Specifications
Frequency: CDMA 800MHZ
Maximum Transmitting Power: > 23 dBm @ 50 ohm
Receiving Sensibility: < -105dBm/1.23MHz;
External DC Voltage: DC 5.0 V/1A
Operation Temperature: -10℃ ~ +45℃
Ambient Humidity: 0~95%
Storage Temperature: -30oC~+60oC
Pressure: 86-106Kpa
14 User Manual
Page 15

Fixed Wireless Phone
6 Quick Troubleshooting Guide
Moisture or ventilation problems: Visually inspect the Phone body, moisture
can damage the Phone. Ventilation is also very important. Move the Phone
to improve the ventilation as necessary.
No power: Verify that AC power source and its corresponding circuit
breaker are functioning properly.
Unable to receive incoming calls:
1. Make sure that the incoming call is not restricted;
2. Make sure that your Phone is having good signal reception
Unable to make outgoing calls:
1. Make sure that the numbers you dialed are not restricted;
2. Make sure that your Phone is having good signal reception
Unable to receive SMS: Make sure that your Phone’s memory is not full for
storing SMS. If the memory is full, please empty inbox.
REMEMBER: you can always use “Restore Factory Setting” sub-menu in
“Security” menu to reset your Phone to its default setting.
While charging the battery, DON’T disconnect the charger before the battery
is fully charged.
15 User Manual
Page 16

CAUTION
FCC RF Exposure Information and Statement
The SAR limit of USA (FCC) is 1.6 W/kg averaged over one gram of tissue.
Device types: LC-160(FCC ID: ZYPL-C160S) has also been tested against this
SAR limit. The highest SAR value reported under this standard during product
certification for use on the body is 0.312W/kg. This device was tested for typical
body-worn. The use of belt clips, holsters and similar accessories should not
contain metallic components in its assembly. The use of accessories that do not s
atisfy these requirements may not comply with FCC RF exposure requirements,
and should be avoided.
This device complies with part 15 of the FCC rules. Operation is subject to the
following two conditions: (1) this device may not cause harmful interference,
and (2) this device must accept any interference received, including
interference that may cause undesired operation.
NOTE: The manufacturer is not responsible for any radio or TV interference
caused by unauthorized modifications to this equipment. Such modifications
could void the user’s authority to operate the equipment.
NOTE: This equipment has been tested and found to comply with the limits for
a Class B digital device, pursuant to part 15 of the FCC Rules. These limits
are designed to provide reasonable protection against harmful interference in
a residential installation. This equipment generates uses and can radiate
radio frequency energy and, if not installed and used in accordance with the
instructions, may cause harmful interference to radio communications.
However, there is no guarantee that interference will not occur in a particular
installation.
If this equipment does cause harmful interference to radio or television
reception, which can be determined by turning the equipment off and on, the
user is encouraged to try to correct the interference by one or more of the
following measures:
- Reorient or relocate the receiving antenna.
- Increase the separation between the equipment and receiver.
-Connect the equipment into an outlet on a circuit different from that to which
the receiver is connected.
-Consult the dealer or an experienced radio/TV technician for help.
 Loading...