


NEXIO Co.,Ltd.
www.inexio.co.kr
LCD Monitor User Guide
Please see the following page for the latest enhancements.
Revised 02/08
Nexio
Note : This information in this document is subject to change without notice.
NEX104MF(R)G & NEX121MF(R)G &
NEX150MF(R)G & NEX170MF(R)G & NEX190MF(R)G
VGA, Composite, S-video & Audio supported

Thank you for your selection of new TFT LCD Monitor.
Please take a few minutes to read this User’s manual for the best performance of this
monitor. Information in this manual is subject to change without prior notice for
improving design, function and etc. IBM, DOS, PC and VGA are trademarks of
International Business Machines Corporation.
CONTENTS
- Feature
- Monitor Parts
- Packing Contents
- Connecting to PC
- Recommended Use
- Adjusting The Display
- OSD Menu
- Troubleshooting
- Specification
- Touch screen specification
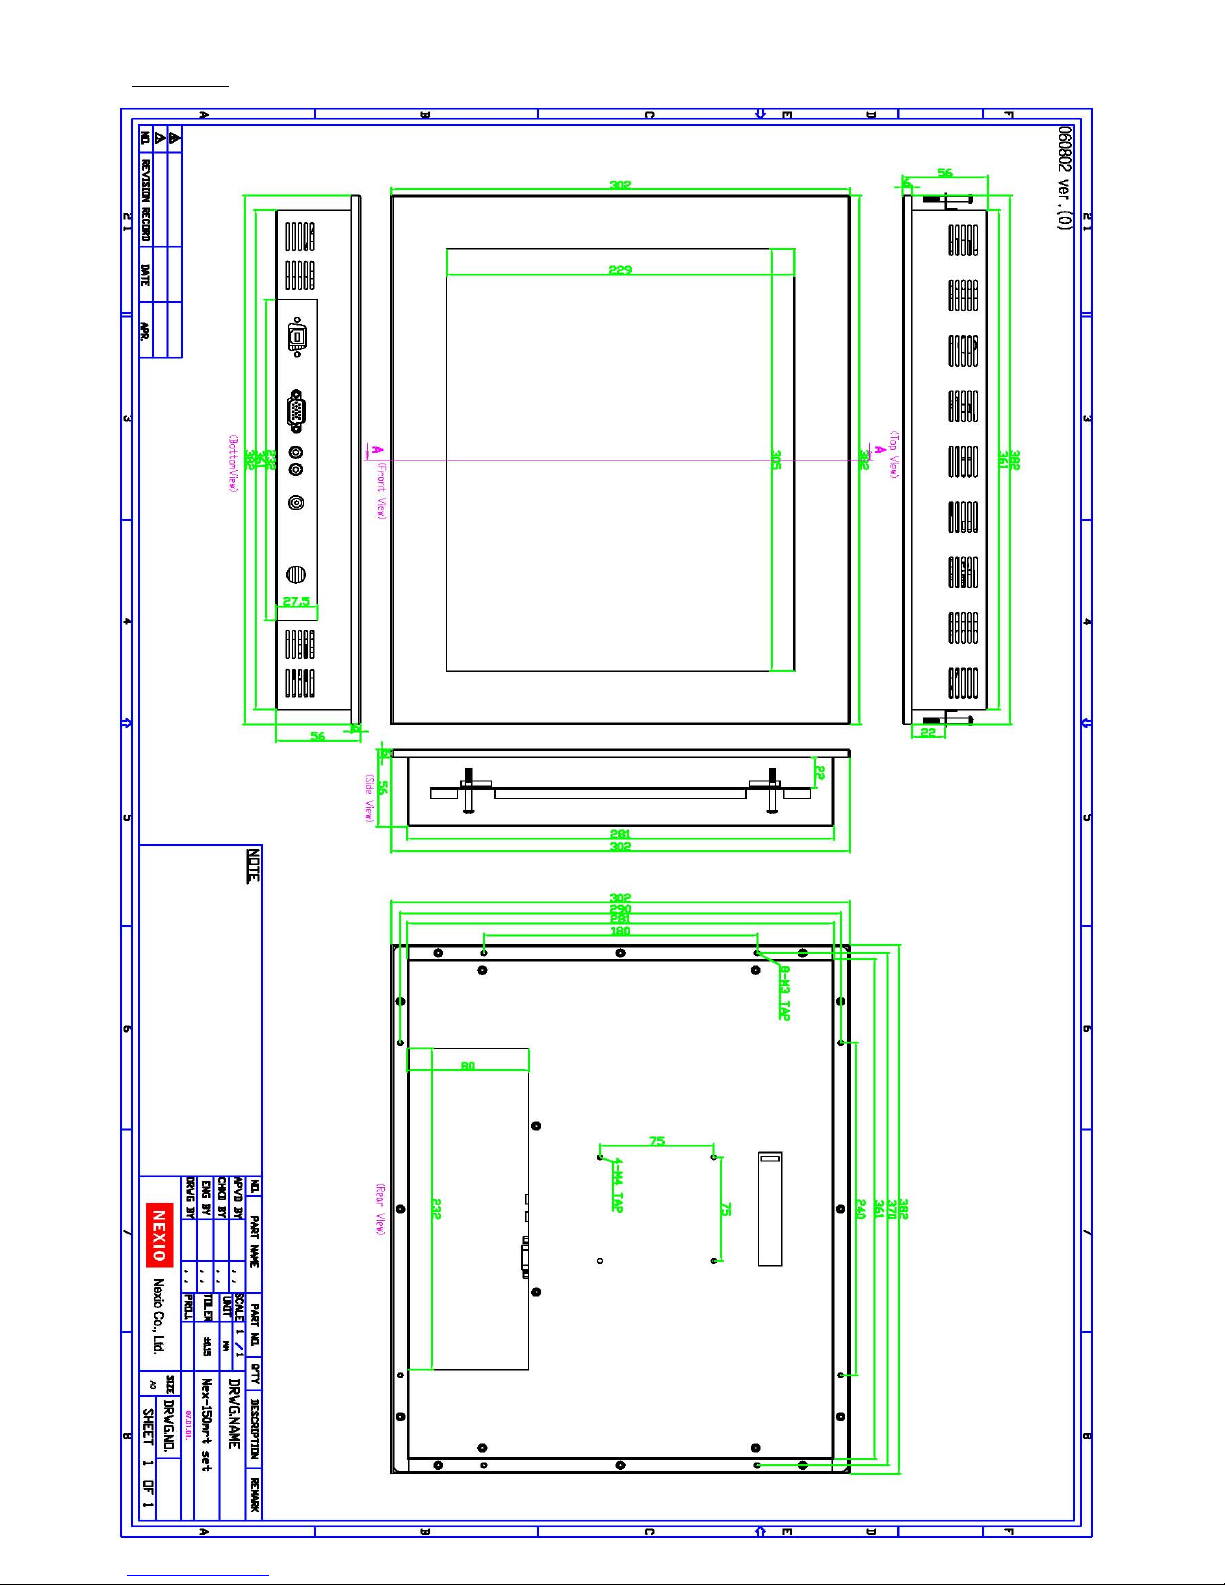
- Drawing

Features
☞The NEX 104/121 series is capable of displaying 6bit, 262K colors colors in a continuous
spectrum, while NEX150/170/190 series is capable of displaying 16M colors. The height
contrast LCD enhances the image with no geometric distortion.
☞ This LCD monitor is designed to act as a full monitor interface with the main
functionality of an analogue RGB, Video( composite & S-Video ) and Audio.
☞ NEX series is supplied with touch screen such as resistive and infrared in case of touch
screen option or an anti-glare impact window on non touch screen models as per
request from customers.
☞ This TFT-LCD monitor conforms to the VESA (Video Electronics Standards Association)
standard and DDC1/DDC2B.
A picture adjustment function makes it possible to adjust the image quality to match the
input signal.
☞ Auto-setup control on OSD screen adjust image position, horizontal size or fine settings.
☞ The power consumption can be reduced by using this TFT -LCD monitor in combination
of a computer that conforms to the VESA DPMS(Display Power Management
Signaling) standard.
Monitor Parts
FRONT
REAR
1
2
1. OSD control button 7. AV(L)
2. VESA standard hole (100mm x100mm) 8. AV(R)
3. 12V DC 9. Audio in
4. VGA 10. Audio out
5. S-VHS
6. CVBS
3 4 5 6 7 8 9 10

Package Contents
Your LCD monitor package will consist of the primary components listed below.
Open shipping container and lay all components on a flat clean surface
☞ LCD Monitor
☞ DC Power adapter : Connects to DC In port on the base of monitor
☞ Power cord : Connects wall outlet to DC Power adapter
☞ D-SUB 15pin VGA cable : Connects PC to LCD monitor
☞ RS232 or USB Touch Interface cable( touch screen option units only)
☞ Manual and Touch Driver CD-ROM( touch screen units only)
☞ Brackets for mounting ( Option)
Connecting to PC
To attach your TFT-LCD monitor to your system, follow the instructions hereunder
1. Connect 15-pin D-SUB cable to the connector or display card of your computer system.
Tighten all the screws
2. Connect 15-pin D-SUB cable to the appropriate connectors on the back of the monitor
head
3. Connect AC adapter cable to the power input connectors on the back of the monitor head
4. Connect one end of the power cord to the AC adapter and the other end to the power
outlet
5. If the unit has a touch screen, connect the touch screen interface cable to the computer.
6. Turn on the monitor
7. To complete the setup
A. set up your computer system to :
640 x 480 resolution @ 60Hz.( NEX104 MF(R)G)
800 x 600 resolution @ 60Hz.( NEX121 MF(R)G)
1024 x 768 resolution @ 60Hz.( NEX150 MF(R)G)
1280 x 1024 resolution @ 60Hz.( NEX170/190/ MF(R)G)
B. Use the following OSD controls
- Auto Adjust
- Auto Color
Adjustment of the H/V Position and Image Adjust H. Size controls may be required to
complete setup of your TFT- LCD monitor. For a full description of these OSD controls,
refer to OSD menu functions

FOR OPTIMUM PERFORMANCE, PLEASE NOTE THE FOLLOWING WHEN
SETTING UP AND USING THE TFT-LCD MONITOR.
• DO NOT OPEN THE MONITOR.
Opening or removing covers may expose you to dangerous shock hazards or other
risks.
Once you open it the warranty voids.
• To protect from electrical shock, unplug the display power supply from the wall
before moving.
• Do not put anything on top of the monitor.
• Do not spill any liquids into the cabinet or use your monitor near water.
• Do not place this product on a sloping or unstable cart, stand or table, as the
monitor may fall, causing serious damage to the monitor.
• If you connect or disconnect the VGA cable while both of PC’s and LCD monitor’s
power is turned on, the monitor might show some garbage on the screen or could
be damaged. Please turn off the TFT-LCD monitor’s power before connect or
disconnect VGA cable.
• Ensure that sufficient space is available around the display to provide air circulation
for cooling.
• Ensure that ambient air temperature will not exceed the specified maximum
temperature.
• Handle with care when transporting. Save packaging for transporting.
• Do not touch or press the surface of the LCD panel, it will cause a permanent
damage. Use only soft cloth with non-ammonia glass cleaner to clean the panel.
Recommended Use

OSD menu functions
Adjusting the displays
The microprocessor in the display has the capability to adjust itself to the computer to
which it is attached. This auto adjustment will take place when the unit is first installed and
connected to a computer and there after. If the video input change, or is user imitated. If
the picture is not satisfactory, the first step is to allow the unit to attempt to re-adjust itself
to your computer.
Located on the rear of unit (MRG Version) or the front of unit (MFG version) is a
membrane keypad used for adjusting the display. Please see the figure below :
OSD (On-Screen-Display) control functions as follows :
To access OSD Menu, press MENU button
OSD Screen for Monitor Mode
Press MENU key, OSD screen appears as below.
Press UP/DOWN Key, you can move between the ten primary functions.
Press Select key at Picture group to highlight this sub menu. You can now
navigate the sub menu using the UP/DOWN keys. To make an adjustment to an
item, use the UP/DOWN buttons to make your adjustments. At anytime, press
the Menu button three times to exit and save your settings.
Display mode
To change the display mode, press the select key each time
Analog Video S-Video
Select key Select key
Color
Image Setting
Position
OSD menu
Language
Misc
Exit
Menu Select Power Down Up
NEX104MRG, NEX121MRG
NEX104MFG, NEX121MFG, NEX150MR(F)G, NEX170MR(F)G,NEX190MR(F)G
SelectPower Menu Down Up

Color
Image Setting
Press MENU key to bring up the OSD. Press UP/DOWN key to move between the 7
primary screen functions. Press the Select button at Color to select it. Press the UP/DOWN
key, you can now move between functions and press Select to adjust the value of each item
with the UP/DOWN key. Please MENU key to return previous state.
* Brightness Adjust the brightness of the screen
* Contrast Adjust the contrast of the screen
* Color Adjust Adjust the color of the screen’s image
* Color Temp 9300 and 6500 Temperature and user
Temperature, Red, Green & Blue.
Press MENU key to bring up the OSD. Press UP/DOWN key to move between the 7
primary screen functions. Press the Select button at Image Setting to select it. Press the
UP/DOWN key, you can now move between functions and press Select to adjust the
value of each item with the UP/DOWN key. Please MENU key to return previous state.
* Clock Adjust the horizontal size of the screen’s image
* Phase Adjust the focus of the screen’s image
* Sharpness Adjust the clearness of the screen’s image
Position
Press MENU key to bring up the OSD. Press UP/DOWN key to move between the 7
primary screen functions. Press the Select button at Position to select it. Press the
UP/DOWN key, you can now move between functions and press Select to adjust the
value of each item with the UP/DOWN key. Please MENU key to return previous state.
* H. Position Adjust the horizontal position of the screen’s image
* V. Position Adjust the vertical position of the screen’s image.

Press MENU key to bring up the OSD. Press UP/DOWN key to move between the 7
primary screen functions. Press the Select button at OSD Menu to select it. Press the
UP/DOWN key, you can now move between functions and press Select to adjust the
value of each item with the UP/DOWN key. Please MENU key to return previous state.
* Language Select one of the six language (Korean,
English, French, German, Italian, Spanish)
* OSD H. Pos Adjust the horizontal position of the OSD Window
* OSD V. Pos Adjust the vertical position of the OSD window
* OSD Timer Adjust the maintain timing of the OSD window
OSD Menu
Miscellaneous
Press MENU key to bring up the OSD. Press UP/DOWN key to move between the 6
primary screen functions. Press the Select button at Misc to select it. Press the UP/DOWN
key, you can now move between functions and press Select to adjust the value of each
Item with the UP/DOWN key. Please MENU key to return previous state.
* Signal Source Select the input signal source.(Ex. Analog/Video etc…)
* Reset Initializing that memory in store of the user mode
* Audio Adjust the volume of sound
* Mute Function of Mute
Exit
Exit the OSD menu
Note : This OSD button is used to select other inputs to the LCD, such as Composite and
S-Video.
Language
Press MENU key to bring up the OSD. Press UP/DOWN key to move between the 7
primary screen functions. Press the Select button at Language to select it. Press the
UP/DOWN key, you can now move between functions and press Select to adjust the value
of each Item with the UP/DOWN key. Please MENU key to return previous state.
* Language Select one of the seven language(English, French, German,
Spanish, Korean, Chinese, Japanese)

Check for proper video cable for proper grounding and shielding.
Check the signal source for proper signal.
Check for proper adjustment of the Phase and Frequency controls.
Check for proper recommended signal timing.
Check for proper power and power connections.
Troubleshooting
Check that the signal cable is properly connected to the display.
Try disconnecting the video cable from the display and connecting
to another display if available to confirm the presence of proper video.
Make sure power is connected to the proper AC source.
Make sure the resolution mode is supported by the display and check
display settings of the PC
Confirm that the video cables is not defective.
Image persistence occurs when a ghost of an image remains on the
screen after the screen image has been changed.
Unlike a CRT monitor, and LCD monitor’s image persistence is not
permanent. To erase an image ghost, turn the monitor off for several
hours. What happens is the liquid crystals after extended periods of
operation. Check for proper Max. Resolution and Frequency.
Picture Quality &
Image Stability
Green LED not lit
No Picture
Image Persistence
Display image is not
properly sized
Press the “Select” button to Auto Adjust the display.
Adjust the Vertical and Horizontal size controls via the OSD.
(Reference setup adjustments)
Ensure that a supported mode is selected on the display card
or system being used. Consult the display card or system manual
for proper video.
Display is present
but “bar” Appear
or roll across screen
Ground loop problem between computer and display.
Interference from adjacent equipment.

Image will not adjust
Video timing outside of range
Use the one-screen menu to adjust the clock setting.
Make sure timing is within VESA standard.
Slight distortion
in text or Graphics
Not working in native resolution.
Vertical shaded bars
on Screen image
Horizontal size not properly adjusted. Adjust horizon tal size.
Image is not stable
Monitor has incorrect or bad sync signals.
Check for proper video cable installation.
Replace suspected faulty cable.
Check to ensure that video source is within the display’s
operating range.

Specification
Note : Features and specifications are subject to change without notice
RESOLUTION
SUPPORT
POWER
CONSUMPTION
<30 watt (Max.)
<3 watt
POWER
SUPPLY
ADAPTER
AC 100V~240V, 50~60Hz
STANDARD ACCESSORIES
POWER SAVING
PANEL
Plug & Play
640 x 350 @ 70 Hz
720 x 400 @ 70 HZ
640 X 480 @ 60Hz ~ 75Hz
On working
Off
Function
OSD CONTROL
DDC1/DDC2B
VESA DPMS
15-PIN VGA cable, AC adapter, Power cord, Manual CD-ROM
SIZE
10.4”
Supported
IINPUT SIGNAL
Supported Video signal
Recommended 640 x 480@60Hz
Language
OPERRATING Temperature
0-50 ℃
STORAGE Temperature
-20 ℃ - 65 ℃
OPERRATING Humidity
10-90% (Non Condensing)
DIMENSION
WEIGHT
Options
Aluminum
Front Bezel
Touch Screen
Touch Interface
12.1”
Output
Input
12V DC
Display Type
Max. Resolution
Screen (Diagonal) Size
Display Colors
Pixel Pitch
Brightness
Contrast Ratio
Display Area
Viewing Angle (typical)
640 x 480
10.4Inche
6bit, 262K Colors
0.33 x 0.33mm
400cd/㎡
300 : 1(Typical)
60º/60º(L/R) & 40º/50º(U/D)
211.2 x 158.4mm
VGA TFT
800 x 600
12.1Inche
6bit, 262K Colors
300cd/㎡
200 : 1(Typical)
60º/60º(L/R)&40º/55º(U/D)
640 x 350 @ 70 Hz
720 x 400 @ 70 HZ
640 X 480 @ 60Hz ~ 75Hz
832 x 624 @ 75Hz (MAC)
800 x 600 @ 56Hz ~ 75 Hz
800 x 600@60Hz
0.3075 x 0.3075mm
246.0 x 184.5mm
SVGA TFT
289 x236.4 x 43mm
319.5 x 260.5 x 45mm
Brightness, Contrast, Position( H/Position), Clock( Clock, Phase, Use), Color
( Color temperature, User Adjustment), Language, Information, OSD(OSD
time, H/V position, Use), Auto Adjust
English, French, German, Italian, Spanish
Option
VGA (15Pin D-Sub), Audio Input/output
Composite, S-Video (PAL/Secam/NTSC)
Infrared Touch
USB / Serial
2.5 / 4kg 3.2 / 4.6kg

Specification
Note : Features and specifications are subject to change without notice
RESOLUTION
SUPPORT
POWER
CONSUMPTION
<36 watt (Max.)
<3 watt
POWER
SUPPLY
ADAPTER
AC 100V~240V, 50~60Hz
STANDARD ACCESSORIES
POWER SAVING
PANEL
Plug & Play
640 x 350 @ 70 Hz
720 x 400 @ 70 HZ
640 X 480 @ 60Hz ~ 75Hz
832 x 624 @ 75Hz (MAC)
800 x 600 @ 56Hz ~ 75 Hz
1024 X 768 @ 60Hz ~ 75Hz
On working
Off
Function
OSD CONTROL
DDC1/DDC2B
VESA DPMS
15-PIN VGA cable, AC adapter, Power cord
SIZE
15.0”
Brightness, Contrast, Position( H/Position), Clock( Clock, Phase, Use), Color
( Color temperature, User Adjustment), Language, Information, OSD(OSD
time, H/V position, Use), Auto Adjust
Supported
IINPUT SIGNAL
Supported Video Signal
VGA (15Pin D-Sub), Audio Input/output
Recommended 1024 x 768@60Hz
Language
English, French, German, Italian, Spanish
OPERRATING Temperature
STORAGE Temperature
OPERRATING Humidity
10 - 95% (Non Condensing)
DIMENSIO
WEIGHT
Options
Aluminum
Front Bezel
Touch Screen
Touch Interface
17” 19”
Output
Input
12V DC
Display Type
Max. Resolution
Screen (Diagonal) Size
Display Colors
Pixel Pitch
Brightness
Contrast Ratio
Display Area
Viewing Angle (typical)
1024 x768
15Inche
16M Colors
0.264 x 0.264mm
300cd/㎡
400 : 1(Typical)
80º/80º(L/R) & 80º/80º(U/D)
304.1 x 228.1mm
XGA TFT
1280 x 1024 1280 x 1024
17Inche 19Inche
16M Colors 16M Colors
450cd/㎡ 1000cd/㎡
500 : 1(Typical)350 : 1(Typical)
80º/80º(L/R)&70º/70º(U/D) 89º/89º(L/R)&89º/89º(U/D)
640 x 350 @ 70 Hz
720 x 400 @ 70 HZ
640 X 480 @ 60Hz ~ 75Hz
832 x 624 @ 75Hz (MAC)
800 x 600 @ 56Hz ~ 75 Hz
1024 X 768 @ 60Hz ~ 75Hz
1280 x 1024@ 60Hz ~ 75Hz
1280 x 1024@60Hz
0.294 x 0.294mm0.264 x 0.264mm
376.32 x 301.056mm
337.92 x 270.33mm
SXGA TFT SXGA TFT
382 x 302 x 56mm 411 x 348 x60mm 460x392x64.6mm
Infrared , 5-wire Resistive Touch
USB / Serial
Option
Composite, S-Video (PAL/Secam/NTSC)
0-50 ℃
-20 ℃ - 65 ℃
4.2 / 5.9kg 5.5 / 7.2kg 6.8 / 8.5kg

Infrared Touch Screen Specification
MECHANICAL
Input Method Finger or gloved hand activation
ELECTRICAL
Position Accuracy Typical centroid accuracy 2.5mm
Resolution
Touch point density is based on controller resolution of
16,384x16,384
Touch Activation Force No minimum touch activation force
Operating Voltage DC 5V
Power 0.6W(Current) 120mA at DC 5V
PANEL
Transmission 92%, Up to 100%
Response Time Under 10ms
Touch Intensity Over 60,000,000 single point touch
Thickness of glass 3.2mm with anti-vandal
ENVIRONMENT
Temperature
Operating -20℃to 85℃ Storage -40℃to 85℃
Humidity Operating 10% to 85% Storage 0 to 95%
Altitude Operating 3,000m
Seal Ability Can be sealed to meet NEMA4 and IP65 standard
Interface RS232(C) or USB
Multi monitor Split, Dual, multi monitor support
Drift No drift
Mouse Click Right click function support
Available size 10.4” to 103”(custom size for OEM available)
Warranty 5 years – limited warranty

NEX 10.4”

NEX 12.1”
NEX 15”

NEX 17”

NEX 19”
 Loading...