

NEXIA WCO200NX Installation Manual
Camera
Model WCO200NX
Installation Guide
DO NOT plug in Ethernet or power until instructed during Nexia enrollment!
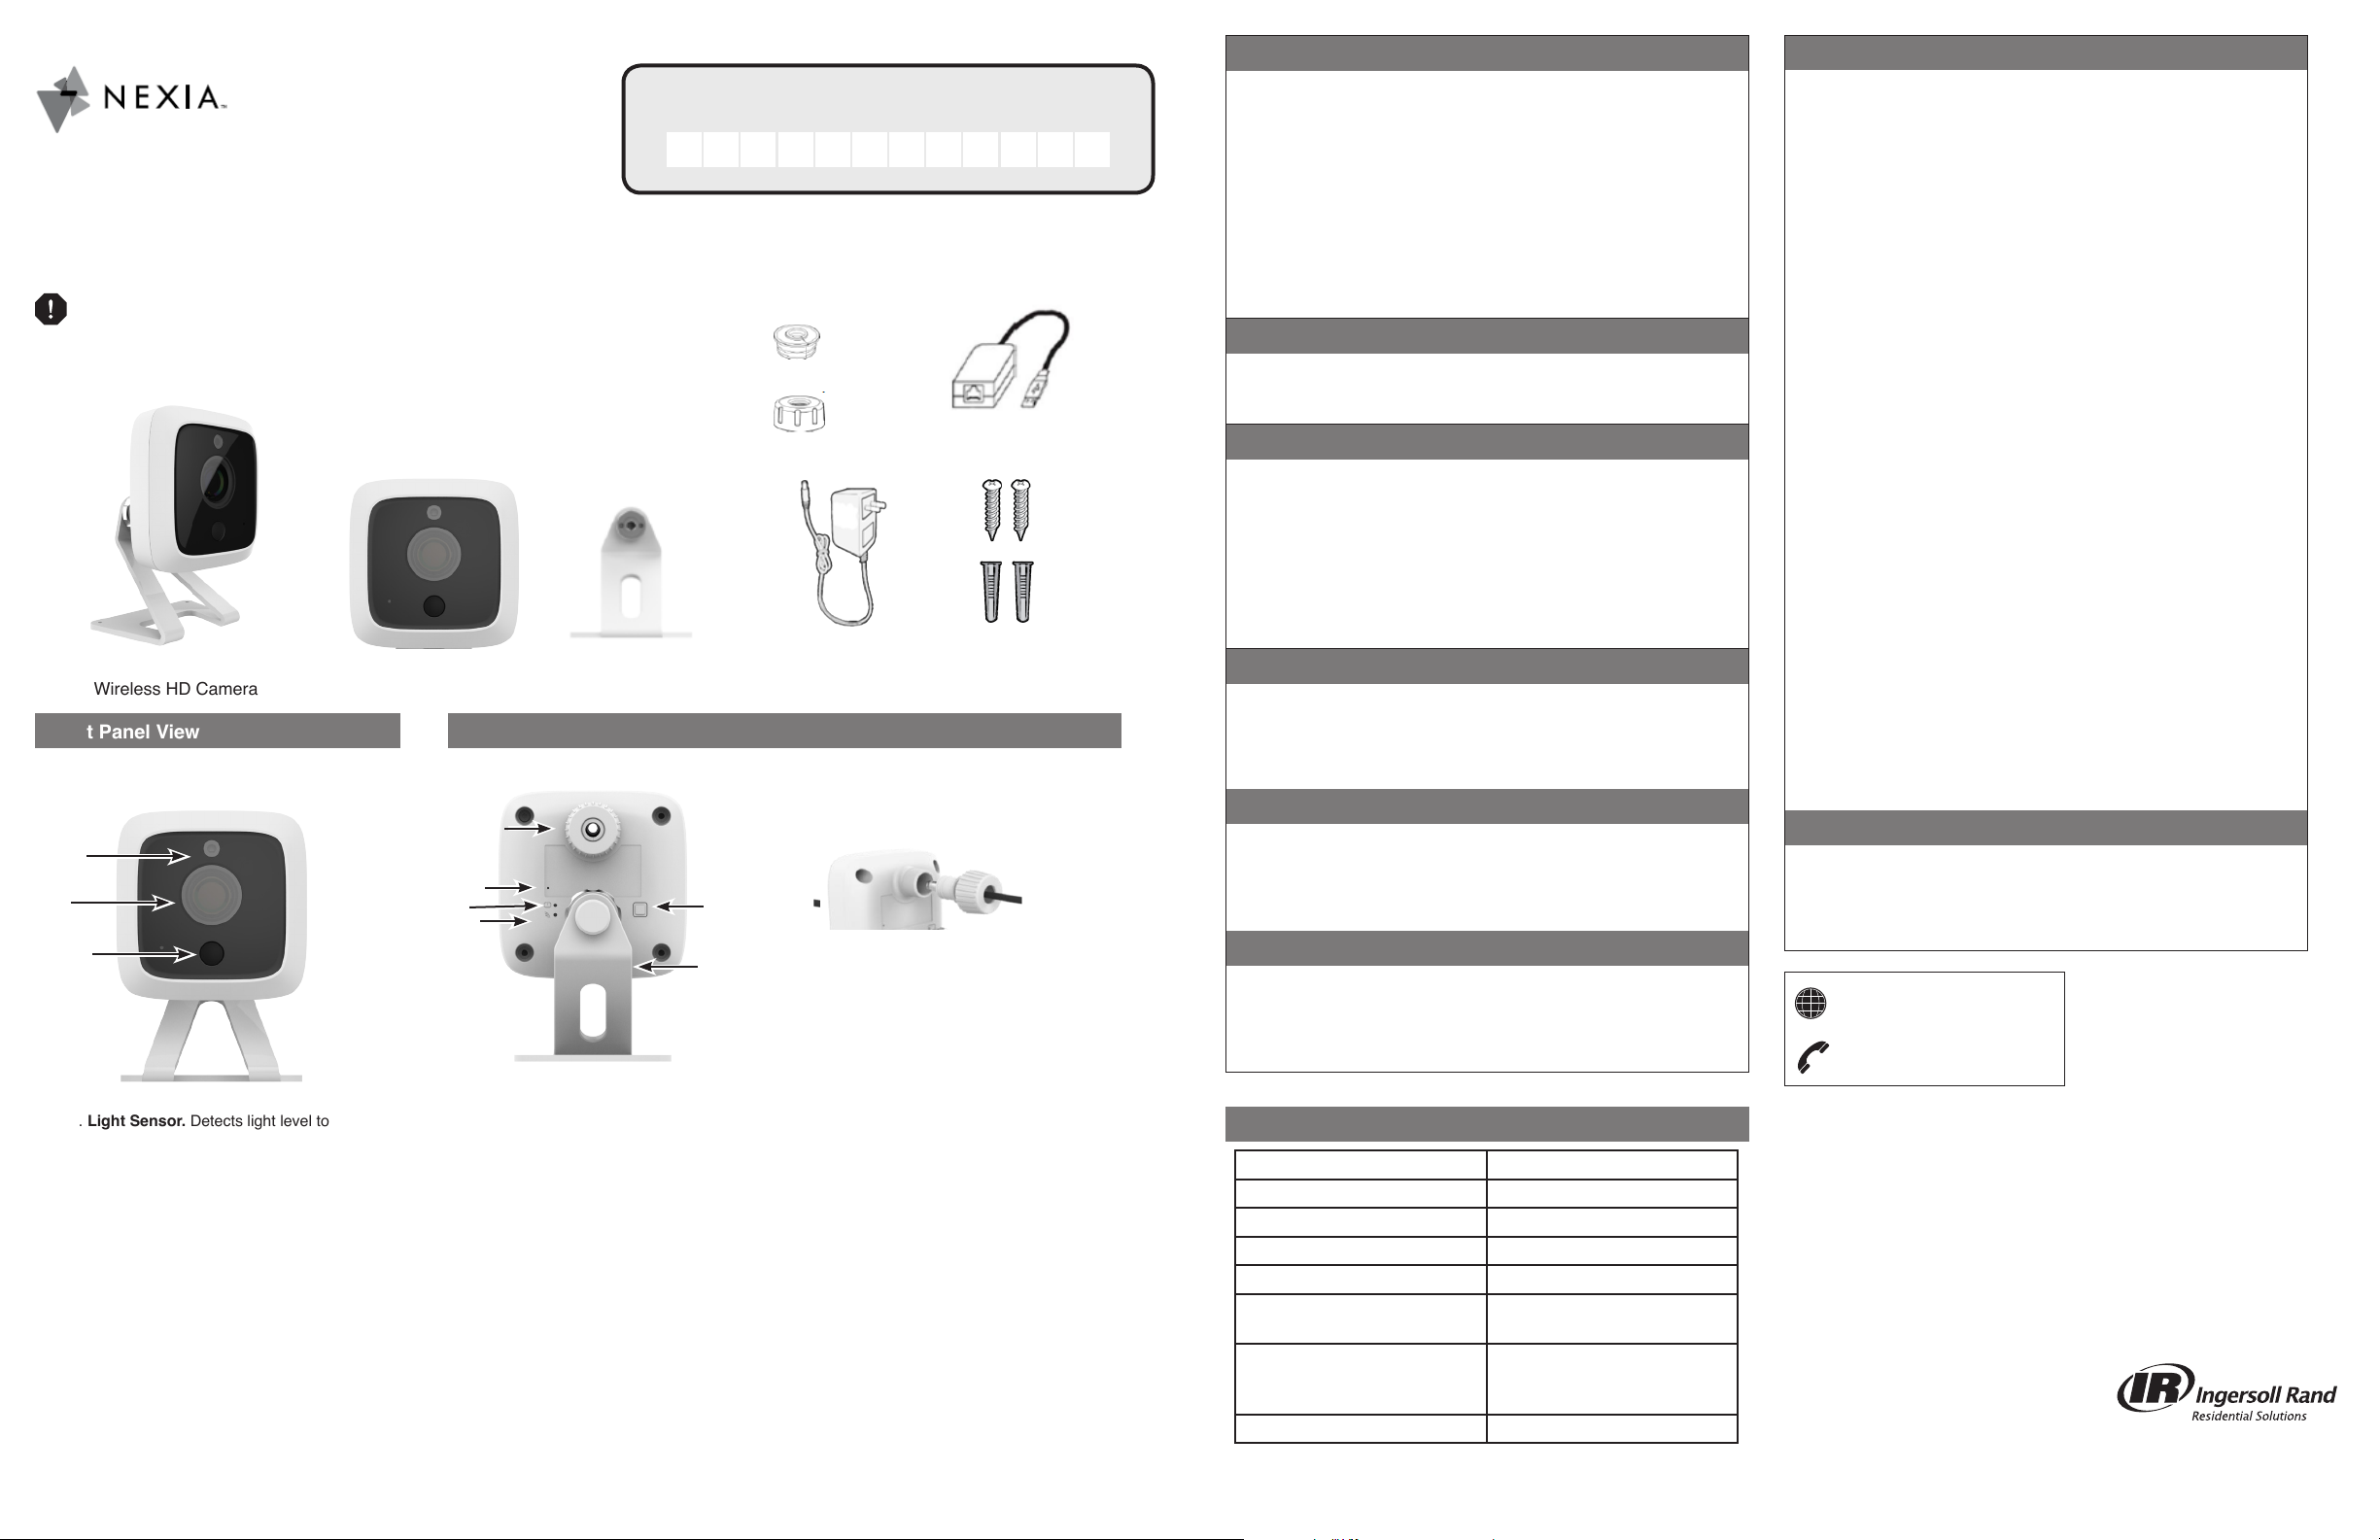
Package Contents:
WCO200NX
Camera
Wireless HD Camera
Front Panel View Rear Panel View
1
1
2
2
3
4
3
1. Light Sensor. Detects light level to
enable night vision when required
2. Lens. No physical adjustment is
possible for the lens. Ensure lens
cover remains clean. Image quality
is degraded if lens cover is dirty or
smudged.
3. PIR Sensor. Detects motion
Mounting Stand Anchor Screws
Camera MAC ID
twelve (12) characters (Will contain 0-9 and A-F only)
Rubber Seal
Screw Cap
USB to Ethernet Adapter
12v, 1.5A
Power Supply
1. DC Power Input. Use supplied 12V / 1.5A
adapter.(Use seal and cap for weather resistance)
5
6
2. Microphone. Not supported by Nexia.
3. Power LED.
On (Green) : Power on
Blinking (Green): Startup in process.
Blinking (Amber): Firmware update in process
On (Amber): Firmware update failed.
4. Network LED. (Green, Amber)
On (Green): Connected to network.
Blinking (Green): Sending/receiving data
Off: Not connected to network.
Blinking (Amber): WPS in process
On (Amber): On for 5 seconds, WPS failed.
5. WPS & Reset Button.
Use WPS to connect your camera to WiFi
automatically. (Not supported on all routers.)
WPS: Tap WPS button on router, then tap
andreleasecamera’sWPSbutton
Reset: Not recommended unless instructed
by Nexia. Press and hold button for 15
seconds. Camera will return to factory default
and will be unable to connect to its Nexia
account until added again.
6. USB port. (Port at bottom of camera) Use
with supplied Ethernet adapter. Allows wired
connection to router.
Enrolling Your Camera
You must have an active Nexia account. Verify Ethernet cable and
power cable are not plugged into the camera.
1. Log in to your account at www.mynexia.com.
2. Click Add Device button.
3. Click Cameras.
4. Click Enroll for the proper camera, and follow on-screen
instructions to complete the connection. (Note: Do not
disconnectcablesduringrmwareupdate.)
5. Once connected, click Live Videotoconrmsuccessfulvideo
connection.
6. To connect to WiFi, click Set up Wireless button . (Or you can
use WPS if your router supports this.).
7. Mount camera in desired viewing location.
Editing Camera Settings
1. Log in to your account at www.mynexia.com.
2. Click Video tab.
3. Click the Edit Settings button next to the camera to be edited.
Moving Your Camera to a Different Nexia Account
A camera cannot be on more than one Nexia account at the same. To
move a camera to a new account, follow these steps.
1. Go to www.mynexia.com and log in to the account to which the
camera is currently enrolled.
2. Click Video.
3. Click Remove This Camera for the camera you want to move.
4. After the camera has been successfully removed from this
account, it can be added to the new account using the Enroll
Camera steps above.
Start Using Your Camera
● View and record live video
● View and download recorded videos
● Automate video recording using Modes and Automations
● For more information at mynexia.com, see Help, Cameras &
Video
Connection Troubleshooting
For a current list of camera connection and troubleshooting tips:
● Go to www.mynexia.com
● Click Help
● Click Troubleshooting
● Click Camera Troubleshooting
Mobile App Troubleshooting
If the camera is not displayed on the mobile app:
1. Log in to your account at www.mynexia.com
2. On the Dashboard, click on Mobile Devices
3. Click Edit Mobile Device
4. Click the selection box next to the camera
Specications
Dimensions (mounted) 3.3” (W) x 4.8” (H) x 3”(D)
Operating Temperature -4°F (-20°C)* to 104°F (40°C)
Video compression H.264 and MJPEG
Image resolution 1280x720, 640x480, 320x240
Storage Temperature -40°F (-40°C) to 158°F (70°C)
Wireless interface 802.11 b/g/n, WEP 64/128,
WPA/WPA2
Power Adapter 12V/1.5A, 100~240 VAC,
50/60HZ input, Adapter
designed for indoor use only
IR Lighting Approx6’rangeatlowlight
* Onboard heater operates automatically below 43F (6 C). Low temperature operates
to -40 F (-40C) with onboard heater.
FCC Statement
This equipment has been tested and found to comply with the limits for
a Class B digital device, pursuant to Part 15 of the FCC Rules. These
limits are designed to provide reasonable protection against harmful
interference in a residential installation.
This equipment generates, uses and can radiate radio frequency energy
and, if not installed and used in accordance with the instructions, may
cause harmful interference to radio communications. However, there is
no guarantee that interference will not occur in a particular installation.
If this equipment does cause harmful interference to radio or television
reception, which can be determined by turning the equipment off and
on, the user is encouraged to try to correct the interference by one of
the following measures:
● Reorient or relocate the receiving antenna.
● Increase the separation between the equipment and receiver.
● Connect the equipment into an outlet on a circuit different from
that to which the receiver is connected.
● Consult the dealer or an experienced radio/TV technician for
help.
Toassurecontinuedcompliance,anychangesormodicationsnot
expressly approved by the party responsible for compliance could void
theuser’sauthoritytooperatethisequipment.(Example-useonly
shielded interface cables when connecting to computer or peripheral
devices).
FCC Radiation Exposure Statement
This equipment complies with FCC RF radiation exposure limits set
forth for an uncontrolled environment. This equipment should be
installed and operated with a minimum distance of 20 centimeters
between the radiator and your body.
This device complies with Part 15 of the FCC Rules. Operation is
subject to the following two conditions:
(1) This device may not cause harmful interference, and
(2) This device must accept any interference received, including
interference that may cause undesired operation.
This transmitter must not be co-located or operating in conjunction with
any other antenna or transmitter.
CE Approval
CE Standards
This product complies with the 99/5/EEC directives, including the
following safety and EMC standards:
● EN55022/24
NexiaHome.com
U.S.A. /Canada
(877) 288-7707
© 2016 Ingersoll Rand
Printed in Country.
18-HD74D1-1-EN Rev. 08/16
 Loading...