

Page 1
NEXHO-CE – Outdoor Camera
Fitting and operating instructions
NOTICE
Please read these instructions carefully before installing or using this equipment
and keep them for future reference. NEXHO range equipment must be installed
by qualified personnel and according the regulations. Otherwise, all claims will
be dismissed.
Page 2
1
Index ................................................................................................. 1
General.............................................................................................. 2
Camera Placement ............................................................................. 2
Datash eet .......................................................................................... 3
Comm is si oning ................................................................................... 3
How to add a camera to the system?................................................... 3
How to view images from the camera?................................................. 5
How to configure the Wi-Fi connectivity of the camera?......................... 6
How to configure your router to access from the outside? ..................... 6
How to change the password of the camera? ....................................... 8
How to set the intrusion notifications? ................................................. 9
How to change the parameters of presence detection? ......................... 9
How to configure the camera to send emails on alerts? ...................... 10
How to schedule the detection functionality of the cameras? ............... 11
How to reset the camera to factory defaults? ..................................... 11
Guarant ee ........................................................................................ 12
Index
Page 3
The Outdoor Camera (NEXHO-CE), allows you to see remotely your
installation. Also, if you want it could send alerts to your device in case of
intrusion.
A NEXHO-NT module and a NEXHO App compatible device are required in
order to install and use the camera.
Once installed and configured, the camera could act as a presence
detector. The camera will monitor the zone in which it is installed and it
could send an alert if an intrusion is detected.
It is recommended to locate the camera away from:
- Heat sources
- Flammable products
The Ingress Protection Rating (IP code) based on IEC 60529 is IP-66.
If you are going to use the camera as a presence detector, avoid placing it
in locations that may cause false alarms. For example avoid areas where
the headlights of approaching vehicles on the outside, could result on light
changes in the monitorized zone by the camera.
The cameras are very sensitive to changes on the monitorized image, but
the system allows configuring some parameters in order to reduce false
alarms.
For more information, see later in this manual "How to change the
parameters of presence detection?"
General
Camera Placement
In order to avoid false alarms, it is recommended to use at
least two cameras for each monitorized zone. See "How to
change the parameters of presence detection?" in this
manual.
Page 4
3
• Power supply 230 V AC – 5 V CC
• Dimensions (length, width, height): 160x83x83mm
• Weight: 910gr (with accessories)
• Color CMOS sensor, 300k pixels (640x480)
• MJPEG video compression, 15 fps (VGA)
• Viewing angle 45º
• Night vision with infrared light (15m)
• Ingress Protection Rating IP-66 (IEC-60529)
• Connectivity Ethernet 10/100Mbps RJ-45
• Wi-Fi 802.11b/g/n compatible
• WPA/WPA2 Wi-Fi security
• Remote access via Internet.
• Presence detection
Free alerts by using PUSH notifications
Settings for simultaneous detection in order to avoid false alarms
email sending of detection pictures
1. Connect the antenna. Screw the antenna into the back of the camera.
2. Connect the network cable between the camera and a LAN port of your
router.
3. Connect the power cord to the camera and plug it into the mains.
4. After a few seconds the camera is ready to be added to the system.
You must have previously followed the steps listed in "Commissioning".
To the remaining process you will need a device with the latest version of
the NEXHO app installed.
Datasheet
Commissioning
How to add a camera to the system?
Page 5
Run the application and go to "Security systems". Within this menu, select
the "Configure" tab. Enter the security password (default 0000) if the app
requested.
Select the option "Add new sensors" and then select the sensor type
"Camera". The application will now ask you for the zone in which you want to
install the camera. You can choose between the existing zones or you can
create a new zone.
After selecting the zone, the looking for new cameras process starts.
Remember that both, the camera and the device running the app, must be
connected to the same router as the NT module.
After the search process ends, the app shows a list of cameras found.
Select a camera and wait until the configuration process ends (This may
take a few minutes. Please, do not turn off the camera or the application)
Once the configuration process finish, at the setup menu
After a few seconds you can see the setup menu of the camera. Enter a
name for the camera and press "Save".
The camera has been added to the system.
It is recommend to change the default passwords by others of
your trust.
If the camera is not listed, check the connections and the
router configuration. If the problem remains, reset the camera
to factory defaults (See "How to reset the camera to factory
defaults?").
Page 6
5
Run the application and go to "Security systems". In the Selection tab
choose one of the cameras. You can find it by looking for the cameras
symbol located before the name.
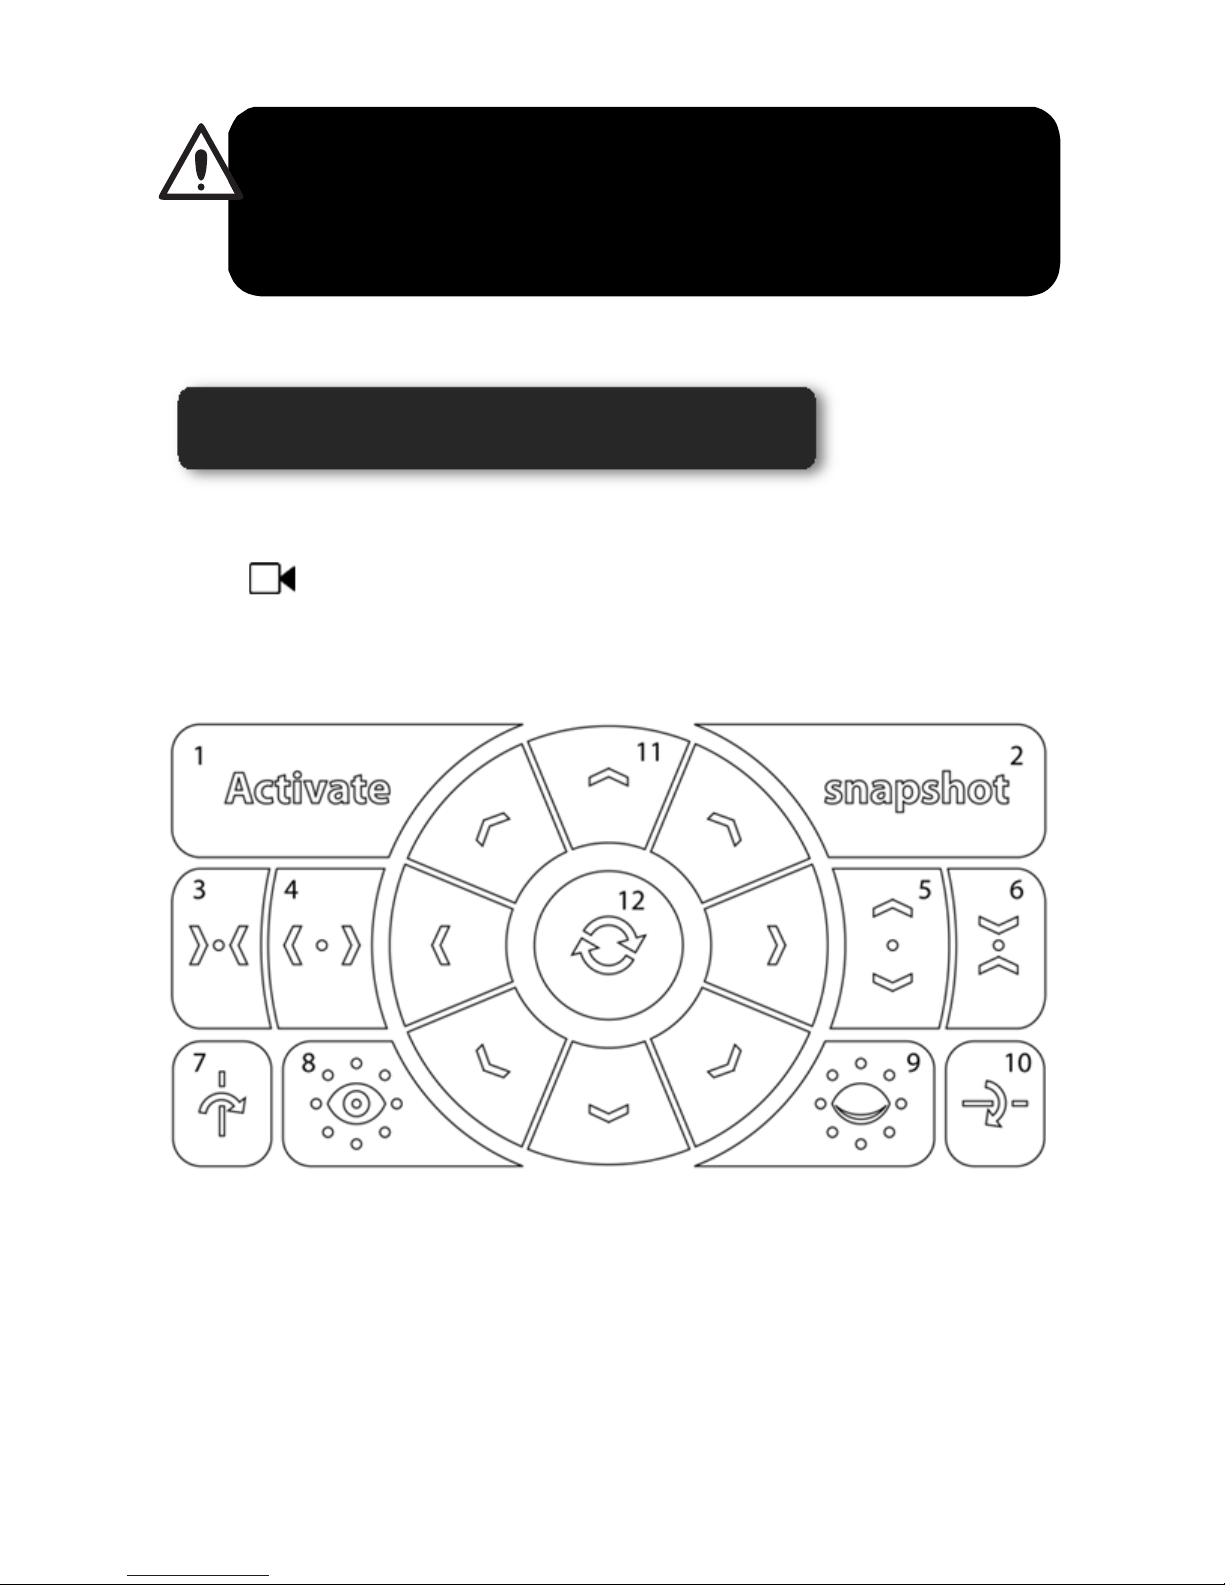
Once selected, you are able to see live images from the camera. Below the
live image you can see a control panel similar to the following:
1. Enable / Disable the presence detector
2. Take a snapshot
3.
Functionality not available for the Outdoor Camera NEXHO-CE
4.
Functionality not available for the Outdoor Camera NEXHO-CE
5.
Functionality not available for the Outdoor Camera NEXHO-CE
6.
Functionality not available for the Outdoor Camera NEXHO-CE
Do not turn off the rest of the cameras while you are installing
new ones.
All previously installed cameras must be connected before
tr
ying
to add a new one.
How to view images from the camera?
Page 7
7. Mirror image horizontally
8. Turn on infrared light
9. Turn off infrared light
10. Mirror image vertically
11.
Functionality not available for the Outdoor Camera NEXHO-CE
12.
Functionality not available for the Outdoor Camera NEXHO-CE
Run the application and go to "Security systems". Within this menu, select
the "Configure" tab. Enter the security password (default 0000) if the app
requested.
Choose the "Edit installed sensors" option and then the camera you want to
configure.
At the bottom you can see four buttons, press the wireless
configuration button.
After a few seconds you can see all the Wi-Fi signals found around the
camera. Choose the correct one and type the password (press refresh if
your network doesn't appear in the list).
To access from outside your local network, you must configure your router
to authorize such access. You need to access to your router configuration
in order to make a port-forwarding.
How to configure the Wi-Fi connectivity of the camera?
The security encryption of your network must be WPA or
WPA2.
How to configure your router to access from the
outside?
Page 8
7
First of all, to get the needed information about the camera you have to run
the application and go to "Security systems". Within this menu, select the
"Configure" tab. Enter the security password (default 0000) if the app
requested.
Choose the "Edit installed sensors" option and then the camera you want to
configure.
At the bottom you can see four buttons, press the information
button. There are 2 useful values in the dialog box: IP and port.
Record these values in order to use them later.
To do the port-forwarding you will need a device with an Internet browser
connected to the router by Wi-Fi or better wired directly to it.
Open the Internet browser (Explorer, Mozilla Firefox, Safari,...) and type in
the address bar the local IP of the router (usually http://192.168.1.1 or
http://192.168.2.1). In some routers the local IP is printed on the bottom.
If not sure about the IP address of your router, or if you can’t access to the
configuration menu, please see your router manual.
The configuration menu of your router could prompt you for a username and
password. See the router manual about that.
Locate the port-forwarding menu. This menu is often named as: PORT
FORWARDING, or FORWARDING, or VIRTUAL SERVERS, or NAT, or
Applications and Games, or Gaming ... depending on your routers model
and brand.
Once you have found it, set the following parameters:
• Name.- Only for identification purposes. You can use the same name you
had chosen for the camera.
• Ports.- In some cases there are two fields in order to select the start and
the end port of a range of ports, or just one field to enter the port to be
forwarded. In both cases, fill the fields with the value of the port you
obtained previously from the info menu of the camera.
• Protocol.- Usually you can choose between "TCP", "UDP" or "Both". Check
"Both".
Page 9
• Destination IP.- The IP address of the camera (the IP you obtained
previously from the info menu of the camera)
• Check "Enable" if it appears, and save the changes to finish the
configuration.
Run the application and go to "Security systems". Within this menu, select
the "Configure" tab. Enter the security password (default 0000) if the app
requested.
Choose the "Edit installed sensors" option and then the camera you want to
configure.
At the bottom you can see four buttons, press the camera
password button.
You will be prompted to enter the old password. Then you should type the
new password twice in order to avoid mistakes.
If you want to access the cameras from the outside of your
installation, please note that the "Send connectivity data to the
external server" option must be checked.
You can find it at "Configuration -> Communications" menu.
For increased security, it is recommended to change the
password of the camera. See "How to change the password of
the camera?"
How to change the password of the camera?
Page 10
9
The Nexho-CE Outdoor Camera could act as a presence detector. Once you
install the camera in a zone, a "presence security zone" is created as well (if
does not exist yet). If the security is active in that zone and an alert occurs
(camera detection), the system will act launching the security scene and
sending a PUSH notification to the associated devices. Same behaviour as
the normal presence detectors (Nexho-PR)
There are three different ways to activate/deactivate the security of the
camera monitorized zones. You can activate it within the live video screen of
the app, within the configuration menu of the camera or within the main
menu of the security system. In this case there is a button at the bottom of
the screen that allows to enable / disable all zones of presence with a single
tap.
See the manual of your Internet Module NEXHO-NT for more information.
By default, cameras have a high rate of false alarms due its high sensitivity.
Minor changes on the monitorized image could cause a false alarm, even if
the changes are not visible (changes in the infrared spectrum).
To avoid false alarms, you should adjust the parameters of presence
detection combined with a minimum number of two cameras for each zone.
See "How to change the parameters of presence detection?" for more info.
Run the application and go to "Security systems". Within this menu, select
the "Configure" tab. Enter the security password (default 0000) if the app
requested.
Choose the "Camera alerts configuration" option and then the camera you
want to configure.
How to set the intrusion notifications?
How to change the parameters of presence detection?
Page 11
There are two parameters on this menu, the number of simultaneous alerts
required to consider that an alert is valid and the maximum time between
those alerts.
The default number of simultaneous alerts is 2 and the time, within this
alerts must occur, is by default 25 seconds.
Adjust those parameters according your installation requirements and
press "Save".
If your camera is located in a place with a stable environment and false
alarms do not usually occur, you can set the camera to send an email with
a 6 pictures sequence in case of an intrusion is detected.
You can configure up to 4 addresses. Run the application and go to
"Security systems". Within this menu, select the "Configure" tab. Enter the
security password (default 0000) if the app requested.
Choose the "Edit installed sensors" option and then the camera you want to
configure.
At the bottom you can see four buttons, press the email
configuration button.
Press the "+" symbol to add a new mail address. Remember to press
"Save" before exiting the menu.
How to configure the camera to send emails on alerts?
This functionality is not under the supervision of the
parameters set at "Camera alerts configuration". If a detection
occurs the camera will send a mail regardless the number of
simultaneous detections set in the configuration.
Page 12

11
If for some reason you want to keep active the presence security, but not
the presence detectors of the cameras, except in certain scheduled slots,
you can schedule those slots in the "Schedule" section of the cameras
configuration.
Run the application and go to "Security systems". Within this menu, select
the "Configure" tab. Enter the security password (default 0000) if the app
requested.
Choose the "Edit installed sensors" option and then the camera you want to
configure.
In the middle of the screen there is a "Schedule" button. Press it. Then
choose the days of the week and later the slots in which you allow the
detection by the camera.
In order to reset to factory defaults the camera, keep pressed the reset
button at least 10 seconds. The button is at the cable that exits from the
back of the camera (with a tag marked as RESET).
Wait 30 seconds and unplug the camera from the power. Wait a few
seconds and plug it again.
How to schedule the detection functionality of the
cameras?
Schedules are only processed if the security is active in the
camera zone.
How to reset the camera to factory defaults?
Page 13
Farho guarantees the proper and correct operation of the appliance for 2
years from the date of purchase, as long as it is used for the domestic
purposes for which it has been manufactured
FARHO may, at its own discretion, require the customer to ship the unit
back to the factory for diagnosis before making a determination as to
whether it is covered by this warranty. Shipping costs to the FARHO factory
(including but not limited to, freight, insurance, customs fees and taxes,
and any other expenses) will be the responsibility of the customer.
If it is determined that the new product defect is covered by the warranty,
FARHO will repair, or substitute the product at its own discretion to the
customer at no charge.
Warranty is limited to the repair or substitution of the product.
FARHO warranty does not cover:
1. Improper installation, connection, operation, maintenance, and/or
storage,
2. Minor defects not interfering with the operation of the product,
possible indemnities, misuse or improper usage
3. Abnormal or unusual operating conditions or application outside
the specifications for the product
4. Application in any way different from that for which the products
were designed,
5. Repairs or alterations performed by individuals other than
FARHO employees or an authorized representative
6. Breakdowns provoked by atmospheric or geological phenomena
(frost, storms, rains, etc.) as well as those arising from
inappropriate voltage.
7. Parts or components that have received knocks during carriage
or the fitting operation.
Guarantee
Page 14
13
8. Cleaning operations of the appliance, or parts thereof, provoked
by dirt, grease or other circumstances related to the premises
where the appliance has been fitted.
The seller will have the property of parts replaced.
Any other type of compensation is excluded, and no other type of claims,
direct or indirect (including third parties) will be accepted, even in the cases
where there is a lack of replacement for any given period of time.
Any other expense or related costs such as (labor, transport, food/hotel
allowance, product assembly, disassembly, etc) will be paid by the buyer. It
will be FARHO´s responsibility the cost of parts replaced and the time
required for the replacement.
This clause is not intended to limit the liability of the manufacturer in a
manner contrary to the provisions of the applicable national law nor to
exclude its liability for matters that, under those rules may not be excluded.
The buyer waives the guarantee provided for in this Article, in the case of
failing to meet at least one of their contractual obligations, particularly with
respect to payment terms.
Any warranty repairs, in or out of warranty, must be claimed in writing by
the purchaser to the company FARHO.
As regards to the parts replaced or repaired, and only for them, the
warranty period has a new beginning and expires three months after
completion of the intervention of replacement or repair.
In the case where FARHO is responsible for defective products, the
compensation may not exceed the amount of the purchase price of such
defective products.
In any case, the company FARHO assumes no responsibility for indirect
damages, including, for example, loss of customers, sales, production,
profits, image, including damages to the buyer resulting from potential
actions brought against third parties.
Page 15
Page 16
FARHO S.L.U.
Polígono Industrial Tabaza II, Parcelas 9 a 13
Tel.: (+34) 985 514 082 – (+34) 985 514 605
Fax: (+34) 985 514 164
33438 Tabaza (Asturias), Spain
www.FARHO.com
NEXHO SYSTEM FOR HOME COMFORT
Outdoor camera NEXHO-CE
Distributed by:……………………………………………………………..................
Purchase date:……… of …………….…………… 20…..……
FITTER:………………………………………………………………..………….
Name:………………………………………..Town/City:………………….…………
Home
address:…………………………………………..…..Telephone:…………………….
USER:
Name:………………………………………..Town/City:………………….…………
Home
address:…………………………………………..…..Telephone:………...……………
……. In service:…….………………….
No.……………………………………………………Fitter’s stamp
To be completed by the fitter
 Loading...